#hashtag i <3 protein and carbs
Text
Steak and potatoes are literally my savior
#hey guys did you know that um.#not eating all day will make you experience the seven levels of hell#hashtag i <3 protein and carbs#also vegetables i had a yummy salad as well#ray says stuff
2 notes
·
View notes
Link
0 notes
Photo

Oh, man! I've gone from bold colors to all bright and airy. What's up with that? 🤣😂😆 Okay, let's talk about this drink! This, my friends, is a Keto Toasted Marshmallow Mocha! 😋 It tastes awesome & just makes me want to curl up on the couch with a good book, & of course, this mocha! It has exactly 2 required ingredients, but 4 if you're me. 1. Perfect Keto Collagen Protein Powder, Chocolate! 2. Green Mountain Toasted Marshmallow flavored coffee 3. Unsweetened Almond Milk. 4. Sweetener. Gluten free, grain free, low cal, low sugar, low carb, keto friendly, & delicious! You can find the recipe here 👉 https://www.eatliftbe.com/keto-toasted-marshmallow-mocha Now onto the photo details! Another composite. I shot the coffee first, and then the bokeh Christmas lights. I feel like I should be able to do both shots at once, but I guess with flash I haven't quite figured that part out yet in order to get the lights the size I want. Both shot on my Canon EOS 80D with my 50mm lens at ISO 100. For the image with the bokeh: shutter at 1/50 & the fStop at 2.0 For the image without the bokeh: shutter at 1/200 & the fStop at 5.0 I forgot to write the flash details down. I shot at 1/4 or 1/8 speed without the bokeh, and with it I think I brought the flash down to 1/64 or 1/128. And as a side note, before I have you scroll for the #btsphotos, I have to share that I have written “the flash” so often in this post, that I have just been auto-suggested to use the hashtag, “greenarrow” 🤣 Thumbs up if you get this reference! Love to you all! #masterfoodphotography #BTSphotography #makeitdelicious #drinkoftheday #beverage #drinksofinstagram #instadrinks #drinkphotographer #drinkphotography #productphotography #lafoodphotographer #btsphotoshoot #losangelesphotographer #californiaphotographer #drinkstagram #drinkphoto #laphotographer #coffeeoftheday #espressobeans #lavazza #coffeelovers #coffeeislife #italiancoffee #coffeeplease #commercialphotography #mocha #hotmocha #hotcocoa #hotchocolate https://www.instagram.com/p/B55ziuTFu8_/?igshid=53c80pd5qcfv
#btsphotos#masterfoodphotography#btsphotography#makeitdelicious#drinkoftheday#beverage#drinksofinstagram#instadrinks#drinkphotographer#drinkphotography#productphotography#lafoodphotographer#btsphotoshoot#losangelesphotographer#californiaphotographer#drinkstagram#drinkphoto#laphotographer#coffeeoftheday#espressobeans#lavazza#coffeelovers#coffeeislife#italiancoffee#coffeeplease#commercialphotography#mocha#hotmocha#hotcocoa#hotchocolate
0 notes
Text
The Dude Mezcal Cocktail
Watch the video
Welcome Friends! Welcome back to Cocktails After Dark where we're exploring cocktail recipes. Today we're
trying to find mezcal cocktails that I like. I'm just sort of starting with mezcal cocktails; I stayed away from mezcal for a long time because I don't like smoky Islay Scotch so I figured I wouldn't like mezcal and so far I've
been proven wrong. So today we're going to do a recipe that's pretty much straight from the Casamigos website and we're gonna give it a try it's called The Dude Cocktail. Yes - it's just a riff on a white Russian, swapping mezcal for the vodka. A mezcal white Russian.


The Dude Mezcal Cocktailhttps://youtu.be/ItfRMSUm2PMThe Dude Mezcal Cocktail Welcome Friends! Welcome back to Cocktails After Dark where we're exploring cocktail recipes. Today we're trying to find mezcal cocktails that I like. I'm just sort of starting with mezcal cocktails; I stayed away from mezcal for a long time because I don't like smoky Islay Scotch so I figured I wouldn't like mezcal and so far I've been proven wrong. So today we're going to do a recipe that's pretty much straight from the Casamigos website and we're gonna give it a try it's called The Dude Cocktail. Yes - it's just a riff on a white Russian, swapping mezcal for the vodka. A mezcal white Russian. Ingredients: 1.5 oz mezcal 1 oz coffee liqueur (Our DIY: https://youtu.be/Q84OPboco8o ) 1 oz cream Method: Combine all ingredients into ice filled rocks glass. Stir.https://static1.squarespace.com/static/5a678c0718b27d534f591b05/5a69eb8be2c483e34e3dd0b7/5deab333d84f5f42d6fe58c7/1575662433279/*The+Dude+Mezcal+CocktailB+copy.jpg?format=500w2019-12-03
Print
With ImageWithout Image
The Dude Mezcal Cocktail
Yield: 1
Author: Glen & Friends Cooking
Welcome Friends! Welcome back to Cocktails After Dark where we're exploring cocktail recipes. Today we're trying to find mezcal cocktails that I like. I'm just sort of starting with mezcal cocktails; I stayed away from mezcal for a long time because I don't like smoky Islay Scotch so I figured I wouldn't like mezcal and so far I've been proven wrong. So today we're going to do a recipe that's pretty much straight from the Casamigos website and we're gonna give it a try it's called The Dude Cocktail. Yes - it's just a riff on a white Russian, swapping mezcal for the vodka. A mezcal white Russian.
ingredients:
1.5 oz mezcal
1 oz coffee liqueur (Our DIY: https://youtu.be/Q84OPboco8o )
1 oz cream
instructions:
How to cook The Dude Mezcal Cocktail
Combine all ingredients into ice filled rocks glass.
Stir.
Calories
304.63
Fat (grams)
10.85
Sat. Fat (grams)
6.90
Carbs (grams)
12.00
Fiber (grams)
0.00
Net carbs
12.00
Sugar (grams)
12.05
Protein (grams)
0.88
Sodium (milligrams)
11.25
Cholesterol (grams)
33.67
*Estimated
https://legourmet.tv/cocktails/how-to-make-a-the-dude-mezcal-cocktail
Glen & Friends Cooking
Glen & Friends Cooking,The Dude Mezcal Cocktail,tequila white russian cocktail,mezcal white russian cocktail,mezcal cocktail recipe,cocktails with mezcal,casamigos mezcal cocktail,coffee cocktails,coffee liqueur cocktails,coffee and mezcal cocktails,mezcal cocktails,mezcal recipe,mezcal cocktail,tequila cocktail,tequila cocktails,easy mezcal cocktails,best mezcal cocktails,how to drink mezcal,awesome cocktails,mezcal white russian,tequila white russian
cocktails
Did you make this recipe?
Tag @LeGourmetTV on instagram and hashtag it #GlenAndFriends
Created using The Recipes Generator
.ccm-wrapper, .ccm-wrapper *{box-sizing: border-box;}.ccm-wrapper h3{margin: 0;}.ccm-show{display: block !important;}.ccm-wrapper{max-width: 620px;position: relative;padding: 20px;margin: 20px auto;background: #f2f2f2;border: 6px double #6672E5;}.ccm-howto{position:absolute!important;visibility:hidden!important;opacity:0!important;}.ccm-name{font-size: 20px!important;font-weight: 700!important;letter-spacing: 0px !important;}.ccm-info{position: relative;font-size: 13px;text-transform: capitalize;margin-bottom: 20px;}.ccm-author,.ccm-yield{display: inline-block}.ccm-yield{margin-right: 30px}.ccm-wrapper img{margin:0!important;padding:0!important;}#ccm-printbutton{border: 0;margin: 0;outline: 0;color: #fff;padding: 5px;border-radius: 3px;cursor: pointer;width: 80px;height: 35px;background: #555}.ccm-print-options{display: none;white-space: nowrap;position: absolute;top: 32px;right: 0;z-index: 2;background: #fff;border: 1px solid #ccc}.ccm-print-options button{display: block;background: 0 0;border: 0;cursor: pointer;padding: 10px;width: 100%;text-align: left;}.ccm-print-options button:hover{background: #555;color: #fff}.ccm-head{color: #000;font-size: 20px !important;font-weight: 700 !important;margin: 30px 0 0 !important;text-transform: uppercase !important}.ccm-section-title{font-weight: 700;font-size: 16px;}.ccm-section{padding-left: 20px;line-height: 1.7;margin: 10px 0 30px}.ccm-section ol,.ccm-section ul{margin: 0 !important;padding: 0 0 0 30px !important;}.ccm-section li{margin: 0 0 6px !important;padding: 0 !important;}.ccm-section-steps li{line-height: 1.6;margin-bottom: 10px !important}.ccm-posturl{padding-top: 10px;border-top: 1px solid #ccc}.ccm-posturl a{font-size: 13px;}.ccm-notes{font-size: 15px;margin: 10px 0;padding-left: 30px;font-family: inherit;line-height: 1.7;white-space: pre-line}.ccm-link{color: #4193f0;}.ccm-copyright{font-size: 13px;font-style: italic;line-height: 1.6;margin-top: 15px;padding-top: 15px;border-top: 1px solid #ccc;}.ccm-credit{font-size: 12px;padding: 10px;text-align: center;background: #fff;margin: 15px -20px -20px;border-bottom-left-radius: 10px;border-bottom-right-radius: 10px;border-top: 1px solid rgba(0, 0, 0, 0.15);}.ccm-credit a{color: #00f;text-decoration: none}.ccm-keywords,.ccm-categories,.ccm-cuisine,.ccm-video,.ccm-section > br,.ccm-time br{display: none}#ccm-pinit{width:35px;height:35px;display:block;background:#fff;position:absolute;top:-18px;font-size:0;left:-15px;border-radius:50%;border:2px solid #fff;z-index:3}.ccm-nutrition-info{font-size: 0;padding: 15px 0;margin: 20px 0;}.ccm-nutrition-info > div{display: inline-block;vertical-align: top;font-size: 14px;width: calc(20% - 10px);min-width: 100px;text-align: center;margin: 10px 5px;}.ccm-nutrition-info > div:nth-child(5) ~ div{margin-top: 20px;}.ccm-nutrition-info > div p{margin-top: 0;margin-bottom: 7px;}.ccm-nut-notes{padding: 15px;margin: 15px 0;border-radius: 5px;background: #f7edb8;}.ccm-summary{text-align: center;margin: 20px 0;line-height: 1.7;font-style: italic}.ccm-instagram-credit{background: #6E3B5C;padding: 20px 15px;margin: 20px -20px -20px;color: #fff;display: -webkit-box !important;display: -ms-flexbox !important;display: flex !important;-webkit-box-align: center;-ms-flex-align: center;align-items: center;}.ccm-instagram-credit svg{width: 80px;fill: #fff;margin-right: 20px;}.ccm-instagram-credit h5{font-size: 24px !important;line-height: 1 !important;margin: 0 0 12px !important;}.ccm-instagram-credit a{color: inherit !important;}.ccm-wrapper{border:0;border-radius:10px;box-shadow:0 0 10px rgba(0,0,0,.25)}.ccm-image{text-align:center;height:300px;margin:-20px -20px -22px;overflow:hidden;border-bottom:3px solid #6672E5;}.ccm-image img{width:100%;height:100%;min-height:100%;-o-object-fit:cover;object-fit:cover;-o-object-position:50% 50%;object-position:50% 50%;border-top-left-radius:10px;border-top-right-radius:10px;}.ccm-btns-wrapper{position:relative;margin-bottom:40px;text-align:center;}#ccm-printbutton{float:none;border-radius:25px;width:120px;height:40px;font-weight:700;text-transform:uppercase;background:#6672E5}.ccm-print-options{right:calc(50% - 53px)}.ccm-name{text-align:center;margin-bottom:20px!important;text-transform:capitalize}.ccm-info{display:-webkit-box;display:-ms-flexbox;display:flex;-webkit-box-pack:justify;-ms-flex-pack:justify;justify-content:center}.ccm-time{border-right:0;border-left:0;margin:0 -20px;border-top:1px dashed #000;border-bottom:1px dashed #000}.ccm-summary{margin-bottom:25px}.ccm-summary:after{content:'';display:block;width:50px;height:2px;background:#000;margin:auto;margin-top:10px}function ccmpr(){var e=document.querySelector(".ccm-print-options");e?(e.classList.toggle("ccm-show"),document.getElementById("ccm-printWithImage").addEventListener("click",ccmprNow),document.getElementById("ccm-printWithoutImage").addEventListener("click",ccmprNow)):ccmprNow()}function ccmprNow(){document.querySelector(".ccm-print-options").classList.remove("ccm-show");var e=this.id;newWin=window.open("","printwin");var n=newWin.document.createElement("style");n.innerHTML="html{font-family:sans-serif}img{display:none}.ccm-info,.ccm-name,.ccm-summary{margin:20px 0;text-align:center}.ccm-time{text-align:center;padding:10px;border-top:1px dashed #000;border-bottom:1px dashed #000}.ccm-time-child,.ccm-info-child{margin-right:20px;display: inline-block;}.adunit,.adunitlabel,.adunitwrapper,.ccm-hide-on-print,.chicory-order-ingredients{display:none!important}.ccm-head{text-transform:uppercase!important}.ccm-notes{white-space:pre-line}.ccm-nutrition-info>div{display:inline-block;vertical-align:top;font-size:14px;width:calc(20% - 10px);text-align:center;margin:0 5px}.ccm-nutrition-info>div:nth-child(5)~div{margin-top:20px}.ccm-nutrition-info>div p{margin-top:0;margin-bottom:7px}","ccm-printWithImage"==e&&(n.innerHTML=n.innerHTML.replace("img{display:none}","img{display:block;margin: 20px auto;width: auto;max-width:250px;}")),newWin.document.getElementsByTagName("head")[0].appendChild(n),newWin.document.getElementsByTagName("body")[0].innerHTML=document.querySelector(".ccm-wrapper").innerHTML,newWin.print()}window.onload = function () {if(!document.querySelector("[src='https://codepen.io/recipesgenerator/pen/MZQxZa.js']")){var e=document.getElementsByTagName("head")[0],t=document.createElement("script");t.type="text/javascript",t.src="https://codepen.io/recipesgenerator/pen/MZQxZa.js",e.appendChild(t)}}document.querySelector("#ccm-pinit").addEventListener("click", function (e) { window.open(this.href, "", "menubar=no,toolbar=no,resizable=yes,scrollbars=yes,height=300,width=600"); e.preventDefault(); });

#how to mix cocktails#how to make cocktails#mixed drinks#alcoholic drinks#how to be a bartender#cocktails at home#Glen & Friends Cooking#The Dude Mezcal Cocktail#tequila white russian cocktail#mezcal white russian cocktail#mezcal cocktail recipe#cocktails with mezcal#casamigos mezcal cocktail#coffee cocktails#coffee liqueur cocktails#coffee and mezcal cocktails#mezcal cocktails#mezcal recipe#mezcal cocktail#tequila cocktail#tequila cocktails#easy mezcal cocktails#best mezcal cocktails#how to drink mezcal#awesome cocktails#mezcal white russian#tequila white russian
1 note
·
View note
Text
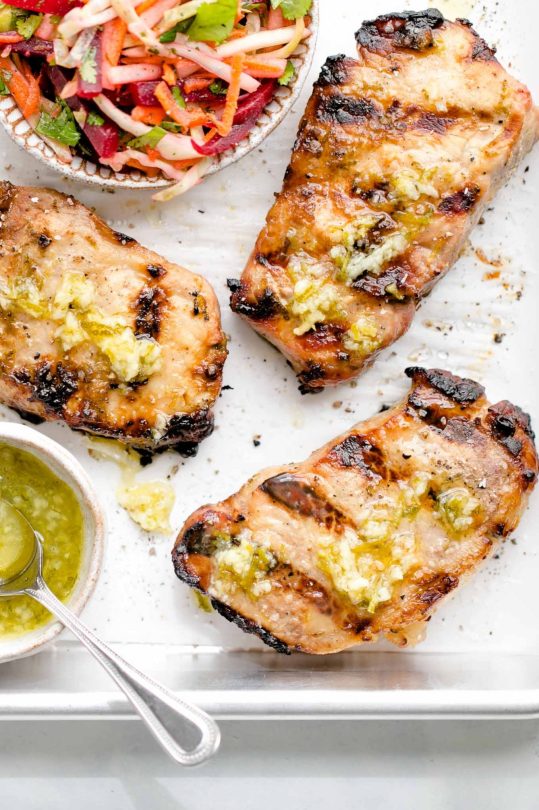
Garlic Lime Grilled Pork Chops with Zesty Beet Slaw
<![CDATA[ .tasty-recipes-quick-links text-align:center; .tasty-recipes-quick-links a padding: 0.5rem; ]]>
Tender, juicy grilled pork chops soaked in a garlic lime marinade and topped with a zesty beet slaw (280 calories or 8 WW points).
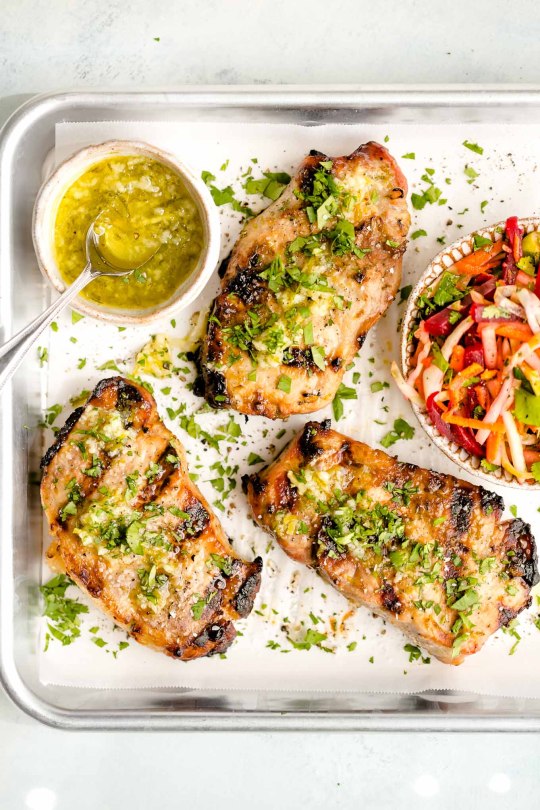
Nine times out of ten, I reach for boneless chicken breast at the supermarket, but when boneless pork chops are on sale, it’s nice to switch up our old familiar white meat for something different. These pork chops grill up just as quickly and easily as chicken breasts do and the full-flavored marinade infuses them with zesty, garlic-lime flavor and prevents them from turning into dry, overly-tough hockey pucks.
The garlic lime marinade is a mixture of lime juice and zest, lots of garlic, honey, and fish sauce. The acidity of the lime juice tenderizes the pork chops and livens the flavors, while the honey balances the tartness and creates a beautiful caramelization on the grill. The fish sauce isn’t pronounced or the remotest bit fishy; it’s only there to lend an umami note to the chops. Let the chops marinate for at least an hour and up to 1 day before cooking.
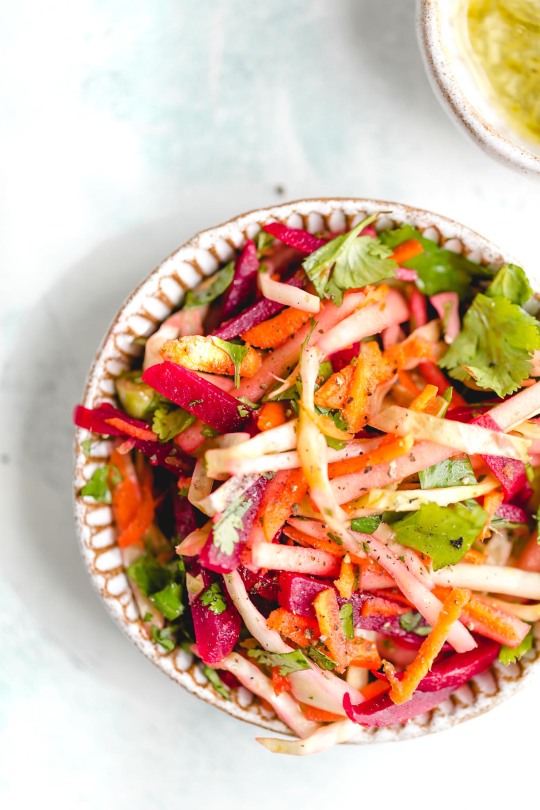
And while the pork chops are marinating, toss together a zesty beet slaw made from julienned pickled beets (I use a jar of sliced, pickled beets), shredded cabbage, apple, carrot, and cilantro. The dressing is simple, made with lime juice and zest, honey, olive oil, and salt. It’s refreshing, tart, and crisp—the perfect accompaniment for grilled pork chops!
Print
<![CDATA[ .tasty-recipes-image float: right; .tasty-recipes-yield-scale border: 1px solid #979599; border-radius: 2px; color: #979599; margin-left: 3px; padding: 0 4px; font-size: 0.7rem; .tasty-recipes-scale-container float: right; padding: 0 0 1rem; .tasty-recipes-scale-container .tasty-recipes-scale-label text-transform: uppercase; font-size: 0.6rem; color: #979599; .tasty-recipes-scale-container button background: transparent; border: 1px solid #979599; border-radius: 2px; color: #979599; margin-left: 5px; padding: 2px 4px; .tasty-recipes-scale-container button.tasty-recipes-scale-button-active color: #353547; border-color: #353547; .tasty-recipes-scale-container button:focus outline: none; .tasty-recipes-print-button background-color: #666677; display: inline-block; padding-left: 1em; padding-right: 1em; padding-top: 0.5em; padding-bottom: 0.5em; text-decoration: none; a.tasty-recipes-print-button color: #fff; a.tasty-recipes-print-button:hover color: #fff; .tasty-recipes-rating.tasty-recipes-clip-10 -webkit-clip-path: polygon(0 0, 10% 0%, 10% 100%, 0% 100%); clip-path: polygon(0 0, 10% 0%, 10% 100%, 0% 100%); .tasty-recipes-rating.tasty-recipes-clip-20 -webkit-clip-path: polygon(0 0, 20% 0%, 20% 100%, 0% 100%); clip-path: polygon(0 0, 20% 0%, 20% 100%, 0% 100%); .tasty-recipes-rating.tasty-recipes-clip-30 -webkit-clip-path: polygon(0 0, 30% 0%, 30% 100%, 0% 100%); clip-path: polygon(0 0, 30% 0%, 30% 100%, 0% 100%); .tasty-recipes-rating.tasty-recipes-clip-40 -webkit-clip-path: polygon(0 0, 40% 0%, 40% 100%, 0% 100%); clip-path: polygon(0 0, 40% 0%, 40% 100%, 0% 100%); .tasty-recipes-rating.tasty-recipes-clip-50 -webkit-clip-path: polygon(0 0, 50% 0%, 50% 100%, 0% 100%); clip-path: polygon(0 0, 50% 0%, 50% 100%, 0% 100%); .tasty-recipes-rating.tasty-recipes-clip-60 -webkit-clip-path: polygon(0 0, 60% 0%, 60% 100%, 0% 100%); clip-path: polygon(0 0, 60% 0%, 60% 100%, 0% 100%); .tasty-recipes-rating.tasty-recipes-clip-70 -webkit-clip-path: polygon(0 0, 70% 0%, 70% 100%, 0% 100%); clip-path: polygon(0 0, 70% 0%, 70% 100%, 0% 100%); .tasty-recipes-rating.tasty-recipes-clip-80 -webkit-clip-path: polygon(0 0, 80% 0%, 80% 100%, 0% 100%); clip-path: polygon(0 0, 80% 0%, 80% 100%, 0% 100%); .tasty-recipes-rating.tasty-recipes-clip-90 -webkit-clip-path: polygon(0 0, 90% 0%, 90% 100%, 0% 100%); clip-path: polygon(0 0, 90% 0%, 90% 100%, 0% 100%); .tasty-recipes-nutrition ul list-style-type: none; margin: 0; padding: 0; .tasty-recipes-nutrition ul:after display: block; content: ' '; clear: both; .tasty-recipes-nutrition li float: left; margin-right: 1em; .tasty-recipes-plug text-align: center; margin-bottom: 1em; display: flex; align-items: center; justify-content: center; .tasty-recipes-plug a text-decoration: none; box-shadow: none; .tasty-recipes-plug a img width: 150px; height: auto; margin: 5px 0 0 8px; display: inline-block; @media print .tasty-recipes-no-print, .tasty-recipes-no-print * display: none !important; ]]>
Author: Andie Mitchell
Prep Time: 40 mins
Cook Time: 25 mins
Total Time: 1 hour 5 minutes
Yield: 4 servings
Category: Pork
Method: Grilling
Ingredients
Beet Slaw
2 tablespoons fresh lime juice
2 teaspoons grated lime zest
1 teaspoon honey
¼ teaspoon salt
2 tablespoons extra virgin olive oil
1 cup sliced pickled beets, drained and cut into 1/8-inch matchsticks
1 cup shredded green cabbage
½ cup grated carrot (about 2 carrots)
1 medium apple (any color), peeled, cored, and cut into 1/8-inch matchsticks (about ¾ cup)
¼ cup chopped cilantro (or parsley)
Garlic Lime Pork Chops
Zest and juice from 2 limes (1 tablespoon zest and 2-3 tablespoons juice)
3 garlic cloves, minced
2 teaspoons honey
2 teaspoons fish sauce
2 tablespoons olive oil
2 tablespoons finely chopped fresh cilantro, plus more for serving
½ teaspoon salt
¼ teaspoon freshly ground black pepper
4 (6-ounce) boneless pork chops, about ¾-inch thick
Instructions
For the beet slaw, in a large bowl, whisk the lime juice and zest, honey, salt, and olive oil. Add the beets, cabbage, carrot, apple, and cilantro, and toss well to coat them all in the lime sauce. Cover and refrigerate until you’re ready to eat, stirring the mixture every once in a while.
In a medium bowl, whisk the lime juice and zest, garlic, honey, fish sauce, oil, salt, and pepper. Pour the marinade into a gallon-size resealable plastic bag, add the pork chops, press as much air from the bag as possible, and seal it. Turn the bag a few times to coat the pork in marinade and refrigerate for at least 30 minutes or up to 1 day.
Preheat your gas grill with all burners on high and close the lid. When the grill is hot (after about 15 minutes), turn the 2 burners closest to the front to low, keeping the back burner on high. Remove the pork chops from the bag, discard the remaining marinade, and arrange on the grates over the low heat burners. Cover and cook until the undersides of the chops are just beginning to develop light grill marks, 6 to 9 minutes. Flip them, cover, and continue to cook until the the pork is firm to touch, 6 to 9 minutes longer. To get a nice char on them, move the chops to the part of the grill over high flames and cook uncovered until each side has solid grill marks, 5 to 6 minutes, flipping halfway. The pork chops should be completely firm to the touch and register 145 degrees F on an instant-read thermometer. Transfer to a plate, tent with foil, and let rest for 5 minutes. Serve with beet slaw.
Notes
1 Grilled Pork Chop (without slaw): 5 WW Freestyle points
200 calories, 9g fat, 2g sat fat, 69mg cholesterol, 393mg sodium, 3g carbs, 0g fiber, 2g sugar, 29g protein
1 Serving Beet Slaw (1/4 of recipe or ~3/4 cup): 3 WW Freestyle points
80 calories, 4g fat, 1g sat fat, 0mg cholesterol, 45mg sodium, 14g carbs, 3g fiber, 9g sugar, 0g protein
Recipe adapted from Cook’s Illustrated
Nutrition
Serving Size: 1 pork chop and 3/4 cup slaw
Calories: 280
Sugar: 11g
Sodium: 438mg
Fat: 13g
Saturated Fat: 3g
Carbohydrates: 17g
Fiber: 3g
Protein: 29g
Cholesterol: 69mg
Keywords: grilled pork chops, pork chops recipe, boneless pork chops
Did you make this recipe?
Tag @andiemmitchell on Instagram and hashtag it #andiemitchell
Source: http://www.andiemitchell.com/garlic-lime-grilled-pork-chops-with-zesty-beet-slaw/

0 notes
Text
Easy Cheese Stuffed Mushrooms
How to make quick and easy stuffed mushrooms with cheese, garlic, and sweet onion. It’s hard to eat just one of these cheesy, garlicky mushroom caps! Jump to the Easy Cheese Stuffed Mushrooms Recipe or read on to see our tips for making them.
You can stuff just about anything into mushrooms caps, but this indulgent combination of melty cheese, garlic, sweet onion, and herbs is my favorite.
If you love mushrooms as much as we do, take a look at our no-fail method for cooking mushrooms. Enjoy them as a side, add to pastas, toast, eggs and more.
Best Tips for Making Stuffed Mushrooms
When we were testing these little guys, Adam and I downed the whole pan in one sitting. Thanks to lots of garlic and fresh herbs, they are loaded with flavor.
When it comes to stuffed mushrooms, there are a few things to keep in mind:
Use white button or cremini (brown) mushrooms. These varieties are a perfect size, and the cavity is perfect for adding the stuffed mushroom filling.
If you notice any dirt on the mushrooms, use a slightly damp paper towel to brush it off. Don’t submerge them in water or rinse them. Mushrooms act like a sponge so water will be absorbed, which causes the final cooked mushrooms to be squeaky instead of flavorful and browned.
Use a rimmed baking sheet or wide skillet when roasting the mushroom caps. This way, any liquid released by the mushrooms or filling stays in the pan.
We use two tablespoons of minced garlic, which is a lot. If you LOVE garlic, add a bit more to the filling.
Use your favorite cheese. In our photos, we used extra sharp cheddar. It’s flavorful and melts nicely, but other cheeses work well, too. Try Swiss or Gruyere, brie, feta, goat cheese or a combination of cheeses. The options are endless.
Add some bacon or sausage. Cook them first then stir into your filling.
Just before baking the mushrooms, we sprinkle toasted breadcrumbs on top of the stuffed mushroom caps. I love the extra crunch this adds, but if you don’t have them on hand or stay away from bread or carbs, you can leave them out.
The mushrooms bake for 15 to 20 minutes — look for the mushrooms to soften slightly and the cheese to be melted. When they are done, serve them with a sprinkling of fresh herbs on top.
If you loved these mushrooms, take a look at more easy appetizers to serve alongside them:
Easy Cheese Stuffed Mushrooms
PREP 10mins
COOK 15mins
TOTAL 25mins
These cheese and garlic stuffed mushrooms are simple to put together and easy to adapt to your favorite cheeses. We love using a sharp cheddar, but mozzarella, Swiss, Gruyere cheese or even creamier cheeses like feta, goat or brie will all work. A combination of cheeses is a great idea, too!
Makes 20 stuffed mushroom caps
You Will Need
20 white button or cremini mushrooms (about 10 ounces)
1 tablespoon olive oil
1 tablespoon butter
1/2 cup chopped onion (half medium onion)
2 tablespoons minced garlic (4 to 5 cloves)
2 teaspoons chopped fresh rosemary or thyme, see notes for parsley
2 ounces shredded cheese like sharp cheddar, mozzarella, Swiss or a combination
3 tablespoons breadcrumbs (use panko or regular breadcrumbs)
Salt and fresh ground black pepper
1 tablespoon chopped fresh parsley or chives for serving, optional
Directions
Heat oven to 375 degrees F.
Using a damp paper towel, brush all dirt from mushrooms. Remove the mushroom stems. Cut away and discard any hard bits of the stems then finely mince them.
Add the mushroom caps to a rimmed baking sheet or large oven-safe skillet that fits the mushrooms in one layer. Toss them with a tablespoon of olive oil and lightly season with fresh ground black pepper. Arrange them cavity-side-up so that they are ready to be stuffed.
Melt butter in a skillet over medium heat. Add the onions and chopped mushroom stalks, and a pinch of salt. Cook, occasionally stirring, until the onions smell sweet and are soft, about 5 minutes. Add the garlic and herbs, then cook, stirring, for 2 minutes. Scrape mixture into a bowl and set aside to cool.
Add the breadcrumbs to the same skillet that the onions and mushrooms were cooked in. Place them over medium-low heat, and then cook, stirring, until they are lightly toasted; about one minute.
Stir the cheese into the onions and garlic mixture then divide the filling between the mushroom caps. Sprinkle the toasted breadcrumbs on top. Bake the mushrooms until the cheese has melted and the mushrooms have softened; 15 to 20 minutes. Serve with chopped fresh herbs and a bit of fresh ground black pepper on top.
Adam and Joanne's Tips
Parsley is excellent instead of or in addition to the rosemary or thyme. Since parsley is less pungent, use two tablespoons of chopped parsley.
To use dried herbs instead of fresh, use 3/4 of a teaspoon of dried rosemary or thyme. Italian seasoning will also work.
Add any leftover filling to scrambled eggs, omelets, mashed potatoes or rice.
Nutrition facts: The nutrition facts provided below are estimates. We have used the USDA database to calculate approximate values.
If you make this recipe, snap a photo and hashtag it #inspiredtaste — We love to see your creations on Instagram and Facebook! Find us: @inspiredtaste
Nutrition Per Serving: Serving Size 1 stuffed mushroom cap / Calories 35 / Total Fat 2.4g / Saturated Fat 1g / Cholesterol 4.3mg / Sodium 29.7mg / Carbohydrate 2.3g / Dietary Fiber 0.3g / Total Sugars 0.6g / Protein 1.5g
AUTHOR: Adam and Joanne Gallagher

Source: https://www.inspiredtaste.net/37349/easy-stuffed-mushrooms/
0 notes
Text
Caprese Pork Chops Recipe
Caprese Pork Chops – Seared juicy caprese pork chops marinated in a garlicky balsamic glaze and topped with sweet tomatoes, melted mozzarella cheese, and fresh basil!
One skillet, 30-minute meal prepared with mozzarella-smothered pork chops and topped with juicy tomatoes and basil. I’m telling you, pork chops have never been so juicy and moist than with this Caprese Pork Chops Recipe!
This tasty recipe is great for a fancy, romantic dinner, but also perfect for a quick weeknight meal. Additionally, it’s low-carb and keto-friendly, too! WINNING! 🙌
Caprese Pork Chops
I love the amazing flavor of seared pork chops marinated in a sweet balsamic mixture, but when you add tomatoes, mozzarella and basil into that mix, trust me, it is BE. YOND. de.licious.
Lately, I’ve been making caprese-all-the-things because my Mom brought over a ton of her homegrown tomatoes from the garden and, in my opinion, they taste best when paired with mozzarella cheese and a drizzle of balsamic vinegar.
When she first gave me some of her tomatoes, I quickly made this Caprese Skillet Chicken and this Caprese Macaroni and Cheese.
Last week, she brought over a bunch more and I made us these pork chops, as well as a Caprese Chicken Nachos recipe that I’ll share with you very soon.
HOW TO MAKE CAPRESE PORK CHOPS
This caprese pork marinates in a delicious garlicky balsamic marinade, and then it’s seared and baked with melty cheese until tender and juicy.
For the marinade, you’ll need balsamic vinegar, olive oil, dried basil, and garlic. If time permits, let the pork chops sit in the marinade for at least 15 minutes before adding them to the skillet.
Cook on both sides for about 4 minutes per side, or until browned.
Top with slices of fresh mozzarella cheese and pop the skillet in the oven for 10 minutes, or until cheese is melted.
Remove from oven, top with tomato slices and basil; drizzle with balsamic glaze and serve.
Super easy, super good, super satisfying!
HOW TO GRILL CAPRESE PORK CHOPS
Preheat grill to medium-high heat.
Remove the pork chops from the marinade and place on the preheated grill.
Cook for 4 minutes; flip and cook for 3 more minutes.
Place mozzarella cheese on top, close the grill and cook until cheese is melted and meat is cooked through. Pork is done when internal temperature reaches 145F.
HOW TO STORE COOKED PORK CHOPS
Refrigerate leftover pork chops in airtight containers or wrap tightly with plastic wrap and heavy-duty aluminum foil over the plastic wrap.
Properly stored cooked pork chops will last up to 3 days in the refrigerator.
YOU MIGHT ALSO LIKE
ENJOY!
CRAVING MORE? SIGN UP FOR THE DIETHOOD NEWSLETTER FOR FRESH NEW RECIPES DELIVERED TO YOUR INBOX!
FOLLOW DIETHOOD ON FACEBOOK, TWITTER, PINTEREST AND INSTAGRAM FOR ALL OF THE LATEST CONTENT, RECIPES AND UPDATES.
If you try a recipe, please use the hashtag #diethood on INSTAGRAM for a chance to be featured!
TOOLS AND INGREDIENTS USED IN THIS RECIPE
Caprese Pork Chops
Seared juicy caprese pork chops marinated in a garlicky balsamic glaze and topped with sweet tomatoes, melted mozzarella cheese, and fresh basil!
Course: Dinner
Cuisine: Italian
Keyword: caprese recipes, easy pork chop recipe, grilled pork chop recipe
Servings: 4 serves
Calories: 496 kcal
Ingredients
1/2 cup balsamic vinegar
3 tablespoons olive oil divided
3 cloves garlic minced
1/2 teaspoon dried basil
salt and fresh ground pepper to taste
4 bone-in center cut pork chops you can also use boneless pork chops
4 slices fresh mozzarella
1 to 2 large tomatoes sliced
1/4 cup freshly chopped basil leaves
Instructions
Preheat oven to 375F.
In a large bowl or a ziploc bag, combine balsamic vinegar, 1 tablespoon olive oil, garlic, dried basil, salt and pepper. Add pork chops and toss until coated.
If time permits, let marinate in the fridge for at least 15 minutes, and up to 4 hours.
Heat remaining olive oil in a cast iron skillet over medium heat.
Add pork chops to skillet and sear for 4 minutes, or until golden; flip and continue to cook for 4 more minutes.
Remove from heat and top each pork chop with sliced mozzarella.
Place skillet in the oven and cook for 10 minutes, or until cheese is melted and pork is cooked through.
Remove from oven and top op with tomato slices and basil.
Transfer to a serving plate and drizzle with some of the balsamic glaze left in the skillet.
Serve.
Recipe Notes
HOW TO STORE COOKED PORK CHOPS
Refrigerate leftover pork chops in airtight containers or wrap tightly with plastic wrap and heavy-duty aluminum foil over the plastic wrap.
Properly stored cooked pork chops will last up to 3 days in the refrigerator.
WW FREESTYLE POINTS: 10
Nutrition Facts
Caprese Pork Chops
Amount Per Serving
Calories 496 Calories from Fat 225
% Daily Value*
Total Fat 25g 38%
Saturated Fat 7g 35%
Cholesterol 178mg 59%
Sodium 316mg 13%
Potassium 884mg 25%
Total Carbohydrates 6g 2%
Sugars 5g
Protein 56g 112%
Vitamin A 5.4%
Vitamin C 1.2%
Calcium 19.9%
Iron 10.7%
* Percent Daily Values are based on a 2000 calorie diet.
SUBSCRIBE TO GET FREE UPDATES & A FREE ECOOKBOOK!
GET AN EMAIL WHEN THERE'S A NEW RECIPE
Source: https://diethood.com/caprese-pork-chops-recipe/

0 notes
Text
Easy Bruschetta Recipe for Pan-Seared Chicken
<![CDATA[ .tasty-recipes-quick-links text-align:center; .tasty-recipes-quick-links a padding: 0.5rem; ]]>
Fresh tomatoes are traditional when tomatoes are ripe and in season, but you CAN make a delicious, easy bruschetta recipe with canned tomatoes. It’s the perfect topping for pan-seared chicken cutlets, with fresh basil, garlic, and balsamic vinegar (250 calories / 3 WW points)

Tomato bruschetta is simple enough to make, and yet it’s completely irresistible. Diced tomatoes are tossed with fresh basil, a little minced garlic, a few glugs of good-quality, fruity olive oil, a pinch of salt, and pepper. And although fresh tomatoes are traditional, they’re not always in season. Believe it or not, you can make a fabulous, EASY bruschetta recipe with canned tomatoes.
The key, as with all simple recipes, is using the highest quality, best-tasting ingredients you can, especially when it comes to canned tomatoes. I always, always, always recommend Tuttorosso Tomatoes. I also think adding a splash of sweet, syrupy balsamic vinegar to your bruschetta topping gives the mix more dimension.

You can spoon it on top of toasted bread of course, but I like to use my easy bruschetta recipe as a topping for quick, pan-seared chicken cutlets seasoned very simply with salt, pepper, and garlic powder. It would add fabulous flavor to fish, pork, beef, or even combined with cannellini beans for an easy vegetarian side. Enjoy!
Print
<![CDATA[ .tasty-recipes-image float: right; .tasty-recipes-print-button background-color: #666677; display: inline-block; padding-left: 1em; padding-right: 1em; padding-top: 0.5em; padding-bottom: 0.5em; text-decoration: none; a.tasty-recipes-print-button color: #fff; a.tasty-recipes-print-button:hover color: #fff; .tasty-recipes-rating.tasty-recipes-clip-10 -webkit-clip-path: polygon(0 0, 10% 0%, 10% 100%, 0% 100%); clip-path: polygon(0 0, 10% 0%, 10% 100%, 0% 100%); .tasty-recipes-rating.tasty-recipes-clip-20 -webkit-clip-path: polygon(0 0, 20% 0%, 20% 100%, 0% 100%); clip-path: polygon(0 0, 20% 0%, 20% 100%, 0% 100%); .tasty-recipes-rating.tasty-recipes-clip-30 -webkit-clip-path: polygon(0 0, 30% 0%, 30% 100%, 0% 100%); clip-path: polygon(0 0, 30% 0%, 30% 100%, 0% 100%); .tasty-recipes-rating.tasty-recipes-clip-40 -webkit-clip-path: polygon(0 0, 40% 0%, 40% 100%, 0% 100%); clip-path: polygon(0 0, 40% 0%, 40% 100%, 0% 100%); .tasty-recipes-rating.tasty-recipes-clip-50 -webkit-clip-path: polygon(0 0, 50% 0%, 50% 100%, 0% 100%); clip-path: polygon(0 0, 50% 0%, 50% 100%, 0% 100%); .tasty-recipes-rating.tasty-recipes-clip-60 -webkit-clip-path: polygon(0 0, 60% 0%, 60% 100%, 0% 100%); clip-path: polygon(0 0, 60% 0%, 60% 100%, 0% 100%); .tasty-recipes-rating.tasty-recipes-clip-70 -webkit-clip-path: polygon(0 0, 70% 0%, 70% 100%, 0% 100%); clip-path: polygon(0 0, 70% 0%, 70% 100%, 0% 100%); .tasty-recipes-rating.tasty-recipes-clip-80 -webkit-clip-path: polygon(0 0, 80% 0%, 80% 100%, 0% 100%); clip-path: polygon(0 0, 80% 0%, 80% 100%, 0% 100%); .tasty-recipes-rating.tasty-recipes-clip-90 -webkit-clip-path: polygon(0 0, 90% 0%, 90% 100%, 0% 100%); clip-path: polygon(0 0, 90% 0%, 90% 100%, 0% 100%); .tasty-recipes-nutrition ul list-style-type: none; margin: 0; padding: 0; .tasty-recipes-nutrition ul:after display: block; content: ' '; clear: both; .tasty-recipes-nutrition li float: left; margin-right: 1em; .tasty-recipes-plug text-align: center; margin-bottom: 1em; display: -ms-flexbox; display: flex; -ms-flex-align: center; align-items: center; -ms-flex-pack: center; justify-content: center; .tasty-recipes-plug a text-decoration: none; box-shadow: none; .tasty-recipes-plug a img width: 150px; height: auto; margin: 5px 0 0 8px; display: inline-block; @media print .tasty-recipes-no-print, .tasty-recipes-no-print * display: none !important; ]]>
Fresh tomatoes are traditional when tomatoes are ripe and in season, but you CAN make a delicious, easy bruschetta recipe with canned tomatoes. It’s the perfect topping for this pan-seared chicken cutlets, with fresh basil, balsamic vinegar, and garlic.
Author: Andie Mitchell
Prep Time: 20 mins
Cook Time: 20 mins
Total Time: 40 minutes
Yield: 4 servings
Category: Poultry
Cuisine: Italian
Ingredients
Bruschetta Topping:
1 14.5-ounce can Tuttorosso Petite Diced Tomatoes, drained
½ cup roughly chopped fresh basil
1 garlic clove, minced
2 tablespoons extra virgin olive oil
1 teaspoon balsamic vinegar
1/4 teaspoon kosher salt
1/8 teaspoon ground black pepper
Optional additions: fresh mozzarella or parmesan cheese
Simple Pan-Seared Chicken Cutlets:
1 pound boneless skinless chicken breast cutlets
2 teaspoons olive oil
½ teaspoon salt
¼ teaspoon freshly ground black pepper
½ teaspoon garlic powder
Instructions
In a large bowl, combine the canned tomatoes, basil, garlic, olive oil, vinegar, salt, and pepper. Stir and let sit for 10 minutes before starting the chicken to allow the flavors to marry.
Season the chicken cutlets on both sides with salt, pepper, and garlic powder.
In a large nonstick skillet, heat 1 teaspoon of the olive oil over medium-high heat. Add half of the chicken cutlets and cook until browned on both sides and cooked through, about 8 minutes. Transfer the cooked cutlets to a plate. Add the remaining 1 teaspoon of olive oil to the skillet and cook the remaining cutlets.
To serve, arrange your chicken cutlets on a large platter and spoon the bruschetta topping over them.
Cover and refrigerate any leftover bruschetta topping.
Notes
1 serving (1/4 of entire recipe): 3 WW Freestyle points
Bruschetta Topping (1/4 of bruschetta recipe):
— 2 WW Freestyle points
— 95 calories, 7g fat, 1g saturated fat, 0mg cholesterol, 218mg sodium, 7g carbs, 2g fiber, 4g sugar, 1g protein
Nutrition
Serving Size: 1/4 of the recipe
Calories: 250
Sugar: 4g
Sodium: 269mg
Fat: 12g
Saturated Fat: 2g
Trans Fat: 0g
Carbohydrates: 7g
Fiber: 2g
Protein: 27g
Cholesterol: 82mg
Keywords: bruschetta, bruschetta topping, easy chicken recipe, canned tomatoes
Did you make this recipe?
Tag @andiemmitchell on Instagram and hashtag it #andiemitchell
Source: http://www.andiemitchell.com/easy-bruschetta-recipe-for-pan-seared-chicken/

0 notes
Text
Egg Salad Recipe with the Best Dressing
Truly the best Egg Salad Recipe you are going to try with minimal ingredients and so quick to make. Hard-boiled eggs with celery, dill, seasoning and chives in a creamy garlic Dijon mayo dressing make up this classic egg salad. Add this to your Easter menu!
Eggs are are a healthy, high quality protein. We love recipes where eggs are the star ingredient like these incredible Deviled Eggs with Bacon and Egg Muffins.
This post may contain affiliate links. Read my disclosure policy.
Hey, hey! Valentina with Valentina’s Corner sharing an Egg Salad Recipe.
Egg Salad Recipe:
This is easiest egg salad recipe and the perfect way to use up leftover hard-boiled eggs. Eggs with herbs, celery and crisp onion in the creamiest dressing makes for one amazing salad.
Egg salad can be served in so many different ways – as a side salad, on toast, etc (see more ideas below). Adding hard boiled eggs is a great way to pack more protein into Potato Salad, a Pasta Chicken Caesar Salad or Salmon Cobb Salad. This classic salad is simple and just as satisfying, but so much faster to make!
What Goes Into an Egg Salad?
Though this is a simple recipe and uses basic ingredients of eggs, dill, chives, celery and onion in creamy garlic mayo, it tastes amazing. Here are suggestions for other ingredients to add to the salad for a fancier salad:
Protein- such as bacon, chicken or shrimp.
Veggies- tomatoes, cucumbers or carrots are great options.
Avocado- can either be cubed and added to the salad or blended with the dressing.
TIP: If you will be adding other ingredients to the salad, prepare a larger portion of the dressing.
How to Make Egg Salad:
Making a salad doesn’t get easier than this homemade egg salad. Just be sure your eggs have cooled completely before preparing the salad or make them ahead and refrigerate until ready to use.
Hard boil eggs and cool. Once cooled, cut into desired pieces (we like ours chunky)
Finely cube the celery and red onion (sweet onion may be substituted for red onion)
Chop the chives (or green onions) and fresh dill
Prepare homemade dressing
Mix salad well to combine and enjoy!
Are Eggs Good for You?
Eggs are the least expensive high quality protein. They are nutrient dense and will keep you feeling good throughout the day. Egg yolks are rich in choline which is important for brain and liver health. Eggs also contain lutein which benefits eye health. They also have zero carbs and no sugar. Read more below on free-range egg nutrition.
The Best Dressing for Egg Salad-
The dressing in any salad can really make or break a recipe. This awesome creamy dressing adds so much flavor to the simple salad. Eggs never tasted so good!
In a bowl, add the mayonnaise, Dijon mustard, paprika, garlic, lemon juice, salt and pepper.
Mix until the dressing is creamy and ingredients are well incorporated.
How to Serve Egg Salad-
Though the salad may be enjoyed as a side dish, it is rather versatile. Enjoy these other variations to serve Egg Salad:
Egg Salad Sandwich- Serve the egg salad as a sandwich between bread slices, as an open-faced sandwich or even in stuffed in a wrap or pita.
Avocado Egg Salad- Load the egg salad onto a halved avocado.
Lettuce wrap- Add the egg salad to lettuce or Romaine and enjoy as lettuce wraps.
Breakfast sandwich- Load salad onto toast for an easy breakfast sandwich, perfect.
Free Range Eggs Vs. Caged Eggs:
Pay attention to the packaging of the eggs you buy. Free-range hens have been shown to lay healthier eggs and more nutritious eggs* which have a shocking:
1/3 less cholesterol
1/4 less saturated fat
2/3 more Vitamin A
2x more omega 3 fatty acids
3x more vitamin E
7x more beta-carotene
Free range eggs are also 98% less likely to carry salmonella since they are surrounded by better conditions, which is reason enough to buy free-range eggs.
More Egg Recipes to Try:
I can’t wait for you to try this easy Egg Salad Recipe. Once you try it, you are going to make it over and over again!
Egg Salad Recipe
Prep Time: 5 minutes
Cook Time: 15 minutes
Total Time: 20 minutes
The easiest Egg Salad Recipe. Hard-boiled eggs with chives, dill, celery and onion in the creamiest Dijon mayonnaise dressing.
Author: Valentina Ablaev
Skill Level: Easy
Cost to Make: $3-$6
Keyword: egg salad
Calories: 290 kcal
Servings: 4 people
For the Salad:
8 hard-boiled eggs
2 Tbsp celery finely chopped
3 Tbsp red onion finely chopped
3 Tbsp dill chopped
3 Tbsp chives chopped
For the Dressing:
1/3 cup mayonnaise
2 tsp lemon juice
2 tsp Dijon mustard
1/2 tsp paprika
1/2 tsp salt
1/4 tsp ground pepper
1 garlic clove, minced
Cook eggs and cool. Once cooled, peel and chop eggs (we like ours chunky) and place into a salad bowl.
Add finely chopped celery, red onion, dill and chives.
In a separate bowl, combine ingredients for the dressing. Gently stir dressing into the egg salad until coated and serve.
Nutrition Facts
Egg Salad Recipe
Amount Per Serving
Calories 290 Calories from Fat 216
% Daily Value*
Total Fat 24g 37%
Saturated Fat 5g 25%
Cholesterol 380mg 127%
Sodium 565mg 24%
Potassium 146mg 4%
Total Carbohydrates 2g 1%
Sugars 2g
Protein 13g 26%
Vitamin A 16%
Vitamin C 4%
Calcium 5%
Iron 6.9%
* Percent Daily Values are based on a 2000 calorie diet.
If you make this recipe, I’d love to see pics of your creations on Instagram, Facebook and Twitter! Hashtag them #natashaskitchen
*Egg nutrition information sourced from Dr. Axe and The Incredible Egg.

Source: https://natashaskitchen.com/egg-salad-recipe/
0 notes
Link
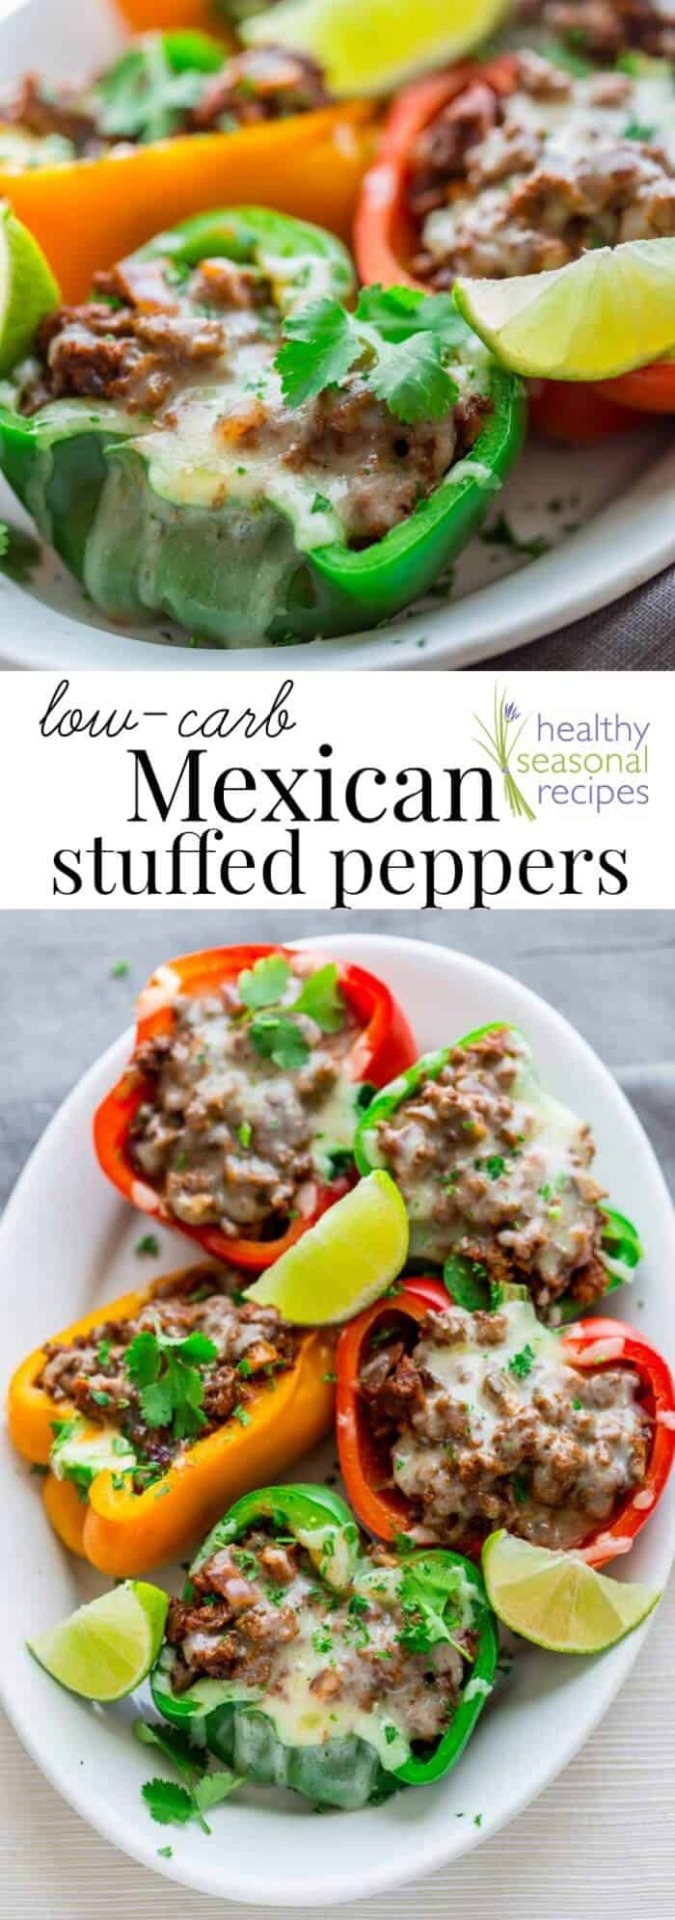
These cheesy spicy Mexican stuffed bell peppers come together in only 20 minutes for a low-carb, gluten-free and totally delicious weeknight meal.
PIN THIS RECIPE
Welcome! If you’re new here you may want to sign up for my email list or follow me on instagram to keep up with the latest posts.
I originally shared this recipe on January 15th, 2016. I have updated some of the text today. This post contains affiliate links.
Why I Came Up with This Mexican Stuffed Pepper Recipe
Did I tell you that I am going to Mexico next month? The whole fam dam is jetting off for a week and I am trying to not get too excited too soon. I may or may not have been spending many minutes hours on Zappos mooning over breezy white cover ups and braided teal leather flip-flops. I may or may not have received these items on my doorstep yesterday afternoon and stripped down in the kitchen to try them on as soon as they came.
And I totally didn’t buy a brand new new suitcase either.
Help me. My name is Katie and I am addicted to Zappos. One day shipping! Free returns! How can you not love free returns?
When the boxes arrived, the girls were almost as excited as me. They helped me unload the new suitcase which came in a comically huge box. The girls quickly forgot all about the stuff I was un-packing (and barely noticed that I was in the kitchen in a state of undress) and proceeded to turn the box into a giggle fest filled game of hilarity. I am not sure what the premise was. I think it involved them being store owners. Didn’t they know brick and mortar is dead and Zappos is where it’s at? Sorry. Not Sorry.
Also in preparation for our trip and wearing not much more than a bikini, said breezy white cover-up and teal flip flops, I am amping up my workouts. Jase is too. (Back to back classes this morning for me and way more cardio for him) and we’ve been avoiding the evening snack fest. I’m not dieting or anything like that, since as a chronic dieter turned intuitive eater, I know that doesn’t work for me. But I am reigning it in to drop a couple holiday lbs before we go. Hopefully this strategy won’t backfire.
Basically, I’ve been steering away from excessive amounts of carby stuff at dinner (sorry rice and chicken casserole you have to wait a little longer.) I’ve been bulking up on mega veggies and lean protein and filling but homey recipes like Keto Chicken Soup. I’ve been having a slice of whole-grain toast with my egg in the morning. Eating off a small plate. All that good stuff. Nothings off limits, I’m just giving everything the “do I really want to eat this?” test before I go for it.
Do I really want to eat these Mexican Stuffed Peppers? Yes, yes I do. And they fit perfectly with this plan. They are awesome since they are low-carb, veggie forward and totally yum. And there is melted cheese so the world can continue to spin. I certainly don’t feel deprived in any way shape or form. And they have a decidedly Mexican flair that puts me in the mood for flip flops!
While I am obsessing about our Mexican trip and all things Mexican, I’ve gotta try this yummy Homemade Taco Sauce by Veggie Balance. And I will most certainly be making this low carb Mexican Chicken Salad in lettuce cups for lunches as much as humanly possible. And for snacks it’s obvi all about the guacamole with raw veggies!
How to make Low Carb Mexican Stuffed Peppers
How to Cut the Peppers
Cut the bell peppers in half right through the stem. This will give you two even sides that lay flat. They’re perfect for filling! Next using a kitchen spoon and pairing knife, scoop out the core, seeds and ribs from the inside of the pepper. Leave the stem intact though so the filling won’t fall out the sides!
Ready in only 20 minutes
It’s not magic, I just used the microwave! Take the peppers halves and set them in a microwave safe baking dish. Place them cut side down so they cook evenly. Add some water so they will steam.
To microwave veggies and trap the steam use plastic wrap, but make sure to put a layer of parchment (or wax paper works in a pinch) over the food so the plastic doesn’t touch the food.
Microwave the peppers until they’re tender. Note the times in this recipe are based on a 1200 watt microwave, so you’ll need to adjust depending on the model you have. This gives them a head start. That way, they will already be cooked when you fill them and top them with cheese they only need another minute or so to melt the cheese. I don’t know if you’ve ever had a stuffed pepper and wondered why the pepper was undercooked, but the reason is that they probably skipped this step of pre-cooking the pepper!
Make the Filling on the Stovetop
The filling for these low-carb Mexican stuffed peppers is made with ground beef, in a style that resembles taco meat. To cook it, just heat some oil in a large heavy skillet and add the beef. Break it up in the skillet as it browns the same way you would for chili or bolognese pasta sauce.
Next, add in onions for flavor and finely chopped mushrooms to add more bulk to the servings but very little calories or carbs.
Once the veggies are softened, add in the spices to bloom them in the hot pan. They’ll smell amazing!!
Then just add tomato puree to make them saucy!
Stuff the Peppers
Once the peppers are soft, and the filling is cooked, you’re ready to assemble the Low Carb Mexican Peppers.
First, carefully remove the plastic from the dish of peppers. There will be steam trapped inside, and it’s easy to get burned by it. Then tilt the water out of the pepper dish, and flip them cut side up.
Spoon the beef mixture into the peppers, dividing evenly.
Top with cheddar cheese. I like to use sharp cheddar cheese because it has the strongest cheesy flavor, so you get the most cheesy flavor per serving!
Cook the Stuffed Peppers
Now it’s time to cook the Low Carb Mexican Stuffed Peppers. So, without covering them again (which would stick to the cheese) pop the dish back into the microwave and microwave them until they are nice and soft and the cheese is completely melted. This takes about two or three minutes!
Note, they’ll be really hot when they come out of the microwave, so let them sit for a moment so you don’t burn your mouth. (You can browse on Zappos while you wait. I won’t judge.)
What to serve with Mexican Stuffed Peppers
For a low carb meal, I like to serve these Mexican Stuffed Peppers with a giant spinach salad with bacon and scallions.
For meals where carbs aren’t too much of a concern, this skillet Mexican street corn is super yummy and really fast to prepare. Or I might like to make this Mexican Bean Salad with creamy avocado dressing.
Probably the easiest thing would be to make a simple classic coleslaw or cucumber salad to serve with these stuffed peppers.
How To Reheat Stuffed Peppers
To reheat the leftover stuffed peppers place them on a microwave safe plate and reheat for about 2 minutes. They should be steaming hot and make sure they are hot all the way through by testing with a thermometer.
To reheat them in the oven place them in an ovenproof baking dish and bake loosely covered with foil for about 20 minutes at 350 degrees. They should be steaming hot.
PIN THIS RECIPE
Thank you for reading. If you’re new here you may want to sign up for my email list or follow me on instagram to keep up with the latest posts. If you make this recipe, please come back and let me know by leaving a rating and review.
Print
low carb mexican stuffed peppers
★★★★★ 5 from 4 reviews
Author: Katie Webster

Prep Time: 20 minutes
Cook Time: 10 minutes
Total Time: 20 minutes

Yield: 6 servings

Category: entree

Method: stovetop

Cuisine: Mexican

Print

Pin
Description
These cheesy spicy Mexican stuffed bell peppers come together in only 20 minutes for a low-carb, gluten-free and totally delicious weeknight meal.
Ingredients
3 large bell peppers, cut in half lengthwise and cored
2 teaspoons coconut oil or avocado oil
1 pound grass fed beef
1 cup chopped red onion
1 cup chopped white or crimini mushrooms
1 tablespoon ground cumin
1 tablespoon chili powder
½ teaspoon ground chipotle chili
½ teaspoon salt
¼ teaspoon cinnamon
½ cup canned tomato puree
4 ounces shredded sharp cheddar cheese
chopped fresh cilantro leaves for garnish, optional
Instructions
Place the peppers, cut side down in a microwave safe baking dish. Add 1 cup water to the baking dish. Cover with a layer of parchment or wax paper. Cover with plastic wrap. Microwave on high until the peppers are just starting to soften, 4 to 5 minutes. Carefully remove cover, drain off water and turn the peppers cut-side up in the baking dish.
Meanwhile, heat oil in a large skillet over medium-high heat. Add beef and cook, crumbling with a wooden spoon until the meat is browned, about 5 minutes. Add onion and mushrooms and cook, stirring often, until the mixture is browning along the edge of the pan and the vegetables are softened, 4 to 6 minutes. Stir in cumin, chili powder, chipotle, salt and cinnamon and cook until fragrant, about 30 seconds. Remove from heat and stir in tomato puree.
Fill the peppers with the meat mixture (about ½ cup per pepper half). Top with cheese, dividing evenly. Microwave the peppers in the baking dish, uncovered until the cheese is melted and the peppers are tender, 2 to 3 minutes. Serve warm with cilantro on top if desired.
Notes
Microwave Tip: This recipe was tested in a 1200 watt microwave. Adjust cooking times depending on your microwave oven.
Once the peppers have been steamed, carefully remove the plastic from the dish of peppers. There will be steam trapped inside, and it’s easy to get burned by it.
Nutrition
Serving Size: 1 stuffed pepper half
Calories: 247
Sodium: 402
Fat: 15
Saturated Fat: 8
Carbohydrates: 9
Fiber: 4
Protein: 22
Keywords: low carb,stuffed peppers,keto,high protein,beef recipe

Did you make this recipe?
Tag @healthyseasonal on Instagram and hashtag it #healthyseasonal
YOU MAY ALSO LOVE THESE RECIPES
20 Minute Low Carb Turkey and Peppers
Guacamole 5 Ways
Mexican Four Bean Salad
from https://www.healthyseasonalrecipes.com/low-carb-mexican-stuffed-peppers/
0 notes
Text
15 minute greek cucumber salad
15 minute greek cucumber salad:
What’s not to adore about this easy-as-can-be 15 minute Greek cucumber salad with feta, olives and cherry tomatoes? It’s the absolute best!
I originally shared this Greek Cucumber Salad on May 30th, 2014. I’ve updated the images, some of the text and added a video to share with you today. This post may contain affiliate links.
Wanna know how much I love this salad? I’ll tell you.
You know that expression, “not my cup of tea”? It’s basically a gentle euphemism for I don’t like something. Well, I think there should be such a thing as a cup of tea scale. Like 1 would be dislike greatly. 5 would be indifferent. And 10 would be love a whole bunch. For me coming in at #1 would be backcountry skiing during a sleet storm. And #10 would be this Greek Cucumber Salad.
That’s how much I love this recipe.
Before we get into the details of how to make this 15 minute recipe, let’s clear up a common question about Greek salad:
Does Greek Salad Have Lettuce In It?
Yes and no. In the United States many recipes and restaurant Greek salads include lettuce. But traditional Greek salads do not have lettuce in them. Instead they allow the cucumbers and tomatoes stand in for the bulk of the salad. The ingredients are chopped and tossed together.
This Greek salad today is the no-lettuce variety that’s all about the chopped cucumbers and tomatoes.
How to Make Greek Salad Dressing
I like to make the dressing for this Greek Cucumber Salad right in the bowl. That saves a dish, and makes it a quicker recipe to prepare. Because tomatoes and cucumbers naturally let off their juice as they sit, you do not need a ton of dressing to make this salad moist enough. Really it’s just about adding flavor!
Remember that the salad also contains feta which along with the raw onion, is the prevailing flavor, so the dressing is more of a background flavor.
To make the dressing just whisk red wine vinegar, really good olive oil and fresh oregano in the mixing bowl. Add in mustard to help it stay emulsified plus a bit of salt and pepper. Whisk everything well!
How to Make Greek Cucumber Salad
Use Fresh Herbs
I use fresh herbs in this chopped salad because it’s a summertime recipe and I always have herbs on hand and they taste much better. If you want to make this with dried herbs, use ¾ teaspoon each dried oregano and dried basil in the dressing.
Do you need to peel the cucumbers?
If you have regular garden cucumbers, you should peel them, but if you have European or Lebanese cucumbers, you can leave them unpeeled. I prefer these thinner skinned varieties of cucumbers, and like to peel strips of skin off, to make them pretty!
How to remove the seeds from the cucumbers:
To remove the seeds of the cucumber, cut them in half from stem to end. Then use a spoon to scoop out the seeds. This will make the cucumber salad less watery.
How to cut the cucumbers for Greek salad
I like to cut the cucumbers into chunks instead of rounds or half moons. They are closer in size to the rest of the ingredients, and easier to eat this way. I cut them into lengths, then crosswise into chunks about ½ to ¾-inch thick. (See the video for more detail.)
Toss the Greek Cucumber Salad at the last minute
Before serving and once the salad dressing is mixed in the bowl, add in the chopped cucumbers, tomatoes, red onions, olives and feta. Toss well to coat with the dressing. Then sprinkle with the freshly chopped basil. Serve right away, as the cucumbers and tomatoes will start to weep and the salad will become watery.
Can you Make Greek Cucumber Salad Ahead?
Yes you can, but you need to keep a couple things in mind.
You can make the dressing ahead and store it in a jar in the fridge for several days. If the oil solidifies, you’ll just need to bring it to room temperature or set your jar of dressing in a warm water bath to liquify it before proceeding.
You can chop the cucumbers ahead too. Just keep them separate from the dressing so they don’t start to weep. (If they get salt on them, they will start to let off their water.)
If you don’t mind the smell of chopped onions in your fridge you can chop them ahead too. I’d recommend not stirring them together with the tomatoes or feta.
Don’t chop the tomatoes ahead. Tomatoes shouldn’t be refrigerated, so wait to cut them until you’re ready to toss the salad.
Add freshly cut basil at the end. If you chop it ahead the cuts will turn black and the taste of the basil will be less strong.
Thanks so much for reading. If you make this recipe for 15 minute Greek Cucumber Salad, please come back and let me know by leaving a rating and review. I really appreciate the feedback.
Print
15 minute greek cucumber salad
Author: Katie Webster

Prep Time: 15 minutes
Total Time: 15 minutes

Yield: 4 servings

Category: Salad

Method: no cook

Cuisine: Greek

Print

Pin
Description
Here’s a recipe for Cucumber Greek Salad made without lettuce. It’s loaded with crumbled feta, cherry tomatoes, olives and red onion and tossed with a simple homemade dressing. Ready in only 15 minutes. Gluten-free, vegetarian and low-carb.
Ingredients
2 tablespoon extra-virgin olive oil
1 tablespoon red wine vinegar
1 tablespoon finely chopped fresh oregano
1 teaspoon Dijon mustard
¼ teaspoon salt, plus more to taste
Freshly ground pepper to taste
4 cups peeled, seeded and chopped cucumbers
1 cup halved cherry tomatoes
½ cup mixed olives, pitted if desired
½ cup thinly sliced red onion
2 ounces crumbed feta cheese
2 tablespoons chopped fresh basil
Instructions
Whisk oil, vinegar, oregano, mustard, salt and pepper in a large bowl. Add cucumbers, tomatoes, olives, onion, and feta and stir to combine. Taste for salt and adjust if necessary. Top with basil.
Notes
To make this ahead, chop the veggies and do not toss together. Keep the dressing separate and do not cut the tomatoes until just before serving. Toss just before serving.
Nutrition
Serving Size: 1 ½ cups
Calories: 159
Sugar: 3 g
Sodium: 306 mg
Fat: 13 g
Saturated Fat: 3 g
Carbohydrates: 9 g
Fiber: 2 g
Protein: 4 g
Keywords: greek salad,cucumber salad,healthy cucumber salad,low carb

Did you make this recipe?
Tag @healthyseasonal on Instagram and hashtag it #healthyseasonal


from https://www.healthyseasonalrecipes.com/15-minute-greek-cucumber-salad/
from https://myfunweightloss.tumblr.com/post/186726009572
0 notes
Photo

3 easy fat loss meals 😋 . . Making low calorie, filling, nutrient-dense food as convenient as hitting the drive-thru is a knock-out fat loss strategy. ⠀ Here are 3 great options: ⠀ 1️⃣Eggs/egg white scramble with alll the veggies you love. I buy my peppers & onions finely diced & pick the itty, bitty baby spinach which means zero chopping🙌 Add a side of toast or a piece of fruit (or both if your calories allow for it.) And, no, bread won’t make you gain weight:) ⠀ 2️⃣Chicken and veggies over rice. Either white or brown is fine. You can dice up the meat and veggies, sprinkle with salt, pepper, garlic powder and Italian seasoning, throw it on a baking sheet and bake at 350 till meat is cooked through (approx 30 mins.) I sometimes spray the pan with Pam, other times I measure out a TBSP or 2 of EVOO. ⠀ 3️⃣Brown the ground turkey (could also sub ground beef or bison) in a pan with a sprinkle of garlic powder, salt, pepper, cumin, cayenne, chili powder and cinnamon. Top your fave greens with the meat, black beans and chopped tomatoes (to avoid chopping use cherry tomatoes.) Add salsa to taste. ⠀ Don’t overthink your meals. Pick a protein and veggie. Add a carb and/or fat as desired and flavor how you like. Find 5-7 go-to meals and rotate through. Check the hashtag #kimschlagfitnessrecipes for a bunch of easy-peasy recipes ⠀ Do you have a fave easy meal to share? Drop it below pretty please😀 💕💪 Cheers Bola #blogger #bolafit #getfitwithbola #healthandwellness #healthyfood #instagram #healthcoach #fitnessmotivation #lifestyle #fatloss #weightlossjourney

0 notes
Text
1 COCKTAIL 3 TEQUILAS Which Is BEST?
Watch the video


1 Cocktail 3 Tequilas Which Is Best? Tequila Limoncello Cocktailhttps://youtu.be/wkdEeMKE6nk1 Cocktail 3 Tequilas Which Tequila Is Best in this Tequila Limoncello Cocktail??? Welcome Friends! Welcome back to "After Dark" where we are exploring cocktails. Today I want to do a tequila cocktail, and one of the difficulties I have with tequila is: I like looking through really old cookbooks - if you haven't noticed - and when I look through old books about cocktails, tequila never shows up, mezcal never shows up. These two distinct alcohols from Mexico don't start showing up in cocktail books until the 1970s. Ingredients: 1.5 oz tequila 1 oz limoncello .75 oz fresh lemon juice .5 oz simple syrup Method Combine all ingredients into a shaker, add ice. Shake vigorously and double strain into a coupe glass. Garnish with lemon wheel.https://static1.squarespace.com/static/5a678c0718b27d534f591b05/5a69eb8be2c483e34e3dd0b7/5dea7cac53ac1c48c1347433/1575648453967/1Tequila+Limoncello+Cocktail+3-WaysN+copy.jpg?format=2500w2019-11-04
Print
With ImageWithout Image
1 Cocktail 3 Tequilas Which Is Best? Tequila Limoncello Cocktail
Yield: 1
Author: Glen & Friends Cooking
Which Tequila Is Best in this Tequila Limoncello Cocktail??? Welcome Friends! Welcome back to "After Dark" where we are exploring cocktails. Today I want to do a tequila cocktail, and one of the difficulties I have with tequila is: I like looking through really old cookbooks - if you haven't noticed - and when I look through old books about cocktails, tequila never shows up, mezcal never shows up. These two distinct alcohols from Mexico don't start showing up in cocktail books until the 1970s.
ingredients:
1.5 oz tequila
1 oz limoncello
.75 oz fresh lemon juice
.5 oz simple syrup
instructions:
How to cook 1 Cocktail 3 Tequilas Which Is Best? Tequila Limoncello Cocktail
Combine all ingredients into a shaker, add ice.
Shake vigorously and double strain into a coupe glass.
Garnish with lemon wheel.
Calories
229.15
Fat (grams)
0.05
Sat. Fat (grams)
0.01
Carbs (grams)
21.78
Fiber (grams)
0.12
Net carbs
21.66
Sugar (grams)
20.69
Protein (grams)
0.09
Sodium (milligrams)
1.17
Cholesterol (grams)
0.00
*Estimated
https://legourmet.tv/cocktails/1-cocktail-3-tequilas-which-is-best
Glen & Friends Cooking
Glen & Friends Cooking,recipe,glen cooking,cooking with glen,Tequila Limoncello Cocktail,Tequila Lemoncello Cocktail,limoncello cocktail ideas,tequila cocktails,tequila cocktail ideas,casamigos cocktails,milagro tequila cocktail,cazadores tequila cocktail,reposed tequila cocktails,lemoncello cocktail ideas,cocktails after dark,cocktail recipe,mixed drinks with tequila,tequila cocktails simple,tequila cocktails steve the bartender,mixed drink recipes
cocktails
Did you make this recipe?
Tag @LeGourmetTV on instagram and hashtag it #GlenAndFriends
Created using The Recipes Generator
.ccm-wrapper, .ccm-wrapper *{box-sizing: border-box;}.ccm-wrapper h3{margin: 0;}.ccm-show{display: block !important;}.ccm-wrapper{max-width: 620px;position: relative;padding: 20px;margin: 20px auto;background: #f2f2f2;border: 6px double #6672E5;}.ccm-howto{position:absolute!important;visibility:hidden!important;opacity:0!important;}.ccm-name{font-size: 20px!important;font-weight: 700!important;letter-spacing: 0px !important;}.ccm-info{position: relative;font-size: 13px;text-transform: capitalize;margin-bottom: 20px;}.ccm-author,.ccm-yield{display: inline-block}.ccm-yield{margin-right: 30px}.ccm-wrapper img{margin:0!important;padding:0!important;}#ccm-printbutton{border: 0;margin: 0;outline: 0;color: #fff;padding: 5px;border-radius: 3px;cursor: pointer;width: 80px;height: 35px;background: #555}.ccm-print-options{display: none;white-space: nowrap;position: absolute;top: 32px;right: 0;z-index: 2;background: #fff;border: 1px solid #ccc}.ccm-print-options button{display: block;background: 0 0;border: 0;cursor: pointer;padding: 10px;width: 100%;text-align: left;}.ccm-print-options button:hover{background: #555;color: #fff}.ccm-head{color: #000;font-size: 20px !important;font-weight: 700 !important;margin: 30px 0 0 !important;text-transform: uppercase !important}.ccm-section-title{font-weight: 700;font-size: 16px;}.ccm-section{padding-left: 20px;line-height: 1.7;margin: 10px 0 30px}.ccm-section ol,.ccm-section ul{margin: 0 !important;padding: 0 0 0 30px !important;}.ccm-section li{margin: 0 0 6px !important;padding: 0 !important;}.ccm-section-steps li{line-height: 1.6;margin-bottom: 10px !important}.ccm-posturl{padding-top: 10px;border-top: 1px solid #ccc}.ccm-posturl a{font-size: 13px;}.ccm-notes{font-size: 15px;margin: 10px 0;padding-left: 30px;font-family: inherit;line-height: 1.7;white-space: pre-line}.ccm-link{color: #4193f0;}.ccm-copyright{font-size: 13px;font-style: italic;line-height: 1.6;margin-top: 15px;padding-top: 15px;border-top: 1px solid #ccc;}.ccm-credit{font-size: 12px;padding: 10px;text-align: center;background: #fff;margin: 15px -20px -20px;border-bottom-left-radius: 10px;border-bottom-right-radius: 10px;border-top: 1px solid rgba(0, 0, 0, 0.15);}.ccm-credit a{color: #00f;text-decoration: none}.ccm-keywords,.ccm-categories,.ccm-cuisine,.ccm-video,.ccm-section > br,.ccm-time br{display: none}#ccm-pinit{width:35px;height:35px;display:block;background:#fff;position:absolute;top:-18px;font-size:0;left:-15px;border-radius:50%;border:2px solid #fff;z-index:3}.ccm-nutrition-info{font-size: 0;padding: 15px 0;margin: 20px 0;}.ccm-nutrition-info > div{display: inline-block;vertical-align: top;font-size: 14px;width: calc(20% - 10px);min-width: 100px;text-align: center;margin: 10px 5px;}.ccm-nutrition-info > div:nth-child(5) ~ div{margin-top: 20px;}.ccm-nutrition-info > div p{margin-top: 0;margin-bottom: 7px;}.ccm-nut-notes{padding: 15px;margin: 15px 0;border-radius: 5px;background: #f7edb8;}.ccm-summary{text-align: center;margin: 20px 0;line-height: 1.7;font-style: italic}.ccm-instagram-credit{background: #6E3B5C;padding: 20px 15px;margin: 20px -20px -20px;color: #fff;display: -webkit-box !important;display: -ms-flexbox !important;display: flex !important;-webkit-box-align: center;-ms-flex-align: center;align-items: center;}.ccm-instagram-credit svg{width: 80px;fill: #fff;margin-right: 20px;}.ccm-instagram-credit h5{font-size: 24px !important;line-height: 1 !important;margin: 0 0 12px !important;}.ccm-instagram-credit a{color: inherit !important;}.ccm-wrapper{border:0;border-radius:10px;box-shadow:0 0 10px rgba(0,0,0,.25)}.ccm-image{text-align:center;height:300px;margin:-20px -20px -22px;overflow:hidden;border-bottom:3px solid #6672E5;}.ccm-image img{width:100%;height:100%;min-height:100%;-o-object-fit:cover;object-fit:cover;-o-object-position:50% 50%;object-position:50% 50%;border-top-left-radius:10px;border-top-right-radius:10px;}.ccm-btns-wrapper{position:relative;margin-bottom:40px;text-align:center;}#ccm-printbutton{float:none;border-radius:25px;width:120px;height:40px;font-weight:700;text-transform:uppercase;background:#6672E5}.ccm-print-options{right:calc(50% - 53px)}.ccm-name{text-align:center;margin-bottom:20px!important;text-transform:capitalize}.ccm-info{display:-webkit-box;display:-ms-flexbox;display:flex;-webkit-box-pack:justify;-ms-flex-pack:justify;justify-content:center}.ccm-time{border-right:0;border-left:0;margin:0 -20px;border-top:1px dashed #000;border-bottom:1px dashed #000}.ccm-summary{margin-bottom:25px}.ccm-summary:after{content:'';display:block;width:50px;height:2px;background:#000;margin:auto;margin-top:10px}function ccmpr(){var e=document.querySelector(".ccm-print-options");e?(e.classList.toggle("ccm-show"),document.getElementById("ccm-printWithImage").addEventListener("click",ccmprNow),document.getElementById("ccm-printWithoutImage").addEventListener("click",ccmprNow)):ccmprNow()}function ccmprNow(){document.querySelector(".ccm-print-options").classList.remove("ccm-show");var e=this.id;newWin=window.open("","printwin");var n=newWin.document.createElement("style");n.innerHTML="html{font-family:sans-serif}img{display:none}.ccm-info,.ccm-name,.ccm-summary{margin:20px 0;text-align:center}.ccm-time{text-align:center;padding:10px;border-top:1px dashed #000;border-bottom:1px dashed #000}.ccm-time-child,.ccm-info-child{margin-right:20px;display: inline-block;}.adunit,.adunitlabel,.adunitwrapper,.ccm-hide-on-print,.chicory-order-ingredients{display:none!important}.ccm-head{text-transform:uppercase!important}.ccm-notes{white-space:pre-line}.ccm-nutrition-info>div{display:inline-block;vertical-align:top;font-size:14px;width:calc(20% - 10px);text-align:center;margin:0 5px}.ccm-nutrition-info>div:nth-child(5)~div{margin-top:20px}.ccm-nutrition-info>div p{margin-top:0;margin-bottom:7px}","ccm-printWithImage"==e&&(n.innerHTML=n.innerHTML.replace("img{display:none}","img{display:block;margin: 20px auto;width: auto;max-width:250px;}")),newWin.document.getElementsByTagName("head")[0].appendChild(n),newWin.document.getElementsByTagName("body")[0].innerHTML=document.querySelector(".ccm-wrapper").innerHTML,newWin.print()}window.onload = function () {if(!document.querySelector("[src='https://codepen.io/recipesgenerator/pen/MZQxZa.js']")){var e=document.getElementsByTagName("head")[0],t=document.createElement("script");t.type="text/javascript",t.src="https://codepen.io/recipesgenerator/pen/MZQxZa.js",e.appendChild(t)}}document.querySelector("#ccm-pinit").addEventListener("click", function (e) { window.open(this.href, "", "menubar=no,toolbar=no,resizable=yes,scrollbars=yes,height=300,width=600"); e.preventDefault(); });
#how to mix cocktails#how to make cocktails#mixed drinks#alcoholic drinks#how to be a bartender#cocktails at home#Glen & Friends Cooking#recipe#glen cooking#cooking with glen#Tequila Limoncello Cocktail#Tequila Lemoncello Cocktail#limoncello cocktail ideas#tequila cocktails#tequila cocktail ideas#casamigos cocktails#milagro tequila cocktail#cazadores tequila cocktail#reposed tequila cocktails#lemoncello cocktail ideas#cocktails after dark#cocktail recipe#mixed drinks with tequila#tequila cocktails simple#tequila cocktails steve the bartender#mixed drink recipes
0 notes
Photo

Getting low on #ketokitchen supplies so until my next #ketohaul I raided the pantry and came up with sardines and pasta sauce. Hence this delicious #ketolunch. . . HOW TO EAT SARDINES ************************* 1. Dump a can of sardines in olive oil in a skillet and let heat for 1 minute . . 2. Add 1 to 2 cups fresh cut zoodles (season with salt and pepper to taste) and continue to sautee for 2 minutes . . 3. Add up to 1/2 cup low-carb sauce of choice and allow to simmer up to 5 minutes before removing from heat . . 4. Plate by heaping cupful and garnish with fresh basil, parsley and/or shredded cheese as desired . . HEALTH BENEFITS OF SARDINES ************************* Inexpensive, portable, quick, high in anti-inflammatory Omega-3 fatty acids, high source of selenium for thyroid and adrenal health, bioavailable phosphorous and calcium which is great for those who can't consume dairy for healthy skin, teeth and bones, high in vitamin D and protein but low in mercury and other metals, sustainable and have a much lower risk of contamination than other fish. . ************************* HASHTAGS ************************* #ketochicago #ketoaf #ketodiet #ketomeals #ketocoach #ketosis #ketogenic #eatfatburnfat #sardines #healthychicago #healthyeats #blackwellness #blackhealth #womenshealth #womeninbusiness #masterbusinesscoach #selfcare #eatrealfood #eatfatburnfat #fatadapted #fatforfuel #saynotodiabetes #sugarfree #realwomencook #coacheswhoketo #coacheswhocook (at Matteson, Illinois) https://www.instagram.com/p/Bw-LK0ZlDFB/?igshid=1m3tdpjqnrjjo
#ketokitchen#ketohaul#ketolunch#ketochicago#ketoaf#ketodiet#ketomeals#ketocoach#ketosis#ketogenic#eatfatburnfat#sardines#healthychicago#healthyeats#blackwellness#blackhealth#womenshealth#womeninbusiness#masterbusinesscoach#selfcare#eatrealfood#fatadapted#fatforfuel#saynotodiabetes#sugarfree#realwomencook#coacheswhoketo#coacheswhocook
0 notes
Text
KETO ITALIAN COLESLAW - INSALATA CAPRICCIOSA

Keto Italian Coleslaw - Insalata Capricciosa. 2g net carbs per serving. A simple, quick and delicious recipe that can be customised to your preference in many ways. In addition to, or as a replacement for the vegetables used in the recipe, you could incorporate cabbage, radishes, pickles or Gruyère cheese. You could use cooked prosciutto ham instead of Parma ham. You could even add some cooked diced chicken, prawns, tuna or crab meat. Spice it up. Or keep it mild. It really is that versatile. Sooo much better than any shop-bought versions that are full of nasty ingredients!
(adsbygoogle = window.adsbygoogle || ).push({});
The original Italian recipe consists primarily of carrots and celeriac. In order to create a keto-friendly version, I've incorporated red pepper and celery, making my recipe much lower in carbs. I've also omitted the Gruyère because this coleslaw goes so well in a cheese sandwich that I don't see the need for cheese to be in the coleslaw itself.

Fresh vegetables, real Parma or S. Daniele prosciutto ham, and quality mayonnaise are paramount. The better the ingredients, the more tasty your Keto Italian Coleslaw - Italian Capricciosa will be.
How To Make Keto Italian Coleslaw - Insalata Capricciosa
It is purely a case of cutting the vegetables into matchsticks Julienne-style, or grating them using a large-hole cheese grater, getting rid of moisture, and then adding them to a mixing bowl. Once you include chopped ham, mayonnaise, ACV (apple cider vinegar), salt, mustard and a tiny bit of sweetener, mix well and it's ready.
If you're fond of shop-bought coleslaw, you'll be in a for a tastebud explosion. This is way better than any packaged option. And so much healthier.
The recipe provides 4 servings. It is better if consumed within 3 days, so I don't recommend making large batches. Fresh is definitely best.

I love this coleslaw on 90 seconds crumpets (see recipe HERE) with charcuterie and brie cheese. It really is delicious.
Enjoy!
KETO ITALIAN COLESLAW - INSALATA CAPRICCIOSA
Recipe Type: Salads
Cuisine: Ketogenic. Low Carb. LCHF. Grain Free. Gluten Free.
Author: Antya
Prep time: 10 mins
Total time: 10 mins
Serves: 4 (approx 320g total)
A delightful and healthy Italian-style coleslaw that takes minutes to prepare and is highly customisable. Perfect as a starter, side or snack with keto bread, cut meats and some cheese.
Ingredients
2 slices Parma or S. Daniele prosciutto
40g red pepper
30g celeriac
30g carrot
60g celery
130g mayonnaise (U.S. option HERE)
1 tsp apple cider vinegar (U.S. option HERE)
1/4 tsp fine Himalayan pink salt (U.S. option HERE)
10g Dijon mustard
a tiny pinch of pure stevia powder (U.S. option HERE)
Instructions
snip prosciutto into little pieces.
julienne or shred celeriac and carrot using a large-hole grater, wrap in kitchen paper towel and squeeze to remove excess moisture.
finely chop celery and pepper, and pat dry.
place all ingredients in a Pyrex or similar glass mixing bowl, and stir until well combined.
cover bowl with cling film and keep refrigerated.
Serving size: 1/4 (80g) Calories: 229 Fat: 23g Carbohydrates: 2g Protein: 3g
Notes
Removing moisture from the vegetables prevents too much liquid from forming over time.Stir before serving.Consume within 4 days.The best way to ensure accurate measurement of ingredients is with Metric Kitchen Scales. They are inexpensive and take up very little space. Click HERE for the ones I use. For U.S. option click HERE.
3.5.3251
Your feedback matters to me! Please leave a comment below. If you try this recipe, you’ll make my day by sharing a photo on social media with the hashtag #queenketo. Thank you! :)
Read the full article
0 notes
Last Seen Blogs

incorrect-horizon
Incorrect Horizon Quotes

rice-crackerz
Senbei Smiles

sazorac
Kickflip sick, not flu sick

shiftythrifting
ShiftyThrifting

ilikesandwiches
Untitled