
Last Seen Blogs

alliemorales22
花樣年華

spillsways
terminally dispelled. ⛥

abhihasabe
World Jobs News


koroldigitalphoto-blog
María Korol DSLR Student Work
Text
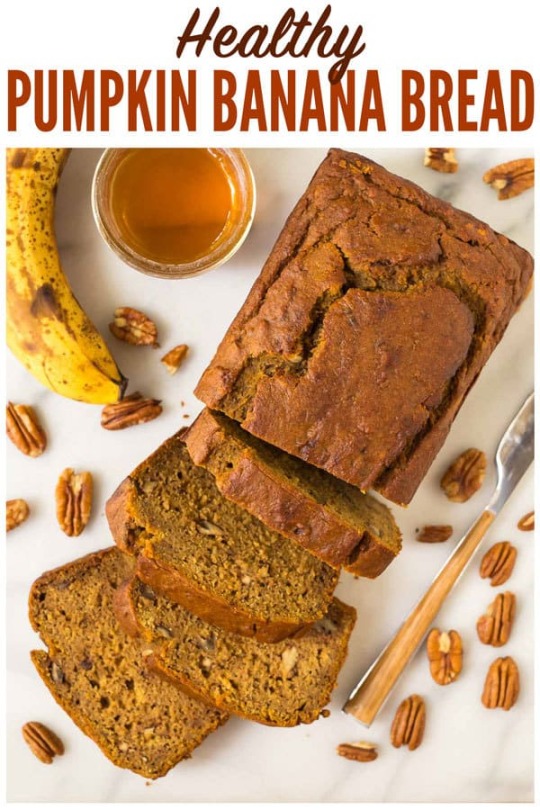
Pumpkin Banana Bread
It happened. Two weeks ago. I became the teeniest, tiniest bit excited about fall. I’m not ready to bust out the boots and don my flannel, but I’m ready to dabble in pumpkin. Pumpkin Banana Bread, specifically.
I’m normally a hold-onto-summer-kick-and-screaming kind of girl.
Thus, while I’m not ready to launch into full-on pumpkin bread baking mode with all-in autumn recipes like Healthy Pumpkin Bread, Pumpkin Chocolate Chip Bread, and Paleo Pumpkin Bread, I’m feeling a little flirty.
We’ve had some cooler mornings and earlier sunsets, and all of the back to school sales remind me that fall has nearly arrived. After avoiding its glances for the last few weeks, I finally fell for the can of pumpkin that’s been winking at me from our pantry shelf.
Had I known how delicious this Pumpkin Banana Bread would turn out to be, I would have cracked the can sooner!
If you’re ready to dabble too, this healthy Pumpkin Banana Bread is the ideal way to begin. It’s not completely committal, but it hints at the plaid shirts, boots, and pumpkin spice lattes (and pumpkin spice everything else) to come.
Healthy Pumpkin Banana Bread — The Best of Both Worlds
Considering my laundry list of healthy pumpkin bread recipes is rivaled only by my collection of healthy banana bread recipes (ahem, classic Healthy Banana Bread, Paleo Banana Bread, Cream Cheese Banana Bread…), it was only a matter of time before the two got together to create a tasty Pumpkin Banana Bread baby.
This Pumpkin Banana Bread is lightly sweet but not overly so, and the majority of the sweetness comes from the natural sugars in the banana itself.
This Pumpkin Banana Bread recipe also receives mega marks in the texture department. Both pumpkin and banana are fabulous at keeping baked goods moist and tender, so with the two joining forces, this is one of the most melt-in-your-mouth bread recipes you’ll ever bake.
As written, this healthy Pumpkin Banana Bread is 100% whole wheat but doesn’t taste it at all thanks to white whole wheat flour, which is mild and tastes like regular white all-purpose flour in this recipe.
If you’d like Pumpkin Banana Bread gluten free, you can use the same amount of a 1:1 gluten free baking blend like this one. To make the Pumpkin Banana Bread vegan is trickier. Because this bread is already so moist, I fear using flax eggs in place the regular eggs is risky. I’d suggest scratching your pumpkin itch with these Vegan Pumpkin Muffins instead.
I haven’t yet tried this recipe as Pumpkin Banana Bread muffins, but I think that would work nicely and have a suggested baking time in the recipe below.
So which are you: Team Endless Summer or Team Early Fall? Fortunately, with this Pumpkin Banana Bread, you can play both sides of the season!
Recommended Tools to Bake This Pumpkin Banana Bread
8×4 inch loaf pan (I am a diehard fan of this pan and this brand’s entire line of bakeware)
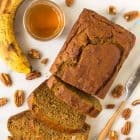
Pumpkin Banana Bread
Moist, healthy Pumpkin Banana Bread. An easy, one-bowl pumpkin that’s the perfect treat for fall (or all year round!). Whole grain and sweetened with honey.
Yield: 1 loaf
Prep Time: 25 minutes
Cook Time: 1 hour
Total Time: 2 hours 30 minutes
Ingredients:
1/2 cup pecan halves or walnut halves (optional; you can also swap other mix-ins of choice such as golden raisins, cranberries, or chocolate chips)
1 cup mashed banana, the riper the better (about 2 large bananas)
4 tablespoons unsalted butter, at room temperature
1/4 cup coconut sugar or light brown sugar
2 tablespoons nonfat plain Greek yogurt
1/3 cup honey
2 large eggs, at room temperature
1 cup pure pumpkin puree (NOT pumpkin pie filling)
1 teaspoon vanilla extract
1 1/2 teaspoons pumpkin pie spice (or 1 teaspoon ground cinnamon, 1/4 teaspoon ground ginger, 1/4 teaspoon ground nutmeg, and a pinch of ground cloves)
1 teaspoon baking soda
1/2 teaspoon salt
1/4 teaspoon baking powder
1 1/2 cups white whole wheat flour
Directions:
Preheat the oven to 350 degrees F. If using nuts for the mix-ins, spread them onto a single layer on an ungreased baking sheet. Bake until toasted and fragrant, about 8 to 12 minutes depending upon the size of the nuts. Do not walk away during the last few minutes of baking (this is when nuts love to burn). Immediately transfer to a cutting board. Let cool a few minutes, then roughly chop. Lightly coat an 8 1/2 x 4 1/2-inch loaf pan with nonstick spray.
In a small bowl, mash the bananas measure them out to ensure that you have 1 cup. In the bowl of a standing mixer fitted with the paddle attachment or a mixing bowl, beat together the butter and coconut sugar until smooth and combined. Beat in the measured banana, Greek yogurt, honey, eggs, pumpkin (feel free to reuse the measuring cup you used for the banana to measure the pumpkin), and vanilla. Sprinkle the pumpkin pie spice, baking soda, baking powder, and salt over the top. Sprinkle the flour over the top, then with a rubber spatula or wooden spoon, stir by hand, just until the flour disappears. Fold in the pecans or another mix-ins.
Scrape the batter into the prepared pan and let rest uncovered at room temperature for 15 minutes (Don’t skip this step! Resting helps the flour absorb the wet ingredients and will give you a better texture and flavor).
Bake the bread for 55 minutes to 1 hour 10 minutes, or until a toothpick inserted in the center comes out clean. Another quick check is to see if the bread reaches 190 to 200 F degrees F on an instant read thermometer. The bread may Place the pan on a wire rack and let cool completely, then wrap the bread tightly in plastic and refrigerate for at least 1 hour, or even better, overnight (I know this step sounds odd but it works and makes the bread taste incredible).
This bread recipe works well when doubled! For the pumpkin, use the full (15-ounce) can. It will be a scant 1 cup of pumpkin per loaf, but the recipe will turn out fine.
Store leftovers in the refrigerator for up to 5 days or freeze for up to 3 months. I like to cut the cooled bread into slices, then wrap and freeze them individually and pull them out as I need/want/CRAVE them.
To bake as muffins (not yet tested but based on my best judgment): Line a muffin pan with paper liners or lightly coat with baking spray. Fill the muffin cups 3/4 or so of the way to the top. Bake at 375 degrees F for 22 to 27 minutes, until a toothpick inserted in the center of a muffin comes out clean.
All images and text ©Erin Clarke/Well Plated.
Nutrition Information
Serving Size: 1 slice (of 10)
Amount Per Serving:
Calories: 230 Calories
Total Fat: 10g
Saturated Fat: 4g
Cholesterol: 50mg
Carbohydrates: 32g
Fiber: 3g
Sugar: 18g
Protein: 5g
This post contains some affiliate links, which means that I make a small commission off items you purchase at no additional cost to you.
Source: https://www.wellplated.com/pumpkin-banana-bread/

0 notes
Text
Christmas Beef: A Delicacy for Only Me
[Photographs: J. Kenji Lopez-Alt]
Growing up, I never saw my mother let a bite of barley pass her lips. She grew up poor in post–World War II Japan, when polished white rice was scarce and therefore expensive, so barley was often served in its place. It wasn't the taste so much as the texture that put her off, that reminded her of her once-miserable existence—the ratty clothes, the run-down house, the hopeless prospects for a bookish girl in a sleepy seaside town in a culture she believed devalued women. "Never again," she once said when I asked her about her aversion to barley, and she might as well have been talking about those clothes, that house, being poor, or living in Japan, feeling imprisoned by circumstances beyond her control.
Scarcity has a way of stamping its mark on your life. My mother's dislike of barley was akin to the aversion Depression-era children in this country have to waste of any kind, particularly of luxuries, like pretty paper used for wrapping presents. It doesn't have to be a scarcity borne of privation, either; my father, whose family lacked for nothing except good taste, has spent a lifetime trying to make up for the insipid food he was served as a kid. I suspect that each and every one of us can trace some quirk or predilection or preference in the present to some absence in the past. For my part, I have a periodic need to eat rare or near-raw beef, which I can easily attribute to the fact that I lived in India for 14 years.
From 1986 to 2001, beef was our family's number one luxury, served only on the rarest of occasions, at the most special of meals, which, despite the fact that we weren't especially religious, included Christmas dinner. Foie gras and caviar couldn't even come close; it was possible to buy either if we had the money or the inclination,* but beef was entirely unavailable from butchers and grocery stores in New Delhi, because cows are considered sacred by the country's Hindu majority.
Raw pork was unavailable, too, although I’m not entirely sure why, but it never really rated quite as high on my list of coveted foods. I have no doubt that part of our reverence for beef was due to the fact that while the meat was unavailable, cows were everywhere; small herds of cattle walked the city streets by day, often gumming up traffic, and bedded down in parks at night, making all of us feel a little bit like castaways dying of thirst.
* Fun fact: After the fall of the Soviet Union, in 1991, the Indian black market was flooded with good caviar and high-quality cigarettes, which my parents snapped up for very, very cheap. When I moved to America when I was 18, I'd eaten more good caviar in my life than I had porterhouse steaks.
While beef was inaccessible to us, many other expatriates could get their hands on it—those who, through some affiliation with the various diplomatic missions in the city, had gained the privilege of shopping at the missions' commissaries. This led to some moments of envy that seem odd in retrospect. I clearly remember spending days yearning for the Rice-a-Roni that I'd had at some American kid's sleepover, solely because it'd had a fair amount of hamburger meat, and turning my nose up at some pilaf my mom had made to shut me up.
I felt the daily lack of beef all the more keenly, I think, because of the way my parents sought out and devoured it whenever we went abroad. In the United States, it was rare roast beef sandwiches, the beef sliced thin and topped with salt, pepper, mayo, and red onions—as a kid, I was astonished that this delicacy was available almost anywhere in the country. In Hong Kong, it was bowls of pho, with rounds of raw beef shingled on top. In Japan, when visiting my grandparents, we'd request shabu shabu as one of our first meals, and upon our arrival we'd be presented with platters of thin slices of beautiful beef, folded and layered in such a way as to seem an offering, the marbling so complete it looked like the meat had trapped lightning.
This kind of behavior can give you a reputation. To this day, all of my relatives believe I crave beef at all times, even though I have lived in the US for close to 20 years and am able to eat it whenever I like, and do, quite often.
One of the last times I saw my Japanese grandfather, I was visiting alone. When we sat down to dinner, my grandmother proudly set down a thin ribeye steak in front of me, barely browned on its exterior, raw on the inside. "You all always wanted to eat beef when you came," she said to me, even as she acknowledged that cooking beef, particularly steaks, wasn't her forte. I ate it happily—though it was a bit more on this side of moo than what the French might call bleu—but did forgo some of the gristlier bits, which my grandfather, a product of his times as much as my mother was of hers, didn't hesitate to pop in his mouth and gum until they'd given up their flavor.
A reputation is rarely unearned. Just the other day, my brother and I were reminiscing fondly—rapturously, if I'm being perfectly honest—about a tenderloin my uncle cooked one Christmas. Tenderloin has always been my father's family's traditional Christmas roast, and my uncle, who has a way with the grill, managed to achieve an appealing and totally complete char on the meat's exterior, even though the interior temperature can't have topped 110°F. I don't know that the rest of my family appreciated that meal, but my brother and I, the sole representatives of the family branch who had beef issues, couldn't stop going back for more helpings of that filet, the near-black crust ringing little rounds of meat the color of a bruise.
That's another of the habits scarcity brings into being: The moment that you're presented with whatever it is that you've been denied, your instinct is to gorge yourself beyond reason, to take in as much as you can, while you can. One summer my mother and I got stuck in an airport hotel in Bangkok, and while I can't remember why we were there, I do remember we ordered a Thai beef salad from room service, even though we weren't particularly hungry. I must have been quite young, since I was fiddling with a Game Boy when the salad arrived. When I finally looked up, my mother had already taken a bite. Her face was lit with what I can only describe as joyful determination, and she said, "It's good. Let's order another."
And we did, enjoying every last bite of what I think was sirloin, cooked rare over charcoal, dressed with cilantro, lime, fish sauce, red onion, possibly mint, and an abundance of fresh red Thai chilies. When we got the call that told us our flight had been delayed another couple hours, we ordered a third.
Since we couldn't buy beef in India, our only recourse was to bring it in ourselves, and so we did, every time we returned to the country. Right before we got on the plane, my parents would buy whole, frozen, untrimmed, vacuum-sealed muscles—tenderloins, flanks, strip loins—and we'd pack them in a suitcase that we'd brought along specifically for the purpose, which would then be checked in under the name of either me or my brother, a half-baked attempt to allay suspicion or mitigate whatever punishment we'd deserve from the customs authorities. As we got off the plane, we'd all be afflicted by the same anxieties over the beef in the checked bag: Had it defrosted too much? (Yes, invariably.) Would the bag have been flagged? (Yes, invariably.) Would we be able to get it out of the airport without paying for it, or having to throw it out?
At the baggage carousel, we'd pick up the suitcase, which, more often than not, would exude pink liquid in steady drips, and would have chalk scribbled all over it by the baggage handlers because of said mysterious pink liquid, and we'd place it on the bottom of one of those luggage carts, buried underneath all our other bags. As we walked past the customs officers, down the lane for those with nothing to declare, my brother and I were tasked with keeping pace with the meat-case on either side of the cart, to obscure any telltale chalk marks that might alert the authorities.
One of the benefits of having to buy beef in this way was that, from a very young age, I was able to watch as my father cleaned up the untrimmed muscles, a task he would've been entirely unqualified for were it not for the fact that we owned the first volume of Jacques Pépin's The Art of Cooking. Aside from being one of the most beautiful cookbooks ever published, it shows in clear step-by-step photographs every bit of butchery a cook could ever need, including how to skin a lamb. I'd watch, rapt, as my father used a not-very-sharp knife to cut away the sinew and fat, gradually revealing, like a little meat David, the blue-red beef buried underneath.
My parents weren't the fanciest cooks, so our Christmas meal was pretty straightforward, even if it felt very luxurious. It was the one meal for which we'd use an actual tablecloth, so white it was begging to be stained, and we'd set out the silver cutlery that was otherwise used only at Thanksgiving. We were all terrified that the tenderloin, so dearly purchased, would be cooked past rare, so we had an unspoken agreement that underdone was just as good as properly cooked. The beef was accompanied by nothing more than some sautéed mushrooms, mashed potatoes, and a Caesar-ish salad.
For a number of reasons, my wife and I typically spend Christmas Eve alone together, and we have adopted my family's Christmas dinner tradition as our own, with a few small changes. Of course, I don't have to cart frozen beef across national borders, and I don't have to do any trimming of whole muscles, and the two of us require only two generously sized filet mignons.
But everything else is the same: the mushrooms, the potatoes, the approximation of a Caesar (no egg, no croutons, but a bracing amount of anchovy in the dressing). While I cook my wife's filet to a perfect medium-rare using the reverse sear, I tend to cook mine on the stovetop, butter-basting over a medium flame. Not just because I want to cook my steak to a different temperature, but because I like the exterior to be a bit more well-done, and the interior to be a bit rarer, so that at its very center it's a little raw. It feels appropriate for a holiday spent, for reasons both practical and irrevocable, away from my family. Which is to say: It's a little blue, but not very.
This post may contain links to Amazon or other partners; your purchases via these links can benefit Serious Eats. Read more about our affiliate linking policy.
Source: https://www.seriouseats.com/2018/12/christmas-beef-a-delicacy-for-only-me.html
0 notes
Text
american flag cake
By the time you read this, I'll hopefully have finished the manuscript for Weeknight Baking. Don't get too excited though — I still have another month to finish up my photos (of which there are a LOT to do) before I can really relax. But for now, I'm spending the weekend with a bottle of rose, catching up on all the exercise I missed this week (I hurt my left arm and couldn't fully extend it for FIVE FREAKING DAYS), and returning all the ill-fitting clothes I panic-bought for my birthday. I know that those plans probably don't sound great to you, but they're everything I want right now.
Although Erlend and I don't have any formal 4th of July plans, I did make this awesome American flag cake to celebrate the occasion. Be sure to check it out on Crate & Barrel's blog, where I include a step-by-step tutorial (complete with GIFs!) on how to build the cake and cover it in the dreamiest chocolate fudge frosting (which will actually be in my book, don't tell my editor, shhhh).
Happy (almost) 4th of July, friends!!!
Source: https://www.hummingbirdhigh.com/2018/06/american-flag-cake.html

0 notes
Text
Easy Bruschetta Recipe for Pan-Seared Chicken
<![CDATA[ .tasty-recipes-quick-links text-align:center; .tasty-recipes-quick-links a padding: 0.5rem; ]]>
Fresh tomatoes are traditional when tomatoes are ripe and in season, but you CAN make a delicious, easy bruschetta recipe with canned tomatoes. It’s the perfect topping for pan-seared chicken cutlets, with fresh basil, garlic, and balsamic vinegar (250 calories / 3 WW points)

Tomato bruschetta is simple enough to make, and yet it’s completely irresistible. Diced tomatoes are tossed with fresh basil, a little minced garlic, a few glugs of good-quality, fruity olive oil, a pinch of salt, and pepper. And although fresh tomatoes are traditional, they’re not always in season. Believe it or not, you can make a fabulous, EASY bruschetta recipe with canned tomatoes.
The key, as with all simple recipes, is using the highest quality, best-tasting ingredients you can, especially when it comes to canned tomatoes. I always, always, always recommend Tuttorosso Tomatoes. I also think adding a splash of sweet, syrupy balsamic vinegar to your bruschetta topping gives the mix more dimension.

You can spoon it on top of toasted bread of course, but I like to use my easy bruschetta recipe as a topping for quick, pan-seared chicken cutlets seasoned very simply with salt, pepper, and garlic powder. It would add fabulous flavor to fish, pork, beef, or even combined with cannellini beans for an easy vegetarian side. Enjoy!
Print
<![CDATA[ .tasty-recipes-image float: right; .tasty-recipes-print-button background-color: #666677; display: inline-block; padding-left: 1em; padding-right: 1em; padding-top: 0.5em; padding-bottom: 0.5em; text-decoration: none; a.tasty-recipes-print-button color: #fff; a.tasty-recipes-print-button:hover color: #fff; .tasty-recipes-rating.tasty-recipes-clip-10 -webkit-clip-path: polygon(0 0, 10% 0%, 10% 100%, 0% 100%); clip-path: polygon(0 0, 10% 0%, 10% 100%, 0% 100%); .tasty-recipes-rating.tasty-recipes-clip-20 -webkit-clip-path: polygon(0 0, 20% 0%, 20% 100%, 0% 100%); clip-path: polygon(0 0, 20% 0%, 20% 100%, 0% 100%); .tasty-recipes-rating.tasty-recipes-clip-30 -webkit-clip-path: polygon(0 0, 30% 0%, 30% 100%, 0% 100%); clip-path: polygon(0 0, 30% 0%, 30% 100%, 0% 100%); .tasty-recipes-rating.tasty-recipes-clip-40 -webkit-clip-path: polygon(0 0, 40% 0%, 40% 100%, 0% 100%); clip-path: polygon(0 0, 40% 0%, 40% 100%, 0% 100%); .tasty-recipes-rating.tasty-recipes-clip-50 -webkit-clip-path: polygon(0 0, 50% 0%, 50% 100%, 0% 100%); clip-path: polygon(0 0, 50% 0%, 50% 100%, 0% 100%); .tasty-recipes-rating.tasty-recipes-clip-60 -webkit-clip-path: polygon(0 0, 60% 0%, 60% 100%, 0% 100%); clip-path: polygon(0 0, 60% 0%, 60% 100%, 0% 100%); .tasty-recipes-rating.tasty-recipes-clip-70 -webkit-clip-path: polygon(0 0, 70% 0%, 70% 100%, 0% 100%); clip-path: polygon(0 0, 70% 0%, 70% 100%, 0% 100%); .tasty-recipes-rating.tasty-recipes-clip-80 -webkit-clip-path: polygon(0 0, 80% 0%, 80% 100%, 0% 100%); clip-path: polygon(0 0, 80% 0%, 80% 100%, 0% 100%); .tasty-recipes-rating.tasty-recipes-clip-90 -webkit-clip-path: polygon(0 0, 90% 0%, 90% 100%, 0% 100%); clip-path: polygon(0 0, 90% 0%, 90% 100%, 0% 100%); .tasty-recipes-nutrition ul list-style-type: none; margin: 0; padding: 0; .tasty-recipes-nutrition ul:after display: block; content: ' '; clear: both; .tasty-recipes-nutrition li float: left; margin-right: 1em; .tasty-recipes-plug text-align: center; margin-bottom: 1em; display: -ms-flexbox; display: flex; -ms-flex-align: center; align-items: center; -ms-flex-pack: center; justify-content: center; .tasty-recipes-plug a text-decoration: none; box-shadow: none; .tasty-recipes-plug a img width: 150px; height: auto; margin: 5px 0 0 8px; display: inline-block; @media print .tasty-recipes-no-print, .tasty-recipes-no-print * display: none !important; ]]>
Fresh tomatoes are traditional when tomatoes are ripe and in season, but you CAN make a delicious, easy bruschetta recipe with canned tomatoes. It’s the perfect topping for this pan-seared chicken cutlets, with fresh basil, balsamic vinegar, and garlic.
Author: Andie Mitchell
Prep Time: 20 mins
Cook Time: 20 mins
Total Time: 40 minutes
Yield: 4 servings
Category: Poultry
Cuisine: Italian
Ingredients
Bruschetta Topping:
1 14.5-ounce can Tuttorosso Petite Diced Tomatoes, drained
½ cup roughly chopped fresh basil
1 garlic clove, minced
2 tablespoons extra virgin olive oil
1 teaspoon balsamic vinegar
1/4 teaspoon kosher salt
1/8 teaspoon ground black pepper
Optional additions: fresh mozzarella or parmesan cheese
Simple Pan-Seared Chicken Cutlets:
1 pound boneless skinless chicken breast cutlets
2 teaspoons olive oil
½ teaspoon salt
¼ teaspoon freshly ground black pepper
½ teaspoon garlic powder
Instructions
In a large bowl, combine the canned tomatoes, basil, garlic, olive oil, vinegar, salt, and pepper. Stir and let sit for 10 minutes before starting the chicken to allow the flavors to marry.
Season the chicken cutlets on both sides with salt, pepper, and garlic powder.
In a large nonstick skillet, heat 1 teaspoon of the olive oil over medium-high heat. Add half of the chicken cutlets and cook until browned on both sides and cooked through, about 8 minutes. Transfer the cooked cutlets to a plate. Add the remaining 1 teaspoon of olive oil to the skillet and cook the remaining cutlets.
To serve, arrange your chicken cutlets on a large platter and spoon the bruschetta topping over them.
Cover and refrigerate any leftover bruschetta topping.
Notes
1 serving (1/4 of entire recipe): 3 WW Freestyle points
Bruschetta Topping (1/4 of bruschetta recipe):
— 2 WW Freestyle points
— 95 calories, 7g fat, 1g saturated fat, 0mg cholesterol, 218mg sodium, 7g carbs, 2g fiber, 4g sugar, 1g protein
Nutrition
Serving Size: 1/4 of the recipe
Calories: 250
Sugar: 4g
Sodium: 269mg
Fat: 12g
Saturated Fat: 2g
Trans Fat: 0g
Carbohydrates: 7g
Fiber: 2g
Protein: 27g
Cholesterol: 82mg
Keywords: bruschetta, bruschetta topping, easy chicken recipe, canned tomatoes
Did you make this recipe?
Tag @andiemmitchell on Instagram and hashtag it #andiemitchell
Source: http://www.andiemitchell.com/easy-bruschetta-recipe-for-pan-seared-chicken/

0 notes
Text
Baked Sweet Potatoes Stuffed with Roasted Broccoli and Green Tahini Sauce (Paleo, Vegan)
Transform simple baked sweet potatoes by stuffing them with roasted broccoli, kale and a drizzle of green tahini sauce.
Sweet potatoes have long been a staple in my kitchen: from soups , to sweet potato gratin , halloumi topped toasts, or even as a creamy drink I’m always finding new ways to put this versatile tuber to good use. But if there’s one way to prepare them that I come back to again and again it’s roasting and stuffing them.
While roasted sweet potatoes are delicious in their own right, stuffed sweet potatoes are even more spectacular. Simple and hearty, they’re an all-in-one meal that’s easy to assemble, making them the perfect weeknight dinner solution whether you’re eating solo or feeding a crowd.
I’ve made a number of versions over the years (including one that’s been a reader favorite since the beginning of the blog) but this is the way I’ve been making them most lately. Piled high with roasted green vegetables and a creamy green tahini sauce, these sweet potatoes make for a satisfying meatless main.
So here’s what you do: Grab a couple sweet potatoes, poke them all over then set them in a hot oven on a middle oven rack with a sheet pan or underneath. Roasting the sweet potatoes directly on the oven rack ensures that they cook evenly and allows the skins to crisp while the interiors become soft and fluffy. While they cook, blend up a quick green sauce made with fresh cilantro, parsley, tahini, lemon juice and olive oil.
About 15 minutes before the sweet potatoes are done, pop in a tray of broccoli florets and torn kale that’s been tossed with about half the green sauce. When the potatoes and vegetables are done, simply split the sweet potatoes down the middle fill them with the roasted vegetables and top them with extra green sauce and dinner is served! Roasting the kale and broccoli with the tahini sauce really brings the flavor up a notch and makes prep super easy since everything comes out of the oven at the same time. Nutritious and filling, it’s my go-to dinner this time of year.
Baked Sweet Potatoes Stuffed with Roasted Broccoli and Green Tahini Sauce (Paleo, Vegan)
Sylvie Shirazi
20 minPrep Time
1 hrCook Time
1 hr, 20 Total Time
Ingredients
2 small sweet potatoes, scrubbed and dried
¼ cup flat leaf parsley, stems removed
¼ cup cilantro, stems removed
2 Tablespoons/ 30g tahini
1 Tablespoon/15g fresh lemon juice
1 small garlic clove
¼ teaspoon fine seas salt
¼ cup extra virgin olive oil
½ bunch of broccoli, cut into small florets
½ a bunch of kale, ribs removed, torn into bite sized pieces
Instructions
Pre-heat oven to 425° F. Pierce sweet potatoes all over with the tines of a fork. Place the sweet potatoes directly on oven rack with a baking sheet on rack below. Roast until tender, about 45 minutes to an hour depending on size.
In the meantime make the green tahini sauce. Combine parsley, cilantro, tahini, lemon juice, garlic, salt and olive oil in a small food processor; pulse until smooth.
In the last 15 minutes of cooking the sweet potatoes, lower oven to 400° F and toss the broccoli florets and kale with half the green tahini sauce on a baking sheet. Spread out evenly and roast until the kale is crispy and the broccoli florets are crisp tender (about 15 minutes).
Split sweet potatoes open; fluff insides with a fork. Top with broccoli and kale. Thin remaining green tahini sauce with a teaspoon or two of water to create a pourable sauce. Serve stuffed sweet potatoes drizzled with tahini sauce. Store any extra sauce in an airtight container in the fridge.
7.8.1.2
352
https://gourmandeinthekitchen.com/baked-sweet-potatoes-stuffed-with-roasted-broccoli-and-green-tahini-sauce/
gourmandeinthekitchen.com
Source: https://gourmandeinthekitchen.com/baked-sweet-potatoes-stuffed-with-roasted-broccoli-and-green-tahini-sauce/
0 notes
Text
Healthful Double Chocolate Cookies
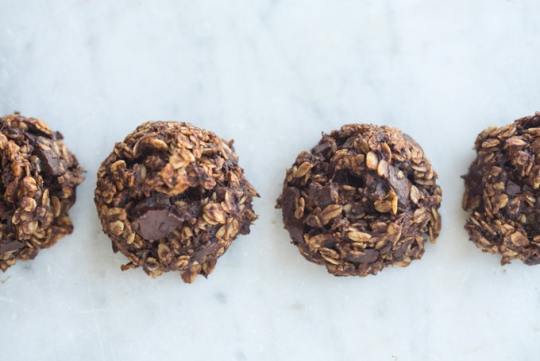
A lot of people have baked these cookies over the past decade. People love them because they're free of any added refined sugar, egg-free, no butter, and gluten-free. They're studded with generously with chocolate, and they're fantastic. The number one question related to them is how to make them nut-free - so kids can take them to school. I took a trip to Tucson last week (I'll post the video soon :), and took the opportunity to remix the recipe. The originals are favorite travel snacks, and I was confident that experimenting with a chocolate version wouldn't be a bad idea. The new version is double chocolate (chips and cacao), and made with crushed sunflower seeds, in place of almond meal. Enjoy! -h
SUBSCRIBE TO VIDEOS


Healthful Double Chocolate Cookies
PRINT RECIPE
0 from 0 votes
You can use unsweetened carob, or grain sweetened chocolate chips, or do what I did and chop a bar of 70% dark chocolate. You can make your own crushed sunflower seeds in a mortar and pestle or by in a food processor until it is the texture of sand - don't go too far or you'll end up with sunflower seed butter. Ground pepitas will also work in this recipe. And lastly, the coconut oil works beautifully here, just be sure to warm it a bit - enough that it is no longer solid, which makes it easier to incorporate into the bananas. If you have gluten allergies, seek out GF oats. You can watch a video of this recipe here.
Ingredients
2-3 large, ripe bananas, well mashed (about 1 1/2 cups)
1 teaspoon vanilla extract
1/4 cup coconut oil, barely warm - so it isn't solid
2 cups rolled oats
1/3 cup ground sunflower seeds
1/3 cup cacao powder
1/3 cup coconut, finely shredded & unsweetened
1/2 teaspoon fine grain sea salt
1 teaspoon baking powder
6 ounces chocolate chips or dark chocolate bar chopped
Instructions
Preheat oven to 350 degrees, racks in the top third.
In a large bowl combine the bananas, vanilla extract, and coconut oil. Set aside. In another bowl whisk together the oats, sunflower seeds, cacao powder, shredded coconut, salt, and baking powder. Add the dry ingredients to the wet ingredients and stir until combined. Fold in the chocolate chunks/chips.The dough is a bit looser than a standard cookie dough, don't worry about it. Drop dollops of the dough, each about 1 - 2 tablespoons in size, an inch apart, onto a parchment (or Silpat) lined baking sheet. Bake for 13 - 15 minutes. Until golden on the bottoms.
Notes
Makes about 2 dozen cookies.
Serves
24
Prep Time
5 mins
Cook Time
15 mins
Total Time
20 mins
PRINT RECIPE
nutrition info nutrition info
January 11, 2019 permalink icon
Per Serving: Calories 114
Total Fat 6g
Saturated Fat 4g
Cholesterol 0mg
Carbohydrates 12g
Sodium 57mg
Fiber 1g
Sugars 3g
Protein 2g
instagram icon
If you make this recipe, I'd love to see it - tag it #101cookbooks on Instagram!
Share this...
Pinterest
0Facebook
72
Google+
0email

WEEKNIGHT EXPRESS features 10 Vegetarian, Plant-centric Recipes for Feel-Good Food — Fast!
Subscribe to get 32-pages of recipes to view on your tablet, e-book reader or phone.


Follow Me:
Instagram
Youtube
Facebook
Pinterest
Related Recipes

Nikki’s Healthy Cookie Recipe
A remarkable healthy cookie recipe. And SO popular! Banana-batter, shredded coconut, dark chocolate chunks, and oats. The recipe is butter-less, flour-less, egg-less, and potentially sugar-less cookies make great after school or after work treats. Healthy cookies!
Chocolate Puddle Cookies
I came across a cookie when I visited Portland, it was a crackle-edged puddle of chocolate with a texture that made me think of the collision between a soft meringue and a fudgy brownie.
Inspiring Hand-painted Cookies
Hand-painted cookies are incredibly special, and these are some of the coolest.
Itsy Bitsy Chocolate Chip Cookies
The perfect bite-sized chocolate chip cookie. Tiny, thin, golden, crisp, a bit nutty with plenty of shaved chocolate.
More Recipes
Whole Grain
WFPB
Vegetarian
Vegan
Soups
Side Dishes
Sandwiches
Salads
Pasta
Quick
Main Course
Low Carb
Instant Pot
Holiday
High Protein
Gluten Free
Drinks
Dinner Ideas
Desserts
Cookies
Chocolate
Breakfast
Baking
Appetizers
Follow Me:
Instagram
Youtube
Facebook
Pinterest
Popular Ingredients
avocado
egg
herb
kale
lemon
lentil
quinoa
pasta
tomato
turmeric
yogurt
zucchini
arugula
asparagus
basil
broccoli
buttermilk
cauliflower
chickpea
chocolate
curry
tempeh
tofu
ALL
© 101 Cookbooks 2019
Use of this site constitutes acceptance of its User Agreement and Privacy Policy.

Source: https://www.101cookbooks.com/healthful-double-chocolate-cookies/
0 notes
Text
Determining the friction factor in baking: calling all bread geeks!
In our earlier blog post on Desired Dough Temperature, we introduced a formula that professional bread bakers use to achieve consistently great results.
We learned that aiming for a desired dough temperature (DDT) in the 75-78°F range will lead to the best flavor and rise in wheat-based yeast breads.
The DDT formula takes into account the principal factors that affect dough temperature — room, flour, preferment (if any), and the friction factor — in order to calculate the one factor the baker can easily adjust: water temperature.
Don’t be afraid of a little math
The DDT formula is easy — all it takes is plugging in a few temperature readings, and doing a little multiplication and subtraction.
Even if you avoid math like the plague, I encourage you to give it a try. You’ll be amazed at how much more predictable and consistent your bread baking becomes!
However, there remains one piece of the DDT formula that we didn’t tackle in our previous blog post. What about that pesky friction factor?
While it’s easy enough to check your thermostat or stick a thermometer into your ingredients, determining the friction factor isn’t quite so straightforward.
What is the friction factor?
The friction factor (FF) in baking represents the amount of heat transferred to bread dough during mixing and kneading.
Friction can raise the temperature of your dough significantly, so it needs to be taken into account when making dough-temperature calculations.
The tricky part is that the friction factor can change considerably from one mix to the next. This is because so many variables go into mixing and kneading bread dough. Factors like the type of mixer, duration and speed of mixing, and the quantity of dough in the bowl all impact the amount of heat generated.
This can throw unwanted uncertainty into the whole DDT formula. After all, we need a fairly accurate predetermined friction factor in order to calculate the correct water temperature.
Unfortunately, I can’t give you a magical friction factor that will be accurate each and every time you make bread. I can, however, offer some tips on using estimated figures, and also show you how to determine the friction factor for yourself.
Choose your own adventure: Is it worth calculating the friction factor?
This is where I recommend you stop and consider how much of a bread geek you are.
Many bakers will be perfectly happy to stick with the friction factor figures I offered in my earlier blog post, and delve no further.
Here are those figures:
•Mixing and kneading in a stand mixer (7-quart KitchenAid mixer using the dough hook on “stir” for 3 minutes, then speed 2 for 4 minutes): FF = 22-24°F.
•Hand kneading (8 minutes total mixing and kneading): FF = 6-8°F.
And here are a few comparison figures:
In his book Bread, Jeffrey Hamelman suggests a friction factor of 24-28°F for most mixers (mixing for 3 minutes on speed 1, and 4 minutes on speed 2).
For hand kneading many bakers go with a friction factor in the 0-4°F range. I do have warm hands and tend to knead quite vigorously, which may explain my higher hand kneading figures.
Given the inherent variability of the friction factor, it makes perfect sense to work with an educated guess. In most cases this will get you close enough to your desired dough temperature, with no further ciphering required.
What if you use another type of mixer or a bread machine?
While these figures will work just fine when using a similar kneading process, they won’t be reliable if you change the duration or speed of the mix, or use a different type of machine — like a bread machine or food processor.
This is all the more reason to continue reading so that you can learn to determine the friction factor for yourself.
That being said, bread machines aren’t really set up for use with the DDT formula. This is because they not only create friction, but also intentionally add warmth to the dough production process. Unless you’re willing to eliminate the preheat cycle and use your bread machine only for mixing and kneading your dough, it doesn’t make much sense to worry about the friction factor when using a bread machine.
Options for determining the friction factor in baking: for bread geeks only
Consider yourself a bread geek? Learn how determining the friction factor and using the DDT formula can transform your bread baking. Click To Tweet
If you’re a bread geek like me, you’re probably curious about how to go about determining the friction factor for yourself. Maybe you just want to know how it all works, or want to be as precise as possible when it comes to your bread-baking routine.
If this sounds interesting to you, read on, fellow bread geeks!
You basically have two options for determining the friction factor.
Option 1: Tweaking
The first option is to adopt an estimated friction factor, and then “tweak” it for your particular mixing and kneading method.
Choose a friction factor and then select your desired dough temperature.
Use the DDT formula as usual to calculate the water temperature.
Mix and knead the dough, and then check the dough temperature.
Calculate the difference between your desired dough temperature and your actual dough temperature.
Add or subtract this difference from the estimated FF you began with, in order to tweak the FF for the next time you make bread.
Option 2: Using the DDT formula to calculate the friction factor
A more precise option for determining the friction factor involves using the DDT formula with a chosen water temperature. In this case, the friction factor becomes the unknown variable.
Select the water temperature you’d like to use. Record this temperature, along with the temperature of the room, flour, and preferment (if your recipe calls for one).
Mix and knead the dough, noting the duration and speed of your mix method.
Take the temperature of the dough after mixing and kneading.
Multiply the final dough temperature by the number of pertinent factors (three if there’s no preferment, four if the recipe calls for a preferment), to yield the total temperature factor (TTF).
Subtract the actual temperatures of the room, water, flour, and preferment (if any) in order to yield the friction factor.
At this point, even the most diehard bread geeks among you may be wondering how on earth to incorporate such calculations into your baking routine.
Let me show you how I use the DDT formula and the friction factor when I make baguettes.
Tweaking the friction factor
It’s a pleasant 70°F in my kitchen and I’m on a mission to make our Classic Baguettes recipe. I mixed the poolish the night before, and it’s now ripe and ready to go.
I decide to adopt a friction factor of 24°F, and use the DDT formula as usual. Both my poolish temperature and my flour temperature are 72°F.
I’m aiming for 77°F as my desired dough temperature.
After mixing and kneading with 70°F water, my actual dough temperature turns out to be 75°F, instead of the 77°F I was aiming for.
This indicates that my chosen FF of 24°F was a bit high, since the increase in temperature is less than expected. To tweak the friction factor, I need to reduce it by the 2-degree difference.
Friction factor = 24° – 2° = 22°F
But what if the dough temperature was 78°F instead of my DDT of 77°F? That’s a sign that the mixer generated more heat than expected. In this case, I’d need to increase my friction factor.
Friction Factor = 24°+ 1° = 25°F
Calculating the friction factor using the DDT formula
A few weeks have passed and I’m ready to make baguettes again. This time, I want to calculate the friction factor from scratch.
Summer has arrived in earnest, and my kitchen is a warm 73°F.
First, I have to decide on my water temperature. I use a thermometer to determine my tap water is 67°F, which seems like a reasonable water temperature — especially on a warm summer day.
Next, a quick check reveals that my poolish temperature is 76°F, and the flour is 73°F.
After mixing and kneading, I check my dough temperature: it’s 78°F.
Ta-da! I now have my very own friction factor to use in future baking adventures. Remember, this number will apply best to recipes that are mixed and kneaded in a similar fashion.
Consider a bread journal
In preparation for this blog post, I consulted my old friend Jaydl McCaffrey. She’s one of the talented bread bakers in our King Arthur Flour bakery.
I asked her how she incorporates the DDT formula into her early-morning mixing routine at the bakery.
Jaydl says she does use the DDT formula and a predetermined friction factor (20-25°F) when she mixes a new dough for the first time. However, for her day-to-day mixing she relies on a mixing log.
“I much prefer to keep a log of all my data,” she says. “I find this is far more accurate. Some doughs have a large preferment; some a large soaker. Some mix for a short time; some for a longer time on high speed. Using the log and comparing my current day’s data to previous batches helps me narrow in on my choice of water temperature.”
What a great idea for home bakers and professionals alike! Logging all the pertinent data each time you make bread will go a long way toward building consistency in your baking.
Here I’ve logged my results when hand kneading my baguette dough.
Not only will your data provide insight into future baking choices; recording and referring back to previous baking experiences will help develop your knowledge and intuitive baking sense.
Tips for determining the friction factor:
If you’re math averse, it’s fine to use the friction factors I’ve determined for you: 22-24°F for mixing in your stand mixer, and 6-8°F for hand kneading. If your hand kneading method consists mostly of gentle folds or you have cool hands, go with 0-4°F.
You can “tweak” an estimated friction factor for accuracy by subtracting or adding the difference between your desired dough temperature and the actual dough temperature you achieve after mixing.
If you want to be more precise, use the DDT formula to determine the friction factor. In this case, the water temperature is known, and the friction factor becomes the missing variable. Take the temperature of the dough after kneading and use this to generate your total temperature factor (TTF). Subtract the temperature of the room, flour, water, and preferment (if any) to find your friction factor.
Consider adding a bread journal to your baking toolbox to record your temperature data, DDT calculations, and results.
Hey, bread geeks! I’d love to hear the friction factors you come up with. Consider the comments section one big baking journal; the more data we gather, the more we’ll learn about the mercurial friction factor and how it affects our bread baking.
For some great background on why the friction factor can help make or break your bread, read our blog post on desired dough temperature.
Source: https://blog.kingarthurflour.com/2018/08/27/determining-the-friction-factor-in-baking/
0 notes
Text
Cusibox 68oz Professional Blender Review & Giveaway
posted by Jaden
This is a Cusibox Blender Review, including both PROs and CONs. – jaden
The Cusibox professional blender features a 1,450 watt motor and a 68-ounce capacity container. It is sold by Tobox, a retailer who has direct relationships with kitchen supply factories, to bring you quality products without the middlemen mark-up.
This blender sells for just over $100 on Tobox.
Just for size comparison, here is the Cusibox next to my Vitamix (1500-watt) blender. The base is similar in size (the Vitamix is heavier).
Both units have similar metal drive systems that connect the base to the blade.
The Cuisibox blade is affixed in the blender – which is a good thing – I find that blenders with removable blades do not last and leak often. The blade is sharp, with 2 of the blades serrated for better cutting.
The lid fits tightly on the container. I like that it is thick and fits snug, to prevent spilling and leaking while blending.
A handful of frozen blueberries, peaches and a little water.
It’s a powerful blender with 1450 watts.
After 30 seconds, a perfect smoothie.
Cleanup is simple.
Add water and a drop of liquid dish soap. Turn on for 15 seconds.
Completely clean!
It’s a good blender for smoothies, or blending anything soft. I had some trouble with making nut butters and got uneven grind of coffee beans. The BPA-free container is dishwasher safe. So, if you’re just blending fruits and veg for your morning smoothies, it’s a good blender. I do like the all-metal drive and stainless steel blade.
Tobox – get kitchen products up to 40% cheaper
What I do like Tobox for is the little kitchen stuff. They have a section on their site for products under $3. Take a look! They also have a cute selection of retro designed toasters that are super cute.
Cusibox Blender Giveaway
** Please add [email protected] to your contacts to help prevent email notifications from going into spam folders.
Never miss another Steamy Kitchen Giveaway!
Subscribe to our Giveaway Notifications to keep up to date on all of our giveaways! We will even throw in a special gift when you confirm your subscription!
List of Past Winners.
DISCLAIMER & OFFICIAL RULES: The giveaway product is provided by the sponsor of the giveaway and will be shipped from the sponsor directly. No purchase necessary to enter or win. Giveaway is open to people who are 18 years of age at time of entry and open to people worldwide. Steamy Kitchen and its sponsors only ship physical prizes to United States addresses. However, Steamy Kitchen reserves the right to provide an Amazon.com or Amazon.ca gift card for the value of the prize (at time of publishing) in lieu of shipping physical product due to shipping costs and logistics, especially for our international winners. Steamy Kitchen assumes no responsibility for late or misdirected entries due to SPAM, technological, or e-mail filtering issues or for prizes lost in transit. Winner will be notified by email, and must respond within 5 business days, otherwise winner will forfeit the prize and another winner may be drawn. For this giveaway, entrants can enter the designated number of times per e-mail address per day. The use of any system, robot, agent, or software to automatically submit entries in connection with this Giveaway is prohibited. Winners of giveaways are published on Steamy Kitchen, and winner's name and city/state/country are announced in Steamy Kitchen email newsletters. See rest of the Official Giveaway Rules.
Comments Off on Cusibox 68oz Professional Blender Review & Giveaway
Source: https://steamykitchen.com/47067-cusibox-blender-review.html
0 notes
Text
Sweetness | Chocolate sugar cookies
I will be the first to say that I'm a terrible food blogger. Maybe it's because I started this site before the phrase was a thing—way back then, it wasn't a profession, but rather a hobby that few understood.
Then writing here became more than a hobby, it became not a journal but a way to talk from this corner of the world to points all over. Posts, to me, were like letters.
But right now, with people murdered as they worshipped in Québec, the litany of egregious acts and lies from the current administration in the United States, and the continuing refugee crisis, I don't have a lot of words. All I have is that Sarah wrote a book I've been meaning to write about for months, and the incomprehensible state of things doesn't the diminish recognition she deserves.
The book is full of sweetness and comfort, and it is a lovely thing. xo
TO HELP: The American Civil Liberties Union | Doctor's Without Borders | The International Rescue Committee
TO READ: Throwing Parties During the Apocalypse, by Tim at Lottie + Doof.
SARAH KIEFFER'S CHOCOLATE SUGAR COOKIES
"I often find myself craving a piece of chocolate in the afternoons, s it goes rather with the cup of hot coffee that is also a necessity in my daily life. Most days a little sure of bittersweet will do, but other times something more extravagant is essential. I found these chocolate sugar cookies to do the trick; they are soft and delicious without being overly rich and sweet."
— From The Vanilla Bean Baking Book: Recipes for Irresistible Everyday Favourites and Reinvented Classics by Sarah Kieffer. (Penguin Books, 2016)
Makes around 12 cookies
INGREDIENTS
1¾ cups | 250 g all-purpose flour
½ cup | 50 g natural cocoa powder or a combination cocoa powder
¾ teaspoon baking soda
½ teaspoon salt
1 cup | 225 g unsalted butter, room temperature
1¾ cups | 350 sugar (plus 1 cup | 200g for rolling)
1 large egg
1 teaspoon pure vanilla extract
1 teaspoon ground cardamom (optional)
METHOD
Adjust an oven rack to the middle position. Preheat the oven to 350 degrees F. Line two baking sheets with parchment paper.
In a medium bowl, combine the flour, cocoa powder, baking soda and salt.
In the bowl of a stand mixer fitted with a paddle, beat the butter on medium until smooth. Add the 1¾ cups sugar and beat on medium until light and fluffy, 2 to 3 minutes. Add the egg and vanilla and beat on medium until combined. Add the flour mixture and beat on low until just combined.
Place the remaining 1 cup sugar in a medium bowl. Stir in cardamom, if desired.
Form the cookies into 3-ounce | 85 g balls (a scant ⅓ cup each). Roll each ball in the sugar and place 6 cookies on each prepared sheet pan. Bake one sheet at a time 11 to 14 minutes, until the edges have set and the centers are puffed and starting to crackle.
Transfer the baking sheet to a wire rack and let the cookies cool completely on the pan.
Newer:To make it last | Frothy turmeric teaOlder:All the things | Rum and Ginger Toffee Cake

Source: http://sevenspoons.net/blog/2017/1/19/sweetness
0 notes
Text
‘Queer Eye’ Sends Jones Bar-B-Q Sauce Sales Through the Roof
On the latest season of Netflix’s hit series Queer Eye, meat-smoking sisters Mary and Deborah Jones get a makeover along with their Kansas City restaurant Jones Bar-B-Q — and now fans are clamoring to get a taste of the duo’s signature barbecue sauce.
As the sisters explain in their Queer Eye episode, the sauce is baed on a secret recipe passed down to them by their father, Leavy, who also worked as a pitmaster when Deborah and Mary were growing up. A few years ago, the sisters started selling their sauce to customers who asked for it, but they stopped because the demand got “out of control” and they couldn’t keep up with production. In their episode, culture guru Karamo Brown surprises Mary and Deborah by taking them to Original Juan Specialty Foods — a packaged foods company — where they work alongside food expert Anthony Porowski on the bottled version of their sauce. At the end of the episode, when the sisters are showing off their refurbished restaurant, they proudly present the bottled sauce to their family and friends.
Apparently, a lot of Queer Eye fans wanted to buy the sauce over the weekend, because there was a temporary shortage due to high demand. Now it appears that the sauce is back in stock, but the Jones Bar-B-Q homepage includes a special note for potential buyers: “Please bear with us in receiving your order. The response to our story and sauce has been overwhelming. Please allow a 7 - 10 day delay in shipping times. We are doing our best to keep up. We appreciate your order!” The tiny restaurant also drew long lines over the weekend.

The Jones sisters with the Fab Five
Christopher Smith/Netflix
While many viewers are learning about Jones Bar-B-Q for the first time, the restaurant already had a great reputation and legions of fans before the Queer Eye crew paid a visit. The sisters have been working in the local barbecue scene for over three decades. Deborah says that they have “at least a couple hundred” regulars that they know by name. Fans of the restaurant have been known to stop by as early as 7 a.m. to get a first taste of the meat fresh from the smoker, and the sisters usually sell out of everything by noon. When asked about the experience of being on Queer Eye, Mary told local new station KSHB: “It changed my life tremendously. I’ll never be the same again.”
The Jones sisters’ sauce is now available for purchase on their website, and all eight episodes of this particularly emotional season of Queer Eye are now streaming on Netflix.
• Jones Bar-B-Q [Official]
• The Jones Sisters Got The Queer Eye Glow Up This Weekend & Sold Out Of Their Famous BBQ Sauce [Refinery 29]
• True pitmasters: The Jones sisters [KC.com]
• Jones sisters of Jones BBQ featured on Netflix’s ‘Queer Eye’ [KSHB]
• Pitmaster sisters smoking out the competition in Kansas City’s barbecue scene [CBS]
Eat, Drink, Watch.
Food entertainment news and streaming recommendations every Friday
By signing up, you agree to our Privacy Policy and European users agree to the data transfer policy.

Source: https://www.eater.com/2019/3/18/18270920/queer-eye-bbq-sauce-jones-barbecue
0 notes
Text
Pizza Pockets (Grain-Free, Egg-Free)
Homemade pizza pockets are a fun make-ahead meal that the kids and adults alike will love!
These grain-free pizza pockets are layered with mozzarella, pepperoni, marinara sauce and baked until golden. The dough is very easy to work with, and you can add in any kind of fillings that you like.
This is a fun recipe to get the kids involved with. They can help cut, shape and fill the dough. Serve the pockets with a side of marinara and dip away!
Makes about eight 5-inch round pizza pockets
Grain-Free Pizza Pockets
25 minPrep Time
15 minCook Time
40 minTotal Time
Ingredients
For the dough:
2 cups shredded mozzarella cheese (or another hard cheese of your choice)
1 cup arrowroot flour
1/4 cup plus 1 tablespoon coconut flour
1/2 teaspoon Celtic sea salt
1 large egg (or 1 gelatin egg for egg-free option)
6 tablespoons water
For the filling:
1/2 cup pepperoni, chopped
1/2 cup shredded mozzarella cheese (or another cheese of your choice)
1/2 cup crushed tomatoes
1/4 teaspoon dried Italian seasoning
Instructions
Preheat the oven to 350 degrees F, and adjust the rack to the middle position. Place the cheese, arrowroot, coconut flour and sea salt in the bowl of a food processor and pulse until combined. Add the egg and water and process until the dough comes together.
In a small bowl, combine the pepperoni, mozzarella, tomatoes and Italian seasoning.
Dust a clean space on the counter with arrowroot flour. Place the dough on top and using a rolling pin, roll the dough until it’s 1/4” thick. Using a round cookie cutter (I used the top of a large, 3-cup mason jar lid), cut circles out of the dough and place half of them on a cookie sheet lined with parchment paper. Place about 1 1/2 tablespoons of the pepperoni mixture into the center of each dough round. Fill a small bowl with water, dip your fingers in the water and then gently rub the water around the edges of the dough. Then, place a second dough round on top and gently press down on the sides to seal the edges. Repeat with remaining dough and filling ingredients.
Using a fork, poke the top of the pizza pocket 3 times. Bake the pockets for 18-20 minutes until golden brown on the edges. Cool for 15 minutes. Serve alone or with marinara sauce .
<![CDATA[#search_tagsmargin-left:-20px;margin-top:25px;text-align:left#search_tags .tags dtline-height:23px;font-size:12px!important#search_tags .tags spanbackground:#a1a1a1;color:#fff;height:22px;margin:0 6px .375rem 0;padding:0 6px;text-transform:uppercase;display:inline-block#search_tags .tagsdisplay:-webkit-inline-box;width:100%#search_tags .tags .tagdisplay:inline-block#search_tags .tags .highlightedbackground:#01a64f]]>
7.8.1.2
4602
https://deliciouslyorganic.net/grain-free-pizza-pockets-recipe/
Copyright 2016 Deliciously Organic
Photos by Becky Winkler

Source: https://deliciouslyorganic.net/grain-free-pizza-pockets-recipe/
0 notes
Text
Bakery Style Lemon Poppy Seed Muffins
Lemon Poppy Seed Muffins are simply scrumptious. Lemon poppy seed muffins are perfect for breakfast, and they are also delicious when served with coffee late in the afternoon.
Have you ever wanted to make bakery-style muffins at home? Sure, you can go out and buy fancy muffins, did you know you can make them simply at home? Muffins are very easy to make, and there is nothing better than adding a small pat of butter to a warm fresh out of the oven muffin.
What makes lemon poppy seed muffins so tasty
These muffins are the perfect marriage of flavors. Fresh lemon zest, vanilla extract, and lemon extract really give these muffins a wonderful layer of flavors. For this recipe, we are using butter and sour cream to make these muffins tender and moist. So these muffins will stay fresh for a couple of days after baking them.
8 Tips for making the best muffins ever
Start with ingredients at room temperature – when the ingredients start from room temperature, the leavening ingredients can do their job, and really raise up your muffins high.
Don’t overmix the batter – mix just enough to moisten all ingredients, any additional mixing may make muffins tough.
The batter should be stiff enough to hold a spoon upright – If your batter is too thin, add a tablespoon (or two) of flour to help thicken the batter.
If using fresh fruit toss with a tablespoon of flour before adding to the batter – coating fruit with flour will keep your fruit from sinking to the bottom of the muffin.
Grease the entire muffin tin – Don’t skip on greasing the entire bowl of the muffin tin, they will release easier if grease the entire tin.
Fill the muffin tin 2/3 full – Do not overfill the tin, when the batter raising during cooking it will spill over your pan. Underfilling may mean your muffins will be tough and overcooked
Don’t overbake the muffins – Overbaking muffins can make them tough, to check for doneness, use a toothpick, when a toothpick is inserted it should come out clean.
Allow muffins to cool in the pan before removing – allow muffins to cool in the pan for about 5 minutes before attempting to remove. They won’t break apart if you do this.
These is no doubt you will fall in love with these flavorful muffins!
Want to enjoy more great tasting muffins
– be sure to try these favorite recipes.
Pumpkin Spice Muffins
Otis Spunkmeyer Blueberry Muffins
Otis Spunkmeyer Almond Poppy Seed Muffins
Lemon Poppy Seed Muffins
Enjoy these easy bakery style lemon poppy seed muffins when you make them from scratch.
Ingredients
Muffin Ingredients
1 1/2 cups sugar
1/2 cup salted butter room temperature
1 tablespoon lemon extract
1 teaspoon vanilla extract
4 eggs room temperature
2 teapoons lemon zest
1/2 cup sour cream room temperature
1/4 cup poppy seeds
2 cups flour
2 teaspoons baking powder
1/2 teaspoon salt
3/4 cup milk
Glaze
1 cup powdered sugar
5 teaspoons milk
1/4 teaspoon lemon extract
1/2 teaspoon lemon zest
Instructions
Muffin instructions
Preheat oven to 350 degrees.
Grease a muffin tin, and use muffin papers if desired. Set muffin tin aside.
With a mixer cream the sugar and the butter together. When light and fluffy add lemon extract, vanilla extract, and eggs. Beat together until well blended.
Add lemon zest, sour cream, and poppy seeds. Mix until all ingredients are just blended in.
In a separate bowl combine flour, baking powder, and salt. Stir until the mixture is uniform.
To combine the dry ingredients into the cream butter, add a third of the flour into the butter, and then add about a third of the milk. Stir gently, then add in the next third of the flour, and milk, and stir gently. Scrape the sides of the bowl to make sure all ingredients are well incorporated. Add remaining flour, and then the remaining milk. Stir until just blended.
Fill each muffin tin 2/3 full. Bake muffins for 24 minutes. You may want to start to check the muffins at about 20 minutes by inserting a toothpick to see if they are done. When the toothpick comes out clean, the muffins are done. Remove from the oven.
Lemon Glaze
In a small bowl combine powdered sugar, milk, lemon extract, and lemon zest. Stir until well blended. When the muffins have cooled to room temperature you can drizzle the glaze over the muffins.
Nutrition Facts
Lemon Poppy Seed Muffins
Amount Per Serving
Calories 342 Calories from Fat 108
% Daily Value*
Total Fat 12g 18%
Saturated Fat 6g 30%
Cholesterol 81mg 27%
Sodium 202mg 8%
Potassium 158mg 5%
Total Carbohydrates 53g 18%
Sugars 36g
Protein 5g 10%
Vitamin A 8%
Vitamin C 0.5%
Calcium 10.3%
Iron 8.3%
* Percent Daily Values are based on a 2000 calorie diet.

Source: https://copykat.com/lemon-poppy-seed-muffins/
0 notes
Text
Blue Cheese Peach Pizza with Honey
This recipe is in partnership with Nugget Markets. See below for more details.
There are combinations that might feel a bit over-done but I will always (and gladly) eat. One of those combinations: blue cheese and peaches. Fresh, sweet peaches paired with the earthy flavor of blue cheese is everything I could want in one bite. Add it to pizza and drizzle it with honey; I’ll probably eat the whole thing.
For this peach pizza, I was lucky enough to source some amazing local honey, c/o Nugget Markets. Nugget’s Fresh to Market brand sources from many local companies and their honey comes from Pure Honey based in Winters, CA. I took a drive out to visit and left with even more of an appreciation for the honey (and the bees).
The honey Nugget sources is raw honey which means all the good stuff is left in the honey. One note, which came directly from Doneice of Pure honey: Crystallization is a natural part of raw honey and the easiest way to get the honey soft: set it outside on a warm day.
Peach Pizza
Grilled Cheese: I’m so in love with the peach/blue cheese/honey flavor that sometimes when I make myself lunch, I’ll add this combination to a grilled cheese sandwich. It’s such a perfect slightly sweet/slightly savory lunch.
Pears: This time of year is great for stone fruit but it’s also pear season! Swap the slices of peaches for pears.
Cheese: I know blue cheese isn’t for everyone. Try goat cheese or you could do mozzarella only on this peach pizza.
Print
Ingredients
3 tablespoons olive oil
1 clove garlic, sliced in half lengthwise
1 store-bought or homemade pizza dough
1 large, just-ripe peach
6 ounces mozzarella cheese
1 to 2 ounces blue cheese
1 to 2 tablespoons honey, for serving
2 to 3 tablespoons julienned basil, for serving
Chili Flakes or Pickled Jalapenos
Instructions
Heat your oven to 475˚F with a pizza stone. Heat olive oil in a small skillet. Add the garlic and fry until the garlic is golden. Remove from heat and let rest until ready to use. Before using, remove garlic.
Prepare the pizza topping. Thinly slice the peaches and grate the mozzarella cheese.
On a good non-stick surface (like a pizza peel sprinkled with cornmeal), stretch and roll the dough into a circle roughly 12 to 14” in size. Spread the garlic-infused olive oil over the pizza dough then layer with the thinly sliced peaches, grated mozzarella cheese, and crumbled blue cheese.
Transfer the pizza to a pizza stone and bake until the cheese has melted and the crust is golden.
Remove the pizza from the oven and drizzle with honey and sprinkle with julienned basil.
Disclosure: This recipe was created in partnership with Nugget Markets. All thoughts and opinions are my own. It’s content like this that helps me keep this site running to provide the vegetarian recipes you see every week.
Source: https://naturallyella.com/blue-cheese-peach-pizza/
0 notes
Text
Chocolate Peanut Butter Pie of Your Dreams
Recipes
Chocolate Peanut Butter Pie of Your Dreams
Share74
Tweet
Pin1.1K
Yum14
1.2K Shares
Dessert doesn’t get any better than a Chocolate Peanut Butter Pie with layers of graham cracker, peanut butter filling, and chocolate. It’s a chocolate and peanut butter lover’s dream come true!
Chocolate Peanut Butter Pie
If there was ever a dessert to put someone in a legitimate food coma, it would be this pie. I’m kind of going into a trance just thinking about it right now. It’s only fitting that the first time this recipe came into my life it was the national day of food comas, Thanksgiving.
Just this past Thanksgiving I learned what I had been missing out on my whole life while spending the holiday in Chicago with my boyfriend’s family. His mom Jane, the sweetest lady you’ll ever meet, makes this peanut butter pie every year for Thanksgiving and it’s always a crowd favorite, like so much blood will be drawn if it’s missing from the dessert table. After trying it I totally understand why!
Thankfully, as mentioned before, she’s the best and gave me the recipe, allowing me to share it with all of you!
A Triple Threat Peanut Butter Pie
This pie is kind of like that girl you love to hate in every teenage drama lifetime movie. You know, the one that looked like she walked right off a runway while managing to be the valedictorian, and the captain of the dance team. The true triple threat that everyone wanted to be.
So, what I’m trying to say is that every other pie out there is going to be jealous of this one. From the graham cracker crust to the peanut butter filling, topped off with a chocolate ganache, this chocolate peanut butter pie has it all!
All of the flavors come together for a chocolate peanut butter perfection that’s irresistible!
How To Be A Chocolate Peanut Butter Pie Superhero
If you want to be the hero of all future parties and family gatherings, just like Jane, you just have to follow the quick and easy steps to make this pie!
It does have 3 different layers, but don’t let that make you think it’s too hard because trust me it’s not! You can actually even shorten the directions, and prep time and buy a store made graham cracker crust. It makes the whole pie no-bake, taste just as good and it saves some time!
Then all you have to do is mix up the peanut butter filling, and the chocolate topping. They’re both super simple and only take a few ingredients.
Once you get through the torture that is waiting for it chill for a couple hours, it will be ready to serve. Just don’t forget to top it with whipped cream first (a rule my boyfriend’s family lives by).
How to Save and Store A Chocolate Peanut Butter Pie
I debated on whether or not this paragraph was necessary because it’s so good, that most of the time it’s probably going to be devoured before you even have the chance to save any. If you do manage to sneak some away for later here’s what you’ll do.
The cream cheese component in this chocolate peanut butter pie means it needs to be kept in the refrigerator. It will keep for about 4-6 days refrigerated, and 6-9 months frozen.
When storing in the refrigerator be sure to cover the pie with plastic wrap, or cut it up into slices and place it in an airtight container.
Like This Peanut Butter Pie Recipe? Pin It!
More Chocolate… More Peanut Butter… More of Everything Good
A chocolate peanut butter combo is my absolute favorite. If I could only eat one thing for the rest of my life it would probably be something chocolate peanut butter. I make sure to always be on the watch for new recipes to try, and I’ve found some pretty amazing ones lately. Here are a few of my favorites.
Peanut Butter Blow Out Cookies
Chocolate Peanut Butter Energy Balls
Peanut Butter Banana Bread With Chocolate Chips
Peanut Butter Lasagna
Easy Peanut Butter Chocolate Fudge
Chocolate Peanut Butter Crunch Bars
Your New Chocolate Peanut Butter Obsession
You have to be craving a slice of pie by now. If not, I think you might need to see a doctor, because something’s must be wrong with you. Since I know you’re going to start whipping up this recipe immediately, I look forward to seeing your pics and comments in a few hours once you’ve tried your beautiful creation.
Yield: 8-10 servings
Chocolate Peanut Butter Pie
Prep Time: 25 minutes
Cook Time: 8 mins
Total Time: 33 minutes + chill time
Dessert doesn't get any better than a Chocolate Peanut Butter Pie with layers of graham cracker, peanut butter filling, and chocolate. It's pie perfection.
Print Recipe
Ingredients:
Crust
1 1/2 cups graham cracker crumbs (about 1 1/2 sleeves of graham crackers)
1/3 cup of sugar
8 tablespoons (1 stick) unsalted butter, melted
Filling
8 ounces cream cheese, at room temperature
1 cup creamy peanut butter
1 cup sugar
3/4 cup of heavy or whipping cream
Topping
1/2 cup sugar
1/2 cup heavy or whipping cream
2 ounces unsweetened chocolate
4 tablespoons (1/2 stick) unsalted butter
1/2 teaspoon vanilla extract
Directions:
Preheat the oven to 350°F
Prepare the crust: Combine the graham cracker crumbs, sugar, and melted butter in a mixing bowl, and stir until well combined. Press the mixture into the bottom and sides of a 9-inch pie dish.
Bake crust for 8 minutes. Set aside to cool completely. (throw it in the freezer to speed up the cooling process if necessary)
Prepare the filling: With an electric mixer combine the cream cheese, peanut butter, and sugar in a large bowl until well blended. Set aside.
Whip the cream with an electric mixer until stiff peaks form, and fold it into the cream cheese mixture. Spoon the filling into the cooled crust.
Prepare the topping: Combine the sugar and cream in a small saucepan and bring to a boil. Reduce the heat and simmer, without stirring, for 6 minutes.
Remove the pan from the heat, immediately add the chocolate and butter, and stir until melted. Then stir in the vanilla.
While still warm, carefully pour the topping over the pie, and refrigerate, uncovered, for at least 4 hours.
Instead of making a graham cracker crust, you can also buy a premade crust and skip directions 1-3 Make sure the cream cheese is completely softened, my best tip is to set it on the counter, or outside for several hours as opposed to softening in the microwave. It's what gives me the best results. Don't skip the chill time, or the filling and topping will be too soft, and you'll be unable to cut smooth pieces. Dust with some extra graham cracker crumbs for an extra crunch on top.
Making this recipe? Share it with us on Instagram using the hashtag #TidyMom so we can see what you're creating in the kitchen!
Want more great recipes like this? Follow my TidyMom Easy Recipes Pinterest Board
Share74
Tweet
Pin1.1K
Yum14
1.2K Shares
Categories: Desserts, Pies/Cobblers, Recipes
Tags: Chocolate, cream cheese, graham cracker, Peanut Butter, peanuts, pie
10 Comments »
about the author Allison Sousan
I'm Allison, a girl who loves a challenge and is ready for anything that life dishes out. I am here to follow my passion and dive into the crazy and fun world that is strategic communications. If I'm not doing school work you can usually find me at Busch Stadium bleeding Cardinal Red, or obsessing over my pride and joy that comes in the form of a 60 pound Border Collie. If you also love those things check out my Instagram @allisonsousan
More by Allison Sousan »
BECOME A TIDYMOM VIP
New Posts
Weekly Newsletter
Like this Post?Then You'll Love These:
Mexican Black Bean Pizza
Chicken and Spinach Enchiladas
Lemon Pudding Pound Cake
Source: https://tidymom.net/2018/chocolate-peanut-butter-pie/
0 notes
Text
Lemon Cheesecake Bars
Lemon Cheesecake Bars: layers of cookie crust, lemon cheesecake and lemon cookie bars! One of the most delicious desserts ever, you won’t be able to stop eating these!
Be sure to sign up for my email…new recipes in your inbox!
Click HERE to save recipe to Pinterest!
If any of you follow my blog for new updates, you may have noticed last week I dropped to only two new recipes. I meant to share these Lemon Cheesecake Bars on Thursday…but I was curled up in a ball crying in the corner.
You see. As excited as I am that my son has plans for his post high school life…it also terrifies me. I have mentioned before that he is heading off to Marine boot camp this summer. Well, we found out his date has moved up and it’s 3 weeks away.
I just want to hold and protect him forever. But you see, that’s the switch that happened. I’ve spent the past 18 years loving him, helping him learn and grow into the man he is today. 18 years of protecting him.
Now, he is the one who is leaving the nest to protect ME. And you. I’m so extremely proud and humbled by this thought. So bear with me the next few weeks as I am sure to be a mess of emotions!
You know what helps? Yep. Eating my emotions. I’m that kind of person. And these Lemon Cheesecake Bars are here for me when I’m feeling sad and scared. And after I’ve eaten the entire batch, I guess I just need to make some more, right?
Last month I proclaimed these Snickerdoodle Cheesecake Bars one of the best desserts I’ve ever made. And now I went and made them with a lemon twist. Which is pretty much my favorite flavor treat…I adore LEMON desserts. So I’d like to amend my previous statement and declare these Lemon Cheesecake Bars THE BEST DESSERT EVER MADE.
I’m totally losing credibility with you guys. Right? But, before I lose you. Make these. Then you’ll trust me again!!
Here are some more Cheesecake Bars you’re sure to enjoy!!
Snickerdoodle Cheesecake Bars: a sweet and salty crust topped with a divine cinnamon sugar cookie!
Pumpkin Cheesecake Bars: the pumpkin cheesecake filling with the chocolate chip cookie is perfect ANY time of year!
Peanut Butter Cheesecake Bars: a peanut butter cookie with extra Reese’s gives this cheesecake bar a decadent twist!
Here are a few more Cheesecake ideas from my friends:
I created a fun little group on facebook and I’d love for you to join in! It’s a place where you can share YOUR favorite recipes, ask questions, and see what’s new with Shugary Sweets (so that you never miss a new recipe)! If you’d like to check it out, you can request to join HERE.
Connect with Shugary Sweets!
Facebook | Twitter | Google+ | Pinterest | instagram
Sign up to receive an email in your inbox for each new recipe:
Be sure to follow me on my social media, so you never miss a post!
FREE EMAIL SUBSCRIPTION
Lemon Cheesecake Bars recipe and video tutorial:

Lemon Cheesecake Bars
Yield: 24 large bars
Prep Time:4 hours, 30 minutes
Cook Time:30 minutes
Ingredients:
For the Crust:
2 cup Nilla Wafers, crumbs (about 60 cookies)
1/4 cup granulated sugar
1/2 cup unsalted butter, melted
For the Cheesecake Filling:
2 packages (8oz each) cream cheese, softened
3/4 cup granulated sugar
2 large eggs
1 tsp lemon extract
1 lemon, zested
For the Cookie layer:
3/4 cup unsalted butter, softened
1 1/2 cup granulated sugar
1 large egg
3/4 tsp vanilla extract
1 1/2 tsp baking powder
1/4 tsp kosher salt
2 cup all-purpose flour
1 lemon, zested
11oz white chocolate morsels (I use Ghirardelli)
Directions:
Line a 13x9 baking dish with parchment paper. Set aside. Preheat oven to 350 degrees.
In a food processor, pulse Nilla Wafer cookies with sugar until fine crumbs. Add in melted butter and pulse until combined.
Press crumbs into the bottom of prepared baking dish. Using the palm of your hand, press crumbs firmly until they are pressed into the bottom of the dish.
For the filling, beat cream cheese with sugar, eggs, lemon extract and lemon zest using the whisk attachment of your electric mixer. Beat until fluffy and smooth (about 3-4 minutes). Pour over cookie crust.
For the cookie dough, beat butter and sugar for 2 minutes. Add egg, vanilla and lemon zest and beat until combined. Add in baking powder, salt and flour, beating until fully blended. Fold in white chocolate morsels. Scoop dough by large spoonfuls onto the top of the cheesecake layer. Use your fingertips to spread gently until covered.
Bake for 30-35 minutes until lightly browned. The center will still be jiggly, that's okay. Allow to cool completely. Refrigerate for 4 hours (or overnight). Slice and serve COLD. Enjoy!
MAKING THIS RECIPE? Share it with me on Instagram using the hashtag #ShugarySweets so I can see what you're cooking up in the kitchen!
Today’s recipe for Lemon Cheesecake Bars was originally published on Shugary Sweets on June 22, 2015 and has been republished in August 2018.
**There may be affiliate links in this post! By clicking on them, or purchasing recommended items I may receive a small compensation. However, I only recommend products I love! Thank you for supporting Shugary Sweets! See my disclosure policy for more info**
Stay Connected
subscribe to receive new posts via email:
Source: https://www.shugarysweets.com/lemon-cheesecake-bars/
0 notes
Text
Paleo Double Chocolate Banana Bread Muffins
Moist, fluffy, ultra chocolaty paleo double chocolate banana bread muffins. These delightful treats are easy to make in your blender, are oil-free, grain-free, dairy-free and made with whole food ingredients for a guiltless pleasure.
Calling all chocoholics and banana bread lovers!: These muffins may just be your new favorite treat!
A mash up of sultry chocolate cake and banana bread, these double chocolate delights contain a little sumthin sumthin for everyone. It’s also a riff off my classic Paleo Banana Bread recipe.
These healthy muffs are mouth-watering enough to be considered dessert, but nutritious enough to be considered snack. Post-workout refuel? Get it!
Made with almond flour, cacao powder, and ripe bananas, these muffins are squeaky clean. They are gluten-free (and grain-free), oil-free, and dairy-free.
Making these double chocolate banana bread muffins is as easy as can be.
All we do to prepare the muffin batter is blend everything except for the chocolate chips in a blender. Once blended, we fold in the chocolate chips, transfer the batter to a muffin tray and bake!
Change it up by added chopped nuts and get wild with your chocolate selection.
Batches on batches on batches aaaaand GO!
My cookbook, Paleo Power Bowls, is now available! CLICK HERE to check it out, and thank you for your support!
For a sultry little treat…
Paleo Double Chocolate Banana Bread Muffins
Print
Instructions
Preheat the oven to 350 degrees F and line a muffin tray with muffin cups.
Add all ingredients except chocolate chips to a blender and blend until smooth (note: you can prepare the muffin batter in a mixing bowl if you'd prefer!). Stir in the chocolate chips.
Transfer batter to the lined muffin pan, filling the holes 3/4 of the way up.
Bake on the center rack of the preheated oven 18 to 22 minutes, or until muffins are puffy and cooked through. Allow muffins to cool at least 40 minutes before peeling the papers off and eating.
Paleo Double Chocolate Banana Bread Muffins
Amount Per Serving (1 of 9)
Calories 251 Calories from Fat 162
Total Carbohydrates 16g 5%
* Percent Daily Values are based on a 2000 calorie diet.
Source: https://www.theroastedroot.net/paleo-double-chocolate-banana-bread-muffins/
0 notes
Text
FAST FOOD NEWS: Burger King Vanilla Shake with M&M’s
Burger King has a new shake to cool you down even more this winter — the Vanilla Shake Made With M&M’s Chocolate Candies. But let’s call it the Vanilla Shake with M&M’s for short.
Just like the number of words in its actual name, the amount of M&M’s swimming in the vanilla soft serve used for this shake is plentiful. Along with the candy and soft serve, the treat also has vanilla syrup and whipped topping.
The sweet drink has 780 calories, 22 grams of fat, 14 grams of saturated fat, 0.5 gram of trans fat, 70 milligrams of cholesterol, 490 milligrams of sodium, 128 grams of carbohydrates, 1 grams of fiber, 111 grams of sugar, and 17 grams of protein.
If you’ve tried it, let us know what you think of it in the comments.
(Image via Burger King’s website.)
Source: https://www.theimpulsivebuy.com/wordpress/2019/01/21/fast-food-news-burger-king-vanilla-shake-with-mms/

0 notes