#go take 1 piece of paper any size color or shape fold it up make a zine out of it THAT is more a zine than any $35 professionally bound book
Text
thats not a “zine” that is an “art book” and you are scaring the hoes (discouraging people from zinemaking by associating it with hefty sleek professionalism instead of extremely diy no resources low cost artistic communication) by mixing up these words
#go take 1 piece of paper any size color or shape fold it up make a zine out of it THAT is more a zine than any $35 professionally bound book#kora.txt
20K notes
·
View notes
Text
How to Use Cricut Joy Xtra: Unlock Your Creativity With Ease
Hey there! Do you know how to use Cricut Joy Xtra? If not, then this blog is for you. In this guide, I have explained how to make a Birthday greeting card for one of my best friends, Reena. I still remember how excited we both were to meet each other. Since she came to visit me here in sunny California, I couldn’t wait to show her around and make some amazing memories with her. But do you know what was unique in this meeting? Her Birthday! To make her day special, I was all set with my Cricut Joy Xtra machine.
With this cutting machine, I made a beautiful greeting card for her, and she was amazed by the creativity I added to the card. Hence, I am here to guide you on the use of the Cricut machine, including the complete machine setup.By following this guide, you will be able to set up and establish a connection between the computer and your Cricut machine. Let’s delve deeper into it.
Step 1: Set up the Cricut Joy Xtra Machine
First, I will show you how to set up the new Cricut Joy Xtra to get started. If you have already set up your machine, you can skip this step and proceed with the second step. Here are the steps on how to set up the cutting machine:
Note: You can find the name of your machine on the bottom of your machine. In the next step, I will show you how to use Cricut Joy Xtra. Let’s start!
Step 2: Preparation Before Your Design
After completing the setup, your second step should be to leave a gap of about 30 cm behind your cutting machine. This is essential so that the Cricut cutting mat can have enough space to roll backward without any difficulty.
Now, take out the practice materials that you received in a welcome pack. Then, move back to your computer or mobile device to perform a test cut on the machine.
In order to perform a test cut, start by feeding the material into the machine. Further, you can start cutting on vinyl by following the instructions given on the screen. After this, you can move to the next step, where I will show you how to use Cricut Joy Xtra to make beautiful greeting cards.
Step 3: Choose a Design on Cricut Design Space
On Design Space, there are multiple ready-made designs available. These ready-made projects are suitable for beginners who want to make something easy and wonderful for the first time. Let’s see how to choose the design for our greeting cards available from the software.
Step 4: Set the Cricut Mat and Your Material
So, this is what it looks like inside the pack. Remove the protective sheet layer from the mat. After that, take a white cardstock with a size of 5 and ½ inches. You can cut the paper accordingly to get the required shape. Further, fold the card from the middle and place it on the Cricut mat.
Step 5: Cutting the Design
Finally, I am going to show you how to use Cricut Joy Xtra. In this last step, you have to place the mat along with the material. After that, go to the Design Space and click on Browse All Materials.
Here, I am selecting what I am using, such as Heavy Cardstock - 100 lb (270 gsm).
On the next screen, you will be asked to move the start wheel on the machine. Follow the instructions to proceed.
Since my cardstock is heavier, I selected More under the pressure from the drop-down menu. Finally, you can start cutting out using your cutting machine.
Step 6: Weed Out and Assemble the Card
I am using a Cricut spatula here to weed my design carefully. Using the same spatula, you can remove those extra materials from the mat.
Note: Always clean your mat to ensure the long lasting use of your mat.
If you want, you can color the cupcake using any color. In my project, I used a Dye Ink pad.
Once done, place a card inside the folded card.
Then, secure it on a flat surface using a masking tape. After that, you can assemble each piece of cupcake using any type of glue. Next, take the shiny insert card and place it inside your folded greeting card.
In addition, you can also write your personalized message on the blank card. Don’t worry; you don’t need to write anything. Cricut Joy Xtra can handle it for you.
Just select the beautiful fonts from the Design Space and send the command to write accordingly on the cardstock. For writing, you have to use a Cricut pen, so don’t forget to replace the cutting blade with your pen.
Finally, here we go! This beautiful cardstock Birthday gift card is ready to be sent.
Final Words
In short, I have explained how to use Cricut Joy Xtra and make your own cards, decals and anything that you love. From machine setup to making a Birthday card for my best friend, I discussed everything in this easy tutorial. For setup, you need to connect your Cricut cutting machine to a computer or phone via Cricut software, which is completely free. Follow the steps carefully and make anything that stands out!
FAQs
Question 1: What can I make with a Cricut Joy Xtra?
Answer: There are a lot of things you can make with a small mini Cricut Joy Xtra. I bought this machine because I wanted to write, cut, draw, and foil to make some popular projects. You can make any project, such as stickers, customer cards, vinyl decals, and more. All you need is Cricut Joy Xtra, and you are ready to go. But don’t forget to set up the account before using this machine. All types of Cricut machines need to be set up before use.
Question 2: What are the basic differences between my Cricut Joy and Joy Xtra?
Answer: The Cricut Joy Xtra has more cutting power with a wider cutting area of up to 8.5 inches, compared to the 5.5 inches offered by the Cricut Joy. Plus, it has the Print Then Cut feature, which allows craters to make full-colored stickers instead of just single-color custom decals. So, yes, this machine is suitable for crafters who want a mid-die cutting machine, making it beginners’ friendly.
Question 3: How can you use a Cricut Joy Xtra for the first time?
Answer: You can do the following things to use your Cricut machine for the very first time.
Visit: install cricut design space app
www.cricut.com/setup login
cricut.com/setup
Source: https://cuttingsetup.wordpress.com/2023/12/12/how-to-use-cricut-joy-xtra-unlock-your-creativity-with-ease/
#www.cricut.com/setup login#cricut explore air 2#cricut new machine setup#cricut design space login#design.cricut.com#install cricut design space app
0 notes
Text
Italian Carnival Chiacchiere
Ingredients
➝ 400 gr 00 Flour
➝ 2 Eggs (Medium/Big)
➝ 30 gr Butter (room temperature)
➝ 3 Tablespoons of white Sugar
➝ 1 Glass of Sparkling white wine (I used Valdobbiadene’s Prosecco)
➝ 1 Grated lemon peel
➝ 1 Pinch of Salt
➝ Powdered sugar to sprinkle on the surface
Preparation
* For this preparation, you’ll need a Pasta Roller.
1. Make a well at the center of which put the butter cut into small pieces, the sugar, the eggs and the lemon zest. Then start kneading.
2. As soon as the wet ingredients are absorbed, add the wine twice and continue kneading.
3. Turn the mixture onto a clean surface and knead the dough until smooth, about 5 minutes.
4. The dough may appear dry but do not add extra liquid. It will become more supple and easy to handle after it rests. Cover and let rest at room temperature for an hour.
5. Divide the dough into 4 pieces and keep the pieces you are not working with covered to prevent it from drying. Flatten the dough with the palm of your hand and pass through the widest setting of your pasta roller. Roll the dough through this first setting several times, folding the dough lengthwise a few times until it is smooth. Gradually decrease the setting and roll the dough through the pasta roller until the second to last setting. Cover the sheet of dough to prevent it from drying while you roll the remaining pieces of dough.
6. Then, you can basically cut into strips of any size you like. Chiacchiere can be made in various shapes using a fluted pastry wheel to get lovely scalloped edges. If you don’t have one, a knife will works.
My Fav Shapes:
Simple Rectangular/Squared - Cut them in rectangular or squared shapes and do on one or two simple slits down the center (tip: parallel or inclined to the edges, is not important: free your creativity! Remember that the number of slots depends on the size of your chiacchiere. That will make them easier to fry as they don’t tend to revert back when flipped.
Knots - Cut the dough in stripes thick more or less 1/1.5 cm and length 20 cm and then tie them as you would a ribbon, obviously leaving the knot wide.
7. Fill a wide, deep heavy-bottomed pan with about an inch or two of vegetable oil. Heat oil on high heat. When the oil is hot (tip: control the temperature, do not go beyond the smoke point) add the strips of chiacchiere. They will immediately puff up. Turn over and brown the opposite side. This literally takes seconds.
8. After the oil heats up, you will have to turn the temperature down to medium-high to prevent them from burning. Do not overcrowd the pan or you’ll have difficulty keeping up with flipping the chiacchiere before they become too dark! They must be a light golden color.
9. Drain them on a blotting paper to let them drip and let them cool completely. Dust with powdered sugar before serving.
0 notes
Text
How to Long Furb
For whatever reason, furbies have taken over the internet. It’s beautiful and terrifying and I desperately want one. Original 1998 furbies are hard to acquire but that doesn’t mean you can’t make one of your own. Imagine the potential for neck pillows with long furbies! I’m going to walk you through step-by-step how I acquired the supplies and compiled these monstrosities. Note, this is not by any means a comprehensive guide, just my personal experience. I am an ameteur. There is a huge community of furby fans online with tips and tricks on executing a variety of furby modifications. Read more below!
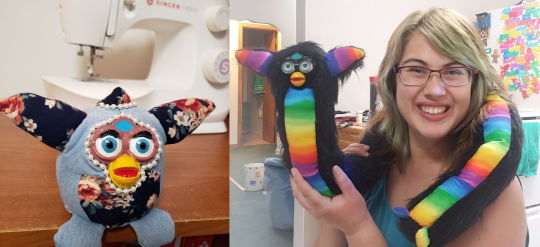
I will start off by saying there were many points throughout this whole process where I got frustrated and set the project aside for weeks at a time. I initially started hand-sewing long furbs but was disappointed with the poor craftsmanship. That’s when I impulse bought a cheap Singer over the 2020 holidays and retaught myself how to use the machine. The point I want to make here is to persevere. Every furby is beautiful! Crooked faceplates and chunky bellies just give a furby more personality. They say practice makes perfect, right? So let’s get started. The main components of a furby are:
1) The faceplate: unless you can get your hands on an original furby, finding a faceplate for your project can be tricky. There are a variety of people online selling furby faceplates. You can also 3D print faceplates using files from thingiverse. I’ve even seen faceplates pressed in resin. My favorite faceplate is from MrDsPrintedCreations on Etsy. The iris of the eyes are recessed so you can easily insert glass eye chips. The first thing I do with my faceplate is glue a piece of fabric behind it so it’s easier to sew into the head. I paint my faceplate with acrylic craft paint and top it off with a clear gloss coat.
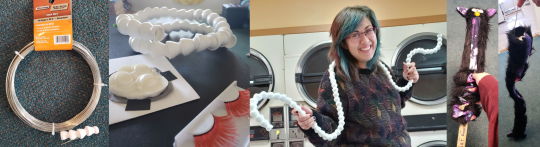
2) The spine: for a poseable long furb, there needs to be a flexible inner piece. I thought thin wire from Menards would do the job, but once it’s in the plush it doesn’t hold it’s shape. I found plastic doll armature works well as a spine. It even creaks when bent for that extra spritz of cursed, spooky energy! You can also use a flexible coolant hose as a spine. I’ve ordered doll armature online from CR’s Crafts: the 1/8th and 1/4th size works well. The 1/2th inch armature is hard to stuff around.
3) Fabric! Fur and belly piece: In order to make furbs, I knew I first needed a sewing pattern. Tumblr user Cavity Sam created a template based on the 1998 furby and I used this to make my first furb with my new machine and scrap fabric lying around. My friend Gunnar 3D printed a rudimentary faceplate to use. After using Cavity Sam’s sewing template, I modified the pattern to use for long furbs specifically. You can download that sewing pattern here.
You’ll need the following supplies per one 3-foot long furby:
quarter of a yard faux fur fabric (9 inches x 44 inches)
patterned fabric for belly, ears, feet (~3 inches x 44 inches)
sewing machine (thread, needle, scissors, pins)
faceplate, 14mm eye chips, eyelashes
E600 glue, scrap fabric
paint (acrylic or nail polish), paintbrushes, clear top coat
spine (plastic doll armature)
cotton stuffing (I cut open cheap pillows from Walmart)

Step one: Use the sewing pattern to cut fabric pieces for the head and body. When cutting on fur, make sure to trace the pattern on the flat backside of the fabric with the fur flattened in the right direction. For example, the hair on the Y-mane piece (back of the head) should be pointed downwards. I made notes on the paper pattern pieces where you can eyeball more or less space. The mane piece should have more rounded corners, for example. I made my furbies 3 feet long, so the front belly piece was 2 inches wide by 3 feet long. The back fur was 6.5 inches wide by 3 feet long.

Step two, feet and ears: Depending on how small you cut your fabric, it can be really hard to combine two separate pieces. For the feet I folded a piece of fabric in half and sewed the C-shapes before cutting them out. Using tweezers made it much easier to turn them back right-side-out. After cutting the ear pieces (making sure the hair on the fur was pointed in the right direction, inside out) I pinned them together before sewing. Turn back right-side-out.

Step three, head: Line the pattern pieces up so the Y-mane is in the middle. Sew the sides of the head to the mane first. Once that is one solid piece, fold it in half to sew the top curve of the head. I have pinned these pieces to ensure they don’t slip when going through the machine. Slow and steady wins the race; make sure to turn the fabric as you’re curving the top of the head. Finally you can sew the piece under the ear together, leaving a gap for the ear to go in.
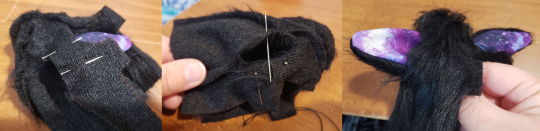
Step four, ears: Everything up to this point has been done on the machine. I haven’t figured out a way to attach the ears with the machine, so this step was done by hand. With the ear facing right side out, pin the ear to the inside-out head. Make sure the patterned part of the ear is facing outwards (where the faceplate goes). By hand, sew the ear to the hole in the head. After the ear is secured, turn the head right side out and voila!

Step five, body: Lining up these pieces is important and a little tricky. You’ll want some excess belly fabric on the top to merge with the bottom of the beak on the faceplate. See the diagram; rotate everything 180 degrees to begin sewing. The fur hair needs to be pointed upwards and the belly fabric pattern is facing down on top of that. After sewing the belly fabric to the fur, fold it over to sew the other side. The fur should be on the inside of the sausage/ body piece. Once you’re finished sewing, the finished piece needs to be turned fur side out.

Step six: Faceplate break time! This step can be done at any point in the process, up until you hand sew the faceplate into the head. To start, glue a piece of fabric behind the faceplate. The faceplate itself should just be the eyes and the beak, making it easier to sew into the head of the furb. You don’t need that extra plastic around the bottom of the beak (or at least I haven’t figured out how to sew that in convincingly). I used grey scrap fabric and E6000 glue to adhere the faceplate. Then you need to paint the faceplates. In earlier furbs I used acrylic paint topped with clear DecoArt gloss varnish on top. You can also use colored nail polish with a clear coat on top. In the pictured furbs I tried sealing the faceplates with mod podge but it dried tacky/ uneven. Optional: you can accessorize your furb with jewelry!

Step seven, inserting the faceplate: You need to sew this part into the head by hand as well. Start from the top center (head inside out, faceplate facing into head) and work your way down the right. Make sure to use a thicker needle and poke the needle through as close as you can get to the faceplate to ensure the fabric fur is flush to the face. The needle may be stubborn (poking through the hardened glue) so use a thimble or bottle cap to help push the needle. When you get to the bottom corner of the eye, the fabric may not line up perfectly. Use excess fabric to sew a seam, effectively acting like a cheek. This part takes a little finessing. Finish attaching the fur fabric one third of the way down the beak. This is where the belly piece will connect to. The final step (later) will be to put the eye + glass chip in.

Step eight, attaching the head to body: I was able to use the machine for this part. Turning the head inside out, pin the head to the outside of the back fur. The head and back should line up so a gap is left for connecting the patterned belly to the bottom of the beak (that step comes later). After the head is connected to the back, I do a second pass to make sure there isn’t any gap in the seam. When turned right side out, you’ll see that excess patterned belly spills out the top. Keep the furb inside out to connect under the beak.

Step nine, connecting the belly to the beak: On the excess patterned fabric sticking out the top of the body, trace the shape of the “M” to cut out. See the highlighted yellow portion in the picture, as well as the printed sewing pattern piece. The piece directly below the beak needs to be done by hand. If you can manage it, you can sew a diagonal line with your machine before trimming the patterned belly. I found it easiest to start from the right and work my way to the left. The acute angle under the cheek will need finessing, but with small and tight enough stitches the end result is good. Turn the furb inside out to see your long sausage of a creation!
Step ten, spine insertion and stuffing: Now THIS is where I may have messed up (i.e. got frustrated multiple times) and need feedback from the furby community. The furby is essentially complete, it just needs the butt and feet attached to seal it off. Because of this long sausage of a furb, it was hard to push stuffing all the way up into the head/ ears, even using a yard stick. Maybe if I printed my original sewing pattern at 115% or 130% size, the completed project wouldn’t have been so narrow. (The ears are a perfect size now that I think about it, so maybe just the head pieces need to be bigger.) This resizing would make for a larger in diameter, plushier furby too. I thought I could insert the spine after stuffing, but the opposite is true. Insert your wire or doll armature after the ears and head are stuffed but before you begin stuffing below the beak. Alternatively, you can fasten the top of the spine behind the faceplate before stuffing. I taped a cup to the end of a yard stick and that helped push handfuls of stuffing into the furb at a time. Leave 2 to 4 inches of the bottom unstuffed so it’s easier to sew on the bottom circle. We will leave a small gap for the rest to be stuffed before totally sealing it off.

Step eleven, connecting the feet and bottom: Stuff the feet and seal them off with a couple stitches. Don’t stuff the feet completely full, the top seam should lay flat. Place the two feet on the bottom of the belly, pointing upwards. Sew the feet onto the belly in a straight line. Now comes the part that takes more finessing, the bottom. When you line up the bottom circle, make sure the hairs of the fabric are pointed backwards. If you can manage it with the machine, sew the bottom circle to the bottom of your furby where the feet connect to the belly, about a third of the way around the full circle. The fur of the circle should be facing down, touching the belly of the furb. Once you’ve attached the circle to the feet, you can fold the circle back to see the butt starting to take shape! You can give it another pass on the machine, sewing the opposite side/ flip the furby so you can see the backside of the belly. Leave enough room to stuff the rest of the cotton and close the gap by hand sewing. Now that your furby is essentially complete, you can add the finishing touches! I always leave the eye chips for last so I don’t scratch them in the process of turning my furb inside out. You can print or paint the eye designs to place behind the glass chip. Use clear glue like superglue or E600 for the best results. Gluing eyelashes on with superglue is an optional last step.

Aaaaaaand the furbies are done! Again, I’m an ameteur sewer who’s learning as I go. I’m always open to suggestions and feedback; if there’s a way to revise this process to make more efficient and better quality furbs, I’d love to know. Thanks yall and enjoy making these cursed friends!
117 notes
·
View notes
Text
making your own tarot/oracle cards: ideas & tips 🃏
i made the mistake of settling with all bendy paper only once. this sounds like a total no-brainer, but never underestimate how durable the material has to be. especially since properly and thinly laminating is usually not something you can do by yourself. so, pick rather stable cardboard and your sharpest scissors.
there’s one exception: use regular paper if you want foldable little pieces to ‘draw lots’. e.g., you can write features on them and divinate your future partner’s appearance. you write all sorts of possible hair and eye colors, heights, ethnicities, clothing styles, prominent facial characteristics etc down. be as specific as you like. then draw from an improvised urn (i use a metal tea box) and you get a physical profile already. e.g. wavy hair - blonde - 5′11.
the same works with personality characteristics. drawing lots is a versatile and faster way of making your own oracle. don’t be afraid to create a bunch, 50 and upward. you’ll need 30% more than you planned once you come up with things to write on them.
for more sturdy cards: since you want to have an easy time shuffling and have all of them in equal size, pick a card template. from another deck, if you have. or print one out. or sketch one with a ruler. important: plain rectangles will be a pain in the ass to shuffle, make sure to cut out cards with rounded edges, always.
go creative with other shapes, just make sure they won’t get jammed or creased when you shuffle. e.g., a heart or sun shape might be very weird to handle. i found that making round cards is great. oval, i don’t know, didn’t try it out yet. triangles: maybe, but again with soft edges.
using stickers and gold/silver/bronze colored-pens works well and looks cool. just be careful to let any gel pen ink dry before assembling the cards. silver on black cardboard is particularly nice.
if you fancy making a larger deck — which you will end up wanting as it has more variety — consider saving time while cutting cards out. stack or fold the cardboard double or triple instead of just one sheet at a time. especially if you make like 80 lots, this will be the #1 hack.
how to come up with things you can write onto your cards? i tend to get the best deck when i don’t think ahead. unless you have a 100% knack for planning it out, improvise all the way, automatic writing. you’ll get all sorts of keywords in your mind once you start out. double-check for repetitions regularly.
sometimes, you might also feel like writing quotes or longer (maybe channeled) messages on them, no limits to experimenting.
take it slow when writing onto the cards. nothing have i regretted more than jotting things down quickly. if you don’t mind sloppy go ahead, just know using a nice handwriting and taking your time respects the cards. especially if you might use them for others, you never know, keep the letters clean and decently large.
mind you, you might omit writing altogether and sketch symbols or imagery. animals, plants, antiques, planets, zodiac signs. it can be rudimentary or absolutely artful, anything is possible. and again, stickers can come in handy here. you often get pretty and plenty ones in home decor/DIY/gardening/lifestyle magazines that have them included on an extra page. just make sure they are rather thin so you can shuffle the cards well. and that’s it, you’re good to go!
383 notes
·
View notes
Text
Finding the Time to Study Fic 2 [Day 6]
Here is my starting post for today’s study break stories session. See this post for more details and feel free to send me asks to keep me going! It’s been a lot of fun so far! I will reblog this post with the story as I write them today. I’ll be constantly looking for ideas of times and places for Janus to have missions, so feel free to send in any you can think of at any point!
If you are a new follower or just don’t want all of these posts clogging your dash, please feel free to block the tag “study break stories” as all posts and voting about it will go there. You can still see the finished product of the story even if you are blocking that tag as I will not tag the edited chapters with “study break stories” but with the (TBD) name of the fic.
Chapter 1, chapter 2, and chapter 3 are under the cut.
I don’t have too much to do today, so this’ll be shorter.
Set Up
Chapter 1
The words in front of him seemed to squirm back and forth across the screen as he watched, despite the fact that he’d bought this screen to prevent that exact thing from happening. The ‘d’s and ‘p’s and ‘b’s seemed to blur together into a sludge of incomprehensible nonsense, just like the voices around him seemed to. He wasn’t quite sure how long he’d sat there staring at this report. Time itself seemed almost like the words and the people, it swirled past him in a blur of sounds and colors, but he never could quite grab ahold of it.
Something smacked him in the forehead, and he startled, looking up. “Remus,” Janus sighed. He picked up the projectile that had just been lobbed at him. “Did you steal paper from the 20th century supply again?” he asked, staring at the folded-up piece of white paper in the shape of a crane. It was one of Remus’s favorite designs. “That’s not what it’s for.”
“There’s a message inside!” Remus replied, happily.
Janus glared at him and carefully unfolded the paper. He squinted at it, and yeah, that was way worse than the screen. Maybe it was worth his money. Or maybe Remus’s handwriting was just horrendous.
He squinted at it for a few moments and then looked back up. He blinked at his surroundings. The note had said ‘Go home. Work ended three hours ago.’ and that certainly seemed accurate considering he and Remus were the only people left in the office.
“I still have to finish this report about the New Easter Island mission,” he said to Remus.
“I’ll do it,” Remus said. “You’ve been working without a break for hours, and I probably owe the agency some time since I took a coffee break to 22nd century France this afternoon.”
“You what?” Janus asked.
”They have the best coffee,” Remus said, and then grinned wolfishly, “and the best guys.”
“Stop doing that stuff,” Janus hissed. “Your lucky I haven’t reported you already.”
“You wouldn’t,” Remus said, very sure of himself. “You like me too much. Plus, without me, you’ll forget to go home and sleep every night. So, it’d be a loose-loose. Now up! It’s time for you to go home.”
Janus sighed and stood. “Fine,” he said. “I’m going, but that report better be done like you said or I will report you for your coffee excursions.”
“Sure, you will,” Remus said. “Now shoo.”
Janus spared him one more glare before standing from his desk and waving his hand through the air. The machine at his wrist buzzed softly and the display screen lit up around him. He jabbed a finger at the last of the three pre-set locations and, with a feeling like he’d just stepped into a pool of softened butter, he was home.
He groaned and fell back onto his couch immediately. “Time?” he asked.
“1:57am,” a soft voice said from his ceiling. He groaned. Considering the agency liked to keep their schedules aligned even though his house sat almost 2 millennia before the agency even existed, he’d have to be up in 4 hours to head back to work. They said it was to ‘stop them from experiencing time jet lag’ and ‘maintain their circadian rhythm,’ but with Janus it usually just ended up with him ‘not getting enough sleep’ and ‘suffering greatly.’
Sure, he had been fine with it, encouraged the policy even, when the agency was created, but that had been before he’d had to live it.
His stomach suddenly grumbled, reminding him that he hadn’t eaten since before the mission he’d been on earlier that day. He was exhausted, but he also knew trying to go to bed this hungry would result in him not being able to sleep at all. He dragged himself to his feet and into one of the barstools at the kitchen island. He didn’t want to wait for the auto cook feature to cook him something and he especially didn’t want to cook something himself, so he pressed a few buttons on the side of the counter and a protein infused, still cold pop tart popped out of the table.
He thought it might be a Hot Fudge Sunday one, but he honestly couldn’t tell. The protein infusion made all of them taste rather horrible. For all he knew, it was one of the Burnt Rubber pop tarts Remus had once snuck into his pantry. To be fair, he hadn’t even noticed until he’d went to go stock his pantry and realized that there was half a box of those things. It was just another example of Remus using time travel for things he shouldn’t. They were a year 2513 delicacy.
The 2510s were an odd set of years.
He chewed on the possibly chocolate, possibly rubber flavored pastry and glanced out the window. Though it was dark, one could still see the water of the man-made lake his home sat on thanks to the floating lights that hovered above it. Each agent working for the TPI received a home and alternate identity in a time and location of their choice. (Within reason, that is. Remus’s request to live among the dinosaurs was quickly denied and new rules were put into place immediately after.) Janus had chosen the late 24th century with a moderately sized home on Lake BlueBox. He didn’t have many close neighbors, but the ones he did know thought he was an accountant who went by the name of Declan Banks.
No, he had not chosen the last name. Yes, everyone got those types of names. The Agent Management Office had a sense of humor or were just not creative. Janus only knew one employee in the AMO and he’d been avoiding him for the past three years as much as possible. Cowardly, maybe, but he knew if he gave the man too much information about his general lifestyle, he’d be dragged into the AMO to talk about his mental state and feelings, and honestly, that would make everything worse.
As soon as he finished the poptart, a glass of water popped up from the table making him jump despite the fact that he had been the one to set it to do that automatically years ago. He downed half of the water and picked up the glass to take it to his bedroom. He should probably clean himself off before bed, but he couldn’t be bothered today, and just stripped off his uniform and collapsed into bed in his underwear. The morning was going to come far too soon, he knew. Yet, his mind would not quiet. His brain kept filling out the report he trusted (well, hoped he could trust) Remus had already finished by now.
He eventually groaned and rolled over in bed. “Play something,” he requested. The screen by the side of his bed lit up.
“Randomizing the ‘Something’ video playlist,” the soft voice said from the ceiling.
A dance recital which he knew had been recorded in 2033 started playing. The images moved on the screen in front of him, but the sound drifted from all around him. He let his eyes linger over the way the dancers’ bodies moved as the sounds washed over him. The image of elegantly twisting limbs remained in his head long after his eyelids drifted shut and he finally fell asleep.
Chapter 2
The morning was just as torturous as Janus had expected it would be. He chewed through another poptart, this time bothering to actually check and see that it was a cinnamon-sugar one and drank three cups of caffeinated orange juice. Then, he waved his hand through the air and selected the 1st saved location on his device. He popped up directly behind his desk where he’d been standing the night morning before.
Someone, probably Remus, had shut his integrator down. He swiped a finger across the power button, and it flickered back on, scrolling through its morning start up routine.
The machine scanned through all of the data in the three main system it was connected to and sorted all information into things that concerned him, could concern him, and did not before then sorting the first two categories into order of importance. As it did, he set up his screen reader so he would hopefully not start the day with more of a migraine than he already had. It took about 3 seconds for everything to turn on and settle.
Sitting down in his desk, he dismissed the notification that Remus had finished and submitted the report from their mission the day before.
A mission had been scheduled for him today, and the details were in his inbox. A piece time travel technology had been accidently dropped by an archology student in the 1890s during a trip. It was an earlier model of emergency time travel given to time travels that would dump them back into the Registration Office in the year they originated. It wasn’t extremely dangerous, but could pose some problems, especially if someone who didn’t know what it was activated it.
Surveillance agents had tracked it down and found that it had been picked up by a local and sold. Though no one from that time had known what it was, they had identified that it was made out of a precious metal and it had been crafted into an expensive necklace. Janus and Remus were supposed to retrieve it today. It had been pinpointed that the most opportune time for the extraction was 1923 during a masquerade ball held by those who had bought the necklace.
It was a fairly low stakes mission. He wasn’t set to leave for another couple of hours, so he clicked through the rest of the important notifications and then set off to meet his missions coordinator, Rhi, in her office.
Rhi and Janus got along fairly well. She was a well put together woman who took her job incredibly seriously. It was fair as her job was to organize all information and materials from every other department and make sure the agents she was assigned to got and understood all of it. A mistake from her could lead to an agent’s death or something far worse.
This, of course, made her relationship with Remus… interesting to say the least. Janus could never place whether they were nemesis, frenemies, or mortal enemies, and he doubted he would ever know.
“Okay, but it’s the 1920s America,” Remus was already in her office arguing when Janus arrived. “There were so many gangsters! I could be a gangster. I would make a fantastic gangster! Just give me a gun, a snazzy suit with a white hat, and a buttload of alcohol. I will be running Chicago with Al Capone in five minutes.”
“Al Capone didn’t become a crime boss until 1925 and you are going to 1923,” Rhi said, sounding bored, “you aren’t going to Chicago, and as I have already stated, your cover is already decided.”
“But-”
“It is nonnegotiable, Agent Clockson,” she said firmly. Remus pouted, but seemingly accepted his fate.
“May I come in?” Janus asked.
“Please do,” Rhi said. “You have been to the 1920s before, correct?” she asked Janus.
“Yes ma’am.”
She tapped the screen on her desk in response. “In the last two years?”
“About two months ago,” he responded. She tapped something else.
“Any blacks, reds, or yellows?” she asked.
“All green.”
“Great. Do you need a refresher course on basic cultural or linguistic procedures?”
“No.”
She pushed one more thing and then swiped the check-in document over to him. He glanced at the report stating he’d had no incidents of any level the last time he visited the 1920s and had opted out of the optional refresher course, and then pressed his finger against the screen to sign it with his fingerprint.
The document returned to her side of the desk automatically. “Okay,” she said swiping another document from her left over to be in front of her. She twisted her wrist to copy it and slide copies to Janus and Remus. “Here are exact details on the time, place, and event you are going to, as well as details about your cover.” Janus scrolled through his quickly. It wasn’t as detailed as some he’d had considering this was a brief in-and-out missing, but he still took care to memorize everything on the page.
As he and Remus read through their things, Rhi got to her feet and turned to the storage compartments behind her desk.
She grabbed out two packages and when they’d both signed that they’d read and understood the paperwork, she slid them across the desk to them. “These have everything you need,” she said. “Clothes, money, and an invitation to the party you’re off to attend. You are to get changed now, have a last check in with costuming to make sure everything is in order, and then report to decontamination in 23 minutes. Your set to leave in 38 minutes. Any questions?”
“How much-?” Remus started.
“None, agent,” Rhi said.
“But-”
“No alcohol,” Rhi said. “It is the prohibition era in the United States anyway.”
“Like there’s not going to be alcohol at the rich people party,” Remus said sullenly.
She pressed her lips together. “It is an in-and-out mission,” she said to both of them, and then turned to glare at Remus. “Do not get arrested.”
“I don’t know,” Remus said joyfully. “I think I still have room for a 1920s mug shot on my wall.”
“Behave,” she said, “or I’ll report you for the cat you smuggled in from the 1800s.”
“You’d never,” Remus said. “You enjoy the cute pictures of Diesel Fuel I send you every day too much, and you know it!”
“Just… don’t get arrested.” She turned to Janus. “Don’t let him get arrested.”
“I’ll do my best,” Janus promised, standing. “Now come on, Remus, we need to get changed.”
“You just want to see me naked,” Remus replied with a wink, but he did stand.
“If I see you naked one more time in my life Remus, my eyeballs will fall out of their sockets,” Janus said, waving to Rhi as he pulled Remus out of the door.
“Kinky.”
Janus’s eyeballs almost did fall out right then and there with how hard he rolled them.
They got changed quickly, Remus complaining and saying if he couldn’t dress like a gangster, he should at least be allowed to wear a flapper dress. Janus had long ago learned to ignore his ramblings. He did seem enthused about the included mask for the masquerade. It was a silver fox shaped mask with green accents that reminded Janus of the Egyptian God Anubis.
Janus’s own mask on the other hand, was only designed to take up the left half of his face. It was mostly golden with a black swirled design. Attached to the side there was a plume of golden tipped white feathers. He had to give it to the costuming department, they did have good taste.
Once they were both dressed, they were poked and prodded by one of the costumers to make sure everything was accurate, fit right, and had been put on correctly.
After that, they went to the decontamination area to have themselves and everything they were taking with them sterilized so they didn’t accidently take any pathogens to the 1920s. They also received an oral vaccination to be sure they didn’t pick up anything from the 1920s and bring it back.
Then they were ready to go. The correct time-space coordinates had already been sent to their timepieces. With a push of a button, they were off.
Inciting Incident
Chapter 3
Janus and Remus both appeared at the same moment a couple of feet apart in what looked like the inside of a garden shed. There was already a man waiting for them a few feet away. “Sup babes,” Remy said, just like he always did. The T-Agent looked their costumes up and down and whistled. “Now that,” he said, “almost makes me want to be one of you time jockeys.”
“They wouldn’t let me have a gun or a canister of moonshine,” Remus pouted.
Remy snorted. “Sorry, babes, but that makes my job a lot easier. If I’ve gotta fish you outta the 1920s criminal justice system, I’d rather it not be because you shot someone on accident ‘cause you don’t know how to use the safety.”
Remus groaned dramatically. “Everyone is lame.”
Remy just shook his head. “Meet back here when you’ve got the necklace,” he said. “Don’t make a move until after 11:05pm and before 11:17. That’s your window.”
“We know,” Janus said. “See you then.”
“Have fun at the party boys,” Remy said and then lowered his shades to look at Remus, “but not too much fun.”
“Yeah, yeah,” said Remus, already towing Janus out of the garden shed. The way had been specifically cleared for them, so they met no other people before they’d rounded the house the party was taking place and had gotten onto the driveway in front of the house.
Without missing a beat, they strolled up to the front of the house, just as a car pulled into the end of the driveway. Janus rang the doorbell, and a few moments later, a man who was clearly the butler answered the door. They handed over their invitation, and the man immediately let them in.
The party had already started when they slipped into the medium sized ballroom that had been decked out in streamers and other decorations. Janus’s nose immediately wanted to scrunch as the smell of sweat from all the dancing already going on as well as the too strong perfume meant to cover that stench wafted over him. It was by far not the worst smelling time period, but he was pretty sure some people still weren’t aware deodorant had been recently invented.
He checked his time piece which had been disguised as a fancy wristwatch for this trip. “Okay,” he said. “We have about two hours before we need to make our move. We should…”
Remus’s attention was already being dragged away by a young man who seemed to be providing guests with food. “I’m going to go ‘mingle’,” he said, winking.
“No!” Janus hissed. “Re- Richard! No!”
Yet, he was already disappearing into the horde of stinky bodies, likely to go scandalize a bunch of rich folks, and leaving Janus alone. Janus mumbled a curse under his breath that he was sure no one around him would understand even if they could make it out.
Unsure what to do with himself, he wandered over towards where the live musicians were playing jazz music, being sure to keep out of the way of the dancers. He was edging around the makeshift dancefloor, when one of said dancers must have misstepped and knocked into another one. The second man stumbled right towards Janus, arms pinwheeling. Janus reached out on instinct to catch the man as he fell.
There was a moment where the two of them just stared at each other, surprise evident on the other man’s face. He was wearing a mask that just covered the area around his eyes and the top of his nose, revealing a smattering of freckles across his cheeks that Janus imagined extended to his nose.
The mask was a light blue velvet with a flower stuck on the side near his right ear, and a trail of curled golden ribbon bobbed down around his chin. The party continued on around them, a blur of movement and sound.
“Are you alright?” Janus asked.
The man blinked up at him and then tilted his head slightly to the side as though confused, before a smile slowly grew on his face. “Oh, I’m fine Dove.”
“Dove?” Janus asked.
He giggled. “You have dove feathers on your mask,” he explained, reaching up a hand to touch one. His finger brushed the tip of Janus’s ear, “and I don’t know what else I am supposed to call you.”
“My name is Lee,” he automatically lied.
“Is it?” he asked, sounding amused. “Doesn’t seem to fit you well. I like Dove better.”
“Oh?” asked Janus. “And what’s your name so I can not call you that?”
The man chuckled. “Call me Pat.”
“Hello Pat,” Janus said.
“I thought you didn’t want to call me by my name.”
“I changed my mind.”
“Hmmm,” Pat said, finger tracing idly across Janus’s forearm which was when Janus realized with a start that he was still holding the man in his arms. He quickly went to release him, which Pat allowed with clear amusement.
Yet, instead of completely stepping away, Pat grabbed Janus’s arm. “What are you doing all the way over here by the way?” he asked. “Don’t you want to dance.”
“Oh,” Janus hesitated. “I don’t really dance.” Or at least not in the way the people around him were. He’d had basic training for this style, but it had been a while and he was a bit rusty.
“Everyone dances Dove,” Pat claimed. “At least if they know the steps and have the right partner.”
“But I don’t know the steps,” Janus said with an eyebrow raise.
He hummed. “Well, I know the dance pretty well by this point,” Pat said. “Why don’t I teach you how it goes.”
He was agreeing with the soft beseeching tone before he even realized it. Pat pulled him into the middle of the throng of people. He seemed to think, bopping his head to the music playing for a moment, before looking back at Janus. “Heard of James Johnson?”
Janus inclined his head.
“Well, have you heard his new song? Because there’s a dance that goes with it.”
He took a few steps away from Janus and started to dance. Despite his claim to know the steps, he wasn’t particularly good, but he made up for any loss of rhythm with pure enthusiasm.
Janus found himself smiling at the man, and after a few moments, joined in with the dance. Despite his lack of practice, he ended up having a better natural rhythm than Pat. Pat didn’t seem to mind that he was being outperformed, however. On the contrary, he giggled at himself the couple of times he stumbled.
When he fell into Janus’s arms for the second time that night, Janus decided he’d probably had enough dancing for the moment and pulled him off to the side to get something to drink and cool down a bit.
He watched the man take a snack and some punch from one of servers and thank him happily before turning back to Janus. Pat was easily able to keep Janus’s attention as they chatted. He was bubbly and soft, and Janus found himself enchanted as they talked.
He was explaining the steps of a different dance, a couples one. “Knowing how to perform the tango will entrance any girl you want,” Pat said, something mischievous sparkling in his eyes. “Assuming you’re that type of fella.”
“As opposed to what?” Janus asked.
Pat leaned in a bit closer. Not too much, but enough that he was definitely in Janus’s space. “A different type of fella,” he said simply, before smiling and leaning back.
Janus let out a shaky exhale and took a sip of punch. He glanced over at Pat. “Tell me about yourself, Pat,” he said.
Pat hummed in contemplation. “Well, I went to France recently.”
“You did?”
“Oui, c'était amusant, mais j'ai eu des ennuis”
“What kind of trouble?” Janus asked curiously.
“Oh, the kind with a pretty boy and crepes that were way too sweet. Anyway,” he continued. “Other than that, I mostly help out my friend. He’s an inventor.”
“And how do you help him.”
He shrugged, “Running errands mostly, and making sure he gets enough sleep, because otherwise he gets distracted and forgets. And you?”
“I’m a banker,” he said, remembering his cover, but felt compelled to add, “but I like to travel as well.”
“You do look the type?”
“And how is that?”
Pat shrugged. “I can always tell a wandering spirt from the masses, and you are easy to spot.” Pat looked at him then with a secret smile on his face, and Janus felt suddenly known, like the man in front of him had known him for years even though they’d only just met. Looking at him then, he wanted suddenly for that to be fact and not a flight of fancy.
He was brought firmly back to reality in the next moment. “Lee,” a pointed and familiar voice said. Janus’s head snapped up to see Remus, staring at him. He tapped his wrist. Janus glanced at his own wrist: 10:58pm. He just barely managed not to curse.
“I,” he said looking up at Pat. “I’m sorry, but I have to go.”
“That’s okay,” Pat said easily. “It is getting rather late.”
“Yes,” Janus agreed. “Well… goodbye.”
Pat, titled his head, a half smile on his face. “I’ll be seeing you around.”
Janus nodded, and turned away from him towards Remus. He didn’t look back as they excited the ballroom. They snuck into a small side closet for coats that wasn’t being used as it was summer.
“So,” Remus said when the door closed behind them.
“Don’t,” warned Janus.
“I’m not one to judge,” Remus said.
“Shut up.” He glanced at his watch. It was 11:02. “We’ll go in 5.”
“I have to give it to you. He was very cute.”
“We’re not talking about it.”
Remus just laughed joyfully, and Janus did his best to halt the blood rushing to his cheeks.
At 11:07, well into their window, they slipped back out of the closet, and towards the stairs as the party raged on.
Despite how Remus usually never shut up, he was able to be quiet when it counted. They snuck to the master bedroom of the home’s owners in silence. The door was already wide open by the time they got there, and Janus didn’t think anything of it. At least, he didn’t until they entered the bedroom, and there was someone already there.
He turned from the dresser he’d been standing in front of to face them, sending Janus the same smile he had down in the ballroom. Janus and Remus both froze. “Sorry, sweetie,” Pat said. “Were you here for this too?” he held up the necklace they’d been sent for. He closed his fist around the charm made out of time travel tech.
“What?” Janus said.
Pat giggled and winked. “Unfortunately, I need it a bit more than you at the moment. So, I’m gonna have to go.” Janus stepped forward, not really sure what he was intending to do, but Pat just smiled. “See you some other time, my Turtle Dove.” With a snap of his fingers and loud crack, he disappeared. The mask he’d been wearing fluttered to the ground.
29 notes
·
View notes
Text
How to Sew YOUR size
Being a cosplayer is challenging for many reasons. Expense and flamboyant designs can be tough to deal with, but even if you go to that sketchy costume site to buy your costume there is one more challenge to face...sizing. As a tall and chubby woman, I’ve always found it nearly impossible to find my size. Even sewing patterns seem to have the problem of making “average” size ranges that don’t fit right. Anyway, the point of this tutorial is to teach you guys how to sew basic patterns to fit you!
NOTICE: If you like to buy sewing patterns and just adjust them to your size, that’s fine too!
Step 1: Break it down now, ya’ll!
The first step to any project is breaking down your outfit. I’ll be using my Litwick cosplay for this. I find it easiest to look at (or create) a reference, then draw it piece by piece on a separate paper. “Okay, so how do I know what is and isn’t a whole piece?” You don’t. Unless you find a very detailed character sheet, the number of pieces is completely up to you.

As you can see, I made views from the front and back. Colors and designs changed while I was sewing this cosplay, but such is art. Also, it really helps to look up similarly shaped clothing online to help you draw a flat of your clothing. Flats are exactly what they sound like, a 2D drawing of clothing. This is where you’ll lay down seams, buttons, and just get a general idea of the shapes you’ll cut out for your outfit.
Step 2: Shapes and Measurements
No matter what size it is, clothing will usually be made up of a few shapes. A size 4 shirt will be made of the exact same shapes as a size 26 shirt of the same type. With this information in mind, break down each article of clothing into basic shapes. The halter top on the top of my dress was made of stretch cotton with 4 shapes: collar, back left, back right, and front. I admit I altered this from a sewing pattern, but we’ll get patterns in a second.

The vertical lines with horizontal marks are seams. This isn’t necessarily a flat as much as it is a diagram, really.
Also, I live by measuring tape. It allows you to go around round objects (like literally anything on your body) without all the hard math! If you don’t have one, I advise either getting one or magically become capable of math. The rest of this tutorial uses measuring tape.
In the fashion world, there are basic areas for measurement. If you’ve ever gone to a tailor, these are the same areas they’ll measure on you to tailor your clothing. This picture will help you locate those areas.

Once you know your sizes and the shapes you’ll be making, you’re ready to start!
Step 3: Making your pattern
You have your reference, your flats, and your measurements. Time to mush them together and splatter them on some paper. I use wrapping paper with a grid pattern. Cheap, easy, maintains better than those cheap toilet paper-like sewing patterns from Joanns.
Always make a mock of your clothing with cheap material that’s similar to your costume fabric. Mock garments allow you to save good fabric and make alterations.
Patterns are actually a lot easier than they seem. If your neckline is supposed to go (comfortably) around your neck, measure your neck, divide by the amount of pieces you have. I had three pieces for the halter top. Because my front and back pieces were symmetrical, I just cut two pieces and split one down the middle. Why does that matter? It matters because it means I divided my neck circumference by two, then split it into three. If you measure the front piece both of the back pieces, it still adds up into the total of inches around your neck. If it doesn’t? Trim it down or re-math and re-cut.
For your bust and waist, take your bust and waist measurements and alter the shape to those measurements. Commit this to memory, you’ll use this technique for ALL of your measurements (or at least until you learn a more formal technique). Using a ruler, draw a vertical line on your paper that matches the length of your garment. Now create horizontal lines (starting from the middle number of your measurement i.e. 5 inches, line the vertical line up with 3) and draw a line matching the HALVED total of your neck. Measure from your neck to the center of your bust. Draw another horizontal line at the end. Next, use a ruler to draw the shape of your garment. I freehand curves and alter them as I go (HENCE THE MOCK MATERIAL). In general, though, it’s a better idea to use a curved ruler. The point is that you’ll want to hit every end point of your horizontal lines. Depending on your measurements and material, you may have a few curves in your originally straight, blocky, shape. That’s natural.

Now, the bust/waist/hip measurements are a bit...exaggerated, but I wanted to show that it’s perfectly fine to start with the small shape on the bottom and come out with a slightly curvy or straighter pattern.
Depending on your material and pattern, you might need to add darts to make a tighter fit. Darts are triangles or diamond shapes made on a pattern, that act as folds to make a garment more form fitting. You’ll want to test placement of your darts through your mock up. There’s a few places to place darts, but the places I’ve used them are: bust to armpit, stomach, and back.

Step 4: Sew and alter
If you’ve decided to make a mock first (as I so wisely advised) your next step is to sew your pieces together and alter them to fit better. Alterations could include: Adding or subtracting the size of your patterns, adding or releasing darts, planning for zippers/buttons/closures, etc. Once you’re happy with your mock garment, seam rip the pieces apart again and use them to alter your original pattern.
NEVER CHEAT YOURSELF QUALITY TO MAKE UP FOR LOST TIME. If you mess up and you have 3 days left until that convention just go without a costume! I know going to a con without a costume when you’ve worked so hard sounds heinous, but trust me, it’s better to make up for your mistake for a future con than to sew over it and pump something you’re not happy with out.
Ta-da! You have your own pattern to fit your body! Now you can sew up the real thing.
DIsclaimer: I am but a humble space slime. I cannot do more than simple math. I also admit that I have no formal training. This tutorial is how I taught myself to sew my own costumes. It took me years to perfect this technique. It’s a little long winded (probably a lot more steps and alterations than a pro would have), but I decided to put this out there for anyone who wanted to try their hand at sewing. Good luck you guys!
Pro tip:
The amount of pieces for the garment decide the size of which you cut them. If you have two pieces, a front and a back, divide your measurements by 2. If 4 pieces, divide by 4. ALWAYS ADD IN YOUR SEAM ALLOWANCE (.25 inches)
Pro tips:
If there’s belts and buttons galore on your costume (and you aren’t a COMPLETE perfectionist), just sew them down. Not every belt or button has to be functional.
More or less pieces depend on the effect you’re going for. If you have a few layers of shirts or jackets, it will save time (and you from heatstroke) if you just create the illusion that you’re wearing more than one piece of clothing. You could also create each piece and have that volume of multiple articles of clothing under that jacket. Your choice!
#cosplay#sewing#cosplay tutorial#sewing tutorial#anime#games#plus size#television#cosplay community#crafts#cosplay crafting#cosplayer#anime costume#cosplaying#costume#costumes#beginner tutorial#cosplay for beginners
95 notes
·
View notes
Note
Howdy, let's go! 21, Ace-PanRomantic yet still prefer males, gender questioning, 5'4, chubby pare shape, acne scars/redness, dark brown almost black eyes/wavy thigh length hair, beauty marks on left bottom lip line/think an incomplete snake bite and on my forehead slightly off the middle are two more beauty marks, hooded eyes, down turned lips, and round face shape, duff beige skin tone, some say I look as young as 15, typically dress in dark colors that are feminine and gender neutral. (1/2)

I’m sorry it took so long! I hope you like them. Also, DAMN your hair is long lol. I can’t get my hair to grow past my chest, it just stops growing lol, though I do now tend to keep it a short bob because I gave up on length lol.
Pushing Daisies:
I think you’d fit in really well in the whole Pushing Daisies style aesthetic lol. And of course, I ship you with Ned (he’s pretty much the only person to ship with though if you prefer males lol). But I do think you would go well together. I think Ned would be very respectful towards you and your boundaries. He loves your beauty marks and sometimes looses himself and traces the invisible lines between them when you are lying comfortably together. Ned is very respectful and would never talk down or over you. He also adores your personality, your willingness to learn, and how kind you are to others.
Prompt 19: Letter (I took a little detour on this, so the more accurate prompt would be ‘Sticky Notes’ hope you don’t mind)
Ned was walking through the kitchen preparing to open the restaurant when something bright pink in the corner of his eye caught his attention. Turning to look, he sees a little pink sticky note stuck on the pie shelves. Smiling to himself, already knowing what it is, he walks over to it.
Pulling it off of the shelf he read the words with a fond smile ‘Try not to burn any pies today! xoxo ♡”
Shoving the note into his apron pocket he continued on with his day.
-
You yawned at you wandered through the kitchen ready to get some coffee/tea to wake you up. As you got to the coffee maker you smiled as your eye caught on a large green paper not stuck to it.
‘Things to remember today:
-Drink Water, Eat Food
-Breath
-That you are perfect and beautiful
-That I’m sorry AGAIN that I accidentally knocked your nail polish off the counter, braking the vial, I promise I’ll buy you a new one
-That I love you
xx”
You grinned at the note as you took the note, carrying it to the living room. Taking out a small paper box from the shelf you opened it, your eyes scanning the small pile of bundled sticky notes, all covered in Neds hand writing. Adding the new note to the collection, you closed the box and placed it back on the shelf before carrying on with your morning.
-
Ned woke up with a groan, stretching and slowly opening his eyes. His hand wandered over to your side of the bed, only to find it empty. Frowning slightly he ran his hand over his face, only for it to knock off a sticky note that had apparently been placed on his forehead.
Squinting as he picked up the yellow note he blinked a few times to clear his still blurry vision. “Left early for my appointment so I could stop at some stores on the way, see you later! xoxo ♡”
Wrapping his hand around he note, he placed his hand on his chest as he slowly lingered back to sleep, wondering if you’d be back by the time he woke up again
-
You sighed as you leaned your head back against the seat of the car, trying to calm yourself from the stressful situation you just got out of. Your anxiety pulsed through you as you took a few breaths trying to calm down.
Feeling the pulse of emotion you grabbed your bag, looking for your car keys. You just wanted to get home. As you looked for your keys your eyes landed on a crumpled blue sticky note.
Pulling it out, you straightened it out, your eyes grazing over Ned’s familiar handwriting as you wondered when he put this in your bag.
“Just remember that no matter what happens, you’ll survive, because you are strong and amazing. And whenever you need help or reassurance, or even just a hug, I will be waiting at home for you. I love you, more than anything. xxx”
You felt tears swell in your eyes as your anxiety and stress began to fade away. Ned knew that today would be stressful for you, he offered to come, but when you said no he must have written and stuck this in your bag.
Grabbing your keys you were more excited to get home and thank him, and get yourself that big hug he promised in his note.
^^This is pretty close to what your height different would be with him lol
The Hobbit
I ship you with Thorin. Thorin would appreciate your outlook on the world, your politeness, self-sufficiency, and the way you take no shit. He was taken back by you when you first met and thought you to be very interesting, he grey to like your company quite a lot, and over time he needed it. He is comfortable in a non-sexual relationship, and adores your companionship. Though he isn’t the best at emotions, he does try his best to comfort you when your anxiety and depression kick-in. He hates seeing you hurt inside and will pull out all the stops to get you out of your own mind.
Prompt 19: Letter (**Lansel is apparently “love of all loves”, taken from this post by @demifishblog)
As you stared out at the rising sun, sat outside your cabin home in the hills outside of the Blue Mountains. A home you had shared with Thorin before he left on his quest to Erebor what felt like so long ago.
Pulling a folded piece of paper out of your pocket, you ran your hand across it before opening it for the hundredth time.
Your eyes scanned over the words, his voice in your head as you read them. You could recite the letter to yourself, as you’d read it so many times, but you loved to see his familiar handwriting as you read it.
My dearest Lanselê,
I know I sometimes cannot speak my true feelings, so I hope that this letter holds more of them than I was able to say to you before I left.
I know you fear for me and my kin, as I fear for you at my absence. But I have faith that you can survive without me, as I have faith I will one day return to you, once again, and as the King of Erebor. Once I do, I will take your hand and you will rule by by side as I once promised to you. Though I know that matters little to you, as all you wish for is my quick return.
I cannot promise it to be a quick return, but I will try my best to come back to you before you have given up on me.
And please know, that al the days that I am gone, my mind and heart will constantly be with you, as I imagine your voice and your beautiful smile and how I hope you will be thinking of me. I know that there will not be a day in which I do not imagine you being in my arms once again.
I hope you forgive me, my love, for leaving you. I hate that I had too. And I promise that I will make up for my absence for the rest of our lives. I will give everything I have to you, and all the love I can muster. I promise. Just please, wait for me. Wait for my return.
And every night, look at the moon, and know that I look at it as well, thinking of you, and sending my love with it to you every night. And every morning, as the sun rises, know that I watched that same sun, rise for me. And as I watched it rise, I whispered ‘I love you’ to you, and hoped that some how you could hear it.
You are as patient with me as you are kind, and I hope that patience does not give out, as I impatiently wait to be back with you. I only ask that you have faith that I will return. I WILL return to you. I promise.
Until my return,
Thorin
As you sighed, closing the letter once again, the distant sound of hoof-beats made you raise your head, your eyes scanning the horizon. As the sound got louder, you rose from your seat, your heart beginning to bead rapidly. Wondering what was coming.
Seeing the top of a flag appear above the hill, you took a step forward. You covered the sunlight that had been blinding you with your hand as you tried to focus on the appearing figures on horseback.
As your gaze adjusted, the figures were still back-lit and hard to see. But as your eyes landed on the figure in front, you heart seemed to burst from your chest. You could recognize that silhouette anywhere, and as he grew closer, and his appearance now clear, your grin widened, your jaw almost aching from the size of it as every ounce of worry you had been carrying on your shoulders faded away, the only thing you could think now was that it was over. He was home.

#ship#ship request#ships#5k ships#5k ship event#special ships#drabble#pushing daisies#ned#ned x reader#the hobbit#thorin#thorin x reader#thorin oakenshield#thorin oakenshield x reader#youngcroissantturkeyworribler#ask
26 notes
·
View notes
Text
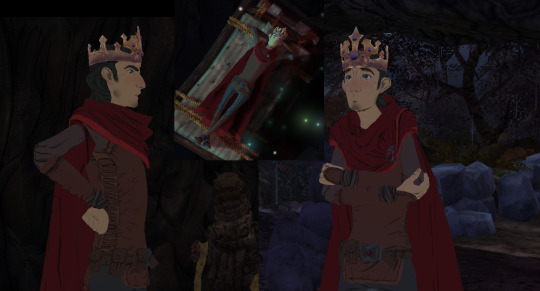
So you wanna be a king (pt2)
(or at least cosplay one.)
Continuing the cosplay creation saga for anyone interested, here’s how I put together my King Graham cosplay:
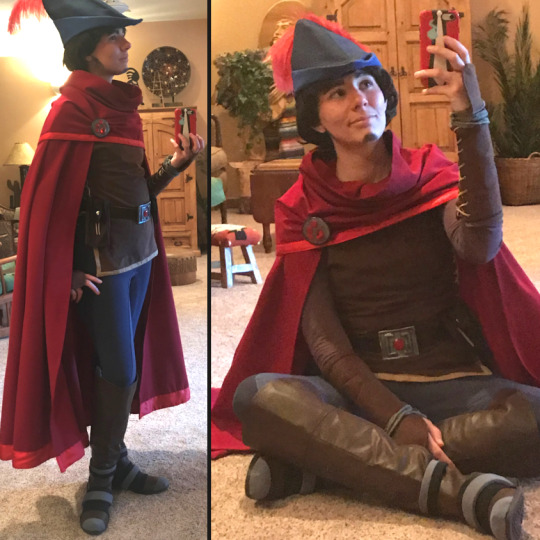
Part 2: Jerkin
Disclaimer: I’m totally novice at cosplay and only do it for like one event per year if that, so take what you will or throw it all away.
Also this is not really a step by step tutorial post because this is several years ago and the details are hazy.
If you’re following along, then you should have a cloak and cowl (click for sort-of-instructions-here).
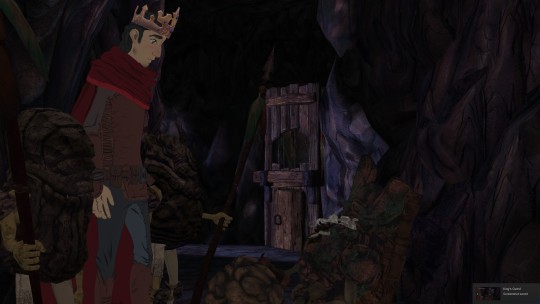
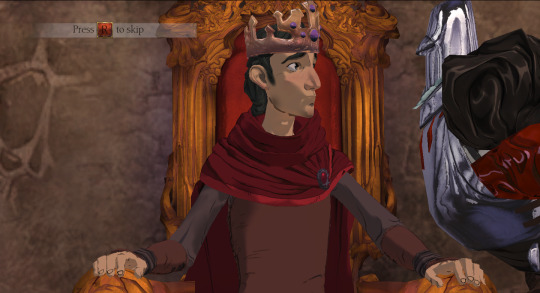
Step one: Pull out those reference screencaps you made in the first part and stare at them. Repeat that you still love this character and that you’re committed to this nonsense. Ready? Let’s go.

The long sleeved purple undershirt I just happened to find at Goodwill. Please try to find something lightweight--this costume is warm.
But you won’t be so lucky to find a jerkin at Goodwill too. You’ll have to make it, or at least modify something.
Still, it’s just an elaborate brown tank top, more or less. You don’t even have to worry about attaching sleeves! Surely this is an eas--wait, what are those lace things? Could you even bend down to pick up inventory items with laces that thick and close together? How can I translate that into something semi-practical I can wear without wanting to eat my adventuring hat?

It’s a great design, but I’m mortal, not digital. If you can determine a simple way to get that lacing to look accurate while still being comfortably wearable, let me, novice cosplayer that I am, know. (maybe if they were just made separately, flat, and sewn on, like a decal thing?)
I had planned on building this out of fake leather/suede-ish material, but then I remembered I wanted to also wear this as my new RenFest costume, and I didn’t want to die in July.
So I went to my local Joann’s and picked up a considerably lighter, thinner, and satisfactorily rich looking brown fabric (I think it was this stuff: https://www.joann.com/kona-cotton-solid-quilt-fabric/1378397.html) for both jerkin and bracers. I’ve lost the original receipt, so I’m not sure how much I bought. Too much, because my storage bin is full of leftovers. I’m sure 3 yards is more than plenty, but measure to be sure.

Tunic time!
This is the point where the “How To Graham” tutorial breaks down and becomes especially fuzzy and experimental, because I kept none of my in-process notes. High five, Gerbil, very helpful indeed. You might just want to glance at this for ideas before doing your own thing.
I laugh in the face of patterns, hahahaha. (bad idea, don’t be me.)
I got my favorite fitted t-shirt (Disney Afternoon ftw), paper, a ruler, and old scrap fabric to maul as practice. I pinned my shirt flat to paper and traced both the front and back separately (folded the sleeves in so my tracework was sleeveless). The front had a deeper neckline but was otherwise nearly identical to its back partner. Once both sides were traced, I added a half inch margin around them, cut them out, and started working on fake jerkins, so I could sculpt the right fit before I got out the nice fabric. I wanted the jerkin to be pretty form fitting as Graham’s is, so I curved the sides in a bit deeper.
I made at least two fake jerkins, fyi.
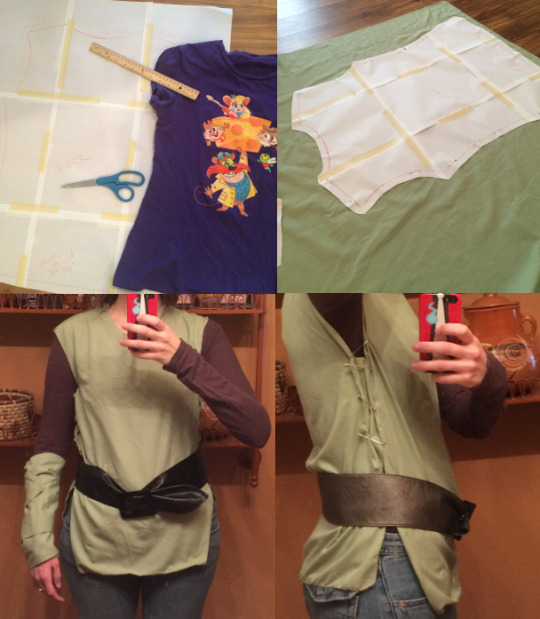
Since I went pattern-less (hahahaarrgh), tests were crucial, especially regarding the neck hole. The t-shirt is elastic, but my fabric is not. I personally require at least 22″ around the neck to get the thing over my nose, and it’s barely enough clearance. (I’m fairly certain I measured some other shirts with my fabric ruler for a loose size to aim for, then did edits on the junk fabric til I had a size that worked.)
Tests also showed that the back piece needed an additional two and a half inches of fabric on the bottom thanks to how it sits on my shoulders. In the above image, you can see the green fabric is higher, but I wanted the piece to look balanced from the side.
It’s a touch hard to see as it’s usually hidden by the cloak, but I find a balanced jerkin is a happy jerkin.

And here’s that additional fabric without a human in it. (ack don’t look at my uneven stitches)
By now, you should have a belt (in my method it doesn’t matter how it clasps, so pick any belt you please as you’ll be wearing it backward) so you can determine how long the flappy things on the front and back should be. Where your belt sits comfortably is where your side laces will stop and your trim on the flap things will start--the belt hides the transition.
Graham’s belt sits low on his (fantastically defined) hips. I prefer it on my waist so it doesn’t slide up when I’m walking, so my flap things are longer than his. For reference, my flap things...no, wait, there must be a technical term....Google says it’s a peplum. My peplum (??) are 8″ish long, though his look like they’re about half that.
For reference, as a 5′6″ person, from hanger to hem my jerkin’s back piece is approximately 28″ long. The most important things here are how long it is overall, and if the neck hole is big enough to fit over your head: nearly everything else can be altered when wearing it via the lacework I have planned.
Look, at this point, you might want to give up on me and find a real shirt pattern, fitted or not. I understand. I’ll wait. This isn’t actually a step by step tutorial so much as a vague What I Did And It’s Probably Wrong.
Okay, you’ve traced your favorite shirt (or bought a real pattern like a good person). Your tests have shown that your peplum sit at the same height on your leg, and you like the shape and feel of it when you wear your scrap fabric test (I recommend using safety pins to replicate the laces during the early size test phase). You’ve cut out the front and back shirt shaped pieces of brown fabric (with that half inch hem margin all around), and now they’re sitting on your floor, mocking you.
The actual construction part!
The only attachment you’ll give these pieces is via the shoulders. If you’re new to this Making Your Own Clothes thing and your fabric has a nice side and a not nice side, put the nice sides against each other and sew along the not nice side so when you turn it over your hem is inside.
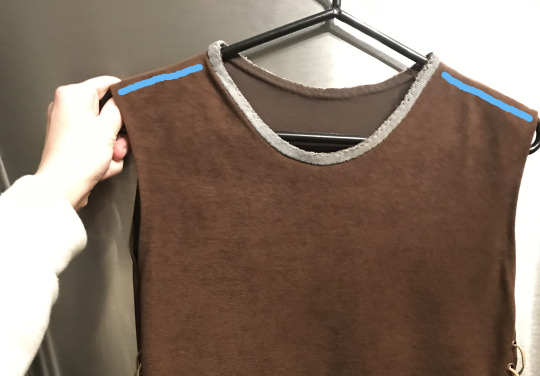
I seam-ripped a collar from a shirt I loved but was too worn to wear otherwise--no math or sewing your own collar from scratch if you swipe it from another shirt. No one will ever see it since your cowl tucks into it, so it doesn’t matter how it looks, though natural colors are better than, say, blue, in case your cowl slips a bit. There are lots of lovely videos about attaching collars: this one seems nice, if you skip ahead to the actual sewing-on part at 4:50. https://www.youtube.com/watch?v=k31FWDp1s5I

At this point, since you’ve fitted it and trimmed it and done all that you want to it to get the shape you like, you’ll want to hem your shirt by that half inch margin all around so it’s clean and easy for the next part. It only looks vaguely shirt-like now since it’s held together just by the shoulders.
Now, let’s get medieval on it.
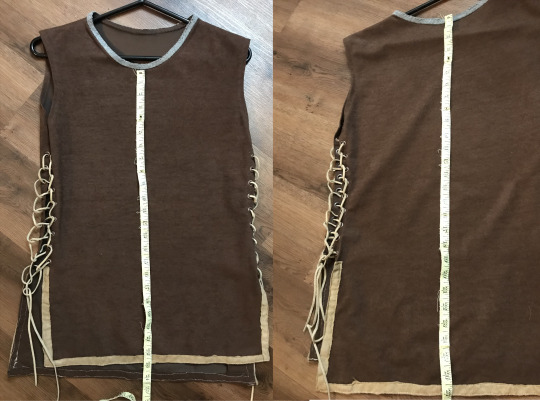
Time for lacing!
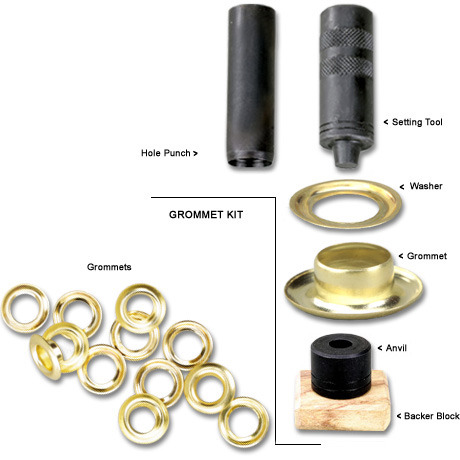
I used a blond suede leather rope to mimic the lighter color on Graham’s sides (check the beading or leather working section of the craft stores, and make sure it’s thick enough that it won’t snap under light strain, and thin enough it’ll fit through the grommet size you select). I already happened to own an anvil (...why?), so I just needed grommets. Mine appear to be 12mm--I got them in Ancient Copper. You’ll use them in the bracers later, too, so leftovers are a good thing for once. Hobby Lobby or Michaels can hook you up with supplies, but Etsy and eBay have more diverse color choices.

Every inch from where the armpit opening stops to where the trim of the peplums begins (the height of which was established earlier when I decided to how to wear the belt), I made a mark for a grommet, and marked its corresponding partner. For reference, I have 9 holes down each hem, for 18 total holes per side, and a grand total 36 grommets in the tunic. I jammed an awl through the holes marked and applied the grommets as per the packet’s instruction.
Like making a metal and fabric sandwich. With a hammer.
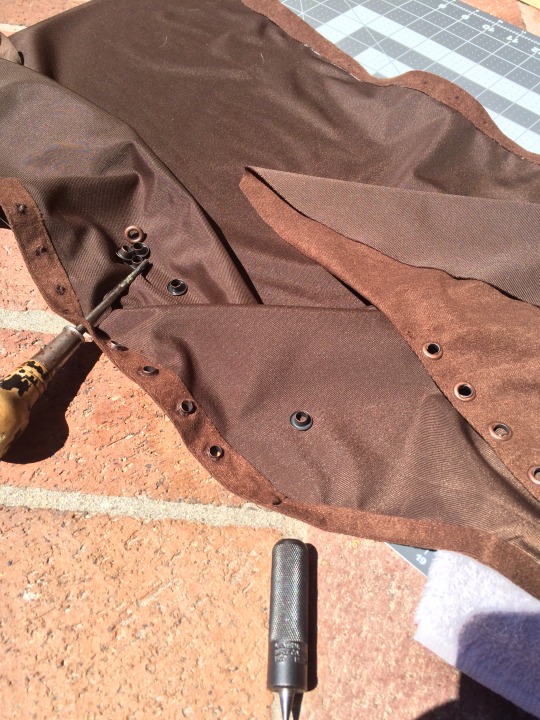
It’s totally therapeutic. I can see why Amaya’s into this stuff.
(It’s not a Looney Toons anvil, by the by: like this, instead.)
Unspool the suede rope and thread it through the grommets. To try and mimic the game, I use a ladder shoelace tie, starting with the grommet pair beneath the arms and running down until I tie a bow in the last pair. I tuck the loose ends into the waistband of the trousers. So, this: https://www.fieggen.com/shoelace/ladderlacing.htm

Finally, I made (because I couldn’t find to buy) my own trim about 1/2″ wide from some scrap light brown suede in the Joann Scrap Bin, and attached it to the peplum (is this truly a better word than flap, vote now).
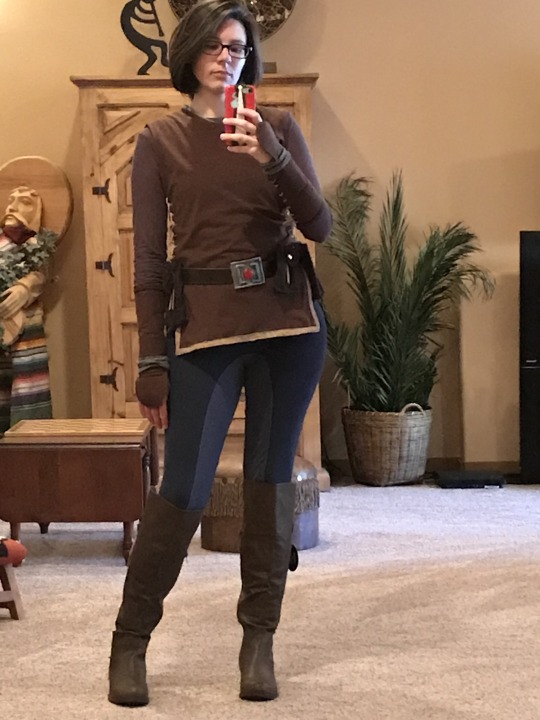
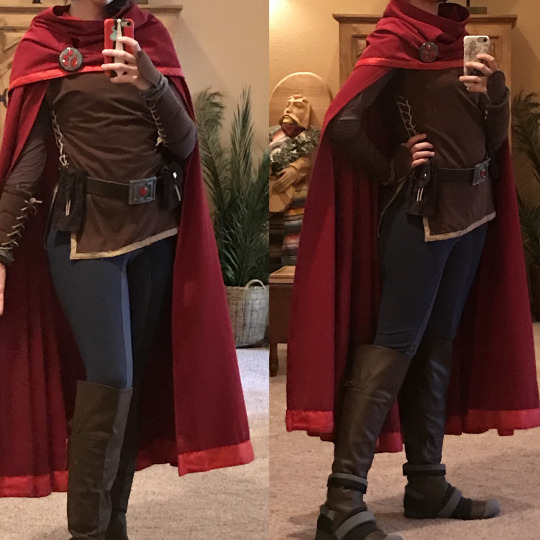
And that, friend, is a jerkin that would make any real medieval person flinch but should be cool for cosplay. You should try it with your cloak and cowl. If you’re following my method, you get to layer up, lucky you: anchor shirt, long-sleeved-purple-undershirt, jerkin, cloak (snaps through the jerkin’s collar onto the anchor shirt), cowl (to cover your shoulders so you don’t see the cloak tugging at your jerkin collar).
Yeah, it’s warm. Sorry.
Drink some water.
When you’re done sweating in it (eww, I know it’s awful, sorry), handwash it. Strip the rope out of the grommets, use handwashing detergent in a (clean!) bathroom sink, then hang it over a bathtub to dry before relacing it using that ladder shoelace technique and storing it on a hanger. I always have it laced, and pull it on over my head with it laced, too.
And with that, you’ve got about half of your entire cosplay done. Congrats! Take some time to relaaaax. You’re gonna be a king.

(is this helpful at all to anyone? should i keep going?)
(peplum?? really????)
#King's Quest#kings quest#King Graham#cosplay#ack i'm sorry this is probably zero help whatsoever#tutorial
21 notes
·
View notes
Text
Western Gun Rig.
Hi, I’ve been busy doing all the bags and pouches, book covers etc that I have previously posted all of which can be located on my Blog ‘Beginners Journey into LeatherCraft’ in the archive. So, what’s this about a Western Gun Rig I hear you ask, Well, the Big Kid inside me has come out after watching some of the fast draw videos on YT. and I’ve made me a ‘Cowboy Belt’. Unfortunately I’m making it in the UK, one of the most strict places on the planet against firearms so I have had to make it ‘very’ clear that what you see are ‘Props’, nothing more than replicas with zero chance of anything going Bang because basically..it’s a Toy used to help me in the build. So lets get on, hope you enjoy.
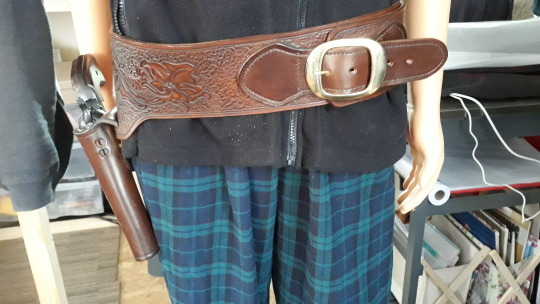

The first thing I needed was a Replica of a Pistol that I fancied making the holster for. I looked online and settled on the ‘Single Action’ Colt ‘Army’ .45 (Short barrel) and a handful of Dummy rounds for the belt.. Not cheap but it was needed..as an actual ‘toy’ pistol wouldn’t have the weight or the bulk of this.

I also needed a pattern so I purchased the Holster and Gun belt pattern pack from Tandy leather. As you can see..it looks a bit complicated, but we have a saying in the UK..’Give it a coat of Looking at’...and after 3 cups of tea and many coats of looking at I finally realised how simple it really was. So I chose which belt I wanted to make from the ‘several’ that are here and started cutting.
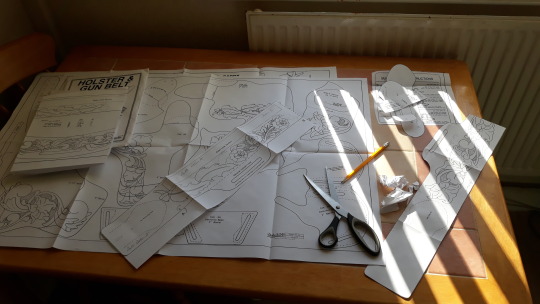
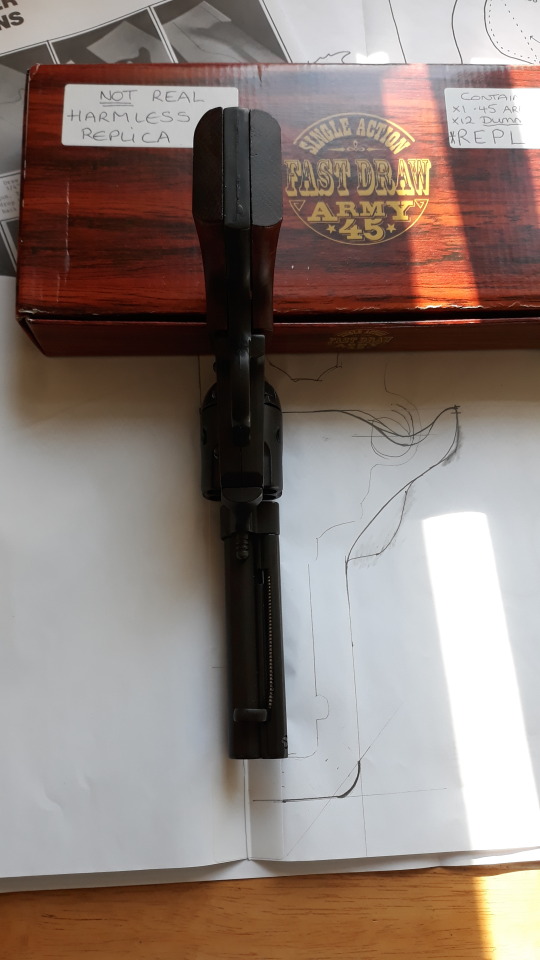
Following the pattern guides I used a sheet of paper laid the gun as shown along the fold line

Then I dropped it down to the Right side and drew around the Pistol as seen here, to the ‘right’ allows for a Right handed draw. if for a left hander...just go to the left, all other instructions are the same.

The basic holster pattern is done.
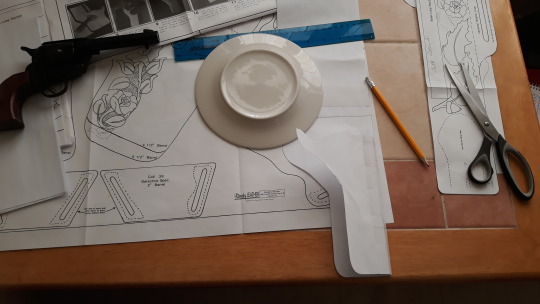
I use anything to hand that will give me the curves I want on the holster and after getting the basic shape you can use a bit of artistic licence to get it how you want it, but there has to be enough to actually hold the pistol in so don’t cut too much away. there is a quite slim looking piece to the pattern on the front, top left...I worried it was too thin but as the project progresses it looks less of a weak spot.


I chose to use the same 3.5-4mm leather for the Holster as well as the belt. next time I would definately choose maybe 2.5-3mm as..although it came out beautiful It is quite a heavy holster and when you consider the weight of leather in the belt plus a Solid Brass Buckle plus a Pistol ‘and’ 24 Dummy rounds...it makes for quite a weight so next time I will ‘save’ weight where I can without giving away quality or looks though.
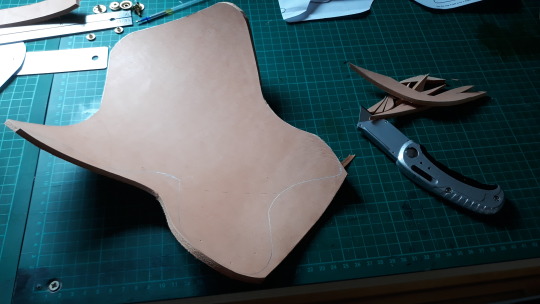
I used the template / pattern I made to cut out the leather as seen here. A quick tip: When I forst started I was going through Stanley blades really fast...now I ‘Use jewellers rouge and strop’ them and one blade is lasting me at least a month and its so easy to do.
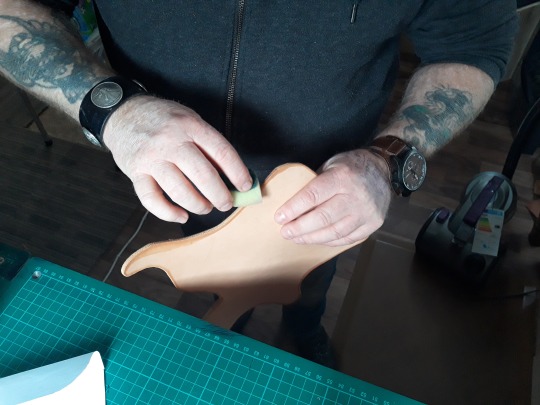
Here I’m ‘dampening’ the Leather ready to Burnish the edges. Don’t soak it or it will go to mush when you burnish. if you over wet it by mistake just wait for it to dry out a bit and carry on.
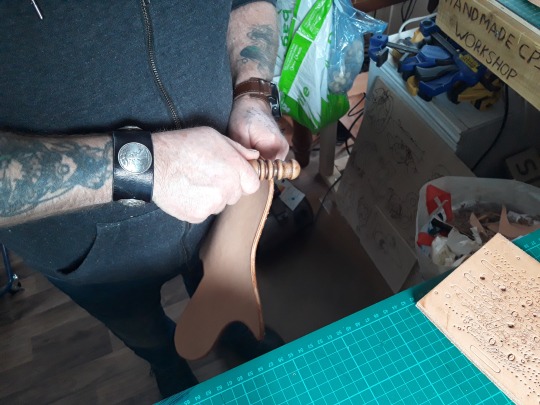
I did use my machine to Burnish most of the edges but had to revert back to the old wooden burnisher for the harder to reach places.

I cut a ‘Welt’ as I would for a knife sheath, it does protect the stitching but in this case it also helps to create space for the pistol. See here I have used 528 contact cement from EVO STICK and have put glue on both pieces...waited for it to get ‘tacky’ before sticking in place.

I glued it one side at a time, don’t try to glue and stick both sides at the same time, I was reliably informed by a very experienced gunbelt maker that if you do...it can cause all kinds of problems...if you get it out of line and the contact cement touched...it sticks fast.

Also, as I was sticking it along one edge I left it ‘proud’ of the edge as seen in this pic’ by an 1/8th or so...for sanding later.
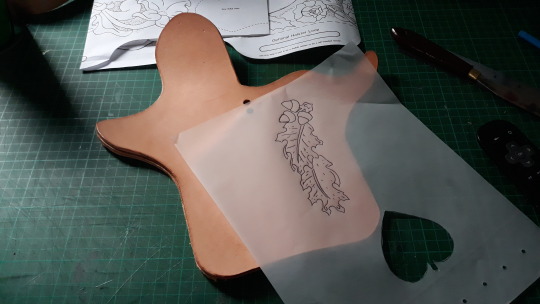
Transferring a pic of some Oak leaves and acorns to the holster after dampening it. You can do any design you please or leave it plain. more on this later.
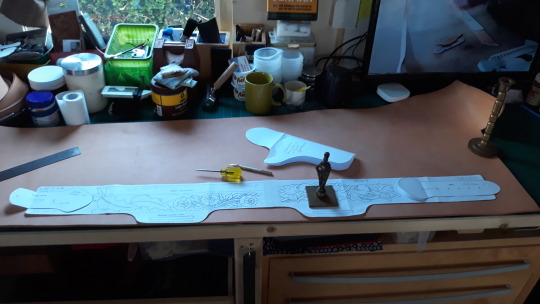
Cut out the pattern for the Belt part of the build. I used 3.5 - 4mm thick veg tan leather, By the end of this I found that this is ideal for the Belt itself and with all the manipulation during the build by the finish it was very supple, far different to what I began with.
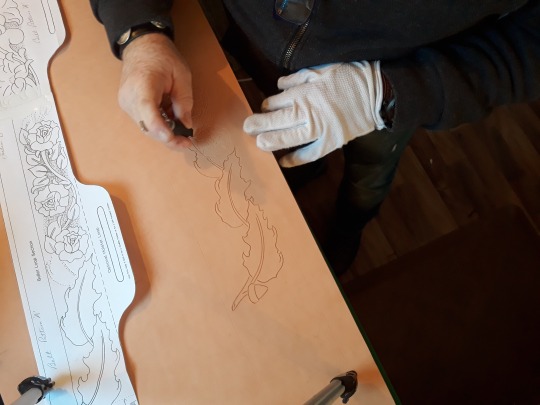
After drawing the outline with a Paint pen refil, (which comes of easily ) I wet / dampened the leather and used a ball point tracing tool to go over the design lines pressing to leave the imprint in the leather. I chose to do everything as it came on the pattern but you can choose sections...it’s your choice. I then put on the soft cotton glove and started the carving with the swivel knife. Some of you know but for those who don’t, I wear the glove to prevent my nails dragging on the leather leaving marks, it’s a tiny detail but adds a little extra professionalism not having nail ‘dents’ everywhere.
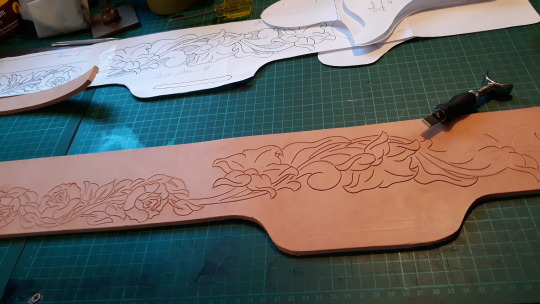
Pattern cutting almost done..
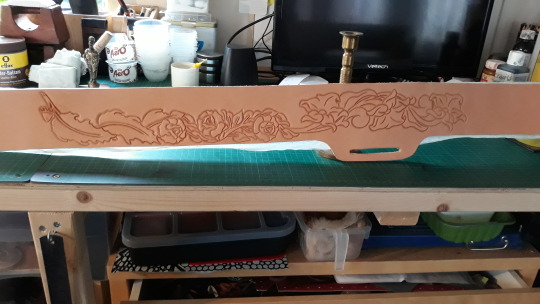
Next I used the beveler to make the design more pronounced from the leather.

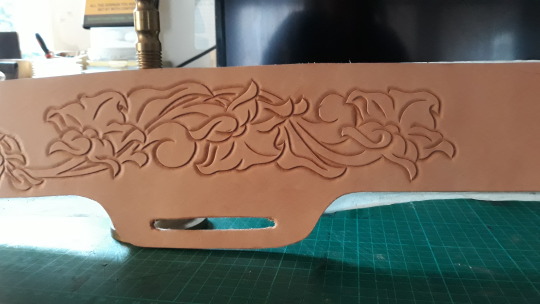
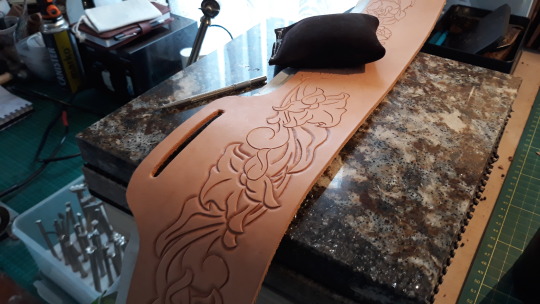
A good Tip...I made a ‘shot’ bag from suede..filled with lead shot, it’s great for holding the leather still whilst tooling.
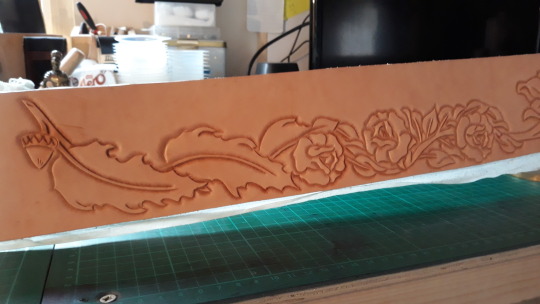
don’t forget to cover the back in the decorators paper tape before tooling to minimise stretching.

I chose for myself, to ‘stipple’ the background. When doing leather crafting, you start with an idea but that idea swaps and changes as you go along and in my mind I felt it would look good once all the dying and polishing was done.

The outline beveling is done and the back ground stippling is well under way.
The long blank area at the bottom of the belt is the area I will put the Dummy rounds.

These next few pics show the detailing going on, making the leaves and flowers etc stand out more.
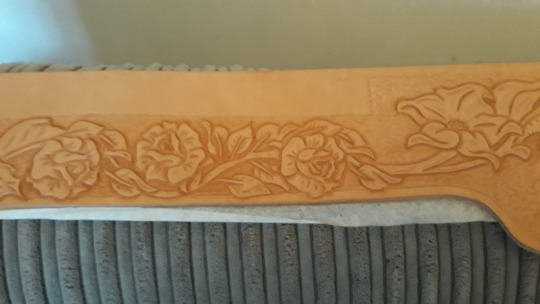
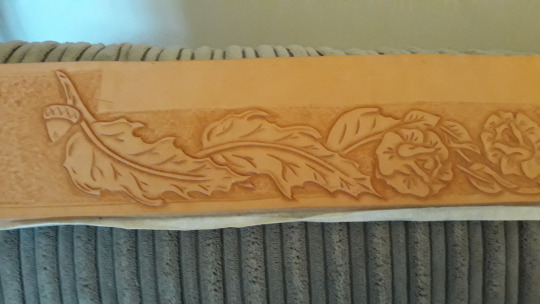
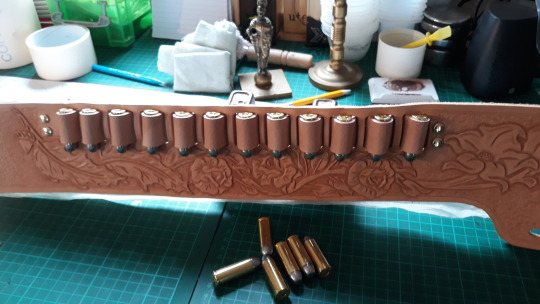
Next I punched the holes I need to put the strap through to hold the ‘Rounds’ then I threaded them to see which particular style of threading I wanted. This way looks good but only allows me to put twelve rounds on the belt.
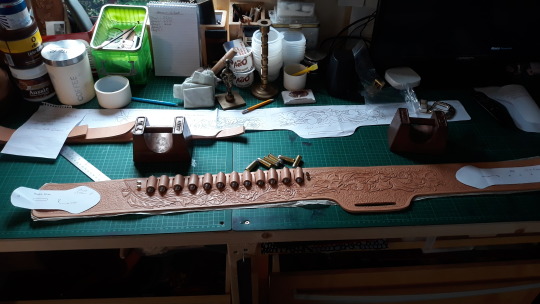
patterns for the buckle strap and the belt holes strap.
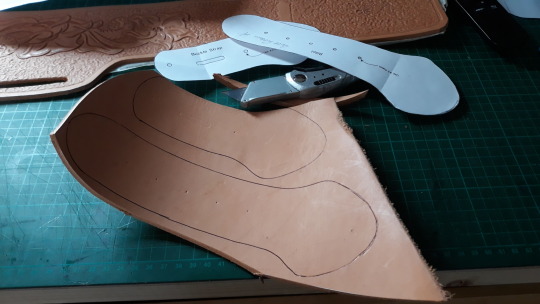
Here you can see the pattern piece I used to trace and then cut these belt end pieces.
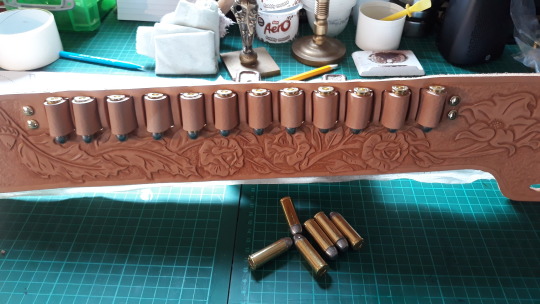
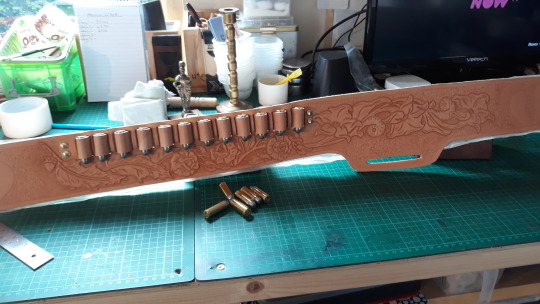
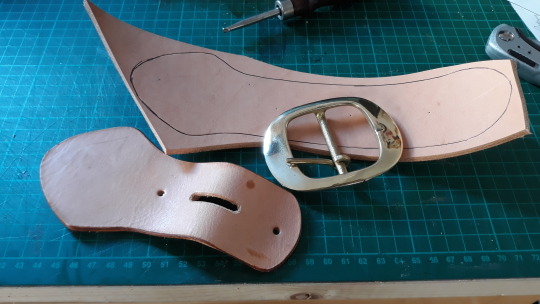
Beautiful Handcrafted solid brass buckle.
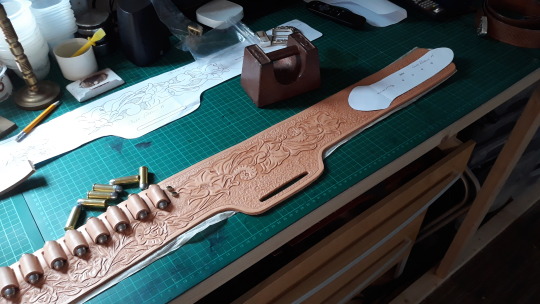
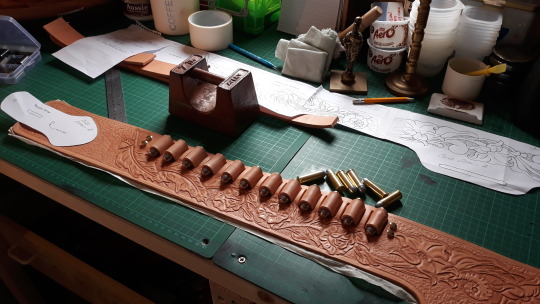
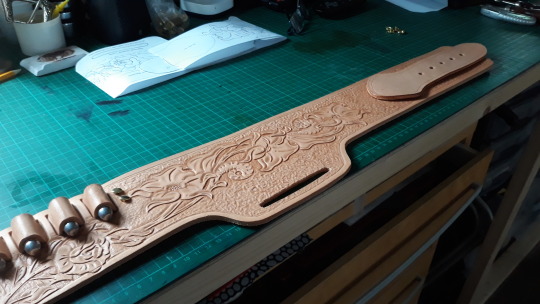
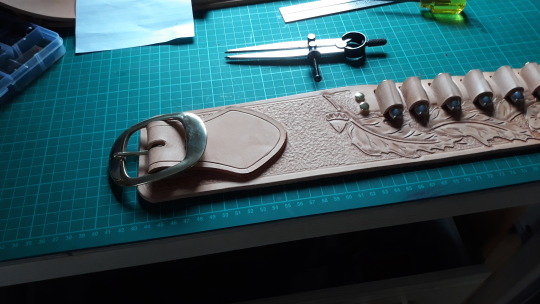
here you see the Buckle strap cut out edged and burnished with a decorative line added around the edge and a Solid Brass Buckle I had made for this project from some guys who make them by hand.
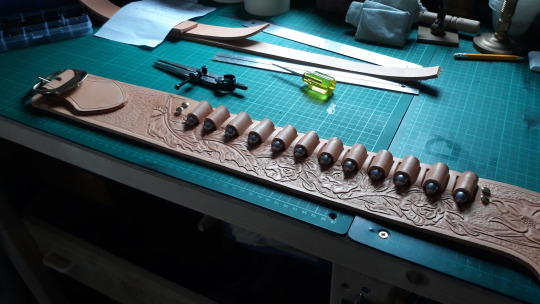
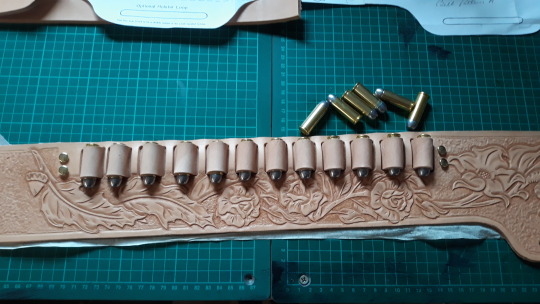
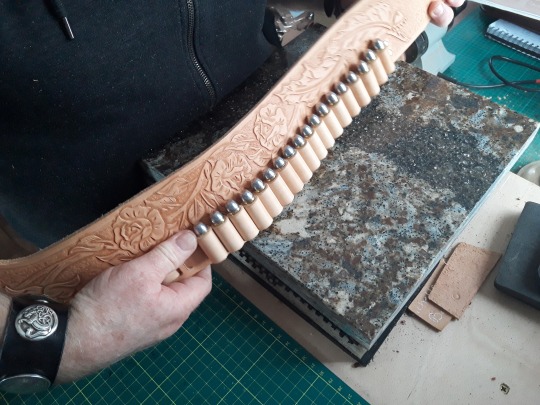

Notice here how I have changed the strapping style to a much tighter closer look, this allowed me to put 24 rounds on instead of only twelve and I feel it’s a much nicer look.
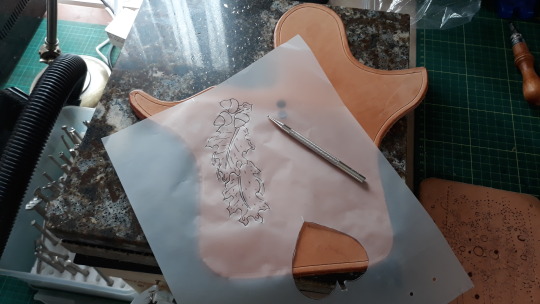
Ok so now we’re back to the holster. The tracing and transfer of the design is the same as with the belt design and a very easy thing to pick up, takes a little practice as with anything but beginners will soon get better with practice on old scraps, I developed my technique by carving coasters for friends and family.
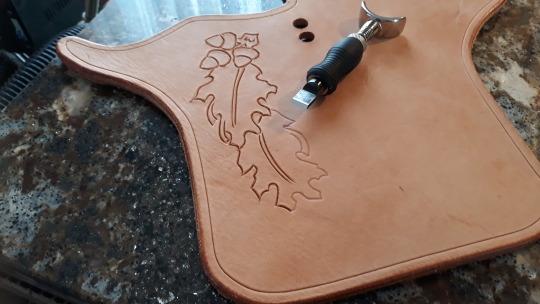
A good view here of the swivel knife cutting, almost finished cutting the oak leaves and acorns in. you can also see a decorative / stitch line around the edge. looking back I discovered it would be better to leave the decorative / stitch line until I’m done sanding edges as I took off so much it left the line slightly closer to some of the edges, luckily this was on the back of the holster out of sight...lesson learned.

The Welt, used for a couple of things, one ...to protect the stitching and two..to give more space for the Pistol.

Here the Welt is glued to one side, better I’m told by a very experienced gun belt maker because if you try to stick both sides at the same time it can go very wrong as the contact cement...once it touches..sticks. You can also see the very soft 1mm leather I chose for the liner, I’m told the liner is to prevent the tougher veg tan flesh side taking the coating off the gun over time.

Here I’m gluing the backing to the holster and trimming. I glued the holster to an oversized piece to make it easier not to have to line up the edges. easier to cut later.
Here you can see that I have left the Welt sticking slightly proud of the edge to make the sanding easier later.

Dampening the dges ready to burnish.

I had to carefully use a sharp blade to get the welt off so that i could put the liner on and roll it down, but it was simple enough toglue back on. Some of you may notice that the actual holster changes half way through the pics, that’s because I got tired and made a left hand holster instead of the right and had to change it.....it’s such an addictive craft that you fail to notice the time sometimes, it gets late and mistakes start to happen.

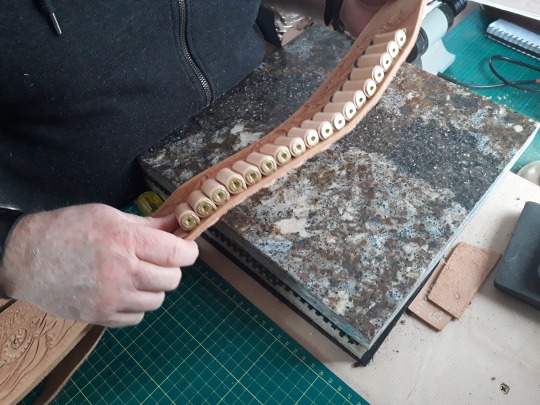
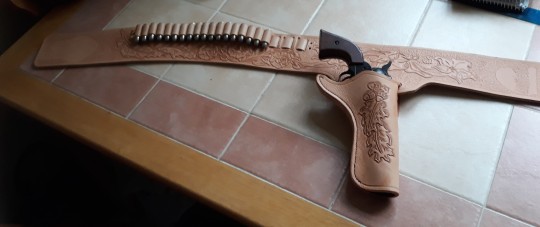
Ok, so here ‘s the first fitting. I loaded up some dummy rounds in the strap ( I still have no idea what that bit’s called lol.) to see if I was getting the fit right. very pleased by this point. I will say that this is a lot of work, so maybe not for a complete novice to try right away but after a few months of learning the basics you (anyone) should be ok to give it a go. I like how the color looks too but ultimately I’m looking to make it more ‘worn’ and antiqued looking. also, if you have a leather stitching machine you can do your stitching quicker, but I like the look of hand stitched so thats what I did.

The dummy rounds strap is missing a few here, I was waiting on a delivery of more rounds.
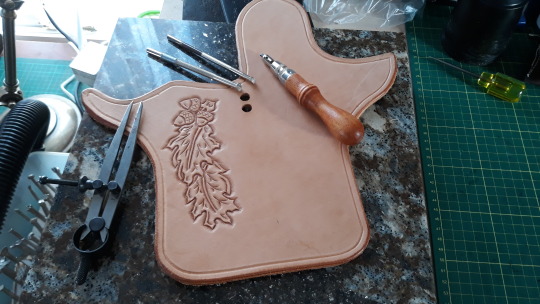
here are a few of the tools I used, Dividers, stitch groover and two sizes of bevellers.

Gluing down the other side of the holster.
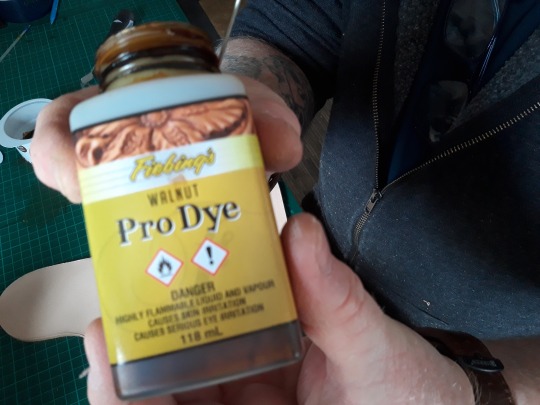
I used Fiebings Walnut Pro dye on the inner liner to help it match the rest later.

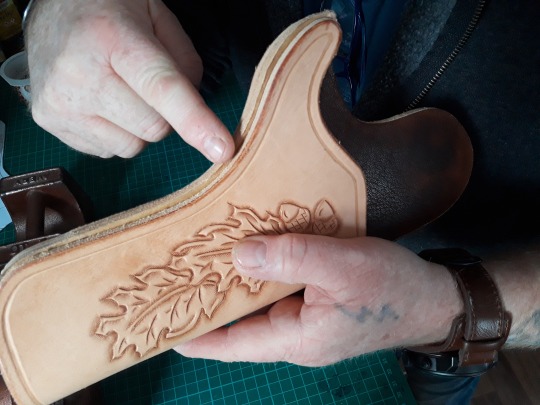
note how much thicker the holster is after gluing the Welt in. I used my sanding machine to smooth down the excess over hang I left earlier.

Note the left handed holster ..I’ll use that on another belt. Here I’m Walnut dying the bullet strap, the buckle strap and the belt extension strap.
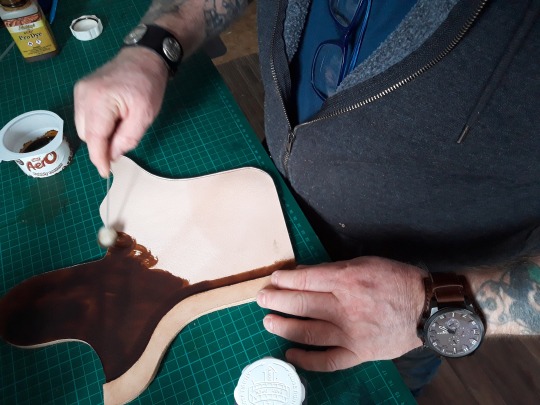
Dying the inner liner.

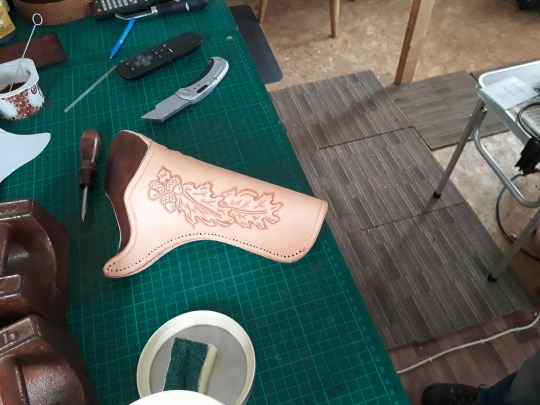
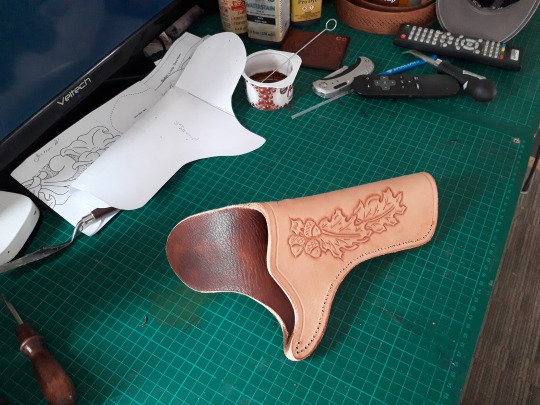
Time to dye the Holster, using Walnut and following it with a coat of eco flo dark brown antique dye.
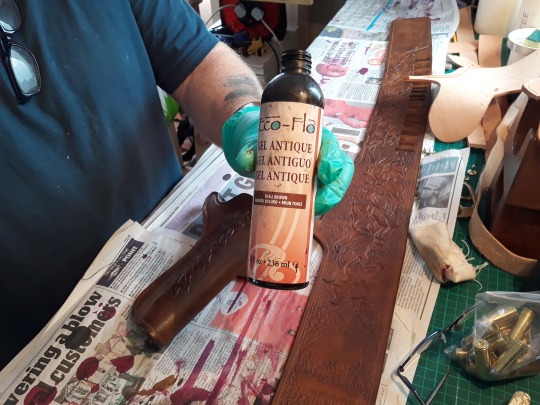
Once dyed the belt and holster need to be darkened off so that it ages the look of the belt. I used Eco Flo Dark Brown antique dye.

Note how much darker the holster is now after the antique dye has been added compared to the belt.

I decided to add line 27 snap studs to the back of the holster to be able to change it out for bigger holsters / pistols if required. The dye came out great and after the antique it polished up very well. Also..though it’s not intended for it...it turns out the antique works great for darkening and polishing the edges. I didn’t use edge kote as I personally don’t like the look. Just a personal choice, maybe you’ll like it...try it on scrap first.
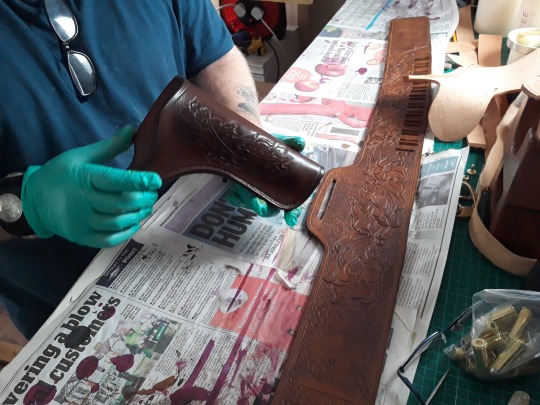
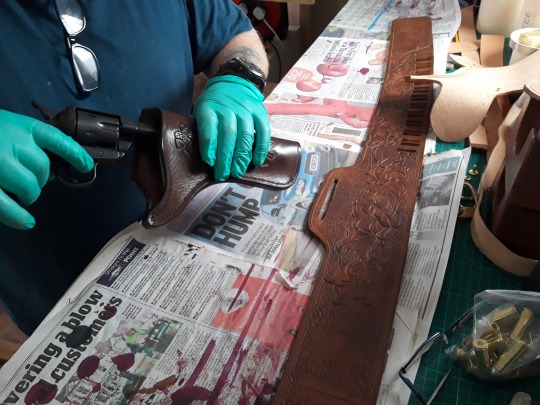
Test fitting.
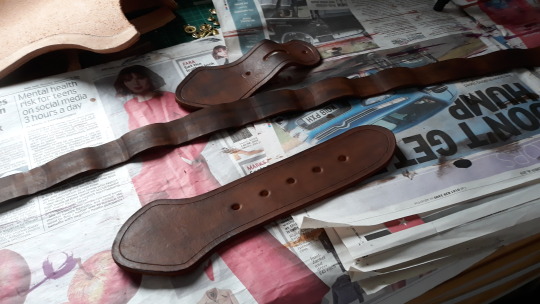
The straps were then dyed to match and burnished, ready to fit to the main belt.

Meet ‘Ken’ our model.

Loving the match with the dye.

I was advised to use an oval hole punch as it doesn’t get mishapen as quickly as a round hole. I now use this on all my belts and straps.
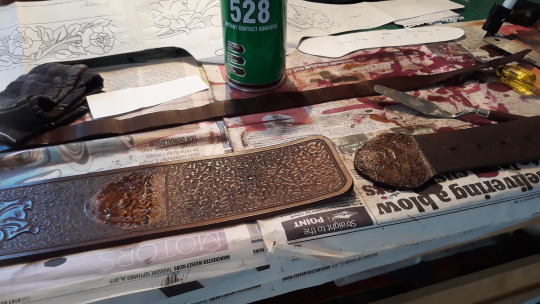
I always use the Evo Stick 528 contact cement if possible, be warned though this stuff..once cured..will really stick and if you are not lined up..you have a problem, it’s good stuff. Not necessary as I only need to attach the strap long enough to hold it in place whilst I Hand stitch it, but I always think..”Why not”..it just makes the whole thing that bit stronger.
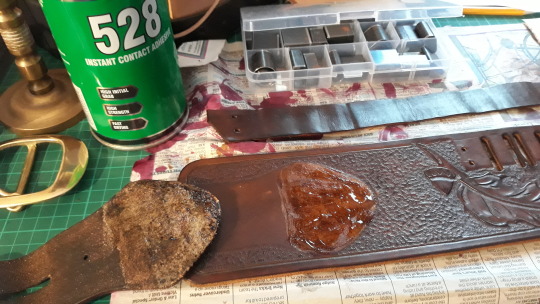
Again with 528 glue for the Buckle strap. I used a leather ‘rougher’ to create grip for the glue but you can do it with a scratch awl or other sharpish object.

The straps are glued, here I’m making the stitch holes I used a 4mm.
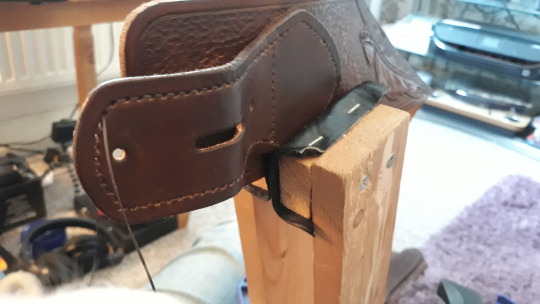
On to the Hand stitching using a Saddle stitch and a Dark Brown waxed thread.
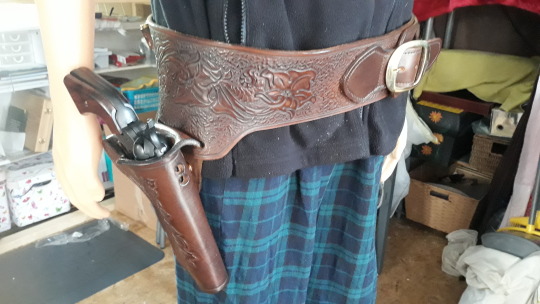
What follows from this point is a lot of extra pics showing off the almost finished belt, You can see I’ve added the Brass buckle, very simple, if you are more than a novice you will be aware how this is done, if you are new to leather craft you will find lots of pics in the archive showing how to do this.
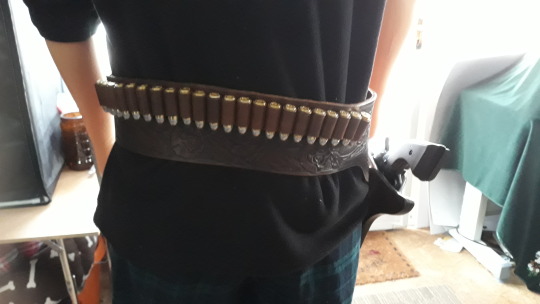
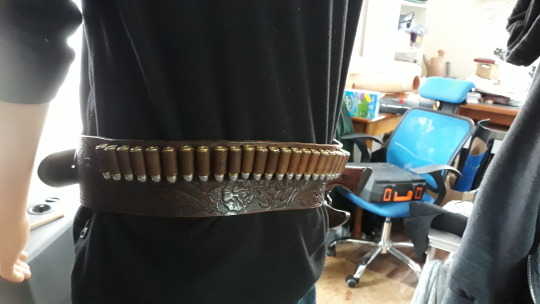

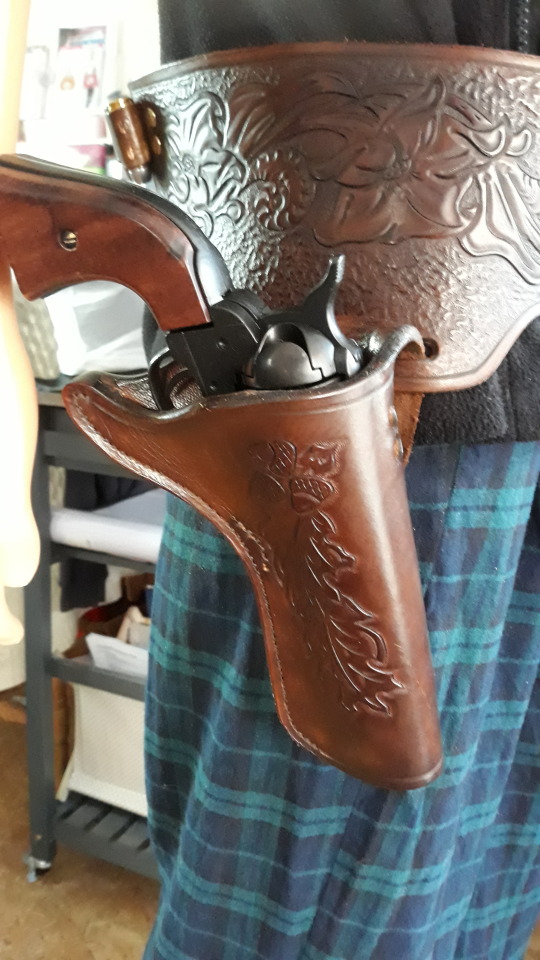
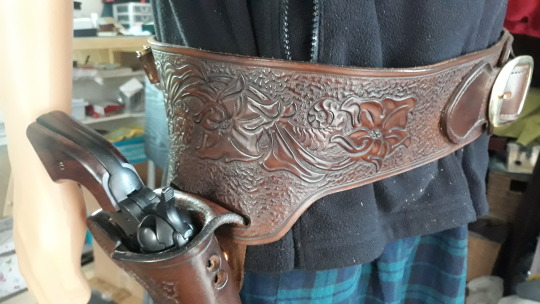
All that’s left to do now are fiddly bits. To burnish the edges of the main belt, very easy to do as I decided ‘not’ to add a ‘Liner’ to the main belt...the reason?...well the holes I cut for the ‘Rounds’ strap were a tiny bit close to the edge of the belt and I didn’t feel there would be enough material stuck in that area, hence my decision. lesson learned for my next one. I said four and a half years ago when I began my ‘journey’ that I would mention any issues or mistakes I make in the hopes that you might avoid doing the same thing...that was not so much a mistake...as I followed the pattern..but I learned that not all patterns are exact and I will adjust this area next time.
I also need to add some lace in these two holes to pull over the Pistol ‘Hammer’ to prevent the gun falling out of the holster whilst the ‘Cowboy’ / ‘Cowgirl’ is running or rolling around and to add a longer lace to the back bottom edge to use as a leg tie.

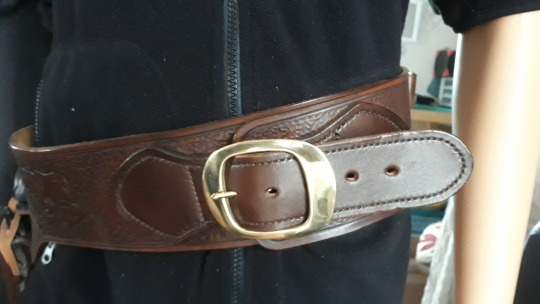
Excuse ken, he’s a slim kinda guy and it’s falling off him...oh well. lol. But I’m Loving this thick strap with the hand made solid brass buckle.
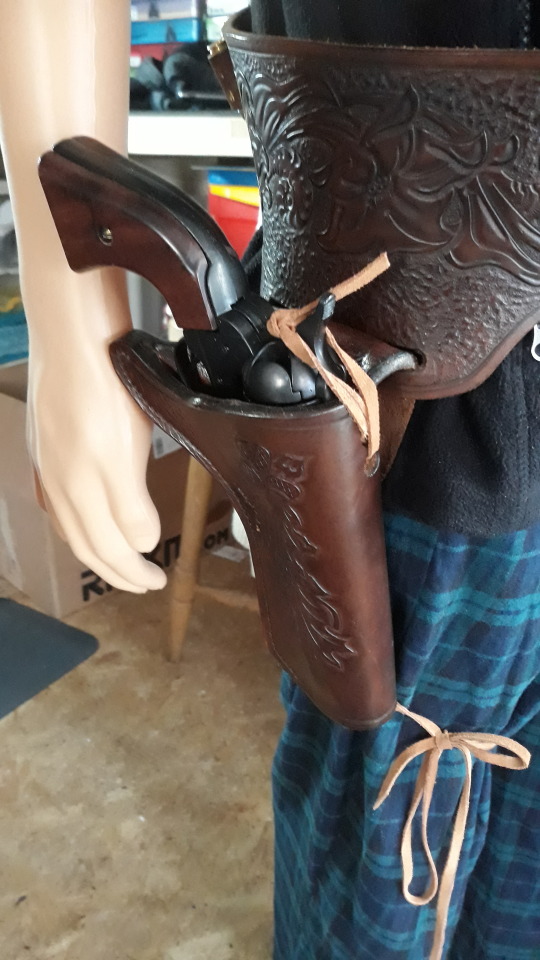
The lace over the ‘Hammer’ and the leg tie.
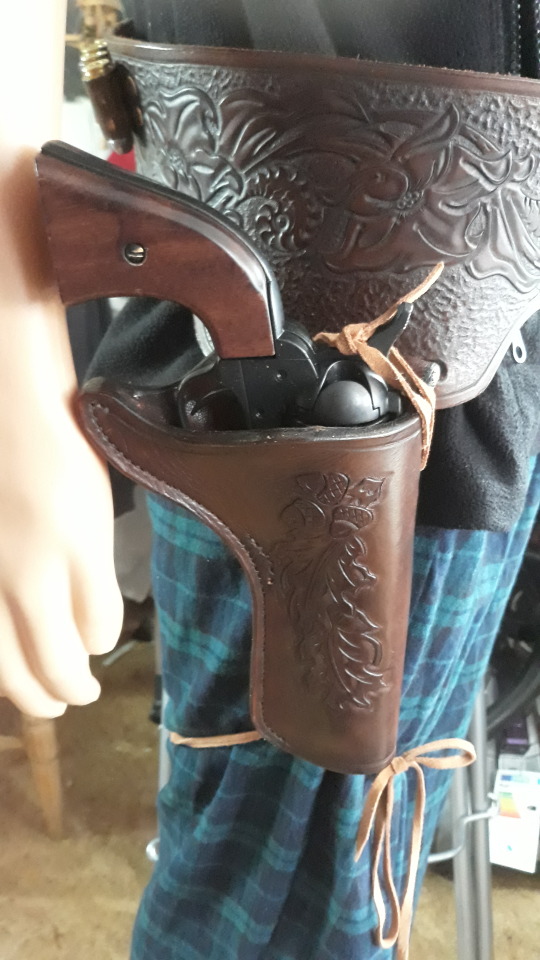
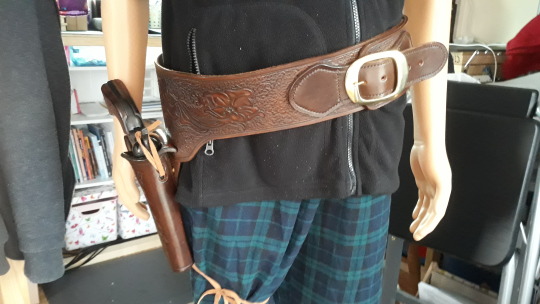
Annnnd..that’s a Wrap folks, What a great project this was, I would recommend having a go, maybe not for a complete beginner.....not that you couldn’t do it if you took it slow but it’s expensive to make, especially if you need to buy the replica and the dummy rounds and to make mistakes on expensive leather can ruin your day. I’ve learned a lot making this and I will improve again on the next one but I am more than happy with my first ever attempt, I’m looking forward to the next one. I hope this might encourage some of you to try your hand at leather craft. For those who aren’t already aware there are many more project build alongs in the archive of my Blog ‘Beginners Journey into Leathercraft’ . Watch this space, good luck with your own Projects and Stay safe...Stay Crafty.
4 notes
·
View notes
Text
Help Wanted 1/16
Pairing: MC!Steve Rogers x Single Mom!Reader
Warnings: Language. Use of Mas. Creepy guys. Violence. Living on the run. Secrets. Mentions of abuse. A lot of sad little pieces as well.
A/N: This is the story I came up with from the Story Vote we did before Thanksgiving!!
It was just a Help Wanted sigh, but to you it was a saving grace in your free fall down. The owner is welcoming, kind and dreamy to boot. Not that you needed that kind of trouble, of a man.
No, you were already on the run from one man and that was enough. You don’t want to get close, to open up your baggage, you want to work and know your ex isn’t closing in on you. You’ve got secrets and a nightmare coming for you, you can’t risk falling for a biker, let alone your boss. But you’re sinking fast in blue eyes and you’re not the only one.
But what happens when your baggage explodes, how are you going to explain?
Tag List Is Open!! If Your URL is crossed out, check your settings before I remove you, please.

“So how did it go last night?” Clint chuckles as Steve shoves the Help Wanted sign into the window of his bar.
“Oh you’re funny.” Steve sighs, glaring at Clint. His short order cook and a member of the MC the lot of them was involved with, the bar included.
“Did you see the way her make up was running?” Nat laughs, her hands on her little baby belly she had started growing.
“She looked like the match maker off Mulan.” Sam snorts. Clint shakes his head.
“Dude you have got to stop watching Disney movies with Nic.” Clint laughs. Nic was Clint’s only daughter, and she had a knack for convincing anyone to watch her favorite Disney movies on repeat.
“What is it about you? They just can’t take the heat you’re putting off.” Nat giggles, rolling silverware.
“No heat. Not even a dying ember.” Steve shakes his head.
They were trying to find a second waitress, with Nat being pregnant, they were going to need all the help they could get. But each new waitress they brought on, ended up falling wildly, and even mindlessly crazy, in love with him. And each time he tried to pretend he didn’t notice, he made it clear he wasn’t interested, but each and every time, they threw themselves at him even harder.
It always came down to having to let them down, in the nicest way he could. It never went over easy, it always ended ugly in some kind of way. They cried, he hated when they cried, and they begged, it always made him so uncomfortable, and then they quit. A few called him names, broke a few things, and of course telling him it was his loss.
“They’re just love struck by that pretty face.” Clint laughs, patting Steve’s cheek.
“I’m in my office.” He grumbles, batting away Clint’s hand.
He sifts through the papers on his desk, rubbing his fingers through the beard that coated his jaw. A knock on the office door, and Sam pokes his head in. A grin covers his lips, something he was typically sporting, unless he had mouthy drunks at the bar.
“Hey boss, some ones here to see you.” He chuckles.
“Who?” Steve’s brow pulls together.
“Saw the Help Wanted sign.” He nods, still grinning.
“Does she look crazy?” He sighs, almost smirking.
“Trust me, you’ll want to see her.” Sam chuckles.
“Send her back.” He sighs, shaking his head.
Only a moment passes before there is a smaller lighter knock on the door. He calls her in, the door opens, and she slips in. Softly closing the door behind her. She’s dressed in a faded T-shirt that hugs her frame in a complimenting way, her hair falls over her shoulder in a messy braid, and her cut off shorts aren’t overly short, begging for attention, but her legs are shapely and attention grabbing. He’s staring at this woman who was standing in his office looking rather unsettled.
“Steve.” He clears his throat standing and shaking her hand.
“Y/N.” She gives him a small smile. There was no overly welcomed grin, the softness of her hand in his makes him a little short of breathe.
“Have a seat.” He waves her into the seat in front of his desk.
What was he doing, he didn’t fawn over woman, no he didn’t bother with woman, it never turned out right anyways. The club joked, calling him a monk, it’d become his nickname over the years.
“Thank you.” She nods crossing her legs and placing her hands in her lap.
“Have you ever been a waitress before?” He tries to remain focused on the task, and not the fact she was naturally gorgeous, with barely a hint of makeup on her face.
“I have bartended as well.” She nods, looking slightly ashamed.
“Really?” He smirks. Perhaps she could be their saving grace?
“I didn’t finish college, they’re the best I can do.” She shrugs, he nods.
“Well I’m not judging you.” He smiles, she gives him a small smile back. “Crowd can get rough at night.” He warns her. She holds up her keys, a black container of Mace sits on her key rings.
“I can handle it.” She smiles, and it sucks the breathe right out of his lungs. He licks his lips nodding, looking down at his desk, he start pulling out the papers she would need to fill out.
“It’s a mix crowd during the days, you’ll see families, bikers, and old couples.” He rambles on. “Till about eight then it becomes a hard bar scene.” He looks up at her again.
“I saw when I stepped in.” She nods, clearly taking in all the information he was handing her.
“If you have any issues. Problems with any of the customers, staff, anyone, tell me. What hours would you like? I can give you anything you want.” He nods. Hours for the bar moron. He scolds himself. She’s a sweet woman, clearly not looking to throw herself at a dirty biker. He reminds himself.
“You’re hiring me?” She lights up and its like someone flipped on the lights in his office, the whole room lights up with her. He was so fucked.
“Why not?” He shrugs, grinning at her.
“I can start now, if you give me thirty to change. I’ll take any and as many hours as you’ll give me.” She smiles nodding. He hands her the papers and a pen.
“I just need your ID and I’ll grab you a T-shirt.” He nods.
She quickly hands over her ID and tells him her shirt size, he steps over to the copy machine, hitting copy twice. He decides to not linger on why he did that, he finds her size in three colors, throwing them over his shoulder he takes one copy, folding it up and putting it into his back pocket, the other he brings back to the desk with him. Handing over her shirts, and ID he starts her file.
“Any color for any day?” She smiles looking at the shirts.
“Yes. If you need more, let me know I can order other colors for you too.” He nods.
“Thank you Steve.” She grins. He smiles nodding.
“See you in thirty.” He slips her file into the drawer on his desk, and she’s out the door with a skip in her step.
Everything Peaches 8/23/18:
@mo320
@all1e23
@izzy--lee
@irepeldirt
@alyssaj23
@elle88531
@allyp1023
@itsemmyb
@joannie95
@kgbrenner
@violinbetty
@jade-taillia
@sarahp879
@raquegp02
@rileyloves5
@flashfanfics
@pigwidgexn
@bfuckjames
@pcterpvrker
@bluebird214
@teller258316
@wandressfox
@amandab-ftw
@henrietteoaks
@bettercallsabs
@queenforatime
@lucifersnipnips
@queenkrissy11
@destiel-artemis
@paintballkid711
@sweet-honey15
@mellxander1993
@geeksareunique
@spookygrantaire
@supernatural508
@mariekoukie6661
@capsheadquaters
@futuremrsb-r-main
@lovemarvelousfics
@petersunderoos96
@booktvmoviefangirl
@supernatural-girl97
@justmeinthisworldblr
@nerdyandexhausted
@kingarthurofslytherin
@supernaturaldean67
@xqueenofthecraziesx
@ssweet-empowerment
@writingaworldofmyown
@villainsaremorerelatable
@for-the-love-of-the-fandom
@ocaptain-mycaptainmorgan
@wonderlandfandomkingdom
@crazy-little-thing-called-buck
@teenagetragediesforeveryone
@letsgetfuckingsuperwholocked
@stupendoussciencenaturepanda
@jamesbarnesappreciationsociety
Steve Rogers:
@zlixlle
@lizzylu18
@jjsoccer11
@dkpink123
@patzammit
@coley0823
@kazuha159
@thefanficfaerie
@wishingforahome
@thefox-and-thegrapes
@fandomsstolemylife00
@kiss-the-stars-goodbye
@blackcoffeeandgreenteaforme
@supernatural-strangerthings-1980
Help Wanted:
@mrooks0205
@ailynalonso15
@dontneedbiologytoadopt
@angel-demon-temptation
@superlightalternateuniverse88
#Marvel#Steve Rogers x Reader#Avengers#Steve x Reader#Help Wanted#Marvel Fanfiction#Steve Rogers AU Series#Avengers Fanfiction#Steve AU Series
500 notes
·
View notes
Text
Stimmy Sammy Plush DIY
I love creating my own stim toys, and I also love collecting and making plushies, so it was only a matter of time before I came up with a plushie that incorporated elements of various stim toys. Enter Stimmy Sammy.
This is Sammy. She is a palm-sized weighted fluffy bunny filled with rice that can be heated in the microwave or cooled in the refrigerator. Both her ears contain beads, creating a “boink”-like fidget like those sold at stimtastic. She also has a fuzzy Pom Pom tail to create varying texture.
Sammy is easy to make, even for a novice seamstress/tailor. She has only two pattern pieces, and is simple to assemble. I will say now that I used a high-pile (read: super fluffy) fake sheepskin fabric that is tricky to work with. For beginners, I recommend fleece. It’s easy to work with, doesn’t fray, and comes in literally a billion different colors and prints (okay maybe not literally, but there are a lot...) Below are Stimmy Sammy’s construction instructions.
Step One: Materials
Sammy only requires a few materials. They include:
- Two colours of fabric
- About a quarter cup of dry, uncooked rice
- Two buttons or plastic safety eyes
- Two wood or plastic beads (not metal, otherwise she can’t be microwaved)
- One medium-sized Pom Pom
- A sheet of paper
- A pencil
- A ball-point, permanent, or fabric marker
- A sewing machine or needle and thread

Step Two: Drawing the Pattern:
To start with, do a rough sketch of her body shape in a similar size as your palm. You only have to draw one side, as the paper will be folded in half to create a symmetrical pattern piece.

Once you like your sketch, do a rough outline to mark your seam allowance. Typically this is about 1/4 of an inch, but I eyeballed it so I think mine is closer to 1/8.
Also draw out your ear piece. It’ll be a long oval that’s flat at one end. You can make this any size you want. Make sure to give it a seam allowance too.

Next, fold the paper in half right down the middle of the pattern. If you’re like me, the middle of the pattern won’t be the middle of the page, so don’t worry of the fold is crooked. Cut the body and ear pieces out with paper scissors ( never use fabric scissors on paper as it will blunt them.)

Step Three: Tracing and Cutting Out the Pattern Onto Fabric:
To start with, make sure your fabric is folded in half, so that when you cut out your pattern, you end up with two identical pieces. Be sure to fold the fabric so that the “wrong side” (the side that will be facing inwards once you flip your completed plush inside out) is facing up (this is also called “right sides together”: fleece fabric has no wrong or right sides, so if you use it, you can ignore this note.)
Pin the paper pattern pieces to the top of your fabric, and trace them with your pen.

You will draw and cut out the ear pieces twice, once on the same fabric as the body, and once on the second fabric for a total of four identical pieces in two different colours.
Once you’ve traced your pattern pieces, remove the paper, pin the folded fabric together, and cut them out. Below you can see the two body pieces and four ear pieces cut out, with the “right” side on the left, and the “wrong” side on the right.
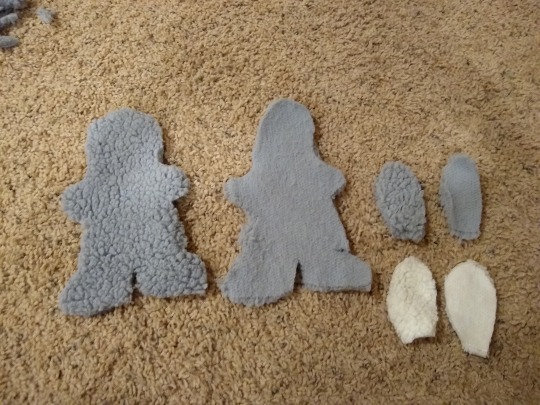
Step Four: Pinning and Sewing:
We will start by sewing the ears. Place two ear pieces, one of each colour, right sides together, and pin them. Then use your needle and thread or sewing machine to sew them together, remembering to take your seam allowance into account. Leave the flat side unsewn.
Once sewn,the ears can be flipped inside out. You may need a pen or chopstick to help you if the opening is very narrow. The flipped ear is on the left, and the unsewn pinned ear is on the right.
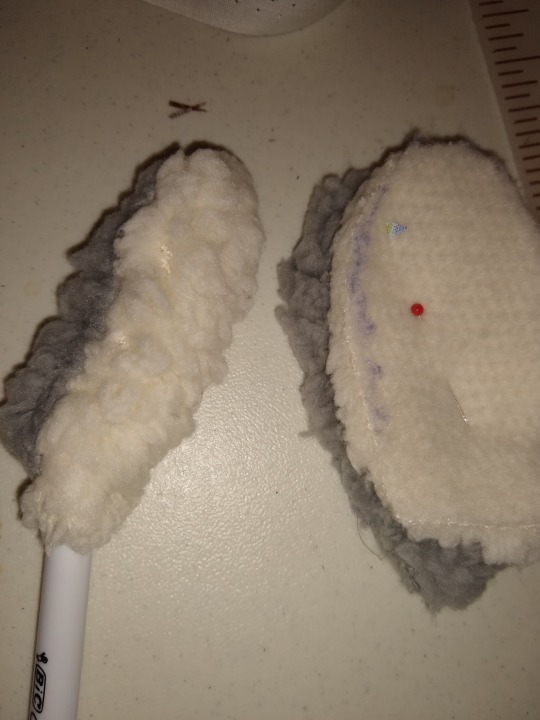
Now, take your two wooden or plastic beads, and insert them into the holes in each ear. Once the beads are in place, sew the flat side up.
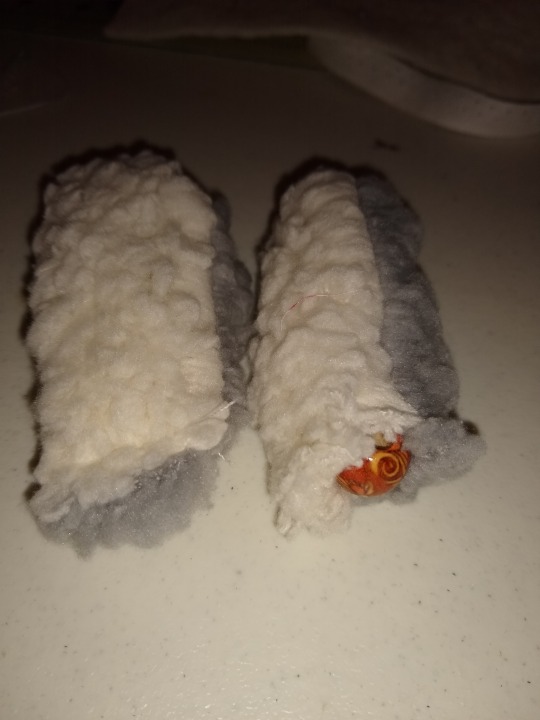
Take your two ears and pin them to the sides of the head on just one of the body pieces, like so:
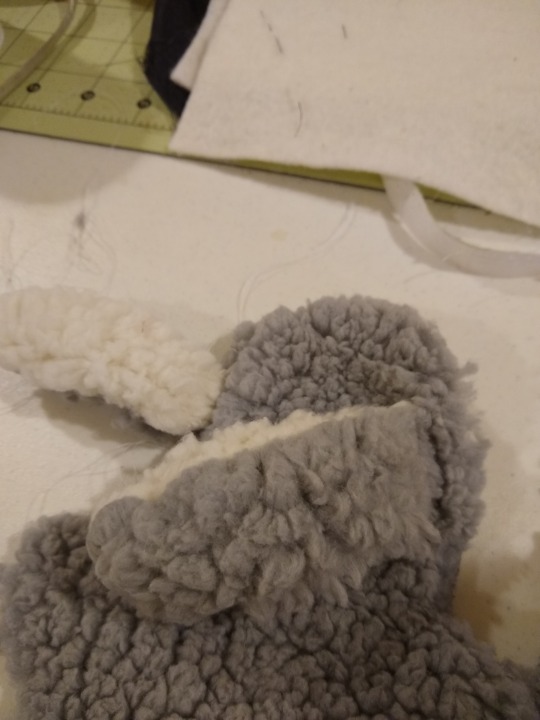
Now take the second body piece and lay it wrong side out over the first one, sandwiching the ears in between. Pin the body pieces together and sew them up. Tuck whichever ear you’re sewing over first into the head, and when you reach the other side, stuff the other ear in alongside it. Make sure to leave a gap near the top of the head.
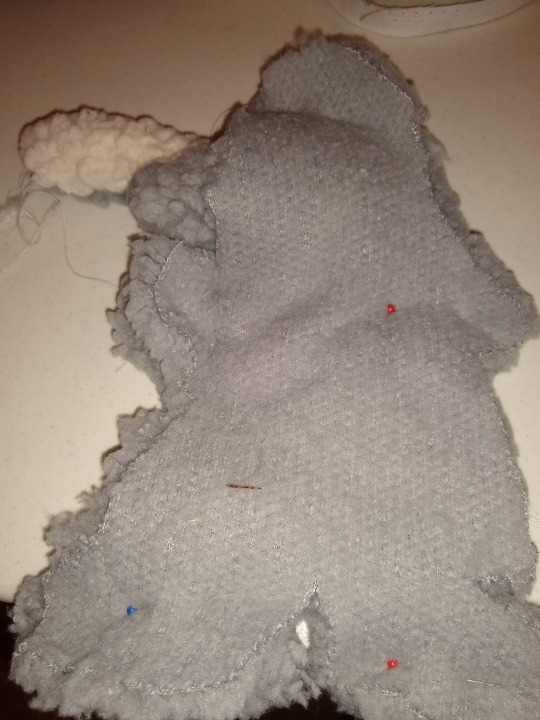
Step Five: Flipping, Stuffing and Eyes:
Flip Sammy inside out so that the right sides are on the outside and the seams are tucked in. You may need the chopstick again, as the feet and arms are rather fiddly. Locate where you want your eyes to go, mark them with a pin or pen mark, and sew on your buttons or insert your plastic eyes.
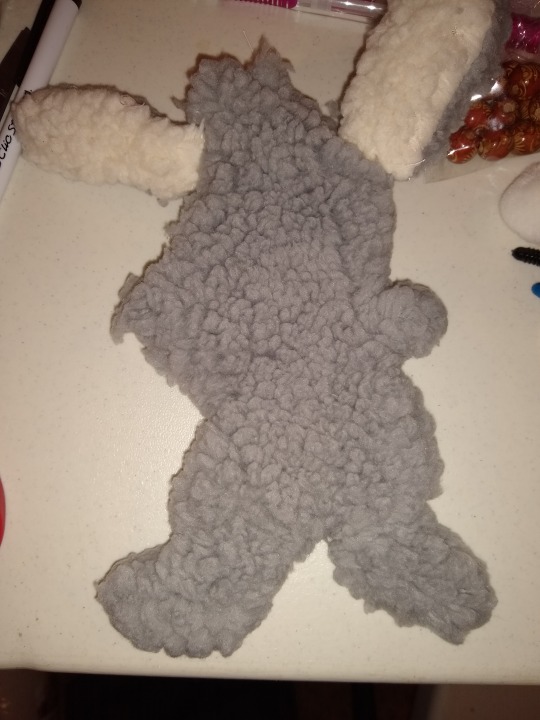
Next, pour your rice into the body cavity, filling it as much as you want (I filled my bunny about halfway). You may need to massage it to work the rice into the feet.

Fold over the raw edges of the hole, and sew it closed by hand. The final step is to stitch on the Pom Pom tail, and Sammy is complete!
This is Sammy hitching a ride in my pocket. I keep her head sticking out so I can stim with one of her ears as I walk.

I microwave her for 20 to 30 seconds to make her nice and toasty. If she feels a little damp when you pull her out, that’s normal, it’s just the rice sweating and will dry quickly.
If any of you try this project and make your own Stimmy Sammy bunnies, do show me pictures, I’d love to see them!
66 notes
·
View notes
Text
drugs 101 : marijuana
below the readmore is compiled information about marijuana. while i don’t consider it a drug, some people do and it is incorrectly portrayed a lot on roleplay. so, below is some information about the prices, variations, how it feels, and more. this is explained from personal experience; while some people may have slightly different experiences, it is generally all about the same. this took a lot of time to type out so please give this a like if you found it remotely helpful or i'll assume no one wants any others posted for other drugs.
! PSA ! this post is in no way saying to do the above listed drug.
pricing.
the price varies depending on your location. some places overcharge because the supply is lower, while some places or legal places are more mandated. the key difference in some pricing is the quality of marijuana. while you could get ‘mid’, it’s not the best strains and to me is not worth it; my friend gets hers for $30 for 8 grams.
however, good weed ( the kind i’d hope you’d rp your characters with ), it’s usually $10/gram. if you’re in a bad location with low supply, you could pay up to $25-30/gram. below i will explain how much a gram stretches for each way you can get high from marijuana.
strains & effects.
what is important to know is that there are different strains of marijuana. each strain has slightly different effects ( both positive and negative ). while you don’t need to know specific strains to write it, you could if you wanted to and a good website for strains knowledge is leafly.
the key to know is the three basic categories of strains and what they tend to make you feel.
indica — couch potato. this is the one people typically think of when they think of marijuana. you tend to get the munchies heavily and you just want to relax and be chill.
sativa — energy. these strains typically put you in a social mood, you’re more likely to dance around and laugh. most of these strains don’t really give you the munchies.
hybrid — as expected, it is a combination of an indica and sativa. most have a dominance, so they will be more sativa than indica or vice versa.
while each strain gives you slightly different effects, i’d explain the high simply by saying:
your head feels a bit lighter in the sense that you tend to not focus on anything for too long; this keeps you from getting into low points mentally. your body feels tingly; some strains makes you feel like it’s tingling on the outside while some strains make you feel like the inside of your body is tingling. no matter the strain, you typically laugh more than usual. personally, i rarely want to watch serious things while i’m high because it’s hard to focus on all the details, so most stoners end up watching things that don’t need full attention; like rick & morty, southpark, youtube videos, etc.
please stop saying your character is hallucinating on marijuana; they aren’t. each method of getting high on marijuana gives different levels of high, usually, but even with a dab, you are not hallucinating.
side note of importance; marijuana is a drug that the high heavily depends on the environment you’re in. different environments can give you different experiences even if it’s the same strain and method of getting high. you can have a depressed high, an angry high, a paranoid high, etc. while different strains give different negative side effects, if you’re around a mean/paranoid/etc someone or simply a bad environment, the high can have more negatives than positives.
before i dive-in, i want to discuss how some people attempt to hide/conceal the smell of marijuana when they are smoking. there are some little containers that you blow the smoke into that it says it cleans it to rid the smell, but i have never tried those to know for sure. most people i know will get a toilet paper roll, have a drier sheet tied to cover one end of the roll, and then they will blow into the roll. another way, if you live alone like i do, if you know people are going to come around and you can’t have the smell, you can put a tsp-tbsp of vanilla extract in a small oven-safe bowl. put this into the oven or toaster oven; turn it on a low level for a while. your entire house will smell like a bakery.
ways to get high off marijuana:
smoking through a homemade pipe/bong.
yes, you read correctly. while in a bind, people often will resort to a homemade pipe or bong. i find this is most commonly used by young teenagers, so i won’t go too deep into details about how to make the pipes. if you want to know the specifics because your character is making one, you can google it. however, some things that people turn into pipes are apples, pens, toilet paper rolls, paper towel rolls, water bottles, tic tac containers, soda cans, etc. if you can imagine it, someone has already tried to turn it into a pipe or bong.
smoking through a store-bought pipe.
store-bought pipes can be found in smoke shops, some gas stations and online ( smoke shop websites, amazon, etsy, etc ). the prices vary depending on the size and the place you buy it. smoke shops tend to be pricier, as well as etsy.
the size of a pipe changes how much weed it takes to pack a bowl. my favorite pipe has a decently deep bowl; i usually pack in 0.4 grams per bowl, though you could pack up to 0.6 grams into the bowl i have. typically, most pipes tend to hold between 0.2 grams to 1 gram in the bowl; though that’s not always the case.
for example, one-hitters are a thing. just as it sounds, it’s good for 1-2 hits from it before it needs to be emptied and repacked. if you’re wondering the point of a one-hitter, i’ll answer that right now for you. one-hitters are different shapes and styles, but my favorites are the ones that look like cigarettes. this would allow you to walk around in uncrowded streets smoking from it, or smoking it in the car without anyone noticing ( i’m not saying you should smoke while driving but if you did, or if you were just a passenger ).
process of packing a bowl :
1. ensure that the bowl of the pipe is emptied and clean. ( how often you clean your pipe is up to you. you can use pipe cleaners to do this, but i find the best way is to let the empty pipe sit in rubbing alcohol for an hour or so before shaking it around in the bag and then rinsing it out with water ).
2. take out the weed you want for the bowl.
3. break it into pieces that will fit in the top section of your grinder.
4. twist the top of the grinder back and forth until all of the weed is grinded into the middle chamber.
5. twist off the first and section chamber to reveal the grinded weed being held within the grinder.
6. pick it up and push it down into the bowl. you don’t need to pack it too tightly but you don’t want it not properly pressed either.
*bonus* if you wanted to add kief to the top of the bowl, you can open the last chamber of the grinder and sprinkle some of the fine powder onto the top.
( kief, keef or keif ) is a fine powder made from dried resin glands that are found on the leaves of the cannabis plant. it contains a high concentration of the psychoactive chemical or thc that causes euphoric feelings or opium-like high that can last for hours.
process of smoking from a bowl :
1. press your finger over the carb; which is the small hole on the side of the pipe.
2. light the top of the weed within the pipe and suck in.
3. stop the lighter and continue to suck in as you lift your finger off and back on the carb.
4. try to hold the smoke in for a few seconds at least before blowing the smoke out. simple enough!
5. once the top is a gray color on top, use something to mix around the marijuana; you can use a bobby pin or something so that you’re not seeing ash on top before smoking more of it.
you typically begin to feel the high after a couple of hits from the pipe. i don’t usually smoke a bowl at once; i smoke on it throughout time, so i couldn’t tell you exactly how long the high lasts for me but it varies per person. on a normal work day, i get home from work and start smoking around 6pm and go to sleep around 11pm; within this time, i’ll have 1-2 bowls to myself. however, some people smoke much more than that, and some people don’t even smoke daily.
rolling & smoking a joint.
! PSA ! a joint and blunt are NOT the same thing!!!!!!!!
a joint is with the thin white rolling papers. you can typically buy packs of these for very cheap; a couple of bucks. if you hit up the daily smoke club, you could get a pack of papers for like a buck. however, you can also get different kinds of papers. you can buy colored ones, or ones with designs, even paper made from gold; some smoke shops have them, different online stores; and i know amazon sells them.
joints are typically up to the person with how large they are. i’m really not a fan of them, so i never roll them or ask to smoke them ( unless offered ). from everyone i know, typically you’d put anywhere between 0.5 grams to 1.5 grams in a joint; could be bigger but i don’t find that people usually do joints with less than half a gram.
process of rolling a joint without a dollar bill :
1. lay the paper down.
2. grind the weed and sprinkle it down the center of the paper, length wise.
3. begin to roll the paper around the weed in the center.
4. lick the trim on one side and press it down. be careful not to use too much spit or the entire joint will be ruined and the paper will rip.
5. ensure that the ends have some empty space and twist them closed. you can leave one end open if you’re going to smoke it immediately.
process of rolling a joint with a dollar bill :
1. grab your dollar bill and fold it hamburger style.
2. grind the weed and sprinkle it down the center of the crease you just made.
3. begin to rub the ends of the bill together up and down, the weed should begin to roll together.
4. press the paper into the bill, the edge on the side of the weed.
5. continue to slowly roll the ends of the bill together until it begins to wrap around the weed properly.
6. continue to roll until it’s completely rolled. then, use your tongue to run it across the edge of the paper to seal it down.
7. ensure that the ends have some empty space and twist them closed. you can leave one end open if you’re going to smoke it immediately.
normal joint papers and cones are not the same. you can roll a cone or buy pre-rolled papers. unless you want to learn how to roll cones, i just buy packs of them pre-rolled online and all you have to do is push the weed down into the papers. as it sounds, they are shaped like a cone.
process of smoking from a joint :
1. put your lips on the filter.
2. light the end of the joint.
3. every few hits, you’ll have to tap the end against something to get the ash to fall ( ashing it ).
you typically begin to feel the high after a couple of hits from the joint. whenever smoking a joint, they burn quickly so it’s hard to not smoke it all at once. the high typically is stronger than from a pipe and it’ll last a couple of hours before it’s down enough to want more.
rolling & smoking a blunt.
! PSA ! a joint and blunt are NOT the same thing!!!!!!!!
a blunt is weed wrapped in a tobacco leaf. the most common way of doing this is to buy a cigarillo, empty it out and then fill it with weed before sealing it. you can buy tobacco leafs that are empty, but people typically just go buy the cigarillos and empty them. they are $1/pack of two cigarillos. there is multiple brands and flavors to pick from. the two brands i use the most are game and swishers. games are harder to roll/seal but burn slower and smoother. swishers are much easier to roll/seal but burn a little faster. i typically go for swisher sweets green.
blunts take up more weed than joints and pipes. it’s the only reason i don’t smoke blunts every day. blunts are usually at least 0.8 grams to 2 grams; some people go much bigger than this, but i don’t really see people doing under 0.8 grams unless they are making the blunt very slim or cutting it to be shorter.
process of rolling a blunt :
1. drag your tongue across length wise on part of the cigarillo where you’re going to cut ( talented people can use their fingers to find the seal and break it, but i don’t find it that easy to do ).
2. cut length wise down the gar. you can use whatever you want for this. most commonly is a pocket knife. not even going to lie, i use eyebrow scissors a lot to make the line straighter.
3. empty out all of the tobacco.
4. drag your tongue over the inside of the gar. when i say this, i mean you literally have to lick all over the inside of the gar to make it easier to roll.
5. grind up your weed or break it up with your fingers. it’s easier to roll when it’s grinded but it burns slower if it’s broken up with your fingers.
6. slowly begin to roll your fingers back and forth to mold the weed into a roll.
7. to seal it, drag your tongue along the inside of the edge and over the top of it as well. add some pressure to the seal to let it try to hold before officially sealing.
process of smoking a blunt :
1. put your lips on the end you aren’t going to light.
2. light the end of the blunt.
3. every few hits, you’ll have to ash it or it will fall on you.
you typically begin to feel the high after a couple of hits from a blunt; sometimes even just one if you get a big enough hit. whenever smoking a blunt, you can dab it out and restart it later. most of the time, i’ll smoke about half and then smoke the other half later. the high is more than a joint or pipe and half a blunt will last a couple of hours. overall, smoking wise, blunts are my favorite and give the best high, in my opinion.
smoking from a bong.
bongs are the one smoking method i know the least about. i only typically use a bong with friends. however, it’s a good high and it’s very quick to get to that point. people use anywhere between 0.3 gram to 1 gram in the bong’s bowl; however, most commonly people use 0.5 gram to 1 gram.
process of packing a bong :
1. grind up the weed, or some people will just put the nug into the bowl.
2. cover the seal of the top of the bong with your lips.
3. light the marijuana in the bowl and suck in.
4. after a few moments, stop lighting it and lift the bowl out of the bong.
5. suck in as much of the smoke that you can.
6. hold it in for as long as possible for blowing the smoke out.
bong highs are strong; typically only needing one or two hits to be high. i don’t have a lot of experience with these in particular to tell you how long it lasts. whenever i use them, we will take a few bong hits each and then go inside and relax for an hour or so.
eating an edible.
truly, there could be an entire post just dedicated to edibles. there is so many different kind you can have and make. in a way to condense it, the explanation for making them will only be for brownies and i will explain it very vaguely. you don’t need to know all the very specifics to make them on roleplay. if you want to actually make them, you can look into recipes and things yourself.
there is so many forms of edibles. if it’s edible, it can likely be made into an edible. the most common ones that i know of and have personal experience with are brownies, cookies, gummies and lollipops/hard candy.
the biggest thing to know is the difference in how it’s presented to you if it’s homemade vs dispensary bought. homemade is going to be given to in with dosing in grams. dispensary bought is going to be given to in with dosing in mgs. it is very easy to be confused when it comes to mgs because not everyone has experience with mgs to know what any of that means.
mg breakdown
1 - 2.5 mg — microdosing, some first time users.
2.5 - 15 mg — still a small dose, helps to feel more social; restless sleepers.
15 - 30 mg — more seasoned consumers; experienced users looking to help insomnia.
30 - 50 mg — season consumers, higher tolerance to thc.
50 - 100 mg — experienced thc consumers only; medically for cancer or inflammatory disorders.
as personal reference, most edibles i’ve experienced are between 50 - 100 mg. i’ve had gummies that were 10 mg per gummy; i had three of those and it only really made me relax and not really feel high. for homemade edibles, they are usually around 0.5 gram to 2 grams per edible.
edible high is unlike smoking marijuana. it’s much stronger, usually. you get the normal effects of weed, but at heightened levels. it usually takes anywhere between 30 minutes to 2 hours to kick in. from personal experience, edibles are my favorite way to get high with marijuana, but i find it isn’t good for a daily basis. the end of edible highs make you want to sleep for a long time. sometimes you may feel like you’re melting into something you’re sitting on or floating; but it’s still never a crazy enough high where you feel out of control of your body.
my favorite time on an edible is when i went to an aquarium while high on it. i don’t remember almost anything about the aquarium, but i hated aquariums prior to this visit. while there, everything seemed so beautiful to me and it was the most exciting thing i’ve ever done while on an edible to this day. the colors seemed so much brighter and i just remember laughing a lot.
making brownie edibles :
1. collect the ingredients which are basically just normal brownie ingredients and then you need canna oil.
2. to make canna oil, you just need to take an ounce of ground weed and bake it for around 30 minutes. then, combine the bud with your favorite oil ( olive, coconut, etc ) on the stove on low heat for 6 or more hours.
3. then, you just add the oil into the normal brownie recipe and bake your edibles.
4. cut them into pieces. you want the pieces to be smaller than normal sized brownies, unless you are experienced and you know how much is in that cut of the brownie. it is better to underdose than overdose yourself with edibles.
having too much of an edible :
you will think you are dying. i don’t mean that in a fun way. everyone has a slightly different experience with this, but i will give you my personal experience. tw: vomit mention.
the edible was 300 mg and it said to have 1/4 of it for experienced users ( 75 mg ). i had never had mg edibles before so i didn’t really understand and i didn’t read the directions; MISTAKE. — always read your directions on the edible packages if it’s from a dispensary. i ate a little over half of the edible. at first, it was fun. the high kicked in and i felt great. soon, it became too much. lifting my head made me feel lightheaded; my entire body felt tingly and heavy. i felt like i was spinning while i was laying down on my bed. i don’t remember much other than telling my friend i had too much and i thought i was going to die. that’s when the vomiting began. i proceeded to vomit everything out of my system; into my trashcan by my bed because i could not get up from my bed. this continued until the consistency made me think i might actually choke on it because i couldn’t breathe. after vomit everything out, i continued to dry heave for 40 minutes. then, i passed out. i busted multiple blood vessels in my eyes; the whites of my eyes were a deep red and they did not fully go away for a little over a month. however, all the side effects did not go away until almost march; this happened december 8th. the side effects i had were dizzy spells, nausea ( i was taking a nausea medicine around the clock ), some memory lapses and generally feeling exhausted.
even with this awful experience, i still smoke and i still do edibles. but please ! if you are going to have an edible, be careful with dosing. and if you say your character had a bunch of edibles, know that there is a big negative if you over-do it with edibles.
as for how long edibles last, it depends on the edible mg and how your body breaks down your foods. it can last usually between 4 hours and 12 hours. most i have tried last over 4 hours, for sure.
bonus : taking a dab.
dabs are practically another language to a lot of people. dab, wax, honey oil and shatter are all the same thing. dabs are a solid, waxy substance of concentrated butane hash oil; most commonly created by a high quality strain is blasted with butane, that is then extracted, these cannabis concentrates approach 70 to 90 percent thc. if none of that made sense, it’s basically a highly concentrated oil/wax that has very high percentages of thc. for reference, some of the best strains out there only have around 25 percent thc.
it comes usually in a wax form, so that is how i will talk about it mostly. firstly, i will discuss the oil. a lot of people are using the oil in vapes so that they can smoke them in public. they do not smell or taste like weed; they taste like whatever flavor you get. i find that the high isn’t as good, however, and that you end up spending more to do that than if you were simply dabbing.
how to take a dab :
1. get a small ‘dab’ of the wax onto the end of a thin glass rod, then set to the side.
2. use a torch to heat the metal piece at the end of the glass pipe until it’s glowing red.
3. set the torch down, pick up the glass rod and touch the wax to the hot nail.
4. circle the rod around inside of the metal piece until all of the wax has been vaporized while sucking in.
5. once all the smoke is gone from the pipe, or until you can’t take it any longer before pulling away.
6. hold it in for as long as possible before blowing the smoke out.
no matter how experienced you are, i’ve found very few people that can take a dab without coughing afterward. i have never coughed harder than i have with a dab. it’s very strong, so you don’t need to have a lot on the rod. however, the size of the dab is up to whoever is doing it.
for shits and giggles, here is some hilarious reactions from taking a dab that i have seen when smoking with people: coughing until vomiting, falling back onto the couch with arms across chest and eyes closed for a few minutes, falling onto the ground coughing until drooling onto the ground, and my favorite experience to witness — she started coughing and began to run around the house coughing until going to the sink, leaning her head under it and letting the faucet run water into her mouth.
as for the feeling, it’s similar to an edible. there is no down-time after, unlike edibles. however, edibles last much longer than a dab. dabs are great for taking one of them and being high off of your ass, but i’m usually taking another one before an hour is up.
i hope any of this has been helpful to anyone. i plan to do this with other drugs like cocaine, ecstacy, acid, shrooms, xanax, oxy and more. please let me know if this is something you’d be interested in or if this was helpful to you!
175 notes
·
View notes
Text
Cheap Ass Bitch Millennium Puzzle Tutorial

As requested by @cipheral, here’s how I made my Millennium Puzzle. This method will get you one that looks like an actual 3D puzzle and not just a pyramid with some lines drawn on, but still costs... Probably less than $10 depending on how much paint you need to buy. Fair warning, though, it is somewhat time consuming.
Materials needed:
Cardboard
Thin craft foam (two sheets ought to do I think? I used stuff leftover from another costume so idk), white, grey, or yellow is best but any color works
Hot glue gun + glue sticks
Regular glue of some sort (I used mod podge + occasionally superglue where needed, but white glue or tacky glue would also probably work fine)
Gold acrylic paint
Optional: Black acrylic paint + very tiny paintbrush
Plastic chain (can be obtained at a hardware store, usually sold by the yard, mine came out to like $2)
Silver spray paint + primer
Printer paper
Scotch tape
Craft knife (technically you COULD use scissors but it’d be a major pain in the ass)
Step 1: Preparing the template
The first thing you need is a template for all 5 sides. I used this, since it was the best example I could find that had all 5 sides laid out flat and was accurate to the actual design of the Puzzle. I actually did some image editing to turn it into black and white lineart (for ease of tracing, this is probably optional though) and scale it to uhhhh A Size, I forgot how big mine is? Anyway, you can decide how big you want your Puzzle to be, and then scale it to fit. Print it out.
Step 2: Making the base
Take your template and tape it to the cardboard. Cut out the basic shape of each side (i.e. the four triangles + square). Remove the template.
Now for the tricky part: Hot glue all of the pieces together into a pyramid. Be careful not to burn yourself! When you’re done, remove any particularly large lumps of glue, and paint the whole thing gold. I recommend doing two sides at a time, and then the top.

Step 3: Lots of cutting, unfortunately
Tape your template pieces on all sides to your craft foam, and use the knife to carefully cut out each individual piece. When you do the front, ignore the eye and just cut the main pieces; When you’re done, tape the front template back together, and cut out the pieces for the eye as well. Also, when you arrange your template on the foam, make sure you leave a decent size empty strip (at least an inch wide).
IMPORTANT: Make sure you keep all the pieces of each side together in the right layout, and all right side up. This shit took Yugi 8 years to solve, so unless you want to do that, make sure it stays together!
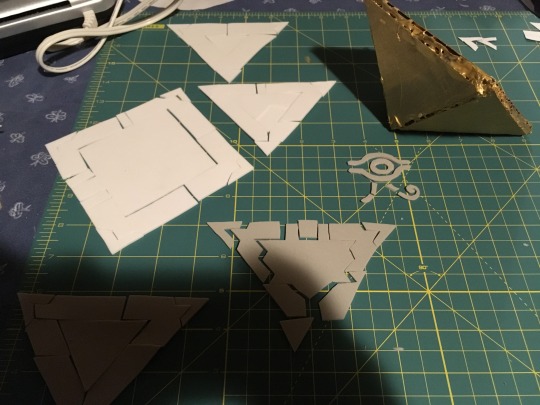
Step 4: Lots of gluing
Glue each piece to the sides of the base, using your regular glue. In order to get that 3D look, the pieces will be spaced out slightly; Try to make sure the corners are touching, and if necessary, trim down some pieces to make them fit properly as you like it. I would recommend doing one side at a time, and be careful to keep all the sides in the right order! Finally, add the eye.
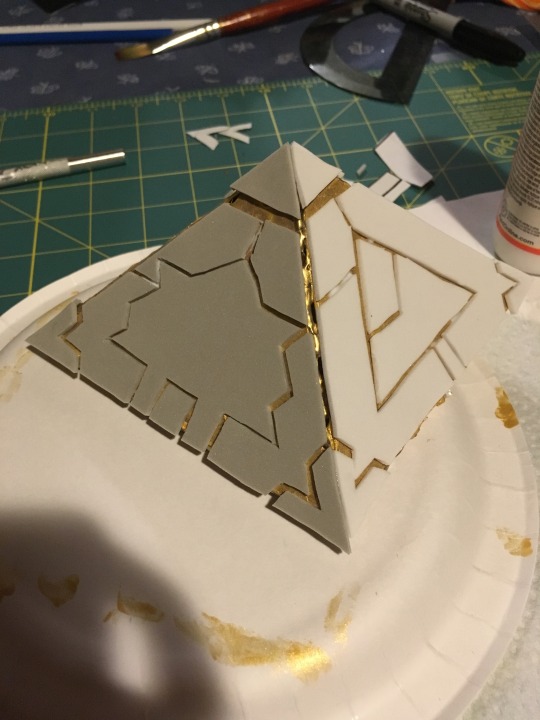
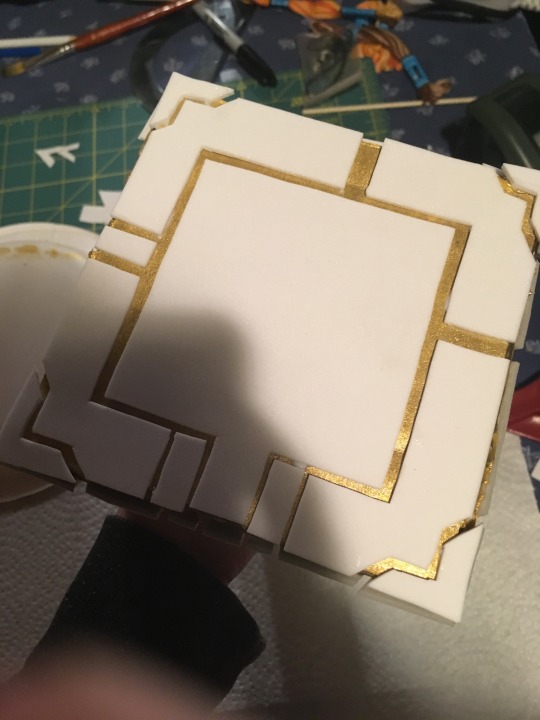
Step 5: Paint
Just like you did before, paint the whole thing gold. I would recommend at least two coats.

After you do that, if you want to add extra depth to the eye, you can take your black paint and Very Tiny Paintbrush and paint the inside of the eye. If necessary, touch up any mess with more gold paint afterwards.
Step 6: The loopy bit
This part is a bit tricky. Basically what you’re going to do is take a strip of craft foam, and roll it up lengthwise, while hot gluing the inside. Fold it over a few times to make sure it’s thick/sturdy enough, but don’t worry too much if it’s not perfectly round!
Use the craft knife to trim off the excess so it’s as flush as possible, and bend the whole thing into a loop, about however big you think is proportional to your Puzzle. Trim the end as needed, and hot glue it to the Puzzle- make sure you use enough glue to keep it in place! Finally, paint it to match.

(Ignore the other accessories, lmao.)
Step 7: CHAAAAAAAAAAAAAAAAAAAAAAIN KEEP US TOGETHER (RUNNING IN THE SHADOOOOOWWWSSS)
Unfortunately, I don’t have many pictures for this step, but get a plastic chain like this:

Spray paint it silver. I won’t explain how to spray paint things, because that’d be a whole other tutorial and there are 500 already on the internet, but please make sure you use proper safety precautions!
When you’re done, put the chain through the Puzzle, and secure the ends together however you like (I used a paperclip). If you find that your Puzzle tends to twist the wrong way when you wear it, you can tie or clip the chain to itself near the loop of the Puzzle.
And that’s it! You’re done! The Puzzle is fairly sturdy, but please be gentle with it anyway, and avoid any particularly flammable-looking warehouses or suspicious game stores. Enjoy!
26 notes
·
View notes
Text
Trinkets, Worthless, 8: These trinket are garbage plain and simple. They would be termed vendor trash or junk loot in video games. They aren’t touched by stray magic or mystery as with regular trinkets, aren’t made from valuable materials and aren’t particularly useful even if they aren’t damaged.
A box of odd beads that bear no resemblance to eyes, yet always seem to watch the nearest creature.
A wanted poster that bears the face of a terrified elf. The reward is not listed.
A bright orange, ceramic throwing star that will always miss its target.
A small pair of scissors that only cut eyebrow hair.
A glass bottle filled with multiple layers of differently-colored sand.
A dried leaf that is entirely unaffected by any sort of natural wind or breeze.
A shirt button that changes shape every day.
A map with vague directions to an abandoned gnome's house.
A small wooden box that contains a single, worn thimble.
A 1’ x 2’ sheet of white canvas upon which the words “SUFFERING IS NOT ART!” are written and underlined in blood.
—Keep reading for 90 more trinkets.
—Note: The previous 10 items are repeated for easier rolling on a d100.
A box of odd beads that bear no resemblance to eyes, yet always seem to watch the nearest creature.
A wanted poster that bears the face of a terrified elf. The reward is not listed.
A bright orange, ceramic throwing star that will always miss its target.
A small pair of scissors that only cut eyebrow hair.
A glass bottle filled with multiple layers of differently-colored sand.
A dried leaf that is entirely unaffected by any sort of natural wind or breeze.
A shirt button that changes shape every day.
A map with vague directions to an abandoned gnome's house.
A small wooden box that contains a single, worn thimble.
A 1’ x 2’ sheet of white canvas upon which the words “SUFFERING IS NOT ART!” are written and underlined in blood.
A mouthpiece for an unknown musical instrument.
A single newt's eye in a glass jar.
A small jar of nails that can only be driven by a glass hammerhead.
A small jar of glass nails that can only be driven by a cold iron hammerhead.
A sword scabbard that's filled to the brim with tiny wooden swords.
A fine, leather pouch that contains exactly 248 smooth stone pebbles.
A thin sheet of cooking paper that's been folded into a swan.
A decaying wooden knife inscribed by a child that reads "The Ultimate Blade of Destruction".
An old doll wooden doll in rotting knit clothing. The doll's eyes seem to follow the creature closest to it and people who sleep near it regularly suffer from nightmares
A sickly green humanoid bone.
An odd metal cog that spins on its own every so often.
A small wooden carving that depicts a naked goblin scratching his hindquarters.
A small dull dagger that refuses to sharpen.
A rusted coin that slowly absorbs oil it comes into contact with.
A long letter of complaint addressed to a school teacher criticizing his methods and general personality.
A glass jar containing a dozen folded paper frogs.
A small jar of hard candies that taste of sour apples and never seems to go bad.
A small doll with a cloak and toy dagger attached. On the back of the doll, the letters "TDG" are written.
A drinking horn with an odd rune carved on it.
A tiny pink bottle that smells of roses when it is empty.
A wooden carving of an orc doing a handstand.
A small twig that doubles as the perfect toothpick, no matter who uses it.
A gnome's hair brush.
A small painting of a horse's rear end.
A cork for an old wine bottle that won't fit in any other bottle.
A small pot of horse glue that says “NOT FOOD, SERIOUSLY” on the side.
A bamboo scroll tube containing a legal and notarized deed for a house whose address doesn't exist.
A dagger made of folded parchment, that could at best give someone a paper cut.
A wooden box containing twelve matching pieces of broccoli that have somehow remained fresh.
A bar of soap that smells like rotten meat.
A key that breaks the first time it’s used in a lock. To add insult to injury, it doesn't open the lock.
A tin of makeup that's just the most absurd shade of orange.
A magically preserved apple that tastes like an orange.
A letter from an unknown sender that simply reads, “I told you so!”. The return address is plainly labeled “Feywild”.
An undersized wooden backscratcher, for use by gnomes.
A tattered blacksmith cap full of red dwarf hair.
A small roll of leather that's been cured with giant urine.
The hollowed-out shell of a large hermit crab.
A crudely made treasure map that leads to a beggar's dandelion garden.
A small blue stone that feels like silk to the touch.
A pocket multitool with only one tool remaining in it. The remaining tool is a magnifying glass that has the words "Find the rest of me." inscribed on it.
A wooden scroll case filled with fine ash. The top of the lid sports a tiny iron spike that may have triggered some sort of combustable trap.
A fist sized bar of harsh lye soap
A homemade pan flute consisting of a dozen reeds of gradually increasing length held together by vines and dried grasses. Despite its crude origins it plays quite nicely
A dog muzzle made out of leather and steel with adjustable straps that allow it to fit most medium and large canines.
A brown leather hawk's hood that's used to keep the birds docile during periods when they are not hunting or resting.
A ceremonial headdress of similar make to one of the local barbarian tribes, with the exception that it is made entirely out of steel wiring and tin spoons. You’re not sure if this is some sort of artistic interpretation, strange inside joke or weird form of insult.
A preserved, hollowed out corpse of a Flumphling stuffed with sage.
A metal flask containing a thick concoction that smells dark and musty, like a forest after heavy rains.
An unremarkable spoon fashioned from horn.
A thick, heavily padded leather and burlap sleeve made to fit over the bearer's arm and serves as a target for animals being trained to attack.
A sealed one gallon cask of Bufo, a favorite drink of goblins, boggards, and other primitive humanoids. It is made by soaking a poisonous toad or frog (Or its eggs) in weak beer or by “milking” these animals for their poison and mixing it with the beer (Allows the animal to be used repeatedly). Some tribes use wide-mouthed jugs and leave the dead animal inside as a crunchy treat for eating once the drink is gone.
A sealed one gallon cask of luglurch ale. This pale frothy beer is found by most races to be too salty to swallow, with the exception of halfings who find it an acquired taste
A clockwork blue bird that emits a horrendous screeching sound when it is wound up.
A musty smelling, threadbare, grey towel that never completely dries. If someone attempts to dry themselves with it, they will develop a mildewy smell exactly like the towel until the creature takes bathes and dries off with a proper towel.
A purple ring box that croaks like a frog when opened. It is lined with lime green satin on the inside and smells of a swamp.
An old black cord with three matching light blue buttons, strung on it, all about the size of a gold piece.
A large piece of parchment with a tea stain in the shape of a kitten.
A rolled up parchment with a sketching of the ugliest Dwarven baby the bearer has ever laid eyes on.
A beat up, wooden compass that always points towards the bearer, never north.
A plain, wooden footstool about six inches high, with a round top about 18 inches across.
A crude, 500 piece puzzle that appears to be a treasure map, but 100 of pieces in the middle that show the specific coordinates and details of the treasure are missing
A thick braided cord made of dark leather, hanging from which is a giant's toenail reeking of cheese.
A voodoo doll of a young man that's missing it's head.
A small jar of chocolate cookies that cannot be opened or broken.
A set of crooked and yellowed dentures with teeth missing.
A dictionary with over half of the words spelled wrong and out of alphabetical order.
A brass chamber pot that was not thoroughly cleaned since its last use.
A wooden scroll tube containing the blueprints of a church that has long since collapsed.
A faux-distressed piece of parchment that is a crude map of the local area, with red circles and arcane gibberish scrawled on it. Intentionally made to look old and worn, it’s actually a simple piece of parchment that’s been singed, crumpled, and rolled in the dirt. It's obviously meant as bait to lure creatures into an ambush it appears that whatever dimwitted humanoid authored this had a very poor knowledge of spelling and grammar. Any literate creature who so much as glances at it can identify the map as a fake.
A plain thimble, with absolutely nothing particularly interesting about it.
A crude earring made from a tiny tooth, wrapped in thin twine.
A formal letter that is badly seared and charred. It’s impossible to decipher because of the damage.
A small blue candle that smells of fruit. It’s fragrance is weak and barely noticeable.
An assortment of pieces from cracked eggshells. Most are a pale creamy color, like the egg of a chicken. Some larger pieces are a deep purple.
A porcelain doll about the length of a human’s index finger. The face is chipped away.
A black flask with a gaping hole in its side. It’s covered in punctures that look like bite marks.
A silky cloth fraying quite badly around its edges. It’s almost reflective in its lustrous sheen.
A smooth, round stone about the size of a human fist. It feels oddly heavy.
A set of three clay dice, painted with black pips.
A chunk of rusted metal covered in dents.
A somewhat oval-shaped… thing. You think it might be really, really, really stale bread.
A pair of glasses whose frames look as good as new, but the lenses are stained, cloudy, and cracked.
A trio of matching bracelets, made from knotted thread. You’re almost certain there’s supposed to be four of them.
A hollow reed that creates a low, soft whistle when blown.
A hand sized figurine of a cat, perpetually coated in a layer of dust.
A waterskin filled with a slick, greasy oil. Patterns of snakes cover its sides.
A single tile that appears like it was from some type of mosaic mural. It’s a dull green in color.
A pouch of bitter tea leaves. Their aftertaste is unsatisfying and almost sour.
A jagged arrowhead, cracked into a shape reminiscent of a fox’s head.
#d&d#dnd#d&d 3.5#d&d 4e#d&d 5e#d&d homebrew#d&d 5e homebrew#loot#custom loot#loot generator#random loot table#pathfinder#trinkets#roleplaying#rpg#dungeons and dragons#dungeon master#dm#d&d ideas#treasure#treasure table#d&d resources#tabletop homebrew#junk loot#vendor trash
486 notes
·
View notes
Text
Finding the Time to Study Fic 2 [Day 3]
Here is my starting post for today’s study break stories session. See this post for more details and feel free to send me asks to keep me going! It’s been a lot of fun so far! I will reblog this post with the story as I write them today.
If you are a new follower or just don’t want all of these posts clogging your dash, please feel free to block the tag “study break stories” as all posts and voting about it will go there. You can still see the finished product of the story even if you are blocking that tag as I will not tag the edited chapters with “study break stories” but with the (TBD) name of the fic.
Chapter 1 and what I have finished of chapter 2 are under the cut.
I probably won’t be studying too much today, but I wanted to get a bit done. I’ll be constantly looking for ideas of times and places for Janus to have missions, so feel free to send in any you can think of at any point!
Chapter 1
The words in front of him seemed to squirm back and forth across the screen as he watched, despite the fact that he’d bought this screen to prevent that exact thing from happening. The ‘d’s and ‘p’s and ‘b’s seemed to blur together into a sludge of incomprehensible nonsense, just like the voices around him seemed to. He wasn’t quite sure how long he’d sat there staring at this report. Time itself seemed almost like the words and the people, it swirled past him in a blur of sounds and colors, but he never could quite grab ahold of it.
Something smacked him in the forehead, and he startled, looking up. “Remus,” Janus sighed. He picked up the projectile that had just been lobbed at him. “Did you steal paper from the 20th century supply again?” he asked, staring at the folded-up piece of white paper in the shape of a crane. It was one of Remus’s favorite designs. “That’s not what it’s for.”
“There’s a message inside!” Remus replied, happily.
Janus glared at him and carefully unfolded the paper. He squinted at it, and yeah, that was way worse than the screen. Maybe it was worth his money. Or maybe Remus’s handwriting was just horrendous.
He squinted at it for a few moments and then looked back up. He blinked at his surroundings. The note had said ‘Go home. Work ended three hours ago.’ and that certainly seemed accurate considering he and Remus were the only people left in the office.
“I still have to finish this report about the New Easter Island mission,” he said to Remus.
“I’ll do it,” Remus said. “You’ve been working without a break for hours, and I probably owe the agency some time since I took a coffee break to 22nd century France this afternoon.”
“You what?” Janus asked.
”They have the best coffee,” Remus said, and then grinned wolfishly, “and the best guys.”
“Stop doing that stuff,” Janus hissed. “Your lucky I haven’t reported you already.”
“You wouldn’t,” Remus said, very sure of himself. “You like me too much. Plus, without me, you’ll forget to go home and sleep every night. So, it’d be a loose-loose. Now up! It’s time for you to go home.”
Janus sighed and stood. “Fine,” he said. “I’m going, but that report better be done like you said or I will report you for your coffee excursions.”
“Sure, you will,” Remus said. “Now shoo.”
Janus spared him one more glare before standing from his desk and waving his hand through the air. The machine at his wrist buzzed softly and the display screen lit up around him. He jabbed a finger at the last of the three pre-set locations and, with a feeling like he’d just stepped into a pool of softened butter, he was home.
He groaned and fell back onto his couch immediately. “Time?” he asked.
“1:57am,” a soft voice said from his ceiling. He groaned. Considering the agency liked to keep their schedules aligned even though his house sat almost 2 millennia before the agency even existed, he’d have to be up in 4 hours to head back to work. They said it was to ‘stop them from experiencing time jet lag’ and ‘maintain their circadian rhythm,’ but with Janus it usually just ended up with him ‘not getting enough sleep’ and ‘suffering greatly.’
Sure, he had been fine with it, encouraged the policy even, when the agency was created, but that had been before he’d had to live it.
His stomach suddenly grumbled, reminding him that he hadn’t eaten since before the mission he’d been on earlier that day. He was exhausted, but he also knew trying to go to bed this hungry would result in him not being able to sleep at all. He dragged himself to his feet and into one of the barstools at the kitchen island. He didn’t want to wait for the auto cook feature to cook him something and he especially didn’t want to cook something himself, so he pressed a few buttons on the side of the counter and a protein infused, still cold pop tart popped out of the table.
He thought it might be a Hot Fudge Sunday one, but he honestly couldn’t tell. The protein infusion made all of them taste rather horrible. For all he knew, it was one of the Burnt Rubber pop tarts Remus had once snuck into his pantry. To be fair, he hadn’t even noticed until he’d went to go stock his pantry and realized that there was half a box of those things. It was just another example of Remus using time travel for things he shouldn’t. They were a year 2513 delicacy.
The 2510s were an odd set of years.
He chewed on the possibly chocolate, possibly rubber flavored pastry and glanced out the window. Though it was dark, one could still see the water of the man-made lake his home sat on thanks to the floating lights that hovered above it. Each agent working for the TPI received a home and alternate identity in a time and location of their choice. (Within reason, that is. Remus’s request to live among the dinosaurs was quickly denied and new rules were put into place immediately after.) Janus had chosen the late 24th century with a moderately sized home on Lake BlueBox. He didn’t have many close neighbors, but the ones he did know thought he was an accountant who went by the name of Declan Banks.
No, he had not chosen the last name. Yes, everyone got those types of names. The Agent Management Office had a sense of humor or were just not creative. Janus only knew one employee in the AMO and he’d been avoiding him for the past three years as much as possible. Cowardly, maybe, but he knew if he gave the man too much information about his general lifestyle, he’d be dragged into the AMO to talk about his mental state and feelings, and honestly, that would make everything worse.
As soon as he finished the poptart, a glass of water popped up from the table making him jump despite the fact that he had been the one to set it to do that automatically years ago. He downed half of the water and picked up the glass to take it to his bedroom. He should probably clean himself off before bed, but he couldn’t be bothered today, and just stripped off his uniform and collapsed into bed in his underwear. The morning was going to come far too soon, he knew. Yet, his mind would not quiet. His brain kept filling out the report he trusted (well, hoped he could trust) Remus had already finished by now.
He eventually groaned and rolled over in bed. “Play something,” he requested. The screen by the side of his bed lit up.
“Randomizing the ‘Something’ video playlist,” the soft voice said from the ceiling.
A dance recital which he knew had been recorded in 2033 started playing. The images moved on the screen in front of him, but the sound drifted from all around him. He let his eyes linger over the way the dancers’ bodies moved as the sounds washed over him. The image of elegantly twisting limbs remained in his head long after his eyelids drifted shut and he finally fell asleep.
Chapter 2
The morning was just as torturous as Janus had expected it would be. He chewed through another poptart, this time bothering to actually check and see that it was a cinnamon-sugar one and drank three cups of caffeinated orange juice. Then, he waved his hand through the air and selected the 1st saved location on his device. He popped up directly behind his desk where he’d been standing the night morning before.
Someone, probably Remus, had shut his integrator down. He swiped a finger across the power button, and it flickered back on, scrolling through its morning start up routine.
The machine scanned through all of the data in the three main system it was connected to and sorted all information into things that concerned him, could concern him, and did not before then sorting the first two categories into order of importance. As it did, he set up his screen reader so he would hopefully not start the day with more of a migraine than he already had. It took about 3 seconds for everything to turn on and settle.
Sitting down in his desk, he dismissed the notification that Remus had finished and submitted the report from their mission the day before.
A mission had been scheduled for him today, and the details were in his inbox. A piece time travel technology had been accidently dropped by an archology student in the 1890s during a trip. It was an earlier model of emergency time travel given to time travels that would dump them back into the Registration Office in the year they originated. It wasn’t extremely dangerous, but could pose some problems, especially if someone who didn’t know what it was activated it.
Surveillance agents had tracked it down and found that it had been picked up by a local and sold. Though no one from that time had known what it was, they had identified that it was made out of a precious metal and it had been crafted into an expensive necklace. Janus and Remus were supposed to retrieve it today. It had been pinpointed that the most opportune time for the extraction was 1923 during a masquerade ball held by those who had bought the necklace.
20 notes
·
View notes
Last Seen Blogs

aopoio-442
제목 없음

numberoneheartcycle
Sewing

nrlines
Inspiration Chasing

liffeblend
LiffeBlend

breadwitchery
look down at the stars