#for the background coloring tutorial
Text


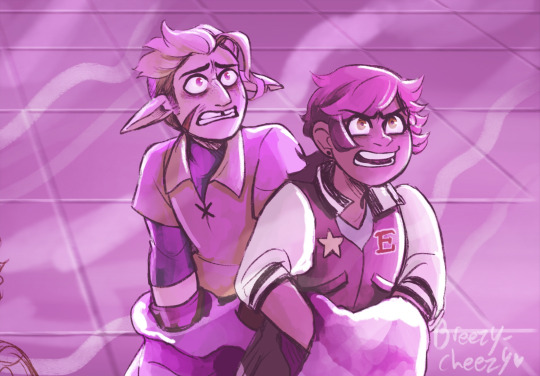
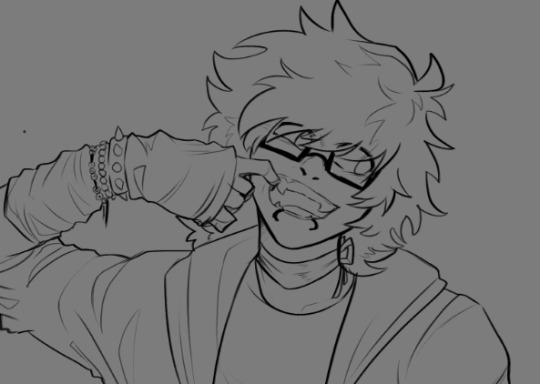
Lucy Chen + Pantone Pride Colors 🏳️🌈
#30DAYSOFLUCY for PRIDE 2023
THE ROOKIE (2018) – Season 5
in/sp
#the rookie#therookieedit#lucy chen#the rookie s5#credits#usernik#thoresque#userbecca#for the background coloring tutorial#melissa o'neil#30DAYSOFLUCY#lucylessons#until next time :)
56 notes
·
View notes
Text
In case you missed it, check out this video from BaM Animation about BG painting that I helped consult on and drop them a follow for more industry tips if you're not already! Thanks for watching!!
youtube
#bam animation#bam#animation#background paint#background painting#color theory#color#youtube#youtuber#youtubers#video#videos#tutorial#tutorials#art tutorial#art help#artist support#art tricks#art tip#art tips#how to#digital#digital art#background#allisonperryart#allison perry
94 notes
·
View notes
Photo
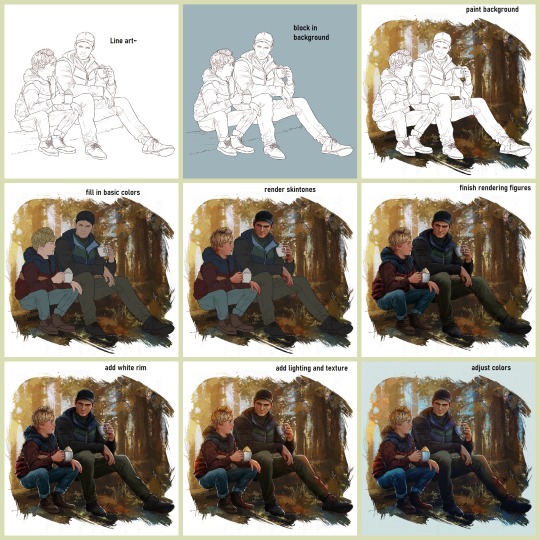
Brief tutorial on how I usually color my drawings~
#my art#tutorial#lol the background just..appears#but I always do the bg first so I can figure out the colors I want#I have more stuff like this on my patreon btw ^u^
128 notes
·
View notes
Photo
“Leave him alone!!”
Soooooo new ep huh? I’m loving me this enemies to siblings arc-
#my art#toh#toh spoilers#the owl house#luz noceda#hunter#screenshot redraw#so much....pink#love the kids' new outfits!! and so many things!!#poor Hunter gets to be damsel in distress for alot of it#but seriously Luz.....she knows what will happen if he gets sent back to belos#she is smol and ready to throw hands#her arms are no longer weak and nerdy#now STRONK and nerdy#character development#wow a background!! I tried#still figuring out Luz....#that hunter I actually used in a tutorial to explain to a friend how his hair works kjHLJKSDHFS#glad I could color it up#mmmmmm 4 more days#can't wait
178 notes
·
View notes
Text
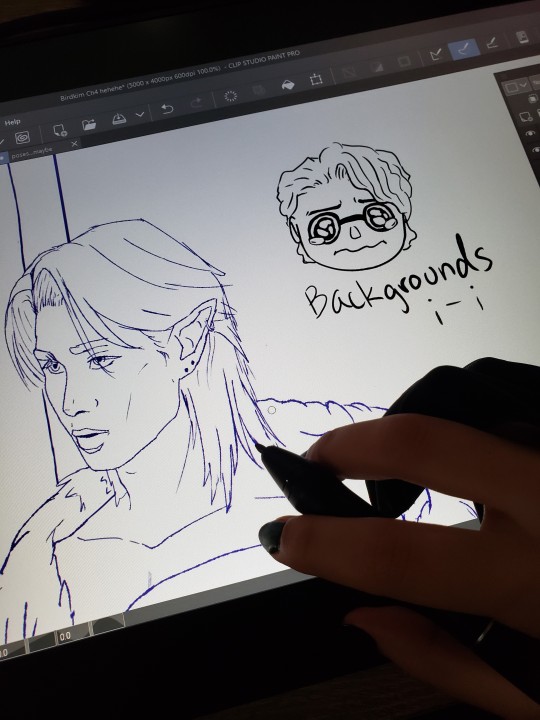
Working on wips and uuuuuhhhh hate this thanks
but this might definitely probably be for someone and i may or may not have been working on it on and off for months lmao
#why does it take so looooong#probably shouldve saved all those backgrounds tutorials for csp i sae#late wip wednesday i guess#my art#kim theerapanyakul#wip#don't ask me how i'm gonna color this i've got no idea how to do that either#kinnporsche fanart#fanart
11 notes
·
View notes
Note
What would you say your least favourite/the hardest part of drawing for you?
(ngl for me I'd say it's posing,,,, yes I know it's like one of the main bits of art but it's so fucking hard to do,,,,,)
Putting clothes on them I simply cannot design characters I have to steal someone else's ideas I hate thinking about clothes I hate it Im terrible at styling and making cohesive designs I can forgive coloring I'm getting better slowly but FUCK picking out clothes brother
#augustanswers#backgrounds im shit at but i dont actively despise it. colors im finding the right tutorials now. composition i LOVE posing and angles#FUCK CLOTHES
14 notes
·
View notes
Text
Every day I consider a little more quitting my job and dedicating like a full month to just learning basic art techniques
#but I just need to pay off ooooone last credit card and then buy a new computer rig#and then honestly?????#i may quit to just do freelance work#just enough funds to pay for my college courses next year#but then with freelance work comes the ability of free TIME to sit and study other peoples art styles and watch tutorials#oh to be able to understand shadows and simpler ways to color in grayscale#to be able to do more engaging expressions#to draw **backgrounds**#baby steps tho friends baby steps........#i will say i compare my whump art here to the old art on my g/t blog when i had just started digital art and goddamn#my style used to be ROUGH because i was practicing like 78 different things at once#so nothing ever looked good or consistent...............#i think my style is getting a bit more defined now but it's still pretty stiff and plain#oh well practice makes perfect
21 notes
·
View notes
Photo


we were supposed to be just friends
you don't live in my part of town, but maybe i'll see you out some weekend
depending on what kind of mood and situation-ship i'm in
and what's in my system
i think there’s been a glitch (x)
#law & order#law and order#law and order og#mygif#logif#ben stone#mike logan#flashing gif#glitch#listen.#the glitch gif looked SO mcuh better in my head#but i was having a TIME#i was looking at another tutorial and it got worse and it was a whole thing#i spent HOURS on that one gif lmao#and i would have been able to recreate the colors a little better on mikey's#bc i had done ben's first and loved it#and there's no gradient map for the background#it's just color balance and selective color#but our power went out and i didn't have it saved as a psd 🙃#so if the text looks different no it doesn't#i did the best i could okay#and there's like 3 people who will even care about this lmao#myself included#so if it's chill with you guys#we'll say it looks good and call it a day#loganstone
7 notes
·
View notes
Text
For the first time EVER someone stole my work (that I know of)
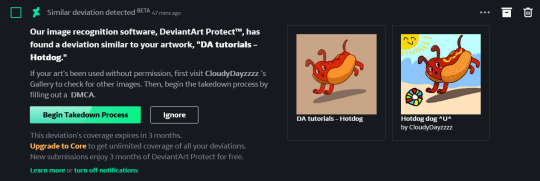
Does that mean I'm becoming famous ╰། ◉ ◯ ◉ །╯
#glad it's an image that I did in like 10 minutes and not one of those I spent multiple days on#but it's still shitty to steal someones work and not even credit them#like why#there's literally a tutorial on how to draw this character#that was made to get a badge#that I followed myself#they could've just drew their own#but they decided to use my as a base and just change colors a bit and add a background#such shitty behaviour#I sublitted a DMCA claim#we'll see what comes from this#deviant art#art theft#my post#my text post
2 notes
·
View notes
Text
This was meant to be the eye tutorial from yesterday but it kinda became it's own thing and honestly I couldn't be happier with this piece.
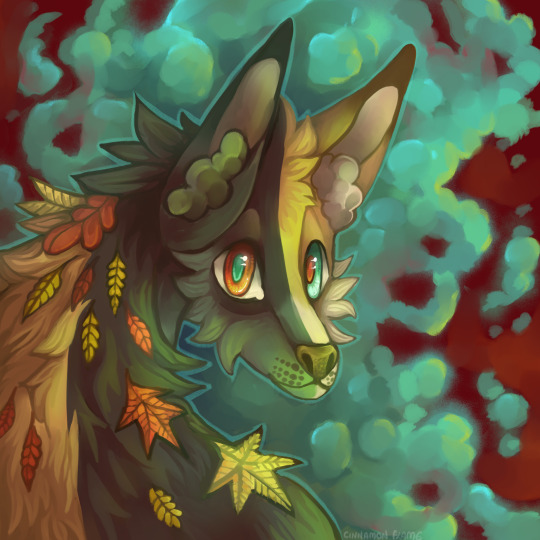
#I still think Veya will be my best design till I die#I wanted to use her heterochromia for the tutorial#but I got to much into the painting and the tutorial was missing a step#and I was too far to just go back#I love how color turned out in this actually#responding to the tags from the tutorial:#All my paintings are done on the least amount of layers I can pull off#I merge them at the begining and go from there#so the end result is the two main layers : Veya and the background#and additional three layers on overlay with the color corrections#this is the opposite to my non paintings which almost everytime have like a 1000 of layers and it crashes my programs#fox#autumn#oc#cinnamon's doodles
24 notes
·
View notes
Note
hello Virgil when you have the time you should explain your coloring and lining process
they way i do both lines and ESPECIALLY color changes basically every time i draw but yeah sure! im also p bad at explaining myself so idk if this is gonna make sense to anyone but me!
(first off dont draw on pure white canvases!! itll psyche you out and intimidate you because of the blank canvas, also its fucking eye bleeding!! i like going with a medium/light grey but ive seen people use a beige or light brown too just anything but pure white. also helps to just get SOMETHING onto the page if your having trouble w/ artblock, doesnt matter if its good it just has to be something u can work with. trust the process 100% and if it doesnt turn out good theres no shame in restarting from scratch, at least the idea is out of your head and easier to work through what was wrong)
my sketches are usually super messy and i go through like two to four different layers of refining it before starting lineart, and with lineart i usually use either a simple hard round brush or a sketchier one if im doing painting? my go-to ones are the default G-Pen in clip studio edited a bit to fit how i like pen pressure and 1834113 and 1761353 in the asset store but i like messing w/ whatever i can find on there and whatever feels fun at the time lmao so its not very consistent
i try and keep my lines pretty thin on the inside and thicker on the outer edge? as well as adding bits of cross-hatching and hatching both in the lines and when i go in with shading!
i keep my lineart brushes pretty minimal with the pen pressure as im not the best with my pen control and just change the size of pen as i go lmao. More prevalent when i'm doing super clean lines for comics and not sketchy ones like this for painting but its generally the same, i'm not the neatest person when it comes to lines
I draw a lot of the individual parts (head, facial features, hair, clothes, hands, etc.) on separate layers so if something looks wrong i can either wipe the layer entirely or go in with the transform tool and not mess with the rest of the lineart in the process lol
(also i saw someone keep the eyes and facial features visible under the hair but erase where they meet the lines for the hair? and just yoinked it for myself because it looks super nice lmao.)

starting colors is almost always the same, where i just go in and block in the base color for each part (skin, hair, clothes, etc.) on a separate layer to make going back and editing colors a lot easier. with painting like here i also go in and add basic shading, mostly around the skin! usually i add a darker & warmer color around the cheeks, nose, eyes, fingertips and joints as well as in places where theres shading like under the head and under the nose.

also in the darkest parts of the shading like under the head/neck and under the nose i like to add a light bluish/purpleish color very lightly as a bounce light! it doesnt always fit with the piece but it does look very nice when i can make it fit so i try to remember to do that lol.
(I dont take many progress shots or timelapses so i apologize for not having the best reference images lmao)
if im doing painting, after finishing the base colors & light shading i put everything ive done into one folder and make a clipping mask over top of it and paint over it!


i usually add more detailed shading + heavier highlights on places like the nose and edges of the skin showing to make it look nice and shiny lol
(i dont have any recent drawings i can show progress pics of but just trust me on this) if im doing cell shading though i do the same thing with putting the lineart and colors into a layer, but add a multiply layer on top of it and pick a pretty saturated color to go in with the shading. if i have a background i try and keep in mind what colors are in the background and what the lighting situation is to make sure the characters blend into the background more realistically. also airbrush tool and the add glow layer is your best friend in this situation

usually after that i go back and color the line art! I pick the darkest color in a part of the drawing like the clothes or hair, make it warmer and darker and go in on the innermost parts of the lineart with it and keep a lot of the outer lines black for contrast
then i just go completely fucking ham with overlay layers and gradient maps lmao, they ARE the fucking best and are usually what i use to finish off a drawing lol.
usually i use a combination of just fucking with the default "sky" graidents in clip studio or one set i got from the asset store (1814319) on a soft light layer at like, 10-30 opacity because it gives it a REALLY nice look. again just keep in mind the lighting situation (darker night? daylight? funky bright colors?) and just go until it looks good lol.
that's basically it? though tbh i tend to just grab onto whatever technique or tip i saw on tiktok or someone on youtube do and use that, as well as changing how i color hair/skin depending on what i think looks nice at the time. none of my shit is consistent what so ever so i just kinda change things or try new brushes/coloring styles on the fly if i think it looks nice lmao. pure essence of fuck around and find out every time i open clip studio
really hope this makes sense to anyone but me and hope this was helpful!
#virgil arts#virgil asks#long post#(?)#honestly best tip is just browse the clip studio asset shop and try as many brushes as u can#and just watch every coloring tutorial u can find on yt or tiktok or wherever#just try shit!#eventually youll find stuff you really like and wanna go with#my entire style is a mish mash of my favorite shows or comics or artists styles that ive yoinked and blended together#(((((specifically stole the way abd illustrates draws faces if u want to know how i draw faces just binge his yt channel)))))))#((((also i go tt the way i draw hair 100% from ikimaru and the general homestuck fandom back in the day))))#also one of the best bits of advice ive gotten is to not worry about finding a style#eventually if u just start adding cool shit u see other artists do itll just come naturally to u#pure trial and error motherfucker!#tho tbf i learn mostly via the 'trial by fire' method#where i just throw myself into something im not remotely qualified to make and figure it out as i go#because eventually if i do that enough i do in fact get really good at the thing im trying to learn!#thats how i learned background stuff!#(also. if u dont have clip studio. u can do most of this shit sans gradient maps in any program)#(ALSO CLIP STUDIO IS BABY EASY TO PIRATE BUT YOU DIDNT HEAR THAT FROM ME)#(I FOR SURE OWN A COMPLETELY LEGAL COPY OF CSP)
6 notes
·
View notes
Text
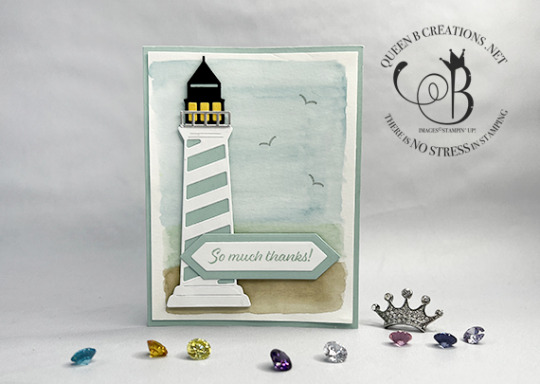
Simple Watercolor Background
Welcome back, stamper! Today’s card is a simple one. It’s a simple watercolor background behind my lighthouse made with the Lighthouse Point bundle. Did you know that July is World Water Coloring Month? I’ve attached a video below with lots of tips and tricks for water coloring.
My card has a Pool Party background followed by a layer of watercolor paper. I used the new Water Painters to paint…
View On WordPress
#card making#craft supplies#crafting#DIY#hand stamped#handmade card#handmade cards#instructions#Learn to Stamp#Lisa Ann Bernard#paper crafting#papercrafts#queen b creations#rubber stamping#stamp set#stampin&039; up#stamping#tutorial#water color background#watercolor background
3 notes
·
View notes
Text

original gif before and after coloring darkness ⤴
colored gif with extra sharpness + additional coloring with and without background coloring ⤴
#my gifs#chuu#kim jiwoo#aesthetic#gifs#aesthetic gifs#work in progress#wip#gif wip#i used several tutorials in order to attempt creating different kinds of colored gifs :)#i chose coral as my background color... 🥺
0 notes
Video
youtube
Create BEAUTIFUL Colorful Motion Background in After Effects Tutorial
#youtube#create#beautiful#motion background#background animation#colorful#blobs#beauty#how to#tutorial#filtergrade#after effects#video editing#animator
0 notes
Text
Learn Online CSS Design Fundamentals: Backgrounds, Borders, Margins, Padding, Height, Width & Box Model

In this blog post, we will delve into the essential aspects of CSS backgrounds, borders, margins, padding, height, width, and the box model. Whether you're a beginner or an experienced web developer, understanding and utilizing these CSS properties effectively can greatly enhance the visual appeal and layout of your webpages. Follow along as we explore each topic with concise explanations and practical examples.
CSS Backgrounds:
CSS backgrounds allow you to style the background of an element. Here's an overview of commonly used background properties:
a. background-color:
The "background-color" property sets the background color of an element. For example, to set a blue background color, use:
.element {
background-color: blue;
}
b. background-image:
With "background-image," you can specify an image as the background of an element. Let's say you have an image called "bg-image.jpg" in the same directory as your CSS file. To set it as the background image, use:
.element {
background-image: url("bg-image.jpg");
}
CSS Borders:
CSS borders enable you to add borders around elements. Here's an overview of relevant properties:
a. border-style:
The "border-style" property determines the style of the border. For example, to create a solid border, use:
.element {
border-style: solid;
}
b. border-color:
To set the color of the border, you can use the "border-color" property. For instance:
.element {
border-color: red;
}
CSS Margins:
CSS Margins allow you to control the space around elements. Here are the key properties to consider:
a. margin-top, margin-right, margin-bottom, margin-left:
You can set individual margin values for each side of an element. For example:
.element {
margin-top: 10px;
margin-right: 20px;
margin-bottom: 10px;
margin-left: 20px;
}
CSS Padding:
CSS Padding is the space between the content of an element and its borders. Consider the following property:
a. padding:
The "padding" property sets the padding for all four sides of an element. For instance:
.element {
padding: 15px;
}
CSS Height and Width:
Controlling the height and width of elements is crucial for achieving desired layouts. Here's what you need to know:
a. height:
To set the height of an element, use the "height" property. For example:
.element {
height: 200px;
}
b. width:
Similarly, the "width" property sets the width of an element. For instance:
.element {
width: 300px;
}
CSS Box Model:
Understanding the CSS box model is fundamental to layout design. It describes how elements are rendered on the page. Here's a brief overview:
The box model consists of four components: content, padding, border, and margin. When you set the width and height of an element, it applies to the content area. The padding adds space around the content, followed by the border, which surrounds both the content and padding. Finally, the margin creates space outside the border, separating it from other elements.
Consider the following example:
.element {
width: 200px;
height: 150px;
padding: 20px;
border: 2px solid black;
margin: 10px;
}
Conclusion:
In this blog post, we covered the fundamental aspects of CSS backgrounds, borders, margins, padding, height, and width. By mastering these properties, you can take your web design skills to the next level. Experiment with different combinations, explore advanced techniques, and create visually stunning webpages. Stay tuned for more informative content at webtutor.dev!
Don’t Miss to Read
Learn Online CSS Background
Learn Online CSS Margins
Learn Online CSS Padding
Learn Online CSS Box Model
#Free CSS Tutorial#Online CSS Tutorial#Online CSS Design Fundamentals#Learn Online CSS#CSS Backgrounds#background-color#background-image#CSS Borders#online CSS Borders#Learn CSS Borders#border-style#CSS Margins#Learn online CSS Margins#online CSS Margins#CSS Padding#Learn CSS Padding#Online CSS Padding#Free tutorial#CSS Padding free learn#CSS Height and Width#CSS Box Model#Learn CSS Box Model
0 notes
Text
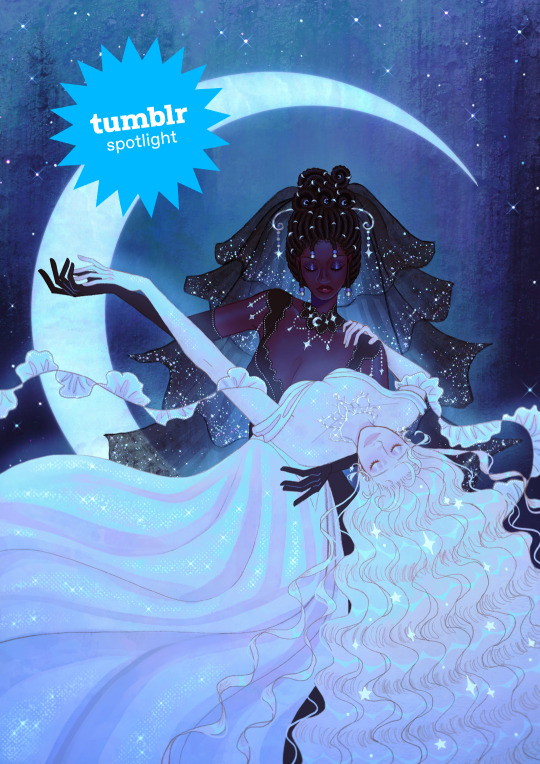
Creator Spotlight: @mimimar
Hi! I’m Michelle (Mimimar), an illustrator born and raised in Venezuela, currently based in Italy. I enjoy making colorful illustrations that reflect the things I love: fairy tales, fantasy, tenderness and queer (especially sapphic) stories. Occasionally, I also make paper dolls, comics and animatics. I have a lot of interest in book illustration and I’m currently developing my own stories that I hope to share as an author-illustrator someday!
Check out our interview with Michelle below!
Did you originally have a background in art? If not, how did you start?
I always enjoyed drawing when I was a kid, but it only became a hobby that I did almost every day when I was around 11. At first I only used traditional mediums, but I decided to make a serious effort to learn how to draw digitally when I was 15, and once I got the hang of it I never stopped!
I didn’t go to art school so all of my learning was done through studying the tutorials and resources that other artists generously share on the internet and lots of practice / trial and error.
How do you want to evolve as a creator?
I want to do many things but what I want to do the most right now is work on books! I want to make art for other authors’ stories and also my own stories as an author-illustrator. I want to grow as a storyteller and create art and stories that will really resonate with people emotionally. I’m always striving to improve my skills as well.
I also really love dolls, so working on doll box art or as a doll designer is something I would love to do someday. I actually have been designing paper dolls on my Patreon for the past few months, it’s been a fun project that is still ongoing right now!
What is one habit you find yourself doing a lot as an artist?
Probably using a lot of purple! It’s my favorite color so I find myself using it a lot. If I can find a way to sneak a little bit of purple into an illustration or a character design then I will.
Congratulations on finishing your Ivy Comic! Did the outcome turn out like how you expected or were there some unexpected bumps along the way?
Thank you! It’s a project that I worked on very slowly in between other art because I wanted to really take my time with every spread and make each of them a fully detailed illustration. I thumbnailed the full comic before starting but I kept changing the sketch for the final spread until the very end! Overall I’m really proud of the end result. I sprinkled a lot of hidden details in every page that I hope some of the readers will notice. For example: the meanings of the flowers in each page represent what the characters are feeling in that moment, and the colors of their wardrobe become gradually lighter as the story progresses to represent their emotions, as well as the changing of seasons.
We’ve noticed that you have created some amazing cover art for TGCF. Is there another series you would like to do something similar with?
That was another passion project that took some time to complete. Initially, I didn’t intend for them to be specifically covers, it was just a series of illustrations based on the 5 books/main arcs of TGCF. But since they were well-received and I had people telling me they wish they could use them as covers for their books, I decided to rework them into dust jackets for the english translation of TGCF!
I haven’t thought of any other specific series but I love doing cover art so maybe I’ll do something similar again in the future!
What’s your favorite part of your style? Why?
I’ve heard from other people that there’s a delicate quality to my art, this is something that I like a lot! I like pretty things, fairytales and vibrant colors. I think all of these things probably reflect in the art I make as well.
If there is one thing you want your audience to remember about your work, what would it be?
I hope that they remember how it made them feel. Feelings and colors are the two things I give priority to in my work. Most of the time I like depicting tenderness, softness and emotional intimacy. If that could reach the viewer and stay with them it would make me very happy.
I make a lot of art with queer (mainly sapphic) themes because they’re the kind of stories I personally like and want to see more of, so whenever people tell me that my art has helped them in their journey to discover and accept themselves, or that they see themselves and their partner in my art, it is always extremely meaningful to me. When art that I made to give myself comfort can provide comfort for others, no matter how small, it reminds me once again that despite any hardships art is genuinely worth pursuing.
Who on Tumblr inspires you and why?
So many artists! To name a few:
I love @sakizo’s amazing eye for fashion and detail,
@paneeps’ gorgeous style and striking colors,
the sweetness of @bevsi’s art,
@vickisigh’s pretty colors and concepts,
@idledee’s warm and heartfelt art,
@littlestpersimmon’s dreamy wonderful art,
and @loish has been an inspiration for as long as I can remember.
Thank you so much for stopping by and sharing, Michelle! Be sure to check out their Tumblr blog over at @mimimar.
2K notes
·
View notes
Last Seen Blogs
weir-woods
we were never meant for this collapse
iamacolor
Dear old world

onpu-rock
{ O T O R A N }
latinxradio
alexa play gasolina
nocokenoparty
Babyboy