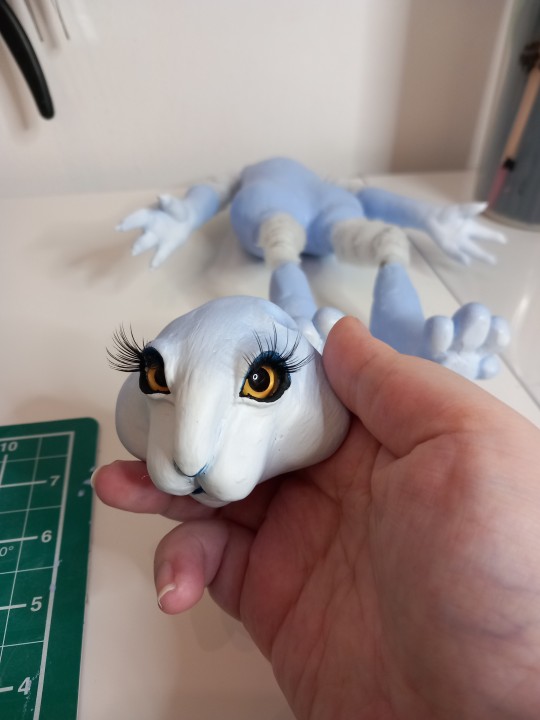
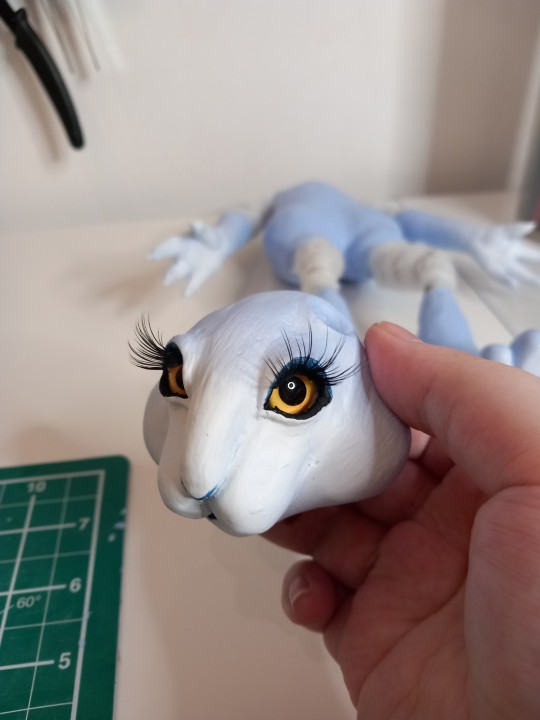
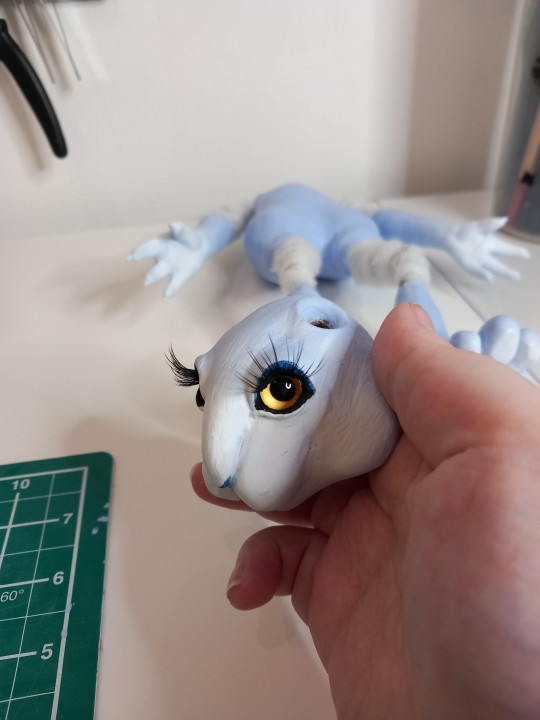
#faceup progress
Text

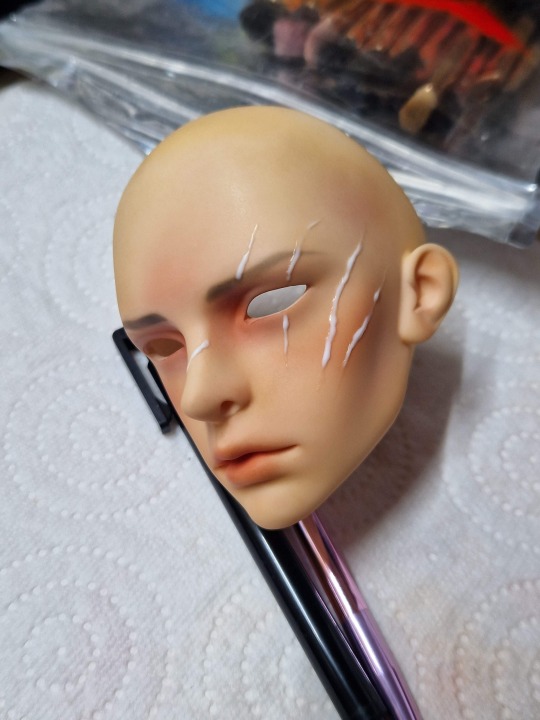
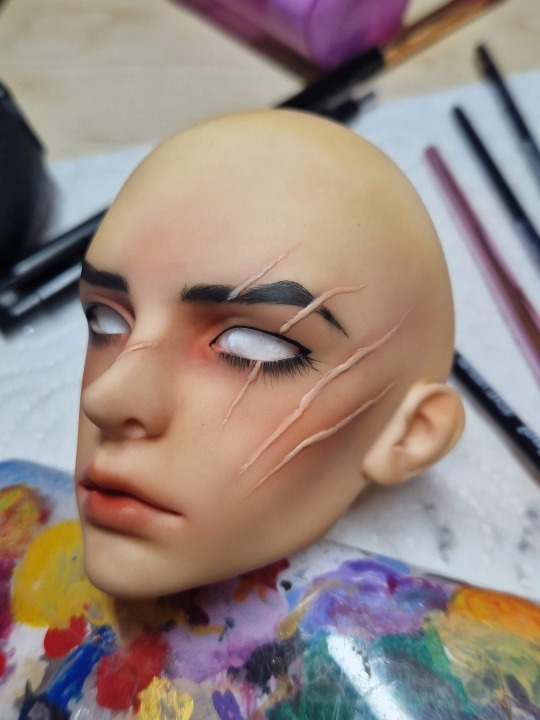
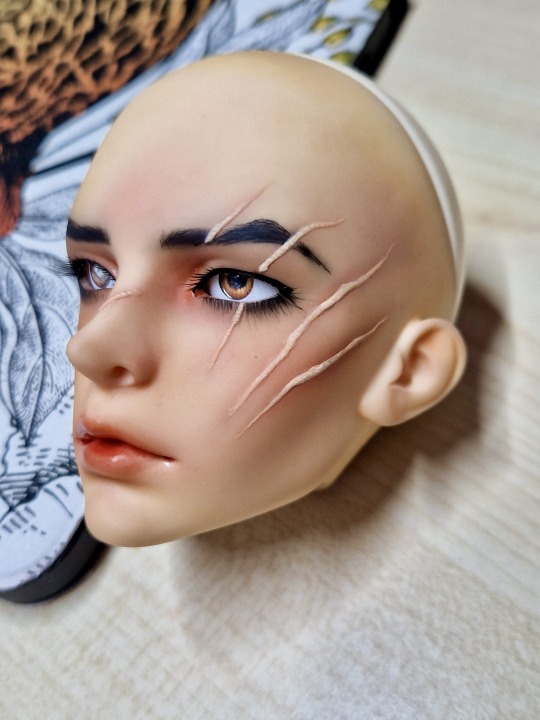
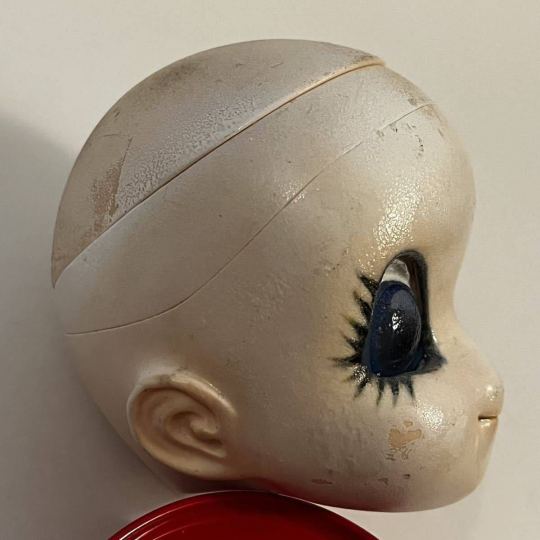
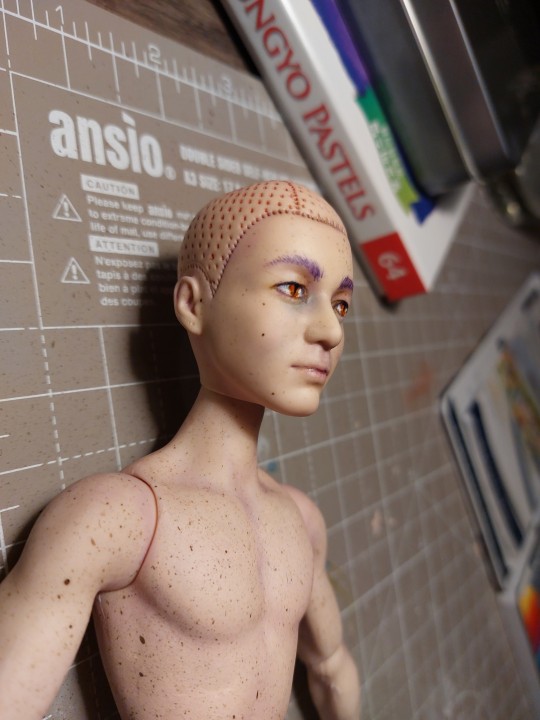
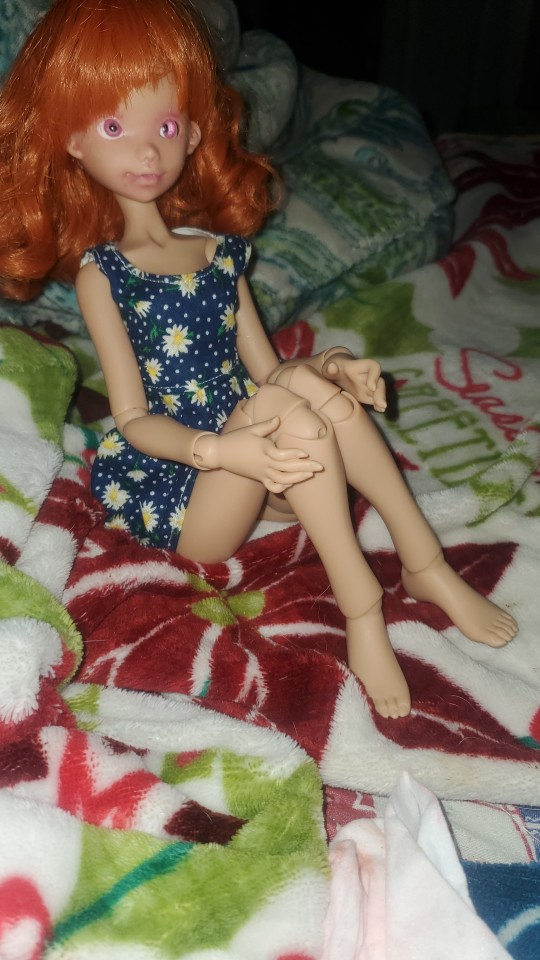
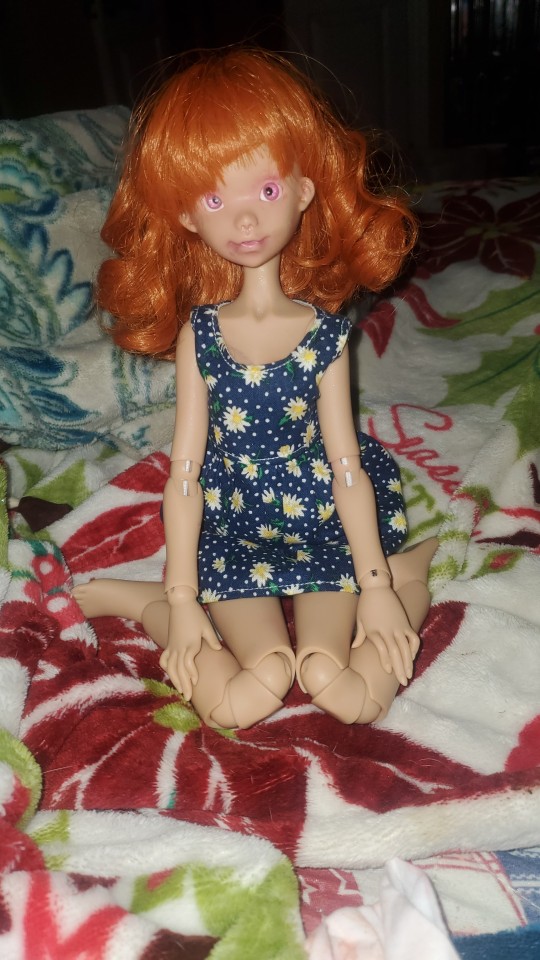
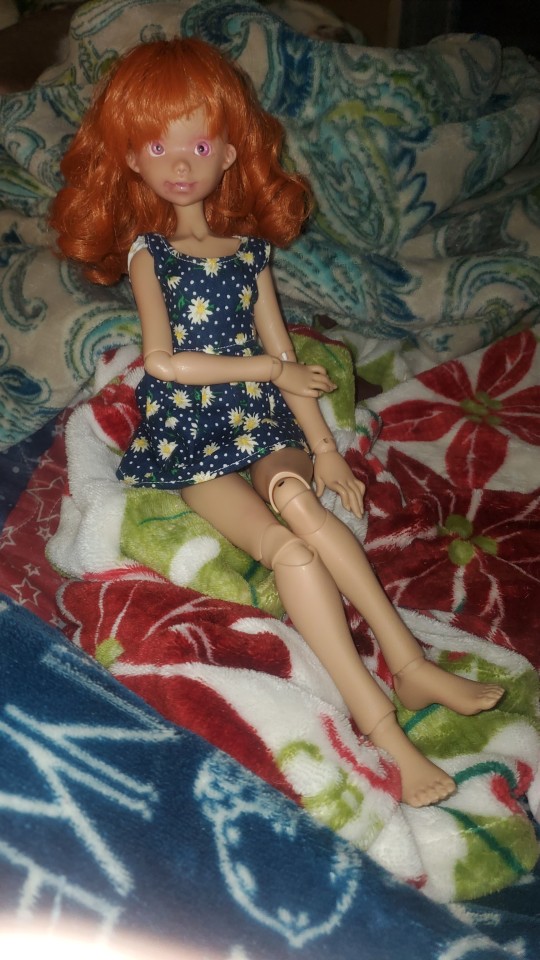
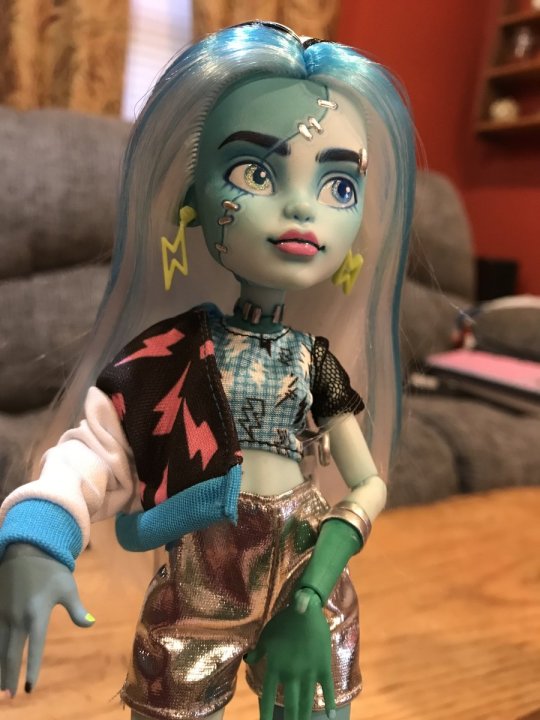
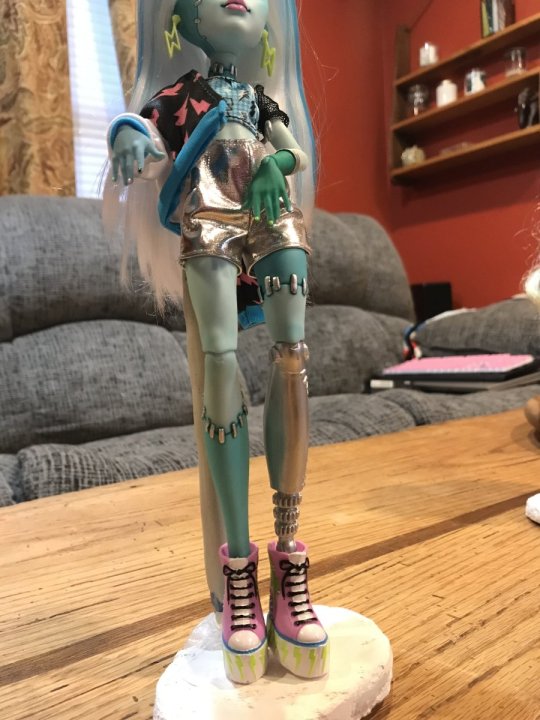
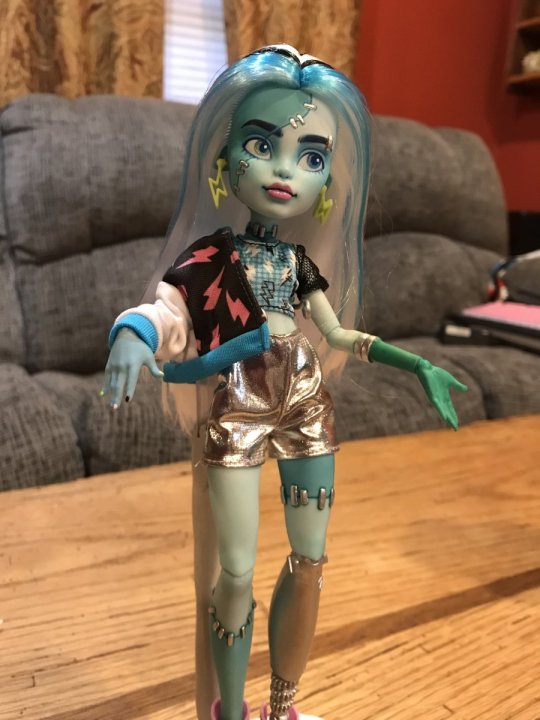
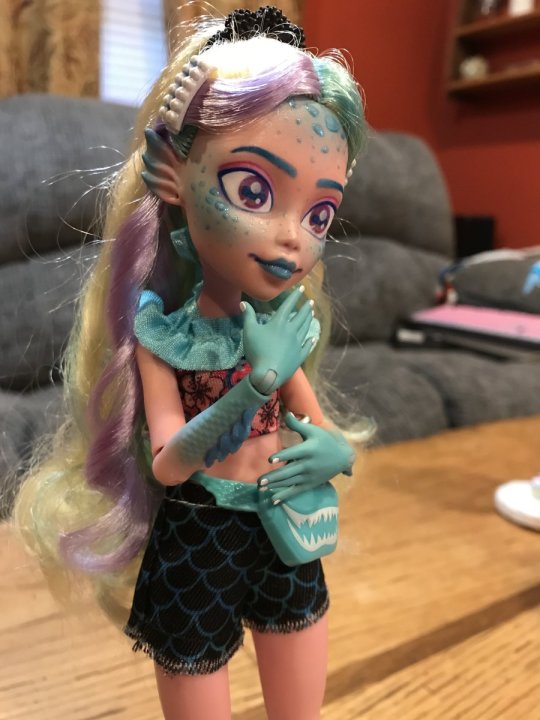
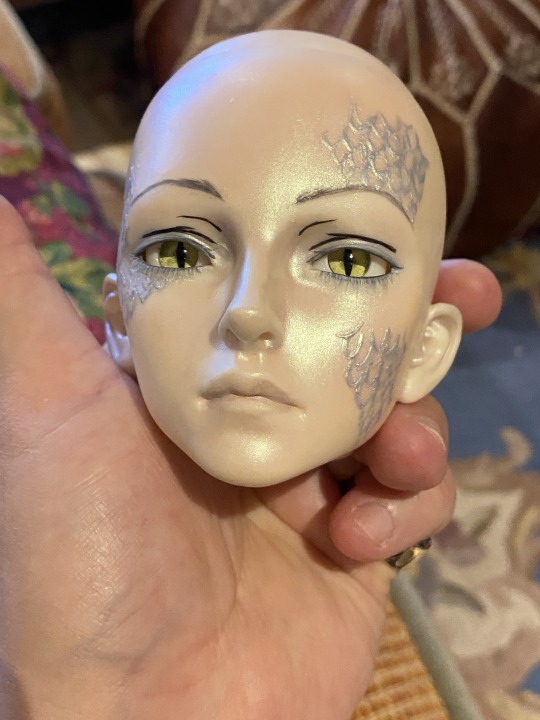
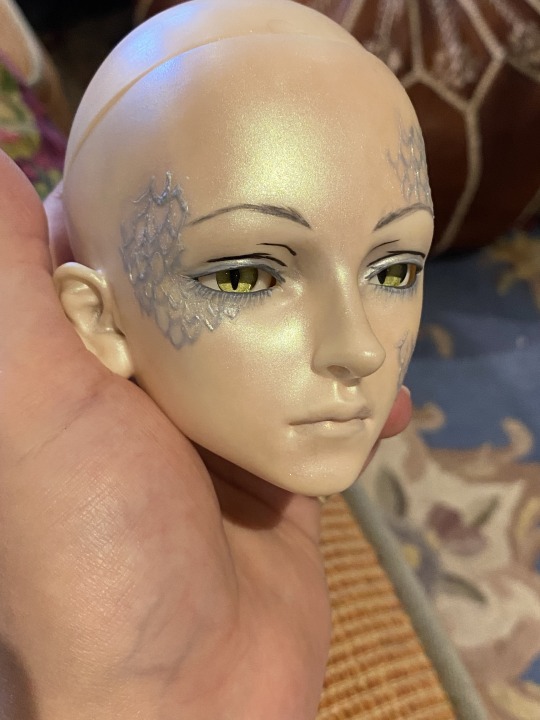
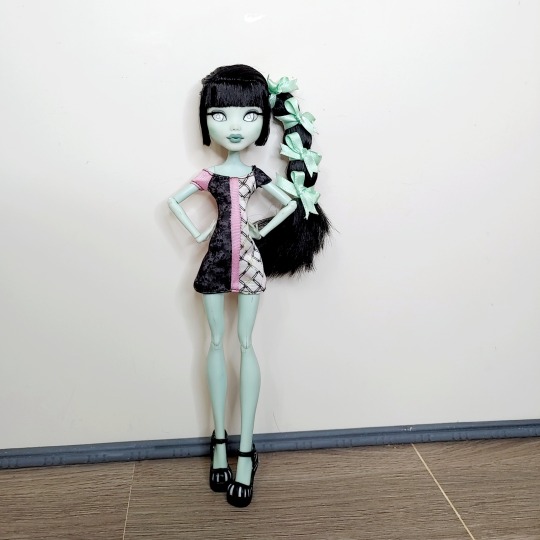
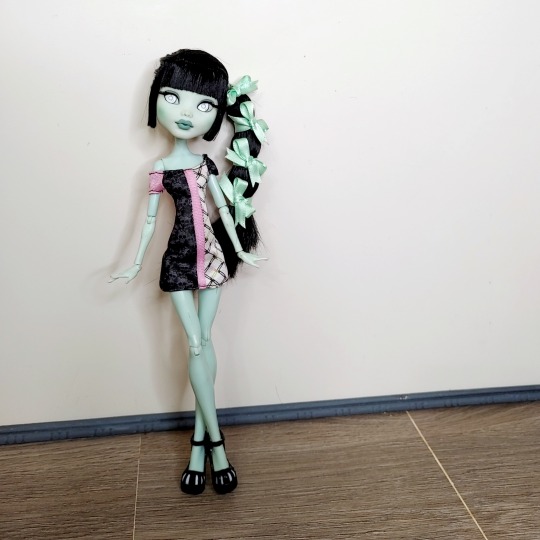
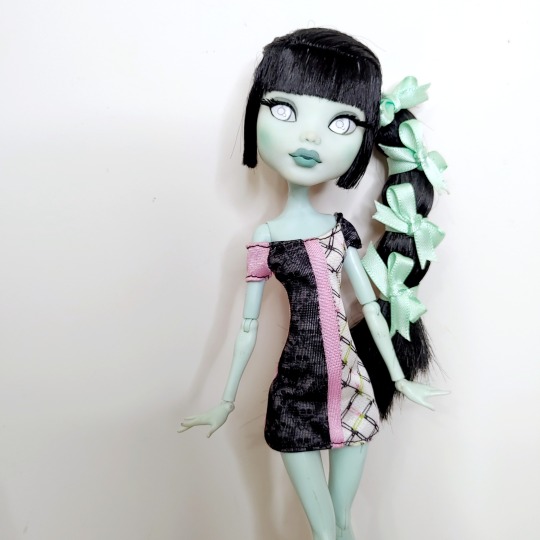
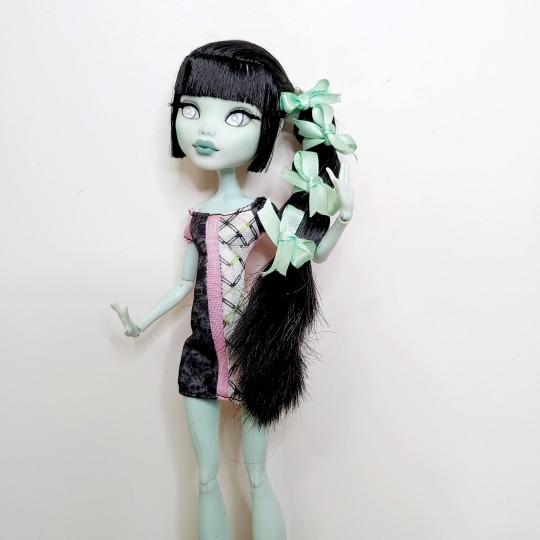
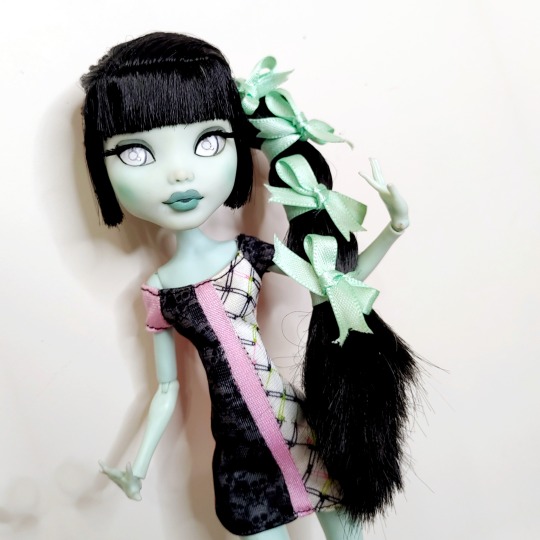
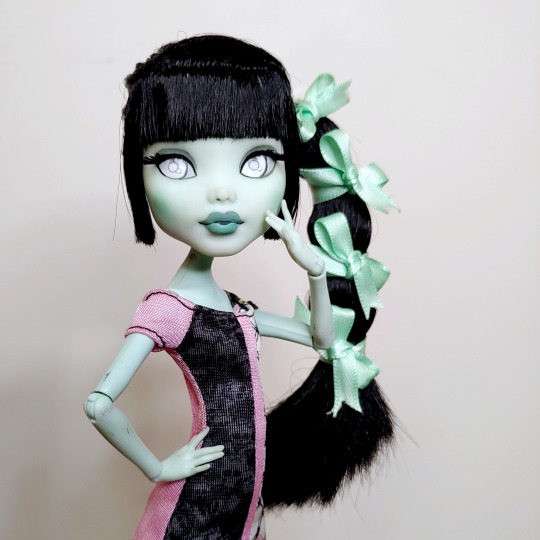
I’m pleased to introduce Zai, doll number 51. He is Jazz’s first mate and lover, and the father of her daughter (Bonnie). I still need to get a picture of the 3 of them together…
Zai is a Dollzone Raymond-1, who took Val’s previous body (B70-003). I knew he’d fit as Raymond had been originally released with that body way back when. I got the head secondhand.
He is normal pink, though the body is the old dark normal yellow from 2015. I knew I’d have to color match no matter what head I decided on. I’ve always liked the Raymond head, just didn’t know which character he suited, but his gaunt features are perfect for Zai!

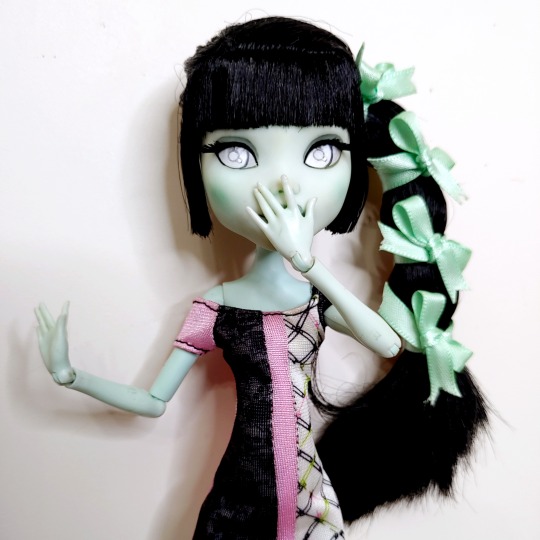
Here’s some closeups of his Faceup. I’m really proud of his scarring, I always forget how much I love the look of them. They require patience as I use the glue method to apply them, which means I gotta wait for the pva glue to fully dry before I can seal and continue…

The what is what:
Sculpt: Dollzone Raymond-1 in normal pink color matched to normal yellow on a DZ B70-003 body
Eyes: EyesinaBox on Etsy
Wig: Monique Gold 8-9 Reeva in black-brown
Faceup: me over at @izasfaceups
#bjd#ball jointed doll#izasbjdphoto#abjd#bjd photography#dollzone#legit bjd#izasfaceups#Dollzone raymond#Zai#eyesinabox#BJD Photo#faceup progress#Iza rambles
34 notes
·
View notes
Text

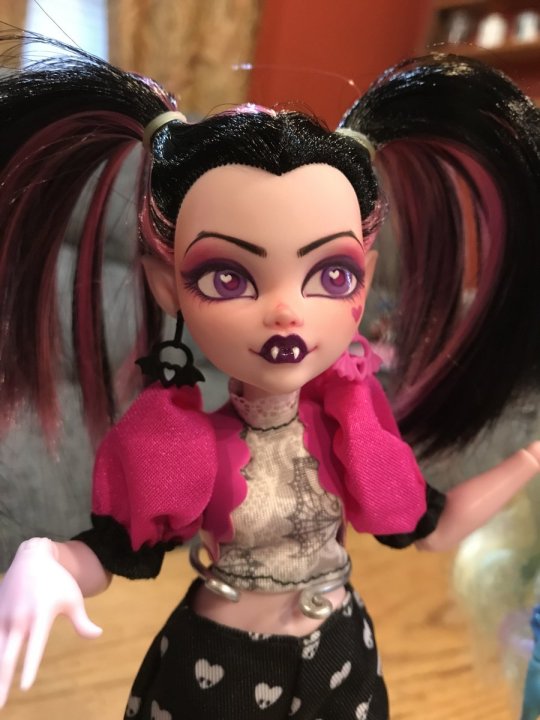
Redid my Fyodor bjd with a head that I think fits better 🖤 This one has narrower eye openings and a more prominent smile. I also chose eyes that are a little more anime and a little less soul-piercing lol. I spent way too long on the faceup though omg 😭 Also, please ignore the tiny bust it's on; I don't have any 1/3 ones
#anime doll#bjddoll#ball jointed doll#bjd#doll#bsd fyodor#fyodor dostoyevsky bsd#bjd faceup#bungou stray dogs fyodor#doll head#wip#art wip#work in progress#current wip#bjdphotography
34 notes
·
View notes
Text
the big and long miss yucky restoration post, part 1:
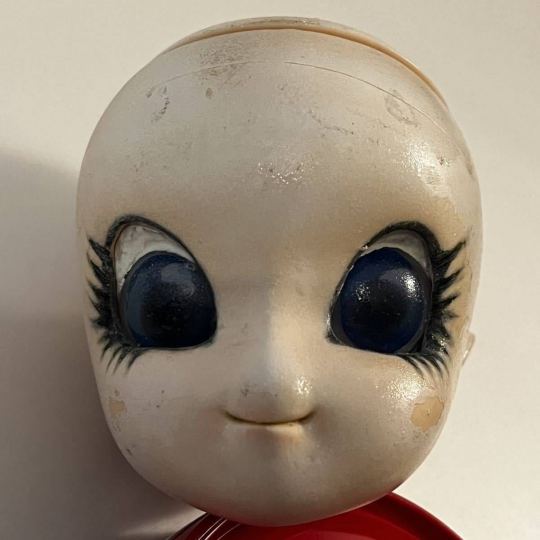
early february, i got a very damaged (what i thought was) ddh-10 (dollfie dream head, model 10) head from yahoo japan auctions. i had never seen a doll with such damage EVER and even though i hoped someone else may buy her (i did not want to pay the shipping fees), i ended up buying her. for your viewing pleasure, images of miss yucky at the start of this with explanations of what exactly is the damage (or what i thought the damage was at the time)


[ID: Four images of a severely damaged doll head.
The first image is of the head facing straight forward. Her face is very unevenly colored. She has small patches of a darker and more yellow vinyl tone showing on her face, from the paler paint cracking away. Her face is very simple, with big eyes that have cartoonish eyelashes and a small smiling mouth. Noteably, her nose is barely there. She has many spots of dirt on her forehead. Her eyes are dark blue and round, with unsmoothed white clay above the iris.
The second image is inside the doll's head, showing the eyes being held in with hot glue, gray clay, and blue sticky putty. Her headcap is set to the side and the true more yellow vinyl color is visible on the rim of the head that is open.
The third image is her head at an angle that better shows the eyes. The eyes themselves have a weird bumpy texture on them and her face looks very shiny from this angle.
The fourth image is her head in profile, showing that her nose has been almost completely removed. The discoloration is more visible in this photo than the first, with patches of bright white along the head seam right beside dark patches where the paint appears to have been scratched away. In this picture, it is most clear where the headcap has been replaced from the original, as there is a lower seam running around her head, with the headcap being much smaller than it should be. /end ID]
Hopefully her nickname makes more sense now lol. More elaboration on the issues and her process to looking a lot better under the cut, because it is long :)
As for the issues, I assumed it was either a sealant issue or just something mysteriously wrong that was causing the sheen (once I got her in the mail, I began to assume that it was all the plasticizer leaking out of her head, leaving it rock hard). Plasticizer is what keeps vinyl (which is what her head is made of) squishy, and when it leaks out, it leaves a sticky residue on the vinyl, a lot of sheen to it, and most importantly, when it is all leaked out, it leaves the head hard. Her head was as hard of a rock (or as hard as my resin dolls) and that was the only thing that made sense. It couldn't be age, as at the time, I believed she was a DDH-10, which had only begun production around 2016 (and most of the heads that had hardened over age were at least 5-10 years older than that).
Her eyes were stuck in in some mysterious way. The white on the top being not smooth threw me off, as I couldn't tell if it was supposed to be clay or just something to stick the eyes in. I hadn't really seen white sticky putty used on eyes super often but it is something that was used. The other obvious issue is the modding. At the time, I fully believed she was a DDH-10, so was shocked at all the modding that had been done to her. Her eyes had been widened, nose completely sanded away, chin seemingly sanded a bit, and her head cap was from (what i thought was) a different company. We will return to the true ID of miss yucky shortly.
Once I got her, I became aware of a few more issues:
She was INCREDIBLY sticky when I touched her face. This is not normal with vinyl dolls, and I could really only pray it was a sealant issue (as the most popular sealant in the BJD hobby, MSC, can seal glossy if it's used improperly (I've had the same issue when spraying it too close to the face or in too cold of weather)). The shininess was far worse in person as well.
The aforementioned head as hard as a rock. For people unfamiliar with vinyl heads, this specific type of doll has a headcap (which is the thing that you can kind of see is ill fitting in the original photos) that you are supposed to be able to squeeze the head to remove. These kinds of heads are VERY squishy. For example, my other vinyl doll, Beatrix, has a head so soft that I can easily remove the headcap with little effort (it's about the squishy levels of a Monster High head if that helps). At this point, I was very worried I would be completely unable to remove her headcap. But since the listing photos had had it removed, I was moderately hopeful
Her eyes were in odder shape than I thought. Prior to getting her, i had assumed her eyes were the ones you see in an average stuffed animal, just simple ones you sew in. With her modded eyes, it was pretty clear that she would need some kind of custom eyes, so this had made sense to me, that someone would have gotten those eyes and popped some clay around them. But upon getting her, I saw that they were custom eyes that were usually made for these kind of anime BJDs (term used loosely but most vinyl bjds like this have stylings closer to anime artstyles rather than the realistic ones that resin bjds have) and had some weird residue on them.
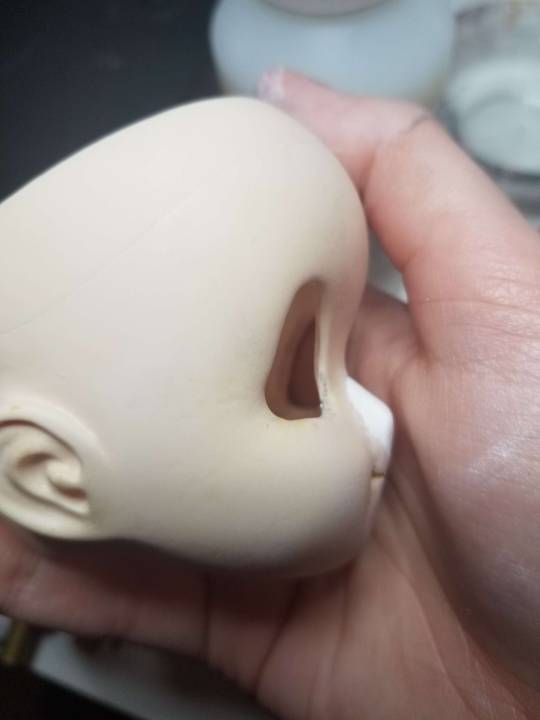
Her eyewells (the bit of vinyl between her eye and eyeball, where your waterline would be if she was a human) were much deeper than expected, which was why her eyes looked so deep and far back. Most of my resin dolls have similar issues due to that being how the company sculpts them so I wasn't too worried about that as much as I probably should have been lol


[ID: Two pictures of the same doll head.
The first picture is from an upwards angle and shows that she has a somewhat thick line of vinyl between her bottom eyelashes and her eyeball itself. She is being held by a pale hand and the photo is under harsh lighting.
The second picture is facing from the front and is being held by a pale hand. She is noteably very shiny and is about the size of the person's palm. /end ID]
You can see here the way the vinyl is thicker under the eye than it should have been in this case. The second picture is there because she was MUCH bigger than I anticipated, about the same size as Beatrix's head. Quick explanation on why this is odd: The DDH-10 sculpt is meant for 1/4 or MDD scale bodies (BJDs have different scales, all compared to the human body. 1/4 scale dolls are less than 2 ft tall, or on average, 45 cm tall. MDD is the type of body that the company that produces the DDH-10 that is made for the 1/4 scale), but the DDH-03 (the head model Beatrix has) is meant for 1/3 scale (on average around 60 cm or around 2 ft). Everywhere online had said that 10 head model was smaller but I didn't think much of it at the time.
The day that she had arrived, I had made a post on a big BJD forum, as a sort of project journal as I worked on her. The members were IMMENSELY helpful and the hunt for her true identity had begun. A few members were convinced she wasn't a DDH-10, but to me, I really was convinced she was, as she had been listed as such, had arrived in a box for that head type, and the way that she could have been modified made a lot of sense to me with that sculpt. This was not the case, as she ended up getting id'd as an Obitsu 60 cm girl head. I'm including this for a reason (and not just because I wanted to do a big post writing up the specifics of my journey fixing her)

[ID: A blank doll head. It has the same smile and nose of the doll head shown in the photos prior, but noteably does not have any eyeholes carved in. Her vinyl color is much warmer and closer to a typical peachy tone than the very pale paint covering the prior shown doll head. /end ID]
This photo is taken from an old Mandarake listing, as one of the forum members had linked me to it. The most noteable thing here, is that unlike the head I have, the eyes are meant to be painted on (much like a Monster High head). Which means the customizer before me had hand carved these eyes (and somehow got them as even as they did). Other good news with this- the body I wanted to put her on was an Obitsu body, so somehow, they matched perfectly (each vinyl BJD company has different skintones, so I was not expecting that much of luck).
Her ID aside, let's dive into the restoration! I had to give a bit of backstory before we got into the good stuff lol
First step was getting her headcap off, as I wanted to remove her eyes before cleaning her face, just to not cause more damage to them than what had already happened to them (at this point, I did not know why the eyes looked like that). Thankfully, a hair dryer was able to heat the headcap and get it loose enough that I could pop the headcap off and get my first look inside her head.

[ID: A closeup of the inside of the doll head. There are thick globs of hot glue holding the gray clay in, a mysterious clear shape that is the back of the eye, and blue sticky tack holding it all up. /end ID]
Getting a better look at it, I just decided to dive in and start prying the hot glue off. Once I did that, it revealed that the gray clay was in fact Apoxie Sculpt (which dries VERY hard when its cured all the way. This was the worst case scenario, as I did not want to deal with removing that) and that one of the eyes came out all the way.

[ID: A closeup of the doll eye out of the head. It is surrounded by white clay on the top, with some of the Apoxie sculpt on the top. Above the doll eye, there is a piece of Apoxie sculpt that has browned and has some of the blue sticky tack on top. Two pieces of the hot glue are below the eye and the head is off to the side. /end ID]
I was SO relieved to see it was coming out, but the other eye did not come out as easily sadly. There was still a big chunk of clay that was presumably used to hold the eye in. I have no idea why the eye mechanism was like this at all to be honest. That clay was NOT coming out at all, so I moved to get her cleaned up.
At this point, I had noticed some black spots inside of the head. I was praying it was not mold because that would be nigh impossible to get cleaned up (given I could not just do what you do with MLP and heat the vinyl up and squish the mold out with using Oxi-Clean. Her head was too hard for me to do that). I had also been hit with an overwhelming "new vinyl" smell, which was another sign of the plasticizer being completely gone/leaking slightly, so I was pretty sure that was the case.
I cleaned her up with warm soapy water, but it didn't really get anything off. My next step was to remove the faceup with acetone, which is a little stronger than what most people use to remove faceups but I am very careful with it so please do not try using it unless you are cautious as well. I needed something strong to really get the layers of paint off. With how many dolls I've removed full body/full head paint off of, I have the method down pretty well (a short list of painted dolls I have had to deal with: my own Cordula head, as her head is bright white and needed to match her yellowed body; the body I have for my big guy (which was just a LOT of blue paint); Clarimonde's body (which was painted mostly to hide the top surgery scars from the modification but I wanted to remove the paint)). It came off pretty smoothly, and was revealing a gorgeously yellowed vinyl underneath. Quick clarification here, most people do NOT like their dolls yellowed. I do because it's easier to blush and work on because it is not stark white and I feel it makes the skin look a bit better for the most part (most of my dolls are yellowed but maybe 2 of them). She had some minor staining around her eyes and mouth but nothing compared to what I expected.

[ID: The aforementioned doll head, now much closer in tone to the listing photo. Her face is all cleaned up and her headcap is resting besides her. There are some faint stains by the eyes left from the eyelashes but she is otherwise completely cleaned and is blank. /end ID]
The difference was stark, as she looked much better with all the discolored paint removed. What I had worried was mold was just paint from the faceup and came off completely with no worries (I am convinced I kept lucking out with her because she was thankful to be cleaned up and taken care of).
I had, weirdly enough, been very worried that she would lose all of her charm and cuteness with no faceup, but she did not. Now that I had cleaned her up, I could return to the to do list. With no faceup, it was clear her eyes were slightly uneven, and the modding had left some scratches inside of the head that i wanted to clean up (namely because I felt bad for her for having to have those inside her head). Her nose was something that I definitely wanted to resculpt (which was partially why I wanted to get this doll, she was a big project and an excuse to learn skills that I had been too scared to learn prior to this, sculpting being one of them), but the shape was something I was super uncertain of. She would need custom eyes that were made to fit only her eye shape (her eyes are carved very low on her face in comparison to the original, so normal round BJD eyes would not fit properly) and I would want to make her a wig. I also needed to get her on the body in a specific way modification wise, which will be something we will cover in a later post (as I have not done it yet lol).
Starting with the eyes, I started to work on getting the chunk of clay out of the head. I was immensely glad I had gotten a dremel to help restore my big boy (if you remember me posting images of getting the clay on a chest piece sanded down, that is the same doll) as I had to pretty much sand away at the clay for about an hour or more. Eventually I just gave up and pried it out of the head with a small sanding tool (as sanding it down was just not working too well and it was kind of my last resort). I sanded the inside of her head and outside of it, but neither of these differences show up a lot on camera, so I won't be including images. I sanded the outside of her head to get a few of the areas that were stained a bit to be a tiny bit less stained, as well as wanting a fully clean and sanded surface before I started sculpting.


[ID: Two pictures showing the inside of the dolls head. The first one has a large chunk of white clay visible under the right eye and the second shows the same spot with no clay, as it has been removed. /end ID]
You can see how big of a hunk of clay it was! It was BAD lol. I got through maybe 3 long youtube videos while getting this thing out.
The eyeballs themselves turned out to be made of resin, and thanks to one of the members suggestion on the forum, I cleaned them with acetone. They believed it was just sealant sprayed while the eyes were still in, and the acetone cleaned them up beautifully. They were still not the right fit for miss yucky, but I was very relieved to see that they cleaned up okay.
This photo was before cleaning them up, as I was so confused what could have even been going on here and needed to get advice.

[ID: The eye close up. There is an almost foggy texture over it that obscures the colors a bit. They are a dark blue. The surface is very bumpy and there are some remnants of the white clay that surrounded them still attached. /end ID]
And this photo shows them cleaned up! The left one has been cleaned and the right has not.

[ID: The two eyes laying flat on a gray countertop. The left one is still moderately foggy but is much much clearer than the one to the right. There is a slight gradient in the iris and a small light blue highlight towards the bottom. The right eye is much foggier and is still very bumpy. /end ID]
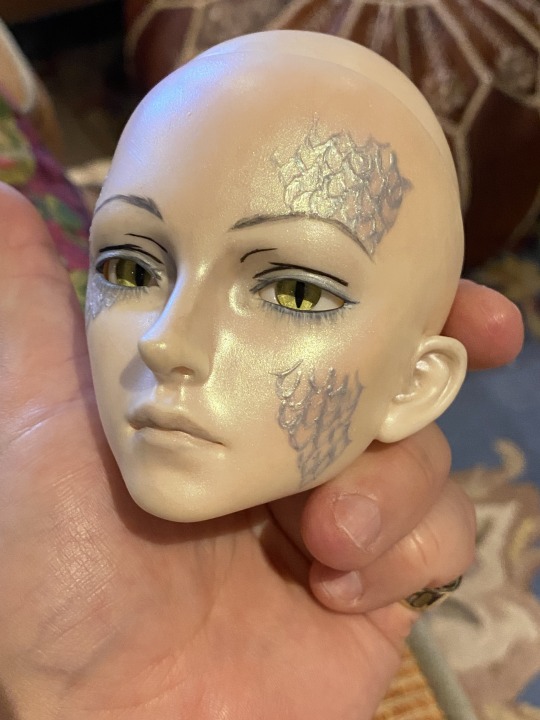
As for the nose, I was originally planning on doing a larger nose (at least for an anime doll. Closer to what a Dollfie Dream Alna looks like versus the typical very skinny pointed nose) but the more I looked at her, the more I felt she resembled Pinoko from Black Jack. The eye shape, nose shape, and mouth shape (as well as how the eyelashes were painted) felt near identical, so I took inspiration from how Tezuka drew her nose when I was sculpting. I wanted it to flow into the rest of the profile naturally (that does not make much sense but it will once I show the pictures, or so I hope). I didn't want to do a super big difference with her nose, and stick to the original aesthetic as much as I could (which was my goal for most of this project, stick to the original but make it look a bit less "haunted doll" (as one forum member described her)).

[ID: Pinoko from Black Jack. She looks surprised or startled in the photo. She is a pale young girl with a orange-brown bob with bangs, wide brown eyes, a small round nose and a round face. She is wearing a blue shirt. /end ID] (This photo is from the All of Black Jack artbook if anyone is curious)
^Pinoko for reference. I hope the similarities are clear to see! I took some "pre-op" photos of miss yucky (she still does not have a name) and then got to work with some superfine white milliput.

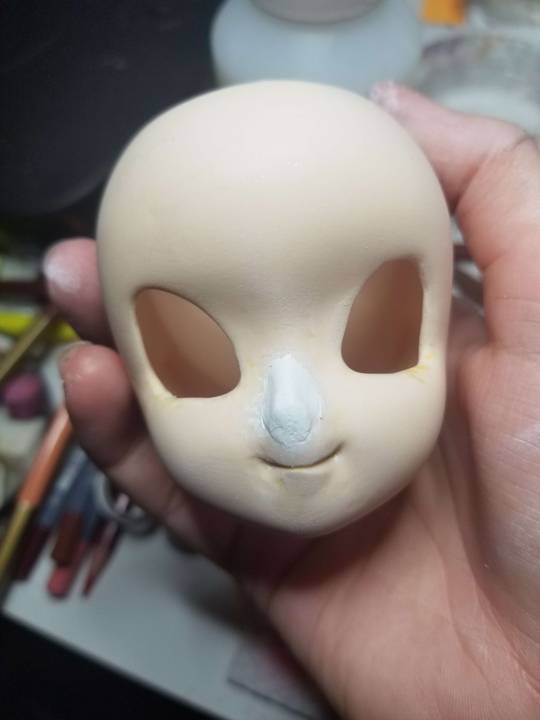

[ID: Images of the blank head from the front and both sides. The first three photos show what the head looked like before the nose, and the second three photos show what she looks like with the nose. The nose is a very stark white compared to the rest of the head and is fairly small. It is upturned and has a slightly rounded tip. It flows into the rest of the profile smoothly, causing it to look very natural from the side. /end ID]
I was not perfectly happy with the nose but it was pretty close to what I had wanted, and I hoped that painting would just fix my issues. It is hard to see here but her eyeholes are also more evened out, although it is a VERY small difference.
The next step was a faceup, which was admittedly very scary. I got nail brushes to help get the fine lines a bit better than what I could do with my usual brushes (my hands are IMMENSELY shaky and have not wanted to cooperate at all during this project, thus the faceup has taken forever because I want to get it right) and wanted to pretty much just redo the previous faceup but with eyebrows and not the scariest skintone situation known to man.
For some context here - normally with faceups, you start with using chalk pastels to shade the head, then go in with watercolor pencils to get the lines, and then do acrylic paint last before doing the final sealing and glossing areas that need to be glossed. I normally follow this to a T, you can see that in my past faceups, I do most of the blushing and the eyeshadow colors first, then go through the rest of the steps.
This was not the case with this head, as I started off with trying to sketch her eyelashes with a watercolor pencil (this did NOT want to cooperate with her head texture/sealant texture) and then eventually just gave up and went in with watercolor paints on a brush. This was ALSO a pain (she wanted to be so so evil to me during this step I think lol) so I just went in with acrylics before doing anything else on the head. Her faceup was going to be mostly acrylics (minus the blushing on the cheeks) as I wanted to keep a similar look to how Tezuka paints Pinoko (he was a very big inspiration during this project, and is why I am doing certain steps, such as the nose and eyes (when I get there) the way I am) and keep the head's cartoonish and cute appearance. The eyelashes were the worst part of it, as I wanted to keep them symmetrical or as much as I could, but it was very hard. I got through the faceup immensely slowly, but to be fair, I was working on another faceup as I did hers (as I wanted to redo both of my anime style heads).
The eyebrows were OBJECTIVELY the worst part of this faceup though, as even in the mockup, I really struggled to paint ones that I felt suited her. At this point, I was really empathizing with the previous faceup artist as with her eyeshape, good eyebrows were hard to do. My other struggle was matching the nose to the vinyl. I am normally somewhat decent with color matching (again, doing Cordula's faceup around 3 times and having to color match the head to the body with paint each time helped here), but this was just very rough, as even with sanding, I felt the nose didn't blend into the face the way I wanted it to. The color was off and I couldn't figure out exactly HOW which was a very big pain. Admittedly, in lower lighting, the nose mod looks GREAT but up close with harsh lighting (which is how I do my faceups), it looked pretty rough. I'm not done with the faceup just yet, so I'm really including a few WIP pics, as I will be tossing the finished faceup pics in when I make the part 2 of this post :)
First off, the nose painted pics:


[ID: The head, now with the sculpted nose that is painted over, on a messy desk. The first image is in harsh lighting and the line where the nose mod begins and the vinyl head is more apparent. The second image is in darker and warmer lighting, and the mod looks more natural. The third image is under the same harsh lighting and shows the head tilted on its back, showing the side view of the nose that is painted. This angle makes it look better than in the first image. The paint is nearly perfect color matched but is slightly off. /end ID]
For my very first attempt doing a mod like this, I was very pleased with how it looked. Milliput is NOT as bad to work with as I anticipated and with the paint, the nose looked pretty natural. It definitely encouraged me to want to work with it more in the future, which is good (as I need to go back and fix Aca's top surgery a bit lol, as I was too scared to do the sculpting at first for him, but now I feel moderately confident about it). It was pretty fun to sculpt it but the painting was a bit of a pain since it was just off in a way that I couldn't put my finger on.
Next up, the most recent WIP

[ID: A closeup of the head, with the same cartoonish lashes painted on in black that she had before. The lashes are incomplete, with the left eye being painted partially with dark brown paint and the right in black paint. Both eyes have the bottom lashes fully painted in black and faint brown pencil marks serve as guides to place the lashes. The right eye has the first two eyelashes painted in black, whereas the left only has the pencil marks. She is very faintly blushed with a light pink on her cheeks. Another doll head in the process of being painted is in the background of the photo, mostly out of shot. /end ID]
I did dark brown paint first, in hopes that I could just outline it first and then do the blushing I needed to, but the stupid paint was NOT going on solid. So i had to jump right into the black paint and pray for the best. The best thing about acrylic paint is you can wipe it off with water easily. The faceup has been taking days, not just because of my chronic pain flaring up and making it hard to move my hands in a way that would work to make these eyelashes right, but because I am doing one lash at a time. This makes sure that my prior work isn't erased if I need to redo a lash but it makes it take a lot more time. I did this for both the heads I was working on, as they both are very fine motor skill required and I needed to get them perfect. The nose mod is also a bit more visible here, it really looks good in certain lighting and bad in others which makes it frustrating lol.
That's all for this VERY long post, ty if you have made it this far! The next post will hopefully be including progress on:
The faceup (hopefully done lol)
Eye making (this will be a VERY miserable time for me I fear)
The way I'm working with my personal modifications to the body to get the head to fit on there
Wig making/styling a wig I have to be her temp wig
And as a little bonus treat, her with Beatrix before I got her cleaned up :)
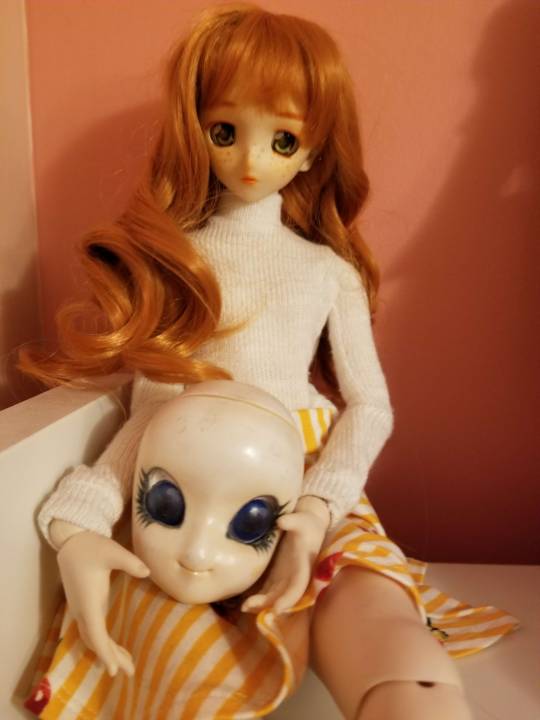
[ID: A pale vinyl BJD with an orange wig holding the project head. The doll holding the head has green eyes, and a very orange toned faceup. She is sitting on a white shelf and is wearing a white turtlenck and a striped yellow and white skirt. Their heads are around the same size. The project head has had no work done on her in this photo, so the contrast between the heads appearances in this photo is quite stark. /end ID]
#twist rambles#bjd posting#this is LONG long. so that is why it is under a cut lmao#and i need to make a post showing bea's faceup progress i think... but i gotta work on their heads a bit more now.#its insane how well its gone. i rly think shes happy to be home and grateful im helping her look a bit better :)#and in unrelated news good god im so glad i redid bea's faceup bc mannn it looks so much better now lmao. even if she was crazy stained#from the past faceup lol.#anyways. back to work. but this is what ive been working on for like a week but didnt wanna derail from the strike bc of how long of a post#ik it would be. like. as u can see i can talk abt dolls for forever. but this is not like... even all of the stuff i could talk about but i#wanted to kind of take ppl on the journey i was on#i think this is prob the longest doll post ive ever made good godddd... so sorry lol
11 notes
·
View notes
Text
faceup done, won't lie it was a struggle tryna get detail on something so small and it's not the most symmetrical thing in the world but I'm still p proud for my second faceup 👍 it's wig time next
#all his freckles r so cute eheeheheeheee#also meant to take progress pics and forgot lol#dollblr#wip#faceup#doll customisation#doll custom#levi
9 notes
·
View notes
Text
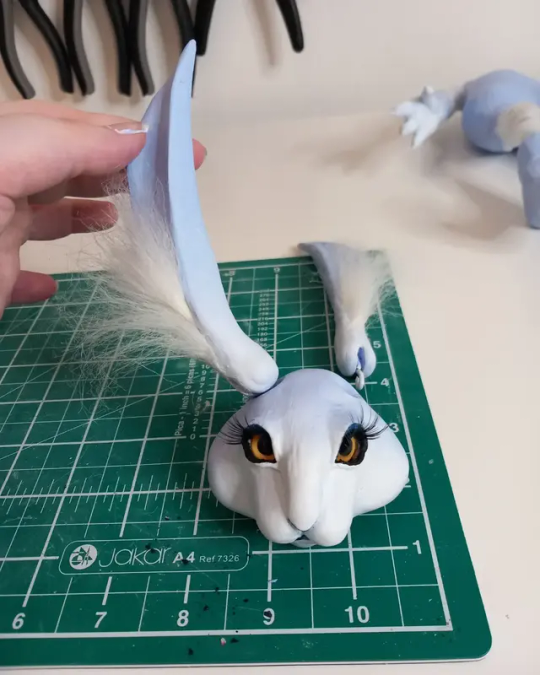
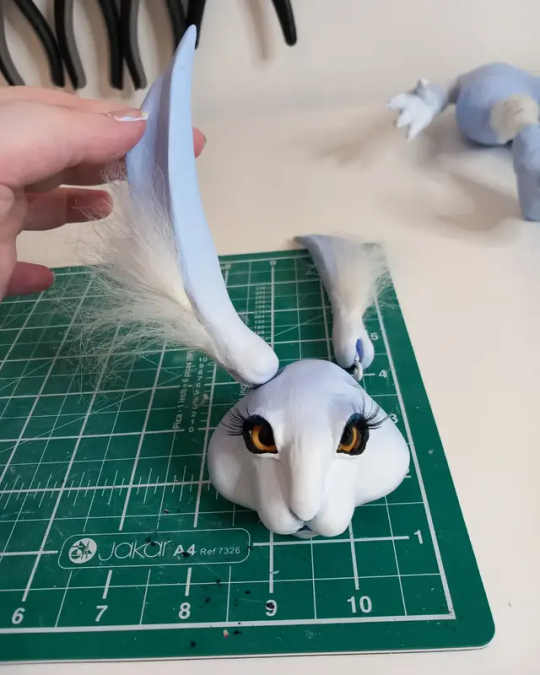
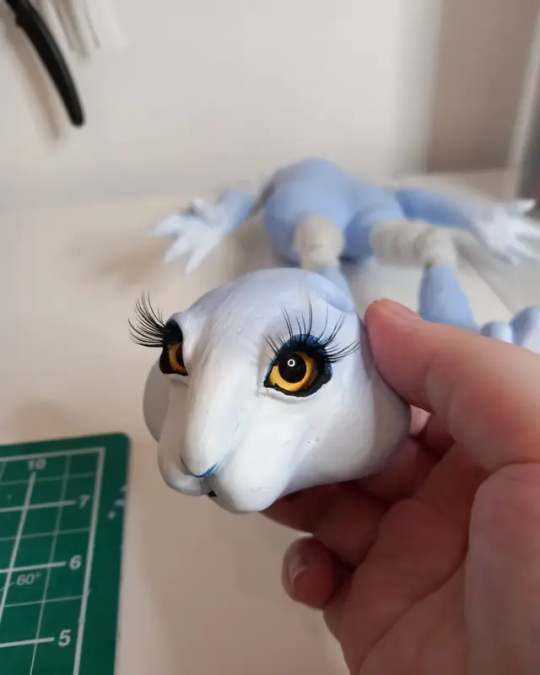

She's starting to come together! I didn't want to make her face too busy because it'd clash with her outfit. I also changed her eyes because the darker ones were looking kinda drab. Don't these suit her much nicer? I also have her some fluff on the ears, she's gonna have some accessories on her head so I didn't want to make it too long, I'll give them a little trim later just to tidy them up.
4 notes
·
View notes
Text
Gave my Riley a Faceup. I'm not totally happy with it as it still needs some work. I want to give her a tattoo or several as well as a white short wig.
Riley is a 40 cm Momoni by Atelier Momoni in Toffee Resin. Faceup in progress by me.
#40 cm momoni#bjd#atelier momoni#1/4 scale#ball jointed doll#hispanic bjd#riley#in progress#faceup#face up stories
2 notes
·
View notes
Text
tonight I will make a wig for merry
#there's a con coming up and I wanna bring her to it because she's my pride and joy my angel my biological child#but she's. bald and has no faceup which when you're as pale as her. makes her look completely fucking insane#so. hold me to it. if any of my friends see this and zero progress pics on discord I have failed and I need to be slapped around a little
1 note
·
View note
Text
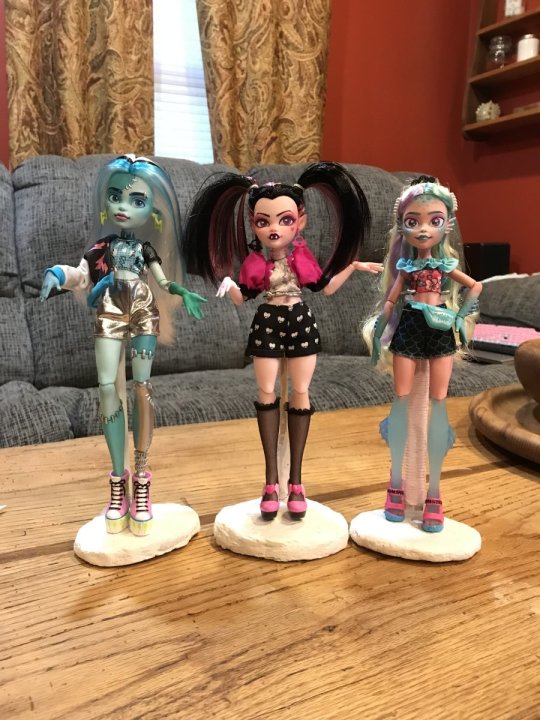

I never got around to posting my finished customs of these three ghouls!! Frankies forearms are attached with magnets and can be detached like in the show :3 I wish I'd gotten a couple more pics of drac before I sold her but oh well LOL... Gotta make myself a new one to replace her. Anyway.
Frank was my second ever faceup, I think I improved a lot as i did Lagooba and Drac. :] currently I have miss Clawdeen in progress and Abbey done but unphotographed sorrr. Look forward to that in ... A few weeks to months LMAO
119 notes
·
View notes
Text
Still procrastinating on Sebastian, but Snake’s faceup is almost done! His lips and eyebrows are still in progress, and he’ll be getting eyelashes as well.
I’m aware this is a ridiculous amount of BJDs—I’ve been steadily acquiring them over a period of years, and am trying to get them all finished before the new academic year starts up in September and I lose the cognitive load needed for tiny precise painting.
116 notes
·
View notes
Text


I've been waiting for better lighting but it's cloudy so there is no good natural light right now.
It's ok. I'm not happy with the lower lashes, but that's ok, too. I don't think I will be happy with anything I do ever.
I don't dislike this.
Progression:


Do like shorter lower lashes on her because longer lower lashes exaggerate her droopy eye shape, but my hands didn't want to.
Now I sit with this faceup for a little while to decide whether I want to go to the effort of installing lashes or want to redo it.
I may be a wiz with eye putty, but eye lashes are the bane of my existence.
11 notes
·
View notes
Note
Hello!! Your Copia doll is coming along beautifully! The paint is so realistic. Like his bottom lip has texture I have no idea how you do it! Your project got me really curious about doll work myself!! 🫣 but I have no idea where to begin. I have a few questions to start out with-
1. Could you summarize the overall process? What are the general steps from start to finish?
2. What general materials do you need?
3. What paint do you use? What brushes/applicators do you use? How did you achieve those softer/blended contour lines, like in skin tone? If that makes sense. I see some others’ projects that you can clearly see paint lines or the texture of the paint they used, but your Copia almost looks airbrushed!! :0
4. How does putting in the hair work?
5. Where do you buy your base doll? And as far as the reveal in the ~bonus picture~, did he come anatomically correct or was that something you had to add? 👀
6. Where do you recommend buying supplies?
Thank you in advance! 🙏 and happy customizing!
Long Post Incoming💀💀💀💀💀
Thanks for all the fantastic questions! Whether you work on playline vinyl dolls like Monster High or Resin Ball Jointed Dolls, the process is the same. The only difference between them is that with the vinyl dolls you are painting the eyes on yourself. Resin Popia has inset glass and resin eyes.
My tag #Resin Popia BTS has all my Behind the Scenes stuff and progress photos.
All the questions answered below the cut!
1. Could you summarize the overall process? What are the general steps from start to finish?
I will be uploading some vids soon. Try this one first tho.
When you do a faceup, it is a collaboration between you and the sculptor. The sculpture does most of the work. You are bringing the deep parts of the sculpture deeper and the forward parts more forward.
Basically this:
photograph and disassemble doll
wash doll pieces with dawn dish soap and warm water. dry all parts I want to paint.
three coats of Mister Super Clear UV Cut (MSC) sealant on each piece, with a 20 min dry time between coats.
deep freckle/blood vessel texture (optional) with red, blue,brown waterey gouache, spray MSC
dark reddish pink chalk pastel pigments in the deep creases/crevices, areas of blood flow. Correct work with kneaded eraser.
after every layer of pigment that I like, I do another spray of MSC.
lighter pinks or tans (based on skin tone references) on things I want to bring forward (brows, nose tip, cheekbones), another pass in the deep areas, new color on the lips. spray seal
Detail with fine lines under eyes, line texture on lips, wrinkles, lower eyelashes. Check references and experiment. A touch of green in the deepest part of the skull on either side of the nose. You know, where you get sinus headaches.
Pray to Satan and cry as I add eyebrows and hair details with gouache. I start by mapping the brows out with dark chalk pastel then do hairstroke lines with gouache. Personally I am super heavy -handed with my brushes, I need to work on that.
When happy, 2 final coats of MSC
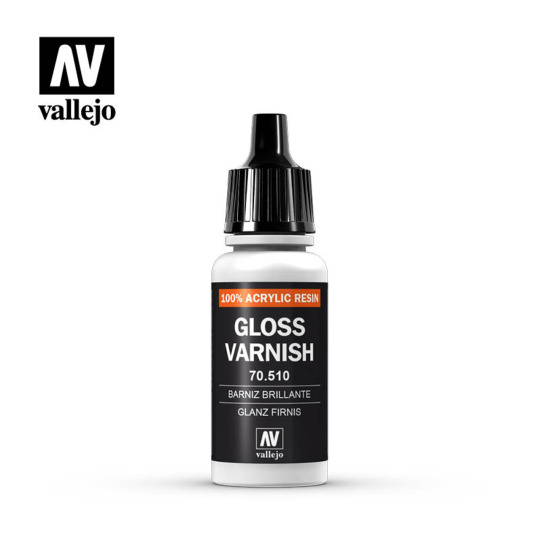
Add Vallejo gloss varnish to water lines of eyes and lips.
2. What general materials do you need?
FYI I have been in this hobby for about 7 years. I have only had to replace Mister Super Clear cans and respirator cartidges in that time. Everything else I have used for nearly a decade. And also used them for other projects!
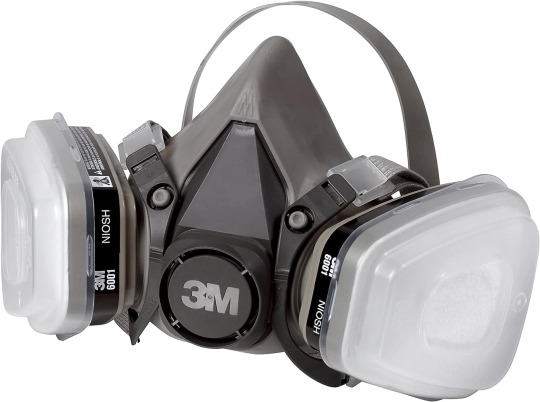
#1 item you need: a proper serious respirator. You will be at risk of inhaling toxic chemicals when you work with sealants or do any sort of dry sanding. Please please please invest in this item.
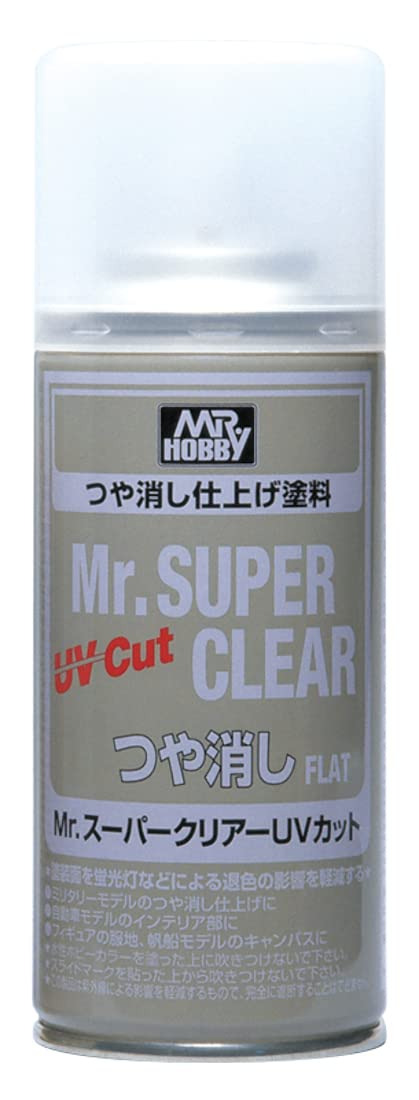
Mr. Super Clear UV Cut sealant spray. This gives the resin or vinyl a toothy surface to apply pastel pigments, watercolor pencil, and gouache paint on. The techniques will not work without this surface.
The sealant also behaves like skin, which is made up of several layers of matte cells So the pigment you apply to the resin is suspended in layers just like real skin.
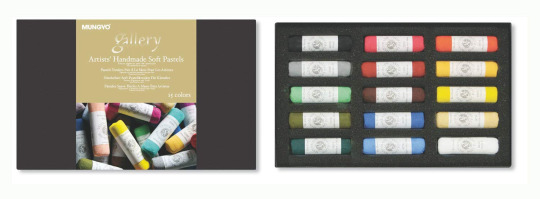
Chalk Pastels I like the mungyo hand-rolled chalk pastel just because when you use a razor to scrape off some pigment it crushes up and mixes better. But any chalk pastel will do. The Xanthi video I will link later has a great idea of just buying a few chalks at a time, because to be honest I don't use all of my chalk.
Small nylon brushes.
A fan brush
A tooth brush (for skin texturing/freckles)
Crappy dollar store makeup brushes (for pigment powders)
Kneaded Erasers
White cloth gloves
ceramic dish for a palette
Some people use watercolor pencils, but I never got the hang of them. I prefer just using brushes. Everyone has their own thing they do.
Paint recs in Next Question
3. What paint do you use? What brushes/applicators do you use? How did you achieve those softer/blended contour lines, like in skin tone?
Goache paint dries flat and matte. It's basically opaque watercolor. I use a damp q-tip to remove it if I make a mistake.
Winsor-Newton is great. I am pleasantly surprised by Arteza's gouache. I have used the same gouache tubes for seven years. You put like a raindrop sized bit on a ceramic dish, that's it. And you can reconstitute gouache endlessly with just a little water.
The trick is to never EVER EVER use true black. nothing is true black unless it's makeup. I use gouache paint on Resin Popia's eye makeup but then soften it with black pastel powder to make it richer.
If you use true black it looks like mud or holes. Dark purples, browns, and greens.
Also don't be afraid to be a bit louder with the colors, the sealant mutes them a lot. Just work slowly and take breaks.
4. How does putting in the hair work?
For resin dolls, you need to make a wig. They are a PITA to make, but it's possible! Check out Mozekyto for how to make wigs. (I'll have more recommended videos further down this post.) Vinyl playline dolls you can reroot, but some people prefer wigs.
5. Where do you buy your base doll? And as far as the reveal in the ~bonus picture~, did he come anatomically correct or was that something you had to add? 👀
The same techniques can use used on vinyl dolls like Rainbow High, Monster High etc. You can get them at goodwill, big box stores, and on ebay. Lots of people sell old toy dolls.
Resin Ball Jointed Dolls are a lot more expensive, so I have spent several years slowly building up my collection. I love vinyl and resin dolls equally.
I bought my base doll from Alice Collections acbjd.com they are a vendor of many resin dolls. I absolutely love Resinsoul.
My favorite doll companies (find them on Alice Collections!) are IslandDoll, Resinsoul, Dollmore, MyouDoll, DollLeaves, 5StarDoll.
Resin Popia is MSD "Mini Super Dollfie" size aka 40cm-52cm. He's 52 cm. SD (Super Dollfie) is around 60-65cm.
I have owned dolls that were considered "prestige artist dolls" in the past, but I always end up selling them because they are so precious I'm afraid to ruin them so they just become dollar signs to me instead of something I love. I'd say $300 would get you a gorgeous resin doll and some clothes for them. Saving up for a doll you really really love is worth it in the end. People also sell used dolls on Instagram. Just please make sure to check the COAs.....
Important Note: I am a Pro-Artist legit BJD collector. AliExpress, Etsy, and Ebay have bootleg dolls that yes, are significantly cheaper, but that is because they steal from the artists that did 99% of the work (and spent tons of their own money) to develop the doll's appearance and engineering. If one cares about supporting artists they should consider the ramifications of purchasing these recasts and propagating the bootleggers. (Especially since a large part of the artist BJD community is from Russia and Ukraine, who have been lately hard hit by war and YET are still making beautiful art for the world to enjoy) I am not pro-bullying though, I am Pro-Education so if anyone wants to have a private, frank conversation about recasts in the BJD hobby feel free to message me.
One silly thing that happened once was I purchased a legit IslandDoll Bru (IslandDoll is always on sale TBH) that was actually cheaper than its recast on ebay. There are a lot of sales during Chinese holidays (11/11, Lunar New Year, Fall Festival) and you usually get a lot of extras like free eyes, beautiful carrying cases, incredible boxes, etc. Resinsoul, the "cheap" BJD company often gives you a gorgeous carrying case for your doll.
Ok enough with the disclaimers now onto doll d!cks haha
Resin dolls are usually realistic when it comes to parts. Realistic in the fact that they add something there...something simple but it's there. Resin Popia has option parts made of silicone that are actually from an action figure company called TB League. Look up "TB League Option Parts" on Ebay. The figures are 1/6 scale making the parts scary and massive at 1/6 scale but funnily enough they make sense at 1/4 scale.
IDK why i got em, I just wanted to have some fun with this doll.
6. Where do you recommend buying supplies?
If you can get to a local hobbyshop that sells models (like miniatures and wargaming figures) please support them first! As vital spaces for geek culture they need all of our support. You can get tiny brushes, Model Paints and sometimes even the sealant from them. Just call ahead they can work something out for you!
Chalk Pastels, Gouache paints I get from art supply stores and as a last resort, Amazon. I use these supplies in other art projects and you will quickly get addicted to gouache painting, i'm sure of it!
Great Videos/Resources
Xanthi's Minimalist Supply List
Xanthi's Male Realistic Faceup (I watch this one so much)
Youtube Channels I like: Enchanterium, Dollymotion, Dollightful, Lomi's Playground, Xanthi
This Book is Great: How to Rock at BJD Faceups
I am answering your additional questions in the comments if you have any! I am @anamelessfool
#bjd copia#toy customization#dollblr#doll customization#bjd tutorial#bjd faceup#q&a#legit bjd#resin popia bts
35 notes
·
View notes
Text
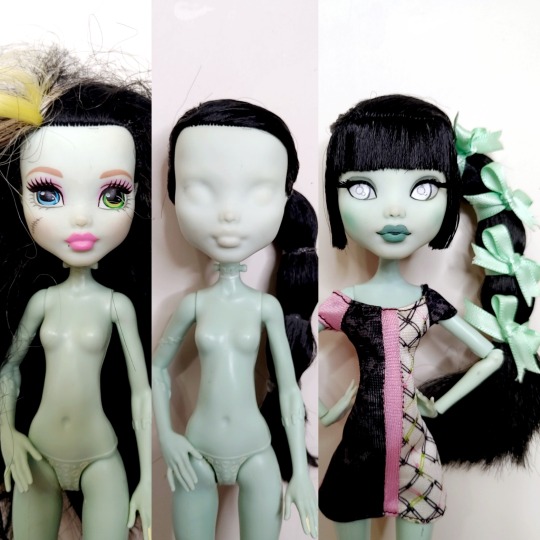
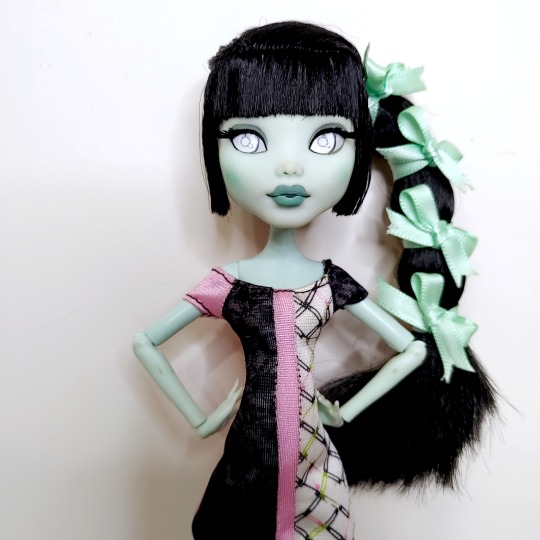
So Scarah Screams from Monster High is one of my favourite characters. From seeing her as a random backgrounder and having voted for her in the polls to finally seeing her actualised as an official doll, I really do love her a lot.
I also love how she has a nod to Mod era fashions so I really wanted to a Mod era inspired Scarah for the longest time but it really wasn't until the reboot that I was looking at my work in progress dolls I hadn't touched since G2 died.
Even though I like Scarah's sculpt, I opted to use Frankie's head instead as both a nod to the SDCC prototype and the fact I feel it has a closer look to Mod era Barbie in terms of proportions.
I used this G2 Frankie I've been holding onto as she has nearly a full head of black hair and I just plucked out the other colours that was there. I then rooted in bangs and styled the hair to look like Talking Barbie's hairstyle.
The faceup was really simple but I added more details to her eyes to help drive home the Mod era paint and added rooted eyelashes as I feel a true Mod era doll needs them.
I then stuck her on a G1 Frankie body that I removed all the markings from and now I'm happy I FINALLY got this doll off my project list.
If anyone is wondering, yes, I did choose Talking Barbie as the main inspiration as Scarah is a voice based Monster and it's a funny joke to combine those two.
191 notes
·
View notes
Text
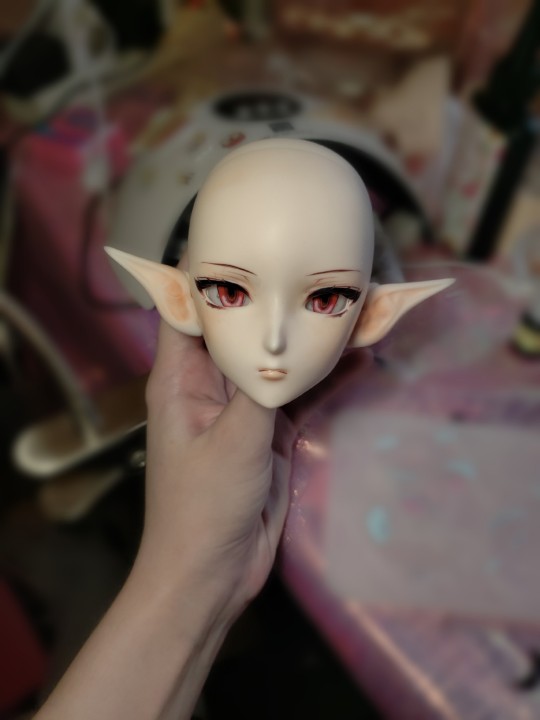
One of my elf OCs, Vaeril 🥰
#bjd faceup#anime doll#bjddoll#ball jointed doll#doll#anime boy#husbando#current wip#work in progress#legit bjd#male character#elf oc#elf doll
12 notes
·
View notes
Text
This has gotta be the fastest I've had a 3 am gourmet midnight snack bc I'm literally so excited to get back to work
#twist rambles#the bdg video about being a midnight gourmand. literally me all the time.#but oughhh so so excited to get silly faceup progress pics :)
2 notes
·
View notes
Text
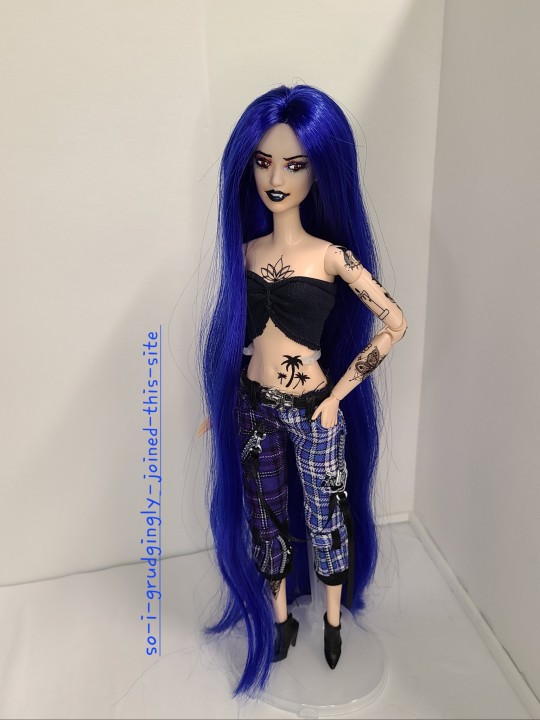
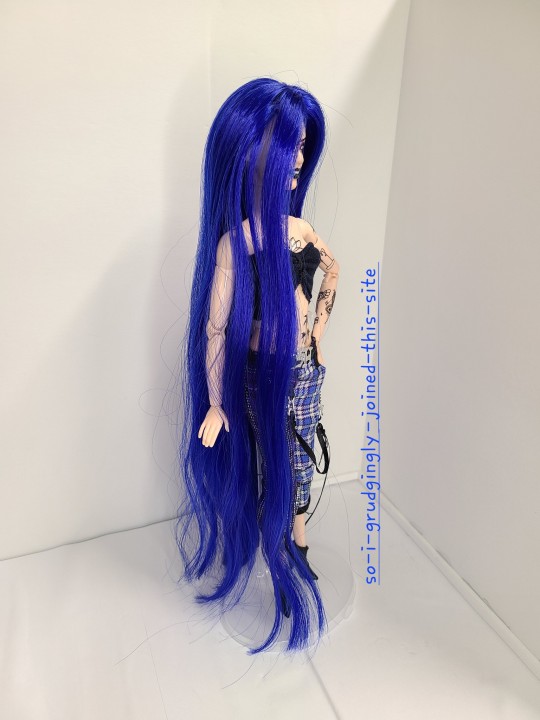
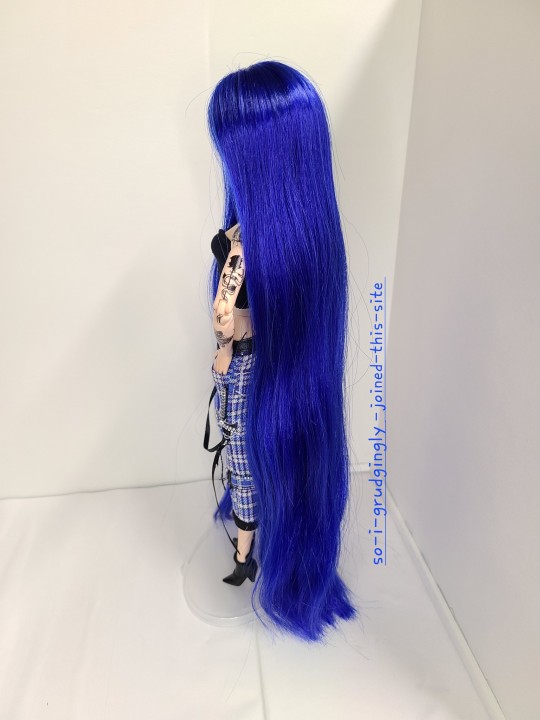
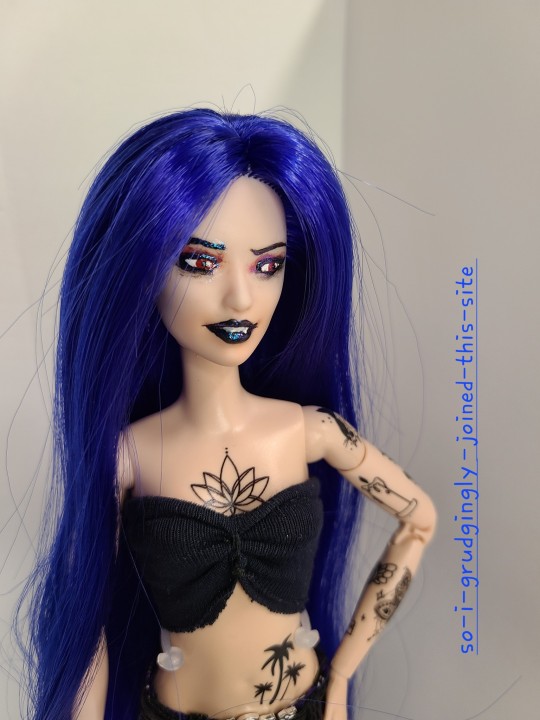
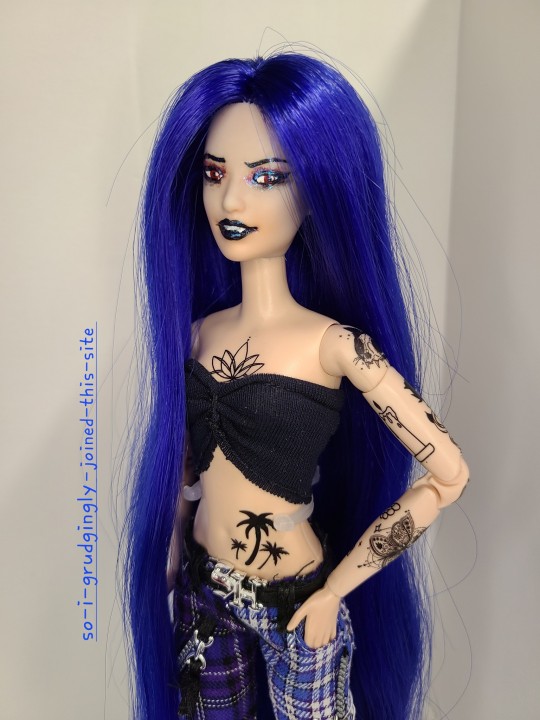
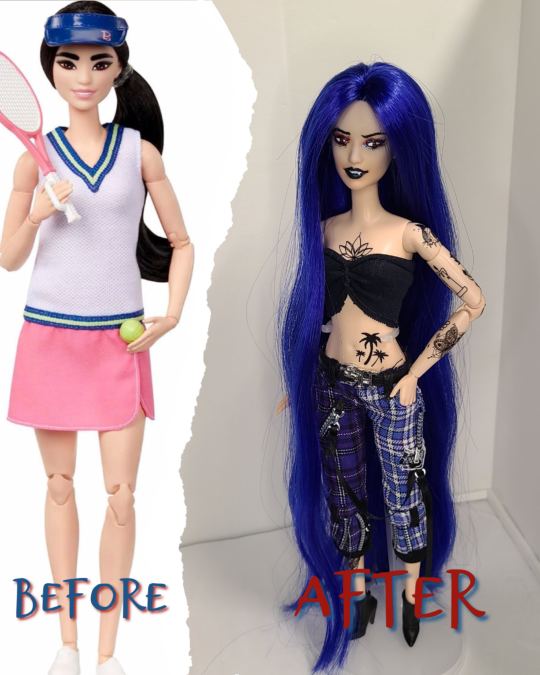
I guess October became OCtober for me, since here's another OC design!
I decided to try a contemporary take on a Vampire gal. She's still unnamed as she's technically a work in progress; details under the cut
Base doll: Made to Move Tennis Player Barbie
Face: completely repainted by me
Tattoos: transferred from a temporary tattoo sheet (yes, that works to give dolls tattoos!)
Clothes: pants are Shadow High, boots are from Looks 8, top sewn by me.
Unfortunately, she's still a work in progress because the nylon hair I rerooted her with STARTED STAINING EVERYTHING BLUE. Thus, I had to completely rip her hair out again, and she's awaiting a de-staining treatment before I try reinstalling different hair. I've bought the same deep blue in kanekalon and I'm hoping the difference in fiber and manufacturer means that the blue won't transfer to the head and body plastic. Here's hoping that faceup I did survives; working on the ultra-flat "balloon head" sculpt that Barbie keeps using these days is tough! I'm proud of how much dimension and expression I managed to get out of it with minimal paint.
#custom doll#custom barbie#ooak doll#ooak barbie#my art#art#doll art#barbie#made to move barbie#character design#oc art#original character#original post
22 notes
·
View notes
Text
Recently purchased a Sio2 Funan from Julia on Den of Angels and now it’s time to customize!
This was him right out of the box:

Just a gorgeous doll, even blank. But, I intend for him to be one of my OCs, Cernun, a spring spirit. So he can’t remain blank.
At first I was intending to dye him, but then I realized I liked the more organic looking color variations that comes from doing a color change with pastels. So I thought I would do it that way instead. Though last time I did a pastel color change was on my Doll Chateau Pluto, and even then I only did her legs and tail. So I had never done a color change of this magnitude with pastels…
So let’s do a test area! I wasn’t 100% sold yet on the resin wig, so I decided to try blushing the wig first:

And I really loved how it turned out. So I did the antlers and started adding flowers and butterflies to really give that Spring Spirit vibe:

Which turned out super pretty when it was finished:
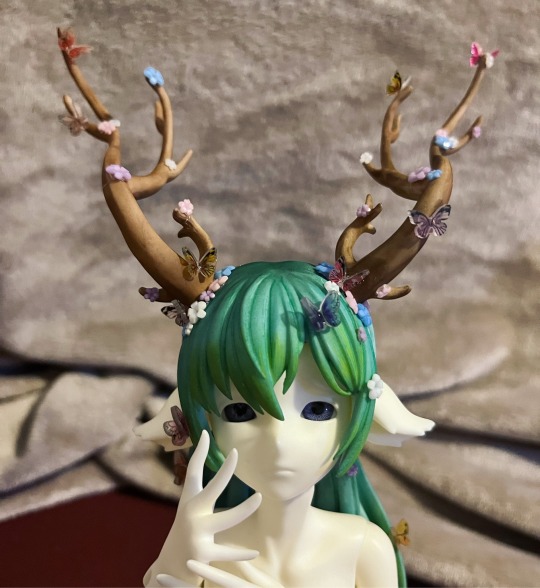
Then I moved on to his faceup, which I wanted to still have those floral/spring vibes, but be a bit more subtle since his hair and antlers were so extra:
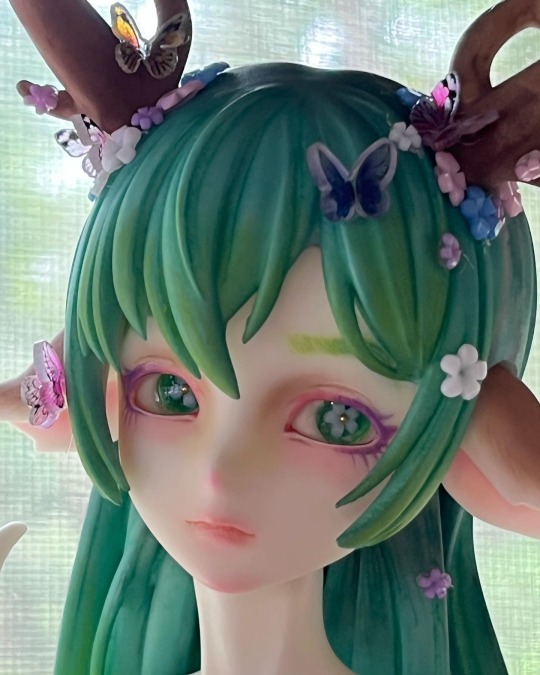
I absolutely love how it turned out, and I made him some custom eyes to fit his vibe.
And I just…

Love him so much
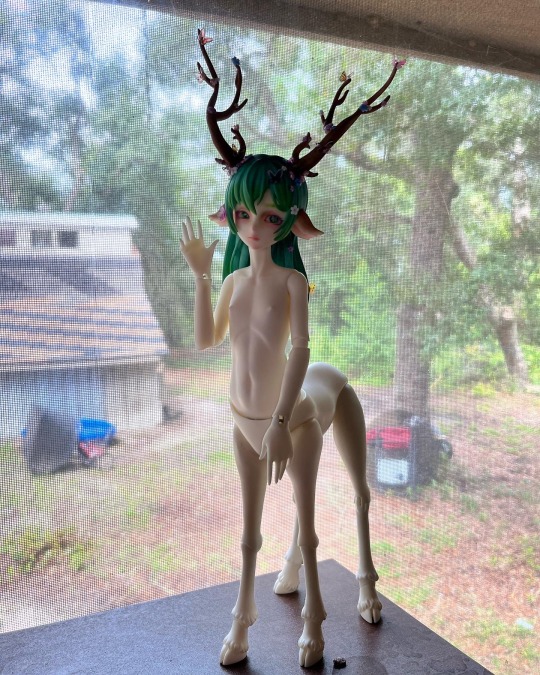
So now I’m working on blushing his arms so I can avoid taking him apart completely for a little bit longer.
But I will update my progress as I go. 🥰
#bjd#legit bjd#balljointeddol#centaur#centaur bjd#centaur doll#sio2#Sio2 Funan#deer centaur#stag centaur#custom doll#custom#custom bjd#BJD blog#bjdblr#cervitaur#deertaur
154 notes
·
View notes
Last Seen Blogs
omg-rainbow-fenrir
This is my blog. There are many like it, but this one is mine.

pink-key
Welcome to my CavE!

dududjrn
제목 없음

aftgficlibrary
AFTG Fic Library

editorlisa
builtbylisa