#bonethrowing
Photo

🦷💀 Shop update tomorrow 💀🦷 www.Igatherthedead.com . . . . . . #igatherthedead #igtd #vultureculture #ethicallysourced #erhicalbones #deadwhenwemet #foundinthewoods #bonecollecting #skullcollecting #bonecleaning #death #deathtalisman #bonethrowing #animism #paganism #altarspace #witchythings #recycledmaterials #heathen https://www.instagram.com/p/ClZL5ERPc0P/?igshid=NGJjMDIxMWI=
#igatherthedead#igtd#vultureculture#ethicallysourced#erhicalbones#deadwhenwemet#foundinthewoods#bonecollecting#skullcollecting#bonecleaning#death#deathtalisman#bonethrowing#animism#paganism#altarspace#witchythings#recycledmaterials#heathen
13 notes
·
View notes
Photo

Superpower 💪 #superpowers #junkremoval #junkie #bonethrowing #hoardingcleanup #junkinthetrunk (at Catalina Foothills, Arizona) https://www.instagram.com/p/ChANB5TLdlabuPn7JG0KzlnQ70IM4-9LpVL5ss0/?igshid=NGJjMDIxMWI=
3 notes
·
View notes
Text

Good luck with that, Sarkaz Bonethrower.
150 notes
·
View notes
Text
magic with matchsticks
a small discussion about matchsticks in my witchcraft/magic discord server inspired me to make this post, and note the different ways you can use matchsticks in magic/witchcraft!
used (or new) matches can be used in divination, similar to bonethrowing
used (or new) matches can be used to determine if you're cursed by throwing 2 matchsticks into a cup or bowl of water
use match remnants/ashes to make black salt
use matches to represent fire in deity workings, spells, elemental magic, on your altar, etc
matches can be used to speed up spells/spellwork by "lighting a fire under" someone/something
use matches for simple intention spells
light a match and use its smoke for cleansing or banishing
another great masterpost for matchstick magic
#witchcraft#witch#witchblr#spellwork#simple magic#magic#fire magic#elemental magic#spells#witchy#thevirginwitch#baby witch#witch tips#witchy things#witchcraft 101#spell work
769 notes
·
View notes
Text
I feel like a lot of people seem to be struggling against a lot of the stages, most notably those before story segments. And as a chronic Arknights player who regularly plays high Surging/does ending 2 and ending 3 attempts regularly in IS3, I'd like to share some tips to potentially help with progression!
First and foremost, it does help to have a zone where you can concentrate all your damage at, then prepare blockers and DPS units at that specific area, along with potentially healers. Marbas is the go-to usually because his ult is a heal over time in a 3x3 area around him that lasts the entire stage, kinda like Bard Supporters in Arknights. This comes with enemy pathing and behaviour knowledge, however. Basically, identify a chokepoint to concentrate all your firepower at.
It's probably one of the things you have to get used to in Arknights ASAP if you want an easier time. Take a look at this early stage in IS3 - where you'll have to improvise on the fly based on the unit classes the game gives you.
In this stage (Precarious Defense - normal operation), I took the long straightway in front of Exusiai (the red-haired angel) as my main damage zone. It helps burst down the exploding spiders, as well as the enemies from the bottom spawn point. Gnosis and Steward, the other two ranged units near Exusiai (black and white hair respectively), help with DPS their own way. And I would plug the the leftmost lane as a chokepoint with Spot if I had a weaker sniper than Exusiai, like May or Kroos, but S3M3 Exusiai is more than enough to deal with the squishy units on left lane.
Other options I've used at other points for this stage include:
Using Mountain (S2), Thorns (S3), Lappland (S2), Mudrock (S2), or Saria (S1/S2) to solo lane the top left spawn point.
Using a combination of anything between Agent, Merchant, or Executor classes to deploy and redeploy for the leftmost lane.
If on Emergency (bottom lane spawns turn into Bonethrowers that inflict heavy physical ranged damage, but takes damage over time), focus down the leftmost spawn point with ranged units, and have a Defender/high defense melee unit with healer support near the blue base to tank the hits until the Bonethrowers die.
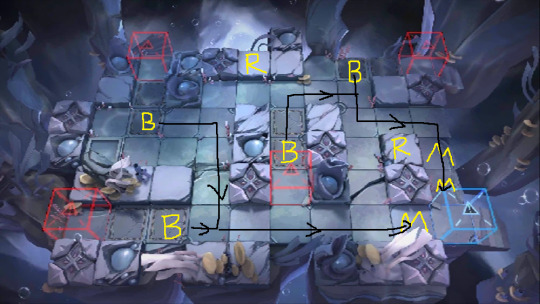
But there are times where you can't funnel everything into a single chokepoint. In situations like this, you're better off looking for several laneholding combinations while focusing your damage on the lane/area with the largest threats. And since I'm limited to one video on mobile, have this screenshot from one of my ending 3 clears on IS3 as an illustration!
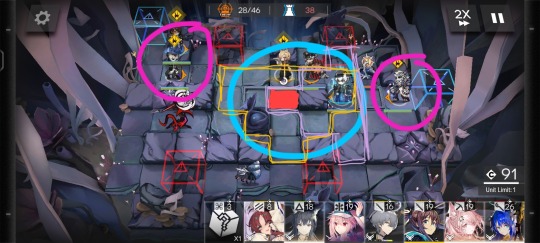
It looks like there's a lot of things going on in this image, but I'll explain.
First of all, the concept. I want to spawn-kill the boss, Ishar'mla, who appears in the red box before making a loop around the map, and finally going to the top left blue base. In this run specifically I have a relic combination that allowed me to one-cycle this boss, which includes the ASPD boosting relics (increases attack speed based on the amount of ingots you have), the Old Fan (increases all Operators' attack by 10% based on the number of classes in your team, capping at 80%), and the chocolate sauce pasta (boosts attack by 100% one second after using a skill).
Two types of main zones to pay attention to: the spawn kill zone in blue and the laneholding zones in dark pink.
With the laneholding zones, you need units with DPS and blocking power - Mountain on S2 is a premiere laneholder on the rightmost area (2-block, attacks everyone he blocks, gives him an attack boost, and gives him HP regen), while a combination of Gnosis's damage (S3M3) and Spot's 3-block plus heal on skill takes care of the leftmost area.
As for the spawn kill zone, it uses both Mlynar and SilverAsh to deal damage. They deal immense physical damage, and considering their ranges somewhat overlap (yellow for Mlynar and light purple for SilverAsh), it helps burst down the boss ASAP.
Of course, to utilize these tips well, you need an understanding of enemy pathing and behaviour. Sadly enemy pathing really isn't exactly indicated by the game, and it's a QoL that I also want in WHB. It's the red line that appears before a wave of enemies spawns in Arknights. Here's some things I've noticed about enemy behaviours:
The enemies that look like fluffy angel doggos move faster than other enemy units.
Screamers/ranged attackers tend to attack the closest unit within their range, and stop moving when they're attacking until they or their targets die - like the Bonethrowers.
The blobs are your slugs. Squishy, easy to beat, weaker than most other units.
As for the other units (eyeballs, smiley faces, etc) I haven't managed to playtest enough, as skill cycling between my L cards (Bath Levi, Selfie Levi, and Selfie Bubs) is enough to kill most everything without issue.
If I have to split up my forces, I personally usually have Bubs and one Levi handle a weaker lane, then focus on the other lane with everything else. I get that moving units is a thing but if I can AFK...why not? Lol
Also, as an aside, I would love to see units with lower rarities gain viability in WHB. Believe it or not, some of the units I use in those Arknights examples aren't the top rarities. To wit:
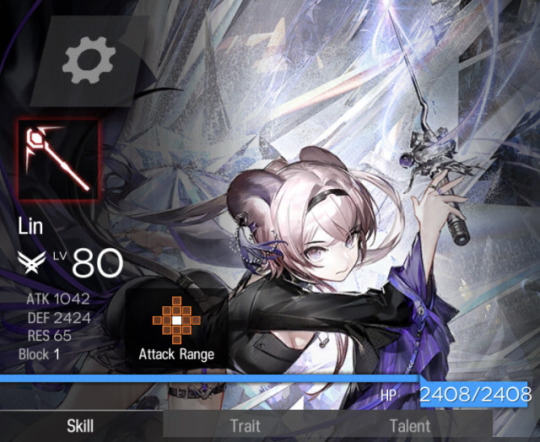
In the video, I brought Exusiai (6* Marksman Sniper), Gnosis (6* Hexer Supporter), Mulberry (5* Wandering Medic), Cantabile (5* Agent Vanguard), Steward (3* Core Caster), Fang (3* Pioneer Vanguard), and Spot (3* Guardian Defender). Only Mulberry and the 3*s aren't at E2.
In the Ending 3 screenshot, I brought Mlynar (6* Liberator Guard), SilverAsh (6* Lord Guard), Mountain (6* Brawler Guard), Saria (6* Guardian Defender), Gnosis, Texas the Omertosa (6* Executioner Specialist), Mostima (6* Splash Caster), Guard Amiya (5* Arts Guard), Arene (4* Lord Guard), Myrtle (4* Flagbearer Vanguard), Ansel (3* Single-target Medic), and Spot. Only Saria and the 3*s aren't at Elite 2.
However, with how rare Solomon's Tears are and with how upgrade costs are the same across rarities, perhaps having only A+ ranks be viable is for the best. Sunk-cost fallacy and all that.
#what in hell is bad#whb#rimei rambles#using whb as an excuse to talk about other games#the chronic arknights player in me emerges yet again#help this is what i'm known for now apparently!!!
28 notes
·
View notes
Text
Here's an extremely hot IS3 take: I think Out of Control is kind of really fucking cool. If Out of Control were not so hard at high difficulties (by high I mean above D10, I think this map is slightly on the hard side but about fine at D10 and below) it would be one of the best IS3 maps (even then, I appreciate the current version of the map very much for what it is. Despite it being notoriously difficult and its emergency even worse, I can very much still see and appreciate that the cool stuff it does well underneath.)
Ooc is a stage that tests a bunch of skills that Arknights as a game generally doesn't test very much and in doing so, rewards many unconventional operators. Unlike the vast majority of stages, it's a stage with an extremely small number of safe tiles, which you can expand to some extent by killing specific enemies. This rewards strong, slot-efficient units and also units that are able to defy the usual "there are only a few safe tiles" restriction (for instance, April is really really good in this stage!) It's also a stage whose lanes are positioned in a way that makes it difficult for most conventional ops to cover both lanes (in particular, conventional sniper marksmen have to face some weird directions to make it work), but rewards more unconventional operators with unconventional ranges like Hexers, Decel Binders, Deadeyes etc.
It's also a stage that shows off extremely well one of the relatively unique to IS mechanics, which is that your life total is a resource that persists throughout a large number of stages, and can be spent strategically as you choose within stages as you choose by selectively leaking problematic enemies. It does this by having a large numbers of relatively easy to deal (yetis, dogs, spiders) with enemies that you generally don't want to leak, and also a small number of extremely threatening, damage spongy enemies (that is, the melee possessed) that if you can't kill, you can just leak. In many cases, even if you can kill, oftentimes focusing on killing possessed melees commits too many resources that could have better been spent on killing the easier to kill mobs. This means that if you can intelligently gauge the resources you do have and how to properly allocate them to deal with the varied enemies in this stage, you'll be much much better off. This is the sort of skill that can really only be tested in an environment with life points that work the way they do in IS, because what you chose to spend your life points on in earlier stages matters and what you chose to spend your life points on in Ooc matters because it will affect what you can do in future stages.
In this vein, one of the coolest categories of units that Ooc rewards is units that allow you to be intelligent about what units leak by selectively becoming 0 block, so you can leak the units you want to leak while blocking the units you want to block. Examples include Liberator Guards, Flagbearers. Another similar thing that works well in Ooc is timing the deployment of low block units so that they block only weak units, reach their block count, and harmlessly leak the threatening possessed melees (helpful tip: if you deploy a 1 block unit on a tile with multiple enemies on it, your 1 block unit will block the enemy closest to the center of the tile it is standing on).
Lastly, I really appreciate how Possessed enemies are a category of enemies for which there's good ways to deal with them other than damage. The Possessed enemies are surprisingly light (2 weight), meaning that units with repeatable shift effects (Mountain S3, Wildmane S2, Gavialter S2) can often just infinitely shift Possessed melees to death. One of the coolest things you can do with Shifters in this map is to use Weedy's Water Cannon (on the tile C) to push the Bonethrower on tile B to tile X, opening up several ranged tiles and putting the Bonethrower in a position that with the right units, can be far easier to kill it at.

20 notes
·
View notes
Text
CALLOUT POST VERY/SRS
Denizens of tumblr its come to my attention that there is a manner that needs illuminating the rumors are indeed true Azalea Az middle name last name @anawesomedude does in fact look like

This irl do with this information what you will, i would advise if a figure matching this picture approaches you and starts talking about YOMI hustle or Risk of Rain that you scream "BONETHROWERS" and run as fast as you can
4 notes
·
View notes
Text
I don’t rly wanna post my tarot pulls for my self on here cuz its spammy and feels weirdly personal and I didn’t/don’t care if the pic is ugly when it’s for myself so the pics r ugly but I Need to document them (otherwise it’s pointless) and tumblr is an easy medium for that
Considering doing it on my side blog for witchcraft stuff @bonethrowing instead but like it’s also nice to have my readings all in one place for organization purposes n I have already posted a lot on here
I could however rb all them I already posted here to the sideblog too ?but that sounds annoying maybe idk I think I’m just high and it’s making me paranoid or self conchy
3 notes
·
View notes
Note
Hi! If the kin readings are still open, could I get a reading on these?
- Angelkin
-Satyrkin
-Voidkin
Thank you in advance, and have a great day!
Greetings Anon!
Thank you for letting me help! I hope you have a lovely timezone as well <3 Onto the reading!!

Angel- Pendulum was uncertain so I did bone throws 9/15 were Yes. You’ve got Strength and 5 of Pentacles. 5 of Pentacles within this spread are telling you that when exploring this kin you may feel excluded, rejected, alone etc. This along with Strength is simply telling you to look after yourself, ground yourself, remember to find angelkin tips that you find helpful and that make you feel euphoric.
Satyr- No. Pendulum was very clear on this one and I double checked with bonethrowing divination - results 7 No 3 Maybe. As for tarot we have 9 of Pentacles and Death card. 9 of Pentacles here is making it clear that you should reevaluate this kin! Refine your approach slightly and look elsewhere - I’m seeing from the cards (and from the previous cards I pulled with your Angelkin answer) that Pentacles are showing up a lot. Pentacles are passive within tarot which just means that if you see a lot of it within a reading you most likely need to be more introspective, focus on yourself, adapt to your environment, allow yourself to receive help + gifts etc etc. The Death card is talking about change and transformation. Expect yourself to go through some realizations and epiphanies!!
Void- Gentle yes! Queen of Pentacles and 10 of Swords presents themselves to you. Queen of Pentacles, wow another Pentacles, is all about being nurturing, resourceful and knowing when to keep secrets and when to open up with a welcoming smile. I’m seeing a lot of relation to children and animals here so perhaps look into how they could relate to your voidkinity. 10 of Swords is telling you that… the only way to go is up! Positives, love, community, understanding — they’re all on the way. Your “voidkin-self” may relate a lot to the 10 of Swords so I recommend doing a bit of research if you’d like on the card! But, essentially, just be kind to yourself and remember to hydrate your body.
It was a pleasure to do this for you, good luck!
2 notes
·
View notes
Text
the blood knight: you are much stronger than i imagined...what have you been through?
nearl, who has been thrown backbone by enraged bonethrower: wouldn't you like to know blood boy
19 notes
·
View notes
Photo

Its time for you to stand your ground and fill your own damn cup today. 🥛 You know as I am saying this, there are a few things hanging around you that you no longer need to be dealing with. ✋ It's time to take back your energy, space and well time! 🙌 How are you going to do that today?? If it seems like alot at least say "no" to something you usually say yes too and instantly regret it! Boom 💥 Done deck: #bootarotdeck #energyhealer #spiritualhealing #crystalcollection #crystalenergy #crystalgrid #intuition #trustyourintuition #intuitivemessages #highvibes #higherself #manifestationbabe #beherenow #innerpeace #intuitiveliving #spiritualgangsta #tarot #tarotlover #tarotoftheday #lawofattraction #psychics #psychicmedium #psychicreading #psychicreadersofinstagram #gratitudepractice #gratitudeattitude #vibrationalhealing #crystalcollector #stardustwanderertarot #bonethrower (at Salem, Massachusetts) https://www.instagram.com/p/ChDhHhsr8MR/?igshid=NGJjMDIxMWI=
#bootarotdeck#energyhealer#spiritualhealing#crystalcollection#crystalenergy#crystalgrid#intuition#trustyourintuition#intuitivemessages#highvibes#higherself#manifestationbabe#beherenow#innerpeace#intuitiveliving#spiritualgangsta#tarot#tarotlover#tarotoftheday#lawofattraction#psychics#psychicmedium#psychicreading#psychicreadersofinstagram#gratitudepractice#gratitudeattitude#vibrationalhealing#crystalcollector#stardustwanderertarot#bonethrower
0 notes
Photo
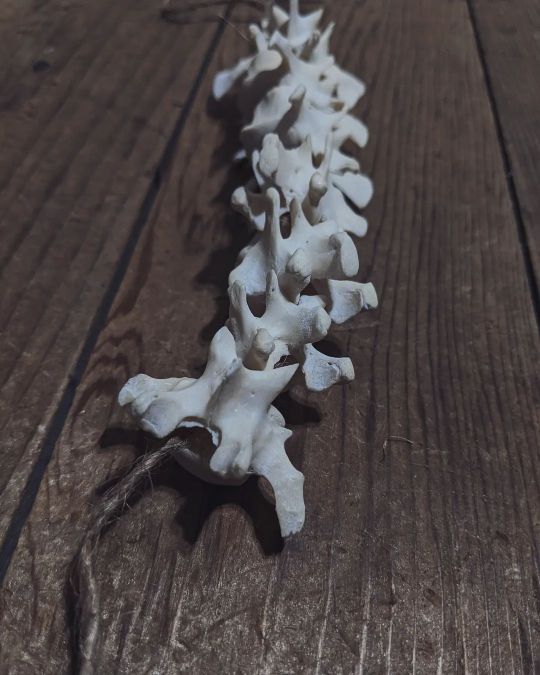
Elk & Raccoon bones just added to the shop 💀🌿 www.igatherthedead.com . . . . . . . . #bonejewelry #ethicalbones #vultureculture #bonecleaning #bonecollecting #ostealogy #osteomancy #bonethrowing #bonesandskulls #deadthings #ethicallysourced #igatherthedead https://www.instagram.com/p/CkjhsVPSVMF/?igshid=NGJjMDIxMWI=
#bonejewelry#ethicalbones#vultureculture#bonecleaning#bonecollecting#ostealogy#osteomancy#bonethrowing#bonesandskulls#deadthings#ethicallysourced#igatherthedead
11 notes
·
View notes
Photo
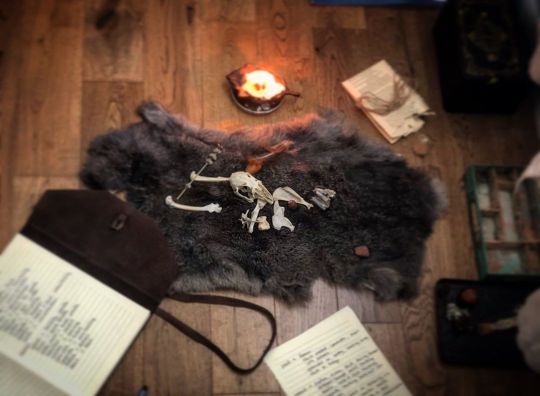
Conversation . #osteomancy #bonethrowing #rabbitbones #curiosandcandles #deadthings #soalive #divination https://www.instagram.com/p/CPgND4ljHM4/?utm_medium=tumblr
8 notes
·
View notes
Note
IS3 question: how do you deal with emergency Out of Control on higher Waves numbers with any sort of consistency? Or like, even at all, outside a run with perfect collectibles?
The bonethrowers start strutting toward the exit with around 35% of their big ass HP bars left, and they just about onehit even my strongest units, so it’s extremely difficult to get any damage on them before they decide it’s time to head out and take your whole squad with them.
I can’t even begin to imagine how I’d build my squad to accommodate this stage given all the other killers you have to deal with and the strain on your resources. Any advice?
On higher Waves, like 12 and above, the best strategy is really to avoid Out of Control as best as you can. Dealing with it with no losses on higher Waves is pretty difficult, it is in fact one of the hardest maps, period, due to the way the stat multipliers just send the very high stats of the berserkers into space, and it's a pretty demanding map in terms of roles. It's not impossible but when doing Out of Control at highers Waves, always be prepared to lose a few Lives if it means clearing, as opposed to trying to not lose any and crumbling entirely. Taxes Omertosa and Kirin Yato S3s are good due to their ability to deal good damage safely, Fortresses (Horn, Firewhistle, Ashlock) are very good since they can be more freely deployed than ranged units (who initially only have the right tile and the mid upper tile) and have great range and damage, making them good at killing Bonethrowers. Paired with other damage dealers, Muelsyse Melee S3 and Eunectes S2 are great since they Stun blocked enemies for the duration of the Skill, making the rushers way more manageable. Pozy S3 is extremely good here due to the Typewritter. Trapmasters like Dorothy and Robin kick their asses with CC mines due to their high Physical damage and ability to keep them in place, as well as Out of Control having great Trapmaster tiles. Global attackers like Goldenglow and Ambriel work well on lower Waves, but not too well later unfortunately, due to their ballooning RES and HP being too much for them, respectively. Shifters have a bit of a hard time since the rushers' only real big lane to push them far into is the upper row which is well covered by Bonethrowers, so they only really pay dividends if you have ways to kill the Bonethrowers relatively quickly.
In terms of gameplan, you usually want the center and upper right Bonethrowers eliminated ASAP, while throwing excess means of damage at the left ones. Secure the right side to cover for fodder, take the right ranged tile and aim left or up to kill the Bonethrowers with a Marksman or anything that can reach (Fortresses can do this from Melee tiles), and use the mid upper ranged tile to the left to target whichever Bonethrower you aren't attacking first (I recommend aiming the top ranged unit to the right so that way they have better coverage of the rushers once the times comes). From here on, it really depends on what you're packing, but you ideally clear the map from right to left, and save skills as best you can for rushers. If you don't think you can avoid losing Lives, just pop skills to kill the earliest rushers and deal with the situation as it evolves.
Certain items make this map MUCH easier, like Civilight Eterna (their innate health loss is in fact True Damage, and it is amplified by Civilight), reduce enemy HP items in general (their innate health loss is a flat value, Bonethrowers lose 350 HP per sec, Leaders (aka rushers) lose 500 HP per sec, and their big HP pools makes the % based reduction good), Glory Pack if you have plenty of Fast Redeploy units like Executioners and Merchants (essentially lets you stunlock them!), Fincatcher's Shawl literally wins you the map instantly and is the best Out of Control item unless you have no ranged units at all, End of Times is, well, for obvious reasons, really good for this map lmao, and anything that extends CC duration especially if you combo with items that inflict damage while CC'd assuming you have consistent sources of CC. There's more utilities but those are the ones I rely upon personally.
Higher Waves Out of Control, not even the Emergency version, is an infamous run-ender. I personally handle it by sacrificing a few lives early if I can afford it to the first couple of rushers so I can bring out a strong latemap composition into the field, take out the second pair of mid and upper Bonethrowers, and then open the map up with units fresh and ready to cover the killer upper lane. I wish I could give you Magic Killer Strat but it's a difficult map that you never know really well what you'll have going into it. Hell, I try to make my Operator examples in these of varying rarities, but you can see how I mostly used 6* Operators as examples.
30 notes
·
View notes
Text
A Pretty Comprehensive Guide to Out of Control:
I got pretty annoyed at losing a few too many runs to the "Out of Control" stage on floor 5 of IS3 so I suppose I am writing a guide. This is mostly intended towards high difficulties, but almost all the advice here applies to lower difficulties too.
The Enemies:
There's 5 different enemy types that show up in this stage. The 3 basic ones (ice dogs, melee yeti soldiers, and ice slugs) are all generally pretty basic to deal with. What makes this stage so threatening are the enraged possessed enemies that show up.
The first of them is the Enraged Possessed Leader. They're a melee unit with 30k HP, 1750 ATK, relatively low (230) DEF, and 30 RES before buffs from difficulty. This generally means physical units are better at dealing with them than arts units, especially if you're at a difficulty with +RES to all enemies. They also have an incredibly fast (1 attack/1.3 seconds) attack interval for an enemy with that much attack. Their massive HP is somewhat compensated for by the fact that take lose 500 HP per second. Note that while their stats do scale with difficulty level, their HP loss does not, which is really what makes them so threatening. This means that they scale far far more with increasing difficulty than most enemies do.
The second of them is the Enraged Possessed Bonethrower. They're a ranged unit with 22k HP, 1050 ATK, 220 DEF, and 30 RES before buffs from difficulty. They have an attack range of 2.6 tiles (more on this later, since this number is a little misleading), and an attack interval of 1 attack/2 seconds. Once again, this generally means physical units are better at dealing with them than arts units. They passively lose 350 HP/sec, but once again, while its stats are multiplied by difficulty multiplies, its HP loss is not.
A visualization of the range of a bonethrower standing at the center of the tile marked B. Tiles marked X are in its range. (Note that if you do the math on the range with the Pythagorean theorem, you'd conclude that the tiles of the corner of the square of Xs aren't in range, but they are. Fun.)
Emergency mode increases the ATK/HP/DEF/ASPD/Speed of enemies, but does not fundamentally change anything about how to deal with any of the enemies.

The Map + The Waves:
(Note: most of the spawn/route information is from https://map.ark-nights.com/map/ro2_n_5_3. It's a pretty great resource. I'm not going to go over the exact sequence of spawns, just the important ones, so if you want the full details, follow this link. )
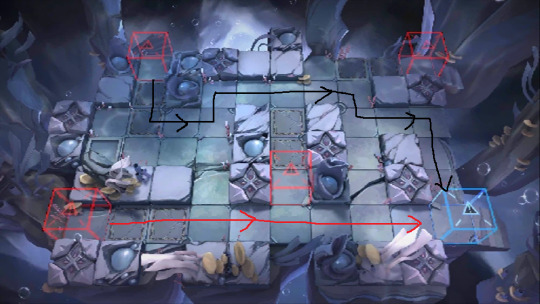
You start with 18 DP (without accounting for effects like +DP collectibles or Texas1's talent.) The stage starts with 4 Bonethrowers located at the 4 tiles marked with a B. They will stand there for 75 seconds before progressing to their respective exits by the paths marked in black. With their range, they cover almost every tile on the map. The only tiles that are safe are the ranged tiles marked R and the melee tiles marked M.
After 5 seconds, a wave of standard yeti enemies will spawn following the top, black route, spawning at a pretty regular, long interval until the end of the map.
After 11 more seconds (so a total of 16 seconds from the start of the map), a wave of standard yeti enemies spawn and follow the bottom, red route, spawning at a pretty regular, long interval until the end of the map.
Your early priorities for this map are:
Generate some early DP, deploy some blockers (they don't have to be particularly strong, even at n15) to defend against the yeti units, clear out the two rightmost bonethrowers, which then opens up the map somewhat and allows you to clear out the left two bonethrowers. However, do note that a second wave of bonethrowers will spawn about 80 seconds after the start of the map, so don't deploy anyone on non-safe tiles unless you're ok with retreating them once the second wave of bonethrowers spawn.
Generally the best way of dealing with the two right bonethrowers is to deploy an S3 Pozyomka on one of the ranged safe tiles, point her so she hits one of them with her S3 active, and then use the typewriter to take out the other. Which specific ranged tile is the better one to deploy her on depends on context. The left ranged tile is better for dealing with some of the later enemies that show up (like Possessed Leaders), while the right ranged tile makes her somewhat easier to protect from the second wave of bonethrowers that show up. Her S3 + typewriter cycle time also syncs up nicely with the spawn time second wave of bonethrowers. If you don't have Pozyomka, most other ranged DPS units can replicate her role to some extent, Pozyomka isn't essential, the fact that she has cracked out DPS + typewriter just makes her generally the best option for dealing with them.
After you've dealt with the right 2 bonethrowers, you can begin chipping down the left bonethrowers somewhat. Good options for this include relatively disposable ranged DPSes (with a built of collectible synergy, even someone like Kroos) is pretty decent, fast redeploys, especially Texalter on S3, since she has good survivability against the bonethrowers, and melee helidrops with some built in surviability (e.g. Nearl the Radiant Knight on S2, Specter on S2, although you might need some initial +SP to not immediately get blown up).
At 55 seconds after the start of the map, Enraged Possessed Leaders begin spawning. They typically stay at their spawn for about 10 or 15 seconds, before running to their respective exits. Every Enraged Possessed Leader takes top route, so it's generally best to prioritize your strong operators defending the top of the exit lane. I've been told that placing Mlynar on the tile above the blue box, pointing left, is incredibly strong. This way, he covers both lanes and does large amounts of damage with some amount of safety in the form of someone blocking for him. The fact he has 0 block when off skill means that, if you fuck up and Enraged Possessed Leaders break through your backline, Mlynar will often be safe.
At some point, a small number of ice dogs start spawning, but they're basically irrelevant except insofar as you can leak them if other enemies fuck up your blockers.
At 80 seconds in, a second set of Bonethrowers spawn. They once again sit there for 75 seconds. This is the last set of Bonethrowers, once you clear out the two rightmost ones, you are (mostly) safe to deploy ranged units, from which you can clear out the 2 left ones. At this point, the only potential threat to your ranged units are some ice spiders that spawn on the bottom lane about 120 seconds in.
At the end, I believe it's possible for a last Enraged Possessed Leader to spawn, but this doesn't happen all the time. If the enemy counter is out of 52, this indicates that either this guy or a duck/bear/dog will spawn. If the enemy counter is out of 53, both spawn.
Good Operators and Collectibles:
A very incomplete list of operators and collectibles that are really good against this stage:
Pozyomka (for reasons discussed above)
Mlynar (for reasons discussed above)
Texalter: for reasons discussed above + stalling for time against the Possessed enemies + giving time for your other units to DPS them)and other fast redeploys, especially some with some built in survivability or stalling potential (Red, Kafka, Phantom on S3).
April: really great way of ignoring the "you only have 2 safe ranged tiles" restriction of the map. Other units with camouflage/invisible can also be decent, but most of them need some initial SP from collectibles to work.
Kal'tsit + Mon3tr: a good combination of fast redeploy, being able to stall, clearing out trash mobs, and DPSing possessed enemies
Goldenglow: S3 is a good combination of slow + DPS, and can be used to DPS possessed enemies at global range
Dorothy on S2/S3 and Robin on S1: good at stalling possessed leaders)
Specter/Specter Alter: invulnerability lets you actually block + DPS the possessed leaders for a reasonable amount of time. Specter in particular can also be used as a helidrop with a bit more initial SP.
Mr. Boom: allows you to stun possessed enemies for a massive 12 seconds, giving you good time to safely dps them without instantly getting popped back.
Fincatcher's Shawl: this item is kind of ridiculously gamebreaking in general and the best collectible in the gamemode, but most importantly in this specific stage it lets you ignore everything that makes this stage difficult
Medicine Sticks/Royal Brooch: Greatly improves the effectiveness of your Fast-Redeploy/helidrop units
+SP collectibles: good for enabling some helidrops
+DP collectibles: this stage is one that greatly benefits from having just a bit more DP at the beginning
Loss Mitigation:
At high difficulties, this stage is often the single hardest stage that you can encounter in a run, even harder than the boss. For the most part, the goal for this stage is just to survive. The worst possible outcome on this stage is having a lot of lives, but letting your backline get destroyed, causing you to also leak a bunch of standard enemies and lose. In many cases, you won't be able to with the enraged possessed leaders just because of how much HP and how hard to block they are, so instead you have to prioritize leaking the threatening enemies while dealing with the relatively easy to deal with. Generally, to do this, you'll want good fast redeploys and/or a good sense of when to deploy your non-fast redeploy units to be able to prioritize the weak enemies. It's also pretty important to be able to retreat operators for DP instead of letting them die, because otherwise you'll almost certainly run out of DP.
12 notes
·
View notes
Note
Is bonethrowing a closed practice? It’s the only divination I’ve ever felt comfortable with so when someone on discord mentioned it I got really concerned and I can’t find anything on the internet about it
It depends on how you use it. To use bonethrowing in a way that Brujeria or Voodoo/Hoodoo practicioners would if you are not part of those practices is not something I would do. However, bonethrowing is a dovinitory tool used by many practices throughout western traditions. Make it your own practice, and you should be fine.
For example- you could carve runes (farthark or any other) onto fox/cpyote toe bones. Just be sure to wear a dust mask because bone dust is deadly.
5 notes
·
View notes
Last Seen Blogs

bachi04
:>>

rassicas
CEO of splatoon lore

themoonmail
Themoonmail

ivomagus
undersky abandoned

classysoulfart
台中女台南了