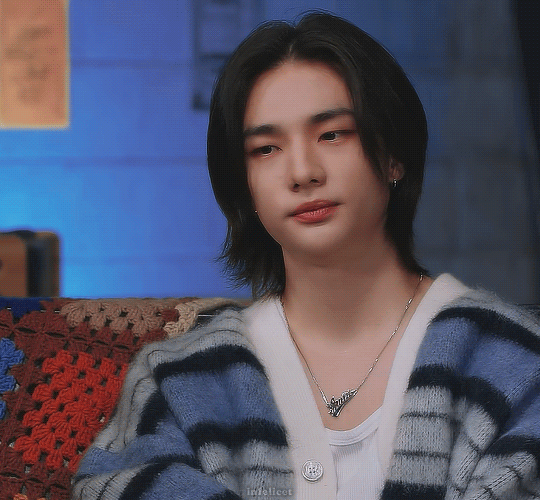
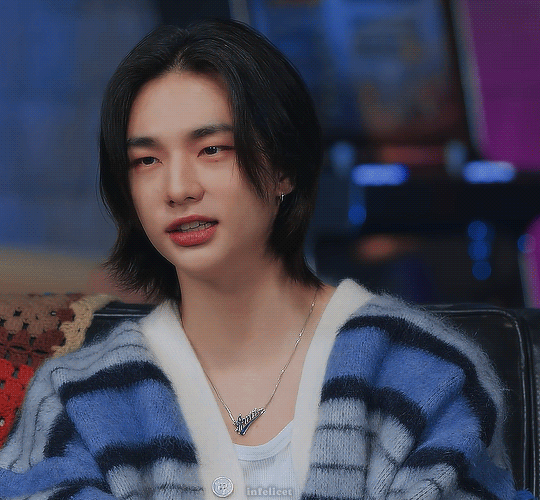
#also the way i'm playing with these sliders is like... you know what colour i like? blue. he'd crush this look also in blue
Text


(the truth about going to school with your hyung)
#will i stop terrorizing you all with this long ass posts? i'll think about it#also the way i'm playing with these sliders is like... you know what colour i like? blue. he'd crush this look also in blue#text formatting intentional. read between the lines#hwang hyunjin#skz#stray kids#kpopccc#dancerachasource#usertsu#uservasya#melontrack#usermoonjuice#userjinnie#bystay#createskz#.gifs#.500
662 notes
·
View notes
Text


Get to Know Me - Sims Edition
i am so late to this but thank you to everyone who tagged and mentioned me!! i loved reading your answers, i love being nosy.
let me get this first q out of the way:
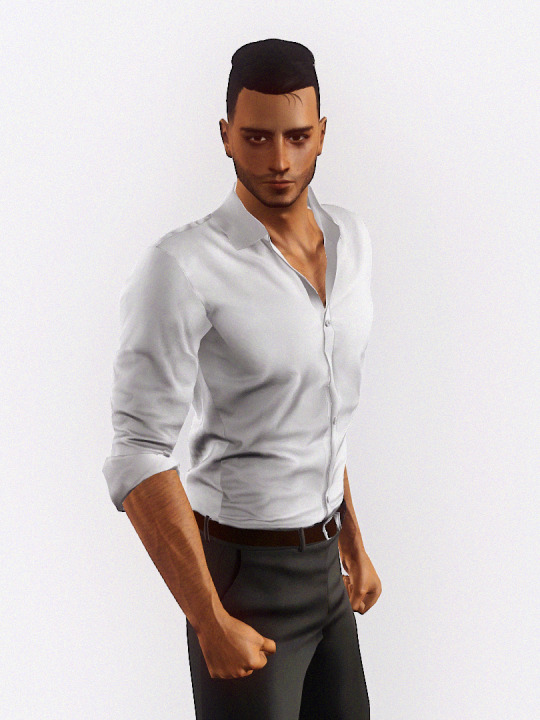
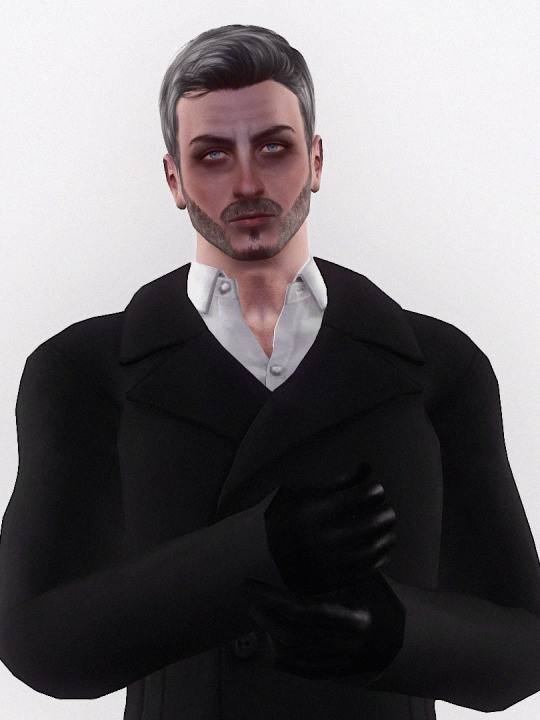
Who's your favourite sim that you've made?
it's a tie between my 2 little meow meows pictured above 🥺
amir because he's the oc i'm most attached to and have most fully developed
vlad because i just love the way his sim turned out and he's such a fun character to think about
if they ever met, vlad would be like "greetings." and amir would be like "bro what the fucckkk" 😭
speaking of vampires i also love the idea of au-vampire-amir being this ashamed, existential crisis having vegetarian vampire who struggles with controlling and hiding his bloodlust.
i never get bored coming up with ideas for those 2.
rest of my answers below the cut :3
What's your favourite Sims death?
it's been YEARS since i intentionally made any of sims die. i barely do gameplay these days and i am attached to the sims i make. but when i used to play sims chaotically, i preferred to "accidentally" murder sims by fire instead of deleting the pool ladder. i would furnish their houses with the cheapest stoves and fireplaces, and sit back and watching the inevitable unfold... it was the final destination fan in me.
Alpha CC or Maxis Match?
i can't live without alpha hair and i love a well done piece of alpha clothing.
Favourite Mod?
CmarNYC morphing penis 😐
for a sfw mod, pose player was truly a game changer, can't play without it.
First Expansion/Game Pack/Stuff Pack?
i never bought any of them 💅 the first one i p*rated was late night because umm a fancy city, bars and clubs, celebs and vampires, 2000s hoe clothes... what more could you want!
Do you pronounce live mode or aLIVE or LiVing?
a-live!
Have you made a simself?
no ❤
Which is your favorite EA hair color?
if we're talking about TS4, i think the ginger hair colour is okay and the grey too. for TS3, i don't use any of the default hair colour presets.
Favorite EA hair?
i've tried so hard and i just cannot enjoy any of them compared to the alpha cc hair available. in my opinion this is the least offensive one, the "teddy" from the store:

Favorite life stage?
young adult
Are you a builder or are you in it for the gameplay?
i'm in it for cas and the storytelling medium
Are you a CC creator?
hehe...
Do you have any Simblr friends or a Sim Squad?
i consider all the people i frequently engage with to be my simblr friends!! 💗
Do you have a YouTube for sims?
i've considered recording, editing and uploading speed CAS videos but it seems like a lot of effort 😭
How has your “Sims style” changed throughout your years of playing?
i've always preferred creating masculine male sims/characters, that hasn't changed throughout the years. i've learned how to take better pictures, how to style my sims better, how to create the kinds of clothes i want to style them in, and i've learned my preferred slider settings and facial features/proportions. i make the same "genre" of male sims over and over and over again, so my style hasn't really changed, but my skills have improved and i've solidified my aesthetic which i am proud of :D
Who's your favourite CC creator?
i really can't pick a favourite because there is just so much sheer talent and a thriving cc community even today, but if i had to pick one, i would say rustynail. i used the shit out of their cc back in the day. everything my sims wore was straight off the runway darling... rusty brought glamour and high fashion to the sims! an inspiration.
How long have you had a simblr?
since even before 2013 😭 tumblr was my main social media for many years LMFAOOOOO and i made a simblr after following many ts3 blogs, being wowed by their screenshots, and i wanted to join in on the fun and wanted to download all the cool cc people were making... that was the start of my ts3 obsession !
How do you edit your pictures?
i use a gshade preset i made, then i mostly just crop and add text in gimp. i don't have the patience to edit my pics.
What expansion/ stuff pack is your favourite?
late night duh and seasons is a close second because it just makes the game so much more immersive and beautiful. pets is also a top one because it adds so much to the game, it's such a well thought out pack in my opinion, and what life simulator can be complete without pets?
79 notes
·
View notes
Note
Would you ever share your colouring or make a tutorial about it? It looks amazing!
hi nelly!! thank you so much 🥺💙
i don't really have any colourings to share because i don't save them 99% of the time (unless i know i'll color the same scene again soon), i usually color each gif from scratch. but i can give you the usual steps i do to color 911. first i do my sharpen settings (i have made different actions that i'll use accordingly to the scene, and then i have an action i call "coloring lineup" lol, that brings out all the layers i use in the right order. the layer order i use is almost always like this:
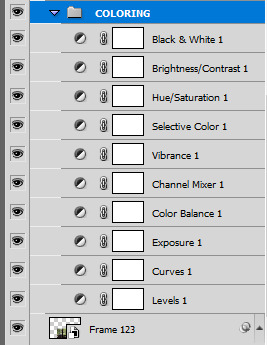
i don't always use all of them, but it's the ones i use the more, in usually this order. more details under the cut, i apologize if this is hard to follow, i'm not really good at tutorials haha. oh and i use photoshop cs5 (so old, i know haha, i'm still stuck in 2011 apparently)
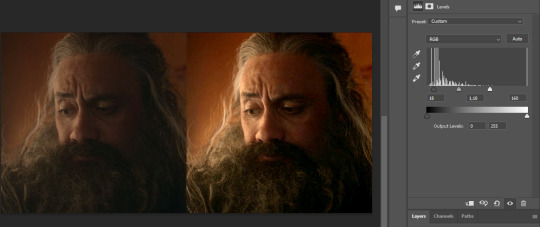
Levels
i usually use levels to brighten the scene if needed, by using the white point dropper icon to select the brighter part of the image (or sometimes just a bright spot, not necessary just the brightest will work). this will usually brighten the image and sometimes balance colors. you can also do this with the black point dropper with the darkest part of the image (the dropper on the top).

sometimes when needed i drag the middle slider to the left to make things brighter, and the black slider to the right just a little so things don't look too washed out.(just beware of this with skintones):

Curves
you can do pretty much the same thing as levels with the a curves layer (i know a lot of people do!), but i usually use the curves layer only when i need to add more brightness. i prefer using levels and color balance to balance the colors in the image (i'm just more used to it), and an exposure layer to bring more light.
Exposure
if the image needs more light, i usually up the exposure just a little. usually between +0.10 and +.50

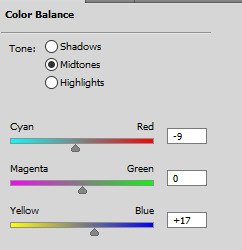
Color Balance
color balance is where i usually spend more time. i do prefer a cold tone to gifsets so i tend to push the yellow out by bringing the color cursors into blue and cyan, if needed. i usually do this for both midtones and highlights. sometimes for shadows too, if it's a particularly dark scene. i'll make sure it's not too magenta or green too. of course it depends on the image, but the sliders often look similar to that:

Channel Mixer
now channel mixer is a miracle worker sometimes! especially if you need to kill out yellow hues, or green, magenta, etc. this tutorial here is really helpful, and much better than anything i would say haha. i usually only use it if i can't correct the colors the way i want to with color balance.
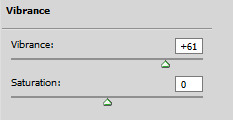
Vibrance
i always add vibrance to my gifs, usually between +20 and +80 on the vibrance slider, and maybe some saturation if the image is particularly bland, but i prefer to add saturation with other layers.
Selective Color
selective color, my beloved!! it's my favorite adjustment layer and what brings the whole thing together. i spend most of my time coloring a gif here. first i will fix the skintones because it's usually too red or yellow or magenta, or even too bland or too bright.
with the Reds i mostly play around to get the skintone to the right shade, with usually the cyan, magenta and yellow sliders.

in Yellows i fix the skintone if needed. it's sometimes too yellow, so i bring the yellow hue down with the yellow slider, and sometimes the cyan slider as well.
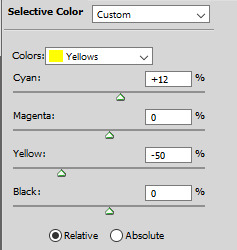
if there's still too much magenta left in the skintone, then playing with Magentas to remove it usually does the trick
Neutrals is good the darken or brighten things up a bit with the Black slider, but beware with gifs with poc especially so it doesn't wash them out
i also always have the black slider in Blacks up 10-20%

once the skintones are good, i usually add another selective color layer to play with the other colors that need altering in my opinion. i like to focus on the blues, so i often play with the Cyans and Blues

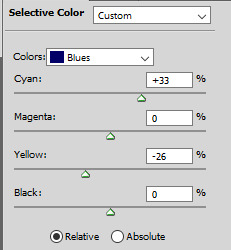
I usually make greens lush and greener with Greens and Yellows, and even Cyans sometimes, but be sure it doesn't affect the skintones. you can even mask the layer out with a smart mask, i do this often.
Hue/Saturation
this layer is very useful if there's still too much red in skintones especially. i usually go to the reds and bring down the saturation and lightness a bit as needed.
if you want to bring more saturation to a color in particular, you can pick it with the dropper and then play with the saturation or hue levels there. you can even change the range of color the picker selected with the bottom color sliders. it's useful if you want to edit a larger range of colors altogether.

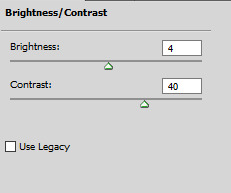
Brightness/Contrast
i always add a bit of brightness/contrast on top of everything. usually the brightness slider is between 0 and 25, and the Contrast slider between 20 and 50.
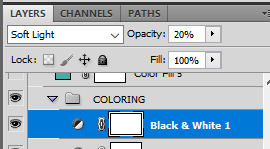
Black & White
i always put a black & white layer on top of everything, set to Soft Light, at around 10-40% opacity. it adds a bit more crispness and black to the blacks in the image and i don't know, i just like what it adds lol.
and that's it! that's how it goes usually. i've been making gifs for over 10 years and i've used this method for at least half of that lol. of course every show and every gif is different so every layers will have different settings everytime. this is why i prefer coloring from scratch, i find psds don't usually work well on most scenes, because every scene needs different settings.
other tutorials that are really good and use similar methods to mine:
coloring yellow tinted shots
queen becca's coloring tutorial
how to properly color poc
another great coloring tutorial
how to change the background color (i use this technique very often)
i hope this helped a bit!
84 notes
·
View notes
Text
15 Questions
Hey @vayneoc, thanks fpr tagging me! 🖤
Are you named after anyone?
I would really like to be named after the Grand Duchess Anastasia Romanova, but I'm not.
No data on this question available, all I know is my dad thought was a great idea.
When was the last time you cried?
Can't remember, I'm stone cold most of the time. It was probably a year ago a few weaks after my granny died.
Do you have kids?
I am a 34yo kid.
Do you use sarcasm a lot?
I do but try not to because most of people don't seem to understand sarcasm and get offended. Everyone gets so easily offended these days.
Actually I'm an ironic kind and try to do everything with humor.
What sports do you play/have you played?
Not much, too lazy for this. A few months in a vollyeball section at school. A few years of heavy lifting at the gym, could've gotten a candidate master's degree buuuuut, as was mentioned above, too lazy. Then life happened and I ditched it all.
What’s the first thing you notice about other people?
It's how they behave, I'm not a fan of snobs and narrow-minded people. Those who are open, simple, honest and cheerful are my folks.
Eye colour?
Blue.
Scary movies or happy endings?
Scary movies with happy endings, happy movies with scary endings.
It doesn't matter much, the movie must be good in general.
Any special talents?
Can't say for sure. I just do what I do the best way I can.
Where were you born?
Northern Russia, Yamal to be precise.
What are your hobbies?
My work lol.
Okay. Drawing (watercolor and digital), reading, knitting and crocheting (yep, I'm old), collecting figures, lifting weights, etc etc, but what occupies the most of my scarce time is VP (and gaming ofc). I worked as a retoucher for almost 15 years and wanted to be a photographer, so VP is a good opportunity not to lose any skill I got.
Do you have any pets?
Had a few - a red-eared slider, a siamese and a scottish fold, a bunch of guppies, tiger barbs and catfishes. My late dog, of course, poor baby, miss her something awful :(
Don't have time for any pets in the near future unfortunately. Would really like to have a dog someday.
How tall are you?
172cm, 5'6"/5'7"
Favourite subject in school?
English and arts. I liked teachers more, not subjects. We had the best ones we could have.
Dream job?
No need to dream, I have a dream job already. It's the biggest typography in the city and I'm open to print you whatever the hell you desire.
But to be honest I've always dreamed not to work at all, just have a shitton of money and travel the world. I can't afford this in real life and it's not about the money - I don't have any free time. At all. Just work-work-work, like in Rihanna's song.
I also would love to be a tattoo artist, buuuut this is not an option as well.
Don't know who to tag :D How about you folks? @scrinovskaya @kittenchrissy and @katsigian
6 notes
·
View notes
Note
I like both. But for now I would prefer to learn the cinematic way. Thank you again. You are the best.
hey hey, sounds rad, I'm gonna obviously put it all under the tab but I'm gonna explain how I go from this

to this

I'm not going to explain my sharpening or how I make gifs if you do want to know that here is the sharpening and basic colouring tutorial and basic gif tutorial
alright, lets gooo.
so first off for my 'cinematic' style it kinda just comes down to very pure colours and very very dark and contrasting blacks. especially because this interview has a pretty neutral base colour so there's not a lost of 'fixing' here
this kind of all comes down for me to he 'levels' adjustment layer because this, is what that does in one click.

so I'm mostly going to be explaining how that works. it comes down to the little pipets you see here on the left side

these three help you pick your darkest and lightest part of the picture photoshop does half our work so. the top pipet is your blacks and the bottom your whites. the best way I can explain the picking out your darkest and lightest points is with this

the yellow are the points id click to pick my darkest points and the green my light points.
it's normally easiest to find your darkest points in gifs so what I normally do is grab the black pipet and grab my darkest point which makes the colouring alone imediatly go up in contrast and also semi fixes the basic colours.
(what happens is what the gif does above! where on the right side you can also see how your sliders adjust instantly to how photoshop read your file)
then I play around with the sliders. if you move the right slider the black goes up if you move the white goes up. I just play around with it until the contrast feels right. this is what my levels slider looks like

now you have a gif with deep blacks but no solid dark colours yet so now I normally just grab the vibrance an dup it to smth like +50 or higher and dont touch saturation. and this is what my gif looks like with just levels and vibrance.

then if you're lazy and wanna keep it easy and still have a basic nice colouring you can stop there but I normally go into my fav lil toy in photoshop 'selective colour'.
now I'm not going to run down every tab in selective colour but for this colouring specifically I know there's blue in his fireproofs and obvisouly red and yellow in his face.
so with selective colour I make sure these colours are upped. and for my 'cinematic' style I make sure my blacks and whites are also high up.
so after playing around with selective colour, this is what I have. this is just two layers of basic selective colour. (if you want me to share every laer of selective colour pls tell me n ill gif it so u can see)

then sometimes I stop right here but id like it to be a bit like deep so im gonna use channel mixers (which is kinda hard to figure out but just play with it and see what you vibe with) to make the base a bit more neutral so then we have this

and then I'm just gonna trow one more selective colour on top and we're done
we've got this and I'm pretty happy with it but id play around with the blacks a bit, id prob go back into levels and play around with curces and brightness/contrast for these but thats all extra stuff
but yeah this is how I do my 'cinematic' colouring
if you've got any more questions feel free to ask em and I hope this was clear and useful!
27 notes
·
View notes
Note
Hi i’m a gif maker and i’m always trying to improve them but coloring is something i always struggle on. like i have no idea where to really start tbh. i saw you’re ofmd gif coloring post and just wanted to know if you’d be willing to share any tips and beginner level stuff on the color adjustment side of gif making?
Hello dear Anon :)
Hmm, well, I am by no means a pro at this, but sure, I can tell you what I know - or, at least, the way I do the colouring :)
(I will assume you use Photoshop for your gifs?)
✨ Personally, I like to start by playing with the light -that is, brightening up the gif and enhancing the light & dark spaces -; and for that I use these adjustment layers:
levels (especially this one)
curves
brightness/contrast
And I just move the sliders/values this way and that, until I like the way the light in the gif looks.
Even with just the Levels themselves, the light in the image/clip can be enhanced nicely, like here:
I also use all three of these adjustment layers together in a gif- since they all work nicely with each other :).
✨ For the colouring itself, my main to go adjustments are:
Selective Color (that's my main one)
Color Balance
For them, -I don't know if it's a tip, but it's something I like to do ^^, and that is -> I create a new layer for every color (or tone type, with Color Balance): so I end up having several Selective Color & several Color Balance adjustment layers, each with only one color adjusted/changed.
(Another thing I do, I put all adjustment layers into a group [or few groups]; so that I can toggle it off/on en masse and quickly see what effect I'm accomplishing).
And for adjusting the Selective Color and Color Balance, I will play with the sliders, one color at a time/per adjustment layer- ; move every slider to the left and to the right, several times, until I decide 'okay that looks good'. (And you can nicely bring out the colour with these effects)

✨ Hmm I'd also advice to move sliders slowly and bit by bit; both for the light effects and color effects. Moving them too fast/too far, makes you hit extremes quickly and ruins how the gif looks.
✨ I also redo the layers all the time, fiddling with the sliders, toggling layers on/off, just trying to get a feel for the image and which effects on it I like; so, I guess, my tip is:
don't be afraid to go back to previously added adjustment layers and change them or to move layers around or turn effects off -or to add several of the same adjustment layer type -> sometimes that's what works, having a few layers of the same type but with different settings on them.
✨ Also, before I even start adding adjustment layers, I use the option on the timeline called "Convert to Video Timeline", then I select all layers in the layer window/panel on the right, and right click the option Convert to Smart Object. That way when I add adjustment layers, I can just move cursor over the timeline, and see how the colouring looks at any point in the gif. :)
-------
I don't know if that helps you? I feel like all I said is, add adjustment layers and fiddle with the sliders until you like how the image/gif looks; but that's how I do it 🤷♀️ Others may have different methods 🙃 (I also do additional colouring in Sony Vegas, but that's a whole different thing, and it's not a requirement for gif colouring ^^.)
Here's the adjustment layers on one of my Ed gifs. As you can see, there's no logic or reason to it, just a mess of interspersed light and color adjustments. But in the end that's what worked for that gif 🙃
-------
(If someone has different or better tips, feel free to chime in ✌🙂)
1 note
·
View note
Note
Hey, how are you?
I have a question regarding gifs, how do you get them to look so good? I'm very much impressed by the quality of each one you publish. If you have any advice I would love to hear them :)
aw thank you! i usually think they look like ass when i look at them 🥲 🫠
but. in general I have quite a few things
colouring plays a massive role. all gifs are limited to 256 colours, which means you are playing with a limited deck. more so, if you have many different colours, your gif will struggle, because it has to use the limited number it has for a lot of shades. however, if you lean towards certain shades it becomes way easier!
personally, i prefer shades naturally occurring in the skintones of the people im giffing. this most often means reds, yellows and magenta, so i make sure if i don't need a colour, i completely remove it. to do so, go to layers -> adjustment layers -> hue/saturation-> from the drop down select each individual colour (RYMGCB) and lower the saturation to 0 of the ones you don't need. this most often means you are getting rid of like a green speckle on the wall that has no bearing on the gif, but PS will try to allocate colours to it.
flatten colours. what this means is that in places that are not the main focus, i don't really care about having depth, i care more about having uniformity. this looks better to me (e.g. most of my gifs have a fairly solid background of one colour that looks good to me). to do so go to layers -> adjustment layers -> selective colours and play around until you even out the colours (eg. if i have a white background, that also has some magenta tint, i will go to the white channel and play around with the sliders until the magenta tint is gone and i have a pure white background). also, in layers -> adjustment layers -> hue/saturation, pick the background colour in the drop down and if it's made of 2 parts, try to even it out by using the hue slider (the rainbow one at the top) until the 2 colours are close enough (for example, if a background is green and blue, I will move the hue slider until it's fairly the same tone as the blue) . again, this lessens the number of colours you have to use, leading photoshop to allocate colours where you care about them.
ye olde and nearly retired tumblr trick: the still image background. back in the days of yore, tumblr had a 500kb gif limit, which meant that you had to perform miracles to post gifs here. this included a trick, which was supposed to be used only on footage shot on a steady cam (e.g. a vlogger doing a story time). that is still something i do when i have that type of footage if i need to increase the quality, because as a non moving part, it doesn't update every frame and ergo has consistent values out of the 256 without the minor shade adjustment every frame. to do so, you need to be giffing on a timeline. take the first/last frame of your gif, and place it on top of the gif. then, in the layers pane, add a layer mask and paint out the parts of the frame where the person will be moving.
last but not least, iconic gif action by legend morgrana. it makes everything look nicer and as an added bonus it also gives a light blur to help your colours be even more uniform. nowadays i no longer use the original style as it looks a bit dated (it's styled after a filter popular in 2014) and i adjust it per gif.
now i know this massive post is nearly incomprehensible, so i'm down to make a tutorial for all this over my long weekend if anyone's interested :)
4 notes
·
View notes
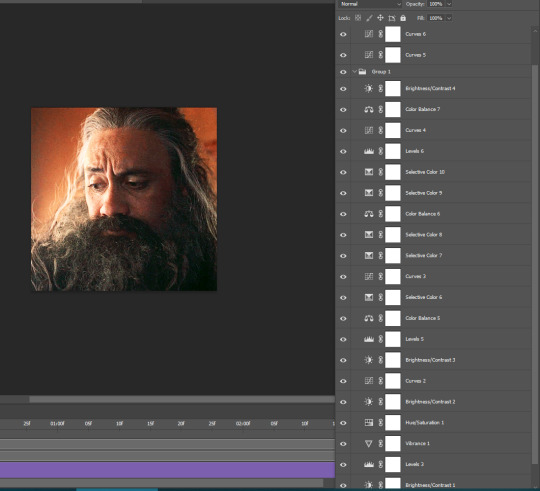
Note
I know this is probably a super stupid tutorial request, but I'm still trying to learn photoshop. if you have time can you do a tutorial on how to make black and white gifs?
Sure! Gifs aren’t exactly my area of expertise, exactly, as I find them personally to be too time consuming for the end result, but I do know how to make them. I wouldn’t consider myself the authority on gifs, not compared to fandom Greats™ like @starlightcastiel, @inacatastrophicmind and @hallowedbecastiel, for example. Pretty much every step has variations, there are so many different ways of making gifs, but this is just the way I make them.
1.) First, you’ll want to open your clip or frames in Photoshop. There are many ways you can do this, by capping with VLC Player, or using the autocap feature of KM Player, or even using File >> Import >> Video Frames to Layers on Photoshop, which is what I do.

It looks like this, you can use the slider or the play buttons to pick the part of the movie you want to gif, and then use the start and end sliders underneath to choose your start and end points. If you have ‘make frame animation’ ticked, your chosen scene should open with the animation frames and speed all set up for you. That’s one of the reasons I choose to do it this way. So ultimately, you should end up with something like this:
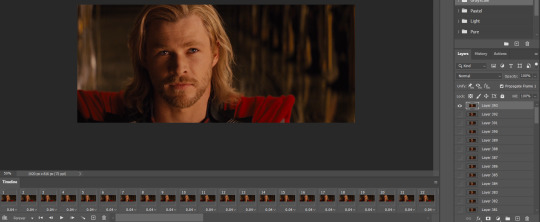
2.) Next is a matter of cropping and resizing. Obviously it depends on your gifset layout as to what size you choose. Because I’m planning on turning this into an 8 panel Thor gifset for my sideblog (@jasperwhitlock, shameless plug there), my size will end up at 268px wide and 179 pixels high.

3.) Next up is colouring. I find black and white to be significantly easier than just a regular saturated colouring because there’s no worry that something will be too yellow, too blue, too vibrant. Instead of adjusting lighting and colouring, you’re mostly just focused on lighting.
I’m not sure how familiar with adjustment layers you are, so I’ll do a quick explanation. Adjustment layers are your best friend. For adjusting lighting, you’ll want to use Levels, Curves, Brightness/Contrast, Gradient Map and Exposure. For adjusting colouring, you’ll want to use Vibrance, Hue/Saturation, Colour Balance, Selective Colouring. Technically, Selective Colouring and Hue/Saturation can also be used to adjust lighting too. But it’s all completely on how you choose to colour. You might not use all of these, you might use multiple layers of some of them.
Another quick note is, for black and white gifsets, I would recommend using Gradient Map over the Black & White adjustment layer. I just think it gives a smoother look?

Anyway, the bottom right of this image shows you the available adjustment layers, and you can see that my gifset is now black and white. I used Levels, Curves, Brightness/Contrast and two gradient maps to achieve that look. I can’t be more specific than that - every movie and TV show has different levels of lighting, saturation, levels of yellow, cyan, magenta that all need to be adjusted separately. There is no ‘one PSD suits all’ cheat.
5.) Last up is sharpening. I know that a couple of people prefer to switch to video timeline at this point and sharpen that way, but I don’t do that. A long time ago, a friend gave me an action that sharpens 68 frames, and I was so overwhelmed by how amazing it was, that I made my own. It sharpens 120 frames and adds topaz settings to reduce grainy noise over the gifs. If you don’t have anything like that, you can manually sharpen every frame, but it can be time consuming. But if you choose to go that route, I recommend clicking the lines at the top right of the timeline panel and clicking ‘flatten frames to layers’, which will merge all your colouring to each frame.
Sharpening can really improve the quality of your gif. I’ve posted a gif below of one of the frames, sharpened and unsharpened so that you can truly see what difference it makes. Since my Thor gifset is going to be in colour rather than black and white, I’ve now adjusted it to the new colouring.
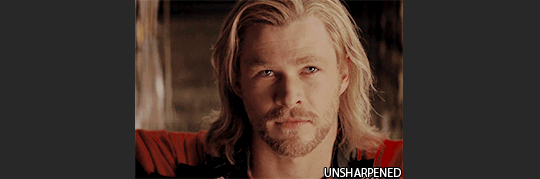
There’s so much more definition! His eyes are clearer, his hair is defined, his beard stands out. It just looks so much better and it’s such a simple step.
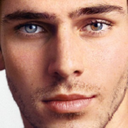
And below is a closeup of the finished gif. I hope that was helpful!

13 notes
·
View notes
Last Seen Blogs
beautiful-face-men
A Man's Face

sticksnstonescobykat
SticksnstonesCobyKat
theoutstandingowl
Something About, Like, Sex On Fire

chicapoetisa-blog
Chicapoetisa