#also check out my recommendations tag in my nav
Note
hi! can you rec me some of your favorite photography blogs? would appreciate it :)
This is a pretty broad question! I would probably recommend just looking at who I reblog from frequently. You can also check out my nav which will be helpful if there's a particular aesthetic or subject you're looking for (some of it's out of date but the aesthetic tags are still in use) - if there's a particular look you like, just check who I tend to reblog from in that tag. If you've got something more specific you're looking for, let me know!
2 notes
·
View notes
Text
- BLOG INTRO -
• cece •
˖° hi everyone! i’m cece and i’m trying something new this summer (writing fanfiction)! just a warning, i text like i talk (which means i am prone to rambling so bear with me here).
i lean towards writing smaus since this is the first time i'm trying out something like that and i just love writing them so much (it's such a different perspective and tone) and it doesn't require the kind of detailed plot that writing actual fics does.
masterlist
• some facts about me •
˖° i am…
chinese-american
fluent in english, mandarin, and french
taking a gap year before attending college (deferred attendance to my dream college)
a student
a STEM girl
• favorite… •
teams in f1? scuderia ferrari (forza!) + mclaren
drivers in f1? charles leclerc 🥺and lando norris 🥰 (oscar piastri too as well as carlos sainz and max verstappen)
driver in f2? ollie bearman ❤️
singer? ts (BUT I AM NOT A SWIFTIE I SWEAR) - but i also like beabadoobee/bruno mars/cigarettes after sex/arianna grande/d4vd/illenium
song? right now it's good things fall apart by illenium (but it varies dat to day)
music genre? edm or pop
book/series? struggled for at least 10 minutes to decide this, but if i had to pick one it’d be the off campus series (it’s no masterpiece like but it’s amazing in it’s own way - and primarily the first 2 books) - and out of that the deal would be my favorite.
classic? pride and prejudice or little women
genre? romance (particularly sporty romance) 😉but dystopian is a close second
movie? lord of the rings (the hobbit was a complete 💩show and as far as i’m concerned, it never happened) OR legally blonde
tv series? bridgerton
sport? golfer here and i’m married to the golf course so… 🤷🏻♀️there’s really no debate as far as i’m concerned.
• who i write for •
˖° currently, i am trying to write for f1 (trying being the keyword). mainly writing blurbs/imagines, but i might try out writing some smaus in the not-so-far future. this is my first time writing fanfiction, but charles had me feeling inspired so… please be patient with me!
i’m a pretty new f1 fan but i’ve REALLY gotten into it (ask any of my friends). obviously i don’t know everything just yet, but i do understand enough to know that ferrari is driving a shitbox.
and no i did not get into f1 because of dts so 😌 and if someone asks, i’ll tell you the story.
right now, i will write for any f1 driver, but charles leclerc, lando norris, and oscar piastri will probably be getting most of my time for now. if you request anything, i'll give it a shot!
i also write for the following characters :)
cedric diggory (harry potter)
finnick odair (hunger games)
tobias james (divergent)
requests are open.
• fic recs •
˖° on my blog right now, i mainly have the fon it. all you have to do is search up their name, followed by fic recs in my tags. an example of this would be #charles leclerc fic rec
one of my favorite charles writers is @writingstoraes and she is absolutely amazing so i completely encourage you to check her page out.
some other recommended f1 writers are - @norrisleclercf1 @dilemmaontwolegs (check out her NAV series) @landonfour @formulaforza @cieloclercs @cartierre @httpiastri @f1version @holllandtrash (6 to 1 >>> and she's writing a sequel of sorts 🥺) @golden-cherry (the deal is just perfection)
these are just a few - please just check out who i'm following, you will not be disappointed
if anyone’s looking for any recommendations, let me know and i’m happy to find you some.
• tag list •
tag list is open right now, just let me know!
˖° anyways, have a great day and if you enjoy my work, give me a follow. if not, have a great day as well!
#charles leclerc#blog intro#lando norris#f1#cedric diggory#finnick odair#mclaren#romance#writer#f1 fanfic#formula 1 fanfic#scuderia ferrari#charles leclerc fanfiction#lando norris fanfiction#finnick odair fanfiction#cedric diggory fanfiction
8 notes
·
View notes
Note
Hello :) My name is Dani and first of all let me tell you that I LOVE your writing. I literally sit and read how you interact with others for HOURS and seeing you and a couple of the people you write with gave me the inspiration to create an indie blog for my bb Reyes. That being said, I've never had an indie rp before but I've figured the basics with the rules, verses, etc. Could you please give me some suggestions on how to approach people or get this thing started? I'd thank you forever
asldkfh that’s so sweet of you omg what the fuck
HELL YEAH OKIE DOKIE first thing first: the best way to learn how to indie rp is just to follow a bunch of people and sort of pick and choose the different techniques you like to resemble. that what i did. i came from a long experience of closed group rping with no formatting, and just sort of floated with the indie trends that came and out, and kept the ones i like. i’m gonna tell you how I consider indie rping, which isn’t law or bible or anything, but this is what i look for when i’m looking to follow people!
first, the technical shit
RULES. i’m gonna go over things you say you already know, because there are some. hidden things that people sort of silently expect. in your rules, you must have your name/alias, your pronouns, your age (the terms ‘minor’ or ‘18+’ are sufficient, you don’t need to give your exact age but you NEED to tell people if you’re a minor or not), and your triggers (again, no detail necessary, just tell us what we should tag for you). these are the necessities and the rest is up to you. make your rules clear and concise, and on the short side. it helps to bold important things so people can skim and find them easily. personally, i like seeing people’s shipping policies. bc i’m a shipping slut. are you single ship? multiship? do you prefer not to ship? are you exclusive?
SELECTIVITY. on that note. let people know about your selectivity. do you want to play with anyone who follows you? do you only want to play with mutual followers (people you follow who follow you back)? i, as well as (almost) everyone i follow, are mutuals only. don’t feel guilty if you want to follow this route, and don’t let people talk you into playing with people you don’t want to play with. this blog is yours and your time is yours. spend it how you choose.
EXCLUSIVITY. along the same vein, let people know about your policy on exclusivity – which basically means that there are certain blogs of characters and theirs is the only blog of that character with whom you will play. this is entirely up to you. personally, i don’t do it and i never will. but be sure to let people know if you do! make sure to be honest. make sure you’re comfortable with your rules.
then, the aesthetic shit
REPRESENTATION. the first glance. the first eye contact. generally, this is the mobile preview. have a cool looking mobile banner! it attracts the eye! you don’t need to be a photoshop god for this, either. minimalism is in. a dark screenshot of your character that blends in with the color of your mobile background is hella neat. make sure the color is eye-friendly. black, white, cream, soft tones. if a mobile preview is lime green or shocking blue, i won’t give it a second look. My Eyes, They Bleed. then make sure you have SOMEWHERE on your mobile preview the bare minimum of your blog’s explanation. it doesn’t need to be long. in fact, i tend to like short ones. minimalism, man. for example, mine: ‘multimuse rp blog: dragon age and mass effect canon and ocs’. i’m saying what this blog is: an rp blog. i’m saying what KIND of rp blog: a multimuse. what fandoms i cater to: dragon age and mass effect. what characters you expect to find here: canon and ocs. sometimes people will put their name, too. (also, warn people if you have an autoplay. just write ‘ap’ or ‘autoplay’. people know.)
REPRESENTATION PART 2. piggybacking on all that: promos. gotta have a promo. this is how people find you, and how you can spread the word about your cool new blog. (tag it with the audiences you want to attract. such as: mass effect rp, mass effect roleplay, bioware rp, bioware roleplay, star wars rp, etc etc. the mass effect fandom isn’t all that huge. consider expanding with crossovers to other space fandoms, such as star wars and star trek. we’re buddies.) it can be as simple as the icon promo trend, where you have a horizontal line of icons of your character followed by ‘like/reblog if you’re interested in playing with (character name)! written by (your name).’ it can be that chill. sometimes it can be dramatic. just make sure it’s tasteful. try to avoid gaudy. ALWAYS ALWAYS ALWAYS (this is my pet peeve) INCLUDE YOUR CHARACTER’S NAME AND THE FANDOM NAME. i die inside every time i have no idea who this promo is for.
THEME. the second glance. your blog’s handshake. first – and sometimes last – impression. same rules as the preview and the promo, make it tasteful or make it minimalist. make it easy to follow. if you’re not confident in your aesthetic or ps skills, the white blogs with a simple pic of your character in the sidebar is in right now. leave it open to interpretation. theme-hunter is where i get all my themes, for the most part. if you want some cool theme suggestions, let me know! you may end up interested in html through theme aesthetic and wANTING IT TO BE PERFECT. like me. hehe. anywho – you’ll see a lot of Hyper Aesthetic Themes. try not to get worried about them. the most important thing is that your links to your rules, verses, dossier (if you have one), and ask are clear. the writing is easy to read.
also, the replying shit
FORMATTING. okay so formatting is a Minefield right now. personally, i really enjoy formatting! my formatting trick is: twenty spaces before each paragraph to simulate tabs, bolding quotation marks and putting a space between the marks and the dialogue, ( doing this to parentheses and quite frankly using Way too many parentheses ), BOLDING AND CAPSING emotive words or phrases, italicizing things for emphasis, using small font (and sometimes tiny font). but DON’T overdo it. still, the point is legibility. it’s your choice to use formatting at all. i like it a lot, it helps me Feel the writing and reply. it’s also your choice to use small or tiny font, but… i’ma be honest. i really really do prefer when people use small or tiny font. people are pushing back against tiny font bc it can be really hard to read, so i tend to just use small font (unless my partner uses tiny font). to small font (on pc): select all the text, ctrl shift minus sign. to use tiny font: use small font, then ctrl comma.
ICONNING. again, another minefield. as we speak, rp icons are getting smaller and smaller. my icons at 80x80 with a 2px border, and i often times use a psd. if you get your icons from somewhere, credit that place. i frequently make my own, but not always. as a personal favor, don’t go smaller than 75px… the icons… they’re shrinking…
SPEED. go at your own speed! i cannot stress the importance of this. i’m currently suffering from depression and some Shit, so i may be on the dash a lot, but my reply speed is frequently outstripped by passing snails. don’t write if you’re not feeling it. don’t feel pressured to do it. personally, the majority of the fun of rping is plotting with your partner and obsessing over your character. people love to see people enthusiastic about their kid. that’s why they followed you. bc they love your kid, too. if you have a thread you’re not feeling, be honest! TALK TO YOUR PARTNER.
COMMUNICATION. on that note! get to know your rp partners. love them. cherish them. tell them they’re wonderful. tell them when you’re not feeling a thread. don’t suffer in silence. drop threads. treat yoself. also, follow ALL THE PEOPLE. they may not follow you back. don’t tug at them if they don’t. follow people and make sure you have examples of your writing on your page, even if it’s just a long headcanon or drabble. like a cover letter.
WRITING. third person. i think i can be pretty confident about this: only third person. i use present tense for the most part, but present or past tense. sometimes there are oneliners (replies that are usually just dialogue, maybe with a lil but of narrative for actions, usually spur of the moment and dropped after the moment is gone). there are short paras (generally 1-3 paragraphs of varying sizes). there are long paras (4-6 paras, usually for plotting). there are Novella (6+ for the Intense Future Tolkiens i can’t do this i’m a dr seuss).
TAGGING. can be pretty simple. as a multi, i have too many characters to have thorough tagging systems. a lot of people have different tags for like. aesthetic, musing, visage, headcanons, etc. mine is simple. each character has an in character thread tag: * 。✧ ━ ⦅ character: scott. ⦆. also, a musing tag: * 。✧ ━ ⦅ musing: scott. ⦆. a headcanon tag: * 。✧ ━ ⦅ headcanon: scott. ⦆. sometimes a ship tag: * 。✧ ━ ⦅ scott & liam: just frame the halves and call them brothers. ⦆. and you MUST have an out of character tag, where it’s just you talking, and you must tag every post of just you talking with it: * 。✧ ━ ⦅ out of character. ⦆. it must be clear. you can make them fancy and pretty like this. i like them. it’s not necessary. also: tag any triggers. important. search your partners’ rules for their triggers. if someone asks you to tag a trigger, do it without a second thought.
lastly, the important shit
HAVE FUN! we’re all here for the same reason. we love mass effect. WE LOVE SPACE. there will always be aggression and elitism and hurt feelings in the indie rp community. always. try not to let it bring you down. play nice. kindergarten rules. enjoy!
let me know if you have more questions/want more detail!
don’t reblog this
#long post cw#I'M SURE I FORGOT THINGS#OR I TOOK THIS THE WRONG WAY AND WENT MORE INTO LIKE#THE FUNCTION OF INDIE??#idk Let Me Know i'm fine with explaining more#Again this is just my take on indie rping#everyone is different#rxysvidal#let me know if you want this rebloggable i can post it elsewhere#let me know if you want me to make a suggestions list#also check out my recommendations tag in my nav#for some Hella Cool Kids
4 notes
·
View notes
Note
this may sound a bit silly but how do you find new fics to read? 😩 every time I try to look for fics the tags are all filled with asks 😅 or if I’m searching for a certain member (ex. seung), every member except him pops up 😭 kinda frustrating but I guess I just have to keep ..digging? I don’t think that’s the right term
hello sweets!! i gotchu!! i totally know what you mean! i got some loopholes for ya! 😉
Mobile: look up a tag, at the top, theres the white slide bar, and select either text or photo. these two categories weed out the asks and are 100% full fics and other longer things.
Desktop: look up a tag, under the blogs to follow there’s the options with dropdown menus that say “Most popular” and “post type” like mobile, from the post type drop down, select text or photo!
If you feel like doing a little browsing around on some of your fave blog’s accounts, most of us have a tag for our own fic recs (for example mine is #ro’s recs) and you can find new fics this way too! (although you might still run into some asks with this)
Along this line, some of us also have main blogs or fic rec blogs on the side as well, and these are typically advertised somewhere on our blogs--usually as a part of our nav.
You can follow a network! this is a super great way to find new fics! networks reblog their members’ fics and have rules about not posting asks (unless they are longer) i’m a member of @stayhavens but there are so many other cool ones like @skzwriternet @stayracha-net @districtninewriters @straykidsland @skzsmutnetwork
There are also just general accounts out there dedicated to reposting fics and fic recs, off the top of my head, some of my lovely moots @lechanters @meow-minho do this!
as for looking for specific fics of a certain member like seung, i recommend checking out author’s masterlists: we sort our fics by members here!
13 notes
·
View notes
Note
Hello Jack, could we please trouble you for an opinion? Thank you so much in advance!
hi there @shamhq! i’m happy to give you an opinion. since you didn’t specify private, i will post this on my blog. feel free to ask me to take it down if that was a mistake.
NOTE: all opinions expressed here are mine, jack’s, belonging to jack. i make no claims to knowing what is best for every group – i only offer advice based on my experiences, what i’ve seen in the community, and my personal knowledge. no one person knows what is best for you or any group other than yourself; because you were the one who put all of this together in the first place. so take everything i say as a suggestion, and remember that you have accomplished so much!!
and if you have any questions, want feedback on something specific, or want elaborations on anything said in this opinion, don’t hesitate to message me!!
this isn’t just an opinion, it’s a shoutout and a rec!! @shamhq is the perfect blend of semi-appless reality genre and a place with an overarching plot that will captivate readers and challenge writers at portraying different facets of their characters. the concept is fresh and inviting and the admin/s have obviously put so much love and imagination into this group!! check it out!!
start: 12.23 | pause: none | end: 12.29TOTAL: 6 minutes to read all pages (please don’t take this as a measure of anything, I simply time myself and am a speed reader)
So I’ve said before in other places that I’m not a big fan of container themes for rpg mains, but having used this theme myself previously I think it really works with the aesthetic of what you’re trying to portray. The link amount is perfect for the highlighted information and I love how there’s a semi sort of “poster” for the show on the nav hover. It really completes the overall look, you know? Of course you know, you designed it. The colour scheme is, I’m assuming, meant to mimic a sunset on the beach? While some of the colours of the POC faces turn a bit red in tone due to the psd, the overall aesthetic achieved is really well done. The thing I like the most is how unique and well thought-out the concept of this all is. It’s not just a typical “reality show” rpg where people are living their lives while the cameras are rolling. You have a real plot that branches and intermixes with the subplots of the characters and there’s more going on than the shallow, at-first-glance stuff. Even in a few short sentences you introduce happiness, sadness, drama, anger, and jealousy; this is a concept I could see brought to the real television screen and you deserve major accolades for that!
The one thing about your main that I would recommend a change to: while the sidebar image is really cool and I like the video camera template, it did make it hard for me to notice the links on the side because they blend in a bit TOO well. Maybe changing them to a similar pink color would help them stand out a bit more? Otherwise a yellow is the only other thing I could recommend.
So your plot page is really well done. I like that you give the shorter, generic version of the plot in multiple locations, and that it’s on top of the actual extended plot, so people don’t get bored and have to scroll. It’s like a teaser and entices the reader to read more into it all. The way it’s written in first person as well is excellent. It brings a life to the plot and concept. Adding the info and skeleton links at the bottom is also a great idea and overall I can’t think of a genuine thing I would change??
Normally from here I go into an in-depth paragraph about each page, but this is a surprising incidence in which I really don’t see anything I would heavily suggest changing or recommend changing on a big level so I’ll go into a few sentences about each?? Your Rules are clear-cut and it’s good that you have the age limit on the very top. You’re not asking too much or too little of your members, in my opinion, so they’re very well done. I really like the wide range of personalities and archetypes displayed in your skeletons. They do seem like the executive producers tried to cover all bases for all walks of life and I like that you don’t have set faceclaims but heavily encourage nonbinary and trans characters, while also promoting diversity heavily. The “More Info” page is also a great idea and perfect for answering all of the questions you might otherwise get and need to put in your FAQ tag, because it also helps envision life on the show as the characters for any potential members.
Your application is clean-cut and I like that you provide an area for expansion because certainly with a deep concept like this there would be a lot rolling around in anyone’s brain. It’s also nice that you offered a place to ask about having a second character. My one question: do you plan on, if someone better fits the second character, having them submit a formal application for it? That way you get everything from them for both characters (eventually) rather than just hoping they do the second character mure justice? That might just be something to think about more in-depth once you get to having consistent applications.
I also like your “Producers Needed” part! It’s a great and in-lore way to ask about co-admins and with everything you plan on undertaking I hope you get them, because you deserve it!! I wonder if maybe there could be an in-character way to execute their producer role, as well. For an rpg like this I wouldn’t be surprised if you utilized anonymous polls and suggestion boxes often. If you need links to either of those I would be happy to provide.
My FAVORITE THING about this rpg: the concept. I’ll repeat myself here but you really thought outside the box and expanded your reasoning on a lot of the concepts introduced here. From the fact that the show is still “airing” season 1 while filming season 2, the drama happening behind the scenes, and the insistence that the on-camera persona of the characters can and will be much different than their real personalities; it all speaks to the time and dedication of your imagination to all of this!!
My LEAST FAVORITE THING about this rpg: honestly there’s not a lot that I can critique heavily, but I said before I’m not really a fan of the container theme and, even though you are going for aesthetic and have achieved that “look,” for a concept like this--where there is, in my eyes, the potential for substantial growth of the main through events, character polling, season announcements, etc if you would be inclined--you might want to think about a fansite theme? But it’s all personal preference in the end.
OVERALL this rpg is so much more than I thought it was when I first got the opinion request. I’m honestly considering looking y’all up and applying if there is an open spot when I’ve finished with some RL things in a month or two. This is the perfect place for people looking for a specific niche of the “reality” genre while also having a heavy appeal to people like me; who need an overarching plot to survive writing in an rpg. I truly and genuinely want you to know how impressed I am with this rpg and how amazing of a job you’ve done in the creation of this group.
Sincerely,Jack
3 notes
·
View notes
Text
Nav post
Hey! I’m Deadset or DS or whatever you wanna call me! I’m 20 and use any pronouns - No preference so go wild. I live, breathe and thrive of anything that evolves creativity. As easier way to get an idea of me as a person is to check my object show kin list, I’m currently the only mod that runs the @/yinyangdaily. too so feel free to check out for daily shenanigans. I’m cool w/ doubles but having that ALSO helps Incase you aren’t!!! I’m a silly little enby who’s sibling dragged them into watching object shows and now... Well we’re here.... I really like ii and ONE. But also feel free to recommend other ones!!! I love watching new things!

REQUESTS OPEN!!
Feel free to message and talk with me in the ask box! I LOVE meeting and talking with people, although I might get socially exhausted so I might not always be quick with responding all the time.
I’ll happy offer advice or if you need someone to listen to your woes, I’m here for you! Although I won’t have an answer for anything, I’ll do my best to try and point you in the right direction! I’m always here if you whether or not you need me to be!
I interact / Follow back / whatever from my main @concentratedclowns
TAG CONTENTS UNDER THE TAG
TAGS
#💡💡 ;; TEXT POSTS - Just text posts: For thoughts, announcements, etc. Stuff like that. Although not a lot will be posted, Just think of this tag as my Fan-arc where I talk about that sorta stuff.
#🍊🍊 ;; ART TIME - So yeah. Just fanart stuff. You MIGHT see the occasional sona art but that’s mostly being saved for me se.lf.sh.ip with the rest of my self indulgence nonsense hehehe
#🍑🍑 ;; EDIT TIME - I wanna try making both picture edits / icon stuff but also video edits for fun. So I might do that in future but no guarantee
#🍂🍂 ;; WRITING TIME - I MIGHT do some imagines, hcs, etc. So anything I do with stuff related to any sort of creative writing can be found in this tag!
#🥭🥭 ;; ASKS - Just like. Where I’m keeping all my ask stuff
# 🍁🍁 ;; NONSENSE - basically memes / shitposts. Fyi if your uncomfy w/ swearing I'll try tone it down but I can have QUITE the mouth on me.
0 notes
Text
What Is Internal linking | Internal Links for SEO
What Is Internal Linking - Internal Links Impact On SEO With Example
Hey guys. today, we're talking about What Is internal links and internal linking in html. So what is internal links? They're simply links on your page that link to anything on your own site, so that's pages on your own domain.
And I say "domain," so not subdomain, but the same domain. Anytime you link to yourself, that's simply just called an internal link.
It's just the official term for something you probably already know and are probably already doing.
An important thing to note-- that internal links are not just links inside of your post content. So if you're writing a blog post, and you have a few links there, you have way more links on your actual page, right-- everything in your navigation, your header, your footer, your sidebar.
When we're saying "internal links," every one of those links count. I'm going to refer back to this a few times. So it's important to remember, when you're thinking internal links, not just when you're writing a post, think about internal links across your entire site.

Internal Links For SEO
So we're going to give a little more of a brief overview here. So when it comes to what you should be linking to, I want you to use anchor text as your guideline.
And there's a reason why. Anchor text is incredibly important. You remember, when you link to something, the link text should be basically what the key phrase of the page you are linking to.
All right, so why am I saying use anchor text as your guide? So whenever you're going to write a post, now when you're linking to something, I'm only letting you use the anchor text when you link to it.
You can't use cheats like "click here" or linking on paragraphs or images or anything else. You can only link on anchor text.
And if you're using that as your guide, you're only going to link to things that are contextually relevant to that post. That's super important.
In Google's Webmaster Guidelines, they basically tell you, only link to things that are a good user experience or useful for the user to use for navigation.
So that is going to be your guideline here. You're not just linking to things, because you want to rank on them.
You're linking to things, because you think they're going to be useful for your user. They fit into the context of what you are writing. I mean that's also a super important thing to know.
Google is a contextual search engine. It's using things like natural language processing. It's improving all the time. It's going to learn just as much about a link from the text around your link as the anchor text itself.
So it's really important, as you are writing, that you are organically linking the things. You're not faking it for the sole purpose of getting that anchor text or that link into another post.
If you're using that as your guideline, you'll pretty much be able to figure out what you should be linking to, and it will be organic within that post, and you'll be OK.
Internal linking SEO Best Practice - too many internal links
So how many links or internal links should you aim for in a given post? So again, remember, internal links count everything on your page, so it's actually a good thing to link as too many internal links as you can, because you want to outweight kind of all that navigation bloat you're going to end up having.
In your navigation, you'll probably have tons of links, so out the gate, you probably have 20, 30 links counting against that page rank you're distributing out. Get as many into your internal post as you can. There's like an age old number that people use to toss around.
You could have a maximum of 100 links per page. That's because Google said that-- I don't know-- like 10 years ago when their algorithm and their computers were, you know, not as complex as they are today. Since then, if you read the webmaster guidelines, Google says you can have thousands of links on a page.
I promise you, even in a 5,000-word blog post, you will never hit Google's upper limits. So you cannot link enough, especially if you're following our guidelines that we said before.
Make sure you're only linking on anchor text and within text. I'm going to throw another guideline in for you. Space out your links.
we recommend using short web-friendly paragraph, so one the two sentences per paragraph. not just for usability, but make sure you're breaking up your paragraphs-- again, one to two sentences.
If you're following that, one to two links per each of those paragraphs, and you'll be OK. You're going to get a lot of texts around there to give Google that contextual stuff they love, and you'll make sure it's a good user experience, because you didn't over stuff with links. And therefore, you will never hit the upper limits of Google.
And remember, that thing that we told you out with page rank. In the back of your mind, remember every link is something that you are voting for.
So don't link to things that you don't want to rank. There are exceptions to that, obviously. For legal reasons, you might need to link to a terms of service or a privacy policy.
For business reasons, you might need to link to your About Us page. There are going to be exceptions that are pages that you won't rank for that you will need to link to. Whenever possible, only link to things that you want to rank on and are good for the user experience.
So along those lines, when you go to your site navigation, your whole theme, and your footer and everywhere around it, clean up your links.
Get rid of any links that you don't need for that user experience. If you're linking to something for the sole purpose of, I wanted to fill up my sidebar, kill those links.
I want to fill up my nav bar. No, that's not a good user experience. Only link to things that you want to rank on or that you think the user needs in that experience, because remember, all of those links are weighing you down when it comes to your ability to pass your page rank around. Clean it up.
Time for a little spring cleaning on those links. All right, this is kind of more of an Eric thing, but don't link to the same page twice. You can't vote for something twice. If you link to it four or five, six times, Google isn't giving you six votes for that. You only get one vote, and it's not a great user experience in general.
Internal linking in html
Linking to something multiple times, unless you absolutely need to for that user experience, cut the links out. Link the first time-- generally the best.
Second, time, third time, whatever you think is the best for the user experience -- if you use the anchor text 30 times on a post, and you're like, oh, man, there's 30 chances to link to that thing, no. Link once.
You're just kind of wasting your page rank. Again, not a great user experience. All right, so last thing is kind of more of a technical thing, and that's how you can link to yourself internally.
So Google recommends always linking on plain text whenever possible in the webmaster guidelines. So what that means is just using a plain old a tag or a HREF in the attribute.
Don't do things like JavaScript, or you do like an onclick. Don't do buttons. Don't do even images when you can. Obviously, for your logo, it's probably going to be an image that links.
That's OK. Just make sure in those cases, you use good alt text. Whenever you can, link on plain text. It's a better user experience. Again, remember when users are browsing quickly, they want to be able to easily see what they're linking to. You have accessibility issues if you're using a lot of images for your links.
And again, Google is flat out telling you, link on text. So please link on text whenever you can. There are some obvious reasons you might need to use JavaScript to generate your links, if you have, like, what's called a single page app.
There are exceptions to this, but if you're writing a blog post, and you're on WordPress, none of those exceptions apply to you. So use plain text links when you can. And that is pretty much our whole topic on internal links.
And again, we're going to come back to a lot more on the site structure stuff, how you should be worrying about silos and cornerstone content and so much more exciting stuff to talk about with internal links.
This is important stuff to remember as we go through all those future segments. This tool Internal linking Checker tool Helps You To Check Internal Links in blog posts.
Conclusion
So, in this article i have given information What Is Internal linking, Internal Links for SEO and Internal Links In Html. If you like this Article then do share it on Social Media.
Also Read This
Godaddy Domain not working without www In Blogger | Solution
Wordpress Top 5 Security Plugins | Make Wordpress Site Secure
What Is Internal linking | Internal Links for SEO
SEO Tips
via exercisesfatburnig.blogspot.com https://ift.tt/2FOBa4M
0 notes
Text
30 HTML Best Practices for Beginners
The most difficult aspect of running Nettuts+ is accounting for so many different skill levels. If we post too many advanced tutorials, our beginner audience won't benefit. The same holds true for the opposite. We do our best, but always feel free to pipe in if you feel you're being neglected. This site is for you, so speak up! With that said, today's tutorial is specifically for those who are just diving into web development. If you've one year of experience or less, hopefully some of the tips listed here will help you to become better, quicker!
You may also want to check out some of the HTML builders on Envato Market, such as the popular VSBuilder, which lets you generate the HTML and CSS for building your websites automatically by choosing options from a simple interface.
Or you can have your website built from scratch by a professional developer on Envato Studio who knows and follows all the HTML best practices.
Without further ado, let's review 30 best practices to observe when creating your markup.
1: Always Close Your Tags
Back in the day, it wasn't uncommon to see things like this:
1 <li>Some text here.
2 <li>Some new text here.
3 <li>You get the idea.
Notice how the wrapping UL/OL tag was omitted. Additionally, many chose to leave off the closing LI tags as well. By today's standards, this is simply bad practice and should be 100% avoided. Always, always close your tags. Otherwise, you'll encounter validation and glitch issues at every turn.
Better
1 <ul>
2 <li>Some text here. </li>
3 <li>Some new text here. </li>
4 <li>You get the idea. </li>
5 </ul>
2: Declare the Correct DocType

When I was younger, I participated quite a bit in CSS forums. Whenever a user had an issue, before we would look at their situation, they HAD to perform two things first:
Validate the CSS file. Fix any necessary errors.
Add a doctype.
"The DOCTYPE goes before the opening html tag at the top of the page and tells the browser whether the page contains HTML, XHTML, or a mix of both, so that it can correctly interpret the markup."
Most of us choose between four different doctypes when creating new websites.
http://www.w3.org/TR/html4/strict.dtd">
http://www.w3.org/TR/html4/loose.dtd">
http://www.w3.org/TR/xhtml1/DTD/xhtml1-transitional.dtd">
http://www.w3.org/TR/xhtml1/DTD/xhtml1-strict.dtd">
There's a big debate currently going on about the correct choice here. At one point, it was considered to be best practice to use the XHTML Strict version. However, after some research, it was realized that most browsers revert back to regular HTML when interpretting it. For that reason, many have chosen to use HTML 4.01 Strict instead. The bottom line is that any of these will keep you in check. Do some research and make up your own mind.
3: Never Use Inline Styles
When you're hard at work on your markup, sometimes it can be tempting to take the easy route and sneak in a bit of styling.
1 <p style="color: red;">I'm going to make this text red so that it really stands out and makes people take notice! </p>
Sure -- it looks harmless enough. However, this points to an error in your coding practices.
When creating your markup, don't even think about the styling yet. You only begin adding styles once the page has been completely coded.
It's like crossing the streams in Ghostbusters. It's just not a good idea.
-Chris Coyier (in reference to something completely unrelated.)
Instead, finish your markup, and then reference that P tag from your external stylesheet.
Better
1 #someElement > p {
2 color: red;
3 }
4: Place all External CSS Files Within the Head Tag
Technically, you can place stylesheets anywhere you like. However, the HTML specification recommends that they be placed within the document HEAD tag. The primary benefit is that your pages will seemingly load faster.
While researching performance at Yahoo!, we discovered that moving stylesheets to the document HEAD makes pages appear to be loading faster. This is because putting stylesheets in the HEAD allows the page to render progressively.
- ySlow Team
1 <head>
2 <title>My Favorites Kinds of Corn</title>
3 <link rel="stylesheet" type="text/css" media="screen" href="path/to/file.css" />
4 <link rel="stylesheet" type="text/css" media="screen" href="path/to
/anotherFile.css" />
5 </head>
5: Consider Placing Javascript Files at the Bottom
Place JS at bottom
Remember -- the primary goal is to make the page load as quickly as possible for the user. When loading a script, the browser can't continue on until the entire file has been loaded. Thus, the user will have to wait longer before noticing any progress.
If you have JS files whose only purpose is to add functionality -- for example, after a button is clicked -- go ahead and place those files at the bottom, just before the closing body tag. This is absolutely a best practice.
Better
<p>And now you know my favorite kinds of corn. </p>
<script type="text/javascript" src="path/to/file.js"></script>
<script type="text/javascript" src="path/to/anotherFile.js"></script>
</body>
</html>
6: Never Use Inline Javascript. It's not 1996!
Another common practice years ago was to place JS commands directly within tags. This was very common with simple image galleries. Essentially, a "onclick" attribute was appended to the tag. The value would then be equal to some JS procedure. Needless to say, you should never, ever do this. Instead, transfer this code to an external JS file and use "addEventListener/attachEvent" to "listen" for your desired event. Or, if using a framework like jQuery, just use the "click" method.
$('a#moreCornInfoLink').click(function() {
alert('Want to learn more about corn?');
});
7: Validate Continuously
validate continuously
I recently blogged about how the idea of validation has been completely misconstrued by those who don't completely understand its purpose. As I mention in the article, "validation should work for you, not against."
However, especially when first getting started, I highly recommend that you download the Web Developer Toolbar and use the "Validate HTML" and "Validate CSS" options continuously. While CSS is a somewhat easy to language to learn, it can also make you tear your hair out. As you'll find, many times, it's your shabby markup that's causing that strange whitespace issue on the page. Validate, validate, validate.
8: Download Firebug
download firebug
I can't recommend this one enough. Firebug is, without doubt, the best plugin you'll ever use when creating websites. Not only does it provide incredible Javascript debugging, but you'll also learn how to pinpoint which elements are inheriting that extra padding that you were unaware of. Download it!
9: Use Firebug!
use firebug
From my experiences, many users only take advantage of about 20% of Firebug's capabilities. You're truly doing yourself a disservice. Take a couple hours and scour the web for every worthy tutorial you can find on the subject.
Resources
Overview of Firebug
Debug Javascript With Firebug - video tutorial
10: Keep Your Tag Names Lowercase
Technically, you can get away with capitalizing your tag names.
<DIV>
<P>Here's an interesting fact about corn. </P>
</DIV>
Having said that, please don't. It serves no purpose and hurts my eyes -- not to mention the fact that it reminds me of Microsoft Word's html function!
Better
<div>
<p>Here's an interesting fact about corn. </p>
</div>
11: Use H1 - H6 Tags
Admittedly, this is something I tend to slack on. It's best practice to use all six of these tags. If I'm honest, I usually only implement the top four; but I'm working on it! :) For semantic and SEO reasons, force yourself to replace that P tag with an H6 when appropriate.
1
2
<h1>This is a really important corn fact! </h1>
<h6>Small, but still significant corn fact goes here. </h6>
12: If Building a Blog, Save the H1 for the Article Title
h1 saved for title of article
Just this morning, on Twitter, I asked our followers whether they felt it was smartest to place the H1 tag as the logo, or to instead use it as the article's title. Around 80% of the returned tweets were in favor of the latter method.
As with anything, determine what's best for your own website. However, if building a blog, I'd recommend that you save your H1 tags for your article title. For SEO purposes, this is a better practice - in my opinion.
13: Download ySlow
download yslow
Especially in the last few years, the Yahoo team has been doing some really great work in our field. Not too long ago, they released an extension for Firebug called ySlow. When activated, it will analyze the given website and return a "report card" of sorts which details the areas where your site needs improvement. It can be a bit harsh, but it's all for the greater good. I highly recommend it.
14: Wrap Navigation with an Unordered List
Wrap navigation with unordered lists
Each and every website has a navigation section of some sort. While you can definitely get away with formatting it like so:
<div id="nav">
<a href="#">Home </a>
<a href="#">About </a>
<a href="#">Contact </a>
</div>
I'd encourage you not to use this method, for semantic reasons. Your job is to write the best possible code that you're capable of.
Why would we style a list of navigation links with anything other than an unordered LIST?
The UL tag is meant to contain a list of items.
Better
<ul id="nav">
<li><a href="#">Home</a></li>
<li><a href="#">About</a></li>
<li><a href="#">Contact</a></li>
</ul>
15: Learn How to Target IE
You'll undoubtedly find yourself screaming at IE during some point or another. It's actually become a bonding experience for the community. When I read on Twitter how one of my buddies is battling the forces of IE, I just smile and think, "I know how you feel, pal."
The first step, once you've completed your primary CSS file, is to create a unique "ie.css" file. You can then reference it only for IE by using the following code.
<!--[if lt IE 7]>
<link rel="stylesheet" type="text/css" media="screen" href="path/to/ie.css" />
<![endif]-->
This code says, "If the user's browser is Internet Explorer 6 or lower, import this stylesheet. Otherwise, do nothing." If you need to compensate for IE7 as well, simply replace "lt" with "lte" (less than or equal to).
16: Choose a Great Code Editor
choose a great code editor
Whether you're on Windows or a Mac, there are plenty of fantastic code editors that will work wonderfully for you. Personally, I have a Mac and PC side-by-side that I use throughout my day. As a result, I've developed a pretty good knowledge of what's available. Here are my top choices/recommendations in order:
Mac Lovers
Coda
Espresso
TextMate
Aptana
DreamWeaver CS4
PC Lovers
InType
E-Text Editor
Notepad++
Aptana
Dreamweaver CS4
17: Once the Website is Complete, Compress!
Compress
By zipping your CSS and Javascript files, you can reduce the size of each file by a substantial 25% or so. Please don't bother doing this while still in development. However, once the site is, more-or-less, complete, utilize a few online compression programs to save yourself some bandwidth.
Javascript Compression Services
Javascript Compressor
JS Compressor
CSS Compression Services
CSS Optimiser
CSS Compressor
Clean CSS
18: Cut, Cut, Cut
cut cut cut
Looking back on my first website, I must have had a SEVERE case of divitis. Your natural instinct is to safely wrap each paragraph with a div, and then wrap it with one more div for good measure. As you'll quickly learn, this is highly inefficient.
Once you've completed your markup, go over it two more times and find ways to reduce the number of elements on the page. Does that UL really need its own wrapping div? I think not.
Just as the key to writing is to "cut, cut, cut," the same holds true for your markup.
19: All Images Require "Alt" Attributes
It's easy to ignore the necessity for alt attributes within image tags. Nevertheless, it's very important, for accessibility and validation reasons, that you take an extra moment to fill these sections in.
Bad
1
<IMG SRC="cornImage.jpg" />
Better
1
<img src="cornImage.jpg" alt="A corn field I visited." />
20: Stay up Late
I highly doubt that I'm the only one who, at one point while learning, looked up and realized that I was in a pitch-dark room well into the early, early morning. If you've found yourself in a similar situation, rest assured that you've chosen the right field.
The amazing "AHHA" moments, at least for me, always occur late at night. This was the case when I first began to understand exactly what Javascript closures were. It's a great feeling that you need to experience, if you haven't already.
21: View Source
view source
What better way to learn HTML than to copy your heroes? Initially, we're all copiers! Then slowly, you begin to develop your own styles/methods. So visit the websites of those you respect. How did they code this and that section? Learn and copy from them. We all did it, and you should too. (Don't steal the design; just learn from the coding style.)
Notice any cool Javascript effects that you'd like to learn? It's likely that he's using a plugin to accomplish the effect. View the source and search the HEAD tag for the name of the script. Then Google it and implement it into your own site! Yay.
22: Style ALL Elements
This best practice is especially true when designing for clients. Just because you haven't use a blockquote doesn't mean that the client won't. Never use ordered lists? That doesn't mean he won't! Do yourself a service and create a special page specifically to show off the styling of every element: ul, ol, p, h1-h6, blockquotes, etc.
23: Use Twitter
Use Twitter
Lately, I can't turn on the TV without hearing a reference to Twitter; it's really become rather obnoxious. I don't have a desire to listen to Larry King advertise his Twitter account - which we all know he doesn't manually update. Yay for assistants! Also, how many moms signed up for accounts after Oprah's approval? We can only long for the day when it was just a few of us who were aware of the service and its "water cooler" potential.
Initially, the idea behind Twitter was to post "what you were doing." Though this still holds true to a small extent, it's become much more of a networking tool in our industry. If a web dev writer that I admire posts a link to an article he found interesting, you better believe that I'm going to check it out as well - and you should too! This is the reason why sites like Digg are quickly becoming more and more nervous.
Twitter Snippet
If you just signed up, don't forget to follow us: NETTUTS.
24: Learn Photoshop
Learn Photoshop
A recent commenter on Nettuts+ attacked us for posting a few recommendations from Psdtuts+. He argued that Photoshop tutorials have no business on a web development blog. I'm not sure about him, but Photoshop is open pretty much 24/7 on my computer.
In fact, Photoshop may very well become the more important tool you have. Once you've learned HTML and CSS, I would personally recommend that you then learn as many Photoshop techniques as possible.
Visit the Videos section at Psdtuts+
Fork over $25 to sign up for a one-month membership to Lynda.com. Watch every video you can find.
Enjoy the "You Suck at Photoshop" series.
Take a few hours to memorize as many PS keyboard shortcuts as you can.
25: Learn Each HTML Tag
There are literally dozens of HTML tags that you won't come across every day. Nevertheless, that doesn't mean you shouldn't learn them! Are you familiar with the "abbr" tag? What about "cite"? These two alone deserve a spot in your tool-chest. Learn all of them!
By the way, in case you're unfamiliar with the two listed above:
abbr does pretty much what you'd expect. It refers to an abbreviation. "Blvd" could be wrapped in a <abbr> tag because it's an abbreviation for "boulevard".
cite is used to reference the title of some work. For example, if you reference this article on your own blog, you could put "30 HTML Best Practices for Beginners" within a <cite> tag. Note that it shouldn't be used to reference the author of a quote. This is a common misconception.
26: Participate in the Community
Just as sites like ours contributes greatly to further a web developer's knowledge, you should too! Finally figured out how to float your elements correctly? Make a blog posting to teach others how. There will always be those with less experience than you. Not only will you be contributing to the community, but you'll also teach yourself. Ever notice how you don't truly understand something until you're forced to teach it?
27: Use a CSS Reset
This is another area that's been debated to death. CSS resets: to use or not to use; that is the question. If I were to offer my own personal advice, I'd 100% recommend that you create your own reset file. Begin by downloading a popular one, like Eric Meyer's, and then slowly, as you learn more, begin to modify it into your own. If you don't do this, you won't truly understand why your list items are receiving that extra bit of padding when you didn't specify it anywhere in your CSS file. Save yourself the anger and reset everything! This one should get you started.
html, body, div, span,
h1, h2, h3, h4, h5, h6, p, blockquote, pre,
a, abbr, acronym, address, big, cite, code,
img, ins, kbd, q, s, samp,
small, strike, strong,
dl, dt, dd, ol, ul, li,
fieldset, form, label, legend,
table, caption, tbody, tfoot, thead, tr, th, td {
margin: 0;
padding: 0;
border: 0;
outline: 0;
font-size: 100%;
vertical-align: baseline;
background: transparent;
}
body {
line-height: 1;
}
ol, ul {
list-style: none;
}
blockquote, q {
quotes: none;
}
blockquote:before, blockquote:after,
q:before, q:after {
content: '';
content: none;
}
table {
border-collapse: collapse;
border-spacing: 0;
}
28: Line 'em Up!
Line em up
Generally speaking, you should strive to line up your elements as best as possible. Take a look at you favorite designs. Did you notice how each heading, icon, paragraph, and logo lines up with something else on the page? Not doing this is one of the biggest signs of a beginner. Think of it this way: If I ask why you placed an element in that spot, you should be able to give me an exact reason.
Advertisement
29: Slice a PSD
Slice a PSD
Okay, so you've gained a solid grasp of HTML, CSS, and Photoshop. The next step is to convert your first PSD into a working website. Don't worry; it's not as tough as you might think. I can't think of a better way to put your skills to the test. If you need assistance, review these in depth video tutorials that show you exactly how to get the job done.
Slice and Dice that PSD
From PSD to HTML/CSS
30: Don't Use a Framework...Yet
Frameworks, whether they be for Javascript or CSS are fantastic; but please don't use them when first getting started. Though it could be argued that jQuery and Javascript can be learned simultaneously, the same can't be made for CSS. I've personally promoted the 960 CSS Framework, and use it often. Having said that, if you're still in the process of learning CSS -- meaning the first year -- you'll only make yourself more confused if you use one.
CSS frameworks are for experienced developers who want to save themselves a bit of time. They're not for beginners.
Original article source here : https://code.tutsplus.com/tutorials/30-html-best-practices-for-beginners--net-4957
1 note
·
View note
Note
🙄+ I recommend reading carry on by rainbow Rowell is very sweet and very gay it's a little confusing at times but it's so amazing you won't even care
Hi sweetie sorry i took so long to respond i hate a bad day.
Also i will totally check that out! If you’re into books with gay protagonists you should check out Tell me again how a crush should feel by Sara Farizan or Crush by Carrie mac which is the first gay book i ever read and still my fave!
url: 9/10 url length: 7/10 Magnus is perf therefore url is perf
icon image:10 /10 colours and crop: 10/10 Yus
theme: 6/10 mobile theme: 7/10 header image: 6/10 updates bar: /10 sidebar image: /10 description: 7/10 Your blog is great but i would recommend using a different theme.
nav/tags page: /10 about page: /10 additional pages (icons, fanfics, characters, etc.): /10 I would recommend getting some pages :)
content: 9/10 my fandom? yes/no Great content love.
overall: 9/10 I love your blog i alway look forward to seeing you posts. i know themes and pages can be difficult so if you ever need help you can i ask me and i will try to help :)
Want one?
1 note
·
View note
Text
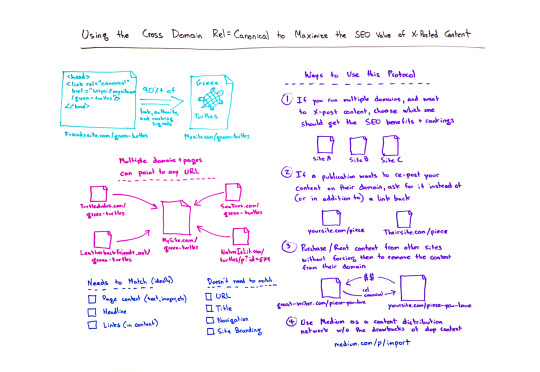
Using the Cross Domain Rel=Canonical to Maximize the SEO Value of Cross-Posted Content – Whiteboard Friday
Posted by randfish
Same content, different domains? There’s a tag for that. Using rel=canonical to tell Google that similar or identical content exists on multiple domains has a number of clever applications. You can cross-post content across several domains that you own, you can benefit from others republishing your own content, rent or purchase content on other sites, and safely use third-party distribution networks like Medium to spread the word. Rand covers all the canonical bases in this not-to-be-missed edition of Whiteboard Friday.
https://fast.wistia.net/embed/iframe/qsmvv6edgb?seo=false&videoFoam=true
https://fast.wistia.net/assets/external/E-v1.js
Click on the whiteboard image above to open a high-resolution version in a new tab!
Video Transcription
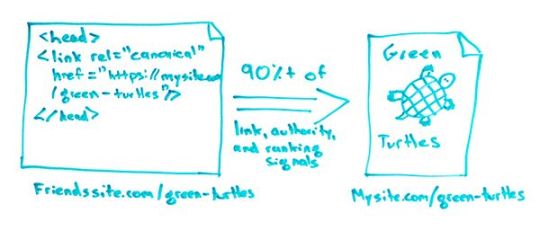
Howdy, Moz fans, and welcome to another edition of Whiteboard Friday. This week we’re going to chat about the cross-domain rel=canonical tag. So we’ve talked about rel=canonical a little bit and how it can be used to take care of duplicate content issues, point Google to the right pages from potentially other pages that share similar or exactly the same content. But cross-domain rel=canonical is a unique and uniquely powerful tool that is designed to basically say, “You know what, Google? There is the same content on multiple different domains.”

So in this simplistic example, MyFriendSite.com/green-turtles contains this content that I said, “Sure, it’s totally fine for you, my friend, to republish, but I know I don’t want SEO issues. I know I don’t want duplicate content. I know I don’t want a problem where my friend’s site ends up outranking me, because maybe they have better links or other ranking signals, and I know that I would like any ranking credit, any link or authority signals that they accrue to actually come to my website.
There’s a way that you can do this. Google introduced it back in 2009. It is the cross-domain rel=canonical. So essentially, in the header tag of the page, I can add this link, rel=canonical href — it’s a link tag, so there’s an href — to the place where I want the link or the canonical, in this case, to point to and then close the tag. Google will transfer over, this is an estimate, but roughly in the SEO world, we think it’s pretty similar to what you get in a 301 redirect. So something above 90% of the link authority and ranking signals will transfer from FriendSite.com to MySite.com.
So my green turtles page is going to be the one that Google will be more likely to rank. As this one accrues any links or other ranking signals, that authority, those links should transfer over to my page. That’s an ideal situation for a bunch of different things. I’ll talk about those in a sec.
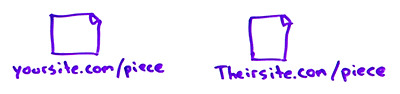
Multiple domains and pages can point to any URL

Multiple domains and pages are totally cool to point to any URL. I can do this for FriendSite.com. I can also do this for TurtleDudes.com and LeatherbackFriends.net and SeaTees.com and NatureIsLit.com. All of them can contain this cross-domain rel=canonical pointing back to the site or the page that I want it to go to. This is a great way to potentially license content out there, give people republishing permissions without losing any of the SEO value.
A few things need to match:
I. The page content really does need to match
That includes things like text, images, if you’ve embedded videos, whatever you’ve got on there.
II. The headline
Ideally, should match. It’s a little less crucial than the page content, but probably you want that headline to match.
III. Links (in content)
Those should also match. This is a good way to make sure. You check one, two, three. This is a good way to make sure that Google will count that rel=canonical correctly.
Things that don’t need to match:
I. The URL
No, it’s fine if the URLs are different. In this case, I’ve got NatureIsLit.com/turtles/p?id=679. That’s okay. It doesn’t need to be green-turtles. I can have a different URL structure on my site than they’ve got on theirs. Google is just fine with that.
II. The title of the piece
Many times the cross-domain rel=canonical is used with different page titles. So if, for example, CTs.com wants to publish the piece with a different title, that’s okay. I still generally recommend that the headlines stay the same, but okay to have different titles.
III. The navigation
IV. Site branding
So all the things around the content. If I’ve got my page here and I have like nav elements over here, nav elements down here, maybe a footer down here, a nice little logo up in the top left, that’s fine if those are totally different from the ones that are on these other pages cross-domain canonically. That stuff does not need to match. We’re really talking about the content inside the page that Google looks for.
Ways to use this protocol
Some great ways to use the cross-domain rel=canonical.
1. If you run multiple domains and want to cross-post content, choose which one should get the SEO benefits and rankings.

If you run multiple domains, for whatever reason, let’s say you’ve got a set of domains and you would like the benefit of being able to publish a single piece of content, for whatever reason, across multiples of these domains that you own, but you know you don’t want to deal with a duplicate content issue and you know you’d prefer for one of these domains to be the one receiving the ranking signals, cross-domain rel=canonical is your friend. You can tell Google that Site A and Site C should not get credit for this content, but Site B should get all the credit.
The issue here is don’t try and do this across multiple domains. So don’t say, “Oh, Site A, why don’t you rel=canonical to B, and Site C, why don’t you rel=canonical to D, and I’ll try and get two things ranked in the top.” Don’t do that. Make sure all of them point to one. That is the best way to make sure that Google respects the cross-domain rel=canonical properly.
2. If a publication wants to re-post your content on their domain, ask for it instead of (or in addition to) a link back.
Second, let’s say a publication reaches out to you. They’re like, “Wow. Hey, we really like this piece.” My wife, Geraldine, wrote a piece about Mario Batali’s sexual harassment apology letter and the cinnamon rolls recipe that he strangely included in this apology. She baked those and then wrote about it. It went quite viral, got a lot of shares from a ton of powerful and well-networked people and then a bunch of publications. The Guardian reached out. An Australian newspaper reached out, and they said, “Hey, we would like to republish your piece.” Geraldine talked to her agent, and they set up a price or whatever.
One of the ways that you can do this and benefit from it, not just from getting a link from The Guardian or some other newspaper, but is to say, “Hey, I will be happy to be included here. You don’t even have to give me, necessarily, if you don’t want to, author credit or link credit, but I do want that sweet, sweet rel=canonical.” This is a great way to maximize the SEO benefit of being posted on someone else’s site, because you’re not just receiving a single link. You’re receiving credit from all the links that that piece might generate.
Oops, I did that backwards. You want it to come from their site to your site. This is how you know Whiteboard Friday is done in one take.
3. Purchase/rent content from other sites without forcing them to remove the content from their domain.

Next, let’s say I am in the opposite situation. I’m the publisher. I see a piece of content that I love and I want to get that piece. So I might say, “Wow, that piece of content is terrific. It didn’t do as well as I thought it would do. I bet if we put it on our site and broadcast it with our audience, it would do incredibly well. Let’s reach out to the author of the piece and see if we can purchase or rent for a time period, say two years, for the next two years we want to put the cross-domain rel=canonical on your site and point it back to us and we want to host that content. After two years, you can have it back. You can own it again.”
Without forcing them to remove the content from their site, so saying you, publisher, you author can keep it on your site. We don’t mind. We’d just like this tag applied, and we’d like to able to have republishing permissions on our website. Now you can get the SEO benefits of that piece of content, and they can, in exchange, get some money. So your site sending them some dollars, their site sending you the rel=canonical and the ranking authority and the link equity and all those beautiful things.
4. Use Medium as a content distribution network without the drawback of duplicate content.
Number four, Medium. Medium is a great place to publish content. It has a wide network, people who really care about consuming content. Medium is a great distribution network with one challenge. If you post on Medium, people worry that they can’t post the same thing on their own site because you’ll be competing with Medium.com. It’s a very powerful domain. It tends to rank really well. So duplicate content is an issue, and potentially losing the rankings and the traffic that you would get from search and losing that to Medium is no fun.
But Medium has a beautiful thing. The cross-domain rel=canonical is built in to their import tool. So if you go to Medium.com/p/import and you are logged in to your Medium account, you can enter in their URL field the content that you’ve published on your own site. Medium will republish it on your account, and they will include the cross-domain rel=canonical back to you. Now, you can start thinking of Medium as essentially a distribution network without the penalties or problems of duplicate content issues. Really, really awesome tool. Really awesome that Medium is offering this. I hope it sticks around.
All right, everyone. I think you’re going to have some excellent additional ideas for the cross-domain rel=canonical and how you have used it. We would love you to share those in the comments below, and we’ll see you again next week for another edition of Whiteboard Friday. Take care.
Video transcription by Speechpad.com
Sign up for The Moz Top 10, a semimonthly mailer updating you on the top ten hottest pieces of SEO news, tips, and rad links uncovered by the Moz team. Think of it as your exclusive digest of stuff you don’t have time to hunt down but want to read!
0 notes
Text
Using the Cross Domain Rel=Canonical to Maximize the SEO Value of Cross-Posted Content – Whiteboard Friday
Posted by randfish
Same content, different domains? There’s a tag for that. Using rel=canonical to tell Google that similar or identical content exists on multiple domains has a number of clever applications. You can cross-post content across several domains that you own, you can benefit from others republishing your own content, rent or purchase content on other sites, and safely use third-party distribution networks like Medium to spread the word. Rand covers all the canonical bases in this not-to-be-missed edition of Whiteboard Friday.
https://fast.wistia.net/embed/iframe/qsmvv6edgb?seo=false&videoFoam=true
https://fast.wistia.net/assets/external/E-v1.js

Click on the whiteboard image above to open a high-resolution version in a new tab!
Video Transcription
Howdy, Moz fans, and welcome to another edition of Whiteboard Friday. This week we’re going to chat about the cross-domain rel=canonical tag. So we’ve talked about rel=canonical a little bit and how it can be used to take care of duplicate content issues, point Google to the right pages from potentially other pages that share similar or exactly the same content. But cross-domain rel=canonical is a unique and uniquely powerful tool that is designed to basically say, “You know what, Google? There is the same content on multiple different domains.”
So in this simplistic example, MyFriendSite.com/green-turtles contains this content that I said, “Sure, it’s totally fine for you, my friend, to republish, but I know I don’t want SEO issues. I know I don’t want duplicate content. I know I don’t want a problem where my friend’s site ends up outranking me, because maybe they have better links or other ranking signals, and I know that I would like any ranking credit, any link or authority signals that they accrue to actually come to my website.
There’s a way that you can do this. Google introduced it back in 2009. It is the cross-domain rel=canonical. So essentially, in the header tag of the page, I can add this link, rel=canonical href — it’s a link tag, so there’s an href — to the place where I want the link or the canonical, in this case, to point to and then close the tag. Google will transfer over, this is an estimate, but roughly in the SEO world, we think it’s pretty similar to what you get in a 301 redirect. So something above 90% of the link authority and ranking signals will transfer from FriendSite.com to MySite.com.
So my green turtles page is going to be the one that Google will be more likely to rank. As this one accrues any links or other ranking signals, that authority, those links should transfer over to my page. That’s an ideal situation for a bunch of different things. I’ll talk about those in a sec.
Multiple domains and pages can point to any URL
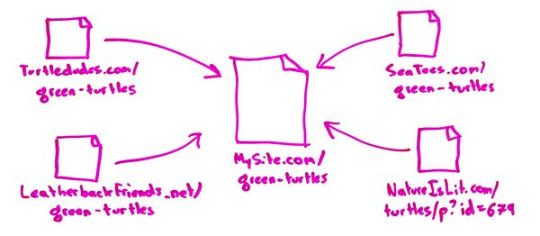
Multiple domains and pages are totally cool to point to any URL. I can do this for FriendSite.com. I can also do this for TurtleDudes.com and LeatherbackFriends.net and SeaTees.com and NatureIsLit.com. All of them can contain this cross-domain rel=canonical pointing back to the site or the page that I want it to go to. This is a great way to potentially license content out there, give people republishing permissions without losing any of the SEO value.
A few things need to match:
I. The page content really does need to match
That includes things like text, images, if you’ve embedded videos, whatever you’ve got on there.
II. The headline
Ideally, should match. It’s a little less crucial than the page content, but probably you want that headline to match.
III. Links (in content)
Those should also match. This is a good way to make sure. You check one, two, three. This is a good way to make sure that Google will count that rel=canonical correctly.
Things that don’t need to match:
I. The URL
No, it’s fine if the URLs are different. In this case, I’ve got NatureIsLit.com/turtles/p?id=679. That’s okay. It doesn’t need to be green-turtles. I can have a different URL structure on my site than they’ve got on theirs. Google is just fine with that.
II. The title of the piece
Many times the cross-domain rel=canonical is used with different page titles. So if, for example, CTs.com wants to publish the piece with a different title, that’s okay. I still generally recommend that the headlines stay the same, but okay to have different titles.
III. The navigation
IV. Site branding
So all the things around the content. If I’ve got my page here and I have like nav elements over here, nav elements down here, maybe a footer down here, a nice little logo up in the top left, that’s fine if those are totally different from the ones that are on these other pages cross-domain canonically. That stuff does not need to match. We’re really talking about the content inside the page that Google looks for.
Ways to use this protocol
Some great ways to use the cross-domain rel=canonical.
1. If you run multiple domains and want to cross-post content, choose which one should get the SEO benefits and rankings.

If you run multiple domains, for whatever reason, let’s say you’ve got a set of domains and you would like the benefit of being able to publish a single piece of content, for whatever reason, across multiples of these domains that you own, but you know you don’t want to deal with a duplicate content issue and you know you’d prefer for one of these domains to be the one receiving the ranking signals, cross-domain rel=canonical is your friend. You can tell Google that Site A and Site C should not get credit for this content, but Site B should get all the credit.
The issue here is don’t try and do this across multiple domains. So don’t say, "Oh, Site A, why don’t you rel=canonical to B, and Site C, why don’t you rel=canonical to D, and I’ll try and get two things ranked in the top.” Don’t do that. Make sure all of them point to one. That is the best way to make sure that Google respects the cross-domain rel=canonical properly.
2. If a publication wants to re-post your content on their domain, ask for it instead of (or in addition to) a link back.

Second, let’s say a publication reaches out to you. They’re like, “Wow. Hey, we really like this piece.” My wife, Geraldine, wrote a piece about Mario Batali’s sexual harassment apology letter and the cinnamon rolls recipe that he strangely included in this apology. She baked those and then wrote about it. It went quite viral, got a lot of shares from a ton of powerful and well-networked people and then a bunch of publications. The Guardian reached out. An Australian newspaper reached out, and they said, “Hey, we would like to republish your piece.” Geraldine talked to her agent, and they set up a price or whatever.
One of the ways that you can do this and benefit from it, not just from getting a link from The Guardian or some other newspaper, but is to say, “Hey, I will be happy to be included here. You don’t even have to give me, necessarily, if you don’t want to, author credit or link credit, but I do want that sweet, sweet rel=canonical.” This is a great way to maximize the SEO benefit of being posted on someone else’s site, because you’re not just receiving a single link. You’re receiving credit from all the links that that piece might generate.
Oops, I did that backwards. You want it to come from their site to your site. This is how you know Whiteboard Friday is done in one take.
3. Purchase/rent content from other sites without forcing them to remove the content from their domain.

Next, let’s say I am in the opposite situation. I’m the publisher. I see a piece of content that I love and I want to get that piece. So I might say, “Wow, that piece of content is terrific. It didn’t do as well as I thought it would do. I bet if we put it on our site and broadcast it with our audience, it would do incredibly well. Let’s reach out to the author of the piece and see if we can purchase or rent for a time period, say two years, for the next two years we want to put the cross-domain rel=canonical on your site and point it back to us and we want to host that content. After two years, you can have it back. You can own it again.”
Without forcing them to remove the content from their site, so saying you, publisher, you author can keep it on your site. We don’t mind. We’d just like this tag applied, and we’d like to able to have republishing permissions on our website. Now you can get the SEO benefits of that piece of content, and they can, in exchange, get some money. So your site sending them some dollars, their site sending you the rel=canonical and the ranking authority and the link equity and all those beautiful things.
4. Use Medium as a content distribution network without the drawback of duplicate content.
Number four, Medium. Medium is a great place to publish content. It has a wide network, people who really care about consuming content. Medium is a great distribution network with one challenge. If you post on Medium, people worry that they can’t post the same thing on their own site because you’ll be competing with Medium.com. It’s a very powerful domain. It tends to rank really well. So duplicate content is an issue, and potentially losing the rankings and the traffic that you would get from search and losing that to Medium is no fun.
But Medium has a beautiful thing. The cross-domain rel=canonical is built in to their import tool. So if you go to Medium.com/p/import and you are logged in to your Medium account, you can enter in their URL field the content that you’ve published on your own site. Medium will republish it on your account, and they will include the cross-domain rel=canonical back to you. Now, you can start thinking of Medium as essentially a distribution network without the penalties or problems of duplicate content issues. Really, really awesome tool. Really awesome that Medium is offering this. I hope it sticks around.
All right, everyone. I think you’re going to have some excellent additional ideas for the cross-domain rel=canonical and how you have used it. We would love you to share those in the comments below, and we’ll see you again next week for another edition of Whiteboard Friday. Take care.
Video transcription by Speechpad.com
Sign up for The Moz Top 10, a semimonthly mailer updating you on the top ten hottest pieces of SEO news, tips, and rad links uncovered by the Moz team. Think of it as your exclusive digest of stuff you don’t have time to hunt down but want to read!
0 notes
Text
7 Steps to Grow your Church Using SEO
The question for many pastors and church planters is, “How can I increase traffic to my church website?”
Instead of straining your budget and subjecting your church to costly SEO, here are seven simple tactics that will help your church’s website rise in the local google search rankings.
Though these techniques are more for the DIY (do it yourself) crowd, if you wish to learn how search engine optimization (SEO) can help grow your church membership, you will want to get your free SEO analysis by completing the short form in the footer and we’ll be happy to follow up with what we can do to make sure you receive the maximum exposure possible online.
Watch this short video to learn everything you need to know about SEO.
youtube
Seven tips for improving your church website rankings.
1. Disburse the power of your home page’s link to your most eminent (relevant – main) pages. Put simply, spread the link juice around your website.
As one could assume, your homepage draws in many more online consumers than any other part of your website. It is important that link authority is easily directed from your homepage to your most evident subpages. Your most secure bet is through HTML links.
Even if you have already made sure that your most crucial category pages are incorporated in the top nav, it is critical that you include links to your most prized products, or articles (content) and landing pages. Footer and navigational links will not pass much authority; however, links in the body of a homepage will be most likely to attract more views and direct more traffic to your important subpages. And you can always remember, where the viewer goes, so does Google bot.
Tip: Create simple and straightforward links so that online consumers can easily find your website
2. Use smaller images that will load faster. No one likes to carry more weight than they need to…
When designing a website, it is important to consider the file size and resolution of an image prior to including it on the webpage. Although putting large images on a website because of the quality you will get is tempting, it can drastically slow down the sites load time.
An image with 600 dots per inch that was shrunk down using height and width features not only gives online consumers the idea that the website designer was lazy, but impedes them from further using the website. Remember, a slow website will timeout on some devices and browsers, leading the visitor to click away never to return. Also, an image too large or the webpage can significantly slow down the load time- hindering the consumer’s experience on the website. And as Google is using page load time as a ranking factor, this can and will affect your local search ranking.
Lucky for you, it’s incredibly simple to change that image to a smaller-more reasonable-size, and then re-upload it. This will not only increase your website’s aesthetic appeal but it will also optimize your site speed.
Make sure to check the file sizes of your images prior to publishing your website. An easy tool to use is WebPageTest, which will check the file sizes of all the aspects of your page. Teach your design team to not upload images that are too large to your webpage. Checking images before including them on a website is a good habit to get into. A powerful tool for optimizing images is JPEGmini by Beamr.
3. Ensure that other sites aren’t linking to pages that are returning a 404 message.
If URLs are returning a 404 error (dead link) on your website it not only impedes the visitor from getting the information but it will damage your site’s link authority. Google Search Console is a simple and reliable tool that allows you to check for 404 pages on your site and whether or not they are being linked to. If the web service reveals that you have an externally linked page that leads to a 404, it is crucial that you fix it immediately.
TIP: To check 404’s using Google Search Console, just navigate to ‘Crawl’ – then – ‘Crawl Errors’ – ‘Not Found’, and select every URL that is linking to a 404 error page.
Google will prioritize the errors, and the most prominent errors they will include their external links. Click the URL and then select the “Linked From” tab which will display the URLs linking to the 404s. Ensure that these misleading URLs are permanently redirected to the correct link on your site.
As your link recovery skills begin to develop it is important that you increase GSC utilizing other helpful tools like Link Research Tools, Ahrefs Broken Links report and Link Juice Recovery Tool. However, we’ll focus on more pressing matters right now.
4. Optimize videos, articles or microsites that aren’t on your home page. Web 2.0’s make for amazing “supporting sites” to your main website.
While videos, article’s, and microsites are a fantastic way to gather support for your business, they are not nearly as effective if you’re hosting the content on other domains. You will lose the opportunity for higher SEO rankings if your content’s links are pointing to another business’s website.
For example, when Victoria’s Secret’s article “12 Things Women do Every Day That are Fearless” was posted on Buzzfeed’s front page, they missed the opportunity to increase traffic on their website because the article didn’t link back to their main webpage. Buzzfeed benefited, but Victoria’s Secret lost all that link juice that Buzzfeed was throwing off.
By far, the best way to increase your website’s ranking is to include videos, article’s, and microsites on your website. From there, you can expand and find ways to direct even more traffic to your website through you most prominent products and landing pages.
One technique that is proving extremely powerful is to leverage site builders or so called web 2.0’s. Examples include Tumblr, Wiseintro, Wix, etc. The way this works is to build a microsite or landing page on one of these sites that serves as a feeder to your main site. Not only does it allow you to dedicate an entire site to a very narrow aspect or topic relating to what you do, but it allows you to benefit from the power of the domain. Essentially, Google gives you credit for having such a powerful “friend” connecting to your website.
5. Utilize social hubs and forums to discover important keywords prior to your competitors.
If you notice a persistent mention or question in social media, you can take advantage of the keyword before your competitors! Then, you can easily find a way to include it in your website and improve your SEO rank (score).
Discovering recurring keywords before your competitors will not merely improve your ranking, but give you a head start on the popular questions online consumers are likely to ask. Becoming the first to jump on popular keywords will set you up as a leader among other businesses.
The keywords you discover will not always directly relate to your product. A good example of this is a company who makes baby furniture including the phrase “baby names” in their website content. Even if the phrase is barely related to your product, if it is being searched by your direct target market it is a good idea to include it in your website plan. Learn how our brand authority service can grow your church.
6. Augment the “visual richness” of your SERP listing with intriguing (rich) snippets.
Snippets are the cherry on top of a delicious ice cream and hot fudge sunday. The sunday (your website) is already great; however, there’s always room for improvement. Leveraging snippets are one of my most recommended SEO strategies. Along with an enticing title tag and meta description, your snippet will radiate above all others.
For example, if you are interested in a safe and trustworthy crib for your newborn baby, you will be most interested in a listing that looks like it’s a remarkable product with great quality.
Every new snippet added to your website is a new opportunity for your business. Ratings on your website provide reliable reviews of your product from previous consumers. The “in stock” and price disclosure depicts what online customers need to know in order to make a buying decision for your product.
Although rich snippets won’t directly increase your ranking, they will draw more potential customers to your website by increasing your click-through rate.
7. Utilize link analysis techniques to decipher your competitors’ best links.
Despite the fact that commanding links are incredibly important when vying for high search rankings, obtaining such links is a confusing process for many. Finding hubs (common connection points for devices in a network) that link to multiple sites is an easy way to get on track. Hubs can be review sites, trade magazines, city wide resource/review sites, or even blogs. An easy way to uncover these hub sites is through the Majestic tool “Click Hunter” or SEOprofiler. It shouldn’t be a big deal for hubs to link to you because they are already linking to similar websites and in fact many just need you to complete a short form on the site with your information and it will be added in minutes, hours or weeks at the longest.
An easy way to build your links is to search for websites linking to other churches in your area and analyze which of those sites may be willing to link to you too. From there, reach out to the sites that make the most sense to approach. By using this technique, your competitors did all the hard work of qualifying sites that could possibly link to sites like yours, but you can still benefit.
If your head is spinning, feel free to reach out and we can take a look at what will be required to get your church the massive exposure in your city that you deserve. Complete this short form to get started with a no obligation discussion.
The post 7 Steps to Grow your Church Using SEO appeared first on Get your website on the first page of Google with SEO.
0 notes
Text
Building a Notepad Application from Scratch with Ionic (StencilJS)
A difficult part of the beginner’s journey to learning Ionic is the step between understanding some of the basics and actually building a fully working application for the first time. Concepts explained in isolation can make sense, but it may be difficult to understand when to use them in the context of building an application. Even after spending some time learning about Ionic, you might find yourself starting a new project with no idea where to begin.
The aim of this tutorial is to provide a complete walkthrough of building a simple (but not too simple) Ionic application from start to finish using StencilJS. I have attempted to strike a balance between optimised/best-practice code, and something that is just straight-forward and easy enough for beginners to understand. Sometimes the “best” way to do things can look a lot more complex and intimidating, and don’t serve much of a purpose for beginners until they have the basics covered. You can always introduce more advanced concepts to your code as you continue to learn.
I will be making it a point to take longer to explain smaller concepts in this tutorial, more so than in some of my other tutorials, since it is targeted at people right at the beginning of their Ionic journey. However, I will not be able to cover everything in the level of depth required if you do not already have somewhat of an understanding. You may still find yourself stuck on certain concepts. I will mostly be including just enough to introduce you to the concept in this tutorial, and I will link out to further resources to explain those concepts in more depth where possible.
What will we be building?
The example we will be building needs to be simple enough such that it won’t take too much effort to build, but it also needs to be complex enough to be a realistic representation of a real application.
I decided on building a notepad application for this example, as it will allow us to cover many of the core concepts such as:
Navigation/Routing
Templates
Displaying data
Event binding
Types and Interfaces
Services
Data Input
Data Storage
Styling
As well as covering important concepts, it is also a reasonably simple and fun application to build. In the end, we will have something that looks like this:
We will have an application that allows us to:
Create, delete, and edit notes
Save and load those notes from storage
View a list of notes
View note details
Before We Get Started
Last updated for Ionic 4.6.2
This tutorial will assume that you have read at least some introductory content about Ionic, have a general understanding of what it is, and that you have everything that you need to build Ionic applications set up on your machine. You will also need to have a basic understanding of HTML, CSS, and JavaScript.
If you do not already have everything set up, or you don’t have a basic understanding of the structure of an Ionic/StencilJS project, take a look at the additional resource below for a video walkthrough.
Additional resources:
Getting Started with Ionic & StencilJS
1. Generate a New Ionic Project
Time to get started! To begin, we will need to generate a new Ionic/StencilJS application. We can do that with the following command:
npm init stencil
At this point, you will be prompted to pick a “starter” from these options:
? Pick a starter › - Use arrow-keys. Return to submit. ❯ ionic-pwa Everything you need to build fast, production ready PWAs app Minimal starter for building a Stencil app or website component Collection of web components that can be used anywhere
We will want to choose the ionic-pwa option, which will create a StencilJS application for us with Ionic already installed. Just select that option with your arrow keys, and then hit Enter.
You will also need to supply a Project name, you can use whatever you like for this, but I have called my project ionic-stencil-notepad. After this step, just hit Y when asked to confirm.
You can now make this new project your working directory by running the following command:
cd ionic-stencil-notepad
and you can run the application in the browser with this command:
npm start
2. Create the Required Pages/Services
This application will have two pages:
Home (a list of all notes)
Detail (the details of a particular note)
and we will also be making use of the following services/providers:
Notes
Storage
The Notes service will be responsible for handling most of the logic around creating, updating, and deleting notes. The Storage service will be responsible for helping us store and retrieve data from local storage. We are going to create these now so that we can just focus on the implementation later.
The application is generated with an app-home component (we use “components” as our “pages”) by default, so we can keep that and make use of it, but we will get rid of the app-profile component that is also automatically generated.
Delete the following folder:
src/components/app-profile
Create the following files in your project:
src/components/app-detail/app-detail.tsx
src/components/app-detail/app-detail.css
src/services/notes.ts
src/services/storage.ts
We have created an additional app-detail component for our Detail page - this component includes both a .tsx file that will contain the template and logic, and a .css file for styling. We also create a notes.ts file that will define our Notes service and a storage.ts file that will define our Storage service. Notice that these files have an extension of .ts which is just a regular TypeScript file, as opposed to the .tsx extension the component has which is a TypeScript + JSX file. If you are not already familiar with JSX/TSX then I would recommend that you read the following resource before continuing.
Additional resources:
Understanding JSX for StencilJS Applications
3. Setting up Navigation/Routing
Now we move on to our first real bit of work - setting up the routes for the application. The “routes” in our application determine which page/component to show when a particular URL path is active. We will already have most of the work done for us by default, we will just need to add/change a couple of things.
Modify src/components/app-root/app-root.tsx to reflect the following:
import { Component, h } from "@stencil/core"; @Component({ tag: "app-root", styleUrl: "app-root.css" }) export class AppRoot { render() { return ( <ion-app> <ion-router useHash={false}> <ion-route url="/" component="app-home" /> <ion-route url="/notes" component="app-home" /> <ion-route url="/notes/:id" component="app-detail" /> </ion-router> <ion-nav /> </ion-app> ); } }
Routes in our Ionic/StencilJS application are defined by using the <ion-route> component. If you require more of an introduction to navigation in an Ionic/StencilJS application, check out the additional resource below:
Additional resources:
Navigation with IonRouter in StencilJS
We have kept the default route for app-home but we have also added an additional /notes route that will link to the same component. This is purely cosmetic and is not required. By doing this, I think that the URL structure will make a little more sense. For example, to view all notes we would go to /notes and to view a specific note we would go to /notes/4.
We’ve also added a route for the app-detail component that looks like this:
/notes/:id
By adding :id to the path, which is prefixed by a colon : we are creating a route that will accept parameters which we will be able to grab later (i.e. URL parameters allow us to pass dynamic values through the URL). That means that if a user goes to the following URL:
http://localhost:8100/notes
They will be taken to the Home page. However, if they go to:
http://localhost:8100/notes/12
They will be taken to the Detail page, and from that page, we will be able to grab the :id value of 12. We will make use of that id to display the appropriate note to the user later.
4. Starting the Notes/Home Page
The Home page, which will display a list of all of the notes the user has added, will be the default screen that user sees. We are going to start implementing the template for this page now. We don’t have everything in place that we need to complete it, so we will just be focusing on getting the basic template set up.
Modify src/components/app-home/app-home.tsx to reflect the following:
import { Component, h } from "@stencil/core"; @Component({ tag: "app-home", styleUrl: "app-home.css" }) export class AppHome { render() { return [ <ion-header> <ion-toolbar color="primary"> <ion-title>Notes</ion-title> <ion-buttons slot="end"> <ion-button> <ion-icon slot="icon-only" name="clipboard" /> </ion-button> </ion-buttons> </ion-toolbar> </ion-header>, <ion-content> <ion-list> <ion-item button detail> <ion-label>Title goes here</ion-label> </ion-item> </ion-list> </ion-content> ]; } }
This template is entirely made up of Ionic’s web components. We have the <ion-header> which contains the title for our page, and we have <ion-buttons> set up inside of the <ion-toolbar> which will allow us to place a set of buttons either to the left or the right of the toolbar. In this case, we just have a single button in the end slot which we are using as the button to trigger adding a new note. By giving our icon a slot of icon-only it will style the icon so that it is larger (since it doesn’t have text accompanying it).
Then we have our <ion-content> section which provides the main scrolling content section of the page. This contains an <ion-list> with a single <ion-item>. Later, we will modify this list to create multiple items - one for each of the notes that are currently stored in the application.
There will be more information available about all of this, including “slots”, in the additional resources at the end of this section.
Although we will not be making any major changes to the class/logic for our Home page just yet, let’s make a few minor changes so that we are ready for later functionality.
There are two key bits of functionality that we will want to interact with from our pages in this application. The first is Ionic’s ion-alert-controller which will allow us to display alert prompts and request user input (e.g. we will prompt the user for the title of the note when they want to create a new note). The second is Ionic’s ion-router, so that we can programatically control navigation (among other things which we will touch on later).
To use this functionality, we need to get a reference to the Ionic web components that provide that functionality - this is done quite simply enough by using document.querySelector to grab a reference to the actual web component in the document. If you are not familiar with this concept, I would recommend first watching the additional resource below:
Additional resources:
Using Ionic Controllers with Web Components
We already have an <ion-router> in our application (since that is used to contain our routes), so we can just grab a reference to that whenever we need it. However, in order to create alerts we will need to add the <ion-alert-controller> to our application. We will add this to the root components template.
Modify src/components/app-root/app-root.tsx to reflect the following:
import { Component, h } from "@stencil/core"; @Component({ tag: "app-root", styleUrl: "app-root.css" }) export class AppRoot { render() { return ( <ion-app> <ion-router useHash={false}> <ion-route url="/" component="app-home" /> <ion-route url="/notes" component="app-home" /> <ion-route url="/notes/:id" component="app-detail" /> </ion-router> <ion-alert-controller /> <ion-nav /> </ion-app> ); } }
Notice that we have added <ion-alert-controller> in the template above. Now we will just need to grab a reference to that in our home page (and we are going to add a couple more things here as well).
Modify src/components/app-home/app-home.tsx to reflect the following:
import { Component, h } from "@stencil/core"; @Component({ tag: "app-home", styleUrl: "app-home.css" }) export class AppHome { componentDidLoad() {} addNote() { const alertCtrl = document.querySelector("ion-alert-controller"); console.log(alertCtrl); } render() { return [ <ion-header> <ion-toolbar color="primary"> <ion-title>Notes</ion-title> <ion-buttons slot="end"> <ion-button> <ion-icon slot="icon-only" name="clipboard" /> </ion-button> </ion-buttons> </ion-toolbar> </ion-header>, <ion-content> <ion-list> <ion-item button detail> <ion-label>Title goes here</ion-label> </ion-item> </ion-list> </ion-content> ]; } }
You can see that we have created an addNote method that we will use for creating new notes. We haven’t fully implemented this yet, but we have created the reference to the ion-alert-controller that we need in order to launch the alert prompt that will ask the user for the title of their note.
We have also added a componentDidLoad lifecycle hook - this functions just like a regular method, except that it will be triggered automatically as soon as the home component has loaded. We will make use of this later.
It’s going to be hard for us to go much further than this without starting to work on our Notes service, as this is what is going to allow us to add, update, and delete notes. Without it, we won’t have anything to display!
5. Creating an Interface
Before we implement our Notes service, we are going to define exactly “what” a note is by creating our own custom type with an interface.
StencilJS uses TypeScript, which is basically JavaScript with “types”. A type gives us a way to enforce that data is what we expect it to be, and you will often see variables, methods, and parameters followed by a colon : and then a type. For example:
let myName: string = "Josh"
Since we have added : string after the variable we defined, it will enforce that myName can only be a string. If we tried to assign a number to myName it wouldn’t allow us to do it. I don’t want to dive too deep into types and interfaces here, so I will link to another tutorial in the additional resources section below.
Create a folder and file at src/interfaces/note.ts and add the following:
export interface Note { id: string; title: string; content: string; }
This will allow us to import a Note type elsewhere in our application, which will allow us to force our notes to follow the format defined above. Each note must have an id that is a string, a title that is a string, and content that is a string.
Additional resources:
Creating Custom Interfaces (NOTE: This video is for Angular, but the concepts are mostly the same)
6. Implement the Notices Service
The “page” components in our application are responsible for displaying views/templates on the screen to the user. Although they are able to implement logic of their own, the majority of the complex logic performed in our applications should be done in “services”.
A service does not display anything to the user, it is just a “helper” that is used by components/pages in our application to perform logic/data operations. Our pages can then call the methods of this service to do work for it. This way, we can keep the code for our pages light, and we can also share the data and methods available through services with multiple pages in our application (whereas, if we define methods in our pages they are only accessible to that one page). Services are the primary way that we are able to share data between different pages.
Our Notes service will implement various methods which will allow it to:
Create a note and add it to an array in the data service
Delete notes from that array
Find and return a specific note by its id
Save the array of notes to storage
Load the array of notes from storage
Since our Notes service will rely on adding data to, and retrieving data from, the browsers local storage (which will allow us to persist notes across application reloads), we should tackle creating the Storage service first.
Modify src/services/storage.ts to reflect the following:
const storage = window.localStorage; export function set(key: string, value: any): Promise<void> { return new Promise((resolve, reject) => { try { storage && storage.setItem(key, JSON.stringify(value)); resolve(); } catch (err) { reject(`Couldnt store object ${err}`); } }); } export function remove(key: string): Promise<void> { return new Promise((resolve, reject) => { try { storage && storage.removeItem(key); resolve(); } catch (err) { reject(`Couldnt remove object ${err}`); } }); } export function get(key: string): Promise<any> { return new Promise((resolve, reject) => { try { if (storage) { const item = storage.getItem(key); resolve(JSON.parse(item)); } resolve(undefined); } catch (err) { reject(`Couldnt get object: ${err}`); } }); }
The main purpose of this service is to provide three methods that we can easily use to interact with local storage: get, set, and remove. This service allows us to contain all of the “ugly” code in one place, and then throughout the rest of the application we can just make simple calls to get, set, and remove to store the data that we want.
For more information about how browser based local storage works, and a more advanced solution for dealing with storage, check out the additional resource below. The solution detailed in the tutorial below will make use of the best storage mechanism available depending on the platform the application is running on (e.g. on iOS and Android it will use native storage, instead of the browsers local storage). This is generally a better solution than the above, but it does depend on using Capacitor in your project.
Additional resources:
Using the Capacitor Storage API for Storing Data
Now let’s implement the code for our Notes service, and then talk through it. I’ve added comments to various parts of the code itself, but we will also talk through it below.
import { set, get } from "./storage"; import { Note } from "../interfaces/note"; class NotesServiceController { public notes: Note[]; async load(): Promise<Note[]> { if (this.notes) { return this.notes; } else { this.notes = (await get("notes")) || []; return this.notes; } } async save(): Promise<void> { return await set("notes", this.notes); } getNote(id): Note { return this.notes.find(note => note.id === id); } createNote(title): void { // Create a unique id that is one larger than the current largest id let id = Math.max(...this.notes.map(note => parseInt(note.id)), 0) + 1; this.notes.push({ id: id.toString(), title: title, content: "" }); this.save(); } updateNote(note, content): void { // Get the index in the array of the note that was passed in let index = this.notes.indexOf(note); this.notes[index].content = content; this.save(); } deleteNote(note): void { // Get the index in the array of the note that was passed in let index = this.notes.indexOf(note); // Delete that element of the array and resave the data if (index > -1) { this.notes.splice(index, 1); this.save(); } } } export const NotesService = new NotesServiceController();
First of all, if you are not familiar with the general concept of a “service” in StencilJS, I would recommend reading the following additional resource first.
Additional resources:
Using Services/Providers in a StencilJS Application
At the top of the file, we import our Storage methods that we want to make use of, and the interface that we created to represent a Note. Inside of our service, we have set up a notes class member which will be an array of our notes (the Note[] type means it will be an array of our Note type we created).
Variables declared above the methods in our service (like in any class) will be accessible throughout the entire class using this.notes.
Our load function is responsible for loading data in from storage (if it exists) and then setting it up on the this.notes array. If the data has already been loaded we return it immediately, otherwise we load the data from storage first. If there is no data in storage (e.g. the result from the get call is null) then we instead return an empty array (e.g. []) instead of a null value. This method (and others) are marked as async which means that they run outside of the normal flow of the application and can “wait” for operations to complete whilst the rest of the application continues executing. In this case, if we need to load data in from storage then we need to “wait” for that operation to complete.
It is important to understand the difference between synchronous and asynchronous code behaviour, as well as how async/await works. If you are not already familiar with this, then you can check out the following resources.
Additional resources:
Understanding Asynchronous Code
Using Async/Await Syntax (NOTE: This tutorial is for Angular, but the same concepts apply)
The save function in our service simply sets our notes array on the notes key in storage so that it can be retrieved later - we will call this whenever there is a change in data, so that when we reload the application the changes are still there.
The getNote function will accept an id, it will then search through the notes array and return the note that matches the id passed in. We will make use of this in our detail page later.
The createNote function handles creating a new note and pushing it into the notes array. We do have an odd bit of code here:
let id = Math.max(...this.notes.map(note => parseInt(note.id)), 0) + 1;
We need each of our notes to have a unique id so that we can grab them appropriately through the URL. To keep things simple, we are using a simple numeric id (an id could be anything, as long as it is unique). To ensure that we always get a unique id, we use this code to find the note with the largest id that is currently in the array, and then we just add 1 to that.
The updateNote method will find a particular note and update its content, and the deleteNote method will find a particular note and remove it.
7. Finishing the Notes Page
With our notes service in place, we can now finish off our Home page. We will need to make some modifications to both the class and the template.
Modify src/components/app-home/app-home.tsx to reflect the following:
import { Component, State, h } from "@stencil/core"; import { Note } from "../../interfaces/note"; import { NotesService } from "../../services/notes"; @Component({ tag: "app-home", styleUrl: "app-home.css" }) export class AppHome { @State() notes: Note[] = []; async componentDidLoad() { this.notes = await NotesService.load(); } async addNote() { const alertCtrl = document.querySelector("ion-alert-controller"); let alert = await alertCtrl.create({ header: "New Note", message: "What should the title of this note be?", inputs: [ { type: "text", name: "title" } ], buttons: [ { text: "Cancel" }, { text: "Save", handler: async data => { NotesService.createNote(data.title); this.notes = [...(await NotesService.load())]; } } ] }); alert.present(); } render() { return [ <ion-header> <ion-toolbar color="primary"> <ion-title>Notes</ion-title> <ion-buttons slot="end"> <ion-button> <ion-icon slot="icon-only" name="clipboard" /> </ion-button> </ion-buttons> </ion-toolbar> </ion-header>, <ion-content> <ion-list> <ion-item button detail> <ion-label>Title goes here</ion-label> </ion-item> </ion-list> </ion-content> ]; } }
We have now added a call to the load method of the Notes service, which will handle loading in the data from storage as soon as the application has started. This will also set up the data on the notes class member in the home page. Notice that we have also decorated our notes class member with the @State() decorator - since we want the template to update whenever notes changes, we need to add the @State() decorator to it (otherwise, the template will not re-render and it will continue to display old data). For more information on this, check out the additional resource below.
Additional resources:
The @State Decorator
The addNote() method will now also allow the user to add a new note. We will create an event binding in the template later to tie a button click to this method, which will launch an Alert prompt on screen. This prompt will allow the user to enter a title for their new note, and when they click Save the new note will be added. Since creating the alert prompt is “asynchronous” we need to mark the addNote method as async in order to be able to await the creation of the alert prompt. In the “handler” for this prompt, we trigger adding the new note using our service, and we also reload the data in our home page so that it includes the newly added note by reassigning this.notes. The reason we use this weird syntax:
this.notes = [...(await NotesService.load())];
instead of just this:
this.notes = await NotesService.load();
Is because in order for StencilJS to detect a change and display it in the template, the variable must be reassigned completely (not just modified). In the second example the data would be updated, but it would not display in the template. The first example creates a new array like this:
this.notes = [/* values in here */]
and inside of that new array, the “spread” operator (i.e. ...) is used to pull all of the values out of the array returned from the load call, and add them to this new array. For a real world analogy, consider having a box full of books. Instead of just taking a book out of the box full of books to get the result we want, we are getting a new empty box and moving all of the books over to this new box (except for the books we no longer want). This is a round-a-bout way of doing the exact same thing, but the difference is that by moving all of our books to the new box StencilJS will be able to detect and display the change.
This isn’t really intuitive, but if you ever run into a situation in StencilJS where you are updating your data but not seeing the change in your template, it’s probably because you either:
Didn’t use the @State decorator, or
You are modifying an array/object instead of creating a new array/object
Now we just need to finish off the template.
Modify the template in src/components/app-home/app-home.tsx to reflect the following:
import { Component, State, h } from "@stencil/core"; import { Note } from "../../interfaces/note"; import { NotesService } from "../../services/notes"; @Component({ tag: "app-home", styleUrl: "app-home.css" }) export class AppHome { @State() notes: Note[] = []; async componentDidLoad() { this.notes = await NotesService.load(); } async addNote() { const alertCtrl = document.querySelector("ion-alert-controller"); let alert = await alertCtrl.create({ header: "New Note", message: "What should the title of this note be?", inputs: [ { type: "text", name: "title" } ], buttons: [ { text: "Cancel" }, { text: "Save", handler: async data => { NotesService.createNote(data.title); this.notes = [...(await NotesService.load())]; } } ] }); alert.present(); } render() { return [ <ion-header> <ion-toolbar color="primary"> <ion-title>Notes</ion-title> <ion-buttons slot="end"> <ion-button onClick={() => this.addNote()}> <ion-icon slot="icon-only" name="clipboard" /> </ion-button> </ion-buttons> </ion-toolbar> </ion-header>, <ion-content> <ion-list> {this.notes.map(note => ( <ion-item button detail href={`/notes/${note.id}`} routerDirection="forward"> <ion-label>{note.title}</ion-label> </ion-item> ))} </ion-list> </ion-content> ]; } }
We have modified our button in the header section to include an onClick event binding that is linked to the addNote() method. This will trigger the addNote() method we just created whenever the user clicks on the button.
We have also modified our notes list:
<ion-list> {this.notes.map(note => ( <ion-item button detail href={`/notes/${note.id}`} routerDirection="forward"> <ion-label>{note.title}</ion-label> </ion-item> ))} </ion-list>
Rather than just having a single item, we are now using a map which will loop over each note in our notes array. Since we want to view the details of an individual note by clicking on it, we set up the following href value:
href={`/notes/${note.id}`}
By using curly braces here, we are able to render out the value of whatever note.id is in our string. In this case, we want to first evaluate the expression /notes/${note.id} to something like '/notes/12' before assigning it to the href, we don’t want the value to literally be /notes/${note.id}. We also supply a routerDirection of forward so that Ionic knows the “direction” of the page transition, which will make sure that it animates that transition correctly (there are different page transition animations for a forward and backward transition).
Finally, we use an “interpolation” to render out a specific notes title value inside of the <ion-label>. An interpolation, which is an expression surrounded by curly braces, is just a way to evaluate an expression before rendering it out on the screen. Therefore, this will display the title of whatever note is currently being looped over in our map.
These concepts are expanded upon in the tutorial on JSX, so make sure to check that out if you are feeling a little lost at this point.
Additional resources:
Understanding JSX for StencilJS Applications
Alert API
8. Implement the Notes Detail Page
We just have one more page to implement to finish off the functionality in the application! We want our Detail page to allow the user to:
View the details of a note
Edit the content of a note
Delete a note
Let’s start off with just the logic, and then we will implement the template.
Modify src/components/app-detail/app-detail.tsx
import { Component, State, Prop, h } from "@stencil/core"; import { Note } from "../../interfaces/note"; import { NotesService } from "../../services/notes"; @Component({ tag: "app-detail", styleUrl: "app-detail.css" }) export class AppDetail { public navCtrl = document.querySelector("ion-router"); @Prop() id: string; @State() note: Note = { id: null, title: "", content: "" }; async componentDidLoad() { await NotesService.load(); this.note = await NotesService.getNote(this.id); } noteChanged(ev) { NotesService.updateNote(this.note, ev.target.value); NotesService.save(); } deleteNote() { setTimeout(() => { NotesService.deleteNote(this.note); }, 300); this.navCtrl.back(); } render() { return [ <ion-content /> ]; } }
In this page, we use the @Prop decorator. If we give this prop the same name as the parameter we set up in our <ion-route> to pass in the id this will allow us to get access to the value that was passed in through the URL. We want to do that because we need to access the id of the note that is supplied through the route, e.g:
http://localhost:8100/notes/12
In our componentDidLoad method, we then use that id to grab the specific note from the notes service. However, we first have to check if the data has been loaded yet since it is possible to load this page directly through the URL (rather than going through the home page first). To make sure that the data has been loaded, we just make a call to the load method from our Notes service. The note is then assigned to the this.note class member.
Since the note is not immediately available to the template, we intialise an empty note with blank values so that our template won’t complain about data that does not exist. Once the note has been successfully fetched, the data in the template will automatically update since we are using the @State decorator.
We have a noteChanged method set up, which will be called every time the data for the note changes. This will ensure that any changes are immediately saved.
We also have a deleteNote function that will handle deleting the current note. Once the note has been deleted, we automatically navigate back to the Home page by using the back method of the ion-router. We actually wait for 300ms using a setTimeout before we delete the note, since we want the note to be deleted after we have navigated back to the home page.
Modify the template in src/components/app-detail/app-detail.tsx to reflect the following:
<ion-header> <ion-toolbar color="primary"> <ion-buttons slot="start"> <ion-back-button defaultHref="/notes" /> </ion-buttons> <ion-title>{this.note.title}</ion-title> <ion-buttons slot="end"> <ion-button onClick={() => this.deleteNote()}> <ion-icon slot="icon-only" name="trash" /> </ion-button> </ion-buttons> </ion-toolbar> </ion-header>, <ion-content class="ion-padding"> <ion-textarea onInput={ev => this.noteChanged(ev)} value={this.note.content} placeholder="...something on your mind?" /> </ion-content>
This template is not too dissimilar to our home page. Since we have our note set up as a class member variable, we can access it inside of <ion-title> to display the title of the current note in this position.
We have our delete button set up in the header which is bound to the deleteNote method we defined, but we also have an additional button this time called <ion-back-button>. This is an Ionic component that simply displays a button that will handle allowing the user to navigate backward. Since it is possible to load the Detail page directly through the URL, and we still want the user to be able to navigate “back” to the Home page in this instance, we supply the back button with a defaultHref of /notes which will cause it to navigate to the /notes route by default if no navigation history is available.
Inside of our content area, we just have a single <ion-textarea> component for the user to write in. Whenever this value changes, we trigger the noteChanged method and pass in the new value. This will then save that new value.
This is a rather simplistic approach to forms. If you would like a more advanced look at how to manage forms in StencilJS, take a look at this preview chapter from my book Creating Ionic Applications with StencilJS:
Additional resources:
Handling Forms and Validation in StencilJS
We will actually need to make one more change to our home page to finish off the functionality for the application. Currently, the home page loads the data when the component first loads. However, since we can now delete notes, that means the data on the home page might need to change as a result of what happens on our detail page.
To account for this, we are going to set up a listener that will detect every time that the home page is loaded, and we will be able to run some code to refresh the data.
Modify src/components/app-home/app-home.tsx to reflect the following:
import { Component, State, h } from "@stencil/core"; import { Note } from "../../interfaces/note"; import { NotesService } from "../../services/notes"; @Component({ tag: "app-home", styleUrl: "app-home.css" }) export class AppHome { @State() notes: Note[] = []; public navCtrl = document.querySelector("ion-router"); async componentDidLoad() { this.navCtrl.addEventListener("ionRouteDidChange", async () => { this.notes = [...(await NotesService.load())]; }); } async addNote() { const alertCtrl = document.querySelector("ion-alert-controller"); let alert = await alertCtrl.create({ header: "New Note", message: "What should the title of this note be?", inputs: [ { type: "text", name: "title" } ], buttons: [ { text: "Cancel" }, { text: "Save", handler: async data => { NotesService.createNote(data.title); this.notes = [...(await NotesService.load())]; } } ] }); alert.present(); } render() { return [ <ion-header> <ion-toolbar color="primary"> <ion-title>Notes</ion-title> <ion-buttons slot="end"> <ion-button onClick={() => this.addNote()}> <ion-icon slot="icon-only" name="clipboard" /> </ion-button> </ion-buttons> </ion-toolbar> </ion-header>, <ion-content> <ion-list> {this.notes.map(note => ( <ion-item button detail href={`/notes/${note.id}`} routerDirection="forward"> <ion-label>{note.title}</ion-label> </ion-item> ))} </ion-list> </ion-content> ]; } }
We now have a reference to the ion-router and we set up a listener for the ionRouteDidChange event which will be triggered every time this page is activated.
9. Styling the Application
The functionality of our application is complete now. But we are going to take it one step further and make it look a little nicer. You may have noticed in the templates that we reference color="primary" in the toolbars. Ionic has a default set of colours defined that we can use, including:
primary
secondary
tertiary
light
danger
dark
We can use these default colours, or we can define our own in the src/global/app.scss file. You will find a bunch of CSS variables in this file that can be modified (if you aren’t familiar with CSS4 variables, I would recommend checking out the additional resources section near the end of this article). You can just modify these manually, but it is a better idea to use Ionic’s Color Generator to generate all of the necessary values for you, you just pick the colours that you want:
Ionic Color Generate
You can create your own colour scheme, or use the one I have created below.
Add the following to the bottom of src/global/app.scss:
// Ionic Variables and Theming. For more info, please see: // http://ionicframework.com/docs/theming/ /** Ionic CSS Variables **/ :root { --ion-color-primary: #f10090; --ion-color-primary-rgb: 241,0,144; --ion-color-primary-contrast: #ffffff; --ion-color-primary-contrast-rgb: 255,255,255; --ion-color-primary-shade: #d4007f; --ion-color-primary-tint: #f21a9b; --ion-color-secondary: #da0184; --ion-color-secondary-rgb: 218,1,132; --ion-color-secondary-contrast: #ffffff; --ion-color-secondary-contrast-rgb: 255,255,255; --ion-color-secondary-shade: #c00174; --ion-color-secondary-tint: #de1a90; --ion-color-tertiary: #7044ff; --ion-color-tertiary-rgb: 112,68,255; --ion-color-tertiary-contrast: #ffffff; --ion-color-tertiary-contrast-rgb: 255,255,255; --ion-color-tertiary-shade: #633ce0; --ion-color-tertiary-tint: #7e57ff; --ion-color-success: #10dc60; --ion-color-success-rgb: 16,220,96; --ion-color-success-contrast: #ffffff; --ion-color-success-contrast-rgb: 255,255,255; --ion-color-success-shade: #0ec254; --ion-color-success-tint: #28e070; --ion-color-warning: #ffce00; --ion-color-warning-rgb: 255,206,0; --ion-color-warning-contrast: #ffffff; --ion-color-warning-contrast-rgb: 255,255,255; --ion-color-warning-shade: #e0b500; --ion-color-warning-tint: #ffd31a; --ion-color-danger: #f04141; --ion-color-danger-rgb: 245,61,61; --ion-color-danger-contrast: #ffffff; --ion-color-danger-contrast-rgb: 255,255,255; --ion-color-danger-shade: #d33939; --ion-color-danger-tint: #f25454; --ion-color-dark: #222428; --ion-color-dark-rgb: 34,34,34; --ion-color-dark-contrast: #ffffff; --ion-color-dark-contrast-rgb: 255,255,255; --ion-color-dark-shade: #1e2023; --ion-color-dark-tint: #383a3e; --ion-color-medium: #989aa2; --ion-color-medium-rgb: 152,154,162; --ion-color-medium-contrast: #ffffff; --ion-color-medium-contrast-rgb: 255,255,255; --ion-color-medium-shade: #86888f; --ion-color-medium-tint: #a2a4ab; --ion-color-light: #f4f5f8; --ion-color-light-rgb: 244,244,244; --ion-color-light-contrast: #000000; --ion-color-light-contrast-rgb: 0,0,0; --ion-color-light-shade: #d7d8da; --ion-color-light-tint: #f5f6f9; }
By supplying these variables to the :root selector, these variable changes will take affect application wide (although they can still be overwritten by more specific selectors).
This is a good way to add some basic styling to the application, but we might want to get a little more specific. Let’s say we want to change the background colour of all of our <ion-content> sections. We can do that too.
Add the following style to the top of src/global/app.css:
/* Document Level Styles */ ion-content { --ion-background-color: var(--ion-color-secondary); }
Unlike the :root selector which defines variables everywhere, this will only overwrite the --ion-background-color variable inside of any <ion-content> tags. We set the background colour to whatever the --ion-color-secondary value is, but we could also just use a normal colour value here instead of a variable if we wanted to.
We can also add styles just to specific pages if we want. Let’s make some changes to the Home page and Detail page.
Modify src/components/app-home/app-home.css to reflect the following:
ion-item { --ion-background-color: #fff; width: 95%; margin: 15px auto; font-weight: bold; border-radius: 20px; --border-radius: 20px; }
This adds a bit of extra styling to our <ion-item>. We want it to have a rounded border so we supply the border-radius property, but notice we are kind of doing this twice. Inside of the <ion-item> there is a ripple effect component that applies a little animation when the item is clicked. We need the border of this effect to be rounded as well as the item itself. Since the ripple effect is inside of a Shadow DOM, we can only change its style by modifying the --border-radius CSS variable. I realise this probably sounds very confusing, so I would highly recommend checking out the additional resources below on Shadow DOM as this is a big part of styling in Ionic.
Modify src/components/app-detail/app-detail.css to reflect the following:
ion-textarea { background: #fff !important; border-radius: 20px; padding: 20px; height: 100%; }
This just adds some simple styling to the textarea, and with that, we’re done!
Additional resources:
A Primer on CSS 4 Variables for Ionic 4
Shadow DOM Usage in Ionic Web Components
Styling a Shadow DOM in Ionic 4
Summary
Although this application is reasonably simple, we have covered a lot of different concepts. If you are still just getting started with Ionic, and even if you’ve been at it for a while, there are more than likely a few concepts that we have covered that might not make complete sense yet. After completing the application, I would recommend going back to the additional resources in each section to read further on any concepts you are struggling with.
If you are looking for something to speed up your Ionic/StencilJS learning journey, then take a look at the Creating Ionic Applications with StencilJS book.
via joshmorony - Learn Ionic & Build Mobile Apps with Web Tech https://ift.tt/2y1xC7Z
0 notes
Text
Content Design
Content is anything you create/consume/interact with.
What do users/people actually need from my portfolio? In order for me to present myself/get a job.
WANT V NEED; If someone is in debt, they are going to want a quick, simple solution. But what they need is a series of simple, manageable steps to help get them out of debt. This is what they need but not what they want.
Content can be anything. A combination of many forms could be what users need.
About me page in portfolio; could it be a video? A gif?
BOOK RECOMMENDATION; Content Design By Sarah Richards. Sarah worked on the .GOV website which is amazing looking now but when she started it had 30,000+ pages. So she printed all the pages out, laid them all out and the team walked about deciding what pages were essential and what weren’t. She paid a lot of attention not only to the content itself but also the way people talk about the content. Eg; people tend to use the word doctor as opposed to GP. Intuitive content design in action.
It’s important to put hours into the development of the content of your website. Content needs to be easy to find/use/consume.
Gazillions of webpages on the internet. Unless you’re incredibly specialised ie a government website, there are going to be competitors. You need to develop smart content. Design entrepreneur vs designer? Innovator or disruptor? We don’t want more content, we need smarter content.
Push vs pull content
Trust
Ease of use
PUSH CONTENT; look at this new iPhone, buy it! Ie bus stops, it’s THERE PULL CONTENT; This cool new phone makes your life easier and puts the entire world in your pocket, and it’s only £500. Pull content is you pulling it towards yourself ie searching things or following links etc.
Turning push content into pull content is an important skill. Your content needs to standout. Any push content can be turned into pull content, all you need to know is what your audience wants to see.
Why are we creating portfolios? MONEY. Good work will get you more work! Kyle ranks this as the most important thing. Portfolios should illustrate your work, your skills and how to contact you!! A bit about who you are is very good also.
People will pay more to use a good product. If a website is easier to use people are more likely to use it, even if the service is more expensive than a more difficult to use website. You need to make sure your website works and they can find your content. Your website has to be really good because employers KNOW what they’re looking for and they know what you’re talking about.
BRIEF; Portfolio Site and Content Strategy Example; Garry’s website. 3 portfolio items minimum.
Each portfolio piece should have its own page and case study; pics and exploration of the brief and process etc. Link blog through case studies? Words and images; prototype, video! It’s up to you!! App prototypes in invasion etc
CONTENT AUDIT; If you’re working on any kind of redesign project you’ll have to do a content audit Compiling all the content into a big list. Full content inventory
What are they used for? The list of content will come in handy at various stages of the project. If you’re redoing the information architecture you’ll come back to it again and again. It will give you a better idea of the content that you already have. Pre-courser to content analysis.
What to include Nav title Page name URL Comments Content hierarch
Content type Basic description of content; brief reminder. Topics, tags or categories; meta data Attached files; how many and type Related; links, related links Availability desktop, mobile, app? Numbering system; index
http://tinyurl.com/ContentAudit1234
Page is whole number Items within page are decimals
Site map Desc/comments
Tobias Van Schneider An incredible beard; the moustache work is a thing of beauty. First page is who is and what he does. Semplice, GOOGLE THIS Latest instagrams in the html not a link, a showcase. He doesn’t demonstrate much work because he’s working for other companies but his website is still slick.
Lefft (Paddy Donnelly) Illustrator, blogs are individual to the project he creates. Newsletter, styles his articles very well, about him page, links used. Colour changes of text to highlight. Paddy exhibits his work straightaway. Cloud whale is amazing.
Both he and Tobias have their own newsletters, Tobias also has a podcast. CONTENT EVERYWHERE. A newsletter could even be things you’ve found on the internet this week, or facts you learned or new words you heard etc.
Wenizhou Simple grid but exhibits her work immediately, and it’s lit. Little animations that are easy to do. When you click on each piece of work it talks about the project, this is what we need to. Her process is amazing.
Shantell Martin Unreal, I love her. Her website and the way she’s used photography is amazing. Detailed discussion of each piece within the page and how she arrived at the end product. Lots of photos. Website is fluid as heck. Worked with Kendrick.
John Hicks Big headers and pieces that take up the whole screen. Lots of content without over crowding. Then case studies which are very important. You can talk about what was easy and also what obstacles you encountered as well. Downloadables? Goodies.
Brian Holf Home page is one portfolio item but it changes the odd time, keeps the site fresh, not the same viewpoint every time. You can then go into the case study from the piece, takes you to an individual page. Contact deeds at the bottom along with an “All Work” button.
Case studies are so important! Four case studies looks far better than four finished pieces.
Xavier Cusso, Toy Fight, Cédric Pierra <- research in own time.
HAMBURGER MENUS ARE FOR MOBILE
SITEMAP YOUR OWN SITE
A sitemap is a planning tool, structure, navigation, page hierarchy, plan logical presentation to users, visualise user paths.
Marking algorithm has changed; 2nd year worth 30% and final year is 70%. Both new and existing algorithms are going to be used and we will receive whichever gives the best outcome. If you want to do a masters you need a 2:2 or a first. Grades count, don’t faff about!
Fathom talk, they’re offering placements. In next Thursday afternoon. Russell in the following Thursday. recruit.ulster.ac.uk lists all placement opps.
Apply for jobs even if you’re not sure!! Check linkedin about that Disney placement. Santander SME.
CONTENT DISCOVERY AND RESEARCH Discovery is an important process! Not just dribbble. Prototyping, attempting to build so you can see what works and what makes sense. Problem solving. Not all looking at computers, a lot of it is discussion. Understand the problem. Understanding comes from discussion. Discovery helps you discover your audience, what you think you want, what you need, when you should publish that and the channels in which to do that. Using discovery to bring people with you. Sometimes you have to sell things to people. Content discovery as a team is a great way for everyone to be involved at an early stage and dissolve confrontations etc. Everyone has a chance to share. Everyone can see the same data or idea. Helps build a collective understanding and appreciation.
Figure out who your audience really are, what they want from you and how to speak with them. You need to know all this before you write a single word.
What can you do for them? What is your skillset? What have you done and how did you do it? Understand beforehand. Your audience are human beings as well. Writing good content with real human language is what gets you ranked on search engines etc. You’re writing good content for humans.
Sometimes the audience you think you want isn’t the audience you’re actually creating content for. Finding your audiences vocabulary. What vocabulary are you using? What words are your audience using? Search data = the words people use. Google trends for example.
Web designer is OUT. App design is IN. Content strategist is solidly known. UX design is on the rise.
Using web analytics and metrics. Login to your gmail and it starts working, telling you how long people spend on your site etc etc More vocabulary, what your readers want to know most, their mental models. Unique visits. Bounce rate. How long people spend on your page; time spend there.
Digital language and spoken language. Absence of body language. You don’t put search terms into google the way you’d ask a friend. Language patterns, common usage.
Narrow it down; what do you do? Can you do it? How can I contact you?
Doing discovery and research means you’re better informed and better equipped to start tackling the content design problem.
Write the content for your portfolio in plain html - no styles. Focus on the content. Write it in markdown.
Include images, pages and links as well if you wanna. Case studies. Home page and one case study as a minimum.
Content Audit
Look at what heroes are doing
Research and Discovery; google trends
Site map - in illustrator
Start to write your content for your website in HTML
STATIC AND DYNAMIC CONTENT What is a static sitE? Fixed content written in html Each page written separately as it is o the web Every web page saved separately Any changes need to go into the separate files
Advantages Easy to develop Cheap to develop Cheap to host
Disadvantages IDK KYLE MOVED THE SLIDE
Dynamic side Construction is controlled by an application server processed by server side scripts
Webpages not coded and saved separately Point 2 Point 3
Main difference is that the layout can be changed quite quickly.
Advantages Much more functional Easy to update Easier to add new content Good for large websites
Disadvantages More difficult to develop Requires you to understand databases
What is a Cms Content Managed System Bro. What is it? Allows users to manage content Separate content from structure Versioning of post content Manage media Manage content grouping Easy to use Manage any time/type of content.
FLAT FILE SITES A hybrid of both? Jekyll is a ruby based parsing engine that generates sites based on what is put into it. It’s main components are yams, liquid and markdown. YAML Aint Markup language. Liquid is ruby based?
Jekyll gives you a lot of freedom as a designer because you can build whatever you want. But it is also angry emoji, huff puff emoji. sO INSTEAD.
Kirby, file based CMS east to setup, easy to use, flexible as an Olympic gymnast. You gotta build a website with Kirby. getkirby dot com. You can use it for free until it comes to hosting. We are gonna use it for either portfolio or elements!
0 notes
Text
Internal Linking & Mobile First: Large Site Crawl Paths in 2018 & Beyond
Internal Linking & Mobile First: Large Site Crawl Paths in 2018 & Beyond
Posted by Tom.Capper
By now, you’ve probably heard as much as you can bear about mobile first indexing. For me, there’s been one topic that’s been conspicuously missing from all this discussion, though, and that’s the impact on internal linking and previous internal linking best practices.
In the past, there have been a few popular methods for providing crawl paths for search engines — bulky main navigations, HTML sitemap-style pages that exist purely for internal linking, or blocks of links at the bottom of indexed pages. Larger sites have typically used at least two or often three of these methods. I’ll explain in this post why all of these are now looking pretty shaky, and what I suggest you do about it.
Quick refresher: WTF are “internal linking” & “mobile-first,” Tom?
Internal linking is and always has been a vital component of SEO — it’s easy to forget in all the noise about external link building that some of our most powerful tools to affect the link graph are right under our noses. If you’re looking to brush up on internal linking in general, it’s a topic that gets pretty complex pretty quickly, but there are a couple of resources I can recommend to get started:
This top-level Whiteboard Friday from Rand
This 30-minute audit guide from me
I’ve also written in the past that links may be mattering less and less as a ranking factor for the most competitive terms, and though that may be true, they’re still the primary way you qualify for that competition.
A great example I’ve seen recently of what happens if you don’t have comprehensive internal linking is eflorist.co.uk. (Disclaimer: eFlorist is not a client or prospective client of Distilled, nor are any other sites mentioned in this post)
eFlorist has local landing pages for all sorts of locations, targeting queries like “Flower delivery in [town].” However, even though these pages are indexed, they’re not linked to internally. As a result, if you search for something like “flower delivery in London,” despite eFlorist having a page targeted at this specific query (which can be found pretty much only through use of advanced search operators), they end up ranking on page 2 with their “flowers under £30” category page:
¯\_(ツ)_/¯
If you’re looking for a reminder of what mobile-first indexing is and why it matters, these are a couple of good posts to bring you up to speed:
General guide to mobile-first indexing, by my former colleague Bridget Randolph
How mobile-first indexing disrupts the link graph, by Russ Jones
In short, though, Google is increasingly looking at pages as they appear on mobile for all the things it was previously using desktop pages for — namely, establishing ranking factors, the link graph, and SEO directives. You may well have already seen an alert from Google Search Console telling you your site has been moved over to primarily mobile indexing, but if not, it’s likely not far off.
Get to the point: What am I doing wrong?
If you have more than a handful of landing pages on your site, you’ve probably given some thought in the past to how Google can find them and how to make sure they get a good chunk of your site’s link equity. A rule of thumb often used by SEOs is how many clicks a landing page is from the homepage, also known as “crawl depth.”
Mobile-first indexing impacts this on two fronts:
Some of your links aren’t present on mobile (as is common), so your internal linking simply won’t work in a world where Google is going primarily with the mobile-version of your page
If your links are visible on mobile, they may be hideous or overwhelming to users, given the reduced on-screen real estate vs. desktop
If you don’t believe me on the first point, check out this Twitter conversation between Will Critchlow and John Mueller:
In particular, that section I’ve underlined in red should be of concern — it’s unclear how much time we have, but sooner or later, if your internal linking on the mobile version of your site doesn’t cut it from an SEO perspective, neither does your site.
And for the links that do remain visible, an internal linking structure that can be rationalized on desktop can quickly look overbearing on mobile. Check out this example from Expedia.co.uk’s “flights to London” landing page:
Many of these links are part of the site-wide footer, but they vary according to what page you’re on. For example, on the “flights to Australia” page, you get different links, allowing a tree-like structure of internal linking. This is a common tactic for larger sites.
In this example, there’s more unstructured linking both above and below the section screenshotted. For what it’s worth, although it isn’t pretty, I don’t think this is terrible, but it’s also not the sort of thing I can be particularly proud of when I go to explain to a client’s UX team why I’ve asked them to ruin their beautiful page design for SEO reasons.
I mentioned earlier that there are three main methods of establishing crawl paths on large sites: bulky main navigations, HTML-sitemap-style pages that exist purely for internal linking, or blocks of links at the bottom of indexed pages. I’ll now go through these in turn, and take a look at where they stand in 2018.
1. Bulky main navigations: Fail to scale
The most extreme example I was able to find of this is from Monoprice.com, with a huge 711 links in the sitewide top-nav:
Here’s how it looks on mobile:
This is actually fairly usable, but you have to consider the implications of having this many links on every page of your site — this isn’t going to concentrate equity where you need it most. In addition, you’re potentially asking customers to do a lot of work in terms of finding their way around such a comprehensive navigation.
I don’t think mobile-first indexing changes the picture here much; it’s more that this was never the answer in the first place for sites above a certain size. Many sites have tens of thousands (or more), not hundreds of landing pages to worry about. So simply using the main navigation is not a realistic option, let alone an optimal option, for creating crawl paths and distributing equity in a proportionate or targeted way.
2. HTML sitemaps: Ruined by the counterintuitive equivalence of noindex,follow & noindex,nofollow
This is a slightly less common technique these days, but still used reasonably widely. Take this example from Auto Trader UK:
This page isn’t mobile-friendly, although that doesn’t necessarily matter, as it isn’t supposed to be a landing page. The idea is that this page is linked to from Auto Trader’s footer, and allows link equity to flow through into deeper parts of the site.
However, there’s a complication: this page in an ideal world be “noindex,follow.” However, it turns out that over time, Google ends up treating “noindex,follow” like “noindex,nofollow.” It’s not 100% clear what John Mueller meant by this, but it does make sense that given the low crawl priority of “noindex” pages, Google could eventually stop crawling them altogether, causing them to behave in effect like “noindex,nofollow.” Anecdotally, this is also how third-party crawlers like Moz and Majestic behave, and it’s how I’ve seen Google behave with test pages on my personal site.
That means that at best, Google won’t discover new links you add to your HTML sitemaps, and at worst, it won’t pass equity through them either. The jury is still out on this worst case scenario, but it’s not an ideal situation in either case.
So, you have to index your HTML sitemaps. For a large site, this means you’re indexing potentially dozens or hundreds of pages that are just lists of links. It is a viable option, but if you care about the quality and quantity of pages you’re allowing into Google’s index, it might not be an option you’re so keen on.
3. Link blocks on landing pages: Good, bad, and ugly, all at the same time
I already mentioned that example from Expedia above, but here’s another extreme example from the Kayak.co.uk homepage:
Example 1
Example 2
It’s no coincidence that both these sites come from the travel search vertical, where having to sustain a massive number of indexed pages is a major challenge. Just like their competitor, Kayak have perhaps gone overboard in the sheer quantity here, but they’ve taken it an interesting step further — notice that the links are hidden behind dropdowns.
This is something that was mentioned in the post from Bridget Randolph I mentioned above, and I agree so much I’m just going to quote her verbatim:
Note that with mobile-first indexing, content which is collapsed or hidden in tabs, etc. due to space limitations will not be treated differently than visible content (as it may have been previously), since this type of screen real estate management is actually a mobile best practice.
Combined with a more sensible quantity of internal linking, and taking advantage of the significant height of many mobile landing pages (i.e., this needn’t be visible above the fold), this is probably the most broadly applicable method for deep internal linking at your disposal going forward. As always, though, we need to be careful as SEOs not to see a working tactic and rush to push it to its limits — usability and moderation are still important, just as with overburdened main navigations.
Summary: Bite the on-page linking bullet, but present it well
Overall, the most scalable method for getting large numbers of pages crawled, indexed, and ranking on your site is going to be on-page linking — simply because you already have a large number of pages to place the links on, and in all likelihood a natural “tree” structure, by very nature of the problem.
Top navigations and HTML sitemaps have their place, but lack the scalability or finesse to deal with this situation, especially given what we now know about Google’s treatment of “noindex,follow” tags.
However, the more we emphasize mobile experience, while simultaneously relying on this method, the more we need to be careful about how we present it. In the past, as SEOs, we might have been fairly nervous about placing on-page links behind tabs or dropdowns, just because it felt like deceiving Google. And on desktop, that might be true, but on mobile, this is increasingly going to become best practice, and we have to trust Google to understand that.
All that said, I’d love to hear your strategies for grappling with this — let me know in the comments below!
Sign up for The Moz Top 10, a semimonthly mailer updating you on the top ten hottest pieces of SEO news, tips, and rad links uncovered by the Moz team. Think of it as your exclusive digest of stuff you don't have time to hunt down but want to read!
xem them tai https://ift.tt/2o9GYfe Internal Linking & Mobile First: Large Site Crawl Paths in 2018 & Beyond xem thêm tại: https://ift.tt/2mb4VST để biết thêm về địa chỉ bán tai nghe không dây giá rẻ Internal Linking & Mobile First: Large Site Crawl Paths in 2018 & Beyond https://ift.tt/2CahJky xem thêm tại: https://ift.tt/2mb4VST để biết thêm về địa chỉ bán tai nghe không dây giá rẻ Internal Linking & Mobile First: Large Site Crawl Paths in 2018 & Beyond https://ift.tt/2CahJky xem thêm tại: https://ift.tt/2mb4VST để biết thêm về địa chỉ bán tai nghe không dây giá rẻ Internal Linking & Mobile First: Large Site Crawl Paths in 2018 & Beyond https://ift.tt/2CahJky xem thêm tại: https://ift.tt/2mb4VST để biết thêm về địa chỉ bán tai nghe không dây giá rẻ Internal Linking & Mobile First: Large Site Crawl Paths in 2018 & Beyond https://ift.tt/2CahJky xem thêm tại: https://ift.tt/2mb4VST để biết thêm về địa chỉ bán tai nghe không dây giá rẻ Internal Linking & Mobile First: Large Site Crawl Paths in 2018 & Beyond https://ift.tt/2CahJky xem thêm tại: https://ift.tt/2mb4VST để biết thêm về địa chỉ bán tai nghe không dây giá rẻ Internal Linking & Mobile First: Large Site Crawl Paths in 2018 & Beyond https://ift.tt/2CahJky xem thêm tại: https://ift.tt/2mb4VST để biết thêm về địa chỉ bán tai nghe không dây giá rẻ Internal Linking & Mobile First: Large Site Crawl Paths in 2018 & Beyond https://ift.tt/2CahJky xem thêm tại: https://ift.tt/2mb4VST để biết thêm về địa chỉ bán tai nghe không dây giá rẻ Internal Linking & Mobile First: Large Site Crawl Paths in 2018 & Beyond https://ift.tt/2CahJky xem thêm tại: https://ift.tt/2mb4VST để biết thêm về địa chỉ bán tai nghe không dây giá rẻ Internal Linking & Mobile First: Large Site Crawl Paths in 2018 & Beyond https://ift.tt/2CahJky xem thêm tại: https://ift.tt/2mb4VST để biết thêm về địa chỉ bán tai nghe không dây giá rẻ Internal Linking & Mobile First: Large Site Crawl Paths in 2018 & Beyond https://ift.tt/2CahJky xem thêm tại: https://ift.tt/2mb4VST để biết thêm về địa chỉ bán tai nghe không dây giá rẻ Internal Linking & Mobile First: Large Site Crawl Paths in 2018 & Beyond https://ift.tt/2CahJky xem thêm tại: https://ift.tt/2mb4VST để biết thêm về địa chỉ bán tai nghe không dây giá rẻ Internal Linking & Mobile First: Large Site Crawl Paths in 2018 & Beyond https://ift.tt/2CahJky xem thêm tại: https://ift.tt/2mb4VST để biết thêm về địa chỉ bán tai nghe không dây giá rẻ Internal Linking & Mobile First: Large Site Crawl Paths in 2018 & Beyond https://ift.tt/2CahJky xem thêm tại: https://ift.tt/2mb4VST để biết thêm về địa chỉ bán tai nghe không dây giá rẻ Internal Linking & Mobile First: Large Site Crawl Paths in 2018 & Beyond https://ift.tt/2CahJky xem thêm tại: https://ift.tt/2mb4VST để biết thêm về địa chỉ bán tai nghe không dây giá rẻ Internal Linking & Mobile First: Large Site Crawl Paths in 2018 & Beyond https://ift.tt/2CahJky xem thêm tại: https://ift.tt/2mb4VST để biết thêm về địa chỉ bán tai nghe không dây giá rẻ Internal Linking & Mobile First: Large Site Crawl Paths in 2018 & Beyond https://ift.tt/2CahJky xem thêm tại: https://ift.tt/2mb4VST để biết thêm về địa chỉ bán tai nghe không dây giá rẻ Internal Linking & Mobile First: Large Site Crawl Paths in 2018 & Beyond https://ift.tt/2CahJky xem thêm tại: https://ift.tt/2mb4VST để biết thêm về địa chỉ bán tai nghe không dây giá rẻ Internal Linking & Mobile First: Large Site Crawl Paths in 2018 & Beyond https://ift.tt/2CahJky xem thêm tại: https://ift.tt/2mb4VST để biết thêm về địa chỉ bán tai nghe không dây giá rẻ Internal Linking & Mobile First: Large Site Crawl Paths in 2018 & Beyond https://ift.tt/2CahJky xem thêm tại: https://ift.tt/2mb4VST để biết thêm về địa chỉ bán tai nghe không dây giá rẻ Internal Linking & Mobile First: Large Site Crawl Paths in 2018 & Beyond https://ift.tt/2CahJky xem thêm tại: https://ift.tt/2mb4VST để biết thêm về địa chỉ bán tai nghe không dây giá rẻ Internal Linking & Mobile First: Large Site Crawl Paths in 2018 & Beyond https://ift.tt/2CahJky xem thêm tại: https://ift.tt/2mb4VST để biết thêm về địa chỉ bán tai nghe không dây giá rẻ Internal Linking & Mobile First: Large Site Crawl Paths in 2018 & Beyond https://ift.tt/2CahJky xem thêm tại: https://ift.tt/2mb4VST để biết thêm về địa chỉ bán tai nghe không dây giá rẻ Internal Linking & Mobile First: Large Site Crawl Paths in 2018 & Beyond https://ift.tt/2CahJky xem thêm tại: https://ift.tt/2mb4VST để biết thêm về địa chỉ bán tai nghe không dây giá rẻ Internal Linking & Mobile First: Large Site Crawl Paths in 2018 & Beyond https://ift.tt/2CahJky xem thêm tại: https://ift.tt/2mb4VST để biết thêm về địa chỉ bán tai nghe không dây giá rẻ Internal Linking & Mobile First: Large Site Crawl Paths in 2018 & Beyond https://ift.tt/2CahJky Bạn có thể xem thêm địa chỉ mua tai nghe không dây tại đây https://ift.tt/2mb4VST
0 notes
Last Seen Blogs

yourmothersson
Your Aunt’s Sister’s Kid

baovevietthienlong
Bảo Vệ Việt Thiên Long

km-nm-hentai
↑好きド変態

swwilley18
Seth Willey

42prowl
* prowler called .