#Zip File Extractor
Text
Have you ever received an email attachment containing a ZIP file and had no idea of unzipping it? A ZIP file may be opened on nearly every computer or operating system in the same manner as other digital folders.
#Zip Extractor#Zip File Extractor#Free Unzip Program#Unzipper Mac#How to Open a Zip File#Open Zip File#Free Zip File Opener#free unzip program
0 notes
Text
hello baldurs gate 3 community again: This time im talking about modding!
hello adventurers and shifty-eyed people, I bring to you some important stuff.
Mod compilations!
Below the cut, if you are interested, I have compiled a few things for what I think the bg3 tumblr modding community wants (based on me being in the tag for a month straight).
Things I have compiled include:
- Super basic install of baldur's gate 3 mod manager (and a bit of vortex) (9 Easy Steps!)
- My OWN special "Computer helper" mod bundle with super easy installations (helps it run on my piece of crap laptop who hates me so much but I love her <3)
- Companion and player mods (visuals only, and like de-ab-ing and stuff, I'm not going around adding all the extra eye colour mods)
INCLUDING TRANS TOP SCARS AND DADBOD MODS + MORE
- Some personal favourite mods that really helped enhance my experience.
Enjoy!
(if you enjoy bg3 modding, please consider reblogging because I think posts with links are still shadowbanned in the tag lol)
HOW TO GET THE MOD LOADER FOR BG3 IN 3 EASY STEPS
go to the github download page and scroll down until you see the first downloadable file that reads "BG3ModManager_Lastest.zip"
extract the file into an accessible area (your downloads folder should work fine, I just put it on my desktop) (just anything that won't require you to give admin permissions to download it. I would also keep this off Local Disc (C:) for convenience)
You can use any free extractor program, 7zip works, i used to use Peazip and now I use Breezip and that works well.
Tada! You should have an open folder in your extracted location.
2 things may happen here: You will get the extracted folder with the other documents inside. Congrats, you're done! If you have an extracted folder with ONLY the .exe file in it, go back into the zip file and drag the other files into the folder. This should fix the problem, all files from the zip need to be there to work.
(OPTIONAL) you CAN use Vortex mod manager to manage your bg3 mods on there, in which case any nexusmods mod will have a direct download button for you. Personally I have my subnautica mods loaded from there so bg3 is unavailable.
HOW TO MOD BALDURS GATE 6 IN EASY STEPS + SCRIPT EXTENDER
Make sure you have Baldur's Gate 3 Installed. I have it on steam, I don't know how to help with EA, sorry.
open your file explorer/documents. Go to Admin -> AppData -> Local -> Larian Studios* -> Baldur's Gate 3 (leave launcher alone). Create a mods folder if you don't already have one, but one should have been created on your first bootup.
DO NOT CLOSE THIS TAB. THIS TAB STAYS OPEN UNTIL YOU ARE DONE MODDING.
* I also just search Larian Studios in Local Disc (C:) but that does take some time to load
Congrats, you're ready to mod! Now, most good mods will need something called the Baldur's Gate 3 Script Extender. You can find the download page here, and this time you're going to hit the green "code" button. Ignore everything else. Hit download zip
Extract the file again, but this time into Local Disc (C:) -> Program Files (86x) -> Steam -> Steamapps -> common -> Baldur's Gate 3 -> bin* **
* MAKE SURE to extract it to the bin folder. Some other mesh and texture mods use the data bin, so confusing them is bad.
** you CAN directly extract the folder to the bin, but I personally find it easier to extract the zip back into downloads, then open my other file explorer and click and drag the whole extracted file into the bin folder
The fun part begins! Go find some mods you like (nexusmods mostly, gamebanana MAY have some). Extract folder to your mods folder in larian studios -> baldur's gate 3 -> mods. ONLY DRAG THE .PCK FILE. YOU DO NOT NEED ANY OTHER FILES UNLESS THE MOD MAKER SAYS SO.
USING THE MOD LOADER: you are done with file explorers! Go ahead and boot up the bg3modmanager.exe file from earlier. Any INACTIVE MODS must be CLICKED AND DRAGGED over to the ACTIVE MODS side. If you don't see any mods, hit the blue circle refresh button. After that, hit the "export order to game" button right beside "export". If you see a green popup at the bottom, you are good to go!
All done! You are now on your modding journey! (if you have any outlying problems, my dms are open and there is a whole host of modders out there with answers!)
NOW TO THE FUN PART: MOD PACKS!
My own Game Optimizer Pack (basic): includes General Fixes (general bug fixes), Improved UI & Improved UI Assets (necessary for customization mods), and Mod Fixer (necessary for mods to work)
*you CAN download all of these files individually from https://www.nexusmods.com but this is basically. a short version of that.
My own Game Optimizer Pack (deluxe): includes all previous mods as well as 5e Spells (spell fixer), Additional Backgrounds, Customizer Compendium, Show approval ratings in dialogue, Purchase camp clothes from merchants, Tav's hairpack
COMPANION MODS:
No Abs for companions/pcs
"oops all futas" (all female companions have penises, if you want like an all transfem run or something)
Customizable Origins (lets you customize if you play as an origin character)
Astarion:
Astarion Moles and blemishes mod
Vampire Ascendant (ability fixer mod)
TAV MODS:
Freckles and Moles as Tattoo replacers
Trip's Accessory Collection (has glasses & monacles)
Ophelia's Body Shop (top heavy/bottom heavy/chubby body alternatives)
Stronger Tav - Muscular Upper Body Mod
Top Surgery Scars
Alternate Top Surgery Scars mod for bodys 1 and 3
Strongfat body - humans and half orcs
Tav's Dadbod Mod
Softie Body - Tiefling 2
New Eye Colours and Blindess for all eyes
Transmasc Clothing options
Actually feminine and lore friendly dragonborn legs
Femme obese dragonborn body (no clothing options developed yet)
Chubby/thick/bbw body mods and clothes
Big gut dragonborn (male)
Female muscle mod
Less defined abs for male bodies
Game Enhancing Mods that I recommend!
(if I have one marked starting spoiler! just. just download it and ad it just trust me dont look to far into it I promise it will be good. If I have one marked late spoiler! you can look at it and decide if you want it or later)
Faithful & Faithless - no mandatory choice of god
Mundane Blindfold (one eye cover)
No Romance Limit (polyamory mod)
highlight everything tooltip
Party Limit begone
No more spiders (all spider models replaced with dogs)
Ritual spells for rp fun
Colourblind friendly spell slots
Camp event notifications
Autosaver/Save timer (GET THIS IT SAVED MY LIFE SO MUCH)
Histories & Occupations - new backgrounds
Scratch colour variety (late spoiler!/not spoiler heavy)
Just Story (for those who just want the story. every enemy has 1 hp)
Wyll's Devil Form (starting spoiler!)
Eyes of the beholder (eye alts + scleras)
#lying flat on my back after typing this i think it took like 3 hours to compile everything#my neck hurts OTL#bg3#baldurs gate 3#baldur's gate 3#baldur's gate iii#bg3 mod#bg3 mods#baldurs gate 3 mods#modding#mods#modblr
52 notes
·
View notes
Photo


Sims 3 Pattern Recategorizer (S3PR) Tool
Organize your CC pattern files with ease!
Current version: v1.1.0.2
Recategorizes pattern .packages (overwrites those files upon recategorization)
Extracts ICON resources
Download: SFS | MTS (coming soon)
How to use this tool: extract the .zip file to a new directory and open the executable (.exe) to run the tool. Detailed steps in the README.md file included.
More information under the cut!
Credits: This tool’s utility was inspired by @ktarsims‘s pattern hoarder tutorial which suggested changing pattern categories to be more consistent and extracting icons for better organization. In addition, the source code for @chocochipsims‘s Pattern Preset Color Extractor tool (the tool can be found here) was monumental to helping me learn how to identify and extract pattern-specific resources within sims 3 .package files.
I’ve been sitting on this for a while! A while ago, I gauged interest for this tool that I had built for my own uses. With the help of @simlicious‘s vigorous testing and enthusiastic suggestions, this tool has been polished! Currently, it only supports .packages, but I am considering implementing .sims3pack support in the future. This tool does not modify any files that aren’t pattern .packages.
Potential feature roadmap:
Support pattern .sims3pack recategorization
Able to change surface material type
Able to change pattern description
Give TSRW patterns unique res keys (A.K.A. why some .sims3pack patterns cannot be converted to .package without manual editing)
I’m happy to take suggestions for future improvements!! I’m also happy to support any interested collaborators who want to work on this project! Working on it isn’t exactly my top priority — so I encourage any enthusiastic simmer to help make this a full-fledged tool! It’s coded in Python and uses Peter L Jones’ s3pi .NET library to work with Sims 3 .packages. I have already made some preliminary progress with .sims3pack files (message me if you want to know more!).
I sincerely hope you enjoy using this tool and that it makes your pattern CC organization a little easier! ✨
289 notes
·
View notes
Text
how to download sims 4 packs for free(mac) UPDATED tutorial
02/08/24: PLEASE READ: I have updated the tutorial to work for the updated website. for any issues, contact me on instagram and i'll try my best to help.
hi everyone! this tutorial is over a year old and i've been getting countless requests asking for help so i've finally gotten around to updating this tutorial. youtube and tiktok have taken my videos down repeatedly so i've resorted to posting it here and reddit. i plan on hopefully making a new video in the future for those who are visual learners, but for now this will do. before we get started
here are a couple things to consider:
this tutorial is for mac users only. there are probably tutorials available for windows users you just have to browse for it
do this at your own risk. i cannot be held responsible for any damages this causes or any viruses you get on your computer
if you have questions please dm me on instagram @rosepehtels. i do not accept discord dms or friend requests
now for the tutorial...
STEP 1: downloading the unlocker
first thing we'll do is type "sims 4 updater mac" into your web browser or go to this link. next, scroll down until you see "step 1" and follow the steps.
step 1 says to download the file: origin DLC unlocker for mac, so let's do that. click this link, then under "origin" and "ea" click the first link depending which software you use. if you use EA use this link.
the file should download into a .zip file, if this is the case it's downloading correctly. if not, you didn't do it right or theres some restriction on your computer.
once the file is downloaded, click it to extract it(should happen automatically). if it doesn't open, download a zip extractor from the app store. if it doesn't open you didn't do it right and you should dm me on instagram.
now, you should quit origin if it's open. make sure it's completely closed. to do this, click "quit" when holding down on the app.
once you've done that, we're going to open the DLC unlocker folder we downloaded. inside the folder, there should be a file called "fix originclient.command". hard press on the file then click "open" and it should open in terminal.
NOTE: PLAYING AROUND WITH TERMINAL CAN BE HARMFUL TO YOUR COMPUTER. MAKE SURE YOU BACK UP YOUR DEVICE AND DO THIS AT YOUR OWN RISK.
once terminal is open, follow the prompt and where it says "press any key to continue" press enter/return on your keyboard. once you've done that it should say process completed. if it does, you did it correctly. if it doesn't you did it incorrectly and you need to contact me.
now we're going to repeat the process but with the "add fake entitlements.command" and do what it says. if it says "press any key to continue" press enter/return on your keyboard. when it lists different games games in order from 0-2, press 2 for sims4. if you're not playing sims 4, this tutorial is not for you. after, you should press enter/return to confirm your choice.
now, open origin like normal, run the sims4(but don't open a game), then immediately quit the game once it's open. once you've done that, go back to the terminal window and press enter/return on your keyboard. it should say process completed
STEP 2: downloading the pack(s)
now, we're going to download our pack(s) to add to our sims 4 game. to that, click this link then scroll down until you see an organized table of all the sims4 packs.
important thing to note:
download each pack one at a time. after each download of each pack, you must redownload the DLC unlocker AGAIN and repeat the steps in step 1.
to download your desired pack, click the red link beside the pack name. in this tutorial, i'll be downloading wedding stories, once you click the red link, it should immediately start to download, you should not be brought to a new website or link.
your file should be an .iso file. if this is the case, you're doing it correctly. if not, please dm me on instagram.
wait for the file to download then open the disk utility application. you can find this by opening launchpad and searching disk utility or by opening finder -> applications -> utilities -> disk utility. depending on how many files you have on your computer, this could take awhile.
once it's downloaded, do not open it. simply, open the disk utility application, go to the top menu bar at the VERY TOP OF YOUR SCREEN and click file -> open disk image then find the .iso file and select it then click "open" a section called "disk images" should pop up. if this isn't the case, you didn't do it correctly, please contact me.
now, we can open the .iso file from our downloads. a window should pop up with a folder. if this isn't the case, something is wrong and/or you didn't do it correctly. with this folder, open finder -> shift+CMD+H -> applications -> sims 4 packs. drag the folder into the sims 4 packs folder we just found.
now you may open your sims 4 game, and the pack should be there.
LINKS:
website i used
instagram
65 notes
·
View notes
Text

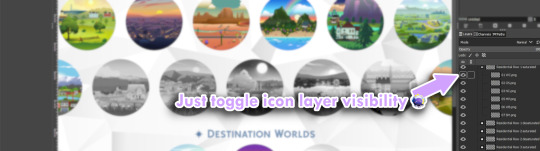
World Icons List PSD
Update 17 Mar 2024 : Added Tomarang and a different version (details added to end of post).
With huge credit to deevo's Image Viewer for Package Files which has a Packs Extractor tool. Similar to my Packs List PSD, this one is for the World icons. I've had this since April and never used it myself, but just in case someone would want this thing here it is updated to include Chestnut Ridge.
Download from source or link below:
SFS
1. [quiescence90] World Icons List in .pdf and .xcf formats - as pictured above
2. [quiescence90] Individual World Icons in .pdf and .xcf formats - this is the original sized images extracted from the game arranged and grouped together. You can move each layer as you please to create your own icons for the Worlds
3. [quiescence90] 512px World Icons - .zip folder containing all the uncropped original sized World icons in .png format. I only arranged them to match how they appear in the World Selection Menu so a few of them will show blank/unfilled spots because EA did not bother to draw anything on that part of the layer. See example below:
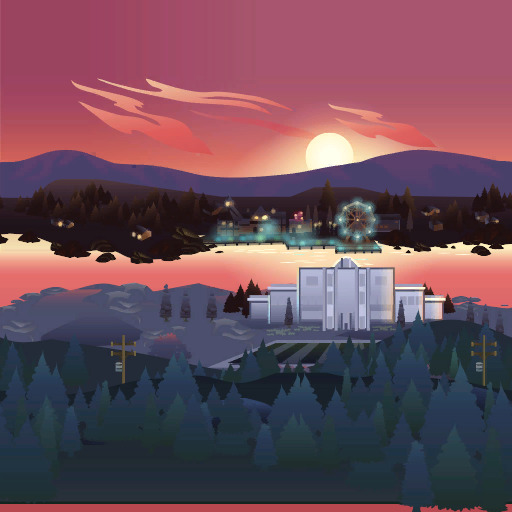
(observe the bottom)
4. ✨NEW!✨ [quiescence90] World List (by pack) in .pdf and .xcf formats - The worlds listed by pack icons as exemplified below:

I excluded basegame and Journey to Batuu for this one because this is meant for a "packs needed" kinda situation and I couldn't extract a bigger icon from JtB 🤷🏻♀️
9 notes
·
View notes
Text
ETA: Wow, it really is breathtaking. Not sure what I want to do with that information.
-----------
Now looking at checking out Glennborough. Wow, it has SO MUCH cc. It’s really offputting. Tons of cc were included in the zip as supplemental package files, which is really the right way to do it. But then I ran the Sims3Pack through Multi-extractor, and there were over 200 MORE packages included in that. A bunch of the items included in the Sims3Pack are patterns, but many others are clutter and deco items.
Srsly, it looks like they included a default skin in here. That was in the packages, not included in the Sims3Pack, but still. Come on now.
I’ve seen a lot of folks say this world is gorgeous. I’d like to load it up and then, if I like it, make some decisions about cc to leave out. But I’m starting to wonder if I even want to do that. No matter how lovely it looks, a good half of this clutter cc has to go.
I don’t really think my medieval world needs to be roadless, btw. I have some nice default replacements for vehicles, and roadless worlds end up needing disguised subways for sims to get places anyway, so I don’t know that roadless worlds end up being that much more immersive. If there were a way to get inactives to go everywhere on horseback, I’d dig that, but I don’t know that it can be done. I don’t think inactives can tie their horses up at hitching posts anyway, so the horses would just be wandering around, and it would be a mess.
16 notes
·
View notes
Text
Cloud's FNF GIF Making Tutorial
Hello there, have you ever wanted to make FNF GIFs like this for example?

Well, your in luck, because in my personal guide, I'll teach you how to do so.
This is for desktop users by the way, I don't know how to do this on mobile.
1. Getting Started
You'll need the following program to make your GIFs. I personally use.
Spr2PNG (Highly Recommended | Automated, Simple Process)
Java (Needed for Spr2PNG to work.)
EZGif (Needed for GIF Making.)
But there are other options such as FnF-Spritesheet-and-XML-Maker but I personally use Spr2PNG as that is more simple.
To download Spr2PNG, first go to the releases tab and click on the Latest release you see, then click the zip file to download it automatically. You'll want a ZIP Extractor like 7-Zip, which I recommend, but WinRAR is another good option.

Now, once you have your programs, you'll want to download the FNF mod you want to rip the sprites from, like for instance; VS Sonic.EXE, or basically any other FNF Mod and download that either from GameBanana or GameJolt, depending on where it is.
2. Ripping the Sprites
Okay, now, to make the GIF, you have to rip the sprites. To do this, go to your FNF Mod that you downloaded and go to either mods\images\characters or assets\shared\images\characters. It depends where all the [charactername].xml and [charactername].png files of that character is located so you might have to do some digging around in the mod files. But once you find those, you want to copy & paste them into a separate folder, I recommend creating one to store all your ripped sprites at, aswell as your gifs.
3. Making the GIFs
Okay, now that you have your sprites ripped from the mod files. You'll want to open SprToPNG.bat or SprToPNG.jar. It doesn't really matter what you choose to open. It should show a small window that says “Select XML or PNG Files to Open” and you'll want to locate the files you ripped from the mod files. Please keep in mind that the .png and .xml files of that character must be in the same folder together otherwise it won't work. Just double-click on either file, again, it doesn't matter. Then, SprToPng will do the rest and separate the animation sprites into one folder that is named after that character, aswell as all the sprites.
Now, click on the folder of the sprites that you want to animate, it might say "Idle Dance" or any of the character poses, aswell as the special animations if the character has them. There should be some PNGs that are ranging from 0000 to random, depending on how many animation sprites that animation has.

Now, open EZGIF.com and click on "GIF Maker" and then click on Browse and then locate the separate PNG files of the character. A good tip is that you can select the first PNG with 0000 and then the last by shift-clicking, just click the first png and then the last one with shift-click and it'll select all the following PNG files and then select "Open". It might take a couple of seconds, depending on the file but it should show all the PNG Sprites in order.

Set the delay time to either 4, 5, or 6. You want it to act like how the actual in-game sprites would. If it's too fast, increase the delay time, if its too slow, decrease the delay time. Optionally, you can set the last PNG to 30, then select "Don't Stack Frames" so the sprites don't overlap over each other and make it look ugly.
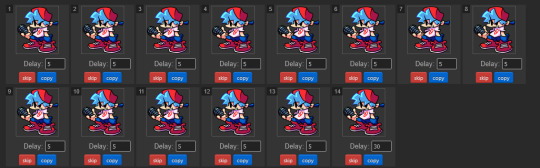
I'll show two examples, one with "Don't Stack Frames" on and off.

On the left is with it on while on the right is with it off. You see how on the right the sprites are behind the ones that are displayed? Yeah, you don't want that. So I highly encourage and recommend you to turn on "Don't Stack Frames" on.
Now, select "Crop" and then scroll down and select "Trim Transparent Pixels around the image" as this will remove any transparent pixels we don't want, while also reducing the file size, either a tad bit or a lot, depending on the sprite.


And once you're done, click save, your sprite should look like this!
Now that you made your Sprite, you can upload it to the Funkipedia wiki to help out with pages and such that need sprites.
Fin.
Feel free to leave any suggestions in reblogs or comments, they'll really help out. Also, make sure to reblog this so more people know how to make GIFs in the future (on desktop or laptop).
3 notes
·
View notes
Text
Mafia (2002) modding: Installing Custom Playermodels.
Learned how to install a custom playermodel for the original Mafia game! First thing I did was to replace Tommy with Big Smoke.
Credit: Huckleberrypie on Gamebanana is the original modder.
I made a quick guide for everyone on how to install custom playermodels for the original game featuring this mod. This is separate from the Definitive Edition.

DETAILED INSTALLATION STEPS BELOW:
Requirements:
Own a PC copy of Mafia 2002. Available on Steam Store.
- MafiaDataXtractor.exe. Available on NexusMods.
(Skip to Step 6 if you don't want to do the extraction process).
Zip-file of Huckleberrypie's mod: Big Smoke (Mafia) for both Tommy and Sam on Gamebanana.
Credits: Thank you to Huckleberrypie for making this mod playable for everyone.
INSTALLATION STEPS:
After downloading MafiaDataXtractor, drop it in the following folder path: steamapps < common < Mafia < Mafia < Drop file here.
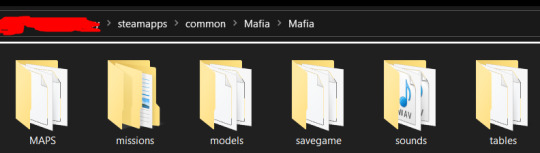

Yes, there are two Mafia folders. The one you'll need to drop it in is the second Mafia folder. (ex: Mafia < Mafia < Put the MafiaDataXtractor here)
2. Open MafiaDataXtractor.exe. You should receive a prompt that asks you what you'd like to extract.

3. Select "a2.dta - Models." It might ask you an additional question considering the program itself or the game may be updated. Click "Yes" for the second question.

4. Wait for the extractors to finish loading.
5. Once the extractor finishes loading, you should see a new folder created inside of your 2nd Mafia folder < models.
6. Go back to your Big Smoke mod folder.
If you need further help than this quick tutorial, read the readme Huckleberry included inside.
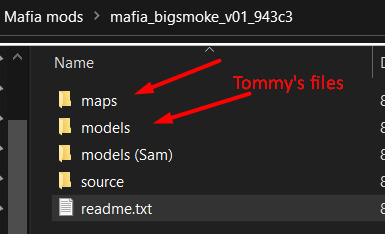
7. Inside the folder, copy the maps and models folder for Tommy. Drag and drop them into the current Mafia folder you're in. File Explorer will automatically replace any of the default files that has the same name.
Breakdown if you still need further help:
Inside of BigSmoke's folder, drag and drop the file named "melvin_diff.bmp" into Mafia's Maps folder. This indicates that a custom texture will be used for a custom player model rather than a retexture. Do the same thing for the models.


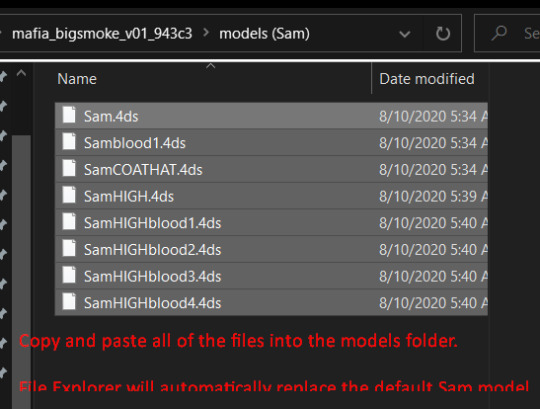
Optional 7.1: If you want to install the files for Sam, copy the maps folder first. Then, you'll want to go inside the folder named models (Sam), and then drag and drop them into the original models folder. Just as the same steps for replacing Tommy's playermodel and textures.
8. Once you've finished doing that, pull up your Mafia game. Tommy's player model should be replaced by Big Smoke's playermodel complete with the custom textures the original modder put.
youtube
If you see Big Smoke, congratulations! You learned how to replace original models and textures, and learned how to use the MafiaDataXtractor tool if you want to do some modding of your own.
If you don't see Big Smoke's model nor textures, there might've been a step missed. Again, read the readme that the original author has put in their file.
If you'd like to see more of custom mods that I made for the original Mafia game, give them a try on NexusMods!
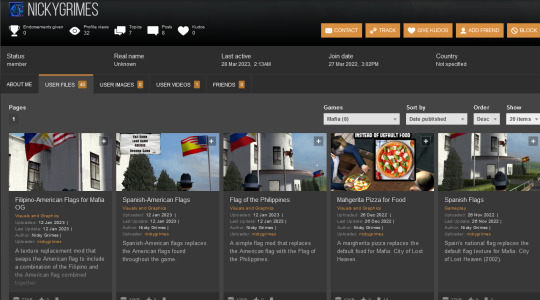
Head to NexusMods.
#tommy angelo#big smoke#mafia#mafia 1#mafia 1 modding#mafia city of lost heaven#gta#big smoke gta#tommy mafia#tommy angelo mafia#mafia modding guide#modding help#nicky grimes#Youtube
8 notes
·
View notes
Note
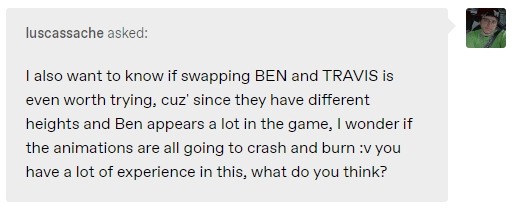
Hello, I'm very newbie to model swap and I need some help :C I've been wanting to swap BEN and TRAVIS, could you please help me out? I know that Ben appears in a lot of episodes (not sure which ones), and I also know that Travis barely have archives since he appears very quickly on episode 2, I already learned how to extract the files with the extractor and everything (I have all the files from ep1 and ep2 already extracted), I don't know how to swap the models, which files I should replace etc.
Well hello, luscassache! I'm sorry to hear about your trouble getting swaps to work, it's fiddly to figure out, especially when you're new to it.
Season 1 is also a bit more tricky to swap around since a lot of the files aren't in the episodes ttarch files, but instead they are in the projectseason ttarch files. And you're also right about Travis being a bit more trouble since he doesn't appear for long in the game and therefore has less files that are made specifically for him.
And without knowing where exactly things have gone wrong for you when trying your swap, it's hard for me to say definitively how to correct it. Off the top of my head, I can only suggest double checking that you have the correct files, you have renamed them properly, and that you have overwritten your archives in your game directory.
However... I do still have archives saved of a lot of my old swaps (not the Travis and Doug one, unfortunately), and I have been experimenting with the Telltale scripting tool to figure out how to form these into mod files.
So to cut a long story short, I set up a google drive and made a zip file with the necessary archives pre-built to have Travis replace Ben in season 1 of the Definitive Series (It doesn't make them swap places, there are just two of Travis). You can >>click here<< for the download link.
It does still have some problems with facial animations/lip syncing not always working, and the eyes not moving correctly - but it should be playable from episode 2 onwards. [hopefully... I tested it in episode 2 and it works there]
There he is - the animations don't line up properly when interacting with other characters, but it's something.
To get the zip file to work in your game, you can load it using the >>Telltale Mod Launcher<<.
Or you can extract the zip archive and place the extracted ".lua" and ".ttarch2" files into the game's "Archives" directory. And to remove the swap, all you have to do is delete all the the files again - they should be easy to identify as they all have "Travis replaces Ben" somewhere in their name.
22 notes
·
View notes
Note
HIII okay so like. I REALLLYYY wanna start posting olnf stuff the way u do with the sprites and already made audios but like…I literally DONT know how. Would u mind telling me about it? No pressure though! 🫶🏽🫶🏽
I think you're referring to the stuff I post on tiktok and I'll try to explain the process as best as possible!! Let me know if it's confusing in any way.
First I get the sprites I need by either accessing spriters resource (which I did for OLB&A) or extracting the files directly from the game (which is what I had to do with OLN&F since they weren't on spriters resource)
Spriters resource: Simply search up "spriters resource our life sprites" in any search engine (I use google) and download the chosen character sprite packs! You'll then have to unzip the files in your files or download applications.
Extracting from the game files: This one may take a little longer. You need to have access to the games files obviously so using a pc would be best (that's what I did) and open the games files and then the file titled "game" there you should find a paper looking icon with "rpa" or "archive.rpa" next to it. Once you've found it, open your search engine and search rpa file extractor online. Don't download any apps, you don't need to. Then you should find the link that says "File extractor online — game resources viewer" then drag the rpa file from the games file and drop it! Then the extracted files should appear on the left side of the screen. There you'll select the files option at the top of the screen and select "save all (zip)" and unzip it in your files.
I know it's a lot!! If you can't be bothered going through with the whole process I can give you access to a discord I made and uploaded some of the sprites to. It's not all of them, just the kids, the backgrounds and overlays. I do plan to eventually get all the sprites uploaded but it'll most likely only happen if I need to use them for anything. I'll get around to uploading the OLB&A sprites sometime soon as well!
Now when you get the sprites, they'll all be separated by the base of the character and expressions so you'll have to put them together yourself. I use ibis paint to put the eyes and mouths in the right places, its the easiest way!
Then afterwards, just start editing in capcut or any editing app you prefer! I recommend making use of the graphs when making the sprites move if you use capcut or any editing app that makes use of graphs! :)
If there's anything else you wanna know just ask! I hope you found this helpful <3
3 notes
·
View notes
Text
A ZIP file ( free unzip program), which is a single file, may contain one or more compressed files or directories. It provides a way for compressing large files, encrypting data, dividing archives, and grouping related files for storage or transfer.
#Zip Extractor#Zip File Extractor#Free Unzip Program#Unzipper Mac#How to Open a Zip File#Open Zip File#Free Zip File Opener#Winzip rar download
0 notes
Text
Saturday, March 25, 2023
Lets continue from yesterday, and show you how to extract files from Persona Games!
CRI FILE SYSTEMS
OR,
I NEED HOW MUCH STORAGE?
Yeah you're gonna need an extra hard-drive if you want all the Persona games unpacked on your computer.
The process for unpacking these games has never been simpler. If you are trying to unpack any of the newer releases (P5R, P4G and P3P's Recent PC and Modern Console ports) than just follow this guide, this method will also work for older releases of Persona games such as P5, P5R PS4, P4G Vita, P3P PSP, basically all of them except P3FES and the older PC port of P4G (known as P4G32 as it used a 32-bit executable).
Ok so step one is to get the most recent version of CriFSLib.GUI.zip from this link. Once you have this file you will need to unpack the zip in a new folder wherever you please.
Now that you have CriFSLib on your computer, open the CriFsLib.GUI.exe file and you will be able to use the program.
The program should look like this:

And as the window says, you can drag any .CPK files onto this window to open them. If you are trying to extract the files from Persona 5 Royal PC, you can find the files by going to "{Your Steam Library Folder}\steamapps\common\P5R\CPK" and unpacking the files there. You can also use Steam and right-click on a game and select "Browse local files" under "Manage" and click on the CPK folder in the window that pops up.
Once you are in the CPK folder, select one of the files and drag them onto the "CriFSLib Extractor GUI" window, like so:
(ignore the anime girl desktop wallpaper)
Next, you can either select all the files you want by shift- or ctrl-clicking the files you want, then right-clicking the window and clicking "Extract Selected" , or extracting all the files by just right-clicking and selecting "Extract All".
A folder select screen should pop up next, I would recommend making a folder named the same thing as the file, so if you were unpacking BASE.CPK, make a folder wherever you want the files also called "BASE.CPK" or just "BASE".
Tip: If you don't want to dig through your files every time you want to extract a new CPK for your CriFSLib.GUI folder, you can set CriFsLib.GUI.exe as the default program to open CPKs. That way, when you need to extract a CPK, you can just double click on it and it will open an empty CriFSLib Extractor GUI window, that you can then drag the CPK onto!
Alright! Thats it for today everyone, see you again tomorrow!
5 notes
·
View notes
Text
Old Game Decompilation Reference Post
In the end, the decompilation of the old Spirit Animals game was achieved using three tools:
ILSpy, which pulls the scripts from .dll files
Unity Asset Bundle Extractor (UABE), which pulls assets of all types out of Unity file bundles.
and we'll give credit to UTinyRipper, which, though it wasn't able to extract all assets from Unity file bundles, was able to recreate the levels in a format that could be loaded into Unity, and so see how things fit together.
You can find the full decompilation of the game at https://drive.proton.me/urls/VFG903EZWG#eXmnNUPduNoS. There are three items at that link.
Scripts/, which contains the code that ILSpy extracted.
Assets/, which contains the full set of assets extracted by UABE
Unity.zip, which is a zipped folder containing the output of UTinyRipper as a Unity project, so that if you have Unity downloaded you can poke around at the assets with it.
The folder also contains a file called README.txt. Feel free to read it! It contains the information in this post, as well as some directions to points of interest, like where to find music files, or 3D models.
An upcoming post on this blog will step-by-step describe how the decompilation was done and how you can do it yourself, in case this tweaks your interest!
#sa game remake#game assets#As I post this technically the folder doesn't contain all those items. They are in the process of upload. Should be there by tomorrow#see patriotismforstetriol 'thanks australian internet connection' post (Nov 2021)#There will be a bit of a warning about UABE in the do-it-yourself decompilation post so wait up on that before using it
3 notes
·
View notes
Text
how to download sims 4 packs for free(mac)
Hi Besties, I recently posted on instagram about how I found a way to download the sims 4 expansion packs , game pack and stuff packs so here are the instructions on how to install them. If you have any issues please contact me on instagram and i'll happily help out.
here are a couple things to consider:
this tutorial is for mac only, there are options for windows on the website in step 1 and there should be instructions there aw well
do this at your own risk, i am not responsible for any issues or viruses you get on your computer. downloading anything off the internet risks the chance of viruses so be careful
If you have questions please dm me on INSTAGRAM @imanimckee , please make sure you are following me so that I get your message request.
now for the tutorial.
STEP 1: DOWNLOADING THE UNLOCKER
first thing we want to do type "sims 4 updater mac" into your web browser or go to this website. next, what we'll do is scroll down until you find "step 1" and follow the steps.
step 1 says to download the file: origin DLC unlocker for mac so let's do that. click this link then under "origin" and "EA" click the first link depending on which software you use to play the sims. if you use origin download with this link, if you use EA use this link.
the file should download in a .zip file, if this is the case it's downloading correctly. if not, you didn't do it right or there's some restriction on your computer.
once the file is downloaded, click it(or double click) to extract it. your computer should do it automatically but if not, go to the app store and download a zip extractor.
now, you should quit origin so it's not open at all. this means completely shut down the app(don't uninstall it, just close the app). to do this, click "quit" when holding down on the app
once you've done that, we're going to open the DLC unlocker folder we downloaded. inside the folder, there is a file called "fix originclient.command", hard press on the file then click "open" and it should open terminal.
NOTE: playing around with terminal can be detrimental to your computer. make sure to back up your device and do this at your own risk.
once terminal is open, follow the prompt and where it says "press any key to continue" press enter/return on your keyboard. once you've done that, it should say process completed. if it does, you did it correctly. if it doesn't, please contact me on instagram for further help.
now, we're going to repeat the process but with the "add fake entitlements.command". so, open the folder once again, open the file "add fake entitlements.command" and do what it says. if it says "press any key to continue", press enter/return on your keyboard. when it lists different sims games in order from 0-2, press 2 for sims4. if you're not playing sims4, this tutorial is not for you. after typing 2, press enter/return. now it'll ask you to open the sims4 online and quit it immediately after. to do this, open origin like normally, run the sims4(but don't play), then immediately quit the game once you get to the main screen. once you've done that, quit origin and go back to the terminal window and press enter/return on your keyboard. it should say "process completed" if you did it correctly.
STEP 2: DOWNLOADING THE PACK(S)
now, we're going to download our pack to add to our sims4 game. to do this click this link. if you scroll down, you should see an organized table of all the sims4 packs. important thing to note: download each pack one at a time. after each download of each pack you must redownload the DLC unlocker and repeat the steps in step 1.
to download your desired pack, click the red link beside the pack name. once you click the red link, it should immediately start to download. there may be an additional tab that opens , close it and go back to the original tab. I noticed it did this a few times before it finally downloaded th pack so just keep closing the additional tab until your desired pack is downloading
your file should be an .iso file. if this is the case, you're doing it correctly. if not, please dm me on instagram. wait for the file to download and once it's downloaded, DO NOT OPEN IT select the file , hard press , open with , → disk image mounter this step is important if you don't open the file correctly it won't apper in your game, please contact me for help.
now, we can open the .iso file from our downloads folder. a window should pop up named TS4-(your pack) with a folder inside , if this isn't the case something is wrong and/or you didn't do it correctly. We're going to go into finder and find the sims 4 packs folder. to do this, open finder → search → sims 4 packs. drag the folder into the sims 4 packs folder we just found.
lastly , make sure your game is offline. from now on anytime you want to play the game you have to open it while offline - you can disconnect from your wifi or go offline in origin. You can do this by opening origin → account → go offline.
If you open it online you will have to repeat all the above steps. But once your game is loaded you can go online from in the game. once origin is offline , open your sims4 game and it should be in there. if necessary i will post a tutorial soon but i hope this helps!
1 note
·
View note
Text
How to extract multiple ZIP files Windows 11
ZIP files offer an efficient and effective way to organize and share multiple files at the same time, but the default ZIP extractor in Windows 11 only permits extracting one ZIP at a time. In order to extract multiple ZIPs at the same time, third-party tools like WinRAR or 7-Zip must be utilized and this guide will walk through these steps to efficiently extract multiple ZIPs simultaneously on…

View On WordPress
0 notes
Text
ppt viewer
Document Reader PDF, DOC, PPT
Document Reader is the solution! It is a free application that allows you to open and view over Word (DOC, DOCX), Sheet (XLS, XLSX), Slide (PPT, PPTX), PDF, TXT, ZIP, RAR and RTF file formats support. all document reader
Do you have documents files on your mobile that you can't open?
Document Reader is the solution! It is a free open office document files that allows you to open word document, read PDF file, open excel, open PowerPoint and extract zip and rar file formats support. document read
➡️ Why should you choose our all document reader app?
• Fast and easy viewing of your office documents
• Search particular document by name
• You can easily convert doc to pdf pdf opener
• Find any keyword in document files through quick search option
• Easily copy text from PDF file PDF opener
• All the functionality of this app you can access without internet access.
• You can easily view documents look like as a as Doc reader, PDF reader, PPT reader, XLS reader, TXT reader, csv file viewer, xml viewer & other open document format. ppt viewer
🌟 Document viewer - Document reader 📖
The most used tools for working with Word, Sheet, Slides, TXT, PDF, ZIP and RAR all from one application. You don’t need to install multiple applications to open apps on different platforms. It is a complete all document reader app. File Reader
🌟 PDF reader - PDF viewer - File Viewer
✔ Zoom in/zoom out pages while reading PDF document
✔ Jump to the page you want directly
✔ Switch from landscape and portrait reading mode freely
✔ Easily print and share PDFs using our PDF reader app
🌟 Word reader - Docx reader 📘
✔ A simple list of word file like as DOC, DOCS and DOCX files
✔ Easily find word document through quick search feature
🌟 Xlsx viewer - Xls reader 📊
✔ Quickly open all excel spreadsheets
✔ A simple and straightforward way to read xlsx file on your device
🌟 PPT reader - PPTX file opener 💻
✔ Support PPT files, PPTX reader, PowerPoint view with high resolution
✔ Easily you can convert ppt to pdf
🌟 Zip Extractor - RAR file opener 🗜️
✔ You can also extract files without internet connection
✔ The quickest way to create a zip file.
✔ All of the files that you want to archive into one folder.
🌟 PDF Tools
✅ JPG to PDF: You can easily convert images (jpg, jpeg, png, etc.) to PDF files. During file conversion time you can compress the pdf file acceding to your requirement.
✅ PDF to JPG: As Important favorite page saves into image format.
✅ Text to PDF: You can easily change your Text files to PDF with this tool.
✅ Remove Password: Remove PDF password security, giving you the freedom to use your PDFs as you want.
✅ Add Password: Encrypt your PDF with a password so it can't be read by unauthorized users.
✅ Merge PDF: Combine PDFs in the order you want with the easiest PDF merger available.
🌟 Document Scanner 📷
The Document Scanner is a PDF document scanner app. You can scan documents, receipts, photos, reports, or anything.
🌟 Notepad - TXT file 📝
Notepad is a small and fast note taking app for making and reading notes, memos, or just any plain text content.
🌟 Scan QR Code - Scan Barcode 📃
This scanner focuses on the core functionality to scan and read the most common types of QR codes and barcodes with super-fast speed.
🌟 File viewer - File opener 🔍
All files are no longer hidden in the mobile. The file manager will help you find files easily. It also provides for opening, deleting, renaming, and sharing files. See file information like file path, file size, last modified date, etc.
Experience the ultimate file reader for all formats now and boost your productivity while saving valuable time.
Our team is dedicated to enhancing the functionality of the office opener application, ensuring it meets your needs. As we continue to develop this comprehensive document management app, we eagerly welcome your feedback.
More Information - https://play.google.com/store/apps/details?id=com.united.office.reader
0 notes
Last Seen Blogs
refugeed-kim
This cane eats peperoni
sakuramisthaven
sso's lesbo stablehand (the other one)

sobblefan
cringe's dead, baby

tomsbonner-blog
Untitled