pi-creates
Pi in the Sky
Heyo, I'm Pi.
INFJ trying to branch out a little and share my arts/crafts/writing/whatever I feel like.
Thanks for stopping by.
======
If you would like to use my screenshots for edits or other creative works, please provide credit back to this blog.
I do not condone of bulk reposts, regardless of credit. Especially in regards to moving my content to a different platform.
701 posts
Don't wanna be here? Send us removal request.
Last Seen Blogs

freakyt33nslvt
Virgin Teen Slut Fantasies


pronglewongle
Yes, I'm the UwU-Gi-Oh bitch

harleyscoffee
Untitled
dominiqueholmes
Dominique A. Holmes
Note
Hi, I'm sorry to bother you. I'm trying to figure out the whole model swap for TWDG and for the life of me I can't. Your tutorials are very well written but I am an idiot when it comes to this type of stuff. I'm trying to swap S1 Kenny with the S2 model and if you are busy or just not in a mood to help I'll understand :) I'll keep trying to make sense of it in my head anyway ':D
I have actually puzzled through that particular swap before - and don't worry, it wasn't just you who had trouble with it.
The basics are the same as outlined in the tutorial where you want to get your season 2 files for Kenny, rename the mesh(es) and related skl to overwrite the files in season 1, and then also get the relevant textures so the mesh doesn't end up invisible. But if you just look at Kenny's files, it can be a little overwhelming since he also has files in season 2 for all his damaged states as well as for when he appears in flashbacks from season 1.
The only mesh you want to deal with is called "sk54_kenny202.d3dmesh" - this is the way Kenny appears when you first see him in the ski lodge. And the skl file associated with that mesh is called "sk54_kenny202.skl". These should be the only two files you need to rename in order to replace Kenny in season 1.
As for what textures Kenny needs... you need all the d3dtx files that have the prefix "sk54_kenny202". All of those are needed to make sure his clothes, body, head, and hair all load correctly.
What's weird about Kenny is he also has updated eye textures in season 2, and if you don't bring these files back as well, he will just have empty eye sockets... his new eye textures come from the files beginning with "sk_wdSharedParts_eye_brown200" - there are 4 files you need to copy over, don't just take the texture without taking the detail, normal map, and specular files.
While you're in the textures for shared parts, there are also 4 parts for eye covers starting with "sk_wdSharedParts_eyesCover" - you will want to save these too.
And lastly, even if you do all of the above correctly and load up your game - you will quickly notice that for some reason season 2 Kenny doesn't have any hands. This is a weird one, but just trust me... the texture for the hands is combined into the textures for the character's head; so what you need to do is save the texture files for Luke's head, that gives Kenny hands.
... I don't know why he apparently uses Luke's hand textures when Kenny has his own, but whatever.
So if you want to bring season 2 Kenny into season 1 episode 1, here's what your files will end up being:
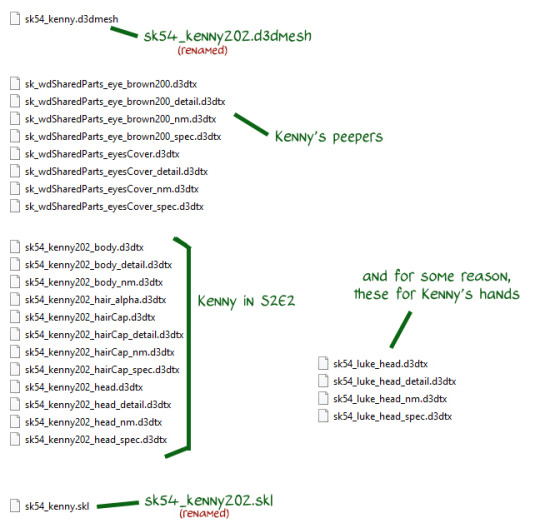
I hope the visual gives you a better idea of how the swap works - because I really get it... it can be confusing when you're looking at all the files, but seeing the end state and working backwards can sometimes help to make sense of things.
And basically, if you wanted this swap to be present in the other episodes of season 1, you'd have to to use the same mesh and skl, but duplicated to rename the meshes and skls that Kenny gets in the other episodes. But at that point, at least it's just the two files and all your texture dilemmas are already sorted.
Good luck, mate!
3 notes
·
View notes
Note
Hey, Pi. Not sure if you're still active, but I am modding my copy of TWDG: Definitive and have been following your model swap tutorials for season 4. I was wondering if you knew how to make multiple model swap mods run together without any conflicts? My goal is to have four running at once (Player/Clem controlling Minnie, Minnie replaced by Clem/AJ as Tenn, Tenn as AJ) for a modded playthrough. For Minnie swapped by Clem, I wanted Clem to use her ranch outfit instead of default. Thanks.
I'm still here, but I'm in like a constant state of hibernation unless prodded.
To answer your question - you can theoretically do as many model swaps as you want in your game so long as you know what you're doing and have the right amount of "parts" to overwrite with. There will always be fiddly moments where things may look off, but complete breaking shouldn't happen all that often.
With that said... swapping out AJ makes certain scenes be unplayable - I don't think it matters who the character you replace him with is, it moves the interaction points in a few scenes and makes them impossible to select.
Off the top of my head, in episode one during the car crash sequence, you need to get a knife from AJ's hand via clicking on one of those interaction circles - changing AJ to another character moves that circle outside of your vision and thus causes you to fail the sequence. And in episode 2, the scene where you need to remove bullet fragments has the same problem - you can't interact with what you need to and therefore you can't progress.
The only way to get passed those moments (as far as I know) is to remove the modded content, play to the next checkpoint, then exit out of the game and put the modded content back in.
If it helps at all, this is kinda how I would go about things...
Get your files for the character parts you need:
- Minerva's files: episode 3 or 4 archives [make sure to save the textures as well]
- McCarroll Clementine's files: episode 4 archives [note that she uses the "sk62_clementine402.skl", but her meshes and textures use the word "Mccarroll" with both the 400 and 402 number]
- AJ's files: any episode archive depending on the outfit
- Tenn's files: any episode archive [note that his name in the files is "tennyson"]
Try swapping in one character at a time:
- KEEP ALL THOSE UNALTERED FILES SEPARATED FROM THE FILES YOU'RE RENAMING
- Just trust me, it gets real confusing if you lose track of what has been renamed and what hasn't - especially when you are doing a swap that directly "flips" characters
- Make a new folder and name it clearly something like "Minnie replacing Clementine" - copy your Minerva files here and rename them to overwrite Clem's files
- Replacing Clementine with Minerva for all episodes requires you to overwrite the the "sk62_clementine400" files for episode 1, then the "sk62_clementine402" files for episode 2 and onwards. Episode 4 has many iterations of Clem's mesh for her lower body - it's a pain to make files for all of them, but just replace all those files with Minerva's lower body.
Check that the character appears correctly:
- Go into the game directly and play for a moment to check that the swap has worked appropriately
- You can see in the episode select screen if Clementine and AJ have been replaced, or you can also check the character viewer, but they aren't always accurate to how the character appears in the game
- If you see the character models appear spindly like their limbs are very warped, this is probably a "skl" file issue... double check that you've used the proper skl to match with the meshes you're using in your replacement.
- Invisible parts can be because textures from later episodes haven't been copied over [unaltered - you shouldn't need to rename any textures for this swap to be what you want]
Move on to the next character:
- Doing it character by character will make it easier
- But still, put things in their own folders with clear names
- In the end, you should be able to take all of your "renamed" files, stick them in one folder, and be able to make a mod file out of it
#twdg#twdg s4#model swaps#hopefully this is helpful#for curious campers out there#the telltale modding discord server has a 'help' channel for people wanting to mod#for if i'm unresponsive or if people just want to look into projects other people are up to#meanwhile... i go back to hibernating#and by hibernating i mean play bg3 because i have a problem#but also actual hibernation because fatigue is poopy
10 notes
·
View notes
Note
Not sure if this’ll get a response, but have you tried removing characters’ glasses? Is that even possible?
I hadn't tried before getting this ask - but for characters who have a mesh for the glasses that is separate to their head, you can just remove the mesh (make a blank to overwrite it with nothing). So for characters like Sarah or Lingard, you could just delete their glasses and it would take them off for the game.
For characters like Alvin or Arvo who don't have a separate mesh for their glasses - you can technically still remove their glasses by editing the texture files and taking the texture for the parts of the glasses away (making them transparent).
Tested this out with Arvo who had a mix of separate textures for his glasses lenses, but the texture for the frames of his glasses were included with his body texture.
So I made blanks for the lenses of his glasses, and then edited the textures:


And then I get this in game:
So in summary - yes, you can remove the glasses of characters - it just takes some extra effort depending on whether the game has a "without glasses" version already or not. And i will note that Arvo's head texture is designed to create shadows on his ears for the glasses - so if you wanted it to look natural, there would be even more edits that need to be done
10 notes
·
View notes
Text
Dropping the link to the Telltale Modding Community's Christmas themed mod for TFS. Key features being a snowy change to the environments, a gingerbread themed school, and numerous other texture changes to bring the whole season into the holiday spirit.
I had a lot of fun contributing alongside other talented mod people in creating textures for this, and I hope people who use the mod can feel the effort we all put into it.
Merry Christmas, mates!
#twdg#twdg s4#twdg mods#texture edits#merry christmas everyone#and happy holiday season to those who don't celebrate
23 notes
·
View notes
Text
For the computer players out there who also get distracted by the grime in TFS on the characters - I finally decided to take my texture edits and turn them into mod files.
So yeah... check it out if you want. It covers all the Ericson crew, Clementine and AJ, James, and Minerva. But if you don't feel like James or Minerva should be cleaned up due to their situations in the plot, they have separate files so you can choose to leave them out.
[The mod doesn't remove all grime, just the worst of it. It doesn't remove acne, scars, or face fuzz. It also has some embellishments by me in the form of freckles/moles for when I erased them in the clean-up and re-added them afterwards.]
16 notes
·
View notes
Note
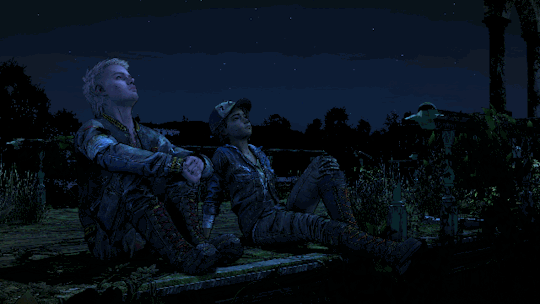
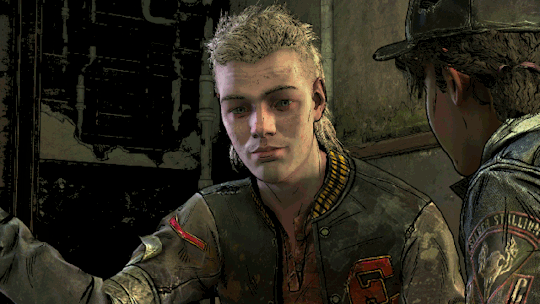
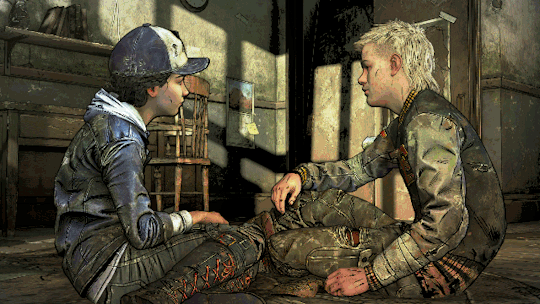
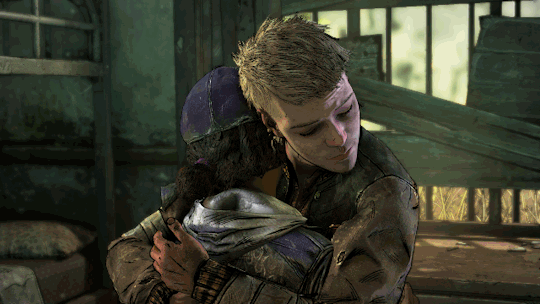
Can you do Marlontine gifs, specifically with the dance scene, the pretzel date scene, the piano scene, the stargazing scene and the party scene?


===
I got you some Marlontine, anon.
[plus a bit of dancing AJ, because he's going to be a shadow to every Clem relationship]
38 notes
·
View notes
Photo


Some practice with digital art and flat colours - because I like how these ones turned out.
I’m also never able to leave the Dragon Age headspace if you can’t tell...
19 notes
·
View notes
Text
Cross Season Swap
With many many thanks the BatuTH on GitHub and the Discord modding group, this clever cookie has put together tutorials and materials to make cross-season swaps work together nicely in the Definitive Edition.
His tutorial can be found >>here<< and >>here<<, he also links to the materials you’ll need to make sure your swapped character appears without texture/graphical issues. Forgetting to put those materials in will lead to characters appearing invisible, grey, or just glitchy overall. With his permission I’ve put together an example of how to use the files and move a character from one season to another.
In this case, I’ll be swapping tiny McCarroll AJ from Season 4 into Season 1 to replace Lee. I will go through the swap step by step, but the process will be significantly easier to follow if you are already familiar with the basics covered >>here<<.

As always, we’ll be following these basic steps:
1. Finding the files associated with the character we want to swap in
2. Renaming a character’s files in a manner that causes the game to load them instead of another character
3. Putting the renamed files back into the game
And then optionally going the extra mile to tweak files to improve the swap, and potentially making a mod file for ease of use.
The way we go about improving our swap will be slightly different depending on what season we are swapping into, but primarily what we want to do is make sure we rename our files or make duplicate files to properly overwrite as many parts of the other character as possible. I will be going through the basics of how this works for moving a character from Season 4 to Season 1 as we reach the renaming process for this example – but the way we rename would be different if we changed the swap we are doing.
1. Finding the Files
Since the character we want to swap in for this example is AJ during the McCarroll portion of Season 4, we are going to want to search in these archives for our files:
WDC_pc_WalkingDead404_anichore.ttarch2
WDC_pc_WalkingDead404_data.ttarch2
WDC_pc_WalkingDead404_txmesh.ttarch2
Using the TellTale Explorer, we can go into the archives and search for “ajmccarroll” to see files associated with him. [lots of double letters – watch your spelling]
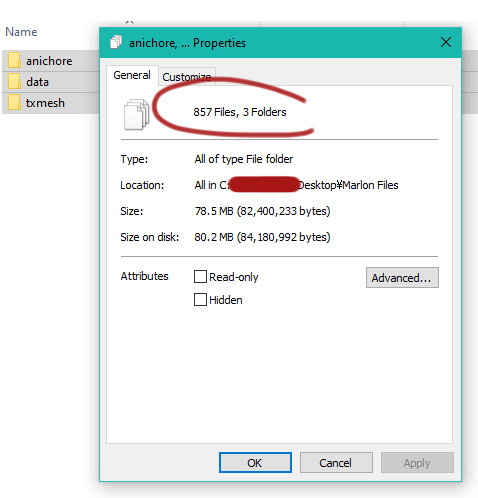
Create a folder somewhere on your computer to place all of his files as we find them. In my case, I just make a new folder on my desktop and call it “aj files”, then within that folder I make three folders to house the “txmesh”, “data”, and “anichore” files we will be dumping out of the archives.
[You can simply drop all the files without separating them into individual folders if you wish, but keeping them separated for now may help with troubleshooting later should something go wrong.]
In the “data” archive, all we need to do is search “ajmccarroll”, select “Save All Files”, then “Save all visible files (raw dump)”, and select to save the files into the “data” folders inside the “aj files” folder. In the “anichore” archive we start the same way as the “data” archive by searchi
ng for “ajmccarroll” and saving all the files. But after getting these files, we want to also search for “aj_headEyeGesture_look” – we want these files as well because McCarroll AJ doesn’t have his own set of eye movements, and we want our swap to have animated eyes. So, we will need these files for later renaming.
And if we also want eyebrow movements, we’re going to want to search for “brows” in the “anichore” as well. There aren’t a lot of eyebrow animations that are unique in Season 4, and in our case we can see from the short list that our options are either based on Clementine’s eyebrow movements, Minerva’s eyebrow movements, or the generic male animations from the Batman Telltale game… we want to save those generic Batman animations, so we can change our search terms to only include those.

To make things simpler, change the search term to “Gesture_brows” and we should only see the batmanGM animations. Save all the visible files alongside the other animations we’ve saved.
For the “txmesh” archive, we will need to do something similar to the “anichore” archive. We want to save all of the “ajmccarroll” files as before, but we need to do a little bit more. The McCarroll version of AJ uses the normal textures from AJ for some parts – that means we want to also save those textures otherwise we’ll have blackened or invisible parts in our swap. Specifically, we want to save the d3dtx files that are responsible for AJ’s hair, head, and eyes as they are reused on the McCarroll model.
These are the specific files you will need to save:

An observant eye might notice that McCarroll AJ does have an eye texture and be wondering why I’m suggesting we save AJ’s eye texture too. The reason I’m suggesting we save the normally used eye texture is because of this:

McCarroll AJ has red eyes throughout his appearance in the game – and therefore he doesn’t have a non-crying variation to his eye texture. We can, however, use AJ’s other textures to fix this in the renaming process later.
Now we need to go through the files we’ve dumped to filter out the things that are unnecessary and delete them.
====
Starting in the anichore…
We can immediately delete any file with the “.chore” file extension.
And we can also delete any files that begins with “sk”.
---
Moving on to the data folder…
We only want to keep the “.skl” file and the “.ptable” files. Delete the “.prop” files.
--
Finally, the txmesh…
In this folder we need to choose what to keep based on how we want AJ to appear in our swap. Currently, the files we have saved will make AJ appear in blood splattered clothes, and with blood on his face. I personally would rather that not be the default for this swap, so I want to make some changes to remove those blood textures.
Here I have highlighted the textures associated with the blood that appears on AJ’s McCarroll model during the Ranch sequence:
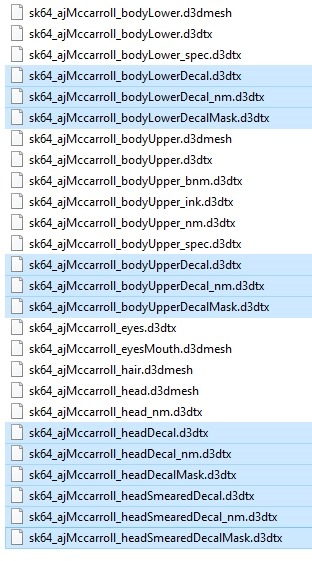
From experience I can tell you that we SHOULDN’T simply delete these files. Deleting all of them will lead to AJ’s swapped model to appear as if it’s in shadow at all times in our game. What we can do is delete most of the files, but keep the files that end in “Decal_nm.d3dtx”. We also only need to keep one of either “headDecal_nm” or “headSmearedDecal_nm”.
I also delete the “sk64_ajMccarroll_eyes.d3dtx”. We are going to replace this file later with AJ’s normal eye texture, so we don’t need this one.
2. Renaming
This is where things are a bit more complicated in some parts of the process. It will help to be familiar with the file names of the character we want to overwrite, and how the season we are overwriting into normally names its files.
In the anichore folder…
Since we are taking a character from Season 3 or Season 4 into Season 1 or Season 2, we have to rename things based on the differences on how the first half of the franchise names filed compared to the second half.
Our first big problem is the differences in how the seasons name the files responsible for the facial emotions for the characters.
For comparison, here are the files responsible for facial emotions:
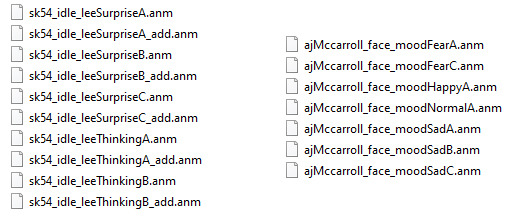
On the left we have some of Lee’s normal files to make sure his face emotes correctly when he’s not actively speaking – on the right we have McCarroll AJ files for the same purpose.
We do not have a clean overlap of emotions, nor is it a simple issue change where we only have to swap out “ajMccarroll” with “lee”.
If we want our swap to emote at all times, we have to use what little amount of AJ files we have, and make them overwrite all of Lee’s files by duplicating them (copy + paste) and renaming the copies.
There is no right or wrong choice in deciding what file will overwrite what file, just use your best judgement and probably try to match emotion types together if they make sense. Basically, this is what I have done:

We have to do something similar for the animations necessary for making sure our swaps eyes move and that they blink.
To make AJ blink, we want to rename “ajMccarroll_face_eyesClosed.anm” into “lee_face_blink.anm”.
Making AJ’s eyes move is a bit more complicated, but follows the same principles as the renaming we did for the emotions. We want to use those “aj_headEyeGesture_look” animations to overwrite instances of “lee_headGesture_look” that would normally appear in our game. Much like before, there isn’t a 1:1 change we can make here – the naming conventions are different and we have a different number of files… use your best judgement and try to keep things at least consistent with the same basic directions.

[Please note that those instances of “lee_headGesture_lookDownQuicRight.anm” and “lee_headGesture_lookDownQuicRight_add.anm” are missing the “k” in the word “Quick” – this is not a typo on my part, the game files are named that way]
For the eyebrow animations, we have to do something similar to the eye movements. We want to use those batmanGM brow animations, and rename them to cover up Lee’s brow animations. Once again, there isn’t a perfect matchup for all of these files, use your best judgement to try to align things according to the direction of movement.

Any files that are “leftover” after the renaming process for the eyes and eyebrow animations can be deleted as they won’t provide anything for our swap.
That should leave us with our renamed files and the ajmccarroll phoneme files that we won’t be renaming.
This is what our anichore folder should include when we are finished:

---
In the data folder…
We have a much easier time and just have to change instances of “ajmccarroll” to “lee”, and also every instance of “sk64” to “sk54”. And if we theoretically wanted this swap to carry on for the future episodes in Season 1, we’d make duplicates of our .skl file and use it to cover the various other .skl files that Lee has in the rest of the season.
But if we want to have our character to emote as fully as possible, we need to try to cover all of Lee’s normal ptable files, even though McCarroll AJ has fewer. Like in the anichore renaming stage, we need to create duplicates and do our best to match them to the appropriate emotions that Lee has.
This is what happens to my data folder as I rename the files, and create the necessary duplicates to cover Lee’s additional ptables.

---
In the txmesh folder…
For this folder we want to first rename our meshes to overwrite Lee’s meshes. WE DON’T WANT TO RENAME THE .d3dtx FILES - leave those texture files unaltered.
However, Lee has a lot of meshes throughout the season – I’m going to replacing his files for episode one, but the same principles apply to his meshes that appear in the rest of the season.
In episode 1, Lee has more meshes than we have AJ meshes – so we want to rename what we can to cover Lee’s files, then we can either make “blank”, 0kb d3dmesh files to cover them, or dupe one of our other meshes to cover them. It doesn’t matter which option you choose, the result will be the same visually, the only difference will be the final size (in mb) of your swap.
Here are the changes I made:

It is worth noting that it doesn’t matter if you decide to use AJ’s head mesh to overwrite Lee’s leg mesh – it won’t shuffle where the meshes load in game. So long as you get all the files to load on separate meshes, it doesn’t matter if they “match” the part type.
And finally, we want to rename one texture file so that AJ’s eyes load correctly. Remember when we saved AJ’s “normal” eye texture instead of the McCarroll eyes? We have to rename that file now so that the McCarroll mesh will load that texture.

The rest of those d3dtx files that we haven’t renamed can stay as they are – we still need them, but we don’t want to change anything about them.
3. Putting the files into the game
Now all that’s left is to put all the files from our “aj files” folder into our game’s archive directory, and to take those material from BatuTH’s Github link and put the appropriate folder’s contents into our archives as well.
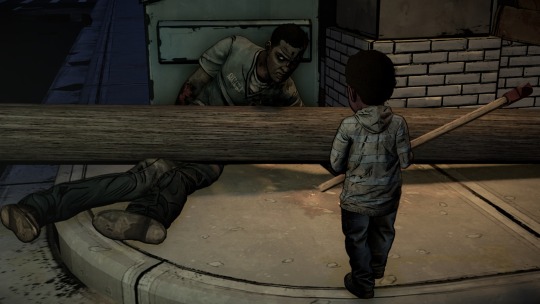
Once we have copied all of our files over, we should be able to boot up Season 1, episode 1 and see our swap in action. Or, alternatively, you can take a sneak peek in the character viewer – but be aware that the character viewer isn’t always an accurate test as to whether your swap will work completely in game.
But if things have worked out, you can enjoy the hilarity of never having the camera focus on you, but you know if you could pan the camera normally this is what you’d see:
And if you want to go the extra mile and overwrite Lee’s meshes and skeleton for future episodes, you can continue putting the tiny AJ into many more situations that are very unfitting for him.

And from here you can turn your modified files into a mod file, just check out the steps for how to do that at the end of the other tutorial >>here<<.
16 notes
·
View notes
Text
Season 4 Swap
For demonstration purposes, this will be the step-by-step process for doing a swap in Season 4 – in this case, using Marlon to overwrite Minerva.

As with any swap, there are three basic steps to getting this to work:
Finding the files associated with the character we want to swap in
Renaming a character’s files in a manner that causes the game to load them instead of another character
Putting the renamed files back into the game
And there are additional steps that can be done to improve a swap and make it into a mod file, there is information on those steps in my other tutorial >>here<<. I would also recommend reading the start of that other tutorial for links to relevant tools that will help you with swapping, as well as an explanation on the file types we’ll be looking at.
This post’s primary role is to be a quick reference for someone who somewhat knows what they’re doing but wants a quick reminder on the differences of swapping in Season 4 compared to the other seasons. I’m making the assumption that you know where to locate your games archives and how to use the Telltale Explorer to look through them.
1. Finding the Files
A quick summary to help you when looking through the files.
Male adult characters will have names like this: sk61_xxxx
Female adult characters will have names like this: sk62_xxxx
The smaller characters will have names like this: sk63_xxxx
Toddler AJ is unique and has: sk64_ajMccarroll
It is also worth noting that when I say “smaller characters”, I am specifically referring to AJ, Omar, Ruby, Tennessee (who is named Tennyson in the files), and Willy.
And here’s a quick cheat sheet to let you know what sorts of files you’re looking for and where to find them:
In the txmesh archives:
skxx_NAME_bodyLower.d3dmesh
skxx_NAME_bodyUpper.d3dmesh
skxx_NAME_eyesMouth.d3dmesh
skxx_NAME_hair.d3dmesh
skxx_NAME_hands.d3dmesh
skxx_NAME_head.d3dmesh
skxx_NAME_PART.d3dmesh
skxx_NAME_PART.d3dtx
skxx_NAME_PART_bnm.d3dtx
skxx_NAME_PART_ink.d3dtx
skxx_NAME_PART_mask.d3dtx
skxx_NAME_PART_nm.d3dtx
skxx_NAME_PART_spec.d3dtx
In the data archives:
skxx_NAME.skl
skxx_NAMEEMOTION.ptable
In the anichore archives:
NAME_eyes_xxxx.anm
NAME_face_xxxx.anm
NAME_faceGesture_xxxx.anm
NAME_headEyeGesture_xxxx.anm
NAME_headGesture_xxxx.anm
NAME_phoneme_xx_EMOTION.anm
For Season 4 all of the files can be found in these three archives:
WDC_pc_WalkingDead40X_anichore.ttarch2
WDC_pc_WalkingDead40X_data.ttarch2
WDC_pc_WalkingDead40X_txmesh.ttarch2
The X in each filename being the episode number where the character appears.
===
Since in this demonstration we want Marlon to swap in for another character, we want to find his files. As a male character, his files are going to look like “sk61_marlon”, or simply “marlon” when we search for them.
Create a folder somewhere on your computer to place all of his files as we find them. In my case, I just make a new folder on my desktop and call it “Marlon files”, then within that folder I make three folders to house the “txmesh”, “data”, and “anichore” files we will be dumping out of the archives.
[You can simply drop all the files without separating them into individual folders if you wish, but keeping them separated for now may help with troubleshooting later should something go wrong.]
Using the Telltale Explorer, I open up the Season 4 Episode 1 archives and search “Marlon” in all 3 of the archives. After performing the search, I select “Save All File” > “Save all visible files (raw dump)” and select to save the files into their respective folder location inside the “Marlon Files” folder.
Since this is the only episode that Marlon appears, we shouldn’t need to go into any of the other episode archives looking for his files.
And now we’ve got some files to sort through and remove everything unnecessary.
---
Starting in the anichore…
We can immediately delete any file with the “.chore” file extension.
All we want of the remaining files, are those that start with “marlon” in the name.
But that summary I added at the start of this post? We only want some of those for this swap as it takes place in s3 or s4… anything else, we delete. Basically, this means we keep every file that looks like this:
marlon_face_moodEMOTION.anm
marlon_phoneme_xx_EMOTION.anm
Once I’ve removed everything, I’m left with 145 files…. Which is still a lot, but it’s far fewer than what we started with – but these should undoubtedly be files we actually need for a usable Marlon swap.
---
Moving on to the data folder…
This one will be quite easy to narrow down. The only things we are interested in are files with the “.skl” and “.ptable” extension.
Everything else can go.
And that should leave us with these 11 files:
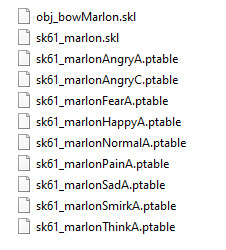
The only major issue with what is left in this folder is that “obj_bowMarlon.skl” file – it is completely unnecessary for our swap so we can get rid of it.
---
Finally, the txmesh…
In this folder, we only want the files that start with “sk61_marlon”. Every other file in this folder is not related to our swap and can be deleted. That should leave us with an assortment that looks like this:
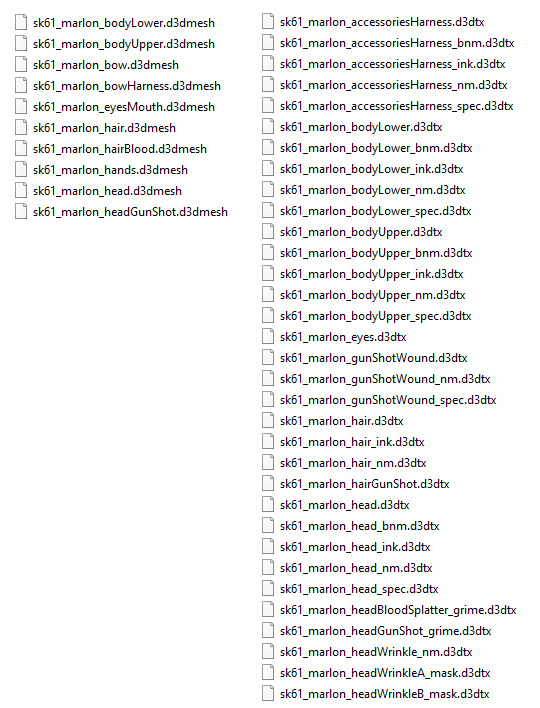
Because I don’t particularly want my swap to feature Marlon walking around with a bullet hole in him, or being covered in constant blood splatter, I’m deleting the .d3dtx files that mention the gunshot or blood.
Then we have to decide if we want Marlon to be wearing his bow harness or not in our swap. And for that matter, if we can have the harness appear of not… what I mean by this, is that most characters only have 6 main meshes to overwrite, and adding the bow harness will require a 7th “slot”. Minerva has 6 meshes in episode 3, but she has 7 in episode 4 – so if we want to use the harness, it will only appear in the final episode should we use it.
For demonstration purposes, I will use the harness in this swap in the final episode – so we can leave the “sk61_marlon_bowHarness.d3dmesh” in our txmesh folder. What we should delete, however, is “sk61_marlon_bow.d3dmesh”. He won’t be using the bow in this swap.
This should be the final look of the txmesh folder now:

2. Renaming
For this step it is helpful to know how the files are named for the character we are overwriting.
Most of the files for Minerva will be named in the same format as Marlon’s files, with the exception of having a different sk number and, of course, her name instead of his.
The main things we want to take particular notice of are the .skl and .d3dmeshes of the character we want to replace. Because if we don’t overwrite something the game is going to still try to load it, and that is likely to cause obvious visual problems in the swap.
For Minerva, across the whole season this is what we’re looking at covering:

Now what we want to do is go into each of our folders and rename the required files, while taking care to leave other files alone. I also recommend a bulk renaming program just to speed up the process, but you can do these swaps by hand renaming if you so desire.
---
In the anichore folder…
Rename every instance of “marlon” to “minerva” for the face_moodEMOTION.anm files.
LEAVE THE PHONEMES UNALTERED
---
In the data folder…
Rename every instance of “marlon” to “minerva”.
Rename every instance of “sk61” to “sk62”.
---
In the txmesh folder…
We only want to rename the .d3dmesh files in this process. WE DON’T WANT TO RENAME THE .d3dtx FILES - leave those texture files unaltered.
For most characters in Season 4, we will have roughly 6 main mesh “slots” to work with, then with the occasional extra item, piece of clothing, or altered state creating extra “slots” for us to work with.
For the main 6 meshes, we can simply replace instances of “marlon” to “minerva” and “sk61” to “sk62”:

As for the remaining “sk61_marlon_bowHarness.d3dmesh” file, we can rename that to “sk62_minerva_headBitten.d3dmesh”. However, this mesh only appears in episode 4, so this change may not be noticeable in our swap outside of that episode.
---
Some extra info for if you’re doing a swap with a character that uses more meshes…
You simply cannot get a swap to load more meshes than it is meant to – if a character you want to overwrite only has 6 “slots” for you to replace a mesh, then you can only load another character who uses a max of 6 meshes. Trying to load a character with 7+ meshes into a character with fewer “slots” will have parts missing.
But if you are trying to do things the other way around because you have a 6 mesh character who you want to appear in the place of a character who has more meshes, for example Clementine in Season 4:

If you were doing a swap to overwrite Clementine in Season 4, she has variations of her meshes that will load if you don’t overwrite them with something – most notably with her hair as she has a bandaged variant, a hatless variant, and a hat variant.
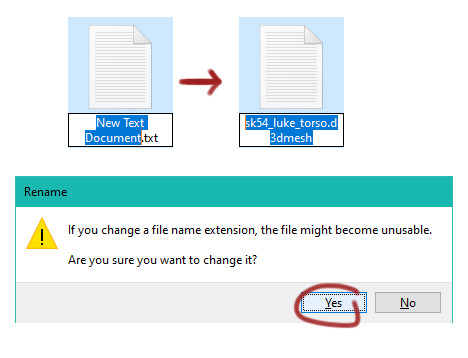
An easy thing we can do to stop other meshes from loading when we don’t want them to is to make some “blank” mesh files. All you have to do it make a text document (or empty file, it doesn’t really matter) then rename it to whatever we want, followed by changing the file extension to “.d3dmesh”. It’s likely you’ll get a popup asking if you want to change the file extension – click yes, and tadah! You have a 0kb mesh file.

You can do this with any files you want to not load in your game. It effectively makes your game decide to load nothing instead of what it should load in the normal situation.
This can also be used for .ptable or .anm files when characters don’t have a proper overlap of file names – while it of course will make nothing load in those moments, it can stop meshes from “breaking” mid-animation if they happen to try running an .anm that is incompatible with it.
3. Putting the files into the game
All those files in the Marlon Files folder can now be put into the game and if everything has been done correctly, we should be able to see the results of the swap.
Navigate to your game’s directory (the location where the game was installed) and open the “Archives” folder inside there. You want to take all the files out of the “Marlon Files” folder we have made and copy and paste them into the “Archives” folder. Please note that you don’t put the folders into the Archives directory, just the raw files (including the files we saved but didn’t rename).
[If you’d like an explanation as to why we are still putting in the files we didn’t alter, it is in the event we are putting a character into a position where the game normally doesn’t have those files accessible to it – in this case, we are taking files we found in the episode 1 archives and trying to get them working after they would otherwise stop appearing naturally. We are basically putting these unaltered files into a place where the game will always load them, regardless of which archives it would normally be trying to load.]
Now if you boot up your game, you should be able to see the results of your swap.
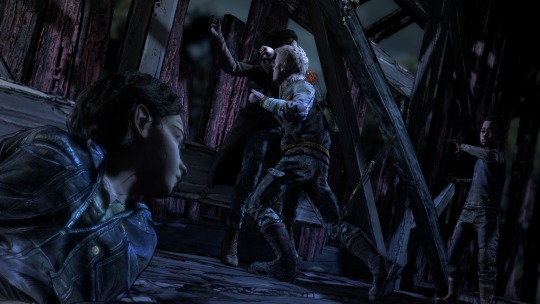
Here’s Episode 3 (notice no quiver on Marlon’s shoulder):

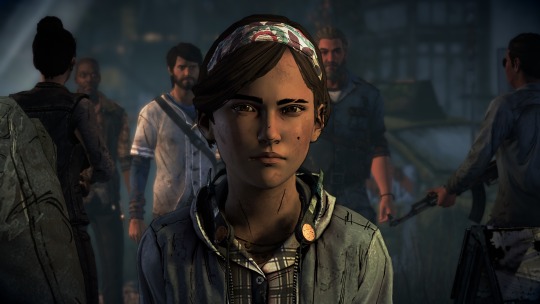
And here’s Episode 4 (with his harness and quiver):
And when you’ve finished playing with the swap and you want to return your game to normal, all you have to do is remove those files you just added from the Archive folder.
And if you want to try improving the swap you’ve made or make it into an easy to install/uninstall mod file, you can read about how to do that in this post >>here<< - just scroll down to steps 4 and 5.
13 notes
·
View notes
Text
Season 3 Swap
For demonstration purposes, this will be the step-by-step process for doing a swap in Season 3 – in this case, using Mariana to overwrite Gabe.
As with any swap, there are three basic steps to getting this to work:
Finding the files associated with the character we want to swap in
Renaming a character’s files in a manner that causes the game to load them instead of another character
Putting the renamed files back into the game
And there are additional steps that can be done to improve a swap and make it into a mod file, there is information on those steps in my other tutorial >>here<<. I would also recommend reading the start of that other tutorial for links to relevant tools that will help you with swapping, as well as an explanation on the file types we’ll be looking at.
This post’s primary role is to be a quick reference for someone who somewhat knows what they’re doing but wants a quick reminder on the differences of swapping in Season 3 compared to the other seasons. I’m making the assumption that you know where to locate your games archives and how to use the Telltale Explorer to look through them.
1. Finding the Files
A quick summary to help you when looking through the files.
Male characters will have names like this: sk61_xxxx
Female characters will have names like this: sk62_xxxx
Child characters will have names like this: sk63_xxxx
And toddler AJ is unique and has: sk64_aj
It is also worth noting that Clementine, Mariana, and Gabe do not qualify as “child” characters in this numbering system outside of when they appear in flashbacks. Their younger variations (and also the generic children that appear in Richmond) use the sk63.
And here’s a quick cheat sheet to let you know what sorts of files you’re looking for and where to find them:
In the txmesh archives:
skxx_NAME_bodyLower.d3dmesh
skxx_NAME_bodyUpper.d3dmesh
skxx_NAME_eyesMouth.d3dmesh
skxx_NAME_hair.d3dmesh
skxx_NAME_hands.d3dmesh
skxx_NAME_head.d3dmesh
skxx_NAME_PART.d3dmesh
skxx_NAME_PART.d3dtx
skxx_NAME_PART_detail.d3dtx
skxx_NAME_PART_mask.d3dtx
skxx_NAME_PART_nm.d3dtx
skxx_NAME_PART_spec.d3dtx
In the data archives:
skxx_NAME.skl
skxx_NAMEEMOTION.ptable
In the anichore archives:
NAME_eyes_xxxx.anm
NAME_face_xxxx.anm
NAME_faceGesture_xxxx.anm
NAME_headEyeGesture_xxxx.anm
NAME_headGesture_xxxx.anm
NAME_phoneme_xx_EMOTION.anm
For Season 3 all of the files can be found in these three archives:
WDC_pc_WalkingDead30X_anichore.ttarch2
WDC_pc_WalkingDead30X_data.ttarch2
WDC_pc_WalkingDead30X_txmesh.ttarch2
The X in each filename being the episode number where the character appears.
===
Since in this demonstration we want Mariana to swap in for another character, we want to find her files. As a female character, her files are going to look like “sk62_mariana”, or simply “mariana” when we search for them.
Create a folder somewhere on your computer to place all of her files as we find them. In my case, I just make a new folder on my desktop and call it “Mariana files”, then within that folder I make three folders to house the “txmesh”, “data”, and “anichore” files we will be dumping out of the archives.
[You can simply drop all the files without separating them into individual folders if you wish, but keeping them separated for now may help with troubleshooting later should something go wrong.]
Using the Telltale Explorer, I open up the Season 3 Episode 1 archives and search “Mariana” in the data and txmesh archives. After performing the search, I select “Save All File” > “Save all visible files (raw dump)” and select to save the files into their respective folder location inside the “Mariana Files” folder.
We aren’t going to search “mariana” in the anichore archive for the simple reason that we won’t find any Mariana files – Mariana uses rehashed assets from Clementine in Season 3, so what we are going to do instead is search for “clementine” in the anichore and data archive for Episode 1.
Since this is the only episode that Mariana appears in outside of flashbacks, we shouldn’t need to go into any of the other episode archives looking for her files.

And now we’ve got some files to sort through and remove everything unnecessary.
---
Starting in the anichore…
We can immediately delete any file with the “.chore” file extension.
Anything starting with a prefix such as “obj_”, or “rec_”, or “skxx” can also go.
After removing all those files, I’m still left with 619 animations – which is a lot, but these remaining ones need to be examined more closely before we decide what stays and what goes.
But that summary I added at the start of this post? We only need some of those files since this swap is taking place in s3 or s4… anything else, we delete. Basically, this means we keep every file that looks like this:
clementine_face_moodEMOTION.anm
clementine_phoneme_xx_EMOTION.anm
It is also worth noting that we have files with the name “clementine100” mixed in with our files. These are files related to the younger variants of Clementine (and Mariana) that appear in flashbacks. Since we aren’t using the younger version here, we still want to remove all the instances of “clementine100”.
Once I’ve removed everything, I’m left with 554 files…. Which is still a lot, but it’s far fewer than what we started with – but these should undoubtedly be files we actually need for a usable Mariana swap.
---
Moving on to the data folder…
This one will be quite easy to narrow down. The only things we are interested in are files with the “.skl” and “.ptable” extension.
Everything else can go.
And that should leave us with these 44 files:
There’s some quite obvious problems here if you know what we’re looking at in this folder at the moment. First of all, the only .skl file we want is “sk62_mariana.skl” – we are going to be using Mariana’s meshes, so this is the only logical .skl file to use. Delete every other .skl.
As for the .ptable files, Mariana does not have any of her own – she uses Clementine’s – but there is one .ptable in this folder that is for the “clementine100”, and we should remove that.
And this should be our final look of our data folder:

---
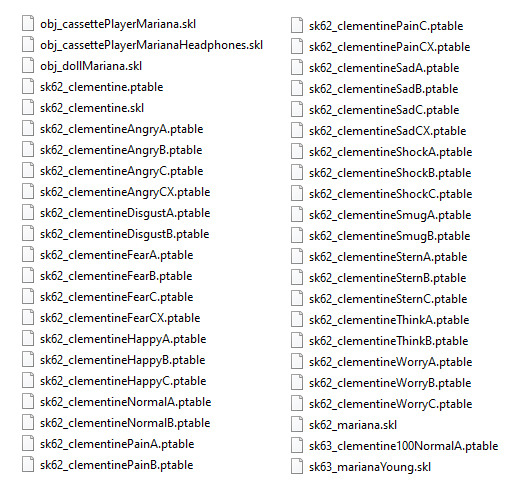
Finally, the txmesh…
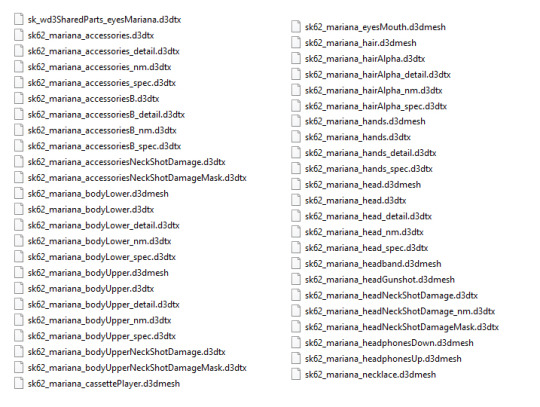
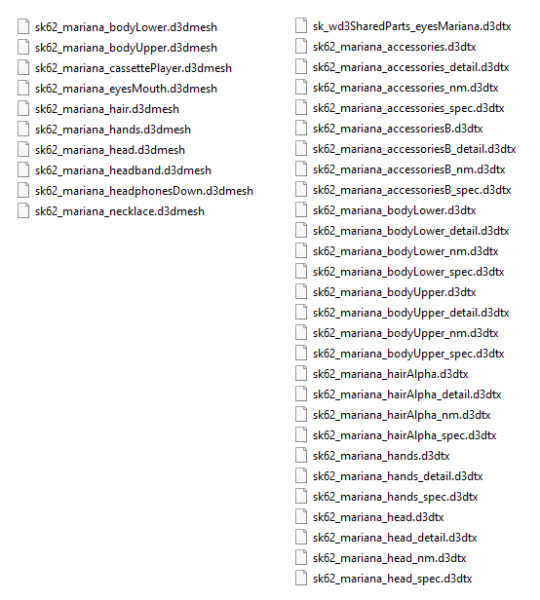
In this folder, we only want the files that start with “sk62_mariana”, and the one extra file called “sk_wd3SharedParts_eyesMariana.d3dtx”. Every other file in this folder is not related to our swap and can be deleted. That should leave us with an assortment that looks like this:
Because I don’t particularly want my swap to feature Mariana being injured or shot, I’m deleting the .d3dtx files that mention the gunshot.
Then we can also decide on whether we want to use the meshes for Mariana with her headphones up, or her headphones down. In my case, I want to use the headphones down, so I can safely delete “sk62_mariana_headphonesUp.d3dmesh”.
This should be the final look of the txmesh folder now:
2. Renaming
For this step it is helpful to know how the files are named for the character we are overwriting.
Most of the files for Gabe will be named in the same format as Mariana’s files, with the exception of having a different sk number and, of course, his name instead of hers.
The main things we want to take particular notice of are the .skl and .d3dmeshes of the character we want to replace. Because if we don’t overwrite something the game is going to still try to load it, and that is likely to cause obvious visual problems in the swap.
For Gabe, across the whole season this is what we’re looking at covering:

Now what we want to do is go into each of our folders and rename the required files, while taking care to leave other files alone. I also recommend a bulk renaming program just to speed up the process, but you can do these swaps by hand renaming if you so desire.
---
In the anichore folder…
Rename every instance of “clementine” to “gabe” for the face_moodEMOTION.anm files.
LEAVE THE PHONEMES UNALTERED
If Mariana wasn’t borrowing Clementine’s files for her animations, naturally this would be a case of renaming “mariana” to “gabe” instead.
---
In the data folder…
Rename every instance of “clementine” and “mariana” to “gabe”.
Rename every instance of “sk62” to “sk61”.
---
In the txmesh folder…
We only want to rename the .d3dmesh files in this process. WE DON’T WANT TO RENAME THE .d3dtx FILES - leave those texture files unaltered.
For most characters in Season 3, we will have roughly 6 main mesh “slots” to work with, then extra pieces based on items that are more like “accessory parts” to their character.
For the main 6 meshes, we can simply replace instances of “mariana” to “gabe” and “sk62” to “sk61”:

As for the remaining 4 meshes, we can look at the names of Gabe’s other files, and pick which consistent meshes will appear throughout the rest of the story that we can overwrite. Using his cap, holster, and different states of his jacket’s hood, we can now do this:
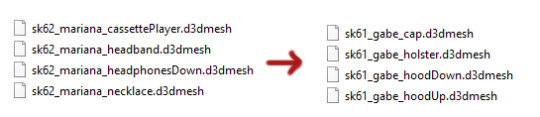
For clarity’s sake I should note it doesn’t particularly matter which slot you use to overwrite another – I could use Mariana’s necklace to overwrite Gabe’s hair file, and it will still appear around our swaps neck and the mesh for Gabe’s hair will disappear. Since the main priority is to have all of Gabe’s files disappear and load of all Mariana’s, it doesn’t really matter how you do it, so long as you do both of those things correctly. It is simply easier to keep track of if you rename things in a logical pattern when it’s possibly to do so.
At this point, however, we still have some of Gabe’s mesh files that will load in our swap. We can’t have that happen if we want our swap to look correct and without those other meshes clipping into our character swap since those will still be loading.
An easy thing we can do to stop other meshes from loading when we don’t want them to is to make some “blank” mesh files. All you have to do it make a text document (or empty file, it doesn’t really matter) then rename it to whatever we want, followed by changing the file extension to “.d3dmesh”. It’s likely you’ll get a popup asking if you want to change the file extension – click yes, and tadah! You have a 0kb mesh file.

You can do this with any files you want to not load in your game. It effectively makes your game decide to load nothing instead of what it should load in the normal situation.
So, in our situation, we want to make blank files to cover up these meshes for Gabe:
sk61_gabe_backpack.d3dmesh
sk61_gabe_bodyUpperBitten.d3dmesh
sk61_gabe_handsBitten.d3dmesh
This can also be used for .ptable or .anm files when characters don’t have a proper overlap of file names – while it of course will make nothing load in those moments, it can stop meshes from “breaking” mid-animation if they happen to try running an .anm that is incompatible with it.
3. Putting the files into the game
All those files in the Mariana Files folder can now be put into the game and if everything has been done correctly, we should be able to see the results of the swap.
Navigate to your game’s directory (the location where the game was installed) and open the “Archives” folder inside there. You want to take all the files out of the “Mariana Files” folder we have made and copy and paste them into the “Archives” folder. Please note that you don’t put the folders into the Archives directory, just the raw files (including the files we saved but didn’t rename).
[If you’d like an explanation as to why we are still putting in the files we didn’t alter, it is in the event we are putting a character into a position where the game normally doesn’t have those files accessible to it – in this case, we are taking files we found in the episode 1 archives and trying to get them working after they would otherwise stop appearing naturally. We are basically putting these unaltered files into a place where the game will always load them, regardless of which archives it would normally be trying to load.]
Now if you boot up your game, you should be able to see the results of your swap.
And when you’ve finished playing with the swap and you want to return your game to normal, all you have to do is remove those files you just added from the Archive folder.
And if you want to try improving the swap you’ve made or make it into an easy to install/uninstall mod file, you can read about how to do that in this post >>here<< - just scroll down to steps 4 and 5.
5 notes
·
View notes
Text
Season 1 or Season 2 Swap
For demonstration purposes, this will be the step-by-step process for doing a swap in Season 1 – in this case, using Ben to overwrite Lilly. Season 2 uses the same methods and has the same naming conventions as Season 1 – the only major difference is that Season 2 tends to use more meshes for its characters.

As with any swap, there are three basic steps to getting this to work:
Finding the files associated with the character we want to swap in
Renaming a character’s files in a manner that causes the game to load them instead of another character
Putting the renamed files back into the game
And there are additional steps that can be done to improve a swap and make it into a mod file, there is information on those steps in my other tutorial >>here<<. I would also recommend reading the start of that other tutorial for links to relevant tools that will help you with swapping, as well as an explanation on the file types we’ll be looking at.
This post’s primary role is to be a quick reference for someone who somewhat knows what they’re doing but wants a quick reminder on the differences of swapping in Season 1 or Season 2 compared to the other seasons. I’m making the assumption that you know where to locate your game archives and how to use the Telltale Explorer to look through them.
1. Finding the Files
A quick summary to help you when looking through the files.
Male adult characters will have names like this: sk54_xxxx
Female adult characters will have names like this: sk55_xxxx
Child characters will have names like this: sk56_xxxx
And here’s a quick cheat sheet to let you know what sorts of files you’re looking for and where to find them:
In the txmesh archives:
skxx_NAME.d3dmesh
skxx_NAME_PART.d3dmesh
skxx_NAME_PART.d3dtx
skxx_NAME_PART_detail.d3dtx
skxx_NAME_PART_nm.d3dtx
skxx_NAME_PART_spec.d3dtx
In the data archives:
skxx_NAME.skl
skxx_NAMEEMOTION.ptable
In the anichore archives:
NAME_eyes_xxxx.anm
NAME_face_xxxx.anm
NAME_headGesture_xxxx.anm
NAME_phoneme_xx_EMOTION.anm
skxx_idle_NAMEEMOTION.anm
Depending on which character you’re swapping, some have a lot of unique files and some have very few because they use rehashed assets from another character or multiple characters. For example, character like Lee has far more files than a character like Danny St. John – particularly in regards to the data and anichore folders. Basically speaking, the files related to emotions and animations that exist in episode 1 are being reused when necessary for characters that appear later to lighten the workload on creating new, unique assets.
For Season 1 most of the files can be found in these three archives:
WDC_pc_ProjectSeason1_anichore.ttarch2
WDC_pc_ProjectSeason1_data.ttarch2
WDC_pc_ProjectSeason1_txmesh.ttarch2
And if they are not finding all the files you feel you should, then they will be in:
WDC_pc_WalkingDeadXXX_anichore.ttarch2
WDC_pc_WalkingDeadXXX_data.ttarch2
WDC_pc_WalkingDeadXXX_txmesh.ttarch2
where the XXX is the relevant season and episode number which the character appears in. For example, Season 1 Episode 3 will be “WalkingDead103” while Season 2 Episode 5 will be “WalkingDead205”.
Season 1 is the only season where you will have to look in the “ProjectSeason” archives – for all the other seasons you will be looking in the individual episode archives.
===
Since in this demonstration we want Ben to swap in for another character, we want to find his files. As a male, adult-sized character, his files are going to look like “sk54_ben”, or simply “ben” when we search for them.
Create a folder somewhere on your computer to place all of his files as we find them. In my case, I just make a new folder on my desktop and call it “Ben files”, then within that folder I make three folders to house the “txmesh”, “data”, and “anichore” files we will be dumping out of the archives.
[You can simply drop all the files without separating them into individual folders if you wish, but keeping them separated for now may help with troubleshooting later should something go wrong.]
Using the Telltale Explorer, I first open up the ProjectSeason1 archives and search “ben” in all three locations. After performing the search, I select “Save All File” > “Save all visible files (raw dump)” and select to save the files into their respective folder location inside the “Ben Files” folder.
This won’t be all of Ben’s files – to get the others we will have to go into the episode archives as well. Specifically, since we know Ben doesn’t appear until Episode 2, we start there and perform the same process – saving all the files that show up when we search for “ben” using the Telltale Explorer. Then there are still more txmesh files for Ben in Episode 3 and Episode 5 – but we shouldn’t need to search any of the data or anichore archives aside from Episode 2.

And we quite obviously have a lot of files to work with now – but a lot of these are not actually files we need – now we need to cull the files here that are unnecessary.
---
Starting in the anichore…
We can immediately delete any file with the “.chore” file extension.
Anything starting with a prefix such as “cam_”, “obj_”, or “ui_” can also go.
And since we know that Ben’s sk number is “54”, we can safely remove any file that start with “sk55” or “sk56” – those belong to other characters and have simply been lumped into our dump of files since the letters “ben” appear somewhere in the name.
After removing all those files, I’m still left with 384 animations – which is a lot, but these remaining ones need to be examined more closely before we decide what stays and what goes.
But that summary I added at the start of this post? Everything we want to keep will be named like that… anything else, we delete. Basically, this means we keep every file that looks like this:
ben_eyes_xxxx.anm
ben_face_xxxx.anm
ben_headGesture_xxxx.anm
ben_phoneme_xx_EMOTION.anm
sk54_idle_benEMOTION.anm
Once I’ve removed everything, I’m left with 174 files…. Which is still a lot, but it’s far fewer than what we started with – but these should undoubtedly be files we actually need for a usable Ben swap.
For people who like the visual aide, here’s everything in my anichore folder now:

It’s a lot – but most of it is phoneme animations based on making sure the lips move appropriately when talking. And Ben is actually one of the characters with fewer unique files compared to some.
---
Moving on to the data folder…
This one will be quite easy to narrow down. The only things we are interested in are files with the “.skl” and “.ptable” extension.
Everything else can go.
And that should leave us with these 14 files:

You may be able to notice at this point that there are two .skl files here – one that is simply labelled as “sk54_ben.skl”, and another that is “sk_54ben103.skl”. We only want to keep one of these – and we want it to be the same .skl that is going to match the .d3dmesh we’re planning to use.
For added context, it helps to know the differences between the appearances of Ben when he first appears in episode 2, and how he appears in episode 3 and onwards. Basically, it’s choosing between a clean jacket texture with the white hood, or the dirtier texture with the red hood:

For this swap, I’m more partial to the red hood – so we want to keep the “sk54_ben103.skl” and delete the other .skl file.
---
Finally, the txmesh…
In this folder, we only want the files that start with “sk54_ben” or “sk54_ben103”. Every other file in this folder is not related to our swap and can be deleted. That should leave us with an assortment that looks like this:
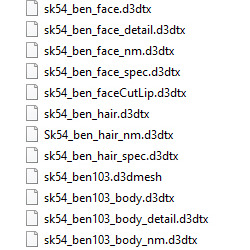
Reading the names of all of these files, you should notice we have two meshes, then a bunch of textures associated with those two meshes.
Because we’re going to be using the “sk54_ben103.skl”, we want to also use the “sk54_ben103.d3dmesh” – we can delete the other mesh.
And because I don’t particularly want my swap to feature Ben with his face beat up or his body bloody from being impaled, I’m also deleting “sk54_ben_faceCutLip.d3dtx”, and “sk54_ben103_bodyImpaled.d3dtx”
That should leave us with the one mesh we’ll be using, and a handful of textures. Some of these textures, however, are repeats of the same part but with variations – we don’t need extras, but we do need to make sure all of Ben’s parts are textured so they appear in our swap. That means we need to make sure he has this combination of files:
alphaHair.d3dtx
body.d3dtx
body_detail.d3dtx
body_nm.d3dtx
body_spec.d3dtx
face.d3dtx
face_detail.d3dtx
face_nm.d3dtx
face_spec.d3dtx
hair.d3dtx
hair_nm.d3dtx
hair_spec.d3dtx
Because we have multiple here that can work to fill this combination, I am putting priority on keeping the “ben103” textures, then using the “ben” textures to fill in the blanks.
This should be the final look of the txmesh folder now:

2. Renaming
For this step it is helpful to know how the files are named for the character we are overwriting.
Most of the files for Lilly will be named in the same format as Ben’s files, with the exception of having a different sk number and, of course, her name instead of his.
The main things we want to take particular notice of are the .skl and .d3dmeshes of the character we want to replace. Because if we don’t overwrite something the game is going to still try to load it, and that is likely to cause obvious visual problems in the swap.
For Lilly, across the whole season this is what we’re looking at covering:
Now what we want to do is go into each of our folders and rename the required files, while taking care to leave other files alone. I also recommend a bulk renaming program just to speed up the process, but you can do these swaps by hand renaming if you so desire.
---
In the anichore folder…
Rename every instance of “ben” to “lilly” – EXCEPT FOR THE PHONEMES.
LEAVE THE PHONEMES UNALTERED
Rename all instances of “sk54” to “sk55”
---
In the data folder…
Rename every instance of “ben” to “lilly”.
Rename every instance of “sk54” to “sk55”.
And remember looking at Lilly’s files and seeing she has 3 .skl files? Even with our renaming, we now only have 1 .skl that cover “sk55_lilly103.skl”. What we want to do is copy and paste that file we have renamed to make duplicates of it. This means that we technically have 3 copies of “sk54_ben103.skl”, but we rename them to:
sk55_lilly.skl
sk55_lilly103.skl
sk55_lillyJacket.skl
---
In the txmesh folder…
We only want to rename the .d3dmesh files in this process. WE DON’T WANT TO RENAME THE .d3dtx FILES - leave those texture files unaltered.
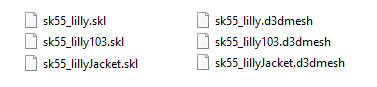
For this swap, we only have the one mesh that needs renaming – “sk54_ben103.d3dmesh”. And like with the .skl files we duplicated and renamed in the data folder; we do the same thing here. Copy that one mesh so we have 3, and make sure they get renamed to:
sk55_lilly.d3dmesh
sk55_lilly103.d3dmesh
sk55_lillyJacket.d3dmesh
---
Some extra info for if you’re doing a swap with a character that uses more meshes…
You simply cannot get a swap to load more meshes than it is meant to – if a character you want to overwrite only has one “slot” for you to replace a mesh, then you can only load another character who uses one mesh.
But if you are trying to do things the other way around because you have a one mesh character who you want to appear in the place of a character who has lots of meshes, for example Luke:

…you can do a swap like this – we could use our one Ben mesh and override “sk54_luke_body.d3dmesh” and all of Ben will load in our game. But he is likely to load with a bunch of other meshes clipping into him for the parts we didn’t overwrite of Luke’s since those will still be loading.
An easy thing we can do to stop other meshes from loading when we don’t want them to is to make some “blank” mesh files. All you have to do it make a text document (or empty file, it doesn’t really matter) then rename it to whatever we want, followed by changing the file extension to “.d3dmesh”. It’s likely you’ll get a popup asking if you want to change the file extension – click yes, and tadah! You have a 0kb mesh file.
You can do this with any files you want to not load in your game. It effectively makes your game decide to load nothing instead of what it should load in the normal situation.
This can also be used for .ptable or .anm files when characters don’t have a proper overlap of file names – while it of course will make nothing load in those moments, it can stop meshes from “breaking” mid-animation if they happen to try running an .anm that is incompatible with it.
3. Putting the files into the game
All those files in the Ben Files folder can now be put into the game and if everything has been done correctly, we should be able to see the results of the swap.
Navigate to your game’s directory (the location where the game was installed) and open the “Archives” folder inside there. You want to take all the files out of the “Ben Files” folder we have made and copy and paste them into the “Archives” folder. Please note that you don’t put the folders into the Archives directory, just the raw files (including the files we saved but didn’t rename).
[If you’d like an explanation as to why we are still putting in the files we didn’t alter, it is in the event we are putting a character into a position where the game normally doesn’t have those files accessible to it – in this case, we are taking files we found in the individual episode archives after episode 1 and trying to get them working before they appear naturally. We are basically putting these unaltered files into a place where the game will always load them, regardless of which archives it would normally be trying to load.]
Now if you boot up your game, you should be able to see the results of your swap.

And when you’ve finished playing with the swap and you want to return your game to normal, all you have to do is remove those files you just added from the Archive folder.
And if you want to try improving the swap you’ve made or make it into an easy to install/uninstall mod file, you can read about how to do that in this post >>here<< - just scroll down to steps 4 and 5.
9 notes
·
View notes
Text
I’m waking up from my hibernation just long enough to say happy pi day to the +timezone people... and happy early pi day to the -timezone people! 🥧
I’ve also been getting some asks on here and messages on Discord asking about model swapping things related to the little differences between how to do things based on the different seasons of The Walking Dead - so I’ve made some little guides that I’ll post up shortly and link to the tutorial post I’ve made. I hope it helps in some way for the people who seem to have suddenly got the urge to learn, but are trying in a different season and are unsure of what the differences are.
1 note
·
View note
Note
Hey there!
Do you have any tutorials on how to model swap in season 1 specifically? I'm trying to swap Travis and Doug and am completely at a loss due to the way the files are so funky with season 1 - any help is much appreciated!
The tutorial I have >>here<< is specifically walking through a swap to put Vince from the 400 Days DLC into the role of Lee in Season 1. It isn't really specifically about Season 1, but it focuses and shows a swap happening in that season.
It covers the basics of file types and how to get them working for a swap. It also goes over the method to load a swap without remaking your archives, which I would highly recommend as it is both much easier and quicker that way.
But if you're having issues finding files for Season 1 in particular, a big differences between that season and any of the others is that it has a lot of files in these archives instead of the individual episodes:
WDC_pc_ProjectSeason1_anichore.ttarch2
WDC_pc_ProjectSeason1_data.ttarch2
WDC_pc_ProjectSeason1_txmesh.ttarch2
This doesn't mean that all of the files you need will be in those, but if you're looking for something specific in the episode archives and can't find it, it's probably in those Project archives instead.
And at the most basic level, the meshes and textures you will be looking for are probably going to look like this:

Even though there are separated meshes for Travis (body, hair, head), he also has a singular combined mesh with everything - that's the "sk54_travis.d3dmesh". This will be the easiest one to work with since a lot of Season 1's characters only have one mesh.
And Doug has three meshes depending on the episode he appears in "sk54_doug.d3dmesh" is the appearance he has in episode 1, "sk54_doug103.d3dmesh" is his appearance in episode 3, and "sk54_dougJacket.d3dmesh" is his appearance in episode 2.
If you want Travis to appear in Doug's place in your game, you will have to use the "sk54_travis.d3dmesh" and rename it to overwrite the Doug mesh you want to replace. If you want him to appear in all of the episodes instead of Doug, then you'll have to duplicate the Travis mesh (just copy + paste) and make sure you rename each copy to cover all three of Doug's meshes.
If you want the inverse and to have Doug appear in Travis' place in episode 2, you do the same process but in reverse. You'll have to pick which version of Doug you want to appear, then use that mesh to rename into "sk54_travis.d3dmesh".
The rest of those .d3dtx files need to be in your archives too in order for the mesh to load it's associated textures. And you DO NOT want to rename your textures if you're just trying to do a standard swap. They just need to exist in their unaltered state in a way the game can load.
You also will want to find both Travis' and Doug's .skl files in the data, and there should thankfully only be these ones:

And it's the same principle as the meshes before. Whichever mesh type you used to overwrite the others, use the matching .skl to overwrite the remaining .skl files that your swap is going to cover.
The most difficult part is going to be getting your swapped character to emote properly in the role you put them in. You might be lucky and the characters you've swapped share base animations and therefore their faces move appropriately... if not, you're going to have to go through the other character's files and experiment with .ptables in the data, and the .anm files in the anichore archives.
If it helps at all, I do know that Doug's character shares files with the cop at the start of the game (sk54_copWD), and Travis shares at least some files with David, the teacher who is with him and Ben in the woods. There are likely even more characters with compatible files that intermix, but I can't personally tell you what they all are, I'm afraid.
Hopefully something in either the tutorial or my rambling helps you, mate. Good luck!
8 notes
·
View notes
Text
A Better Model Swapping Tutorial for The Walking Dead: The Definitive Series
As the title of this post says, I have had the pleasure to discuss modding [and more specifically model swaps] with some clever cookies recently and I have learned that the old method I was using to make model swaps and texture edits appear in-game is obsolete and there are much easier and simpler methods.
And for whoever is still lurking here, I figured it would be a disservice to not provide information on this easier method for others who stumble across this post (or the old tutorial I made).
For this method, you can use Telltale Explorer to open your archives and look at files, and optionally a Bulk Renaming program to speed up renaming files, and optionally the Telltale Script Editor to compile your file changes into an easy to install/uninstall mod file.
The basic process to making a model swap involves 3 steps, with a few extra steps if you want to go beyond:
Finding the files associated with the character we want to swap in
Renaming a character’s files in a manner that causes the game to load them instead of another character
Putting the renamed files back into the game
(optional) Tweaking the swap to have it fit better or correct errors
(optional) Building it into a mod file
In order to get a swap to work correctly, you need to understand a few basic file types that we’ll be dealing with:
d3dmesh : These are the meshes, in very simple words they are the 3D shapes that make up the objects and characters within the game
d3dtx : These are the textures for the meshes
skl : The skeleton of a character which is needed to make animations work correctly
ptable : The emotion table that determines which animations to load on a character’s face
anm : The animation information for all of a character’s movements
The trickiest part is finding the appropriate files amongst all of the game files, and then also renaming them in a manner that does create the end result we are looking for. To begin, let’s decide on what swap to do and figure out where to find the files we need.
===
**Added content for people want an example of a swap that is tailored more to the specific season you want to swap in**
Season 1 or Season 2 example - a swap where Ben overwrites Lilly
Season 3 example - a swap where Mariana overwrites Gabe
Season 4 example - a swap where Marlon overwrites Minerva
Cross season example - a swap where McCarroll AJ overwrites Lee in Season 1
===
For this swap let’s try to take Vince from 400 days and turn him into our playable character in Season 1 Episode 1.
Before we start, we should make a folder somewhere on our computer and simply name it “Vince Files” – this is where we will place all the files we find associated with Vince for this swap and then rename them.
1. Finding the Files
To begin, we need to boot up the Telltale Explorer. In the upper left corner of the explorer window, you can select to open up any Telltale game archives. Either use the drop down menu to select The Walking Dead > The Definitive Series, or simply select the “open file” button at the top of the menu. In either case the “open” window will appear and you will have to navigate to the install directory of your game, and then into the “Archives” folder within it.
Since Vince appears in the 400 days episode of Season 1, all of his unique files can be found in the following three archives:
WDC_pc_WalkingDead106_anichore.ttarch2 – all of the anm files will be in here
WDC_pc_WalkingDead106_data.ttarch2 – the ptables and skl files will be in here
WDC_pc_WalkingDead106_txmesh.ttarch2 – the d3dmesh and d3dtx files will be in here
Open “WDC_pc_WalkingDead106_txmesh.ttarch2” to start looking through the files. In this ttarch2 we can find all of the meshes and textures in the 400 days episode. You can now type in “vince” in the search bar in the upper right and the Telltale Explorer will only show you files with that search term.

Clicking on any of the d3dtx files (shown with the paintbrush icon) will show you the flattened texture on the right panel. Now that we have less files to look at, click the “Save All Files”, then select “Save all visible files (raw dump)”. A window will pop up asking you where the explorer should save the files – direct the explorer to the “Vince Files” folder you made earlier and allow the explorer some time to save all the files.
If we now go to this folder and look through some of Vince’s files.
Right away we can delete the files that start with “obj” – these are objects and not related to our swap. We can also delete the files beginning with “ui” – these are UI elements that aren’t related to our swap. Here is what we should be left with:

Looking through what is left, we can see Vince has a few versions – most notably, we can see he has two meshes: sk54_vince.d3dmesh sk54_vinceCh6.d3dmesh The first file is Vince when he’s on the prison bus, whereas vinceCh6 refers to Vince at the group camp at the end of the 400 Days story. We need to decide which version of Vince we want for our swap – in this case, let’s choose Vince in the casual clothes seen at the end of 400 days. What we need to do now is remove all the files that don’t relate to the mesh we’re going to use. Once we remove everything, we should be left with something like this:

This is everything we’re going to need from the WDC_pc_WalkingDead106_txmesh.ttarch2, so next we need to go back to Telltale Explorer and open up “WDC_pc_WalkingDead106_data.ttarch2”.
We follow the same process as we did before in the txmesh archive. Type “vince” into the search bar, then “Save all visible files (raw dump)” and put it into the same folder where we previously dumped our files.
Of the files we just added to our folder of Vince Files, we can immediately delete all of the “prop” files and “style” files – if you sort the files by “type” in your folder, it should be easy to single out these files and remove them.
After we’ve removed the unnecessary files, we should be left with just these files from the data files:

Notice how we have two skl files – we only want to use the skl connected to the mesh we are using, so we can also remove the “sk54_vince.skl” from this folder.
This is everything we need from the WDC_pc_WalkingDead106_data.ttarch2, so let’s move on to the final archive, “WDC_pc_WalkingDead106_anichore.ttarch2”.
Once again, it’s the same process as the other files – open the anichore archive in Telltale Explorer, type “vince” into the search bar, then “Save all visible files (raw dump)” into the Vince Files folder.
This is where we need to be the most discerning in which files need to be deleted or kept for our swap to work – but to significantly cut out a big chunk of the files at the start, we can remove ALL of the files with the “chore” file extension. None of those matter for swapping – we only want to deal with the “anm” files.
We can then also delete all the animations that begin with the prefixes “cam” and “obj”. We’re not trying to swap any camera movements or object movements, so they’re all unnecessary to keep around.
From here we essentially want to delete anything based on specific moments in the game, but keep animations related Vince’s emotions, facial/head movements, and phonemes.
This means we can delete all the anm files that start with “sk54_action” or “sk54_vince_sk54_action” – those are animations related to specific actions in the story that aren’t going to pop up during our swap, so they’re absolutely not needed.
We can also safely delete all the files beginning with “sk54_bennett”, “sk54_dan” and “sk54_justin”. These are the animations of other characters interacting with Vince – so they are not needed.
Now that we’ve removed most of the unnecessary files, we need to more carefully look at the file names and ask ourselves “is this an animation that could happen in my swap?” and if the answer is no, then we delete it. Also, we need to think about if the way an animation plays out will overwrite something and make it appear wrong. In our case, the game starts with Lee in handcuffs in the back of the police car – and we have animations of Vince in the police bus with handcuffs on. We specifically don’t want these files to be in our swap because the way Vince moves about in a bus will not be the same way Lee moves around in the car, using Vince’s files are likely to make scenes at the start of the game appear buggy.
After culling all the files I thought were unnecessary, I have been left with:
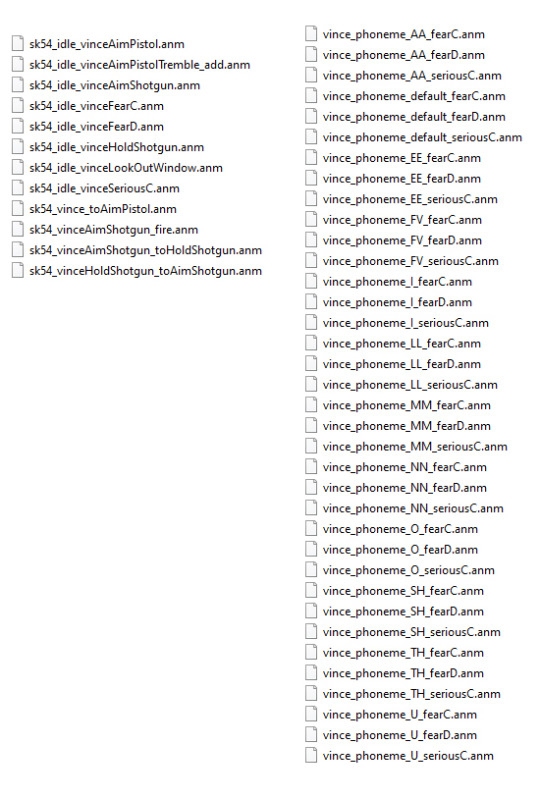
Now our Vince Files folder has everything we need to start renaming them.
2. Renaming
*NOV/2023 Section edited - reworded this part to hopefully fix some common errors
For people new to model swapping, it is recommended you try to manually rename files until you are more familiar with what needs to be renamed.
In the end of this section I cover how to shortcut the renaming using a Bulk Renaming program - this is only recommend for people who have successfully created a swap before.
First, before we try to rename anything, it is important that we know the naming conventions of our “target” character we are overwriting. Using Telltale Explorer, try opening up the archives for the intended episode your swap takes place in, then search the name of the character you want to overwrite.
In this case, since we are going to overwrite Lee with Vince, I can open up either the episode 1 archives, or the ProjectSeason1 archives to get a better idea of what our renamed files should look like:
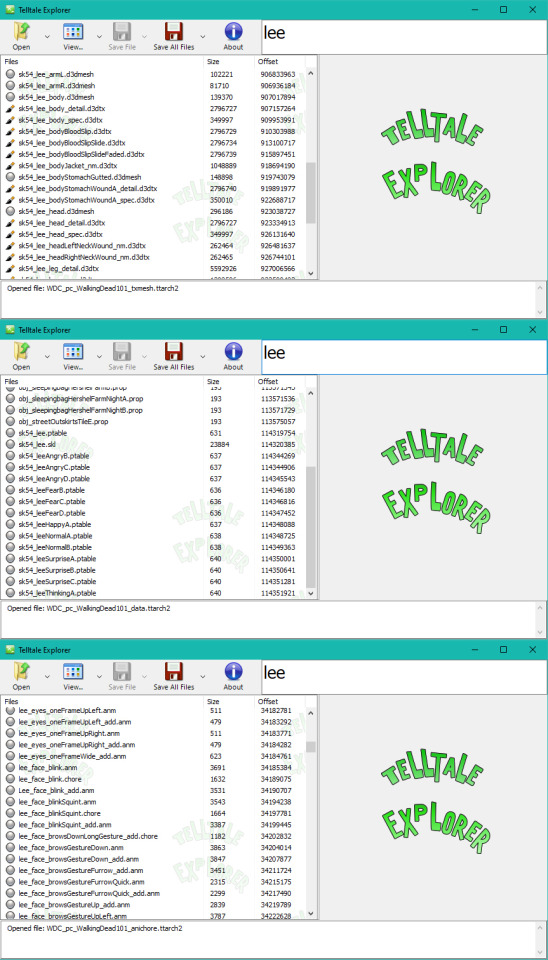
(not all information is shown in this screenshot - this is purely for demonstration purposes)
If this is your first time doing a swap, you may want to regularly come back to look at these files to make sure you rename things correctly in our exported folders. Our priority in this step is to rename our meshes, the character’s skeleton, their ptable files, and some of their animation files so they load instead of our target.
Most files are named something like this:
sk(xx)_(character name)(file information)
(character name)_(file information)
And for some characters with alternative appearances depending on the episode:
sk(xx)_(character name)(identifier)(file information)
(character name)(identifier)_(file information)
What we need to do ensure is that our swap has the correct number following instances of “sk”, the correct “character name”, and to make sure we use an “identifier” if necessary.
For this particular swap, both Vince and Lee use “sk54”, so we don’t need to make changes in that area for our files.
We want to rename our extracted meshes to overwrite Lee’s meshes in the archives, like so:
sk54_vinceCh6.d3dmesh > sk54_lee.d3dmesh
But looking at the archives we can see that Lee has more than one mesh that he uses in episode 1, and this is a problem for our swap if we stop here. If we don’t overwrite ALL of the mesh files that Lee would use for the duration of our swap, the game will still load those other meshes as normal while only part of our swap takes place.
To fix this, we have to take our one d3dmesh and copy+paste it until we have enough meshes in our Vince Files folder so we can overwrite all of the Lee meshes that will appear in the duration of our swap.
Ergo, we end up creating something like this:
sk54_vinceCh6.d3dmesh > sk54_lee.d3dmesh
> sk54_lee_armL.d3dmesh
> sk54_lee_armR.d3dmesh
> sk54_lee_body.d3dmesh
> sk54_lee_bodyStomachGutted.d3dmesh
> sk54_lee_head.d3dmesh
> sk54_lee_legs.d3dmesh
Alternatively, you could create a 0kb “fake” d3dmesh to overwrite superfluous mesh slots.
All you have to do is make a text document (or empty file, it doesn’t really matter) then rename it to whatever we want, followed by changing the file extension to “.d3dmesh”. It’s likely you’ll get a popup asking if you want to change the file extension – click yes, and tadah! You have a 0kb mesh file.
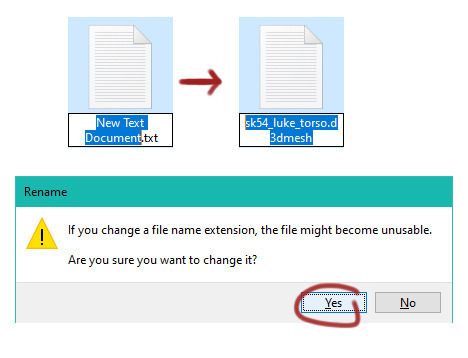
You can do this with any files you want to not load in your game. It effectively makes your game decide to load nothing instead of what it should load in the normal situation.
We follow the same naming convention with our .skl file and rename like this:
sk54_vinceCh6.skl > sk54_lee.skl
And again for all of the ptables, such as:
sk54_vinceFearC.ptable > sk54_leeFearC.ptable
For the ptables, Lee clearly has far more files than we have extracted for Vince, and Vince may also have some ptables with emotion names that don’t overlap cleanly with how Lee’s are named.
If this is your first attempt at doing a swap and you don’t mind your character not always lip-syncing or emoting correctly so long as they visually look correct - you can simply rename what we have and move on.
However, if you want to tweak this and improve it, I go into more detail later in this tutorial on how to improve the facial animations and emoting of our swap.
We can also rename our some of our .anm files here if there is a clear alternative for it to overwrite. In season 1, this will primarily mean doing things such as this:
sk54_idle_vinceFearC.anm > sk54_idle_leeFearC.anm
HOWEVER - we do NOT want to rename any of the phoneme files.
AND we do NOT want to rename any of our texture files.
We need those files unaltered if we want a “normal” looking swap. Renaming the phonemes is unnecessary, and renaming the textures will cause the meshes to load the wrong texture.
This should be all the basic renaming you need to do.
But if you are more confident in renaming and skipped to find the shortcut method...
Here is the point where if you have a Bulk Renaming program, it can make your life a lot easier – otherwise, you’re going to have to rename files manually. For those people who use the link I provided to the Bulk Renaming Utility, if the amount of buttons and input areas seems a little bit daunting, we only really are interested in these bits (I have already renamed my files in this screenshot):

For convenience's sake, I press that heading on the right to sort the contents of the folder by file type.
For this particular swap, both Vince and Lee use “sk54”, so we don’t need to make changes in that area for our files. And while Lee does have identifiers in future episodes, in episode 1 he does not. Therefore, we can simply type into that little replace window on the Bulk Renaming Utility to replace instances of the word “vince” with the word “lee”.
Now we need to highlight the correct files in our folder and hit the Rename button in the bottom right when we’ve highlighted everything. We can highlight the files by simply clicking on the file in the upper window, and holding Shift or Ctrl while clicking on other files we want to add to our selection.
As for what files are the correct files to rename… we want to rename everything in this folder EXCEPT for the phoneme anm files, and the d3dtx files. We still need these files for later, but we need them in their unaltered form.
I will repeat DO NOT RENAME the files with the .d3dtx file extension - it will cause the models to load the wrong texture. Only rename these files if that is your intention.
After you’ve renamed all of those files, we still have some more fiddly things to deal with inside that folder, but we can stop using the Bulk Renaming Utility now, so feel free to close it.
Remember how we were using the d3dmesh and skl named “sk54_vinceCh6”? We need to open our Vince files folder and check that those files are renamed in a manner that they will overwrite Lee’s files in the swap we’re making. And because I used the Renaming Utility, they are currently named like this:
sk54_leeCh6.d3dmesh
sk54_leeCh6.skl
This won’t work in our swap because Lee’s d3dmesh and skl files in season 1 look like this:
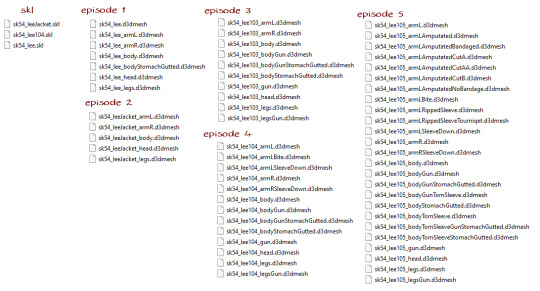
So if we want our swap to actually appear instead of Lee, we need to name the files in our folder in the same way so that Lee’s files get overwritten. This means that for episode 1 we want to change the “sk54_leeCh6.skl” file into “sk54_lee.skl”
3. Putting the files into the game
So this is the main reason I remade this tutorial, because what was once a very hard and frustrating part of this process that required you to make backups and ttarch2 archives actually has some very simple other methods to achieve.
Here is the easiest method…
All those files in your Vince Files folder (both the renamed and unaltered), select all of them inside that folder, right click and select copy. Now navigate to your game’s directory (the location where the game was installed) and open the “Archives” directory inside there. Paste your copied files here.
That’s it.
If you boot up your game now, you should be able to see if your swap was successful. You can check in the character viewer, or if you go into the season 1 menu, you should clearly see Vince has replaced Lee on the episode 1 slide.

But if you play for a little bit, you might notice some… oddities with the lip syncing and facial animations. Or perhaps you simply look at Vince’s clothes and recall a different texture being in the archives when you were using the Telltale Explorer and would rather see Vince wearing that.
Or you’re happy with the basic swap as it – if that’s the case, you can carry on and enjoy it as is – but if you want to make changes to your swap and improve the animation situation, then you can carry on to the next section.
4. Tweaking the details (optional)
How to switch textures:
You might have noticed that Vince has two body textures related to his sk54_vinceCh6.d3dmesh.
One is “sk54_vinceCh6_body.d3dtx”:

And the other is “sk54_vinceCh6_bodyALT.d3dtx”:

If we want the lower option to appear in our swap instead, we can simply delete the other texture from our folder of copied-over files, and rename “sk54_vinceCh6_bodyALT.d3dtx” into “sk54_vinceCh6_body.d3dtx”. Using the Telltale Explorer, you can find the single file you want and select to save it as a “raw” file to use without doing a bulk dump of everything.
Or, we can get creative and see what happens. Looking through other files using the Telltale Explorer, I stumbled on one of Russel’s textures that I thought might be an interesting alternative:

This texture is called “sk54_russellCh6_body.d3dtx”, and you’ll notice how the textures have a mostly similar layout with the exception of the shoes. If we decided to rename this file and it’s associated detail, normal map, and spec d3dtx files, we could overwrite the textures that would normally load on Vince’s mesh.
Basically, by replacing Vince’s files like this:

We can create changes like this:

It isn’t a perfect match, we can clearly see the texture seams on the inside of the pants and how the texture doesn’t line up on the shoes – but this is the potential method to apply texture changes between meshes.
How to improve the facial animations:
An issue with the swap we have performed thus far is that Vince’s face only emotes and lip syncs sometimes. This is because Vince only has a few unique ptable files and animations that we could find in the 400 Days archives, thus most of Lee’s ptables and animations have been left unaltered and are not compatible with Vince’s character – therefore his face defaults to a blank stare.
What Vince uses for the rest of his animations and ptables are rehashed from Glenn. Knowing this, what we need to do is find Glenn’s files and use them to fill in the blanks.
In order to find these we’re going to have to go back to the Telltale Explorer and open up the following archives: “WDC_pc_ProjectSeason1_anichore.ttarch2” and “WDC_pc_ProjectSeason1_data.ttarch2”.
Before we start getting our files, it may be prudent to make a separate folder called “Glenn Files” to keep these ones apart from the others for now.
Once again, use the search function to separate out and dump all the files featuring the name “glenn”.
There will be over 500 files for us to look through now, but there are some big cuts we can make to that number immediately by deleting:
The chore files
The skl file
The style files
The prop file
After removing those, we should be left with only the anm files and ptable files. We will need to keep all of those ptables – however, we only want some of the animations. Of the animations, the files we definitely want to keep will start like this:
glenn_eyes
glenn_face
glenn_headGesture
glenn_phoneme
sk54_idle_glenn(an emotion name)
Everything else can be deleted – you could experiment and try using some of the other animations at a later time, but for the pure basics we have all that we need. And that cuts out about half of files we dumped initially. But now we have to go and rename some of these…
We want to replace the word “glenn” with “lee” in all instances except for with the phonemes. We don’t need to rename those, we just need to make sure they exist in the archives so the ptables can draw the animations from them.
Once everything has been appropriately renamed in the Glenn Files folder, copy and paste the contents into the Vince Files folder we were using earlier. There will be a few files that overlap with the files we previously renamed DO NOT overwrite your old files. This is important because we want Vince’s unique files to take priority over the versions that Glenn uses.
Now if we copy the contents of the Vince Files folder back into our game’s Archive directory, our Vince swap will be much more animated in his facial movements compared to before. I will also note that it isn’t necessary to copy the glenn_phoneme files into the Archive directory for this swap to work since those phoneme are already accessible in the swap we are doing – in other words, because Glenn and all of his files already exist in episode 1, we don’t need to make more copies in the archive. If you were however doing a swap to another episode or season where those files wouldn’t normally be located – then you would also need to copy the phonemes over.
Even with what we have done now, things might not be perfect all the time – if you believe you can improve further, it is up to you to experiment and look for ways to overwrite more of the incompatible animations and ptables with compatible ones.
5. Turning your swap into a mod file (optional)
If you don’t like having all of those loose files inside your Archives directory, you can go a step further and build a mod file that consists of a few lua files. This makes your swap more easily “stored” if you wish to keep backups, and also makes it easier to apply and disable your swap.
In order to create the mod file, we are going to need to use the Telltale Script Editor. I promise you, as someone who doesn’t know diddly squat about programming and scripting – you’ll be fine, it’s not difficult to use.
Run the telltale-script-editor.exe and press the big button that says “New Project”. Fill in the window that pops up (there’s no need to mess with the priority setting, just leave it as default) and then set the file location where you want your mod to be created. For convenience, I have used that Vince Files folder we were using before as the Project location.
Before we carry on using the Script Editor, lets go back and open up the Vince Files folder we just selected as our project location.
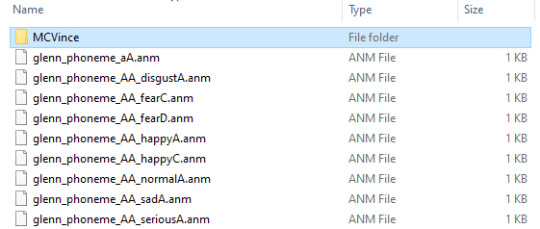
You will see a new folder inside with whatever name you decided to give your mod. In my case, it says MCVince so I will remember that this mod swaps the Main Character into Vince.
If you open up that folder, there will be a file inside, “(project name).tseproj”. Whatever gets placed inside this folder now will show up in the Script Editor window if you right click on your mods name in the left window and select “Refresh”.
So before we move on, let’s make a new folder beside that tseproj file. Call it whatever you want – I have simply called it “Model Swap”.
Now copy all of those files within the Vince Files folder (except for the project folder, of course) and paste them into the newly made folder (“Model Swap”).
Go back to the Script Editor and right click on your project name and hit “Refresh”. Now you should be able to see your new folder if you click on your project and expand it. Expanding the new folder will also show us all of the files we have just put into it:
Now we need to click on the green hammer icon in the top, middle – this will build our mod files. Give the Script Editor some time, and then when it says it has completed building, you can close the program – we don’t need to use it anymore.
And now if we go back to the folder with our mod in it, there will be a new folder inside called “Builds”. Open up that folder and there will be a zipped build archive.
If you unzip this file you will see an lua file, a ttarch2 file, and a json file. This is your mod – you can either use a mod launcher to enable and disable this mod from now on, or simply copy these three files into your Archives directory. To remove your mod later, you simply remove the files.
Simple!
#twdg#the walking dead game#model swaps#modding tutorial#my old tutorial is still up#but i will be editing it to link this new one#because this method is the more friendly method#especially for people who were intimidated by the process before
9 notes
·
View notes
Photo


Dragon Age Inquisition : “Always Night in Thedas” mod and “Always Night in Skyhold” mod by @fontofnothing.
=====
Creatures of Thedas once night falls...
#dragon age#dragon age inquisition#da#dai#gifs#dai gifs#i'm sad that a lot of the gifs i made ended up being too big to upload =[#i know it's my own fault#but still...
35 notes
·
View notes
Note
Hi Pi, im the anon asking about Kenny, thanks for the reply! sorry i worded it badly, I'm trying to do it the other way round so I'm trying to swap bearded Kenny S2E2 model on to Kenny S1E2. While i waited for your reply i managed to get the eyes working for Kenny because i saw your response on a different forum regarding the shared eye dtdx but Kennys hands won't appear. Every time he runs up to Lee in the forest Hes missing his hands, everything else is swapped. I'm not sure what I'm missing
Ah, my bad anon - it's not your fault, the wording of "swap X and Y" is bound to cause confusion for me no matter what.
So I tried the swap the other way around, and yep, no hands... I also had some weird issues with the arms/jacket which I assume was related to not swapping the skl files in the S1project data archive.
I did get it to work eventually, though (ignore the clipping, the important bit is that his hands exist):

Weirdly enough, I worked on the hunch that because the hand textures are in the same d3dtx file as the head/face, Kenny was probably using another character's files instead of his own. I worked through some likely candidates in S2... and it turns out those are Luke's hands.
So basically, I remade the "WDC_pc_ProjectSeason1_data.ttarch2" archive to put the skeleton files in there:
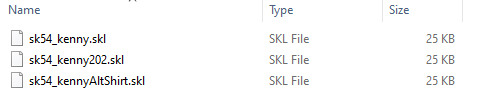
(sk54_kenny202.skl is the original, the other two are renamed - and I probably only needed to make the sk54_kennyAltShirt.skl... the other skl would only be needed if you wanted the swap to carry over into another episode)
And here's everything that I used to remake the "WDC_pc_WalkingDead102_txmesh.ttarch2" :
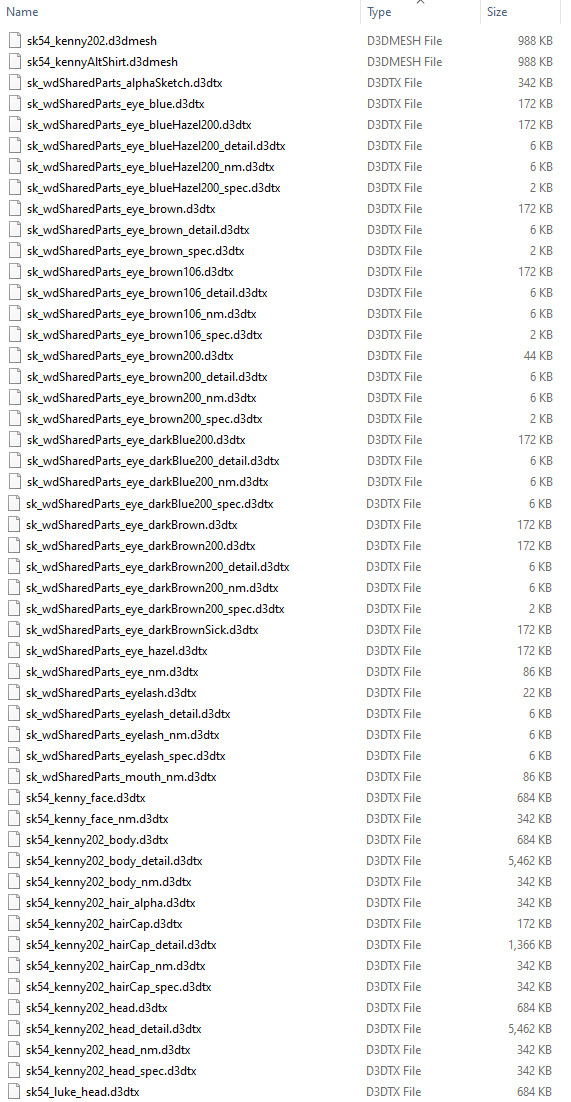
It looks like a lot, but most of it is those SharedParts since I have them all separated out already into a folder and can just copy them over easily. Otherwise it's the basic kenny202 textures and also Luke's head texture to put Kenny's hands back on.
Hope that works for you too, anon - and sorry about the initial confusion.
6 notes
·
View notes
Note
Hi Pi, So I'm trying to model swap Kenny from S2E2 to his S1E2 version model. Now I'm aware if you swap skins from different episodes you need to copy over the D3DTX files too, this is where i get confused because technically Kenny is the same person/model in S1&S2 right? so i only copied over the mesh folder files (D3DMESH&D3DTX) and Kenny does swap but he's missing his eyes hand & feet. his mouth moves though to his dialogue. Have i messed up the mesh? or do i need the data & anichore aswell?
Is this the model and texture you're referring to anon?
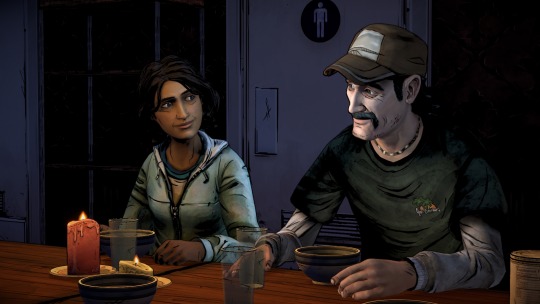
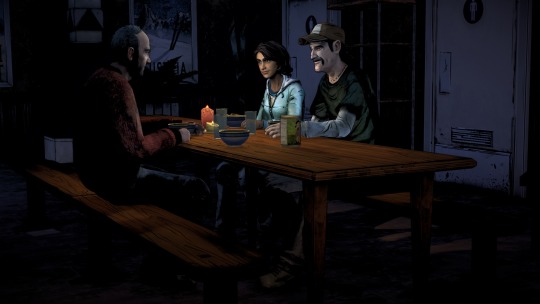
If this is what you're trying to do, then you should be able to do that by only altering the mesh archives. As for why it hasn't worked... my only guess would be that something might have been missed during the copying over process, or perhaps something got corrupted partway through.
Here's the list of files I copied over from the S1 over to S2E2 - the highlighted meshes are the same file (sk54_kennyAltShirt.d3dmesh is the original file) but renamed to overwrite Kenny's normal mesh for S2E2:

All of the textures and the mesh can be found in S1E2's mesh archive, or in the S1project mesh archive. None of the textures shown here will overwrite anything in the S2E2 mesh folder, they all just slot in to make sure the mesh has the files it needs to load.
Hope that helps, anon - good luck with your slightly more shaved Kenny.
3 notes
·
View notes