#DIY tutorials
Text
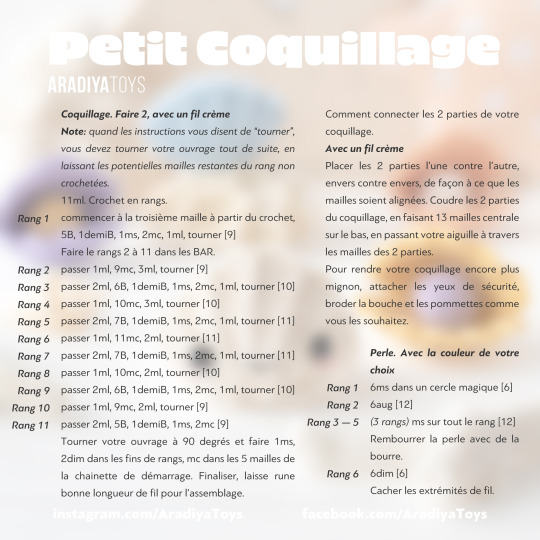
Mead Making for the Blithe and Erratic: A Tutorial
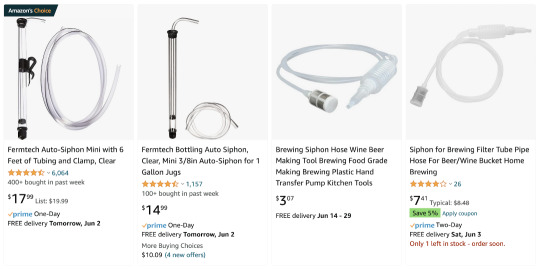
For a One Gallon Batch:
Ingredients ($20USD+):
~3lbs (48oz, 1.5L) raw, unprocessed honey
~2.5quarts (2.4L) drinking water
1 packet of dry yeast
Supermarkets typically sell honey in 1lb/16oz containers or smaller. You can find 3lb containers if you order online. Make sure to buy raw, unprocessed honey. The pasteurization process may destroy the anti-bacterial enzymes that protect your batch from contamination during the initial stages of the brewing process.
If you trust your tap water enough to drink it you can use that, otherwise you can buy a gallon of whatever bottled spring water you prefer (just don't use mineral water or distilled water).
Wine yeast is preferred, but bread yeast works too; the resulting mead will have slightly lower alcohol content if made with bread yeast. Note: mead with higher alcohol content is more shelf-stable.
Equipment ($10USD+):
1 gallon carboy set (includes 1gal./3.8L glass brewing vessel plus drilled rubber stopper w/ airlock; sold as a unit for $15 on amazon)
brewing siphon (about $5+ on amazon; DO NOT get a petrol siphon; product must be made with food safe materials)
optional: 1gal. airtight drink dispenser with spigot** (see footnotes)
If you'd rather not pay for a glass carboy, you can instead use any empty plastic gallon-sized milk/juice jug you have lying around. You'll still need to get an airlock ($2+ on amazon). Punch a hole through the lid of your plastic jug to attach the airlock (borrow your neighbor's drill), then seal off any potential air leaks with food-safe cling wrap, Elmer's glue, or some other non-toxic sealant.

Steps:
Add honey* to the brewing vessel + enough lukewarm drinking water to fill it 85% full.
Let the honey fully dissolve in the water. Stir it, or screw on the lid and shake it.
Add 1 tsp yeast.
Kill the remainder of the yeast packet in half a cup of boiling water (you can nuke it in the microwave) and add that too. It gives the yeast some extra nutrients to help it ferment.**
Add a little more water until your fermenting vessel is 85-90%full.
Put in the rubber stopper/airlock.
Store the carboy somewhere room temperature. Ideal fermenting temperatures vary depending on the yeast. Wine-strength mead ages well at room temperature (64-75º F). Mead with a lower alcohol level should be aged at slightly cooler temperatures.
Swish the liquid in the carboy around once a day for the first 5 days, to make sure the honey really is fully dissolved and not settling to the bottom.
Wait for fermentation to finish (usually 3 or 4 weeks but it may take longer) -> when air bubbles stop coming out of the airlock, it's done fermenting (give it a couple weeks after it seems to have stopped to be extra sure).
Your mead will still be cloudy at this point. Remove any solids you might have put in the brew like fruit or spices (you can use a metal sieve, or cheese cloth, or a coffee filter, or whatever you have on hand to strain it), and seal off the container (be SURE fermentation has stopped, because you can EXPLODE your container if you seal it off when fermentation is still going.***
Wait for the mead to clear. All the yeast/particulates from the honey will slowly settle to the bottom of the container now that it has completed fermentation. This might take several weeks, or even several months**** depending on which honey you used.
Transfer the cleared mead into a new container(s), leaving behind any particulates and dead yeast that have settled to the bottom of the container.
At this point (3-4 months after you started the batch) you can go ahead and drink it, OR if it doesn't taste good yet, you can continue to let it age for up to 2 years in an airtight container***** in a temperature controlled root cellar/wine cellar/wine fridge.
Best served cold. Chill before drinking.
.
*If the honey is too thick to pour directly into the carboy, warm a half gallon of water in a large pot pot (no hotter than 95°F/35°C, which is the internal temperature of a beehive -> DO NOT boil) and let the honey dissolve in it before adding it to carboy.
**You can also buy commercial yeast nutrient. Or you can not add any nutrient and your mead will probably still come out fine, but it might take longer to ferment and require more aging to taste good.
***If your container is a conventional jar/jug, you will need to buy a brewing siphon for step 10. If, however, you use a jar/jug with an attached spigot, you will not need a siphon.
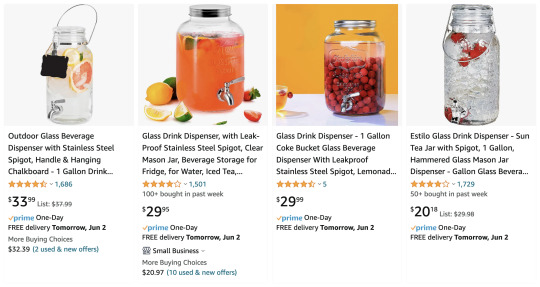
The spigot will allow you to pour off the cleared mead, while leaving behind any unwanted residue that has settled to the bottom of the container. Do TEST the spigot first to make sure it doesn't leak.
****I know I said you could us a plastic jug, but once the fermentation is complete you should transfer it to a glass container(s) to let it clear. You can buy additives to make it clear faster by searching for "brewing clarifiers" online. Or you can just drink it cloudy if it passes your personal taste test.
*****If you want it to have an oaky flavor, you can age it in an oak barrel, or you can get the same effect by adding oak chips to the batch before sealing it off in a glass container.
.
I see a lot of brewing guides tell you that yeast nutrient is absolutely necessary. My mead has always tasted fine without it. YMMV.
You can buy additional equipment to measure exactly how alcoholic your mead is and exactly what the pH is in your carboy etc., etc., but I just don't see the point unless you're a professional brewer making mead with intent to sell.
Some mead guides will tell you that you need to buy special sanitizer and use special gloves and build a special cleanroom to avoid contamination. Contamination risk is higher if you're doing a fruit mead using a fruit that rots easily like raspberries. But if you stick to basics, risk is low since both raw honey and the alcohol it is converted into have anti-fungal/anti-bacterial properties. Just wash & rinse your hands and your equipment with regular dish soap.
Honestly, as long as you don't let any NYC sewer rats piss directly in your carboy and you should be fine.
3 notes
·
View notes
Photo
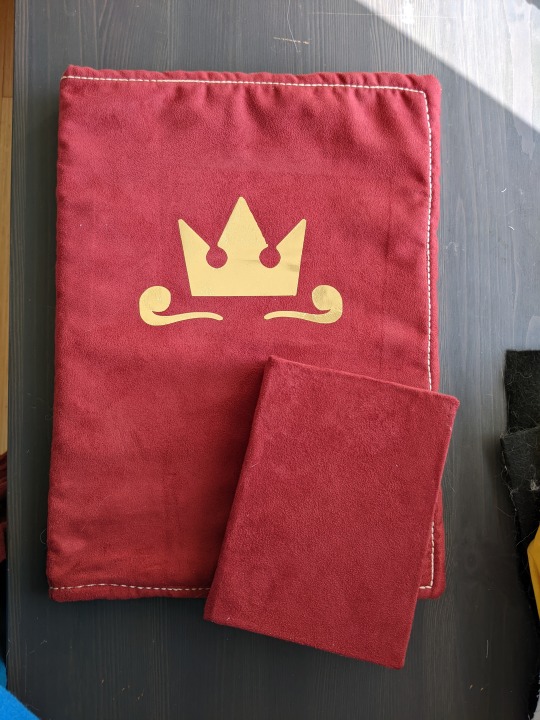
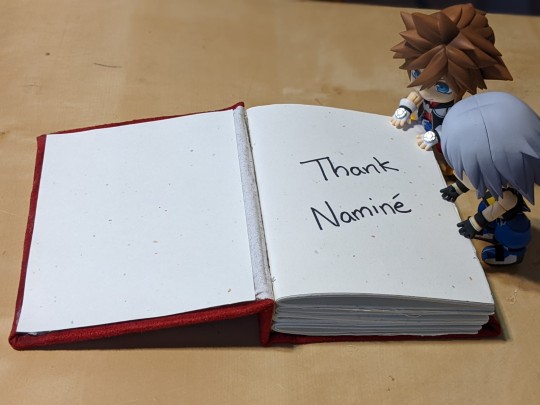
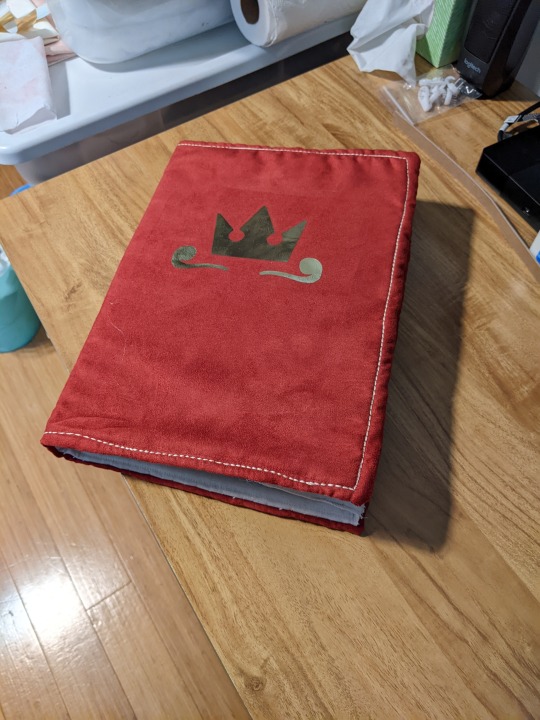
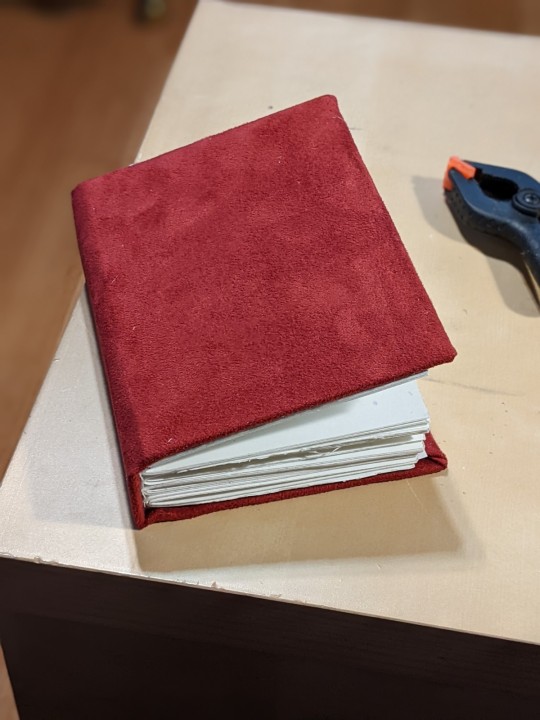
Monthly subscriber projects are done! This month was about book binding in honor of NaNoWriMo-- the large Jiminy Journal is a tablet cover (for people who prefer typing their works), and the little red notebook is a blank canvas for all of your wild plotting adventures. <3
Reward is available until the 7th, so if you wanna learn how to make your own, now’s the time! Head over to my KoFi page and sign up for my Mini-makers tier!
Next up, MasterClass Project~
#my art#kh art#kingdom hearts#Jiminiy Journal#DIY#crafting#subscriber projects#tablet cover#blank notebook#DIY tutorials
11 notes
·
View notes
Text
#asmr relax#asmr#oddly satisfying#diy#tutorial#do it yourself#tutorials#crafts#diy ideas#diy projects#easy diy#origami#video tutorial#craft#diy videos
107K notes
·
View notes
Text
I will only watch sewing tutorials from aged women who do not know how to cut footage. The more midwestern and hard to hear, the better
1 note
·
View note
Text
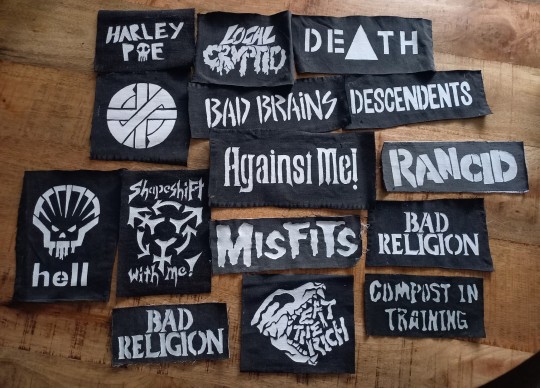
Had a few folks interested in how I made the patches I posted for Solarpunk Aesthetic Week, so I thought I'd give y'all my step-by-step process for making hand-embroidered patches!

First, choose your fabric and draw on your design. You can use basically any fabric for this - for this project I'm using some felt I've had lying around in my stash for ages.

Next, choose your embroidery floss. For my patches I split my embroidery floss into two threads with 3 strands each, as pictured. You can use as many strands in your thread as you prefer, but for the main body of my patches I prefer 3 strands.
Next you're going to start filling your design using a back stitch.

First, put in a single stitch where you want your row to start.

Poke your needle up through the fabric 1 stitch-length away from your first stitch.

Poke your needle back down the same hole your last stitch went into so they line up end-to-end.
Repeat until you have a row of your desired length (usually the length of that colour section from one end to the other). Once you have your first row, you're going to do your next row slightly offset from your first row so that your stitches lay together in a brick pattern like this:

Make sure your rows of stitches are tight together, or you'll get gaps where the fabric shows through.
Rinse and repeat with rows of back stitch to fill in your patch design.

When you're almost to the end of your thread, poke your needle through to the back of the fabric and pull the thread under the back part of the stitching to tuck in the end. Don't worry if it looks messy - no one's gonna see the back anyway.
This next step is fully optional, but I think it makes the patch design really pop. Once your patch is filled in, you can use black embroidery floss to outline your design (or whatever colour you want to outline with - it's your patch, do what you want). I use the full thread (6 strands, not split) of embroidery floss to make a thicker outline.

I use the same back stitch I used to fill the piece to make an outline that adds some separation and detail. You could use most any 'outlining' stitch for this, but I just use back stitch because it's just easier for me to do.
Once you're finished embroidering your patch, it's time to cut it out!

Make sure to leave a little border around the edge to use for sewing your patch on your jacket/bag/blanket/whatever, and be careful not to accidentally cut through the stitches on the back of the patch.
If you have a sturdy enough fabric that isn't going to fray, you can just leave it like this. If not, I recommend using a whip stitch/satin stitch to seal in the exposed edges (I find that splitting your embroidery floss into 3-strand threads works best for this).

And then you're done! At this point you can put on iron-on backing if you want, or just sew it on whatever you wanna put it on. Making patches this way does take a long time, but I feel that the results are worth it.
Thanks for reading this tutorial! I hope it was helpful. If anyone makes patches using this method, I'd love to see them! 😁
#solarpunk aesthetic week#sewing#tutorial#sew on patch#punk diy#diy punk#punk aesthetic#handmade#solarpunk#handcrafted#embroidery#embroidered patch#how to#how to make a patch
17K notes
·
View notes
Text
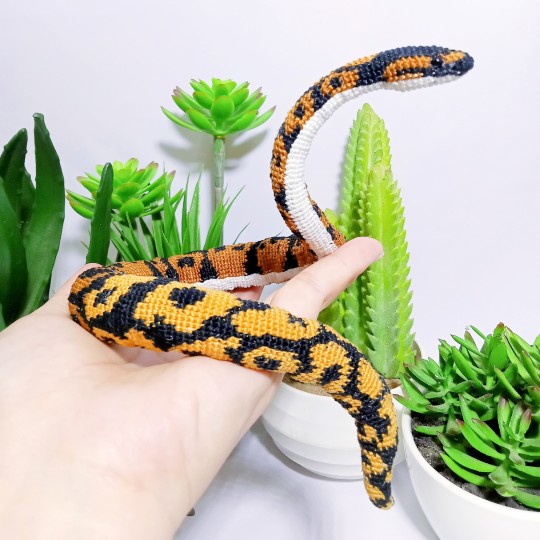
Hello, everyone! 👋
I wanted to share with you all a pattern, which is an amigurumi crochet ball python snake. You can find the free tutorial on my YouTube channel and the PDF pattern on my Etsy shop.
Thank you so much for stopping by and have a great day! 😊
659 notes
·
View notes
Note
Patch making tutorials?
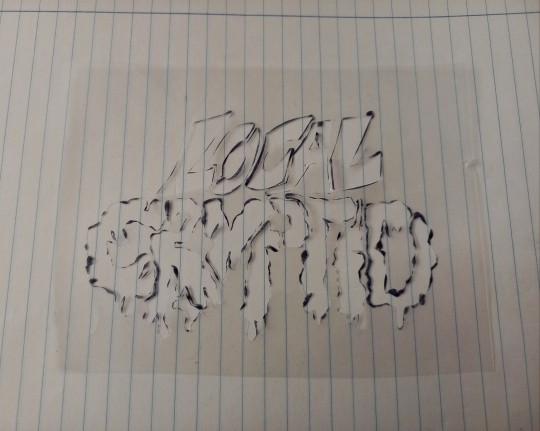
and here i am once again, with a patch making tutorial
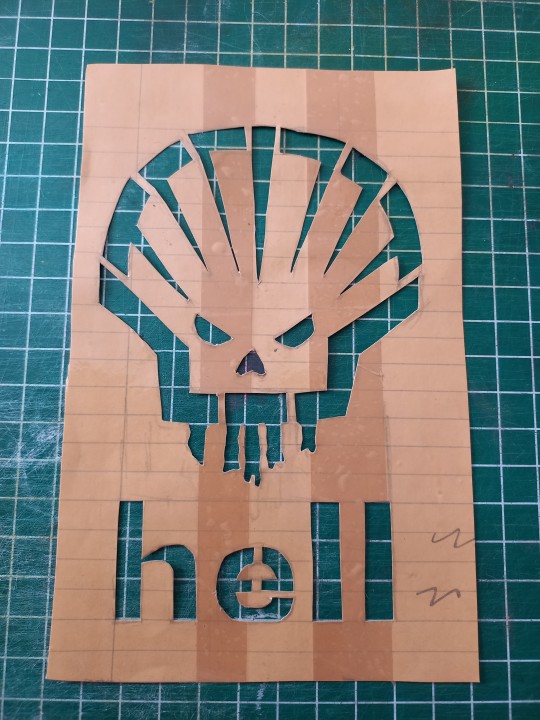
how to make stenciled patches:
i'll post a part two in the future which will cover freehanding and stamping ur patches
-
first some general info that might be useful:
i get my patch design inspo from pinterest, etsy, and tumblr. if sell your patches make sure you arent ripping off another artists patch design when using etsy for inspo. anarchostencilism also has tons of stencils both on deviantart and reddit which are free to use.
i use acrylic paint for my patches, but if you can afford it id advise fabric paint. to seal paint into the fabric iron the patches, it helps em last longer. some acrylic paint survives very well in the washing machine, but wash your stuff by hand the first time to see how well it holds up.
if you make your patches multiple colors, dont first make the whole patch one color and then paint over it with the other colors. if the paint starts cracking the base color will show through. (if you like that however then dont mind this)
i paint my patches on jean fabric, cause it makes the patches sturdy yet flexible. but shirt fabric or canvas both work very well too. anything except really plasticy/slippery or textured fabric can be used
i pin my patches down with pins onto multiple layers of taped together cartboard, to prevent the fabric from moving around and distorting the print
-
there's two ways in which i make my stencils
1. with paper covered in tape
2. with the plastic folder you put in your binders
-
option 1:
draw out your design onto some paper, make sure there arent any "loose" parts in the design that will get lost when cutting out the stencil

cover the paper in tape front and back, make sure you can still see your design through the tape
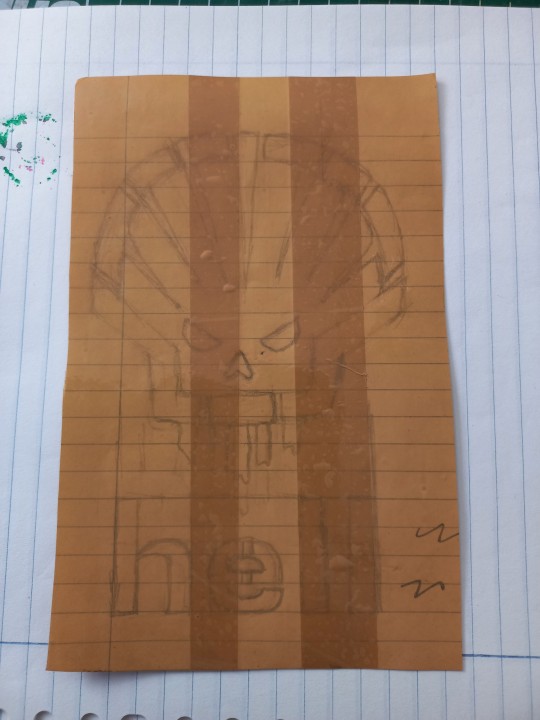
cut out your design, i use scissors and an exacto knife
-
option 2:
draw out your design (you can also draw the design directly onto the plastic folder)
cut a piece of plastic out of the folder big enough to cover your drawing and tape it down.
trace the design onto the plastic with pen or marker (any mistakes can be wiped out)
cut out your stencil
-
continuation from both option 1 and 2
after finishing your stencil you can pin them down on some fabric
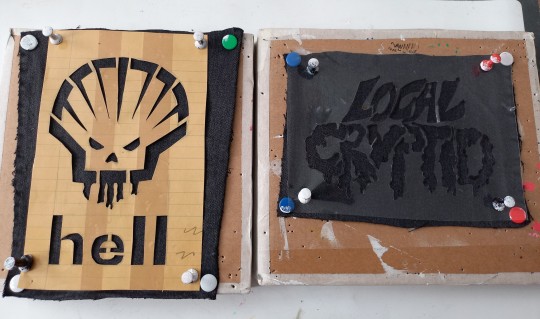
dap on your paint with the point of a big brush or a sponge, depending on the paint it'll take 2-3 layers.
make sure your previous layer dried completely before adding the next one

after the paint has fully dried you can carefully take off your stencil.
!!dont unpin the patch before it fully dried, or the drying paint may cause the fabric to warp!!

thats it, questions are always welcome, now go and make stuff!!
#punk diy#diy fashion#punk#queer punk#diy punk#punk clothes#punk style#punk patches#patches#tutorial#my stuff
2K notes
·
View notes
Text
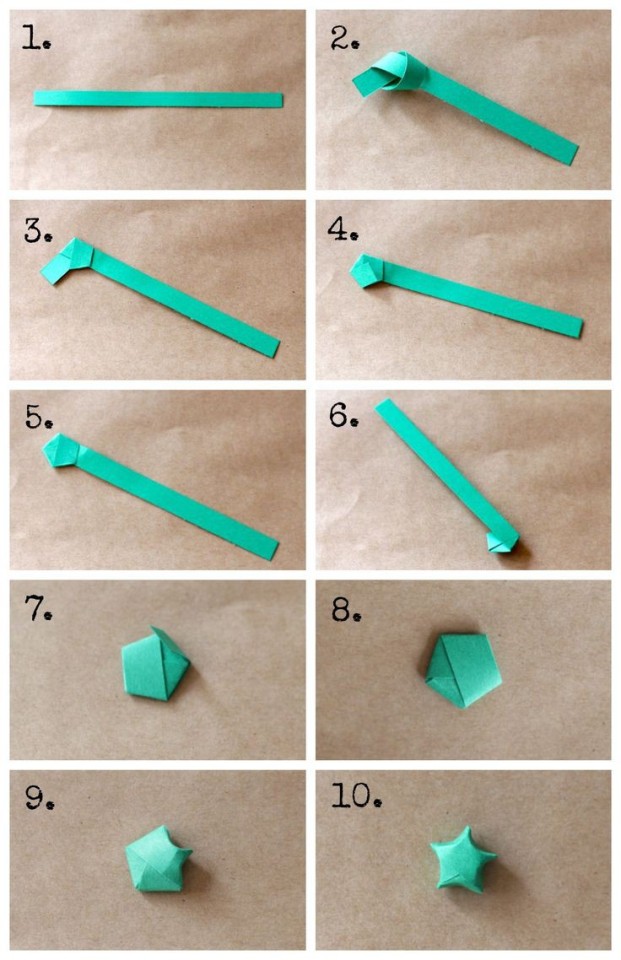
➩ Tutorial on a Paper Star 🌱
#tutorial#paper stars#paper star#star#papercraft#paper art#origami#aesthetic#greencore#green aesthetic#handmade#diy#crafts#starcore#design#art#goblincore#goblin aesthetic#green#green goblin#fairycore
1K notes
·
View notes
Photo
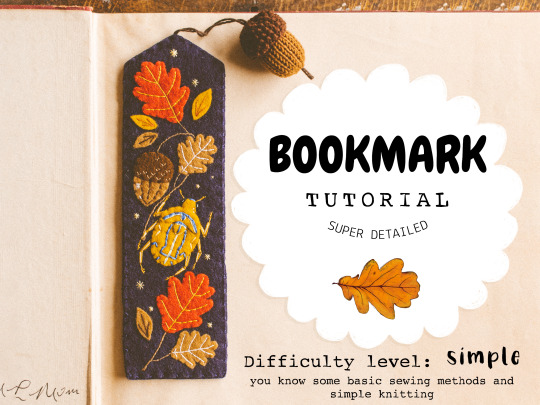

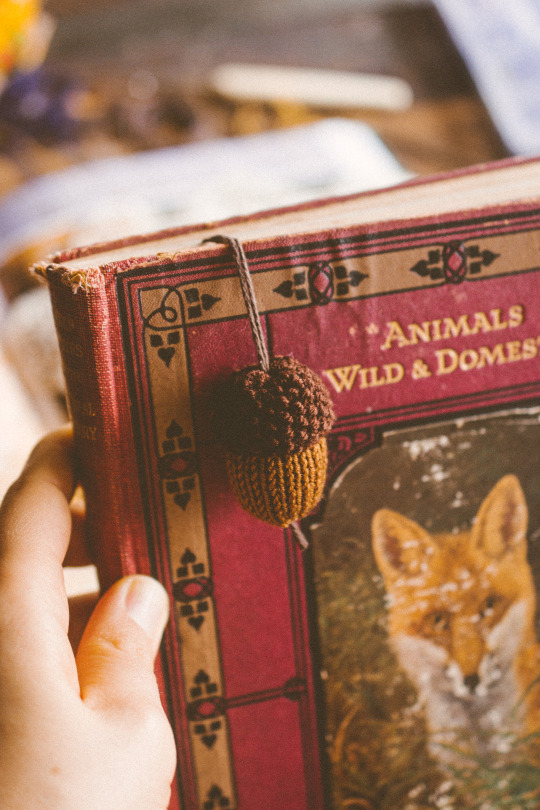
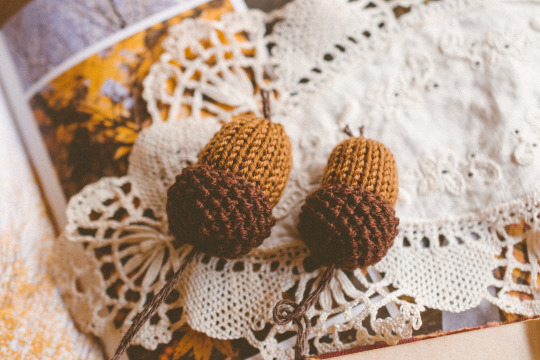
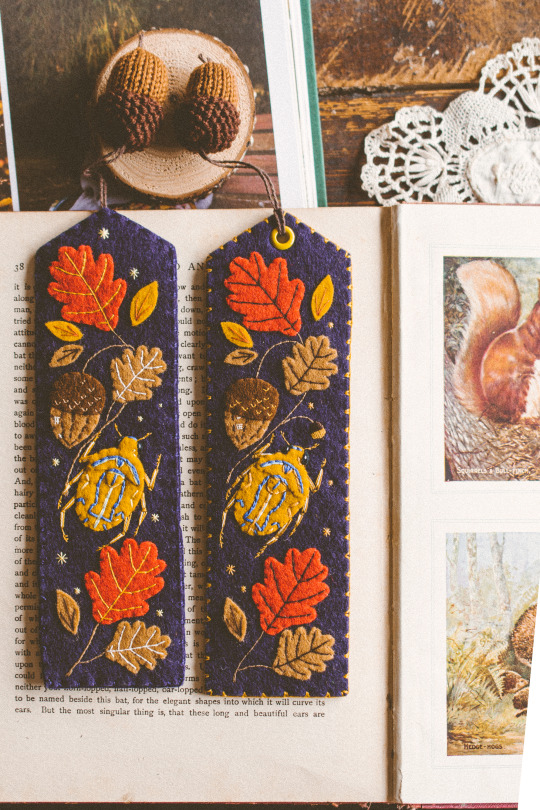
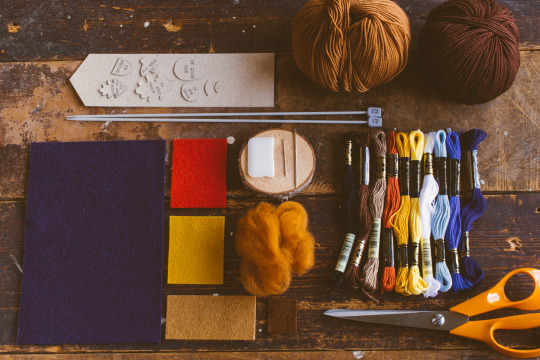
🍂 Autumn Bookmark DIY 🍂 [etsy]
#diy#autumn#fall#oak#acorn#bookmark#cottage vibes#grandmacore#etsy#cottage#cottagecore#cottage aesthetic#grandma vibes#naturecore#book lover#booknerd#bookmarkcollection#my bookmarks#ferntales#tutorial#Small business#australia
1K notes
·
View notes
Text
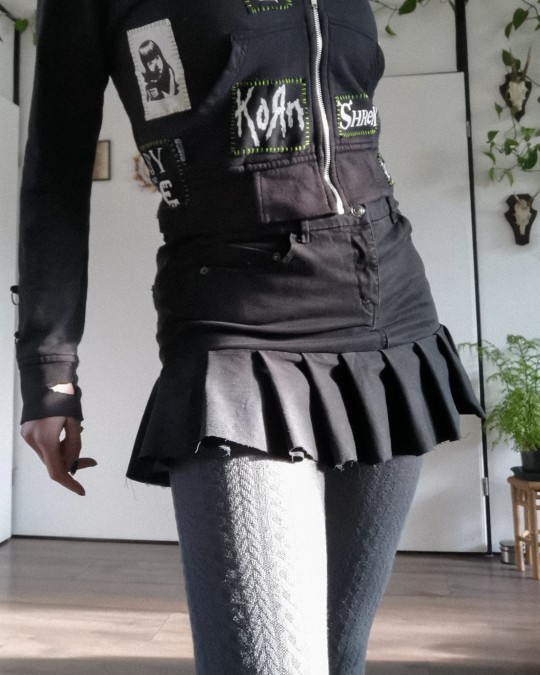
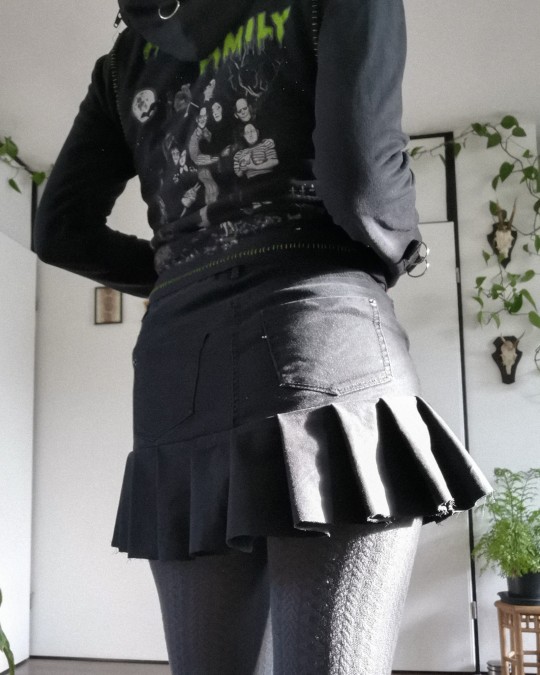
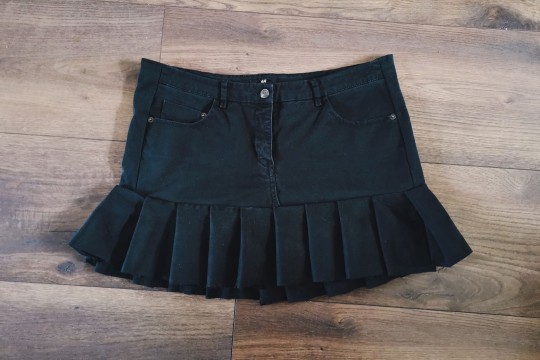
jeans to y2k/tripp inspired skirt ݁ ˖ִ ࣪✩₊ ⊹˚
I thrifted some jeans recently, not knowing if they would fit me, but buying it anyway bc 1) it was €1 and 2) if it didn't fit I could surely make something with it.
turns out it was wayyy too small 😂 so I decided it would be perfect to make one of those tripp/y2k skirts with!
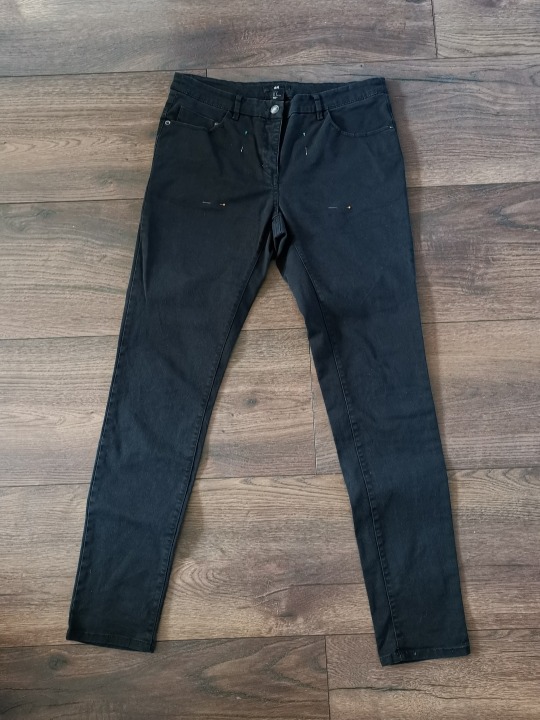

firstly I cut off the legs just above the crotch. I then tried it on, found it was too tight still, and added two strips of leftover fabric on either side. it fits perfectly now!
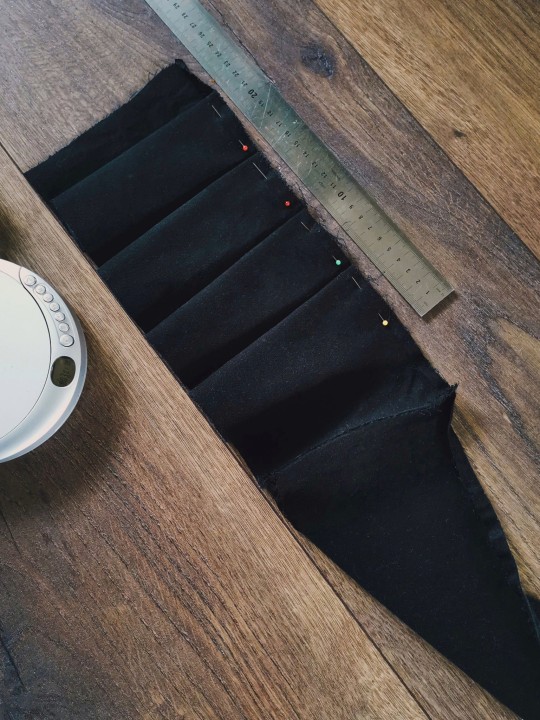
then I cut the remaining pant legs in even strips and connected them all to make one long strip. I folded ruffles of 5cm along the length, and sewed it in place before I sewed it onto the bottom of the skirt!
and just like that, I have a new skirt 𓆩♡𓆪 I might add some strips with d rings on it once I figure out the placement ^_^ but for now it's done
#mine#i showed it to my partner who immediately was like YOU HAVE SO MUCH TALENT#which was rly cool to hear actually#goth#alternative#diy#crafts#handmade#tripp#skirt#y2k#selfmade#tutorial? kinda???
312 notes
·
View notes
Photo


Mushroom Hats and Tutorials // Natly Cosplay
2K notes
·
View notes
Photo
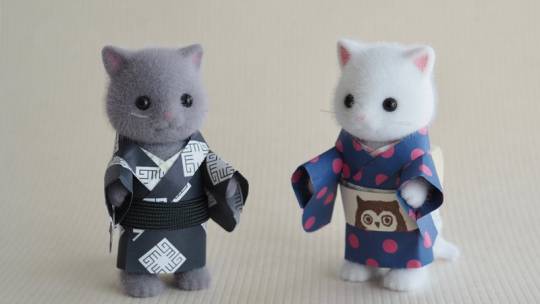

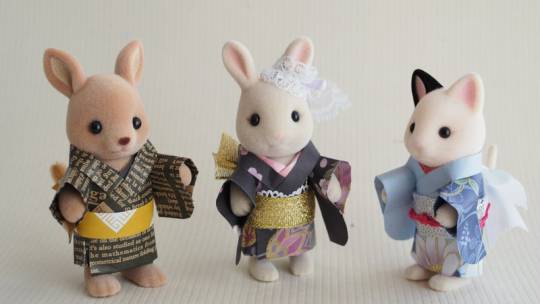
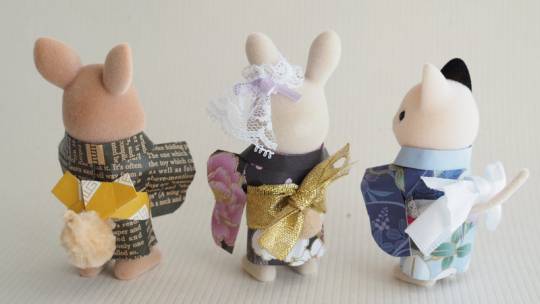
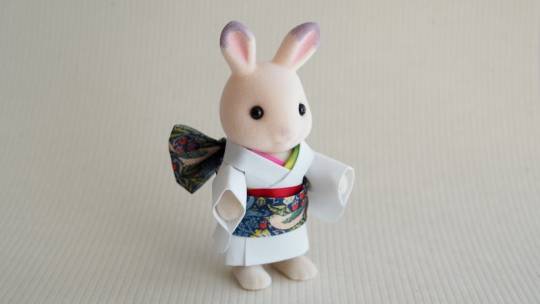
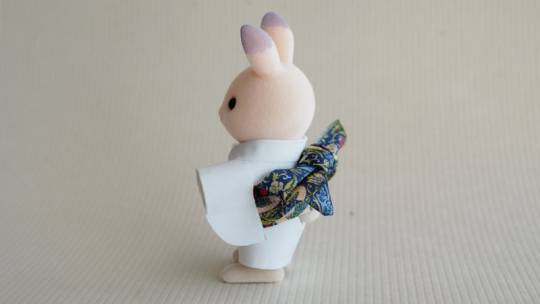
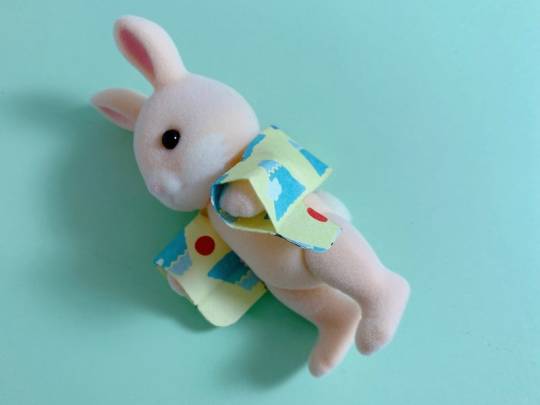
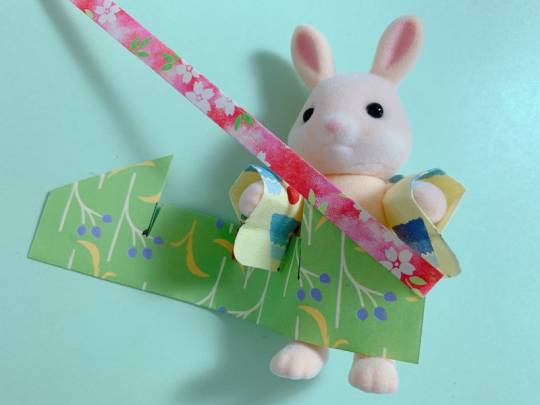
Adorable papercraft/pepakura kimono made for Sylvanian Families (Calico Critters) figurines. Patterned origami paper is cut to form 3 different pieces (top, bottom, collar). You’ll find the measurements and step by step on OP’s website (example below is found here):
#japan#art#craft#sylvanian families#doll#figurine#doll clothes#calico critters#kimono#paper kimono#papercraft#pepakura#diy#step by step#tutorial#着物
1K notes
·
View notes
Photo

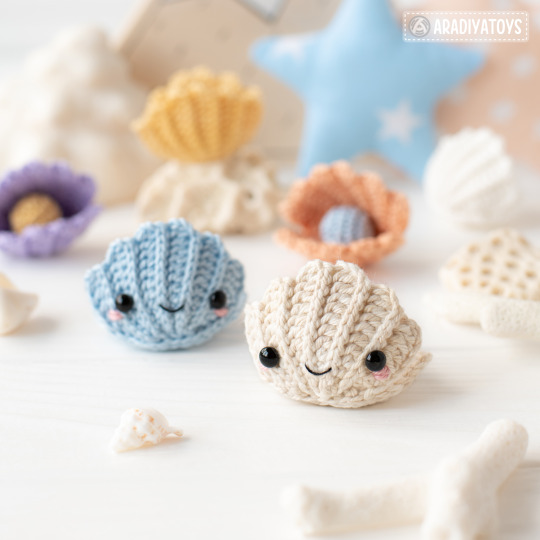
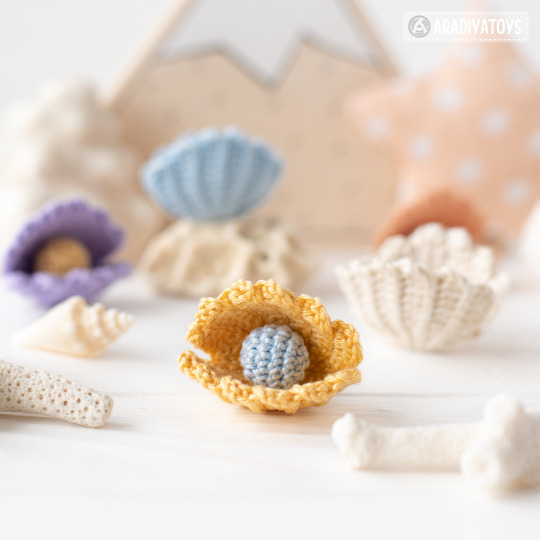
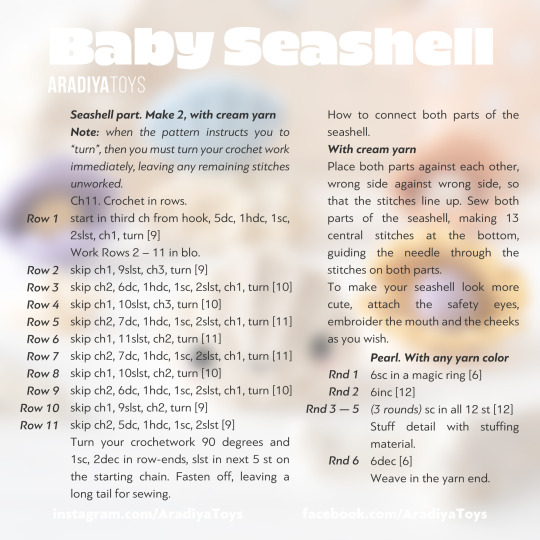
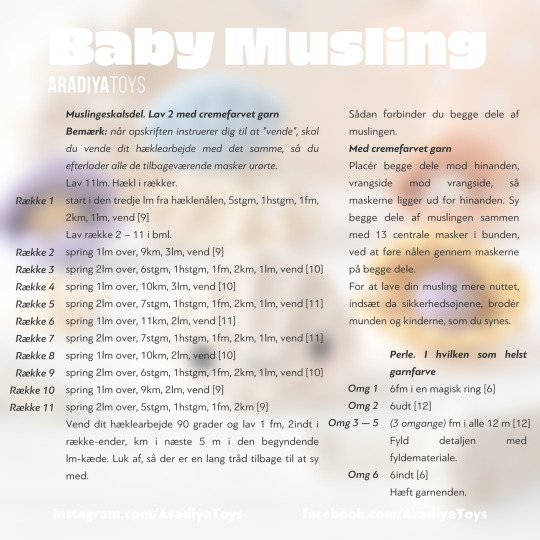


🚨[FREE BABY SEASHELL PATTERN!]🚨
Once upon a time, in the deep blue ocean, there was a tiny Baby Seashell. She lived among the mermaids 🧜🏻♀️ crabs 🦀 and octopuses 🐙 in a beautiful underwater world 🌊 The Baby Seashell loved to play hide-and-seek with her octopus friends and listen to the beautiful songs 🎶 of the mermaids. She would also often explore the nearby coral reefs 🪸 marveling at the vibrant colors and the exotic sea creatures that called it home. Despite being small, the Baby Seashell had a big heart ❤️ and always looked out for her friends, whether it was helping a crab mend a broken shell or sharing a tasty seaweed snack with the mermaids. Life was full of adventure and wonder in the deep ocean, and the Baby Seashell couldn't wait to see what each new day would bring! 🥰
Baby Seashell is a FREE addition to my Kawaii Ocean Minis crochet pattern that includes Mermaid, Triton, Octopus, Hermit Crab and Seahorse and is available here -> https://etsy.me/41Oz4GU 😊
FREE Crochet pattern for amigurumi Baby Seashell is available in English, Spanish, French, Italian, Dutch, Portuguese and Danish, browse through the gallery to see all of these languages! 🤗
Happy crocheting and have a wonderful weekend, dear friends! 💛💙
#AradiyaToys#olka novytska#amigurumi#crochet#handmade#crochet pattern#free crochet pattern#free crochet tutorial#free#free amigurumi pattern#kawaii#seashell#ocean world#kawaii ocean minis#DIY#cute#adorable
1K notes
·
View notes
Text
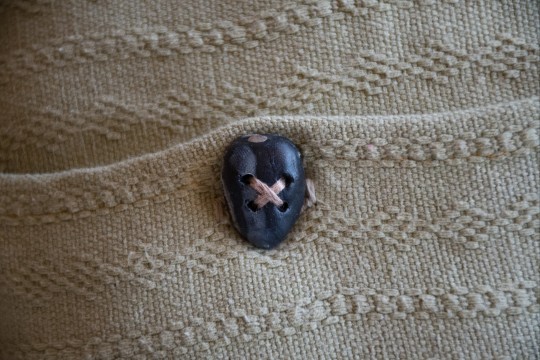
I made some cute sunflower pillows out of scrap fabrics I had been saving from the dump. I couldn't find the right buttons so I made some out of polymer clay I had in my stash 🌻

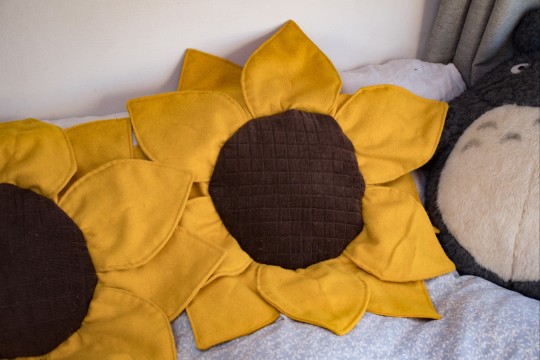
Here's some instructions if you also want to make some 😊
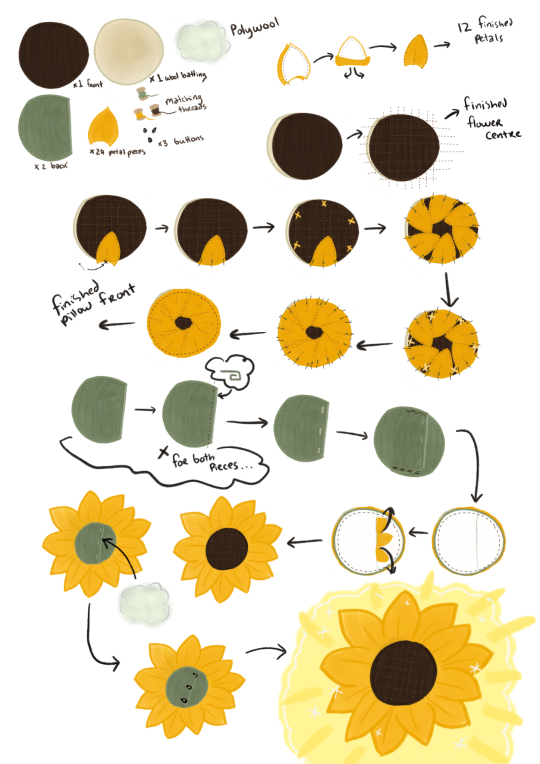
I still need to draw up a sized petal template but I've also made a youtube video (my first one, it's horrible 😂) if you are more of a visual learner.
youtube
1. Cut 1 brown corduroy circle 1 wool batting circle and 2 green 2/3 circles (for the back)
2. Cut 12 pairs of petals (24 pieces total)
3. Sew petal pieces right sides together 1cm away from edges. Turn right sides out and top stitch along the edge. Stitch centre petal seam. Repeat for all petals
4. Quilt your brown centre to the wool. I made lines about 1.5cm apart making a grid.
5 Pin 6 of your petals centre first evenly spaced around the edge. Pin the last 6 over the gaps. Sew 1 cm from the edge
6 Roll hem the straight edge of the 2/3 circle pieces (a rol hem to folding and then folding again)
7 make 3 button holes evenly spaced on one back piece
8 secure the pieces to eachother both having right sides up, creating a pocket
9 fold on your petals and pin your back piece right sides together to your flower front. Sew 1.5cm around the edge and turn out through the pocket.
10 stuff your pillow then add buttons to fit the holes you made earlier. I do the buttons last to make sure they fit nicely when fully puffed.
11 yayyyy pillow!
#cottagecore#slow living#cottagecore aesthetic#hobbitcore#sewityourself#diy#sewing tutorial#free sewing pattern#cottage life#Youtube
380 notes
·
View notes
Text
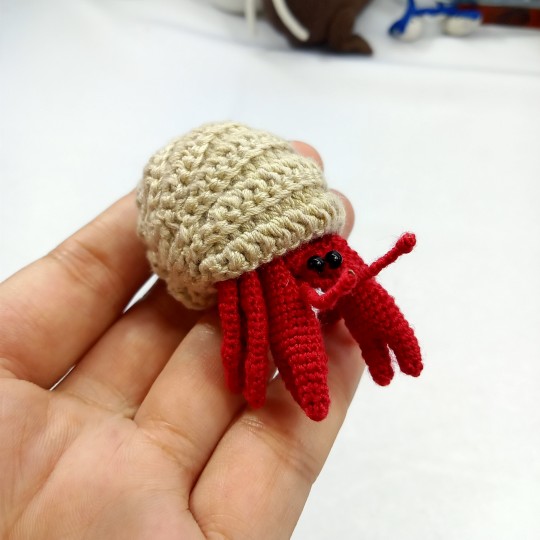
Hello, everyone! 👋
I wanted to share with you all a pattern, which is an amigurumi crochet hermit crab. You can find the free tutorial on my YouTube channel and the PDF pattern on my Etsy shop.
Thank you so much for stopping by and have a great day! 😊
278 notes
·
View notes
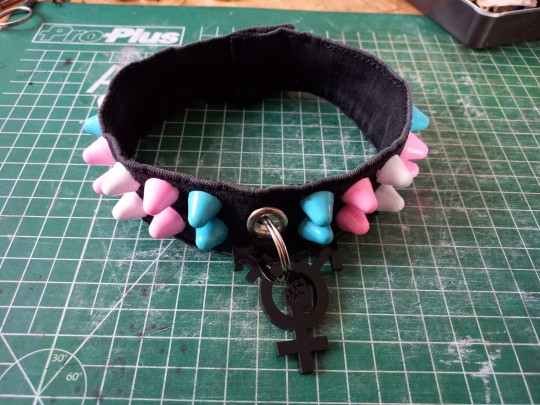
Note
Do you have a tutorial for the denim choker and/or the bat keyholder you made?? They're so cool :0
a tutorial on how to make chokers from some old pants!!


you will need:
-some old jeans
-a button
-strong thread, for these i used emboidery thread
-spikes and/or other decorative stuff you wanna put on the choker
-scissors
-pliers
-sewing needle
-seam ripper or small scissors
•
first get your pair of pants, and cut of the waistband. you can remove the belt hoops with seamrippers (or keep em and sew them on as extra decoration) i always use the part with the buttonhole, it saves on sewing
the band should be a large enough to wrap around your neck plus some extra space


measure and draw on where your button will be placed (on the end where the buttonhole is not) then about 5cm from there, make a small cut in the band and fold the ends in, press together and sew closed. there should be around 2-3 cm of band left next to where youre gonna attach the button (where i drew the white line)


time to gut em!! open the seams on one side (not fully till the ends) and attach your spikes, this prevents the point or screws from pressing/poking into your skin. (i made this part the next day hence the lighting change)
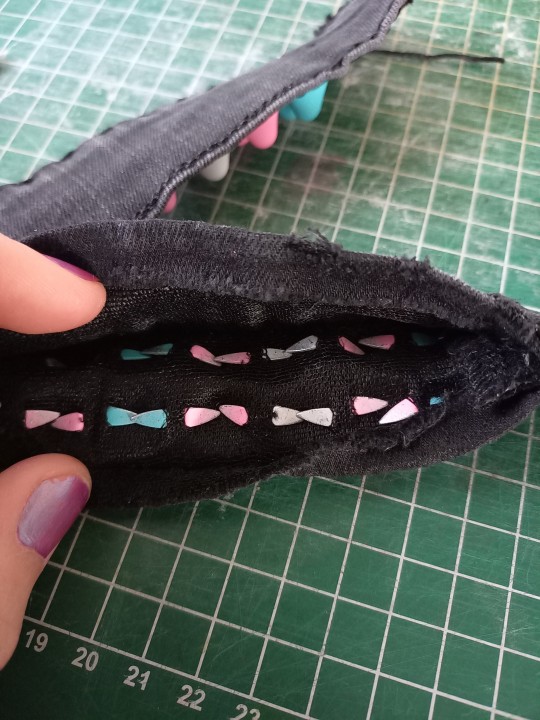
sew em back up and attach your button
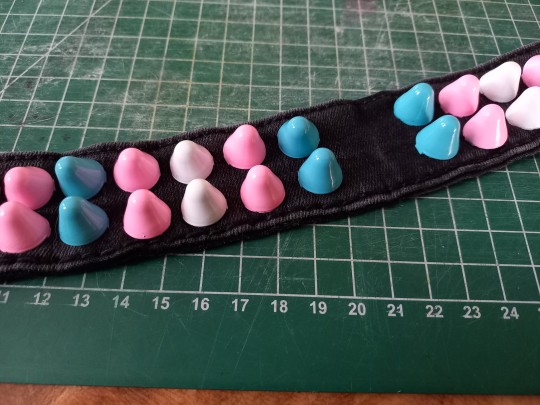

i added an eyelet so i could attach charms to the choker, but you can also attach chains, soda tabs, embroidery or whatever on there. after that youre done! you can also use this exact method to make cuffs, just make the band shorter.
#punk diy#diy fashion#diy punk#punk clothes#punk style#queer punk#tutorial#my stuff#queercore#punk#punx
490 notes
·
View notes
Last Seen Blogs

nuttyhologramfox-blog
Senza titolo

namukook
Namkooker

bochosblog
Bocho.inc

saltytracks-blog
Salty Tracks

darthasterisk
adventures of a jedi clone trooper