#Curve Text in Cricut Design Space
Text
How to Curve Text in Cricut Design Space?
A Cricut works only with the Cricut Design Space app. It is because the app is the interface between the computer/mobile and Cricut machine. You can send the designs from the computer to your Cricut machine. Further, you can upload your designs or create new designs on the canvas. Also, the app lets you write, shape, and many other things. You may have to curve the text for some projects if you are writing. It becomes important if you are designing a mug or text for t-shirts. So, we will learn how to curve text in Cricut Design Space.
Curving Text on Your Computer
You can easily bend the text into a circular shape using the Curve function. Let us see the steps involved in Curving the text.
First, open the Design Space software on your computer.
Next, select the new project or open the previously saved project.
Further, you need to click on the Text tool in the Design panel.The text option is present to the left of the Canvas.
Now, type a text into the text box, and then choose the font for the text. Also, you can set the font style, use the Letter Space tool and adjust letter spacing as needed.
Further, if the text contains multiple lines, you need to curve each one. The best is to write the lines in separate boxes, or you can Ungroup to Lines.
Next, you can go to the Text Edit bar and find the Curve tool option. It is present between the Alignment and Advanced tools.
Now, drag the slider to the right to curve the text downward. The Design Space uses an imaginary circle to determine the arc of the text. Also, the size of the circle reduces as the slider moves to the right.
Additionally, you need to note the number in the Diameter field while dragging the slider. It is important to note that the smallest diameter will change depending on your text’s size, length, and spacing.
Also, if you are curving multiple lines of text, you need to quickly match the curvature of previously curved text by manually entering the same number in the Diameter field.
Plus, you can curve the text in the opposite direction. To do that, you need to add a dash before the number as per your need. The dash or – means minus, and the Design Space curves the text in the opposite direction.
Curving Text on Your iOS Device
If you use Design Space on an iOS mobile or tablet, the app contains a curve text option. But it is not currently available on Android. Let us see the Curve text in Cricut Design Space iOS app.
The first step is to launch the app on your iPhone.
Next, you need to select the Text. It will be present at the bottom of the Canvas.
Now, just type a line or word in the text box. Also, choose the font and font style.
You can even use the Letter Space tool and adjust the letter spacing.
You must ungroup if your text contains multiple lines.
Next, go to the Curve tool. You can find the option by selecting the Edit option and the Curve tool.
Further, the Design Space will take a few minutes to analyze the text for size and spacing. After that, you will have a display slider and a number field.
Now, to curve the text, you must drag the slider to the right side. It will curve the text downward.
For curving the text upwards, you can drag it to the left, where you will notice that a dash is added to the number in the diameter field. So, that minus symbol acts as an indication of the upward curve.
Conclusion
The Cricut Design Space has many features and functions that enhance the project’s outlook. You can add different shapes, colors, text with different fonts and font sizes, and many more. And sometimes, in your text project, you need to curve it to fit the project. For that, you can use the curve feature. The curve text in Cricut Design Space is an easy feature to use, and you can curve the text both upward and downward.
FAQs
Can I edit the text after curving it on Design Space?
You can select the Curve tool function because the text might contain more than one line in the same text box. You can fix the issue by inserting separate text boxes for each line. Or it is just easy to use the Ungroup to Lines options and move the lines of texts into separate text boxes. After that, you will be able to curve each line separately.
Why can’t I select the Curve tool function?
You can select the Curve tool function because the text might contain more than one line in the same text box. You can fix the issue by inserting separate text boxes for each line. Or it is just easy to use the Ungroup to Lines options and move the lines of texts into separate text boxes. After that, you will be able to curve each line separately.
Can I Curve text on Design Space on an Android phone?
No, you can’t curve the texts on your Android phone. The Curve text is only available on Design Space computer and iOS. The Curve text feature lets the user reshape the linear text into curves. You can add a different layer to the original text by curving the text. So, if you want to do attractive projects and design a mug or tumbler, you can use curves to fit the surface.
Visit - Cricut.com/setup
design.cricut.com
www.cricut.com/setup
Cricut.com sign in
#Curve Text in Cricut Design Space#Cricut Design Space#Cricut Design Space Download#Cricut Design Space app#Cricut Design Space login#cricut.com/setup#design.cricut.com#cricut explore air 2#cricut setup
0 notes
Text
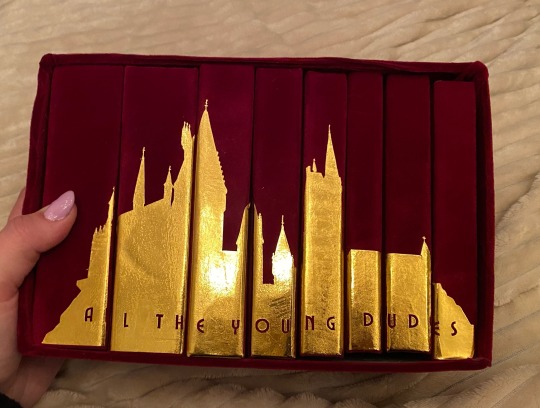
this is the one. the most popular fic in the harry potter fandom. the fic that got me into fanfiction. the fic that i sobbed to for months after reading it.
i tried to bind this three separate times over the last two years and bro the first two sucked ASS. it was legit the very first fic i tried to typeset which is like, not the greatest thing to start off with LMAO. it looked funky, i hadn’t fixed any of the spacing, my footers didn’t match the text font or size. it was very much a baby binding.
the second one was my first time using a cricut and there is a very steep learning curve w the cricut, especially in creating designs that aren’t too complex or too plain. i tried to copy one of the popular printable book jackets and omg i spent weeks modifying my designs and printing and reprinting on my cricut and it looked like trash when i was done.
so finally, we have come to this.


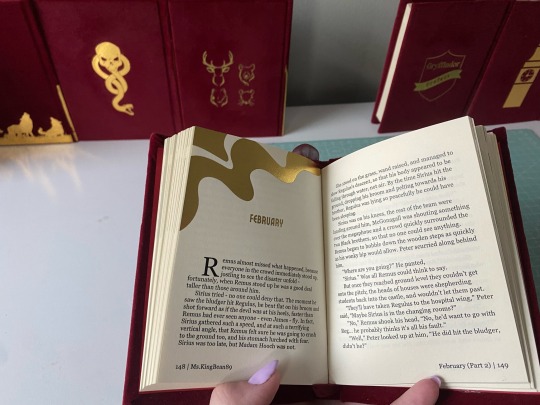
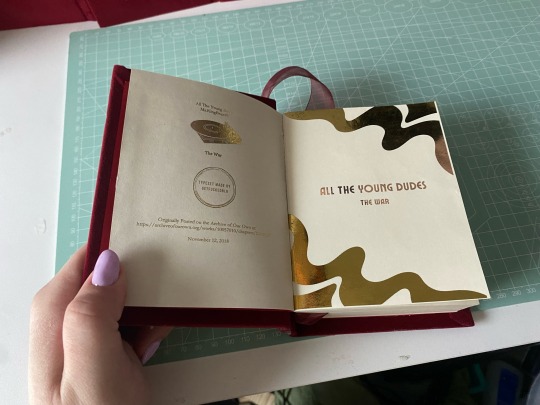
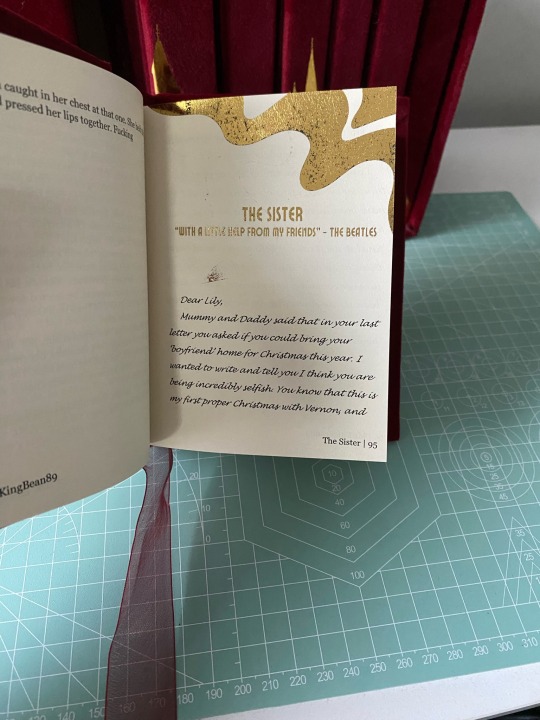
i got really into quartos during the winter and was like omg the editing process for this would be so much more manageable if i broke it down into years! so then i did lol. it allowed me to customize each chapter into sections so i could add the chapter title to the footers, and break down graphics into separate years so i didn’t have 100 pages in one canva file. it was just a lot easier to feel accomplished having broken it down bc this fic is a MONSTER.
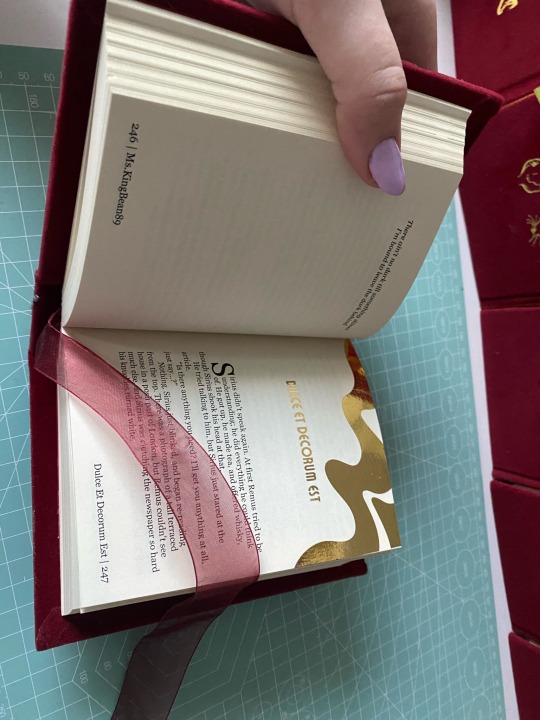
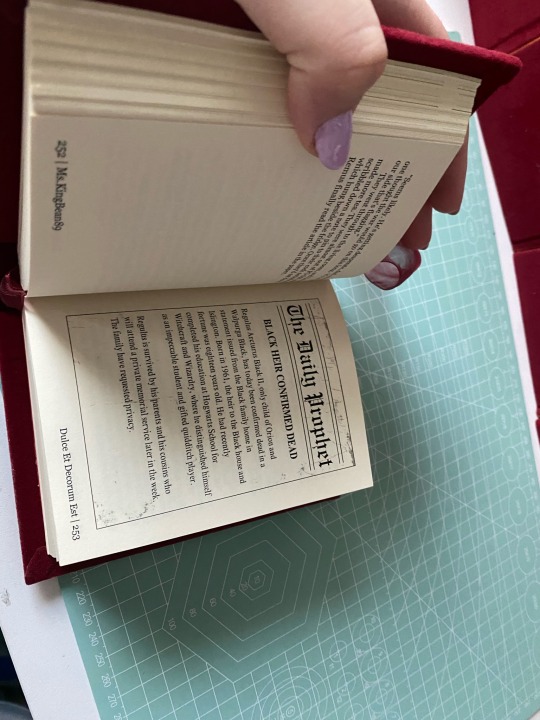
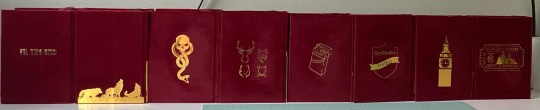
every chapter heading is the same - just the swirl. i gilded all the chapter titles using toner reactive foil and my laminator (she broke in the middle of this project. i ended up having to buy another laminator, and about 3 packs of foil from icraft. this is my most expensive fic binding to date🫠). i included the songs ms.kingbean put at the top of every chapter, and the bootleg tapes and christmas special.
i am seriously so proud of how this turned out, and can’t believe it’s actually done. sorry this is super long, but this really was a labor of love. they’re not perfect, i’m still really bad at measuring and cutting straight lines, but i’m satisfied. really satisfied.
#fanfiction#harry potter#harry potter fanfiction#bookbinding#ao3 fanfic#fanbinding#wolfstar#atyd#atyd marauders#atyd fanart#atyd fandom#remus lupin#sirius black#grant chapman#bound in peel and stick velvet flocking#chipboard#and gold htv#fucking hell it’s DONE!!#typesets in my drive#free for personal use#don’t sell fics!!
105 notes
·
View notes
Text
How to Use a Cricut to Make Shirts: A Step-by-Step Tutorial
Hey! Do you know how to use a Cricut to make shirts? When I say Cricut, I mean Cricut Design Space and cutting machine. Yes, the term ‘Cricut’ is related to both of them. Design Space is a design software that provides us with a platform to create unique designs, and a cutting machine is a tool that cuts out your design.
Here are two questions that arise in my mind. The first is how to use the Cricut Design app to create a design, and the second is how to use a Cricut cutting machine to cut designs. In this blog, I will answer both questions individually. so, get your Cricut machine and install the Design Space on your computer or mobile phone. And then, let’s learn how to make custom shirts using Cricut. Now, let’s delve into this blog!
What Cricut Tools and Materials Do You Need for Your Craft?
Before I teach you how to use a Cricut to make shirts, let’s learn about the supplies I use to make shirts on Cricut. I have provided some of the best and most basic tools or materials you must use while working on the shirt project.
Here are the supplies I used in my Cricut project:
● Cricut Explore 3
● EasyPress Mat
● Cricut EasyPress 2
● Material Trimmer
● Smart Iron-On, White
● T-Shirt Blank
● Weeding Tool
How to Use Cricut Design Space to Create a Shirt Design?
First of all, I will teach you how to use Design Space for creating a design. To make it easier for you, I will show you how to create a design from scratch. Don’t worry; the design is going to be very simple, as I will be adding the text-based design only.
Let’s get started!
First of all, you will need to open a Design Space on your computer.
Then, go to the My Project (shown in the picture below)option to start a new project.
Afterward, move to Canvas and navigate tothe Text (on the left sidebar) menu to add the text.
Now, you will need to add the text that you like.
You can also change the font of your text. For this, you just need to click on the Dropdown menu from the top screen saying Font.
Hence, choose the font you like. Here, I have chosen Trade Gothic LTD Bold for my T-shirt project
But here I am, not just adding the text but also curving it. So, if you want to curve your text, select the text first and then hit the Curve option from the top of the screen.
Once you are done with your design, you have to press the Make It button to begin cutting. But wait!
Have you mirrored your design? If not, you can simply turn the Mirror toggle button on. Once done, move to the next section, where you will use a Cricut machine to cut the design on iron-on vinyl.
How to Use a Cricut to Make Shirts?
Here comes the exciting part in which I will walk you through each step to cut design on HTV material. To cut the vinyl design on Cricut, follow the following instructions:
Make sure you have selected your compatible materials on Design Space.
Now, place your vinyl on the cutting mat. Use the brayer tool to ensure the vinyl is properly adhered to the mat.
After that, load the mat into your Cricut cutting machine.
Next, you need to press a Flashing Arrow button on your machine to start cutting. Once the cutting is done, you have to unload your mat.
Then, start weeding your design.
Afterward, you must place the shirt on an EasyPress mat and preheat it using Cricut EasyPress 2.
After preheating, place the weeded vinyl on a shirt and press the Heat Press with the recommended timing and pressure.
Finally, here you have learned how to use a Cricut to make shirts by creating a simple project.
FAQs
Question 1: What types of shirts should I use for Cricut?
Answer: If you use a Cricut iron-on, you can’t transfer your iron-on vinyl to any shirt. For this, you will need a shirt made of 100% cotton or polyester—however, a combination of 50% cotton and 50% polyester will also be suitable. Therefore, whenever you are going to add your vinyl design to your blank shirt, you must use a high-quality blank shirt. Using a good quality shirt will ensure the smooth transformation of your shirts.
Question 2: Can I use Cricut vinyl on shirts?
Answer: Yes, absolutely, you can use the vinyl on shirts. In fact, Cricut machines are very compatible and cut the vinyl smoothly without any interruption. In simpler terms, all the cutting machines are compatible with cutting the vinyl. So you can easily cut the vinyl on the T-shirts. The Cricut Maker 3 machine is one such machine that can cut over 300+ materials easily in one go, including vinyl.
Question 3: How long does permanent vinyl last on fabric?
Answer: If you use permanent vinyl on your fabric or clothes, it will last up to 5 to 15 years. It also depends on what type of brand you are using for your vinyl. However, many other crafters recommend using heat transfer vinyl (HTV), which is thin and durable. In addition, it is easily stretchable, making it ideal for your fabrics.
Conclusion
Now, you might have understood how to use a Cricut to makeshirts with this step-by-step tutorial. In this blog, I have added the essential supplies needed for this project. Moreover, I have divided the whole tutorial into two sections. In the first section, I explain how to create a design on Design Space. Meanwhile, the second section is all about placing the vinyl on a cutting mat and cutting it on your Cricut. That’s all in this blog. Good luck with your project!
Source Url : How to Use a Cricut to Make Shirts
#designcricutcomsetup#cricutcom#cricutcomsetup#cricutdesignspacedownload#cricutdesignspace#cricut design space
0 notes
Text
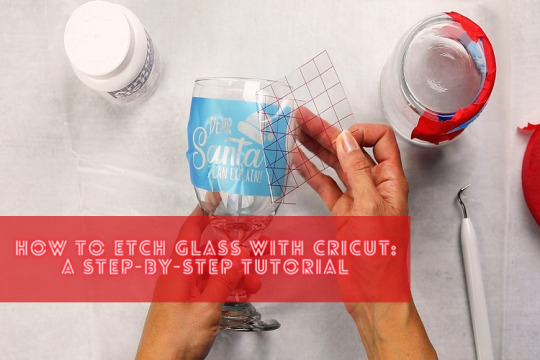
How to Etch Glass With Cricut: A Step-by-Step Tutorial
A year ago, my daughter came and asked me to make a beautiful gift for her class teacher. I wasn’t really sure what and how to make things for her teacher. Then, the idea of etching glass with Cricut occurred to me. To be honest, I had worked on many projects using my Cricut, but I had no idea how to etch glass with Cricut. Initially, it was challenging, but today, I have created more than 10 projects that were all related to etching glass and acrylic.
Since I had learned and had good experience in this field, I thought of sharing it with my fellow crafters. Thus, I will show you how to etch on glass with Cricut. Etching is similar to engraving, but the only difference is that chemicals are used instead of sharp tools in etching. So, let’s look further into this blog to know the process of etching a glass.
What Do You Need for Cricut Etch Glass?
So we are finally going to learn how to etch glass with Cricut. For this, you will need some items that will be useful in etching. Let’s see what they are:
Cricut machine
Protective eyewear and gloves
Vinyl and transfer tape
Wine glass or any other glass
Isopropyl alcohol (also called rubbing alcohol)
Etching creams (Armour Etch)
Small paint brush
Masking tape
Note: I would recommend you not to use colored glass. This is because colored glasses are treated with a coating. So, it can prevent your etching cream from working.
How to Etch Glass With Cricut for the First Time?
There are a few steps that you will need to follow to etch the glass. Make sure you are ready with all the above-mentioned supplies or items. Let’s start with the first step of cleaning the glass:
Step 1: Clean the Glass Surface

First of all, I always prefer and recommend cleaning the surface. To clean, I use isopropyl alcohol that cleans up everything, such as fingerprints, grease, and dust. After this, let it try for a deep cleaning.
Step 2: Create a Vinyl Stencil
The step to create vinyl is to make a design on Design Space. Either you can add an image or text whatever you like the most. Here, I added the phrase “Lesson Planning Juice” for my daughter’s teacher, Mr. Joseph, who can use it for his favorite wine.
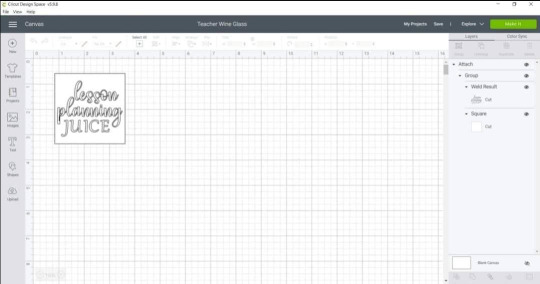
When done, you can hit the Make It button to cut the stencil on Cricut. After cutting, remove the negative space of the vinyl.
Step 3: Apply Your Stencil to Glass
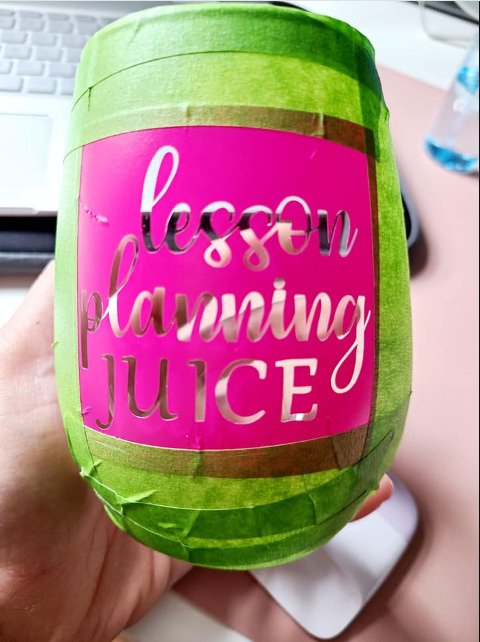
Now, use the weeded stencil with transfer tape to carefully apply it on the glass surface. Gently press the stencil onto your glass to adhere the entire design properly. Make sure there are no bubbles remaining, and try your best to remove those bubbles.
When I was applying it on the surface, I curved the design which helped me to adhere it better on the rounded surface of the glass. As you can see in the picture above, I have also used the masking tape to protect the remaining surface. However, the best alternative for masking tape is painter’s tape.
Step 4: Etch the Glass
Here, I am going to show you how to etch glass with Cricut. Before you start, you should know that the etching cream is an acid, and it can cause burning. Hence, you should cover up your hands and eyes with protective gear. Besides, you should maintain your room temperature at about 70°F or 21°C, and it must be well-ventilated and have access to running water.

Note: Cream reacts quickly, and hence, you should try to apply the cream quickly and evenly for better results.
Now, after you have applied the cream, you need to let it sit on the surface. I left it for three minutes. There is also a disadvantage of leaving the etching cream for too long, as it can eat away your vinyl. So, 3 to 5 minutes is a suitable time for etching.
Step 5: Remove the Etching Cream
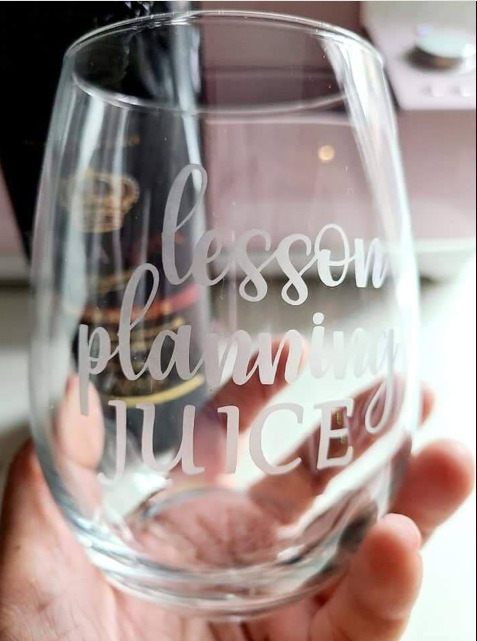
Now, you can use this tutorial to create a similar glass project. Etching glass with Cricut is always exciting and the best way to create a beautiful gift.
Final Thoughts
Through this blog, I have covered the simple steps that teach you how to etch glass with Cricut. Etching cream can be extremely harmful to your bare skin and can cause irritation or even burning if you don’t wash it immediately. So, you must wear gloves and goggles to protect yourself. Besides, the process will be simple so that even a beginner can etch the glass on their first attempt.
FAQs
What type of glass cannot be etched?
I found the Tempered glass is the only one that you cannot etch. This type of glass is usually made with a process called heat treatment. This process is used to strengthen the glass. Hence, it is stronger and can withstand a force, which is why it is not easily curable. An example of tempered glass is Pyrex bakeware, which is tempered for high heat. Despite these, you can etch mirrors, windows, mason jars, and candle vases.
Can I etch leather with Cricut?
Etching is a bit different from engraving, meaning etching is chemical and engraving is a physical process. Hence, we can engrave the leather but can’t etch. In simpler terms, you can’t use the chemical to etch the leather. Therefore, we use sharp tools to engrave the leather rather than a compound that is used to etch the glasses.
Can I etch on acrylic?
Absolutely, yes! You can etch the acrylic, and this is the most widely used method. Using this method, you can simply create various personalized designs that include signs, jewelry, awards, and more. For etching the acrylic, you can use a chemical solvent or rotary tool. Both are suitable and can give you a professional result that looks outstanding.
For more information visit: www.cricut.com/setup login
install cricut design space
design.cricut.com
cricut account login
#etching glass with Cricut#how to etch on glass with Cricut#how to etch glass with Cricut#cricut design space login#install cricut design space app#cricut design space software#cricut.com/setup
1 note
·
View note
Text
Top 6 Cyber Monday Cricut Deals for Craft Enthusiasts
On the first Monday after Thanksgiving, e-commerce retailers offer attractive deals to customers on Cyber Monday. I also like to go shopping and buy all the things I need. Plus, I am planning to get some Cricut machines this Cyber Monday as there are huge discounts. If you are a crafter, now is the right time to buy yourself a Cricut machine. In this deal, you can get at least 10% off on various major Cricut machines. So, let’s talk about the top Cyber Monday Cricut deals that are worth buying.
1. Cricut EasyPress Mini
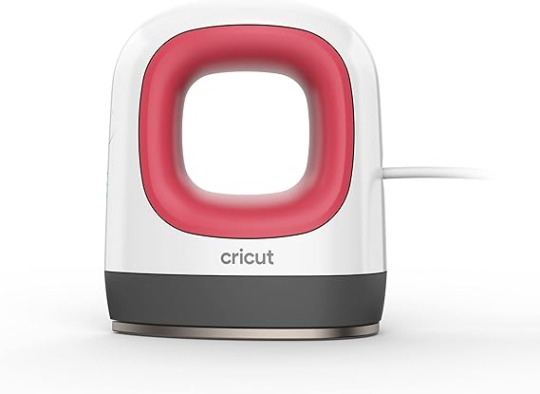
Alt Text: A Cricut EasyPress Mini machine
The machine comes with three easy-to-set heat settings and provides an equally high temperature for the product. It also has a ceramic plate and auto-shut-off features that you do not find in any other heat press machine.
2. Cricut Hat Press
Alt Text: A Cricut Hat Press machine
Additionally, the machine comes with a curved, ceramic-coated heat plate for iron-on and easy-to-use features. The machines have a minimalist design and simple working procedures to give world-class results while creating custom hats with this machine. Also, when we talk about the price during Cyber Monday, it is just $129 in comparison to its actual price of $149.
3. Cricut EasyPress 2
Alt Text: A Cricut EasyPress 2 machine
In addition, its ceramic plate and insulated safety base provide complete edge-to-edge heat on the whole surface. Plus, the auto-shut-off feature ensures the full safety of the users. I will put this device as my priority in this Cyber Monday sale because of the use price drop.
4. Cricut Explore Air 2

Alt Text: A Cricut Explore Air 2 machine
On the official website of Cricut, this machine is usually available at $229, but you will be able to buy it for just $169 on Cyber Monday. Also, this machine is one of the most prominent machines Cricut offers for cutting DIY crafters.
5. Cricut Explore 3
Alt Text: A Cricut Explore 3 machine
The actual price of the Cricut Explore 3 is just 279.00, making it one of the most worthwhile Cyber Monday Cricut deals. The machine also works with the Cricut Design Space app to create stunning designs with the help of a computer or smartphone. Plus, this device is also compatible with the Mac, iOS, Android, and Windows devices.
6. Cricut Maker 3
Alt Text: A Cricut Maker 3 machine
The robust design, smart engineering, and sharp blades provide a fast and accurate cutting experience. During the Cyber Monday Cricut deals, the machine is going to be available at just $379, and the actual price of the machine is $429. Also, this machine is an ideal option for anyone who wants to have a professional-level machine.
Frequently Asked Questions
When is the Cyber Monday Sale?
Cyber Monday always falls on the first Monday after Thanksgiving. This year, Cyber Monday will be on 27 Nov 2023. On this day, e-commerce retailers offer massive discounts on electronic products. So, people who are planning to get their favorite gadget to wait for the sale and buy the products. Also, this is the best way to save some extra bucks while you are shopping.
Which Machines are Available on Cyber Monday Cricut Deals in 2023?
Here are some of the Cricut products you can choose to buy at huge discounts to save some bucks. These machines will be available for less than $30 less than their actual price.
Cricut EasyPress Mini
Cricut EasyPress 2
Cricut Explore Air 2
Cricut Explore 3
Cricut Make3 3
Cricut Hat Press
Cricut Auto Press
Cricut Mug Press, and others.
Does Amazon Do Cyber Monday?
Yes, Amazon offers the Cyber Monday discount deal and provides huge discounts on a plethora of electronic products and gadgets. Along with Amazon, there are many other e-commerce sites that provide the best Cricut deals on the sale day. If you are a crafter, you can get the Cricut crafting machines and tools at a handsome price. Also, this deal will be beneficial for people who want to start the crafting journey without breaking the bank.
Visit: cricut.com/setup
cricut.com/setup mac
Cricut design space
install cricut design space app
Source: Cyber Monday Cricut deals
#Cyber Monday Cricut deals#Cricut design space#install cricut design space app#cricut.com/setup mac#cricut explore air 2#cricut thanksgiving projects#design.cricut.com#cricut.com/setup#best Cricut deals
0 notes
Text
Curving font on isplash

#CURVING FONT ON ISPLASH HOW TO#
#CURVING FONT ON ISPLASH PLUS#
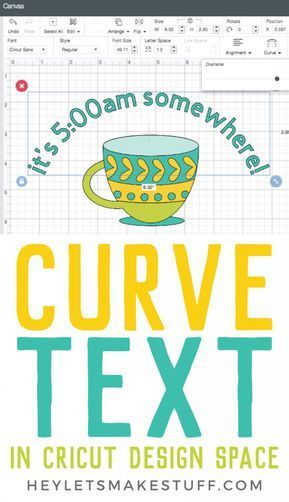
So as an example, below I used the font called: DJ Flirt The ONLY difference is you use symbol’s instead of letters. The easy part is it’s just as easy as the instructions below. Why yes you can! This to me is where the fun really begins. It’s quite simple, isn’t it? It’s really very easy to just get in there and slide the slider a bit and just play with it until it looks pleasing to you. So there is the step by step tutorial of curving text. I then changed the moon to a gold color and attached the “i love you” and “to the moon” together, so they’ll cut out together in the same color. I then clicked on images and searched “moon” and added it to the design. When you curve with the slider to the left, the number adds a – (minus) symbol in front of the number. Screen shot below shows both curves and I used the same Diameter number of 2.75. 😊 (notice when you slide it the number changes in the little box) The number will display 0 (zero) when there is no curve, just a perfect straight line.īonus Tip: You can highlight the box where the number displays and manually type in the numbers you want and the minus (-) sign if needed. 😞 If you slide it to the left, it curves like a smile. Click on “Curve” and as seen below you will now have a “Diameter” with a slider DOT or Circle where you can move it to the right, it curves like a frown. Once you type in the text box, the “Curve” option becomes bold so you may select it to play with the curves.Ģ. This will open a text box where you will type in your text or symbols.
Select “Text” in Cricut Design Space as seen below.
You can curve 2 lines equally (same radius) by utilizing the diameter field and entering the same numbers.
Ex: If you decide you want to change the font you can.
Curved Text is still editable unless you “Weld” or “Flatten” the curved text.
To get around this feature, be sure to curve your text first then if you need to, you can ungroup to separate letters and arrange each letter or rotate and space if needed.
The curve tool can not be used if you have “Ungrouped to separate letters” then “Regrouped”.
If you forget and put 2 lines of text you can use the “Advanced” tool and “Ungroup to Lines” feature.
You can curve one line of text at a time.
When you type your text into the text box the Curve Text Tool is now Bold and usable. The Cricut Text Tool will now show up but it is grayed out until you add text to a box as seen below. When you first open up a new canvas in Cricut Design Space, you will not see the Curve Text Tool.Įven if you add an image to your canvas you will not see the curve text tool as seen below.Įven if you click on the Text Tool and you get that text box to type your text in.
#CURVING FONT ON ISPLASH HOW TO#
Or you can continue with my blog post or Hey! Do both! Video of How to Curve Text using Fonts and Symbols If you love to learn by watching video so you can see the process, I prepared one for you as well. So many more shapes and options to use instead of just fonts! It is a game-changer when it comes to the curve tool. I am also excited to show you how you can use symbols instead of fonts with the Curve Text feature.
#CURVING FONT ON ISPLASH PLUS#
I do have a bonus tip to get a completed curved text into your mobile device which I’ll share a bit further down in this post, plus I show tips for this process in my video too. So it is not available yet for mobile apps. Plus a bonus tip on how you can use your curved design in your phone app as well.Īt the time of this post, the Curve Text feature is only available on the Windows/Mac Desktop version. In addition, I want to help you understand why the curve text feature does not show sometimes while working on a project. Today I show you how to easily curve text using fonts and symbols in Cricut Design Space.
0 notes
Photo

How to Curve Text in Cricut Design Space #cv
#baby #babyroomdesign #cv #cvdesign #design #room
0 notes
Photo

How to Curve Text in Cricut Design Space #room
#design #dining #diningroomdesign #room #tabela #tabeladesign
0 notes
Photo
Mermaid Tumblers: Learn how to curve text for tumblers in Cricut Design Space so that it appears straight, and create these adorable mermaid tumblers! FIVE different mermaid tumbler designs to choose from! via @hiHomemadeBlog #ad @OfficialCricut #Cricut #CricutMade | Like My Facebook Page >> https://ift.tt/2jty87z ... Saved from - https://ift.tt/2XFtpVj
1 note
·
View note
Text
How Do You Curve Text In Powerpoint For Mac

Related Articles
How Do You Curve Text On Silhouette
How Do You Curve Text In Cricut Design Space
How Do You Curve Text In Photoshop
1 Type Following a Curve in Microsoft Word 2010
2 Draw a Precise Curve in Photoshop
3 Drawing Normal Curves in PowerPoint
4 Create Text Bubbles in Microsoft
Google Docs allows you to enhance your documents with the use of images, shapes and lines. You can draw a curve in your document using the line tool and size it to fit within your document. The curve should appear within the margins specified by the ruler located at the top of the document to ensure the entire curve prints.
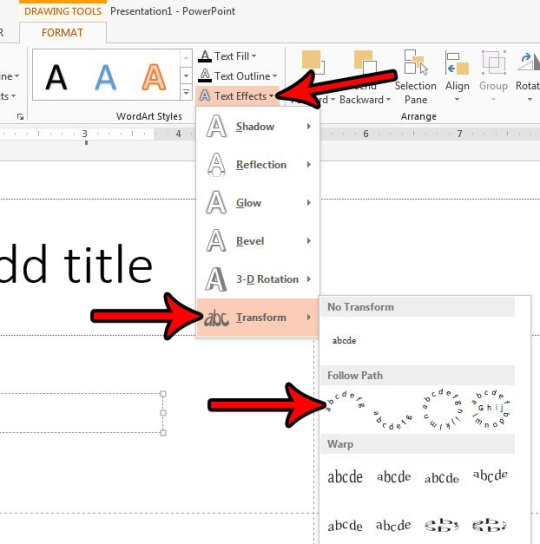
Curved text is possible using text effects 3. Curving text in PowerPoint In the Ribbon, hit FORMAT/Text Effects/ Transform Your curve options are under Follow Path – hover over the effect to see how it will look and click the one you want. Continuing from our look at putting Word text vertically, at an angle or curved here’s how to put text around an object; image, chart, shape or other Word object. Text around a Box. Putting text around a box requires four separate text boxes, positioned and grouped around the object. Here’s a chart with four text boxes around it.
2.
Click the “Create new” button in the upper-right corner of the Google Docs site.
4.
Click “Insert” from the top-menu, then select “Drawing.”
5.
Click the arrow to the right of the “Line Tool” icon, then select “Curve.”
7.
Click “Save and Close.” The curve is inserted into your document.
8.
Click the curve image in your document. An editing box appears around your curve.
9.
Click and drag an anchor point on the editing back to size the curve to fit in the Google Doc.
About the Author
Diana Braun began her writing career as a consultant and technical writer for a software company focusing on how-to, training, white paper, and internal process documentation. After two years, Braun left to pursue her entrepreneurial dreams. Since then, she has launched several startups including a t-shirt business, an online marketing and advertising t-shirt distribution business, and an entertainment site. She currently resides in South Florida.
Cite this Article
Choose Citation Style
Braun, Diana. 'How to Fit a Curve in Google Docs.' Small Business - Chron.com, http://smallbusiness.chron.com/fit-curve-google-docs-29973.html. Accessed 07 September 2019.
Braun, Diana. (n.d.). How to Fit a Curve in Google Docs. Small Business - Chron.com. Retrieved from http://smallbusiness.chron.com/fit-curve-google-docs-29973.html
How Do You Curve Text On Silhouette
Braun, Diana. 'How to Fit a Curve in Google Docs' accessed September 07, 2019. http://smallbusiness.chron.com/fit-curve-google-docs-29973.html
Note: Depending on which text editor you're pasting into, you might have to add the italics to the site name.
How Do You Curve Text In Cricut Design Space
I'm trying to create some documents and am in need of adding some curved text (similar to WordArt) in Pages. Is there some key combination that will allow me to modify (click/drag) the Text Box containing my text to create a curve. I found the rotate commands but nothing for my current need. I have previously done this by using Word, creating the necessary text in WordArt and then copying it to my Pages document. This works but is archaic, believing that Pages should be robust enough to perform this function as well, given it's claim to being a Word Processing/Page Layout product. This process doesn't allow me much flexibility in modifying the text or the curvature after the fact. Any help would be appreciated. Thanks in advance...
iMac 24, Mac OS X (10.5.2)
How Do You Curve Text In Photoshop
Posted on
0 notes
Photo
How to Curve Text in Cricut Design Space – New Feature! https://ift.tt/2YDQKZD
0 notes
Text
What is the Best Cricut Software in 2023?

Cricut is a powerful and versatile machine that can precisely cut and craft different materials. To help out crafters, Cricut also offers a graphics designing tool called Cricut Design Space. It features a user-friendly interface that is very easy to use and is compatible with multiple devices such as mobile, laptop, PC, and tablet.
As a bonus, the app is free, and you can download it directly from Cricut’s official website. However, you can also use the software if you are unsatisfied with the Design Space. If you are wondering which software is compatible with your Cricut, you don’t need to look further. In this blog, we have the best Cricut Software, along with its pros and cons.
OPTION ONE: ADOBE PHOTOSHOP
Adobe Photoshop is the world’s best photo editing and graphic design software without introduction. Hobbyists and professional designers widely use it to create paintings, drawings, and animations. Photoshop is also used to edit and retouch digital images, and it is quite good at vector art. It’s a robust editing toolkit that helps users to create complex designs from plain elements. When graphic designers need to create bitmaps in multiple layers or handle image masking, they turn to Photoshop.
Photoshop automatically saves your projects to the cloud. Besides the standard function, Photo Shop offers live streaming, project tracking, data storage management, and offline access. It also lets you invite other people to edit files so you can collaborate with team members on various projects. Although it’s not the most affordable software, the value that it brings to the table is hard to beat.
REASONS TO GO FOR IT
Powerful web design tool
Cross-platform Integration
Intuitive interface
A wide array of high-quality templates
REASONS TO AVOID IT
Expensive
OPTION TWO: ADOBE ILLUSTRATOR
For professionals and artists, Adobe Illustrator is the best Cricut software. Adobe Illustrator is a vector graphics program that allows you to create anything, such as text, shapes, and symbols, for your projects. Like Photoshop, it also lets you create complex and beautiful patterns. Use the preset workspace to customize your workforce. Although beginner-friendly, its extensive tools let you create precise and intricate models compatible with the Cricut machine.
Illustrator allows you to use multiple artboards; this feature is handy when working on projects with multiple items. Various plugins expand Adobe Illustrator’s capabilities. These plugins let you create your own custom fonts. If you need software that works well and lets you create anything, and if you’ve no problem paying for it, then Adobe Illustrator is the most suitable option.
REASONS TO GO FOR IT
Compatible with different OS
An extensive set of tools can be further expanded using plugins
Best for creating new shapes
Countless shortcuts
REASONS TO AVOID
Have to pay a monthly fee.
OPTION THREE: GIMP
Although Photoshop is a great software that lets you create everything, its only drawback is its cost. If you want a free alternative to Photoshop, you can opt for GIMP. Like Photoshop, GIMP is free software that offers various features for editing images and creating original illustrations from the ground up. Its extensive brush-based tools range from the clone/heal brush to the brush/burn tool.
These brush-based tools come in handy when working with large, high-resolution images. Most people use GIMP as a photo editor, but it can also be used for graphic designing. GIMP lets you add and edit text, move and control images. It also lets you configure contrasts and curves. GIMP is one of the best Cricut software for beginners who want to create awesome art.
REASONS TO GO FOR IT
User-friendly and customizable interface
Supports different formats
Lots of drawing tools
Advanced processing of graphic files
Multiple drawing tools
REASONS TO AVOID
Can’t handle CMYK color space
OPTION FOUR: CORELDRAW
Those looking for an alternative to Adobe Illustrator don’t need to look any further. CorelDraw is a full-fledged design program that lets you create everything. The program was originally designed as a rival to Adobe Illustrator. Both are great tools for vector designing and cost the same. But unlike Adobe Illustrator, where you must pay monthly, CorelDraw allows you to join for a monthly cost or pay an up-front fee.
CorelDraw gives you access to hundreds of pre-designed templates, which you can use to create stunning designs. It also lets you create designs from scratch with a few clicks. With a simple right-click, you can create complex designs and vectorization. You can design your graphics, convert them to SVG, and then send it to Design Space. CorelDraw’s extensive library of plugins is specially designed for cutting machines such as Cricut. Opt for its trial version if you still decide to go for CorelDraw.
REASONS TO GO FOR IT
Simple and user-friendly interface
A free trial version is available
Works great for vectorization
Offers a range of membership types
REASONS TO AVOID IT
It doesn’t offer tools to create HDR or panoramas.
OPTION FIVE: INKSCAPE
Inkscape is another great alternative to Adobe Illustrator, but unlike Illustrator and CorelDraw, it’s free. Its interface is straightforward, so you will quickly get the hang of it, even if you are a beginner. Inkscape is an open-source vector graphics editor which uses SVG as its primary file type.
Although Inkscape is prone to lag, it can run on low-end laptops and tablets. With Inkscape, you can customize virtually everything- colors, lines, grid, icon type, and other elements. Designers use it to create logos and banners. You can also convert raster images into vectors and save, import, and export your projects in various formats.
REASONS TO GO FOR IT
Beginner-friendly interface
It’s free
Flexible drawing tools
It lets you generate and edit SVG files
Exports in PNG and PDF
REASONS TO AVOID
Poor text editing instruments
#Cricut Software#cricut#art and craft#cricut.com setup windows#design cricut.com download#cricut.com design space#cricut.com/setup#cricut setup
6 notes
·
View notes
Video
youtube
Liked on YouTube: Curved Text Cricut Design Space Tile Project https://youtu.be/XkpL-V4o-kk
0 notes
Text
BRAND NEW: 3 Curved Text Secret Hacks for Design Space
Curved text is a brand NEW feature added to Design Space and this is the best tutorial I’ve found on it! It teaches the basics of how to curve text in design space for beginners plus 3 secret hacks on how to use this feature with your Cricut designs! #cricut #beginner #designspace
The post BRAND NEW: 3 Curved Text Secret Hacks for Design Space appeared first on Good Info.
0 notes
Link
Just Pinned to Handmade: Curve Text Tutorial in Cricut Design Space plus Cricut Freebies | Tutorials for Your Cricut Projects on Frugal Coupon Living. http://bit.ly/2W45ZG7
0 notes
Photo

How to Curve Text in Cricut Design Space!!! It's finally here and so easy!! | Like My Facebook Page >> https://ift.tt/2jty87z ... Saved from - https://ift.tt/2TulaZB
1 note
·
View note
Last Seen Blogs

drustvar-dragonfly
Lydia Reid

jan-dec-calendar
Untitled

rosepoems
poems

princessthyra
Princess Thyra

heyjes
Heyjes