
lolita-patterns
lolita craft patterns archive
78 posts
Don't wanna be here? Send us removal request.
Last Seen Blogs

crohnicallyfab
Crohnically Fabulous

mrcikosblog
Untitled


lactoseparty
potato smile

cherrykissoceanlips
cherrylilly
Photo
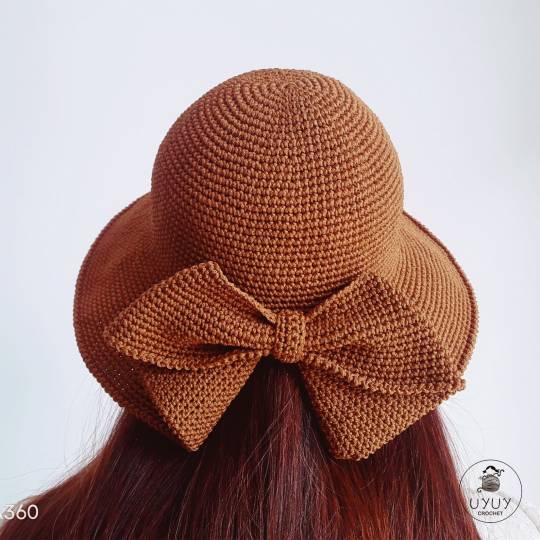
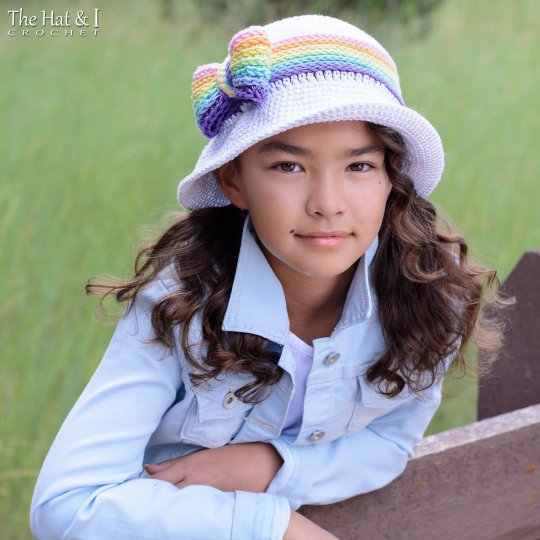
crochet sunhat patterns
hat by uyuycrochet [$6.50] ;; cloche hat with bow by grace wong [$5.50]* ;; rainbow reflections sun hat by thehatandi [$5.99]
*photo unavailable due to webp format
7 notes
·
View notes
Video
youtube
~ How to make a Tea Length Petticoat (Tutorial) DIY Petticoat ~
This is a great tutorial I’ve seen and the way she makes it, it can be easily shortened or lengthened. I’m making one with 6in wide tulle strips because I’m short.
62 notes
·
View notes
Text
Detached Collar
(Construction)
Tutorial to drafting the pattern so that it will fit you personally are right here.
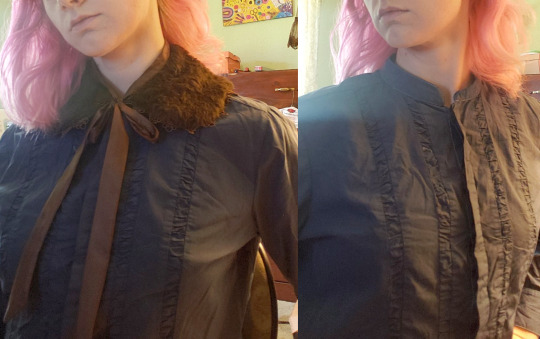
Lots of normal blouses you get at normal person stores, when you’re out being a normal person and are definitely not some kind of otherworldly being who is accidentally stuck in a shopping mall, are pretty okay for lolita fashion, except for the collar.
Sewing a detached collar allows you to easily convert blouses that are almost okay into something that definitely works. You can also use more expensive fabric and lace, and then have a small accessory that can be used with multiple looks to bring that level of quality into the coord. Collars are right by your face, so it’s an added detail that can get noticed easily.
In the last post, before tumblr made me split it into multiple posts because they just made a rule that will seriously jeopardize the future of this blog on this platform, we went over how to draft a template that will allow you to make multiple collars with multiple heights, and how to use that template to make a collar pattern.
Now, let’s sew some stuff.
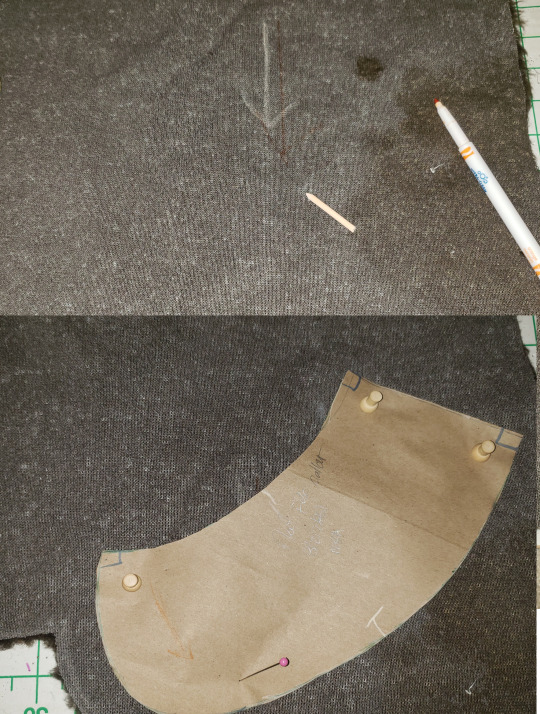
As everyone who has a cat knows, fur has a direction. When you’re making a collar, you need to keep that in mind.
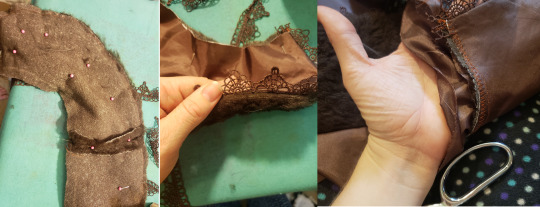
Every time I work with fake fur, I start by taking my chalk and drawing the direction the fur goes onto the back. On my pattern, I draw the direction that I want the fur to go directly onto the pattern. Then, I line the two arrows up.
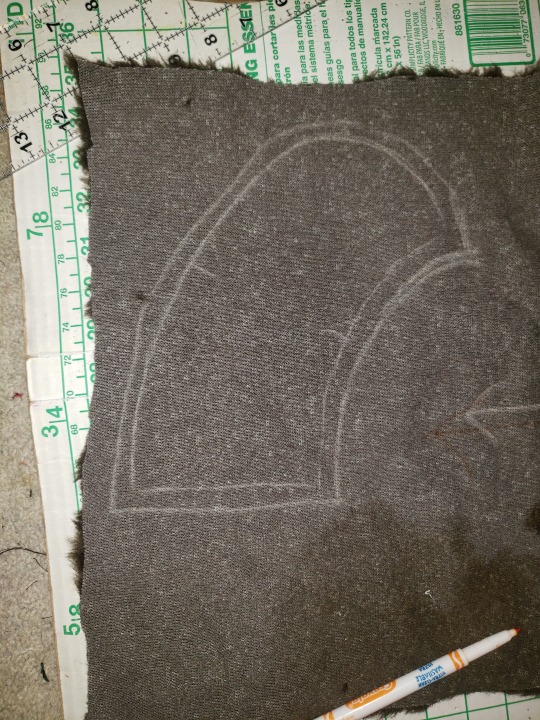
Our pattern that we made doesn’t have seam allowance, so we’re not going to cut with the pattern on the fur. We’re going to trace around the pattern, remove the pattern, add our seam allowance, and then cut it out from the backside.
<Please note that this specific picture has the pattern traced with the fur going in the wrong direction. It’s just the best example I have of tracing the pattern and adding seam allowance on the fabric itself>
When you’re cutting fur, you want to cut the backing that the fabric is attached to, but not cut the fur itself. I’ve found that the easiest way to do this is with a sharp box knife, but you can use small scissors and very tiny snipping motions if you want.
We’ve cut two pieces of fur out for our top of our collar. Because of the shape of the collar and the way we want the fur to go, it would not have been possible to cut this on the fold.
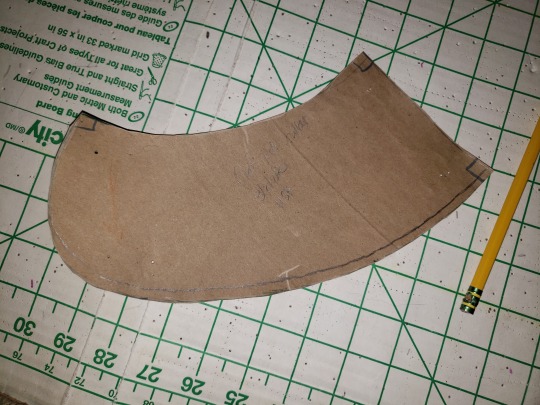
You want to trim the pattern for the lining (or undercollar, if you’d rather) by 1/8th-1/4″, just on the bottom edge. I’ve got that line penciled in here. Since we don’t have seam allowance on our pattern, we can just mark this section off without worrying about how seam allowance comes into play.
Making the undercollar/lining smaller ensures that it won’t ever flip to the outside and become visible. You should also do this when making attached shirt collars.
I cut the lining out as a single piece, on the fold. Fold the fabric, put the center back seam on the fold, and trace the pattern onto the fabric. Remove the pattern, and add your seam allowance before you cut.
My collar uses a generic polyester lining fabric that I found in a drawer for some reason.
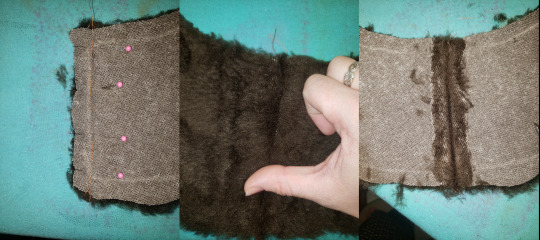
The three steps of sewing a seam with fur:
1) pin and sew your seam
2) open the seam up on the right side and, using whatever tools it takes, get the fur that is stuck in the seam out of the seam. With this short-pile fur, I just needed to rub it with my thumb a bit. Long-pile fur might require you getting a slicker brush at your local pet store and carefully combing it out.
3) take your scissors and shave off the hair that is on the seam allowances. This cuts down on bulk on the inside of the collar.
Did you know that geometry is annoying?
As I said in the scallop hem tutorial, which absolutely had more than ten pictures in it, in sewing we regularly have a problem where the inside of a circle is smaller than the outside. In scallop hems, we have to figure out how to get the extra outside part of our curves to sit flat and not interfere with the inside part of our curves.
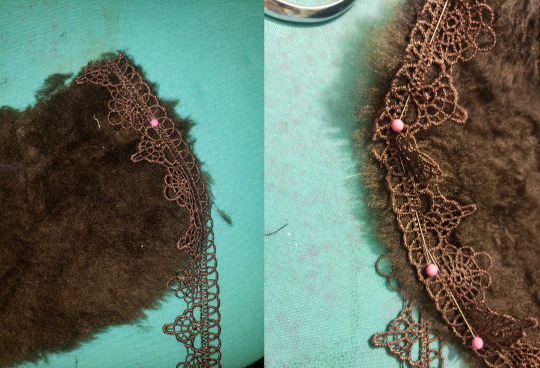
When you’re putting lace on a curve, you have the opposite problem. If I just pin the lace to this curve, the edge of the lace is pointing at the inside. When I try to turn that outside, the lace will be too small and won’t be able to lie flat.
This is a fancy way of me saying that, when you’re applying a lace to this collar, clip the edge as you go. Just take a look at that righthand picture. Snip snip snip all the way along the edge.
I like to sew the lace down at this point, so that I can get the pins out of the way.
Now, you can stack the fur layer (or whatever your outer layer is) over your lining, and sew along the outside edge. You can leave the neckline edge open for turning out.
If you did it right, your lace will be cute and lying flat. Once again, get the fur out of the seam allowance.
Since you just turned an outside curve in to an inside curve, you’ll have some bulk from your seam allowance in there making a mess. Cut little notches into the seam allowance so that it lays flat (check the scallop hems tutorial for details on that).
Once you like how everything lays, zigzag your neck edge so that the lining is attached to the face fabric/fur.
You’ll need to encase that top edge in a ribbon or some bias tape. I just used a strip of the same fabric that I used to line the collar.
Remember that this goes right up next to your face, so take your time with this edge and make it look good. In my case, I did the top edge very carefully with my sewing machine, and then rolled the other edge under and put the collar in a box from august 2020 to april 2021 and then finally got off my butt and today I finally sewed the under edge down using an invisible hand sewing stitch. Make sure that you take your edge is an even width across the top, and that the place where it connects to the collar (center front) looks good.
If you don’t want to have it tie in the front, you could use a large hook and eye (like a coat hook) or a button.
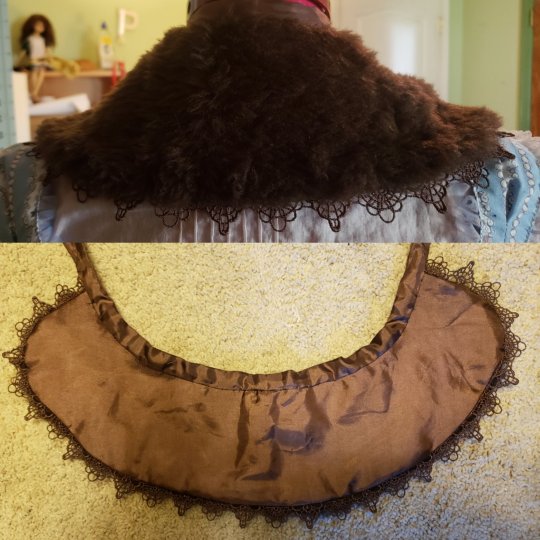
And there you go!
Fur is a really good choice for this if you’re not as confident with sewing like this, because it naturally disguises some mistakes. You can see there’s a little bt of an uneven spot on mine, and you can’t even tell from the front view.
This is a very fun project to use as a jumping-off point, if you’re looking to get into handmade lolita and are looking for something small to see if you like detailed work like this.
That’s about it.
91 notes
·
View notes
Text
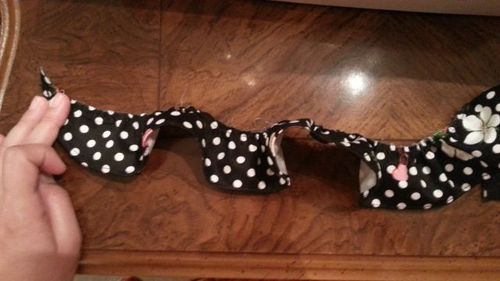
This is a hack for using these blanket storage straps to extend the straps of a JSK with zero sewing required.
I have like negative energy right now, so sorry if I sound out of breath, my body decided talking was strenuous today. :/
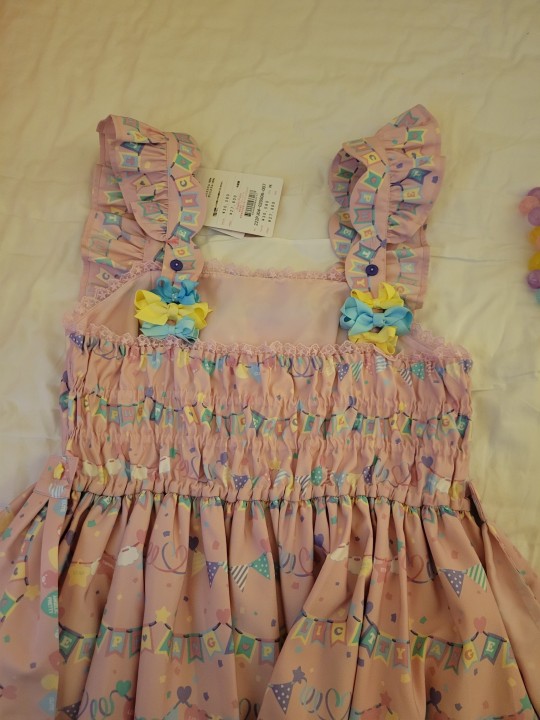
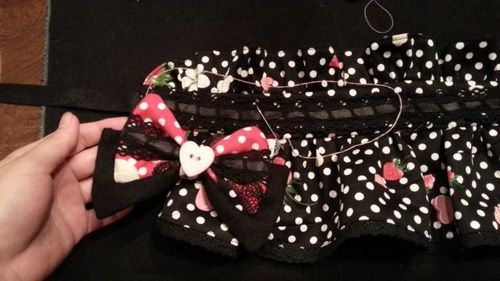
Here is what it looks like when it's done, I'm probably going to change the bows I used, these are just what I had on hand and I was too tired to go get others that matched better.
If you want to do this with a JSK where the button is on the strap (vs the button hole being on the strap like this one), you will have to trim the blanket strap to the right length or you will have a big old tail sticking up. The end of the elastic you cut will fray. Use fray check or clear nail polish to seal the raw edge (DO NOT GET IT ON YOUR DRESS) and let it dry. You can loop it around a hanger and hang it from a shower bar or something so it's not touching anything.
If you can sew a button, I personally would move the strap button down and to the inside/underside of the strap so that the blanket strap buttons on under the strap. That way the raw part you cut and sealed is hidden under.
You can also just buy a roll of button hole elastic or a strip of it at a sewing store and sew on your own buttons! It's cheaper, but harder to find colors other than black or white quickly.
You don't have to put bows over the button hole elastic, but I think it looks better to hide the elastic strap personally.
This is one of the types of bows I used to buy from Target (not the ones pictured here). I also recently bought these ones on Amazon and these ones on amazon and both are fine for something like this.
92 notes
·
View notes
Photo
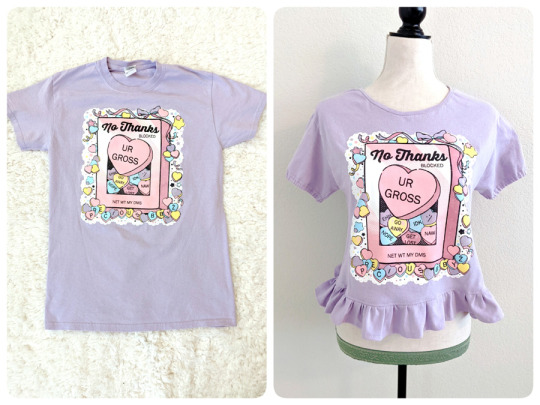
T-shirt refashion from regular unisex shirt to cute lolita-style cutsew! No serger/overlocker machine used, only some elastic. So happy to have finally redone this shirt to something that fits and is comfy but cute. Base tee shirt from https://preciousbbyz.com/
Check out the tutorial and video here!
https://starsbegantofall.blogspot.com/2022/06/diy-tutorial-precious-bbyz-cutsew-from.html
35 notes
·
View notes
Text
Shoe repair: Regluing soles.
So, when I was out and about, dressed all cute, my Bodyline shoes did to me what my Bodyline shoes have done to me many times before.

By the end of my trip to the quality retail establishment known as Five Below, the platform and sole of my Mary Jane pump had detached itself.
As I've mentioned before, it's generally not a bad idea to have some tape in your purse when you're working with Bodyline shoes. Almost every pair of Bodyline shoes that I've owned has broken on me in some way, and sometimes you need to tape it back together to get home. I was driving myself this time, and I keep backup shoes in my car because of a longstanding ankle problem, so my day wasn't completely ruined.
if you have to tape your pump to your foot so you can get through the day, I find that putting a few loops of tape around the middle works pretty well, Tape all the way over your foot and all the way under the shoe. This allows the tape to actually support the shoe, instead of trying to peel off, and it's relatively subtle if you have to do it, like I had to at the convention earlier this year.
Anyway, Bodyline's shoes are just not meant for northern California in the summer, and I think the glue just melts, so I actually had two pairs I needed to glue back together. There's part of me that actually looks forward to needing to do this, because I know that my glue job won't fall apart, and my shoes will be better in the end. I did a tutorial on regluing shoes back in 2015, so it's time to redo that tutorial.

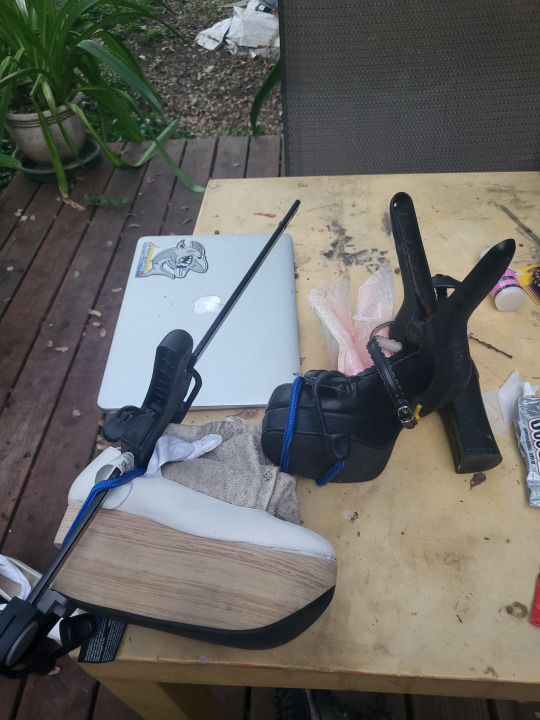
Let's take a look at what we need to do this:
One, we need a place to work that will be safe if little bits of glue get on it. If we do this right, we will not drip glue everywhere. However, if we do this right, we also will not be somewhere that a little drop of glue will destroy.
Two, you need clamps and clamping material. I'm going to be honest, getting some good quick-release clamps and keeping them with your sewing/crafting/diy supplies will be a game changer in many aspects of what you do.
Pretty much any clamp that you get will be good for something, but here's my favorites:
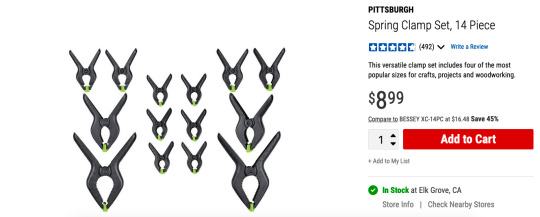
Rabbit-ear spring clamps. The smaller sizes are really good to have around because you sometimes just need A Thing to hold A Thing nice and tight. I used one of the really big ones to hold the sole of the black shoe's rubber sole onto the back. The clamping surface swivels so they're good for clamping angled things.

These things are like a traditional c-clamp, but with a quick-slide action that makes them way easier and faster to use than a c-clamp. I have like 20 of these with my weaving supplies because it's way better than a warping peg or a table clamp. These have a swivel clamping surface, so they can do angles okay. The end of the clamp that swivels also adjusts in and out, so you can use that to put clamping force over a edge of a shoe and avoid bending the edges too much. You can also use that screw mechanism to really tightly clamp something.

You can take the end off one of these and put it on the other end, and then it's a reverse clamp used to hold things apart. I like these little 4" ones for a lot of applications. You can also get a really tight clamp/strong spread with these because of the ratcheting handle. In this tutorial, I use one of these, but I'm using the 14" version instead of the 4" version. This is because I don't know how to read when I buy things online.
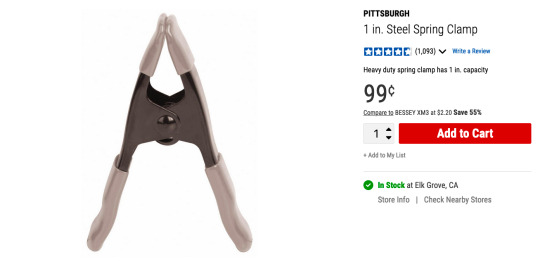
And I'm throwing this 99 cent spring clamp in here because I use these in sewing all the time. Any time you need to get some fabric together and out of the way, this is your tool. Also, if you have rented costumes that are larger than your actor, you can clamp the extra fabric in the back to make it look like it fits them (and then clamp it in the front for any shots of them from behind). I keep these on my dress form as well, because I'm a slightly different size than my dress form, and clamping the back edge of the garment sometimes makes it photograph better on the form.
So get yourself some clamps. In addition to those clamps, I used bungee cords and a lot of stained towels/discarded shipping envelopes to stuff the insides of the shoe. Don't need to make new trash if you reuse the trash you have.
Let's talk about glue, really fast. In that picture, we have four kinds of glue.
Shoe Goo: This is the one I used in this tutorial. Shoe Goo is a glue made specifically for shoes. It's a little bit flexible when dry, is water proof, and can withstand higher temps intermittently. This means that it won't melt when you leave your shoes in your car on a summer day.
E-6000: E-6000 will glue most things to most other things. It comes in a few colors and dries flexible. I keep it on hand, and I have fixed shoes with it before. I like the Goo a little better for this specific application, but I use E6000 on small things like broken buckles. I think I fixed the left shoe of this black pair with E6000, because the store I was at didn't carry Shoe Goo.
Fix All Adhesive: I've used this one in a pinch before. You can find it in more places. It also does something that the other two glues can't do, which I'll go into in a minute.
Glossy Accents: Glossy Accents should not be out there. Glossy Accents is not ready for shoe repair. Glossy Accents does not know what it's doing out there with all those strong glues. Glossy Accents should go back home. Do not use Glossy Accents on your shoe repairs.
Please note that, with the exception of the accidental inclusion of Glossy Accents, all of these are called solvent glues. A water-based glue has water in it, and the glue will dry as fast as water evaporates. If you want it to dry faster, you can replace the water with a solvent like acetone, which will dry as fast as acetone evaporates, which is much faster. If you expose a dried water-based glue to water, it could dissolve back into the glue, making the join weak. A solvent-based glue won't dissolve in water, but you also can't use water to clean it up. Read the instructions on your glue. It will tell you, "when wet, clean up with x." Find out what X is and then have that on hand. Hopefully, you won't need it. Also, most solvent glues are flammable, so don't smoke or burn candles while you do that. The lighter in that picture up there, much like Glossy Accents, has no place in that image and should just go home.

My white rocking horse shoe is a really good example of an easy shoe to re-glue. The front is still attached, but the back is free. Because the front it attached, it will keep the back in alignment. You don't need to worry about lining it up as much, because the shoe will line it up for you.
This is also nice because there's not really any dirt or grass in there. If your shoe broke and you had to walk home with your sole missing, you might have dirt to clean out before you do this glue.
What we do here is pretty simple: put a lot of glue in there, spread it around, put the two sides, together, clamp, and come back later.
How much glue? You want enough so that there's not a lot of empty air pockets between the two sides of the shoe. You want it to be shoe to glue to shoe, without air between. However, you don't want so much that a ton runs out of the sides of the shoes and you need to do cleanup.
I did a nice fat bead of glue down the sole, squished it together, and then pulled it apart. From that point, I could spread the glue around and get good coverage. You want glue on both parts to be glued.
Then, apply some force onto the shoe, to really get the two glue surfaces touching each other as much as possible. I like to just put the shoe on my foot and stand on it for a few seconds.
Once I've put some pressure onto it, I check for two things. The first is for any glue squeeze-out. Acetone cleans that up, but it can also dissolve some of the finishes on some shoes, so be careful with throwing it on there.
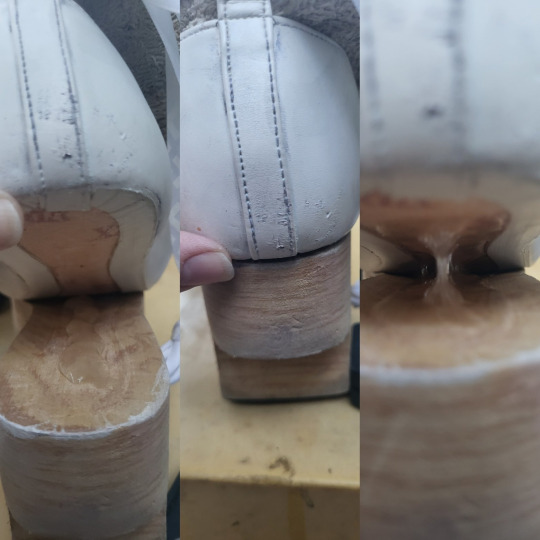
The second thing I look for is any areas where the sole and the shoe are not properly joining. You can see in that three-part pic up there that the back of the shoe wasn't totally meeting the sole, so I had to make sure that I had glue all the way back there.
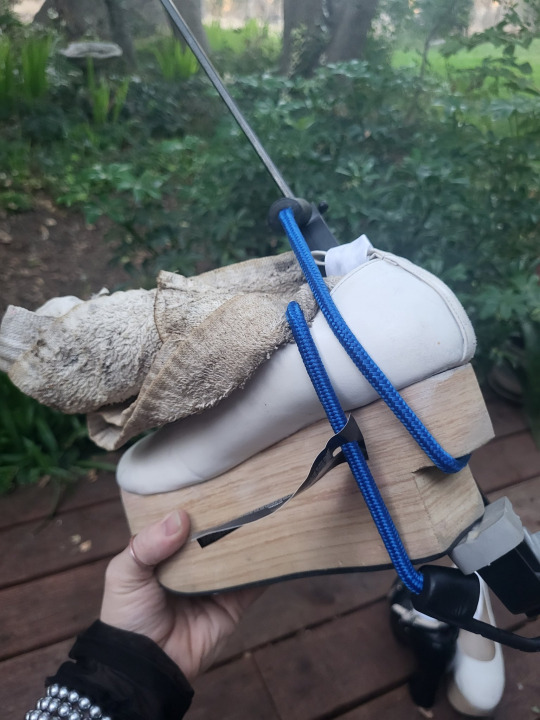
Then it was time to stuff the shoe with something (I used a stained towel) and apply clamps to it. We stuff the shoe so that the clamp can't bend the edges of the shoe down and break them. Here I have one large clamp to provide most of the clamping force, and then a bungee cord to make sure that very back part stays stuck to the sole properly.
Once I was confident that everything was making contact, and that any excess glue was cleaned up, I could set the shoe aside and allow the glue to cure.
So what's going on with the Fix All glue? The main different thing about the fix-all glue is that they instruct you to apply it to both sides, let it dry, and then bring the sides together. This makes two changes to doing it with Shoe Goo.
First of all, when you use glue that dries first, you only get a single chance to align the two parts. This means it's a good choice for things that are very easy to align (like this shoe where the front half is still attached) and not very good for things that might take a couple of tries (like my black pump with the whole platform detached).
The second thing is that it grabs hold immediately, making it a good option for things that are difficult to effectively clamp. You will still want to clamp it in place until it dries, but it will do a lot of that initial holding for you.
Know that one kind of glue will give you multiple tries, but must be heavily clamped while it dries, and another kind will only give you one shot, but it'll do some of the holding for you. (If you really need that sudden grab and long hold, and you're applying it to a large heavy-wear area like the entire sole of a shoe, you probably want Barge All-Purpose TF Cement. It's a dangerous product to work with, but exposing yourself multiple times to different slightly-less dangerous products to glue and then reglue and reglue a shoe as it keeps falling apart seems like a not better option IMO).
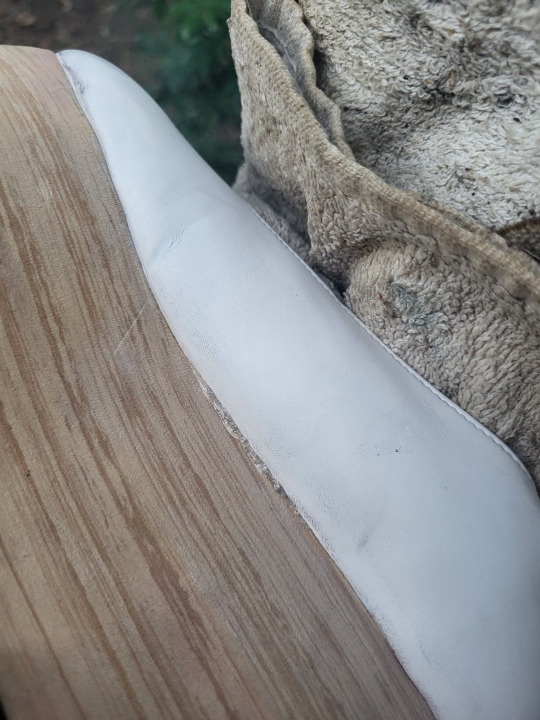
So a glue that has you let both sides dry first can be really great if you have just the tip of the rubber sole starting to peel back. The other advantage is that, if the glue dries before it sticks, it dries faster than if you have glue trapped between two non-porous surfaces. Because of this, I use Fix-All when I'm just gluing the soft rubber coating on the sole back into place.
On the black shoes, I needed a few tries to be able to get the platform aligned with the upper. The platform had completely detached, so I had to make sure it was in proper alignment. The right shoe is also where my bad ankle is, so I had to make sure the shoe wasn't twisted, so that my ankle wouldn't be under additional stress.

Here's how much glue I used, before it was spread around. I moved it around to make sure there weren't big patches with no glue. Good contact is good bond.
And here's how I clamped it. I shoved a bubble mailer (waste not; reuse your trash!) into the toe of the shoe, and the wrapped a bungee cord around that to hold on the platform. Then, I used a rabbit-ear clamp to hold the instep together.
And then it's just about giving it 24 hours to mostly cure. After 24 hours, it's a good idea to remove the clamps, so you don't put stress on the walls of the shoe. However, give it a full 48 before you try to wear the shoes, because there's still some final curing that has to happen before the whole thing is ready to be put under stress.
And now you can go out and about, knowing that your shoes are stronger than before, and that you won't need to fix that shoe again.
123 notes
·
View notes
Text
sorry for the inactivity - the mod of this blog has adhd, and made it in a fit of hyperfocus lol. i’ve queued up some more posts and i hope to update more regularly from now on!
0 notes
Text
PSA for other folk not in the "normal" size ranges- DIY shirring is not nearly as daunting as it seems!
Part one of two: Making Replacement Shirring to Expand the Bodice of a JSK (or other styles/dresses, this is not limited to the realm of lolita fashion!)

A few things to note:
I am not a professional seamstress, and I'm probably doing some steps in an asinine, backwards manner, but hey- they work for me... 😬👍🏻
I have never written a tutorial on any of my sewing projects before now, I wish you luck lol
I didn't think to photograph some stages of the process such as taking out the existing shirring, but once I thought about it I did grab these while working on the new one to the best of my ability. I'll try to at least describe anything not pictured.
I am not an expert in lolita fashion. I've fawned over it for over a decade, a newbie to wearing it personally. I still have many things to learn!
This is actually my very first (be it indie) brand jsk (!!!), recieved in one of Soufflesong's recent lucky packs- what I think is an older design for the Rossellt Roses print, the bodice is a different design from the current one available.
I selected XL, the highest size available for them at the time, knowing that the items would still be a few inches shy of fitting comfortably.

Tools and materials: dress to alter, matching, nice quality, comfortable feeling fabric, elastic, matching colored sewing thread, seam ripper, ruler, a non-staining, fabric safe, washable sewing pencil or chalk, sewing pins, safety pins, and a sewing machine!
So first, using a seam ripper -carefully- remove the existing shirring or back panel! Save this fabric, I'm making accessories with my scraps, you can too! :3
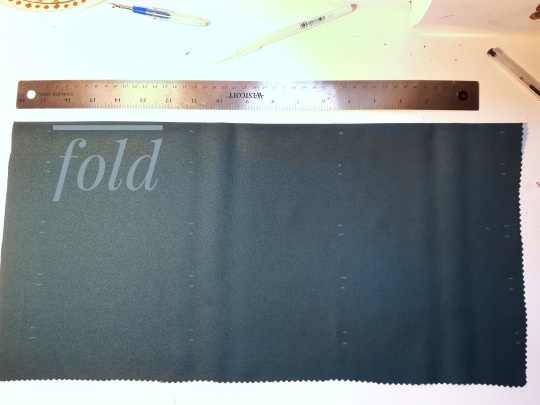
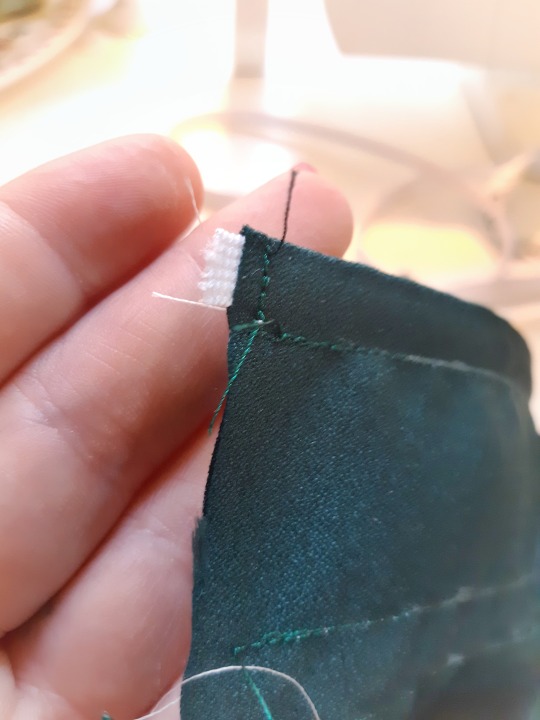
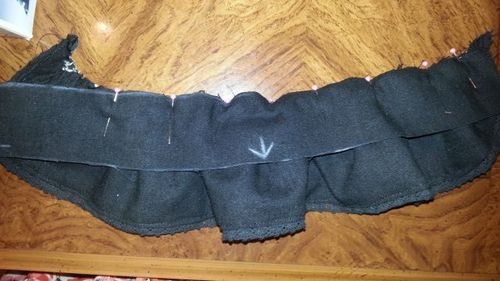
Your replacement fabric needs to be cut twice the height of the piece you removed (folding this piece in half while we work creates a sleek and professional looking interior, beautiful top edge, and the easiest elastic casing you'll ever sew), adding any extra seam allowance that you prefer (I typically work with 1cm), and the width should be the measurement of the existing piece you removed + the shortage from the dress fitting properly + a bit more for gathering (I estimated an extra 10cm or so), and another two seam allowances for the sides. In the image above the fabric is already folded in half, the fold at the top where indicated.
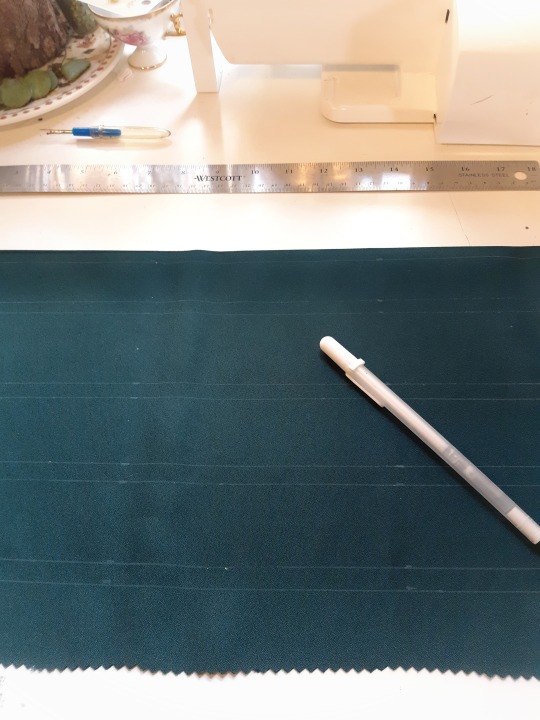
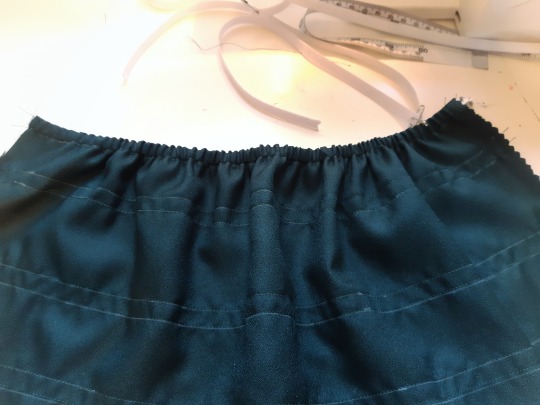
The next step is to measure and mark where the casings will be. For this step I measured the spacing for the existing casing on the old panel, translating this to the new fabric. You can also choose to decide on the spacing yourself. Make sure that the channels are wide enough to accommodate the elastic you've picked up (I am using 1/4" elastic, making 1cm channels), and not too wide where your elastic can go swimming and do somersaults.

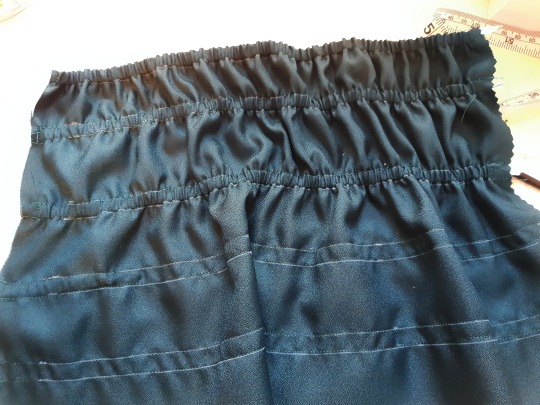
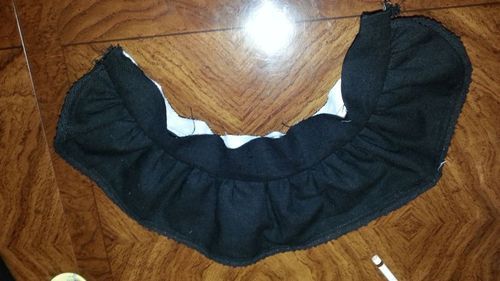
After lightly marking the lines across, pin the fabric to keep the back piece (from folding it in half earlier) secured in place as you sew all of your casings.

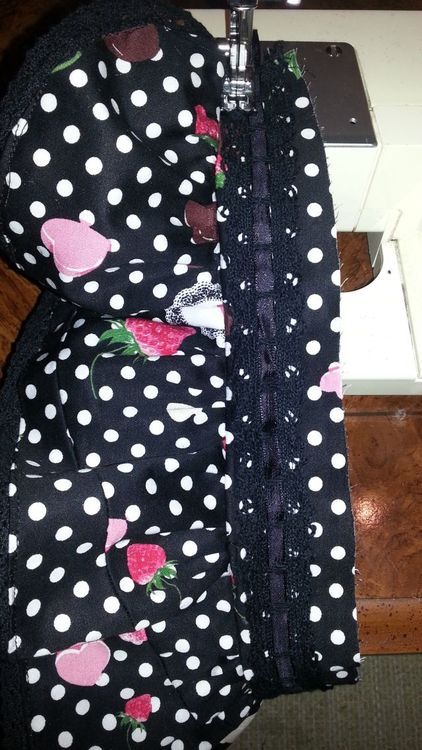
Cut the necessary amount of elastic strips- I typically measure elastic in scenarios such as this by cutting a length that, when gently stretched almost to it's full extent, will reach from one end of the channel to the other.
Put small safety pins through the ends- we're using these lil friends to feed the elastic through! You can get crafty and pull them through with a long wire or something of the sort from there, but at least having something attached to the ends helps to shimmy them across from the outside of the fabric.
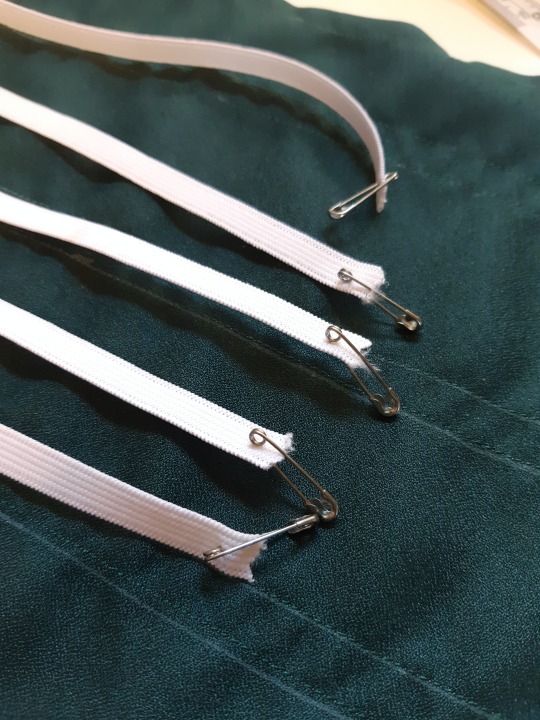
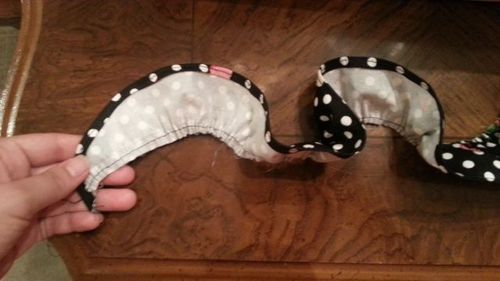
Once you have an end of the elastic pulled to the edge of fabric, secure it in place with a couple of quick stitches so you can pull it through to the other side to do the same.
Continue until all pieces are worked in with both ends sewn in place.
Hopefully I can write up the rest soon! Part two will also have the tag "shirring tutorial", so it can be found later.
💖🧵 serothivia
529 notes
·
View notes
Photo

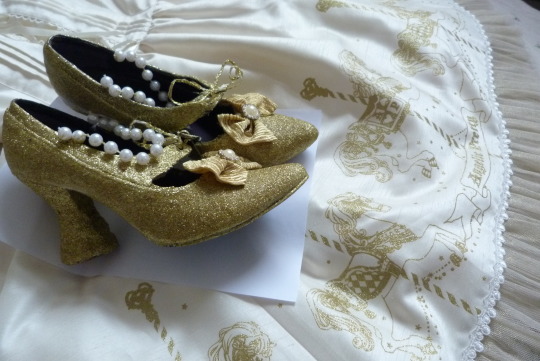

HOW TO DO IT! <3
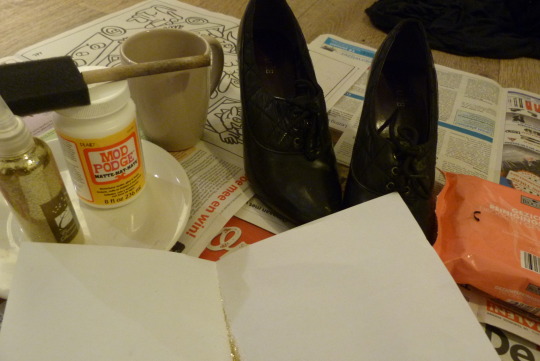
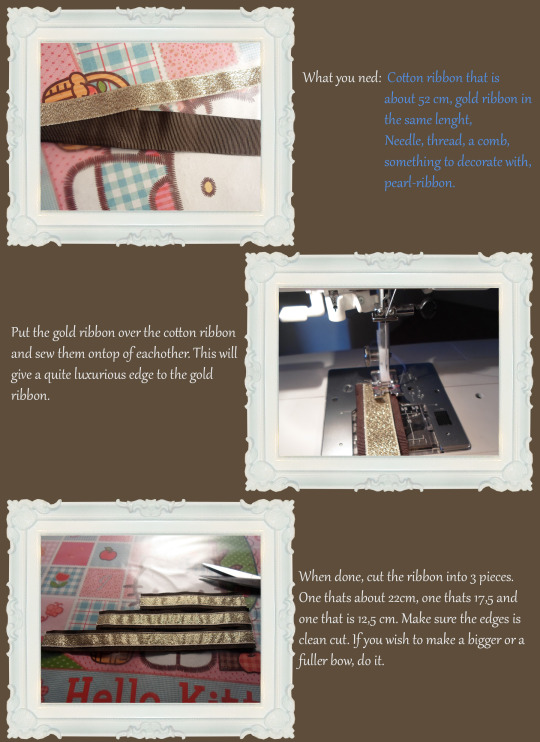
What you need for BASIC:
Modpodge glue ~ Glitters ~ Sponge on a stick ~plate to put the glue on ~A fold paper to collect the remaining/falling off glitter and CLEAN shoes
What you need for HEELS:
well this was my first try and was super low on budget so there might be better ways to do this.
~cork coaster~ scissors~ glue~solid fabric like leather
What you need for DECORATIONS :
in my case: gold fabric ~ pearl stones~a gold strap to close the shoe ~scissors ~needles ~ gold thread
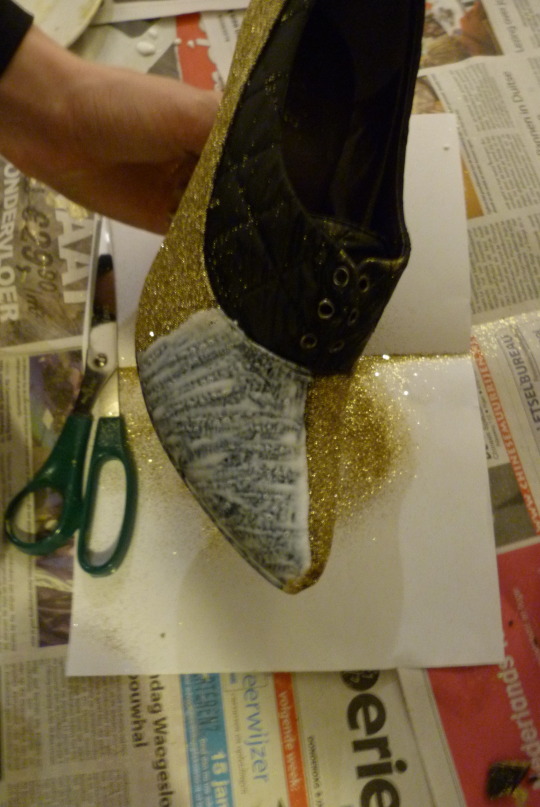
BASIC!!!
1. apply the glue on the shoes a couple centimeters/inches at the time using the sponge on a stick
2. Apply the glitter on the shoe above the folded paper
3. put the glitter back in the bottle, xD
4. continue this process till the whole shoe is covered ,
5. let it dry while you start on the shoe 2, when that is done.. Again repeat this process on shoe 1 and then shoe 2, a couple of times till the original color is not visible anymore
6. Add one last coat of glue and let both shoes dry for about 5 hours.
*ADVICE*
~ Dip the glue on the shoe, NOT Wiping!
~ choose one area to hold on the shoe, like the heel or back , You can cover this part with the same tactic while the other parts of the shoe is completely dry! ^.^
~ you can reshape some shoes but not all, mine where made out of 2 differed materials, the top part was just fabric so i cut out a shape i like and glitter that
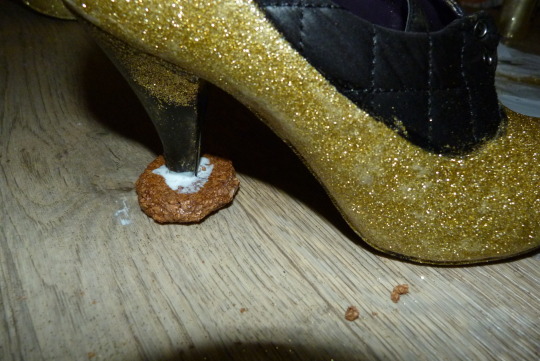
HEELS (optional):
1. find a cork coaster and draw a circle about the same size you would like your heel to be, then carefully cut it out. reshape till its perfect
2. carefully make a hole in the middle of the circle, to fit the original heel and cover it with glue and place those pieces together (see picture)
3. cut the leather in to little strips, this will be used to fill in the gap between the original heel and the cork
4. now shape it till its the way you love it
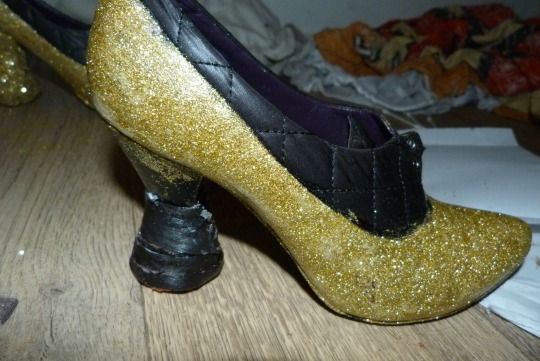
5. now cut out a bigger piece and put it all around the handmade part of the heel (i used a triangle shape cut)
6. With the BASIC technique, glitter the original heel a couple of times to make it more even with the handmade part
7. Then cover up the handmade part to make it more smoothly and natural looking
8. if needed you can glitter the original part again to make sure its all even.
ADVICE: cover up the cork part with leather as good as possible that way it will last longer and it can handle a kick or 2 xD
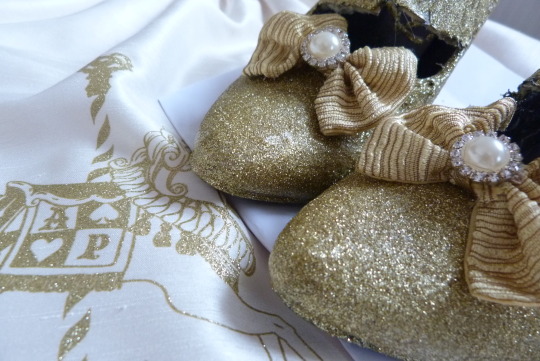
DECORATIONS (optional) :
you can use almost any decoration you like, in this case i used a simple little bow and pearls, but i have also used fake flowers, real sea shells and starfishes
1. get yourself the supplies you like, or make those
2. Find the perfect place for them, Some areas are harder to get trough or are to bumpy to glue something on
3. first stick the items to the shoe, using a needle and thread you can glue the little parts to give the item a perfect shape if needed so.
ADVICE:
~Make sure your decorations are water proof, you can spray them like that or add some glue on top of the item
~ sometimes it’s a hard job to sew your decorations on , so be aware that needles can break please be careful ^.^
~if you want to stick something on top of the shoe like my bow:
then always go from outside in! it’s a lot easier and safer
you can use pincers to get hold of the needle on the inside of the toe
~ there might be a lot of thread visible on places you don’t want to,
just grab the glue and glitters and cover up those areas using the basic technique
Hope you find this helpful! :D <3 =^.^=
*Click Here for more Final product pictures*
850 notes
·
View notes
Photo
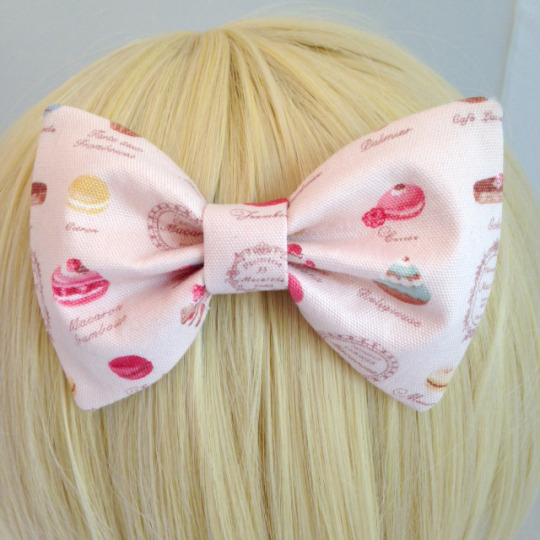

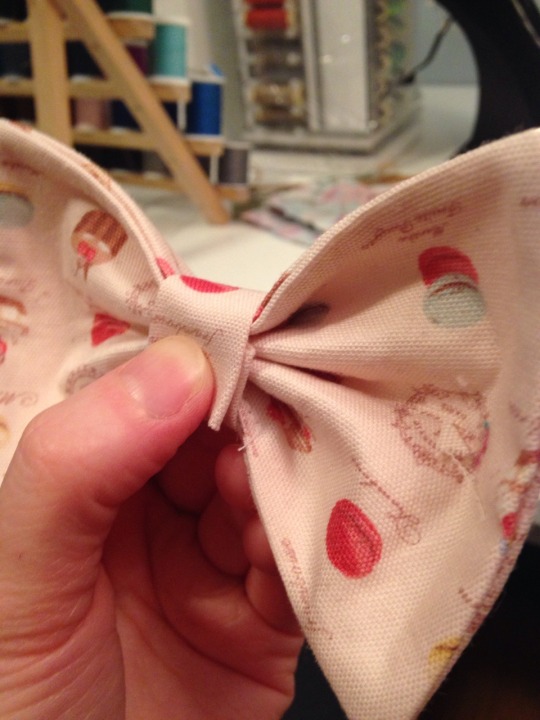
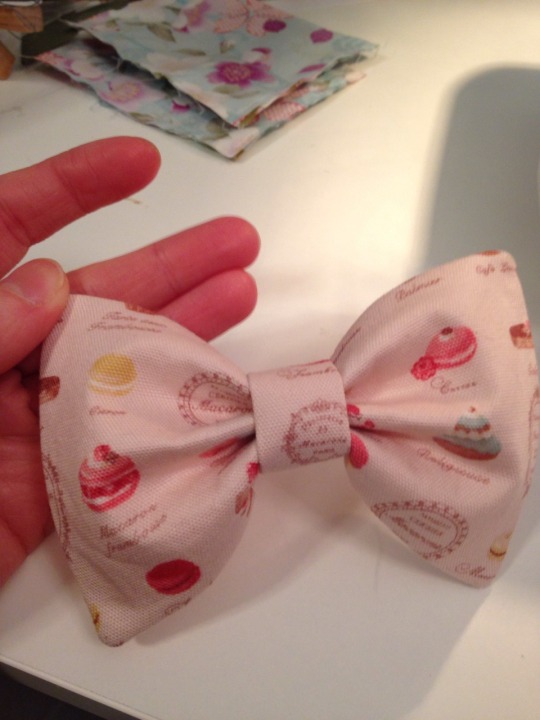
Quick and Dirty Bow Tutorial
This is exactly how I make my hair bows. I use a sewing machine for parts, but you can do it all by hand
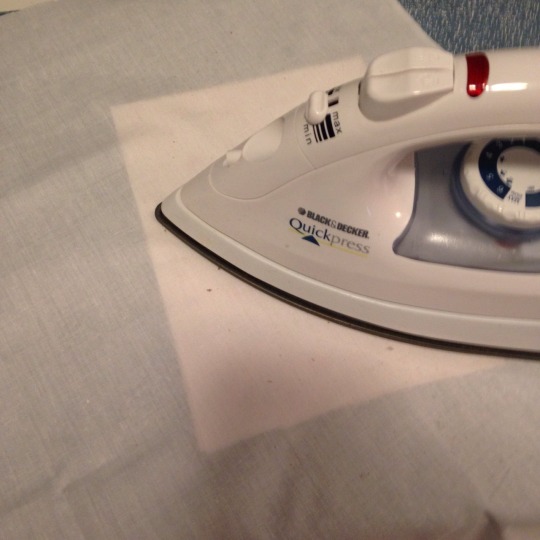
You will need:
Fabric (8”x5” in my case, plus a teeny bit for the center)
Fusible interfacing (same size as fabric) OR spray laundry starch
Needle and Thread
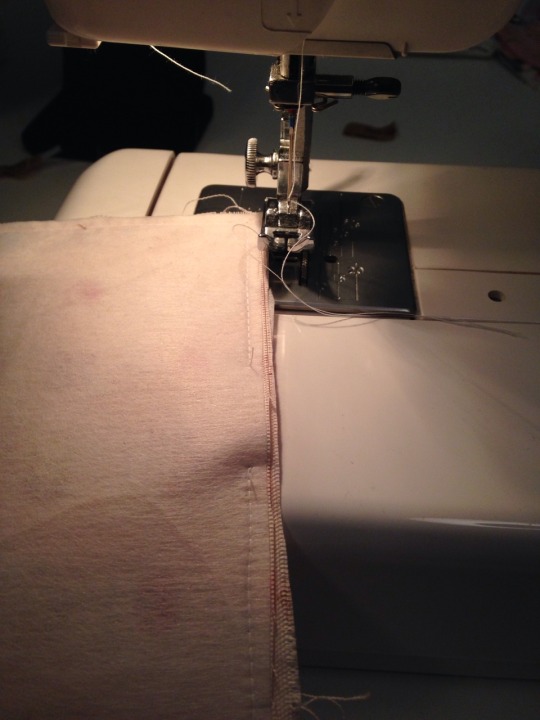
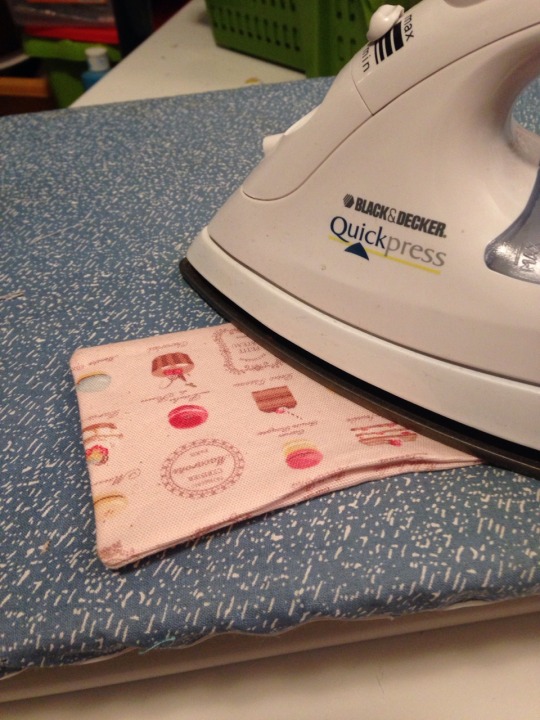
So iron your fusible to the wrong side of your fabric or spray with starch and press.
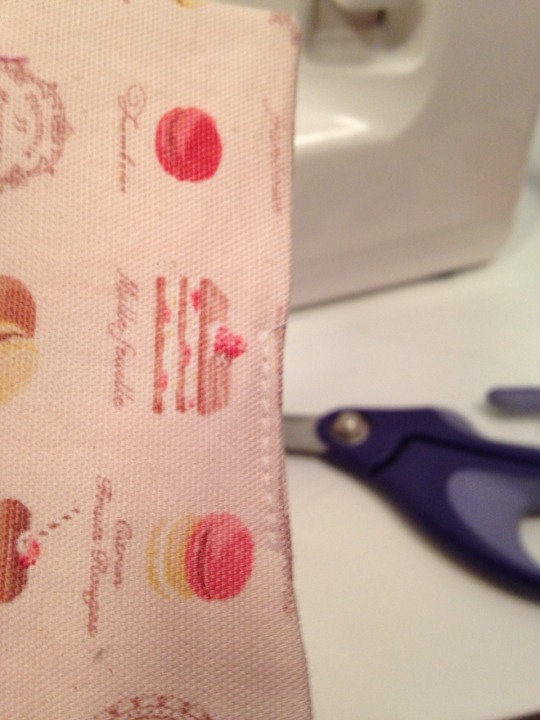
Fold bow in half wrong sides together. Sew around outside, leaving about an inch unsewn.
Turn it right side out, press flat (you might need a little more starch here if you are using it), and sew the opening shut.
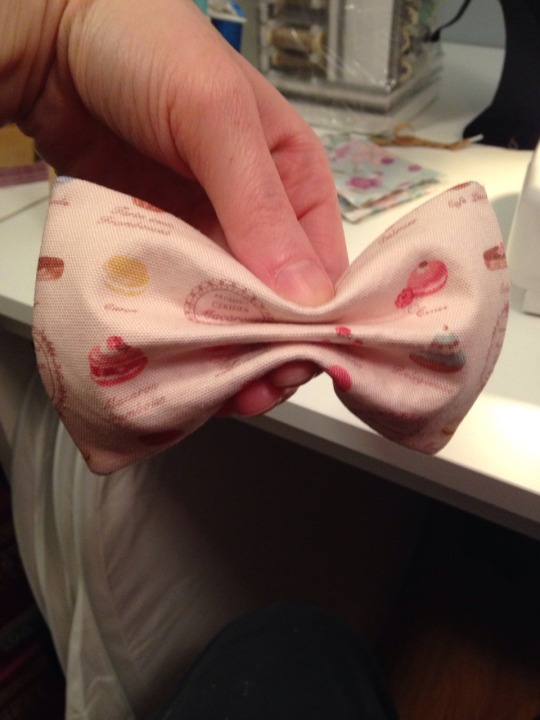
Fold rectangle in half the long way. Fold the two halves in half again. You should have three creases. Put a few stitches through by hand to keep this shape.
Thanks your center piece and fold rough edges over. Wrap around center of bow and stitch closed.
Admire new bow
1K notes
·
View notes
Photo
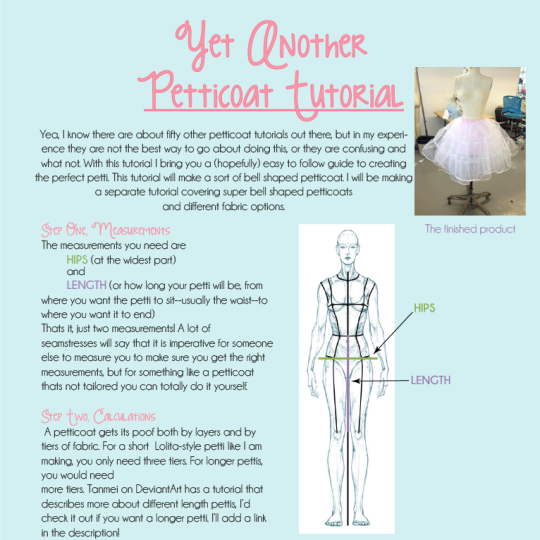
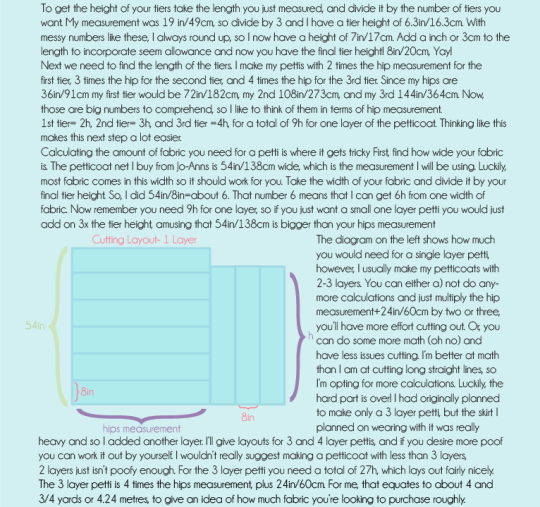

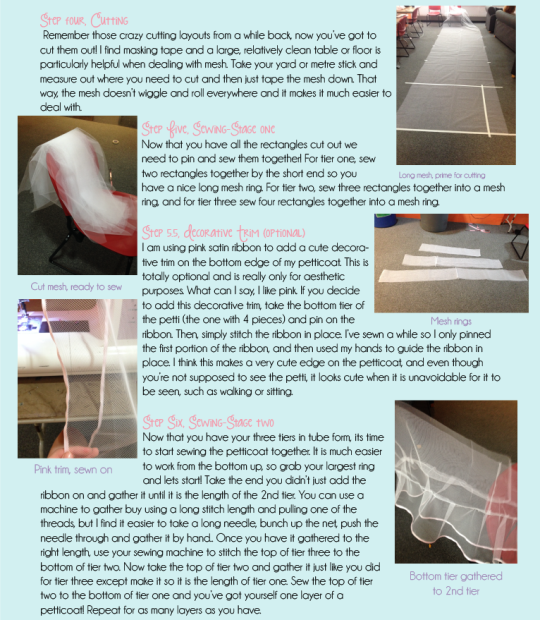
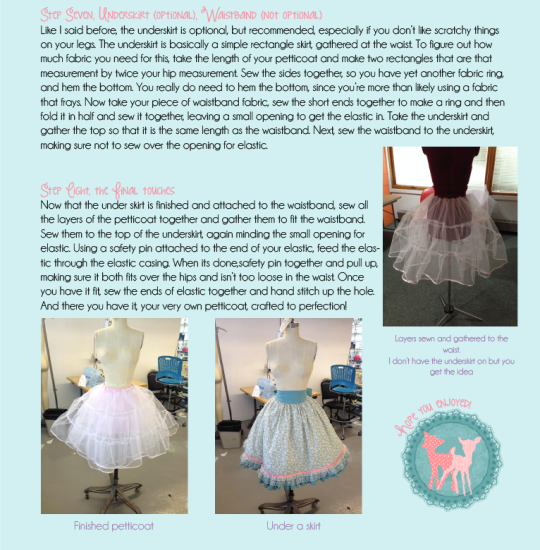
Hi! I’m starting off my new lolita blog with a tutorial of epic proportions. Here is the petticoat tutorial that I’ve been working on for a while. The other tutorial that I mentioned can be found here. Thank you so much!
1K notes
·
View notes
Video
youtube
Lined lolita skirt with full elastic waistband TUTORIAL by Attitude Lolita
Link: http://youtu.be/IWa8iwZAmtM
This is also a helpful tutorial for understitching your lining at the top of the waistband! Link: http://youtu.be/ujSyZLqxWu4
114 notes
·
View notes
Text
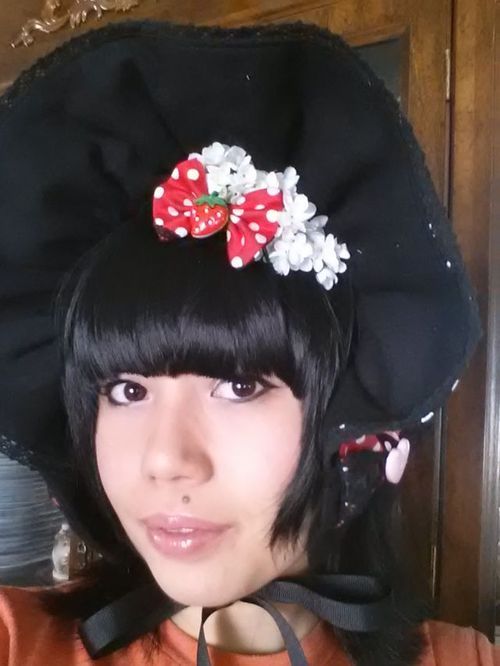
Waist ties to half bonnet tutorial
I wasn’t originally going to make a tutorial so I do not have pictures of the whole process but I will try my best to explain what I did.
NOTE: Since this was the first time I ever tried making a half bonnet there are a few things that I wish I could have done a little better. The first thing is making the middle strip that lays against the head wider as mine came out a little skinny and I had a harder time keeping it on my head because of it. The second would be adding lace to the inside of the brim. (You need pretty wide lace for that which I didn’t have at the time.)
For the half bonnet I used:
* 2 Bodyline waist ties
* ½ yard black linen fabric
* Black ladder lace
* Black ½ inch lace for brim
* 2 pink heart buttons
* 1 black hair comb
Quick reminder! I was able to do this with the Bodyline wasit ties because they are double sided. If not I wouldn’t have been able to make the back frill or side ribbons in the color of the skirt.
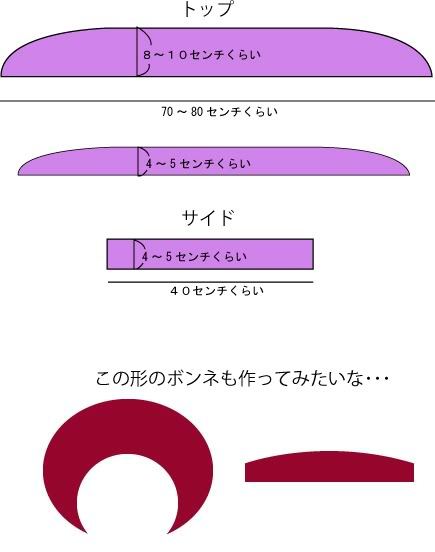
I used this picture as a reference for all the measurements I made for the half bonnet. (Ignore the round brim picture)
First of all you will need to rip all the seams and completely separate the two sides of the ties.
When you are done put two aside for the time being and lay the other two length ways. Since these particular waist ties are tapered you will have to sew two of them diagonally to keep the same width for the brim. If you do not want as wide of a brim then you might not have to do this step as it is kind of a pain. >.o
Lay one on top of the other and try to make a long rectangle that is about the same width for about 70 - 80 cm. I chose to make my brim 30 inches long. The width for that section should be 8 - 10 cm ( I believe I went with 4 in.) Draw a line diagonally and draw another line parallel to it for the seam allowance. You will have to mark the first line with pins or tailors tacks to see where the line is on the bottom waist tie so you can draw a line on that one for seam allowance. (I know this is super confusing, I screwed up and drew wrong lines the first time.) Once you have that you can cut at the second lines and it should look like this:
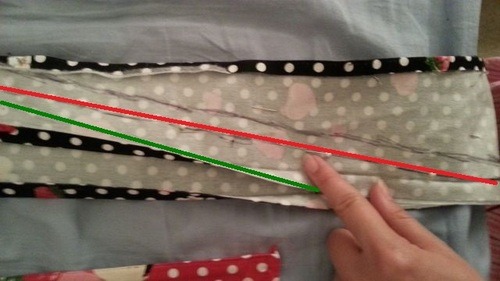
^The red line is where you sew along and the green is the edge of the seam allowance. The other black line is the screw up line.
There will be a line where the two pieces meet but as long as the fabric doesn’t have too busy of a print it shouldn’t be that noticeable.
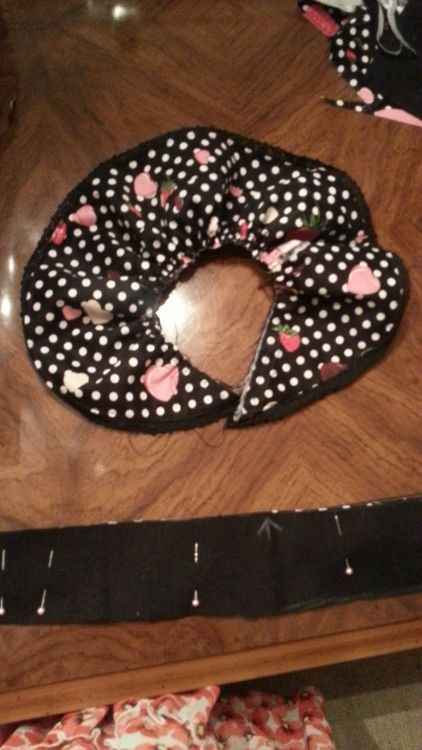
Next you will need to round out the brim (use the reference picture as I do not have exact measurements for it.) Once you have that cut out trace it onto the black fabric and cut out a piece for the front of the brim. Next you will need to iron the seam allowance inward so the lace used on the brim can be sandwiched between the two pieces. Pin the lace in place and sew on the edge of the fabric making sure to check if the lace comes lose or not.
Once that is done gather the raw edge until the desired length is reached for your bonnet brim. Secure the ends.
For the flat portion that rests on your head measure out as much as desired. The picture says 4-5 cm but it can be wider. Just make sure to take seam allowance into consideration. Cut out a rectangle out of one of the two left over waist ties and the black fabric.
Next take the two strips that were cut out and sandwich the brim between them. You want to have the bad sides facing out with the strips laying against their corresponding fabric.
^The patterned rectangle is on the other side facing the patterned brim.
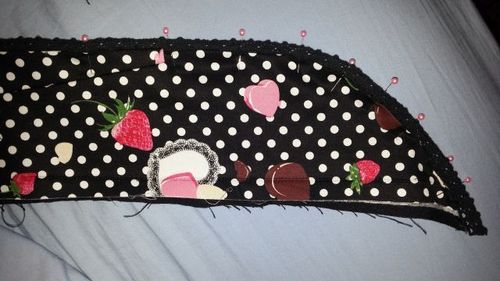
Once you get them fitted together nicely stitch and fold over the pieces and iron flat. Use a strip of the black ladder lace and sew it to the patterned side of the fabric and stitch.
^Here you can actually see the line connecting the two waist tie pieces really well. It looks a little bad but we try and work with what we’ve got. ;3
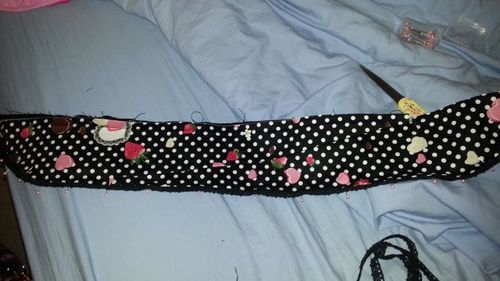
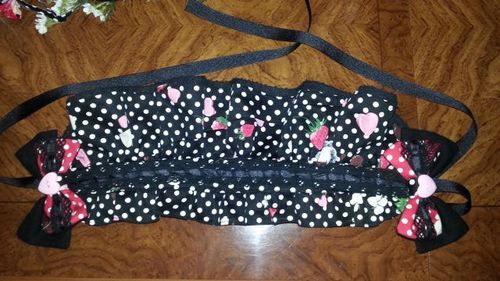
For the back of the bonnet cut out a long rounded rectangle using the picture as a reference. The ruffle should be at least 2 in if you factor in seam allowance but it can be wider. Fold over the round edge twice and stitch to give a nice hemmed edge. Take the other flat edge and gather until the length matches the other raw edge of the bonnet. Secure the stitching.
Iron the two raw edges of the flat part of the bonnet inwards. Then sandwich the ruffle so you see no raw edge showing and stitch closed. When you are stitching the sides add two long ribbons and sew securely in place. For the bows I used two rectangle edges from the first two ties that were sewn together since the bottom of the print wasn’t used. Use that as the top of the bow and add ladder lace or any other embellishment. I used black fabric for the back of the bow because I ran out of waist tie fabric. Secure the two rectangles together with a strip in the middle and sew the heart button to the front. When you are done hand stitch them to the sides of the bonnet near where the ribbon peaks out. Lastly hand stitch the comb to the center for extra help in securing the bonnet to your head.
And now you’re finished!

I didn’t get to take as many pictures as I had hoped during the whole process, so if there are any questions feel free to ask on tumblr or through my twitter. Good luck!
583 notes
·
View notes
Photo
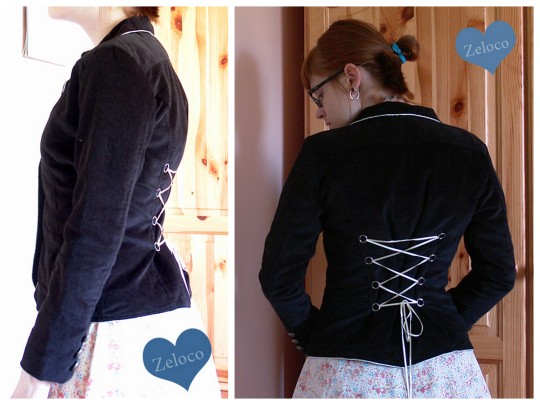
DIY Easy Lace Up Corset Back Tutorial from Zeloco here. This is an excellent and easier than it looks tutorial. There is a tiny bit of hand sewing. *You could easily do this with any shirt or jacket.
623 notes
·
View notes
Text
Cute mini bloomers *Free sewing pattern from colette
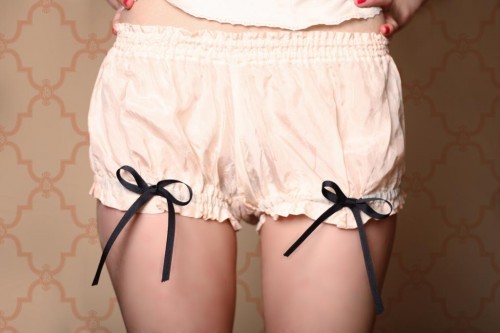
Mini bloomers free sewing pattern from famous colette patterns!
So cute !
66 notes
·
View notes
Photo
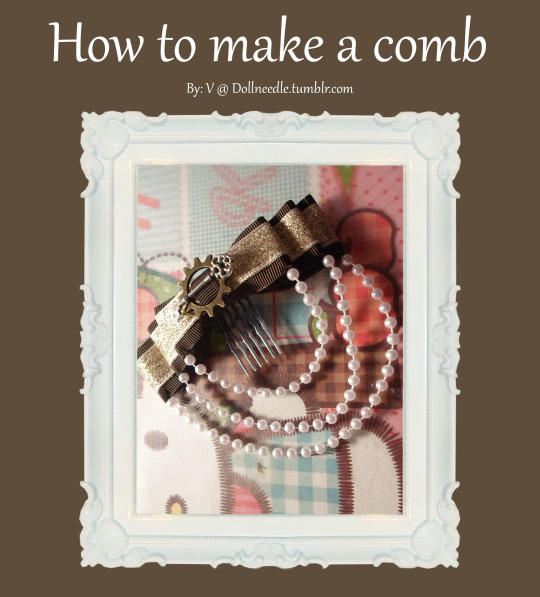


400 followers. Or, well… almost. Close enough, haha.
There is the latest tutorial on how to make a comb to put in your hair as a bit of an detail to your outfit. There is something with autumn that makes me Think alot about steampunk, so I guess thats why it got so steampunky-ish-something. Hehe, have fun with my new tutorial and let the fantasy run free. Be creative.
Love/ V
607 notes
·
View notes
Text
part two
Sewing-Lolita JSK Tutorial Part 1
Hello everyone, welcome to the first tutorial for sewing-lolita. We are going to be making a simple jsk as our first project and I have decided to split the post into two parts to make it a bit easier on everyone. I hope everyone enjoys this pattern and make beautiful things from it. Since this is my first tutorial ever, there will be mistakes and not everything will be perfect, so do message me if you have any questions, need something clarified, or have any suggestions. The pattern is free and linked below for everyone.
Keep reading
64 notes
·
View notes