
kitchenhermit
KITCHEN HERMIT
Welcome to Kitchen Hermit! I'm Brita, a self-taught baker based in Italy with a passion for food. I hope you enjoy my favourite recipes!
13 posts
Don't wanna be here? Send us removal request.
Last Seen Blogs

voidlightcomix
Voidlight Comix


naamverjaardag
naamverjaardag.nl


kaansenamerikkka-blog
trap trap crap
Text
Neapolitan Tortano (Casatiello)
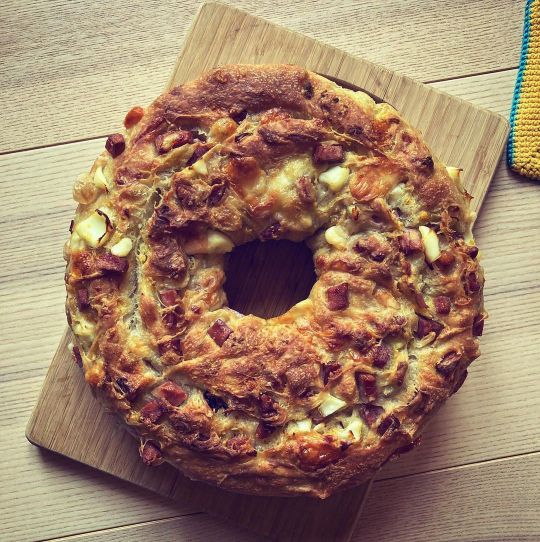
Tortano is a rich and savoury leavened bread dating back to the 17th century that is traditionally eaten over the Easter period in Naples, Italy.

Tortano and pastiera (a sweet Easter pie) are both mentioned in La gatta Cenerentola (Cinderella the Cat) in 1634 when talking about the feast to find the girl who lost her slipper! There is even a saying in Neapolitan ‘Sí proprio 'nu casatiéllo”, which means something or someone is a bit slow and boring- because casatiello is so rich!
I can’t recommend tortano enough, if you’ve never tried it you’ve got to make my recipe!
Ingredients:
Bread:
First dough:
750 grams bread flour
525 grams water (room temperature)
4 grams fresh yeast
Second dough:
20 grams water (room temperature)
15 grams salt
10 grams olive oil
Filling:
200 grams ham (prosciutto cotto)
80 grams provolone (mix of spicy and sweet)
90 grams grated salty hard cheese ( mix of parmesan and pecorino)
100 grams salami
3 boiled eggs
60 grams lard/shortening (room temperature)
Freshly cracked pepper
Method:
Crumble the yeast into the water. Gradually add the yeasted water into a bowl of the flour as you mix. I first do it with a spoon and then continue by hand once all the water has been added (but you could also use a mixer with the paddle and then hook attachment). When the dough is starting to come together, turn it out onto the table and knead for about 5 minutes or until it looks smoother and is less sticky. Roll into a ball and place the bowl over the top of it. Let it rest for 20 minutes.
Wet your hands with water or oil and then remove the bowl and flatten the dough ball a little bit on the counter. Add 1/3 of the water and sprinkle 1/2 of the salt on top, then repeatedly squeeze the dough with your hands so the dough absorbs it all. After the dough has absorbed most of the water, add the rest of the salt and 1/3 of the water and continue to squeeze with your hands. After some time, add the rest of the water. Slap and fold the dough and knead for a couple of minutes until everything has been incorporated and the dough is once again looking homogenous. Next, pour 1/2 of the olive oil onto the counter and knead the dough on top of it to absorb it. Now add the other 1/2 of the oil on top of the dough and knead for a couple of minutes, or until everything is absorbed. Leave the dough on the counter and cover with the bowl. Let it rest for 5 minutes to relax the gluten.
Next, knead the dough for a couple of more minutes, or until it is very smooth and flexible. Put it in a large container that has been lightly oiled. Cover with a lid and let it rest for an hour at room temperature. All of these steps are much easier if you have a bench scraper to help move the dough, but a spatula would also be useful.
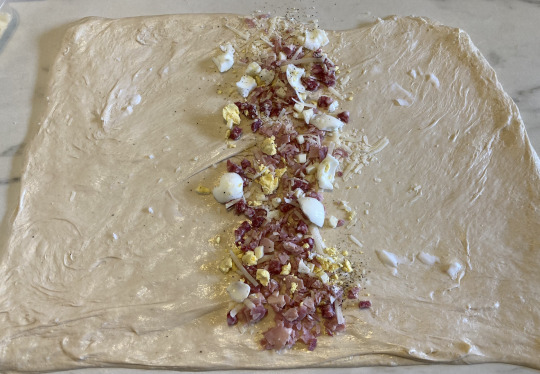
While the dough rests, prepare the fillings. Finely chop the salami, ham, and pecorino. Then grate the parmesan and pecorino. Prepare the boiled eggs (see note 2 below). You can put everything in a bowl mixed well, however, I prefer to control my portions by adding the ingredients one at a time.
When the hour is up, lightly grease the counter with lard. Stretch the dough onto the counter into a large rectangle, approximately 50cm x 40cm. The dough shouldn’t be too thin and fragile.
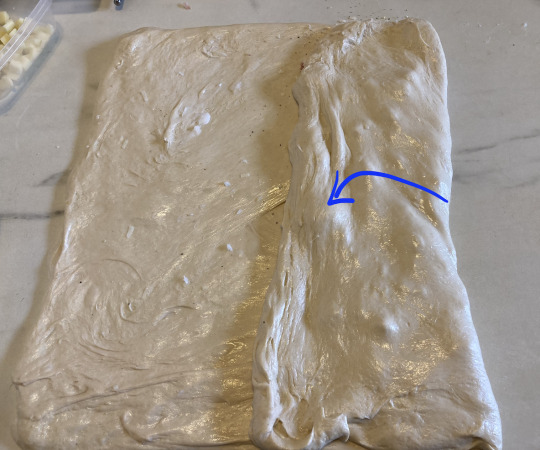
For this next part, there are reference photos below, which may be helpful! Add 1/3 of the filling in a strip in the middle of a rectangle, from top to bottom. Add some lard on either side of this ham and cheese mix. Fold one part of the rectangle over the filling. Then add 1/3 of the filling on top of this newly folded part. Fold the other part of the dough over and then add the 1/3 of the mix into the very centre, and add lard on either side. Fold both of these sides over. At this point, all of the mix should be included.
Add the dough back into the container and cover for 30 minutes at room temperature. After, keeping the dough in the container carefully stretch and fold all four sides over each other, to make sure the filling is distributed throughout. Some of the fillings might become exposed or fall out, but this is normal. Just press it back in. Cover again for another 30 minutes.
Now, put the dough directly into a 30cm tortano tin (see note 4 below) that is generously greased with lard. I also put a bit of baking paper on the bottom to prevent sticking. Slowly and patiently stretch it out into a long thick rope until the ends are touching. Filling may come out, but this is normal and they will be extra crunchy and delicious! Spread a small amount of lard on top of the dough. Cover with plastic wrap and leave it at room temperature for one hour and then put it in the fridge overnight and up to 20 hours.
The next day, take it out of the fridge and lightly cut a line around the top of the dough with a bread lame or a sharp knife. This will help to release the steam.
Put the tortano into a static oven pre-heated at 250C / 482F for the first 10 minutes. Then lower to 180C/356F and bake for a further 40 minutes. The tortano should have a golden colour on top and smell fragrant. Take it out on its own and let it rest for 5 minutes (don’t wait too long or as it cools the cheese may stick to the tin). Then with a knife cut around the side to release it from the pan. Turn it out onto a wire rack to cool completely before serving.
Enjoy and Happy Easter!!
Notes:
1: Decorative Eggs: Optional: You can put eggs on top of the tortano with dough to hold them in place. Here is a photo to get an idea of this. Doing this will make it a casatiello and it’s very festive!
2: Boiled Eggs: to boil eggs, I add them to cold water and put them over high heat. Once the water is boiling, I turn off the heat, cover it with a lid and leave the eggs for 12 minutes. Then put them in an ice bath and let them cool for a further 10 minutes. To take off the shell, simply crack the shell all over on the counter and take off the shell under running water. I’ve found this is the easiest way to do it!
3. The Filling: I’ve written what I like to add to my tortano, but everyone is different! Feel free to mix and add whatever cheese and cured meats that you like. You can also omit the egg if you prefer.
4: Baking tin. This recipe uses a tortano pan, however, any large cake tin with a hole in the middle will be great like a chiffon cake tin or bundt pan.
Reference photos for the folding of the tortano:


Did you try this recipe? Let me know on Instagram!
0 notes
Text
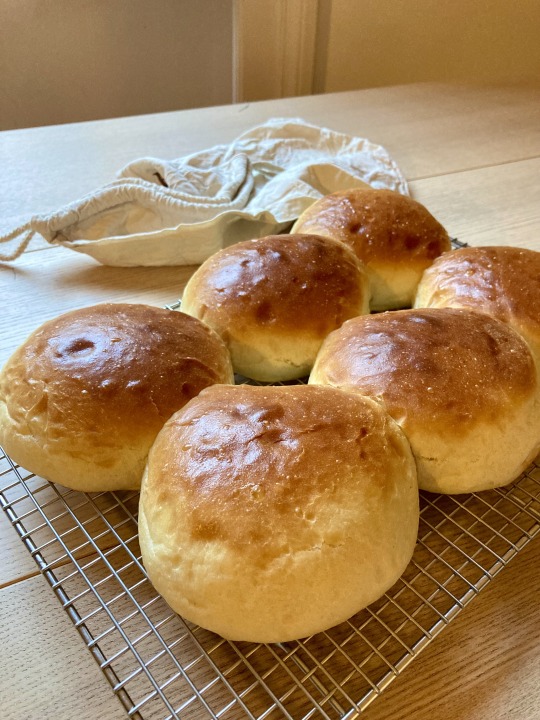
Brioche Buns

These buns are super soft, lightly sweet and perfect for burgers. The secret is the "tangzhong," which is a Chinese technique that involves pre-cooking a portion of the flour first. This quick extra step ensures that these buns will be extra fluffy and stay fresher longer.
Notes:
Mixer: This recipe calls for a mixer as brioche dough is very hydrated and is quite difficult to knead by hand.
Flour: Try to use bread flour as the protein percentage is higher (12%-14%) which will give you an end product with more chew and structure. However, if you only have all-purpose it’ll be fine.
Ingredients:
Tangzhong:
20 grams bread flour
27 grams water
60 grams milk
Dough:
120 grams milk (95F/35C)
9 grams dry yeast
320 grams bread flour
7 grams salt
35 grams sugar
1 egg + 1 egg yolk (room temperature)
42 grams unsalted butter (room temperature)
Egg wash:
1 egg
1 tbsp cream/milk
Method:
In a small jug, whisk the warmed milk (95F/35C), yeast and sugar together. Leave it to activate until bubbly, about 8 minutes.
In a small pot, add the ingredients for the tangzhong (flour, water, and milk). Put over medium heat, constantly whisking. It will quickly become a thick gelatinous paste in only about 30 seconds. Immediately take the pot off the heat and put the tangzhong paste in a small bowl to cool.
In the bowl of a stand mixer, whisk the flour and salt together. Add the flat beater attachment and turn the mixer on low. Slowly pour in the yeast mixture and then the tangzhong paste. When it forms a shaggy dough add the egg and mix until it's incorporated, and then add the egg yolk and mix again. Next put in the butter one piece at a time.
Once everything is incorporated, change the attachment to the dough hook. Let the mixer run until the dough is smooth and it mostly comes away from the sides, around 10 minutes. With the help of a bench scraper, move the dough to a lightly greased large bowl. Cover with a damp kitchen towel or plastic wrap. Put it in a warm area to proof (I use my oven with the light turned on) until doubled in size (about 1 hour).
When the dough has doubled in size, punch it down to take out the excess air. Turn it out onto a scale to weigh the dough and then divide that weight by six. It should come to about 110 grams.
Put the dough onto a lightly floured work surface with the help of a bench scraper. Divide it into six even pieces, use the scale to make sure each piece is about 110 grams. It’s important that each bun is about the same size so that it all bakes evenly.
Now it’s time to shape the individual buns. Pull in a section of each side to meet in the middle. Pinch the middle to make a seam. Then put the dough on an unfloured surface seam side down. Roll it around on the table (always seam side down) your hand cupped on top.
As you go, place the shaped dough balls on a large tray lined with baking paper. Leave about 2in/5cm of space between each one. Cover again either as before or with an inverted tray. Let them rise until doubled (about 1 hour).
When they are doubled gently brush with egg wash that you have whisked together. It’s ok if the buns are touching at this point as this will actually help them rise.
Place in an oven at 375F/190C for 15 minutes or until golden. Brush with melted butter as soon as they’re out of the oven. Let them cool on a cooling tray and enjoy!
#kitchenhermit#recipe#baking#bread#homemadebread#brioche#recipeoftheday#bread buns#bread rolls#brioche bread
0 notes
Text
Classic Key Lime Pie

Key Lime Pie is one of my favourite desserts; it’s light, refreshing, and simply delicious. It comes together quickly and it’s easy to make ahead of time.
This dessert is named after Key West, Florida, where it was supposedly invented in the 19th century. Fresh ingredients were not always available there, so condensed milk, and key limes, widely available in the area, became a main feature of this pie. You can taste the zesty and tropical flavour in every bite!

Notes:
Limes: Where I live key limes, (a small, yellow and fragrant lime native to Southeast Asia) aren’t available. However, I use Persian Limes, which are the most common in supermarkets and sold year round. Both work wonderfully for this recipe.
Food processor: If you don’t have a food processor, crush the biscuits in a zip lock back with a rolling pin or glass and then mix in the melted butter.

Ingredients:
Crust:
60 grams unsalted melted butter
250 grams biscuits (graham/Biscoff/digestive)
Filling:
595 grams sweetened condensed milk
160 ml Key/Persian lime juice
3 egg yolks
2 tsp lime zest (from 5/6 limes)
Chantilly cream:
250 ml whipping cream
60 grams powdered sugar
1 vanilla pod/1tsp vanilla extract
75 grams mascarpone (40% fat)
Method:
Pre-heat oven to 176C/350F. Put the biscuits into a food processor, pulse until you get fine crumbs. Pour in the melted butter and pulse until the mixture looks like wet sand.
Put the biscuit mixture into a 9 inch/22cm glass pie dish and use the bottom side of a glass to press the crumbs down until they are compact. For the edges of the pie, use the side of the glass to press the crumbs into the dish and your fingers to press from the top.
Bake the crust uncovered for 10 minutes and then remove from the oven while you make the custard.
Whisk eggs yolks and zest in a stand mixer for about a minute. Add in the condensed milk and whisk until well incorporated. Slowly pour in the juice while the mixer is on low. Make sure you scrape down the bowl regularly with a spatula to make sure everything is well combined.
Pour the custard in the crust and level it with a spatula. Bake for 10 minutes or until there are some small holes in the custard and it jiggles slightly. Cool on a wire rack at room temperature for 20 minutes and then refrigerate for at least an hour and up to three days.
For the chantilly cream, whip all ingredients in a stand mixer on high until stiff peaks form. Stiff peaks stand up straight when you lift the whisk into the air. Pipe onto the pie with a pastry bag or dollop it on with a spoon. Finish off the pie with lemon zest of candied lime for extra decoration.
#keylimepie#keylime#kitchenhermit#baking#bakingtime#grahamcracker#grahamcrackers#pie#pietime#ilovepie
0 notes
Text
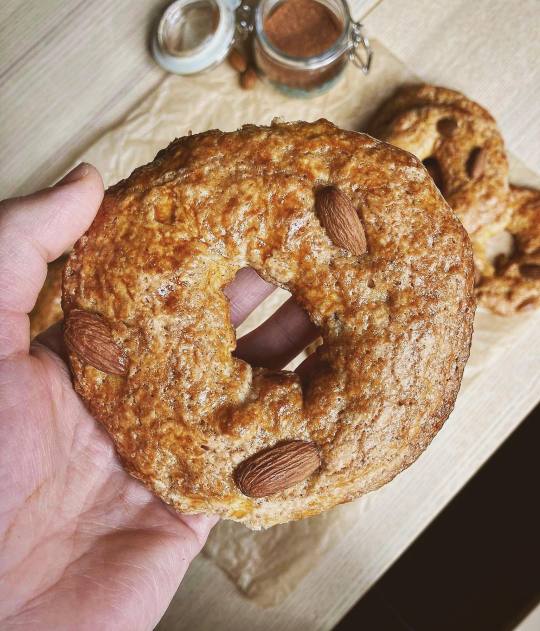
New York-Style Bagels
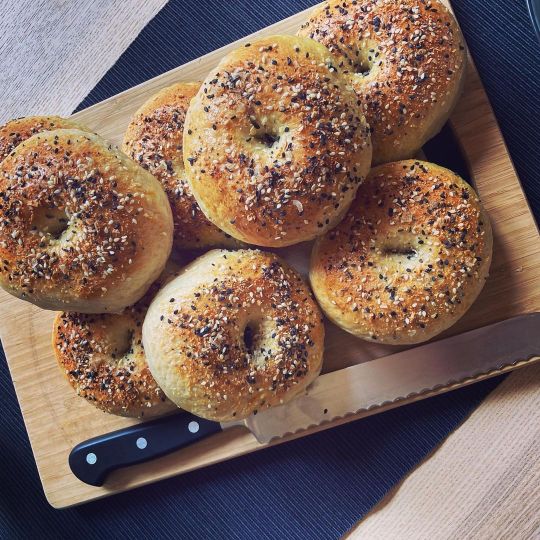
The New York-style bagel is truly iconic. When I lived in NYC I couldn’t get through a week without a few of these! When I moved out of the city, bagels were among the things I missed the most. Luckily, they are super simple to make at home.
Bagels were brought to NYC by Ashkenazi Jewish immigrants from Poland in the 1800s. Overtime, they became a widespread local staple, and they’re still a popular mainstay to this day. New York-style bagels are distinctive because they are boiled before baking. This is how the famous chewy texture is achieved.
I’ve included a recipe for “everything seasoning,” but these bagels are also great plain. As far as fillings, these bagels are perfect with just cream cheese and chives or with the addition of smoked salmon, capers, pickled onions, and dill.

Ingredients:
Bagel dough:
297 grams/320ml water 90F/32C
10 grams dry yeast
23 grams white granulated sugar
500 grams bread flour / Manitoba
6 grams/1 1/2 tsp salt
1tbsp baking soda/malt syrup (optional)
Egg wash:
1 egg
1tsp cream/milk
Everything seasoning:
Makes 3/4 of a cup - so there’s some leftover!
2 Tbsp + 2 tsp white toasted sesame seeds
2tbsp black toasted sesame seeds
4 tsp Maldon sea salt flakes
2 tsp poppy seeds
2 tbsp dried minced onion
2 tbsp dried minced garlic
Method
Whisk in the yeast and sugar to the warm water, and let it rest for about 10 minutes or until frothy.
In a large bowl, whisk bread flour and salt together. Add in the yeast mixture and stir until the dough is shaggy. Once everything is well-combined, turn it out onto a lightly floured work surface and knead for about 10 minutes or until the dough is smooth and pliable. You can also do this in a mixer with the dough hook.
Put the dough into a lightly-oiled bowl. Cover with a damp towel and place in a warm place away from drafts (I use the oven with the light turned on), Let it ferment for about an hour or until doubled in size.
Then, punch down the dough to deflate it and turn it out onto your bench.
Before you move on to the next step, put on a pot of water to boil and pre-heat your oven to 218C/425F. You can add baking soda or malt syrup to your water, but this is optional.
With a bench scraper, split the dough into eight pieces that are roughly the same size. I cut it in half, then quarters, then eighths. Pinch each piece to create a seam and then place it on an un-floured work surface (seam side down) and move your hand in a circular motion to tighten it into a ball.
Place the dough balls onto a baking sheet lined with baking paper or a silicone mat. Cover with a damp towel and let them rest for 10 minutes.
When your water is boiling, pick up a ball with a floured hand and poke a finger straight through the middle. With two fingers in the hole, slowly turn the bagel to widen it. Then carefully drop the bagel into the water and boil for 1 minute on each side. Drain well and place on a baking sheet lined with baking paper.
When all the bagels have been boiled, whisk the egg and the cream together and brush the bagels with the egg wash, covering the surface well.
Sprinkle a generous amount of everything seasoning on top of the bagels. Bake in the oven for 15-20 minutes or until the bagels are golden. Remove from the oven and let them cool completely on a wire rack. Enjoy with your favourite toppings!
Did you like the recipe? Let me know on Instagram!
#bagel#bagels#newyork#newyorkbagel#nyc#newyorkstylebagel#everythingseasoning#nybagel#ilovebagels#recipe#recipeoftheday#blogg#foodblogger#kitchenhermit#baking#bakingrecipe#bread#homemadebread
2 notes
·
View notes
Text
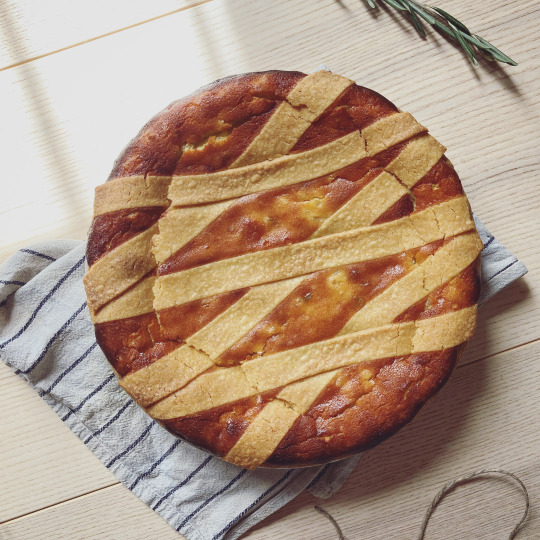
Pastiera Napoletana
Pastiera Napoletana, also known as grain pie, is a delicious and luxurious sweet enjoyed in Naples, Italy, throughout Easter. It is filled with a rich wheat and ricotta custard, brightened with candied fruit, orange blossom water, and lemon zest - baked in sweet shortcrust pastry.
Recipe notes:
Shortcrust pastry: I have an easy recipe included. You can use store-bought dough, just make sure it’s sweet pastry. I’d also recommend buying an extra sheet of pastry, to cut the strips to put on top of the pastiera!
Making ahead: You can make the pastry and the ricotta mixture up to two days before baking. Pastiera is even better on the second day because the sweetness softens and the flavours become much more complex and nuanced. I love it the most on the second day - so this is perfect to make ahead.

Ricotta: I use 200 grams of sheep’s milk ricotta (which is sweet and creamy) and 200 grams of cow’s milk ricotta (which is denser and slightly more savoury). This combination makes a delicious pastiera, but it’s also fine two use 400 grams of cow’s milk ricotta if you prefer!
Cooked wheat: This is an absolute must for pastiera! In Italy, it’s known as grano cotto, and you can buy it in jars at the supermarket around Easter time. If you can’t find it online, check out an Italian speciality grocer, or even a health-food store.

Ingredients:
Sweet shortcrust pastry:
315 grams all-purpose / 00 flour
135 grams granulated white sugar
180 grams cold lard/shortening
3 egg yolks (whisked)
Wheat ricotta custard:
250 grams whole milk
350 grams cooked whole wheat berries (grano cotto)
Zest from 1 lemon
30 grams lard/shortening
400 grams ricotta
3 eggs
350 grams white granulated sugar
100 grams finely diced candied orange/citron (optional*)
15 grams orange blossom water
A pinch of ground cinnamon
Seeds from one vanilla bean / 1 tsp vanilla extract
Method:
Sweet shortcrust pastry:
Sift flour into a large bowl. Then add the sugar and the cold lard in small pieces. Using a pastry cutter/fork, or your fingers, cut the lard into the flour until there are only pea-sized amounts remaining and the mixture looks sandy. Add in the egg yolks and mix the dough with your hands until it comes together. You may need to add 1 tsp of water, but the dough will be quite crackly and delicate. There may be little spots of egg yolk throughout, but this isn't important. Just don't over-mix!
When it comes together, put the dough out on plastic wrap and shape it into a flat disk. Cover well with the plastic, and refrigerate for at least one hour and up to two days.
Wheat ricotta custard:
While the pastry is in the fridge, add the milk, lemon zest, lard, and cooked wheat into a small pot. Cook over low-medium heat, stirring regularly and breaking up the large pieces of wheat. The cream is done when the lard is melted and isn’t separated from the milk, the wheat has softened and isn’t clumped together, and the mixture has just started to simmer. Take it off the heat, and let it cool while you prepare the ricotta.
Push the ricotta through a fine-mesh strainer (use a rubber spatula to force it through). If you have a food mill, use that! The reason we do this extra step is to make sure the ricotta is nice and fluffy. If you don’t have these tools, just whisk it together well.
Add in the eggs, sugar, and the cooled wheat and milk mixture. Then whisk in the candied fruit, orange blossom water, vanilla beans, and a pinch of cinnamon.
Putting it together:
Grease a 22cm/9cm pie tin with lard/shortening. Dust generously with flour and set aside.
Take the shortcrust pastry out of the fridge. If it's been in the fridge for more than an hour, let it rest for a few minutes on the counter. Lightly dust some flour on a silicone pastry mat or your counter top, and gently roll out the dough. This is a very delicate dough, so cracks are normal. Just gently press the broken dough back together and try not to use too much flour. Roll out into a circle until it's about 1/2 inch/ 1.5cm thick and 12 inches/30cm in diameter. Gently place it in the greased tin. Don't worry if it breaks in the process, just press it into the baking tin and it'll work fine! This is a very forgiving dough. Cut off the extra dough overhanging the baking tin. Gather it all together, dust with flour and roll it out into a rectangle, around 22cm/9 inches in length. With a pastry wheel cutter, cut as many 2-inch strips as you can. Gently place them across the pastiera in a weave pattern. I usually get around 6.
Pour the mixture into the pie crust, and place the strips on top. Put the pie into an oven, preheated at 180C/356F. Bake for 60 minutes. Then, place the oven tray on the bottom and bake for 10 minutes more. The pastiera is done when it’s dark (but not burnt on top), the pie has puffed up, and there is a fragrant smell of orange blossom water throughout your kitchen.
Once the pie is finished, open the oven door slightly and let the pastiera rest there until completely cool. I use a piece of aluminium foil, to keep the oven door slightly ajar. If you take it out too quickly the middle will sink, causing the pastiera to have a crackly hole in the middle. If this happens, don’t worry, the pastiera will still be delicious!
When the pastiera has cooled down, cover with plastic wrap and store it at room temperature. It will be good to eat for up to 5 days.
Serve with a light dusting of icing sugar, and enjoy your Neapolitan easter treat!
Notes:
1- The pastiera is very delicate, so it may not be possible to take the entire pie out of the tin to serve. In Naples, bakeries actually sell the pastiera inside its baking tin, because it's so fragile!
*Candied fruit: This is an optional mix-in, but highly recommended! Candied citrus fruit cuts through the sweetness, and adds to the floral notes of the pie. If possible, try to find candied citron (a large type of green lemon that’s grown in the south of Italy). If you can’t, orange or lemon peel will work just as well!
#pastiera#kitchenhermit#easter#pasqua#easterbaking#easterrecipe#italian recipes#foodporn#naplesitaly#napoli#baking#recipe#ricetta#easterpie#grainpie
3 notes
·
View notes
Text
The Best Eggnog Ever
I know that this is a big claim, but this recipe has been two years in the making and as an eggnog lover I’m 100% behind it. Eggnog is an English Christmas beverage made with egg yolks, sugar, rum, cream and milk that is served chilled during the holiday season.

I like to keep my eggnog simple, but if you want to spice up your eggnog you can add 1tsp of vanilla extract, cinnamon, or nutmeg. Eggnog is also a great addition to your morning coffee!
Recipe:
710ml / 3 cups whole milk
6 egg yolks
220 grams / 1 cup granulated white sugar
30ml / 1/8 cup brandy or rum (optional)
170 ml / 3/4 cup heavy cream
Method:
Put the milk in a big pot and heat it until it’s steamy, but not boiling. In a separate bowl, whisk together the egg yolks and sugar until the mixture is a light yellow colour and there are no lumps of sugar.
Very slowly add some milk to the egg yolk mixture while constantly whisking. This is called tempering. It’s a technique to slowly warm up the mixture without cooking the eggs. When most of the milk has been added, add the egg yolk mixture into the pot with the leftover milk.
This is the tricky part where a lot of eggnog fails. With a rubber spatula you need to constantly stir the eggnog on low heat until it’s a thick consistency, which will take at least 15-minutes. The eggnog needs to have a nappe consistency, which means that it will thickly coat the back of a spoon and when you run your finger through it, the line will stay.
After you’ve reached this stage, pour the liquid through a fine mesh strainer into a bowl. Whisk in the rum and cream. Then bottle it and store it in the fridge, preferably overnight so that it’s thick and well-chilled.
Enjoy and happy holidays!!
0 notes
Text
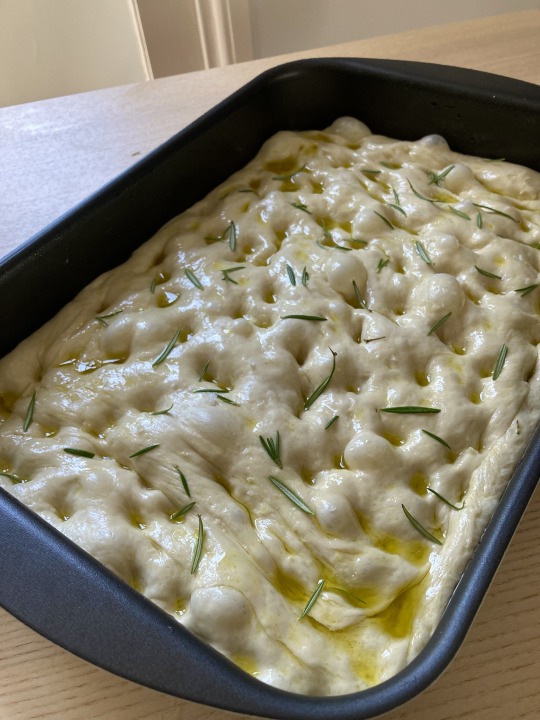
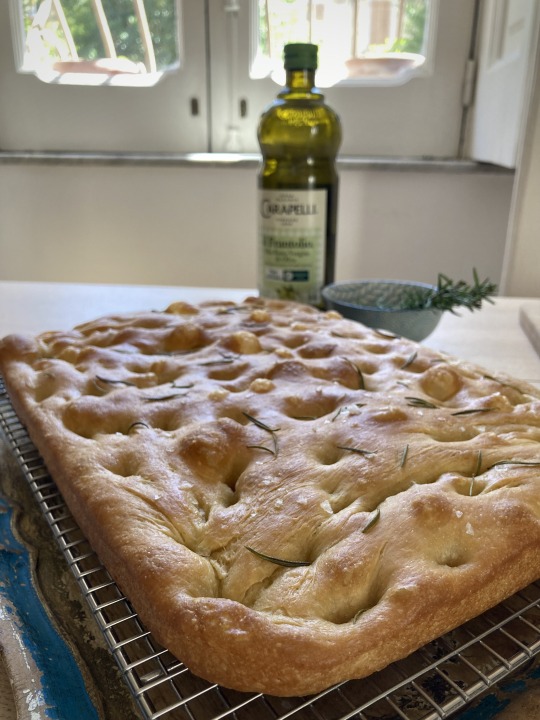
Simple Italian Focaccia

I’ve been living in the south of Italy for about four years now, and I’ve been obsessed with making the perfect focaccia. The first time I saw dough fermenting was in my mother-in-law's kitchen as she was making focaccia. I was hooked instantly!
My focaccia recipe is very easy and it yields the fluffiest, softest focaccia: It will keep you coming back for more!
Notes:
Olive oil: There aren’t many ingredients in this recipe, so most of the flavor comes from olive oil. For this reason, you shouldn’t skimp on it! Use the highest-quality Italian extra virgin olive oil you can find.
Mixer: For this recipe, I use a mixer, but it can be done by hand.
Flavor: This is a simple focaccia recipe with a topping of salt and rosemary. Still, you can personalize it however you like. I also love topping it with potatoes or caramelized onions.
This recipe is adapted from the simple focaccia recipe from Giallo Zafferano
Ingredients:
Focaccia dough:
470 grams flour (bread flour or all-purpose)
16 grams white sugar
5 grams dry yeast
12 grams fine salt
115 grams whole milk
230 grams water (room temperature)
45 grams extra virgin olive oil
Topping:
40 grams extra virgin olive oil
Sea salt flakes
Fresh rosemary
Method:
In the bowl of a stand mixer, whisk the flour, sugar, and yeast together. In a separate jug, mix together the milk and water. Attach the flat beater to the mixer, and run it on low. Slowly pour in the water/milk mixture.
Mix until a rough dough starts to form. Then, slowly pour in the olive oil while the machine is going. Wait until the oil is incorporated and then change the attachment to the dough hook. At this point, add the salt.
On medium/low, knead the dough in the mixer for about 15-minutes or until the it looks hydrated and stretchy. This is a very hydrated dough so it will be sticky.
With the help of a bench scraper, place the dough directly into an oiled bowl. This next step is optional but recommended. Put some oil on your hand and gently take one side of the dough, stretch it and fold it over the rest. Repeat this on all sides. Then, using your bench scraper or a spatula, flip the dough over, so that the seams are on the bottom of the bowl. Cover the bowl with a wet kitchen towel or plastic wrap. Put it in a warm place, I use my oven turned off with the light on. Let it rise until doubled, about two hours.
After the dough has doubled in size, gently place it in a well-oiled rectangular pan (35 x 38 cm). The more oil you use for the pan, the crispier the bottom will be, so be generous. Put some water or oil on your fingertips and gently dimple the dough as you push it out into the edges. It may not fill the pan immediately, but just try to lengthen the dough gently. Cover with a kitchen towel or plastic wrap again, and put it back in a warm place for about one hour.
Now, brush on some olive oil and dimple it again with your fingertips. Sprinkle with rosemary leaves and flaky salt. Bake in a pre-heated static oven at 180C/356F on the lowest level for 35 to 40 minutes, or until golden brown.
Let it cool, cut, and serve as is, or with some cold cuts, cheese, and marinated vegetables! Buon appetito :)
Did you try this recipe? Or do you have any questions? Reach out on Instagram.
1 note
·
View note
Text
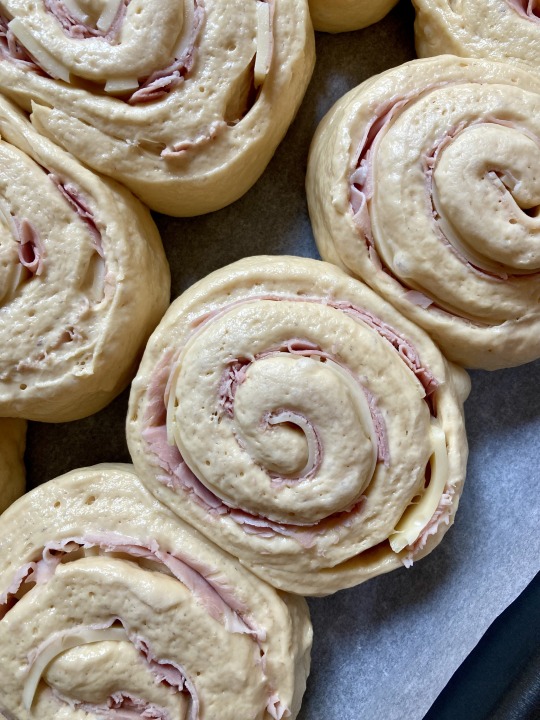
The Best Ham And Cheese Rolls

These ham and cheese rolls are made with a soft pillowy dough and a sweet-mustard glaze. They’re perfect for parties, or even just for an indulgent treat at home. They’re also highly customizable, so you can change the filling to suit your taste.
Notes:
Sour cream: If you can’t find sour cream where you live, Greek yogurt will work just as well.
Stand mixer: I use a stand mixer for this recipe. If you don’t have one, you can mix and knead by hand.

Recipe:
Dough:
420 grams all-purpose flour
50 grams granulated white sugar
50 grams light brown sugar
1 tsp salt
2 1/4 tsp instant yeast
1 large egg (room temperature)
120 ml milk (1/2 cup)
1 tbsp vanilla extract
120 grams sour cream
85 grams unsalted butter
Filling:
300 grams prosciutto cotto (sliced ham)
200 grams thinly sliced cheese (Emmental/gouda)
1 tbsp unsalted butter (room temperature)
Glaze:
4 tbsp melted butter
1 tbsp brown sugar
1/2 tbsp dijon mustard
1 tbsp poppy seeds
Method:
In the bowl of your stand mixer, whisk the flour, salt, white and brown sugar, and yeast together. In a small pot heat up the milk, butter, vanilla, and sour cream until it’s warm (110F / 43C) and the butter is melted.
Pour the liquid into the dry ingredients, attach the dough hook, and mix on low. Then add the egg and mix until it comes together (about 10 minutes). It’s quite a soft and hydrated dough, so it might still stick a little even after you’re finished.
Put the dough on a well-floured surface and knead by hand for about five minutes. Add flour as needed. Place the dough in a large bowl that’s lightly oiled. Cover with a wet tea towel and put it in your oven with the light turned on. The dough needs to double in size, so it should take around an hour.
Put the dough on a well-floured surface (I also use a silicone pastry mat) and roll it into a rectangle that is 1/4 inch (1/2 cm) thick. The thinner the better!
Now, spread some of the butter onto the dough with a pastry brush or spatula. Lay out the prosciutto/ham on the surface and then top it with the cheese. Starting with the short side of the rectangle, roll the rectangle carefully until you have a long log. When you’re finished, use a sharp knife and first trim the edges. Then cut the log in half. Repeat this step two more times until you have eight equal pieces.
Place the rolls in a baking tin lined with baking paper so that they’re not touching each other and cover with a damp towel. Let it rise at room temperature for about 40 minutes or until puffy.
If you want to do an overnight ferment, cover the rolls with plastic wrap and put them in the fridge. The next day take them out and let them rise at room temperature.
While the rolls are rising, make the glaze. Simply whisk the melted butter, brown sugar, mustard, and poppy seeds together. Then brush the glaze over the rolls before putting them in the oven.
Bake in a preheated oven (350F /176C) for about 30-minutes or until they are lightly brown on top.
Did you try the recipe? Let me know on Instagram!
#baking#hamandcheese#rolls#recipe#recipes#recipeidea#partyrecipe#sweetandsalty#pinwheels#kitchenhermit
0 notes
Text
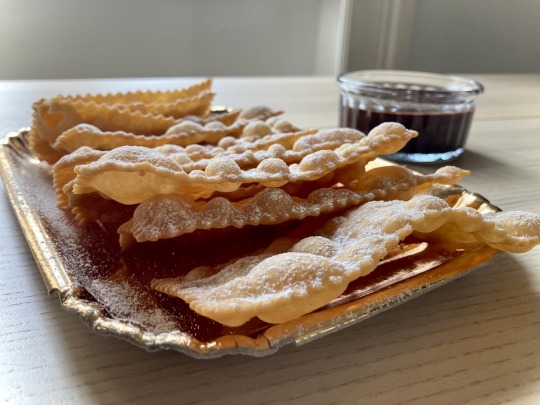
Chiacchiere for Carnevale!
s

It’s Carnevale! That means it’s time to dig into some lasagne and munch on chiacchiere as all the children wear fun outfits and throw confetti in the streets!
I love this time of year in Italy. The weather is slowly getting warmer and Easter is just around the corner. Mostly, I love it because of chiacchiere; flaky, fried dough that is dusted with powdered sugar and dipped in a dark chocolate sauce, called sanguinaccio. Fun fact: sanuinaccio traditionally had pig's blood in it, which is why it's has blood (sangue) in its name.
This pastry was invented for Queen Savoy who asked her pastry chef (Raffaele Esposito, the father of Neapolitan pizza) to make a dessert that could accompany the ‘chatter’ (chiacchiere) of her guests.

Bring a taste of Italy and Carnevale into your home with these crunchy, airy pieces of heaven!
Recipe notes:
Oil - If you don’t want to use peanut oil, you can sub it with another neutral-tasting oil with a high smoking point such as sunflower, corn, or canola.
Frying: It’s very important to bring the oil to the correct temperature. I’d recommend investing in a cooking thermometer!
Tools - This recipe calls for a pasta roller, but it’s also possible to do this with a rolling pin. Try to make the sheets as thin as possible. I use a mixer, but you can knead the dough by hand.
Ingredients:
Chiacchiere:
500 grams Flour (all-purpose/Tipo 00)
50 grams butter (at room temperature)
3 eggs and 1 egg yolk
1 vanilla bean / 2 tsp of vanilla extract
A pinch of fine salt
70 grams white granulated sugar
30 grams Grappa (or rum, marsala, brandy)
6 grams baking powder
2 litres of peanut oil
Powdered sugar/icing sugar
Sanguinaccio (chocolate sauce):
500 grams whole milk
70 grams dark cocoa
40 grams corn flour
2 grams cinnamon
200 grams white granulated sugar
100 grams dark chocolate
30 grams butter
Method:
First, sift the flour and baking powder into a bowl. Then, add the sugar, salt, beaten eggs, and grappa. Mix everything well. If you’re using a mixer, use the paddle attachment.
After, add the seeds from the vanilla beans and soft butter. Replace the paddle with the hook attachment and knead for 15 minutes or until the dough is homogenous, smooth, and firm. You may need to add 1-2 teaspoons of water. You can also do this by hand, but prepare yourself for a bit of an arm workout!
Put the dough on a work surface and shape it into a ball. Cover it with plastic wrap and let it rest at room temperature for 30 minutes.
Next, divide the dough into 150-gram portions. Take one, sprinkle it with flour, and flatten it with the palm of your hand. Be sure to cover the rest of the dough with a tea towel or some plastic wrap to prevent it from drying out.
You can do the next step with a rolling pin, but it’s easier and more effective with a pasta roller. If you’re using a rolling pin, try to get the dough as thin as possible.
Roll out with a pasta roller at the widest thickness. Take the short sides of the rectangle and fold them until they meet in the middle. Roll it out again, and fold the two sides again.
Gradually roll the dough out over and over again until you reach the thinnest thickness. The aim is to get the dough as thin as possible! Finally, get a fluted pastry wheel (or you can use a sharp knife or pizza cutter wheel) and cut out rectangles. Be sure to cut to small lines inside each rectangle, so it’s easy to split the chiacchiere. If you want to be exact, you can cut them into 2in x 4in (5cm x 10 cm), but I find it more fun to eyeball it!
Heat a heavy-based pot with the peanut oil until it reaches 300F (150C). When the oil is ready place the chiacchiere into the pot, they will quickly rise to the surface and bubble, as you see in the picture. Once they are golden brown, drain the oil with a spider strainer (or tongs) and let them rest on some paper towel. At this point they won’t be crunchy, so you must wait until they cool.
When they are cool, sprinkle them with powdered sugar and dip them into the traditional chocolate sanguinaccio sauce!
Sanguinaccio:
Put the sugar to a medium-sized pot and whisk in sifted cinnamon, cocoa, and corn flour. Then add the cold milk and whisk to combine. Put the pot over medium-low heat and whisk often until the mixture is thick. This can take anywhere from ten to twenty minutes, so just look for the right thick consistency.
Add in the chopped chocolate and whisk until it’s fully incorporated into the mixture. Then take it off the heat and stir in the butter. Pour the sanguinaccio into a heat-proof container that’s flat so it can cool quickly. Cover with plastic wrap or a lid. Let it rest until it’s at room temperature and then put it in the fridge for at least two hours to set.
If you have any questions, let me know on Instagram!
1 note
·
View note
Text
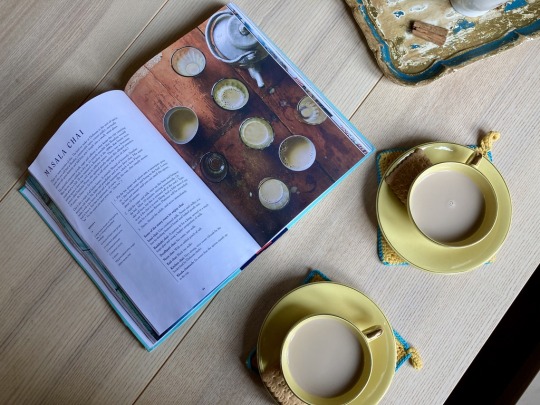
Dishoom’s Authentic Masala Chai
I’ll never forget trying Masala Chai for the first time.
I was visiting my friend in her hometown in Bhubaneswar, India. She was getting married, and I was lucky enough to be there for the ceremony. We were in her mum's kitchen, and she made me my first cup of chai. From there, my obsession began. Just like espresso in Italy, India runs on chai.
I always craved the unique taste of chai after that, and it was only when I first tried it at the London restaurant Dishoom that all those memories came flooding back. This recipe is the real deal, and you can easily make it at home. I bought the amazing Dishoom cookbook (this isn’t sponsored, I’m just a big fan!) and now I can make authentic Masala Chai whenever I want. Trust me, this recipe is perfect! Make a batch and drink it hot (or even cold in the summer), with your favourite biscuit. You’re welcome!!!
Notes:
Adjustments: This sweet milky drink tea is packed full of spices. It’s perfectly balanced, not too spicy or too sweet. But the best part is that you can easily add more or less of any ingredient to suit your personal taste.
Milk: If you want to make this vegan, oat or almond milk would work well! Want a sweeter taste? Use condensed milk instead!
Tea: In the recipe, Dishoom recommends using Assam or Darjeeling. However, I usually use whatever black tea I have on hand, and it tastes great.
Spice: If possible don’t skip any spices, they are all really important for the overall taste. If you can’t find cinnamon sticks, add 2 tsp of cinnamon powder.
Sugar: I recommend using granulate white sugar to cut through all of these strong spices.
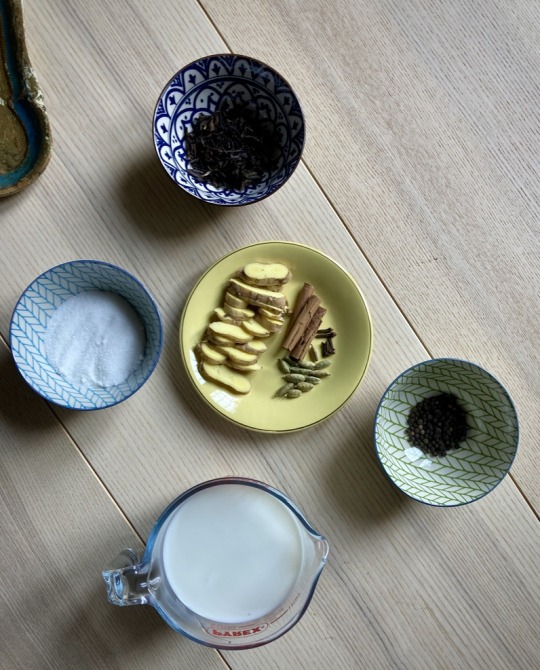
Recipe:
2 tbsp loose leaf plain black tea (or 3 tea bags)
12 slices of fresh ginger
1 1/2 tsp black peppercorns
12 cardamom pods
2 cinnamon sticks
5 cloves
50 grams granulated white sugar
500ml whole milk
Method:
Place the tea leaves, fresh ginger, and spices into a saucepan. If you’re using tea bags, cut them open and pour the leaves into the pot. Pour 1 litre of boiling hot water into the pan. Turn the heat on low and simmer for about 10 minutes or until you smell the spices.
Next, pour in the sugar and mix to dissolve. Then add the cold milk, turn up the heat and bring it to a boil. Keep an eye on the pot because sometimes it can bubble up quickly. When it comes to a boil, continue cooking it on high for about 10 minutes, stirring regularly. Then your chai is finished. If you want a stronger taste you can continue boiling it for longer, taste it, and cook to your preference.
Lastly, strain the tea through a fine-mesh strainer, and throw away the leftover tea and spices. Serve the chai and enjoy it hot! I also love drinking it cold in the summer, if you’d like to try this then pour it into a bottle and refrigerate it until ice cold.
Keep updated on more recipes on Instagram!
5 notes
·
View notes
Text
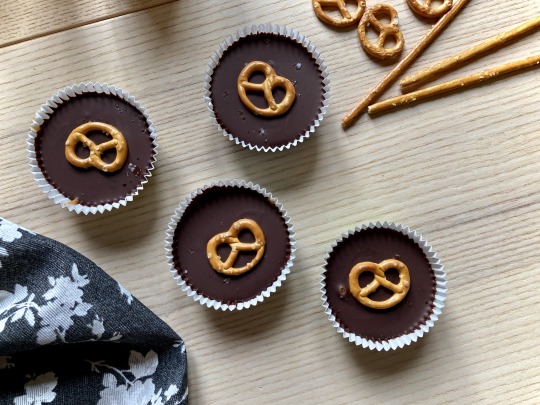
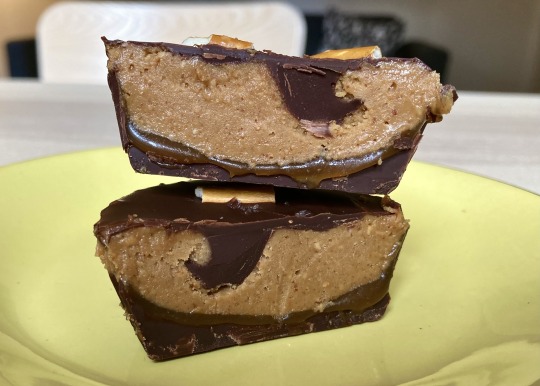
Deluxe Peanut Butter Cups
Christmas and NYE may be over; but in Italy, Epiphany Eve is just around the corner! On January 5th, an old woman (Befana) flies around on her broomstick and leaves chocolate and candy in little stockings at the homes of all the children who’ve been good ( and a lump of coal for the naughty kids).
Even though this is a day for kids to eat treats, I’ll take any excuse to indulge in something sweet. That’s why this year I’m making deluxe peanut butter cups (from the Lady in The Wild West blog) to celebrate. Complete with homemade caramel sauce, crunchy salty pretzels, and a luscious peanut butter cream, you just can’t go wrong.
These are way better than the commercial peanut butter cups and they make fantastic gifts. Once you try these deluxe peanut butter cups, you’ll never be able to go back to the store-bought ones!
Recipe notes:
Caramel Sauce: I’d recommend starting with the caramel sauce so that it has time to cool before adding it to the recipe. You can also buy it from the store, or omit it altogether. But it’s highly recommended as it really takes the recipe to the next level!
Muffin tin: I like making big cups with a medium-sized muffin tin, but these would also be great with a mini-muffin tin. You could also use a round tart pan to make one large single peanut butter cup that you can slice up if you want a quicker version.
Chocolate: You can melt the chocolate in a microwave (20 seconds at a time, stirring in between) or with a double broiler. I prefer the double broiler technique as you have more control over the final product.
Lard/Shortening: Using a small amount will make the chocolate shinier and it won’t have any impact on taste. But it's entirely optional!

Ingredients:
Chocolate:
550 grams / 20 ounces baking chocolate (I prefer dark 50% cacao)
1 tsp lard or shortening (optional)
Peanut butter cream:
1 cup / 1 jar of peanut butter (preferably natural and unsalted)
56 grams / 4 tbsp unsalted butter (room temperature)
50 grams / 1/2 cup powdered sugar
Caramel sauce:
200 grams / 1 cup granulated sugar
85 grams / 6 tablespoons unsalted butter (room temperature)
120 grams / 1/2 cup heavy cream (room temperature)
1 tsp vanilla extract or 1 vanilla bean (the seeds)
1 tsp fine salt
Optional: pretzels, flaky salt
Method:
Place liners in a muffin tin. In a medium-sized bowl, melt the chocolate. Simply, place the bowl over a pot of simmering water and mix continuously with a rubber spatula. Add in the lard if using.
Spoon in the melted chocolate into each liner, gently pushing the chocolate up the sides of it, about 2/3rds of the way. You should still have about half of the chocolate left.
After this, put the muffin tin into the fridge for 10 to 15 minutes, until the chocolate is set. While you wait, whisk the peanut butter, powdered sugar, and unsalted butter together until combined and smooth. Don’t have an electric mixer? A whisk is also fine!
When the chocolate is set take it out and place some chopped pretzels into the bottom. Add a spoonful of caramel sauce (recipe below), covering the pretzels. Then, follow it with a large spoonful of peanut butter cream. Lightly pound the tin on the counter to level it out. Make sure the peanut butter doesn’t touch the liner. Place back into the fridge and let it sit for 10 minutes.
Remove the muffin tin ad put melted chocolate on top of each one to seat it. Pound it again on the counter, make sure the chocolate completely covers the peanut butter. Sprinkle with pretzels and flaky salt, and put them back in for another 15 minutes.
After this, they are ready to eat and enjoy!!!
Caramel Sauce:
Put a medium-sized saucepan on medium heat. Add in the sugar, swirling the pan occasionally until the sugar melts and its color turns to amber. Then, immediately add in the butter and whisk until melted. Carefully pour in the cream and continue whisking until everything is melted and the mixture is a rich golden color. Keep in mind that it will bubble a lot, but this means you're doing it right!
Take the pan off the heat and stir in the vanilla and salt. Pour it into a heat-proof container (like a glass jar) and let it cool for five minutes. Then refrigerate it while you prepare your cups. It will thicken more when it’s cool. This recipe makes about 1 cup of caramel sauce, so you’ll have some leftover. It goes well on ice cream, panna cotta and more!
Original recipe:
https://www.ladyinthewildwest.com/lwwblog/homemademilkchocolatepeanutbuttercups
#peanutbutter#peanutbuttercups#recipe#recipeidea#chocolate#homemadechocolate#giftideas#foodblog#kitchenhermit#chocoholic
0 notes
Text
Roccocó (Neapolitan Christmas Biscuit)
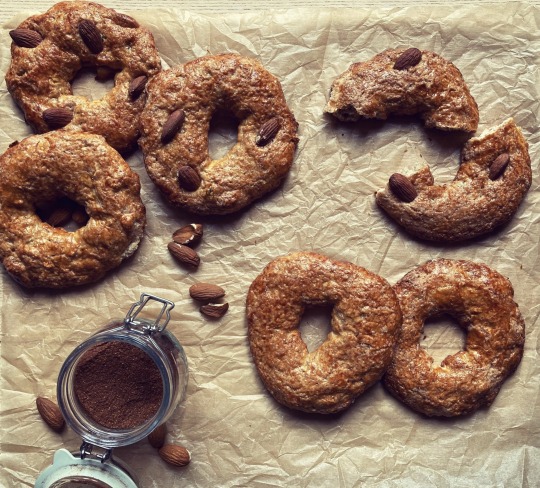
It wouldn’t be Christmas in Naples without roccocó. You know that the holidays are around the corner when you see this delicious crunchy biscuit in the local bakeries.
This biscuit is steeped in history and tradition. Invented in 1320 by the nuns of the Real Convento della Maddalena, roccocó is eaten from December 8, the celebration of the immaculate conception, and enjoyed through the holidays.
Roccocó is easy and inexpensive to make at home, and it tastes amazing because of the Neapolitan spice blend ‘pisto’.
Ingredient notes:
Candied fruit: The candied fruit in this recipe is very important. Traditionally, you should use candied citron. As it may be difficult to find outside of Italy, I’d recommend using candied lemon or lime chopped into tiny pieces.
Pisto: This is an essential ingredient, and you can easily buy it online. However, I’ve found that the homemade version is cheaper and way tastier and you probably have all the ground spices in your cupboard right now. Simply mix 15 grams cinnamon powder, 5 grams pepper, 5 grams nutmeg, 2 grams cloves, 2 grams star anise, and 2 grams coriander seeds.
I hope you enjoy this recipe and a taste of Christmas in Naples!
Ingredients:
100 grams almonds (skin on)
250 grams granulated white sugar
2 grams pisto/mixed spice
87 grams water (room temperature)
250 grams 00 flour / all-purpose flour
100 grams candied fruit
Zest of 1/4 orange
A pinch of baking soda or baker’s ammonia
Decoration:
1 egg (for the egg wash)
30 grams whole toasted almonds (optional)
Method:
First, roast the almonds in an oven (preheated at 180C) for five minutes. After, let them cool and put aside half (50 grams). Then, blend the other half in a food processor until you have a sandy mixture.
In a medium-sized bowl, whisk the flour, sugar, baking soda, pisto, and ground almonds together until combined. Add in the orange zest, and slowly pour in the water while mixing the dough by hand. After the dough is well-mixed, add in the diced candied fruit and 50 grams of whole almonds. Mix and transfer the dough to an un-floured work surface. Knead until the dough is smooth.
Following this, it’s time to shape your roccocó. Lengthen the dough until it’s a long tube and then dived into eleven equal portions (75 grams each). Take each piece, roll, and put the two ends together, sealing them.
Put the roccocó onto a baking tray lined with parchment paper. Whisk one egg for the wash, and brush the biscuits with it. Press a couple of almonds into the top of each biscuit for decoration.
Bake in a preheated oven (180C) for 25 minutes or until the roccocó are lightly browned. When they’re finished, let them cool on a wire rack.
Notes:
1- If you don’t have a food processor, you can buy ground almonds at a supermarket or health food store. Otherwise, a mortar and pestle would do the trick!
2- Want to make a harder biscuit? Bake them for five to ten minutes longer! Then, you can dip them in some wine to soften when you eat them.
Did you try this recipe? I’d love to know how it went, let me know on Instagram!
4 notes
·
View notes
Text
The Best Sourdough Banana Bread!

There’s nothing more heart-warming than a slice of banana bread, straight out of the oven. Growing up in Australia, banana bread was a very familiar sight in every café. It’s the perfect treat to relax and unwind with a cup of coffee!
I experimented and researched a lot to create the perfect recipe, and this is it! The sourdough, brown sugar, and vanilla extract give the banana bread that richness and complexity you just can’t beat. The process is very easy, and although I use one, a stand mixer is not necessary!

Ingredient notes:
1- Sugar: I use brown granulated sugar as I think it gives the bread more depth of flavour and moistness. However, white castor sugar is also fine!
2- Bananas: The bananas should be overripe. If the skin is brown and they smell sweet, they’re perfect.
Enjoy the recipe, and let me know how you like it or if you have any recommended add-ins

Recipe:
224 grams (15 tbsp) unsalted butter (room temperature)
300 grams (1 1/2 cups) granulated brown sugar
300 grams (1 3/4 cups + 2tbsp) all-purpose flour
145 grams (2/3 cups) active sourdough starter
5 grams baking soda (1 tsp)
3 grams (1/2 tsp) salt
4 overripe bananas (3 for the bread, 1 for the top)
2 whole eggs (room temperature)
4 grams (1tsp) vanilla extract
Method:
1- Preheat your oven to 176 C / 348 F
2-In a large bowl, whisk the flour, baking soda, and salt together. Set aside.
3- Cream the butter and sugar together with a stand mixer. You can use a handheld whisk, but get ready for an arm workout! While it’s mixing add the vanilla extract and the two eggs one at a time. Wait until the egg is fully mixed in before adding the second.
4- Mash the three bananas in a separate bowl and add them into the mixture along with the sourdough starter.
5- Lastly, mix in the dry ingredients until combined. Be careful not to over-mix.
6- Cover the bowl with cling wrap and let the mix rest for at least 30 minutes at room temperature or up to 12 hours in the fridge. If you ferment it in the fridge overnight be sure to mix it again before baking.
7- Grease a loaf tin, line it with baking paper, and gently dust it with flour. Pour in the batter. Slice the remaining banana in half length-ways, and put it on top of the mixture. Put some honey on the banana and sprinkle some flaky salt (optional).
8- Bake in the preheated oven and remove when the top is brown and a skewer comes out clean. Cool on a rack for 10 minutes before taking it out of the tin. Slice and serve the banana bread while it's still warm.
Notes:
1- There are many optional add-ins for this recipe. You can include a 1/2 cup of walnuts, chocolate chips, or 1 tbsp of coffee for an added caffeine kick!
2- Pan: Traditionally, you should use a loaf pan for banana bread. If you don’t have one, don’t worry! A round cake pan or a muffin tray will do fine.
3- You can serve a slice with peanut butter, Nutella, butter, or even honey & ricotta. It’s also delicious by itself!
4- The banana bread will last you about five days (although it never lasts that long in my house!). If you don't eat it the same day, I’d recommend toasting the slice, and spreading some butter on top.
Did you try this recipe? I’d love to know how it went, let me know on Instagram!
0 notes