
berryandtart
Berry & Tart
2 girlfriends and some pets who make art and homemade crafts together.
follow @berryfandom for more!
16 posts
Don't wanna be here? Send us removal request.
Last Seen Blogs

luckydaddy33
DADDY GAY ONLY

junpr
roast beef

caniaskyouabouttoday
God Is In The Details


getwhore
getou's bimbo
Text
hot artists don't gatekeep
I've been resource gathering for YEARS so now I am going to share my dragons hoard
Floorplanner. Design and furnish a house for you to use for having a consistent background in your comic or anything! Free, you need an account, easy to use, and you can save multiple houses.
Comparing Heights. Input the heights of characters to see what the different is between them. Great for keeping consistency. Free.
Magma. Draw online with friends in real time. Great for practice or hanging out. Free, paid plan available, account preferred.
Smithsonian Open Access. Loads of free images. Free.
SketchDaily. Lots of pose references, massive library, is set on a timer so you can practice quick figure drawing. Free.
SculptGL. A sculpting tool which I am yet to master, but you should be able to make whatever 3d object you like with it. free.
Pexels. Free stock images. And the search engine is actually pretty good at pulling up what you want.
Figurosity. Great pose references, diverse body types, lots of "how to draw" videos directly on the site, the models are 3d and you can rotate the angle, but you can't make custom poses or edit body proportions. Free, account option, paid plans available.
Line of Action. More drawing references, this one also has a focus on expressions, hands/feet, animals, landscapes. Free.
Animal Photo. You pose a 3d skull model and select an animal species, and they give you a bunch of photo references for that animal at that angle. Super handy. Free.
Height Weight Chart. You ever see an OC listed as having a certain weight but then they look Wildly different than the number suggests? Well here's a site to avoid that! It shows real people at different weights and heights to give you a better idea of what these abstract numbers all look like. Free to use.
181K notes
·
View notes
Video
after eight years, I finally updated my huge Historical Fashion Reference & Resources Doc! Now in the form of a MUCH more easily updated Google Doc with better organization, refreshed links, and five more pages of books and online resources.
I know tumblr hates links, but it’s worth it for a doc that I can now update with far more regularity going forward! RIP to the original, you did your duty for far longer than you should have. 😔🙏🏼
24K notes
·
View notes

Text
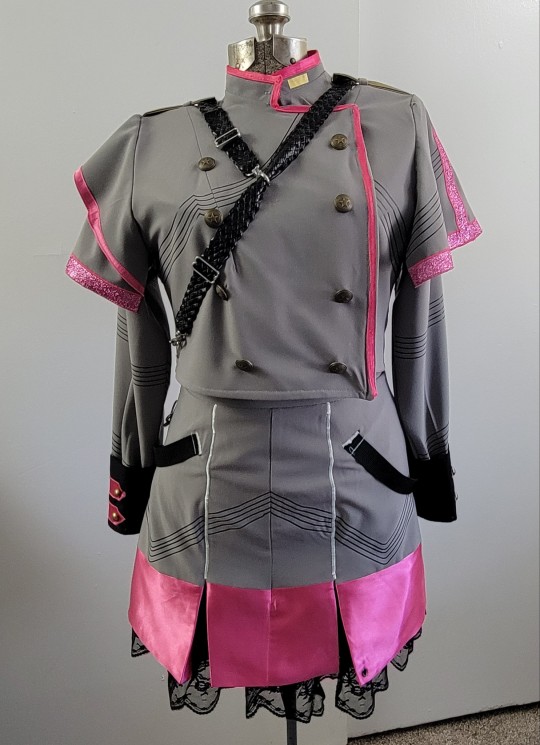

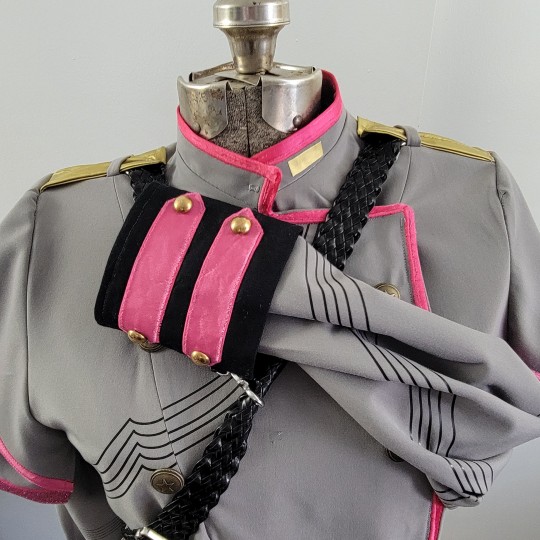
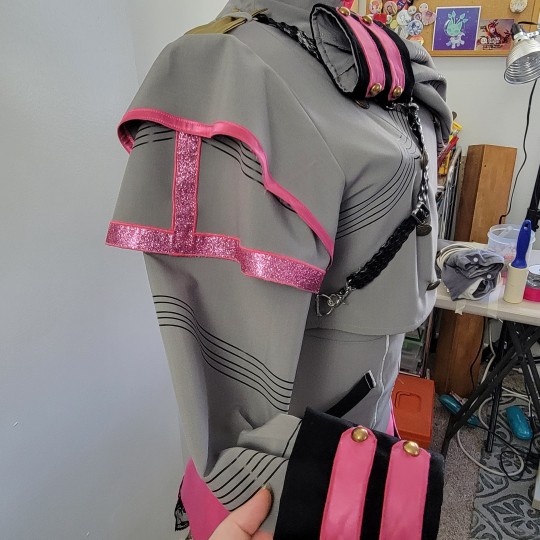
Teto - Synth V🎶
Costume Comission for a friend!
Fully drafted from scratch! Roughly 8 hours patterning and 40 hours of sewing.
20 notes
·
View notes
Text

so like what’s their ship name
20 notes
·
View notes
Text
He's the best princess

henry is very Snow White coded
70 notes
·
View notes
Text
THERE IS. a website. that takes 3D models with seams and pulls it apart to make a plushie pattern and informs you where things need to be edited or darts added for the best effect. and then it lets you scale it and print off your pattern. and I want to lose my MIND because I've lost steam halfway through so many plushie patterns in the mind numbing in betweens of unwrapping, copying all of the meshes down as pieces, transferring those, testing them, then finding obvious tweaks... like... this would eradicate 99% of my trial and error workflow for 3D models to plushies & MAYBE ILL FINALLY FINISH SCREAMTAIL...
68K notes
·
View notes
Text
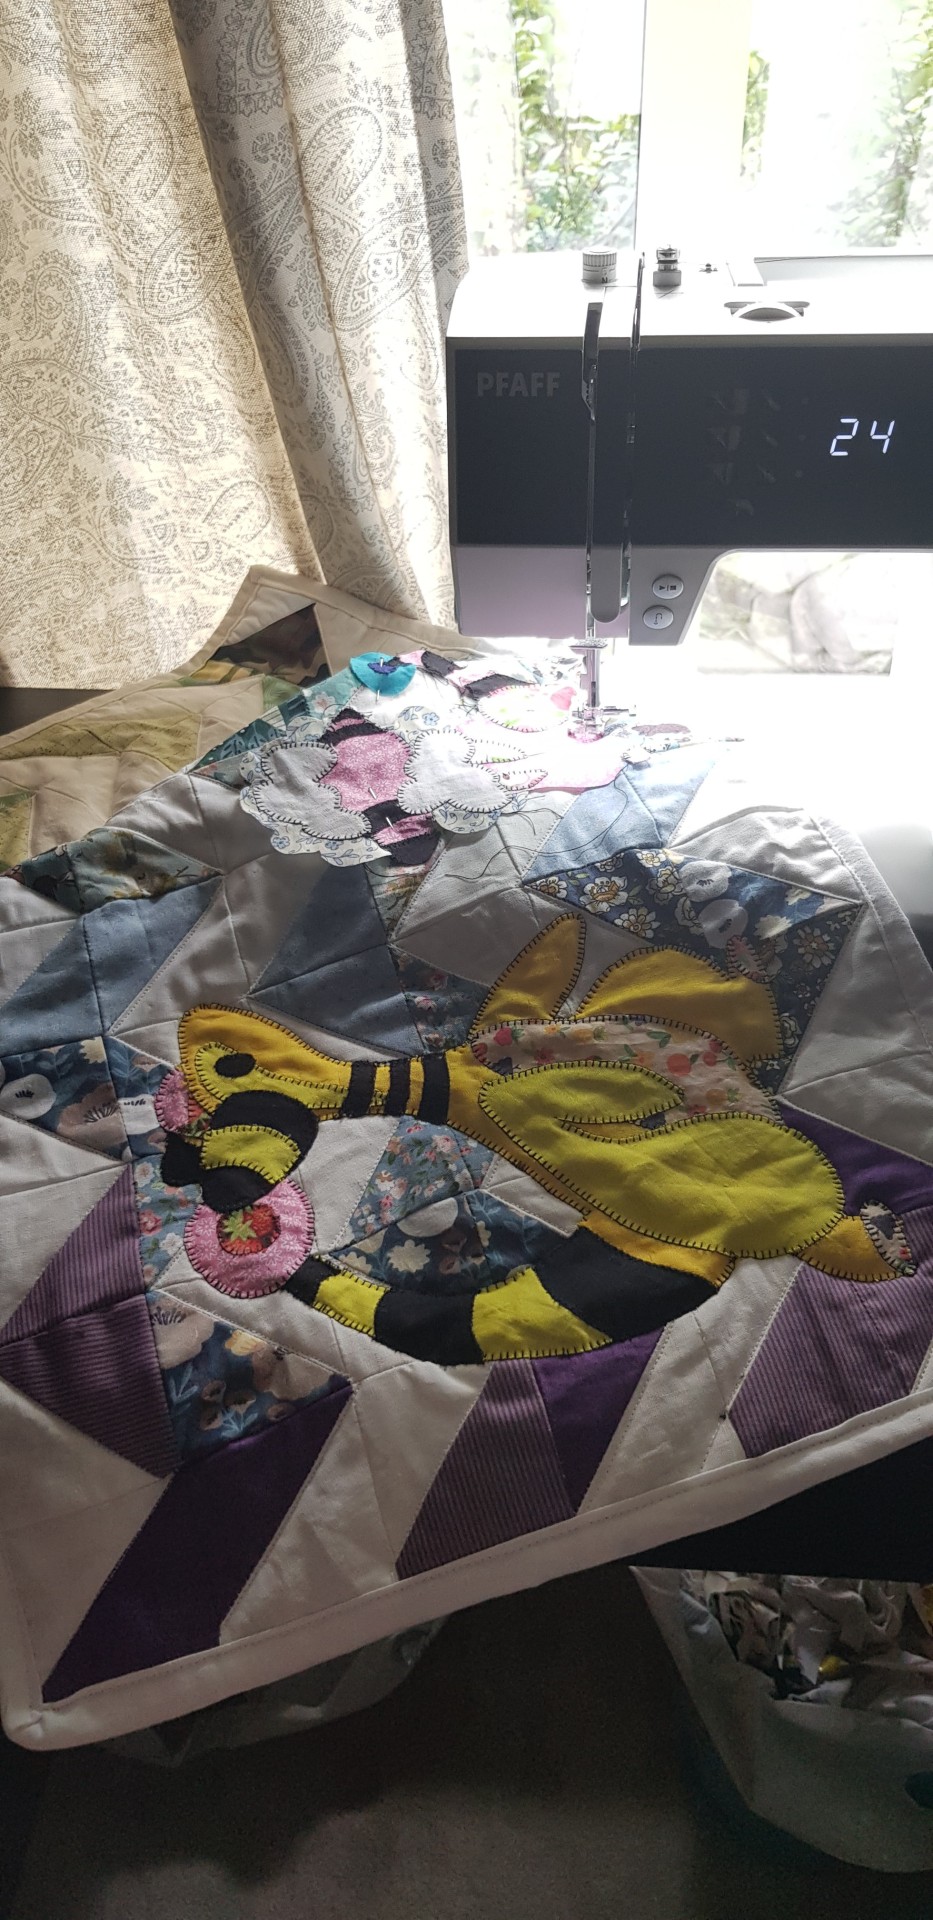
As per my lovely icon you can probably tell I Love mareep evolution line... and I have been wanting to try quilting for a bit... so I combined them! Behold my first quilt!

Itll just be on my little table, so it's pretty small, but I love it!
I had a lot of fun making it, here is the quilt without the pokemon, boring I know;)

And the pokemon themselves!

Great project to learn quilting, highly recommended!
117 notes
·
View notes
Photo
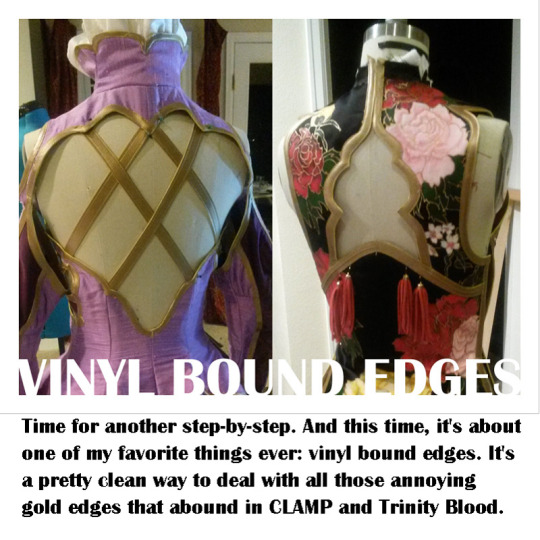
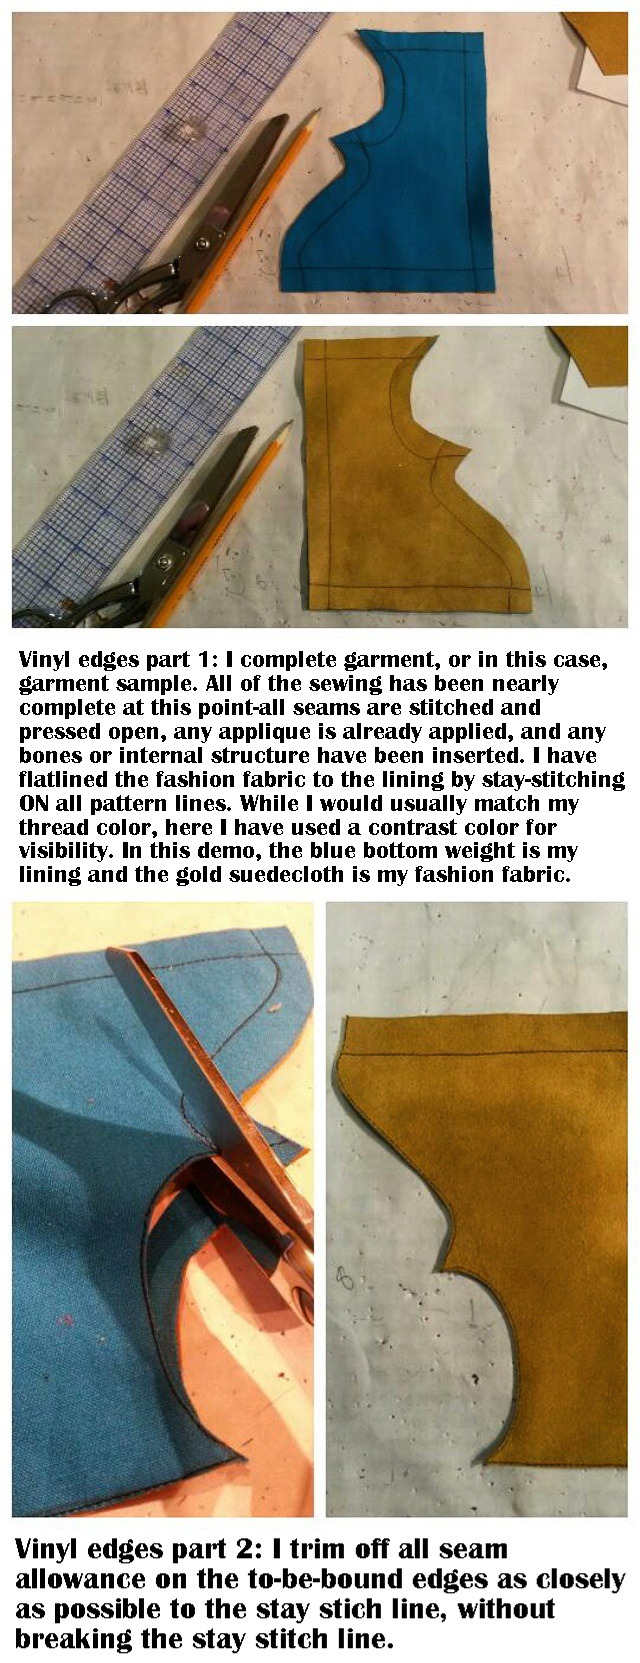
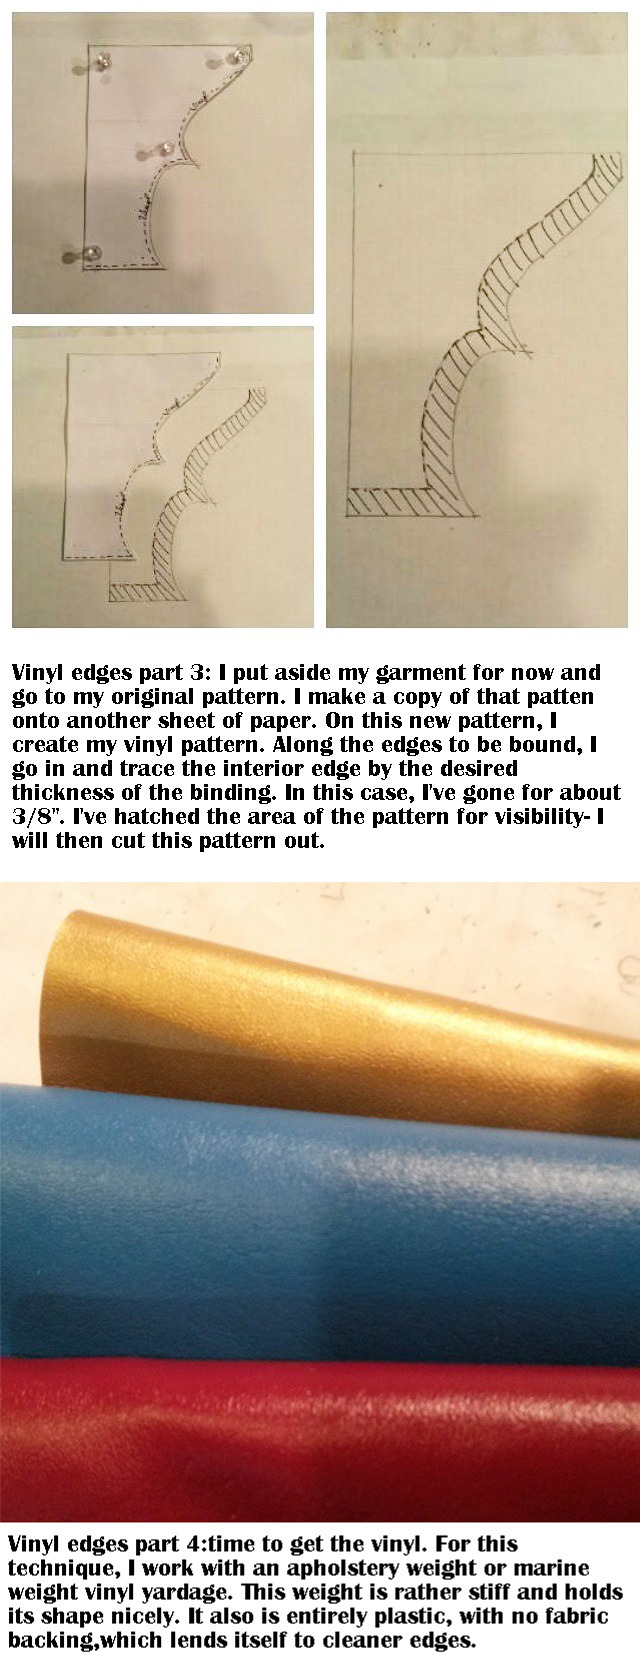
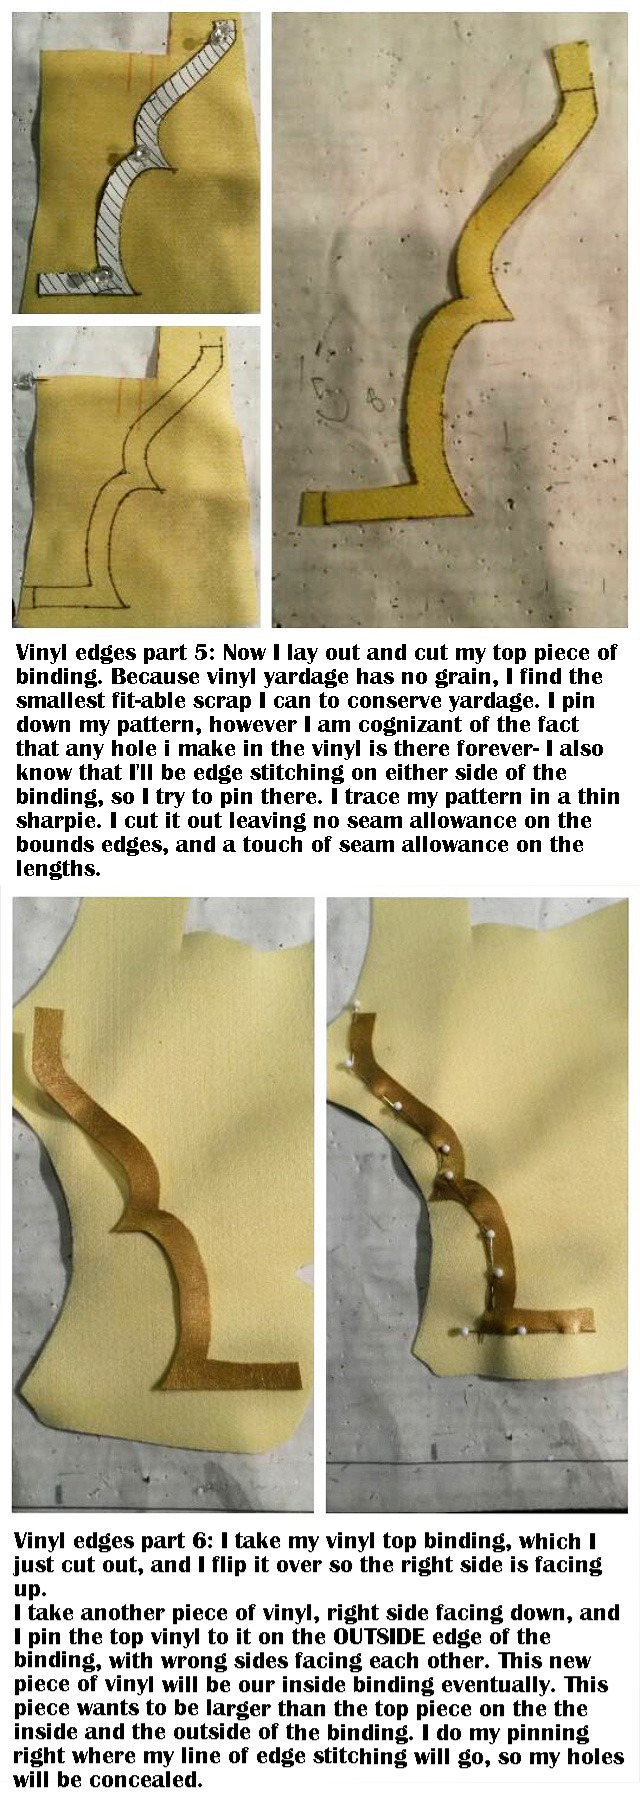


I spiffed up this tutorial I made a while ago. And by spiffed up I mean I added the text to the pictures.
16K notes
·
View notes
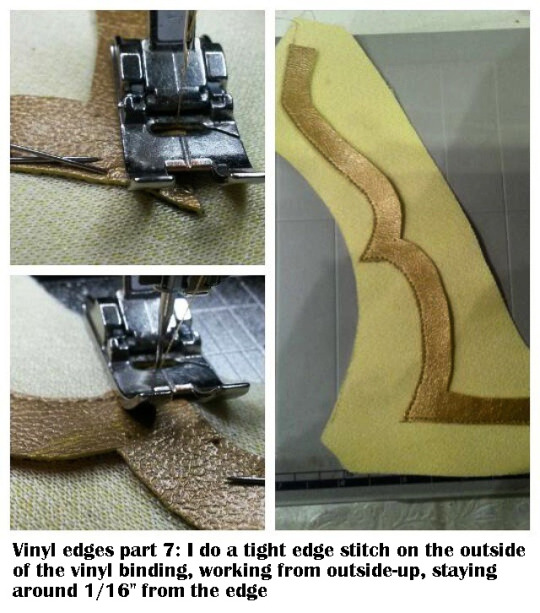
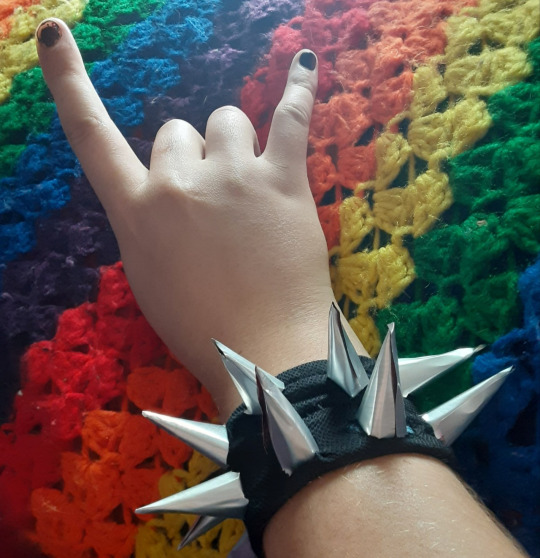
Text
DIY How-To; Aluminum Can Spikes
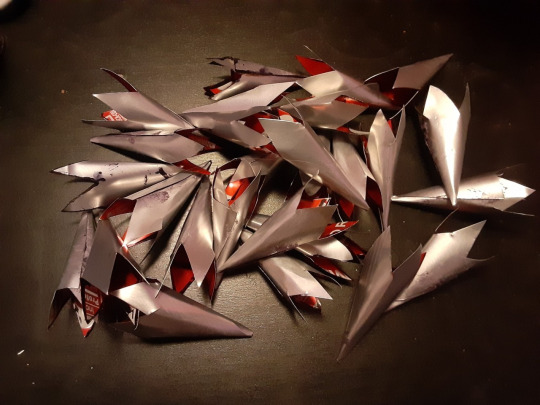
Preface; This will work with any kind of can as long as its metal. (soda, monster, ect) You can make them in colors depending on which side you trace your stencil on but im gonna teach you how to make them silver
And i cannot stress this enough,
BE CAREFUL WITH THE RAW CUT EDGES OF THE CANS, THEY ARE SHARP ENOUGH TO CUT BADLY
Material needed;
Empty clean aluminum can(s)
Sharp scissors (maybe a stitch ripper for attaching them but scissors work too)
A sharpie or permanent marker
Superglue if you want them perfect
An abundance of patience and caution
1 Gather your aluminum
First step is to turn those cans into flat sheets of metal. Start by making a small cut near the rounded edge of the top or bottom, about this distance

Then cut around the top to connect back where you started and take the ends off.
Next you cut a line straight down the side to interrupt the loop of aluminum.
What I do next is kinda just flatten it the best I can? Press it against a flat surface, make tiny bends against the curve, just to make it easier to work with, always being careful of the sharp edges
2 Make a stencil
So the general shape youre gonna wanna make it is like this
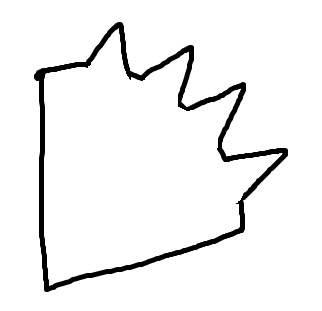

The big point will be the tip of your spike, and the little nubby ones will hold it on
imo it helps to have an extra can to experiment with what works best for what youre going for, but once you figure it out, have one flat cut out piece to trace for the rest, to make sure they all come out the same!
3 Trace a bunch and cut them out!
Sounds easier than it is. if you work with it, you can get more spikes sometimes by drawing them close together, but then theyre harder to cut out. Again, be careful of edges. If you want silver, trace on the printed on sign so you dont get sharpie on your spike (or dont, mistakes are punk)
4 Roll them up
This takes a little practice, but what you wanna do is roll up the wider end of the triangle, one edge over the other, into a pyramid, forming a spike with the point of the big triangle at the end. (this ones harder to draw)
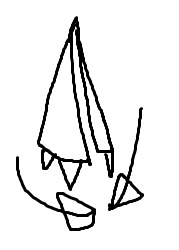

Sometimes theyll stay curled tight on their own, sometimes they need a little help (superglue) i havent figured out how to make em curl perfect every time yet. You can also fill them with hot glue to make them sturdier ( BEING CAREFUL OF THE SPIKES WHEN THEY HEAT UP FROM THE GLUE)
But the good news is your spikes are done!
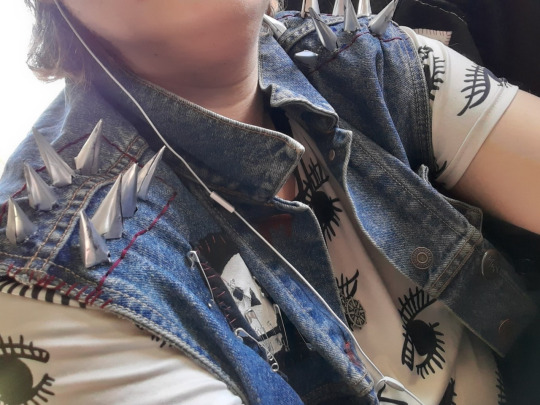
4 Affixing them to your shit
Once you figure out where you want them, hold the bottom triangles on the first spike up to the spot it goes like you mean to put it in, mark where they touch the fabric, and then take your scissors or stitch ripper and cut four little tears that DO NOT connect at those points.
It should look like this, with the center dot representing where the spike point is centered!
You should also give each spike enough room that the tears dont run into each other. I usually do them one at a time but i dont think it matters.
After the tears are cut, you carefully insert the bottom triangles into the rips
flip it over, and fold the triangles in over themselves like a staple
Repeat until youve added on all your spikes and your piece looks sick as fuck
5 Bonus; patching over the studs
So when you do this, like a staple, theres the little pointy bits sticking in, and if its a wearble item, it'll prick your skin. If youre autistic like me thats a big drawback, but you can remedy this by sewing a patch of a thicker material (i use denim) over the place where these spikes are holding on.
310 notes
·
View notes
Text
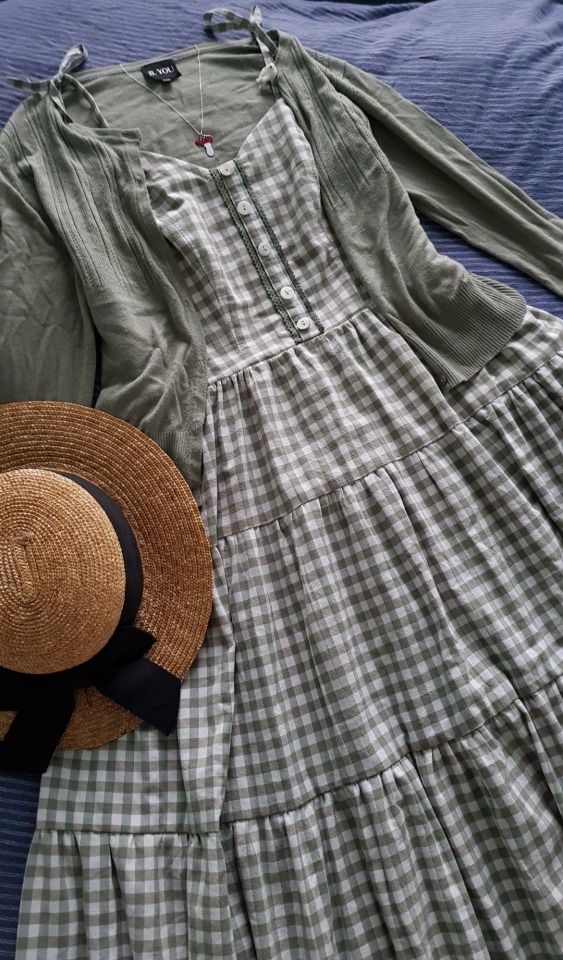
🌱S o f t G r e e n🌱
🍄I loved this sage gingham (duvet cover) as soon as I clapped eyes on it, and I knew exactly what I wanted to make :")
🌱Self drafted sundress bodice with button placket and back shirring, with self draft tiered skirt. Styled with thrifted cardi and hat, and a little enamel mushroom necklace from mairijewellery.bigcartel.com 🍄
🍄Drafting that tiered skirt was hard! Proportions for a flattering waist-hip ratio are actually quite delicate (I have no hips), so I wound up making the top tier 2.5x waist and the same length as the side bodice after a LOT of trial and error ;_;
377 notes
·
View notes
Text
sewing tip
trying to draft your own patterns from scratch? stumped by those pesky curves? don't have for whatever reason a french curve? well if you have access to a printer there are sites that have templates you can print out and use! literally changed my life last night when i learnt that here's the site i used but you can always search for others
247 notes
·
View notes
Text
Hooping Tips For Great Stitch-Outs

If you ever see the outlines of your designs “run away”, design parts not lining up, stitches missing, fabric puckering or thread looping - these simple tips may help.
Basic Tips for Great Stitchouts
Hooping has enormous effect on embroideries quality. Because of improper hooping, it often looks like the design we’re embroidering is inferior. Fortunately, 95 times out of 100 it’s not the case!
Yet, to achieve great results, it’s not enough to hoop well. There are a few steps that must be done right, in addition to proper hooping. We’ll try to mention them too, to help you avoid painful pitfalls :o) Here they are:
1. Launder the fabric you’re going to embroider on, to pre-shrink it. Use the same washing conditions you’re going to use on your ready item later.
For example - if it will be “machine boiled” at 95 C - machine boil the fabric before embroidering. Because if you forget to do this, it can shrink later, together with the design. Then the fabric will pucker and look terrible.
2. Stabilize properly to prevent fabric puckering, fabric stretching & deformation of ready embroideries after laundry. Use water soluble topping to stop stitches from sinking into stitches-observing fabric types.
3. Always use EMBROIDERY supplies. This may sound trivial, but sewing threads, for example, are not good for embroidery, because of their low quality.
So don’t try to save by shopping for sewing thread for embroidery purposes. Instead of saving money, you will only harm your embroidery machine & get terrible stitchouts.
Always order quality embroidery supplies, so that you and your machine would be happy and healthy!
4. Take a piece of identical type & weight fabric and do a test stitch of your design with exactly the same materials you’re going to use on final project.
This will help you see whether your decision about stabilizing and other materials selection was good.
Test until you pick up materials that work great together.
We even suggest that you use the same thread colors, to make sure these cones include quality thread. Because sometimes one color embroiders beautifully, while other is a disaster. This happens with most expensive thread brands, nobody is insured.
If you don’t do such testing, you’re gambling. Don’t gamble, because it’ll cause you disappointment. It’s sad to see a ruined project.
5. Take a new 12/80 needle every 8 hours of embroidering. It must be sharp and not “hooked”.
Otherwise your thread may start looping. Just because of bad needle, your machine can even start missing stitches.
Hooping Tips for Great Stitchouts
It’s hard to undervalue the importance of quality hooping, because most times we have troubles with designs not lining up and fabric puckering, it’s because of incorrect hooping.
You’ve probably heard about “in hoop” and “hoopless” embroidery, and even know the difference between these two terms. Nevertheless, we will explain them both, to avoid confusion.
“In Hoop” Embroidery - What it Is & When to Us
This term relates to all cases when you hoop the fabric you’re going to embroider on.
“In Hoop” embroidery is usually used whenever you have no problems with hooping the material you want to embroider on. To summarize - if your item is large enough to be hooped, the fabric is not too fat and not too slippery, and the hoop won’t damage the fabric - it’s usually easier and better to hoop. Together with embroidery backing, of course…
“Hoopless” Embroidery - What it Is & When to Use
This term relates to all cases when you hoop only embroidery backing, and the main material you want to embroider on is not hooped, but gets sticked over the hooped backing.
Sometimes this can be achieved using adhesive stabilizer, sometimes - by applying temporary spray adhesive to regular backing. But the result is always the same. The backing is carefully hooped, and fabric secured over it.
This method is wonderful for several situations:
1. When your fabric is very slippery. It works better than regular hooping with slippery fabrics, because this way the backing “sits” well between the hoop rings and provides stability, while the fabric doesn’t have any chance to slip, because it’s glued to the backing!
2. With small items. If you want to embroider on something tiny that isn’t possible to hoop, like collar for example, you may just hoop embroidery backing, “glue” the non-hoopable item to it and embroider.
3. With fabrics that are too fat to hoop the regular way - like polar fleece, fat bath towels, fur etc.
4.. With materials that can be damaged or stretched if hooped - like corduroy, velvet, knits, paper, leather.
Basic Hooping Technique
Remember. No matter if you’ve decided to use “in hoop” or “hoopless” method, you need to hoop, and hoop well. The only difference is that in first case you hoop the backing and fabric together, and in second case - only the backing.
When hooping, whatever material you hoop - it should be quite tight (not loose, without “bubbles”).
Yet, NEVER, NEVER stretch your fabric or deform it. Because when you will finish embroidering and unhoop - it will return to it’s original shape, creating ugly puckering.
To achieve such result, you may hoop the following way:
1. Lay the bottom hoop ring, with loosened screw, on working surface.
2. Put stabilizer & fabric over it. Using your fingers, feel where the bottom ring is positioned.3. If you’re using large hoop, or a bit slippery fabric, or your hoop is just known for not holding fabric well enough - do the following:
- Take 4 paper towels, fold them 2 times, and put each long folded piece over one hoop edge.
- They will make your fabric hold better in hoop, without moving.
4. Using both of your hands, slide the upper hoop ring inside. You should see NO fabric or stabilizer bubbles.
If you see them - retry until the surface is wrinkless.
Tighten the screw. If you’ve used paper towels - cut the excess of paper towels, that you see entering the embroidery area.
5. Take the hoop to your hands, and insert the upper ring a tiny bit more inside (~ 1/8 inch inside).
6. In case you hoop the backing only - now spray temporary spray adhesive on your hooped stabilizer, and carefully stick the fabric.
Ready! Wish you a wonderful day & happy embroidering!
Read the full article
16 notes
·
View notes
Text
Baby the Stars Shine Bright rose lace machine embroidery pattern:
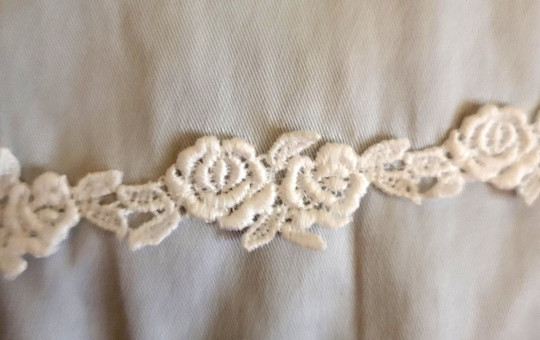
I like this lace

So I digitized it for embroidery.
This is not a freestanding design. You need to embroider this onto a fabric. Don't try to just do this on wash-away stabilizer and make a trim. It's not ready for that, and it'll fall apart.
Files are here. Once I've given this a test run, I'll update with a picture of how it stitches. For now, these are untested and should be sampled before you decide to sew it onto your project. If you have 60wt thread, it will probably look better than with 40wt.
Files included in that folder: single repeat in VP3 and PES files, 4x repeat (as shown on the screenshot up there) in PES, VP3, and VP3 with alignment markers for mega endless hoop. If anyone wants a PES with alignment stitches, let me know.
This design stitches out slightly bigger than the official lace. Official lace is 4cm repeat and this is a 6.2cm repeat. This is because it's hard to make small things in embroidery. This is already pretty dense and finicky, so please resize down at your own risk, and run a test run before you do it on your important project! You can easily make this 150% bigger without serious problems, though.
There's also a jump stitch over the front of the lefthand rose. I tried really hard and couldn't make it go away, so you'll just have to clip it out when you're done. One jump stitch over a 3k stitch design is not too bad, so I will not apologize for it.
Anyway, have fun!
322 notes
·
View notes
Note
Upsizing clothes! There are a million upcycling tutorials for clothes that are too big, but so few on how to make too small clothes you still love bigger!
Thank you for your suggestion! We all go through weight fluctuations in life, so it stands to reason our clothes should be able to fluctuate with us.
Resizing your clothes used to be a very common practice before the advent of fast fashion. Fast fashion sizing is extremely flawed, especially when it comes to plus size fashion, and we're stuck with a lot of vanity sizing, so it's a good skill to have regardless of whether you're looking to mend something old or buy something new.
How to upsize clothes:
Introduction:
There are many different ways to make a garment larger. The following list is not exhaustive, just a few ideas to get you started.
Grading patterns:
If you're making your own clothes, it's always useful to know how to modify a sewing pattern. The easiest way to adjust a pre-existing pattern to your size is slash and spread grading. First, you need to define which spots on the pattern need extra space. You then cut your pattern in that spot, and slide the resulting pattern pieces away from each other until you've got the size you need. Use paper to fill in the gaps. To ensure the resulting pattern makes for well-fitting clothes, make a mock-up and add, move, or remove darts where necessary to adapt it to your body type.
The image below shows potential slashing lines on a set of standard pattern blocks. Each line is a spot that allows you to add extra space. To read more about this process, check out the corresponding article by Threads Magazine.
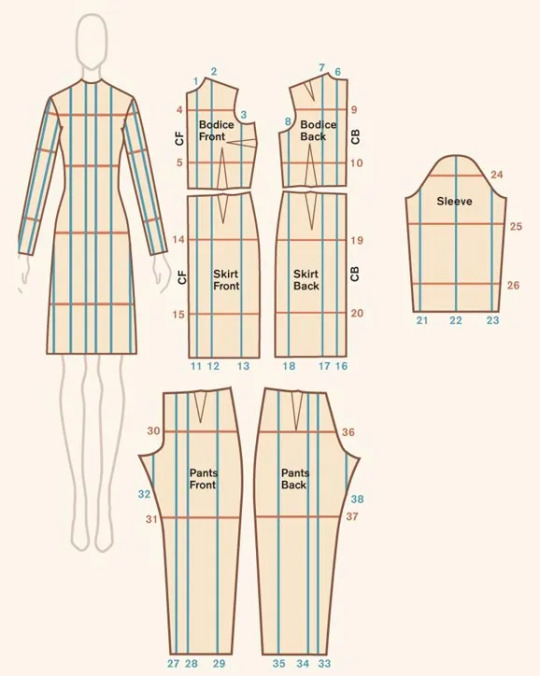
(Image source) [ID: a diagram of slashing lines on a pattern block for a dress, bodice, skirt, sleeve, and a pair of pants.]
To make your clothes easier to let out in the future, make sure to provide ample seam allowance when cutting out your pattern pieces. This surplus fabric has several different uses, including giving you some wiggle room for when you need to size up your garment.
Now, let's take a look at pre-made garments.
Lengthening clothes:
A garment that's too short on you is easy to modify. Just add more material!
If it's a skirt or a dress, add ruffles to the bottom. Ruffles are easy to make by hand or with a sewing machine. You could also add lace, or wear the item with an underskirt.
For pants, let down your hem or sew on a new cuff. If this isn't enough, maybe consider turning your trousers into capri pants or shorts.
As for shirts, sewing an extra layer to the bottom edge is the easiest way to go, too. You could even combine two shirts into one to get an extra long shirt.
Another option is to cut your item in two and insert extra fabric between your separated garment parts.
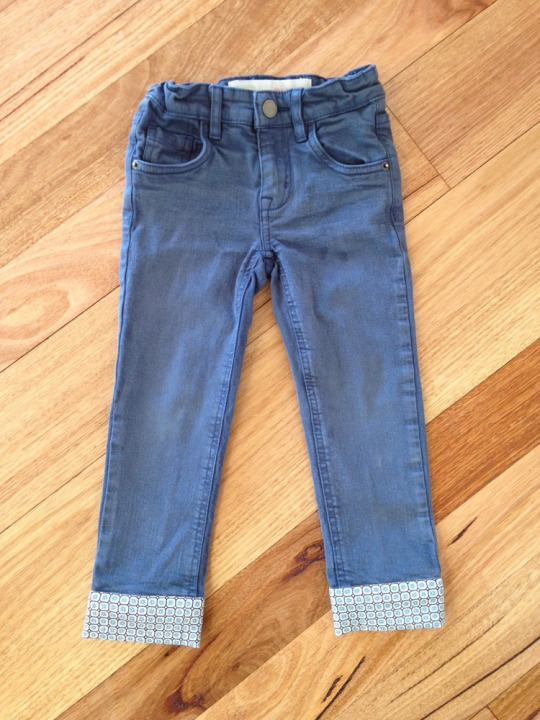
(Image source) [ID: a pair of blue pants with cuffs sewn onto the bottom of the legs to lengthen them. The cuffs are made out of a fabric with a blue and brown geometric print.]
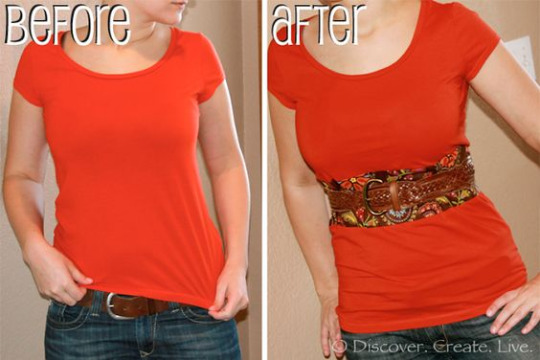
(Image source) [ID: a before and after picture of a red t-shirt that was lenghtened by adding in a patch of colourful fabric at the waist.]
Letting out seams/darts:
Remember how we made sure to have ample seam allowance earlier? When a garment has surplus fabric in the seams and you only need a little extra space, you can undo the seams of your garment and sew them back together again, this time with a smaller seam allowance than before. The Spruce Crafts has a pretty good tutorial on how to let out seams. You won't be able to make major size changes using this technique, but if you only need a few centimetres, this is a good way to go.
A lot of garments also have darts. Darts are fabric folds that are sewn down in strategic places to help the fabric follow the body's curves. If a dart doesn't fit you the way you want it to, then unpick the dart and try on the garment. Either leave the dart open, or pin the dart in place however you want it, then take off the garment again and sew the dart back together.
Be careful not to rip the fabric when using a seam ripper. Also note that removing entire darts may change the garment's fit.
You can also add custom darts to achieve a better fit, but that's a topic for another time.
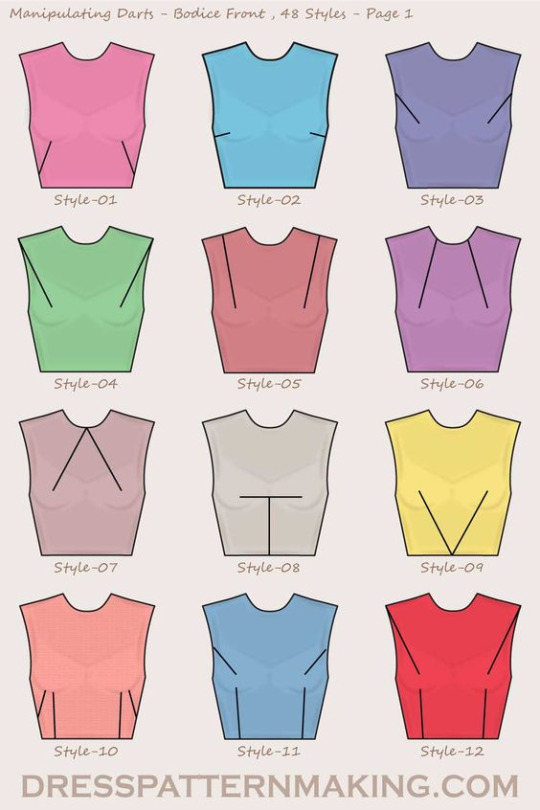
(Image source) [ID: twelve different types of darts on a feminine bodice block.]
Adding extra fabric to your garment:
If we need to add more room than seam allowance or darts can provide us with, we need to add extra material. Remember those slashing lines we looked at earlier? If you're working with a pre-existing garment rather than a pattern, those are the perfect places to chop up your clothes and add in extra fabric.
Check your sewing stash for fabric that's similar in weight and material to your original garment, or go thrift shopping for an item you could use to upsize your garment. Long skirts and maxi dresses are a great source of fabric for alterations like these!
Lace inserts are also a fun choice to add some room, and if you're working with a knit item, you could even knit or crochet your own custom insert.
Define the area where you want to add extra fabric on your item, and measure how much you need. Draw a straight line on your garment with chalk/soap. Make sure the line doesn't cross any important structural or functional parts of your garment like darts or button holes: refer to the slashing diagram we saw earlier if you're not sure what spot to pick. Cut the line open (or unpick the seam if it's situated on a seam), and add in your extra fabric. Finish off your new seams so they don't unravel later on, and you're done!
You can add straight strips of fabric for extra width or length, or you could use flared panels or even godets to make your item flair out.
Want to see this technique in action? Check out this video by Break n Remake:
youtube
Some ideas:
This Pinterest user cut a straight line down the front of a t-shirt and inserted a lace panel to add extra width in the front of the garment.
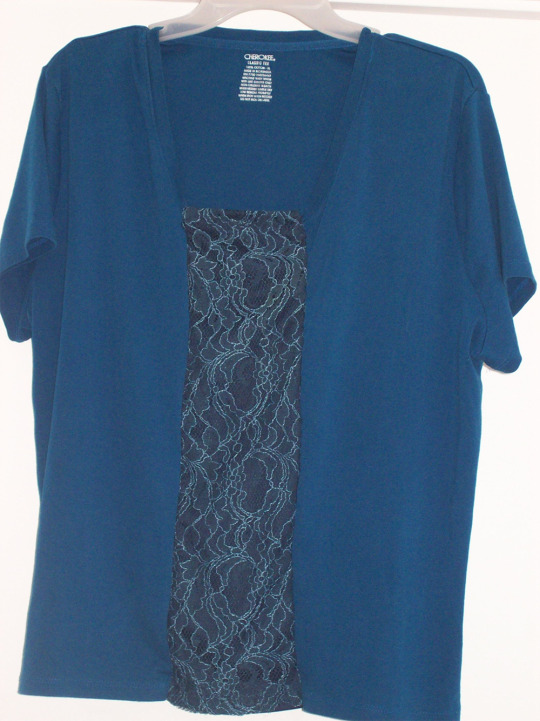
(Image source) [ID: a blue t-shirt with a panel of dark blue lace added in at the centre front.]
Busy Geemaw cut open the side seams of a shirt and used flared panels to add some extra width in the bust and hip area.
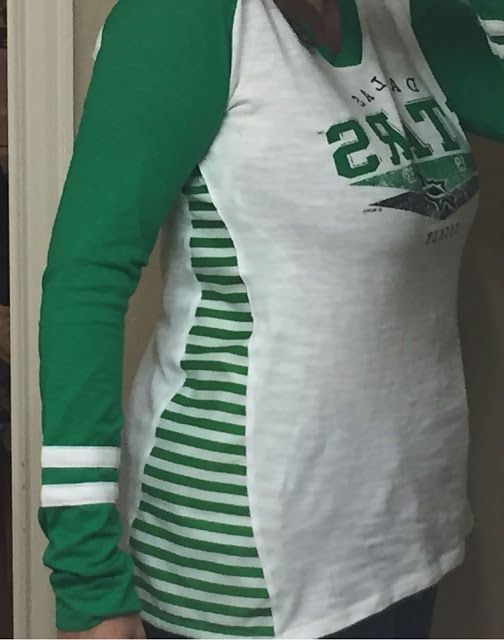
(Image source) [ID: a green and white long-sleeved shirt with a striped flared panel in matching colours inserted at the side seam.]
This person added a panel to the sides of a pair of jeans to give them more space in the hip area. You could easily use a long straight panel or a panel that flares at the bottom to resize the entire garment instead of just the hips, or use a wide piece of elastic for extra stretch.
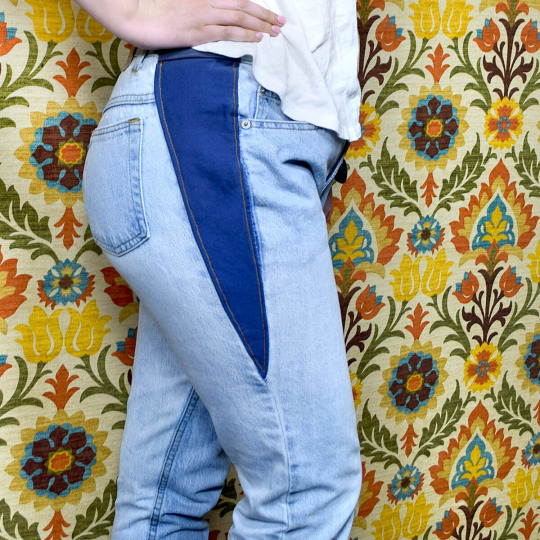
(Image source) [ID: a side view of a pair of light blue jeans with a dark blue wedge-shaped denim insert running down from the waist and ending above the knee.]
This person added a godet in the back of their shirt in order to get more space in the back.
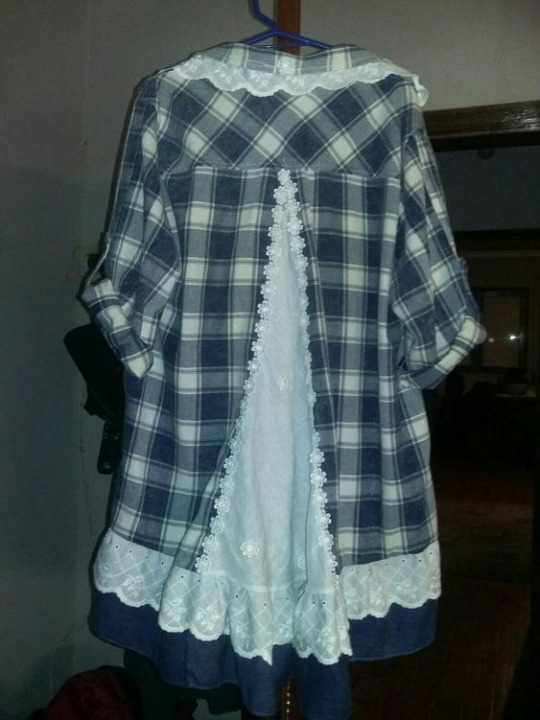
(Image source) [ID: a blue and white plaid shirt with a white lace godet inserted in the back.]
Blue Corduroy enlarged a pair of shorts by opening up the side seams and adding in strips of fabric.
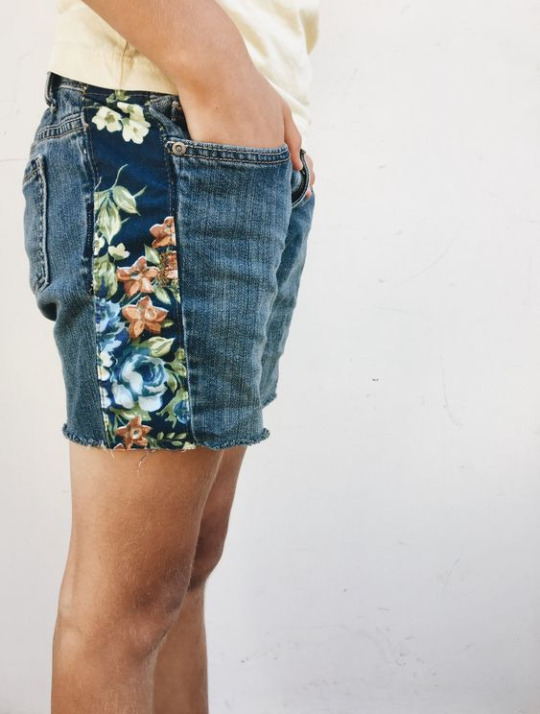
(Image source) [ID: blue denim shorts with a floral fabric insert at the side seams.]
You don't need to resize the entire garment if you don't want to. For example, One Brown Mom turned this ankle-length skirt with a too small waistband into a well-fitting knee-length skirt by taking advantage of the skirt's flared shape.
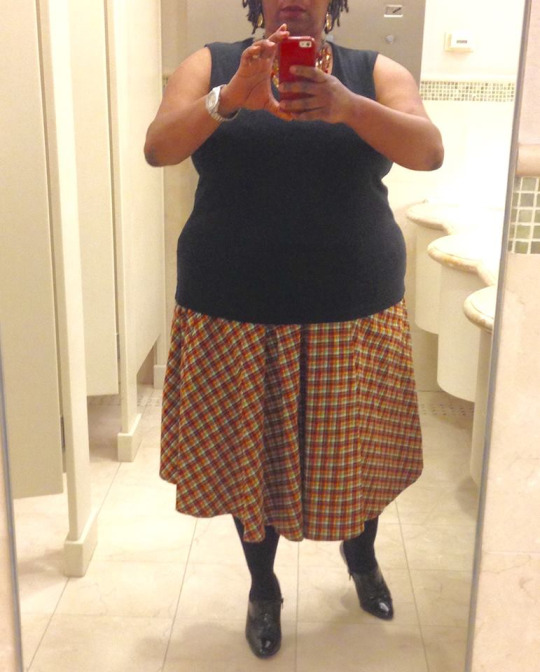
(Image source) [ID: a woman wearing a black shirt and a brown tartan knee-length skirt.]
Conclusion:
Throughout our lives, our weight will fluctuate and our bodies will change. There's no shame in this: it's just a fact of life. Therefore, knowing how to upsize an item that is too small for you is a useful skill to learn.
If you want more inspiration, check out these projects by Confessions of a Refashionista, One Brown Mom, and Thriftanista in the City.
47K notes
·
View notes
Text
Hey i’m a fashion design student so i have tons and tons of pdfs and docs with basic sewing techniques, pattern how-tos, and resources for fabric and trims. I’ve compiled it all into a shareable folder for anyone who wants to look into sewing and making their own clothing. I’ll be adding to this folder whenever i come across new resources
https://drive.google.com/drive/folders/16uhmMb8kE4P_vOSycr6XSa9zpmDijZSd?usp=sharing
89K notes
·
View notes