therecipes-includingcake
Including Cake Recipes
223 posts
Don't wanna be here? Send us removal request.
Last Seen Blogs

1stlvl8spring
Toxic Doomed Yuri

guilleandrade
Guille Andrade - BlockBlog

resolvedbrunette
dum spiro, spero

ghostfightimprov
Ghost Fight (Improv Team)

tabletopbellhop
Tabletop Bellhop
Text
My Rawgust Experience... and Raw Avo & Tomato 'Toast'
'Rawgust' is over and we are rolling swiftly into September!
I thought I'd take a moment on this sunny Sunday morning to reflect on a few thoughts of my 'raw food' experience. As I mentioned in my previous post I didn't maintain a 100% raw diet, it was more like 85% as my view was to see it as an exploration and open my mind to new recipes and ideas, rather than a restriction which I may have felt had I been super strict.
This decision to go 'high raw' rather than fully raw was partly based on the fact I had a few family commitments and events I knew I would be attending which would have made life difficult. I decided that a 'high raw diet' would allow me to appreciate most of the benefits and enable me to broaden my raw food repertoire without it feeling pressured or frustrated.
Overall I really enjoyed the month, initially I did miss big hot bowls of porridge (yes, I still eat porridge in the summertime!) and I really missed beans and lentils- such a staple in my everyday diet.
That being said, I really threw myself into creating some amazing salads and lots of raw dressings and dips to go with them. For me, a good dressing can turn any salad from average to amazing :-)
This is definitely something I'll be continuing, as I'd like to aim for at least 50% raw ongoing- basically, i'll be incorporating a smoothie and a big salad every day- pretty easy, right!
I'll post a recipe round up of loads of sauces, dressing and dips from my vegan community in a separate post- hopefully, there'll be lots to inspire you too!
My boyfriend, who took the challenge along with me- who also reminded me that it was his idea in the first place (credit where it's due!!) has, for the time being, decided to maintain a 75-80% raw diet, so we'll still be eating a lot of raw meals together.
My downfall (if anything) was eating too many Bliss Balls, ha ha. I often get carried away anyway when I make them, but during Rawgust I fell into the trap of having even more excuse to indulge.
Many people I know who eat raw, typically follow a high-fruit diet. This is something I have never felt really suits me. When I've experimented with an 801010 (80% carbs, 10% fat 10% protein) style diet in the past I ended up feeling incredibly bloated with the ratio of fruit. I feel I need to incorporate more fats. Maybe that was why one of my favourite meals last month was avocado and tomato on dehydrated flax crackers.
That said, my digestion was, for the most part, really great this last month, even though I have had some tough personal challenges to content with (stress usually impacts my bowels- sorry TMI!) My tummy felt flat and I have lost a little weight. Maybe that's down to the lack of legumes and/or grains... who knows? It will be interesting to see what happens as I add them back.
I'm also not convinced that a fully raw diet is particularly suited to our UK climate during the colder winter months. I know the idea of a nourishing warm meal really soothes me and the abundance root vegetables help ground me. I wouldn't want to forgo soups and stews indefinitely regardless of any nutritional science.
I know there are ways to create 'warmth' in the body whilst consuming raw foods by using ginger and other warming spices to 'fire up' the body, but nothing compares to a big bowl of soup in my opinion! :-)
I also query the environmental angle. I like the idea of aiming to eat more seasonally and locally, (although i'll make it clear I'm not perfect at this by any means), so feasting on tropical fruits shipped from far overseas during our cold winter months, doesn't quite sit right with me. I want to enjoy our abundance of winter vegetable roots and brassicas from the ground during this time.
One final point of interest... I was scanning through all my old health and wellness magazines, as part of my declutter ahead of moving house in a couple of weeks and I found various articles on Ayurveda. I am definitely a Vata Dosha and interestingly one of the things it advised 'Vata's' against was to consume raw foods... how interesting!
I have not looked deeply into the reasoning behind this (but now I am curious to know more), but it did remind me that there is never a 'one size fits all approach' when it comes to food, and that we all need to be intuitive eaters when it comes to what we feel our bodies need.
As an example, I would never directly advise others to eat animal products BUT I do appreciate that we each need to find out own way and tune into what really works for us away from societies expectation and the pressure from the media and those around us.
Most of all, I believe we need to become more curious, more self-aware, more confident and relaxed around food.
Short terms 'Detoxes' and Challenges' (such as Rawgust) create the perfect opportunity for shaking things up, trying new things, re-setting our bodies systems, checking in with any symptoms that might be showing up and reflecting on what we really need deep down.
To break the pattern of the autopilot mode that so many of us function on day to day when it comes to food and lifestyle.
So on that note, I am going to leave you with the recipe for my favourite avocado and tomato salad on raw flax crackers.... ridiculously simple, and definitely one I'll keep on weekly repeat.
I'd love to continue this conversation...
Have you tried a raw diet? Maybe you loosely follow a raw-till-4 approach? Or something else... I'd love to hear your own thoughts, experiences and results.
Recipe: Raw Avo & Tomato 'Toast'
Ingredients:
1 avocado
A large handful of cherry tomatoes
Dehydrated flax crackers (quantity to suit appetite!)
Fresh basil
Salt and pepper
Sprinkle of nutritional yeast (optional)
Salad leaves (optional)
Flax Cracker Ingredients:
1 1/2 cup ground flaxseeds
1 cup sunflower seeds, soaked overnight
1 cup walnuts, soaked overnight
1 stick of celery, roughly chopped
1 red onion, roughly chopped
1/2 cup sun-dried tomatoes in oil (including the oil)
1 tsp Himalayan salt
1-2 tsp mixed dried herbs (or other herbs/spices to suit)
a few tbs water to create the right consistency (add gradually)
Method for the flax crackers:
Blitz all ingredients together in a food processor, until thick and sticky, adding a little water add needed (I used approx 1/3 of a cup)
Spread the mix to a 0.5 cm thickness over teflex dehydrator sheets.
Dehydrate at 45C for approx 10 hours, turn over and place onto mesh sheets and return to the dehydrator for another 4 hours.
Cut into any desired slices. Can be stored in an airtight container for up to two weeks.
Method for the avo 'toast':
There is no real method.... just assemble everything on top of the crackers!
You can slice your flax bread/crackers into larger 'bread style' squares but because I make mine in a large batch I had pre-cut them into small squares for versatility. Either is fine.
NOTE: I originally made a version of this style of raw bread/cracker HERE. At that time I also tried a second batch and spread it out on a lined baking sheet at 'baked' it for approximately two hours on my lowest oven temperature (approx. 80ºC). I covered it loosely with foil after 1 hour to ensure the most even cook. It worked well so it's an option to try if you don't have access to a dehydrator.
1 note
·
View note
Text
My #Rawgust experience, top 'raw' meal ideas & raw banana bread recipe!
It's coming up to the end of the month. The end of August.... and therefore the end of #Rawgust
I didn't announce it directly on my blog (kept that to social media) but I made the decision on the last day of their life to give Raugust a go - that's raw vegan for the month of August. My boyfriend was also up for playing along which helped!
I felt very unprepared and aware that it may not run perfectly or smoothly but that's ok. It was the spontaneity that spoke to me in the moment when I saw a post by the Ethcs crew that I really resonated with.
Having spent time at Raw Fest on the last weekend of July, and more recently exploring the connection between a plant-based diet and our innate sense of creativity for my forthcoming book, I am learning that a raw vegan diet has the potential to bring you even closer to that connection with self, with source, with nature.
My good friend Rhiannon Van Der Griffin recently shared her raw journey with me a part of my book research and I was inspired more than ever to try it for myself.
In moments like this I come back to this quote by Matt Cutts. It's simply about getting curious to explore what becoming the very best version of you could look like. For 30 days.
So how did the month play out for me?
Well, I admit I wasn't perfect. I wasn't 100% raw. Probably about 85% in reality.
One of the biggest reasons for wanting to do it, was to increase my repertoire of raw meal ideas for the future, and that I did for sure. In particular, raw sauces, dips and dressings for salads can REALLY make a salad.... it doesn't often matter what veggies you have in the bowl if you have an incredible sauce to smoother them in, right? ;-) Make enough for the week and you have easy meals lunches you can make in moments.
I am going to put together a separate post sharing a big roundup of raw recipes from a vegan community I am part of, but for now I'd like to share a few of my favourite discoveries and tips.
I'd also love to hear about your own 'raw' adventures...
Whether that might simply be incorporating a green smoothie each day, or a raw lunch Monday to Friday, or more raw snacks. It's not about hitting 100% perfect, what works for you?
Have you felt any benefits going more 'raw'? Or what are you currently struggling with?
My favourite things to make...
Raw sauces etc (as noted above) - make a weeks worth.
Deyhdrated flax crackers which are great as a snack in the go, as cracker as a 'bread substitute' and also as croutons in a salad when sliced into tiny squares- recipe here
Bliss Balls are also an obvious go-to, BUT I did have a tendency to eat a lot of them and then be too full for a massive salad- ooops!
Courgetti- spiralised courrgette and carrot for a fun pretty bowl. Also great with the chunky bolognaise- see pic above - recipe to come.
Smoothies of all kinds - green, berry or banana and raw cacao for a chocolate hit!
Overnight oats - this one is a little contentious as to whether it's actually raw, since rolled porridge oats are technically heated in the rolling process. But this was often nice to wake up to instead of smoothie or fruit bowl in the morning, or as lunch on the go.
Mushroom curry - so easy and so good (see pic above) based on this recipe using cashews.
Lettuce wraps with a peanut satay dipping sauce (technical the peanut butter component wasn't raw) note: gem lettuce leaves work best- those in the picture were from my veggie patch.
Still a few more days of #Rawgust to go, so I will see what creations catch my eye- I will be back with more raw recipes here soon!
For now, I'll leave you with this recipe for a raw banana bread... I totally made this up as I went along, but it worked so well as a spin-off on a bliss ball style creation.
Recipe: Raw Banana Bread Slice
Ingredients:
2 bananas
2 tbs flax seed
1 cup dates
1-2 tsp cinnamon (to taste)
1/2 cup oats
1/2 cup nuts- chopped (I used macadamias*)
1/2 cup nuts- ground (I used pecans*)
pinch salt
* I loved the flavour and texture of the chunky macadamia pieces, but I imagine cashews or almond would also work well. Any ground nut could be used.
Method:
Blend the banana with the flax, cinnamon and dates until smooth. Add all remaining ingredients and mix well to form a stiff slightly sticky 'dough'. (I pulsed the mix together in a food processor but you could do it by hand).
Form into a log on a liner and chill for at least an hour to firm up. Once firm slice into pieces and serve. Store in the fridge for up to a week. This freezes well too.
NOTE: It makes about three times the amount shown, but I gifted most of it to my boyfriend before I had a chance to shoot it ;-)
0 notes
Text
Veggie pesto pine nut squares
This veggie pesto bake is a wonderful summer recipe, especially using fresh basil from the garden!
I wanted to make this recipe for my family at the weekend. I found the photos in my archives from when I first shot the recipe last year for realfoodsource using their new ingredient range, but I couldn't find the actual recipe anywhere!
I have made variations on it - these sweet potato rostis in particular, so I knew the rough idea. I figured I'd have to wing it and hope for the best.... it turned out really well!
Instead of making it as squares as per the original photos, I cooked it in a square oven dish and served it up hot with a huge salad. The squares are still amazing though.
This is best made with spiralized veggies for a pretty ‘curly whirly’ effect but you could use a julienne peeler or a coarse grater. I used a mix of carrot, courgette and a little onion but you could use fewer or different ingredients such a sweet potato or parsnip if you prefer. You could also bake this mix into pre-portioned muffin cups.
To save time I used bought free-from pesto in a jar, but you could make your own, or use hummus with herbs added to it.
Recipe: Veggie pesto pine nut squares
Makes approx 12 squares (a brownie sized pan)
Ingredients:
3 cups spiralized vegetables (I courgette, 2 medium carrots and 1 red onion)
¼ cup almond or cashew paste (optional)
1/2 cup vegan pesto (or regular pesto or hummus and fresh basil)
approx. ½ tsp salt (this may depend on the pesto etc used)
approx. 3 tbs water
A handful of extra fresh basil, roughly chopped
1 cup chickpea (gram) flour
¼ cup pine nuts (up to ½ cup more if preferred)
Method:
Spiralize or julienne the veggies, chop a little to avoid very long ribbons. Set aside.
Mix together the wet ingredients and add to the coat the veggies (taste test and add salt and pepper as desired). Add the gram flour last and mix to coat well. Add an extra splash of water if the mix doesn’t appear quite wet enough to coat evenly. Mix through the pine nuts now or set aside to press into the top if preferred.
Press the mix firmly into a lightly greased brownie sized tin- the mix should be approx 2cm thick. Smooth the top and press in the pine nuts. Bake at 180C for approx 25-30 mins until golden. Serve hot or allow to cool and cut into squares- great for lunchboxes or picnics when served cold. Will keep in the fridge for a couple of days.
0 notes
Text
Picnics... the plant-based way!
Schools out...and so is the sunshine, er kinda...
The sun might have hidden the last few days where I am but excusing the little blip in the weather (I hope) it has been HOT HOT HOT as of late... and that means one thing, dining al fresco!
Even though the sun isn't out much today, I still sat outside to eat my lunch and that's when it occurred to me to write a picnic post for the holidays, so here you go!
It's funny really as sometimes blog posts take a while to come to fruition... beginning as a thought that might sit in my 'drafts' or 'to try' folders on Evernote for months. Yet sometimes they literally spring forth in a matter of minutes. Being the messy creative type you could probably guess that I don't have a lot of structure going on behind the scenes when it comes to blogging, it;s kind of whatever my head throws up in any given moment... hmmm, yeah I should probably get onto that ;-/
I was also sitting and dreaming about my retreat and all the food i'd love cook up- simple yet tantalising dishes that everyone (including kids and picky eaters) would enjoy and most importantly be able to recreate back home! This seemed to lend itself nicely to the picnic philosophy, so here's a little round up of ideas to get you going... if you make any off them please take a pic and tag me on Facebook or Instagram as it always bring a super shiny smile to my face!
The lunch I happened to be sitting and eating earlier was this one... a spin on my classic 'chickpea cauli quiche' (featured in the round up) and because it was a little different (with broccoli subbing some of the cauli) I figured it was deserving of a full recipe post of it's own.
Recipe: Cauli-Brocolli Mini Quiche
Makes 4 mini quiches
Ingredients:
½ heaped cup finely processed broccoli (approx. 4 florets or stalk)
½ heaped cup finely processed cauliflower (approx. 4 florests or stalk)
1 cup chickpea flour
1 tbs flax
½ tsp salt
3 cloves crushed garlic
1 heaped tsp dried mixed herbs
1 scant tsp baking powder
½ cup water (plus 1-3 tbs extra if needed)
½ a red onion- chopped
½ a courgette sliced into thin half moons or quarters
Method:
Add all ingredients to a food processor other than the water, red onion and courgette. process until the cauliflower and broccoli are a rice-like consistency (it should be a bit pasty due to the chickpea flower.
Tip the sticky mix into a medium mixing bowl and add the chopped onion (courgette can be added now or at the end end). Add the water and mix through well until the mixture is very thick but easily spoonable and the top can be smoothed, add a little extra water if needed but not so that the batter is runny.
Spoon the mix into large muffin cups (or an 8" tin) I use silicone muffin cups/tin, but you could also use a metal one with removable bottom or line the cups to ensure easy removal.
Press the mixture firmly into the cups and smooth the tops, press the courgette into the tops. Bake at 180C for approx. 20 mins for muffins (longer for a single large quiche) until the tops are nice and a skewer comes out almost clean.
Serve either hot or cold. Perfect cold for picnics and because it freezes well it can also be made in advance.
Plant based picnic round up...
All the recipes are perfect for portioning, for serving cold and making in advance. Perfect for picnics ...or just whilst sitting on a blanket in the garden!
They appear a little randomly below as they are listed in chronological order in the summary window. P.s the cauli-cheese sauce makes the perfect dip alternative to hummus which is why I included it!
I'd love to hear your own picnic ideas too... let me know in the comments!
1 note
·
View note
Text
Summer Berry Crumble Bars
I made this oat crumble as a surprise 'bressert' for my boyfriend last weekend. His favourite fruit is rhubarb and I had a few stalks in the garden that I wanted to use up. I wanted a super healthy breakfast crumble that was indulgent enough for dessert (hence bressert).
I had planned for this to be enoigh to last us for breakfast ABD dessert late in the day.... but we ate it all for breakfast ;-)
I first made this oat crumble recipe for my 'Not Just For Goldilocks' book, so I won't share it in full right here, BUT I will share with you a great spin-off in the form of these bars. I made the bars in the photos below initially for Real Food Source last year and using the same principle as the crumble I made them again.
These bars are quite soft and cakey with a crisp top, which is how I love them. I used a combination of oats, ground almonds and tiger nut flour for the topping, but other flours in place of tiger nuts and almonds would also work.
They also have a great nutritional boost by way of chia seeds which are also used here to thicken and bind the base and fruit layer.
These are perfect served hot with some vegan for a little indulgence or with a dollop of plain vegan yoghurt for a breakfast option.
Recipe: Summer Berry Crumble Bars
Makes approx 12 squares
Ingredients:
Crumble:
1 ½ cup oats
1/2 cup ground almonds
1 cup tiger nut flour (or other flour such as wholemeal, spelt or a gluten-free blend)
½ cup coconut oil– melted
approx. 2 tbs coconut syrup (to taste)
2 tbs chia seeds and 3 tbs warm water (mixed to gel)
Berry Layer:
1 heaped cup stewed fruit (I used a combination of apple, rhubarb and raspberries)*
approx. 1 tbs maple syrup
2 tbs chia seeds
½ cup rough chopped nuts of choice for topping (optional)
*I used approx 2 small/medium apples, 2 medium stalks or rhubarb and a large handful of raspberries (I didn't measure precisely but it equated to a good cup of fruit once cooked down)
Method:
Mix the oats, ground almond and tiger nut flour dried with the melted coconut oil and syrup. Set aside approx. 1/4 of this mixture for the topping (or more for a thicker topping).
To the remaining mix, add the chia ‘gel’ to help bind. Press the crumble mix firmly into an 8” square pan- it should be approx 1cm deep. Bake for approx 15 minutes at 180C until just golden.
Meahwhile stew the fruit in a saucepan, adding a little syrup to taste as the rhubarb and raspberries are tart. No extra liquid is required as the fruit will release it's own. Add the chia seeds during the last few minutes to help thicken.
Remove the base crumble from the oven and spread the fruit layer evenly over the top. Add the reserved crumble mix, plus extra chunky nuts if desired.
Bake for another 5 minutes or so until the topping is golden and the fruit bubbling.
Serve hot or cool (note: the bars slice better when cool)
#bressert#breakfast#baked desserts#gluten free#berries#oats#crumble#bars#slices#rhubarb#apple#chia#tiger nut#summer
1 note
·
View note
Text
Chocolate Crispy Cake 'Bliss Bars'
So here's a super simple recipe that I first made a month or two ago and I think I have now made at least 4 times since! It's a great one to make with or for kids too.
They are soooooo moreish it's unreal.... a soft and chewy 'bliss ball' texture with loads of crispy flakes mixed through.
The added bonus with the high proportion of flakes mixed in is that it helps lighten up an otherwise dense snack... that's the only problem with bliss balls/energy balls- they are very dense for their size and if like me you have a tendency to 'eat with your eyes' - it's very easy to overdo it!
Guilty admission- as I sit here writing this post, I have a box of these bites beside to take on a road trip with a friend this afternoon, BUT I have already munched through the about four of them! Oooops.... ;-)
This most recent batch I made had protein powder added instead of the coconut flakes. This really helps bump up the protein count, if that's your thing for for it. One tip- I found they flavour was so much better the following day- on day 1 I could slightly taste the protein powder but by the second day onwards it had pretty much disappeared as the flavours had time to meld.
You can use any type of crispy flaked cereal you like, but for extra nutritional value I used these amaranth, quinoa and buckwheat cornflakes by RealFoodSource (amaranth is shown in the photos here)
You can press the mix into a square pan and cut into squares/bars or roll into balls, both work great. They freeze well too, and can even be munch o straight from the feeezer (mind your teeth- you may prefer to defrost a little!)
Add any 'mix-ins' you fancy, some other dried fruits, nutty chunks or an extract such as peppermint, orange or almond always go down well. If using an extract- about 1/2 tsp should do mixed in at the start, with other ingredients pulse through at theed for a chunky texture.
Recipe: Chocolate Crispy Cake 'Bliss Bars'
Ingredients:
2 cups chopped dates
1/2 cup cocoa (or raw cacao)
1/4 cup ground flax (optional but I like the hidden nutritional boost)
1/2 cup ground almonds (or any ground nut)*
a pinch of salt
1 cup flakes cereal
handful chocolate chips or cacoa nibs- optional for extra crunch and chocolateyness
* for the protein version I swapped the ground nuts for defatted almond protein powder- you favorite neutral protein blend would also work here.
Method:
Place the dates, cocoa, flax, nuts and salt in a food processor. process until you have a soft-ish, sticky and clumpy mix- you will likely need to add 2-3 tbs water to create the right consistency.
Add the cereal flakes and choc chips (if using) and pulse through to mix in evenly.
Press firmly into a tin or roll into balls, Chill for an hour until firm.
Will keep for a week or two in the fridge or you can freeze them.
0 notes
Text
Blueberry & Banana High Protein Pancakes
I feel like it's been forever and a day since I've posted loads of food recipes! Once upon a time back in the early days) I was posting three or four times per week, but that's when I had nothing else to do alongside ;-)
Recently I've been spending a lot more time doing my own inner work which is my track of to becoming a better person and coach. I've also been doing a lot of brainstorming- figuring out how to make my mark on this world and how best to make a difference in your lives. With the news of Scott's passing a few weeks ago it made me think more deeply about how I show up and the actions I take.
On another lighter and altogether delicious note, if you've been keeping up with me on Facebook page you'll know I have been busy creating recipes for a 'porridge' e-book to be ready for you very very shortly. Sign up to my newsletter for a special launch offer coming in the next couple of weeks!
In the meantime it's the weekend and so I reckon pancakes should be on the agenda. It's been a while!
Mmmmm pancake brunch!
These ones are super duper simple and also super duper high protein- all natural protein by way of the chickpea flour, chia seed and a little nut butter.
I love the flavour of these, although if you are not such a fan of chickpea flour you might want to sub half with ground oats or another grain for a neutral flavour. I have used banana and frozen blueberries, but for for an autumnal twist why not try stewed apple or pear.
If the hot sun comes out as it has done most days this week, I may well whip up another batch and sit out in the garden. Indian summer bliss!
Recipe: chickpea flour pancakes
Serves 1 (3 small pancakes)
Ingredients:
½ cup chickpea flour (aka gram or garbanzo flour)
2 tsp chia seed (or flax)
¼ tsp baking soda
1 heaped tsp coconut sugar
½ tsp cinnamon
½ cup water
1 tbs peanut or almond nut butter
toppings of choice- I used mashed banana, blueberries and soy yoghurt
Method:
Mix/mash all ingredients together until you have a thick but spoonable/runny batter. Ideally, allow to stand for 2-3 minutes to thicken a little more whilst you prepare your toppings.
Dollop into three equal sized pancakes into a large oiled frying pan. Cook for 2 minutes then flip and cook for another minute or so until both sides are golden.
Layer up with mashed or sliced banana and blueberries (or fruity filling of choice!) and a little non dairy yoghurt for extra messyness ;-)
Serve immediately.
1 note
·
View note
Text
Easy raw chocolate brownies
Guess what... it's national chocolate week! Time for a little celebration with a new recipe I think!
I wanted to give you an indulgent chocolatey classic, yet something easy to whip up in minutes.
I have just the thing. Actually it's a spin on these chocolate balls which are always a winner with people whenever I make them and so a pressed a sliced version was a nice alternative. For some reasons changing the format of things always makes them taste different! I always remember when I was younger how much more I loved Maltersers in the cardboard box compared to in the regular packets! (anyone agree or am I just a weirdo!!)
You could add walnuts here for an even more authentic brownie if you fancy. I dusted the top with a raw cacao and coconut sugar blend.
Eve though they are not baked, these slices have a beautiful cake like quality to them, deeply rich, slightly crumbly and melt in the mouth. Keep them in the fridge and they'll stay more robust. They also freeze very well too not that they'll be around for long enough!
Recipe: Easy raw chocolate brownies
Ingredients:
Makes approx. 12 slices
Ingredients:
3/4 cup ground almonds
1 cup almond or cashew butter
2 tablespoon coconut syrup
12 pitted dates( based on deglet noor dates but if using larger medjool dates reduce to 7 dates)
1/2 teaspoon ground cinnamon
1/4 tsp salt
1/4 cup raw cacoa powder (plus extra raw cacao to dust- optional)
1/2 cup roughly chopped walnuts (optional)
Method:
Soak the dates in hot water for 5 mins and then drain. In a food processor, process all the truffle ingredients together to form a thick paste, it should be sticky but not to sticky to handle. Add the walnuts to the mix last and stir through by hand (or a couple of pulses) so they don[t break up too much.
Press the mix firmly into a lined 8" square pan. Dust the top with cacao if desired. Chill until firm before slicing. Keep in the fridge.
1 note
·
View note
Text
Halloween Chocolate Tiffin!
I originally made this Chocolate tiffin recipe in the run up to Christmas last year and I've recreated a Halloween themed version for Real Food Source using many of their ingredients.
It was a winning recipe back then and now it's gone even healthier with a green frosting in place of the dark chocolate topping. I put this question out on my Instagram page and on Facebook…
What makes it so green?
I had a few guesses and the answer is… Wheatgrass powder! I blended it with coconut oil to get the firmer texture once chilled and cashew butter for a creamy richness plus a little coconut syrup and vanilla bean for sweetness and flavour. You can't taste the wheatgrass once it's slathered over this beautiful chocolate base, I promise! You could probably use any greens powder such of spirulina or chlorella if you have those instead of wheatgrass, but I haven't tested those.
It's a no-bake recipe and that's always a winner, it's perfect for making with children too!
Head over to Real Rood Source to find the full recipe here!
0 notes
Text
No-Bake Choc Berry Beet Balls!
I am in love with beetroot power! Aside from the fact it looks super cool with it's bright red colour, it imparts a sweetness to recipes and well as a nutritional boost. Beetroot juice is known to be great for our blood, athletes love it as a pre-work out.
In relation to other so called 'superfoods' beetroot power is actually pretty economically priced, another winner in my view. I mix it into smoothies and porridge but here I have used it as a coating for these chocolate berry balls (you could make other flavours such as choc orange).
I thought they were quite halloweeny or even Christmassy... even though I am trying to resist thinking about Christmas- I imagine they would look awesome in a bowl alongside some spiralling covered chocolate balls! ha ha
What are you plans for Halloween... will you be celebrating?
Recipe: Choc Berry Beet Balls
Makes approx 15 balls
Ingredients:
1 cup packed dates
½ cup dried cranberries or cherries
1 cup cashews or almonds
¼ cup cocoa
¼ cup beet powder (plus extra to coat)
½ tsp cherry extract (or sub for orange extract is that’s more your thing)
Method:
Blend all ingredients together in food processor until you have a slightly sticky well blended mix.
Roll into walnut sized balls with your and dust in the beet powder. Allow to chill in the fridge to firm.
0 notes
Text
Best ever festive nut roast!
This will probably be my last recipe post before Christmas day... so I figured I'd better make it a good one AND I figured a savoury recipe might just be in order!
For those of you with a sweet tooth...don't worry, I've added links to two of my favourite festive treats too.... scroll down for those!
I had an epic baking session in the kitchen yesterday.... four big nut roasts, two big batches of bliss balls and two big trays of chocolate-orange-raspberry brownie cake. That should set me up for the next week, though they weren't all for me somewhere private orders for others ;-)
The photos of the nut roast are not the best ever since they were fresh out of the oven and I couldn't slice into them as they needed to be kept whole for the big day itself, however the recipe is very similar in texture to my previous nut roast recipe and so I have shown sliced photos of that one below so you get the full idea!
What's different about this nut roast?
What's the secret ingredients?
.... well, sun dried tomatoes are the answer!
On my recent wellness retreat I made 'meatballs' that used mushrooms, sunflower seeds and sun-dried tomatoes and they tasted incredible- I'll try and post the recipe soon but I need good photos! The sun-dried tomatoes create an amazing richness to a meatball/nut roast style recipe, and so in creating this nut roast I tweaked my previous recipe that I still love so much to add in the tomatoes as well as a few different herbs.
One of things I love about this recipe, as well as its previous incarnation was that it's not too heavy on the nuts- a lovely combination of nuts and beans and oats (oat make a great wheat free alternative to breadcrumbs).
I found an idea for a glaze by Angela at Oh She Glows, and so I tweaked that and added it to the top half of my loaves too for variety.
I have made this as a loaf tin and also in deep cake pans, as shown here, that I plan to cut into wedges to serve. Always nice to change things up a bit!
Do the double bake! As per my original recipe one of the ways I like to serve this is to bake a few days in advance, freeze, then defrost for an hour or so on Christmas morning just enough to slice neatly and then arrange the individual slices on a baking sheet and 'double bake' for super crispy edges and to heat though. Amazingly time-saving on Christmas morning!
A good nut roast would not be complete without gravy… This is my favourite mushroom gravy recipe and the one I'll be serving up on Christmas day. Even mushroom haters will like it (I used to be a mushroom hater myself!) It looks a bit grey in the photos on the link but it's not so much in real life ;-)
Recipe: Christmas Nut Roast
Makes 1 loaf or a 8" cake pan
Ingredients:
1 cup chopped nuts/seeds (I used a mix of almonds, walnuts and sunflower seeds)
1 tbs olive oil (if sun-dried tomatoes are not in oil)
One onion diced
Three garlic clove minced
1 large carrot grated
1 medium parsnip
1 cup cooked white beans
1/2 cup sundried tomatoes (approx 6)
1 cup dry porridge oats
2 heaped tbs flax (or chia, tapioca or potato flour)
small handful fresh parsley
small handful fresh oregano
1 tsp dried mixed Italian herbs
2 tbs tamari soy sauce
Salt and pepper to taste
Up to ¼ cup vegetable stock if needed (I never need it as it's moist enough)
Method:
Pre-heat oven to 180C. Coarsely grind any nuts/seeds and set aside. if you are using sun-dried tomatoes not in oil add them here also (if soft in oil add with veg)
Sauté vegetables in olive oil for 5 mins until soft- add sun-dried tomatoes if in oil.
Mix all ingredients in large bowl adding sautéed vegetables to it. Mix and mash together well and add stock only if needed to achieve a sticky (but not wet) consistency. Add more oats if mixture is too wet.
Press mixture firmly into a greased and lined 20cm loaf pan or cake pan. Bake for approx. 45 mins until cooked through and golden on top. If adding the glazed brush this on generously 10 mins before the end of the cooking time I found it tended to burn of added at the beginning of the cooking time).
Let the loaf sit for 10 mins before turning out of the tin.
Recipe: Glaze:
Ingredients:
2 tbs tomato puree
1 tbs balsamic vinegar
2 tbs maple syrup
2 tbs apple puree (plain applesauce)
Method:
Mix all ingredient together and brush on top of the loaf with a pastry brush in a generous layer. I add the glaze towards the end of the bake time so seal it but so that it doesn't risk burning.
Easy sweet treat ideas roundup!
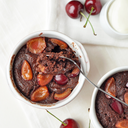
Since I have had a few full on chocolatey days at home in my kitchen, I thought it would only be fair to share a few recipes with you from ym archives- easy no fuss winners that are wheat free and refined sugar free too.
This forest fruit chocolate pudding-cake is a spin on my favourite brownie cake and perfect for a celebttipn- serve hot or cold with vegan cream or ice-cream. Winner! I made a version this year mixing the beside through the batter and then adding a sugar free jam glaze when it came out of the oven!
These choc-orage goji bites are one of my classic 'bliss ball' style recipes- seen here sliced into squares instead of rolled into balls. You can really make any variation- this year I made this recipe but istead of orange extract I added a generous helping of ground ginger, added a tiny bit of water to make the mix even more fudgey, rolled them into balls and then dusted in extra cacao. So good!
I'd love to hear what you'll be concocting in the kicthen for Christmas... if you make any of my recipes please tag me on social media (see links below) you have no idea how happy it makes me to see your pics!
Wishing you a totally magical Christmas season!
0 notes
Text
High protein pizza base... in minutes!
I never really worry much about getting protein on a vegan diet as my focus on real whole foods of maximum variety typically does that by default, but it is nice to know that it's easy to put together a high-protein meal when needed- particularly something like this pizza when the base itself gives a great protein boost and you can top it up with anything you like knowing that I've got a well balanced meal in the bag!
In addition it's always nice to have an answer to the question 'where do you get your protein?' and also offer a simple option for those who are looking for high-protein veggie-based meals.
oh and did I say... Pizza?
Yay, pizza :-)
The pizza base contains just three ingredients- quinoa, almonds and flax (plus any herbs if you wish to add them). Each ingredient is in itself a great source of protein, amongst other nutrients, Plus it couldn't be easier to make in minutes. Such a winner!
You can top the base with anything you like, I'm not a fan of fake vegan cheeses so I used home-made hummus mixed with tomato purée and then just any veggies I had to hand. This base also freezes beautifully as I have now done on multiple occasions since I first created the recipe. It makes for an amazingly speedy last minute dinner!
Recipe: High protein pizza base
Serves 2
Ingredients:
1 cup cooked quinoa
½ cup ground almonds
2 tbs flax
1-2 tsp mixed herbs (optional)
½ tsp salt
Pizza topping:
1 tbs tomato puree
2 tbs hummus
1 cup worth finely chopped veggies of choice- tomato, onion, bell pepper, courgette and sweeetcorn work well.
Method:
Process all ingredients together until you have a well blended slightly sticky dough. It should still be easy enough to handle and roll. I found it didn’t stick to my rolling pin at all but if this is a problem for you that’s the running pin with a little dry ‘flour’ of some kind- such as fine almond flour or protein powder. Attentively press out into pizza bases with your hands.
Once you have rolled the dough to approximately 3-4mm thick, bake at 180C for 10-15 minutes until sealed then flip over and bake for a further 10 minutes until just beginning to turn golden.
You can remove from the oven and allowed to cool and then freeze at this point or simply add all your pizza toppings and bake for 10 minutes until cooked and golden.
1 note
·
View note
Text
Portugal so far... plus chocolate recipe with a quirky ingredient!
Hello! I am at Merkaba in the mountains of Northern Portugal! If you follow me on Facebook or Instagram you will already know all about this! i decided to treat myself to a month long birthday present so deeper my own inner journey and spiritual growth.. you'll find more on all that over on the mindset blog.
I am here for the entire month of May (well just over 3.5 weeks) and am settling into community life. It is an incredible space... and the view is stunning! That said we did have ten full days of torrential rain- though luckily out of the other side of that now. Sunshine looks set for the rest of my stay! The rain was a great teacher and afforded me much thinking space.
I'm off to join the yoga class on the bus deck shortly (yes the deck next to a converted double decker bus!) and so will leave you with a quick recipe (and some extra food pics)!
One of the guys cooked up way to too much couscous so I tried tho think of as many ways to use it as possible.... these chocolate bars were a huge hit! You could use any grain really- I would typically go for quinoa as a more nutritious and gluten free option. Or how about millet of amaranth?
Recipe: Chocolate cous-cous snack bars
Ingredients;
2 cups cooked cous-cous (or other grain- see notes above)
1/3 cup peanut butter (crunchy is good for added texture)
1 cup chopped dates (with 1/4 cup hot water to partly soften them*)
1/4 cup melted coconut oil
1 cup soaked seeds (I used sunflower and pumpkin)
1/2 cup raw cacao powder
1/4 cup coconut sugar if needed- adjust to taste)
1/2 cup cocoa nibs (mixed through or press on top)
chocolate drizzle- optional (cacao coconut oil and coconut sugar)
Method:
Blend the peanut butter, coconut oil and soaked dates (I softened my dates simply the processor here is very basic).
Stir all remaining ingredients together then add the wet 'paste'. Stir/mash evenly to coat fully then press into a lined brownie sized tin. I added a little chocolate drizzle to decorate
Firm up in the fridge before slicing into squares.
Here is a little teaser to some other meals I've been enjoying here...
Al food is plant based and organic as far as possible. Much of it is also raw, so I've been trying out loads of raw nut and seed based sauces, I really want to share this one of mine with the gang soon! Also lots of decadently healthy raw desserts. For my first two weeks here Tracy from Raw Happy was here- she is a raw food chef and also amazing yoga teacher and cooked up some incredible meals and treats of us all.
1 note
·
View note
Text
Chocolate Biscuity Tiffin (p.s great Fathers Day gift!)
I made these treats a few week back and they were so incredibly good, but I didn't take photos! I made another batch (with a tweaked recipe) the following weekend! I used the excuse that they were a recipe test ahead of Fathers Day... but in all honesty it was just an excuse to eat more tiffin.. and take photos!
I suddenly realised Fathers Day was just a few days away... but these are so simply hopefull you still have time to make them. The only specialist ingredient is the almond flour, and you do need fine almond flour (not just ground almonds) as this is what creates the texture. I buy this flour from Real Food Source but other health shops should stock it (just make sure it isn't whole ground almonds as sometimes the wording on the pack can be misleading).
The tiffin biscuit chunks are actually not a new recipe as I have used them top top these strawberry shortcake parfaits and also this 5-minute fruit crumble... but I had never thought to cover them in chocolate! I highly recommend you try it as it is such a simple concept and so versatile.
The first batch was literally just the biscuity chunks and dried fruit covered in dark chocolate (and I forgot to photograph them properly). But then I wondered whether having a softer base surrounding the biscuit might be more authentic so I made a variation to incorporate this (shown just below). Both options were great! If you do the latter be careful not to make the base to soft as it might fall apart. I kept mine in the fridge so that it was firmer.
If you are pushed for time go for the first option! It literally takes about 10-15 mins.
Recipe: Chocolate Biscuity Tiffin Slices
Ingredients:
Biscuit chunks:
1/2 cup fine almond flour
2 tbs agave syrup (or syrup of choice)
1 tbs coconut oil (soft but not melted)
pinch of salt
a touch of water (approx 1tbs)
Plus:
approx. 1/2 cup dried berries - I used cherries, cranberries and sultanas
1/2 cup worth (approx 100g) dark chocolate (maybe less if you are just using it for a thin topping)
1 tbs coconut oil (this helps the pouring consistency of the melted chocolate)
Softer base (optional):
1/4 cup cashew or almond butter (could use peanut butter but would have a stronger flavour)
1/2 cup dates (soaked for a few mins and drained)
1/4 cup coconut oil- melted
1/4 cup cocoa powder
Method:
For the biscuit, combine all ingredients using your fingers (as if making pastry) to form small crumbs then grab fistfuls of the mix to bind together and break off small globs. Add a touch of water (if needed) to help it stick together a little better.
Lay the chunks evenly on a baking sheet and bake the for 5-6 minutes until they begin to go golden- note it wont take long at all so keep a close eye!
(Only if making the base) Meanwhile combine all the ingredients and blend in a food processor- you should have very thick smooth paste. Smooth this evenly into the bottom of a smallish cake tin (it should be approx 1xm thick). When the biscuit is cooked allow to cool a little and then press lightly into the base along with the dried fruit.
(If not making the base) place the biscuit chunks in the bootom of a smallish cake pan and mix the dried fruit in evenly. There mix should cover the pan generously with only small gaps - so use a smaller pan if needed (or double the recipe).
Pour the melted chocolate over the top in a thick even layer. Allow to set in the fridge before slicing and serving.
1 note
·
View note
Text
'Greens powder' FREE recipe book!
You may have seen over on my Facebook page that I've been experimenting with all things 'green' in the recipe department recently!
No it's not St Patrick's Day, it's because I've been developing recipes for Real Food Source using their Matcha powder and their Green Tea Blend. I created another free ebook to add to their ever growing collection showcasing a collection of recipes using their green tea blend... most of these are also interchangable with pure matcha tea, so if you are a matcha fan you have loads of inspiration ready for you too!
The best thing about the green tea blend is that it combines a variety of nutritionally rich green powders at a very cost effective price.
Here's a little sneak peak.... but you can follow this link to download your very own copy!
One of my favourite recipes in the collection is this green tea 'Nice Cream'...so quick (with a little pre-freezing required) and perfect to pep you up on a summer afternoon. It's also totally ok to serve this as breakfast.... a seriously healthy treat! Don't skip the nut butter as this creates a much creamier, richer result.
Recipe: Green Tea 'Nice' Cream
Serves 2
Ingredients:
2 bananas- chopped into chunks and pre-frozen
2 tsp of green tea blend (or matcha tea)
2-3 tbs cashew butter
Mulberry crumble (or other dried fruits, granola or choc chunks) sprinkled on top to serve.
Method:
Blend all ingredients together until smooth and totally smooth and creamy, it will be very thick when you spoon it in to bowls
Add toppings of choice... something with a little chew or crunch works well. (In the photos is this mulberry crumble)
0 notes
Text
Raw pomegranate and mint salad... with a pea dip!
I made this salad a few weeks back, took the photos... then promptly forgot about it!
Even just looking at it now makes me feel light and refreshed.... I've had a heavy few days with sweet recipe experiments so this is a welcome change. I'm even very tempted to pop to the shop and buy a pomegranate right now.
I used my favourite bean and pea dip as the 'sauce' but if you didn't want to whip that up (though it only take minutes, is very versatile and stores well in the fridge), you could try using simple hummus or guacamole.
To make it a little more substantial you could add some quinoa, cous-cous, tortilla wedges or some salad potatoes maybe.
It's a perfect quick light summer lunch as it is or double up the recipe to serve as a side dish at a BBQ maybe?
I still haven't perfected an un-mesy way to bash out the seeds from the pomegranate hence the messy dressed dish. Ha ha though I think it looks pretty ;-)
Recipe: Pomegranate salad
Serves 2
Ingredients:
1 large courgette
1 small red onion
1 cup bean and pea dip (using this recipe)
2-3 handfuls of watercress
handful fresh mint leaves- roughly chopped
seeds from 1 pomegranate
Method:
Spiralise the courgette (or use a julienne peeler) and slice the red onion very finely. Mix the courgette and onion with the dip to create a sauce.
Pile the a watercress to the serving plate and dollop the courgette mixture on top. Generously sprinkle the pomegranate seeds as garnish.
0 notes
Text
Green beans, radishes... and Soul Circus!
Last weekend I had the privileged of working at Soul Circus, as taken from their website...
"Let your body dance and your soul run free. Soul Circus is about shedding the constraints of your adult life and rediscovering the world through the eyes of your inner child. Fun. Fantastical. Free. We invite you to participate in a weekend of celebrating and rediscovering your true self."
After a week of beautiful weather, it rained almost all weekend. I'm not going to lie... it would have been amazing if we could have enjoyed sunshine, chilling out on the hay bales, soaking up the sun, sipping green juices, chatting, jamming, playing... but instead we spend most of it ducking under cover! The sun did make an appearance in Sunday and so we all made the most of that!
Luckily, all the yoga sessions were held under cover the paver of beautiful tents, and I went to as many sessions as I could... plus a sound bath (cos I love them!) and a pineal light therapy session. My favourite by far was the handstand yogis session led by these guys.
The attention to detail at this festival was incredible, maybe it's my years as an architect but I have an eye for that kind of thing and it did not go unappreciated. The bright colours of the ribbons and bunting brought such life, colour and beauty to the rainy greyness that prevailed.
On two evenings I helped out back of house in the kitchens, on the first night we prepared six course vegan dinner for 40 guests led by Jay Halford at The Core Cheltenham and then on the second evening I assisted a dinner for 12 VIP's in a makeshift back stage kitchen! Chris the chef, gifted me lots of lovely organic veg that was leftover... I received a bag of cobnuts, beautiful red and golden beets and a bunch of radishes and fresh herbs.
I have only even eaten radishes raw before and so I was intrigued to pan fry them. I had loads of green beans ready in the garden so this simply dish came together nice and easily.
If you haven't tried cooking radishes before, I highly recommend it... lovely mellow and almost buttery flavour. I used coconut oil but you could use an alternative favourite.
Recipe: Green beans and radishes
Ingredients:
2 handfuls green beans- ends trimmed and beans cut in half
1 small red onion (or 2 shallots)- sliced thinly
1 handful radishes- halved or quartered
2 tbs coconut oil
2 garlic clives- crushed
1 tsp mixed Italian herbs
small handful of fresh parsley or rosemary- chopped
red chilli pepper flakes to serve- optional
Method:
Boil the green beans for 5 mins.
Meanwhile prepare remaining ingredients and add to a large frying pan with the coconut oil.
Drain and add the green beans. Pan fry all together until the radishes are lightly golden. Add the fresh herbs and stir through to serve. Sprinkle a few red pepper flakes over the top if desired and add salt and pepper to taste.
P.s There is an early bird rate coming soon for next years Soul Circus festival... so keep an eye their website for more details.
0 notes