#this is from a blurry 720p twitter file
Photo


BIG DRAGON | Episode 7 | Preview
#big dragon#big dragon the series#mosbank#mos panuwat#isbanky#bank mondop#mangkornyai#bigdragonedit#thai bl#thai drama#bl drama#bl series#my edits.#this is from a blurry 720p twitter file#and i normally wouldn't gif this#but i won't be able to watch this ep until a few days later#and i'm 🥲🥲#look at them!#back in the pink bedroom 🥰#and whoever did mangkorn's tattoo did such a good job
807 notes
·
View notes
Text
how i make my gifs
making gifs this way will require you to have 4k video downloader (dl), photoshop, and vapoursynth (dl). i personally use photoshop cs5 (dl) but any other version of photoshop should work too.
1) downloading the video
i recommend using 4k video downloader to download videos from youtube since it lets you choose which quality your downloaded video will have. the better the quality of the video, the better the quality of your gif, so i usually try to aim for at least 720p, although 1080p and 4k are much better. also, you can download videos as .mkv this way, which is higher quality than .mp4. they also take up more space tho, so it’s up to you.
you can get 4k video downloader here. 4k video downloader also has a premium version but the free version lets you download 30 videos per day, so unless you for some reason want to download a ton of videos at once, the free version’s good enough. to download videos from sites that aren’t youtube, i recommend using this:
kpop ts files: 4sashi, twitter also works sometimes
twitter: savetweetvid
instagram: downloadgram
vlive: soshistagram
2) using vapoursynth

first, download and install vapoursynth from here. this tutorial uses the windows version but the mac os version probably works similarly. after that, drop your video on the batch file named “vapourscript (drop video file on me)”.

now, a command window should pop up. enter the timestamp where the section of the video you want gif starts and then the duration of the clip you want to gif, not the end timestamp. usually, 2 seconds will produce ca. 100 frames, which is more than enough. once you’ve entered everything, hit enter and the program will crop your clip for you.
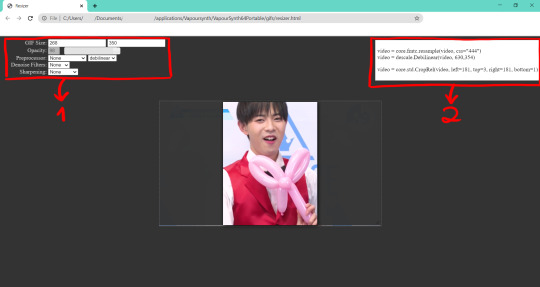
a browser window should open once your file is finished processing. this is called the resizer.
1) on the left, you can sharpen, denoise, resize, and process your gif, which will affect the code in 2. i usually set my preprocessor to qtgmc 60 slow, denoise on the lowest setting using knlm, and sharpening on finesharp's lowest setting. depending on how grainy or blurry your video is, you might want to adjust this.
2) this is the code you will enter into your vapoursynth script. whatever you set on 1 will appear here. copy the code once you’re done with setting everything up and copy it into your vapoursynth script.

your vapoursynth script should look something like this. just copy whatever you got from the resizer in the section marked as 1. if you want to preview your video, go to script > preview. you can also trim your clip to the exact frames you want here. below is a sample code with annotations, which you can just copy-paste into your vapoursynth editor like that:
import vapoursynth as vs
import havsfunc as haf
import muvsfunc as muvs
import mvsfunc as mvs
import descale as descale
import G41Fun as fun
core = vs.get_core()
core.max_cache_size = 1000
video = core.lsmas.LWLibavSource(source=r'video_cut\cut.mkv')
#Trim returns a clip with only the frames between the arguments first and last, or a clip of length frames, starting at first (a = first frame, b = last frame). Untag the line below before using it.
#video = core.std.Trim(video, a, b)
#Whatever you copied from the resizer goes below
video = core.fmtc.bitdepth(video, bits=8)
video.set_output()
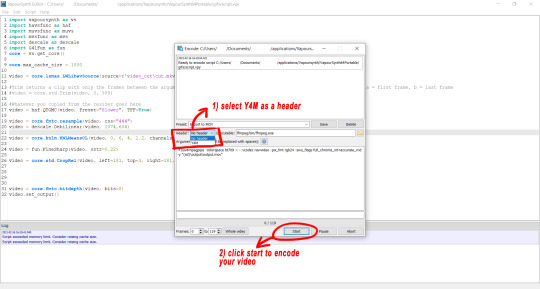
once you’re done with your script, go to script > encode video and select y4m as your header before clicking on start. your video will now be encoded. the finished file will be automatically saved as “output” and the file path will look roughly like this, depending on where you initially saved vapoursynth: vapoursynth > vapoursynth64portable > gifs > output.
you might want to copy the generated clip and save if somewhere else as once you run the script again, it will be overwritten again.
3) using photoshop
download photoshop from here and install it. to change the language from spanish to english, follow this tutorial. afterward, go to file > import > video frames to layers and open the file you just generated with vapoursynth.
i use the “animation frames” tool to make my gifs. if it’s not already opened on your version of photoshop, you can open it by going to window > animation.

also, vapoursynth will already have slowed the video for you but if you want it even slower/speed it up again, just press shift and select all frames in your animation timeline, then click on one of the little black arrows at the bottom of each frame and adjust the time from there.

then, to loop your gif infinitely, go into the bottom left corner and set your animation timeline to forever.
this next part depends on personal preference but they are the basic things i do to every single one of my gifs. they are 1) curves, 2) vibrance, and 3) selective color. vibrance and selective color are very straight forward to use: for vibrance, just move the slider to the left or right as you desire; for selective color, you can change the value and hue of every color in your gif as you desire by using the sliders.
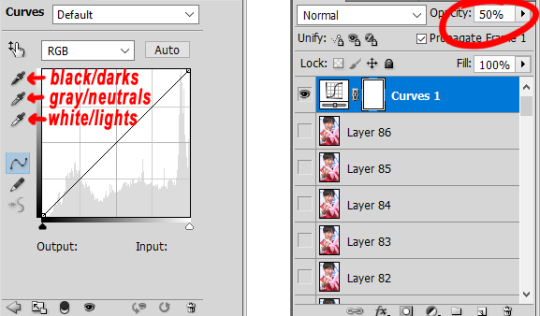
curves might require some explanations, though. first of all, curves will give you 3 pipettes to work with: black/darks, gray/neutrals, and white/lights. to use them, just click on them and then on a part of your frame in that color (e.g. click on the black pipette and then on a black spot on your frame). sometimes, curves make your gif look sort of harsh; if that is the case, just just select all of your frames while pressing shift and adjust the opacity of your curve accordingly.

here is a comparison for the same frame using no curves, curves at 100% opacity, and curves at 50% opacity. i also highlighted the spots in the frame that i used to create my curve.
4) save your gif
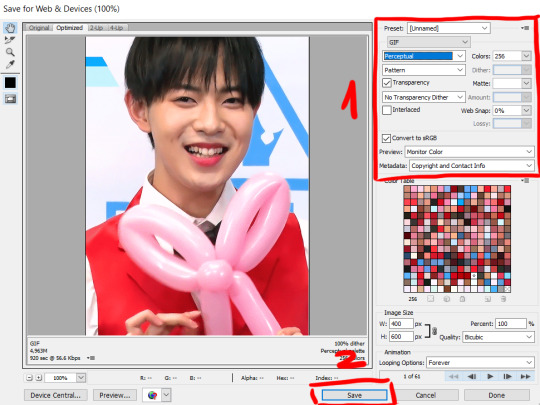
lastly, save your gif by going to file > save for web & devices. then, copy the settings in the area highlighted as 1. depending on your gif, you might switch from perceptual to adaptive to get a smoother look. i personally don’t recommend the other settings tho, as they tend to make gifs look grainy.
lastly, hit save and you’re done.
2 notes
·
View notes
Text
gif tutorial for anon!
hi everyone! an anon asked me about how i sharpen my gifs and i got a bit carried away in my answer so i decided to just turn it into a tutorial oop.
disclaimer: i’m still a beginner, so some of the stuff i do might be a bit weird! also, two of the “tricks” i use i did not come up with/figure out on my own, i linked to the posts of the original creator’s in the step.
so my settings do vary for each gif, but in this tutorial i just go through all the general steps i use for each gif i make, so hopefully it’s at least a bit helpful to someone!!! there’s a lot of images bc i’m a visual leaner so sorry if you’re not!!!🥺
for this tutorial you will need:
- photoshop + basic photoshop understanding.
- a way to download videos.
- patience with my ramblings.
- i think that’s it?
ok here we go!!! so.
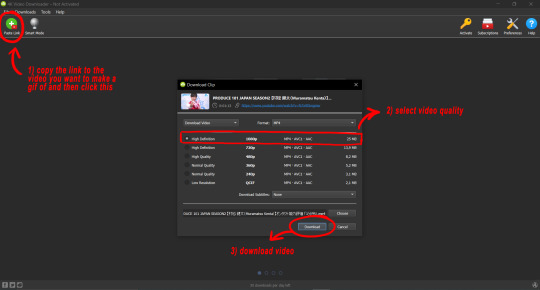
step one: the first thing you do is find the video you want to gif. i’m gonna do this one:

i use clipgrab to download videos of the youtube, which i downloaded for free from right here. i haven’t gotten a virus yet, so it seems safe. it works for youtube videos and instagram videos, but not twitter videos or vlives.
there’s also Y2Mate which is online and does the same thing, but i think for only youtube videos - i also can’t completely vouch for it because i’ve never used it, but i think it should work just fine! you can find it right here.
IMPORTANT - make sure that your video is as high quality as possible. you can either change that on youtube by clicking on the gear in the play bar (right next to cc box). usually videos are automatically set to 720p, which is pretty good, but i like to bump it up to 1080p when there’s the option to! note: clipgrab usually does this automatically for you, i’m not positive about Y2Mate and other online converters.
step two: copy the link into your converter. make sure that the quality is where you want it, then hit “grab this clip” or “convert” or whatever the prompt is and it will download onto your computer. save it wherever you want to that you’ll find it, i usually just save it to my desktop so that it’s right there for me.
step three (optional): i like to crop the video down and do a primary editing on imovie just so it’s easier to manage when making the gifs. this step isn’t necessary, but if you have imovie or another video editing app, i would suggest it!! (you can also slow down the video here if it’s too fast to make a good gif!)
here’s a before and after shot!

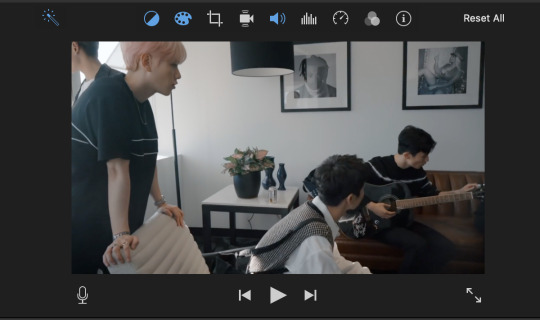
for me, i literally just click the “magic wand” or “auto-adjust” tool. but you can already see it makes a big difference!
so now i also use iMovie to crop down to the gifs i think i want to use. it makes things easier to be precise when using photoshop.
step three and a half: export your new mph. once again, make sure the quality and resolution is bumped up to your liking!

step four: so now it is time to use photoshop! open up a new document. you can set it to whatever dimensions you like, i typically prefer 500x281, but it doesn’t actually matter because it will automatically resize to the size of your video lol. anyways, once you have your canvas open, go to file -> import -> video frames to layers.
depending on if you have more than one gif in the movie file, you can either crop it down or just import the whole thing. since i have to gifs in this file, i’m going to crop it.

step five: okay, full credit to this life saving post for the next step!!!! i was stumped on how to edit all layers of a gif at once for quite a bit of time, which is why some of my earlier gifs are a much crustier looking. anyways, op explains it much better than i ever could, so i would suggest just reading their tutorial for this step!!!
step six: so now that you’ve combined all your gif layers into a smart object, it’s time to edit them!! the adjustments i typically mess around with are image -> adjustments. i almost always adjust the brightness/contrast, vibrance, hue/saturation, and selective color. i don’t have specific settings for these (sorry if that’s not helpful!) because it really does depend on each individual gif! sometimes my adjustments are drastically different for gifs from the same video!! i’m perfectly happy to help troubleshoot for specific issues if you need help, but it’s hard for me to give a blanket tutorial for this part :)
also remember to not whitewash poc when adjusting the settings. please don’t do this!!!! it’s also possible to correct whitewash w/photoshop, so just fool around on the settings until the subject’s skin tone is what it should be.
step seven: after adjusting your gif to your liking, now it’s time to actually sharpen. for steps 7 through 10, i use a trick from this amazing post to sharpen! so now that you’ve adjusted all your layers, do control/command click on the layer and choose duplicate layer. this will make a copy of the edited gif.
step eight: on the original layer, go to filter -> sharpen -> smart sharpen. once again, every gif is different so depending on the size and quality of your gif, the sharpen settings will be different. the larger the gif is, the more you can sharpen it, which is why i like to wait until the end to resize it!

step nine: on the copied layer go to filter -> blur -> gaussian blur. again, the amount of blur will depend on your gif. this step just smooths it out. don’t worry if it looks blurry, because it’s supposed to! after this, still on the copied layer, go to filter -> sharpers -> smart sharpen once more.

step ten: cool! now you’re going to lower the opacity of the copied layer! i usually put it at about 30 percent!
step eleven: go to file -> export -> safe for web (legacy). this is were the resizing goes! so for this particular gif, i didn’t have to crop it or anything. so the only think i do to resize it is make it 500x281. this size usually ensures it will be small enough to upload to tumblr, and it is a ratio of most standard sized videos so it works perfectly!!
and voila!

i’m so sorry if that was very long and/or hard to understand!!! please feel free to ask any clarifying questions!!
4 notes
·
View notes
Text
How Do I Make Gifs? - A Photoshop CC Giffing Tutorial
(for @elektrawwf, and anyone else interested in how I make gifs I guess, lol)
So, I feel like I should preface this by saying that I'm certainly no expert on this, nor am I a Professional Giffer™, but I’ve been making gifs for a few years now, and have developed a pretty standard system for doing so. Hopefully it works for you like it’s worked for me! :)
Basic Tutorial Steps:
Step 1 - Recording the scene you want to gif
Step 2 - Importing, deleting, and cropping your gif frames
Step 3 - Adding adjustment layers
Step 4 - Resizing your gif and setting the frame delay
Step 5 - Converting and sharpening your gif
Step 6 - Trimming and saving your gif
BONUS STEP - Adding text (OPTIONAL)
-
Programs Used/Needed:
- QuickTime Player
- Photoshop CC 2018
-
The finished gif that I’ll be making:
This tutorial is VERY screenshot-heavy, so the rest of it will be below the cut. Happy giffing!
STEP 1 - Recording the scene you want to gif.
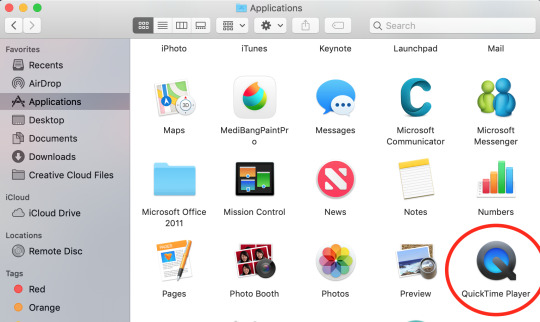
All gifs start as videos. I use the Screen Recording feature on QuickTime Player to create videos of whatever scenes I want to gif. If you have a Mac, you can find QuickTime in the Applications folder:
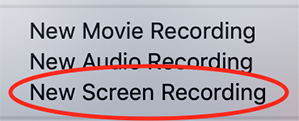
Right click, then select New Screen Recording.
You can then play the scene you want to gif on your computer, and your screen with the video on it will be recorded. Hit the stop button when you want to end the recording, and then save the video.
It’s best to not record more than a minute or two at a time - basically, just record the exact scene that you’re looking for - because the longer the video is, the harder it’ll be to select the portion of it that you need for giffing.
You can technically screen-record any type of video, but I (and most giffers) vastly prefer videos that are 1080p, which is the best kind of HD. That’s why I usually don’t gif things unless I can find them either on Netflix, Youtube (in HD) or the CW site (or NBC, CBS, whatever). There are definitely other (less legal) ways to get your hands on HD videos, but I’m just not super comfortable using those lol.
That being said, 720p videos are usually okay for smaller (268px-wide) gifs - they’re just less ideal (I wouldn’t really recommend using them to make 540px-wide gifs, but you can still technically do it).
STEP 2 - Importing, deleting, and cropping your gif frames.
Now that you have your video, you have to import it into Photoshop. Once you open Photoshop, you need to go to File > Import, then select Video Frames to Layers.
A window will pop up, where you can set the amount of frames that you want Photoshop to import, and select the exact section of the video that you want to import. Here are my settings:
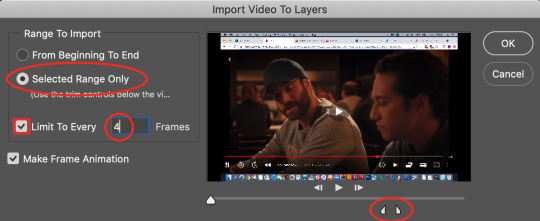
The two little toggles below the video are meant to be dragged around, and you use them to section out the specific Range of the video that you want to turn into a gif. Once you have all of this set up to your liking, hit OK.
-
NOTE: The selection of Limit To Every 4 Frames is more my personal preference than anything else. If you want Really Smooth Gifs, then you can uncheck that box and simply import every single frame in your Selected Range. This is what High Quality Giffers always say to do. Unfortunately, while those gifs do end up really smooth, they also end up being really short, which I don’t particularly like.
So basically, I’m personally willing to sacrifice some smoothness in favor of an increased gif length, but you do NOT have to do that if you don’t want to. Choose whichever option you like best - these Steps work no matter which one you do. (We’ll come back to this later though, once we get to setting the frame delay in Step 4).
-
Okay, back to the tutorial.
Once the scene is imported, you can delete any extraneous frames at the beginning and end of the frame animation Timeline, which can be found at the bottom of the screen.
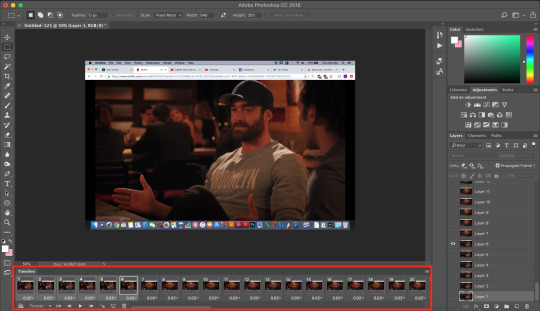
As you can see, I have the first 6 frames selected. Those are the ones I ended up deleting (among some others at the end of the Timeline).
You can also go to the Layers panel on the right, and delete the corresponding layers from there, once you’ve deleted the frames. This isn’t technically necessary, but it might help free up some computing space if you’re deleting a lot of frames.

Next, you need to click the Selection Tool in the top left corner of the screen. Then, set your selection preferences (circled below) as follows:

Style: Fixed Ratio
Width: 540
Height: 250
This is specifically the ratio to set for a 540 x 250px sized gif, which are the dimensions of the example gif I’m making. If you want to place two gifs beside each other in a gifset, each gif needs to be 268px wide. (The heights can be whatever you want them to be.)
Use the Selection Tool to select the area that you want to be your gif, and then go to Image > Crop.

STEP 3 - Adding adjustment layers.
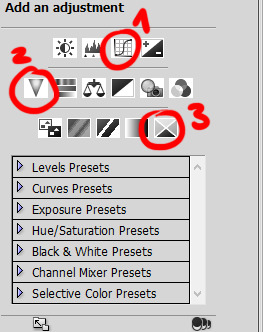
Now it’s time to make your gif look pretty™. For this part, you’ll be using the Adjustments panel above the Layers panel.
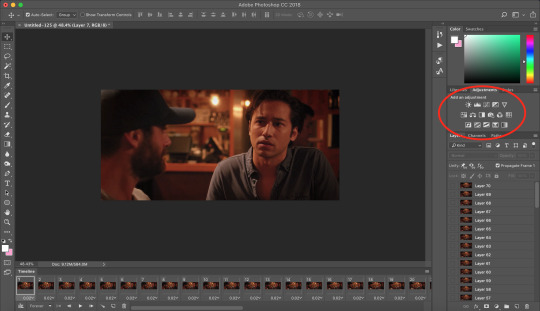
Adjustments will affect all the layers below it, so you want to make sure that your adjustment layers are placed above all of your gif layers.

These are the adjustment layers that I used for this specific gif, but they’re also just generally the same three adjustments that I use for every gif I make. (I also usually add a Hue/Saturation adjustment to my gifs, which I set to +15 Saturation, but since this scene was already so heavily saturated, it didn’t need it.)
Here are the specifications for the Brightness/Contrast and Levels adjustment layers:

Regarding the Curves adjustment layer (pictured below), if you click on the RGB dropdown menu, you can single out specific colors in order to color-correct the gif, which I did here (by removing a lot of extra reds and yellows).
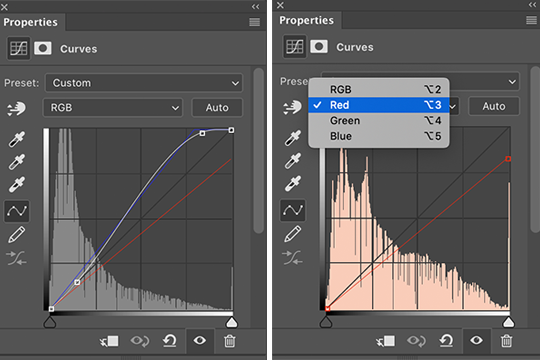
While these are good general adjustment examples, just take note that the values pictured here won’t be exactly the same for every gif, and you need to toggle and play around with them to make every new gif look its best.
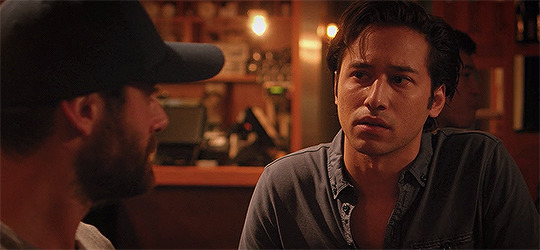
Here’s the example scene before any adjustments:
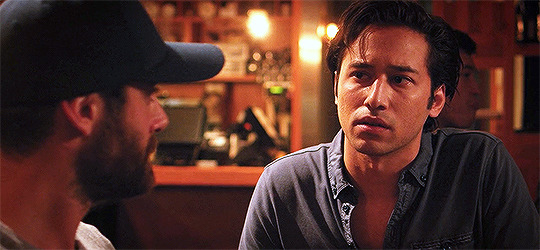
And here’s the scene after my adjustments:
STEP 4 - Resizing your gif and setting the frame delay.
To resize your gif, go to Image > Image Size, and then change the gif’s width (in this example, I change the gif’s width to 540px).
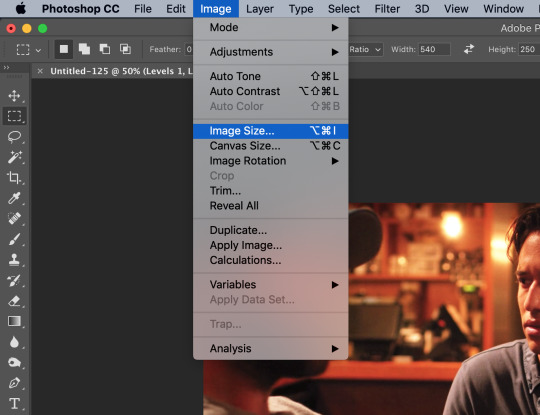

As long as Resample is checked the you’re working with Pixels, the gif should resize properly. Hit OK.
Next, to change the Frame Delay of the gif (basically how fast it goes), look for this button in the right corner of your Timeline, then click it and Select All Frames.

Once all the frames are selected, you can hit one of the little downward arrows next to the 0.02 values, and select Other.
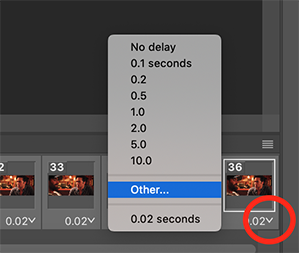
Now you can set your new frame delay. I always set my delay to 0.09 seconds, which produces gifs that are a bit slower than the Professional Gif Standard™. This is due to a combination of personal preference (I just like slower gifs) and an effort to maintain as much smoothness as possible, given how I choose to import my frames.
-
NOTE: Remember the NOTE from Step 2? Now, if you chose to import every frame, rather than “Every 4 Frames” like I do, then you should set your frame delay to 0.04.
Doing so will produce a final gif that looks like this:

Notice how this gif is smoother and faster, but also shorter than my example gif? Yeah. Like I said, whichever style of gif you choose to make is up to your own preference.
STEP 5 - Converting and sharpening your gif.
You never quite realize how blurry a gif really is until you Sharpen it. To do this, you first need to convert your Timeline from a Frame Animation to a solid Timeline. You can do this by making sure all your frames are still selected, and then clicking the Convert to Timeline button in the bottom left corner of the Timeline.

Now your Timeline should look purple, like it does in the picture below.
Next, you need to select all of your layers (MINUS the adjustment layers) on the right side of the screen. Once all of your layers are selected, go to Filter > Convert for Smart Filters.
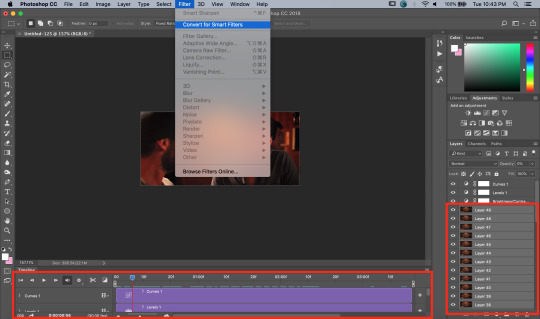
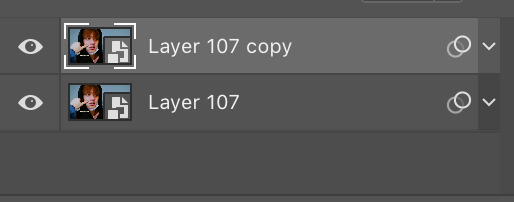
Once your gif layers have been compressed into a Smart Object (see circle below), you can select Filter > Sharpen > Smart Sharpen.

The first time you select Smart Sharpen, you need to set all the parameters for it. But once you do that the first time, you shouldn’t have to set them again. Basically, make sure your window looks exactly like this one:
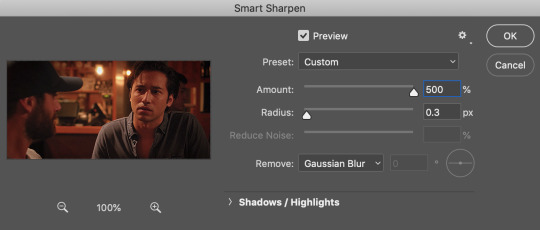
Then hit OK.
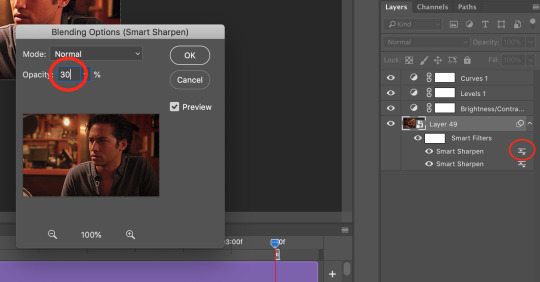
You’re going to do this TWICE (so you’re going to end up with TWO Smart Sharpen layers below your Smart Object layer). Then, you need to click the button to the right of the top Smart Sharpen layer, and change the opacity of that layer to 30%. (Otherwise, your gif will be way over-sharpened.)
STEP 6 - Trimming and saving your gif.
You’re almost done! It’s time to save your gif.
To save a gif, you must go to File > Export > Save For Web (Legacy).
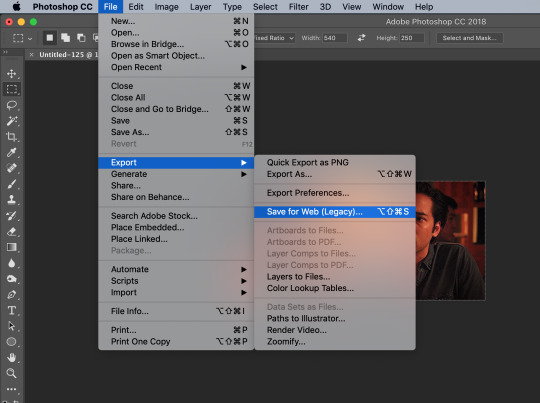
However, this gif has a problem.


This number in the bottom left corner of the Save For Web window tells you the current size of your gif. As you can see, this gif’s size is currently 3.541 MB. That size wouldn’t be a problem if you were intending to upload this gif to Twitter, because Twitter has a gif size limit of 5 MB.
Tumblr, however, only has a size limit of 3 MB. So, to get your gif to work on tumblr, you need to Trim it.
Trimming is the process of changing the length of a gif without actually deleting any part of it permanently. This gives you the freedom to edit your gif and pick the portion of it that you like best.
You can easily trim your gif in the Timeline, by clicking the dragging the Gray Sliders at each end of it (see the arrows below). Wherever you leave the stoppers will become the new beginning and end of the gif. You can make this process more precise by using the Blue Slider (circled below) to choose where you want your stopper to go before you drag it there.

The Timeline pictured here has already been trimmed.
Trimming your gif will often require some trial and error. Whenever you want to check the length of your gif, simply go to Save For Web again and check the amount of MBs in your gif. (Click Cancel if your gif is still too big.)
Once your gif falls below 3 MB, you can finally save it!

The last thing you need to do before saving is change your Looping Options from Once to Forever in the bottom right corner of the window. Then, click Save.
You now officially have a finished gif!
Mine looks like this:
-
BONUS STEP - Adding text (OPTIONAL)
Now, I’ve just shown you how to make and save a gif. But what if you want to add text to that gif? I’ll show yow how to do that too.
First off, you should only add text after the rest of your gif is completely done and ready to be saved (basically, once you’ve already completed Steps 1-5). Then, before you save it, you can click on the Text button on the left side of the screen.
Click on the gif to create a new Text layer, and then type whatever you want. Generally, dialogue captions are placed in the middle of a gif towards the bottom, while other, more artistic types of Text can go wherever you want.
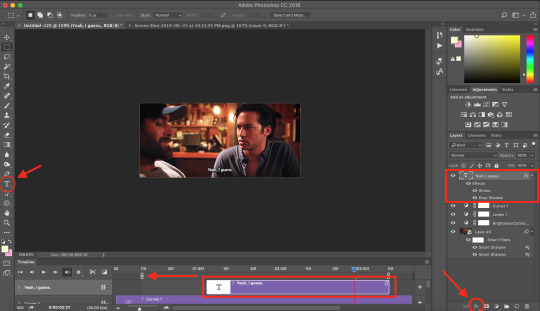
Now that you have a Text layer, you want to make sure of a few things. First, make sure that your Text layer is your TOP layer on the right side of the screen, above all of the Adjustment layers.
Next, you want to make sure that your Text layer spans your entire gif Timeline. Notice how my Text layer (depicted as a purple rectangle in the Timeline) doesn’t reach the Gray Slider on the left? To fix this, simply click and drag the Text layer until it extends past both Gray Sliders.
And finally, I always add Effects to my Text. You can do this by hitting the fx button in the bottom right of your screen. Specifically, I use the Stroke and Drop Shadow effects to make my gif stand out from whatever background it happens to be on.
My Stroke is always set to 1px thick, and my Drop Shadow settings are as follows:

As a final note, if you want your text to look exactly like mine, then you need to use the font Myriad Pro in size 14, which I then italicize and bold. You can also open Window > Characters, and make sure that your preferences look like this:

ALRIGHT. Now that you’ve added your extra text, you can FINALLY go to Step 6 and save your gif.
Now, your finished gif should look like this:

I hope this tutorial was helpful! I tried to be as thorough as possible to avoid any confusion, but if you have any additional questions, you should always feel free to ask me!
Have fun giffing!! :)
#my tutorials#my gifs#idk what else to tag this lol#gif tutorial#personal shit#long post#I'm so sorry to anyone on mobile with no read more
55 notes
·
View notes
Last Seen Blogs

vitreaisvongarreg-blog
Sweetness and Roses

nice-home-services-posts
Untitled

misscru
misscrulicious
badlydrawnelderscrolls
Badly Drawn Elder Scrolls

iero
time incoming, life becoming