#the software wouldn’t let me actually download the video without paying for premium
Text
got bored so i made a good old anakin edit :)
#sorry the quality is shit#the software wouldn’t let me actually download the video without paying for premium#so i had to screen record it#star wars#star wars prequels#anakin skywalker#darth vader
16 notes
·
View notes
Text
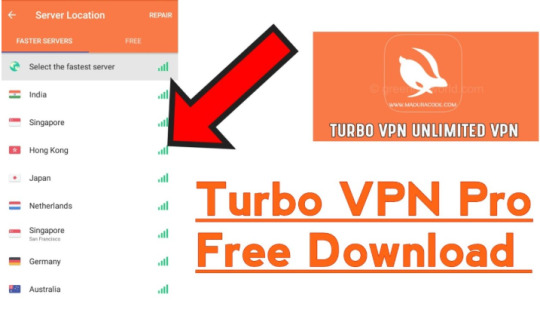
How to install Turbo VPN on PC
Turbo VPN for PC is now completable to using on Windows 32bit and 64Bit too! Download and set up Turbo VPN proxy service software for popular PC OS like Windows and Mac. We offer you to at once download the Turbo VPN app on a laptop and laptop.
Turbo allows proxy browsing with unlimited bandwidth for surfing web content material. Such as Images, Texts, Audios, and Videos.
It has a brilliant capability to unblock the websites which can be blocked by means of geographically. Use the Turbo app to get admission to all blocked corners on the floor web.
Trending on SafeForPC.Com: How to download VPN Master For PC ( Windows 7, eight 10 & Mac)
Turbo VPN- Best Free Secure VPN
Office and the diverse organization has provided free WiFi. But they use a tough firewall to prevent your tool from gaining access to most vital websites. Such as Facebook, Instagram, Twitter, YouTube with lots of important social app and area names.
Even it may move motion pictures in an HD temper from online video media like YouTube! Some free or public networks are able to music customers' net interest.
As a result, Turbo VPN is a must software for the users who are usually related to a public community.
Because Turbo software can save you tracking your visitor's sports. It the use of a high-speed proxy server to trade statistics among your PC to the net.
What is Turbo VPN for Windows
Turbo VPN has the ability to exchange the actual IP cope with and the vicinity of your PC. It creates P2P (Peer to peer Connection) amongst those computers in the equal nearby location. Even if there are any firewalls, it is able to break it to enter into the deal with/vicinity. It may be used for unblocking web sites and unblocking geographically restricted places. If you’re the use of Windows working gadget on your PC, you'll want to download Turbo VPN for windows compatibility.
On the other facet, if you use Mac you'll want to download Turbo VPN for Mac. Turbo VPN redirects you thru their personal network and continues your footprint safe. Else, you might be were given hacked or your critical statistics might be leaked out. So, the entirety of using a rapid VPN for your computer is maintaining your identity disguise via private tunnels.
Read VPN Master for PC Windows 7/8/10 & Mac Free Download
Advantages of Turbo VPN App
Ability to get admission to limited web sites or sources.
Encrypted net access and surfing. It clears all browsing history as soon because the consumer logs out.
Nonstop, 24/7 limitless carrier.
Ability to connect to the net in any part of the world.
Access to download a large number of statistics or even unrestricted access to Netflix and different social networking.
The Turbo VPN app will let you change your IP address.
It has a large list of users around the world due to its dependable and fast connection.
Lots of server alternatives around the world that you may pick out to attach.
They don’t accumulate any records concerning the websites or apps you go to and enforced the no-log policy.
WHY TURBO VPN FOR PC:
Turbo VPN gives you loose limitless data to unblock websites. It protects your WiFi hotspot from cybercriminals. When you connect to Turbo VPN then you could without difficulty create an at ease and encrypted connection. After connecting to this VPN no person can steal your touchy statistics.
Another high-quality reason to use this VPN is that will help you to attain geo-confined content material. It allows you to open any blocked websites and apps no matter in which you're. It changes your vicinity mechanically and lets you open any internet site or app which blocked in your area. So in case you are being blocked from one of a kind content than actually hook up with a Turbo VPN and begin viewing or surfing the content you need to open.
Although this app additionally allows you to download all forms of the track, motion pictures, and android apk as nicely. Its a 100% maximum velocity free turbo VPN for laptop Windows 10 and permit you to use its all features for free. You can also be involved in examining our article Best Free VPN for Netflix 2019.
Read Directv App for PC Windows & Mac Free Download
IS TURBO VPN BEST FOR PC :
It all relies upon on your desires like what you essentially want to your device. If you're looking for a carrier that helps you to unblock all restrained content material then Turbo VPN for home windows isn't a horrific option for you. It also attempted to provide you a better diploma of security and hold your sensitive facts secure from the 1/3 celebration. As this VPN provider from China and that u. S ., the Government does no longer offer net freedom. So they do no longer keep facts and additionally not clear on different factors. As China is dealing with amazing internet firewalls, so if you need freedom at the net in China you should flip to our article nice free VPN for China.
Turbo VPN vendors also try to offer their users with full freedom at the internet international. So now it’s up to you that you need to go along with Turbo VPN or need to strive for other premium services. Now go to the download technique beneath and download Turbo VPN for windows 7 laptop.
Download Turbo VPN For Windows and Mac PC
As I discussed before that there is not a reliable app of rapid VPN available for laptops.
So here we need to use an android emulator to run the android apps on our laptop.
First, download and save under zip record to your computer then simply unzip it any particular folder.
Download
Now double click on at the bluestacks installer and install the app on your computer. It will take time depends on your internet pace.
Once the app has been established then open the app and click on on the play save icon.
Now in the play shop click at the seek bar and search for the ‘Turbo VPN’ in that seek bar.
Search for rapid VPN on pc
On the next step click at the app and then click on the installation. It will mechanically set up Turbo VPN to your pc.
Set up faster VPN for home windows
Now you can click on the open button to begin the app to your android emulator.
Here is a screenshot of ways the turbo VPN will appear to your computer. You can all the alternatives are to be had in pc that's to be had on cell.
Now any of you're facing any problem for the duration of the download manner of faster VPN for home windows then you could go together with the second one method.
How to download Turbo VPN for windows with the apk document?
If you cannot sign in to play keep or getting trouble at some point of the set up from the play save.
Then observe the below method to put in rapid VPN apk on windows pc.
First, open the bluestacks emulator and click on the ones three dots wherein you discover options.
Now click on the primary choice ‘pick apk’ and then select apk record from the folder and click on the open.
And it's going to automatically set up the app to your emulator, you can affirm it by means of the icon.
Click on that icon to start the app and carried out now you could use this app to your computer.
So, this is the complete process now before you cross simply take look on a few features of this app.
Why uses this app? (some nice matters)
Here I percentage some high-quality features of the app no longer all. You can enjoy all through the use of this app.
The first thing is that it will offer loose services so that you don’t need to pay whatever to use this app.
You can use their VPN service for a limitless time there isn't any restrict on time or facts transfer.
Your net pace wouldn’t affect you may get nearly equal velocity even if you are linked with the VPN.
There are more than five nations that are to be had so that you can pick which one you need.
So, these are a few exceptional capabilities of this app. I hope you like it and were given an overview of the app.
How to apply it for chrome browser on windows pc?
If you want to download Turbo VPN for the chrome then you definately may not locate this app.
Because there isn't a legit extension of this app available for chrome.
So, I advocated you go together with the Touch VPN which is one the high-quality VPN for the chrome web browser.
You can effortlessly upload it for your chrome browser, as standard, you add different extensions.
Once you upload it then you may without problems connect with a VPN of any USA through a click at the icon.
I desire you understood all of the things well.
Conclusion
Last if you are facing any difficulty at some stage in the set up of the app then you may inquire from me within the remark field.
I will defiantly assist you to solve your hassle. And ensure you join our blog.
Because all the answers to your problems may be posted as a piece of writing replace.
And if you want this text then don’t forget about to proportion it to your social media and additionally in your WhatsApp agencies.
More info Clicks Helpsforpc.com
0 notes
Text
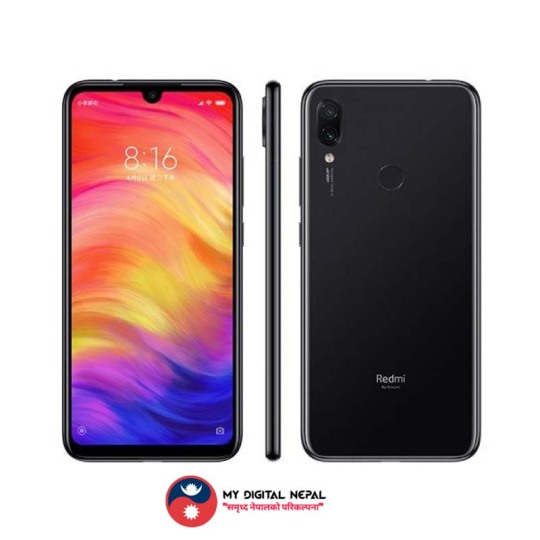
Xiaomi Redmi Note 7

Xiaomi Redmi Note 7 Price Full Specifications Features and Comparison
Today we are going to review Xiaomi Redmi Note 7. Redmi Note 7 has been getting so much hit right now for a very good reason. Because it comes with decent specs a really nice design and all wrapped up into a product on this price range. So, let's see what the xiaomi Redmi note 7 has an offer and we're going to list the Xiaomi Redmi Note 7 Price in Nepal and an overall first impressions review. Hence, without further delay let's get straight to it.
Overview of Xiaomi Redmi Note 7
Firstly, we're going to review specs straight away so we've got dual camera 48 megapixel and a 5-megapixel sensor on the back. Since comes with Qualcomm Snapdragon 660 chipset. So while it's not the 800 series. when we talk to the price you'll understand why not 800 series?. Guys don't get me wrong this Qualcomm Snapdragon 660 is still a very good SOC. It's just not the top tier which you're gonna pay more for 4000 mAh battery capacity. This mobile phone accepts 18W quick charging through a USB-C port. It also has a headphone jack and an IR blaster on top of it
Secondly, Xiaomi Redmi Note 7 had different RAM and ROM variant. Redmi Note 7 comes with 4GB/ 6GB RAM with 64GB, and 3GB RAM with 32GB Storage options respectively.
Design overview of Redmi Note 7
We have got so many requests to review this similarly, on the back you can see the dual camera. Also, there is a bit of text here which says AI dual camera. Now the text on there it does remind me of the Huawei and honor' phones. Xiaomi Redmi Note 7 has different color variants like Black, Red and Blue version for now. This phone provides the feel of more mid-range to budget than premium and flagship.
On the other hand, straight away probably because of its metal and glass sandwiched. This makes it feel to me anyway a bit more premium. But, some of you guys may not like it for the fact that it's got glass on the back. However, I personally don't see is a massive problem. Similarly, it feels very nice in the hand. I know it does have slight rounding on the edges on front and back but the middle bit is completely flat.
Redmi Note 7 provides a case which is made of silicon. so at back, you can see Redmi by Xiaomi just there. Basically, the Redmi line of phones is kind of a Sub-brand of Xiaomi. However, Redmi produces pretty decent products at mid-range budget prices. so Redmi phones are generally pretty popular when they come out on market. This is the reason why potentially Redmi by Xiaomi has got so much hit.
Teardrop notch with Bezels
So getting your glimpse on that front straightaway we have the teardrop notch at the top the chin and the bezels the chip. Moreover, the premium device having said that I don't know about you I think that's quite a nice form factor overall if I got that for Rs. 23,000. I mean can you really complain about the size of those bezels on the chin. or I personally wouldn't I think it looks and feels really pretty nice for that price.
It has volume rocker up and down on the right your power button. We have a SIM slot there which does contain a micro SD card slot. This micro SD card slot is for up to 256GB. Similarly, we can see the USB type C charging cable.
Software and Features
Xiaomi Redmi Note 7 is running over the top of android 8.0 i.e Oreo. This is a little bit disappointing it's not Android 9 i.e pie again. Maybe consider the price. It has both the Chinese and English ROM. Chinese version comes without the Google Play Store. But you can download it yourself. However, on the global version, it will be pre-installed.
The fingerprint of Xiaomi traditionally does some of the fastest on the market. However, I don't think it's gonna be quite as quick as the Xiaomi mix 3 or the Xiaomi Mi 8. But I might be pleasantly surprised. you can feel what it's a fraction slower than those two phones. like that again for the price point is incredibly impressive. You can also do full-screen gestures if you so choose at the Xiaomi gestures. I really do like they're up there for me with the iPhone and the OnePlus gestures. which I think are slightly better than the native Android Pie gestures.
Now the actual display is a 6.3 inch full HD Plus IPS LCD display. The screen resolution is 2340 by 1080 Pixel with a Pixel identity of 409. Redmi Note 7 have Gorilla Glass protection. Similarly, Bluetooth 5.0 and the headphone jack is still Available.
Cameras of Xiaomi Redmi Note 7
So in terms of that camera. It has Dual Camera 48MP+5MP setup at the rear. As you open its AI camera, the AI camera detects scenes automatically and optimizes your photos based on this info. now, this isn't new there are tons of phones that have been doing this over the last year. personally, I am not a massive fan of this AI features. However, I think we can turn it off. It has other features like slow motion video, portrait, HDR+, square panorama, and pro as well. So, if we just scroll back to portrait we'll have a little to go with that as well. you know what again from first impressions the camera looks pretty good. But, it seems to have slight issues with exposure but nothing too significant. it also seems to have a slight pulsing of focus.
However, I want to make sure that I'm not having to work too hard to get some nice shots. Similarly, for me is one of the areas that separates the good cameras from the great cameras. The ability to take fantastic shots in a snapshot in an instant. This is a very solid good camera, not a great camera. It also has led flash on a rear camera.
Xiaomi Redmi Note 7 Selfie Shooter
As we're discussing on cameras. let's see a selfie camera. 13 MP front selfie shooter In straight away, I've noticed the classic Xiaomi beautify. It basically automatically starts and well it's smooth. The face out makes me look like I'm wearing makeup. again fairly similar to every Xiaomi smartphone. I get the front facing camera it tends to be again pretty good not the best. This generally seems to be the way of it to be fair again for Rs. 25,000. I can't really complain it does have portrait mode on that front-facing camera.
As we have mentioned earlier about the Snapdragon 660. The everyday user Don't feel any lags or issues unless you do hardcore gaming. If you're very into your gaming on your smartphone or high intensive tasks. Then there you can see the difference of mid-range 600 series and the 800 series in the Snapdragon SOCs. On this price range, the performance is quite impressive. I just kiss them
Redmi Note 7 price In Nepal and Availability
Xiaomi Redmi Note 7 price in Nepal has been set at Rs. 17,990 for the 3GB RAM/ 32GB storage variant, while its 4GB RAM/ 64GB storage model is priced at Rs.22,999. However, the price tag of Xiaomi Redmi Note 7 pro price in Nepal has been set at Rs. 23,999 for the 4GB RAM/ 64GB storage variant, while its 6GB RAM/ 64GB storage model is priced at Rs.28,990. But, we don't have confirmed launch date and availability in Nepal. However, it will be launched within the last week of March 2019 in Nepal. We have expected that this phone will be exclusively available on Daraz.com.np in Nepal.
You may like
Xiaomi Redmi Note 7 Pro
Samsung Galaxy S10 vs S10 Lite
Mate 20 Pro
Huawei P30
Huawei p30 pro
Galaxy M30
Samsung Galaxy M20
Samsung Galaxy M10
Wrapping Up
Therefore, I think I have provided all the required information about the Xiaomi Redmi Note 7 price in Nepal. But if you have any confusion regarding this please Feel free to comment below. I will be thankful for your personal review in a review tab. Thanks for visiting " MYDIGITALNEPAL". Let's make a Digital Nepal.
Read the full article
0 notes
Text
Loupedeck+ Review: A Big Improvement From The Original
I’ve seen peripherals like the Loupedeck+ and its competitors around the market for a while now and I’ve been quite skeptical about the practicality of their use. Not that they are bad things, just that I’ve spent so many years with a keyboard & mouse combo that the thought of learning a new device to work on my images caused me a near panic attack. I will, however, admit that after getting hands on with the updated Loupedeck+ after WPPI 2019 that my opinion has changed greatly! While I’m still pretty clunky with it, the ease of use, accuracy, customization and versatility with the variety of supported apps make it more than worth the $249 price tag.
What Is It?
The Loupedeck+ is a photo & video editing console or keyboard that was created (initially by crowdfunding) to help you edit your photos & videos faster and easier than via the computer/mouse combination. It takes the software version of your sliders in Adobe Lightroom (among others) and gives you a physical button to use instead. I can also confirm that the knobs actually give you more control, or better accuracy than when using just the mouse in most of the applications as well.
youtube
[REWIND: Introducing Loupedeck+ | Loupedeck Gets An Upgrade & No Longer Just For Lightroom]
At Loupedeck, We’re Passionate about each and every step of the photo and video editing process. From first shoot to the final edit, we know it’s the small details that often make the biggest difference between a good image or video and a great one.
Quality
Having not been familiar with the first generation of Loupedeck, I did a fair bit of homework as well as picking the brains of the folks at SLR who did the initial review here. Among the biggest “cons” that I found from users with the original was the actual build quality. From what they’ve told me and what I’ve seen in my own use of the Loupedeck+, while the dimensions are the same, the quality of the product has improved significantly. The console is sturdier and the buttons/dials have a much more stable and satisfying feel when pressed and adjusted.
Another improvement is the addition of completely customizable functions, buttons, and a much improved software/plugin & interface.
Setup & Install
Here’s what I loved about this product. The first thing you have to do is download the updated software/drivers for your operating system from the Loupedeck Website and install them like any other application. Once you’ve done that, just plug in the console via the USB cable and that’s it. The system even recognizes when you’ve connected the device and lets you know that it’s running. That’s literally it. No confusion, no crazy setups; it’s just ready to go out of the box.
As you can see from my screencap above, if you open the application the system recognizes which application is “using” the devices and from here, if you choose to, you can go crazy and start customizing the buttons and layouts to suit your personal preference. Regardless of whether or not you do, as you turn the dials and buttons on the console, the relating sliders and settings in Lightroom (or the other supported applications) adjust accordingly.
Using It / The Process
So here was my personal bottleneck using the Loupedeck+. I’ve had such a muscle memory developed for Lightroom after using it in the same process every day for nearly a decade that moving to this hardware was a bit of a challenge. I was actually afraid that it would take me days, if not weeks, to actually get used to and comfortable with this peripheral. As mentioned above, it nearly gave me a panic attack when I was looking at the PILE of client work I needed to rush through.
https://www.slrlounge.com/wp-content/uploads/2019/04/loupedeck-gradient-2350x1324-25fps.mp4
Once I got over that initial anxiety and actually started to play with the device, I was kinda blown away with how easy it was to get used to. In fact, I even found myself using more of the available sliders/features in LR simply because they were laid out so clearly in front of me and not hidden in my often collapsed menus on screen. The part that got me was just how accurate adjusting the dials was compared to manually dragging the sliders in the OS. I found myself happier with my edits and have started to test out more features and creative tools that usually were glanced over in the past.
If you’re anything like me, you’ll find yourself looking at the screen, finding the slider, then looking back to the Loupedeck+ and finding the corresponding Dial/Button, making an adjustment, and then looking back at the screen & sliders and back again to make sure everything worked the way it should…and then you’ll realize you’re wasting a ton of time and you can just focus on the image while making fast and accurate adjustments with a newfound muscle memory for each of the preferred dials & buttons in your workflow.
Granted, I’m still not up to the speed I want to be with it, but it’s starting to feel natural and that’s making the difference every time I’ve sat down to edit. The learning curve is actually quite simple once you actually start to use it.
Price Point
The original Loupedeck launched with a price point of $300 US and now the updated Loupedeck+ is available for just $249. While that may seem steep, when you compare it to the other options on the market, it’s actually one of the best and most affordable ones out there. Especially when you look at the extreme high end console/decks for video production that start at price points of nearly $10,000. If you spend a lot of time working in any of the applications listed below (with more being added), $249 is a very small price to pay for the amount of time it can save you and the amount of creative control it will add for you!
Check out the pricing from our preferred retailers below;
Amazon | B&H | Adorama
Who Is It For?
Let’s get straight to it. If you’re in the business of dealing with a large number of files like a wedding or event photographer, than this is the device for you. It feels like that is the primary target market for the Loupedeck company and it definitely works there. As a wedding or event photographer, this would make editing a lot more fun, especially since I can sit back at my desk with the console on my lap and work away with ease on my images.
Even if you’re not a wedding or event photographer there is still a lot of value in this device for portrait and landscape shooters. Since speed isn’t really at the front of your requirements, this device will let you get more flexible and creative with your edits, finding and using more features within lightroom than you may have without, thus letting you explore many more possibilities with your final images.
The only market I didn’t see any real value beyond the “fun” portion was Commercial Photography. The reason here is typically in this world you’re shooting for a specific look, culling images quickly, and then editing small batches (if not just a single file) in Photoshop to meet a client deadline. Again, maybe as a commercial photographer you’d love it, but terms of a first impression and its broad usage, that’s really about the only field I felt wouldn’t get the most out of it.
So if you’re a high volume shooter, or you spend a lot of time in Adobe Lightroom already making every image absolutely perfect, it may be worth knocking on your friends door to borrow their loupedeck to see if the device is right for you.
Technical Details
Supported Software
Adobe Lightroom Classic CC
Adobe Premiere Pro CC
Adobe Photoshop CC
Adobe After Effects CC
Adobe Audition
Final Cut Pro X
Skylum Aurora HDR
Beta Support for Capture One Pro
System Requirements
Adobe Lightroom® 7.4 or later
Adobe Lightroom 6
Adobe Photoshop CC
Aurora HDR
Beta integration with Capture One
Adobe Premiere Pro CC 2019
Apple Final Cut Pro X 10.4.5
Adobe Audition CC 2019
Windows® 10, Windows® 8.1
Mac® OS 10.12 or later version
Internet connection needed for Loupedeck software download
USB 2.0 A
Upgrades to the Loupedeck+ include:
Mechanical keys with a more precise and sturdy feel
Improved build quality
Two dedicated customizable dials and seventeen buttons
“Custom Mode” that allows full user control of all dials
Configuration software built from scratch for an even better, faster and more stable photo editing experience
Additional application support for Adobe Premiere Pro, Photoshop, After Effects, Audition, Final Cut Pro X, Skylum Aurora HDR, and beta support for Capture One Pro
Things to Improve Upon Still
Wireless support like with wacom tablets would be a huge addition
Addition of tilt functions like most keyboards have for additional ergonomic benefits
youtube
For More information on the Loupedeck+ be sure to check out the loupedeck blog here.
[REWIND: Loupedeck Review | A Thorough Review Of The Lightroom Controller Console]
If you’re reading this you’re likely into post processing, and if you really do and want to absorb lots of this kind of information, I highly suggest you take a look at our Lightroom Organization & Workflow workshops. Premium SLRL Members get access to it all. They’ll get you up to speed, and fast, allowing you to get the most out of this program we spend so much time with.
from SLR Lounge http://bit.ly/2ZtBYBt
via IFTTT
0 notes
Text
How to Enhance Your Content by Building Infographics with These 12 Tools
Those of you who have been reading my blogs for a while know I’m a huge advocate of using visual elements to enhance my blog posts.
In addition to being visually appealing, images can actually improve the performance of your articles. That’s because blogs with pictures receive 94% more views than posts without them.
According to a recent study from the Content Marketing Institute, 73% of marketers say their top priority is to create more engaging content.
And 55% of these content creators are prioritizing visual content.
If you haven’t been using images to enhance your content, you should consider starting with some infographics. Even if you have included pictures in some of your old content, you can take this strategy to the next level by building custom infographics.
That’s because infographics are a combination of text and images. Research shows people follow directions 323% better if the directions include both text and illustrations.
On social media platforms, infographics get liked and shared at three times the rate of all other content.
Once you start building infographics, you will drive more traffic to your website. That’s because other people will use your custom images to enhance their own content.
As a result, you will consistently build backlinks, which will improve your SEO.
Now that you understand why you need to create infographics, it’s time for me to show you how. There are tons of tools available, but not all of them are created equal.
I’ve narrowed down the top 12 tools for building infographics.
1. Easel.ly
If you want to create an infographic fast and efficiently, Easel.ly is a great place to start.
Above is a sampling of some of their top infographic templates. All you need to do is select the template you want and plug in your information.
They’ve got a template for everything. Some are designed to fit more text on the page, while others prioritize numbers from any research you may have conducted.
It’s free to use Easel.ly, but if you want premium templates, you can access over 500 of them for a fee. I recommend starting off with the free ones to see whether you’re happy with the platform before upgrading your membership.
Another cool feature of this platform is that they have community infographics built by others. You can plug your information into those as well.
The Easel.ly website features an easy to follow guide on how to create content on their platform. They also offer a live customer service chat option in case you have questions or run into any problems with the platform.
2. Pitkochart
Pitkochart is another top option for beginners. The platform makes it easy to create custom infographics without any design experience.
In addition to infographics, they have other design templates as well. You can build things such as:
flyers
posters
presentations
reports
Some of my favorite types of infographics on Pitkochart are the graphs. It’s a great way for you to display your numbers in a custom chart.
Pitkochart also has a map feature. You can customize the color options on these maps to show how different states, regions, or countries have varying results for your discussion.
Speaking of color options, Pitkochart has many. You can select colors for each portion of your infographic, or you can choose preset color schemes.
It’s an important feature because different color schemes can impact sales on your website.
They have a library of more than 1,000 icons. You can use these without having to pay licensing fees or give an attribution to the creator.
This definitely makes things less complicated, which allows you to spend your time and effort on building the infographics.
Once you build your infographic on Pitkochart, they help you name your image so that it’s optimized for SEO. Then, you can share it directly from the platform.
They have sharing options for email, ebooks, and social media. You can get an embedd link for your website, share it with your team, or download a high-resolution version of your infographic.
3. Venngage
Are you a student? If so, Venngage will let you use their software free. But everyone else will have to pay for the platform.
Their monthly rate is $19 for individuals and $49 for businesses. It may seem pricey, but the business membership comes with premium features such as:
custom templates
unlimited infographics
100 image uploads
branding help
charts
icons
team collaboration
high-resolution downloads
If you know you want to take advantage of these features for the entire year, you can pay upfront annually and receive a 20% discount off your membership.
Venngage is great because their infographic templates are seemingly endless. With so many options, it’s less likely you’ll have similar to other infographics templates already published on the Internet.
This can make your brand stand out from the crowd.
They also group their infographics based on several categories. You can build the right image for whatever you’re trying to illustrate. Some of the top categories include:
statistical
lists
timelines
geographic
real estate
nonprofit
human resources
They even have “fun data” templates to help you display your unique research in a way that’s easy to comprehend.
4. Visme.co
A list of visual design tools wouldn’t be complete without Visme.co. The platform specializes in all kinds of visual content, including infographics.
If you need to make an infographic that compares multiple variables, Visme.co has more than 20 charts and tables to choose from.
There are a couple of different ways you can input data into these visuals. Your first option is to type the numbers in manually. But if you have lots of information, you may prefer to import your data.
Another cool feature of these charts is the ability to connect with live data.
All of the templates have customizable fonts. You can change the color, size, and style of your text. Don’t see a font you like? No problem. Visme.co lets you upload your own fonts as well.
This software can help you take your infographics to the next level by making them more engaging. You can add video and audio files.
They also give you the option to embed polls, surveys, and maps. You can even add motion features, like popups, to your infographic.
Once your infographic is published, you can track how well it’s performing. The analytics tools tell you how many people saw your infographic, what type of device they used, their location, and level of engagement.
5. Infogram
Infogram is another one of my favorites. The platform allows you to fully customize every element of each infographic you create.
In addition to infographics, you can also use this software to create:
reports
charts
maps
dashboards
Infogram also helps you build images specially designed for your social media channels.
Their platform has more than one million icons and images, all royalty-free.
What I like most about Infogram is their editing tool. You can drag, drop, and move every element on the screen to fully customize your design.
If you have data that needs to be imported, it’s easy for you to upload spreadsheets from Excel, Google Drive, Dropbox, etc. You can even use a cloud service or their API to set up live data integration.
They have interactive charts and maps at your disposal as well.
Ultimately, if you need a one-stop shop for all your infographic needs, you can’t go wrong with Infogram.
6. Canva
Even if you don’t plan on making a ton of infographics, Canva has plenty of other design tools for you to take advantage of. Those of you who are a little bit more advanced will enjoy the graphic design features offered on this platform.
One of my favorite elements of the Canva platform is the versatility it offers. You can use it on the Internet as well as your iPhone or iPad.
They specialize in photo editor, color palette, and font combinations. But their infographic building tools are just as good, if not better. You don’t need to have a design background to figure it out.
Unlike some of the other Canva tools, the infographic builder is free to use. All you have to do is create a Canva account before you get to work.
Their library has more than one million photos, illustrations, and graphics for you to choose from. If you’re not happy with their selection, you can also upload your own images.
Once your image is uploaded, you can select a font from over 130 options. They make it easy for you to change the background and color scheme too.
After you’re satisfied with your custom layout, you can save these unique templates to your account. This makes it easy for you to repurpose the same layouts for your future infographics. It’s one of my favorite time-saving marketing tools.
If you’re not satisfied with all the elements in the free Canva library, they have premium elements available for purchase.
But unlike some of the more expensive infographic tools we’ve seen, the Canva premium purchases cost only $1 at most. It’s an extremely cost-effective way to enhance your infographics.
7. iCharts
If you want something a little bit different from the tools on our list so far, iCharts definitely fits the description.
This platform is cloud-based. It’s a visual analytics tool allowing you to organize complicated business information.
You can use iCharts to simplify data from extensive research studies. Since it’s a cloud-based platform, you can access it from wherever you are. Nothing needs to be installed on a device.
They have a feature letting you implement real-time data integration.
This option isn’t a typical infographic builder. But you can still export the charts and graphs to enhance your content with custom images.
8. Skitch
Similar to our last tool, Skitch doesn’t necessarily build custom infographics either. But I use Skitch every day to help enhance my visual content.
Some of you may not be interested in building all your infographics from scratch. That’s OK.
If you’ve got a Mac, you can use Skitch to help you customize infographics from other sources. Here’s how you do it.
Once you download Skitch on your Apple device, which is free by the way, you can use it to take screenshots of infographics. Then you can markup specific sections with arrows, boxes, and text to make it your own.
Regular readers of my blog posts might recognize the pink arrows and annotations from Skitch. That’s what I use to mark up the images on my blog.
If you use this tool to help you build infographics, make sure you give proper credit to your image sources.
9. Creately
Creately is a platform specializing in creating unique diagrams for your business.
Although they aren’t exactly the same, diagrams and infographics are very similar, which is why I thought it was worth adding this tool to my list.
I recommend Creately for businesses that have multiple designers producing content at the same time.
With this software, you can collaborate with up to 20 team members on the same project with real-time updates, edits, and changes to your design.
They have over 1,000 diagrams for you to choose from. Even if you don’t want to publish your diagrams, you can use the tool for in-house projects such as building a customer journey map.
10. Google Charts
When in doubt, it’s always a good idea to use tools you’re familiar with. As a business owner, you’ve likely used Google Analytics to help you with your marketing solutions.
Well, Google Charts is another great option offered with your Google account.
Once you determine which types of data sets you want to include, you can customize your design fully. You get to select which type of chart you want to use from Google’s extensive gallery.
It’s easy to add these infographics to your website, email messages, and social media channels.
Their dynamic data feature allows you to connect your data source so the charts updated with real-time information.
Google really stands apart from the crowd when it comes to customer service. There are thorough guides to help you with the tool. Every section has step-by-step, easy-to-follow instructions.
11. Gliffy
If you’re looking for another tool for creating custom diagrams, Gliffy is a great choice to consider.
The software is extremely easy to use. You won’t need any type of design skills to build your infographics.
Everything is done with an HTML5 editor, so you don’t need to download anything to your devices in order to use this tool.
If you want to get your project done as fast as possible without building your own template, it’s no problem. Gliffy has ready-made templates. All you need to do is plug in your information.
Share your infographic with an embed link, or upload it directly to your social media profiles.
You can also use Gliffy to collaborate with your team members. Grant access to people whom you trust making edits to your design.
12. Wordle
Not every infographic needs to be a complicated set of data.
Sometimes, it’s effective to have only one statistic or sentence displayed to stand out from the rest of your content. If that’s the case, Wordle is one of your best options.
This platform is made for creating word clouds. You can use customized fonts and templates to create these unique images.
You can even use Wordle to reinforce a point you made within the text of one of your blog posts.
Conclusion
Images and visual elements are more powerful than words alone.
That’s why you need to be using infographics to enhance your content. But if you don’t want to search for infographics online, the tools I’ve outlined above allow you to create your own.
Don’t get me wrong: there are dozens of other infographic building tools available on the Internet. But from my experience, these ones are the best places for you to get started.
There’s something on this list for everyone—it just depends on what you’re looking for.
Some of these tools are free, while others charge a fee. Certain tools are better for charts and datasets, while others specialize in custom images and animations.
Refer to this guide for all your infographic creation needs.
http://www.quicksprout.com/how-to-enhance-your-content-by-building-infographics-with-these-tools/
Read more here - http://review-and-bonuss.blogspot.com/2019/03/how-to-enhance-your-content-by-building.html
0 notes
Photo
https://jpkee.com/pc-mobile/12-excellent-free-screen-sharing-remote-access-tools-you-havent-heard-of-yet/
12 Excellent, Free Screen Sharing & Remote Access Tools You Haven’t Heard Of Yet
Advertisement
Are you constantly being asked for computer help? Or perhaps you’re the one doing the asking. Either way, seeing and controlling screens remotely can save time and confusion on both ends.
Remote access programs aren’t just for helping someone or being helped with a computer problem, they can also be very beneficial in assisting in holding meetings over the computer without actually meeting in person.
We at MakeUseOf have covered article after article about remote access and screen sharing applications, but I’m going to consolidate some of the potentially less common ones that you may not have heard of. We have all likely heard of the popular programs in the game: TeamViewer
Provide Remote Assistance And Host Meetings Using TeamViewer 7
Provide Remote Assistance And Host Meetings Using TeamViewer 7
As the internet becomes more evolved, more tools pop up to help each other out and spread information. There are quite a few products out there that make long distance presentations easy, while others can…
Read More
and LogMeIn
Join.me: The Simplest Way to Have a Web Conference Call Between Computers & Mobile Devices
Join.me: The Simplest Way to Have a Web Conference Call Between Computers & Mobile Devices
Your friend has called. They have a problem with their computer and are asking for your expertise. You want to help, but everything would be so much easier if you could see what’s on the…
Read More
. But perhaps it’s time to consider some equally solid contenders.
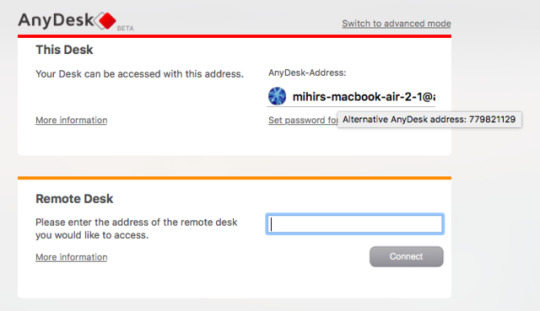
AnyDesk is perhaps the easiest remote desktop access tool
4 Effortless Screen Sharing Tools You Can Use Anytime
4 Effortless Screen Sharing Tools You Can Use Anytime
Sharing your screen with your family or colleague can be painless. Use these four free screen-sharing tools to share your screen as quickly as possible without complicated installations.
Read More
for anyone in the world. It supports all of the major platforms, i.e. Windows, Mac, Linux, FreeBSD, Android, and iOS. And it’s the closest thing you will get to plug-and-play simplicity.
Features Within AnyDesk
The free version of AnyDesk offers all the goodies that any average joe would want. Obviously, you can remotely access the other person’s computer and see their screen. The address or namespace is usually confusing gibberish though. Here’s a pro tip: Hover the mouse cursor over your address to see an alternative 9-digit AnyDesk address number.
Positives
Connecting two devices via AnyDesk is dead easy. It supports audio and video transmission too, so you can talk as you help. The free version also lets you transfer files between the two devices, making it easy to access anything, anywhere.
Negatives
The free account supports only a 1:1 connection, which means only two devices at a time. The AnyDesk premium paid plans let you increase this capacity.
LiteManager is the most powerful of these free remote access tools. At the same time, it’s not a simple and easy interface. But when you get to control 30 PCs at any time, that’s a good enough compromise.
Features Within LiteManager
LiteManager has two different programs to install, on the server side and the viewer side. The viewer can access up to 30 PCs in the free version, and even more with the paid version. This makes LiteManager ideal for IT managers of small teams.
It supports Windows, macOS, Android, and iOS. Linux users can run the program with Wine
How to Run Windows Apps & Games with Linux Wine
How to Run Windows Apps & Games with Linux Wine
Is there any way to get Windows software working on Linux? One answer is to use Wine, but while it can be very useful, it probably should only be your last resort. Here’s why.
Read More
. LiteManager also has a QuickSupport mode for no-installation connections. This mode is ideal for anyone who needs help and doesn’t have LiteManager already installed. The main program is better for system administrators.
Positives
No other free remote desktop tool supports so many PCs at a time. This makes LiteManager unique and a fantastic tool for a system administrator. Plus, it has almost every feature you can think of, like file transfers, drag-and-drop simplicity, event logs, and more.
Negatives
For admins, the only thing lacking in the free version is ticketing and a screen recorder. Those features are available with the paid version of LiteManager, but then again, there are better apps if you’re willing to pay.
Remote Utilities is a popular tool for remote access and screen sharing
7 Easy Screen-Sharing and Remote-Access Tools
7 Easy Screen-Sharing and Remote-Access Tools
We show you 7 free tools that let you share a screen over the internet or gain remote access to a computer to troubleshoot technical issues.
Read More
. It’s quite powerful, bypassing firewalls and NAT devices. And it connects to many computers simultaneously. But it supports only Windows computers, while mobile apps only let you act as viewer.
Features Within Remote Utilities
Install the Remote Utilities “Host” program on the computers you want to access. Install the “Viewer” program on your PC. Connect the two via the IP address and you’re done. It couldn’t be simpler.
You can multi-task and control up to 10 PCs with the free version, and more if you’re willing to pay. In fact, that’s the only difference between free and paid versions of Remote Utilities—how many PCs you can control at a time. So if 10 is enough for you, you get all the features of a premium program for free.
Quick note, you’ll need to register and get a free license to run the program.
Positives
There are some excellent features in the free version of Remote Utilities that other programs offer in their paid versions only. For example, you get Address Book syncing, which is invaluable in a small office.
And it features unattended access, which means you can remotely manage a PC even when the owner isn’t at the workstation.
Negatives
How I wish Remote Utilities was available across more platforms, but it’s Windows only. That is really the only negative of this program.
vimeo
Mikogo is another application which does both remote access and screen sharing. It supports Windows, Mac and Linux and is an excellent program for working in teams.
Features
Not only does it do the basics such as chat and file transfer, but it also allows you to decide which applications are seen by the viewers when you’re presenting. There’s a whiteboard to create drawings and text, the interface is very intuitive and there’s an option to record.
Another thing I liked are the speech bubbles (which can be easily disabled) to help remind you of what all the features can do – they’re just nice to fall back on while still learning the program. I also like that while you are using the program, you can see in a small screen in the window what is being displayed on the other person’s screen.
Positives
Lots of great helpful features and multi-person connection makes it great for teams. No time restriction.
Negatives
Code in program cannot be copied and pasted, nor can the window be resized. Also note that each time the icon for the program is clicked a new window is created. I had to manually close out each one in the system tray.
Bottom Line
Like previously stated, Mikogo is great for groups of people, but it also can be used as a one-on-one tool. Although, it may be a little overkill to use to just help someone with their computer.
ShowMyPC is focused on screen sharing. With a fairly simple user interface and Windows, Mac and Linux compatibility, it makes a solid choice if all you’re looking for is to share your screen.
Features
In the free version the features include the ability to take and share screenshots, Android phone support, limited chat room whiteboard, limited application sharing, file transfer (no folder transfer), schedule meetings, one-hour password length, one-hour session duration and limited participants per meeting, which varies based on network traffic.
Positives
No installation – simply launch the application and run it.
Negatives
Be prepared for a popup window promoting premium services once the session is ended.
Bottom Line
ShowMyPC is certainly not my favorite. Its website isn’t the easiest to navigate around and it took me a while to find the “free” link – you can tell it’s not heavily promoted. That said, the interface of the program isn’t all that bad and makes it fairly easy to use and understand. Out of 5 stars I would give ShowMyPC a 3.5 star rating.
MingleView is a Windows based screen sharing program which is completely free and has no premium package upgrade. This means you won’t be bothered by popups when ending the session. It also has no installation process and can simply be downloaded and ran by clicking “Share” and then allowing it to download to your computer.
Feature-wise MingleView stands out quite nicely. As you can see in the list above, it allows unlimited participants and meeting hosting. Plus, you don’t need to register or sign up like many of the services here.
It claims to have the highest screen quality offered. The user interface is simple – a little too simple actually – and it is easy to figure out what to do, with only a few buttons. The peer to peer connection is secure and built over SSL. In addition, there’s no port forwarding or special firewall configuration that is required.
Positives
MingleView is fast, easy to use and any platform can view another desktop through the web-based platform.
Negatives
The downloadable file is Windows only.
Bottom Line
MingleView isn’t a bad alternative to some of the others, but I wouldn’t say it’s the best. I know some may say it’s not about interface, it’s about the features. But in my mind, the interface is a feature and MingleView just doesn’t seem to offer a very intuitive or clean-looking interface.
That said, the fact that it has the features that it has and is free is impressive and is certainly the one to go with if you are planning to host a large viewing party, just make sure you have Windows. Out of 5 stars I would give MingleView a 3 star rating.
ScreenLeap is completely web-based too and also only does screen sharing. However, I would have to say that out of all the web-based interfaces, ScreenLeap looks and works the nicest. It’s also easy to use – simply click the big large button that says “Share your screen now” and you’re good to go.
Features
Although, there aren’t many real features with ScreenLeap, its simplicity and excellent functionality should not be disregarded. But the main feature that it has is its ability to share the session several ways. There’s a link to copy and paste into any form of communication from IM to email to Facebook message. Or there is a code which you can copy or read off to the people you’re connecting with. You can also type in the email address or phone number that you wish to send the code to.
Positive
Very simple and straightforward. There are many ways to share the session invite depending on the person’s comfort level with different forms of technology. You also have the option to share different windows or the entire screen.
Also, no account or registration is needed, at all.
Negative
There really isn’t much negative with ScreenLeap when you consider that it isn’t a mainstream application, but a simple website. Although it’s, low featured, you can’t compare it to the Mikogo’s of the group.
Bottom Line
You might be thinking right now, that ScreenLeap blows MingleView out of the water, and you’re right. It does. It’s simple, it’s quick and it’s useful at what it does. I highly recommend it for simply sharing your screen and would give it a 4.5 out of 5 star rating.
SkyFex is an online remote access service. That means it too doesn’t require a download since it’s entirely browser-based. This also means that it’s accessible on all platforms, making it a nice choice for those who are looking for a easy tool to use to help clients or even just friends.
That said, SkyFex has a great commercial presence as it allows companies to customize the interface with their logo, color style and custom links, as well as being able to display a link to remote sessions right on the company’s website. This builds customer loyalty and just looks more professional – of course this isn’t free though.
Features
Aside for the non-free customization features, the web application itself is quite nice. First though, let’s start with the appearance of the account from the “Expert’s” point of view. The page is clean and simple. There is the option to add additional computers to be associated with the account. There are also several ways to connect with the client, either by ID, sending the link directly to the client or by email invitation.
While the session is running you have access to several tools such as system information, remote control, sending files, remote reboot, sharing your desktop, chat, and full screen mode. It’s also neat that when your right click, a message bubble will show where you are pointing to.
Positives
SkyFex has some great features within its free model. From remote control to seeing system info, you are surely to be satisfied with it.
Negatives
I didn’t think I would have said this at first, but there are some negatives with SkyFex. For one, you are only given a 30 minute window of time per session. To my knowledge though, you can start a new session with that same user after that and there shouldn’t be any issues.
Also, I found it puzzling that it required a browser plugin to be installed on the client’s end when the link was clicked. This might throw some users off if they aren’t aware of what a plugin is and even though it states that it’s adware/spyware free, they might still be a little suspicious. I know the person whom I tested this with was caught off guard by it, as many websites may claim to be malware free, but that doesn’t mean they are. Hopefully they trust your better judgment.
Bottom Line
Overall, SkyFex seems like an excellent tool. It has all the features you need, and hopefully it doesn’t take you more than 30 minutes to solve the issue, but it’s not a problem if it does (because we all know that rarely happens). One great advantage that SkyFex has over a local program is that you can access this anywhere simply by signing in. There’s no need to spend time downloading and installing a program if you are at a public computer trying to help someone. I give SkyFex a 4.5 out of 5 star rating.
Yugma SE For Skype is a screen sharing and conferencing application. It is especially great for teams and business professionals who want to have a meeting, but don’t have the time or luxury to do it in person. And because Skype is so common for most people to have, why not integrate with it and make everyone’s job easier?
Features
The Skype integration allows you as the presenter to import the contacts, allowing you to easily invite people right from the list.
There is a vast amount of features from being able to switch presenters, have a telephone conference via Skype, schedule meetings and use annotation and whiteboard tools. But that’s just the tip of the iceberg so check out the list below for the rest of the features.
It is important to note that Yugma SE For Skype only works for Windows and Mac, although Linux users can still participate in the meeting, they just can’t host it with the downloaded program.
Lastly, an amazing feature is that you can have up to 20 participants in one meeting at a time.
Positives
Well so far, I’ve listed all the positives of Yugma, so there really isn’t much more to share. The annotation is an excellent feature, and one of the highlights. It is a solid program with an easy to use interface that is not only intuitive, but productive as well and that is very important in a professional setting. The entire website as a whole is easy to navigate.
Negatives
Unfortunately, there are some. And not being fully compatible with Linux is the biggest one. The other negative is that the meeting has a time limit of 30 minutes and that is when the program is started. So hopefully everyone joins fairly quickly to get things taken care of.
Bottom Line
Yugma SE For Skype is a great addition to Skype and since most people already have the program, it makes coordinating with them a breeze. However, they do not need to have Skype open to participate in the meeting, but simply need to add their Skype email to the Email ID field. I give Yugma SE For Skype a 4 out of 5 star rating.
Three Other ToolsWorth Mentioning
There is a lot on MakeUseOf about Virtual Network Computing (VNC) and I’m going to contribute even more to it. TightVNC
Is TightVNC Really More Tight Than Other VNC Clients?
Is TightVNC Really More Tight Than Other VNC Clients?
When it comes to remotely connecting to a desktop PC or a server, most people quickly opt for installing a VNC server. It’s fast, easy to configure, and best of all it’s absolutely free. Once…
Read More
and UltraVNC, both of which have been mentioned on MakeUseOf are excellent free options for remote access via VNC. Both of these programs allow you to log into a computer, including yours at home while you’re away, and completely control the desktop.
The Google Chrome browser now comes with its own free extension for remote desktop access. It works on Windows, Mac, and Linux, and there are mobile apps for iOS and Android. It’s easy to set up and use from anywhere, and works nicely even on mobile data. Check out our full guide to control your PC with Chrome Remote Desktop
Control Your PC From Anywhere Using Chrome Remote Desktop
Control Your PC From Anywhere Using Chrome Remote Desktop
Need to remotely control your PC from another device? Struggling with RDP, or services like LogMeIn? Well, we have the solution: Google Chrome! Let’s find out how to remote control a PC with Chrome.
Read More
.
What About Linux?
It seems like several programs don’t completely work with Linux (although UltraVNC does), so I’ve provided a few links from past MakeUseOf articles on this topic:
Which One Would You Pick?
There are certainly pros and cons of each service, but I feel that overall ScreenLeap, SkyFlex, Mikogo and CrossLoop are the best and shouldn’t be ignored.
What are your favorites in the list? Do you use them for remote support or face to face meetings?
Signal Desktop Brings Secure Messaging to Your PC3 Email Pranks for Messing With Your Friends
!function(f,b,e,v,n,t,s)if(f.fbq)return;n=f.fbq=function()n.callMethod? n.callMethod.apply(n,arguments):n.queue.push(arguments);if(!f._fbq)f._fbq=n; n.push=n;n.loaded=!0;n.version='2.0';n.queue=[];t=b.createElement(e);t.async=!0; t.src=v;s=b.getElementsByTagName(e)[0];s.parentNode.insertBefore(t,s)(window, document,'script','https://connect.facebook.net/en_US/fbevents.js');
fbq('init', '1039155796172671'); fbq('track', "PageView");
Source link
0 notes
Text
Xiaomi Redmi Note 7
Xiaomi Redmi Note 7 Price Full Specifications Features and Comparison
Today we are going to review Xiaomi Redmi Note 7. Redmi Note 7 has been getting so much hit right now for a very good reason. Because it comes with decent specs a really nice design and all wrapped up into a product on this price range. So, let's see what the xiaomi Redmi note 7 has an offer and we're going to list the Xiaomi Redmi Note 7 Price in Nepal and an overall first impressions review. Hence, without further delay let's get straight to it.
Overview of Xiaomi Redmi Note 7
Firstly, we're going to review specs straight away so we've got dual camera 48 megapixel and a 5-megapixel sensor on the back. Since comes with Qualcomm Snapdragon 660 chipset. So while it's not the 800 series. when we talk to the price you'll understand why not 800 series?. Guys don't get me wrong this Qualcomm Snapdragon 660 is still a very good SOC. It's just not the top tier which you're gonna pay more for 4000 mAh battery capacity. This mobile phone accepts 18W quick charging through a USB-C port. It also has a headphone jack and an IR blaster on top of it
Secondly, Xiaomi Redmi Note 7 had different RAM and ROM variant. Redmi Note 7 comes with 4GB/ 6GB RAM with 64GB, and 3GB RAM with 32GB Storage options respectively.
Design overview of Redmi Note 7
We have got so many requests to review this similarly, on the back you can see the dual camera. Also, there is a bit of text here which says AI dual camera. Now the text on there it does remind me of the Huawei and honor' phones. Xiaomi Redmi Note 7 has different color variants like Black, Red and Blue version for now. This phone provides the feel of more mid-range to budget than premium and flagship.
On the other hand, straight away probably because of its metal and glass sandwiched. This makes it feel to me anyway a bit more premium. But, some of you guys may not like it for the fact that it's got glass on the back. However, I personally don't see is a massive problem. Similarly, it feels very nice in the hand. I know it does have slight rounding on the edges on front and back but the middle bit is completely flat.
Redmi Note 7 provides a case which is made of silicon. so at back, you can see Redmi by Xiaomi just there. Basically, the Redmi line of phones is kind of a Sub-brand of Xiaomi. However, Redmi produces pretty decent products at mid-range budget prices. so Redmi phones are generally pretty popular when they come out on market. This is the reason why potentially Redmi by Xiaomi has got so much hit.
Teardrop notch with Bezels
So getting your glimpse on that front straightaway we have the teardrop notch at the top the chin and the bezels the chip. Moreover, the premium device having said that I don't know about you I think that's quite a nice form factor overall if I got that for Rs. 23,000. I mean can you really complain about the size of those bezels on the chin. or I personally wouldn't I think it looks and feels really pretty nice for that price.
It has volume rocker up and down on the right your power button. We have a SIM slot there which does contain a micro SD card slot. This micro SD card slot is for up to 256GB. Similarly, we can see the USB type C charging cable.
Software and Features
Xiaomi Redmi Note 7 is running over the top of android 8.0 i.e Oreo. This is a little bit disappointing it's not Android 9 i.e pie again. Maybe consider the price. It has both the Chinese and English ROM. Chinese version comes without the Google Play Store. But you can download it yourself. However, on the global version, it will be pre-installed.
The fingerprint of Xiaomi traditionally does some of the fastest on the market. However, I don't think it's gonna be quite as quick as the Xiaomi mix 3 or the Xiaomi Mi 8. But I might be pleasantly surprised. you can feel what it's a fraction slower than those two phones. like that again for the price point is incredibly impressive. You can also do full-screen gestures if you so choose at the Xiaomi gestures. I really do like they're up there for me with the iPhone and the OnePlus gestures. which I think are slightly better than the native Android Pie gestures.
Now the actual display is a 6.3 inch full HD Plus IPS LCD display. The screen resolution is 2340 by 1080 Pixel with a Pixel identity of 409. Redmi Note 7 have Gorilla Glass protection. Similarly, Bluetooth 5.0 and the headphone jack is still Available.
Cameras of Xiaomi Redmi Note 7
So in terms of that camera. It has Dual Camera 48MP+5MP setup at the rear. As you open its AI camera, the AI camera detects scenes automatically and optimizes your photos based on this info. now, this isn't new there are tons of phones that have been doing this over the last year. personally, I am not a massive fan of this AI features. However, I think we can turn it off. It has other features like slow motion video, portrait, HDR+, square panorama, and pro as well. So, if we just scroll back to portrait we'll have a little to go with that as well. you know what again from first impressions the camera looks pretty good. But, it seems to have slight issues with exposure but nothing too significant. it also seems to have a slight pulsing of focus.
However, I want to make sure that I'm not having to work too hard to get some nice shots. Similarly, for me is one of the areas that separates the good cameras from the great cameras. The ability to take fantastic shots in a snapshot in an instant. This is a very solid good camera, not a great camera. It also has led flash on a rear camera.
Xiaomi Redmi Note 7 Selfie Shooter
As we're discussing on cameras. let's see a selfie camera. 13 MP front selfie shooter In straight away, I've noticed the classic Xiaomi beautify. It basically automatically starts and well it's smooth. The face out makes me look like I'm wearing makeup. again fairly similar to every Xiaomi smartphone. I get the front facing camera it tends to be again pretty good not the best. This generally seems to be the way of it to be fair again for Rs. 25,000. I can't really complain it does have portrait mode on that front-facing camera.
As we have mentioned earlier about the Snapdragon 660. The everyday user Don't feel any lags or issues unless you do hardcore gaming. If you're very into your gaming on your smartphone or high intensive tasks. Then there you can see the difference of mid-range 600 series and the 800 series in the Snapdragon SOCs. On this price range, the performance is quite impressive. I just kiss them
Redmi Note 7 price In Nepal and Availability
Xiaomi Redmi Note 7 price in Nepal has been set at Rs. 17,990 for the 3GB RAM/ 32GB storage variant, while its 4GB RAM/ 64GB storage model is priced at Rs.22,999. However, the price tag of Xiaomi Redmi Note 7 pro price in Nepal has been set at Rs. 23,999 for the 4GB RAM/ 64GB storage variant, while its 6GB RAM/ 64GB storage model is priced at Rs.28,990. But, we don't have confirmed launch date and availability in Nepal. However, it will be launched within the last week of March 2019 in Nepal. We have expected that this phone will be exclusively available on Daraz.com.np in Nepal.
You may like
Xiaomi Redmi Note 7 Pro
Samsung Galaxy S10 vs S10 Lite
Mate 20 Pro
Huawei P30
Huawei p30 pro
Galaxy M30
Samsung Galaxy M20
Samsung Galaxy M10
Wrapping Up
Therefore, I think I have provided all the required information about the Xiaomi Redmi Note 7 price in Nepal. But if you have any confusion regarding this please Feel free to comment below. I will be thankful for your personal review in a review tab. Thanks for visiting " MYDIGITALNEPAL". Let's make a Digital Nepal.
Read the full article
0 notes
Text
Xiaomi Redmi Note 7

Xiaomi Redmi Note 7 Price Full Specifications Features and Comparison
Today we are going to review Xiaomi Redmi Note 7. Redmi Note 7 has been getting so much hit right now for a very good reason. Because it comes with decent specs a really nice design and all wrapped up into a product on this price range. So, let's see what the xiaomi Redmi note 7 has an offer and we're going to list the Xiaomi Redmi Note 7 Price in Nepal and an overall first impressions review. Hence, without further delay let's get straight to it.
Overview of Xiaomi Redmi Note 7
Firstly, we're going to review specs straight away so we've got dual camera 48 megapixel and a 5-megapixel sensor on the back. Since comes with Qualcomm Snapdragon 660 chipset. So while it's not the 800 series. when we talk to the price you'll understand why not 800 series?. Guys don't get me wrong this Qualcomm Snapdragon 660 is still a very good SOC. It's just not the top tier which you're gonna pay more for 4000 mAh battery capacity. This mobile phone accepts 18W quick charging through a USB-C port. It also has a headphone jack and an IR blaster on top of it
Secondly, Xiaomi Redmi Note 7 had different RAM and ROM variant. Redmi Note 7 comes with 4GB/ 6GB RAM with 64GB, and 3GB RAM with 32GB Storage options respectively.
Design overview of Redmi Note 7
We have got so many requests to review this similarly, on the back you can see the dual camera. Also, there is a bit of text here which says AI dual camera. Now the text on there it does remind me of the Huawei and honor' phones. Xiaomi Redmi Note 7 has different color variants like Black, Red and Blue version for now. This phone provides the feel of more mid-range to budget than premium and flagship.
On the other hand, straight away probably because of its metal and glass sandwiched. This makes it feel to me anyway a bit more premium. But, some of you guys may not like it for the fact that it's got glass on the back. However, I personally don't see is a massive problem. Similarly, it feels very nice in the hand. I know it does have slight rounding on the edges on front and back but the middle bit is completely flat.
Redmi Note 7 provides a case which is made of silicon. so at back, you can see Redmi by Xiaomi just there. Basically, the Redmi line of phones is kind of a Sub-brand of Xiaomi. However, Redmi produces pretty decent products at mid-range budget prices. so Redmi phones are generally pretty popular when they come out on market. This is the reason why potentially Redmi by Xiaomi has got so much hit.
Teardrop notch with Bezels
So getting your glimpse on that front straightaway we have the teardrop notch at the top the chin and the bezels the chip. Moreover, the premium device having said that I don't know about you I think that's quite a nice form factor overall if I got that for Rs. 23,000. I mean can you really complain about the size of those bezels on the chin. or I personally wouldn't I think it looks and feels really pretty nice for that price.
It has volume rocker up and down on the right your power button. We have a SIM slot there which does contain a micro SD card slot. This micro SD card slot is for up to 256GB. Similarly, we can see the USB type C charging cable.
Software and Features
Xiaomi Redmi Note 7 is running over the top of android 8.0 i.e Oreo. This is a little bit disappointing it's not Android 9 i.e pie again. Maybe consider the price. It has both the Chinese and English ROM. Chinese version comes without the Google Play Store. But you can download it yourself. However, on the global version, it will be pre-installed.
The fingerprint of Xiaomi traditionally does some of the fastest on the market. However, I don't think it's gonna be quite as quick as the Xiaomi mix 3 or the Xiaomi Mi 8. But I might be pleasantly surprised. you can feel what it's a fraction slower than those two phones. like that again for the price point is incredibly impressive. You can also do full-screen gestures if you so choose at the Xiaomi gestures. I really do like they're up there for me with the iPhone and the OnePlus gestures. which I think are slightly better than the native Android Pie gestures.
Now the actual display is a 6.3 inch full HD Plus IPS LCD display. The screen resolution is 2340 by 1080 Pixel with a Pixel identity of 409. Redmi Note 7 have Gorilla Glass protection. Similarly, Bluetooth 5.0 and the headphone jack is still Available.
Cameras of Xiaomi Redmi Note 7
So in terms of that camera. It has Dual Camera 48MP+5MP setup at the rear. As you open its AI camera, the AI camera detects scenes automatically and optimizes your photos based on this info. now, this isn't new there are tons of phones that have been doing this over the last year. personally, I am not a massive fan of this AI features. However, I think we can turn it off. It has other features like slow motion video, portrait, HDR+, square panorama, and pro as well. So, if we just scroll back to portrait we'll have a little to go with that as well. you know what again from first impressions the camera looks pretty good. But, it seems to have slight issues with exposure but nothing too significant. it also seems to have a slight pulsing of focus.
However, I want to make sure that I'm not having to work too hard to get some nice shots. Similarly, for me is one of the areas that separates the good cameras from the great cameras. The ability to take fantastic shots in a snapshot in an instant. This is a very solid good camera, not a great camera. It also has led flash on a rear camera.
Xiaomi Redmi Note 7 Selfie Shooter
As we're discussing on cameras. let's see a selfie camera. 13 MP front selfie shooter In straight away, I've noticed the classic Xiaomi beautify. It basically automatically starts and well it's smooth. The face out makes me look like I'm wearing makeup. again fairly similar to every Xiaomi smartphone. I get the front facing camera it tends to be again pretty good not the best. This generally seems to be the way of it to be fair again for Rs. 25,000. I can't really complain it does have portrait mode on that front-facing camera.
As we have mentioned earlier about the Snapdragon 660. The everyday user Don't feel any lags or issues unless you do hardcore gaming. If you're very into your gaming on your smartphone or high intensive tasks. Then there you can see the difference of mid-range 600 series and the 800 series in the Snapdragon SOCs. On this price range, the performance is quite impressive. I just kiss them
Redmi Note 7 price In Nepal and Availability
Xiaomi Redmi Note 7 price in Nepal has been set at Rs. 17,990 for the 3GB RAM/ 32GB storage variant, while its 4GB RAM/ 64GB storage model is priced at Rs.22,999. However, the price tag of Xiaomi Redmi Note 7 pro price in Nepal has been set at Rs. 23,999 for the 4GB RAM/ 64GB storage variant, while its 6GB RAM/ 64GB storage model is priced at Rs.28,990. But, we don't have confirmed launch date and availability in Nepal. However, it will be launched within the last week of March 2019 in Nepal. We have expected that this phone will be exclusively available on Daraz.com.np in Nepal.
You may like
Xiaomi Redmi Note 7 Pro
Samsung Galaxy S10 vs S10 Lite
Mate 20 Pro
Huawei P30
Huawei p30 pro
Galaxy M30
Samsung Galaxy M20
Samsung Galaxy M10
Wrapping Up
Therefore, I think I have provided all the required information about the Xiaomi Redmi Note 7 price in Nepal. But if you have any confusion regarding this please Feel free to comment below. I will be thankful for your personal review in a review tab. Thanks for visiting " MYDIGITALNEPAL". Let's make a Digital Nepal.
Read the full article
0 notes
Text
Loupedeck+ Review: A Big Improvement From The Original
I’ve seen peripherals like the Loupedeck+ and its competitors around the market for a while now and I’ve been quite skeptical about the practicality of their use. Not that they are bad things, just that I’ve spent so many years with a keyboard & mouse combo that the thought of learning a new device to work on my images caused me a near panic attack. I will, however, admit that after getting hands on with the updated Loupedeck+ after WPPI 2019 that my opinion has changed greatly! While I’m still pretty clunky with it, the ease of use, accuracy, customization and versatility with the variety of supported apps make it more than worth the $249 price tag.
What Is It?
The Loupedeck+ is a photo & video editing console or keyboard that was created (initially by crowdfunding) to help you edit your photos & videos faster and easier than via the computer/mouse combination. It takes the software version of your sliders in Adobe Lightroom (among others) and gives you a physical button to use instead. I can also confirm that the knobs actually give you more control, or better accuracy than when using just the mouse in most of the applications as well.
youtube
[REWIND: Introducing Loupedeck+ | Loupedeck Gets An Upgrade & No Longer Just For Lightroom]
At Loupedeck, We’re Passionate about each and every step of the photo and video editing process. From first shoot to the final edit, we know it’s the small details that often make the biggest difference between a good image or video and a great one.
Quality
Having not been familiar with the first generation of Loupedeck, I did a fair bit of homework as well as picking the brains of the folks at SLR who did the initial review here. Among the biggest “cons” that I found from users with the original was the actual build quality. From what they’ve told me and what I’ve seen in my own use of the Loupedeck+, while the dimensions are the same, the quality of the product has improved significantly. The console is sturdier and the buttons/dials have a much more stable and satisfying feel when pressed and adjusted.
Another improvement is the addition of completely customizable functions, buttons, and a much improved software/plugin & interface.
Setup & Install
Here’s what I loved about this product. The first thing you have to do is download the updated software/drivers for your operating system from the Loupedeck Website and install them like any other application. Once you’ve done that, just plug in the console via the USB cable and that’s it. The system even recognizes when you’ve connected the device and lets you know that it’s running. That’s literally it. No confusion, no crazy setups; it’s just ready to go out of the box.
As you can see from my screencap above, if you open the application the system recognizes which application is “using” the devices and from here, if you choose to, you can go crazy and start customizing the buttons and layouts to suit your personal preference. Regardless of whether or not you do, as you turn the dials and buttons on the console, the relating sliders and settings in Lightroom (or the other supported applications) adjust accordingly.
Using It / The Process
So here was my personal bottleneck using the Loupedeck+. I’ve had such a muscle memory developed for Lightroom after using it in the same process every day for nearly a decade that moving to this hardware was a bit of a challenge. I was actually afraid that it would take me days, if not weeks, to actually get used to and comfortable with this peripheral. As mentioned above, it nearly gave me a panic attack when I was looking at the PILE of client work I needed to rush through.
https://www.slrlounge.com/wp-content/uploads/2019/04/loupedeck-gradient-2350x1324-25fps.mp4
Once I got over that initial anxiety and actually started to play with the device, I was kinda blown away with how easy it was to get used to. In fact, I even found myself using more of the available sliders/features in LR simply because they were laid out so clearly in front of me and not hidden in my often collapsed menus on screen. The part that got me was just how accurate adjusting the dials was compared to manually dragging the sliders in the OS. I found myself happier with my edits and have started to test out more features and creative tools that usually were glanced over in the past.
If you’re anything like me, you’ll find yourself looking at the screen, finding the slider, then looking back to the Loupedeck+ and finding the corresponding Dial/Button, making an adjustment, and then looking back at the screen & sliders and back again to make sure everything worked the way it should…and then you’ll realize you’re wasting a ton of time and you can just focus on the image while making fast and accurate adjustments with a newfound muscle memory for each of the preferred dials & buttons in your workflow.
Granted, I’m still not up to the speed I want to be with it, but it’s starting to feel natural and that’s making the difference every time I’ve sat down to edit. The learning curve is actually quite simple once you actually start to use it.
Price Point
The original Loupedeck launched with a price point of $300 US and now the updated Loupedeck+ is available for just $249. While that may seem steep, when you compare it to the other options on the market, it’s actually one of the best and most affordable ones out there. Especially when you look at the extreme high end console/decks for video production that start at price points of nearly $10,000. If you spend a lot of time working in any of the applications listed below (with more being added), $249 is a very small price to pay for the amount of time it can save you and the amount of creative control it will add for you!
Check out the pricing from our preferred retailers below;
Amazon | B&H | Adorama
Who Is It For?
Let’s get straight to it. If you’re in the business of dealing with a large number of files like a wedding or event photographer, than this is the device for you. It feels like that is the primary target market for the Loupedeck company and it definitely works there. As a wedding or event photographer, this would make editing a lot more fun, especially since I can sit back at my desk with the console on my lap and work away with ease on my images.
Even if you’re not a wedding or event photographer there is still a lot of value in this device for portrait and landscape shooters. Since speed isn’t really at the front of your requirements, this device will let you get more flexible and creative with your edits, finding and using more features within lightroom than you may have without, thus letting you explore many more possibilities with your final images.
The only market I didn’t see any real value beyond the “fun” portion was Commercial Photography. The reason here is typically in this world you’re shooting for a specific look, culling images quickly, and then editing small batches (if not just a single file) in Photoshop to meet a client deadline. Again, maybe as a commercial photographer you’d love it, but terms of a first impression and its broad usage, that’s really about the only field I felt wouldn’t get the most out of it.
So if you’re a high volume shooter, or you spend a lot of time in Adobe Lightroom already making every image absolutely perfect, it may be worth knocking on your friends door to borrow their loupedeck to see if the device is right for you.
Technical Details
Supported Software
Adobe Lightroom Classic CC
Adobe Premiere Pro CC
Adobe Photoshop CC
Adobe After Effects CC
Adobe Audition
Final Cut Pro X
Skylum Aurora HDR
Beta Support for Capture One Pro
System Requirements
Adobe Lightroom® 7.4 or later
Adobe Lightroom 6
Adobe Photoshop CC
Aurora HDR
Beta integration with Capture One
Adobe Premiere Pro CC 2019
Apple Final Cut Pro X 10.4.5
Adobe Audition CC 2019
Windows® 10, Windows® 8.1
Mac® OS 10.12 or later version
Internet connection needed for Loupedeck software download
USB 2.0 A
Upgrades to the Loupedeck+ include:
Mechanical keys with a more precise and sturdy feel
Improved build quality
Two dedicated customizable dials and seventeen buttons
“Custom Mode” that allows full user control of all dials
Configuration software built from scratch for an even better, faster and more stable photo editing experience
Additional application support for Adobe Premiere Pro, Photoshop, After Effects, Audition, Final Cut Pro X, Skylum Aurora HDR, and beta support for Capture One Pro
Things to Improve Upon Still
Wireless support like with wacom tablets would be a huge addition
Addition of tilt functions like most keyboards have for additional ergonomic benefits
youtube
For More information on the Loupedeck+ be sure to check out the loupedeck blog here.
[REWIND: Loupedeck Review | A Thorough Review Of The Lightroom Controller Console]
If you’re reading this you’re likely into post processing, and if you really do and want to absorb lots of this kind of information, I highly suggest you take a look at our Lightroom Organization & Workflow workshops. Premium SLRL Members get access to it all. They’ll get you up to speed, and fast, allowing you to get the most out of this program we spend so much time with.
from SLR Lounge https://www.slrlounge.com/loupedeck-review-a-big-improvement-from-the-original/
via IFTTT
0 notes
Text
How to Enhance Your Content by Building Infographics with These 12 Tools
Those of you who have been reading my blogs for a while know I’m a huge advocate of using visual elements to enhance my blog posts.
In addition to being visually appealing, images can actually improve the performance of your articles. That’s because blogs with pictures receive 94% more views than posts without them.
According to a recent study from the Content Marketing Institute, 73% of marketers say their top priority is to create more engaging content.
And 55% of these content creators are prioritizing visual content.
If you haven’t been using images to enhance your content, you should consider starting with some infographics. Even if you have included pictures in some of your old content, you can take this strategy to the next level by building custom infographics.
That’s because infographics are a combination of text and images. Research shows people follow directions 323% better if the directions include both text and illustrations.
On social media platforms, infographics get liked and shared at three times the rate of all other content.
Once you start building infographics, you will drive more traffic to your website. That’s because other people will use your custom images to enhance their own content.
As a result, you will consistently build backlinks, which will improve your SEO.
Now that you understand why you need to create infographics, it’s time for me to show you how. There are tons of tools available, but not all of them are created equal.
I’ve narrowed down the top 12 tools for building infographics.
1. Easel.ly
If you want to create an infographic fast and efficiently, Easel.ly is a great place to start.
Above is a sampling of some of their top infographic templates. All you need to do is select the template you want and plug in your information.
They’ve got a template for everything. Some are designed to fit more text on the page, while others prioritize numbers from any research you may have conducted.
It’s free to use Easel.ly, but if you want premium templates, you can access over 500 of them for a fee. I recommend starting off with the free ones to see whether you’re happy with the platform before upgrading your membership.
Another cool feature of this platform is that they have community infographics built by others. You can plug your information into those as well.
The Easel.ly website features an easy to follow guide on how to create content on their platform. They also offer a live customer service chat option in case you have questions or run into any problems with the platform.
2. Pitkochart
Pitkochart is another top option for beginners. The platform makes it easy to create custom infographics without any design experience.
In addition to infographics, they have other design templates as well. You can build things such as:
flyers
posters
presentations
reports
Some of my favorite types of infographics on Pitkochart are the graphs. It’s a great way for you to display your numbers in a custom chart.
Pitkochart also has a map feature. You can customize the color options on these maps to show how different states, regions, or countries have varying results for your discussion.
Speaking of color options, Pitkochart has many. You can select colors for each portion of your infographic, or you can choose preset color schemes.
It’s an important feature because different color schemes can impact sales on your website.
They have a library of more than 1,000 icons. You can use these without having to pay licensing fees or give an attribution to the creator.
This definitely makes things less complicated, which allows you to spend your time and effort on building the infographics.
Once you build your infographic on Pitkochart, they help you name your image so that it’s optimized for SEO. Then, you can share it directly from the platform.
They have sharing options for email, ebooks, and social media. You can get an embedd link for your website, share it with your team, or download a high-resolution version of your infographic.
3. Venngage
Are you a student? If so, Venngage will let you use their software free. But everyone else will have to pay for the platform.
Their monthly rate is $19 for individuals and $49 for businesses. It may seem pricey, but the business membership comes with premium features such as:
custom templates
unlimited infographics
100 image uploads
branding help
charts
icons
team collaboration
high-resolution downloads
If you know you want to take advantage of these features for the entire year, you can pay upfront annually and receive a 20% discount off your membership.
Venngage is great because their infographic templates are seemingly endless. With so many options, it’s less likely you’ll have similar to other infographics templates already published on the Internet.
This can make your brand stand out from the crowd.
They also group their infographics based on several categories. You can build the right image for whatever you’re trying to illustrate. Some of the top categories include:
statistical
lists
timelines
geographic
real estate
nonprofit
human resources
They even have “fun data” templates to help you display your unique research in a way that’s easy to comprehend.
4. Visme.co
A list of visual design tools wouldn’t be complete without Visme.co. The platform specializes in all kinds of visual content, including infographics.
If you need to make an infographic that compares multiple variables, Visme.co has more than 20 charts and tables to choose from.
There are a couple of different ways you can input data into these visuals. Your first option is to type the numbers in manually. But if you have lots of information, you may prefer to import your data.
Another cool feature of these charts is the ability to connect with live data.
All of the templates have customizable fonts. You can change the color, size, and style of your text. Don’t see a font you like? No problem. Visme.co lets you upload your own fonts as well.
This software can help you take your infographics to the next level by making them more engaging. You can add video and audio files.
They also give you the option to embed polls, surveys, and maps. You can even add motion features, like popups, to your infographic.
Once your infographic is published, you can track how well it’s performing. The analytics tools tell you how many people saw your infographic, what type of device they used, their location, and level of engagement.
5. Infogram
Infogram is another one of my favorites. The platform allows you to fully customize every element of each infographic you create.
In addition to infographics, you can also use this software to create:
reports
charts
maps
dashboards
Infogram also helps you build images specially designed for your social media channels.
Their platform has more than one million icons and images, all royalty-free.
What I like most about Infogram is their editing tool. You can drag, drop, and move every element on the screen to fully customize your design.
If you have data that needs to be imported, it’s easy for you to upload spreadsheets from Excel, Google Drive, Dropbox, etc. You can even use a cloud service or their API to set up live data integration.
They have interactive charts and maps at your disposal as well.
Ultimately, if you need a one-stop shop for all your infographic needs, you can’t go wrong with Infogram.
6. Canva
Even if you don’t plan on making a ton of infographics, Canva has plenty of other design tools for you to take advantage of. Those of you who are a little bit more advanced will enjoy the graphic design features offered on this platform.
One of my favorite elements of the Canva platform is the versatility it offers. You can use it on the Internet as well as your iPhone or iPad.
They specialize in photo editor, color palette, and font combinations. But their infographic building tools are just as good, if not better. You don’t need to have a design background to figure it out.
Unlike some of the other Canva tools, the infographic builder is free to use. All you have to do is create a Canva account before you get to work.
Their library has more than one million photos, illustrations, and graphics for you to choose from. If you’re not happy with their selection, you can also upload your own images.
Once your image is uploaded, you can select a font from over 130 options. They make it easy for you to change the background and color scheme too.
After you’re satisfied with your custom layout, you can save these unique templates to your account. This makes it easy for you to repurpose the same layouts for your future infographics. It’s one of my favorite time-saving marketing tools.
If you’re not satisfied with all the elements in the free Canva library, they have premium elements available for purchase.
But unlike some of the more expensive infographic tools we’ve seen, the Canva premium purchases cost only $1 at most. It’s an extremely cost-effective way to enhance your infographics.
7. iCharts
If you want something a little bit different from the tools on our list so far, iCharts definitely fits the description.
This platform is cloud-based. It’s a visual analytics tool allowing you to organize complicated business information.
You can use iCharts to simplify data from extensive research studies. Since it’s a cloud-based platform, you can access it from wherever you are. Nothing needs to be installed on a device.
They have a feature letting you implement real-time data integration.
This option isn’t a typical infographic builder. But you can still export the charts and graphs to enhance your content with custom images.
8. Skitch
Similar to our last tool, Skitch doesn’t necessarily build custom infographics either. But I use Skitch every day to help enhance my visual content.
Some of you may not be interested in building all your infographics from scratch. That’s OK.
If you’ve got a Mac, you can use Skitch to help you customize infographics from other sources. Here’s how you do it.
Once you download Skitch on your Apple device, which is free by the way, you can use it to take screenshots of infographics. Then you can markup specific sections with arrows, boxes, and text to make it your own.
Regular readers of my blog posts might recognize the pink arrows and annotations from Skitch. That’s what I use to mark up the images on my blog.
If you use this tool to help you build infographics, make sure you give proper credit to your image sources.
9. Creately
Creately is a platform specializing in creating unique diagrams for your business.
Although they aren’t exactly the same, diagrams and infographics are very similar, which is why I thought it was worth adding this tool to my list.
I recommend Creately for businesses that have multiple designers producing content at the same time.
With this software, you can collaborate with up to 20 team members on the same project with real-time updates, edits, and changes to your design.
They have over 1,000 diagrams for you to choose from. Even if you don’t want to publish your diagrams, you can use the tool for in-house projects such as building a customer journey map.
10. Google Charts
When in doubt, it’s always a good idea to use tools you’re familiar with. As a business owner, you’ve likely used Google Analytics to help you with your marketing solutions.
Well, Google Charts is another great option offered with your Google account.
Once you determine which types of data sets you want to include, you can customize your design fully. You get to select which type of chart you want to use from Google’s extensive gallery.
It’s easy to add these infographics to your website, email messages, and social media channels.
Their dynamic data feature allows you to connect your data source so the charts updated with real-time information.
Google really stands apart from the crowd when it comes to customer service. There are thorough guides to help you with the tool. Every section has step-by-step, easy-to-follow instructions.
11. Gliffy
If you’re looking for another tool for creating custom diagrams, Gliffy is a great choice to consider.
The software is extremely easy to use. You won’t need any type of design skills to build your infographics.
Everything is done with an HTML5 editor, so you don’t need to download anything to your devices in order to use this tool.
If you want to get your project done as fast as possible without building your own template, it’s no problem. Gliffy has ready-made templates. All you need to do is plug in your information.
Share your infographic with an embed link, or upload it directly to your social media profiles.
You can also use Gliffy to collaborate with your team members. Grant access to people whom you trust making edits to your design.
12. Wordle
Not every infographic needs to be a complicated set of data.
Sometimes, it’s effective to have only one statistic or sentence displayed to stand out from the rest of your content. If that’s the case, Wordle is one of your best options.
This platform is made for creating word clouds. You can use customized fonts and templates to create these unique images.
You can even use Wordle to reinforce a point you made within the text of one of your blog posts.
Conclusion
Images and visual elements are more powerful than words alone.
That’s why you need to be using infographics to enhance your content. But if you don’t want to search for infographics online, the tools I’ve outlined above allow you to create your own.
Don’t get me wrong: there are dozens of other infographic building tools available on the Internet. But from my experience, these ones are the best places for you to get started.
There’s something on this list for everyone—it just depends on what you’re looking for.
Some of these tools are free, while others charge a fee. Certain tools are better for charts and datasets, while others specialize in custom images and animations.
Refer to this guide for all your infographic creation needs.
What tools does your company use to enhance your visual content strategy with infographics?
https://www.quicksprout.com/2018/05/23/how-to-enhance-your-content-by-building-infographics-with-these-12-tools/
Read more here - http://review-and-bonuss.blogspot.com/2018/05/how-to-enhance-your-content-by-building.html
0 notes
Last Seen Blogs

wumbee-blog1
B.E.E.

iamperouge
I Promise to Obliterate Brittania!

dukeofafrika
SamK

peary-sweet
of earth

worthwhile-mess
0-0