#symington corset patterns
Text
aaaa i know i havent been writing v much (read: at all) recently which i feel kinda bad about bc wanting to write more twst content is why i changed my blog url a while back but. my brain is currently on the "sew projects you're underskilled for" rotation of the crafting cycle so it may be a while yet before i pop out a new ficlet
#the news about bridgerton/netflix/etc removing requirements for wearing corsets got me heated#and i went back into the historical corsetry rabbit hole#and found out i can buy the symington pretty housemaid corset pattern from clockwork_faerie on etsy#who offers a version of the pattern that's drafted to your custom measurements#and then i remembered i never finished reconstructing my mom's tank top and that i should finish that first#but i do have 5 yards of muslin that came free with my last fabric order from mood fabrics back around halloween#so i can actually try making mockups!!#anyway. i apologize for dumping sewing thoughts here lol#rose speaks
2 notes
·
View notes
Note
what pattern are you using for your corset?
A custom pattern based on the Symington “Pretty Housemaid” corset, from Clockwork Faerie Co! It’s very convenient – you just send her your measurements, and she makes a pattern based on them. I’m going to do a mockup still, obviously, because bodies are weird. But it’s nice to have all of the math taken out of it for me
43 notes
·
View notes
Text


I was invited to a museum opening for a fashion history exhibition the other day, so of course I had to dress on theme.
Dress: made with a Gustav Klimt print using a lolita pattern (made by my mother).
Corset: a 1890's Symington reproduction, made by Lace Embrace
Shoes: American Duchess Bernhardt Theatrical Boots
8 notes
·
View notes
Text
Late 1890s Corset Part 2 - Mockups
March 11, 2021

[Image ID: a photo of Alex's torso wearing a navy and red corset mockup, split down the middle to show the left half wearing the poorly fitting first mockup and the right half wearing a well-fitted third mockup.]
Pattern Selection
I had my heart set on a Symington pattern from the start (because heaven forbid we make things easy on ourselves), and I knew I was aiming for the late 1890s, so I was able to significantly narrow down my pattern search just like that.
Doing research into materials and costs (and my limited spending money) narrowed things down one step further - I needed a pattern I could make as a single-layer corset, aka no fashion fabric (aka no beautiful, expensive silk), aka no cording.
Because of these limitations and my own sense of style I was able to narrow down my choices to five patterns which I traced in Illustrator, printed, cut, and assembled into five small paper corset models. I used those to get a sense of the shape created by the original pattern and make my final pattern selection based on the shape and how difficult it might be to construct. I ended up going with the Symington pattern that has instructions (though we'll see later whether or not I end up following them).
From there I followed the Wicked Rain Studio tutorial on scaling a pattern to your measurements to create my pattern. I had measured the paper model incorrectly on the first go-around and created some... alarming shapes. Once I re-measured it, though, and re-did my math the process went really smoothly! (Note to self: consider switching to the metric system! Converting decimals to fractions of an inch is hard!) I did make a slight adjustment to the process, though - I added an underbust line, so I would know approximately where to end the bust curve. I didn't measure around the underbust, just the distance from there to the bust and waist lines.
After I drew out the pattern I double-checked my bust, waist, and hip measurements, cut the pattern out, and 'walked' my seams to make sure the seams and measurement lines matched. Thankfully, everything matched pretty well!
Mockups
Then I gathered my supplies - I had a mostly-suitable mockup fabric in my stash, heavy-duty zip ties to use as bones (admittedly not ideal, but I already had them and I'm on a budget), and stash ribbon for boning channels. Then I borrowed some 'hacks' I've seen other people use, including using grommet trim/tape instead of setting grommets for the lacing and using a heavy-duty zipper which will be reinforced with zip tie 'bones' instead of a busk. Because I don't know the height of the corset yet, I didn't want to buy bones or a busk only to have them be the wrong length!
At long last, it was time for mockups! I traced my pattern onto the fabric and cut the pieces out with a generous 2" seam allowance on the sides (you don't need seam allowance at the top and bottom edges), and then thread-marked the seam lines and the bust, waist, and hip lines. I made the seam allowances so wide so that I could make any adjustments on those pieces instead of cutting new pieces since I don't have much mockup fabric left.
My first mockup went together quickly (minus some thread tension issues), but had some glaring fit issues. It was too large overall and left me with no lacing gap. Even completely laced it was slightly too large in the waist, but was slightly too snug in the hips (I suspect this was because I had used my full hip measurement instead of my high hip measurement, which is where my hip bones stick out and sits about 1.25" higher than the hip measurement I had taken). The front of the corset was also too long - it came up higher on the bust than I liked and was long enough that the bones stabbed me in the legs when I sat down.
To account for these issues, I took 1" at the bottom of the center front (evening out at panel 3), 1.75" at the center front top (evening out at panel 4), 2" off the bust and hip lines all around and 3" off the waist (all spread evenly across each seam). I then remembered that I needed more room in the hips (aka hip spring) at certain seams, so I added a bit back to those seams. The pattern pieces were re-traced, re-thread marked, and re-sewn into mockup #2.
The second mockup seemed to fit a lot better, with the only glaring error being an uneven lacing gap - about 2" at the top, which I wanted, but almost 5" at the bottom, which is way too much. I wore the corset mockup around the house for a few hours that evening to understand how the corset would feel after being worn for a few hours, and I'm VERY glad I did that. The pattern encourages a slightly conical shape sloping from the underbust to the waist, and it seems that my lower two ribs are NOT amenable to that (I have a decidedly rectangular rib cage) and I started to experience discomfort in that area after about two hours that was bad enough by hour four that I had to remove the corset entirely. I expect to wear my corset for hours at a time for events and such, so this had to be fixed. (I was uncomfortable enough that I forgot to get photos of the second mockup, and put it back on briefly a few days later.)
On the bright side of things, I decided I had my pattern close enough to the final that I went ahead and ordered my busk, boning, and lacing cord! I put off making my third mockup until those arrived so that I could practice inserting a busk and also so that I could have one lacing cord instead of three mismatched stash ribbons.
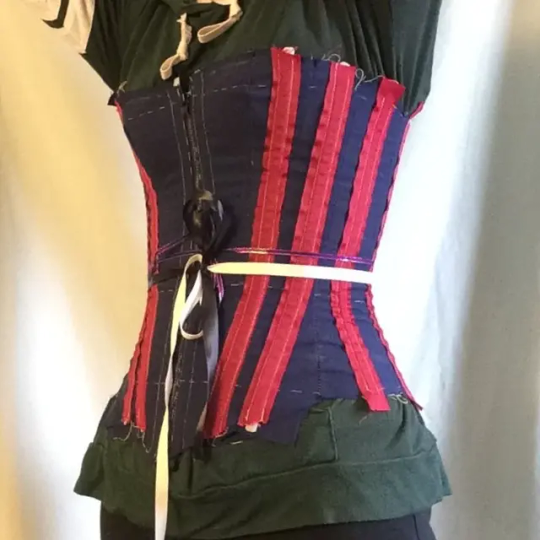
[Image ID: a 3/4 view of ALex's torso wearing a navy and red corset mockup, with three mismatched ribbons tied around the waist.]
My adjustments for the third pattern included evening out the bust curve and adding width to the waist and hip of pieces 1-4. I also had to shorten the height of the back panels (piece 6) to account for the fact that I underestimated how long the spiral steel bones on either side of the lacing needed to be, though that adjustment didn't make it into the mockup as I didn't want to remove and reattach the grommet strips.
The third mockup gave me a much more consistent lacing gap (though still not completely parallel, it got narrower at the hips), but slightly less waist reduction. I wore it around the house again to see how my ribs felt, and it was really comfortable! I had it on for four hours in the morning and another five in the afternoon (with about an hour break in between for a nap). Lacing it up was infinitely easier with a proper lacing cord!
Finishing Up
Ultimately, I was content with my third mockup and deemed that my final pattern! I took apart my final mockup, ironed the pieces, and compared them to the pattern to ensure wearing hadn't warped them (it hadn't).
That means I'm ready to start on the final corset!
My next blog post will go over the construction of the final corset and material costs. Then there will be a fourth and final post looking at flossing and decoration and the final reveal. I can't wait to see how my first corset turns out!
1 note
·
View note
Text
screaming internally bc i found someone on etsy selling made to measure corsets USING THE SYMINGTON PRETTY HOUSEMAID PATTERN but it's $700 and i dont think i could ever justify spending that much money on a piece of clothing
#they also have a custom pattern for just $60 but i dont have the skills to sew one myself yet#rose speaks
0 notes
Text
Cleaned my closet at home a bit and found the slip I took from my mom

Now that I've (mostly) finished the combinations, I want to try make a corset. My plan is to use one of the Symington corset patterns and be willing to do a lot of trial and error.
Already did the first step of making a rough paper mockup and it turned out pretty good for sketching out the pattern by eye

#ossian sews#i saw the paper mockup thing in a video before and im still kinda surprised by how much shape corsets have#the bulk of trial and error will be fitting it to me and making sure its comfy
0 notes
Text
Free historical patterns for stays and corsets
Unknown date:
Valencian Museum of Ethnology’s stays with six pannels (unknown date)
18th century:
Stays from the Textile Museum and Documentation Centre of Terrassa (circa 1730s - 1750s)
Valencian Museum of Ethnology’s stays (1770s)
Victorian:
Godey's Lady's Book’s stays (1857)
The Violetta corset (1886)
The Dahlia corset (1888)
Symington corset #341 (circa 1892 - 1895)
Symington corset #31090 (circa 1892-1907)
Symington corset #23050 (circa 1892-1898)
Symington corset #32730 (circa 1894-1901)
Symington corset style #311 (circa 1894)
Symington corset style #2110 (circa 1896)
Edwardian:
The Tulip Corset (1906)
Please note that this post is just a compilation of patterns I have found online on various websites. Some os these patterns were digitally traced after an original -- please respect those who took their time to do this and never claim these works as your own.
I will be updating this list as I come across other antique patterns
#corset#corsets#stays#historical fashion#victorian era#edwardian era#18th century#18th century fashion#19th century#19th century fashion#antique#antique patterns#antique fashion#sewing patterns#historical costuming#fashion#historical dress#cottagecore
1K notes
·
View notes
Text
Making an 1890s Symington Pretty Housemaid Corset - Part 1
A good while ago I made a mock-up for this corset I found in Jill Salen’s book called Corsets, and then I worked on different projects, and then I bought the fabric but I never actually sat down to make it, but now I’m feeling motivated and I feel like it’s a great next project.
So this is the original corset:

and this was my mock-up:
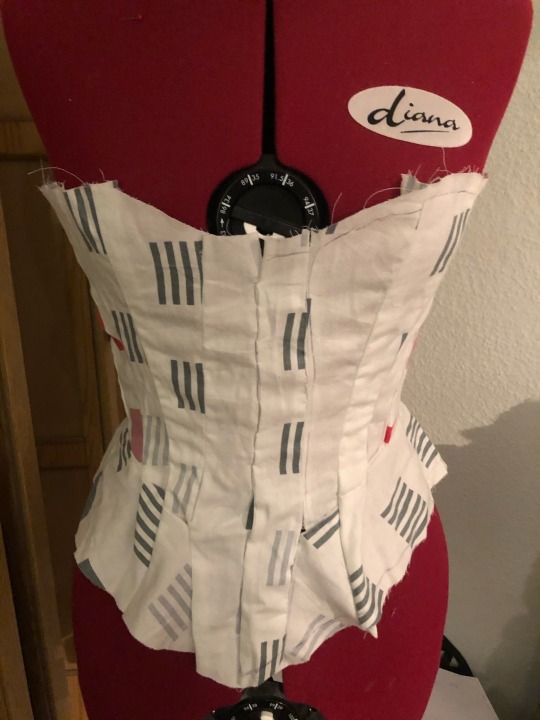
Unfortunately, I lost the paper pattern but I remember making adjustments to the mock-up, so I decided to just take the mock-up apart and use one half of it as a pattern.

Here are all the panels I cut last night, I’ve got a total of 28 panels (it’s going to be 14 more), but so far I only cut the layers that are going to have the boning and the cording sandwiched between them. I was originally just going to have these two layers, but I decided to line it with a layer of cotton canvas so you can’t feel the boning and cording as much on your own body. The original is made of "drab twill lined with fawn coutil and interlined with hessian". Mine is going to be made of two layers of twill (since I couldn’t find coutil anywhere), plus the canvas or maybe I’ll change my mind in the last second and make it out of regular cotton or linen, and I am skipping the hessian interlining as I’m not going to be wearing it a lot anyways and I think the twill will do a great job at making it sturdy enough for those few times I’m actually going to put it on. For the front I’m using a spoon busk I already had from when I accidentally bought one instead of a straight one. At least I’ll be able to use it now.
As you can see in the picture of the original, it’s mostly corded and has only very few bones. The description doesn’t mention whether the boning is baleen or steel, but I’m assuming it’s steel as baleen was harder to find and thus more expensive at that time.
Nevertheless, I’m using my good old, completely historically inaccurate cable binders. It’s a good cheap alternative for fake baleen and I still have more than enough of them left from my stays projects, so I’m using them.
Now I’m going to mark where the cording and boning will be so it’ll be easier to sew the channels afterwards. For that, I’m looking at the original pattern pieces in the book and calculating the ratio (there’s a lot of math involved... please let me know if there’s any other way to do this).
So.. I’ve run into a problem. Each panel seems to have 6 cording channels, but that seemed like a lot to me, so I measured my cording and realized that I can fit 4 at most. I was going to use my 8mm boning but I think I’ll use the 5mm ones to at least save up some of the space so I can at least fit 4 cordings, even if that’s not ideal.
Now on to the cording.
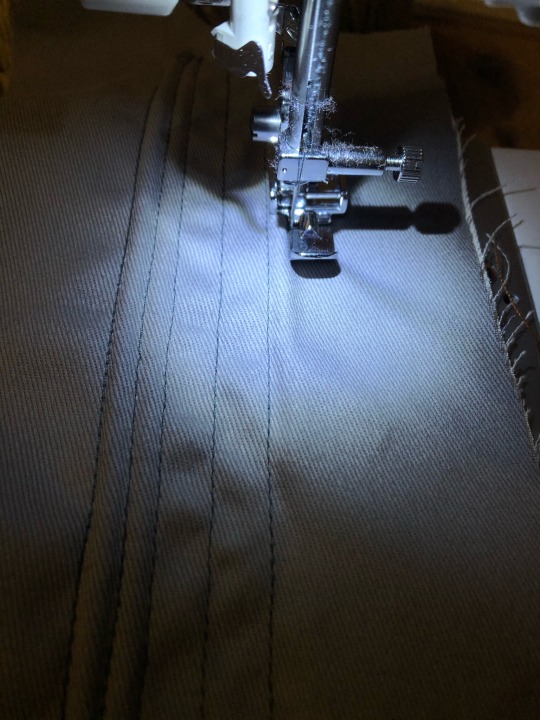
After many, many hours of work - I completely underestimated it - I’ve finally finished all of the cording and boning channels. It was a tiring process (probably because I had to constantly switch back and forth between the zipper foot and the regular one) but somehow got quite therapeutic towards the end, but at the same time I’m so glad I finished and I never want to do that again! (I probably will sooner or later... just me being dramatic!)
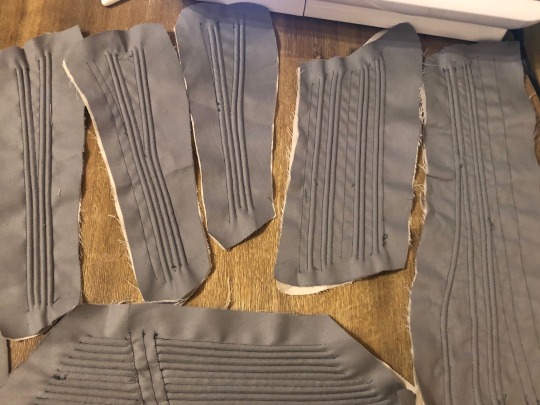
I know, it doesn’t look perfect and I’m very upset about all those stupid irregular entanglements that make it look messy, I’m going to try to clean that up as best as I can but I just wanted to show you (half of) the finished panels now. The boning hasn’t been inserted yet. Damn, I wish I’d bought the same color of the thread as the fabric then it wouldn’t be so obvious I messed up, and it would look nicer in general. Well, you learn something new with every project. It’s just unfortunate that I didn’t realize this sooner.
Now, it’s time to sew them together. I did what I always do and put them right side facing together and pinned along my markings. The front and back panel were very difficult to pin to the test because of the hip piece. It’s difficult to pin a straight piece to one that‘s not.
Anyways, this is half of the corset so far.


I... am just realizing something. The boning on the side, it’s an extra channel and not within the panels itself... I’m just going to have to put another channel on top of the existing one. Ha. Patience is key.
I’ve only sewn half together, the other half will have to wait. In total, this took me two days of work or about 13 hours. I hadn’t expected the cording to take a lot longer than sewing boning channels, but compared to this corset, making a fully boned pair of stays was a walk in the park, in terms of time.
Next I’m going to have to properly insert the boning and do the other half - I might also insert the busk. Then I’m going to have to switch to hand stitching and I’m dreading it, but I just hope it’ll be worth it in the end! Patience. Very important lesson I’ve learned making this corset.
Part 2 | Part 3
#historical fashion#fashion history#victorian#victorian fashion#sewing#corset#fashion#mysewingadventures
115 notes
·
View notes
Photo
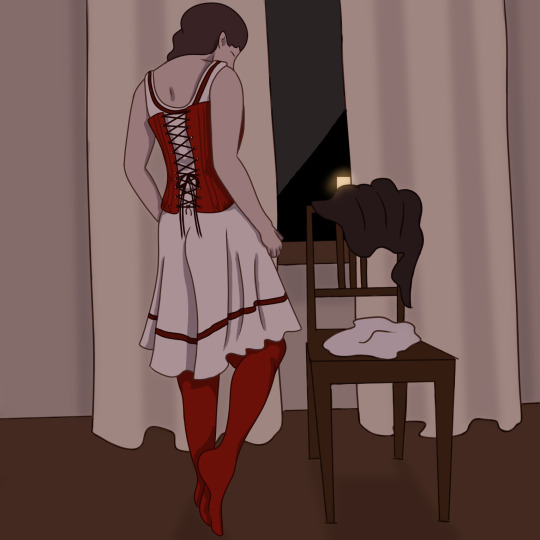
another historical outfit drawing, this time starring Sinning Jenny!

on my last post, i meant to talk more about the clothes themselves, what they were and why I picked them, but totally forgot. But I won’t make the same mistake this time! Info about Victorian underwear under the cut.
In this drawing, Jenny is wearing a corset, stockings, and her combinations.
The corset, of course, was the main supportive garment a woman (or anyone who wore what would be considered womenswear) would wear. They were made with sturdy fabric (like twill or coutil), and supported with whale bone, which would, while being broken in, conform to the wearer’s body. This corset in particular was inspired by a Symington corset which I can’t actually show (because its from an article on Foundations Revealed, which is a paywalled website), but this blog post shows the process of making not the exact corset, but one based on a different pattern from the Symington corset company.
A corset, of course(et), was never worn directly against the skin. Basic undergarments were either a chemise and drawers or combinations, which, as the name implies, were basically a combination of both, looking kind of like a loose jumpsuit or long underwear. In the Victorian era, combinations were usually plain, functional garments, but as things moved closer to the Edwardian (which Fallen London is almost in now), combinations got prettier! These ones were inspired by these ones, from a different Foundations Revealed article.
#fallen london#sinning jenny#i could have said a lot more abt corsets and stuff but i already talk so much abt stuff only i care about lmao#my art
44 notes
·
View notes
Note
I fell down a rabbit hole of aggravating 1920s undergarment research, so many girdles. Before finally I came across the symington side-lacer, which seems to do the binder thing, at least a bit. It's just impossible to find useful information on how to reconstruct it, to see if it worked and how well. It just seemed really promising, especially if used with boning in a reverse v-shape like the binder project was doing. Any advice or luck here?
AHOY, MATEYS, ‘TIS MY WHITE WHALE
I remember being so frustrated with this! The Leicestershire Council’s Symington collection seems to skip the 1920s completely (except for that Cluny lace bandeau) so they don’t have an example. The Smithsonian Magazine has two unsatisfactory pictures of an ebay listing, and there’s this expired Etsy listing for something that claims to be, yet looks nothing like, a Symington side-lacer.
Because the side-lacer was a proprietary garment made with special fabric, it makes sense that there aren’t any sewing patterns of it. You were supposed to buy one, not make it yourself. And yet, that thought led me to other 1920s underwear patterns, which might give you some information.
Reconstructing History has a few, including 1920s brassieres and bandeaux. It’s run by Kass McGann, who tends to like to consult historical garments and patterns--if you email her, she might be able to tell you a few things about 1920s construction and whether there are any extant side-lacers out there. Her patterns have a reputation for being extensively documented and a bit difficult for newbies to sew.
Here’s an Etsy pattern that appears to be reproducing a genuine 1920s pattern with a small amount of information about how the garment is put together--looks daunting to sew, but might have useful information.
Here’s another pattern company I know nothing about that has some 1920s lingerie patterns.
While I was looking all that up, I found something interesting that made me think. On the Wikipedia page History of Bras, there’s a detailed diagram of a bust-reducing brassiere from 1915, which the maker filed with the US Patent Office. Which made me remember other corsets that have been reproduced using filed patents. And apparently Google has a patent search utility that will let you search for every corset or girdle patent filed between 1920 and 1930. Except when I search “R & W H Symington & Co Ltd“ I come up with nothing. Maybe I’m not using it right?
Symington was a UK company, and I don’t know much about how UK patents work, but apparently the archive is managed by the British Library, which says that people new to looking up patents should email them directly for help.
Also while I was looking around I found this in-depth look at a Symington bodice from 1905 that indicates its author has a lot of education and access to the garments in the Leicesteshire collection, so she might be a good resource too.
Please let me know if the prospect of emailing these people seems way too intimidating or anything--I’m curious too, and I could reach out to them if you’re not up for it.
117 notes
·
View notes
Text
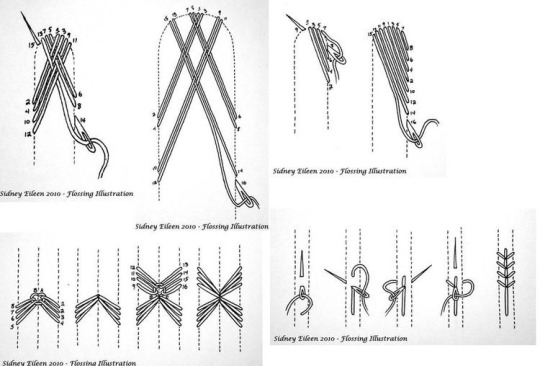
Flossing is a type of embroidery used on corsets and stays to keep the bones from moving around and poking through their channels. It’s very often done in a contrasting color because why not be both functional and pretty?
With the advent of machine embroidery, the motifs got more and more elaborate, but earlier ones were just simple floral or geometric designs.
A diagram of some very basic, practical flossing designs:
Machine embroidered samples form the Symington collection:
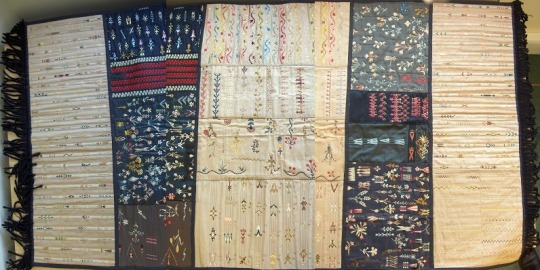
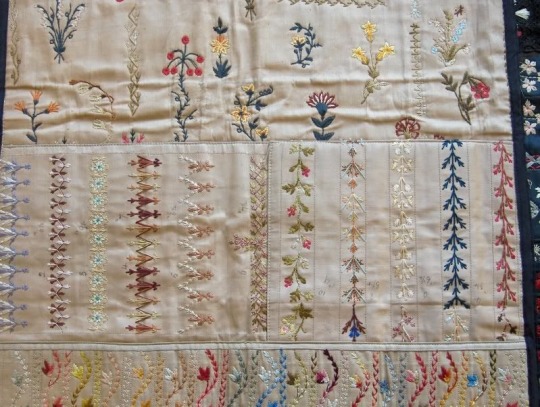
Many of these machine-embroidered designs are purely decorative and have essentially no functional value. Others are more practical. As you can see, floral motifs are extremely popular, and the more practical ones are typically more simple and symmetrical.
Anyway, I’m not making a corset, so what does this have to do with anything? Well, my chemise has side splits, which I achieved by only sewing the seam to about halfway down the length of the chemise. So when I fell the seam, rather than trimming down one side of the seam allowance and folding the other around it, I had to press open the seam and fell each side individually. The first way protects the seam and prevents strain, but only covers one side of the stitching. The second, while covering bother sides of the stitching, leaves the seam very vulnerable because you can just grab either side and pull.
There’s a few ways to protect against that. Modern clothes sometims just don’t care, but often they’ll “face” the split with a piece of matching fabric. The facing would run up either side and across the seam. In the Agnes Walker book I referenced before, she recommended facing splits with “tape,” which could be referring to a number of things, but most likely means cotton ribbon or twill tape. That’s what I did with the neckline split, using silk ribbon, but I can’t do that here, because the felling covered by yet another layer of fabric would be too stiff.
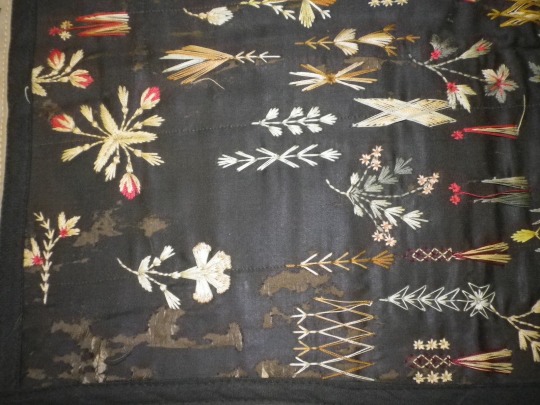
So instead, what I’m going to do is apply a small patch just to the top of the split, and after tacking it in place I’m going to reinforce it—with flossing. And because this is part of my Inej project, I’m going to base my flossing pattern on this:
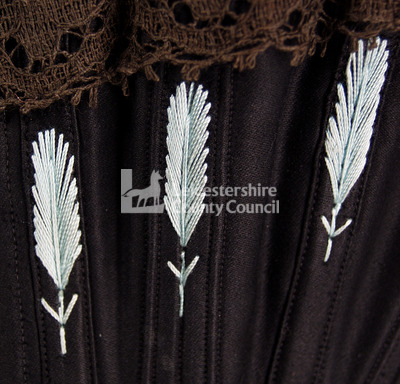
—feather-motif corset flossing, done in white or very pale blue on a black ground. The lace appears dark brown but I suspect that it would have originally been black, and has discolored due to age. (Cotton doesn’t hold color as well as silk does, and black dyes often lighten to brown, orange, and pink tones.) On mine I’m going to use the midnight blue to resemble crow feathers.
24 notes
·
View notes
Text
Alright!
Now that the minor migration from the mainblog is more or less finished, a quick note or two.
There will still be stuff reblogged from there. My insta is linked to mainblog (because that’s how it works) so updates will be posted there and reblogged to here.
The YouTube channel is going strong! Every Tuesday at 11 AM EST (unless I get impatient and upload a little earlier) there will be a new video. Sometimes some bonus stuff in between.
The next two weeks will be a tutorial for a very basic half apron that uses techniques already covered in the channel.
Upcoming videos will include:
hook and eye closures
cording
felling seams
french seams
follower question: What is a princess seam?
follower question: What’s an easy way to do gores?
My current project is a corded corset based off of an 1898 Symington pattern, but I’m afraid it might be a little advanced for what’s been covered. Opinions?
I’m also considering the possibility of putting up a patreon, but that will be at some point in the future. I’d like to get a fair number of videos and a couple of other projects up first.
9 notes
·
View notes
Text
Corsetry questions
@macadamiamilkenema left a couple of questions for me to answer when I woke up, and agreed that they might make a good post. So! Copypasta!
hi! i have some questions that were too long for asks, i hope dming is ok :'>
So i noticed a few posts down that you mentioned knowing people who use corsets as a primary support garment. Im actually looking into making my own because bras just dont work with my proportions and neither do binders. ive been doing a little bit of research, but would really appreciate any knowledge u would be willing to share! so far I know that it would be something as practical as the Symington pretty housemaids corset. I dont have much sewing experience tho i have a Brother. I figure before I work on the actual corset I can work on some simple shirts that I'll wear under as practice.
sorry my question got a little bit lost! My questions are, do you happen to have any resources on corset making as an everyday garment? or would you happen to know anyone who does? Also how feasible do you think it is to wear a corset as a type of binder? Thank you, have a nice day!
Always ok! I love getting questions! :D
There are actually whole communities that are dedicated to corsetry, and wearing corsets as an everyday foundational garment. People did it for literally centuries! Normally I would recommend that you sign up for foundationsrevealed.com but signup for new members is closed right now. That said, there are articles that are available to non-members that may help answer some questions. (I'm not sure whether they will or not, since I'm a member and have full access)
As far as binders, I really can't say at all. I was built tiny up top and have really never needed a binder. Going gender neutral, all I've needed was a sports bra. Thy Symington's patterns are actually fairly simple to follow if you know how to read them. They're the ones I personally use, and find them to be incredibly comfortable. The one that fits my personal needs, and one that can be done with basic sewing skills, is DE2262_94_1892_1909_M1_1000_361
(Yeah, it's a long code, but if you go to the Image Leicestershire website, that's the ID number)
Please purchase the patterns from them directly... They do good work, and need the funds.
9 notes
·
View notes
Text
Late 1890s Corset Part 1 - Research
January 28, 2021
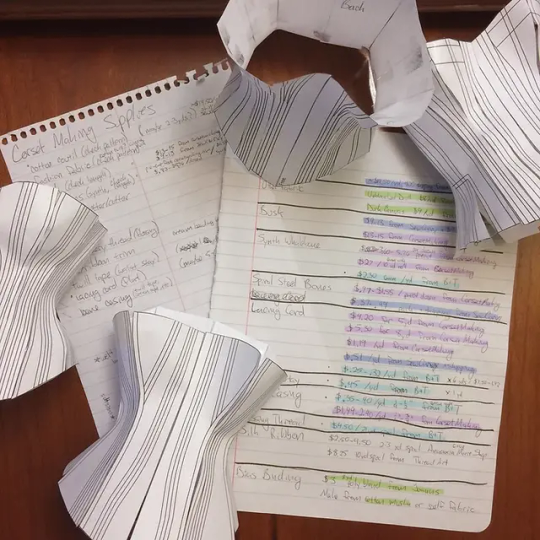
[Image ID: a flat-lay photo of two loose leaf pages of notes and four mini paper mockups of corset patterns on a wooden background.]
As I mentioned in my 2021 goals post, my big, year-long project is a late 1890s corset! Given that my last (and so far only) foray into structural garments was my Regency short stays - which I started about 5 years ago and are of questionable quality and are technically stays, not a corset - I figured I'd better do some serious research before I jumped in.
Hence this post! I wanted to compile my research into one place to serve as both a reference to myself and to help anyone else who is starting their corset making journey. You can come chat with me on Instagram @whennnow about it if you'd like. (There are a lot of links in this post, but I'm not promoting or selling anything or being sponsored or affiliated.)
Inspiration
Let's take a moment to get inspired and remind ourselves of the end goal here. On Pinterest I have a sub-board for 1890s corsets, and here are two more boards (Late Victorian Corsets and 1890s Underwear) for your viewing pleasure.
The Symington Corset collection has an official Tumblr blog where they post photos of Victorian and Edwardian corsets. (And we'll be back to them in just a moment...)
Patterns
There is no shortage of available 1890s/late Victorian corset patterns! There's Ladies' Victorian Underwear from Laughing Moon Merchantile, Hour Glass Silhouette from Past Patterns, Corset for Stout Figure and more from Ageless Patterns, several from Atelier Sylphe Corsetry on Etsy, and the list goes on (especially if you extend your search to all late Victorian corsets).
The Symington Corset Collection offers one of their patterns for sale along with a replica corset box and offers FREE instructions for constructing this particular corset on the Tumblr blog I mentioned earlier, which is very cool of them.
If you, like me, are filled with confidence (or is that hubris?) about your ability to construct a corset without specific instructions, then I'd turn your attention toward the rest of the Symington Collection. The collection includes high-resolution images of 109 patterns (!!!) from the original Symington Corset Company, all of which can be viewed online for free or ordered as a digital file or a print (at least when there's not a pandemic on).
And all of this doesn't even touch on the patterns found in books! We are spoiled for choice or 1890s corset patterns, especially if you're willing to do a bit of extra work to adjust a pattern to your size.
If you're using a pattern diagram like the Symington patterns, I'd suggest using this tutorial on how to make initial size adjustments to your pattern from Wicked Rain Studio.
Materials
Corset fabric can be divided into three sub-sections - the base structural layer which provides strength and durability, an optional fashion fabric which provides extra prettiness, and an optional lining layer.
Cotton coutil is a very strong non-stretch material which makes it a go-to base fabric choice for corset makers. Suppliers include Corset Making Supplies, Sew Curvy, Richard the Thread, and Vogue Fabrics. Unfortunately for those of us on a budget, coutil is also very expensive.
Less expensive options for the base layer include cotton drill, cotton canvas, duck canvas, and maybe also cotton twill. The point is to find a sturdy, non-stretch fabric that will hold up to the strain corsets are often under.
There's a lot more freedom with fashion fabrics! Silk is a popular choice, especially silk satins, taffeta, and brocades. Silk-like polyesters are a more budget-friendly alternative, or you can use a second layer of your base fabric. Depending on your construction method (and whether or not your pattern includes cording) you may not need a fashion layer, but you can use one anyway!
Linings aren't really seen in Victorian corsets and aren't necessary, but if you'd like a lining, a plain cotton or even linen will do nicely.
Other Supplies
Corsets require many different supplies. Aside from fabric, you need a busk (straight busk or spoon busk), bones (synthetic whalebone, flat steel, or spiral steel), grommets, lacing cord, a waist stay/waist tape, tape for boning channels, binding for the upper and lower edges, thread for construction, thread for flossing (cotton embroidery floss or silk if you're fancy), and whatever lace or ribbon you want for decorating.
Corset Making Supplies and Sew Curvy are good places to look for just about everything on that list, as they are both dedicated corset making websites. Burnley & Trowbridge has some boning, plus cotton tapes perfect for waist stays and boning channels, silk thread for flossing, and silk ribbon for decorating.
Lace and ribbon for decorating can also be found in most fabric and craft stores and in many Etsy shops.
Construction
Once you've got everything you need and you've settled on a design, it's time to put it all together. Books on corset making - Victorian or otherwise - are great resources. Foundations Revealed hosts a wealth of knowledge on the subject - a free membership grants you access to some materials, but you need the paid membership to access all of it. Sidney Eileen has several articles on corset making, covering construction for multiple kinds of corsets and individual skills and details. Sew Curvy, one of the suppliers mentioned above, has curated a great list of tutorials and tricks.
YouTube is a great resource too! Prior Attire has a video on lapped seam construction, and Morgan Donner has a video with three more corset construction methods. Not tutorials, but educational nonetheless are Enchanted Rose Costumes' Symington corset construction video, and Cat's Costumery's late Victorian corset video. Starkers Corsets has a corset sew-along playlist which goes in-depth in each step of the process, from making and fitting mockups to setting grommets (but right now it is missing videos on binding and flossing). AraneaBlack also has a 12-part playlist that covers her entire corset making process (though unfortunately the video titles don't say what is being covered in each video - you have to look in the description), plus other playlists full of great corset making info!
Steam Ingenious has a tutorial for the folded seam method, which similar to Prior Attire's lapped seam method except that here the seams become bone casings and the edges of those seams aren't finished, resulting in the need for a lining. The Sempstress has a tutorial for a single layer corset where the seam allowances are covered with bias tape and become boning channels (her casings end up on the outside, but this method could easily be adapted to put the bone casings on the inside). I'd also direct you back to the free instructions provided for the Symington pattern.
As long as this post already is, it's not exhaustive in the slightest. Because of that, I intend to update this post with more resources as I work on this project!
There will be at least two more posts in this corset making series - one on mockups and pattern adjustments, and one on actually constructing the corset. Those are at least a few months down the road, though, as I have a lot to do and so much of it is new to me! There will also be other posts between these, as I have plans for less intense projects and a new book to review.
Stay warm. Stay safe. Stay healthy.
0 notes
Text
Bibliography
Banner, B. (2021) About. Available at: https://bernadettebanner.co.uk/about (Accessed: 6th March 2021).
Bernadette Banner (2019) Basic Figure Drawing for Costume Designers || My Costume Rendering Process. Available at: https://www.youtube.com/watch?v=v4s0GGbMX1w (Accessed: 5th March 2021).
Bernadette Banner (2020) Behind the Screens: YouTubing for Creatives | ft. Morgan Donner, Costuming Drama, Abby Cox. Available at: https://www.youtube.com/watch?v=QXTNADDYYys (Accessed: 11th March 2021).
Bernadette Banner (2020) Careers in Fashion History ft. Raissa Bretaña. Available at: https://www.youtube.com/watch?v=1qNvD3cqzks (Accessed: 10th March 2021).
Bernadette Banner (2019) Drafting & Fitting Victorian Corset Mockups on an Asymmetrical Figure [Corsetmaking Part 1]. Available at: https://www.youtube.com/watch?v=Zhc05WtISV4 (Accessed: 2nd Match 2021).
Bernadette Banner (2019) Making a Victorian Corset || 1890s Symington Pattern [Corsetmaking Part 2]. Available at: https://www.youtube.com/watch?v=JWzXDuwrAgQ (Accessed 3rd March: 2021).
Bernadette Banner (2021) I Redesigned Mary Poppins’ Jolly Holiday Dress Based on REAL Edwardian Lingerie Gowns. Available at: https://www.youtube.com/watch?v=EWR-7GtUnmA (Accessed: 1st March 2021).
Bus Stop (1956) Directed by Joshua Logan [Film]. United States: 20th Century Studios.
Hansford, A. and Homer, K. (2011) Dressing Marilyn The Timeless Dresses of William Travilla Designed for a Hollywood Star. 2nd edn. London: Goodman Books.
Hyde, J. (2020) Learning Mindfulness from the Art of Victorian Dressmaking. Available at: https://hyperallergic.com/535278/bernadette-banner-youtube-dress-historian/ (Accessed: March 8th 2021).
James Kelly London (2021) Sewing The Scarlett O’Hara Screen Test Dress From Gone With The Wind. Available at: https://www.youtube.com/watch?v=yKWz25rOw9g (Accessed: 30th February 2021).
Julian. (2019) How Much Money Bernadette Banner Makes On YouTube – Net Worth. Available at: https://naibuzz.com/how-much-money-bernadette-banner-makes-on-youtube-net-worth/ (Accessed: 4th March 2021).
Rivieccio, G. (2019) Bus Stop: A Film That Didn’t Do Justice to How Marilyn Monroe Fought to Break Free from the Studio’s Stereotype of Her, Nor Is It Much of an Acting Stretch From Her Own Life. Available at: https://www.culledculture.com/marilyn-monroe-bus-stop/ (Accessed: 4th March 2021).
2 notes
·
View notes
Photo
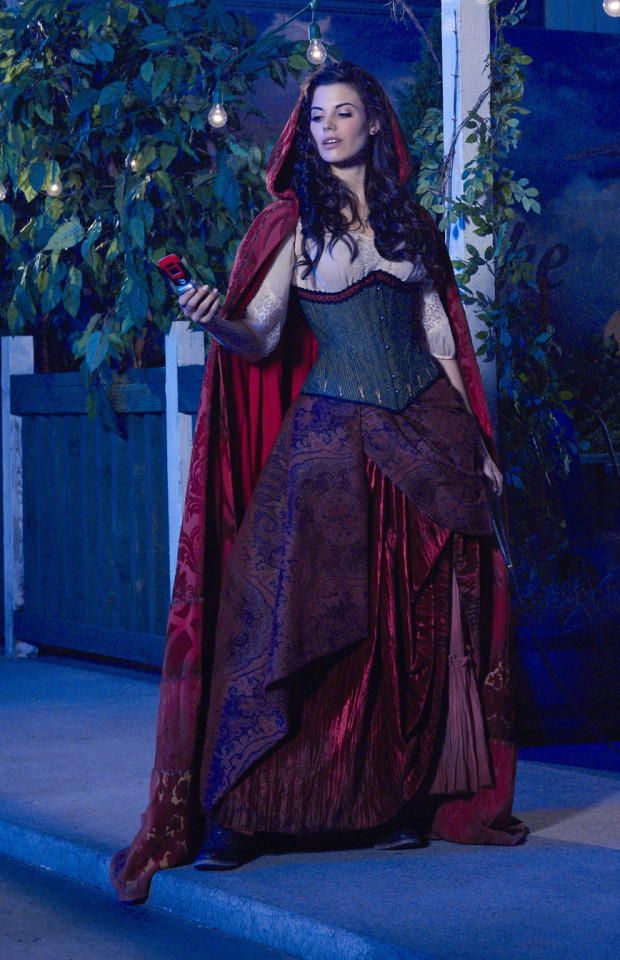


One Dress a Day
Day 9
July - Red
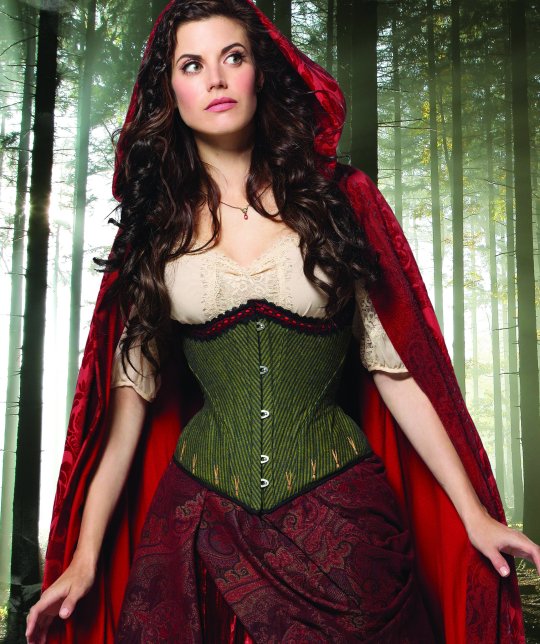
Once Upon a Time - Red/Ruby (Meghan Ory)
I’m including that bottom image because it was a very good episode for beautiful cloaks. I don’t know why, but I really love the look of multi-layered skirts where the top layer is tucked up. I just think it’s really cool, and it shows off a lot of nice fabric. Red has some fantastic textures in her costume. The high-res shots are worth zooming in on just for that! I also like that her corset looks historical. Obviously Red is a fairy tale character, and therefore doesn’t have to conform to a historical period, but this is a pretty good 19th century corset shape, and the little embroidered details at the bottom kind of remind me of some of the Symington corsets. Of course, were this a historical costume, the corset would be underneath, but it’s nice to show it off, I guess! The cloak is obviously the main focus of both the costume and Red’s character, and it’s gorgeous. The patterns and the practical arm holes are just *chef’s kiss*
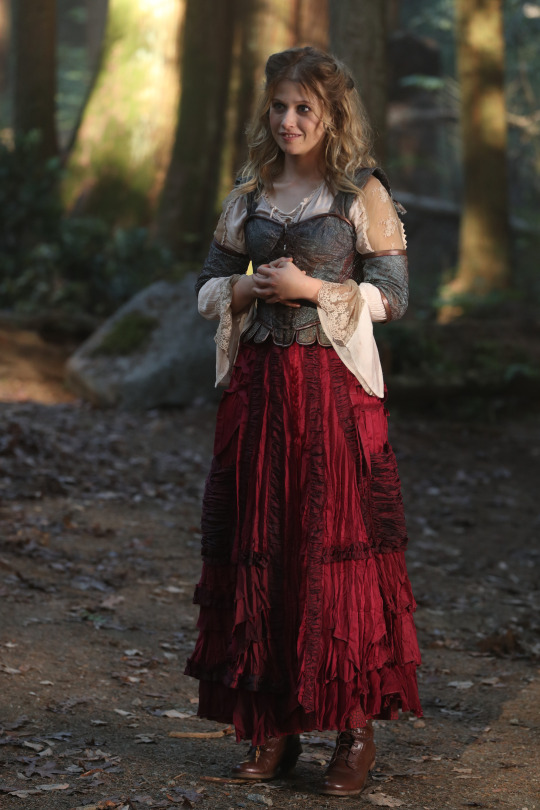
In a later season they gave a somewhat similar look to Alice, (sans famous cloak, obviously), but her bodice looked more inspired by 18th century stays.
26 notes
·
View notes
Last Seen Blogs

flatinthane
Flats For Sale in Thane
onassisdavila
In The Make ❤

tootonejewelry-blog
TootoneJewelry

multivitaminsworld-blog
Untitled

kayleart
Kayle