
whennnow
When & Now Sewing
The tumblr version of my sewing blog! Find more photos on Instagram @whennnow
62 posts
Don't wanna be here? Send us removal request.
Last Seen Blogs

dilfpassing
I think I will cause problems on purpose

tako-kun-blog-blog
Awesome Laziness

thetechpriestandspacemarine
Two Idiots In Space

nightace12socs
OCs

Text
2024 Goals
January 2, 2024
This year is going to be a rough one, I can already feel it. But! We will keep on keepin' on because we have no other choice.
To prepare for that, I am once again going with Vague Goals.
Vague Goal #1: 1890s Stuff
Seriously, I have amassed so much fabric to go into my 1890s wardrobe and I have used so little of it!
I'm still focusing on undergarments for now - bust and hip padding and a petticoat (or two?) would make me very happy. Maybe a shirtwaist if I'm feeling like an overachiever.
Then in 2025 I can start on the pretty outer garments! :)
Vague Goal #2: Stashbusting!
I did not do a good job of this last year. I definitely acquired more fabric than I used, though a lot of it was free, sooo...
For Regency stashbusting, I could (should?) make a pair or two of removable sleeves to go with my open robe.
For modern stashbusting, I have enough flannel to make a nice warm skirt before the weather gets nice again (I've even already patterned it and picked buttons from my stash!) and some pretty bits to make cute lingerie.
I will not buy fabric. I should not accept free fabric. I will only acquire fabric if it will be used within a reasonable amount of time to complete a project that is mostly made from my stash. I will keep telling myself this and hoping it works.
(Actually, I am hoping to make a pair of palazzo pants for a trip this spring which will require a fabric purchase. I will not buy more than I need and I will start the project right away.)
(Not) Vague Goal #3: Medieval Linens
Ok this one isn't really vague BUT it would be nice to make some more basic linen stuff for SCA garb.
I already have enough linen for a half-circle veil and a cap/coif, which are my top priorities, but I should also have enough for a barbette and filet to wear with my hair net.
A larger and non-stashbusting goal would be to make a supportive front-lacing smock! It would be a good base layer for 14th century stuff and also give me a base pattern for making fitted cotehardies in the future.
Actually, once I have a supportive smock, I'll feel less bad about cutting up the polyester one I got second-hand last year. I want to use that to make tippets, line pouches, and make other accessories that don't really need to be linen (like maybe needle books or cup covers for the annual gift exchange).
Aaaannnd... that's it.
I could make another list of the fabrics in my stash and what I intend to use them for (like I did last year), but it would basically be the same list, so I'll spare both you and myself that.
0 notes
Text
2023 Wrap Up
December 31, 2023
This year has been an emotional roller coaster with very high highs and very low lows. But let's focus on sewing and historical stuff!
Goal Recap
I had two main goals this year - starting my SCA-appropriate wardrobe and stashbusting.
Originally, I had wanted to jump right into the fitted cotehardies of the late 1300s, but that didn't work out. For one, those are difficult to fit, and patterning the dresses would have taken as long as (if not longer than) sewing one. I also would have wanted to splurge on linen and wool, which wasn't quite in my budget.
I did, however, throw together some basic Roman-ish garb (perfect for summer events), make two basic tunics (more appropriate for the 1200s) from thrifted sheets, and acquire some accessories to really pull the look together.
That means I have enough garb to wear at SCA events, and my goal has been accomplished.
As for stashbusting, well... seven of my projects did come from stash fabric. I bought fabric for five projects (which did get used already). I also acquired small quantities of some other fabrics, all but one of which was free.
I'm going to say I broke even on that one.
Project Recap
My 2023 sewing projects were (in more-or-less chronological order):
Another "Boardwalk Duet" top from the Wearing History pattern (stash fabric)
Patched/reinforced my favorite pajama pants with flannel scraps (stash)
1940s 'camiknickers' from Mrs Depew Vintage pattern 2010 (stash fabric)
Altered Regency petticoat to increase hem circumference (stash)
Blue Regency lace-up bodice with ribbon trim (stash fabric and trim)
Edwardian combinations with blue accents from the TV pattern (stash fabric)
Roman-ish chiton and palla for an SCA event (bought both fabrics)
Regency open robe in shot dupioni using American Duchess/Simplicity 8941 (stash fabrcic)
Periwinkle velvet panties to match bralette from last year (stash fabric, purchased elastic)
Moved around the patches on my denim jacket
Blue canvas tote bag (leftover fabric from my corset, plus additional stash fabric for the lining)
Black velvet handbag for a friend's wedding plus three drawstring pouches for bridesmaids (mix of stash and purchased fabric)
Two basic t-tunics for SCA garb (thrifted fabric)
Linen veil and wimple set for SCA garb (purchased fabric)
Tree skirt for one of my grandmother's themed trees
Misc Recap
I'd like to commemorate some-sewing adjacent stuff I did this year, too!
I swatched, measured, and catalogued my entire fabric stash, with the exception of scraps.
I also organized my button stash. Sets of buttons were sewn onto cardstock, while singles are divided into small containers - one for black/white/clear buttons, one for brown buttons, one for pearly grey and white buttons, and one for all the miscellaneous colorful ones. There's also a small bead organizer in the box for sets of shank buttons.
I learned to pattern and sew kiss-clasp purses! Or at least one. I made it as a gift for my friend who got married, and it felt like a brilliant culmination of what I've learned in terms of sewing.
I also learned some simple wire-working skills to expand my SCA accessories. First, I learned how the Romans made the beaded links in their jewelry and used that to make two necklaces and two pairs of earrings. Second, I learned to make both plain and beaded fibulae (basically safety pins).
Current UFOs
My grandmother's shirt - take in the princess seams slightly at the top and reattach the sleeves
1890s corset cover - i need to finish the neck, armholes, and hem with bias tape, attach the front placket, and add buttons and button holes
I accomplished more sewing-related stuff than I expected to this year, and I think joining the SCA gave me a big push in the right direction. It was nice to work on things knowing that I would have somewhere to wear them.
Stay tuned for my goals/predictions for 2024!
Until then,
Stay warm. Stay safe. Stay healthy.
0 notes
Text
SCA Accessories
November 14, 2023

[Image ID: a 3/4 length photo of Alex wearing a blue tunic, brown belt and white veil and wimple, holding a small basket in one hand.]
An Accessorized Ensemble
I recently attended my second SCA event (besides the local barony's weekly meetings), and since the event was focused on garb, I wanted to have a fairly complete, if simple, ensemble to wear.
Having already completed two basic t-tunics and acquired a belt, I decided to go for a vaguely early 13th century look and make a rectangular linen veil and wimple (or godet? I'm not sure about terminology here).
Having nothing else to secure them too, wore them over my crocheted hair net. A cap/coif or filet would have been more accurate, but I didn't have time for those.
The larger veil - the one that goes over the top - measures about * after hemming. The hems are an approximately 1/4" wide double turn hem which was whipped down in white thread.
The wimple/godet/neck piece is smaller, measuring about * with similar hems to the veil. I probable could have made it a few inches wider to cover lower on my chest, but it reaches to about my collar bones as-is, and that's good enough for me.
I actually didn't have time to do the last long edge of the wimple, so it was only ironed and basted into place when I wore it at the event! I'm working on finishing that now.
Other Accessories
The event I went to only had one merchant - Reliquaria Medieval - and I had already given myself permission to spend money there.
I ended up not spending as much money as I was prepared to (probably for the best), but I did get two penannular brooches! One is slightly larger than the other, and they're both more of a 14th century style, but that works well for my SCA wardrobe goals. You can see them (plus the site token - a scissor charm) in the photo below.
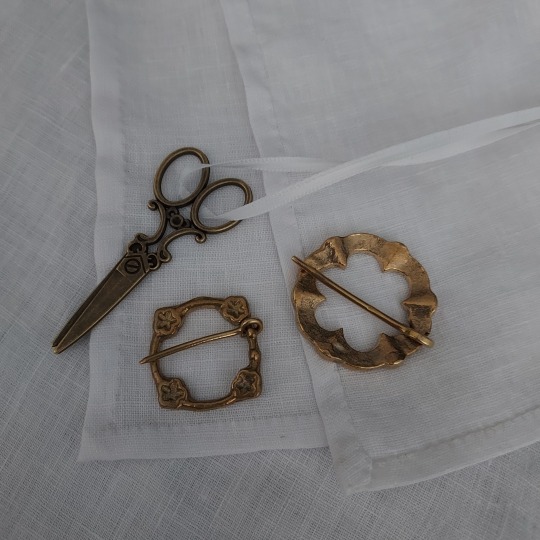
[Image ID: two round gold-tone penannular brooches and a bronze-tone scissor charm on think white ribbon, all laid on a white linen background.]
Prior to the event, at one of the barony's weekly meetings, I attended a workshop on making fibula brooches - aka ancient Roman safety pins.
Ours were mostly just simple wire fibulae, but we also had the option to add beads. We used 16 or 18 gauge wire so they were sturdy enough for use.
I made a matching pair of plain ones about 1.5" long, and a third one that had a blue and bronze glass bead on it, seen in the photo below.

[Image ID: three brass-tone fibulae that look like safety pins. The top one has a cylindrical blue glass bead with a glittery leaf design one it, and the two below that are plain mirror twins of each other. Alex's hand is partially visible on the left for scale.]
I'm already looking forward to getting wire of my own to make more! I'd like to experiment with different finishes for the hook end, and make a few lighter pairs for use with Greek/Roman tunics/chitons.
I'm hoping to sneak in one more historical project before the year ends, but the winter holidays are swiftly approaching and time is slipping through my fingers.
Whatever happens,
Stay warm. Stay safe. Stay healthy.
0 notes
Text
A Very Important Purse
October 26, 2023

[Image ID: a black velvet purse with sequins, black applique, and dark silver metal clasp and chain handle sitting on a grey chair.]
Last summer I had the great honor of being asked to be a bridesmaid at my friend's wedding. In the whirlwind of excitement that followed, I volunteered to make her a purse to use at the reception!
I'm not sure why I did that. Up until that point the only bags I had sewn were simple drawstring bags.
But wouldn't it be special to have a specially made purse? To include pieces from each of the bridesmaids' dresses? To have the bride's initials and wedding date embroidered on the inside?
Fast forward to about two months before the wedding and I had finally researched how to make purses, acquired the materials I needed, and settled on a design.
The Materials
I had opted for a "kiss clasp" purse frame - sort of a modern version of the typical coin purse clasp. So I ordered the frame and a matching chain (for the handle/strap) from this Etsy shop.
The main fabric of the bag was a textured and sequined black velvet, and I used a simple black poly/cotton for the lining. I also included pieces left over from when the three bridesmaids' dresses were hemmed.
As an extra special touch, the bride and her mother gave me some lace motifs that the tailor had saved from altering the bride's dress!
Hidden inside all the fun layers are a medium-weight sew-in interfacing (one layer as interlining each for the outer fabric and the lining) and the heaviest weight interfacing/stiffener my local craft store carried.
The Pattern
Because purse frames aren't really standard sizes, there were no patterns I could count on, so I scoured the internet for tutorials that suited the frame I had. This tutorial ended up being the one I used most because it used the same kind of frame I had and resulted in the amount of structure I wanted.
Now, this calls for one pattern piece and one big piece of fabric (or two if you put a seam in the center bottom), but I wanted my side panels to be plain, not made of the velvet, so instead of one complex shape I ended up with one large rectangle for the body and two small rectangle for the side panels.
So to recap, I had one big rectangle in velvet for the outer body of the bag, and two small rectangles of the poly-cotton. The inside was one big rectangle and two small ones for the side panels, both of poly-cotton. Each piece was interlined with the medium interfacing.
The Preparation
There was a lot of prep work to do before I could really start sewing, though.
First, each of the six pieces was basted to its interlining.
Then, because the main outer fabric was a stretch velvet (whoops), I followed the line of stitching attaching the sequins to the velvet and stitched the velvet to the interfacing at every other sequin. This took about 5 hours, but was absolutely worth it! You can't tell it's a stretch velvet anymore and it doesn't shift or sag at all
I got to attach the lace appliques from the bride's dress once the velvet was stabilized. I trimmed away the excess tulle and followed the direction of the thread in the lace with my thread, so it looks like the design was stitched directly onto the purse! I only went around the outsides of the motifs, but it still took maybe 3-4 hours.
Prepping the inside pieces was a lot quicker. I used two of the bridesmaid dress scraps (which were also stretch velvet btw) to make small pockets. The third scrap, which was the lightest color, I used as a background for the embroidery with the bride's initials and the date of the wedding.

[Image ID: a poor view inside of the completed purse, showing scraps of red and pink velvet used to make pockets on plain black lining fabric.]
The Construction
Finally, I could start sewing everything together.
The outer side panels were sewn to the outer body and the inner side panels were sewn to the inner body.
I added some top stitching around the side seams on the outer pieces to better define the corners and give it more structure.
Then the outside and the lining were placed right sides together and things get a little complicated.
The body of the bag needs to go up about a quarter inch higher than the side panels so you have something to glue to the frame. This was accounted for in my pattern draft.
First, I simply sewed the top of the side panels together. Then I had to do a bit of futzing so I could sew the quarter-inch height difference on the sides of the body panel. Lots of seam allowance clipping here.
Then it all got turned right-side-out and the heavy interfacing was trimmed to fit and slipped between the body and the lining.
Finally I could fold the outer body fabric over the top edge of that interfacing and stitch it down. Then fold the body lining in and top stitch that (it will be hidden when you glue the purse to the frame.)
At this point, I was having misgivings about the bag (it looked lumpy and sad), but I persevered.
The Frame
With the body of the bag complete, it was time for the last step. The only one that wasn't reversible. Easily the scariest part of the project.
I had to glue the body of the purse to the frame.
Yes.
GLUE.
I could only take comfort in the fact that glue is the normal way to attach these frames to purses and I had purchased a glue many people recommended (UHU Max Repair), so hopefully it would hold up to use.
The process itself is simple - clean the frame with alcohol to remove any oils, put a thin line of glue in the channel, and just... tuck the upper edge of the purse body in there. Do one side first, then wait an hour to do the second side. Let cure for 24 hours (waiting is hard).
Thankfully it worked perfectly on the first try (though I got some glue on the frame where it shouldn't be). I even stress-tested it to make sure the glue would hold, and it did!
By this point I was feeling very proud of myself and very in love with the purse. The addition of the modern black clasp and chain handle had really pulled the whole thing together and it looked incredible and surprisingly professional!
Once it was done, I just needed to clip the chain handle to the tabs on the purse clasp and package it safely to take to the bride
I'm pleased to report that she was delighted and amazed at how it turned out and she was happy to use it (and, dare I say, show it off) at the reception.

[Image ID: another photo of the black velvet bag, but this time it's the other side with a slightly different black applique.]
0 notes
Text


I think the times I feel The Most Like A Medieval Person is when I’m getting out of my dress and I look EXACTLY like every manuscript drawing of a woman getting out of a dress. Like yes my bestie from 700 years ago it really do be like that
#there really just isn't any other way to get out of those garments#no room to get your arms out first#wnn reblogs
4K notes
·
View notes
Text
Making Medieval Plans
October 3, 2023
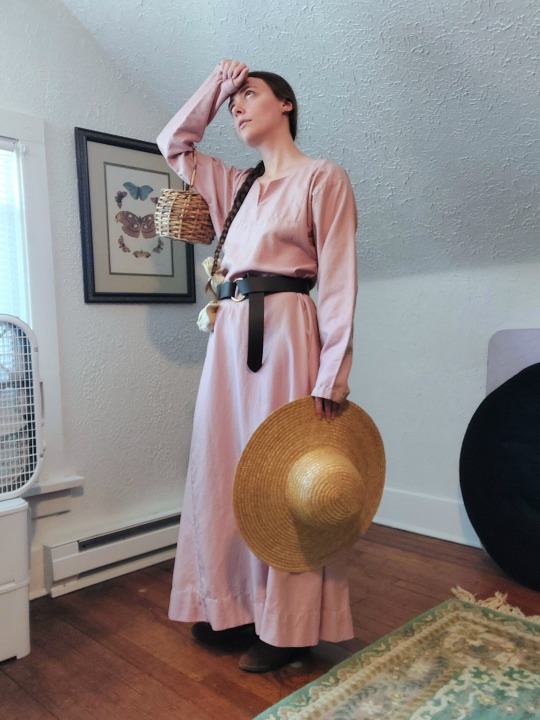
[Image ID: a photo of Alex in a pink medieval tunic and dark belt, posing with a straw hat and small basket and pretending to wipe her forehead.]
With basic SCA garb done (in the form of my t-tunics), I can start making more elaborate, long-term plans.
Nothing is concrete yet, but I want to do this in a strategic way so that I don't end up with partial outfits for multiple eras.
My goal with each era is to make a small capsule-style wardrobe which I can later add to and upgrade, while still knowing that everything will go together well. I've already decided on color schemes for the Greco-Roman stuff (sage green and slate blue) and the 13-14th centuries (blue, oranges and yellows, small amounts of green and pink).
13th Century (1200-1299 AD) (vaguely English/French)
My t-tunic are a great base for the 1300s, and I'll just need some accessories to really pull off this era. I don't have much interest in this era, so I'm aiming for a general look as a branching-off point for other eras (and so I always have backup garb).
Other than the historical-looking crocheted snood I'm working on right now, my first priority is a white linen veil and wimple, and probably a simple cap to wear them over. A barbette and filet/"pie crust hat" could be made to go with the snood/hairnet if I want to double down on the last quarter of the 13th century.
A drawstring bag to wear from my belt is also high on the list, but I can use some of my Regency reticules for now.
For some variety in over-layers, a cyclas (like a sleeveless overdress) or two out of thrifted sheets would be easy, as would some sort of mantle/cape.
I might work on under-layers while I'm in this era, too, just to really have the basics down. (Or to really procrastinate.) A simple linen smock, probably a supportive linen smock, maybe some hose (stockings) and braies (technically men's underwear).
14th Century (1300-1399) (vaguely English/French)
This was my original goal when I got into the SCA, and still my favorite!
The cap, veils, bags, and any underthings I've done already will be a good starting point here, and allow me to focus on larger pieces.
If I haven't made one already, a supportive linen smock with a wide neckline will have to be my first priority here, since I will be the foundation garment for my fitted cotes/kirtles (dresses).
Next up is the kirtles themselves! I should be able to use the supportive smock pattern as a starting point for these. One is necessary. Two-three in different colors is ideal. I bought a slightly too-large one in dark blue from another SCA-dian which will be refashioned to fit me. I'd also like a tawny/orange one.
The 13th-century cyclas evolved into the sideless-surcote. One sideless surcote would be fine, especially if it is reversible. These were often statement pieces, so something silk-like would be best. Maybe one side in a golden yellow and one side a pink/peach?
In the third quarter of the century (~1350-1375) a second, usually short-sleeved kirtle could also be worn, often with tippets (white armbands with streamers) and fitchets (pocket slits, usually bound in white). One of these is probably enough, and it's a low-priority project. Probably a middling or lighter shade of blue.
Hoods are an important cold-weather accessory. I'd like at least two wool hoods - one in an earlier style and one in a later style. I have enough cotton from my t-tunics left over to line one hood with each color.
Misc Accessories
I managed to thrift a nice, generic-looking straw hat which is suitable for most of the medieval era. I also have one of those long leather belts with a metal ring at one end that you see on a lot of SCA/ren faire/fantasy outfits.
A simple linen apron would be a quick project and should be plausible for the 13-14th centuries.
I've started accumulating a vaguely medieval sewing kit, which I would like to continue adding to and upgrading. I even have a lucet fork, which I'm excited to learn to use! These currently live in a small, stained linen pouch, which in turn lives in a thrifted wicker basket. The basket is about the size of a small purse, and is a good size for carrying at smaller events.
Speaking of bags, I also have a large, heavy-duty linen market bag which I made at a local workshop! It's a bit too big for most of my needs right now, but I imagine it would be nice for bigger events. A smaller one might also be nice if I can find something suitably heavy-duty.
Other
I'd also like to upgrade my ancient Roman ensemble with maybe a new chiton, some sort of decorative border on the pallas, and maybe even a patterned stola.
Eventually I'd like to take a stab at a 1490s/northern Italian Renaissance ensemble too, but that's even further down the line. (Colors: maroon, yellow, and warm pink.)
0 notes
Text
Two T-Tunics
September 19, 2023

[Image ID: the bodice and sleeves of two basic medieval tunics - one pink and one blue.]
While my ultimate goal with SCA garb is to create a 14th century capsule wardrobe, I know it will be a while before I have the money to buy all the wool and linen I'd need and the time to make anything out of it.
So I'm starting with something more basic. The uniform of SCA-dians everywhere - the T-tunic!
The basic pattern can be adapted to fit many eras, whether as a base layer or fashion layer, as a shirt or a dress.
The Fabric
You can make t-tunics out of basically any fabric. Linen and wool are the most historically-accurate, and silk probably is too.
Unfortunately, that's not really in my budget right now, so I used two thrifted cotton bed sheets, which I think are queen sized. I got two tunics for $5 of fabric!
The Pattern
These tunics are made out of simple geometric shapes - rectangles for the body and sleeve gussets, triangular skirt gores, and either rectangles or trapezoids for sleeves.
To make things easier on myself, I used this "Custom Smock Pattern Generator" from elizabethancostume.net to make the pattern, then cut out the shapes it gave me with added seam allowance.
Assembly
Instructions for assembling a t-tunic have been written probably hundreds of times, so I'll direct you back to elizabethancostume.net to spare you another explanation.
I usually flat-fell seams on things like this, but I wanted to minimize the amount of hand sewing I had to do while also not having any visible machine stitching, so I french seamed everything.
I used a facing for the neckline instead of a binding and hand-sewed the edges of that down.
The sleeve and skirt hems were also hand-sewn.
A Note on Fitting
The smock generator pattern I used takes into account your shoulder width, and seems to direct to instructions on how to measure that, but it wouldn't show up for me. As a result, I suspect my measurement was too narrow.
While the resulting shapes fit well over my bust and waist, I almost couldn't get it on over my shoulders!
Thankfully, I had suspected this issue, so my first smock was a few inches wider than the generated pattern called for. I added a bit more width to my second tunic.
Looking Forward
I'm glad to have a base for my medieval/SCA wardrobe, but I can't wait to expand! I want to do some basic accessories next, like linen veils.
I already have a few other accessories - a thrifted straw hat, one of those long fantasy/ren faire/sorta medieval belts, and a mug.
I also have decent-sized leftovers from these bed sheets - I'll save most of it to line wool hoods, but I'll use some small pieces to make drawstring bags to hang from my belt.
Stay tuned for a post on plotting out my plans for garb! In the meantime,
Stay warm, stay safe, and stay healthy.
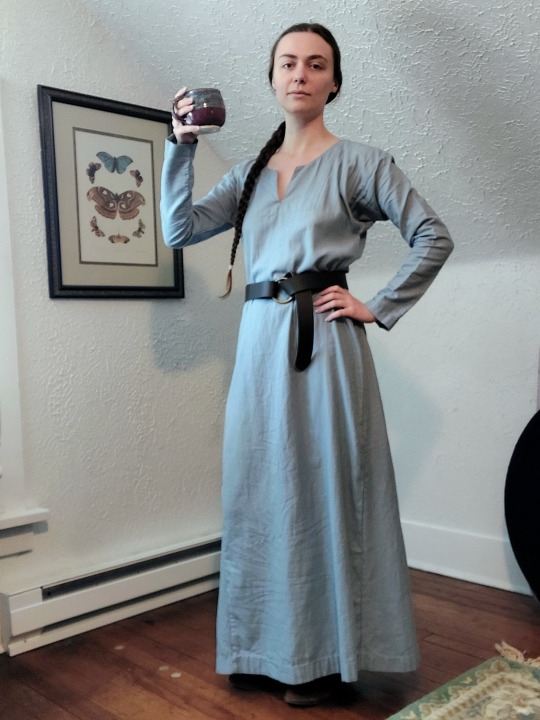
[Image ID: a photo of Alex in a blue tunic with a dark belt, holding a mug as if raising a toast.]
2 notes
·
View notes
Text
A Regency Open Robe
August 17, 2023

[Image ID: a photo of Alex in a Regency ensemble seated at a small table with a mirror.]
As I approached the mid-point of the year (by which I mean I started this project in late May), I wanted to tackle another stash-busting project. This one has been on my list for a while - basically since I started getting into historical sewing.
Back around 2018 or so, I bought 6yds of light blue/magenta poly dupioni fabric from someone de-stashing on Instagram. It was always destined to be a Regency open robe, and finally it will be!
The Pattern
I briefly considered altering the pattern for my white dress to use for the bodice, but then I remembered that I have the American Duchess/Simplicity pattern, S8941. (Quick note: they have pattern notes and adjustments on the AD website!) The sleeve pattern intrigues me, so I decided to go for it. I chose my pattern size based solely on the bust measurement since the waist isn't an issue.
I cut the bodice pattern pieces out of some scrap cotton, pinned them together, and started fitting. My first two adjustments were to adjust the angle of the shoulder seams and side back seams. The shoulder seams needed to come in about a quarter-inch to reduce neckline gaping. The bottom of the center back seam came in by a quarter-inch as well, narrowing the back panel and curving out to meet the existing seamline near the armscye, which resulted in a closer-fitting back.
The front piece got a bit more work. It took a few tries to get the bust darts just right, and I adjusted the curve of the neckline. Then I got overzealous and tried to remove the dart entirely by adjusting the neckline even more, but that led to more gaping in the shoulders, and I decided it was smarter to go back to the well-fitted dart than to continue tweaking a dartless panel.
Once I had transferred my adjustments to the pattern pieces, I could cut out the bodice pieces!
The Bodice
Bodice construction was fairly simple - there are six short seams, plus the two darts. Those were sewn up on my machine, then flat-felled by hand. The darts were also sewn by machine and pressed toward the side seams.
The neckline and the bottom of the bodice were both turned under twice and felled for a clean finish.
The armscyes were a bit more perplexing. I needed to finish these edges so the robe could be worn sleeveless, but I also had to consider how I would be attaching the removable sleeves. I ended up finishing them with self bias tape and leaving the removable-ness of the sleeves as a future problem.
(Note: Because the bias tape only needed to be folded three times, I only made it 3/4 of an inch wide. This was a pain in the butt. Learn from my mistake and just make it an inch wide.)
The Skirt
Now, I had some decisions to make about the skirt. How wide should it be? Where should it begin and end? Do I want a train?
The Simplicity/American Duchess pattern has a piece for the skirt, but I was too lazy to cut that pattern piece out of both the tissue paper and the fabric. I decided to just cut a big rectangle of my fabric from selvage to selvage.
I doubled the width of the lower edge of the bodice, added a bit because it seemed too narrow, and ended up with a piece 47" wide. I pulled threads to ensure that the sides of the skirt were perfectly on grain, then pulled two additional threads on each side to act as guidelines for my hems - one a quarter inch from the cut edge and another a quarter inch from the first line.
Most of the open robes I saw on Pinterest seem to have at least a slight train (examples 1, 2, 3, 4, 5). So I decided to leave the full 60" width of fabric as the length of my skirt. I can always hem it shorter in the future, but right now the selvage edge is the hem.
To finish the upper edge of the skirt and strengthen that edge, I sewed some narrow cotton tape just inside the selvage and turned that edge in to hide the machine stitching.
I attached the skirt to the bodice by laying the pieces right-sides together and using small whip stitches to attach them. The whip stitches allow the seam to lie almost perfectly flat and avoid bulk at the waist.
I lined up the edges of the skirt with the front dart, kept it smooth until the side seam, where I put a 1" pleat on either side (to help it ease over my hips), and then kept it smooth all the way to the center back panel. There's about 14" pleated into an inch and a half! I think it helps control the fullness of the skirt and keep the skirt silhouette slim, plus it adds bulk to the center back of the skirt and acts as its own bum pad.
The Closure
I kept the closure super basic for this because I had lost my motivation and wanted to be done.
I simply marked the center front line on each bodice front panel, folded back the fabric to that point, and stitched it into place.
Then I added three hooks to one side of the opening and three 'eyes' to the other and called it a day.
The Sleeves
Remember how I said I wanted to make removable sleeves for this open robe? Yeah, that's not happening. At least not yet.
This project had been sort of dragging along, and I wanted to finish up a few more UFOs so that I could start on some basic SCA garb, so I decided to leave the sleeves as a future project, and declare this Regency open robe "done enough."
Looking Forward
Now, back at the beginning of this post, I mentioned that I had 6 yds of this fabric. This open robe used up a little over four yards. I have a few ideas for the rest (besides the sleeves, of course).
I have a pair of modern, pointed-toe flats, but they're the kind where the sides (the upper?) don't cover the inner side of the foot, and I don't like that. So I think it would be fun to try and cover them in this material and add a fun ribbon lacing detail!
Another reticule is also a no-brainer. Maybe I'll add beads or spangles to this one. Maybe I'll add beads or spangles to the bodice of this robe!
I've been wanting a turban-looking kind of headwear for my Regency wardrobe too. I have some trims to combine with this fabric to add more color and texture, but this would be a good base fabric.
But those are all future projects!
More immediately, I've got an alteration to (finally) finish for my grandmother and a small modern make for myself. Then I'd like to get two t-tunics made for SCA garb (I've already got the fabric and sketched out a pattern). And by the time I'm done with all that, it will probably be December! Oh boy!
Until next time,
Stay cool. Stay safe. Stay healthy.

[Image ID: a back-view photo of Alex wearing a trained blue open gown over a white Regency gown.]
0 notes
Text
Roman Garb for SCA
April 27, 2023
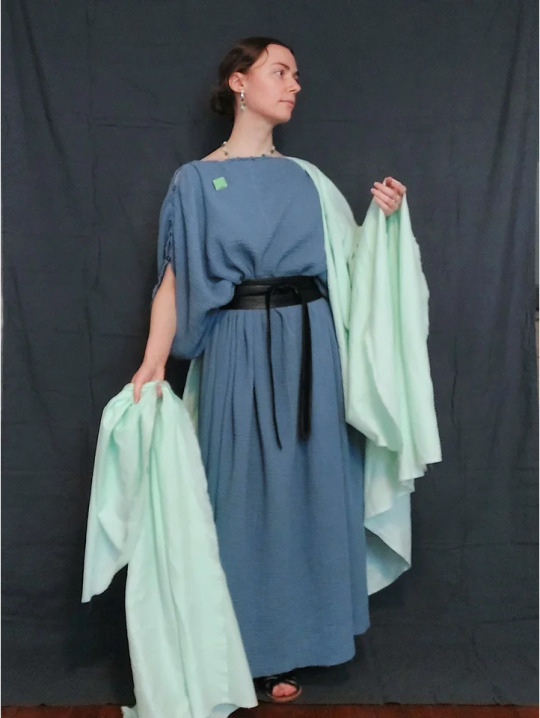
[Image ID: a photo of Alex wearing blue and green Roman garb, posed in front of a dark grey backdrop.]
I discovered my area's SCA group last summer and started going to their weekly meetings around the end of the year. I'm lucky - our local barony's meeting place is only a half-hour drive from me!
I had managed to avoid garbed events until recently - a neighboring barony hosted a Roman-themed event at the end of April and I wanted to go, so I needed garb. Roman garb wasn't required for the event, but I figured it was the easiest option to pull together on short notice.
My planned outfit was simple - a gap-sleeved tunic/tunica, a palla/shawl, a belt, sandals, and jewelry. I had decided on a color scheme already (minty greens and muted blues), which made it easy to coordinate.
The Tunica
The tunica is the main part of my garb, like a dress. I popped by Joann Fabrics and picked up three yards of a double-layer blue cotton gauze, I think. It's opaque, but the fabric is textured and shifty. I have a modern shirt and a dress in a similar fabric, so I knew how it would behave. (And I knew that when I was ready to level up to a linen tunica I could make modern clothing out of the fabric.)
The fabric was about 60" wide, give or take the texture, so it was wide enough to reach from wrist to wrist on me. The three yards were just barely long enough to reach from shoulder to ankle on me when folded or cut in half. I wish I could have used the selvage of the fabric as the top and bottom hem - I only would have had one seam to sew and I would have a bit more length to work with - but the texture of the fabric didn't look right going that way. So I made do.
I cut the three yards in half and sewed the selvage edges of each half to each other, creating one big tube. I did a zigzag stitch over the raw edges at the top and bottom because they frayed a lot. I hemmed the top edge by hand, but didn't have time to hem the bottom. Thankfully it wasn't noticeable!
To create the gap-sleeve look, I raided my button stash and found eight brown metal buttons (brass? bronze? whatever the go-to steampunk color is). One button was placed on each side about seven inches from the side seam to create the armhole. Another button was placed seven inches on either side of the center front/back to create the neckhole. Then I sewed two more buttons on either side, evenly placed between the arm and neck buttons.
And with that, the tunica was wearable!
The Palla
The palla was the really long draped shawl Roman women wore over the tunica and was also used as a veil.
I ordered 3.5 yards of a mint green cotton voile from Mood Fabrics for this - I wanted to be able to straighten both raw edges of the fabric and still have plenty to drape.
It was even simpler to make than the tunica. I just tore the raw edges to make sure they were on grain, pulled out a few extra weft threads, and called it a day. I could have hemmed the two raw edges, but I didn't have the time, and it wasn't really necessary.
After the event, I actually washed the palla (which had fallen on the ground and been dragged a bit) and only lost one or two more weft threads on either side.
The Belt
I was really at a loss for what to do about the belt. In the SCA, certain belt colors mean certain things and none of those things apply to me.
My original thought had been to make a fabric sash out of the same fabric as the tunica. It would be a color, but I thought that it would blend into the tunica well, especially if I wore the palla in a way that mostly hid it. Unfortunately, I didn't have enough fabric to cut a sash and still allow the tunica to be as long as I wanted. And I didn't have the budget to buy a cord.
I ended up just using a black leather wrap belt I've owned for years. It's not historically accurate, but it still looked nice.
The Jewelry
My original thought was to just wear my dark blue and silver jewelry set that I had originally made for my Regency wardrobe. It certainly fits in with Roman jewelry, and it was close enough to my intended color scheme.
Then I remembered that I had a set of connectors that looked like the style of Roman earrings that have three beads hanging from a horizontal bar. And I had sodalite beads that are similar in color to my tunica. And I had oval-disc-shaped stone beads that matched the product photos of my palla material (I had ordered the fabric but it hadn't arrived yet).
So I made a pair of earrings, each one consisting of a sodalite bead, a disc, and another sodalite bead dangling from a silver bar.
Then I couldn't stop admiring the minty-green disc beads and thinking how lovely they would look on a necklace. I didn't have enough of those beads for a necklace, though, and I didn't even have enough sodalite beads to alternate them on a necklace. I did, however, have another kind of green bead that coordinated nicely with the discs.
So I made individual links for all the beads - 10 discs total and 11 of the round green beads - and used a silver toggle clasp at the ends. That gave me a good length to rest loosely at the base of my neck.
And then I wanted the earrings to match the necklace, so I had to switch the sodalite beads out for the green ones.
These were absolutely impulse projects, but I love how they turned out! I'm especially happy that I was able to use all stash materials after how much I spent on fabric for this.
Further Notes
For shoes, I just wore a pair of flat black sandals I've had for years. I figured the black coordinated with my belt and no one would be looking too closely.
This outfit is pretty far from historically accurate, it's more like historically passable. The SCA group I've joined is very self-aware about SCA-isms (aka things that the SCA community considers acceptable, but that aren't historically accurate) and they openly embrace the "creative" part of the Society for Creative Anachronism.
Many women doing more accurate Roman garb would wear a stola, a sort of narrower tunica over the other tunica. That is considered to be something matrons would wear, and I'm neither married nor a mother, so I decided to skip it. I did see a lot of stolas over white tunics at the event and they were really pretty!
The silver-tone jewelry doesn't seem to be accurate, either. Most (if not all) extant Roman jewelry and the jewelry seen in paintings, frescos, etc, is gold tone. I only had silver bars for the earrings though, and my outfit is more cool-toned anyway.
Finally, for the sake of modern modesty and comfort, I did wear modern underthings under this, along with a slip.
Looking Forward
I really enjoyed pulling this ancient Roman ensemble together, and I'm proud of how it turned out, given my time and budget constraints.
I do want to upgrade it, though!
For one, I'd like to switch the jewelry I made to gold-tone findings. I actually went to a jewelry-making workshop at the event, so I now know how the Romans made their connectors and I have the wire to do it with! I'll need a clasp for the necklace and connector bars for the earrings, though.
Next up would be the tunica. You often see tunicas with a contrasting band along the top and sometimes bottom edge, and sometimes they're even patterned bands. I'd like to add that to my tunica - I could really use the extra length. I'm thinking a lighter or darker blue or maybe a grey. Maybe a patterned ribbon trim, maybe a design stenciled on with fabric paint. I haven't decided yet.
I'd also like to get a cord or ribbon to do a proper belt. Having multiple would be even better! I'll have to chat with some SCA-dians to figure out what I could do without infringing on the color codes.
Last up would be the palla. I could totally leave it as-is, which is why it's my last priority, but I could also hem it or add colored bands around the edges.
Eventually, if I find myself going to more events (especially in the hot summer months), I might add more to my Roman wardrobe. That's a long way off, though!
In the meantime,
Stay warm. Stay safe. Stay healthy.

[Image ID: a flay-lay photo of green and silver jewelry on a textured blue background.]
1 note
·
View note
Text
Utilitarian Edwardian Combinations
April 13, 2023
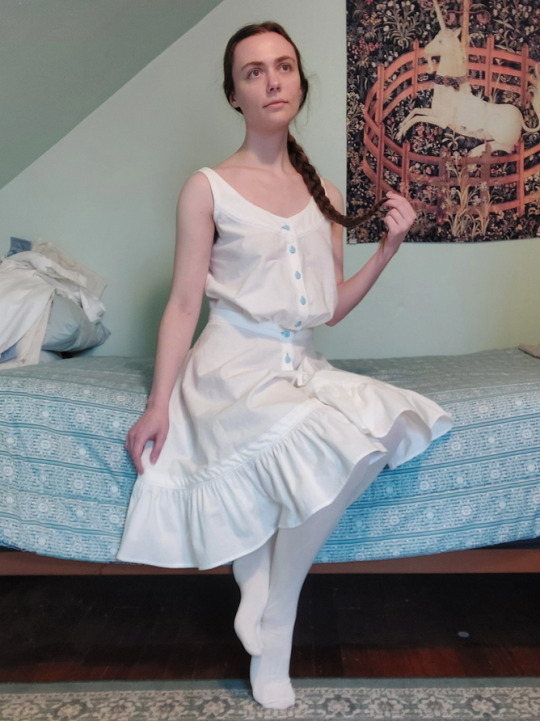
[Image ID: a photo of Alex posing seated on the edge of a bed, wearing white stockings and Edwardian combinations.]
Sometime last summer, having finished my 1890s corset, but not started planning the corresponding wardrobe, I bought a pattern for Edwardian combinations, dug some slightly-discolored white cotton from my stash, and cut out the pieces.
(Now, I want to say that, yes, I understand that these combinations are a few years too late for the 1890s. I prefer the Edwardian shape of combinations over the chronologically-correct 1890s shape. They're underwear, so when I'm dressed no one will be able to tell that they're not accurate. And frankly, everyone's doing it.)
Part of the reason I had put them aside for so long was the fact that I cut out the front bodice pieces as-is, when I had originally wanted to add pintucks. When I got the fabric and pattern back out in mid-March I decided I didn't care enough to do that, so I just started sewing.
Well, actually, I started ironing. There were seven (7) facing pieces that needed to have certain edges ironed down before starting to sew. Then I could actually start sewing - attaching the facings to the front and back bodice pieces, sewing the legs, attaching the leg facings, and making the leg ruffles into a closed loop. More pressing, then more sewing, then more pressing. I skipped the bodice ruffles, though, because they would have been uselessly bulky under a corset.
And then I had an idea.
I didn't intend to add much (if any) lace or decoration to these, but all that white was getting boring. So I decided to spice things up with colored top-stitching. I still have thread left over from my corset, so I top-stitched the bodice facings and the ruffle's hem in light blue! The effect is subtle, but super cute.
I did add a tiny bit of lace, though. I had two lengths of quarter-inch wide lace that I salvaged from... something I can't remember. They were the perfect lengths to add to the bodice just under the facings!
Then it was ruffling time. I didn't want to hand sew the gathering stitches for the leg ruffles, but I was worried that the thread would break if I used machine stitches to gather them. I ended up using the "zigzag stitch over a piece of string" method. I also ended up resorting to an old Pinterest trick where you do two lines of gathering stitches - one above and one below the stitching line - in order to help control the gathers and make them neater.
I'm so glad I did! It was a tedious process but the results couldn't be prettier!
To cover the raw edge of the ruffle, I made bias tape of the same white cotton I used for the rest of the project and used blue topstitching along the top and bottom to hold it in place around the leg.
With the bodice and legs completed, it was time to attach them to the waistband and make it one single garment!
The bodice went first, with a bit of gathering at the center front. I put in two lines of gathering stitches by hand. The result was not as neat as the two lines of zigzagging over string, but oh well. That gets sandwiched between the inner and outer waistbands, sewn, and ironed.
Then the legs get some gathering at the center back. Having learned my lesson on the bodice, I did the gathering with string again. The legs get sewn to the outer waistband first, then ironed. The legs are just barely supposed to meet at the center back (because these are split drawers), but I opted to overlap the facings for a bit more modesty.
I added some more decorative top stitching along the edges of the waistband, which served to attach the bottom edge of the inner waistband as well.
Finally, it was just buttonholes (in blue thread) and buttons (also blue)! The pattern calls for six down the front - one on the neckline facing, one on the waistband, and four in-between. I ended up adding two on the leg facings below the waistband for some more coverage.
And, with that, my combinations were done!
These are easily one of the weirdest garments to put on. I can't explain it, but the way the legs are disconnected just makes it so odd to get into!
I'm mostly pleased with how these turned out, even if my top-stitching doesn't hold up well to close inspection.
There is one thing I want to point out, though. Becuase this pattern (the TV one) is technically for a corset cover and drawers, and the combinations are just a 'pattern hack', the bodice is a bit oddly shaped for wearing under a corset.
As an Edwardian corset cover, the bodice is meant to encourage the pigeon-breasted look of the era, so there's a lot of extra fabric at the bottom front of the bodice. Because I was making a garment to wear under a corset, I could have shortened the center front by an inch or even an inch and a half and the garment would have been a bit more suited to my purposes. It will work fine as is, but it could have been better.
Next up in 1890s sewing is a bust improver and bum pad. I'm hoping to order a bodice and skirt pattern later this month, too, so I can finalize my plans for clothing. I will need a petticoat eventually, but I'm not sure I have the budget to buy fabric for that right now.
My next few sewing projects will not be 1890s, though! I've got a secret project brewing in a new era that needs to be done before the end of the month and then a quick modern project that is already cut out and waiting for me. Then maybe back into the Regency for a bit, but who knows.
Until then,
Stay warm. Stay safe. Stay healthy.
1 note
·
View note
Text
Project Catch-Up and the Event That Wasn't
April 7, 2023

[Image ID: a seated profile-view photo of Alex dressed in a blue and white Regency ensemble.]
My goodness, this year is flying! While I have been very motivated to plan (or at least dream of) some sewing projects, the motivation to actually sew has been... minimal. I've managed a few projects, though!
I made a second bodice from Decades of Style's "Boardwalk Duet" pattern. The fabric is a printed cotton from the stash I inherited from my grandmother, and the lining is a light blue cotton from my own stash. I had actually cut out the pieces last summer before I moved, but I didn't sew it until early February this year. It was a quick project, though - came together over three or four evenings.
Next was a 1940s "camiknicker"/slip from a Mrs. Depew Vintage pattern. That was made from a weird but almost silky pink polyester fabric from my stash. That was also a pretty quick project that I worked on in the evenings the week of Valentine's Day.
Last, but not least, I altered my Regency petticoat. The hem was, originally, a mere 45" around, which made it difficult to walk. I added another rectangular panel and a triangular gore and DOUBLED the hem circumference! At 70", it now fits perfectly under the 72" hem of my dress. The combination of the triangular gore and concentrating most of the waistband pleating toward the back means that the whole thing swishes wonderfully behind me as I move, while maintaining the narrow silhouette.
I've known my Regency petticoat would need altering basically since I finished it and realized how narrow it was. I would have kept putting it off, except that I received word of a Regency ball happening sort-of close to me!
Ok, it was advertised as a Jane Austen Ball. And it's an hour's drive away. But a ball is a ball, and there was the opportunity to learn English Country Dances, AND costumes (or at least formal attire) were highly encouraged, and tickets were only $15. Yes, please!
I ironed my white dress, altered my petticoat, and picked out my accessories so I knew I was prepared.
The day of the event was a windy one - gusts of 30-50 mph! But I really wanted to go, so I got dressed and spent the better part of an hour on my hair (hair and makeup are my biggest weaknesses). Meanwhile, I'm getting texts from my parents about store signs being blown down and from my sibling about the awning at their job being "not where it's supposed to be," and from friends about their power being out. I'm seeing neighboring houses missing shingles and gutters. And, I'm sad to say, I chickened out of driving in that wind.
I had checked the weather for the area where the ball was being held and the winds were no better there. Driving an hour in that wind just seemed too dangerous, not to mention driving back hours later while I was tired and the winds were worse.
So I stayed home.
I was already dressed, though, and determined to make the most of it, so I threw together a little photoshoot!
I'm bummed that I missed the event, but glad that I stayed safe and got these lovely photos!
Now, if things go well it won't be three months until my next blog post, so until then,
Stay warm. Stay safe. Stay healthy.
1 note
·
View note
Text
2023 Goals
January 11, 2023
Now that we've established that I didn't meet most of my 2022 goals, I am going to keep 2023's goals vague.
Vague Goal #1: SCA Garb (3rd quarter of the 14th century)
Yes, I have started getting into my local SCA community. I'm lucky to have found a large, active group that is friendly and willing to teach!
I want to start working on a medieval European/English wardrobe - specifically a decade in roughly the 3rd quarter of the 1300s. I'm still researching to figure out which decade. I'm planning on ordering a buttload of linen in January so I can make a shift, a veil and wimple, and some hose.
I won't fool myself into thinking I'll get any more sewing done this year in this era, but I would like to end the year with a solid plan for this wardrobe going forward. I'll probably do a capsule-ish wardrobe to keep things cohesive.
Vague Goal #2: Stashbusting
I know, it's everyone's forever goal. But I mean it this time.
With the exception of my SCA linens, I am not allowing myself to start any projects whose supplies don't come primarily from my stash. Obviously, if I need something to complete a project like trim or interfacing or something, that's okay, but no buying fabric just because it's pretty or because I want to start another project. Stash-based projects only.
Of course, this would be a very short blog post if I ended it here, so let's see what I have in my stash...
Stash Project Ideas (Not Goals)
Seriously, this is just an inventory of what is in my stash and what I have planned for it. These are NOT goals.
Regency Stash
5 or 6 yds of blue/pink poly dupioni, destined to become a Regency open robe and accessories, like a reticule or turban, and maybe also a pair of slippers. For the robe, I intend to use American Duchess/Simplicity 8941, which I already have.
Misc remnants, including two velvets and a dupioni that might become a bodice, and some scraps and trims that might become a turban or a dark blue bonnet.
1890s Stash
6(?) yds pinstripe poly suiting, to be used for a walking skirt and hopefully a suit jacket. If I don't have enough for a jacket, then I'll make a vest, but I'm really hoping for a jacket. Either way there will be black trim or contrasting black fabric involved.
An unknown quantity of white cotton, which has already been cut out for Edwardian (close enough) combinations, and I should still have enough for a proper 1890s corset cover.
An unknown quantity of light blue cotton, for bust and hip pads because white would be boring or something. Maybe part of a petticoat if there's enough fabric.
4.75 yds striped poly taffeta and 4yds of poly tissue taffeta, in almost coordinating shades of purple that I'm hoping can become a "dress" (aka skirt and bodice), possibly with the help of some white accents. Alternately, the striped taffeta could become a petticoat and the tissue taffeta will become some combination of a bodice, vest, belt, hat, and other accessories.
Misc Stash
Most of a yard of periwinkle burnout velvet, to make more fun lingerie to match the bralette I made in 2022, though I'll need to order more elastic.
1 yd of non-stretch burnout velvet plus elastic and findings, to make more lingerie using my purple cotton bralette and shorts patterns as a starting point.
2.25 yds brown/black flannel, which would make a cute skirt or something.
Roughly 2 yards of blue cotton canvas (left over from my 1890s corset) which would make a sturdy tote bag or two.
Various cotton pieces, which could become summery tops or shorts or both or something else entirely. I need to spice up my everyday wardrobe.
Well, that sums it up, I think. I've had some of this fabric since college or even high school, and I'd really like to use it - get it out of my stash and into my wardrobe. That way I can justify buying nice wools and maybe a little silk in 2024 for my medieval wardrobe, or some thicker wool for Regency winter-wear, or more fabric for 1890s stuff, or, or, or...
The possibilities are endless, but my budget and the space in my apartment are not.
Wishing you all a delightful new year!
Stay warm. Stay safe. Stay healthy.
0 notes
Text
2022 Wrap Up
December 21, 2022
I have had one hell of a year. I left the job I've been at (on and off) for seven and a half years, and finally got a job in the field I have a degree in. I finally bought a car. I had to replace that car's radiator. I moved clear across town and now have to take care of all the household duties myself.
My sewing has suffered for it. I accomplished very, very little this year, which I feel even more frustrated about because I set myself a very, very low bar and I still missed it. This post is quickly becoming a bummer though, so let's jump into it.
2022 Goals and Results
Regency
This year, I wanted to expand my wardrobe with a habit-style chemisette, an open robe, and some smaller accessories like vests and bodices, reticules, and some new headwear.
I made two new reticules right at the beginning of the year, and I really like them!
I also made the DAR vest and an over bodice in the same fabric I've already used to make a reticule and a bonnet.
In non-sewing projects, I made myself another simple jewelry set - a necklace, bracelet, and pair of earrings in deep blue glass beads. I stumbled on some very fun red teardrop-shaped beads that were a near-match for my faux coral jewelry set, so I used some spare beads from the original set to make another pair of earrings.
1890s
My only real goal for my 1890s wardrobe this year was combinations. I got them mostly cut out, but sadly that's as far as I got.
I have, however, made many plans for my 1890s wardrobe, including picking a color scheme and a selection of patterns, and I've expanded my 1890s pinterest board considerably.
Misc
I had one goal for my modern wardrobe this year - a casual warm-weather dress. While I didn't sew one, I did buy a suitable white dress and dyed it a lovely shade of blue. So I'm considering that goal achieved.
I also made a modern bralette this spring and some vaguely 1930s undergarments - a bralette and shorts. Over the summer, I turned an old, too-small attempt at a 1920s house dress into combinations. Then, in the fall, I made a cotton garment bag for what I suspect to be a home-sewn silk dress from the late 1920s or early 30s. It originally belonged to my great-grandmother Elinor. My grandmother kept it, and gave it to me this year when we discovered that it fit me perfectly!
Speaking of my grandmother, I also made some alterations to three or four of her favorite shirts so they fit her better, and I'm currently/still working on another one. I did not enjoy these projects because of the sheer amount of seam ripping I had to do. Please never ask me to alter a store-bought garment ever again.
Summary
Ok, so while I didn't do much sewing this year, I did do some things. And while I'm not thrilled with the number of projects I completed, I am happy with how each project turned out.
Hopefully, 2023 will be a year filled with sewing motivation.
Until then,
Stay warm. Stay safe. Stay healthy.
0 notes
Text
Thoughts on This Green Dress
December 15, 2022

[Image ID: a photo of Alex wearing a wrinkly green Regency dress with a white neckerchief and pearl necklace.]
I originally sewed this green Regency dress back in 2015 (give or take a year), made from a straight size of Simplicity 4055. I had barely gotten into historical fashion, I wasn't super experienced with sewing, and this was the very first thing I made.
Making it was a bit difficult, but I was proud of what I had made at the time. Even today I can look back and be proud of the work I did with so little knowledge or sewing background.
Today, though, this dress doesn't make me happy. I was a bit happier with it after I re-did it at the height of the pandemic, but even that feeling has worn off.
The neckline and waistlines are all wrong, the sleeves are... weird, and I can't tie the back closures by myself. Plus, the lovely dark green color doesn't fit into my Regency wardrobe, making it hard to wear with the accessories I have.
So what do I do with it?
The historical answers are to either alter it (again) or to pass it on to someone else who will get some use out of it.
I'll be honest, I can't see anyone liking it any more than I do. And to be even more honest, I've put so much work into the dress already and I am very attached to it. So passing it on isn't going to happen.
Altering it is a better, but much more labor-intensive option. The color would be easy to fix (the fabric is cotton, so some dye remover and a new dye bath should do the trick). Everything else will be... less easy. Especially because the skirt isn't as wide as it should be, and I only have a few small scraps of this fabric left.
The third, sadder, and slightly less historical option? Scrap it. The skirt has enough fabric to use for mockups and I can always find a use for the smaller bodice pieces.
Alteration Options
There are two ways I can see myself altering this dress to work better for my wardrobe.
(Quick notes - The skirt is fairly narrow, but I don't know how much I actually have to work with because I haven't measured. The bodice is fully lined so I have two bodices to work with. Both of the following options require complete disassembly of the dress.)
Number 1: Center front drawstring
This idea would have the bodice end up like my white dress, with a partial bodice lining and a center-front drawstring closure at the neck and waist. Or maybe no lining.
I would use both the bodice front and bodice front lining to cut out two new bodice fronts. These new pieces would have a lower neckline, and would extend past the center front in order to allow the drawstrings to gather them up nicely. How much gathering there would be depends on how much fabric I have in the skirt, especially since I want to keep some pleating at the center back.
Two back panels would get sewn up to create a center back piece.
Then the bodice can be reassembled. The skirt would get reattached so that the current center-back opening becomes the center-front opening, and drawstring casings would get put in the neck and waist.
Since the sleeve and redying process would be the same, I'll only write it out once after my second alteration option.
Number 2: Apron-front closure
This idea would take the bodice to an apron-front gown. The bodice lining pieces would be re-cut to a better shape and stay the lining, and a large piece of one of the outer front pieces would become the bib/apron front.
Center back bodice pieces would have to be sewn up again, like in the previous option, and then the bodice could be mostly assembled.
The center back opening of the skirt would have to be sewn up, and two new slits would have to be cut and finished for the apron-front closure. How much overlap I'd have on the sides of that would, again, depend on how much skirt I have left after leaving some to be center-back pleats.
Sleeves and Dye
So the sleeves are probably going to be the most difficult part of this process. I have to come up with a new sleeve pattern that fits my arm well, fits into an existing armscye that is mildly deep-set in the back, and the new pattern has to be able to be cut from my existing sleeves.
So my game plan is to disassemble both sleeves and take a pattern from them onto some mockup fabric. and just... have at it, I guess. Lots of trial and error. No cutting into or reattaching the sleeves until I am completely happy with the results.
Then, finally, I can redye it.
The first step, of course, will be to un-dye it. I already have a box of Rit's Color Remover, but I might need a second box.
Once I know the results of that, I can make my final color decision. Right now I'm favoring either some shade of blue or a dark red, because those would match my color scheme best. However, a grey or brown might also do well because they would coordinate with those colors while bringing in some new colors that I can work into my accessories. And this will probably still be a work dress, so it doesn't have to be a super pretty color.
A simple dye bath or two will get the job done and I would be good to go, with a dress that fits me, fits into my wardrobe, and that I am once again proud of!
Of course, this all hinges on my motivation levels and ability to finish the projects I start, which have been... not great lately.
We'll see. The point of this post was to get all these thoughts out of my head, and it has been successful. So until the next time I have the motivation to sew something -
Stay warm. Stay safe. Stay healthy.
0 notes
Text
Blue Lace-Up Bodice
December 2, 2022

[Image ID: a close-up shot of Alex wearing a light blue Regency bodice with white ribbon trim and lacing with a white Regency dress and a peral necklace.]
I have, once again, been long absent from this blog and from sewing. I moved rather suddenly in August (like toured one day and moved in two weeks later) and it took me a while to get settled in and get a table for my workspace.
I was not to be deterred, though. One evening in September I decided I desperately needed a "quick" little hand sewing project, so I dug out the fabric I used for my Regency bonnet and embroidered reticule and the lining pattern I used for my white dress and got cutting.
I had one center back panel and two front pieces with bust darts. The center back panel was also cut out from a perfectly-sized scrap of muslin to act as a lining. I sewed up the bust darts first, then moved on to the shoulder seams and... promptly sewed the wrong piece to the back panel. Oops! That got unpicked and I sewed the side seams correctly, and then the shoulder seams again. I layered the center back lining over the inside of the back and sandwiched all the seam allowances I could in between the layers.
It wasn't until that was all finished that I finally tried the bodice on over my Regency stays and white dress. Thankfully it fit well - which was to be expected since I had used the same pattern as I used for the lining of my white dress - so it was time to start making decisions about closures and necklines and trims.
Yeah, I hadn't made any decisions about what it would look like until this point. Not usually how I go into a project.
I decided to go for a lace-up front with ribbon trim like in this extant garment. There aren't many examples of lace-up bodices in the Regency era, but I really like the bodice in this painting.
I started by folding back the generous front overlap to provide a panel for the lacing and room for a bone to stabilize the lacing (though I doubt the Comtesse's bodice has any boning) while leaving room for a gap at the center front. This was sewn down using a prick stitch along the edge of the bone casing and the lacing panel.
With that set, I started on the hem. The lower edges (besides the center back panel, whose seams were already contained) were turned up twice and whip-stitched down. The armscyes got the same treatment.
Then I got all dressed up again to decide on the neckline. Like in the Comtesse's portrait, I wanted the dress' neckline to show above the bodice, so I trimmed it down starting at the top of the shoulder and scooping it so there would be a little over an inch above the bodice after I finished the neckline edge.
The neckline was finished the same way as the hem and arm scyes. In order to make my work easier around the curves and odd fabric grains, I folded the edge in once and basted it, then used that edge to guide the second turning-in.
With construction done, I could turn my mind to trims again. I ordered 5yds of half-inch wide white ribbon to trim the neckline and hem like on the extant bodice I linked above and I had some white satin cording that I had braided and tassels to attach to the ends.
But then I got to thinking about doing some embroidery to better match my light blue reticule - maybe a simple little basque stitch around the neckline and the back panel seams. And maybe the white lacing cord would blend in too much with the white dress beneath.
So the project was once again put aside for a bit.
Eventually, I decided that I wanted the bodice done sooner rather than later, so ribbon trim it would be!
It looks, in the photos of the extant garment, like the ribbon was just gathered across the width and tacked down, with enough ribbon between the tacking points to make a little puff. I spaced mine out so that the gathering was spaced out about an inch on the ribbon, and the gathered parts were tacked down roughly 7/8ths of an inch apart on the neckline. I did fudge some areas to get the trim to be roughly symmetrical, but those were my starting measurements.
Then, for reasons I no longer remember (because this happened early in November, and now it is almost the end of the month), I decided not to add ribbon to the waistline of the bodice. Instead, I jumped straight to the lacing.
I wasn't able to find a matching blue cord, and the white cording I have is too big for the holes, so I decided to use most of the rest of the white silk ribbon to lace the bodice closed.
The ends looked a little sad, though, so I attached white tassels to the ends. This means that I can't get the ends of the ribbon through the lacing holes, so I had to make sure the ribbon I used was long enough that I could get the bodice on and off.
The white ribbon lacing over a white gown doesn't contrast very well, so I'm considering this a temporary measure. I'm also worried about the tassels being too heavy for such delicate ribbon and the possibility of them tearing off. A better, more permanent solution will probably be to make some self-fabric rouleaux to use as lacing. I certainly have enough fabric left. (Maybe I should cover a pair of flats to be dance slippers?)
Until I actually make the self-rouleaux cord, though, this little bodice is done!
I really like how it turned out (except for the lacing ribbon)! I was worried the ribbon trim would be too frilly for my tastes, but it's actually fairly subtle and I think the scale/size is just right too.
Hope you're all safe as the year comes to a close.
Stay warm. Stay safe. Stay healthy.

[Image ID: a neck-to-knees photo of Alex wearing a white Regency dress with a light blue bodice, matching embroidered reticule, blue shawl, and pearl necklace.]
1 note
·
View note
Text
A Purple Bralette
June 16, 2022
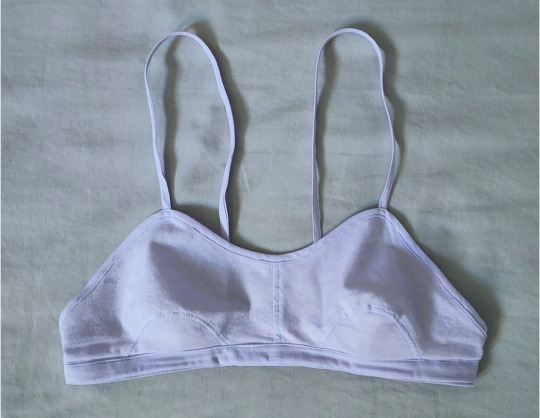
[Image ID: a soft-cup bralette made of light purple cotton, laid flat on a grey background.]
To go with my pale purple shorts - and still riding the high of making a nice bralette - I decided to make a bandeau/bralette out of the same purple cotton.
Some time ago, I bought this 1920s bandeau bra pattern from The Underpinnings Museum. Because they take their patterns from original garments, it's a one-size pattern. The band size of the original fit me, but the cup size was too big so I knew I would have some fitting and adjusting to do before I could actually make the thing.
I transferred the digital pattern to paper in a roundabout way - the pattern files are on A4 (I think) paper so I couldn't print it, and the scale square was in centimeters but my paper was gridded in inches. So... yeah. I opened the pattern pdf in a design program and put a 1" grid on it, making sure that each square was a bit bigger than the 2.5cm scale on the page, then used it like any other gridded pattern.
Fitting & Adjustments
With the pattern sized up, I cut out the pieces from my purple cotton. Obviously I wouldn't normally use the fashion fabric for a mockup, but I have at least two yards of this stuff still, so I didn't really care.
I pinned it together to try it on, which was dangerous, but I survived. Then I pinched, pinned, and marked the excess fabric to make it fit me in the way I wanted it to.
Once that was done I was able to take it apart, even up my alterations, and trace a new pattern. It already looked a lot different than my starting pattern, and not in the ways I was expecting.
I had expected the cutout for the insets to get smaller and the upper part of the 'cup' to also get... smaller, somehow. The upper part did get smaller, but the cutout got wider!
I suppose that makes sense if you think of it like swinging darts around - taking space out of one area and putting it in another. The lower bust inset also got smaller, which keeps it from being too big in the area where the excess went.
The bust got a bit more pointy because I made the inset narrower, but not much shallower. It's not overly pointy, though, and I was already getting a bit frustrated so I didn't try to fix it.
I gave my new pattern half-inch seam allowances at the back, center front, and inset seams. The bralette would have the upper and lower edges bound, so no seam allowances were necessary.
Now I had to wrestle with grainlines. The original pattern had the grainline running parallel to the center front seam, so I did the same with my new pattern.
Unfortunately, that was the wrong choice, as I discovered when I made my next mockup. The shape of the bandeau had changed so drastically from the original pattern that putting the center front on the grain put the top of the bra 'cup' almost directly on the cross-grain, giving it no stretch or ease. I know the 20's had a flat-chested look, but this just did NOT fit.
On sewing that mockup, I also realized that a half-inch seam allowance on such an intensely curved seam was too much to sew smoothly - I ended up with a lot of wrinkling and catching between the main piece and the insets. Those seams were cut down to a quarter-inch. I also narrowed the inset slightly again and moved the part of the body where the strap attached a bit.
So I made those minor alterations to my new pattern and cut it out again, this time making sure the top of the 'cup' was cut on the bias. Then I sewed it up again and it fit great!
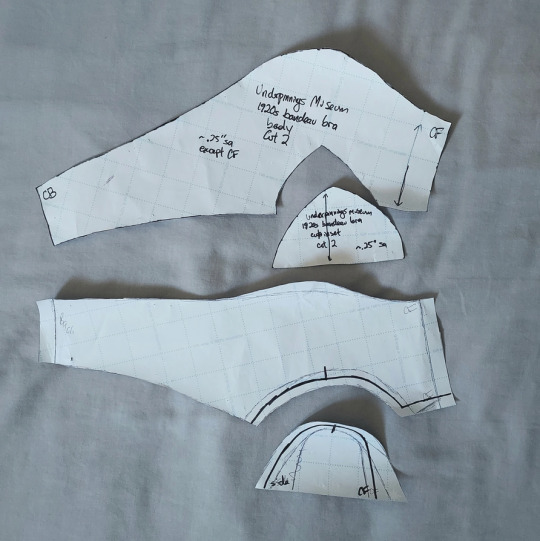
[Image ID: the original two-piece sewing pattern at the top of the photo, compared to my version of the two-piece pattern with marks for the final pattern on the bottom of the photo.]
Finishing
Feeling terribly pleased with myself, I started finishing the seams. The center front was flat felled to one side, in the hopes of fortifying the front seam. I top-stitched the other side of the seam to match. I flat felled the bust seams, too, folding the seams up toward the main piece of the bandeau and carefully stitching them down.
Then I figured I'd better think about elastics and closures. I was intending to attach a V-shape of 1" elastic on each end, with a G-hook as a closure, as you see in this 40s bra. Unfortunately, I only had one G-hook and it was already designated for another project (a modern version of this bralette).
Rather than order another one and wait for it to ship, I decided to alter the bandeau dramatically into more of a bralette. I pinned one end of the elastic to where I wanted it to attach on one side and marked that same point on the other side. Then I put the bra 'on' and wrapped the elastic around to see how much elastic I would need for it to fit snugly. I pinned that end to where I had marked on the bra band and made sure I could (every so carefully, with the pins still in) get it on and off okay.
Once I was sure I could get the bra on and off, I sloped the 'top' of the bra down to where the elastic would be attached. I then folded the elastic and fabric in on each other to hide the raw ends of both and did three lines of vertical stitching to hold the elastic in place.
Finally, I could bind the edges. I cut a strip on the straight grain to serve as the bra band, folded the long edges in, sandwiched it around the lower edge of the bra, and sewed it on in one fell swoop. I folded it over the edges of the elastic, so I made sure to give it a good backstitch on each end. I top-stitched the lower edge of the band too because I thought it would look nice.
The upper edge got a simple quarter-inch bias binding which was also attached in the lazy/all-at-once way. I made sure to sew slowly so my stitching was mostly even and there were barely any ripples.
I didn't have enough elastic for the straps, so I just took more of the bias tape I used for the top edge and top stitched it on each long side. I attached one end of the strap to the front, then pulled it around to the back and pinned the strap to the elastic band. I made sure that the length of the straps and the point where I was attaching them were even, and then I sewed them on.
Final Thoughts
The bra was done! It's obviously very different from the original, but I like it just the same! I'm proud of how well I got it to fit, it's very comfortable, and I can't wait to make a nicer version out of some burnout velvet I picked up a month or two ago.
There was one small issue I didn't discover until I was done. Because I removed so much of the bra band, there is no... containment in the armpit area, so it ends up not being quite so secure or supportive. It's not a huge issue, though. It still fits and it's still comfy, so I'll take what I can get.
My next sewing project is one of my two "big" goals for this year - Edwardian combinations!
Until then
Stay warm. Stay safe. Stay healthy.
1 note
·
View note
Text
Purple Pajama Shorts
June 2, 2022

[Image ID: a pair of plain purple shorts laid flat on a fuzzy white background.]
With my desire for cute lingerie and sleepwear still going strong, I went looking for more cute patterns. I had bought a non-stretch burnout velvet when I bought the fabric for my periwinkle bralette, so I needed patterns for woven fabrics. I thought knickers might make a nice lower half and decided to try my hand at drafting a pair from Vera Venus' French Knicker Tutorial.
The drafting went pretty smoothly, even though this was my first pattern drafting attempt besides my corset. Surprisingly beginner-friendly! There is one point where you put in darts, then close the dart to flare out the base of the leg, but I didn't want the shorts to be too loose in the leg so I didn't do that.
Once my pattern was drafted I figured I'd better do a mockup in something simple before cutting into my expensive velvet. So I pulled out some of the pale purple cotton broadcloth that I can't seem to get rid of.
That's when I realized that a pair of simple cotton shorts would make great summer pajamas and waste not want not... I decided to make them as a test run more than a simple mockup.
So I cut out my pattern with a half-inch seam allowance all around to give me room to do french seams. The hems got a full inch, though.
I pinned it all together to test the fit, and I'm glad I did. The fit was a bit too tight in the waist. I simply decided not to sew up the front darts the pattern calls for (I'm not shaped that way anyway lol). Satisfied with the fit, I got to sewing.
The back darts went first, then I french seamed the short inseams. The crotch seam went next and was also given a french seam.
Then I pinned up the sides to double-check the fit and was very happy with the result, except I felt like the waist sat a bit too high in the front. I experimented with folding the center front down a bit and settled on leaving the side front seams at the height they were but dipping in an inch at the center front.
With that settled, I french seamed the full right side seam and the left side seam below the opening. If memory serves, the pattern drafting instructions call for an opening on both sides, but my hip-to-waist ratio is small so I can get away with one opening.
Next it was time to finish the opening. I opted to bind the opening in one long piece of bias tape. The tape was a quarter-inch wide when folded but attached to a half-inch seam allowance. The binding on the front side of the opening gets folded under and still overlaps with the binding on the back edge to form a sort of placket.
Then I could attach the waistband. I wanted something thin since the shorts are already pretty high-waisted. I cut a piece of fabric two inches wide so that once it was folded in on itself it would be a half-inch wide to match my seam allowance. I was too lazy to attach it properly, so I just encased the raw edges of the waist inside the waistband and topstitched it all together.
I finished the waistband end on the front half of the opening to line up with the edge of the opening (mostly), but the end on the back half extends a bit. A buttonhole went on the front end, with a button on the extended back edge.
For the hem, I folded the edges under twice and machine-stitched a bit over a quarter-inch from the edge. My folds weren't super consistent on the inside but no one will see that so it doesn't really matter to me.
To finish I spaced three snaps evenly down the side opening. My side opening is about 7" long, so the snaps are about 1.75" apart. The opening was pulling in an odd way because of how the front placket was folded under but not secured, so I quickly topstitched short lines between each snap on the front.
From drafting to done, I think these shorts took about three or four short evenings of work. They're almost entirely machine stitched except for the button and snaps. All the raw edges are encased to ensure that these survive the heavy wear they're bound to get.
The shorts are just slightly loose in the waist, but they definitely would have been too tight with the front darts. The bottom of the crotch seam could be an inch higher and still fit well. When I make these shorts out of that next burnout velvet, I'll take the front side seams in by about a quarter-inch on each side and try raising the crotch seam a half-inch (just in case).
I'm super happy with how these turned out and they're definitely going to be my go-to pajama/lounge shorts this summer!
Until next time
Stay warm. Stay safe. Stay healthy.
0 notes