#often copying and pasting the original tumblr text caption
Note
this ^
Hello! Right? The editor is a mess, settings aren't user friendly, it takes 3 clicks to do the simplest tasks like uploading a gif or image from the harddrive. There's apparently a character limit for the caption area, there's not enough room for colorized text html because the code eats up too much space.
Gifs and images, once you upload them, are difficult to move around. Trying to "pull" and "push" a gif into a desired slot (left, right, top, bottom) has been so frustrating and far more difficult than such a task should be. It's like gifs are weighted down by rocks and won't slip into the correct slot. You have to re-do the order over and over again because they never appear in the slot they're supposed to. And sometimes the draft saves itself but other times it forgets the new steps you've made to the post and everything is lost again. You have to refresh the drafts page to see if the post is actually saved!
Then once you set up your gifs in the correct order, feeling like you've accomplished a Herculean task, and you re-edit text in the caption as a last tweak or something, ALL the gifs are in disarray for some reason and need to be re-arranged manually every single time you edit the text. It makes no sense. The code for the caption and the gifs shouldn't affect each other.
It takes me ages to post a simple photo set or a gif set with a caption. The code for the caption is long and overstuffed, further taking away room for colorized text that needs a lot more characters of code.
My temporary solution (that I'm still practicing through trial and error) is to get all the gifs/photos ready first, switch to html view and write the caption and color text as the very last step. This way, in theory, I only have to re-arrange every gif one more time, instead of several times, which is hard because it's my habit to tweak and re-tweak the text caption to my liking. Otherwise if I re-edit the text 10 times, the gifs are also messed up and in the wrong order 10 times. It still takes me several takes to re-arrange and edit because something always needs to be tweaked. It's like the new tumblr editor only saves the gifs/photos uploaded to a post, but not their order. The worst part is, it forgets I placed smaller 268px gifs side by side in a row, not in a column/top to bottom like one would large 540px gifs. Baffling.
The more stuff I find that's not working with the editor, the more frustrating sharing content becomes. Gif makers and other creators are gonna stop posting to tumblr if, on top of spending hours or days or WEEKS on gif sets (elaborate gif sets take a lot of time, energy and creativity), they also have to battle a stubborn, awkward editor that requires another 100 steps before the post is saved correctly for publishing!
Tumblr should have kept the legacy editor as a 2nd option for people who like the old version, and everything would have been fine. :(
#replies#tumblr#and this is just one side of the issue#not even counting all the gif stealing and reposting on#sites like twitter and instagram#without any credit to tumblr gif makers#i rarely comment on it but it's been really frustrating#we had a chronic gif reposter in another fandom#that kept reposting thousands of gifs for clout and instagram followers#gaining over 15 thousand followers (and more via other accounts) using tumblr gif makers' work#spending several years reposting gifs other people made#often copying and pasting the original tumblr text caption#to go with their reposts#yet wouldn't take 5 seconds to add credit to the caption ;)#at least have the decency to write 'this was made by so and so on tumblr'#they had the gall to repost actor birthday gif sets from tumblr#then they tagged the repost with the actor's official instagram account username#likely hoping the actors on instagram would see the gifs#and thank the reposter for the bday 'present'#when in reality all the gifs were made by other people O_O#and it took them ages to make those gifs special and pretty for the bday gif sets#besides they are meant for other fans and not the actors#gif makers make gifs for the fandom#they're not meant for the actor but for fans to celebrate the actor's birthday#to pretend you've made the gifs just so you can catch the attention of the actor#is just so disrespectful it's hard to put into words#and this person appears to be reposting again :/#reposters are the new 'norm' sadly#so i don't comment anymore when i see my gifs on other platforms :(#all gif makers ask is for some credit
28 notes
·
View notes
Text
This is my online accessibility (especially image descriptions) masterpost, which I update periodically whenever I find a new resource or guide. I worry this has the side effect of looking overwhelming in scope, so if you're learning about IDs and/or Tumblr-specific accessibility for the first time, I recommend you start with the first five starred posts. All post titles are clickable links!
*Why and how to write image descriptions (with examples linked)
*Accessibility on Tumblr for new users (has templates, also talks about how to tag for flashing lights to accommodate photosensitive folks)
*I see an image and want to describe it: a step by step guide
*Fanart-specific and Tumblr-specific advice for image descriptions
*How to describe screenshots of tags
Why a short ID is always better than no ID
I want to make my posts more accessible, but can’t write IDs myself: a guide
Google Doc full of template descriptions for memes
Online image to text converter
Describing skin tone and describing hair (heads up that the posts themselves are undescribed and were written with fiction writers in mind; potentially still very useful)
How to remember to write descriptions (spoiler: by putting yourself in situations where you see descriptions more often)
Related, a Google doc of described blogs (almost all the blogs linked earlier in this post have tons of described posts and resources too)
(In my opinion, writing IDs is easiest to learn by doing — but especially if combined with watching other people do so. So follow some described blogs!)
Why not to put image descriptions in small fonts/italics (also, some non-definitive thoughts on IDs vs alt text, and why "both" actually makes sense as an answer in many cases)
More on IDs vs alt text from a visually impaired Tumblr user
Alt text vs IDs vs Captions with examples
Brief Intro to Transcripts/Video Descriptions
The People's Accessibility Discord sever (a very friendly community for crowdsourcing image descriptions)
How to make your blog's colors visually accessible - one of the easiest thing on this list!
Other easy things: show love to artists who describe their work, edit descriptions into your original post when someone provides one in the notes, and copy-paste inaccessible (eg, small text or italicized) descriptions as plain text when you reblog!
Lastly, and maybe most importantly, how to continue writing image descriptions while avoiding burnout.
Let me know if any of these links break! I personally don't describe nearly as much audio/video (got those audio processing issues), so this list is sparse on those resources, but if anyone has good guides/blog recommendations for that too, feel free to add on!
395 notes
·
View notes
Text
Messed up palette sans

#MESSED UP PALETTE SANS GENERATOR#
#MESSED UP PALETTE SANS SOFTWARE#
#MESSED UP PALETTE SANS SOFTWARE#
This can also help social media personalities and influencers attract more people to their posts increasing their reach, followers, number of likes as well as their overall fan base.įurthermore, this creepy text can also be used in Photoshop or other similar software as part of a project to make your text appear different and unique. It will make your captions, posts and comments appear to be more eye-catching, different, and unique. It can also work as a great prank to make people believe that there is something wrong with the text or that there is some glitch that is making it happen.
#MESSED UP PALETTE SANS GENERATOR#
Useful ideas for Creepy FontsĬreepy text maker is a great way to create ֆքօօӄʏ ȶɛӼȶ which would be more fun to use especially on occasions such as Halloween or for themed parties as well.įor instance, if you wish to create banners or invitation cards for Halloween, you can use the void text generator to generate several fonts from which you can choose one according to your liking to add an extra spooky touch to your party decor as well as invites. The creepy font generator can be used to generate messed up text that can be used on different social media platforms such as under scary videos on Youtube, on your Facebook status, and even in your Instagram posts and captions to give that spooky appearance that would not only look cursed but also scary making it more noticeable than normal, boring text. The creepy and scary text generator is a fun and unique way to generate spookiness and messed-up looking text that is creepy and makes it look like the letters are depicting something related to horrific. Paste it where you want and enjoy it Who can use it and where?.Type the text you want in Creepy Text Generator.The interesting thing is that there is absolutely no limit to the number of diacritics that can be added to a character that has been provided by Unicode. The characters that Unicode has are very basic looking and diacritics can be added to those characters to make them look a certain way or appear as a certain letter in a particular language. What they did to make this possible was that they created tens of thousands of Unicode symbols. What Unicode creators wanted to do was that they wanted to cater to all the languages out there and that seemed close to impossible. Unicode uses a set of symbols that look like the original Latin alphabet. Many other such items use particular fonts that can then be labeled as creepy or spooky fonts. This is a board that claims to speak to the dead. These creepy fonts are mainly part of pop occult such as the font used in the ouija board. The Creepy Text Generator provides the users with many scary text styles to choose from. We have a list of them that we think you should check out: All of these fonts are extremely different and unique. There are several types of creepy fonts available out there. It’s eye-catching, and it’s popular on social media, especially around ★ 𝖍𝖆𝖑𝖑𝖔𝖜𝖊𝖊𝖓!☆Įvery single day, a new trend hits the market and everyone suddenly wants to follow that trend. With the help of Creepy Text Generator, you may join the spooky font trend for Halloween and horror stories. We Convert Normal Fonts into a Creepy Text. What can Creepy Text Generator do for you: By using the creepy and scary text generator, it appears as if the font has been changed however in actuality, this is not the case at all. The creepy text generator uses Unicode as a result of which we can easily copy the text that we have created using the surreal text generator and paste it wherever we want without any problem. Often more than not, we see such cursed text appear in different places across the web however when we wish to copy it and paste it elsewhere such as on different social media platforms like Facebook, Twitter, Tumblr, Youtube, etc we are unable to do so and the text fails to appear in the new spooky font that we want it to. The creepy text generator for void and cursed letters is a fun, efficient, and easy-to-use font generator that helps users achieve that scary, spooky text exactly the way they want.
0 notes
Text
Image Descriptions Make You a Better Writer
Writing is a form of art and imagination that can’t be expressed visually the way most other forms of art can, and yet words can fill your heads with images of places you’ve never seen or even considered before.
So reasonably, it’s probably good to practice describing things to people who can’t see the thing you’re describing. and the best way to do that is to learn to write image description.
What is an image description?
It’s a paragraph of text written to describe the image it’s attached to, and it’s written for those of the internet who can’t see the image because they’re blind or visually impaired. Blind/VI people often use screen readers which read all the text on screen for them, but screen readers can’t understand and describe images, so they rely on someone writing an image description down so that blind/VI internet users can understand the image they can’t see.
It’s a form of accessibility, similar to adding wheelchair ramps and elevators for people with mobility disabilities, or adding closed captions to videos for the Deaf/HOH.
Those accommodations make it possible for people with disabilities to share important parts of life with people who are abled. And image descriptions make it possible for Blind/VI people to enjoy the important parts of life able bodied people experience.
And learning to write image descriptions will improve your writing. Here’s why
If you’re someone who struggles to describe the scenery you’re seeing in your head, it might be helpful to have some scenery visually in front of you to describe.
It can be a nature photography image, architecture, people, background setting, anything. Having the image in front of you and allowing yourself the time to describe it effectively and concisely will improve how you describe these images in your writing.
It’s important to note that you should avoid purple prose while writing these, keeping it from being too abstract. There’s nothing wrong with purple prose and if you enjoy writing it than by all means run wild with it. But, it makes things harder to understand, so avoid it in image descriptions.
Writing image descriptions for memes is a different experience.
Memes are abstract images and it takes knowing the context to understand the joke. And memes are evolving every day. We have a dozen new memes every month and they have their own evolution.
So you’re describing an image to someone who’s never seen your meme, and you have to learn to explain the context in a way that makes sense. It’s not like describing a tree or a building, where the person listening to these image descriptions has some experience with the tree or building and can use some sensory memory to fill in the gaps.
Eventually you learn how to describe images in new ways, how to introduce new and abstract concepts to someone who hasn’t experienced that type of humor much.
And having some experience explaining new, abstract concepts might be helpful if you’re trying to explain some unique world building context, I’m just saying.
Writing image descriptions for screenshots or articles, tweets, and other social media will teach you how to explain all the necessary information and prioritize what your reader should know first about what there is to see. Which, again, when in writing you should learn who to prioritize which details come first and how to build on them. These are probably the easiest images to describe, so they’re a good place to start.
The real reason why you should write image descriptions?
It’s accessibility. You’re literally providing someone a chance to join in on the experience of this post by including the image description. People who rely on image descriptions are left out of the loop when entire conversations are based on just one image that they can’t see and have no context for.
If you’ve ever used Tumblr on mobile and you see post after post where images won’t load due to data limitations, then you have a small idea of what it’s like to be left out of the loop on these posts.
There’s a screenshot of an article headline? Great, but it looks like a grey box to you, so you don’t even know what the headline says, just that people are arguing about subject headlines, timing, politics, and semantics.
There’s a screenshot of a tweet, but it’s a grey box to you so you don’t even know that it’s a tweet. All you see are the lines of people adding things like “queen” and “slay” and “ooh, tea” but again, no context for why everyone likes this image. Or they’re roasting the person in the screenshot, but again, you don’t even know that it’s a person.
That is the best way I can explain the experience of being left out of a conversation to sighted people. You have everyone’s reactions, but not what the conversation is about. Sometimes you don’t even have a reaction, just a series of eight grey slides that have no context added.
How to write an image description:
Most image descriptions are put in (paranthesis) or [brackets] and usually begin something like this:
(Image Description: photo of a grey and white kitten on a tree branch, looking at the camera with blue eyes. The kitten looks calm and unworried. End Image Description)
[Image Description: Distracted boyfriend meme. Distracted boyfriend is me, checking out re-rewriting parts you’ve already finished (the other girl) instead of looking at parts that still need to be written (the upset girlfriend) End Image Description]
[I.D. Screenshot of an article headline from The New York Times that says, “Jeff Bezos set to make another 100 billion off Amazon slave labor.” Author, Guy Steves. Includes photo of bald Jeff Bezos in a three piece suit and a second photo of a 40 million dollar mansion. End I.D.]
Please note, the above New York Times article is fake, obviously, I just made that up off the top of my head.
I don’t have photos, but those image descriptions get the idea across without the photo, don’t they.
Final Note:
I understand if you don’t want to add image descriptions all the time. I feel that way too. There are a lot of things I think about reblogging and then don’t because the image description is too much for me, like very long twitter threads or comic strips for example.
Most of the time, if I have an image I want to reblog, I put it into my drafts folder and add an image description and some tags before I toss it out into the void of tumblr.
An option you have is to go through the notes and look to see if someone else has already added an image description and you’ll reblog from them.
One thing you should absolutely not do is find an image that already has an image description and find a way to reblog or repost without the image description. It’s fucked up and I don’t respect anyone who does that. I don’t know why that happens, but I’ve seen people do that and it upsets me.
Thank you to all the people who express support to this blog and to the image descriptions. I’ve had wonderful bloggers add my image descriptions to their original post, I’ve had them reblog the original post (because there was a response they didn’t want on their blog) and copy/paste my image description with credit given. You’re all wonderful and I appreciate you.
#writing community#writing advice#writing tips#accessibility#writeblr#image descriptions#my post#my advice
59 notes
·
View notes
Text
graphics guide
a guide filled with basic info, tips, and answers to common questions that i hope helps people who want to start making graphics
*this was made based on my experiences of making graphics and is what i thought was important to cover but everyone has different ways and approaches so dont feel the need to follow everything on here
what is a graphic?
a graphic (also known as ‘gfx’) is a image edit that incorporates various elements (textures, filters, text, etc) in order to visualize a idea or to create a aesthetic composition
unlike making gifs, there is no right or proper way to make a graphic so dont get too caught up in the idea that a graphic should look a certain way - just stick with your style and what you think looks good
anatomy
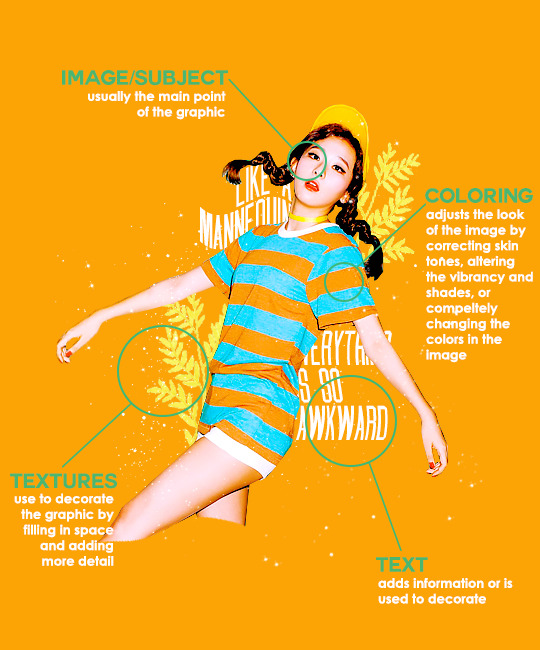
image/subject
usually the main focus of the whole graphic
you should always try to use a sharp hd picture - getting it from the original source is always the best option
make sure the source of the picture allows editing - pictures from public sources like a company or the news can be edited while fansite pics and scans need to have permission asked (and if they give you permission make sure you link them when you post your graphic!)
coloring
often referred as ‘psd’ because that is the format they are in (i.e. pink psd pack)
comprise of multiple layers that can alter the images look
a lot of people make their own colorings since the outcome of the look also depends on the image’s original coloring
textures
smaller cut out images that are often used to decorate the graphic
can also refer to a image that can be use as a background of a graphic
can be found in the form of a png (copy + paste into graphic) or a brush (”painted” on to the graphic)
avoid using any textures that does not state the original poster made them - you could unintentionally be using someone’s work that was not made to be used
[read more about it here + resources that you can actually use]
text
text can be used to tell information or just for decoration
try to choose fonts and colors that are legible
faq
what software can i use to make graphics
most people use some version of photoshop (i currently use photoshop cc 2018) and a lot people have it cracked but if you cant afford photoshop, find a cracked version or a patcher (i used adobe zii 3.0.4 for mac), or are uncomfortable with getting a cracked version then there are other softwares that are just as good!
i can only vouch for gimp since i used it when i first started making gfxs. it is very similar to photoshop and shares most of the same tools and has a similar look to photoshop. it is also probably the most popular photoshop alternative and would totally recommend it if you cant get photoshop!
[visit + download gimp here]
where do you get your pictures from
official sources such as teasers companies release, photos released by press, photos from idol’s instagram - basically photos that are made for the public to see are whats best to use for a gfx. you should download the photos straight from the source so you get it at its highest quality
some phrases you can use to search for pictures on google:
- [group name] photoshoot
- [idol name] press
- [group name] showcase
- [idol name] teaser
remember the more specific you are in your search the better! also when you search through google make sure you check your source!
avoid getting photos from reposting websites like we heart it and pinterest
avoid using fansite pictures and scans unless you are granted permission
i don’t know where to start/i’m overwhelmed and i don’t know what to do/ where should i begin
figure out what you want to make or a theme you want to follow - do you want to make a simple graphic or a infographic? do you want it to center around a certain theme like a comeback or a photoshoot? once you determine what you want to do it becomes easier getting ideas and finding stuff you will need for the gfx
example thought process:
“i want to make a loona graphic” → do you want it to be the whole group or a certain member or unit? will it just be a simple gfx or a AU gfx or based on a event that the group is doing?
“i’ve decided on doing a kim lip one” → do you want it to have a certain theme like kim lip smiling or kim lip with blonde hair? is there a certain frame of time in which you want the graphic to represent like during eclipse era or hi high era?
“i want it to be from max and match era with her teasers” → from here you can start finding pictures to use and thinking of colors and textures that would fit your theme
where do you get ideas/inspiration from
i mean it’s different for everyone but for me i literally just think of stuff and i’m like wow i want to make that happen asdfsdfj but mostly when i see pictures or watch something thats where i suddenly get a idea
but tumblr is full of graphic makers!!! ive seen so many amazing graphics from various fandoms like kpop, anime, marvel, etc.
some amazing graphic editors i know myself include:
primirene, ireone, nctjaemin, celo-mar, 1hyungseo, jeongahn, haechxnie, sonxiumin, syua, lulumelody, dinomite, lovelyeo, joohys, whatchatalkabout, yveu, maerinah, mihyon, lorbits, cherryjennie, thatporcelain, monoka, ifbin, 7ww
some other places you can look at are behance (dont go on behance if you have a cracked ver of ps - it might trigger a ingenue software alert that is a huge pain to deal with), pinterest, deviantart, dribble, and probably any social media platform if you just look up #graphicdesign
remember if you take inspiration from someone’s work then you should cite them in your caption - if you are afraid that you might’ve accidentally copied someone when you were trying to take inspiration from them its best to either try to remake the gfx again or just to ask the creator permission if its fine if certain details are similar/same
my stuff sucks how do i get better
literally just keep on making stuff aka practice. you can’t improve if you don’t bother putting effort.
ways i’ve forced myself into practicing making gfxs is by:
1) starting a gfxs series - its self paced and is based on what you want to make (i.e. introducing my biases gfx series, my favorite outfits gfx series, etc)
2) taking in requests - people who would request from you probably like your stuff so its a win win situation (i.e. send me a idol + era, send me your bias + palette, send me a group and i’ll make a gfx of my fav member, etc)
tips
only sharpen your pictures after you are done resizing them, if you sharpen and then resize it might result in a more blurry or grainy picture
always save your graphic every 5-10 mins in case photoshop crashes
have two copies of your image cutout: one will be the original and the other one will be the one you edit with - in case you mess up like over erasing or over sharpening your image you have a back up you can use
stick with a color palette so you don’t get overwhelmed when having to color everything and it makes all the graphic panels you have look more cohesive
on photoshop you can favorite fonts!!! take advantage of it!!! your computer has a lot of fonts saved on it and it takes forever to look through a whole list of fonts so by favoring fonts you can see all of the fonts that you like to use for graphics
combine a png pack to one psd → when you open a png pack you will probably get a lot of png files and it gets annoying having a lot of tabs open in photoshop when most of them are just textures so by putting all of those pngs into one psd you can cut down the files you open and can easily see all of your options
make folders dedicated to colorings and textures that way you can easily access them instead of looking through your computer for a certain file
name your layers... i dont do it because its easy for me to tell what layer is what but when you are working with a lot of layers its best just to name them it’ll make life easier
lock your main image/subject so that when you play with texts’ and textures’ location you don’t accidentally move your main image
use curves to help get a photo back to its original coloring! like if you have a photo that has a weird filter on it just use curves and it’ll help the picture look more natural! [tutorial]
try warping your text to make it stand out more! you can access it by pressing the icon on the top text bar that has a T with a curved line under it. i use flag and wave the most
alter a particular color by using a selective color layer
rather than changing the actual color of an image/texture you can:
create new layer → select the image/texture and color it on the new layer instead of on top of the image/texture → change the opacity or the mode of the layer so that the color is put on the image/texture while keeping its detailing and not affecting the actual image/texture
resources
colorings: can be found on deviantart or tumblr just look up ‘psd coloring’ or ‘[color] psd’
textures: can be found on deviantart (check to see if its og content or stolen) simply just search what you are trying to find or ‘png pack’ or ‘texture pack’
common textures you can try to find: vintage flowers, memphis shapes, organic shapes, doodles
other wesbites: pngtree, creative market, lost and taken, spoongraphics
fonts: if you are looking for a certain font then you can just do a google search but if you are browsing then dafont and font squirrel are really good websites too
some of my favorite fonts: abril fatface, agfatumc, antonellie calligraphy, arcadeclassic, bebas neue, century gothic, couture, daily news 1915, dark larch, hondurhas, kotori rose, krinkles, risingstar, sant joan despi, studly, zing rust
color palettes: i made one myself which you can find here, color hunt, and honestly a quick google search will give you tons of options
if you have any questions, other stuff you want me to cover, or want to add more resources and tips then please dm or send an ask! i hope this helps!
#i really hope this helps someone and that it makes sense#i literally woudlve been so happy if i saw this when i first started it took me so long to figure things out and im still learning#also i basically told where i got everything so like please dont take advantage of this and end up copying my gfxs... its happened to me a#lot#idk what to properly tag this alfkjasd#ps help
125 notes
·
View notes
Note
do you know that your ideas for posts and their descriptions are stolen elsewere by websites that earn money on them thanks to adverts and traffic? i think it's unfair for you and other passionate bloggers your kind who get their ideas stolen
Hello there Anon. Do you have any particular posts/articles of mine or any particular websites in your mind? Sadly, I get similar messages or emails every once in a while. I’ve been intervening a few times in the past when my articles were stolen word-to-word. Unfortunately I don’t have enough free time to keep an eye on all the popular websites. I’m aware that some of my ideas and inspirations are ‘leaking out’ of tumblr. Ideas are often being stolen and this is a very dark humanity trait. And yes, a direct copy without mentioning the source in its broad sense is always wrong. What can I say, my posts are not OC in the core sense: I use visual content I feel inspired by that I find online at their actual sources aka creators (and I always repeat that I’m very particular about linking all my sources). Here, I’m extremely sad and loose the interest in blogging when I see something looking like taken straight out of my precious child that is Lamus Dworski but without it being mentioned at least as an inspiration where the content was found. I’ve grown to focus on my articles and descriptions - the captions you see under my posts are always my own words or my own translations (unless quoted, ofc with source). If you happen to recognize parts of my own text being copied somewhere, I’d be thankful if you could inform me so I could contact the website that used it. What I want to put the focus on now is the fact that above all of that the most important thing is always the original authors of the visual content being properly mentioned and re-linked. Chill and bless!
2 notes
·
View notes
Photo

i’ve been asked a few times about the process of selecting and using themes, so i thought i would write out everything i can think to say about them and hope it’s useful! i’ve broken it up into the very basics, before you hunt, hunting for themes, colours, pages, update tabs and extras! if you can think of anything else that i’ve missed, please don’t be afraid to ask! i’m happy to help wherever i can!
THE VERY BASICS
html can feel a little daunting, but the amazing theme makers on this site have made it super easy to make use of their codes! so once you’re ready to install your theme it’ll go like this:
once you’ve picked your theme (keep reading for tips on that!), in the description there should be a link usually titled ‘code’ (along with other instructions which will help with installing it!), open this link and copy all of the text (this is the code!) supplied! then when you’re ready, when you click ‘edit theme’ on your blog you’ll see this:
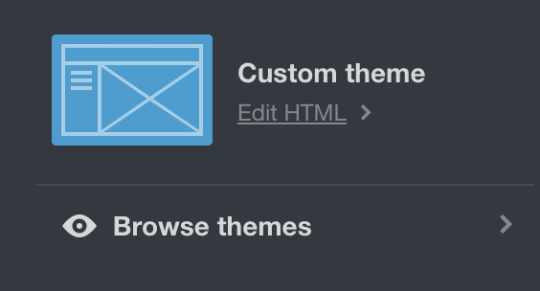
you want to click ‘edit HTML’ and you’ll be taken here:

you want to delete all of the code that’s there already and replace it with the code you just copied! now click ‘update preview’ and then ‘save’ and click the back arrow button and refresh the page! (sometimes you won’t need to refresh but i do it out of habit of having shitty laptops)
depending on the features of the theme your ‘theme options’ should have changed! most basically it should have options for post width, font colour, link colour + where to add your links for your homepage! have a go at turning each setting on and off so you can see what each does for your theme - but yo the theme makers on here are dope and everything should be really straight forward! (i’m happy to try and help if anything seems confusing! but theme makers are also often ready to answer questions and are ofc best to ask!)
DO NOT EVER EVER EVER REMOVE THE CREDIT FROM ANY CODES YOU USE. DON’T BE THAT GUY. JUST DON’T DO IT. coding is fucking hard, and there are so many reasons why it’s not okay to remove the credit after all that hard work they’ve done to supply you and other users with free codes for your blog. so just don’t do it.
don’t edit the code (often small tweaks are fine) unless you have permission to do so.
and please make sure to like and/or reblog any code you do use! you’re about to use their hard work, it’s the least you can do!
BEFORE YOU HUNT
i think it’s good to have a look around at some blogs that you love + admire and start to get an idea of what kind of theme you want because honestly there are so many wonderful themes out there it can get pretty overwhelming trying to pick one! (also look for the credit on these themes, when you find one you really love you can see what else the theme maker has posted! (or even just use that theme if it’s available from the credit source - they are all there for all of us to use, so nobody will mind!))
think about how many links you are going to want to have displayed on your homepage, as some will have a lot more than others! i think the essentials to have linked are your original content, navigation + about pages (going to get to that later!) but the rest is up to you!
HUNTING
my two fave places to find themes + codes are @theme-hunter and @acuite ! (but again, def have a browse of bloggers with themes you love and see what else those creators have made!)
i think it’s a good idea to put a whole bunch you like the look of in your likes and then narrow it down from there! so often i’ll get halfway through changing a theme and decide it’s not quuuite right, so it’s good to have options!
make sure to consider any images within the theme! some themes might need a specific sized image, while others will scale it down for you - so keep an eye out for that kind of stuff. you can use sites like pixlr and picmonkey to crop down and edit images to size! a lot of themes have smaller icons, so often icon pack icons are perfect!
personally (+ remember this is all totally subjective, at the end of the day it’s your blog, so you should have whatever theme you like best!!), i like single columned themes with a white background! i think white is the best to present your content on, but if you do what to have a coloured background - i’d suggest a very pale/saturated colour so it doesn’t distract/clash with some of your posts! (my background is a very light grey with the borders around images kept white!)
also, i think it’s a really nice idea to keep tags showing on your themes! as quite often when i’ll be scrolling through someone’s blog i might see a post i’d like to see more of and with the tags showing it’d only take one click! + leave captions on! same way you shouldn’t delete captions when reblogging edits etc, you should have the caption on show on your blog!!
COLOURS
who doesn’t love a good colour palette? you’ll be able to see how many colours you can incorporate into your theme under ‘theme options’! black/dark greys are usually the best for your default font colour - but have some fun with your link and link hover colour!
looking through ‘colour tumblrs’ are a good way to pick a palette, but make sure they all tie in nicely (including with your themes icon if it has one!) i usually find colour inspo here + from the blogs reblogged from within there.
PAGES
pages can be super important! nicely organised pages are definitely something i look for in blogs, and just makes your blog feel much cleaner and organised! it’s also good to get away from just having a ‘default style’ page with a simple text list tag/about page, it just looks nicer when you have a coded page for it, ya know?
the two pages i think every blog should have (and have linked from your homepage for sure) are an ‘about’ page and a ‘navigation/tags’ page! then after that, just start checking out what kind of pages other blogs have and ones you’d enjoy having on yours!
sometimes you’ll be able to find ‘page packs’ where a coder has made the ‘standard (about, navi, blogroll etc)’ pages all with a similar style! you might notice on my blog, my faq, about and navigation pages all look quite similar because i got mine from a pack! but if not, just aim for pages that work nicely together and with your blog!
(both of the theme blogs i linked above have well-organised pages sections, so they’re still my recommendations!)
(to add a html page just make sure you have ‘custom’ selected here: )

UPDATE TABS
they can feel a little daunting, but really, they’re pretty easy to add and are great to have on your blog! you can use them for a little bio section, a place for extra links and letting people know what you have going on atm!
so each updates tab should have some instructions to help you, but the general idea is you’ll be given one/two bits of code to add to your theme's code. so you will have to go back into ‘edit html’ and usually it’s at least one bit of code to paste into the ‘<body>’ of your theme! but make sure to read the rules supplied for each updates tab, as all are slightly different!
to make your updates tab sit on the opposite side of the blog - cmd+f within the code of your updates tab and look for either ‘left’ or ‘right’ in accordance to how it sits currently + then switch it word for the side you want it to be on!
EXTRAS
clock for your blog (find your timezone and scroll down to where it says ‘tools & converters’ and there will be a link that says ‘Display a free clock for *location* on your website or blog’)
hit counter + online user counter
handy codes to know (for editing your bio etc!):
adding a link: <a href=“urlbetweenthequotes”>name of link</a>
break: (drops your following text down one line) <br>
paragraph (drops it down about two) <p>
67 notes
·
View notes
Text
Best Ads and Social Media Management Tools
1) Sharekit
ShareKit lets you easily customize how your link will appear when sharing it on social media, without the need to get your IT team involved. When using ShareKit, we'll provide you with a new link to share on social media. This link redirects to your original link, but you're able to customize the link's title, description, and image
https://www.sharekit.io
2) Linkmy.photos
Link My Photos helps you monetize your Instagram by getting your followers from your photo feed to your awesome content. Get started today for free. Instagram photos and captions are currently not linkable. The only place where you can add a link to your website is through the URL in your Instagram bio. Link My Photos has created the ultimate destination for your Instagram bio. Your personalized Link My Photos page displays all of your clickable photos to help your followers get to the content and products that you post on Instagram.
https://linkmy.photos/
3) PixelMe
PixelMe is an another awesome and simple URL shortener for Marketers who thinks wisely. You can short your links with retargeting pixels from Facebook, Twitter, Google Ads and Linkedin ad platforms. Check the site for more information;
https://pixelme.me/
4) PromoRepublic
Thus AI for small business social media is now a thing, in the shape of PromoRepublic , a startup which has now raised a investment round. It competes with visual design companies like Canva, Stencil, Adobe Spark, and DIFM companies like Main Street Hub, Boostability and RevLocal who do custom social content for SMBs. So, when to post, how often, what copy, design, call to actions and hashtags to use on Facebook, Twitter, LinkedIn and Instagram. PromoRepublic will post automatically at the right time and frequency, thus doing the heavy lifting for business owners who really wouldnt know where to begin in terms of creating and sharing content about their business
https://promorepublic.com/en/
5) Later
The photo you want is there, but no text shows Why not just go into Instagram and post regularly through actual Instagram? You could write the text you need on the photo and go around it that way, but that degrades to marketing tactic of the photo. Suggestion for creators: Work with Instagram to get permission for users to select deny or allow Later to post automatically. It would be an awesome tool for hours, but right now it's just not effective or efficient. Minimum $200 Later subscription does not include Facebook and Twitter analytics, and scheduled posts are not reliably submitted. This means the only consistently working social media function is the reminder to post to Instagram is sort of cool, but any wordpress novice can make a simple page that does the same thing on their own site.
https://later.com
6) Meet Edgar
One of the most frustrating aspects of any social media update is how quickly they get buried under new social media updates. Add the fact that your followers, fans and connections check their social media accounts irregularly and it’s actually amazing that your updates are seen by anyone at all: Meet the “disappearing updates” dilemma. One solution to this “disappearing updates” dilemma is to each of your social media updates multiple times, upping the odds that it will be seen by your targeted prospects. Unfortunately, adopting this tactic can be very time consuming, even if you use a social media management solution to schedule your updates. If you’re frustrated by the fact that few people see your social media updates and you’re too busy to schedule those updates to up the chance that they’ll be seen, it’s time to meet Edgar . When it comes to automation however, Edgar leaves the rest of the pack behind. Using an library, update categories, and scheduling, Edgar helps your social media updates, as well as any content to which they may link, get the attention they deserve. Edgar’s setup process is an easy way to become familiar with the tool.
https://meetedgar.com/
7) Everypost
Everypost is a critically acclaimed social media tool utilized by digital agencies, SMBs, content professionals, and firms. The app makes it simple for a user to construct, schedule, customize, and post content on popular social media platforms such as Twitter, Facebook, Tumblr, LinkedIn, and others. Social media marketers and content professionals have made Everypost a priority tool for getting content out in the internet across social media platforms. It also facilitates media content upload via One of its biggest strengths is its capacity to deal with a wide range of social media networks as a standalone tool. It can reverse its role by limiting Twitter texts and giving a user the option to choose which social media platforms to blast to. It comes with a support for extracting videos from YouTube, audio from Grooveshark, and images from Flickr. A user will be highlighted with social media networks at the top of the screen, a middle area for inputting text, and list of media format to import from the bottom. Clicking on any social media network will prompt the user to sign in, and if the login is successful, the button will light up.
http://everypost.me/
8) Buffer
Buffer is a popular social media post schedular software. Moreover, you can manage multiple platforms with Buffer.If you still do not try Buffer, just take a look and you will love it.
https://buffer.com/
9) Bitly
Bitly CEO Mark Josephson Bitly Techland, like most places, likes stories with extreme outcomes: Startup X sells for a gazillion Startup Y, once valued at a gazillion dollars, goes to zero. So here’s a story that won’t get much attention: A modest success for a company that once had much grander aspirations. That would be Bitly , a company that lets marketers and other businesses keep tabs on customers as they move around the web by generating short, trackable URL links. Salt on the wound: There was a time, back in the early days of Twitter, that Bitly and its investors thought they had something really, really big on their hands. Twitter was just ramping up, and Twitter used Bitly to shorten all the links its users generated, and that meant Bitly knew a ton about the way the internet worked who clicked on what, when, where. Most of Bitlys attention was focused on its free product, and the money it made selling a premium version to publishers and marketers didnt cover its costs. Credit a pivot, which started when CEO Mark Josephson joined the company in 2013.
https://bitly.com/
10) Click to tweet
Easily view and keep track of all links you've created in the past. Create folders to better organize links by project or campaign. Access to edit, view stats, and copy your links are all easily accessible.Update the text of your links at any time. Use a plain text link or select an image to embed in your website. Always have your link details up to date.View reports of click activity on all your links. Analytics are tracked for all links you embed inside of your message/tweets, too! Every time someone clicks one of your links, we record where they clicked from and present this data to you on a map. See from where people are clicking on your links across the world.Increase your followers by suggesting your (or anyone's) Twitter account to be followed every time someone tweets from your ClickToTweet link.
https://clicktotweet.com/
11) Sumall
In “audience shifts,” not only can you see how many new followers you have attracted but also see how the networks of the people you are following have expanded, which increases your own potential reach. You can also find out which of your new followers have the greatest following insight into where to share to best amplify your and how many of your own followers you follow. You can find out who’s engaging with you, who has responded to your social media posts, what the overall response rate is and how responsive you are to those that mention you. The “audience quality” report is a good one to make sure that you are interacting with active Twitter users. The “audience by engagement” section highlights your top ten most active followers on both retweets and You can also see whether they have verified profiles and can check out common profile keywords and how they engage with you. Other sections of the Twitter Audience Insights report look at “audience by contributed reach” people who have expanded your reach by retweeting and mentioning you to their and “network size” followers have the biggest networks. You can even see the timezone that most of your followers fall into and use this in order to schedule social media posts for maximum engagement. As with the other report, there’s an overview page, before delving into the individual “Best performing time to tweet” is but what’s useful here is the rolling average so you get a wider overview of your best days and times and the times when you get the most engagement.
https://sumall.com/
12) CoSchedule
Posts are easily moved, and social messages attached to those posts move with them. You will then have access to the calendar and team features at CoSchedule synchronizes your WordPress post, author, and category information to its servers, but all of your WordPress data remains in WordPress. Social messages, tasks, comments, team members, and other data you create in CoSchedule will be stored on CoSchedule’s servers, and never in WordPress. Managing a team blog or planning your own blog’s content marketing is not easy inside of WordPress. CoSchedule is an editorial calendar that makes it easier to create, move, and manage your blog posts and stay ahead of your plan. It allows for WordPress blogging team collaboration without needing extra outside tools and logins, reducing the time and unnecessary complexity required to plan your blog’s content marketing program.
https://coschedule.com
13) Raven
Introducing the tool The Raven suite of tools* were originally designed for SEOs by an SEO but they now includequite a few extra features for other disciplines of internet marketing so theres Mailchimp integration, a Facebook page manager, Twitter tool and PPC ad management features. In early Raven removed the keyword rank tracking part of their system following pressure from Google so in this updated version of the comparison well take a look at some of Ravens other SEO features. Raven is a fully hosted web app, like all the tools in this comparison, and its biggest selling point is the sheer amount of integrations it provides with 3rd party tools to pull all your campaign data together. This is no longer the case but they are still refining the system and making improvements to the interface and reporting options. However we were disappointed by the decision to remove rank tracking, something which most SEO agencies and marketers still consider an important part of their client reports.
https://raventools.com/
14) Social Flow
SocialFlow stretches across our business touching both the editorial and the ad sales sides. It's been a solution that allows us to scale what we do from an organic social publishing perspective, but also has allowed us to unlock incremental revenue.SocialFlow allows us to work from one central platform for multiple teams, across the world. For me, it meant no more sleepless.
http://www.socialflow.com/
15) Friends+me
Friends+Me posts using physical real-world Android phones, all running latest official Instagram application. No Instagram private API is used, we are inline with Instagram's terms and conditions.
https://friendsplus.me/
16) Crowdfire
Crowdfire claims to be the biggest marketing product for Twitter and Instagram and offers smart features, which guarantee rapid growth on the social media through its philosophy. Accessible through Web, Android and iOS apps, it’s a powerful solution to attract targeted followers on Twitter and Instagram. It powers connections that help its users achieve their social media goals, including brand recognition, brand popularity, increased sales and fans. Launched in as JustUnfollow, it transitioned into Crowdfire in and currently boasts over million users, which include businesses of all sizes, individuals and entrepreneurs. Overview of Crowdfire Benefits Crowdfire follows the Grow philosophy, which is a recurring and a strategy of growth on the social media. Its Clean features keep away irrelevant, unwanted and spam accounts, which do not add any real value to organizational or individual feeds and also don’t contribute in achieving strategic goals.
https://www.crowdfireapp.com/
17) Post Planner
Post Planner is like having an entire social media team on demand. We help you FIND, PLAN and POST amazing content to your Social Profiles guaranteed to drive engagement. Our algorithm ranks content based on virality and engagement to give you a predictive performance score. So the more stars you see, the better that content will perform. Your personal Facebook profile and Group posting have a daily limit of 15. This does not apply to Facebook Pages.
https://www.postplanner.com/
18) Wask
Wask is the new way to make effective ads and manage them smartly. Wask lets you easily connect to your Facebook, Instagram, Twitter, Google ads account in one screen. Wask is using a well-developed and always up to date Artificial Intelligence program which has many features. You can manage your time with the help of Scheduler, compare your result with Performance Comparison, control your ads daily/weekly/monthly automatically by activating the AutoPilot. You can take advices from your personal experienced advisor for your results. At the end Wask manage your time and budget in the most efficient way.
https://www.wask.co/
19) Kenshoo
Kenshoo is the technology platform looking to plan, activate and amplify effective marketing across the most engaging digital channels. Kenshoo offers the only marketing solution that provides data-driven insights and optimization technology to help make informed decisions and scale performance across critical publishers, including: Kenshoo’s machine-learning algorithms and cutting-edge AI enable companies to predict and keep in-step.
Kenshoo provides a variety of different products: Kenshoo Social (for search engine marketing campaigns), Kenshoo Local (for individual stores, dealers, or franchisees), Kenshoo Search (for social media marketing campaigns), and SmartPath (for analyzing your campaign from the consumer interactions point of view). For each of those services, you can request a demo trial.
https://kenshoo.com/
20) OPTMYZR
Optmyzr motto is "PPC Management Made Smarter." When you launch an ad on the platform, you instantly get alerts and suggestions based on your goals and previous campaigns. The automated report delivers you to share it with your team and bosses.
This tool also supplies the clients with pre-written AdWords scripts, forecast about budget usage, and customised workflow. They have trademarked some of their unique software:
One-Click Optimisation™, it's based on automation. Your keywords and goals are only 1 click away;
Enhanced Scripts™ (it works just for AdWords) supplies the tool to write and store for you the Google AppScripts code.
It's possible to request a demo and start a free trial.
https://www.optmyzr.com/
21) PPC BidMax
PPC BidMax tool provides flexible and automated bidding for Google Ad centre and Google AdWords. The top thing about BidMax is that it develops traffic with maximum results. This innovative tool gives search engine marketers the advantage of managing their bid campaigns for a variety of search engines, including Yahoo, Bing, Google, etc. all from one simple dashboard. It also makes use of complex and sophisticated algorithms for useful analytics and reports.
To understand if this product suits you, BidMax To understand if this product suits you, you can try BidMax for free.
http://www.ppcbidmax.com/
22) AdEspresso
One platform, multiple channels. You can create campaigns on Facebook, Instagram or Google using AdEspresso. The multivariant technology from AdEspresso makes it simple to test and optimize ads increasing ROI of your campaigns. You can test multiple variations of your Facebook Ads based on your targeted audience and find out which one is generating the best result. On top of that, you can generate fully customized PDF reports of your Facebook Ads.
https://adespresso.com/
23) Contently
In November Contently was named by Advertising Age as one of the best places to work in media and. Contently has a lot of clients , and we rely on freelancers like yourself to staff projects for them. We have an algorithm that combs through users’ portfolios and pushes forward relevant candidates. So when you’re setting up your portfolio, make sure you focus on the kind of things algorithms like: namely, keywords that highlight your expertise and skills. In the headline section, be sure to specify whether you’re a writer, videographer, designer, and so on. We’d love to provide assignments for everyone who signs up for a Contently unfortunately, we are not an open marketplace and cannot supply work for the roughly 80,000 users now using a portfolio.
https://contently.com/
24) Invoca
is a tool that offers a variety of solution for marketers and sales reps who need to know more about people calling to them. The platform is not geared only towards the paid advertisement, but it has an extension for Google AdWords.
Indeed Invoca gives you tons of insight into which of your paid search efforts are driving people to call. The platform allows you to track and analyse billions of calls and understand how to spend your budget more effectively.
https://www.invoca.com/integrations/google-ads/
25) Instagram for business
Use relevant, popular hashtags Engage by following others and liking their photos selected images to your Facebook page with a hashtag that aligns with your campaign or brand image to help people who don’t know you’re on Instagram to find you there. Debut Videos Instagram’s recent Video on Instagram has given Twitter’s Vine a serious competitor to contend with. Jordan Crook charts the differences between Instagram and Vine in the image below: Jordan Crook charts Instagram vs. Embed Instagram Video in Your Blog or Website Last month, Instagram released a new embed feature for its desktop web browser version. We’ll talk more about this in Generate a Flexible Posting Plan Carley Keenan offers the following advice on the frequency of sharing on Instagram: “You don’t need to post on Instagram every day. If you start posting a lot, you might saturate your followers’ feeds, and you don’t want to force yourself into the noise too often. There are apps that let users print images, search tags and keywords, subscribe to Instagram profiles via email, download all Instagram photos in a single archive folder, plus many more. Inspire Potential Customers Anna Colibri suggests you post photos that are relevant to your brand and potential customers. Whole Foods Market posts representative photos to promote healthy, wholesome food products, store events, sustainability and their active community of customers and employees. A study conducted by Simply Measured earlier this year found percent of the world’s top brands are now active on Instagram.
https://business.instagram.com/
26) Statusbrew
Statusbrew is a social media management platform that combines the power of internet and technology to empowers businesses, brands, marketing agencies, and organizations to discover and manage customer experience across various social touch-points and drive growth. With a simple to use interface for the planning of social publishing of marketing and PR campaigns on multiple social networks, Statusbrew is a trusted partner for Teams.
The publishing feature helps you to schedule content across different social platforms. With Engage on Statusbrew, never miss out any conversation about your brand or business on social. Reply to DMs, Mentions, and Comments from all the profiles in a single unified social inbox. With real-time sync, receive and assign replies to specific teammates for them to work on it as soon as a prospect talks about you and never miss out on any lead. Slack Integration will change the way Brands, and Agencies can bring in their teams to collaborate in Social Publishing and Brand Monitoring right from their workspace. When you connect your Statusbrew with one or more Slack channels or workplaces, you will receive instant Slack notifications for all the activities you choose are necessary for your Business. Signup on Statusbrew for a free 14 days trial to gain a competitive edge and build strong social connections! show less
https://statusbrew.com/
27) Sprinklr
Sprinklr provides a unified platform for customer experience management (cxm). Our customer experience & social media management software guides enterprise businesses through and digital transformation.
https://www.sprinklr.com/
28) AdNabu
AdNabu is an AdWords optimiser in partnership with Google. On this platform you can create an ad or a campaign (using customised templates) and correct your bid in real time (following the tool suggestions), AdNabu supports different types of ads:
Regular search ads (aka text ads);
Shopping ads (the useful resource for e-commerce sites);
Call only ads;
App install ads, for promoting an application on Google Play or Apple Store.
29) Contently
In November Contently was named by Advertising Age as one of the best places to work in media and. Contently has a lot of clients , and we rely on freelancers like yourself to staff projects for them. We have an algorithm that combs through users’ portfolios and pushes forward relevant candidates. So when you’re setting up your portfolio, make sure you focus on the kind of things algorithms like: namely, keywords that highlight your expertise and skills. In the headline section, be sure to specify whether you’re a writer, videographer, designer, and so on. We’d love to provide assignments for everyone who signs up for a Contently unfortunately, we are not an open marketplace and cannot supply work for the roughly 80,000 users now using a portfolio.
https://contently.com/
30) Keyhole
Keyhole is a real-time hashtag tracker for Twitter, Instagram and Facebook. Its visual dashboard is simple, beautiful and shareable! Keyhole's real-time dashboard shows how many people posted with your hashtag, along with the number of Retweets, Likes and Impressions your campaign is generating. Keyhole tracks the most influential people engaging with your brand. Reach out to them to promote your content and increase your brand's reach.
http://keyhole.co/
0 notes
Text
New impulse: googling the text along with potential social media sites when I see unsourced screenshots going around FB, and then commenting on them with links when possible.
How long will I keep this up? Dunno! My old habit was to just “hide all posts by” the nonpersonal FB pages, and I still do a lot of that. Maybe it’ll become a “when I have the spoons” thing like putting image descriptions on tumblr posts is.
It just...it bugs me! The fact that they’re images instead of texts means original posters worried about their work going around uncredited aren’t going to be able to search for reposts easily! And it’s harder to people to casually look for a source, since they often involve formatting that limits search capability, and of course re-typing text instead of copy-pasting discourages people.
And if they didn’t bother putting a link or source in the caption, they likely didn’t ask OP for permission to share off-site.
0 notes
Last Seen Blogs
conangrayofficial
Conan Gray

wishihadamisstress
Untitled

blackmintsnow-blog
BlackMintSnow

iris-black13
Autistic tendencies abound

pulitzerwon-blog
INTREPID !!