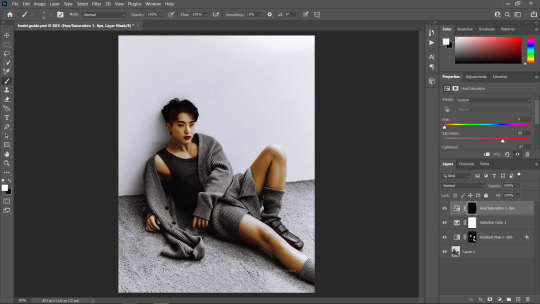
#lee.guide
Text
HELLO & WELCOME ♡
to an all inclusive giffing guide, which includes:
- vapousynth installation on windows / mac
- how to source giffable material
- resizing / deinterlacing / denoising / sharpening on VS
- step by step breakdown of how to use VS
- giffing after you've used VS
- giffing using only photoshop
- simple colouring guide
- watermaking and blurring captions
( a better and updated version of the previous one )
GIFFING USING VS + PS
1. VAPOURSYNTH & ITS INSTALLATION
VS is free to download and use. it is truly an amazing tool which allows you to resize, denoise, sharpen your gifs all at once and save the output in gifs, frames , mp4 and mov.
You can install vapoursyth from here. The site has download software and installation guide for both MacOs and Windows. Please watch and read the installation guide thoroughly, it is a very well written one and if you follow along, installation will be done easily.
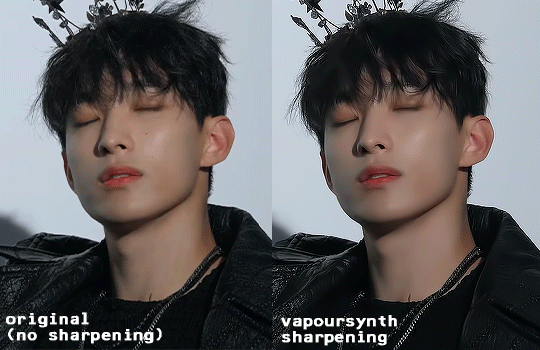
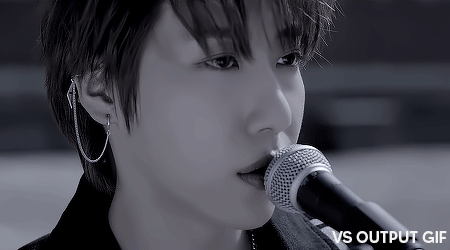
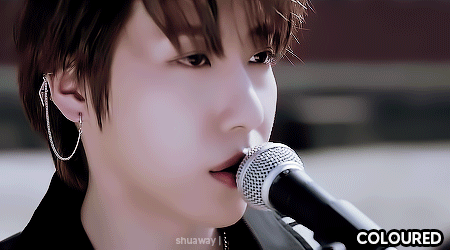
It is best to use a video with minimum resolution of 1080p but a good 720p would work sometimes. This is how gifs look after sharpening a normal 1080p video:
2. SOURCING GIFABLE MATERIAL
➞ You can start with downloading a 4K Video downloader. It will allow you to download clean and best available resolution videos from youtube.
➞ If you don't want to download a software, you can use screenrecording.
- Windows : windows key + alt +R
- MacOs: shift + cmnd + 5
➞ .TS files
- for seventeen .ts files, you can go to rosebay
3. TUMBLR SIZING
Tumblr has it own resizing rules so that your gifs aren't blurry after you've uploaded them. Keep this in mind when you're using VS resizing tool.
4. USING VAPORSYTNH
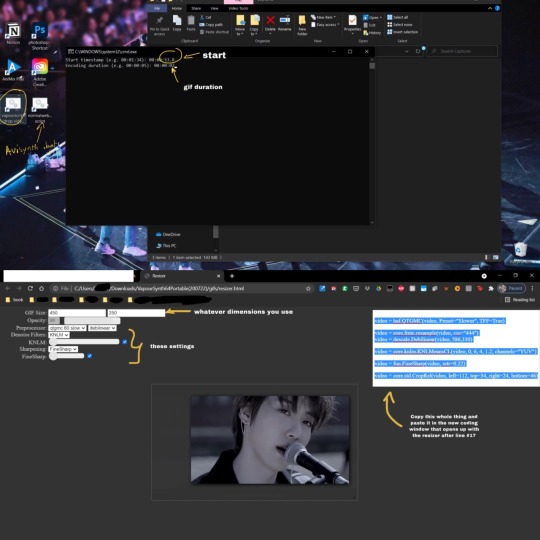
After you've installed the VS properly. You'll have a VS script shortcut on which you'll drop your video file for giffing.
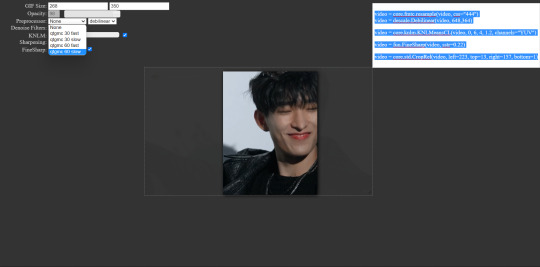
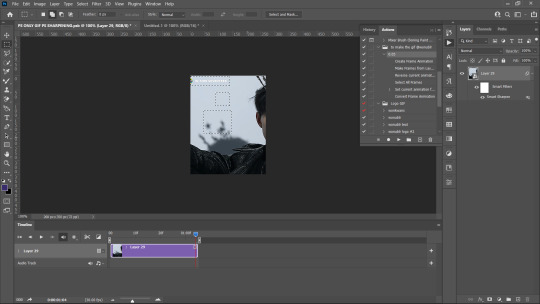
Once you drop your video file on the VS shortcut, a window like this will pop up:

After you've put your timestamps and gif duration, a resizer will open up in chrome ( or your default web) along with a VS Script Window (sometimes it’ll take a min to open).
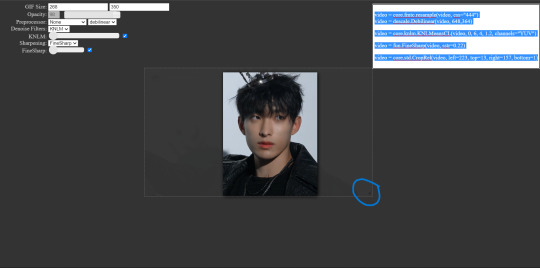
GIF Size: WIDTH (left space) and HEIGHT (right space). Use the bottom left triangle to adjust you clip.
Make sure 'Preprocessor' is set to 'None' and "debilinear'.
Use KNLM for denoising and FineSharp for sharpening by selecting them and ticking the small check box beside them. DONOT mess with the denoise and sharpening cursor on the resizer tab, we'll adjust setting on the VS Script.
There are CCs who use BM3D for denoising but it never worked for me. Always gave me an error. KNLM has worked without an error for years for me.
NOW, there are CCs who like to set frame per second ( qtgmc) on the resizer itself but qtgmc is designed to work with interlaced video. Don’t waste your time with fancams, it won’t do shit.
[ Interlaced content: live performances, variety shows. Typical formats: .ts/.tp/.m2ts
Progressive content: fancams, vlive/instagram videos, some variety shows (basically 1080p/720p/480p/…, anything with a p. Typical formats: .mp4/.avi ]
Copy whatever code that comes on the top right.
YOUR VS SCRIPT:
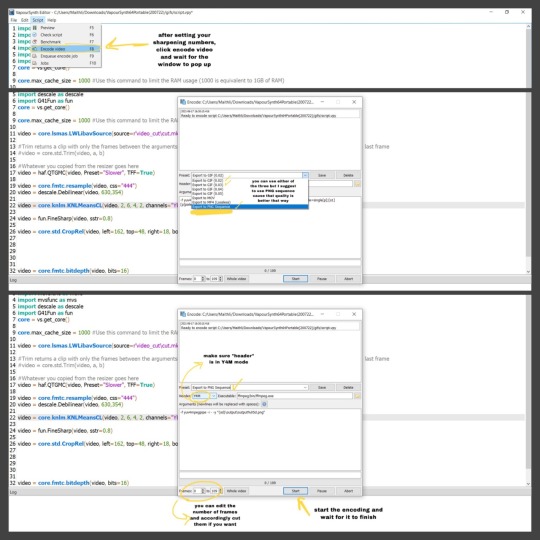
First, remove the # on line 9 to increase your cache size so that your VS doesn't slow down or crash. It is already removed in mine, but you'll have to remove the # on the start of line 9.
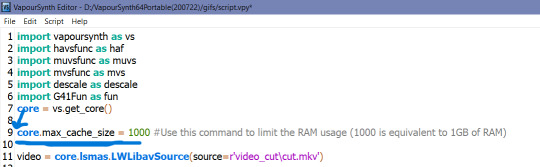
Remove everything from line 17 till before "video = core.fmtc.bitdepth(video, bits =16)" and paste the code you copied from the resizer on line 17.

After you've pasted the code, we put in our denoise and sharpen settings by changing these things.
denoise: 2, 6, 4 , 2
finesharp: 2
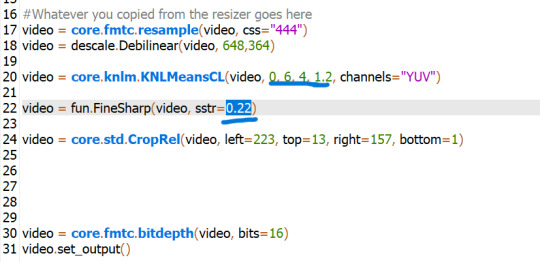
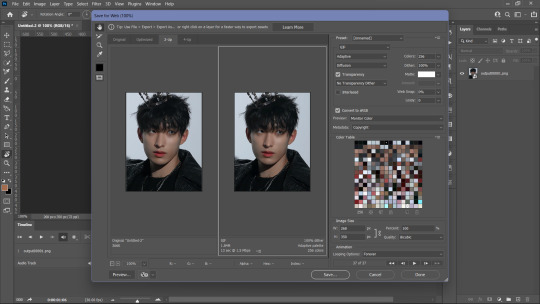
Now, Encoding aka Saving the output. Script > Encode Video and another window will pop up which allows you to select in which way you want to save your ouput.
I would highly suggest using the PNG sequence because it is easily editable and is saved in hd from. GIF output can often be dithered.
Ensure that header in in Y4M mode
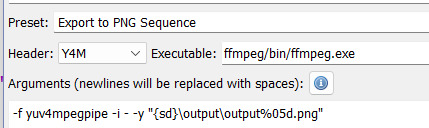
Click on Start to start your encoding process. Don't close any of the window tabs before the encoding is completed.
Your output will be saved under "D:\VapourSynth64Portable(200722)\gifs\output".
Before you start encoding another batch of frames or a gif, please cut and paste the previous output in another folder because each new batch of output gets saved in the same folder with the same name, thus, automatically replacing the files.
after you’re done with accessing your output PNGs, close all the windows and repeat the same for a new set of PNGs for another gif.
TRIMMING GIFS
If your saving as PNG sequence, you can simply trim your gif by removing the unwanted frames!
If you're saving as a GIF output, after loading your gif and converting it into a smart object, you can cut it using the 'scissors' button on the timeline.
Place the cursor thing from where you want to cut the gif from and press the scissors button.
It will split the gif in two. Select the unwanted one and press delete.
REMOVING FLASES FROM GIFS
To remove flashes in gifs in a simple and easy way is to save them as a PNG sequence. With that you can clearly see which frame has a flash and simply delete that before loading in photoshop as stack.

5. LOADING THE GIFS IN PHOTOSHOP
Firstly, turn on your timeline mode. WIndow > Timeline
To LOAD GIF FILE IN PS FOR COLOURING
File > Open > Select GIF > Enter
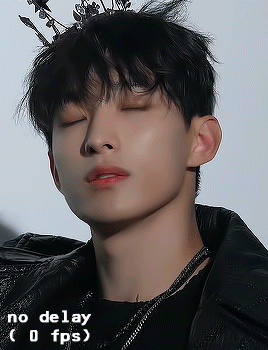
( a normal gif output will have a 0.02 FPS delay )
(if you want to sharpen or add any effects to the gif then:)
- Click the small button on the left bottom of the timeline to convert into into video timeline.
Select all frames on your right and convert them into a Smart Object (select all > right click > covert to smart object)
Add whatever filters you want.
Add your colouring and save.
TO SAVE AKA EXPORT GIF
File > Export > Save to WEB
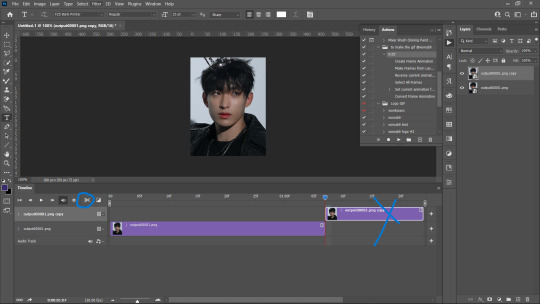
6. LOADING PNG SEQUENCE FRAMES FOR GIFFING
File > Scripts > Load into Stack > Browse
Browse will open your File Manager. Select the frames you want to be loaded as a stack. Let them load and click OK.
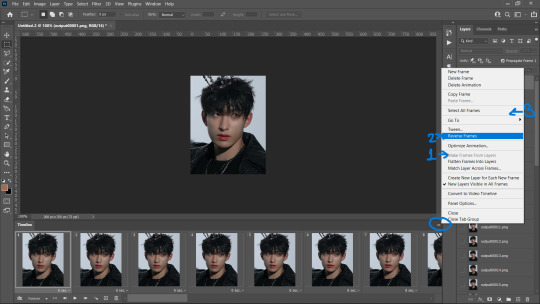
After PS is done loading your frames, Follow these steps:
Click create frame animation. It’s show only one frame so you have to click this ≡ symbol on the top right of the timeline.
Then click Create Frames from layers and it’ll make all frames.
Then click ≡ again and click “reverse frames” because ps loads stacked frames in reverse so you have to un-reverse it.
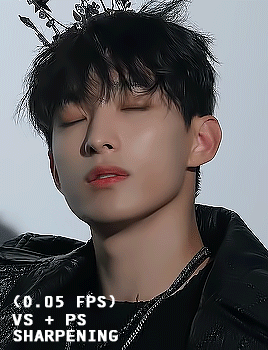
4. Most importantly, we need to set frames per second because we didn't set anything on the resizer. Frames per second can make a huge difference in how fast or slow you want your gif to be.
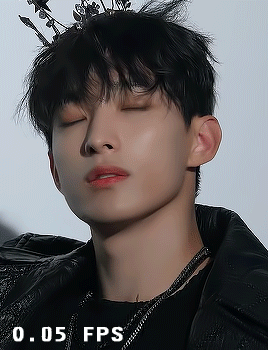
0.05 FPS is just my preferred setting.
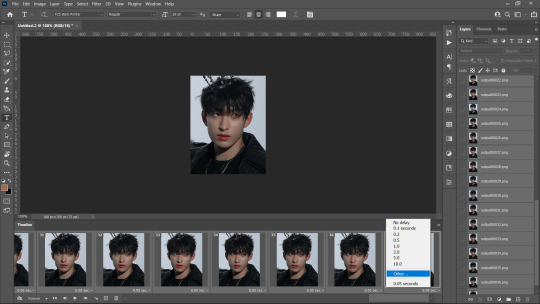
To input your desired FPS settings, select all frame from the timeline, right click on any frame > Other > Input your desired setting.
( anything above 0.08 will make the gif too slow )
5. Click on 'Create Video Timeline' to turn this into a video timeline. (bottom left of timeline)
i made an action that does all steps from 1 to 5. Download it here <3
6. Then select all your layers from the side panel and convert it into a smart object so that you can sharpen it and add other filters.
7. Add your adjustment layers for colouring and save it!! Saving process as same as before. (File > Export > Save to WEB)
GIFFING USING ONLY PHOTOSHOP
If you don't want to go through hassle of installing and using vapoursynth, you can use this photoshop only method. You can simply cut the video and load them as frames.
File > Import > Video Frames to Layers
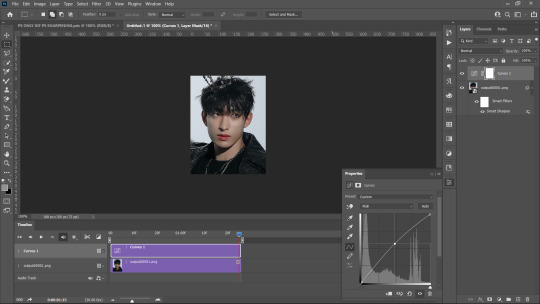
A window like this will pop up:
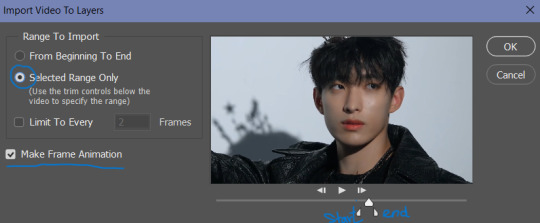
Use the triangle cursors to set the start and end of your clip. Make sure Make frame Animation is check. Press OK.
IMP: After you frames have loaded, you'll see the frames have loaded at a 0.04FPS. You can change it according to your preference but the speed is different (slower) for these gifs even if they're both at 0.05fps, that is because the number of frames is different than number of frames from a VS png sequence for the same clip.
You can adjust the fps the same way mentioned above.
You can see the difference even with the same FPS settings. The frames in the second gif are VS generated whereas the first one is PS generated.

After setting you desired FPS, click on the Make Video frame animation button at the bottom left on the Timeline tab,, Select all frames/ layers on the right and convert them into a SmartObject.
Now comes the main part, Resizing the gif according to tumblr.
For this, Image > Canvas Size. Input your desired dimentions and press OK.
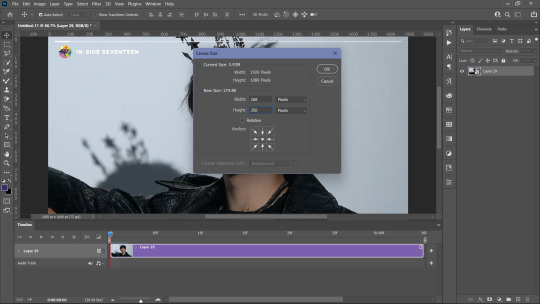
Then, Click of CTRL + T (Free Transform) and adjust the gif along the canvas. like this:

Press Enter. You gif is set. all you need to do is, add your sharpening (filters > smart sharpen).
You can also refer to this amazing tutorial by @jeonwonwoo for photoshop giffing.
BLURRING CAPTIONS IN GIFS
For this you only need a gif in a Smart Object, Marquee Tool and Gaussian Blur.
Marquee Tool is the small dotted rectangle tool. Click on it and then make your selection around the caption by clicking and dragging your cursor.

normal selection
Add to selection (to the normal selection)
( best for multiple captions, it lets you select in multiple places at once) Example:
after selection, go to Filters > Blur > Gaussian Blue > 3.0
IMP: If you want to add Blur using marquee tool on a smart object that already has a smart sharpen filter (or any filter) on then you need to convert that smart object into a smart object again.
after you've added your colouring adjustment layers, save your gif. File > Export > Save for Web
WATERMARK
To make you custom watermark shape, you can follow this wonderful tutorial by @yunaevis
How to set the custom watermark or any watermark, you can follow this tutorial by me. ( bonus: it'll also teach you how to use actions for watermarking)
BASIC COLOURING
Start off Curves.
Click and drag the curves from the middle to upwards. This will increase the brightness .
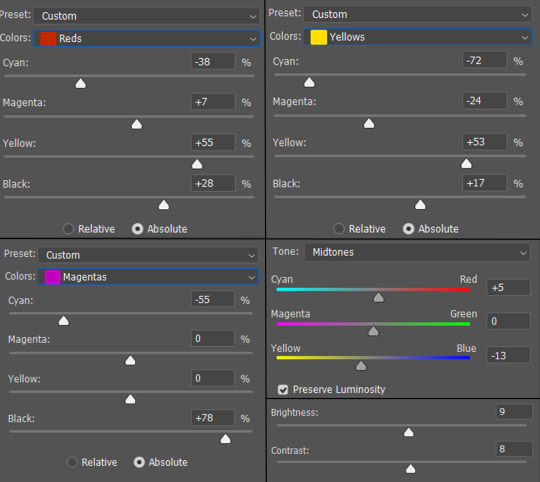
For skin, we begin with Selective colours. Messing with Reds and Yellows, give the skin more even saturation. You can accentuate blacks and increase brightness + contrast too.
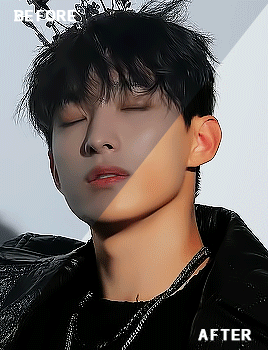
BEFORE AND AFTER:
for a detailed basic colouring tutorial, you can follow this tutorial!
DONE AND DUSTED,,,, THANKYOU <333
I hope this was somewhat helpful <3 if anyone has a doubt, they can always contact me!
#photoshop tutorial#vapoursynth tutorial#all in one gif guide#gif tutorial#kpopccc#lee.guide#ps tutorial#watermark#giffing#blurring captions#resources#guides#allresources#vs#vapoursynth#photoshop#gif making#300
534 notes
·
View notes
Note
Hi, thank you for reblogging my first gifset! I am new to posting gifs on tumblr and was wondering if there's any tricks to getting posts to show in the tags? Mine don't seem to show up and it's making it really hard to exposure :( Love your content btw! - @hitorihanie
hi love !! your gifs were incredible 💓💓
tumblr tags are shitty and barely work :(( you can try a few of these things.
Self reblog your content so it’s on your followers dash from time to time!
you can try removing the custom url thing when you’re posting

you should use kpop/ svt related network tracking tags, they’re really good for exposure. Tags : #kpopco, #kpopccc, #malegroupsnet, # svtcreations, #svtsource, #svtdaily, #hourlyhannie (there are hourly blogs for each member)
there are also personal user tags of a lot of fellow CCs. like #ocora, #cheytermelon, #tuseral, #dreamytag, #shuaria, #planetboo, #wonranglee (me), #marahae
i hope this is helpful !!
9 notes
·
View notes
Note
hi !! can i ask you a question about giffing? im kinda new to this and i really can't find any answers to my situation.
i have a 240-frame gif (i know 200 is already too much but im just messing around) and i can see every frame on the video timeline but when i change it to frame animation it just doesn't go above 150, so i can't delete unwanted frames or change the speed because when i put it back to video timeline those other frames are just.. gone. every faq and forum i've seen say ps' frame limit is 500. is this normal or am i making some kind of newbie mistake? ty for your time !!
henlooo <3 i’m happy i was approachable even tho i have been mia from the blog <3
haha don’t worry about 240 frames,, it happens !! keeping experimenting! that’s how u learn new things!
The problem you’re facing is weird. When your file opens up, is it visible as a video timeline or a frame animation?
do u mind telling me what version of ps you are using and which giffing method you’re using ? (png, gif to frames or video to frames mov)
i tried to see if my ps was having the same glitch my opening a 293 frame clip too. i tried going back from video timeline to frames,, it doesn't lose any frames. i think your ps i having a glitch. if you'd like, i can provide u with a new cracked version of latest ps.


i’m not sure if i can help u with that 150 frame problem but i can provide you with an alternative solution to do edit frame speed and edit the clip. OR if u can send me a screenshot of what your ps screen looks like,, maybe i can be more of help!
you can try this instead:
If you’re going for “video to layers” then as u select your range , you’ll get an option “Make Frame Animation”. Make sure it’s selected.
Your clip needs to open up in frames at first and then you change your frames per second speed and then convert it to video timeline. and after that, to deleted unwanted frames, you can move your cursor on the video timeline and snip and delete according to you! (i would suggest deleting unwanted parts thru video rather than in frames)
you can refer to this tutorial of mine and if anything, pls don't hesitate to reach me ! my dms are open too !
1 note
·
View note
Note
hi im the anon from before about actions, i dont think i need help for that anymore but i was curious about ur image on ur watermark? how did u design iy? im trying to make one (nothing fancy, just the intials of my blog title in some cute handwriting) in microsoft paint (it turned out surprisingly well despite using a mouse lol >.<) but when i put it onto a gif, it looks horrible and pixelly! i was wondering what process u did >.<
hi anon !!! ♡ sorry for the late reply i was busy with assignments </3
so the thing is, for microsoft paint the bitmap and the size of the canvas that you’re using will be different that what you have in a gif, the gifs are set in pixels and i’m pretty sure microsoft paint is in cm/inch and all. So the logo u made in paint is either too huge/small when compared to the gif so when you’re resizing, it gets ruined. So first you need to match that both the logo and the gif are in pixels. I would suggest you to either use photoshop or photopea!
I made my logo using photoshop. i downloaded the kitten thing from a free pic site, converted it into a png and then made a 100x100 px transparent canvas and put the kitten png and my text on it and exported it as a png!
You can download a cute font u like and use it for your initials ! (dafont,, 1001freefonts are good sites)
i hope the video i linked in the last ask was helpful !! ♡
0 notes
Note
hi do u have any recommendations for videos about how to make an action for a watermark in a gif? im no good at following instructions w/o visual help lol >.< i tried going on youtube but u said its different for photos but the only ones i found on youtube was for photos >.<
hi anon ♡ ♡ me being a visual learner, i relate ckrkxm
Unfortunately, there is no video for how to use photo logo on a gif as far as i know 😭 , i learned it through this video and tried a little trial and error method on my own to create a way for using actions for logos in gifs.
The basic steps in putting watermark on photos and gifs is same except, for gifs you need to keep in mind the timeline. Since there is no timeline is photos, the steps are less for making an action in photos.
If you could dm me, i can explain it to you step by step or send a screen recorded video of me doing it (this may take a while cause i have uni finals from next week 😭)
0 notes
Text
i have seen alot of people manually write their url/ watermark or place their logo (essentially, a photo) in each gif or photo they make/edit, which is obviously a waste of time and effort. "Actions" is a life and time saving photoshop function for watermarks.
When you make an action for the watermark, the action will place your text / photo exactly where you positioned it while making the action with the font, blend, size and position you chose.
So, here is a small but helpful tutorial of how to put your logo/text watermark in photoshop using actions on photos or gifs by your friendly neighborhood CC!
i use photoshop 2021 for making my stuff. You can download photoshop and other gifs/grfx related resources from this page. (studiocarat, a grfx network for carats)
This was originally going to a part of my other "photoshop tips n tricks" tutorials but i noticed that this is a sorta big one and imp one and thus needs a tutorial of its own.
ABOUT "ACTIONS"
You can record most—but not all—commands in an action.
You can record operations that you perform with the Marquee, Move, Polygon, Lasso, Magic Wand, Crop, Slice, Magic Eraser, Gradient, Paint Bucket, Type, Shape, Notes, Eyedropper, and Color Sampler tools—as well as those that you perform in the History, Swatches, Color, Paths, Channels, Layers, Styles, and Actions panels.
Results depend on file and program setting variables, such as the active layer and the foreground color. For example, a 3‑pixel Gaussian blur won’t create the same effect on a 72‑ppi file as on a 144‑ppi file. Nor will Color Balance work on a grayscale file.
When you record actions that include specifying settings in dialog boxes and panels, the action will reflect the settings in effect at the time of the recording. If you change a setting in a dialog box or panel while recording an action, the changed value is recorded.
Go to Window > Actions. You will see a small play botton in your toolbar on the right side, that’s your actions. Click on it and it’ll open your box with some photoshop actions.

LOGO IN GIFS
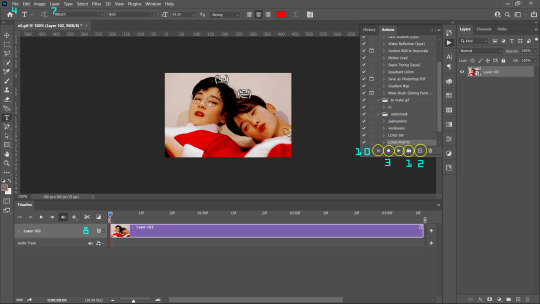
Step 0: open photoshop, load your gifs, convert them into a smart object, do you colouring ! Make sure your gif is in timeline video mode !
Since, your doing a logo, you have to have a logo already made and saved in a png format in your laptop. So when you play your action, PS will automatically place you logo png from the destination it was saved in. Your logo can be in a 100 x 100 px transparent background.
for example, my logo looks like this:

Step 1: Click on the folder icon to create a new "Action Set". Name your set. for example, 'watermark'.
Step 2: Click on the '+' icon beside the Action set icon. It will create a new action. You can select which Action Set you want it to be a part of; in this case, "watermark" action set. Rename your new action as your preference.
The second you hit the record button in the dialog box, everything you do will be recorded as steps/action so don't do unnecessary steps or else you'll have to redo your whole action.
Step 3 : The small button in (3) will turn red (🔴) indicating the recording has begun.
Step 4 : Assuming you already have your logo made and saved, click on File > Place / Place embedded. It will open your file manager, select your logo and press enter. It will place your logo on your gif as a separate layer. If it is made on a small PNG (eg. 100 x 100 px), you wont need to resize the photo, but if necessary please resize the logo to your preference.
Step 5: Right click your layer and rasterize it clicking "rasterize layer". Place your timeline cursor thingy at the starting of the timeline.
Step 6: Select your whole document by the shortcut CTRL/CMND + A or Select > All.
Step 7: Now, select your logo layer by clicking it. Go to Layer > Align layer to selection. Select Align Bottom. You'll see your logo move to the bottom. Go to Layer > Align layer to selection again and click on Alight left or Align Right according to your preference.
i don't like my logo sticking to the edges, so i selected the logo, pressed CNTRL/CMND + T and used arrow keys and pressed right & up arrow keys 5-8 times so that logo doesn't stick to the edge.
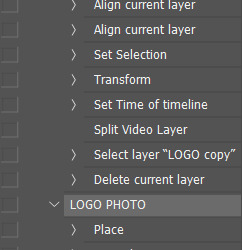
Step 8: Now, in most cases, the logo layer will be longer than the gif layer in timeline. Like this:

Now, You can place your Timeline cursor thingy somewhere in the middle of the logo layer from the starting by dragging it and press cut ( the scissors icon) on timeline. This will split your layer in two. layer “logo” and “logo copy”.
Step 9: Delete the second half of the cut (logo copy) by selecting it and pressed 'delete' key on your keyboard.
Step 10: Press the square logo (■) on your action box to stop recording. Voila! you're done recording your action !
Step 11: you might notice that you can't see you logo, just adjust the logo layer so that it matches the gif layer! The only thing you'll need to adjust in each gif is the size of layer by matching it to the gif layer.
Don’t make the adjust layer size in timeline as a part of your action because it is different with every gif.
You can adjust your blending mode according to your preference but recommended are overlay & soft-light.
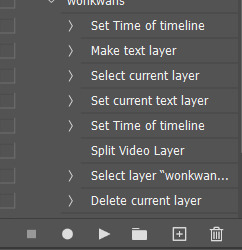
TEXT IN GIFS
STEP 1, 2 AND 3 ARE THE SAME
STEP 4: click on your text tool and type out your watermark name (url, name, whatever) in your preferred font and size. ( recommended size: 10). Press enter.
STEP 5: You don't require to rasterize your layer cause you may want to edit the text later.
STEPS 6 THROUGH 11 ARE SAME.

LOGO IN PHOTOS
FOLLOW STEPS 1 THROUGH 7 to get your action for logo in photos.
Action you just made for gifs won't work with photos because it has the command like "set time of time line", "Split video layer", " Select file 'LOGO copy'" and "Delete Layer" and these won’t work on a photo.
Since there is no timeline in photos, you don't require steps 8, 9 and 10.
TEXT IN PHOTOS
STEPS 1, 2 AND 3 ARE SAME
STEP 4: click on your text tool and type out your watermark name (url, name, whatever) in your preferred font and size. ( recommended size: 10). Press enter.
STEP 5: You don't require to rasterize your layer cause you may want to edit the text later.
FOLLOW STEPS 6 & 7 AND PRESS STOP RECORDING ■.
You can choose your preferred blending mode.

You will see all your action recorded and saved. PS has an auto syncing function so once you have made your action, you don't have to make it again. When required, just select the Action you want and press play ▶
My actions look like this for logos & text (url) in gif:
End result:

i tried my best to explain. if you have any problem or doubt in a step, please feel free to approach me!
Thankyou for coming to my little tutorial. The End ♡
#seventeen#lee.guide#watermark#watermark tutorial#ps help#ps#photoshop#photoshop tutorial#ps guide#photoshop 2021#tutorial#studiocarat#svtsource#kpopccc#resources#allresources
355 notes
·
View notes
Text
I always wanted to make a giffing + colouring tutorial.
So, Welcome to my long and somewhat helpful guide that no one asked for <3
For starters, i use VaporSynth (links for installation compiled by @soonhoonsol <hi bestie3 which has a guide ). Photoshop 2021 version for making the gif and colouring it . Install PS from this site. it’s free and cracked ver ;)
STEP 1 : the video for giffing
i don’t need .ts files cause my gifs can be made with normal .mp4 file which i either download from a 4k downloader or screen record on my laptop (windows key + alt + R), which is actually pretty convenient since it allows you to record even 4K resolution videos with perfect quality. the only downside it that, it take a lot more space than a normal downloaded video. but you can always delete the videos after you’re done giffing.
STEP 2: using VS to make & sharpen your gif
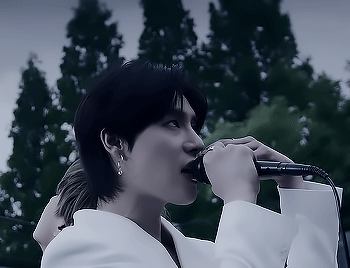
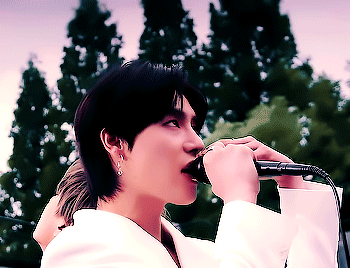
(i will be giffing and colouring Dongmyeong from ONEWE since their mv's are very monotonous but not fully black and white. We need to have some colours present in the video/gif so that we have some colours to manipulate in the first place.)
After you decide what part you want to gif, note down the timestamps. After installing and setting up VS, you’ll have a .bat file on which you have to drag your .ts or .mp4 file which will open a timestamp window which looks like this :
And will open a resizing tab in your default search engine after you press enter after entering the timestamp and gif duration. Use settings: qtgmc 60p cause it saves it at a better quality and has 60 frames per second so it’s smoother and small gif size.
Simultaneously, a vapousynth script will open. Remove whatever there is from line #17 to #26. paste what you copied from the resizer on line #17. Enter your sharpening settings on line #24 and your denoise settings on line #22. After entering your numbers, remove the # before cache size command so it doesn’t hang your laptop. Mine does when I don’t do that. Save that setting, file > save script. Then you won’t have to remove it everytime you make a gif. Your final script before encoding should look like this (refer to the script in the 3rd photo of the collage):
after that, follow these steps:
i personally like to use PNG SEQUENCE for my gifs cause one, it’s compatible; two, the quality of the gif turns out good. For me, normal gif output is pretty dithered which i don’t like.
you can close the script after you see green bar in encode window that says '100%. video has finished encoding'
STEP 3: accessing your output png frames / gif
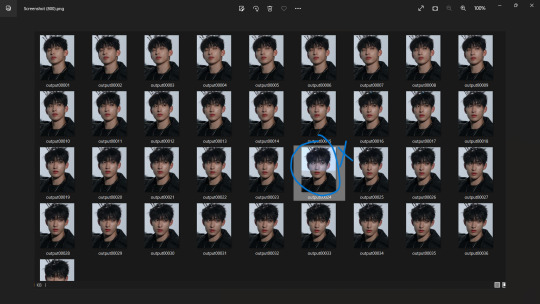
after you close all the vs .html windows, you’ll find your gif/png fames under your VaporSynth folder that you have extracted under VapourSynth64Portable(200722)> gifs>output. i have separate folder where i cut and paste these frames so that they’re easily accessible later.
imp!!!(this may only be my problem): either rename or change the location of the output PNGs before you start with a new one. if not, they will get replaced with the new one since vs automatic name system is 'output00001' for each new batch of encode. Same goes if you decide to encode to gif cause it will be saved as 'output' and be replaced by new one.
after you're done with accessing your output PNGs, close all the windows and repeat the same for a new set of PNGs for another gif.
STEP 4: loading your frames into Photoshop
if you have made an output gif, then you can just open it. File > Open and select all from where you saved it and it’ll load in frames.
after you’ve opened your PS, make sure your Timeline mode is on (window > timeline) then go to File > Scripts > Load Files into Stack. click Browse and it’ll open your file manager; select where you’ve pasted your output frames. select them all and press enter, let them load and press okay.
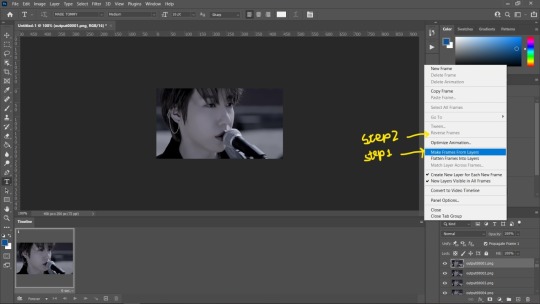
After PS is done loading your frames, it’ll look something like this. After that click create frame animation. It’s show only one frame so you have to click this ≡ symbol on the top right of the timeline. Then click Create Frames from layers and it’ll make all frames. Then click ≡ again and click “reverse frames” because ps loads frames in reverse so you have to un-reverse it.
then click bottom left Switch to Video Timeline.

Then select all your layers from the side panel and convert it into a smart object so that you can sharpen it and add other filters.
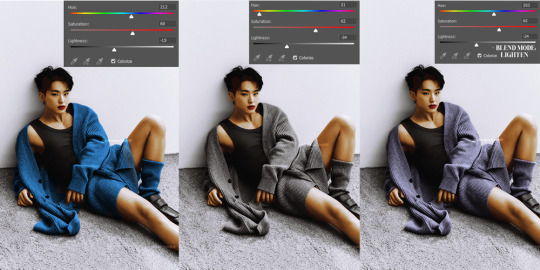
STEP 5: Colouring. Turning dull/monotone gifs into natural colour (not total b&w gifs)
again, we need to have some colour in the gif that we can manipulate. this tutorial won’t be helpful for b&w gifs.
without colouring you can see some faint reds and blues there.
Here’s the colouring tutorial !
A TIP : If you want to dull out a certain colour, use the opposite colour of it. For example of red you can use green/cyan. For blue you can use orange.
A TIP: If you want to add more colour to the skin, you can use gradient map (taught by @scoupsy <33) esp for pale skin. here is her awesome tutorial !
A TIP: direct output gif from vs will be faster than a png sequence created gif. png sequence loads in 0.02 sec delay between each frame but that you can change by selecting all frames in timeline and right clicking them and change it to “no delay”

idk why there are bigass pixels on the monotonous gifs on mobile, ignore that pls
i read tags on my cc game and saw many of you wondered how i coloured this, so:
adjustments layers used for this:
Brightness / Contrast
Vibrance / Saturation
Colour Balance
Photo Filter (Sepia)
Selective Colour 1 (red, blue, magenta, white, neutrals, blacks)
Selective Colour 2 ( red, yellow, green)
Curves
i hope this tutorial was little helpful ! for any problem, you can always reach out to me <3 i tried my best with all the things i know about giffing.
#lee.guide#svt#onewe#kpopccc#colouring guide#colouring tutorial#giffing guide#giffing tutorial#ps#photoshop#gyukwans#vs#lee.gif.gfx#vapoursyth guide#vapoursynth gifs#gif tutorial#gif guide#gif tumblr#allresources
190 notes
·
View notes
Text

HELLO!
Welcome to method 3; written by me, Lee <3
♡ ♡ you can check out @buwuyu method (1) and @soonhoonsol method (2) here and here in a masterpost ♡ ♡
thankyou my besties for doing this !! we had so much fun 🥺💖
we will use gradient map and hue / saturation and mask them with paint brush tool and selective colouring for adjustments.
- this will require basic knowledge of photoshop and colour schemes.
STEP 0: OPEN YOUR B&W PICTURE IN PHOTOSHOP (file > open) AND YOUR REFERNCE PICTURE
we start of by using a reference photo photo with similar lighting as a reference for the skin tone. This process won't be needing to do contouring cause adjustments in gradient map and blending will ensure highlights and dark tones.
I was too lazy to remove teh allure mark so i just coloured the without watermark photo @iiasha posted. thankyou zero<3
STEP 1: MAKING SKIN TONE PALETTE WITH A REFERENCE PICTURE
Pick colours from different tonal values. I'd suggest one colour of skin from each of the degree of contrast; different levels of brightness from the ref picture.
here's something basic about tonal value.
darkest being called blacks and lightest being called whites.

Go to brush tool and set its size according to you and its hardness to full. Make sure your Sample Size settings are set at 5 by 5 per average and Sample is set at All Layers.
With Brush tool selected, Press ALT and you'll see a colour picker, select a colour ; use that brush to make a swatches on any place on the b&w photo so that its easy to access during gradient map.
Select the marquee tool and select the palette and press CTRL + J / CMND + J. this will create a new layer which you can later delete after you're done using the palette.

STEP2: MAKING GRADIENT MAP WITH THE SKIN TONE PALETTE
go to adjustment layers and select Gradient Map. Make sure your palette layer is above the gradient map layer. If not, the it'll become a part of the gradient map and we don't want that since we will be using it for sampling.
click on the small bottom left square, it will open up a colour picker. Select "whites" from the Reference skin tone palette. Select "blacks" from the ref palette. You don't necessarily have to stick with the palette you created. Sometimes, to may be too extreme because in the end it is from a different photo. To adjust the skin tone, you can play with the tones according to your wish.
Now, the gradient may look pretty dark. Select Gradient Map layer and set its blending as "COLOUR".

To add more colour to the skin, you can adjust saturation of each colour too. Select the small box who's colour you want to change and it will open a colour picker, on the right side you can see Hue, Saturation, etc. You can play with both the Bars

The skin tone still looks very unrealistic. To manage that we will edit the layer style. Now, right click Gradient Map layer and Select Blending Options.

If you try to adjust directly with left & right triangle cursors, it will be too extreme. Photoshop allows us to break each of these cursors into two. Press ALT and click on the Triangle cursor and it will split it into two parts. These settings may defer from picture to picture.
STEP3: PAINTING THE SKIN WITH GRADIENT MAP INVERTED MASK

Select the White part on the gradient map layer and click CTRL + I / CMND + I to turn the mask into an inverted mask. The mask will turn black. It looks like we came back to square one, doesn't it? Don't worry! We just turned on inverted mask for us to colour the skin.
Select your brush tool again and start painting/colouring the skin parts. It's okay if you went out of lines. We can easily correct it by erasing the colour that went out of lines. Smaller the eraser, precise the colouring looks after touching up. i'd suggest Kyle's Eraser- natural edge or Soft brush Eraser.

adjust more of skin tone by using Selective Colour adjustment layer and playing with reds and yellows.
reds: +10, +7, +9, -56 | blacks: 0,0,0, +11 | whites: 0,0, -48, +3 | yellows: -43, -10, +5, +29
To darken the Vest and Hair just increase blacks in the Black Colour in Selective colour.
COLOURING THE LIPS & CLOTHES
LIPS
Select Hue/Saturation adjustment layer and turn on inverted layer mask with ctrl + i / cmnd + i and tick Colourise in properties of the layer so that it's the actual colour and not a colour influenced by the gradient map colours.
Select your lip colour and you can lighten or darken it with Lightness bar and adjust the saturation with Saturation bar.
my settings were: HUE= 0 (red), SATURATION= 70, LIGHTNESS= -27
CLOTHES
with the same process as of colouring the lips, mask the clothes and socks part with Hue/Saturation inverted mask and adjust the colour of the clothes according to your linking by playing with Hue, Saturation and Lightness.
To change overall settings of the picture, use Brightness/Contrast and/or Selective Colour. I added more brightness and increased the contrast a little too.
One upside of this method is that you don’t have to re-mask or re-colour if you want to change colours, you can just play with the Hue and change the colour. So, no double work!
if the Skin tone seems very yellow-ish you can use Red PhotoFilter (50% opacity) and colour on the skin using inverted mask again.
FINAL OUTCOME
if youre done with your whole colouring process and still want to change colour, of example clothes; just play with hue/saturation adjustment layer and blending mode ! Ta-Da you have your new colour.
thankyou for reading my method! i hope it was a little helpful ! for any doubts you can reach out to me <3
#lee.guide#colouring#recolouring tutorial#recolour#tutorial#hoshi#studiocarat#colouring tutorial#lee.gif.gfx#photoshop#photoshop tutorial#photoshop recolour#photoshop guide#colouring guide#allresources
92 notes
·
View notes
Note
Hi! Just wanted to thank you for making that vapoursynth tutorial, I just can't explain how much it helped ╥﹏╥
Also, would you mind sharing your vapoursynth sharpening and denoise settings? It's okay if you don't want to!
Again, tysm for your tutorial!!
hi lovely anon ! 💖
i’m so glad it was helpful!! reading that makes me so happy🥺🥺 and yes ofc i will share my denoise and sharpening settings!!
if i have a nice 1080p video then i usually go with these settings.

if it’s still 1080p and i feel the quality can do better, i up my denoise to (3,6,4,3) and sharpening to 2.5.
if it’s a 4k video or anything between 1080p and 4k i usually go with 1.5 on sharpening and keep the denoise same as (2,6,4,2).
i hope this was helpful 💖 thankyou for looking and referring to my guide <3
2 notes
·
View notes
Last Seen Blogs

mediends89
Untitled

honq
3
lepetitmiaw
JE M'EN BATS LES BOOBS!

spiritualselfhelp
Spiritual Self-help