#just with some screencaps for now but i'm actually working on a gifset
Text


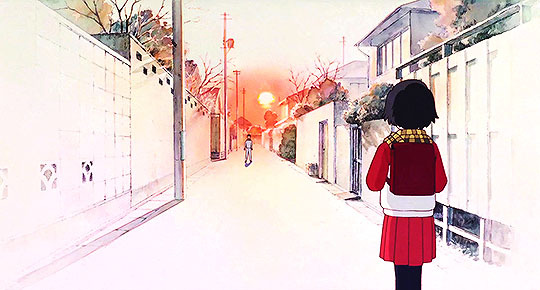
I see. I think that's why it's nostalgic. I've beenthinking for a long time about why I feel like this is myhome, even though I wasn't born or raised here.
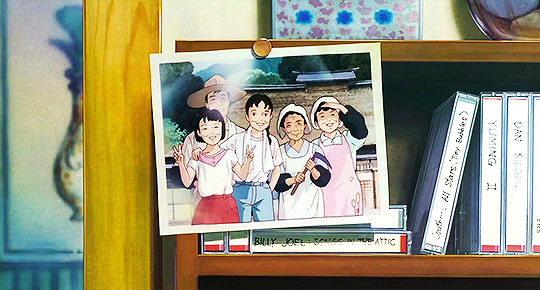
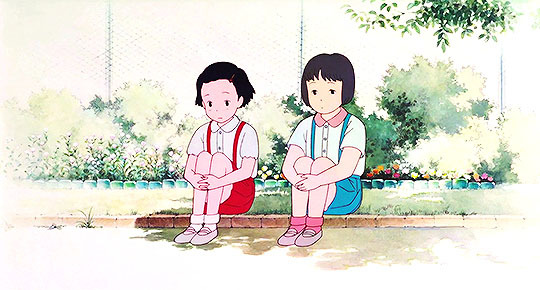
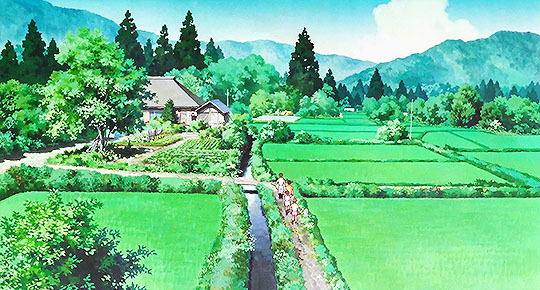
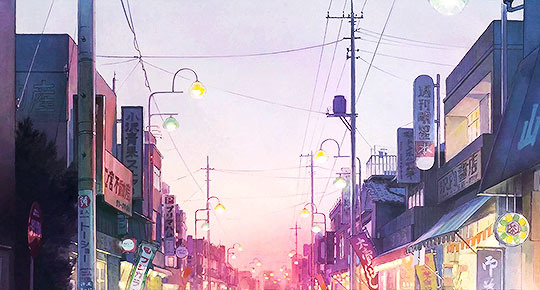
Only Yesterday//おもひでぽろぽろ (1991) dir. by Isao Takahata
#only yesterday#filmedit#ghibliedit#animationedit#movieedit#film#hi i'm kinda back#just with some screencaps for now but i'm actually working on a gifset#it just takes ages to finish because i really don't have that much time to gif rn#anyway enough chattering#screencaps#by me
129 notes
·
View notes
Note
how do you blend your gifs so well? this is something ive been trying to learn but it's so hard. when the gif starts over again and the background that i hadn't deleted shows up it just becomes annoying and covers up everything and is a mess
thank you so much!!! I actually used to have so much trouble with blending gifs (I still do a little tbh) so this means a lot to me 🥺.
Here are some links to tutorials which helped me out when I was learning (x, x, x) plus one I found now which may also be helpful (x).
I've also included my own basic process below the cut with screenshots of what I do to get the below gif. I hope this helps :)

I'm going to keep this fairly basic as I don't have any of my psds saved - so not going to show any of my colouring or basic gif process. A side note: typically I find if you want to do like double exposure gifs I find I have better results if one of the gifs is in bw. This is just a basic blending tutorial and will not go that much into that - but there are similar basic principles applied to making those gifs.
So I start with two gifs that I want to blend. I generally make these gifs the same size and roughly the same number of frames. If your gifs aren't the same number of frames you'll end up with an empty spot on your canvas when the shorter gif finishes (not what we want of course).
Typically if I want my two gifs to be next to each other on the final product I will crop them towards one side so they are easier to lay on top of one another (see below for how I have cropped them). This also minimises how much you will have to delete.


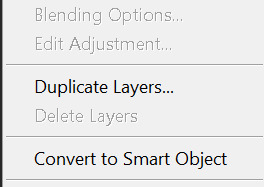
I then colour these gifs as normal - if they are from two separate scenes I do this separately for each gif. Once I am done with the basic gif colouring I highlight all the layers and right click to bring up menu options. I then select 'covert to smart object' so it is easier to work with. For these I am going very minimal with just a curves layer and then I'll add a vibrance layer on top of the canvas with both gifs.
After that's done I have my two basic gifs. I drag one out of the workspace so I can drag the smart object I have created from the layers panel on top of the other gif.

After placing the gif on top I set the layer blending mode of the top layer to 'Screen'. This results in something like this:
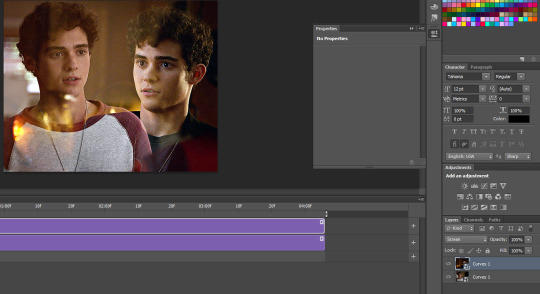
In order to erase some of the background that I don't want in the gif I create a layer mask on each layer by clicking on the layer and clicking the layer mask button (the little button highlighted with a circle inside the rectangle).

This gives you this:

Now basically I go on the masks and 'erase' bits of the gif I don't want to show up by using a black paintbrush. I can restore anything by painting over it in white. A really useful tip I've also picked up if if you use lighter/darker shades of grey the blending result will be different (the darker it is the more masked it is).
For the below gif I moved the left gif slightly more to the left and painted a mask over the gif border. I also masked over the background that was covering Ricky's face. The below example is using a black mask for both.

If I were to use grey in the layer mask I would get something like this:

The background is not as prominent but you can still see it coming through. Typically when I make my gifsets I use a lot of different shades to get the exact result I want.
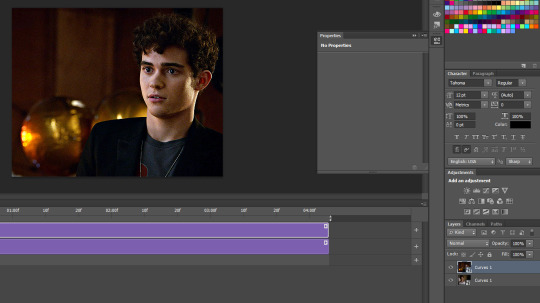
You can also see in my vid timeline that I specifically used the same number of screencaps for each scene so the blending should be seamless.
If the scenes were slightly different lengths I would just move the timeline bar to end where the shorter gif ends (like below).

this is the final result i end up with:
I really hope this makes sense - I kinda suck at explaing things so if you have any other questions feel free to ask :)
#asks#ps help#resources#tutorials#completeresources#allresources#usergif#resourcemarket#chaoticresources#photoshop tutorial#*mine
159 notes
·
View notes
Note
The thing with gifs is that they're closer up, high quality, and (maybe it's just me?) slower than the actual episode. I'm looking at some gifsets and I can see every tiny emotion hitting a character. More specifically, I was looking at that one scene in THORS where she says the Doctor is "not someone special". But like, you can see she's having mixed feelings, you can actually see her hiding the damage. It's something I don't really notice, well I do "notice" it, but I can't actually see what's happening. It makes the scene all the more fun (and emotional) to watch.
I don't know what was the point in saying this, but oh well, random thoughts.
It's not just you. The gifset actually IS slower than the episode. At least, my gifsets are. In PS, the frame rate should be between .04-.06 depending on your PS, with .05 usually being the actual frame rate to match the episodes. But I always put mine at .06 because .05 is just too fast for me. Even if .05 is the actual frame rate, the point of my gifsets is to let people SEE the scene afresh, to spot a detail they never saw before. I slow the scenes down, just by a tenth of a second. And sometimes, I push it even further and make the frame rate .07 or if it's a really short moment, like less than 30 frames (and no one is talking), I might do .08 to make the moment stretch longer.
Often my gifsets are born from a single gif, a lingering look, or a line of dialogue. I just want to capture that, blow it up, and shout hey come look at this! Have you noticed this before? What do you think of this? And then, when I sit down and grab the screencaps, I think what's the best way to capture that feeling, that thought, in a gifset? How can I get someone to pause and take a look closer?
Sometimes, I push the color of the set until it breaks. Then, I start over, and push it again. Other times, I use the crop tool. The crop tool not only blows up the image, but it allows me to cut out any distractions in the periphery. Cropped gifs literally narrow the viewer's focus. And sometimes, if a gif is not strong enough on its own, I buttress it with other gifs. Like with my Doctorriver "That's nice. But I'm married" gifset. 11's quote was the point of the gifset, but imo, it wasn't strong enough to stand on its own.
The reason that line is so powerful is because of the context. It's an unflinching, unapologetic testament; it's a declaration that this marriage, that River, is real to him. So how might I get someone to see that scene afresh? In this case, I used other scenes to amplify the impact of what he stated, scenes from their marriage in which he couldn't get enough of her; moments when he was eager to please her. And by adding those scenes, that's what I drew more attention to. I tightened the focus through parallels and visual cues. And based on the comments in the tags, it worked. People had only expected to see his dialogue, but by adding the other scenes, the set turned into something unique, something they hadn't seen before. And that's the beauty of gif making. Funnily enough, that gifset is unintentionally structured like an essay; you have the intro, the evidence, and the concluding statement. But it's the evidence in the middle that makes the conclusion hit so hard.
P.S. I actually messed up that THORS gifset. That scene has always caught my attention, because we as the viewer know she's lying, but the Doctor thinks she's telling the truth. So the scene finishes with these two heartbroken time travelers who are desperately in love with each other but fear their entire marriage is a lie. I meant to pair it with Moffat's quote to that effect, but I forgot to add it. Oops. Oh well, mistakes happen, and now I get to do a THORS gifset again, this time with even more scenes. :D
#text#personal#thx for asking!#I find gifset making such fun; but it can be time consuming#also i've learned gifsets are a great way to open dialogue and see different perspectives#it's always fascinating to see what someone puts in the tags#fun fact or maybe an OCDish fact? I have a sketchbook where I jot down gifset ideas before I forget them#down to the layout#usually tho i'm too lazy to work those ideas and i just grab a scene that caught my attention that day and gif that instead lolol#doctor who#doctorriver#river song#the doctor#otp: please don't
6 notes
·
View notes
Note
how do you make gifs?
I just scheduled my first gifset of the year so let me answer this while I mostly remember the answer!
To immediately out myself as an ~amateur, I never download super HQ videos like the best gifmakers on here do. I am a lazy bitch and I use screentogif to take screencaps from streaming services. Other folks share their screencapping settings in actual gifmaking tutorials so I assume that's not what you're looking for, but I can share mine if you want nonny, lmk
If you are looking to get into the game, note that screentogif doesn't work on Chrome and also stopped working with the newest Firefox update. I am currently forcing my Firefox to stay a version back lolll. There's a post floating around here that suggests this might be a setting you can change in Firefox, but I haven't checked that.
Thanks to a very kind computer-savvy irl pal, I've managed to keep the same Photoshop CS5 software across three different (PC) laptops now, so that's what I use to make the actual gifs. The most tedious part of my personal process is getting the screencaps for each gif into a single...idk, stack? There's a "load files into stack" script in some versions of Photoshop but it doesn't work in mine. Could I get it to work? Possibly? But I'm a creature of habit so I just select all the caps I want, drag them over to photoshop, and hit the return key a million times, it's fine, the whirring noises the laptop makes are normal
For adjustment layers, I do one or two curves layers (always a white and sometimes also a black), then a levels layer, than VERY minimal brightness/contrast and vibrance, then like...3-4 selective color layers which are very arbitrary tbh
For sharpening, this tutorial changed my whole life
I also learned a lot from this general PS5 gifmaking tutorial and this adjustment layers tutorial
I know this is kind of vague lol but the tutorials above will be more helpful than I could be. BUT if you want any other/more specific info about my ~process, let me know!
1 note
·
View note
Last Seen Blogs
caroliarquitetura-blog
Caroli Arquitetura

jewelryspeaks
Untitled
illusiontea
Nick(y) Rorschach
happyimagines
~Imagines for Fandoms~

fullyfocusonchrist
Fully Focus On Christ