#instructables
Photo


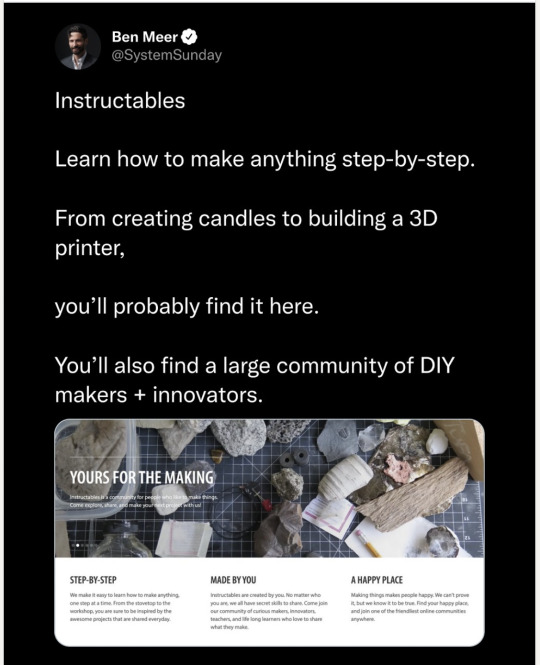


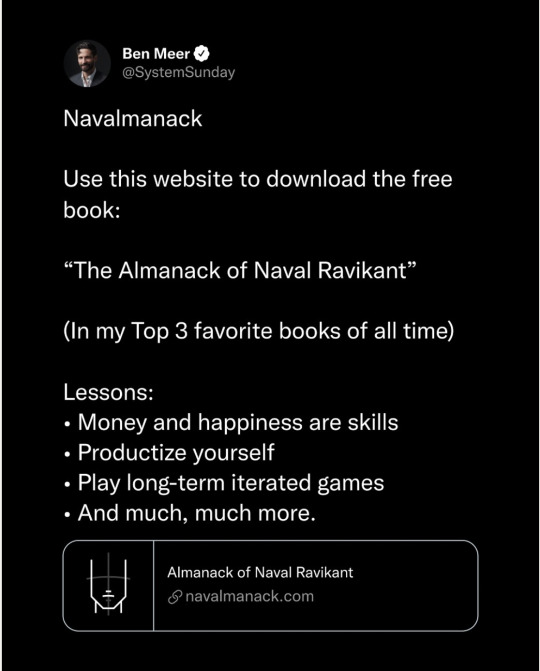
I found this slideshow on Linked In and thought it was worth sharing here. Does anyone have any opinions on any of these resources? I use Duolingo and I like it.
#eLearning#online learning#free learning#learning#autodidact#self motivated#motivation#ben meer#duolingo#coursera#navalmanack#stanford ecorner#untools#instructables#open library
249 notes
·
View notes
Photo

LINE FOLLOWER ROBOT using Arduino #linefollowerrobot #robotics #roboticscompetition #robot #arduinoprojects #arduino #diy #tech #electronics #electronicsprojects #engneering #hackaday #hacksterio #instructables #edison_science_corner https://www.instagram.com/p/CmJrshevnQj/?igshid=NGJjMDIxMWI=
#linefollowerrobot#robotics#roboticscompetition#robot#arduinoprojects#arduino#diy#tech#electronics#electronicsprojects#engneering#hackaday#hacksterio#instructables#edison_science_corner
2 notes
·
View notes
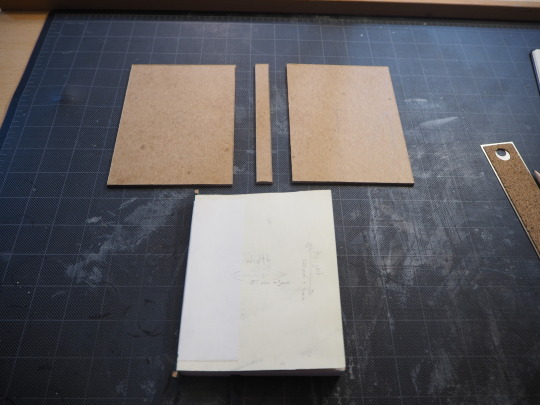
Text
Making a Case-bound Book
Finally, the continuation of the case bound book. I actually finished this awhile ago and my fiance loved her sewing journal. Lets see the process.
Last time, we made the text-block, I also added a small bit of card stock with a decorative paper to act as headbands.


We get the dimensions of the text block add to my measurements for the davy board, I subtracted 3mm to the width (to account for the spine gap), and added 4mm to the height (to add a bit of overhand on the fore edge).
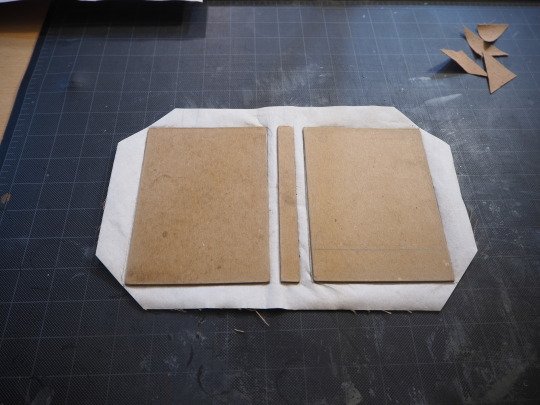
With this in mind we cut our davy board, and use the spine of the text-block itself to measure out a strip for the case.

I also like to hit the board edges with a bit of sandpaper to keep the covering from showing any weird ridges from the cuts.

Now you can PVA glue to attach your first board onto your covering material, using a bone folder to smooth out the front.
Measure the width of the board itself (mine was 2mm), add 7mm to that number and space the spine board next to the first cover board.

I used a straight edge to keep everything lined up while I pressed and smoothed the board.
Repeat these steps with the last cover board piece and trim off the excess cover material. While you're trimming, you can cut 45* angles at the corners of the board, make sure that the cut is a boards width away from the edge of the board (My board was 2mm so I cut 2mm away from the board on those corners.
Now fold over the covering material, starting with the top and bottom edges. A bone folder is really handy here.

Before folding and gluing the fore edge of the cover, indent the little fold at the top and bottom of both sides, this is key in giving you a cleaner look at the fold edges. This is pretty hit and miss for me to be honest, but practice, practice, practice, right?
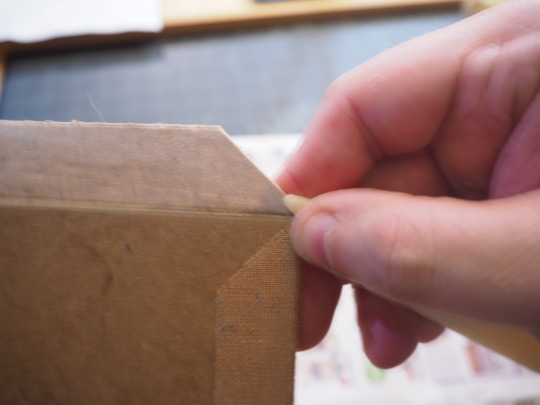

With the Case complete there is only one step left: Casing In!
#bookbinding#late night crafting#book tumblr#books#bindery#crafting#bookmaking#bookworm#diy#instructables
1 note
·
View note
Text


https://content.instructables.com/pdfs/EYY/0QQY/K9R3UMX7/DIY-Yarn-Art-Easy-Tactile-Canvas-Paintings.pdf
2 notes
·
View notes
Text

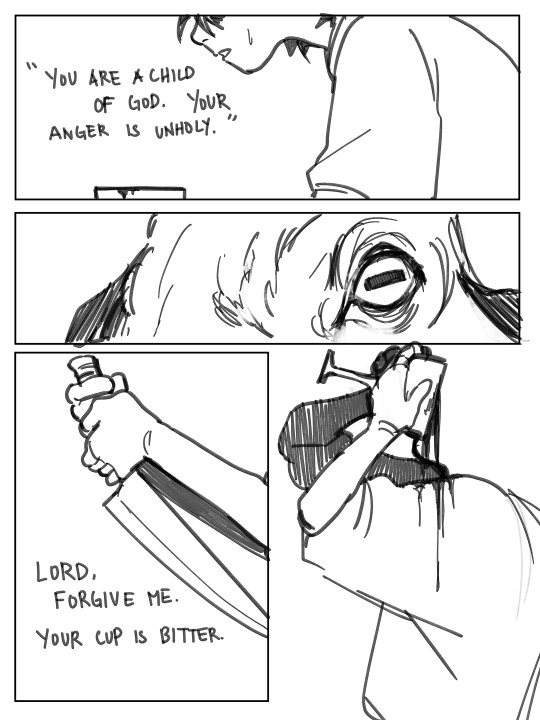
i have so much rage in me one day i think i will explode. i dont think i know how to forgive as much as i know how to forget
#art#wolfy religious tedtalks#sketch#comic#i have such a huge disconnect with my emotions and i do genuinely think a lot of it ties back to religion#crazy how that happens#whats funny is i now have a lot of people i vaguely dislike but cant remember why.#crazy what happens when you treat forgiveness like an instruction and not a process
31K notes
·
View notes
Text
instagram
1 note
·
View note
Photo

(via Dub Siren & Delay/Reverb - 2 in 1 Synth - Little Synths With BIG Sounds #3 : 8 Steps (with Pictures) - Instructables)
0 notes
Text

I get it cut out now and ready to trace onto the wood.
#hema#sword#woodworking#Historical European martial arts#dusack#martial arts#European martial arts#instructables#diy#diy projects
0 notes
Text
The instructable I made while making a hooded scarf for a friend who *refuses* to wear hats no matter how cold the weather gets.
I was looking for free plush patterns for less intensive hand stuff I could do for toy drives. (Yes, I should just rest my arm but I have trouble with the whole not feeling productive thing.)
Then realized, wait, I have free instructions for stuff, I should share that as we're getting into gift season.
0 notes
Text
luffy passing on his skating skills from long ring long land
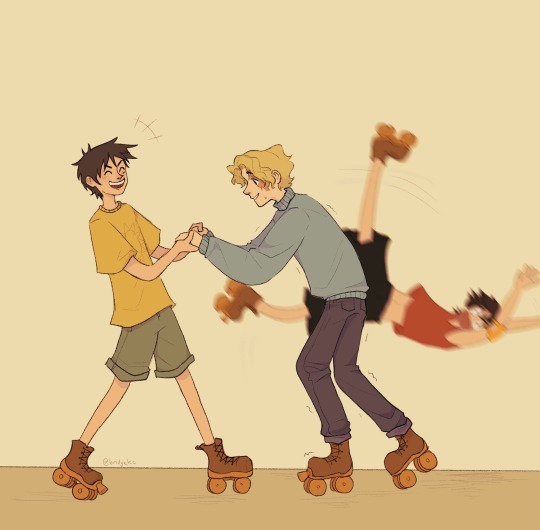
#one piece#monkey d. luffy#one piece luffy#asl brothers#one piece sabo#portgas d ace#ace did NOT listen to the instructions#art
4K notes
·
View notes
Text
don't panic buy games because of the eshop shutdown!!!! the memes are not lying It is genuinely very easy to hack your 3ds!!! please do it!!!!
3ds.hacks.guide
(don't follow video guides they are very often outdated and it's easier to make mistakes that way. this guide is very detailed with step by step instructions and they even have a support server in the event you have any trouble! i understand it might seem intimidating but risks of bricking or banning are very minimal at this point you will be glad you did it)
#bri talks#the only tools you'll need is a computer and a way to read mini sd cards#if you have the New Nintendo 3DS XL model you're also gonna need a certain screwdriver to open the back plate#because for some reason ninty put it there#any other model has easy sd card access so if you have a regular 3ds/xl/any 2ds model you don't need that#i have NO idea why they put it there it's not like they're even against you using a different sd card#there's instructions to change it on nintendo support... like...
40K notes
·
View notes
Text
#instructables#PlayStation#ps4 slim#ps4 cleaning#ps4 thermal paste replacement#how to change thermal paste#loud fan fix
0 notes
Text

1 note
·
View note
Text
IMPORTANT: TUMBLR HAS MADE A DEAL WITH MIDJOURNEY/OPENAI.
YOUR ART AND IMAGES ON TUMBLR ARE BEING USED TO TRAIN AI MODELS.
The opt-in is automatic, but you can turn it off in settings.
Go to "Blog Settings" -> "Visibility" -> "Third-Party Sharing" and turn on "Prevent third-party sharing for [blog]". (This post shows how to do it on browser and on mobile.) You need to do this with every sideblog. (Note: The option in settings might not appear if your app hasn't updated yet. You can still opt out via browser.)
Spread the word. Everyone on Tumblr needs to know about this.
#>> mod: firefly#edited for clarification & to add instructions for turning off on mobile#disclaimer: yes i'm putting this in the transformers tags. this is important and artists need to know their work is being stolen#my apologies for the non-earthspark post (again) but this is fucking insane#i am so unbelievably angry. fuck ai and fuck tumblr for doing this#earthspark#transformers earthspark#transformers#tfes#tfe#tf earthspark#maccadam#edit: holy hell i think this breached containment a bit#which is good; people need to know about this#but also wow my notifications 0.0
5K notes
·
View notes
Text

sorry but this is by far the biggest lie anyone has ever told on this show
6K notes
·
View notes
Text

heiress eternal
#so many thoughts about her#the handmaid#the handmaid homestuck#homestuck ancestors#damara megido#homestuck#egg art#according to hussies book aradia was in contact with the handmaid to receive game instructions#which is interesting considering megidos can speak to the dead and the handmaid is one of the few ancestors alive#so either handmaid channeled a dead aradia or future aradia channeled a dead handmaid#handmaid could of also just manipulated the timeline to make sure aradia was the catalyst for the game being played#or something less more or equally complicated#and without this we just have to assume its maid powers allowing aradia to have flawless instruction of what to do or shes just a#level 3000 gigabrain girl genius at 13 years old#and instead of putting that interaction in the story we got. the dancestor flashes#so im a little miffed about it really
4K notes
·
View notes
Last Seen Blogs

otakubeelze
The Beast That Shouted I At The Heart Of The World

the-city-goes-silent
hi youre cute ♥

leviathan-dee
✨𝕳𝖎 𝕳𝖊𝖑𝖑𝖔✨

automotiveinstincts
Automotive Instincts - Repco Authorised Car Repair & Mechanics

cinatiropa
MULTIFANDOM EDIT BLOG