#i also used my cheapo set of colored pencils for this one
Text
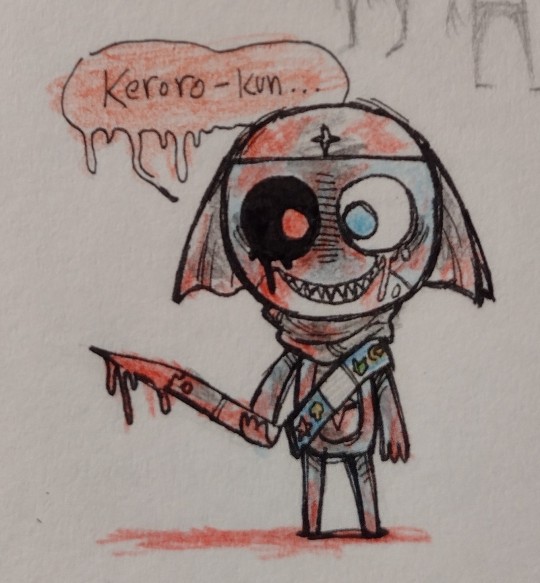
based on @gemwolfz 's goofy creepypasta dororo design. INCREDIBLY endeared by this concept of like, some kids coming up with a lost episode creepypasta about a dark twisted episode of the anime where dororo snaps. king shit. I had to try and turn off my overly meticulous art brain cause-it's SUPPOSED to look raw and scratchy and wonky! I channeled my primal reptilian elementary school brain for this one
this is probably the longest description I've done for an art piece and it's a FUCKING twisted evil dororo drawing
#keroro gunso#sgt frog#dororo#tw blood#tw knife#i felt especially genius for making the eyes mismatched--oOOOo he's turning!!!#i also used my cheapo set of colored pencils for this one#gotta make it authentic to the times#also ALSO: i listened to some early vocaloid horror songs throughout the process of drawing this#those edgy ones you've probably seen a fnaf fan mv for#i hold great affection for them#peekerheads roll out
15 notes
·
View notes
Note
what art supplies do u use? i rly like ur doodles ....
first of all, thank you!
this is gonna be a long one. and hey, before I get into this: getting better tools does not make you a better artist. I'm serious. Please don't get things from this list to improve your art, and especially if they're just gonna languish in a drawer because you're afraid of wasting them. I love you and you deserve nice things, but they are not the key to becoming a better artist.
I've also had many, many years to collect and curate stuff. A lot of it I gave away to friends because I didn't use it. If you're new to this, don't worry about getting "all the best things". It's a little silly, and can hold you back.
Especially for sketchbooks, exploration and just messing around, quality stuff isn't necessary. if you're selling commissions or making stuff that will be hung up, yeah, quality matters, but it's mostly about how archival/lightfast stuff is, not price. you won't catch me with caran d'ache or prismacolor stuff, nuh-uh. Only one of these is good and worth the price, and spoiler, it's not the prismacolor.
also, if I catch you hanging up alcohol marker originals, I will personally come into your house and put them into a safe drawer. that shit fades, and fast.
with that out of the way:
digital: clip studio paint + wacom intuos pro medium (circa 2017?). Don't bother with wacom tho, a huion is just fine. I do recommend not getting a small one though, your wrists will thank you. I use whatever brushes i like atm, usually default or custom-made by me.
watercolor: a mix of roman szmal + renesans paints, because they're high quality and extremely local (and thus cheap!!) to me. Currently I'm using arches 185gsm cold press (100% cotton). I chose it over 300gsm because it's cheaper, and thus feels less precious, so I'm not afraid to "waste it", whatever that means. for brushes, I use a #6 kolibri pure red sable round and a really, really old #2 cotman round (111 series). I would recommend synthetics due to environmental and ethical concerns over how sable hair is harvested. I also have a #16 flat somewhere, but I have no f%$#ing clue where it is. Do note that watercolor is rarely a vegan medium, as the sizing in watercolor paper is usually gelatine. I'm sure you can do it, but idk how.
for gouache i use the watercolors mentioned above + white gouache because I'm a rebel. I do have a renesans gouache set tho, and will use it up because I hate wasting things.
ink: winsor&newton black and white shellac ink. I discovered G-pen nibs like a week ago and they're my jam, but I used a LS40 nib before (too flexy). FWIW i also use a white sakura gelly roll for white highlights sometimes, and sakura pigma microns in various sizes and colors (usually 003, 01, PN). I also use regular fountain pen ink in a fountain pen because it's fun.
sketchbooks/paper: royal talens art creation. they are the superior affordable sketchbook, no contest. I love the 12x12cm size and A5 bound on the short side. I'm also using a 12x12cm sakura sketchbook with black paper for gouache doodles.
for watercolors, I use 100% cotton as mentioned before, as that is the only medium I ever consider selling to people. Everything else I don't bother keeping archival, so it's in my sketchbook or on cheap-ass copy paper. go nuts.
pencils: I prefer a 2H for layouts on watercolor paper and a HB for sketching, usually either a faber castell 9000 (the dark green ones) because idk they make me happy and are nice and smooth. Usually it's "whatever" though. as long as it writes and doesn't scratch I can use it.
colored pencils: a 36 set of faber castell polychromos and i refuse to elaborate
misc. sketching supplies: uni nano dia color mechanical pencil leads. My #1 most used is pink and I plan on getting more colors. for normal mechanical pencil lead i use a HB refill in whatever brand i can find (I'm even less picky than with wooden pencils). All of these are in 0.5mm size. oh, and tons of misc. cheapo colored pencils I have laying around, like most artists.
for erasers, usually it's "whatever" but I do carry several with me at all times. current faves are colored kneadable erasers (ooo pretty colors!!), milan tri jet, pentel hi-polymer in green, pentel hi-polymer slim.
pencil sharpeners are also a whatever as long as it doesn't break my pencil, but I do really like the derwent long point (i have the mini, its cute)
for cute accents of color i use whatever pastel highlighter i have at hand, or a crayola supertip. I sometimes also use alcohol markers, but rarely.
alcohol markers: copic ciao, but don't bother buying them. ohuhu has refills now and copics lost their only advantage.
acrylic paint: renesans flowacryl, but I do plan to switch to golden fluid at some point. this is exclusively for mtg alters, btw. in terms of brushes, I use a #0 milan round (golden taklon i think but idk and I don't have any at hand rn to check) and a #6 oval (it's flat but with rounded off corners) in whatever brand is available.
i think i covered it all! now go grab a pencil and copy paper, and have fun. this is a threat.
3 notes
·
View notes
Photo
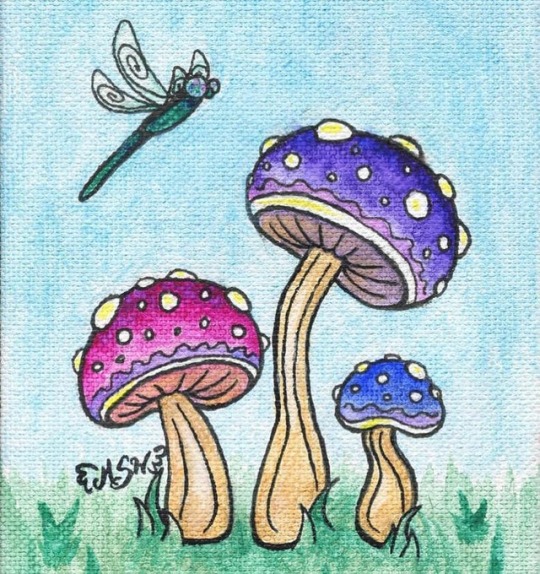
Lazy Mushroom Day
This artwork is now available as a free Coloring Page!
____
More experimenting with watercolors!
I used the same Crafts 4 All set of 24 that I did on my Watercolor Kitty. And honestly, I'm still very impressed with how they handle for inexpensive watercolors.
But this piece was slightly more about trying watercolors in general on canvas. Because for some reason the internet is CONVINCED that if you want to use watercolor on canvas that you MUST prime it first with gesso and then again with an absorbent/watercolor ground. The only explanation is that the canvas won't be absorbent enough on its own and the paint will lift off easier.
That's fine and good and all, but the weird thing to me was that it seemed like no one had thrown caution to the wind and tried it anyway. Or at least if they had, they'd been severely drowned out by all of the insistence on priming.
This all came about because I've had a pack of 8"x10" canvases sitting on one of my art shelves, waiting for a purpose for a few months because I was previously not much into painting, but now that I'm starting to delve into painting with watercolor, I was wondering if that could be a use for the canvases.
The other thing is that, even though I haven't worked with canvas very much, but the few times I have I didn't bother to prime it with gesso (as is typically recommended) and had no issues. (And I wasn't using expensive, pre-primed canvases either. I use typically the cheapest I can get.) Additionally, I've used my Dr. Ph. Martin India Inks and ink in general on canvas with no problem, and from my experience with ink and watercolors, they behave pretty similarly. The main difference is just that ink tends to dry more permanently and usually comes in much thinner/more liquid forms.
Naturally, I wasn't satisfied with just taking the internet's word for it that I absolutely HAD to prime the canvas to use watercolor on it. So next time I found myself at DollarTree, I picked up a little pack of three baby 4"x6" canvas boards to experiment with. (Before going straight to one of the bigger canvases and potentially messing it up because I didn't know what I was doing.)
Then the other night while I was feeling artsy, I came across some pictures of mushrooms on Pinterest and got bitten very hard by the art bug, so I ended up with a small, cute sketch of a little mushroom trio.
It was a bit small for transferring onto my normal papers for coloring with markers or watercolor, and I didn't feel like using colored pencils. Originally, I had scanned it in just so I could make it bigger to use on my regular 5"x7" comfort realm for paper, but even after I had optimized it that way, it ended up clicking in my head that the original might be a good size to use on one of my tiny canvas boards.
So I grabbed some thin graph paper and my lightbox, traced the sketch, and then tried a technique I'd heard about where you shade the back of the drawing with graphite or charcoal (I went with graphite just in case I needed to fix it later and so if I wanted to I could erase it more easily), then you place in with the graphite side down on the canvas and trace the sketch with a fairly heavy hand. I was a little skeptical at how well it would work, but it actually did! The only real issue is that the texture of the canvas can tweak the lines a little, but it wasn't enough to deter me from ever trying this again.
Then I followed my usual routine of going over the lines in pen; opting for my black Sakura gelly roll so I wouldn't murder a felt tip with the canvas texture but the lines would hopefully not react to the water. Fortunately, you can't really tell in the finished piece, but I did accidentally smudge some of the ink before it had fully dried because it did take a little longer to dry on the canvas. I was able to quickly grab a Tombow Dual Brush blender marker and mostly clean up the mess though.
After letting the line art sit and dry for a little while, I came back to it armed with some small brushes, a glass of water, my watercolor palette, and curiosity to boot.
As I already started, these cheapo watercolors continued to surprise me with how well they work. They originally came in tubes, but I purchased a separate palette and squeezed a bit of the paint into half-pans and by this point, they had finally completely dried out. (Last time I used them it had been so humid around here that a few of them were still slightly malleable, but I was impatient) And they reactivated really beautifully; only the white felt like it needed more water, but that had more to do with the fact that I was trying to load it up to mix with other colors, and I needed more of it just because white is easily overpowered. (I have been considering purchasing a separate, bigger, maybe slightly more expensive tube of just white watercolor because of this since I know I'm probably going to go through it the quickest). But even the greens reactivated nicely; though my research had led me to believe that if I had trouble with any of them reactivating that it would be them.
To be fair, yes, the paint did lift a little easier than it would if you were using it on paper. However, this didn't really bother me because I actually found it quite useful for helping correct mistakes and occasionally to blend. Just as well, I also noticed the paint seemed to stay wet just a little bit longer and it flowed together a little more easily (though they don't run all over the canvas without your consent), which were also quite helpful to me for blending.
I didn't get too crazy because this was more of a test than anything else, but I did play a little and try to flex my watercolor muscles to get a good feel for the process.
Honestly, I sincerely don't see why using watercolor on unprimed canvas comes across as such a taboo. Maybe I'm just an idiot who got lucky, but I didn't have any problems with it. Even the next day when I went back to it in better light it looked just fine. I even sprayed it with workable fixative to help preserve it; no issues.
So with my cute little mushroom scene under my belt, I know I'll be more open now to playing with my watercolors on canvas. And since there is no "right" way to do art, I would encourage others to at least give it a try and see how you feel about it with your watercolors.
P.S. There may or may not be something else coming up involving my little mushrooms here in the near future ;)
____
Artwork © me, MysticSparkleWings
____
Where to find me & my artwork:
My Website | Commission Info + Prices | Ko-Fi | dA Print Shop | RedBubble | Twitter | Tumblr | Instagram
2 notes
·
View notes
Text
Wayne Goss Brush Review
youtube
Wayne Goss does an important tabletop demo on sun care and skin care.
I’ve been frequently traveling the past few years but dramatically so in the last 6 months. I thought I had become proficient in all transit procedures... until my luggage was lost in a perfect storm of two missed connections which left me naked apart from my small Guitalele, the clothes on my back, and the laptop that I had, fortunately, had the divine foresight to remove from my luggage before my carryon parted ways with me somewhere in Denver.
When my luggage finally arrived at my hotel looking rather tired and forlorn, I opened the contents of my bag to a relief that my valuables were all there apart from one very carefully wrapped linen scarf that I kept my sacred makeup brushes.
Like anything, experience points make the difference in the tools that you use. When first learning the Guitalele (for example) any cheapo 80 dollars eBay investment will do and does perform quite well for my limited knowledge of how to do basically anything guitar related. However, as I practice I hope that this will change. It certainly was the case for me and makeup.
Any serious artist will groan aloud when they hear that a collection of brushes were stolen. The fact that mine is used on my face shouldn’t make a difference. One brush could sometimes cost up to 70 dollars and surprisingly enough the larger ones were sometimes the less expensive!
The first thing I did when I arrived at my destination with no luggage was to go to Walgreens and try to find some kind of outfit for the next few days as I was at a conference and couldn’t let myself go wearing the same comfy set of stretchy pants I strategically wore on the plane... I was able to find the basics all in one place late at night and felt grateful to be an American where my consumer needs could be satiated even at 11 pm on a Thursday. I felt as if I was somehow parachuted into unfamiliar territory with only a few square bits of plastic (debit card) to use in my environment for survival. In a weird stressful way, solving that problem was oddly exhilarating.
But as I looked in the mirror of the fluorescent Walgreens bathroom in my 10 dollar replacement dress (which got compliments later on) and saw how tired my eyes were and the jet-lagged hair - dull and limp from recycled air - I knew I had to get SOMETHING to make myself feel more comfortable in this body that I more or less was dragging around at that point.
I don’t nag on drugstore makeup because it’s usually pretty workable if you know what you are looking for. Your canvas depends entirely on the genetic makeup you have and after years of trial and error with powders, liquids, and mousse, I can confidently find my way around the drugstore aisles and find which will work for me in a pinch... I bought a light whipped foundation in my shade, a small contouring pallet, eyeliner, mascara, and the cheapest application brushes that I could justify spending on.
Back in the hotel, I almost immediately discarded the brushes. They were cheap synthetic fiber and left almost invisible little hairs in the crease of my eye that were like cactus needles.... impossible to see but exquisitely painful to endure if you happen to want to blink your eye every now and then. I went to apply with my hand and fingers which I haven’t done (much) since I was a child playing in my mother’s shoes and grandmother’s makeup bag. Hopefully I didn’t look as clownish as I did when I was a small girl but no one ran away screaming. Either I blended in, or people were too polite to say otherwise so frankly, you’ll have to ask someone else.
After calling the airline when I got back home to my beautiful 3 bedroom apartment in the Bronx, I received the news that I could buy new brushes and then make a report and wait for 12 weeks on whether the airline would honor the receipt or not. I knew I couldn’t go without as I am going to be a guest speaker at an art auction in a little over a week so I knew that I had to figure something else out and fast.
I was caught between spending the money on high quality and risking that the airline would say “tough tiddies” or cheaper more available brushes that were less risky. In my heart of hearts, I already knew where to go. I poked around online for a bit but saw nothing that gained my TRUST in the artistry of makeup apart from what I had already researched in regards to Wayne Goss.
Wayne Goss is a brilliant YouTuber who unlike most of the Instagram/youtube beauty babes with their sugar skull contouring, Wayne Goss gives highly perceptive artistry tips on how to correct, enhance, and diminish traits on the face, as well as any of the old masters of the Renaissance, could do with oil on canvas. It does take skill and experience to create a visage on a three-dimensional surface that is essentially alive and reacting with the environment. The face is mass in movement and therefore makeup becomes interactive and involved in the flexibility of that movement.
So I ordered the Wayne Goss Anniversary Set Volume 2 (limited edition) and The Brow Set because these would replace MOST of the brushes that were too soon taken from me by an airline that will remain unnamed.
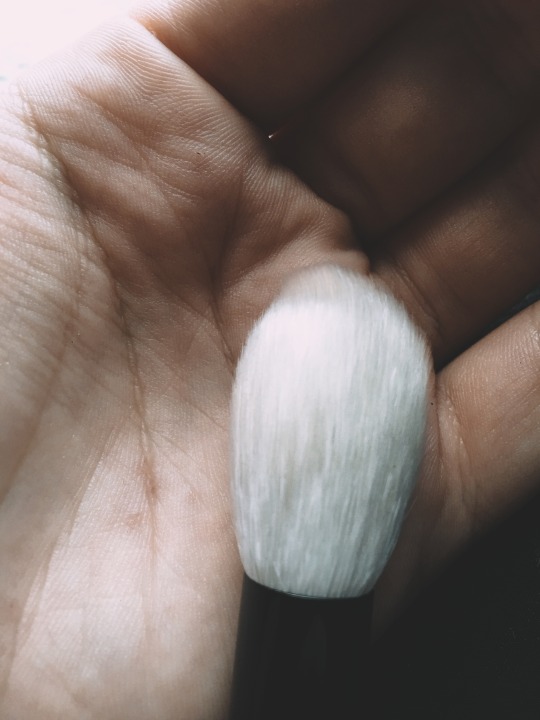
The Anniversary Set Volume 2 contains 8 brushes handmade by artisans in Kumano, Japan from pure white (undyed) goat hair. These eight brushes are:
Brush 01: a dense duo-fiber brush for fast, flawless foundation application
Brush 02: a tapered sculpting brush for highlighter, blush, and bronzer
Brush 03: a fluffy eyeshadow brush that doubles as a precision highlighter brush
Brush 04: a silky-soft crease brush that works with any eye shape
Brush 05: a finely pointed pencil brush for detail work around eyes and lips
Brush 06: an eyeshadow blending brush that softens pigment in a single swipe
Brush 07: a flat eyeshadow brush that packs on pigment and works wonders with concealer
Brush 08: a small push liner brush that works color deep into the lashline
The Brow Set contains 3 brushes also crafted in Kumano, Japan. They are:
Brush 21 – The Hero: A short, flat brush for applying all types of brow products—wax, powder, pencil, pomade, or gel—with precision and ease. Create natural, hair-like strokes with the fine tip to blend color seamlessly into brows.
Brush 22 - The Multitasker: This multitasking tool includes natural bristles to groom, shape, and define brow hairs for an endless array of unique styles. The fine-toothed comb separates lashes and de-clumps mascara.
Brush 23 – The Pre-Show: An upscale take on the classic spoolie, the soft, dense bristles on this cone-shaped brush are designed to distribute products smoothly into the brow. It’s also perfect for applying mascara.
The goat hair brushes from the Anniversary Set Volume 2 had some minor shedding as I tested them rather vigorously on my hand. The number 01 seemed to have the most shedding but also took the most of the circular blending technique and the others will mostly be used in a different method.
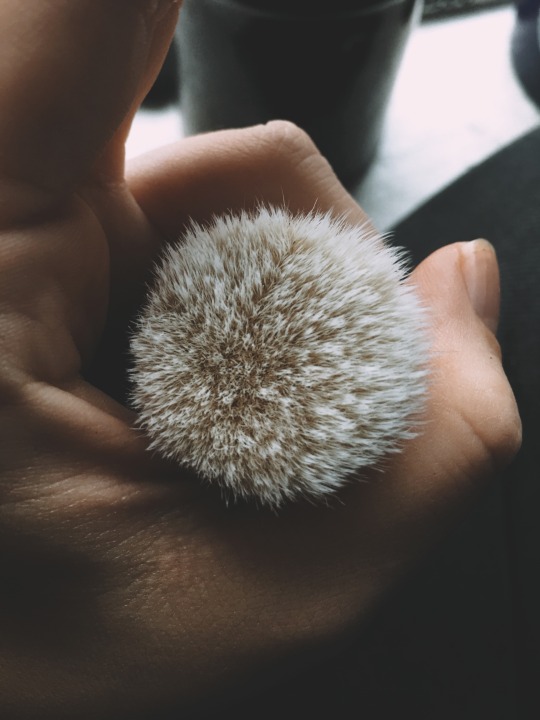
The hair is bundled in a tapered layered way which will promote excellent longevity to their lifespan. There are a few wisps that wander off from the heads of the brush but I think that mostly was done in the shipping and will some relaxing they will fall more so into place.
The Brow Set comes with different courses of boar bristles (I believe). Brush 22 has longer course hair and slanted plastic teeth for the reversed side. I like that these are of course natural hair and not synthetic as I find that synthetic has a tendency to become brittle and break easier. The plastic teeth are fine and tapered but seem durable enough. I ran my nail across the tip to see how flexible they are and they seem to be alright... The plastic and can be moved without much force. Brush 23 - The Spoolie is slightly bent at an angle to allow precision combing of the lashes. The angle itself seems almost perfect and intuitive. Many props to Wayne Goss and Co. for that.
The real test with any quality brush will be how it holds onto the wand. The metal seems durable and the promise of 20 artisans from Japan give me hope that it will last, but it’s been my experience that sooner or later my makeup brush heads always seem to pop off.
The packaging from Beautylish was DIVINE. I opened the package and was treated to a very stylish black box that fit the inside of the cardboard perfectly. Inside the black box, my eyes were treated to a handwritten note thanking me for my purchase, a crushed velvet drawstring pouch, a light black canvas bag which carried two tubes of my brushes inside.

I was apprehensive about how my brushes would arrive and if I would have to get a new brush roll, but luckily Wayne Goss saved my pennies a bit longer with their stylish carrying arrangement. The brushes were gorgeously wrapped in black tissue paper that felt like origami to unfold and was tied with thick black cotton ribbon.

As I opened up my package all I could say was “Oh Wow” and I heard myself becoming my tiny Italian grandmother who coveted craftsmanship in all of her purchases. This demand for quality made her the most stylish and beautiful woman I have ever come across in my days on this wide green Earth. If you are serious about makeup and it’s application as an art form then I am pleased to give you my suggestion to purchase from Wayne Goss. He is a deserving entrepreneur in the beauty industry whose videos are meant to enlighten the people (for free) and the advice is actually worth more than gold. I included a very important PSA about a lie that the beauty industry tells us to get our money while putting us at risk for serious health risks such as skin cancer. If you haven’t heard of Wayne Goss I urge you to find him and subscribe.
0 notes
Last Seen Blogs


kiwischange
Molly's Weight Loss Journal

tcecreative-blog
TCE CREATIVE

lovrencv-blog
sončna svetloba

abrokenwitch
Lizzie.