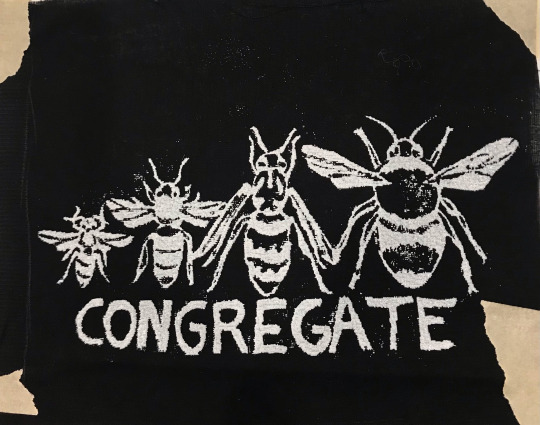
#homemade print
Text
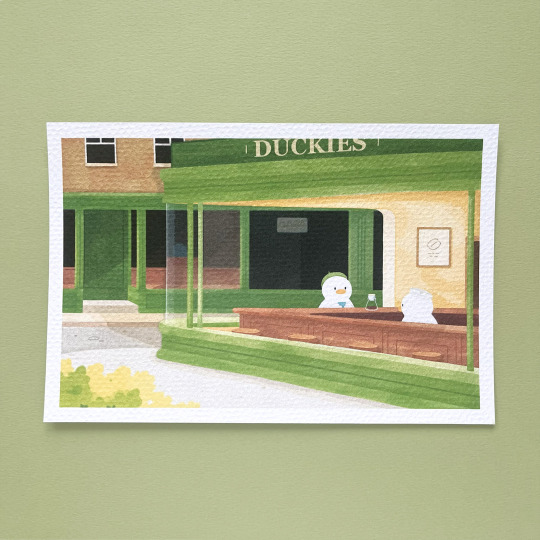

"Early birds" textured art print is now live on the shop! 💛
#my art#shop update#look at all that yummy texture#probably my favorite art print done yet!#will be hanging one of these on my own wall lmao#art print#print#art#illustraton#drawing#paitning#homemade print#small buisness#etsy shop#artists on tumblr#artist on tumblr#edward hopper#the nighthawks#coffee shop#duck#duck art#jeeklaart
101 notes
·
View notes
Text
0 notes
Photo

*猫用版画 / lithograph for cats
ZEN 《禅》
Lithograph, ed.8, 10cm X 10cm, 2019
Naomi HASHIMOTO
#printmaking#lithography#lithograph#artwork#homemade print#fantafonte#naomi hashimoto#橋本尚美#リトグラフ#lithograph for cats#猫用版画#猫#cat
1 note
·
View note
Text

2023, Saint-Petersburg
Printed in Saint-Petersburg
10х15, Silverprint
#35mm#35мм#35mm film#ilford#ilfordphoto#homemade#analog photography#noir et blanc#cityscape#monochrome#Monochrome Photography#vintage#vintage photography#streetphotography#saint petersburg#bnwphotooftheday#bnw photography#bnw film#Gelatin Silver Print#Alternative Process#fujifilm#kodakfilm#filmforever#filmcrew#filmisnotdead#filmisawesome#lomography#дворыпитера#дворыпетербурга#питер
574 notes
·
View notes
Text
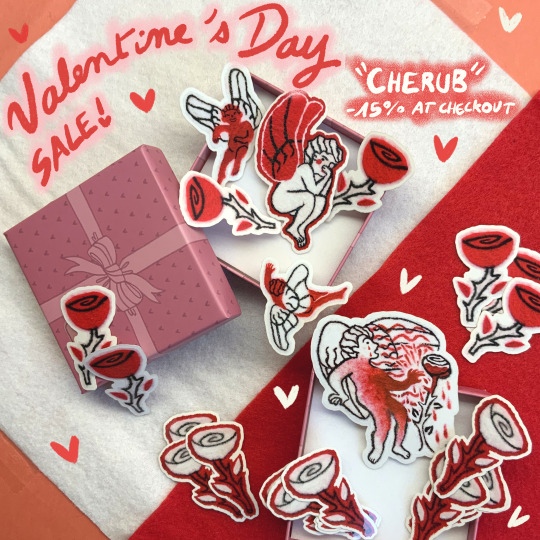
since valentine's day is in two weeks, i'm hosting a sale on my shop until feb 14th!! use code "CHERUB" at check0ut if you're interested in things like cute angels, birds and/or wax seals 👼💌
#french art#french artist#french artwork#french art student#french illustrator#french illustration#small business#stickers#prints#homemade stickers#homemade prints#online shop#cherub sticker#cherub print#bird sticker#bird print#wax seal sticker#wax seal print
449 notes
·
View notes
Text
#republican assholes#the nra is a terrorist organization#Republicans are killing us#gun control#assault weapons ban#gun violence#gun deaths#senseless gun violence#mass shootings#school shootings#Americans slaughtered by gun violence#corporate greed#gun lobby#Wayne lapierre draft dodger#Russia funds the NRA#our enemies want us destabilized by gun violence#ghost guns#3d printed guns#illegal homemade guns#cops shot at with machine guns
52 notes
·
View notes
Text
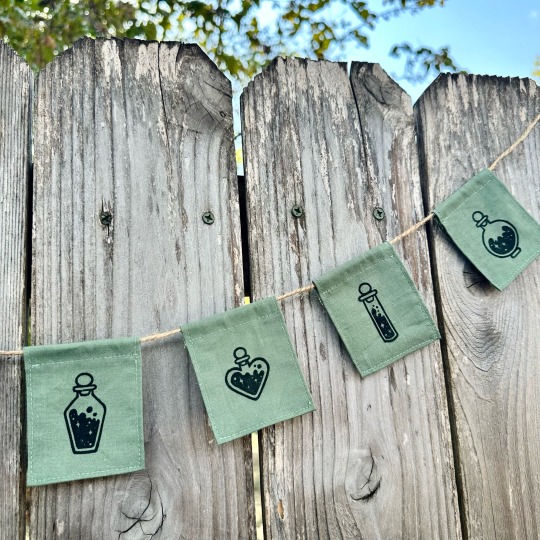


potion bottle bunting,
linocut prints on fabric
#linoprint#printmaker#block printing#printmaking#relief print#bunting#sewing#homemade bunting#reliefprint#block print#salted snail studio#handmade#potion bottles#potions#relief printed fabric#relief printmaking
111 notes
·
View notes
Text
How to Make a Printing Screen from Home
I wanted to share a quick cute little tutorial for how I made my own screen for making patches (and other things that don't require exact measurements). Cute lil how-to under the cut >:)
Disclaimer: I have absolutely no idea what I'm doing at any given moment. There could be a better tutorial out there for you. I'm just guessing for a lot of the things I do and this is no exception. With that out of the way:
THE SUPPLIES YOU DEFINITELY ABSOLUTELY NEED:
a small/medium canvas (depending on what you have and how big your design will be)
paintbrushes
a tight-woven sheer fabric (preferably not stretchy and STRONG)
a fine-tip pen
water-resistant gloss of some kind (mod podge works, but make sure it's a waterproof kind if you want to make more than one print)
paint that won't come off in the wash (acrylic/spray paint work)
good strong tape
a good sturdy card-like thingy
an easy/cool design for your print :)
THE SUPPLIES THAT ARE RECCOMENDED BUT NOT NECESSARY (aka things I like to use):
a good canvas fabric/thick cotton for printing on
fabric paint (will stay on the fabric best duh)
a 1/2in, 1/3in, and fine tip paintbrush for details (depending on your design)
some company for fun :)
Alright, so first you'll want to figure out the design you want to print out and get a good sketch over it. I'm a detail freak so I like sketching out my design then going over it in a black pen. The ideal is hard contrast and clear and discernable lines/fill-in spots, like pictured below:
(Note how I emphasized which spots were to have thicker lines, which parts of the stripes were to be printed, etc. I tried to think a lot about which portions I wanted to show up on the finished design and how they would look on the fabric as a whole.)
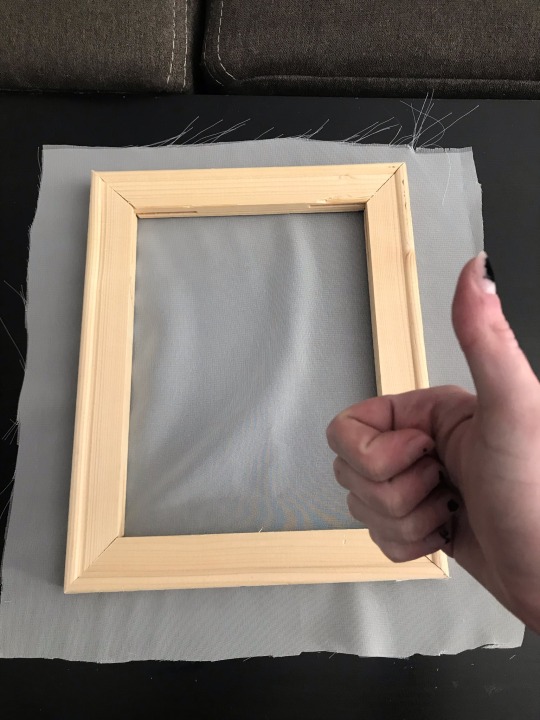
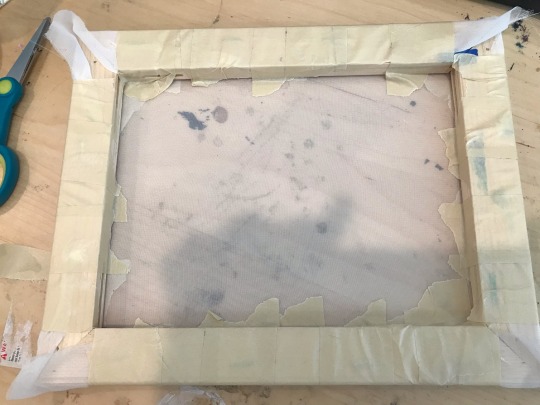
So you've got your design. Great! Next step is a fun one: Grab a canvas you are willing to part with (this one was a painting I made when I was 16. I hate it), and rip all the fabric off of that fucker!! If you pull off some staples in the process, don't worry. Just make sure you can retain the shape of the frame, since that's the part you'll need to keep. You don't need to take off every single bit of the fabric, but as previously stated, I'm a freak, so I did. You'll come out with something like this:
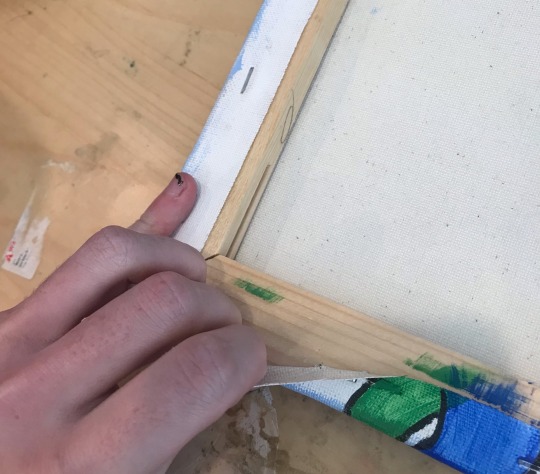
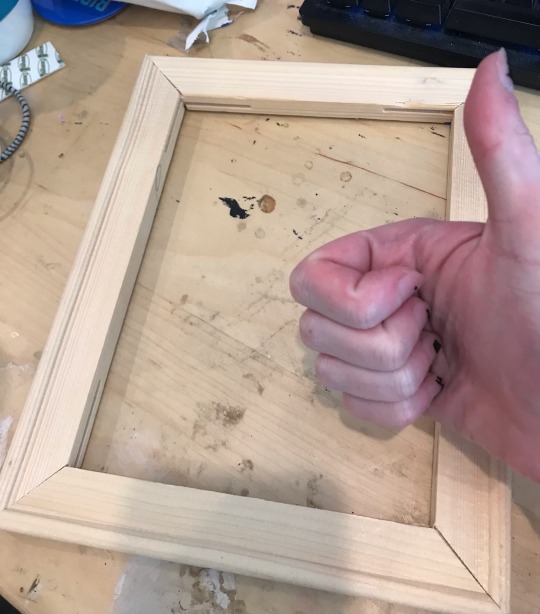
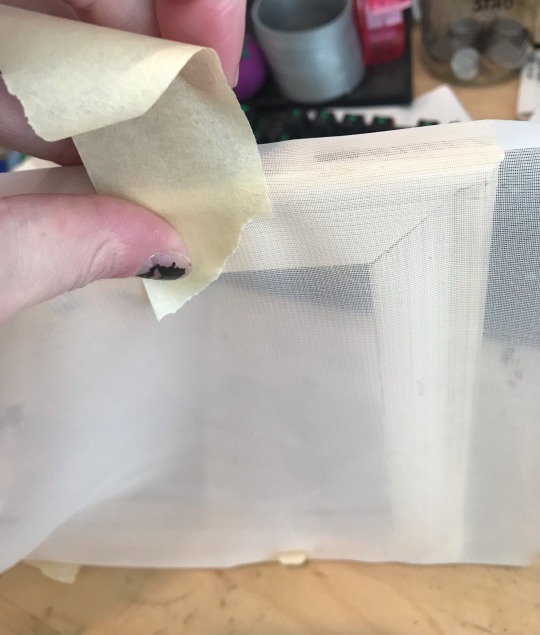
For the next steps you'll need a good pair of scissors as well as your pen and your sheer fabric. You're going to want to set the frame on your fabric and cut about an inch and a half around it so there's extra to wrap around the frame and tape down. You can draw a guideline for where to cut if you want, but once again, I'm a freak:
Now lay the front of the canvas frame (the part without staples on it) face down on the fabric and grab your tape! Now we're going to tape down each end of the frame so the sheer lays taut on the frame. I like to put one or two strips of tape on the ends parallel to each other and pull them tight, then do the same with the other side, then continue adding tape until the whole outside of the frame is covered. See below:
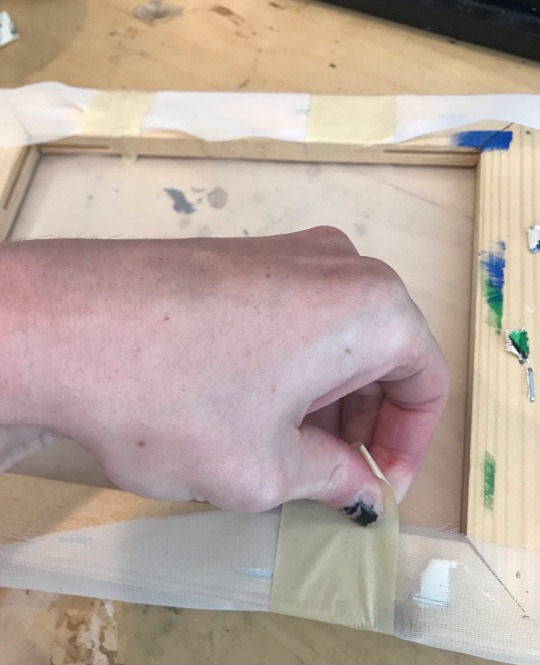
(Note: your goal in this step is to stretch the sheer as tight as it can comfortably go so there are no wrinkles or depressions in the fabric.)
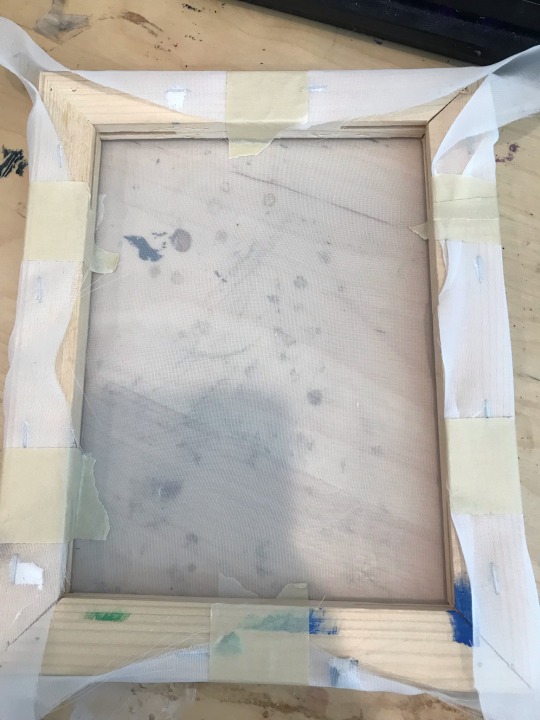
So now you have you're frame. Fuck yes!!! Go ahead and grab the design you came up with as well as your pen (you can use a pencil too, but the pen shows up much better through the fabric so I definitely prefer it), and put the frame front side down onto the sketch.
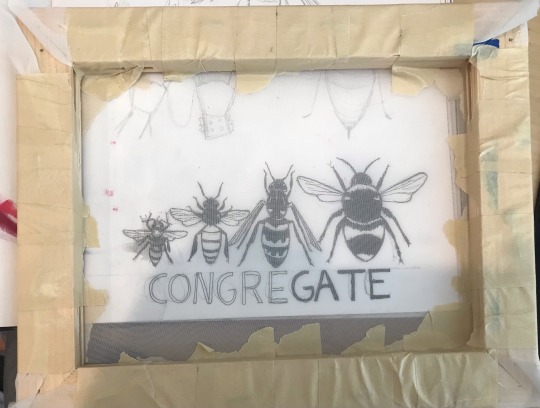
If you're worried about keeping the frame steady, feel free to tape the frame down and go ahead and trace over the design with your pen. Make sure to fill in all the dark parts enough that you can differentiate them from the light parts.
Once you have your sketch copied to the frame, now you can grab your gloss!!! Hurry!!! You're almost done!!!!
With this step I like to start big and go into the details once all the larger portions of the sheer are covered. Pretty much you're going to paint over every part that isn't the black of the pen with your waterproof gloss. This ensures that once you start printing, the only parts that are going to bleed through the fabric will be the black parts that weren't painted over with gloss/varnish/mod podge/whatever you used as long as it's waterproof!!! Take all the time you need, it's not a race. Once you're done and the gloss has dried, your screen is going to look something like this when put up to a light:
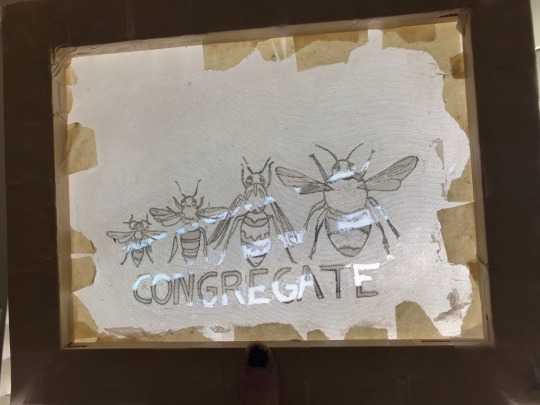
Now that this step is over with, congratulations - you have just made a mesh screen!!! Keep reading to learn how to use it lol
So for the patches that I make I just went with black and white paint, and black and white fabric to keep it traditional, but you can use any colors of paint and fabric you want, truly! The world is your oyster! I do not care! That being said, we're keeping it simple today.
Grab your screen, a piece of fabric that can cover the design and leave at least an inch of space around it, and a surface you won't mid getting paint on on accident. You'll also want to grab that card-like thingy for this as well. It can really be anything that can provide a sturdy, even pressure across the screen consistently. Go ahead and pick up that fabric paint too, I guess. We'll probably need that.
At this point, this is what your workspace might look like:

Next up you are going to center your design onto your piece of fabric-

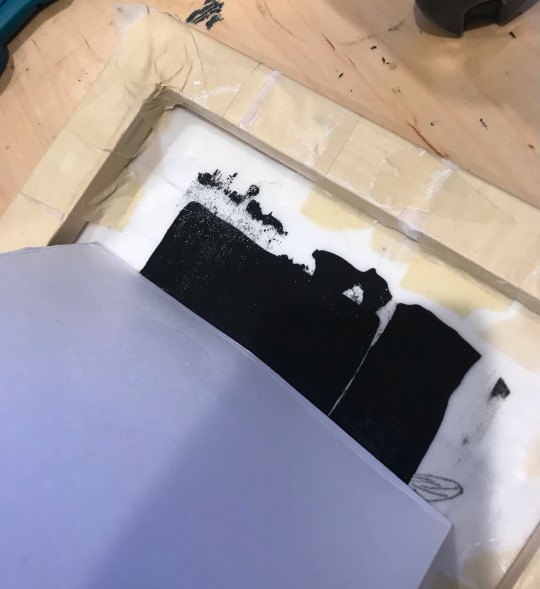
-and grab your fabric paint. put a thin little stripe over the top (start slow and add more - as you can see I added a little too much and kinda fucked up my design) then grab your card thingy. Make sure you have even pressure on it and swipe it down at a medium speed so you're dragging the paint down the screen:


Once you've got everything covered I like to go over it a few more times for even coverage. Then you pull it up from the screen (which you might want to rinse off so no paint sticks to it!!!), wait for that bitch to dry, and you're done!! Congratulations, you have your very own fun silly patch! Go sew it on something! Or not! I do really do not care!!!!!!

#blog post#cant-shake-it#patches#homemade#punk#punk diy#punk patches#tutorial#how to#screen printing#diy#fashion#if i get hate for this im prepared bc i ride life on the seat of my pants#there are no rules and i am so inefficient
141 notes
·
View notes
Text

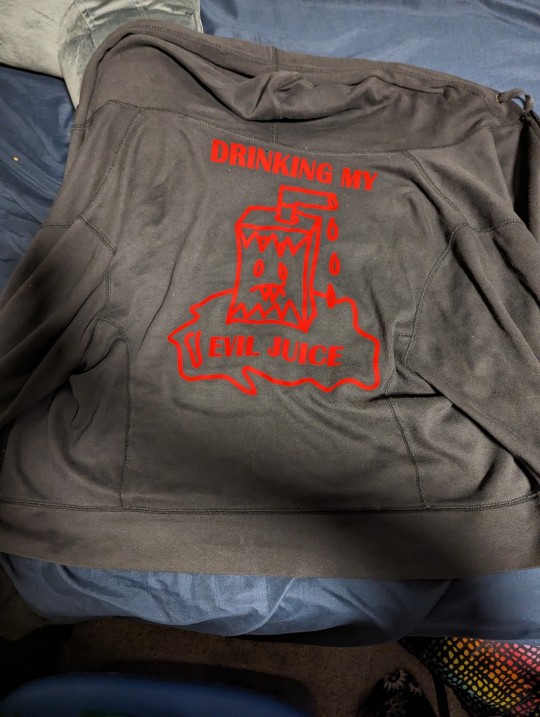
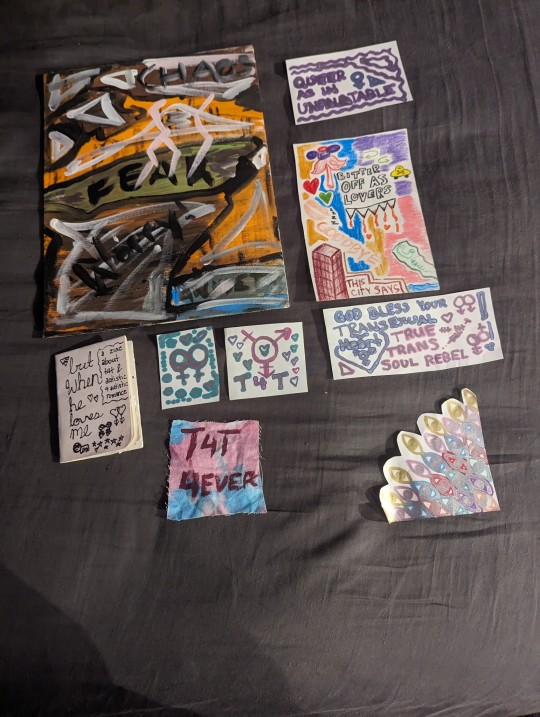
Photos of some more of the works I have for sale! The eyes are by Mason, as is the design on the first shirt. Evil juice is mine, of course. The zine is a cripplepunk zine about @masonmczero and autistic4autistic/t4t/disabled4disabled love and how liberating it can be, and is hand-drawn and one-of. The painting is from when I was 16. The bitter off as lovers piece is based off bang the doldrums by fall out boy, the song that caused me and @waiting-tombstones to meet last December! One of the paper drawings is based off true trans soul rebel by against me, one of my favourite songs.
Please buy my art! It's my only income source atm
#art#cricut#homemade shirts#shirt design#t shirt#shirt print#paintings#abstract painting#abstract art#surealism#artist#t4t#autistic#autistic artists#autistic artist#queer artists#queer art#against me#fall out boy#t4t tumblr#bang the doldrums#small business#small artist#graphic shirt#diy art#diy#cripplepunk#disabled#disabled artist#disabled4disabled
39 notes
·
View notes
Text
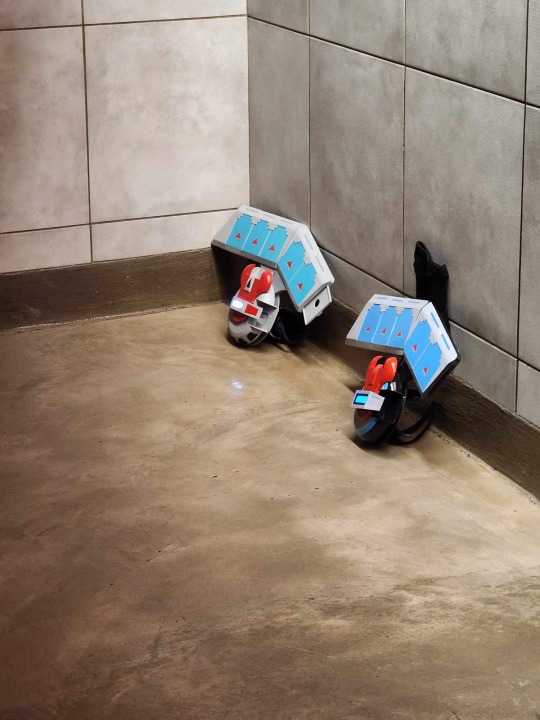
Yugi and Kaiba taking the duel disks off so they can hold hands at the urinals
(duel disks made by me and @omezoku)
#yugioh#ygo#seto kaiba#yugi mutou#yugi x kaiba#yugioh meme#homemade duel disks#duel disk#3d printing#cosplay#yugioh cosplay#Halloween 2023#just two silly guys
40 notes
·
View notes
Text

Couldn’t find any patches of my favorite album cover so I made a linocut to print my own. Definitely not a one to one re-creation but I still think it’s charming :]
#The album is volume one by Amigo the devil btw#amigo the devil#my art#traditional art#crafts#linoprint#linocut#homemade stamps#homemade patches#The stamp doesn’t line up with the print bc I altered it after making the print#I’m running out of ink tho so this is the only one that came out coherent :’]
7 notes
·
View notes
Text


From completely unwearable to both sturdy and sexy in one day, ain't too shabby I reckon
[ID: front and back pictures of black zipped cargo trousers with patches sewn on. On the front, the fly has a pink triangle and embroidery reading 'XXX', a medium sized patch reading 'ANGRY YOUNG AND POOR', and a large patch reading 'QUEER ANARCHY NOW!' over drawings of nature. On the side of one leg is a large patch reading 'TORIES MAKE ME FUCKING SICK'. On the back, one pocket has a black paisley bandana design and the other has a light floral patch reading 'TOUCH ME AGAIN AND I WILL FUCKING KILL YOU'. Near the crotch, covering the enormous hole previously rendering these trousers unusable, is a patch with a picture of a cactus captioned 'EVERYTHING IS A DILDO IF YOU'RE BRAVE ENOUGH'. End ID]
#crust punk#queer punk#i love a good knackered clothes rescue#all these patches are either homemade or salvaged from other scrap [the big ones are misprints my mate nicked from the print shop waste bin#+ angry young and poor i rescued from my old jacket when i was redoing it its originally from chaoscreations.scot highly recommend em]#except touch me again which i got in exchange for donating to an abortion fund at a punk gig
37 notes
·
View notes
Text
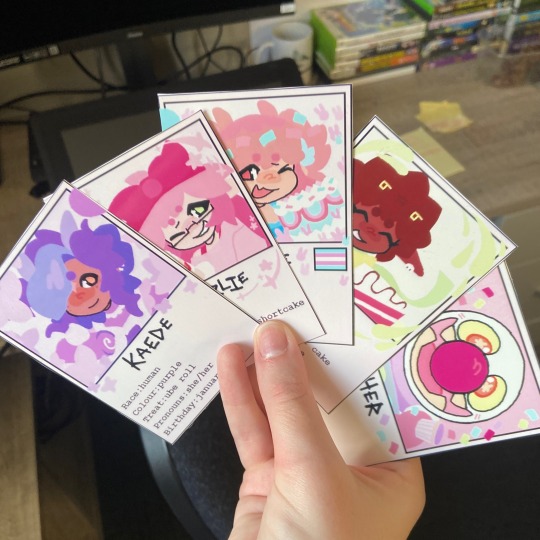

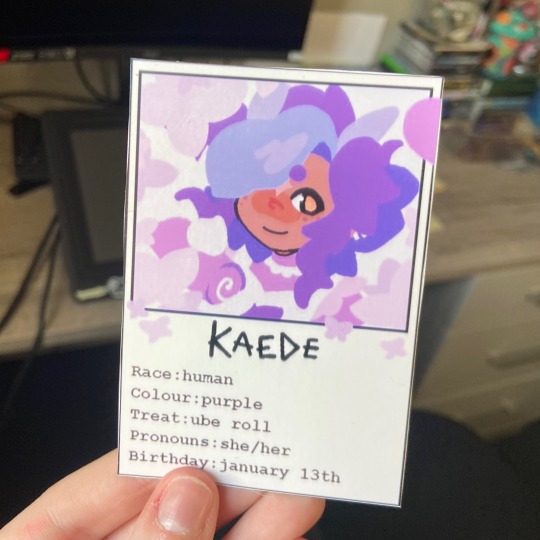
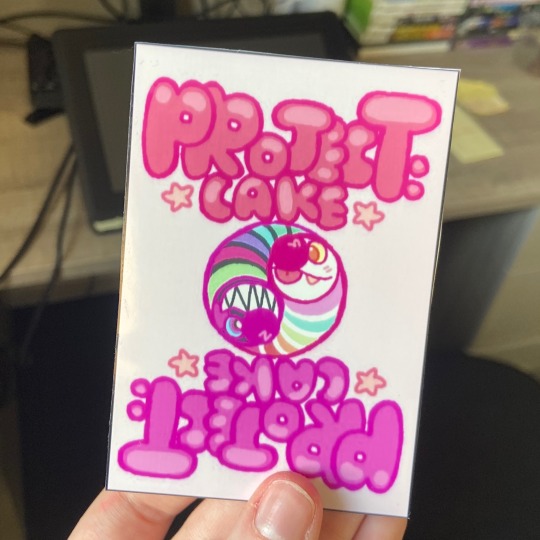


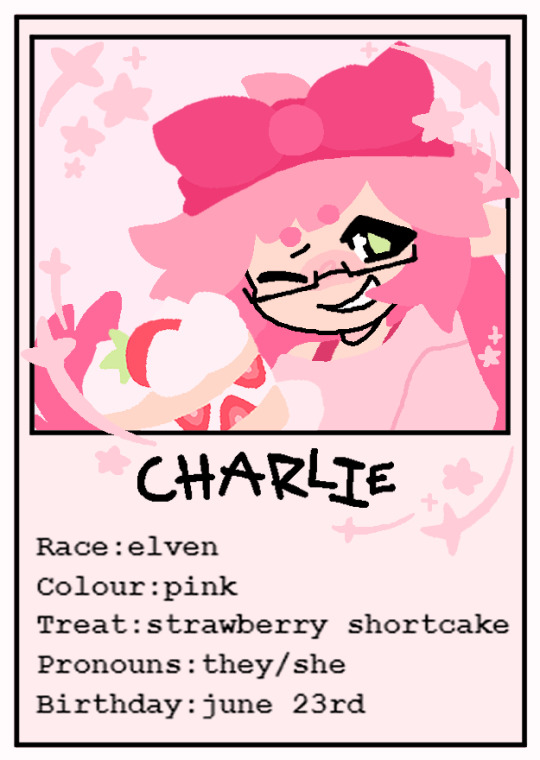
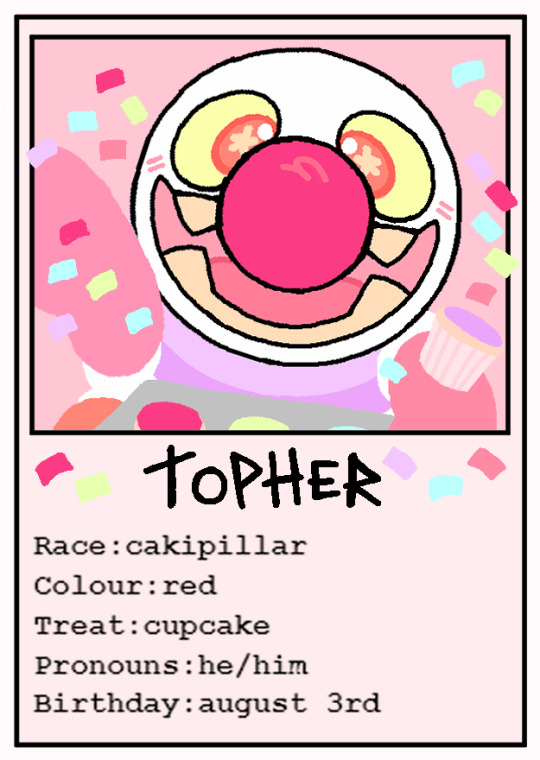

project:cake! oc cards i made :D
#made some oc cards as a uni project here they are#project cake#digital art#character art#oc#oc art#ocart#homemade oc cards#feel free to print out your own if you wan em :}
14 notes
·
View notes
Text
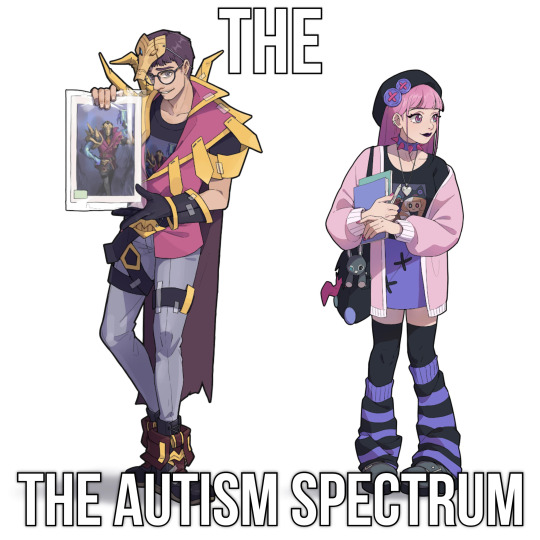
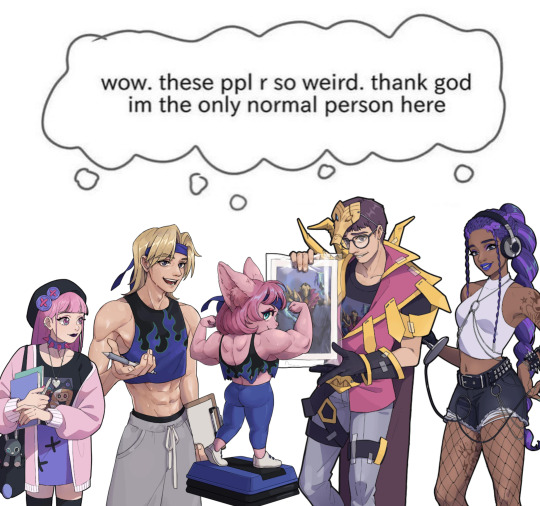
love these guys
#i like how cringe they all are. like all of them are flawed & immensely cringe. no one's main is safe#they're cringe in different ways & some more than others but they're all cringe. love it#why are the fans for my two favourite soul fighter champions the autistic-coded ones !!#why are the autistic-coded ones the most unhinged....#though tbh i think you could make an argument for all 5 of them being autistic 😭#sommer's homemade jhin cosplay is so cute#they somehow managed to capture the exact brand of weird that jhin fans are. bravo#i think the funniest part about him is that jhin would not be able to stand him lmao#him wearing a shirt with the same art that's on the print he's holding makes me crack up for some reason#obsessed with the jacked yordle named rizz.... she's everything#also can i just say i love the crop top on guy. fantastic creative decision. so many crop tops in soul fighter i love it#kiri is crazy though what do you mean she's literally selling rpf at an event that the people she's writing rpf about are at#her repeatedly trying to get samira to read her fanfiction is kind of hilarious#& then she tells samira she's going to write fanfic about her. which is kiri's way of praising her. she is nuts (affectionate)#the way she keeps casually mentioning pyke totally kills people in this universe & she still adores him#she's the worst kind of fangirl (which is the point. they're all parodies) but it's hard to hate her lol she's so silly#my only issue with her is that she's a jhin hater.... how rude#i know her tumblr game goes crazy#the only character i'm confused by is jade. the lux fangirling felt really forced to me#it's not reflected in her design at all; honestly she looks more like evelynn#especially when riki guy & rizz & sommer are all clearly emulating gwen sett & jhin respectively#plus jade's shtick was more about parodying true crime & political content creators it seemed. the lux stuff felt tacked on#i guess it was because dema is after lux & jade doesn't like dema but it felt over the top at least#on top of the fact that it's pretty hard to make sjw characters actually funny#they should've made a dema bootlicker character tbh. for funzies#i think riot should publish some of kiri's fanfiction on the universe site. wouldn't that be silly#they could do one for each of them! a transcription of one of jade's podcast episodes; guy & rizz's training regimen; a poem from sommer#hope some of them show up in LoR sometime. just for fun#league of legends#soul fighter
19 notes
·
View notes
Text

2023, Saint-Petersburg
Printed in Saint-Petersburg
10х15, Silverprint
#35mm#35мм#35mm film#ilford#ilfordphoto#homemade#analog photography#noir et blanc#cityscape#monochrome#Monochrome Photography#vintage#vintage photography#streetphotography#saint petersburg#bnwphotooftheday#bnw photography#bnw film#Gelatin Silver Print#Alternative Process#fujifilm#kodakfilm#filmforever#filmcrew#filmisnotdead#filmisawesome#lomography#дворыпитера#дворыпетербурга#питер
215 notes
·
View notes
Photo

Black Friday here!
20% off on everything in our shop 💜
Discount code needs to be added at checkout: BLACKFRIDAY22
Hint: You’ll find something called “Batches”. When you purchase 2 or more prints through them, you automatically get another discount:

Batch Discount: 5€ per print
Black Friday Discount: an additional 20% off
#black friday#print shop#dragon#illustration#art#baby dragon#sorry I don't usually make these many ads#after black friday it'll stop#Promise🤭#all of our prints are homemade btw#and printed on fine art paper with 6 inks#so the colors really pop <3#we try to focus on quality a lot! :)
102 notes
·
View notes
Last Seen Blogs