#dk inc

Text

my favourite streamer and musician
13 notes
·
View notes
Text


AMERICAN HARDCORE AT ITS MOST SACRILEGIOUS -- THE REAGAN YEARS HAD ARRIVED.
PIC(S) INFO: Spotlight on a promotional concert poster for American hardcore punk band DEAD KENNEDYS, performing live at Bond International Casino on April 26 and 29, 1981 (supported by SIRENS and BAD BRAINS supporting respectively). Poster artwork by Winston Smith.
PIC #2: Spotlight on a DKs "In God We Trust, Inc." (1981) record poster promoting their then newly released 12 inch EP, released under Alternative Tentacles in the US, and Statik Records in the UK.
Resolution at 1808x2765 & 600x1686.
Sources: https://punkrockposters.net/dead-kennedys-in-god-we-trust-1981 & Wikimedia.
#DEAD KENNEDYS#DEAD KENNEDYS 1981#80s hardcore punk#Hardcore punk#80s#80s hardcore#Poster Art#Concert poster#DEAD KENNEDYS In God We Trust Inc.#In God We Trust Inc. 1981#DKs#1980s#In God We Trust Inc. 1981 EP#80s punk#Punk rock#1981#In God We Trust Inc.#Bond International Casino#Punk gigs#Winston Smith#Winston Smith Art#American hardcore punk#Poster#NYC#Record poster#American hardcore#In God We Trust Inc. 12 inch EP#12 inch EP
4 notes
·
View notes
Text
aight so do we think that one riff in six million germans is the same as the one from tweet-tweet on purpose or
#abraham inc shakes hands with dkpb#i mean i wouldn’t put it past dk to have done that as a nod to tweet tweet knowing the#musical significance of abraham inc#as a step between genres
2 notes
·
View notes
Text
"Evil Alice and the Borzoi" by DK Coutant
Trouble in paradise
#books #bookreview #reading #readerviews
Evil Alice and the Borzoi
DK CoutantThe Wild Rose Press, Inc.ISBN: 978-1509245918Reviewed by Stephanie Elizabeth Long for Reader Views (12/2023)
The community of Hilo, Hawaii, is grieving after the lifeless body of island native Alice (Ali) Bacunawa is recovered from the water. The police are quick to pin the murder on the deceased’s boyfriend, Kai, but Cleo Cooper and the rest of Kai’s friends…

View On WordPress
#A Cleo Cooper Mystery#Book Review#DK Coutant#Evil Alice and the Borzoi#Reader Views#The Wild Rose Press Inc
0 notes
Text
FROM TWO WORLDS
profile one : cuties gathering (minus YN)


kang yn: 21, decelis transfer, english major, lives with her parents, works at teatime with sunoo, bffs with sohee and jungwon since childhood, loves cats … like Loves, fan of SEVENTEEN WONWOO. (fc giselle from aespa)
wonucat: yn’s priv. she is here a lot. it’s kinda scary


lee sohee: 21, business major, intern at Lee Corp, bffs with yn and jungwon since childhood, has the biggest crush on yn and everyone knows,,, literally EVERYONE, does not play about yn, thinks yn can do no wrong, only cares about yn … and SEVENTEEN DK
yang jungwon: 20, english major, bffs with yn and sohee since childhood, looks up to yn a lot, also friends with sunoo and is (the) reason why yn got hired at teatime, always free to hang out because he’s unemployed … (pls get a job - sohee), fan of SEVENTEEN DK
kim minju: 22, photography major, intern at Park Inc, yns gf wife soulmate everything, is the designated picture friend and always has a digicam on her when she goes out, fan of SEVENTEEN DK

masterlist ⋆ next
adie yaps : i rlly hope u guys get my cuties gathering joke bc like double meaning yk they’re all cuties and they’re gathering bc they’re a group BUT THEYRE ALSO DK STANS 🤯🤯🤯🤯 anyways that one is for my fellow carats out there … ALSOOOO first smau im so excited i hope u guys r too!!
#from two worlds 🌓#enhypen x reader#enhypen smau#enhypen au#enhypen smut#lee heeseung x reader#lee heeseung smut#lee heeseung smau#heeseung x reader#heeseung smut#heeseung smau#park sunghoon x reader#park sunghoon#park sunghoon smut#park sunghoon smau#sunghoon x reader#sunghoon smut#sunghoon smau#enhypen social media au
35 notes
·
View notes
Text
Some of my current EBAY Auctions
Hi everybody! Hope you're staying warm as the holiday season arrives. As many of you know, I've been dealing with some incredibly difficult hardships over the last few months and one thing I've been doing to help alleviate it and help make rent and bills is selling my collection of toys and other things on Ebay. I currently have several dozen auctions listed, and here are a few highlights you might be interested in:
I'm letting go of the last part of my MONSTER IN MY POCKET collection, and that means a collected lot of the giant MONSTER MOUNTAIN with its original box, a complete 48-figure Series 1 collection AND the Nintendo NES video game, complete with its original box, manual and exclusive monster!
A sorta-still-sealed 1990 WWF outdoor activity pack, with frisbee, yo-yo, kites and more! I have a DISNEY edition of one of these up for auction now as well!
A large lot of childrens books based on the Masters of the Universe series! Golden Books, coloring books and more!
My huge Batman and DC merchandise collection. TONS of BATMAN 1989 items, many still sealed, as well as the later '90s films and other DC toys and items!
A collection of 16 Imaginext dinosaurs and dragons! I've tested all of them and most work! A great lot for the young dino fan in your house!
Over 40 Cartoon TV Show DVD sets, many of them out of print and going for top dollar these days. The starting price and even the Buy It Now are many hundred dollars less than the total of these on Amazon.
My DRAGONS KNIGHTS & DAGGERS collection, with several of the durable rubber beasts, tons of weapons and chariots - perfect for the He-Man collector in your life!
A great lot of sealed DC Comics' greatest superheroine action figures! Wonder Woman, Supergirl, Batgirl and more!
7 modern MEGO-style figures, sold together to help you kick-start that collection you've wanted to start!
My beloved collection of JACK KIRBY #1s from DC has to go. Sandman, Kamandi, OMAC and Demon #1s plus more!
Thanks for checking these out! And if you'd like to help me out but don't see anything among my auctions of interest, please consider donating to my GoFundMe. Thank you again, have a wonderful holiday!!!
#toys#ebay#monster in my pocket#nintendo#wwe#hulk hogan#ultimate warrior#he-man#masters of the universe#batman#dc comics#imaginext#dinosaurs#saturday morning cartoons#imperial toys#mego#wonder woman#batgirl#supergirl#jack kirby#comic books#action figures#wwf#wrestling#kites#dragons#matchbox#mattel#dvd#dvd collection
23 notes
·
View notes
Text

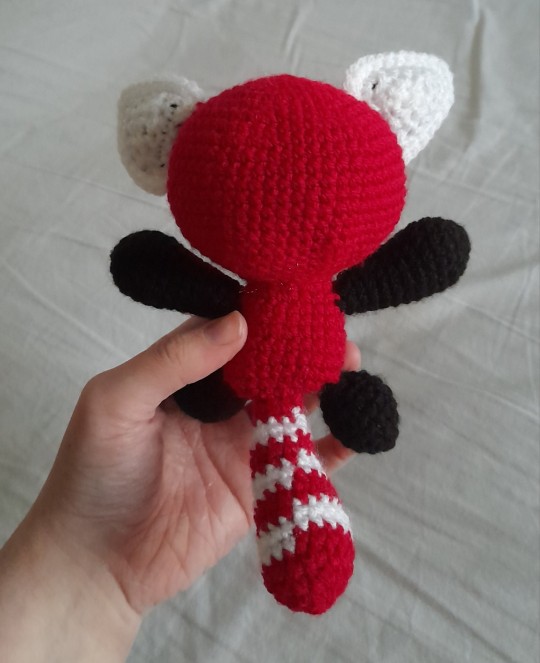
Red Panda free crochet pattern
Ravelry link -- free pdf download
My red panda pattern is no-sew and its parts are attached with single crochets. This written pattern contains photos.
Made with DK yarn and a 3.5mm hook, but can be made with any size yarn and appropriate hook.
Pattern also under the cut:
YOU WILL NEED:
DK yarn in the following colours:
- red/orange (less than half a ball/50g/150m)
- black (less than 25g)
- white (less than 25g)
3.5mm crochet hook
Stuffing
Scissors
OPTIONAL:
Stitch markers (or scraps of yarn) to mark the start of each round
If you don't like the no-sew yarn eyes, safety eyes or buttons
If desired, a darning needle for hiding yarn ends
TECHNIQUES USED:
Single crochets, increases, decreases
Single crochet through two pieces
Colour changes
The loose parts are made first, before the head and body, so that we can sc them together later.
EARS
Middle ears x2 (black)
1. Chain 6. Turn.
2. Skip 1 chain. 3sc, dec. Chain 1 and turn.
3. 2sc, dec. Chain 1 and turn.
4. 1sc, dec. Chain 1 and turn.
5. Dec. Finish off. No need to hide the ends yet.
Outer ears x2 (white)
1. Chain 6. Turn.
2. Skip 1 chain. 3sc, dec. Chain 1 and turn.
3. 2sc, dec. Chain 1 and turn.
4. 1sc, dec. Chain 1 and turn.
5. Dec. Don't break the yarn.
During the next couple rows, hide the yarn tails inside as you go, or leave them hanging and hook them inside later.
6. Line up a black triangle behind your white traingle and go into both of them. Sc them together around the whole triangle and put 3sc into every corner.
7. Sc around again just into the white stitches, putting 3sc into every corner. Finish off and pull the yarn ends inside with your hook.
You may notice there is no given stitch number. This is because it depends on how you sc around. When you get to it, continue the pattern of attaching the ears to the head onwards if you have more than 7 stitches between the corners.
EYES (black)
(Alternatively, use safety eyes, embroidery, buttons, etc.)
1. 4sc into a magic ring [4]
Tighten ring, slip stitch and finish off.
Note: knotting the yarn tails together will keep the slip stitch from loosening.
MUZZLE (start in black, have white nearby)
1. in black, 6sc into a magic ring [6]
2. in white, (inc x2, sc) x2 [10]
3. (inc x4, sc) x2 [18]
4. sc around [18]
ARMS x2 (black)
1. 6sc into a magic ring [6]
2. inc x6 [12]
3. (1sc, inc) x6 [18]
4-5. sc around (2 rounds) [18]
6. (4sc, 1dec) x3 [15]
7. sc around [15]
8. (3sc, 1dec) x3 [12]
9. sc around [12]
10. (2sc, 1dec) [9]
11-12. sc around (2 rounds) [9]
Finish off and tuck/fasten the ends inside. Stuff.
LEGS x2 (black)
1. 6sc into a magic ring [6]
2. inc x6 [12]
3. (1sc, inc) x6 [18]
4-5. sc around (2 rounds) [18]
6. (1sc, 1dec) x6 [12]
7. (2sc, 1dec) x3 [9]
8. sc around [9]
Finish off and tuck/fasten the ends inside. Stuff.
TAIL (start in red, have white nearby)
1. in red, 6sc into a magic ring [6]
2. inc x6 [12]
3. (1sc, inc) x6 [18]
4. sc around [18]
5-6. in white, sc around (2 rounds) [18]
7. in red, sc around [18]
8. (4sc, dec) x3 [15]
9. in white, sc around [15]
10. (3sc, dec) x3 [12]
11-12. in red, sc around (2 rounds) [12]
13. in white, sc around [12]
14. (2sc, dec) x3 [9]
15. in red, sc around [9]
Stuff
16. (1sc, dec) x3 [6]
Finish off and tuck/fasten end inside.
HEAD AND BODY (start in red, have white nearby)
1. 6sc into a magic ring [6]
2. inc x6 [12]
3. (1sc, inc) x6 [18]
4. 1sc, inc, (2sc, inc) x5, 1sc [24]
5. (3sc, inc) x6 [30]
6. 2sc, inc, (4sc, inc) x5, 2sc [36]
The next round will begin connecting the ears to the body along one edge of each ear. Skip the stitch right on the corner and begin with the next stitch. Ensure ears are facing inwards (first ear faces away from start of round, second ear faces opposite way). Don't worry if they twist around after the first stitch, after 2 or 3 rows they should hold straight.
7. 5sc, inc, 1sc through an ear and the body, 4sc, inc, 5sc, inc, 2sc, 1sc through an ear and the body, 2sc, inc, (5sc, inc) x2 [42]
Careful not to accidentally skip stitches while attaching parts, it can be hard to see the head stitch after you put your hook in the ear stitch. Count the stitch number after each round if you're unsure.
8. 3sc, inc, 3sc, 1sc though ear and body, 2sc, inc, 6sc, inc, 5sc, 1sc through ear and body, inc, (6sc, inc) x2, 3sc [48]
9. 7sc, inc, 1sc through ear and body, 6sc, inc, 7sc, inc, 2sc, 1sc through ear and body, 4sc, inc, (7sc, inc) x2 [54]
10-12. 9sc, 1sc through ear and body, 19sc, 1sc through ear and body, 24sc (3 rounds) [54]
13. 9sc, 1sc through ear and body, 3sc, change to white and 3sc, in red 7sc, in white 3sc, in red 3sc, 1sc through ear and body, 24sc [54]
Ears should now be completed. Remember to leave the corner stitches unworked. If you have more or fewer ear stitches, no matter. Keep attaching them in a straight line until they are connected enough.
14. 12sc, in white 3sc, in red 9sc, in white 3sc, in red 27sc [54]
The next round connects the eyes, if you're opting for yarn ones. They may be fiddly due to their size. If you're sewing/snapping on alternate eyes, replace every connecting sc with a regular sc.
15. 11sc, in white 3sc, in red 1sc, 2 stitches through an eye and the body, 5sc, 2 stitches through an eye and the body, 1sc, in white 3sc, in red 26sc [54]
16. 10sc, in white 3sc, in red 2sc, 2 stitches through eye and body, 5sc, 2 stitches through eye and body, 2sc, in white 3sc, in red 25sc [54]
Pick 5 stitches across the top of the muzzle and mark them. The muzzle is slightly wider than it is tall.
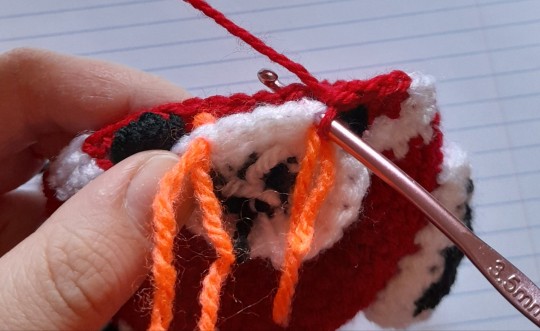

When you come to it, place the muzzle wrong-side-out against the body and sc along the marked stitches, as the photo depicts.
17. 10sc, in white 3sc, in red 4sc, 5sc through both muzzle and body, 4sc, in white 3sc, in red 25sc [54]
18. 3sc, dec, 5sc, in white 1sc, dec, in red 2sc, 2sc through muzzle and body, 5sc, 2sc through both muzzle and body, 2sc, in white dec, 1sc, in red 5sc, dec, 6sc, dec, 5sc, dec, 3sc [48]
19. 3sc, dec, 4sc, in white 2sc, in red dec, 9sc (no muzzle stitches), dec, in white 2sc, in red 4sc, dec, (5sc, dec) x2, 2sc [42]
20. 3sc, dec, 3sc, in white 1sc, in red dec, 2sc through muzzle and body, 5sc, 2sc through muzzle and body, dec, in white 1sc, in red 3sc, dec, 4sc, dec, 5sc, dec, 1sc [36]
You have now finished the white stitches. You can cut and secure your white yarn.
21. dec, 3sc, dec, 4sc. Stuff muzzle a little. 5sc through muzzle and body to complete it. 4sc, dec, 3sc, dec, 2sc, dec, 1sc, dec, 2sc [30]
22. (3sc, dec) x6 [24]
23. 1sc, dec, (2sc, dec) x5, 1sc [18]
Stuff the head.
24. (1sc, dec) x6 [12]
25. inc x12 [24]
26. 3sc, 5sc through an arm and the body, 6sc, 5sc through an arm and the body, 5sc [24]
27. 4sc, 4sc through arm and body, 7sc, 4sc through arm and body, 5sc [24]
28. (3sc, 1inc) x6 [30]
29-31. sc around (3 rounds) [30]
32. 4sc, 5sc through a leg and the body, dec x5, 5sc through a leg and the body, 4sc, dec [24]
The next round will begin attaching the tail. Angle the tail so its jog is hidden from your preferred angle.
33. sc, dec x2, 4sc through leg and body, dec, sc, dec, 4sc through leg and body, dec x2, 2sc through the tail and the body [18]
Stuff the body.
34. sc through tail and body, dec, (1sc, dec) x4, sc, 2sc through tail and body [13]
35. sc through tail and body, dec x6 [7]
Finish off. Use your hook to pull the yarn through the front loops, pull to cinch and hide the end inside.


9 notes
·
View notes
Text

DK
"Never Again" means "Stand with Israel".
Donate for Magen David Adom:
https://www.mdais.org/en/donation
Donate for מתנדבי איחוד הצלה תל אביב - יפו:
https://israelrescue.org/campaign/israel-under-attack/
Donate for „Giving Back Foundation“ (Help Israeli Soldiers Return Home):
https://secure.givelively.org/donate/the-giving-back-fund-inc/help-israeli-soldiers-return-home
Donate for „Friends of IDF“:
https://www.fidf.org
Donate for „Jewish Agency for Israel“:
https://www.jafina.org/crisis-in-israel/?fbclid=IwAR3U1hTjAOQgmUJRkNSR_b7-1b7425W2FJa39hx-FgE-kkhVAX3I9gl3heA
Donate for Pizza IDF:
https://www.pizzaidf.org/shop?fbclid=IwAR3EzgyiazJw6F2NYnXtXbZsWEnJezEjFojUOEnsroRS3xKU47CZp-c0-cU
11 notes
·
View notes
Text
I AM TRYING TO IDENTIFY A MEME MASHUP FROM 2018 (or earlier)
aka the mreligion_set01 post
in 2018 someone i knew sent me a song someone they knew made. it was a 12 minute long meme mashup and it was really impressive. ive had this file on my computer for 5 years and ive listened to it so much but the problem is that i have no idea who the fuck made it or whether it's ever been posted online anywhere. i may very well be one of the only people thats ever heard this song. PLEASE try and help me identify it.
unfortunately. i am NOT going to post it here. because it is not mine and i cannot properly give credit. HOWEVER i am going to post a TRACKLIST because it is a distinctive tracklist that will help in identifying it.
this thing is 12 minutes 10 seconds, or maybe 12 minutes and 9 seconds. it's MAYBE associated with siivagunner somehow because it has siivagunner memes in it. i dont know all the songs in it but i listed the majority of them
track list IN ORDER below the cut (sorry for inserting opinions into it i just really like this mashup)
snow halation
casin by glue70 (reposted in the wrong neighborhood)
we are number one
all star
boulevard of broken dreams
gary come home from spongebob
shelter porter robinson
accidentally in love from shrek 2
679 by fetty wap
closer chainsmokers
in the air tonight
witchcraft by pendulum
live and learn
numb linkin park
one week barenaked ladies
zedd clarity
Vagrant Counting Song of Retrospection from Kirby Planet Robobot (THIS SONG IS THE BASE FOR SIIVAGUNNER REBOOTED)
ocean man
take on me
blurred lines by robin thicke
welcome to the black parade
the man by aloe blacc
smooth
we are number one
bonetrousle
purple lamborghini from suicide squad
[this bridge dates this song heavily]
waters of nazareth
chip da ripper freestyle with interior crocodile alligator
sample of joel saying "GRAND DAD. FLEENTSTONES?"
dk rap
down with the sickness
ghostbusters
crank that soulja boy
gangnam style
i play pokemon go every day (pg song for kids) by misha
the nutshack
[end of bridge]
reeses puffs rap (on top of waters of nazareth)
let the bodies hit the floor
cruel angel's thesis
uptown funk
YMCA village people
wild wild west will smith
rhythm heaven ringside (POSEA FOR THE FANS)
tunak tunak tun
kahoot theme
gentleman psy
pen pineapple apple pen
feel good inc gorillaz
nutshack theme
boombastic by shaggy
panda
swimming pools drank by kendrick lamar
forever by drake et al
goodbye to a world porter robinson
[editors note. this part of this mashup is really fucking good. i need to find out who made this shit because it rules so hard]
shooting stars bag raiders,
snow halation,
carry on my wayward son.
21 guns green day
lord of the game death grips
ignition remix r kelly
cinema (skrillex or whoever)
i dont care charli xcx
scatman
CAAAAAAARRY OOOOOONNN of welcome to the black parade
TAAAAAAKE ONNNNN MEEEEEEE
space oddity by davie bowie
through the fire and flames dragonforce
king of carrot flowers part 2 by neutral milk hotel
spider-man 2 pizza theme
mamma mia abba
[reprise of a bunch of songs from the intro <3<3<3]
fireflies by owl city
NOTABLE: THIS MASHUP DOES NOT HAVE MEGALOVANIA IN IT
&so with that i say please find this mashup and send it to me and listen to it
#this post might b a little silly but thats ok#a511ff#mashup#siivagunner#silvagunner#<-people in these tags will be more likely to know how to look for this shit
32 notes
·
View notes
Text
sometimes I get a little emotional thinking about the history of cgi. Like, when John Lasseter saw Tron he had a nerd moment and wanted to make an entire movie like that... which ended up becoming Toy Story! Sad he had to be a creep and ruin his entire career, but apart from that I relate to that.
When I saw things like Monsters Inc and Dinosaur I wanted to do it too but it was all too complicated back then. My uncle let me play around in Sketchup but that went nowhere.
Also, Donkey Kong Country. My first introduction to pre-rendered graphics. The fact they had to model everything and THEN go over on a piece of paper and use painstaking pixel art to convert it for SNES. Thank goodness it worked out and DKC became one of the best selling games on the SNES.
I highly recommend checking out Kev Bayliss' videos on CGI art, he's a great guy and does super interesting videos about the history of his work. He did all these renders AND designed the modern DK design at Rare when he was 19, afaik. NINETEEN. Absolute madlad. I hope to meet him someday. His DK design only ever got minimal changes over the years - he got bulked up a bit and.... recently gained an actual nose, for some reason. Imagine that!
Blender before 2.8 was a hot mess and only tech nerds knew how to work it. Thankfully, that's different now.
I'm SO thankful for Blender. The fact it's free and open source and does about everything Maya does, some things even better (hello, painting straight on the model?) so now anyone can pick it up and get into 3d modelling. Yeah, it takes a while to get into it, but when you do it's so rewarding. CGI is my baby. Ton Roosendaal is my hero.
3 notes
·
View notes
Text

Scene I did my OCs in my AU, for their designs and anything, I thought it would be fair if each of the Mario Characters a redesign in my version. Some I design them will be the same but change it up a little bit.
Bio: Toads sister "Toadette", Was yet a determined type of Female Toad was a huge fan of the Mario through out his adventure and started making a story that is called Paper Mario Which ends up being a huge success so she decided to stay up Day and Night making more Paper Mario story's as well as making the Mario being put on the spotlight. Toadette was then introduced to The Mario Bros, She was extend about that. She made a special book whic resembles everything Paper Mario related and Mario themed adventure related. She was a veluded help for her allies, especially when Luigi founds and accidently opens the Magical Paper Mario Books Series everywhere around the Mushroom Kingdom. Mario and Luigi teams up with Paper Mario to Stop Bowser and Paper Bowser. Toadette deiced to help out by making a giant cardboard depicters.
About a year later, when She meets Mara, Make new friends and started dating Buken Berry, She was a helping hand to a new age of the Mushroom World especially siding a group called The Mushroom League.
Appearance: A Tied Red Coat, A Pink Dress with White Spots, A Black Belt and Actual Pink Hair.
Voice Actor: Jessica DiCicco
Age: 22
Height: 4.1 incs
Weight: 80 ibs
Personality: Happy, Creative and Upbeat girl
Favorite Foods: Ice Cream
Family: Unknown and Toad *Older Brother*
Allies: The Mario Bros and Sis, Princess Peach, Wario Bros, Princess Daisy and Rosalina, Krunch Kremling, DK Clan, Mushroom Kingdom and Different Kingdoms
Enemies: Bowser and The Koopa Empire, The Kremlings, King Boo and his army
Likes: Making Paper Mario Books, Joining on Adventures, Parties, Go Karts and Leadership
Dislikes: Her work ruined, Her plans didn’t go to plan and being embarrassed in front of everyone.
2 notes
·
View notes
Text


THE KIWIS NEVER KNEW WHAT HIT THEM -- SOME OF THE FASTEST IMPORTED HARDCORE ON NZ SHORES.
PIC(S) INFO: Spotlight on the "In God we Trust, Inc. 12 inch EP by American hardcore punk band DEAD KENNEDYS, jointly released in 1982 under the Stunn/EMI labels. This is the New Zealand first pressing manufactured and distributed by EMI Records Ltd for Stunn records. A very rare and reportedly one of the hardest world wide records to find.
Source: www.picuki.com/media/3243237276830231308.
#DEAD KENNEDYS#DEAD KENNEDYS 1981#80s punk#In God We Trust Inc. 1981 EP#DEAD KENNEDYS In God We Trust Inc.#80s hardcore punk#DKs#80s hardcore#Hardcore punk#American hardcore#American hardcore punk#Punk Vinyl#Vinyl#New Zealand#Stunn Records#DEAD KENNEDYS In God We Trust Inc. EP#Winston Smith#Winston Smith Art#Records#In God We Trust Inc. 1981#In God We Trust Inc. EP#12 inch EP#In God We Trust Inc.#1981#Punk rock#Alternative Tentacles#Sleeve Art#80s#In God We Trust Inc. 12 inch EP#1980s
2 notes
·
View notes
Text
A FINDING NEMO Memory or Two
FINDING NEMO was one of the first films I actually really anticipated a long while before its release.
As a kid, I would often start anticipating movies once I saw a trailer in theaters during one of my frequent movie theater visits, and then that would be it. Whenever I was on the Internet, I wasn't frequenting movie news sites or anything like that. If anything, the release of FINDING NEMO had me going on those sites more often to see what was coming. What the news was...
I first saw concept art for FINDING NEMO in a DK-published hardcover book called DISNEY: THE ULTIMATE VISUAL GUIDE. I had gotten it as a birthday gift in October 2002. I was immersed into that book, a chronological tour through Disney feature film and even park history, throwing in television stuff as well. The page spreads so inviting, and so many great images and stills from the movies, made for really well put-together arrangements. My well worn-out copy is still with me.
The final page spread detailed movies then slated for 2003 and 2004... Only concept art for FINDING NEMO appeared, no stills from the actual movie. The images depicted were Nemo peaking out from behind a coral, Marlin and Dory looking at Sydney Opera House, and a long stretch of Nemo inside the dentist office fish tank. These images completely engrossed me. Just this colorful fish movie, incoming: I always had a thing for the underwater world anyways, between the many animal books I had as a kid to the nature documentaries I'd often see on like Animal Planet, Discovery Channel and such. I was taken to two big aquariums in home state every year or so, and was always fascinated and mesmerized by all those tanks, all that aquatic life. I had PC games about it, and there was also - semi-related - that Titanic phase I went through... The ocean, the sea, it's all very neat.
(As an add-on, the other movies on that page spread were PIGLET'S BIG MOVIE, THE JUNGLE BOOK 2, HOME ON THE RANGE, and BROTHER BEAR back when it was called "BEARS".)
Then, I got MONSTERS, INC. on DVD for Christmas... And when I saw that a teaser trailer for the movie was ON THERE?? I watched it over and over, along with just about everything else on that 2-disc DVD set...
I was all about FINDING NEMO, and I caught it on opening weekend... and loved it so much, I saw it two more times in theaters, which is something I rarely got to do as a kid back in the day. Then I was somehow able to rent it the Friday before its Tuesday DVD release. Rented it, over and over, til I got the DVD and VHS for Christmas. At the time, I didn't have a DVD player in my room, it was only in the family room and my mum's room... So the VHS sufficed, despite no bonus features! In early 2004, after winning a $200 gift card to Circuit City (lol, remember that? No? You might be a young'un reading this!) from a spelling bee, I bought an extension for my Xbox - which I also got for Christmas - that allowed me to play DVDs in my room. Yes, we kids/preteens of the early 2000s had it rough, haha.
On a personal note, this movie came out when my life was in a weird flux, and I was in a part of growing older that didn't go so smoothly. Not to divulge too much, but when you're autistic, neurodivergent, and you're coming of age in the early aughts... Not the nicest time, for sure... Yeah, things weren't easy... And at the end of the year, when the movie was finally out on DVD, I was going through a very big family loss. My first one, really... So, I really gotta hand it to FINDING NEMO for being one of the things that really helped get me through all of it... Just keep swimming, indeed...
Similarly, director Andrew Stanton's sophomore Pixar effort, WALL-E, got me through another tough time in my younger days...
I would say FINDING NEMO and MONSTERS, INC. made me fall in love with the work coming out of Pixar, especially in those early days when it was the movies being made exclusively by the Lasseter circle. As a little kid, I wasn't really that much into the TOY STORY movies, but I did like A BUG'S LIFE and played the PlayStation game quite a bit. MONSTERS, INC. I remember being a blur in the theaters for other reasons... But I asked for MONSTERS, INC. on video the year after because I did remember enjoying the door vault chase, so that was enough to make me want the disc and to watch it again. I got the DVD that Christmas, and as said earlier, I think the combination of that film, the FINDING NEMO teaser and the NEMO concept art in the DISNEY: THE ULTIMATE VISUAL GUIDE book turned me into a cultist for the Luxo lamp in December 2002, haha.
Then I went back to TOY STORY and TOY STORY 2, which I had on VHS, and gave those a proper re-watch. Now that I was 10, knew what computer animation was and how it was made, and having more of an appreciation for the way visual stories were told than I did at - say - age 6 or even 8... And I fell in love with both. Then I rented A BUG'S LIFE over and over until I was able to buy the DVD... I wanna say it was sometime in 2003, maybe early 2004, but it was the "Collector's" set DVD that promoted FINDING NEMO with a giant sticker on the shiny slipcover. Hell, if I remember correctly, I bought it at a Suncoast Motion Picture Company outlet in a mall... Back when there were more than... 4 of those across the country!
And then some 9 years later, I went and saw the 3D re-release... Surprisingly, for a movie made in 2003, it was converted wonderfully to 3D. The 3D actually added a very subtle but very immersive depth of field to many of the underwater scenes, it looked fantastic. So yes, I saw FINDING NEMO four times in theaters. I'd probably see it a fifth if it gets re-released for whatever reason, again.
It's a favorite of mine.
Hey, I once did a video essay on it, too!
youtube
Happy 20th Anniversary.
9 notes
·
View notes
Note
Goblin elf defending cringe slut mog dk isn't really the defense you want. Didn't goblin elfs ic wife have that weird fucked up inc*st family rp going on? And that's who you wanna be defended by? Hell, one of the family members had a whole r* story in their trp at one point. And thaaaat is who you got defending you? Wild.
-
4 notes
·
View notes
Last Seen Blogs

dark-moonlust
Kate Hart
dark-moonlust
Kate Hart
dark-moonlust
Kate Hart

elescritorviajanteypoetadelaruta
El escritor viajante y el poeta de la ruta

thefeet2beat2
Sole Collection