#diy skirt
Text
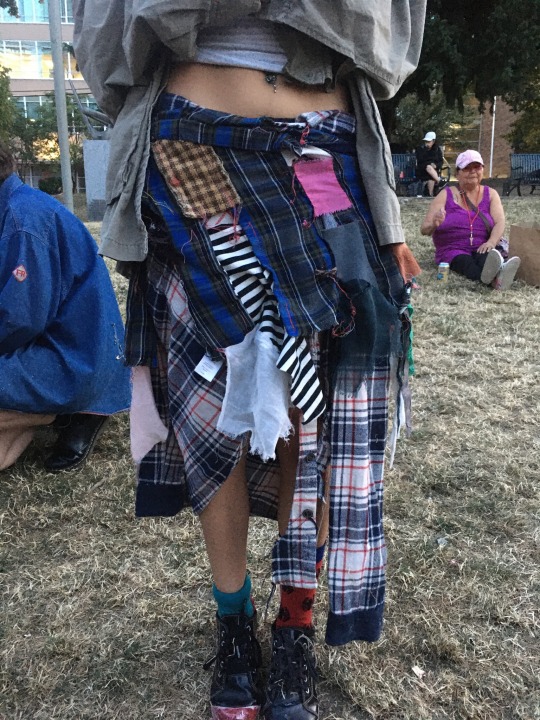
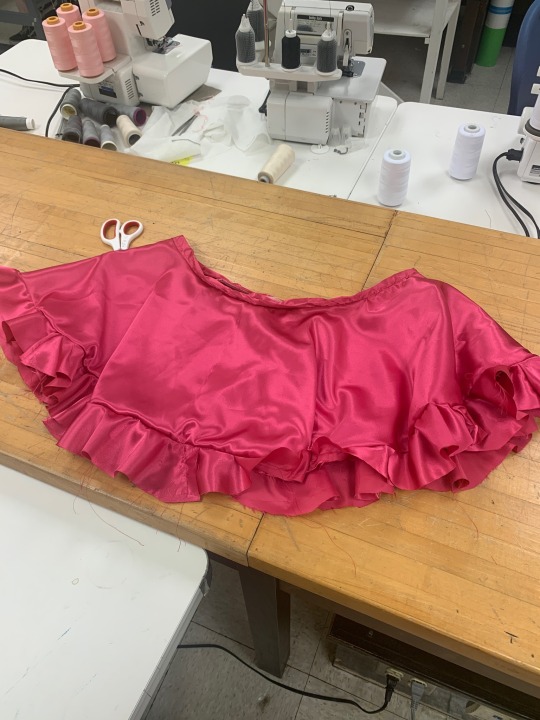
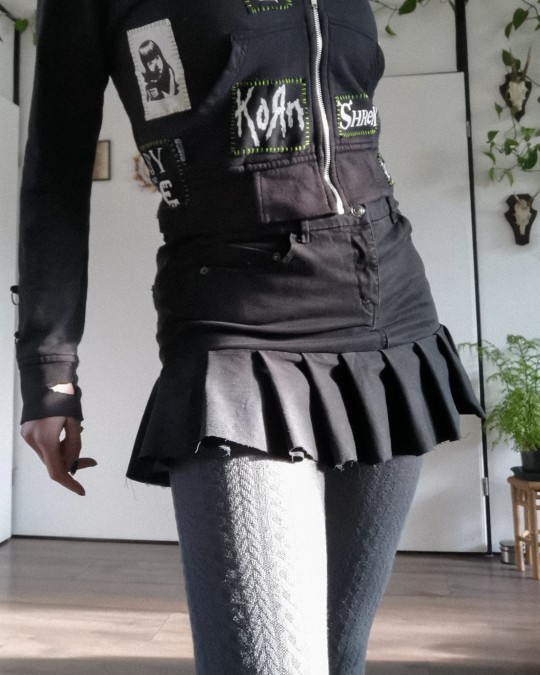
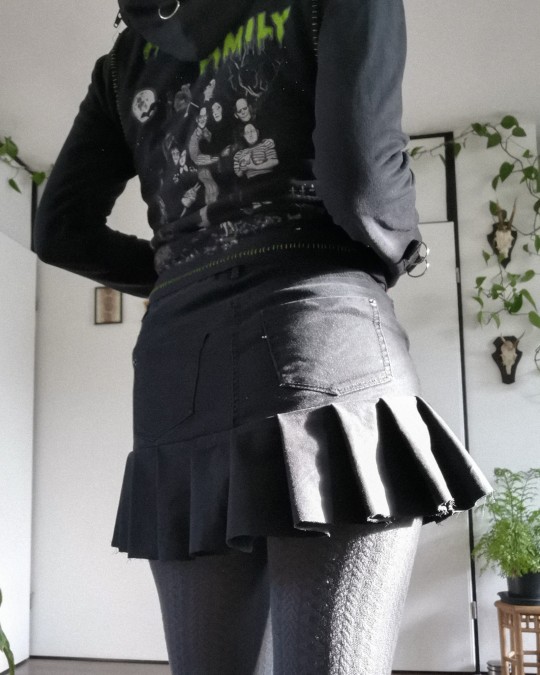
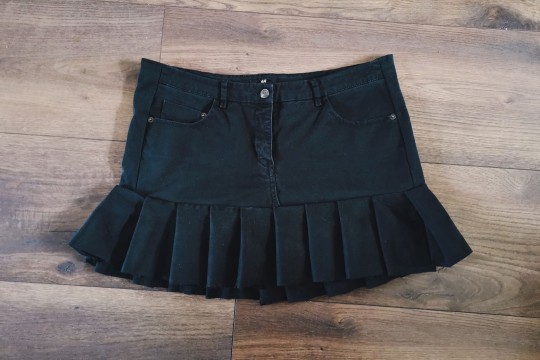
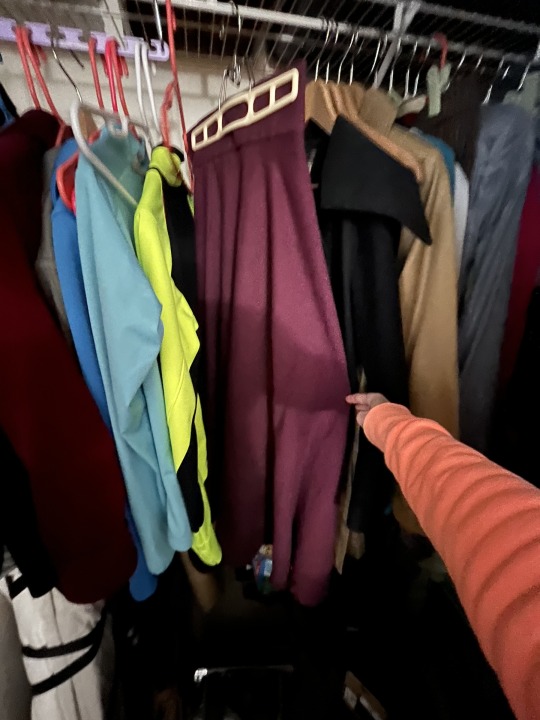
At a park punk show tonight, check out this persons cool diy skirt that they made themselves. They say it cost nothing to make!
#punk#diy#diy punk#punk diy#sewing#upcycling#punk posting#punk skirt#diy skirt#punk fashion#punk scene
858 notes
·
View notes
Text

link here
6 notes
·
View notes
Text
Made by me “Iris”
#fashion#punk#punk diy#hysteric#grunge#seditionaries#punk fashion#diy skirt#skirt#mall goth#goth#goth fashion#crust pants#crustcore#crust punk#crust skirt
44 notes
·
View notes
Text


Added some stuff to this skirt ✨ Also remembered to take a before pic this time 🫠
10 notes
·
View notes
Text
youtube
Watch how I took a vintage maxidress from frumpy to fabulous & created 3 awesome DIYs from it! ✂️♻️
#refashionista sheri#refashionista#thrift flip#dress refashion#make pants bigger#upsize#diy skirt#refashion#sustainable fashion#upcycled clothing#sew#reuse#upcycle#Youtube
2 notes
·
View notes
Text

#goth gf#adult model#alt model#model#ootd#feelin cute#feelin myself#emo chick#pale goth#crop top#diy#diy skirt#diy croptop#i made this#punk girl#goth look
10 notes
·
View notes
Text
K so I'm gonna be making my
Little cousin a skirt as a gift since she's 7 now I have floral patters, yellow colors
And solid colors what should I use as a fabric???
0 notes
Text
Hi everyone 😊👋🏾 just wanna show y’all something y’all my own custom made skirt that I now finished making; and while it’s not the same length for Mattie’s outfit, I’ll still utilize it whenever I can 😊💗🧵
1 note
·
View note
Text

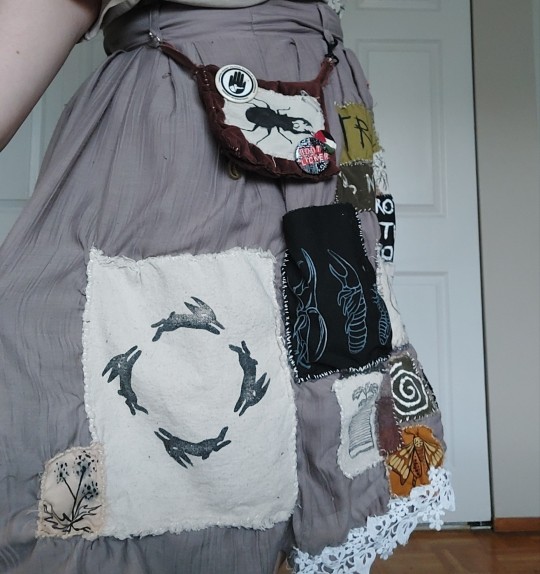
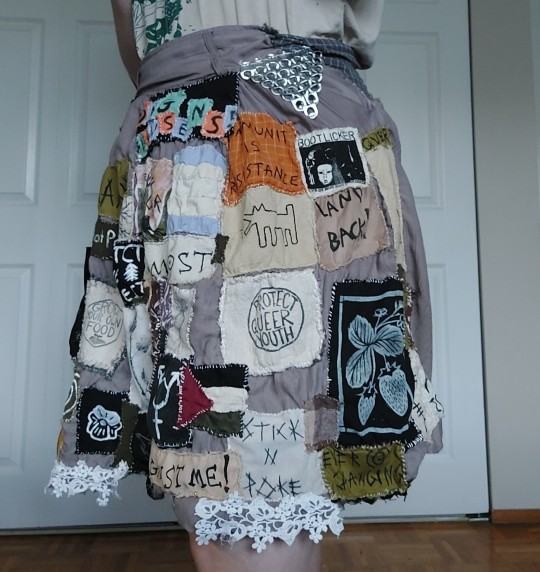
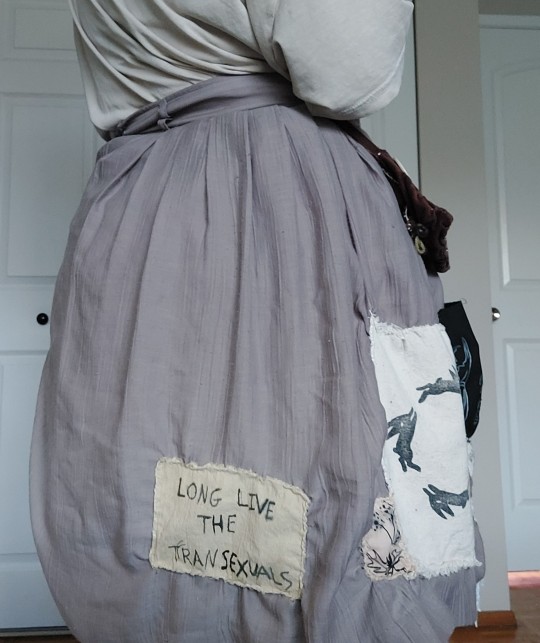
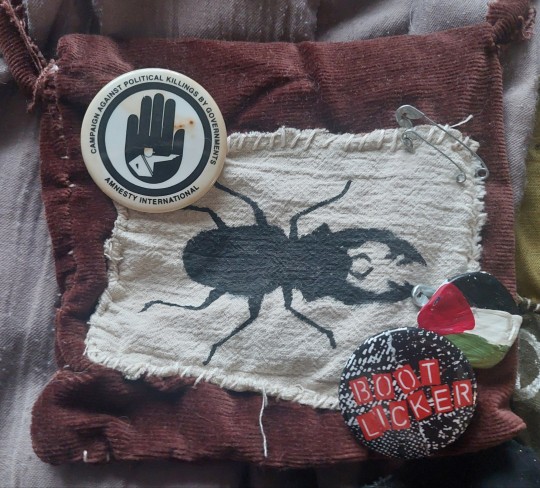
my patch skirt! a hefty boy. ive been working on this for over two years now!! most of the patches are handmade, and the little brown pouch with the beetle is handsewn as well.
1K notes
·
View notes
Text
How to start a pair of punk patch pants
(a potentially really shitty tutorial)
I've seen a couple videos on this but a lot of them seem to skip out on some really key information and tricks so I thought I'd just write a probably really long and really rambly post about it!!!
Step one: gathering supplies
In terms of supplies the main things you'll need are:
The pants
Approximately 4 rolls of dental floss (this can change depending on number of patches and your pant size)
A needle with a big enough eye to fit the floss through
Acrylic paints
Brushes
Scrap denim or other scraps of fabric for the patches
Pins
Some kind of marker or pencil that will work on the fabric you've chosen
I will be going into some detail below about why you need each of these items!!
The pants themselves
personally I prefer either using a pair of jeans I already own or thrifting a pair to be as sustainable as possible, however if you really need to go out and buy a new pair for whatever reason get a high quality pair, this will help in the long run with preventing them from falling apart as easily.
The second main point I want to make is that the pants should not be skinny jeans. This is because when you sew on patches it slightly cinches in the fabric, and with skinny jeans generally being stretchy, this is going to result in the thread of the patches stretching out and snapping. Your patches will all just start falling off and it'll ruin your hard work.
This is why I'd recommend using a pair of jeans or pants that are a bit looser of a fit, such as straight legged pants or a pair of pants a size up from your actual size if possible!
Dental floss
The reason it's generally suggested to use dental floss rather than actual thread is because dental floss tends to overall be a lot stronger than your average thread, as well as often being more easily accessible to buy.
Needle
This ones pretty self-explanatory, just make sure you get a needle with a long/wide enough eye (the hole the thread goes through) for your floss to be able to fit through without trouble.
Acrylic paints
You may be wondering why I'm suggesting acrylics over fabric paints and there are a few reasons!
The first is simply that they're both cheaper and far easier to purchase for the average person than fabric paints, and I want this tutorial to be as accessible as possible for as many people as possible.
The second reason is that fabric paints require a lot of fucking around with setting the paint, whereas acrylics can just be left to dry and be finished, and so long as your pants are hand washed, the paints won't come out (unless you layer it on super thick or are really rough when you clean them).
Brushes
Another pretty obvious one, these are needed so you can actually paint your patches!!!
Fabric/spare denim
You need fabric or scraps to be able to actually create patches for your pants, so this is essential.
Any kind of scrap fabric can do, a lot of fabric stores tend to have bins of scrap fabric that are either pre-priced or priced by weight and that can be a really good opportunity to acquire the fabric you need!
Another way (the method I tend to use) is thrifting a few pairs of jeans alongside the pair I want to patch and then ripping them up into patch-sized pieces!
Either way, I really advise against buying straight up new fabrics by the metre for this as it kinda goes against the entire idea of sustainability and reuse.
A really big tip I have for when you're cutting the fabric of your choice up for patches is to actually only cut a little slit, and then rip. This produces a really nice distressed edge and will help add some texture and more of a fucked up look to your pants a lot quicker than if you waited for the fabric to fray by itself!
Marker/pencil
This is literally just so you can draw your designs onto your patches! I've personally found that either a black or white (depending on how dark the fabric you're using is) pastel pencil is generally good enough to get the general gist of what you want down well enough for you to paint it on.
Pins
These are literally just to hold your patches in place and literally any kind from proper sewing pins to safety pins will work! (just don't forget they're in the jeans before you put them on I promise you it isn't fun to put on a pair of jeans full of pins).
Optional: a sketchbook
You may want a sketchbook or alternatively scraps of paper if you have any kind of original concept for a patch so you can draw it out a few times first to really nail it, and it's also helpful to have if you aren't as confident in your painting and drawing abilities!
Step two: patch making
I personally pre-rip/cut all of my patches before I paint anything on them generally speaking and then fit whatever design I want onto whatever piece I think it would fit on, however if you want to paint your patches and then rip/cut the design out that's also an option (and probably a much smarter one I'm just incredibly stubborn).
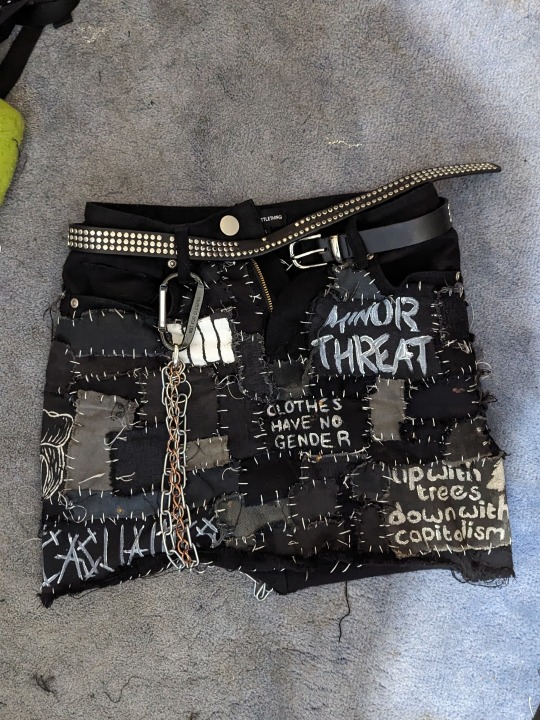
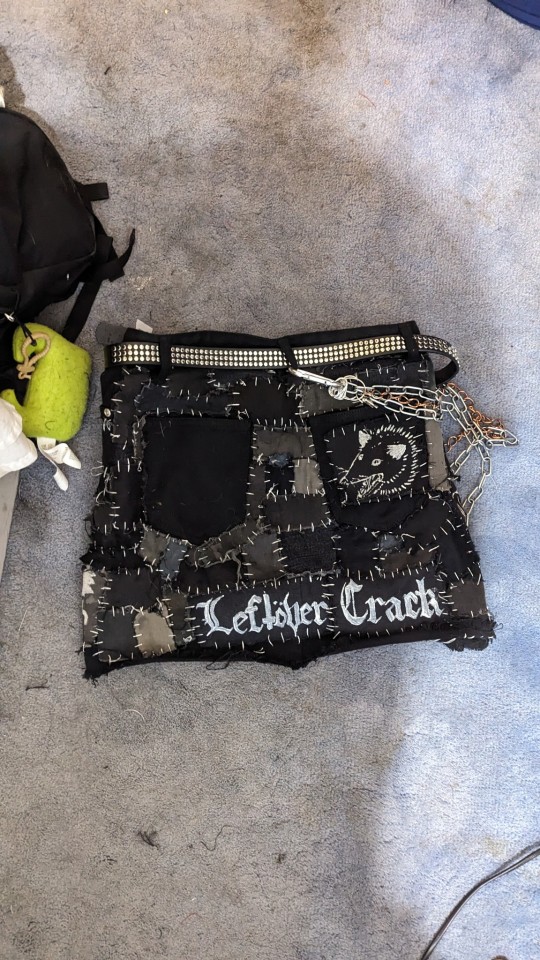
For punk pants you want a good mix of both punk bands, politics, and also maybe something a bit daft (I have the "he scream at he own ass" possum on the back pocket of a patched skirt for example). If you don't have bands and such, it kinda defeats the point of them being punk patched pants.
I personally generally pick a theme (eg. colourful patches, all black and white) when making anything patched because I think it makes everything look a bit more cohesive, but that is by no means a rule you actually have to follow I'm just autistic a fuck tbh.
Step three: the assembly
I personally put my main/bigger patches on first and put them on in a few different places until I get the placement I like, and then sew them on with the floss like this:

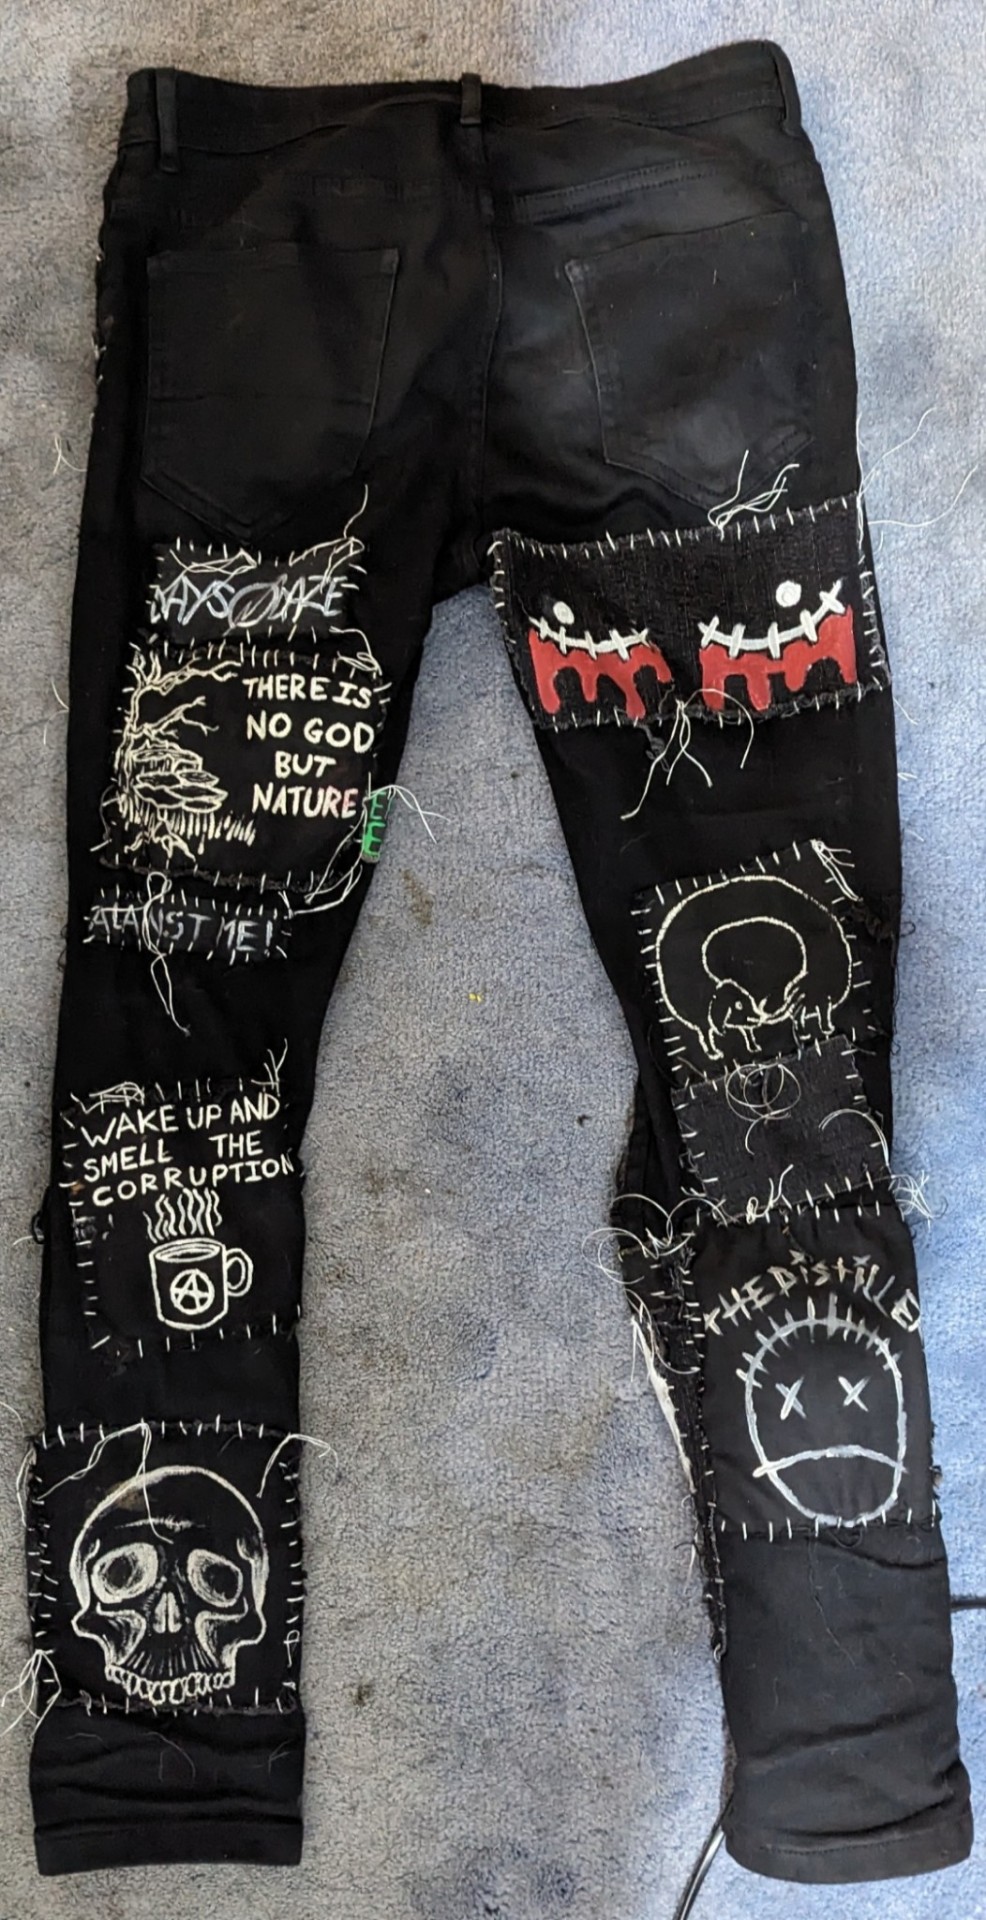
The main thing you want to do to make sure your pants don't wind up looking a bit weird or bare is to fill in any gaps between your painted patches with small, blank patches. Like this:
and that's pretty much it!!! I can't really explain via written text how to sew and how I personally tie off etc but if anyone would like a video tutorial lmk!!!
#punk#alternative#cripple punk#queer punk#diy or die#punk patches#diy punk#punk diy#patched pants#crust pants#patched skirt#punk skirt#crust skirt#punk pants#crust punk#punk style#punk fashion#punk culture
2K notes
·
View notes
Text
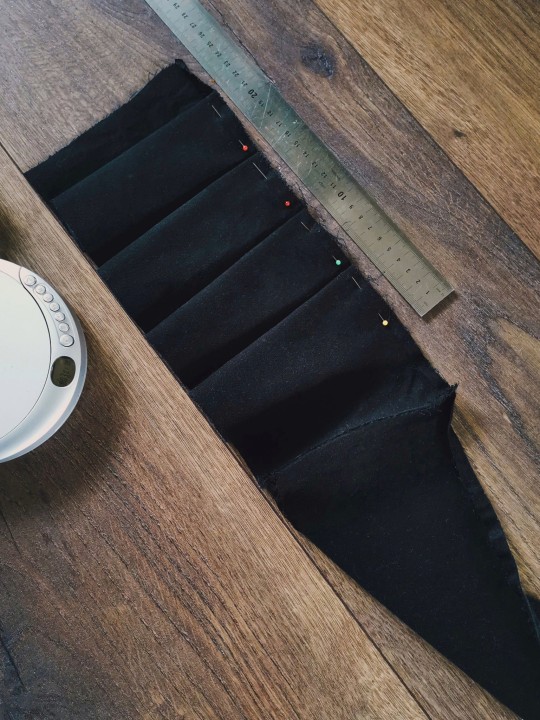
jeans to y2k/tripp inspired skirt ݁ ˖ִ ࣪✩₊ ⊹˚
I thrifted some jeans recently, not knowing if they would fit me, but buying it anyway bc 1) it was €1 and 2) if it didn't fit I could surely make something with it.
turns out it was wayyy too small 😂 so I decided it would be perfect to make one of those tripp/y2k skirts with!
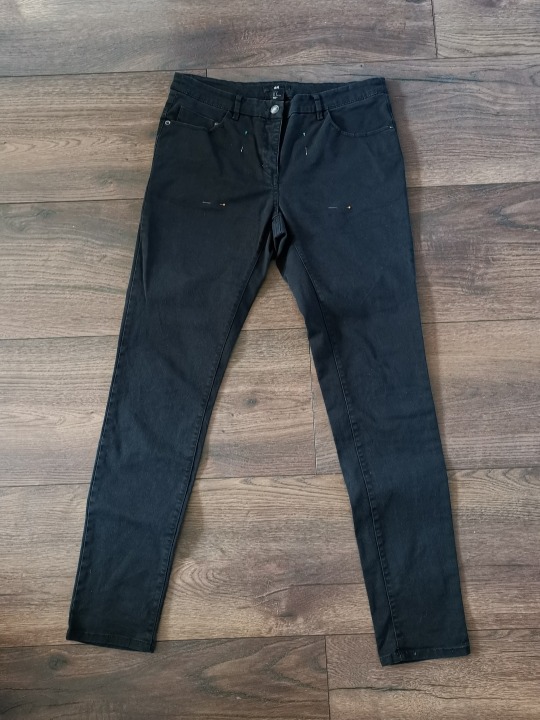

firstly I cut off the legs just above the crotch. I then tried it on, found it was too tight still, and added two strips of leftover fabric on either side. it fits perfectly now!
then I cut the remaining pant legs in even strips and connected them all to make one long strip. I folded ruffles of 5cm along the length, and sewed it in place before I sewed it onto the bottom of the skirt!
and just like that, I have a new skirt 𓆩♡𓆪 I might add some strips with d rings on it once I figure out the placement ^_^ but for now it's done
#mine#i showed it to my partner who immediately was like YOU HAVE SO MUCH TALENT#which was rly cool to hear actually#goth#alternative#diy#crafts#handmade#tripp#skirt#y2k#selfmade#tutorial? kinda???
304 notes
·
View notes
Text
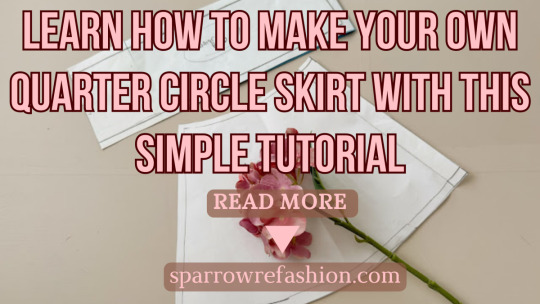
How to Sew a Quarter Circle Skirt in 3 Easy Steps ( free pattern included) beginner friendly
In this post, you’ll learn how to sew a quarter circle skirt .
A quarter circle skirt is a versatile and flattering garment that can be worn for any occasion. It has a smooth and flared shape that hugs your waist and flows around your legs. Plus, it’s very easy to make, even if you’re a beginner at sewing. You don’t need any complicated patterns or techniques, just some basic math and sewing…
View On WordPress
9 notes
·
View notes
Text
Hey guys look at the Secret Pants I made!

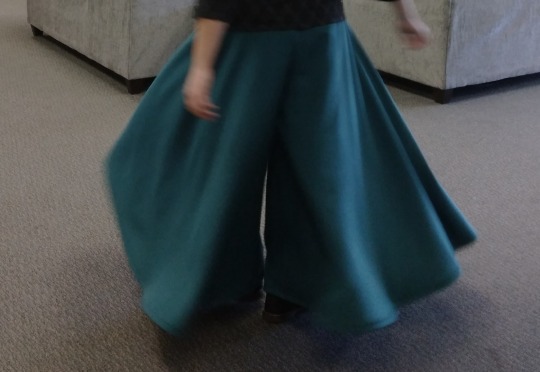

[ID: 3 pictures of me in a turquoise split skirt. When I stand still, it looks like a skirt. When I spin, you can see two different legs. In the third picture, I'm grabbing my foot and stretching it above shoulder level, showing the giant bell-shape spread of the leg. My torso and face are censored with a neon gradient box and a neon swirled circle. End ID.]
#cj sews#sewing#diy#beginner sewing#it's not waste until you waste it#solarpunk#split skirt#secret pants
254 notes
·
View notes
Text
Maomao's skirt
Since I have decided to torture myself and do a cosplay in just over a month, I figured I would start with the easier part - the skirt.
In my intro post, I mentioned that her skirt isn't Ming accurate being vaguely mamian-like but not really. For this I played with two main ideas, using one of my other skirt patterns that has pleats and would be mamian-like or go for the circle skirt.

The fabric I selected was around 2 1/3 yards - less than I'd like but it was the entire remaining bolt and the color was perfect - don't trust my indoor lighting here. With the limited amount of fabric I had to do a little tetris to decide what pattern pieces to use. I washed and dried the fabric before ironing it.
My first and preferred pattern was this one:
Simplicity #2710 - 1949
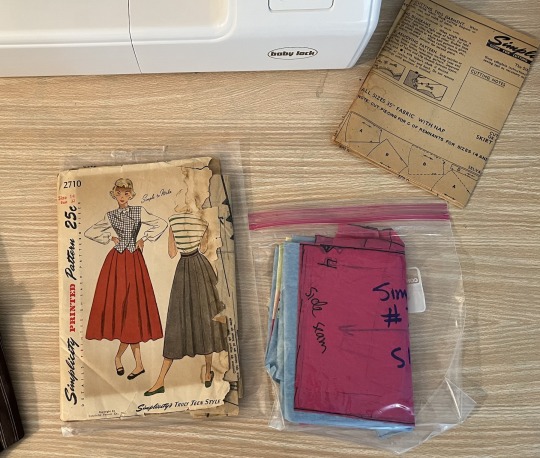
I have already made this skirt, it has thick pleats and falls nicely. I figured it might be a good selection and I'd get that extra Ming style with lazy pleating.
Circle skirt
Less complicated since all I had to do was determine my waist, put it as the circumference and make a 1/4 circle pattern with my pre-marked cutting board. The bolt was 46" from selvage to selvage meaning if I kept one strip I had more than enough for a waistband. I am currently assuming a 4" wide waistband and went with 42" for the skirt length.
Unfortunately for my original plan, the vintage Simplicity pattern was too wide with the pleating. I'd need 3 1/2 yards of fabric and my current pattern pieces were set for a length of around 36" as well to the hem.
Circle it is!
Made my pattern pieces, two so that I could see how to fit them. The fabric has a decent thickness and I didn't want to fold it over and cut, opting to instead chalk out each piece individually on the fabric.
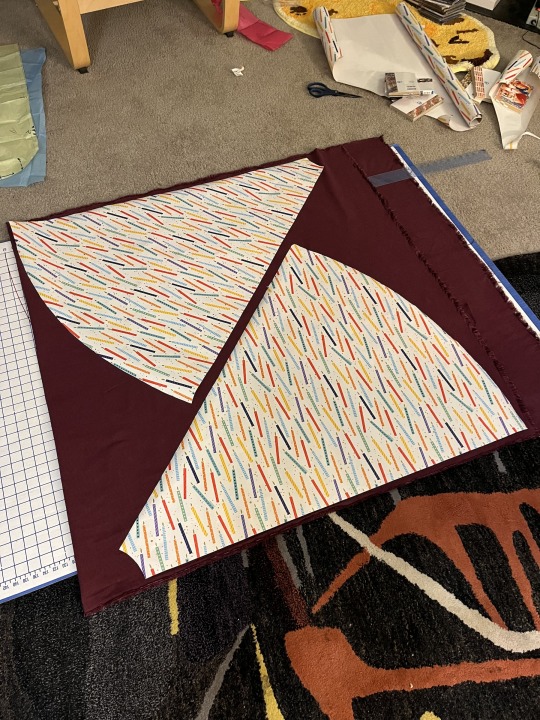
And yes, that is wrapping paper as usual with the square grids on the backside. I love this type of wrapping paper so handy! I cut out my fabric and took it to the sewing machine.

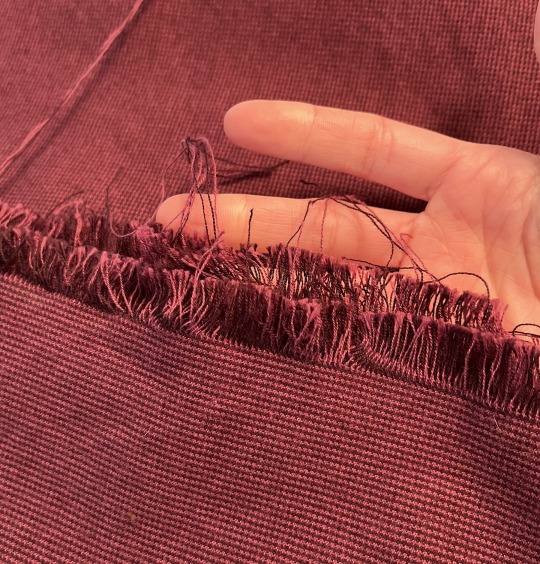
Next, I went ahead and did a zigzag stitch along all the edges except for the selvage. This fabric was showing how it would fray immediately. I washed it in the machine and this is what the edges looked like after drying.
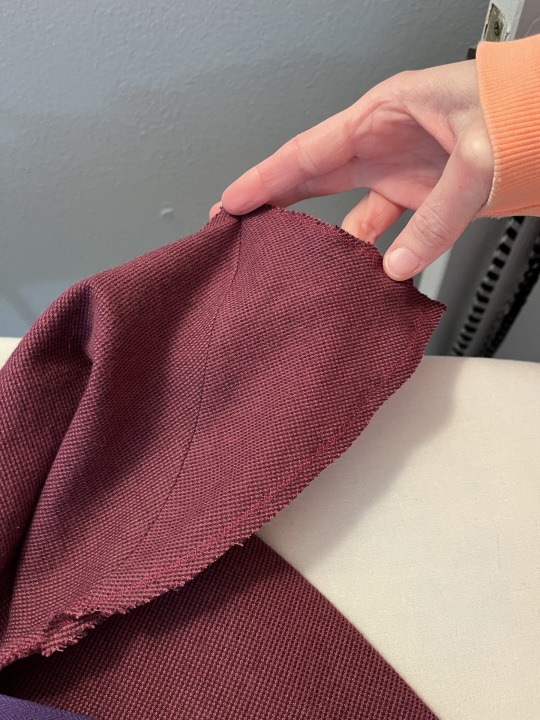
Somehow, I messed up on the waist portion of the skirt panels and I had to take them down by 2". Not sure how I messed that up since I had the radius calculated. I tested this by holding them up to my body and realizing it was off.
Recall, that I have a very limited amount of this fabric, fearing something odd, I went ahead and sewed the front pieces together selvage to selvage and then the back ones. When I held them up to my waist they were still slightly off. I put in the right side seam and made sure all my seams were pressed. Something about my top of the panel pattern is off by a smidge and I need to put in about 3" of a spacer. I decided to put it down for the day and I'll figure out how to put that piece in, since the hips are okay?
It will also allow for me to decide if I want to be lazy and put in a side zipper. I'll go back and put a pocket in the right seam for sure.
The next day -
I went ahead and made a triangle to wedge into the gap area before putting in the zipper. I held the skirt up to my waist and measured it with my measuring tape. I zigzag stitched it and put it in the spot.
I also pressed the seam well. Then I decided to put in an invisible zipper in the spot for a side zip. I had to unpick the seam a bit to fit the zipper in further and get it up around my hips. Whoops.

Due to adding in the wedge the zipper is at a bit of an angle as shown here. I estimated the zipper coming up higher on the waistband so, I but in a hook and eye on the top to pull it together.
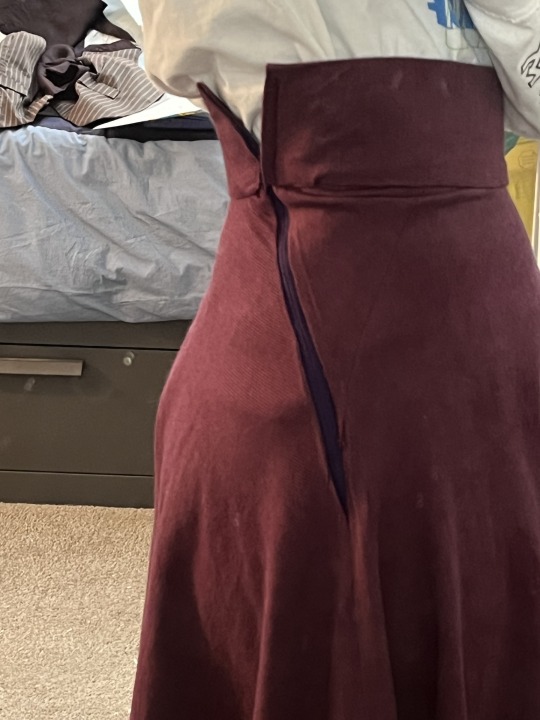
It turned out fine, I'm so limited by the fabric I have to work with. I still have enough to put in pockets on the right side. However, with the skirt cranked out in less than 24 hours, I have it now hanging to even out the hem. It hangs the right way so I'll take it.

Always remember to let your garment hang before hemming. I'm likely going to put some bias tape on the bottom, since this fabric is very prone to fray and then fold that up as opposed to a double folded hem. It is in place and will hang out in the closet for a day or two!
That's all for now!
I'll start working on the aoqun this week as a modified pattern from my previous ones.
101 notes
·
View notes
Video
youtube
Check out what I scored at the thrift shop and transform the curtain I found into a gorgeous skirt with me too! Stick around for Troll Time 👺 with Citrus Meloni.
#refashionista sheri#thrift flip#curtain skirt#diy skirt#diy clothes#easy sewing#thrift haul#lace skirt#look book#vintage style#vintage fashion#refashion
2 notes
·
View notes
Last Seen Blogs

cupidloves15-blog
Cupidissimo hell

cloooeeh-blog-blog
Thinking Out Loud
leaf-let
LeafLet

ededuardo
Living, Not Just Surviving