#New character creation and menu navigation
Note
How about some pretzel sticks? Nothing dries my mouth out like pretzel sticks...
#walter-sullivan#command#icey#1#ic#q#should mention Dry is less about the texture so much as it is about the flavour#Such as bread which is typically very plain on its own#Or even rice I suppose#But pretzels are a bread so they do probably count as Dry#I was supposed to post Bepis yesterday however something came up#So there will be 3 posts today and then following that#New character creation and menu navigation
5 notes
·
View notes
Text
It’s the Tar Taking Over That Came Unexpected
12 Days of Aniblogging 2023, Day 2
Back when it was a frustratingly rare Wii exclusive, I braved a storm to hunt down a used copy of Xenoblade Chronicles, and it still surpassed my every expectation. So finally sinking my teeth into Xenoblade Chronicles X earlier this year felt right.
This was a Wii U game and it’s still nuts that this was a Wii U game. The only change I made when emulating it was bumping up the internal rendering resolution, and it’s crazy how good it still looks. The highest-fidelity games I play are FromSoft so my frame of reference is busted, but even still, it’s frequently breathtaking. Monolith Soft has always had a reputation for building impressive open worlds on underpowered hardware, and their first foray into HD might be their greatest feat. Or maybe I’m just easily impressed by pretty skies. Emulated at 1080p 60FPS, the experience really clicks, with snappy menus, fast loading times, and the ability to alt-tab to the map on the gamepad. For once I didn't feel like I was missing out at all by not playing on original hardware.
After starting a new game you're immediately dumped into a character creation screen, which means I already have to navigate an old stupid censorship debate. See, there was a whole internet shitstorm back in 2015 when this game released stateside because the English version removed the bust slider from the character creator. This was the era of GamerGate and “localization versus translation” and Fire Emblem Fates taking out a waifu-touching minigame and everything surrounding Tokyo Mirage Sessions – things got really heated for a second! In hindsight, it was weird mixture of niche game publishers misreading their target audiences and hypervigilant right-wing provocateurs gearing up for larger culture wars, using titty games as a nexus for radicalizing nerds.
Things have cooled down a lot since then, as Japanese games generally release unaltered these days, rendering it a non-issue. When controversies do happen, it’s not in Nintendo's court anymore, it’s usually Valve removing Japanese visual novels from their store page in an act of laughable double standards. Anyways, thanks to the wonders of PC emulation and memory editors, I was able to restore the boob slider to Xenoblade Chronicles X, and valiantly used it to make my character flat.
XCX’s design sensibilities are a pretty sharp contrast from the direction the series went afterwards, instead dealing in guns, gritty sci-fi, and a more realistic color palette. The storms and forlorn mecha on the box art tell you all you need to know. It’s all very western, with the designers definitely taking cues from Halo and Mass Effect in a lot of places. The hub city is also based on Los Angeles, further cementing the American influence in everything but the mechas.

Ultimately, I think this all worked out well. The original Wii release of Xenoblade Chronicles isn’t particularly “anime”, after all. Its aesthetic sensibilities are closer to Final Fantasy X than, say, any given Tales. Xenoblade Chronicles 2 and 3, as well as the Switch remake of the first game, hew much closer to games like Genshin in terms of colors and character proportions, but Xenoblade X takes the original’s artstyle and places it in a more serious context. I’m glad the series didn’t commit to this direction (it would have gotten bland fast), but it’s cool that we got it exactly once. Despite the more western stylings though, this is still fundamentally a niche anime game, much more so than the first Xenoblade. There’s titty armor and fanservice outfits as quest rewards, a young moe girl in the main cast, and the occasional pervy sidequest. A lot of the localization conflict may have been Nintendo attempting to clean up Xenoblade X in order to pitch it as a mainstream release at a time when the Wii U really needed a hit. While it’s a solid game, it was never going to be able to appeal to a very large audience.
Also, the story’s a bit of a mess. The tone is all over the place, with both comic relief and serious moments frequently failing to land. What starts off as a surprisingly grimdark sci-fi about the last remaining humans trying to survive on an alien planet as their crashed generation ship-city runs out of power quickly morphs into Star Wars levels of goofy aliens. Plot twist after plot twist ensues, defusing a lot of the tension because you know that they’re just going to pull something even crazier out next. Though the main story struggles, the emergent narrative of New Los Angeles is actually pretty good. A lot of the player’s side questing is dedicated to resolving interpersonal conflicts and helping make the city feel like a real home for everyone. Gradually, NLA begins taking on alien immigrants and the mutual fish-out-of-water situation between human and alien refugees leads to some funny moments and the occasional surprisingly thoughtful quest about cultural tolerance.
But for the most part, the story takes a backseat to exploring planet Mira. Through the gameplay loop I’ve come to understand Xenoblade X as something of a single-player MMO. The combat system is based around positioning, auto-attacks, skills that go on cooldown, and extremely customizable character classes. There’s a nightmarish amount of skill trees to keep track off, to the point where I’d forget about them alone until I was having trouble with a fight, and then remember an entire system I’d forgotten to take advantage of. There are item collections to fill out and side quests of all flavors and secret areas and difficult raid bosses yada yada yada…
Okay I can’t hold off from discussing the music any longer. The combat theme for Xenoblade X is the stuff of legends. Terrible, terrible legends.
Putting vocals in your RPG’s regular battle music is a bold move. You really have to make sure you knocked it out of the park, because singing is going to grate on the player far more quickly than any instrumental. Because of this, the battle themes of Persona 5, The World Ends With You, and Get In The Car, Loser! are all something of a flex. Black Tar is not that. I’m just going to link the song, because it really has to heard to be understood.
youtube
Xenoblade X’s battle theme starts off strong, the grim sci-fi tone clearly communicated through the moody synths. Soon enough the guitars come crashing in, giving way to a distinctly nu metal sound. That stylistic choice alone pissed people off in 2015, to which I say grow up, it’s great. But if you let the battle run on for 50 seconds, someone starts rapping.
Black Tar has some of the most nonsensical lyrics ever put to pen, delivered in the jankiest way possible, with words just kind of crammed in without any regard to flow. It’s not even a case of “non-proficient English speaker comes up with shoddy lyrics” as occasionally happens with Japanese songs. Every single word of this is an act of malicious fluency, and if I singled out all the lines I had questions about, I’d be here all day. Opening the first verse with “We’re stuck on a whole different planet” tricks the listener into thinking that the lyrics will to tie into the game’s events and setting, but this is a fool’s errand. The titular tar has no in-game corollary, so to make any sense of it you have to go metaphorical and claim that maybe it stands for losing your squadmates and giving up hope. That's still pretty flimsy! Maybe it really is just be about heroin.
Eventually though, we reach the chorus, and it’s actually a great hook! Except for the fact that it’s sung by a Japanese singer in English. The lyrics were clearly written with no regard for which syllables he’d have difficulty with, and making this guy utter the phrase “Black tar’lll” was an open act of cruelty.
In a 2015 interview, Black Tar rapper and lyricist David Whittaker brings up that the he wrote the words for his first video game song in about two hours, going for “just foolishness”. I imagine his work here was a similar situation.
It’s so, so easy to harp on Black Tar. Everyone did at release, and everyone who hasn’t played the game still does. The thing is, it’s impossible to keep that antagonism up when you’ve got an 80-hour game ahead of you where this is the standard battle theme the whole way through. For the sake of your own sanity, you have to learn to love Black Tar, and pretty much everyone who finishes the game comes around to it. Much to the chagrin of my girlfriend, I quote Black Tar constantly, with less of a sense of irony each time. Eventually, you too will find yourself shouting along with David Whittaker as he raps about being on a sea of dark matter. And of course, the instrumental was always a banger if you weren’t a coward. The theme for New LA also gets a lot of flak for its gibberish vocal samples and St. Anger snares, but I’ve always been a fan and think it holds up great as an endless-looping hub area theme. It’s so…. Sawano zeitgeisty.
The entire soundtrack is actually a Hiroyuki Sawano joint, and he does a pretty good job. It very much all sounds like the kind of music he’s known for, with the exception of the overworld themes, which instead try to mimic the compositions of the first Xenoblade Chronicles. Primordia’s theme is an excellent response to the first game’s Gaur Plain, with a more techy and ominous tone that nevertheless still evokes the sense of grand exploration ahead.

The edgy atmosphere, the washed out palette, the Sawano tunes….Xenoblade Chronicles X is extremely of its time, in a way that comes across as deeply charming 8 years later. It’s kind of terrifying that something can already be an early 2010s period piece! The Sawano music alone will shoot you back to the days of Kill La Kill and Aldnoah Zero, when Gen Urobuchi was absolutely everywhere and the default crap anime genre was magic school instead of isekai. The mere idea of early 2010s nostalgia sets off alarms in my head, but it’s definitely real, and will only become more of a thing in the next few years. Brace yourselves for the flow of time.
Last, but certainly not least, the mechas! They’re one of the main reasons I tried the game out in the first place. Giant robots are often part of Xenoblade worldbuilding, but they don’t really factor into the gameplay. X is the exception. From the first preview trailers to the title screen to their first step into New LA, the player is made to want a Skell. They’re so cute! The Skells were designed by Takayuki Yanase, one of the people who worked on Gundam 00, and I can see the similarities in the combination of curves and blocky elements. There’s quite a few mecha otaku who work at the NLA hangar out of love for the Skells. Most of them are women, a detail that made me really happy!

Adding even more to the player’s desire is the fact that Xenoblade X withholds Skells for a very long time. You have to make it more than halfway through the story and substantially explore the first three continents on foot before receiving your piloting license. And it’s Xenoblade, so these places are massive. Even with an extremely generous jump, you’ll run into countless clifftops out of reach. They really make you work for it, but at least the core gameplay loop of exploring to setting up waypoints and mining devices is a lot of fun on its own (I was curious if the plot would ever get around to problematizing the resource-extraction gameplay loop, but no dice).

party members next to the Skell for scale purposes
When you finally get a Skell about forty hours into the game, everything changes. One of the major challenges facing mecha games is getting the scale right –it’s pretty easy for the giant robot to feel human-sized if all the player is ever doing is piloting. Xenoblade X avoids this by making your human pace painfully clear before giving you a ten-meter robot to traverse those same landscapes. It’s night and day how much more quickly you can navigate. Skells are also wildly stronger than characters on the ground, and being able to take on behemoth creatures as well as pulverize the human-scale enemies you’ve been fighting all this time keeps the scale relevant. It provides a real power fantasy and makes them feel believable in-setting. Being able to get in and out of your Skell at will goes a long way towards making it truly feel like yours, and this mechanic also acts as something of an on-the-fly difficulty modifier for the remainder of the game. A few chapters later you get a flight pack for your Skell, and the world opens up all over again.
not pictured: the j-pop earworm that plays every time you start flying
After spending so much time hanging out with the mecha pervert mechanic girlies in the NLA hangar, the back half of Xenoblade Chronicles X finally lets you be one of the mecha pervert girlies. Customization is on the lighter side, as you can’t mix and match body parts like in Armored Core, but there’s still plenty of color customization and weapons fine-tuning to do. I totally fell in love with my robots, and that alone makes it a victory of a mecha game.

A new song plays during Skell combat, and it’s…. more verses of Black Tar!! There truly is no escape. The backing has more of an EDM sound to it, and the lyrics are even more laughable than before. “Shoot them with your guns” still gets me every time. And yet, I would be lying if I said I’ve never headbanged to the part about being stuck on a different planet. You learn to love these things.
So that’s Xenoblade X. It’s a weird-ass game, a real triumph but also absolutely the wrong thing for Nintendo to have to put out in 2015. It’s easily the most impressive Wii U exclusive and I’m glad Monolith Soft took this detour. You’d be disappointed in it if you went in with purely the expectation of a mecha game, but as a Xenoblade fan who’s been gradually falling deeper into mecha, it was a great genre blend. Xenoblade X’s servers will shut down next year, and while I didn’t partake in any of that (the multiplayer elements seem fairly minor anyways), it will be the end of an era for sure. Just in time to start fondly reminiscing.
19 notes
·
View notes
Text
Tutorial - Your own character in Story Mode
Hello everyone ! I wanted to make this quick tutorial to show you how to actually insert and morph your Red Dead Online character in Story mode ! It's greatly inspired by Abigail Pinehaven and Chel's tutorial's, who I'm thanking today !
Sorry for my bad grammar again !
Prequisites
Rampage Trainer by RampageDev
OutfitChanger by LMS (Lenny)
ScripthookRDR2 by Alexander Blade
Installation
Place your unzipped rampage folder in the game root file, then add all other files into the game root file :
ex: C:/Azuresbazar/Programs/Rockstar Games/Red Dead Redemption 2
I recommend you to create a mod folder on your desktop, giving you a possibility to check which mods you have and how to delete them if you want, for example, to play Read Dead Online (you can be banned if you use mods on RDO).
To check if your mods are working fine, you should hear three "bips" when launching your game.
F2 - Opens Oufit Changer
F5 - Opens Rampage Trainer
Morphing your character
Now, let’s get started ! I will show you how you can morph your character using the generic presets of outfit changer. Our first example will be with a mp_female. This model is like a canvas, and the generic body model used in RDO for female players.
STEP 1 - Change your character for a female model
Open Rampage Trainer by pressing the keyboard command. Go to Player, then to Wardrobe, and click on Model Changer. You will need to type "mp_female" in the search bar, then press enter.
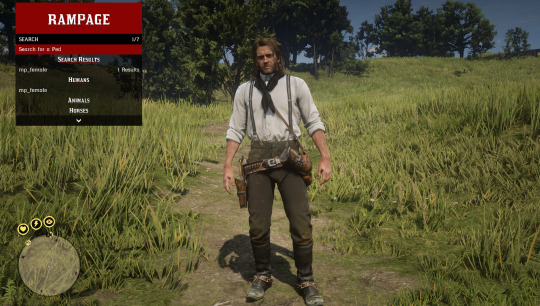
This is Arthur before we change his model to another one.
Your character will end up looking like a neckline and a pair of pants. Not really appalling, I’m afraid ! Changing the model will reset the player's presets and let you create a brand new entity. Your character won't have a voice.
STEP 2 - Head to Outift Changer
Now close Rampage Trainer and open Outfit Changer. Click on “Change Components MP Female”.

STEP 3 - Select a head (along with teeth and eyes)
Click on "Heads" and choose the head you want to pick. I advise you to note the feature references you would like to use ! Unfortunately, there is currently no way to add eyebrows.(EDIT - If you go through Rampage Trainer's Outfit Variation for mp_female, you will find characters with eyebrows or makeup to start with from variation 75 or later)).
Choosing mp_female and adding a mp_female face via Outfit Changer will not provide you any facial details (no scars, freckles, makeup). I’m on my way to check game files and find the correct face to edit and add eyebrows and will make a tutorial when I'll find anything about it. Otherwise, you’ll have to do this manually with Photoshop. :')
Here is our blank character ! Not appalling either.
STEP 4 - Create your outfit (hair, shirt, pants, hats... and so on !)
This process is long, seriously long, since hairstyles have no proper name, letting you navigate among them until you'll find a suitable one. I kindly recommend you to complete your character’s face with its eyes and teeth before moving forward to the outfit and hairstyle, so you won't be surprised if/when a cutscene triggers with your character looking like they came straight out of a horror movie !
And here is a finished outfit !
Most of the outfit components are named like in Red Dead Online. For instance, this is the outfit I crafted for my own character, Adelaide Andersson. You can edit the shirt attributes by pressing the right keyboard key to have the sleeves rolled up or an opened collar… or both ! Feel free to use your imagination !
STEP 5 - Save your creation
Once you're done with your character's creation, get back to Outfit Changer's main menu and save your current outfit. It will save you countless hours of searching for components again !
Play with your character
Your character will now appear in cutscenes (she does in my game !)... and will have Arthur's voice. However, NEVER SAVE your game while using your own character, as it might corrupt and break your save file. Reset your character back to Arthur before saving any story progress.
You're now able to play as your own character ! You won't be able to talk with other characters (I tried getting Arthur's voice back, it did not work), but should be able to play just fine !
Make your character follow Arthur !
If you want to play Arthur again but still want to keep your character around, here's a very easy trick !
STEP 6 - Clone your character
Open Rampage Trainer, click on Player, then go down and select "Clone Player". Your Character should duplicate. Then, click on Wardrobe/Model Changer and select Reset. Arthur should be back on your screen !
STEP 7 - Take control of your clone !
Now head back to the main menu of Rampage Trainer and select the following : Peds/Hijack Ped. Inside the input section, type "mp_female" and press enter. It will allow you to turn your cloned character into a ped.

To make sure your character has succesfully been hooked, head to Ped Database. Your mp_female should be added there !

STEP 8 : Turn your character into a companion
In order to make your character follow Arthur like a companion, select your character in the ped Database, and press enter on "Bodyguard". Your character will now follow Arthur ! Don't forget giving them weapons, in case of a sudden bandit attack !
You can also make your character mount Arthur's horse. To do such thing, double-click on Mount/Dismount my Horse. Your character should be sitting on Arthur's horse, behind him.

Final result :

If you want Arthur to interact with your character, you can go to General and select the option "Make Interactable". You can also set a voice for your character by clicking on Play Speech, then typing the name of the character you'd like to hear (if you want to hear Karen, simply type "Karen").
As of today, I've never heard my character respond with a selected voice, but Karen's slurs and frigtened shouts are triggered whenever I aim my gun at them !
NOTA BENE
Don't save your game while playing as your own character !
Your character will, just like in RDO, remain mute.
Save all your outfits with Outfit Changer, and take a note of every component you wish to use.
If you have any questions or doubts, don't hesitate !
62 notes
·
View notes
Text
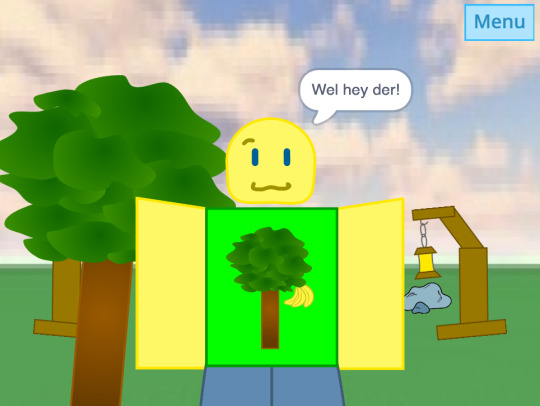
Major Update #1 0.02
Hello everyone! Wiven has just had its first major update! Lots of features, tweaks, and a new game has been added. Let's dive in!
Banana Farm and Other Games!
New Game:
Banana Farm has been added to Wiven! The basic premise of the game is going around collecting bananas for a farmer named Bam. The more bananas you collect the more upgrades you can unlock, along with a sweet badge for reaching one million bananas collected! Banana farm will also include other upgrades and possible tech for you to unlock in the future!
Other Games and Clothing:
Other games currently in the works right now are Zombie Slashout and Aliens Invade. These games are going to be very interesting to play with a new mechanic of a sword to be coded! It will also give some LORE to Wiven as well. We are also implementing clothing items into the game as well! These will be custom-made outfits by Melcat248 or anyone of you that you can use to dress up your character.
New beginnings
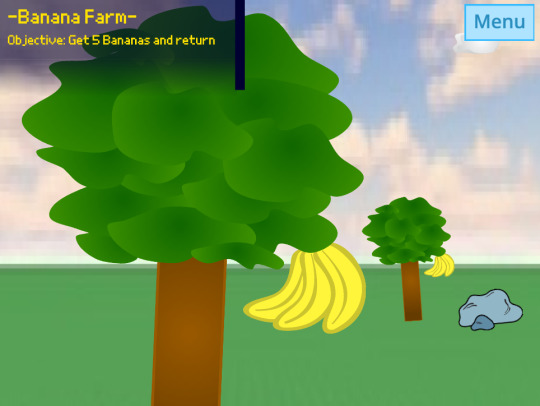
Banana Farm Changes:
Banana Farm has been drastically changed from the Wiven Demo. It now features a marketplace to sell your bananas and upgrades that you can unlock to help you with banana farming. The marketplace is where you sell your bananas but it is a very long walk away and you can only hold so many bananas. Upgrades allow you to upgrade the speed at which bananas sell, the price they sell for, and how many you can collect. Backpack upgrades will allow you to hold more bananas as you walk to and from the marketplace. Hired Help will collect bananas for you depending on the backpack size. Wheel BAMrrow will transport bananas for you to and from the marketplace. BAMobile spawned a car that you can drive. It has storage in the back and is super fast to make quick trips to the marketplace.
Wiven UI and Sprite Remodel:
Wiven has also had a minor UI update and sprite remodeling. The UI update consists of a cleaner user interface that improves the menu, button layouts, and info on certain games. The sprite remodeling was done on Bam and most assets in Banana farm.
Tutorial and Objectives:
A tutorial has been added at the start of every level to help players better understand how to play each game. It will give background information on what the game is like, how to play it, and what to expect! Once loaded in the game, it will give you a certain objective of what to do. For example ‘Get 5 Bananas and Return to Bam”, helps players better navigate their surroundings and get used to the game.


Thats great, what else?
Some Minor Notes:
Some minor notes that I will quickly talk about are Welcome to Wiven (WTW) has been revamped and Peaceful Home (PH) has been added. WTW area was refurnished with new sprites, the POOKIE WUX CONVERTER GUY (that's his name I know :sigh:) was removed to just keep the currency Wux, maps of Wiven were added, and personality was given to each Weev. PH was also added and will help in the creation of your own Wiven game later down the line.


Whats the future look like?
Updates in the Future:
The next major update will be version 0.03. Expect this one to come out around the same time or a little bit longer. A minor update of version 0.025 might come out before that. That update will include Banana Farm being finished and clothing items being implemented! Version 0.03 will most likely include fully working clothing items and the aforementioned shop working as well as another new game (and other minor things).

Bye Bye!
Thank you, Scratchers, Tumblrs, and Wumpus people for taking the time to read this update post! I hope you guys are as excited as I am because Wiven production is finally coming along smoothly! This week of the leak will also be very hype as it will showcase something never before seen in Wiven!!! I hope you all have an amazing rest of your day and with that, Bam out!
6 notes
·
View notes
Text
Week 10(?) Devlog
I:
I did some more writing this week. I finished writing the new SewnIn posts and got a slightly adjusted post generation system functioning. A quick playtest showed that I need more variety in the posts, so that will be a near-future assignment. I also made a temporary title screen so that we had some actual navigation between scenes. I'm working on a pause menu to make an fluid menu loop.
Our beautiful title screen.
S:
I worked on adding Miles's new art for the limbs. We have a little bit of leftover work on that (we still need some things for folks' heads) but you can see most of the new body in game now. Look at the little doll :) This will open the door to both adding skin colors to all of the limbs, and also to carrying developer bodies over to the office scene, so that you can see your creations come to life.

M:
This week, I did some work on designing Lydia and polishing up the previous character art I did. I also made some click-baity pop up ads, which can be used for a few things. Stickers for the NYU Spring Showcase will probably be one of them. I also did some cleaning up of the tumblr HTML theme and want to continue working on it. I want a cute website! You can see the art of the cast in a previous post, so go see that if you'd like. Besides that, here is one of the ads:
1 note
·
View note
Note
oh, there's actually a lot of customization! you'll probably have to start a new game if you want to customize Everything, but back from the initial page, you can navigate through different options using the number keys or by clicking the buttons (where it says "(2) Quick Start", "(3) Character Creation", etc.) — you can do everything from change the genders/sexes of the npcs to toggling the kinks you want to enable, to customizing your own character!
you Can still customize a lot of stuff even after starting a game (by going to your character's bedroom and going to the settings menu), you just can't really customize things like your own character's gender/sex after starting!
ooo good to know! I’ll keep that in mind when I start a new game on my laptop
2 notes
·
View notes
Text
HTML Interview Questions

Are you gearing up for an HTML interview and seeking valuable insights? Look no further! This article provides a concise yet comprehensive overview of essential HTML concepts, offering guidance to help you ace your upcoming interview.
Understanding HTML Basics: The Foundation of Web Development
HTML, or HyperText Markup Language, serves as the cornerstone of web development. It is utilized to craft web pages and applications, forming the backbone of the internet. As you prepare for your interview, familiarize yourself with the fundamental structure of an HTML document, comprising the document head and body. The head holds crucial information such as title, meta tags, and scripts, while the body encapsulates visible content like text and images.
HTML documents consist of elements identified by tags, encompassing opening and closing tags or self-closing tags. Tags, along with attributes, define the appearance and behavior of elements. Nesting elements within one another allows for the creation of intricate structures effortlessly.
Key HTML Concepts: Dive Deeper for Interview Success
Attributes and Usage: Attributes provide additional details about HTML elements, such as size or color. Understanding how to use attributes is crucial, especially in elements like links () where the "href" attribute determines the destination URL.
Comments in HTML: HTML comments offer developers a means to provide insights without displaying information on the webpage. Employing encapsulates comments, aiding in code comprehension and error reduction.
Common Lists in Web Design: Various lists play pivotal roles in web design, including navigation menu lists, header lists, footer lists, form fields lists, article lists, images and media lists, and typical content area lists. Mastery of these ensures organized and user-friendly webpages.
Text Section Separation Tags: HTML tags such as , -, , , , and aid in segmenting text sections. Utilizing attributes like id or class further refines text formatting, while CSS and JavaScript enhance customization.
Alternative Text for Images: Alt-text in HTML provides concise image descriptions, enhancing accessibility for visually impaired users and aiding search engines in proper indexing. It serves as a textual alternative in case images cannot be displayed.
URL Encoding in HTML: Encoding URLs in HTML ensures correct display, prevents cross-site scripting attacks, and aids search engine interpretation. It contributes to improved website visibility and security.
Collapsing White Space: Collapsing white space in HTML streamlines code, fostering concise and efficient development. It eliminates unnecessary spaces, enhances readability, and contributes to faster webpage loading.
Border and Rule Attributes: Both border and rule attributes define borders around HTML elements, with 'border' serving as shorthand for various properties. Understanding their interplay is essential for crafting visually appealing elements.
List Element Organization: Employing CSS styling, HTML tags ( and ), and style classes aids in keeping list elements organized within an HTML file. This ensures a structured and visually pleasing document.
Creating Hyperlinks: Crafting hyperlinks involves utilizing the tag with the "href" attribute to specify the linked page's destination. Optional attributes like "target" can control how the link opens.
Text Field Size Limits: Text field size limits in HTML depend on the programming language and framework. HTML5-compatible browsers typically support a vast character limit, but reasonable constraints are advisable for user-friendly interactions.
HTML5 Form Elements: HTML5 introduces new form elements, including , , , , , range input, color picker control, and date/time inputs. Familiarity with these enhances form functionality and user experience.
CSS Integration in HTML: HTML supports three types of CSS integration: internal, external, and inline. Each method offers distinct advantages, allowing developers to tailor styling to specific needs while maintaining code organization.
JavaScript Application in HTML: Integrating JavaScript into HTML involves using the tag to add scripts, either inline or through external files. JavaScript enhances webpage interactivity, form validation, and dynamic content.
Navigating HTML Challenges: Overcoming Common Hurdles
As you delve into HTML, anticipate challenges like invalid syntax, poor layout, and cross-browser compatibility issues. Validating syntax, ensuring an appealing layout, and testing across browsers are crucial steps in delivering a seamless web experience.
Conclusion: Elevate Your HTML Interview Preparedness
Preparing for an HTML interview requires a multifaceted approach. Delve into coding, design, problem-solving, and industry-specific questions. Recognize the nuances between frontend and backend roles and understand the demands of junior, midlevel, and senior positions. Stay informed about relevant technologies and coding languages, and practice mock interviews to enhance your confidence and response time.
Remember, meticulous research and preparation significantly increase your chances of success in an HTML interview. Engage with experienced individuals, both as interviewees and interviewers, to gain valuable insights. Your commitment to due diligence will establish credibility throughout the interview process. Best of luck!
If you want to know more Scaler Academy Reviews or courses then do visit - analyticsjobs
#analytics jobs#HTML Interview Questions#html#career opportunities#html css#php#programming#data science
0 notes
Text
Screens Explained
While we went through them at the beginning and continue to navigate the game, I wanted to create a quick guide for new players or for an easily accessible refresher.
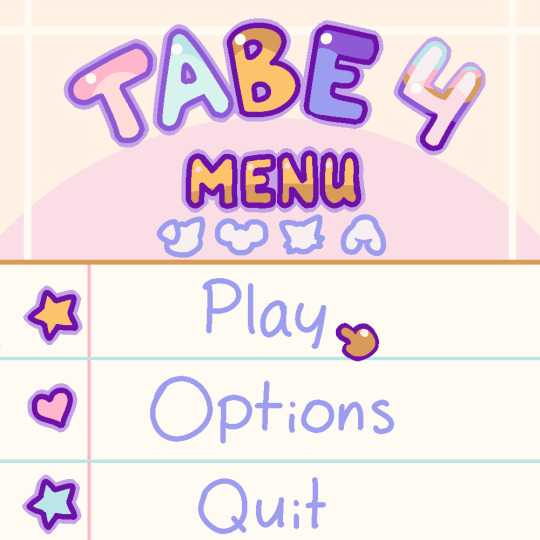

1: Menu. This is the opening menu for the game. Play leads to Character Select, Options is the Options screen, and Quit closes the game.
2: Character Select. This is where you can select your save files.
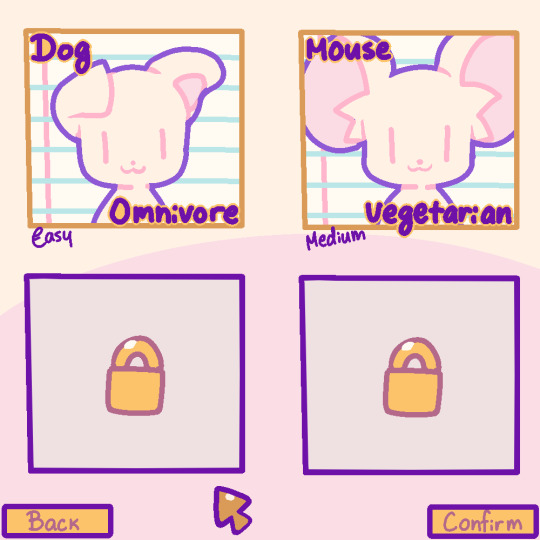
3: Species select. Select your difficulty here with the diets/species. You can unlock 2 more.
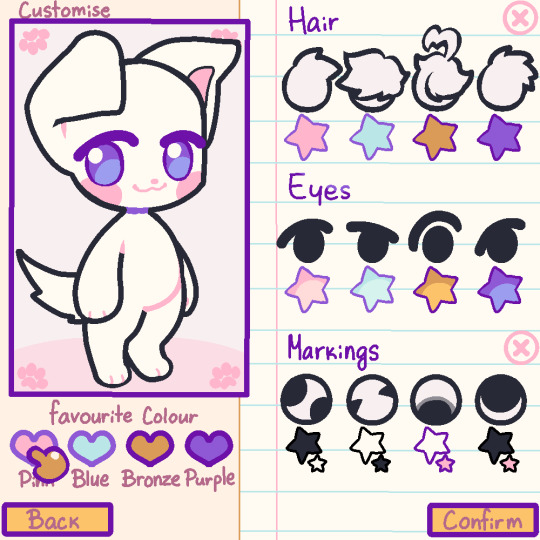
4: Customisation. Change your character's colours, hair style, eyes, and markings. Hair colour determines the marking colour's secondary colour, and the double stars determine the character's markings colours with the secondary star being the pattern's colour. Favourite colour determines their tertiary colour, the cheeks/ears/face.
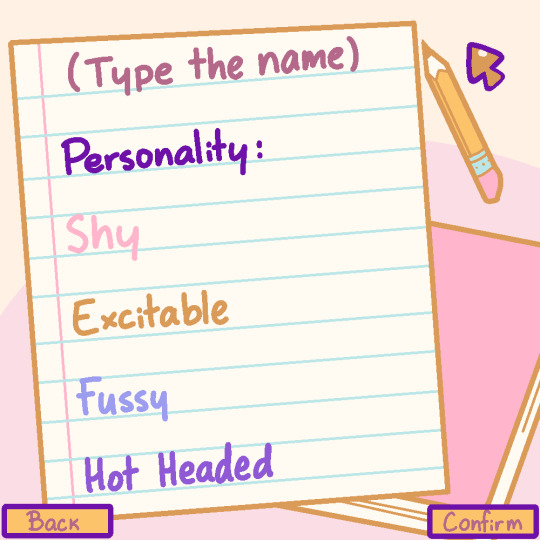
5: Personality and name. Type the name of your character and select their personality to finalise the character creation.
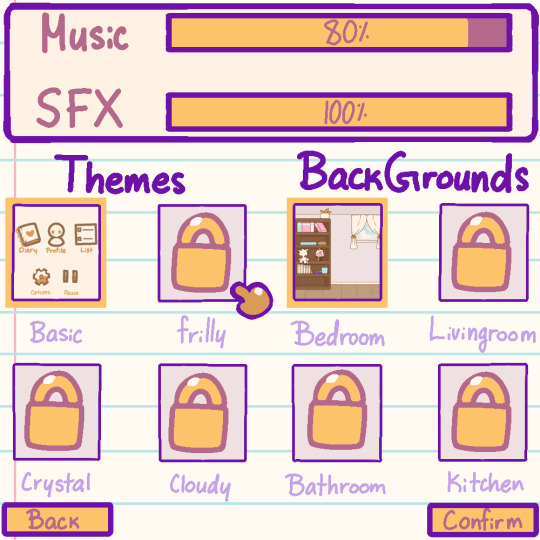
6: Options. You can unlock more themes and backgrounds. On certain Moddays (Mondays) I will allow users to have one hint per unlockable for that week (including character unlocks, and potentially death list items should progress halt on that front)
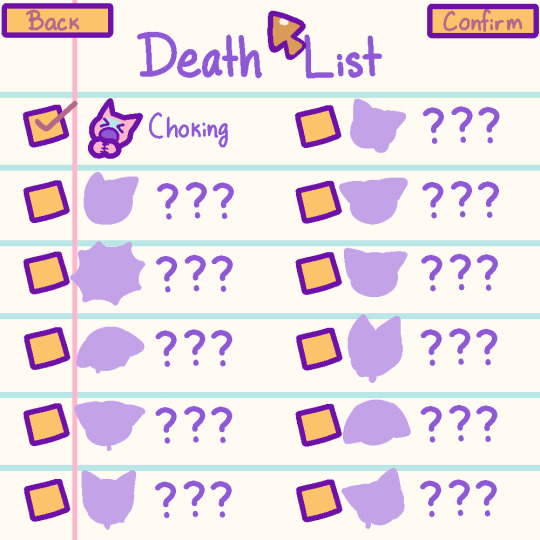
7: Death List. Unlock all 12 if you wish.
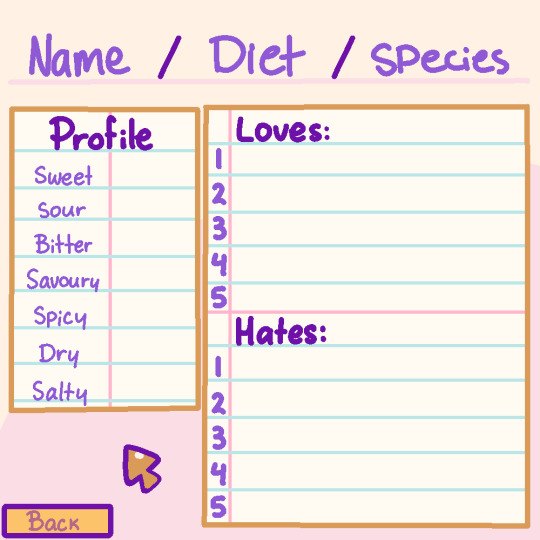
8: Profile. This is where you can check your character's preferred flavour profile and how all the foods you've given them rank so far. The maximum preferred flavour modifier is +5 and the worst modifier is -5 with 0 being neutral. Food will receive an additional negative modifier if the character is sick, if the food is inedible, or if the food breaks their diet.
You can Save or return to Menu using the Pause function in the main game screen.
7 notes
·
View notes
Text
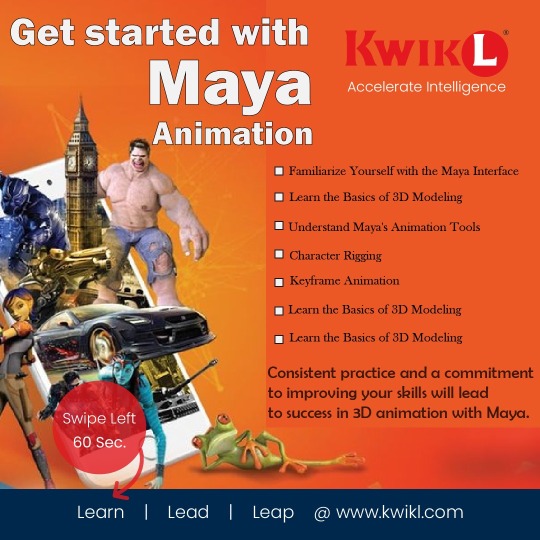
Get Started with Maya Animation
Maya is one of the leading 3D animation and modeling software packages in the industry, widely used by professionals and enthusiasts alike to create stunning visual effects, character animations, and more. If you're eager to dive into the world of Maya animation, this guide will help you get started on your journey to creating impressive 3D animations.
What is Maya?
Autodesk Maya, commonly referred to as Maya, is a powerful 3D computer graphics application that provides a comprehensive suite of tools for 3D modeling, animation, rendering, and visual effects. It's an industry-standard software used in film, television, gaming, and various other industries to bring digital creations to life.
Installing Maya
To get started with Maya, you'll first need to obtain a copy of the software. Autodesk, the company behind Maya, offers a free trial version on their website, which allows you to explore the software's features and capabilities before committing to a purchase.
Visit the Autodesk website (www.autodesk.com) and navigate to the Maya product page.
Download the free trial version.
Follow the installation instructions provided on the Autodesk website.
Keep in mind that Maya is a complex software with a steep learning curve, so don't get discouraged if it feels overwhelming at first. Learning to navigate the interface and understanding the basic terminology is the first step.
Exploring the Maya Interface
Once you've installed Maya, launch the program, and you'll be greeted with its user-friendly interface. Familiarizing yourself with the interface is essential before diving into animation.
Key Interface Elements:
Viewport: This is where you'll see your 3D scene. You can navigate and manipulate objects in this space.
Shelf: The shelf contains various tools and shortcuts for modeling, animation, rendering, and more.
Time Slider: Located at the bottom, the time slider allows you to scrub through your animation timeline.
Attribute Editor and Channel Box: These panels display information and properties of selected objects, allowing you to make adjustments.
Menus: Maya offers a comprehensive menu system with various options and settings.
Starting Your First Animation
Now that you're familiar with the interface, it's time to start creating your first animation. Here's a basic step-by-step guide:
Create or Import a 3D Object: You can either create a new 3D object within Maya or import existing models from other software.
Set Up Your Scene: Adjust the camera view and lighting to frame your scene as desired.
Keyframing: The heart of animation in Maya involves setting keyframes to define the position, rotation, and scale of objects over time. Select an object, move the timeline to the desired frame, and use the keyframe commands to record its position.
Timeline and Playblast: Use the timeline to navigate through your animation. You can also use the playblast feature to preview your animation as it will appear in the final render.
Refining Your Animation: Maya offers various animation tools and techniques to refine your animation, such as curves, constraints, and more.
Rendering: Once you're satisfied with your animation, you can render it to create a final video or image sequence.
Learning Resources
Learning Maya can be a challenging but rewarding experience. Fortunately, there are numerous online resources available to help you along the way:
Official Autodesk Maya Learning Hub: Autodesk provides extensive tutorials and documentation for Maya on their website.
Online Courses: Websites like Udemy, Coursera, and LinkedIn Learning offer comprehensive courses on Maya animation.
Community Forums: Websites like Autodesk's Maya forum and CGSociety are excellent places to ask questions, share your work, and learn from experienced artists.
Books: There are also many books dedicated to Maya animation and modeling, both for beginners and advanced users.
Remember that becoming proficient in Maya takes time and practice. Don't be discouraged by initial challenges, and keep experimenting and learning to develop your skills.
In conclusion, Autodesk Maya is a powerful tool for 3D animation and modeling with a wide range of applications. With dedication, practice, and the right resources, you can unleash your creativity and bring your 3D animations to life. Enjoy your journey into the exciting world of Maya animation!
0 notes
Text
Exploring the Minecraft Marketplace: Java Edition Download and Expansion
why can i get into minecraft servers
Minecraft, the beloved sandbox game, offers players a vast and immersive world to explore, build, and create. To further enhance the Minecraft experience, Mojang Studios introduced the Minecraft Marketplace—a platform where players can discover and download a wide variety of content, including maps, skins, texture packs, and more. In this article, we will delve into the Minecraft Marketplace, focusing on the Java Edition download and expansion options that allow players to customize and expand their Minecraft worlds like never before.
What is the Minecraft Marketplace?
The Minecraft Marketplace is an in-game store where players can access a plethora of community-created content. It serves as a centralized platform for developers, map creators, texture pack designers, and skin artists to share their creations with the Minecraft community. From intricate adventure maps to visually stunning texture packs, the Marketplace offers a diverse selection of content to suit every player's preferences and playstyle.
Accessing the Minecraft Marketplace on Java Edition:
The Minecraft Marketplace was initially introduced for Minecraft Bedrock Edition, which encompasses platforms like Windows 10, Xbox, and mobile devices. However, Minecraft Java Edition players can still explore and enjoy Marketplace content by following these steps:
- Download Minecraft Java Edition: If you haven't already, ensure that you have Minecraft Java Edition installed on your computer. You can acquire Java Edition by purchasing it from the official Minecraft website, www.minecraft.net.
- Open Minecraft Java Edition: Launch Minecraft Java Edition from your computer and log in using your Mojang account credentials.
- Access the Minecraft Marketplace: In the Minecraft Java Edition main menu, click on the "Marketplace" button. This will open the Minecraft Marketplace interface, where you can browse and download various content packs.
- Explore the Marketplace: Within the Minecraft Marketplace, you can navigate through different categories, such as Maps, Skins, Texture Packs, and more. Take your time to explore the vast array of content available and find creations that capture your interest.
- Download and Install Content: Once you find something you like, click on the content pack to view more details. If you decide to download it, click on the "Download" or "Purchase" button (if it is a paid pack) to begin the download process. After the download is complete, the content pack will be installed in your Minecraft Java Edition and ready to use.
Benefits of the Minecraft Marketplace on Java Edition:
- Diverse Selection of Content: The Minecraft Marketplace offers an extensive range of content created by talented community members. Whether you're looking for immersive adventure maps, stunning texture packs, or unique character skins, the Marketplace has something for everyone.
- Quality Assurance and Security: Marketplace content goes through a rigorous curation process by Mojang Studios to ensure high-quality standards and adherence to community guidelines. This provides peace of mind to players, knowing that the content they download from the Marketplace is safe and reliable.
- Support for Creators: By downloading content from the Marketplace, you directly support the talented creators who invest their time and effort into making exceptional Minecraft experiences. This helps foster a thriving community and encourages further innovation and creativity.
- Regular Updates and New Releases: The Marketplace continually expands with new content releases and updates. This ensures that there is always something fresh and exciting to discover, keeping your Minecraft experience dynamic and engaging.
The Minecraft Marketplace on Java Edition opens up a world of possibilities for players to customize and expand their Minecraft worlds. With a diverse range of content available, from maps and skins to texture packs and more, the Marketplace provides an avenue for the Minecraft community to share their creativity and enhance the gameplay experience for all players. By following the steps outlined in this article, you can access the Minecraft Marketplace on Java Edition, explore the wide selection of content, and download creations that pique your interest. So, dive into the Marketplace, discover new adventures, unleash your creativity, and take your Minecraft experience to new heights.
#Minecraft 1.13 how to convert servers#korean minecraft servers#what is the most effective money in minecraft for servers#why does minecraft servers keep crashing#Why do i timeout randomly minecraft servers#Servers For Minecraft 1.8.3#Minecraft How To Give Spigot Servers More Ram#gta in minecraft servers#When will servers be live minecraft bedrock edition ps4#how to play on servers in minecraft
1 note
·
View note
Text
Crafting a Unique Roleplay Experience on Your Minecraft Server
Minecraft, the beloved sandbox game, offers players the opportunity to immerse themselves in a world of boundless creativity and exploration. One captivating aspect of Minecraft is the ability to create and participate in roleplay experiences on multiplayer servers. Whether you're interested in medieval kingdoms, futuristic cities, or fantasy realms, crafting a unique roleplay experience on your Minecraft server can bring a new level of depth and excitement to your gameplay. news for dummies In this article, we'll explore the steps to create a memorable roleplay experience on your Minecraft server.
- Choose the Right Server
Selecting the right server is crucial for a successful roleplay experience. Look for a server that aligns with your desired theme and has a supportive community that embraces roleplaying. Consider factors such as server rules, active moderators, and the availability of plugins or mods that enhance the roleplay experience.
- Define the Roleplay Theme and Setting
Decide on the theme and setting for your roleplay experience. It could be anything from a medieval village to a post-apocalyptic wasteland or a magical school. Establish the lore, geography, and factions within the world. This groundwork will provide a solid foundation for players to build upon and immerse themselves in the roleplay.
- Establish Roleplay Guidelines and Rules
Clearly define roleplay guidelines and rules to ensure a cohesive and enjoyable experience for all players. Set expectations for character creation, behavior, and interactions. Encourage players to develop rich backstories and motivations for their characters. Establish consequences for breaking roleplay rules and provide a mechanism for conflict resolution.
- Create Engaging Storylines and Quests
Craft captivating storylines and quests to engage players and drive the roleplay experience forward. Develop a main storyline that unfolds over time and create side quests or events that allow players to further immerse themselves in the world. Include opportunities for character development, exploration, and decision-making.
- Provide Roleplay Tools and Resources
Consider using plugins or mods that enhance the roleplay experience. These tools can provide features such as character creation menus, chat modifications, custom items, and roleplay-specific commands. Use these resources to help players navigate the roleplay world and enhance immersion.
- Encourage Collaboration and Character Interaction
Roleplay thrives on collaboration and character interaction. Encourage players to form alliances, join factions, and create meaningful connections within the roleplay world. Develop in-game mechanisms, such as designated meeting areas or roleplay events, to facilitate player interaction and collaboration.
- Foster a Welcoming and Supportive Community
A positive and supportive community is essential for a thriving roleplay experience. Encourage players to respect one another, embrace diverse characters, and engage in collaborative storytelling. Moderate the server effectively to ensure a safe and inclusive environment for all participants.
- Evolve and Adapt
Roleplay experiences are dynamic and should evolve over time. Listen to player feedback and adapt the roleplay world based on their suggestions. Introduce new storylines, events, and areas to explore to keep the roleplay experience fresh and engaging.
Remember, the success of a roleplay experience on your Minecraft server depends on the creativity, commitment, and engagement of the players. Encourage active participation, reward creativity, and celebrate memorable moments within the roleplay world.
Can be a rewarding endeavor, both for yourself and for the community of players who join you. With careful planning, attention to detail, and a supportive community, you can create a vibrant and immersive world where players can live out their wildest fantasies and stories. Happy roleplaying!
#News for dummies#newsfordummies.com#minecraft creative mod servers#Reduce Servers Minecraft#Minecraft servers where you build kingdoms#Minecraft Pe How To Check If I Been Ban On Servers#How To Connect To Previous Minecraft Servers With Microsoft Minecraft
1 note
·
View note
Text
Unleashing Creativity: How to Download Minecraft on PC
Minecraft is a game renowned for its limitless creative potential and immersive gameplay. Whether you're a seasoned player or new to the world of Minecraft, downloading the game on your PC opens up a world of endless possibilities. In this article, we will guide you through the steps to download Minecraft on your PC, allowing you to unleash your creativity and embark on exciting adventures.
- System Requirements:
Before downloading Minecraft on your PC, it's essential to ensure that your system meets the minimum requirements. Minecraft is a relatively lightweight game, but it's still important to check if your PC can handle it. The minimum requirements usually include an operating system like Windows 10, macOS, or Linux, along with a sufficient amount of RAM and storage space.
- Minecraft Website:
To download Minecraft, visit the official Minecraft website (https://www.minecraft.net) in your web browser. The website serves as the hub for all things Minecraft and provides the necessary information and resources for downloading the game.
- Choose the Edition:
On the Minecraft website, you'll find different editions of the game, including the Java Edition and the Bedrock Edition. The Java Edition is the original version of Minecraft and offers extensive customization options, mods, and access to dedicated servers. The Bedrock Edition, on the other hand, is a cross-platform edition available on Windows 10 and allows for multiplayer gaming across different devices.
- Purchase Minecraft:
To download Minecraft, you'll need to purchase a license. Click on the "Get Minecraft" or "Buy Minecraft" button on the website, and you'll be directed to the purchase page. Choose the edition you prefer and follow the instructions to complete the purchase. You may need to create a Mojang account if you don't already have one.
- Download Launcher:
Once you've purchased Minecraft, you'll need to download the Minecraft Launcher. The launcher is a desktop application that allows you to access and manage your Minecraft account, install updates, and launch the game. On the Minecraft website, navigate to the "Downloads" section and locate the download link for the launcher. Click on the appropriate link for your operating system (Windows, macOS, or Linux) to start the download.
- Install the Launcher:
After downloading the launcher, locate the installer file on your PC and run it. Follow the on-screen instructions to install the Minecraft Launcher. Once the installation is complete, you should see the Minecraft Launcher icon on your desktop or in your Start menu.
- Log in and Download the Game:
Launch the Minecraft Launcher by double-clicking the icon. On the login screen, enter your Mojang account details and click "Login." Once logged in, the launcher will display the available Minecraft editions associated with your account. Select the edition you purchased and click the "Play" or "Install" button to download the game. The launcher will automatically download and install the necessary files.
- Launch Minecraft:
After the download is complete, the Minecraft Launcher will display a "Play" button for the edition you installed. Click "Play" to launch the game. The launcher will handle any necessary updates and configurations in the background, ensuring you have the latest version of Minecraft ready to play.
- Customize and Explore:
With Minecraft downloaded on your PC, it's time to unleash your creativity and embark on exciting adventures. Launch the game and start by customizing your character and exploring the vast, procedurally generated worlds. Engage in survival mode, where you gather resources, build shelters, and fend off monsters, or dive into creative mode, where the only limit is your imagination. You can also connect with friends or join multiplayer servers to collaborate and showcase your creations.
By following these steps, you can download Minecraft on your PC and unlock a world of endless creativity and exploration. Let your imagination run wild as you build, craft, and discover in the immersive world of Minecraft. Get ready to unleash your creativity and embark on extraordinary adventures that will keep you captivated for hours on end. Minecraft Happy Minecrafting!
#Best minecraft servers#best#minecraft#Servers.Xyz#MINECRAFT DOWNLOAD#minecraft server host#MINECRAFT SERVERS#GGSERVERS#Minecraft server list
1 note
·
View note
Text
Designing Custom Skins and Texture Packs in Minecraft on Mac
BEST MINECRAFT MODS
Minecraft, the iconic sandbox game loved by millions, offers endless opportunities for customization. From building elaborate structures to crafting unique worlds, players have the power to create their own Minecraft experience. One way to personalize your gameplay is by designing custom skins and texture packs. Whether you want to reflect your personality or showcase your artistic skills, creating your own skins and texture packs allows you to add a personal touch to the game. If you're a Mac user looking to dive into the world of custom Minecraft designs, this guide will walk you through the process step by step.
- Preparing the Tools:
To start designing custom skins and texture packs, you'll need a few tools. First, ensure you have Minecraft installed on your Mac. Then, download a suitable image editing software such as Adobe Photoshop, GIMP, or Paint.NET. These programs will allow you to create and edit images to your liking. Finally, have a reliable file archiving tool like The Unarchiver or Keka to extract and compress files.
- Customizing Skins:
Minecraft skins define the appearance of your character in the game. To design your custom skin, follow these steps:
a. Find a base skin: Start by downloading a base skin template from websites like minecraftskins.com or novaskin.me. These templates provide the basic structure for your skin design.
b. Design your skin: Open the base skin template in your chosen image editing software. Use the available tools and layers to create your desired design. Let your creativity shine as you paint the various parts of the skin, such as the head, body, arms, and legs.
c. Save and apply the skin: Once you're satisfied with your design, save the image as a PNG file. Open the Minecraft launcher, navigate to the "Skins" section, and upload your custom skin. Launch the game, and your character will now sport your unique design.
- Creating Texture Packs:
Texture packs alter the appearance of Minecraft's blocks, items, and environments. To design your custom texture pack, follow these steps:
a. Choose a base texture pack: Start by selecting a base texture pack to serve as the foundation for your customization. You can find a variety of pre-existing texture packs on websites like planetminecraft.com or minecraft-resourcepacks.com.
b. Extract the files: Using a file archiving tool, extract the contents of the base texture pack into a new folder. This will give you access to the individual files that you can modify.
c. Edit the textures: Open the textures in your image editing software and make changes as desired. You can modify the appearance of blocks, items, GUI elements, and more. Use your artistic skills to create a unique visual style.
d. Organize and compress: Once you've finished editing the textures, organize them into the appropriate folder structure. For example, create subfolders for blocks, items, and GUI elements. Then, compress the folder into a ZIP file.
e. Apply the texture pack: Launch Minecraft and navigate to the "Resource Packs" section in the settings menu. Click on the "Open Resource Pack Folder" button to access the resource pack folder. Move your custom texture pack ZIP file into this folder. Back in the game, select your texture pack and apply the changes. Enjoy your customized Minecraft experience!
- Showcasing and Sharing Your Creations:
After designing your custom skins and texture packs, consider showcasing and sharing your creations with the Minecraft community. You can upload your skins to websites like minecraftskins.com or share your texture packs on platforms like planetminecraft.com. By sharing your designs, you not only gain recognition but also inspire other players and contribute to the vibrant Minecraft customization community.
Designing custom skins and texture packs in Minecraft on your Mac opens up a world of creativity and personalization. Whether you want to reflect your personality, experiment with new visual styles, or showcase your artistic skills, creating custom designs allows you to leave your mark on the game. So grab your tools, unleash your imagination, and start designing skins and texture packs that will transform your Minecraft experience into something truly unique and memorable.
#EXTREMECRAFT.NET#Minecraft download pc#minecraft server#minecraft server list#Minecraft server download#download minecraft launcher
1 note
·
View note
Text
Unleashing Creativity: How to Download Minecraft on PC
Minecraft is a game renowned for its limitless creative potential and immersive gameplay. Whether you're a seasoned player or new to the world of Minecraft, downloading the game on your PC opens up a world of endless possibilities. In this article, we will guide you through the steps to download Minecraft on your PC, allowing you to unleash your creativity and embark on exciting adventures.
- System Requirements:
Before downloading Minecraft on your PC, it's essential to ensure that your system meets the minimum requirements. Minecraft is a relatively lightweight game, but it's still important to check if your PC can handle it. The minimum requirements usually include an operating system like Windows 10, macOS, or Linux, along with a sufficient amount of RAM and storage space.
- Minecraft Website:
To download Minecraft, visit the official Minecraft website (https://www.minecraft.net) in your web browser. The website serves as the hub for all things Minecraft and provides the necessary information and resources for downloading the game.
- Choose the Edition:
On the Minecraft website, you'll find different editions of the game, including the Java Edition and the Bedrock Edition. TOP MINECRAFT SERVERS The Java Edition is the original version of Minecraft and offers extensive customization options, mods, and access to dedicated servers. The Bedrock Edition, on the other hand, is a cross-platform edition available on Windows 10 and allows for multiplayer gaming across different devices.
- Purchase Minecraft:
To download Minecraft, you'll need to purchase a license. Click on the "Get Minecraft" or "Buy Minecraft" button on the website, and you'll be directed to the purchase page. Choose the edition you prefer and follow the instructions to complete the purchase. You may need to create a Mojang account if you don't already have one.
- Download Launcher:
Once you've purchased Minecraft, you'll need to download the Minecraft Launcher. The launcher is a desktop application that allows you to access and manage your Minecraft account, install updates, and launch the game. On the Minecraft website, navigate to the "Downloads" section and locate the download link for the launcher. Click on the appropriate link for your operating system (Windows, macOS, or Linux) to start the download.
- Install the Launcher:
After downloading the launcher, locate the installer file on your PC and run it. Follow the on-screen instructions to install the Minecraft Launcher. Once the installation is complete, you should see the Minecraft Launcher icon on your desktop or in your Start menu.
- Log in and Download the Game:
Launch the Minecraft Launcher by double-clicking the icon. On the login screen, enter your Mojang account details and click "Login." Once logged in, the launcher will display the available Minecraft editions associated with your account. Select the edition you purchased and click the "Play" or "Install" button to download the game. The launcher will automatically download and install the necessary files.
- Launch Minecraft:
After the download is complete, the Minecraft Launcher will display a "Play" button for the edition you installed. Click "Play" to launch the game. The launcher will handle any necessary updates and configurations in the background, ensuring you have the latest version of Minecraft ready to play.
- Customize and Explore:
With Minecraft downloaded on your PC, it's time to unleash your creativity and embark on exciting adventures. Launch the game and start by customizing your character and exploring the vast, procedurally generated worlds. Engage in survival mode, where you gather resources, build shelters, and fend off monsters, or dive into creative mode, where the only limit is your imagination. You can also connect with friends or join multiplayer servers to collaborate and showcase your creations.
By following these steps, you can download Minecraft on your PC and unlock a world of endless creativity and exploration. Let your imagination run wild as you build, craft, and discover in the immersive world of Minecraft. Get ready to unleash your creativity and embark on extraordinary adventures that will keep you captivated for hours on end. Happy Minecrafting!
#ROOF INFO#ROOFINFO.NET#MINECRAFT SERVER SOFTWARE#MULTIPLAYER MINECRAFT#New Minecraft Servers#MINECRAFT SERVER FILES#MINECRAFT SERVER
1 note
·
View note
Text
Diving into the Minecraft Skin Marketplace: Finding the Perfect Look
In the world of Minecraft, your in-game avatar is a representation of your unique identity and style. While the game provides default skins to choose from, many players seek to customize their appearance further by exploring the Minecraft Skin Marketplace. This vibrant marketplace offers a vast array of pre-made skins designed by talented artists, allowing you to find the perfect look for your character. In this article, we'll delve into the Minecraft Skin Marketplace and provide tips for discovering and acquiring the ideal skin to express your individuality.
What is the Minecraft Skin Marketplace?
The Minecraft Skin Marketplace is a platform that offers a wide selection of pre-made skins created by skilled artists and creators. It provides players with a convenient way to find and purchase unique skins to enhance their in-game characters. The marketplace is accessible through the Minecraft Bedrock Edition, which includes platforms such as Windows 10, Xbox One, Nintendo Switch, iOS, and Android.
Exploring the Minecraft Skin Marketplace:
- Marketplace Access: To access the Minecraft Skin Marketplace, launch the Minecraft Bedrock Edition on your preferred platform. Once in the game, navigate to the main menu and select "Store" or "Marketplace." From there, you can browse the available skins and access the marketplace. mc-skins
- Skin Categories: The Minecraft Skin Marketplace offers a wide range of skin categories to suit various preferences and themes. These categories may include fantasy, animals, superheroes, historical figures, pop culture icons, and more. Take your time to explore the different categories to find a style or theme that resonates with you.
- Skin Samples: When browsing the Minecraft Skin Marketplace, you'll often find samples or previews of the skins available. These samples give you a glimpse of the skin's design and appearance. Pay attention to the details, colors, and overall aesthetics to determine if the skin aligns with your desired look.
- Ratings and Reviews: To make informed decisions about the skins available, consider checking the ratings and reviews provided by other users. This feedback can offer insights into the quality, creativity, and popularity of a particular skin. It's also helpful to read reviews that mention customization options, such as variations or accessories that may come with the skin.
- Free and Paid Skins: The Minecraft Skin Marketplace offers both free and paid skins. While free skins are a great starting point, investing in a paid skin can often provide access to more intricate designs, additional customization options, or exclusive content. Consider your budget and priorities when deciding between free and paid options.
- Customization Options: Some skins available on the marketplace may offer customization options. This can include variations of the base skin, additional accessories, or alternative versions with different color schemes. Explore these options to find a skin that allows for further personalization and uniqueness.
- Supporting Creators: When purchasing skins from the Minecraft Skin Marketplace, you are not only acquiring a customized look for your character but also supporting the talented creators behind the designs. This support helps encourage the ongoing creation of high-quality skins and fosters a vibrant community of artists within the Minecraft ecosystem.
Remember, the Minecraft Skin Marketplace is continually updated with new skins, so make sure to check back regularly for fresh options. Whether you're seeking a realistic design, a playful and whimsical style, or something entirely unique, the marketplace offers an abundance of choices to suit every player's taste.
Finding the perfect look for your Minecraft character is an exciting and personal journey. The Minecraft Skin Marketplace opens up a world of creativity and customization, allowing you to express your individuality through your in-game avatar. So dive into the marketplace, explore the vast selection of skins, and embark on a quest to find the perfect look that truly represents you in the Minecraft universe.
1 note
·
View note
Text
Steps to Setup Company & Assign Company Code in SAP FICO

A company is a business organization or group of businesses whose individual financial statements are prepared in accordance with the applicable commercial law in that country. The company’s financial transactions are recorded in the local currency.
A five-character alphanumeric key identifies a company, known as Company Code. Company codes are a component of your organization’s financial transactions, which are viewed at the company code level. Once a company code has been defined in configuration with all of the required settings, other company codes that are later created should be copied from the existing company code and then changes can be made as per business requirements. This tutorial will teach you how to create a company code in SAP.
A company can have multiple company codes and operations in different locations, but they must all be part of the same business unit.
This article will guide you through the process of creating a new company and assigning the company code in SAP FICO.
Creating A Company
About Company
A company is an organizational unit for which a separate set of financial statements can be prepared based on business rules. A company can be made up of one or more company codes. Local currencies are used by a company to keep track of its transactions. All of a company’s company codes must use the same Chart of Accounts and Fiscal Year for transactions. SAP does not compel you to form a corporation.
Here are The Key Things You Need To Know
You can prepare financial statements that comply with the laws of the country in which the business is located.
A company can be assigned one or more company codes.
It is a SAP organizational unit that can be selected or deselected.
If a company has more than one company code, they should all use the same chart of accounts.
Creation Of A Company Code
SAP IMG Path: SPRO > Implementation Guide for R/3 Customizing > Enterprise Structure > Definition > Financial Accounting > Define Company
OX15 is the code for “Define Company in SAP.”
For making a new company, enter the following information.
Define Company Code
Step #1 Enter Transaction code SPRO in the command field
Step #2 In the next screen, Select SAP reference IMG
Step #3 In the next screen, Display IMG follow the menu path
SAP Customizing Implementation Guide -> Enterprise Structure ->Definition->Financial Accounting->Edit, Copy, Delete, Check Company Code
Step #4 In the next screen, select activity – Edit Company Code Data
In the Change View Company code screen
Step #5 Select New Entries
Step #6 In the Next Screen, Enter the Following Details
Enter your Unique Company Code Number
Enter Company Name
In the Additional Data section Enter City
Enter Country for the Company
Enter Local Currency
Enter Default Language
Step #7 Click the Address Details button on the same screen
Step #8 Enter Address Details for the Company. This will appear in print forms
In the Name Section Enter Title and Company Name
In the Search Term section, Enter Search terms 1 and 2
In the Street Address section, enter street, postal code, city, country
In the P O Box Address section, Enter PO Box and Postal Code
In Communication Section, Enter appropriate details
Step #9 After Completing this information, Press Save How to Create a Company Code in SAP & Assign Company Code and Enter your Change Request number.
You have successfully created a new Company code.
Assign Company Code to Company
After successfully creating a company code and a company in SAP, you must assign the company code to the SAP system. In SAP, the link between company and company code is established by assigning a company code to a company.
You can assign the company code by using either the navigation method or the transaction code.
Navigation: – SPRO – IMG – Enterprise Structure – Assignment – Financial Accounting – Assign company code to company
Transaction code: – OX16
Step #1 Enter Transaction code “OX16” in the SAP command field and press enter to continue.
Step #2 On change view “Assign company code -> Company”: Overview screen, click on the position button and give your company code key. Now your company code displays in the window.
Step #3 Now update your company key “SKRT” in the given field.
Step #4 After the assignment of the company code to the company, click on the save button and save the configured data.
We have successfully assigned company code “SK01” to company code “SKRT” in SAP systems.
Now that you’ve learned how to create a company code in SAP, why not look into other free lessons to further your understanding of Financial Accounting in SAP? You can take a SAP course in Ahmedabad with us and hone your skills in SAP.
1 note
·
View note
Last Seen Blogs

meruchan
Meru

pheonxi37
Untitled

quiquesquiquisimo
Quiquesquiquisimo

thegamesofthrones
TheGamesOfThrones

easyluckyfree45
run mad as often as you choose but do not faint