#Eva Foam Tape
Text
Acrylic Foam Tape Manufacturers Bring Perfect Adhesive Solutions in Cheap!
Acrylic foam tape revolutionizes bonding application across the industries with a versatile adhesive solution. This adhesive on both sides is composed of a viscoelastic acrylic foam core; with durability and strength this tape offers unexpected bonding. It has unique composition that allows it to conform to irregular surfaces while creating a strong bond and permanent bond that can resist the temperature fluctuations, UV exposure and moisture. One of the best features of this foam tape is that its ability to distribute stress evenly and the risk of substrate damage or failure are reduced. This makes an ideal choice for people to use it.
Brings innovative adhesive solutions
In supplying industries with innovative adhesive solutions Acrylic foam tape manufacturers plays a vital role while meeting diverse bonding needs. In research and development to engineer tapes that exhibit superior performance, versatility and durability this manufactures invest heavily. To produce acrylic foam tapes with consistent quality and adherence to stringent standards the leading manufacturers employ advanced manufacturing processes. Throughout the process they utilize state of the art facilities and stick to a strict quality control measures to ensure that each roll of tape meets or exceeds expectations of the customer. And where precision and reliability are supreme, acrylic foam tape finds application in electronics and aerospace industries.
Comes with excellent adhesion and tack
Ensuring a strong bond upon the application the acrylic double sided tape provides an excellent initial tack and adhesion. Even in challenging conditions this tape maintains it's bonding strength over time and making it ideal for long term bonding solutions. In industries like automotive, electronics and construction this doubled sided tape is widely used. While offering a cleaner and more efficient alternative to traditional mechanical, the automotive manufacturers use this tape for attaching trim, molding and emblems. Providing a secure and aesthetically pleasing solution, in construction it is used for mounting mirrors, glass, and other elements that are architectural.
0 notes
Text
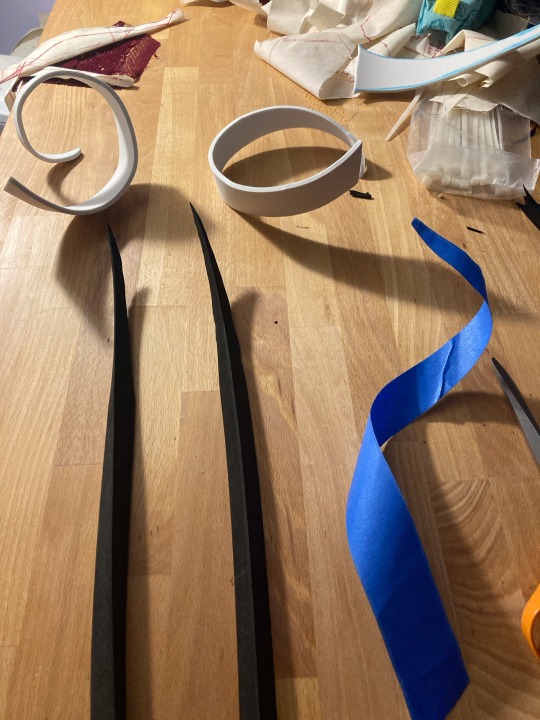
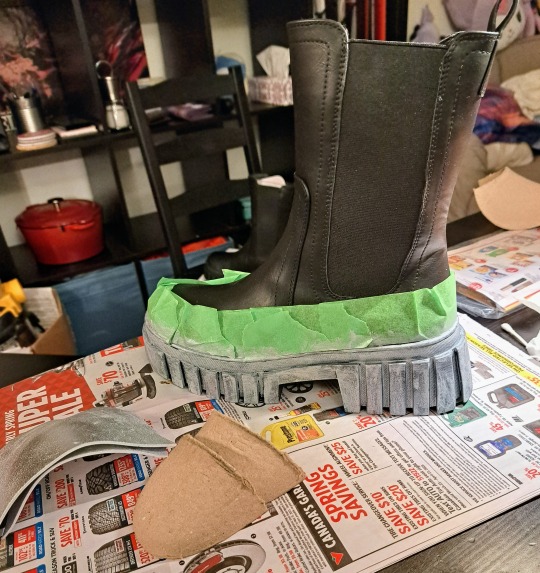
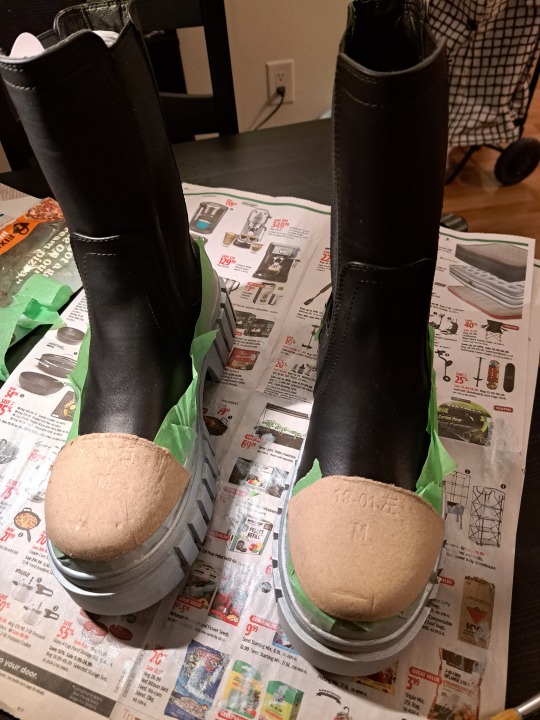
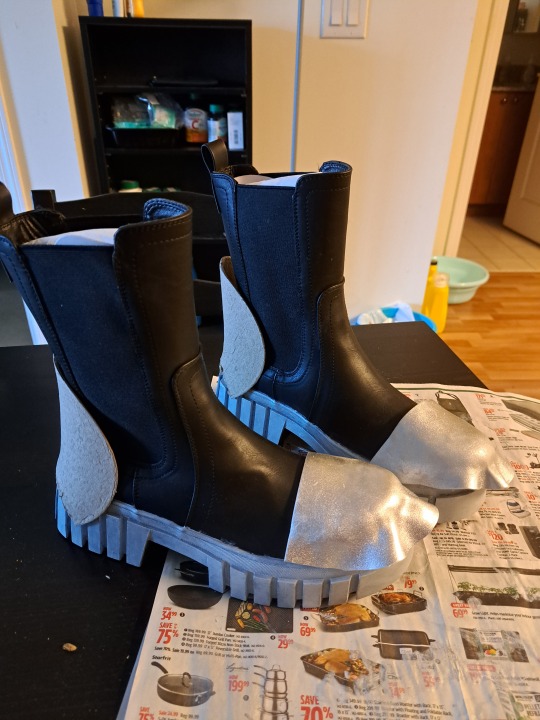
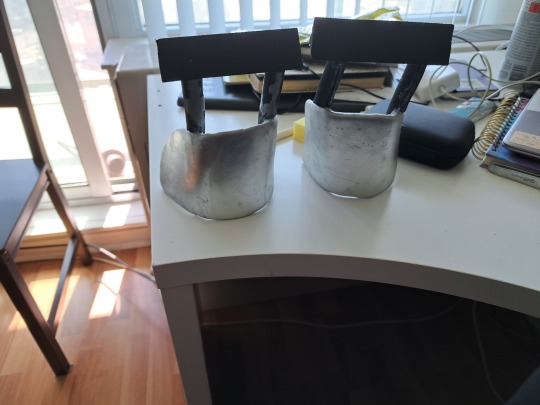
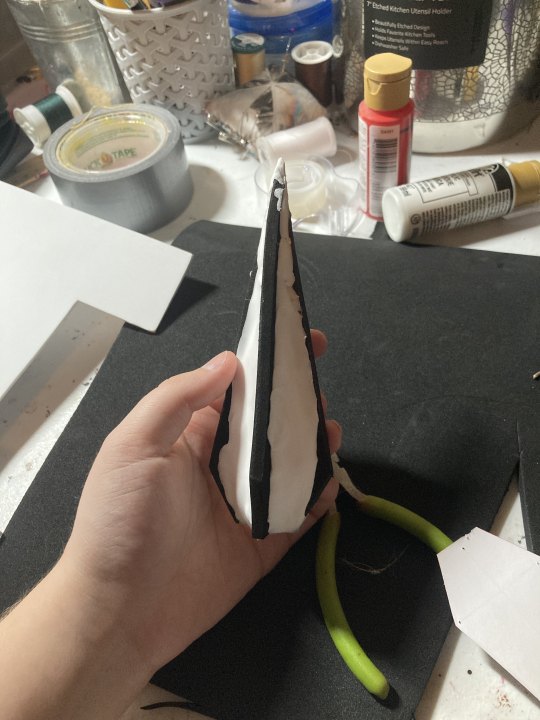
WIPs of my in-progress Metal Sonic Cosplay!
I’m hoping to debut this guy at a convention this year :]


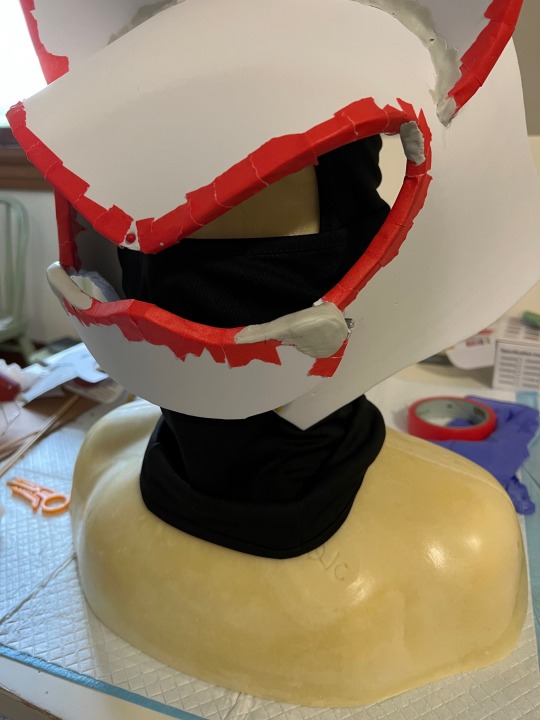


Mannequin I’ve been using is from DreamVisionCreations! Go check em out they sell a buncha neat supplies for cosplays (they cater more towards fursuiters but I think you’ll be able to find something there even if you’re not doing fursuit stuff!)
#sonic#metal sonic#cosplay#cosplay wip#wip#art#my art#foam work#eva foam#tape#lots of it#hot glue#and I mean a shitton of hot glue.
14 notes
·
View notes
Text
ESDGoods specializes in providing a wide range of electronic
packaging materials to meet your specific needs. Our offerings
include Anti-static foam, ESD Conductive Foam, and ESD tray
products, all of which are crafted from materials such as PE foam,
EVA foam, EPE foam, PU foam, Hollow board, and PP corrugated
Box.
Additionally, we offer a diverse selection of Cleanroom Products,
including anti-static wrist straps, ESD shoes, ESD chairs, anti-static
slippers, ESD tweezers, and more.
Trust ESDGoods to fulfill your requirements for reliable and high-
quality electronic packaging and cleanroom solutions.
#ESD foam#Anti static foam#ESD EVA foam#Anti static EVA foam#ESD foam tape#Anti static foam tape#ESD foam insert#Anti static foam insert
0 notes
Text
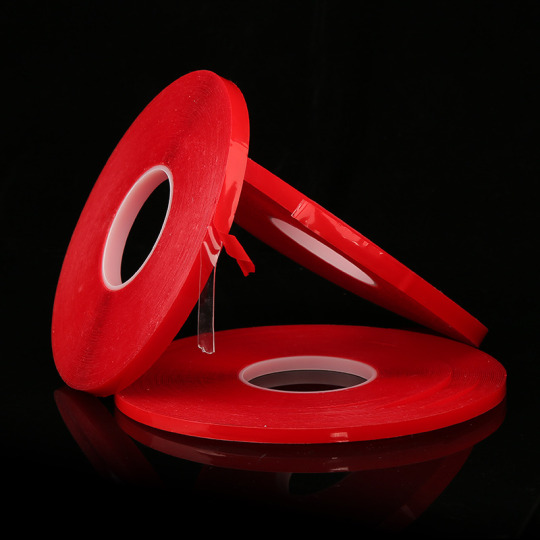
EVA FOAM TAPE
EVA foam tape stands for ethyl vinyl acetate foam tape. Ethylene - vinyl acetate copolymer, EVA for short. Generally, the content of vinyl acetate (VA) is 5%-40%. Compared with polyethylene (PE), EVA reduces the high crystallinity and improves the toughness, impact resistance, filler phase solubility and thermal sealing performance due to the introduction of vinyl acetate monomer into the molecular chain. Moreover, all products meet the RoHS environmental requirements. Furthermore, we can either provide jumbo rolls, or die cutting pieces. The width can be from 10mm to 1600mm, the length can be from 100mm to 2000mm.
Features of EVA foam tape
6mm high-density closed-cell EVA foam as carrier
Coated with special formula of very high tack adhesive
Laminated with yellow paper easy release liner
Excellent properties of toughness
Outstanding impact resistance, wear resistance
Good filter material compatibility
Great thermal sealing, moisture sealing
Outstanding conformity to uneven surfaces
0 notes
Text
let's make fearne horns!
a step-by-step tutorial for making foam horns for cosplay
this was originally posted to twitter last year, but since twitter’s decided to ram itself through a brick wall repeatedly for some reason, i’m reposting here.
materials/supplies:
wire (the hardware store kind, not the flimsy jewelry kind. you want it bendable but sturdy enough to hold whatever size horns you’re making.)
craft foam/eva foam (thickness depends on project needs)
triangular foam dowel
tape or paper for patterning
barge cement (or other brand contact cement)
foam clay
plastidip spray
acrylic paints
gloss spray
heat gun
scissors
paint brushes
something to wrap horns around depending on curl needs
headband or something else to attach the horns to for wearing
the process:
1️⃣ pattern horn curl using tape or paper. mine is going to be a long triangle shape along it’s top face.
2️⃣ cut out of craft foam & trim/taper triangular foam dowel to match. cut wire to match this length plus a couple extra inches for attaching to a headband later on.
3️⃣ carve valley into dowel & glue wire into it using barge cement. tape is helpful for holding the wire down while it dries. be sure to follow glue instructions for use which usually requires good airflow/ventilation in the space! for me, that means opening the window, turning on a fan, and wearing a mask to avoid fumes.

4️⃣ glue foam dowels to craft foam.

5️⃣ spiral horns carefully around a cylinder, heat forming tips where wire can’t reach. the hardest part here is to get both sides even. (i think i used a wooden dowel or a curtain rod for my spirals??)

6️⃣ fill gaps between dowel & craft foam with foam clay, using finger + water to smooth it out. if you want to add any ridges or scars to your horns, do it once this part is dry and before the next step—but i wanted mine to be smooooth.

7️⃣ once dry (give it a couple days just in case), heat seal with a heat gun & spray with plastidip. do multiple coats to get all the angles because spirals are WEIRD!
8️⃣ paint with acrylics.
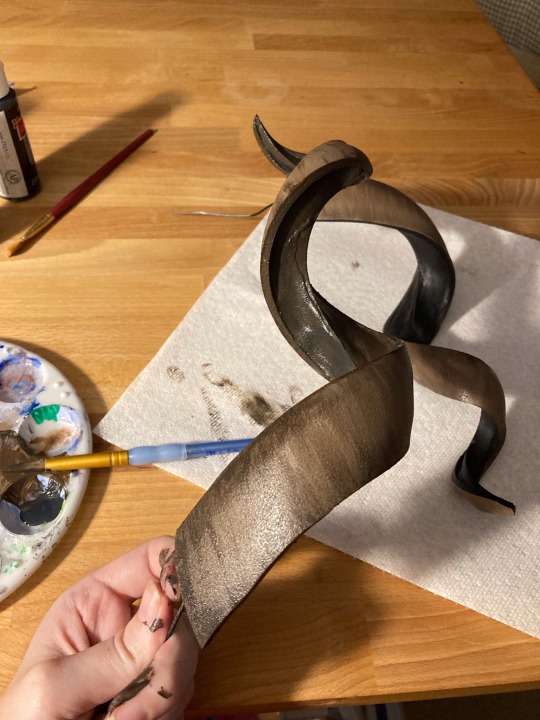
9️⃣ gloss spray!
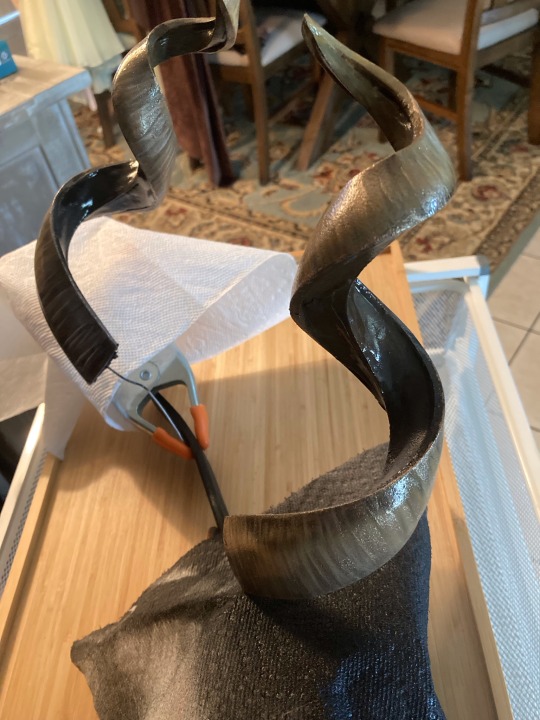
🔟 using the bit of wires sticking out, attach to a headband or wig to wear! mine actually poke through my wig and attach to a headband that sits inside the wig which fearne’s ears also attach to.

i hemmed and hawed over how to approach these originally because i know most folks would either 3d print them or do a proper full craft-foam pattern, but i’m crap at cutting craft foam and i hate sculpting digitally and ALSO don’t have a 3d printer. so i did it my way! and it was fun!! plus, the final horns are super lightweight which makes them great for wearing all day! the flexibility of the wire also allows them to have some pose-ability which can be nice for photos to make sure they’re visible.
185 notes
·
View notes
Text
Infinity Train Boots!
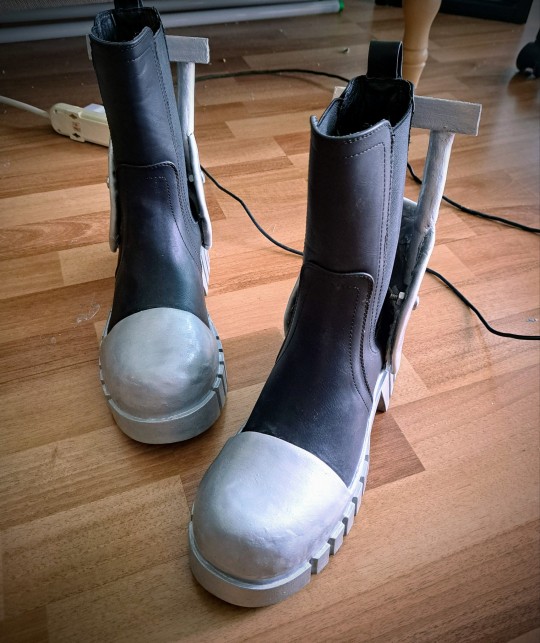
Made these a while back as part of my Simon cosplay, must have been almost a month, but I didn't post the process!
(EDIT: hey I did some fixing up of my cosplay which you can see here in this post!)
Not actually sure if anybody would care because it's so niche, unlike my Spider-Gwen suit, but I did write about how I did the Infinity Train harpoon pack, so I'll discuss this too!
STEP 0: Acquire reference pictures:


Yep, pretty straightforward.
Note that Simon's boots have an extra bar/strap thingy, whereas Ryan and Min-Gi's do not.
I didn't include it because it kinda looks ugly and I didn't know how fragile the strap might be.
NEXT!
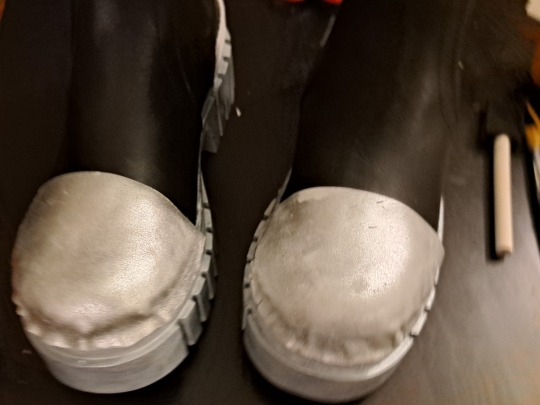
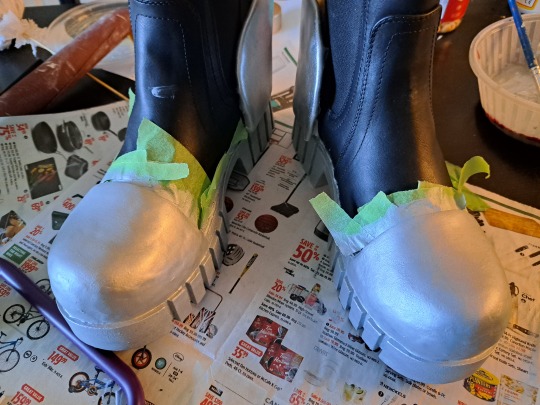
STEP 1: Acquire Boots!

I got these MIA boots from Journeys Canada. They only cost around 60 bucks which is a bit pricey for cosplay, but I'm not about to go thrift shopping when I'm in a time crunch and I can just order online and get free delivery within 2 days. (Also these days 60 bucks for boots from a retail store is considered cheap. Inflation is nasty.)
They came with these cardboard thingies inside to keep the structure of the boots. They have "left" and "right" written on them in Chinese which was helpful for me when I got a bit confused about which side was which.
Save those for later. You'll need them.
STEP 2: Paint the soles silver
Literally any acrylic silver paint works. May take several layers. Make sure to put masking tape around the top edge of the soles.
I didn't use a primer on the base but you probably should. Any white acrylic paint or Gesso would do and you wouldn't need like 8 coats of silver. Do as I say not as I do.
And make sure to seal everything with a varnish or mod podge!
Here are also the cut toe caps and some silver craft foam. The craft foam was kind of a mistake I'll get into it soon.
STEP 3: Make toe caps
Here's me making sure the placement is good.
I glued the craft foam onto the cardboard caps, and then I was thinking "well the little bit hanging over it isn't going to be a problem, nope! I'll just glue them down and it'll blend right in!"
HAHAHAHA. WRONG.
STEP 3.1: Fuck up the toe caps because you were winging this and you have no idea how crafting materials work you idiot
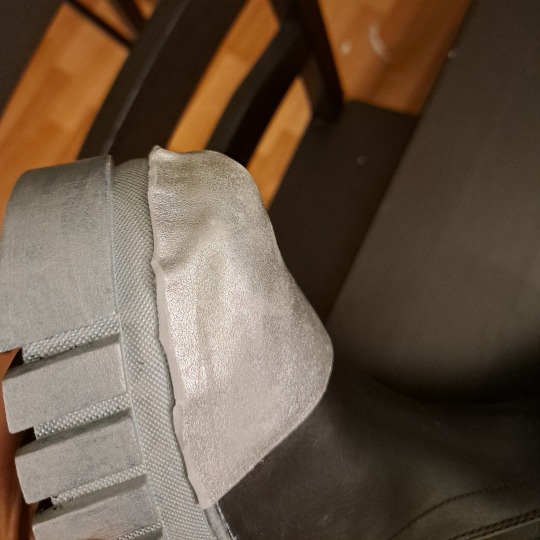
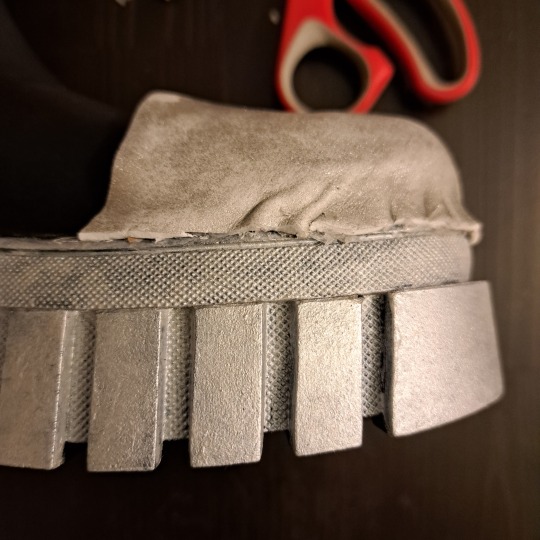
GROSS. DISGUSTING. VILE.
The hot glue melted the craft foam and now it's got this weird melty edge all around it that's all goopy and shit. Anyway you dont want your boots to look fucked up, you want them to look smooth like polished steel, or whatever they were made of in the show.
STEP 3.2: Fix toe caps
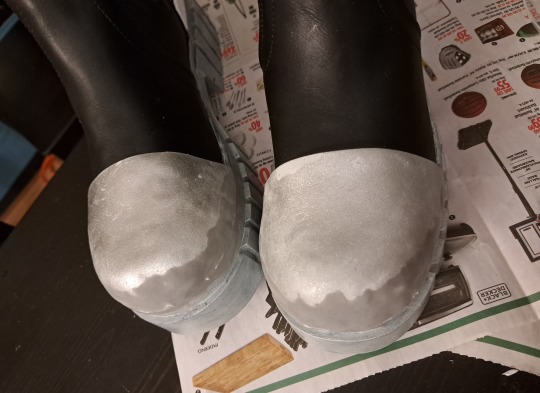
Everything can be fixed with Model Magic and acrylic paint! (and seal your paint with a sealant again!)
I just took some model magic (a type of lightweight air dry clay from Crayola, the cheapest you can get. Other more legit craft supply brands make similar materials as well), and squished it into the ugly bits, making a mostly seemless transition from craft foam to clay to sole.
TIP: to make model magic smooth before sanding, dab your fingers in some water to smooth it out! This also works for Paperclay as well if you decide to use a more higher end type of air dry clay.
STEP 4: Make the back metal thing that goes around the heel
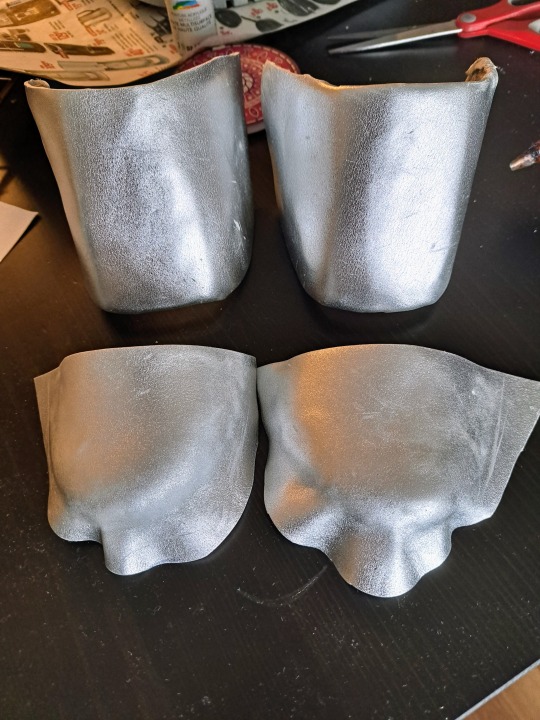
So I did this kinda in tandem with the toe caps which is why the pics will look a little out of order but essentially, I took the parts of the cardboard that I cut off, and I cut them in half, put some other cardboard in between, and then sandwiched the thing in metallic craft foam.
This time it was a bit more successful because I was able to hide the weird gross melted edges on the inside. Also paint that shit silver!
Now you can glue the "heel caps(?)" directly to your boots, but I decided to use stick-on velcro instead so they're kinda removable, and may be easier to transport or clean or something? ehhh.
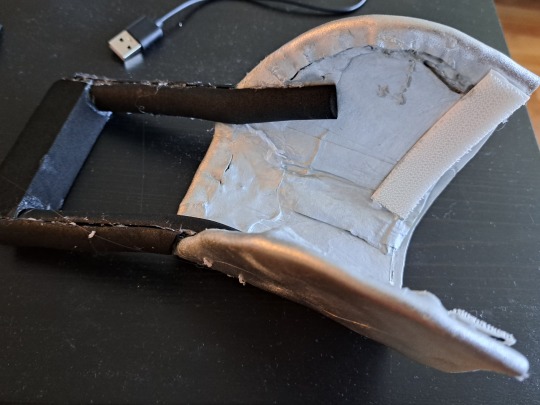
STEP 5: Make those handle things
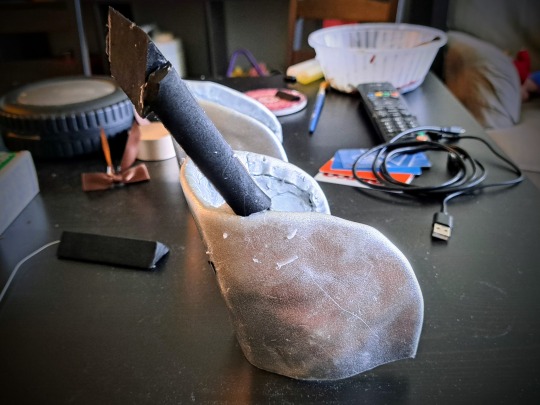
So I also hit a bit of a snag with these. I ordered EVA foam dowels with a semi-circle cross-section as well as a triangular one, but I quickly realized they would be too flimsy sticking out like that unless I put something hard in between them.
So this isn't pictured, but I got some thin crafting wire from Dollarama and just bent them into L shapes, and glued the smaller dowels around them. I also shoved them into the bigger down and glued it down.
You can also see from these pictures that that leaves a weird gap in between the smaller dowels. Again I just used model magic to cover them up. There's probably a better solution but this was the one I went with.
I also lengthened the top "handle" part eventually because it looks better that way. (Please ignore the mess on my desk >_<)
Then I just paint them silver like everything else!
COMPLETE!
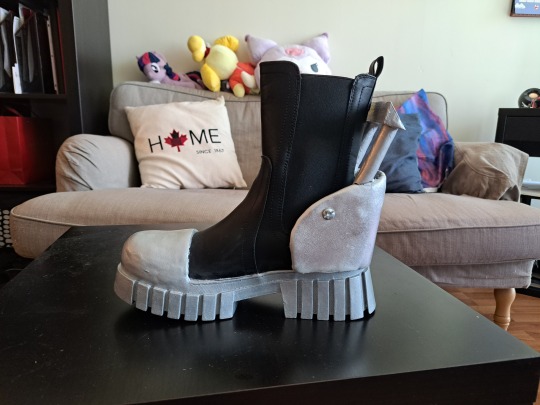
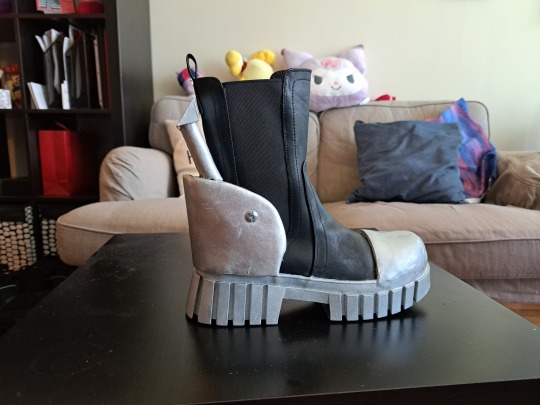
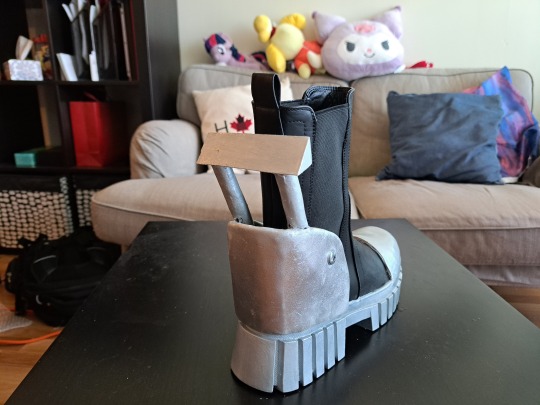
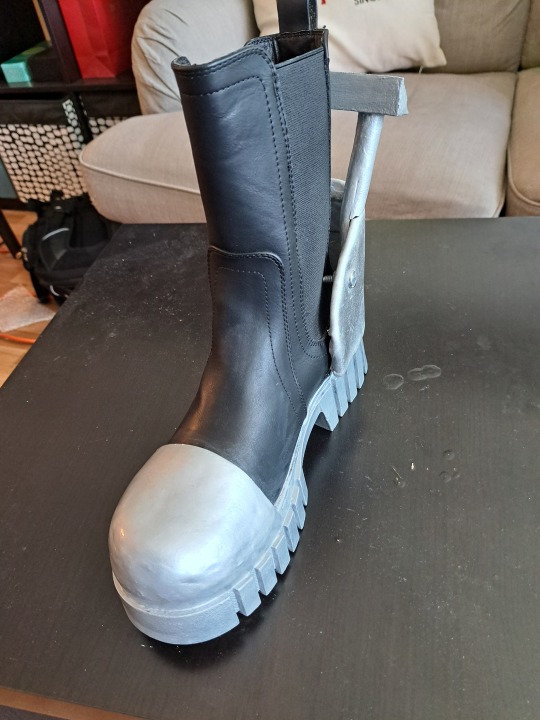
The nut and bolts are actual nuts and bolts. Since the base was just craft foam and cardboard, you can poke a hole in them easily and insert the bolt.
Hope you found this helpful! Or are just willing to indulge me and my notes on my silly crafting journey!
#cosplay#infinity train#infinity train cosplay#simon laurent#ryan akagi#min gi park#tutorial#crafting stuff#i have no idea what im doing#but it worked out#infinity train book 3#infinity train book 4#stuff i made#diy
219 notes
·
View notes
Text
How I Made my V2 Cosplay
Oh boy! This right here is about how I make my cosplay head of V2. Some of the stages don't have photos, but i'll do my best to explain what I did. I also have no WIPs of the gloves, but those were super straight forward. Some photos are very low quality due to my phone having a damaged camera at the time, and other photos were taken from my instagram story as they're the only photos I have from that stage. Please note that this is not a tutorial! This is more of a story of a disastrous (but ultimately successful) project done by someone with no idea what they were doing. Please find actual tutorials by more experienced people!
The Modeling Base


This right hear is a big chunk of upholstery foam! I own a ton of this stuff, so i decided the best way to start this was a foam blank. Well, this was a bad idea in retrospect, but hey it technically worked. Kinda. I started by drawing the basic shape, then cutting out thick sheets. From there, I glued them together and began shaping with scissors to get the desired shape. Honestly a 3D modeled blank may have been better, or a base made of foam board pieces used instead. Live and learn I suppose.

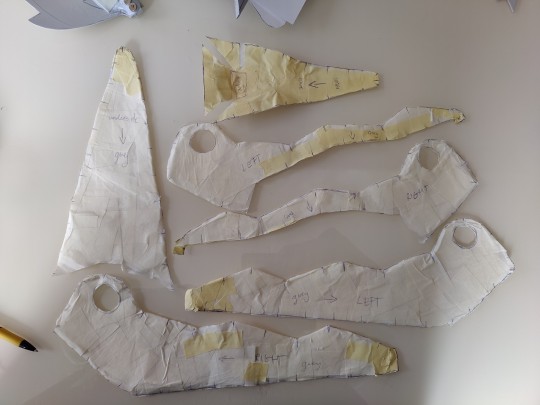
After I got the shape to something i was happy with, I began the transition to EVA foam. To do this, I mummified the thing in duct tape and marked seam lines in sharpie. I then cut out these duct tape pieces, and stuck them to paper to act as a backing.
Foam Shell Construction
Once I had a pattern, I began making the actual head. To do this, I traced the pattern onto sheets of EVA foam (I believe 4mm or 6mm) and cut them out. Lots of these pieces needed bevels, some of which i had to dremel as shown below due to them not cutting correctly. Bevels are important as they make the foam crease as desired for angular shapes. I'm still pretty amateur with it though, and frequently got bevels wrong.


As I cut pieces, I began gluing them together with an awful gunk called contact cement. This stuff is a special glue that you let dry before sticking the pieces together, and it pretty cool. Unfortunately it's flammable and a carcinogen. As stated before, I'm pretty new to armor, so lots of the seams have weird gaps I had to fix farther down the line. After quite awhile, I had the basic shell assembled. However, the shell had numerous gaps and pieces that didn't fit correctly. Enter the foam clay.
Foam clay is a substance similar to model magic, and was honestly a life saver here. This thing has a second shell basically made of the stuff. I had to fill gaps primarily around the eye socket, but the entire thing honestly barely fit together.

After some filling and sanding, I made a test optic. And the head looked preeeety bad. There was something just incredibly off about it. This began the massive amounts of revising and reshaping I had to do. And fixing of awful symmetry. The head required a massive amount of sanding around the sides of the face and the chin. Between initial construction and when I began painting, I completely reshaped these areas. I made the chin significantly smaller, and added the indents or whatever (fins?) on the side of the head. However, doing all of this required me to fill in chunks of the interior with large wads of foam clay. If I hadn't done so, then I would've sanded through it in places. I also made the awful decision to gap fill with hot glue. If you've not dremeled hot glue, I don't recommend trying it. It melts the glue and sends globs of it flying, and those things are hot and really hurt.


After even more sanding, gap filling, and re-sanding, I finally got the shape to something i was happy with. Unfortunately I don't have any photos from just before painting.
Priming and Painting
The next step was for me to slather this thing in primer so it could be painted. I use Plastidip, as a tutorial i saw years ago said it was the best primer. Why does it need primed? I'm not actually entirely sure, but it's what I've heard needs done, so that's what I do.


Plastidip is a spray, so I of course did this outside. After a ton of coats, I was left with a shiny surface ready for the paint. Not much to say on primer.
Due to not currently having a functional airbrush, V2 is entirely hand painted. I coated this guy in red paint, and i mean coated the entire thing. Even areas I'd later paint black. Quick tip: Don't do that. It's a waste of paint. But i did it anyway cause I'm a dumbass. I also had issues when doing the black with getting it to stick, and when removing tape it caused some paint to peal off too. I originally had painted a barcode on the side of the head, but removing the tape took the black paint off too. Sooooo no bar code.

Once I got the shell painted, I did the optic. The test optic I used was marker on unicorn buckram, but that stuff is really hard to see through, the markers looked bad, and I couldn't pain it without clogging the mesh (due to not having an airbrush and having to do it by hand.) So, I got different mesh: a larger weave black mesh. This stuff I was actually able to hand paint, thus how I got the iris I did.
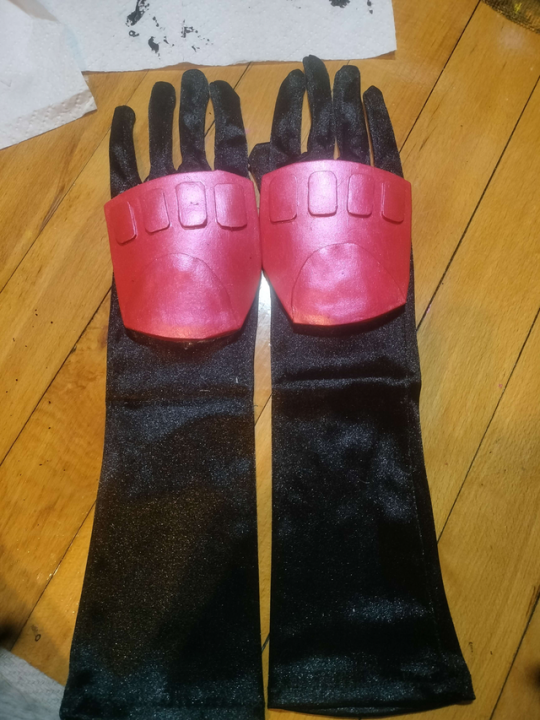
The Gloves
The gloves were, frankly, rushed. I bought a pair of cheap black costume gloves online, and then glued foam to em. For the gloves, I just used paper patterns to make the foam pieces. No fancy patterning here, just drawing shapes. After cutting the foam, I hot glued it, and then painted them. No priming on these, cause I was lazy and had a con coming up.
Conclusion
So that's about it! Thank you for reading this monster of a post! I'm hoping to eventually do a V1 head, so I'll be repatterning the V unit head soon. When I do, I'll probably make an actual tutorial. I dunno. We'll see.
46 notes
·
View notes
Text
taking some time today to discuss xiao! specifically the upgrades i made to him for metrocon 2023. i did so much experimenting with new techniques and materials, so i wanted to share that here to document, and maybe inspire some of my fellow artists/cosplayers!

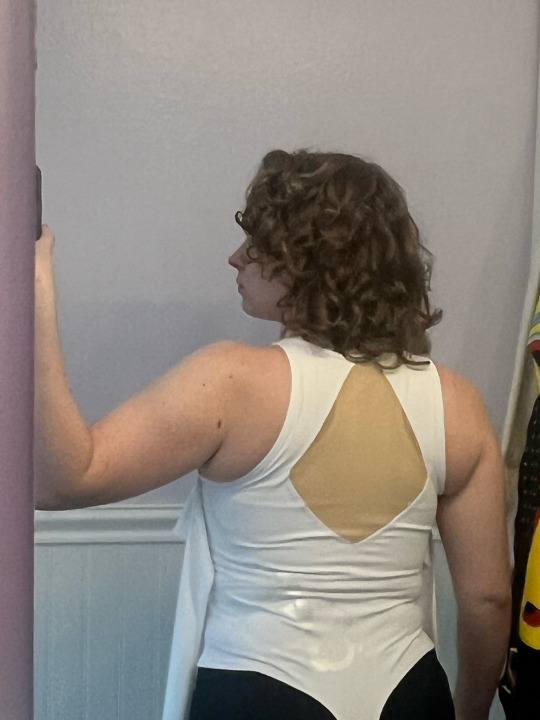
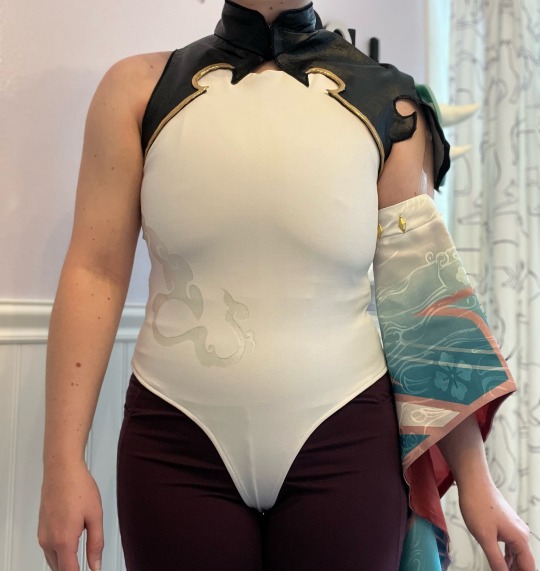
i don’t think i could ever properly explain how happy i was after remaking xiao’s shirt. the previous version (which was purchased) fit really poorly, and the fabric was not great. it constantly pulled out from the waist of the pants and it practically blocked any airflow. the solution was simple: remake it from a bodysuit. that way the shirt not only stayed in place but also already gave me a much better form-fitting base to start out with. the mesh panel in the back was the part i worried about the most but ended up being the part i’m happiest with! i used power mesh that i hand dyed to be close to my skin tone (though the color isn’t very clear due to my binder’s color).
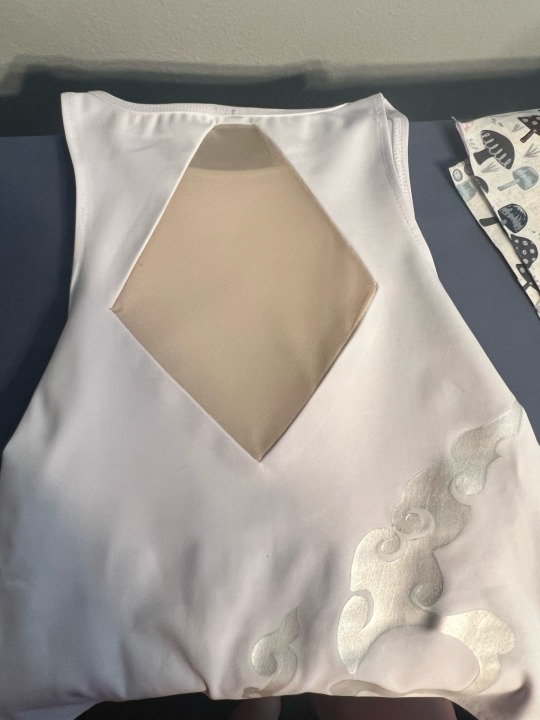
the swirling pattern on the bodysuit is a metallic white fabric paint. i made a digital drawing of the pattern on procreate, then printed it onto freezer paper. after cutting it out with an exacto knife, you can actually iron freezer paper onto fabric (shiny side facing the fabric) and it creates a nearly seamless stencil for fabric paint! i see myself using this technique a lot in the future, it’s literally perfect!!
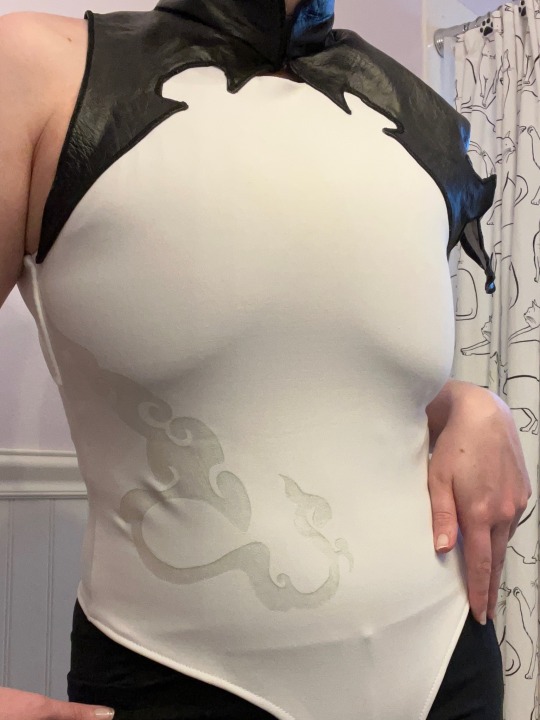
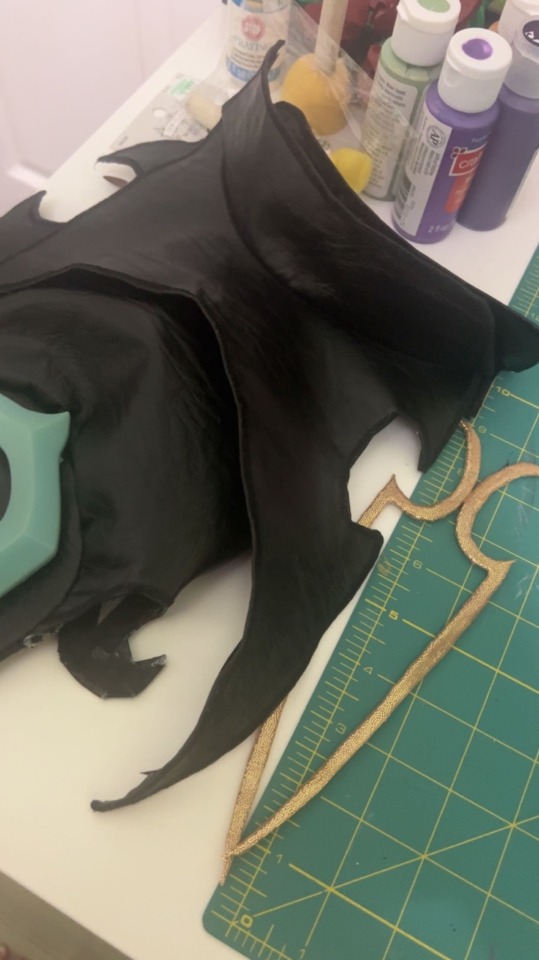
the black leather piece at the neck and shoulders was my biggest obstacle. not only have i never worked with leather, but it is also a non-stretch material i’d be attaching to the collar/neck portion that very much needed to be able to stretch to be pulled on. thankfully the design worked out that i could have 2 closure points, one on the back of the neck and one at the front of the neck. the entire piece is hemmed by folding over and gluing the raw edge to the inside, then i glued hem tape over those raw edges to cover them and make them softer on the skin (the entire leather piece is unlined, due to its complex shape). all the visible edges of the leather were satin stitched to give them a clean, crisp edge. the gold appliqués on the front and back are 2mm eva foam covered in a gold stretch fabric, then glued onto the bodysuit with e6000!

the two white pieces that frame the mesh panel on the back gave me more difficulty than i expected. their shape is a bit deceiving, and needing them to lie flat on my back without sacrificing the stretch of the main garment meant i couldn’t just top stitch them onto the back. and while i’m not super happy with how they ended up aligning (where they meet at the top is much further down than i was aiming for), i still think it came out really nice!
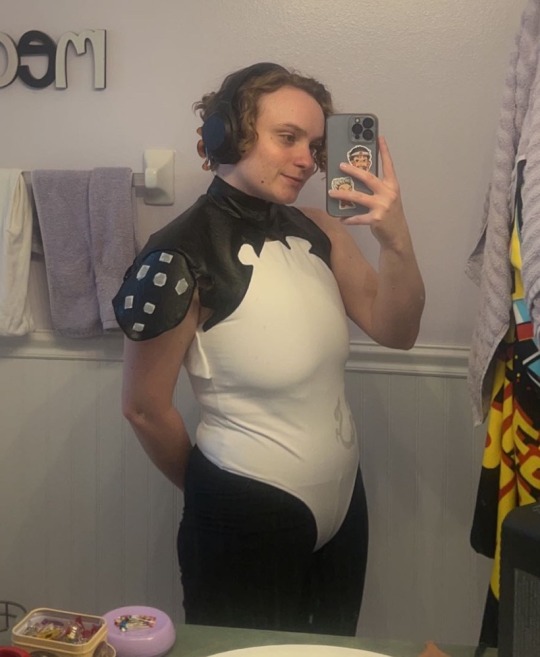
and that’s the finished top!
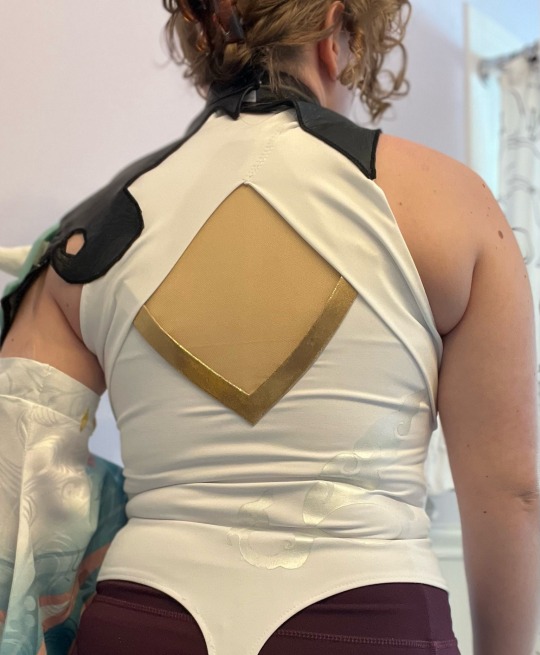
here’s a front and back of the finished top! the sleeve is held up with clear bra straps that hook onto the inside of the shirt at the shoulder. all in all, i absolutely love how this newer shirt came out.
besides the shirt/bodysuit, the boots also got an upgrade! i snagged some boots on sale on amazon for $20, which was an insane steal! this style is very universal for so many costumes, and it also helps that the boots are comfortable and flat too! all of the accessories on the boots are affixed temporarily or from the inside (velcro, snaps, and elastic) so that the integrity of the outer boot remains untouched and i can reuse them for several costumes and even everyday wear. i also replaced the gold piece around the neck that holds the “scarf.” just like the pieces on the shirt, it is 2mm foam covered in gold fabric. this not only helps the gold elements feel more cohesive but also lies a lot more comfortably on my neck!
#cosplay#cosplayer#tutorial#sewing#sewist#cosplay breakdown#cosplay tutorial#genshin impact xiao#xiao genshin impact#genshin xiao#genshin impact#genshin impact cosplay#genshin impact xiao cosplay#genshin xiao cosplay#xiao cosplay#genshin cosplay#cosplay wip#metrocon#metrocon 2023#xiao#adeptus xiao
105 notes
·
View notes
Text
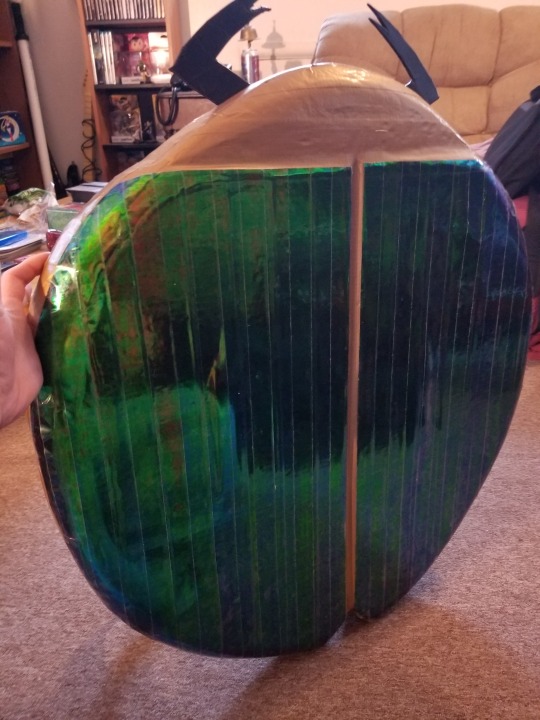
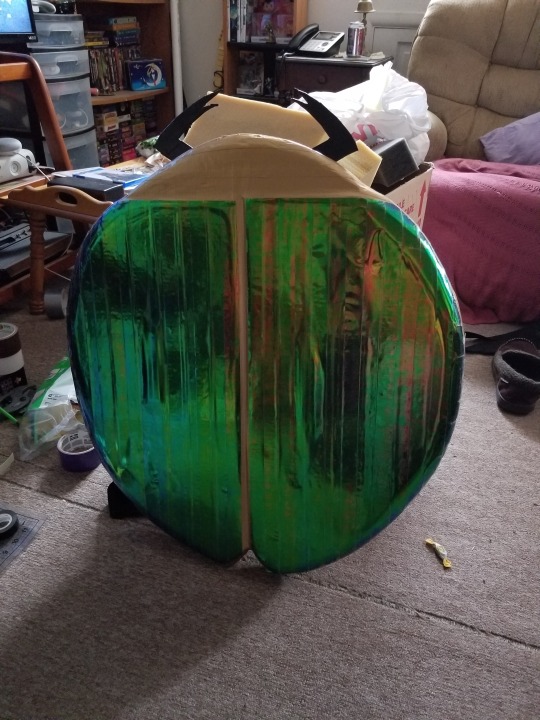
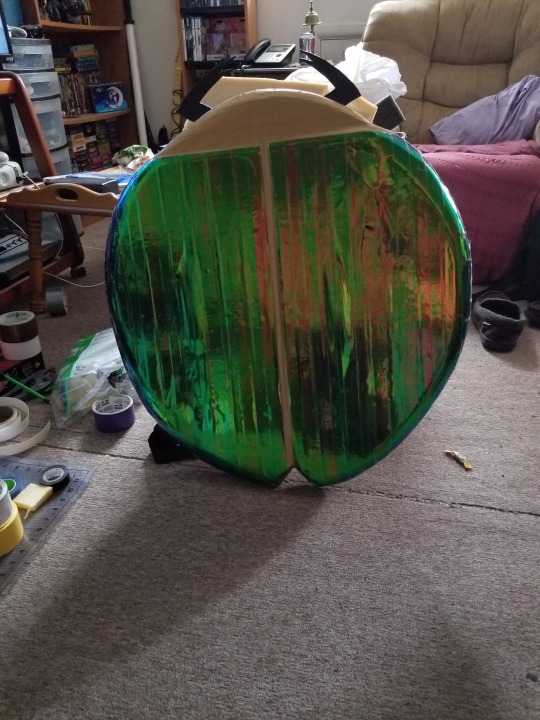

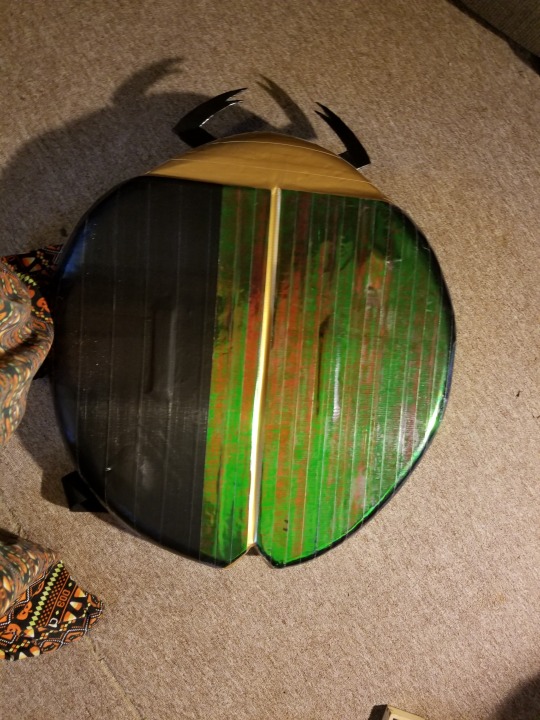
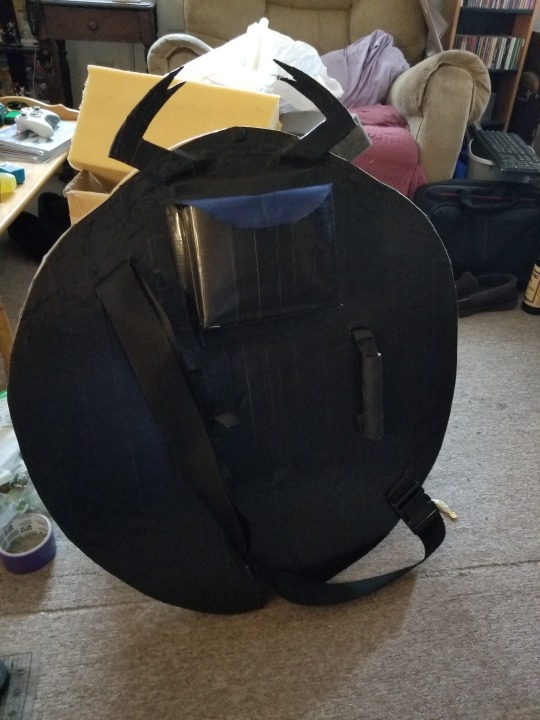
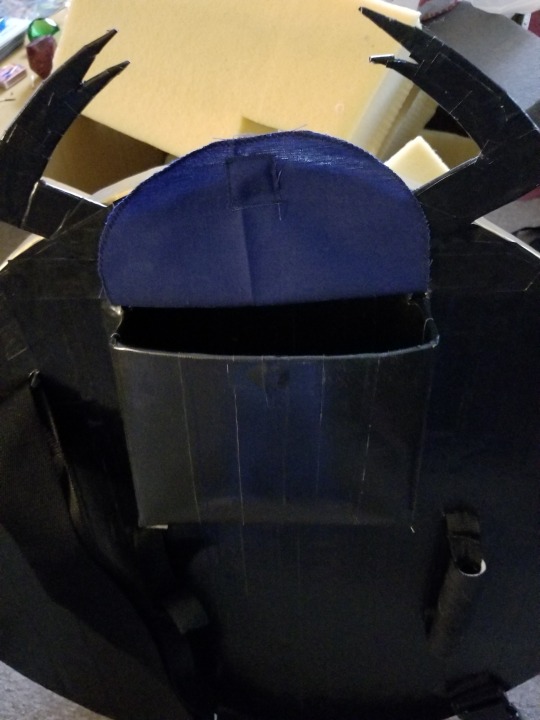
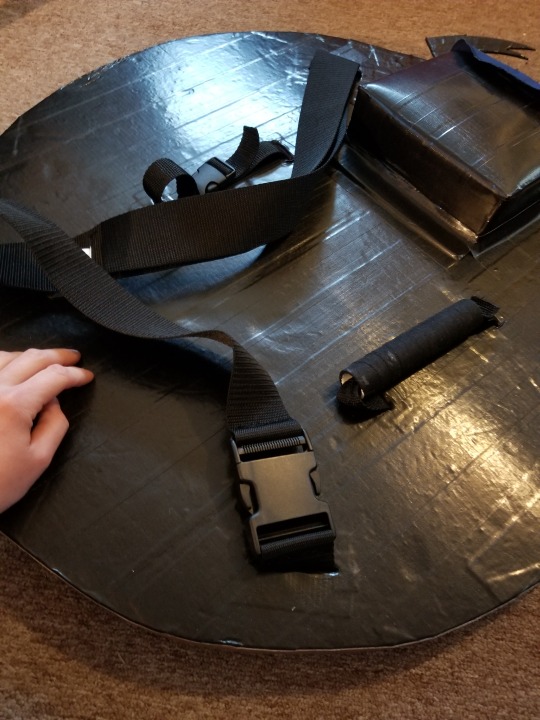
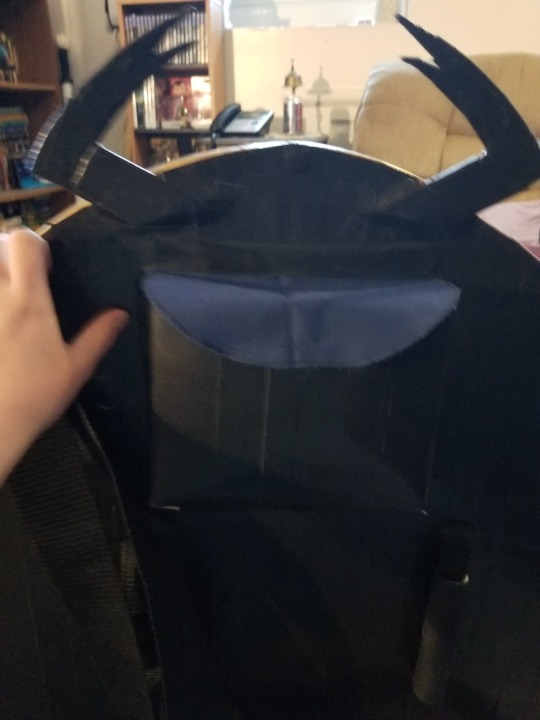
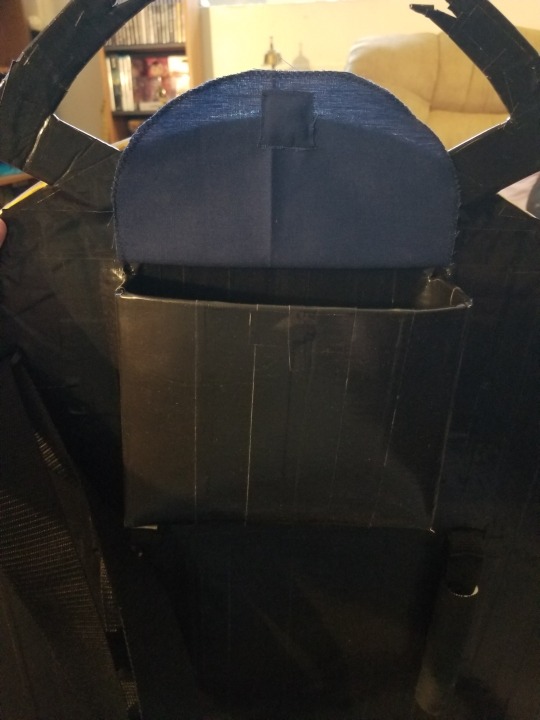
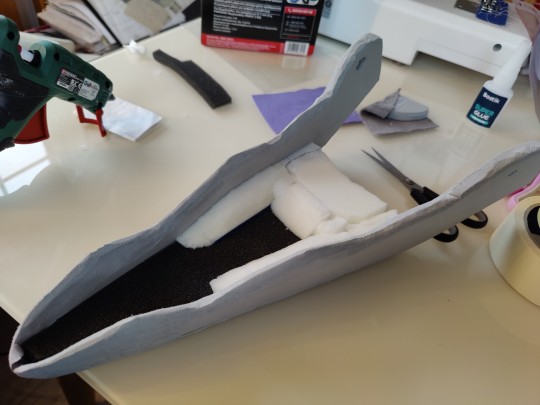
Very very proud of this one. Commissioner wanted a scarab beetle-themed shield, and asked if I could figure out a way to get that cool shiny colour you see on scarabs. Said I'd give it a shot, and discovered the beauty that is Hula Hoop Tape. It's pricey, particularly for this much surface area, but the commissioner has deep pockets and didn't care. That lovely green-gold sheen is hula hoop tape over black duct tape, to get that super unique shine.
He also wanted a cross-body strap, adjustable arm strap with quick release, and a hand-grip with a piece of grip-taped pipe to hold. Built into the back of the shield is a pocket for spell packets, with a fabric flap with a magnet in it. Corresponding magnets are in the pocket and the back of the shield behind it, to hold the pocket open or closed with ease.
(Shield constructed of 2" expanded polystytrene insulation foam, duct tape, hula hoop tape, webbing straps and buckles, 2mm eva foam sheets, neodynium magnets, 1/2" PVC pipe, friction tape on the pipe for grip, and a guitar strap.)
19 notes
·
View notes
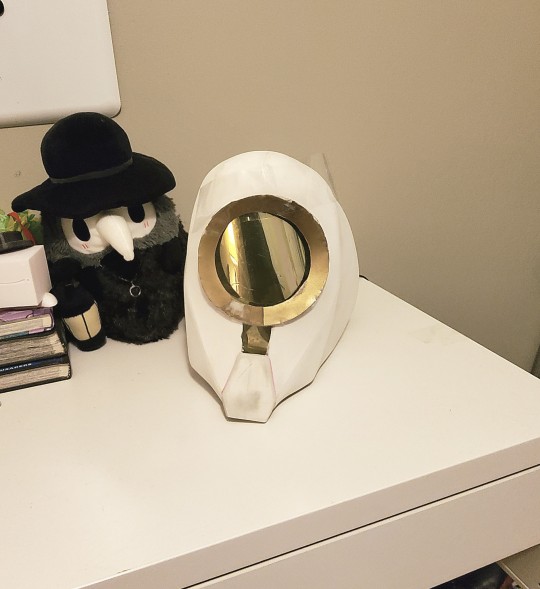
Note
I was wondering, what did you use to make the helmet/visor for you Gabbro cosplay? It looks fantastic and I'm figuring out making one sometime next year. (Thanks in advance!)
Hey, thank you! So the materials that I used were:
- 10mm EVA foam for the helmet
-Helmet painted with FX flexible acrylic paint
- galvanized 14 gauge wire (from home Depot) for the antennae (and I 3d printed the antenna teaspoons from an online template). I made the antennae thicker and cartoonier by doubling them up and keeping them in place with a thinner silver crafting wire.
-to keep the antennae in place, I used mixture of hot glue and thermoplastic pellets stuffed into some thin PVC tubes I cut short and covered in thin EVA foam (for strength- those antennae can be heavy and I was afraid it would cut the EVA foam alone).
- A transparent protective document sleeve for the visor- you know those flexible but tough types you buy to protect art prints. I cut it with an x-acto until it matched the window shape in the helmet.
- For the reflective effect, I used one-way mirror window film, specifically this one, and squeegeed it onto the document sleeve. To get it glued into the helmet, I had to really carefully use a balance of hot glue to get it to stay and E6000 to get it to stay permanently. Be VERY careful about bubbles because this stuff loves to delaminate on curved surfaces.
To form the helmet shape, I basically made the shape I wanted using crumpled paper, cardboard, and tape, and then I made a template using cling wrap and duct tape on the model. There's quite a few tutorials for making EVA foam helmets online.
Let me know if you need any more details!
40 notes
·
View notes
Text
EVA Foam Tape is a Versatile Adhesive Product Best Known for Its Cushioning Property!
In various industries and everyday tasks this foam tape and double sided tape are indispensable tools, offering adaptable solutions for mounting, fastening, and adhering objects. Comprises a foam substrate coated with adhesive on both the sides, this tape is known for its cushioning properties. Making it ideal for uneven surfaces or applications requiring gap filling, the tapes design provides excellent conformability. Foam tape excels in mounting signage, securing trim, or dampening vibrations and is commonly used in automotive, crafting and construction. Such as paper or film, this double sided tape features adhesive on both sides of a thin carrier material. Facilitating clean and seamless installations of posters, carpets, or mirrors this tape strength lies in its ability to create invisible bonds.
The most versatile adhesive product
Made from ethylene-vinyl acetate copolymer foam the EVA foam tape is a versatile adhesive product. Foam tape finds an extensive use across various applications and industries. This tape is renowned for its flexibility, durability, and cushioning properties. Making it suitable for mounting the objects on rough or uneven substrates, its soft yet the resilient nature allows it to conform to irregular surfaces. Its ability to absorb vibrations and shocks are some of the key features of this foam tape. Additionally, its properties to weather resistant ensure a reliable performance in both outdoor and indoor conditions.
It’s a very high performance adhesive product
With versatile applications in industries such as automotive, electronics and packaging, double sided PET tape is a high performance adhesive product. PET serves as the carrier for the adhesive on both sides of the tape and is a durable and heat resistant material. Its exceptional strength and the adhesion is one of the notable features of the double sided tape and provides a reliable bond between a wide range of substrates, including plastic, glass and metal. This makes it an ideal choice for applications that require a secure and long-lasting attachment.
#EVA Foam Tape#double sided PET tape#PVC Foam Tapes#Polyethylene (PE) Foam Tape#Polyethylene Foam Tape Roll
0 notes
Text
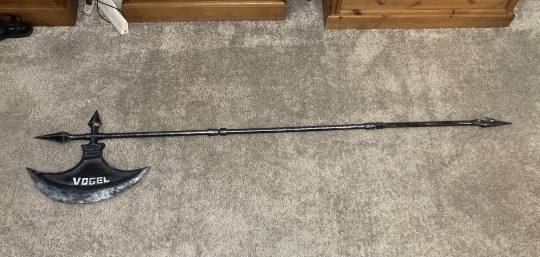
AAAAAAAAA ITS DONEEE
I measured it and this thing is fucking 6’6-
(materials and process underneath vv)
Materials used:
-3 pvc pipe segments with the screw adapters
-Eva foam : 2mm, 5mm, 10mm
-Foam clay
-Thermoplastic beads
-Metal wire
-Various superglues
-Spray paint
-Acrylic paint
~~
The Pvc Segments:
I started off with three 2ft pvc segments and glued the cross adaptor on the top, then proceeded to hack off and move around pieces as I saw fit. For the top segment I believe I cut off 5in, then glued 3 to the top of the cross pipe and tossed the remaining 2in. I also cut off 8in on the bottom to make way for the spike which is around 5.5in.
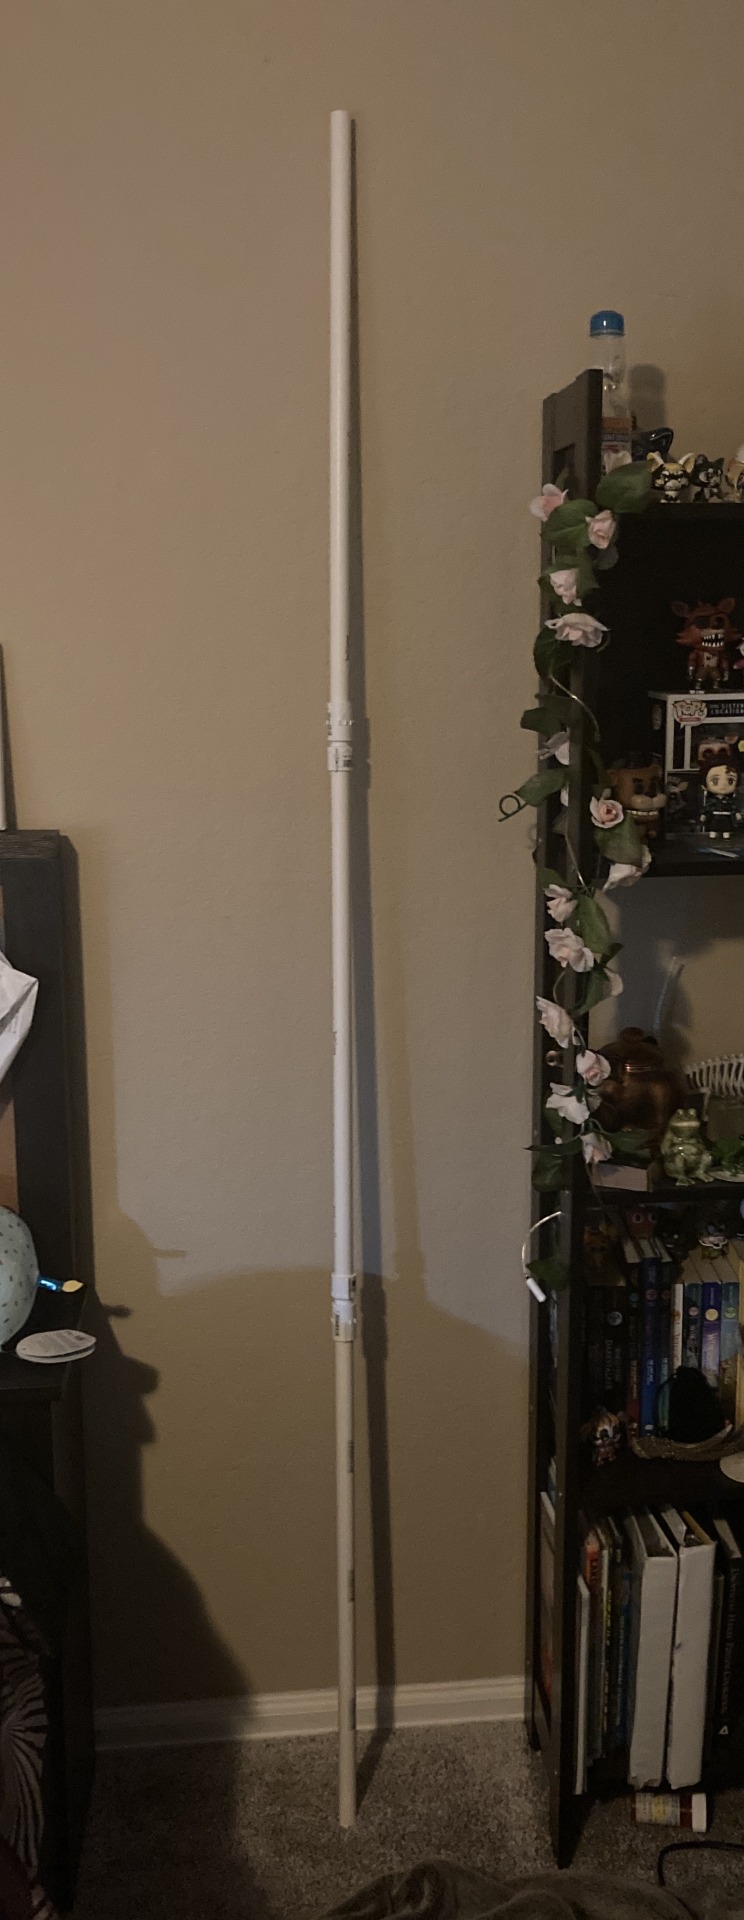
(The original pipes, I didn’t really have any other progress pics of this part)
~~
The Main Blade:
I started by going into FireAlpaca and separating the halberd from Sinclair’s sprite, then broke it up into various pieces and used Rasterbator to size up the blade. After that I printed it out, assembled it, and transferred it to freezer paper to adjust it as I saw fit.
After that I cut out two pieces of 10mm foam and glued them together as the main blade, then added the details with some 2mm foam I got from Walmart I think? I proceeded to hack away chunks of foam with Eva foam with a box cutter (and almost sliced my hand open in the process) before sanding the absolute crap out of it)
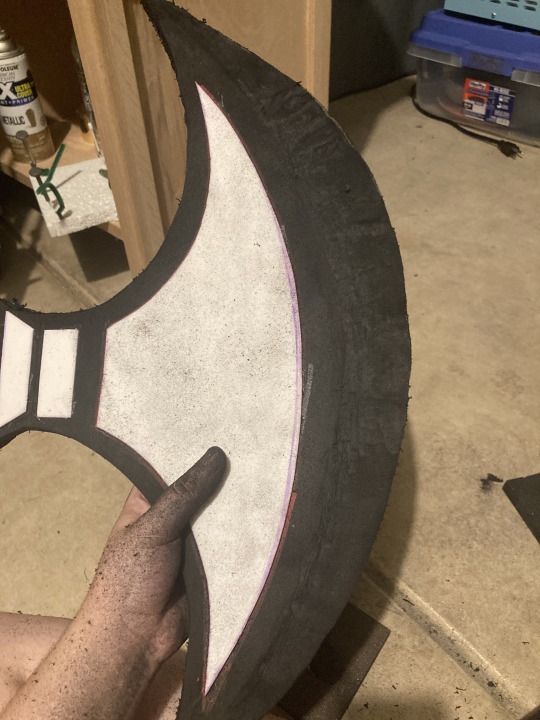
Once it was all sanded and I was content with it I took my heat gun and sealed all the foam and got rid of the fluffy texture created by the sanding and filled some of the gaps with foam clay.
After the blade I was done I stuck some wire into it, then shoved that wire through some thermoplastic beads I had melted and put in the pipe, and superglued it. It really wasn’t wanting to stay so I added more thermoplastic around the outside and proceeded to add more superglue (Gorilla and Flex Seal glue if I recall correctly) which has seemed to help it stay on. It’s not 100% stable but as long as I’m careful with it I’m ok.
~~
The Spikes:
Just like the blade, I made the pattern based the sprite itself. Using the line tool in FireAlpaca I traced over the top spike and the side spike and got the pattern from that. I resized and reshaped them in a Google doc before printing them out. After that I traced two of the spike pieces, cut one in half vertically and glued them together. After that I used small triangular pieces of foam to connect the corners and with that the skeleton was done (I added wire into the bottom spike for support as it is going to be bashing the floor a lot).
i then filled the skeletons with foam clay, making sure to get all the sides even and filled completely.
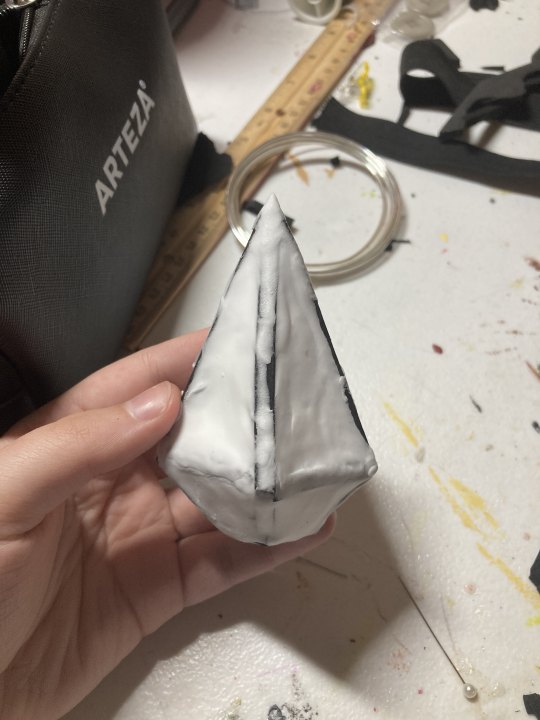
(I forgot to add the triangle pieces in the bottom spike until later)
Once I sanded them and attacked them with the same method as the blade the base was done!
~~
Painting:
In order to create a stable base to paint on I shoved three wooden dowels into a fertilizer box and hot glued them down. I then broke the halberd down and put each piece on the spike before spraying it with multiple coats of plastidip.

(Note- I taped off the parts that would be screwed down as I was afraid that the paint would interfere with the threading. I don’t know if it would actually cause any problems but I didn’t feel like risking it)
Once that was completely dry I sprayed it with three coats of Rustolem Black High Gloss paint.
Finally, I dry brushed everything with silver paint and added the lettering, using some black paint to mimic the paint chipping.
Once I added two coats of Rustolem clear sealant it was done!! The overall process took about two weeks and I’m quite happy with how it turned out! I may or may not have injured myself a lot during the process because I’m stupid but it was quite a fun project, and I do have more Project Moon props planned for the future such as Don’s lance and Argalia’s scythe. Once I finish my full cosplay I’ll make a post similar to this one :)
38 notes
·
View notes
Text
Okok, I know I JUST made a councilor post, but I've been working on a cosplay and I'm finally getting somewhere decent with the helmet. Turns out Eva foam gets EVERYWHERE and can be a slight nuisance to clean up.
It's not done ofc, but it's getting to the point it doesn't make me physically ill to look at. Of course, that could just be the foam I'm inhaling.
Also just ignore me taping the things together, I still have to make it look pretty lol
#Don't even ask me about the actual armor yet#shit still looks foul#i can't deny I'm a little nervous about actually showing up to a con in it#like it looks cool#but I'm scared to meet other ultrakill fans in the wild#some of you guys actually scare me#ultrakill#ultrakill cosplay#councilor ultrakill#ultrakill council#lmk if you guys want more#I have no clue what I'm doing
10 notes
·
View notes
Note
Update: I lost the One Piece I Needed for Percy the Lego rover and it's the smallest one I'm screamingggg. What do you do when you don't have a part?
It depends on the thing I'm building but usually I add a shitload of duct tape, dental floss, eva foam or cardboard and pure stubbornness
7 notes
·
View notes
Text

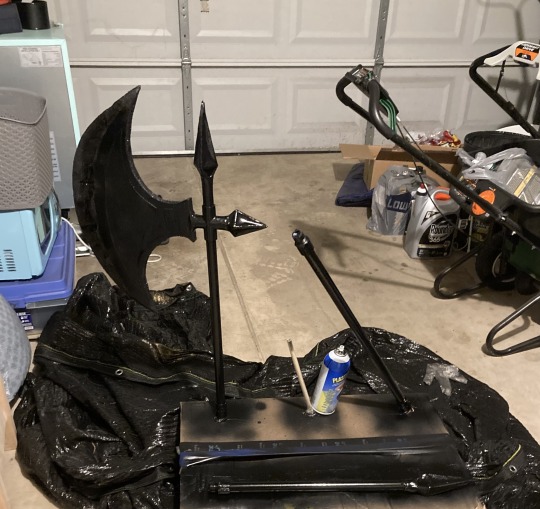
Building Dango: Part 9
It's time to prepare the jaw.
While the head was made to fit my face, I think I ended up with some discrepencies for the jaw size. I probably shouldve added a lot more foam to the top of the head, because instead I ended up with almost 2 inches of extra foam in the jaw so I can move it properly. Oh well.
It is a little too deep too, something I coulve and probably shouldve fixed in the cardboard stage. Why didnt I do that? A mystery of fuck around and find out.
EITHER WAY!
The base has thin 1cm thick foam inserted to elevate the teeth that are going to be in it. But then I realise the jaw angles upwards, so I had to add artificial gums as well for the rest of the teeth.
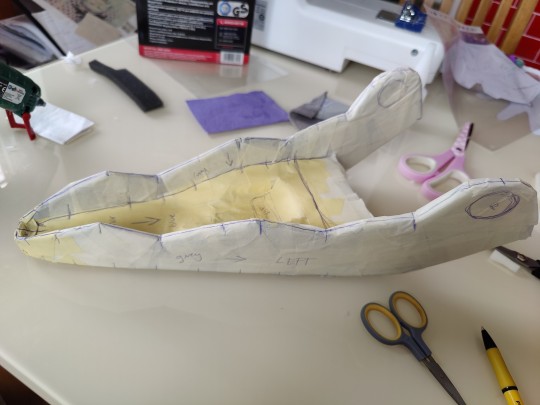
I knew going in the jaw wasnt super symmetrical, so I did end up taping up the whole entire thing to make sure it will all fit and get the pattern that way. Cutting it off the jaw was a greulling process and I also sliced my finger open which was fun to hear my friends yell at me.
After that I finally bit my fucking tongue and actually fitted the head properly. With elastic. One horizontally, and one vertically to create a faux dome. Of course I had to cut through the black foam on the top of the mask to fit the elastic through.
But Jay- how do you attach this elastic?? Are you sewing it through the foam?
NO!!!
We are back to using the strongest bonding agent we own- contact cement. With a piece of 2mm low density eva foam on *top* of it to keep the elastic stable and the bond stronger. I will say. That if i really were to pull at it, it would rip off. Because its not actually stuck to the foam... its stuck to the paint and varnish. So lets avoid that scenario shall we.

After that I started fitting on more foam to the top corner, and then using 1in upholstery foam I built the back of the head. The dummy head I bought just for this is finally being utalised. I was quite stressed about this part because I did not have a lot of upholstery foam but it was all okay in the end! And it came out pretty nice and snug :)
Next step: The neck scales.
8 notes
·
View notes
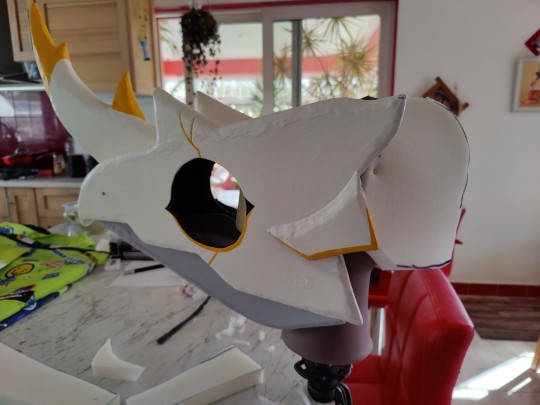
Text
Progress report:
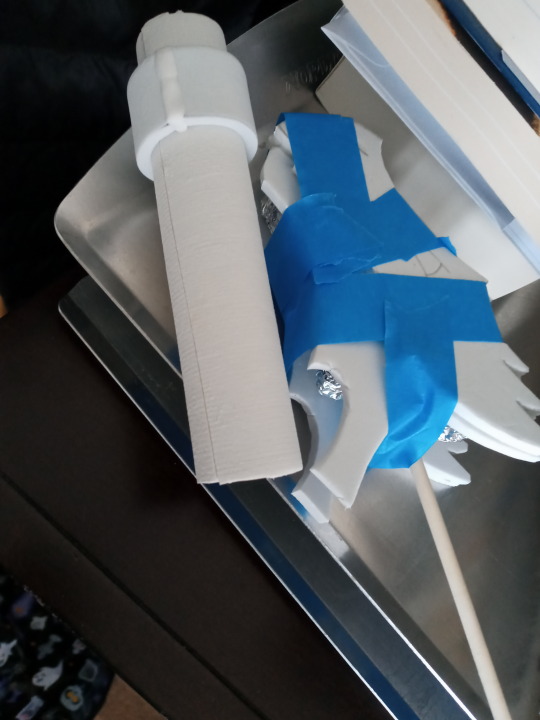
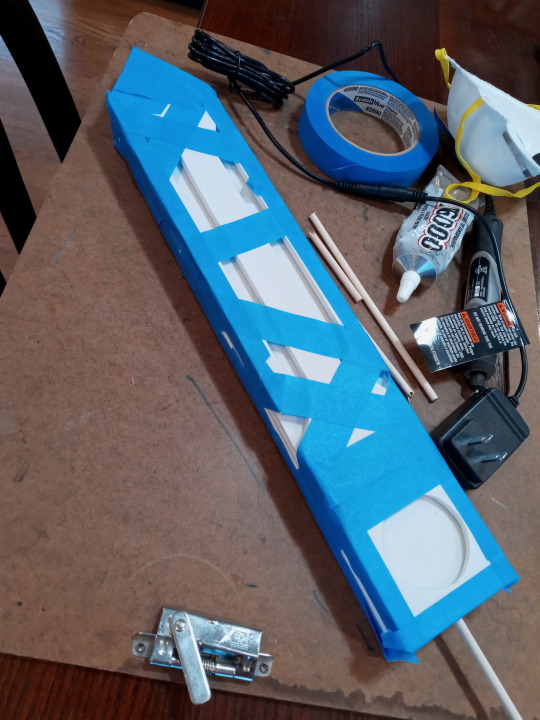
Cut, align, glue, tape, sleep; repeat.
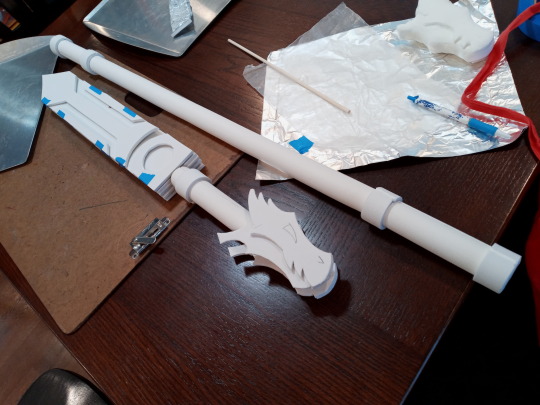
Trying something a little different with the dragon sword pommel. My first attempt (upper right there) didn't dry quite how I wanted. So I cut the detail from eva and glued it to a new armature. Tomorrow I'll start to fill in all the gaps and edges with modeling foam.
#yep that's a monkey king staff there too!#cosplay#mine#mei dragon sword cosplay progress#lego monkie kid#i guess this is an amateur cosplay creation blog too now
22 notes
·
View notes
Last Seen Blogs

senzikal
howdy

micharnababy
Neon Lights and Waiting papers...

anmolkaumr34
Untitled

yellowsyro
Art of Syro

weepingwidar
weeping widar