#* tutorial
Text
putting the water, into watercolor artist
Still can't quite believe it's real, but I'm releasing my own artbook! The Art of Kelogsloops: from Sketch to Finish releases May 21st!
More details about the release here: The Campaign
#brbchasingdreams
#brbchasingdreams#artist#art#watercolor#watercolor artist#artbook#art book#artists on tumblr#my art#original art#sketchbook#sketch#art style#tutorial#resource#book
538 notes
·
View notes
Text
i decided to make a video showing my giffing process to anyone that might be interested.
youtube
I make my gifs with Photoshop 2024 on a macOS
Avidemux download
How to install and use vapoursynth
Action to turn the gif into frames again so you can adjust the frame delay before saving the gif.
If you have any questions, feel free to ask me.
89 notes
·
View notes
Text
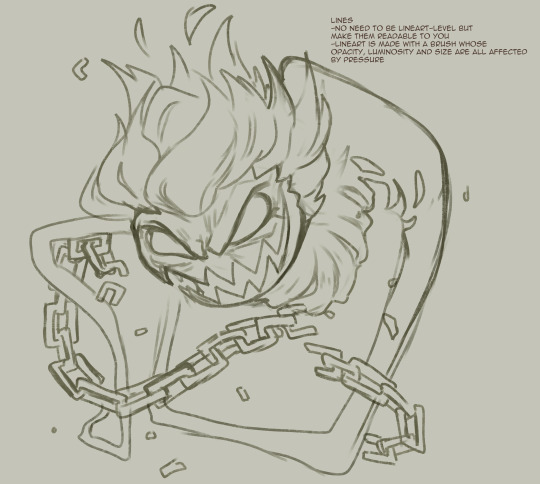
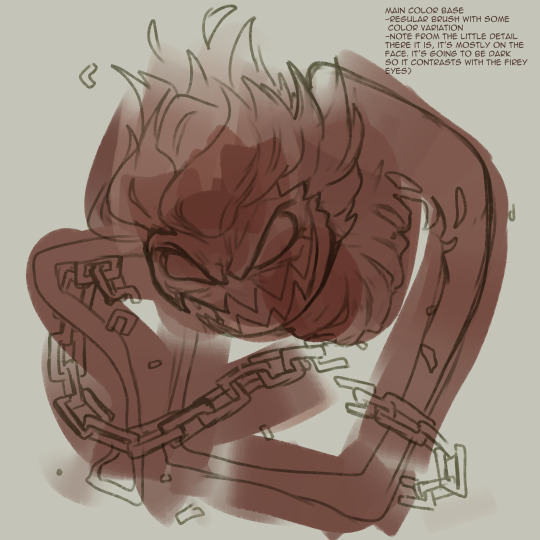
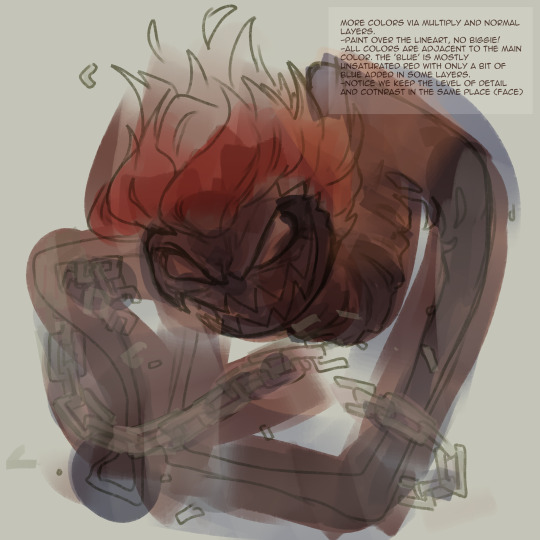
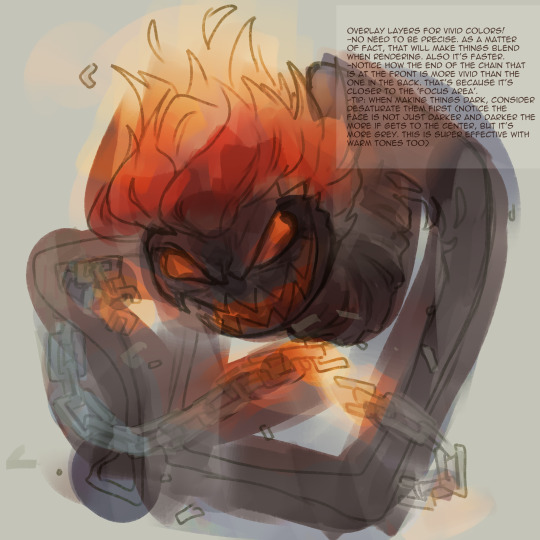
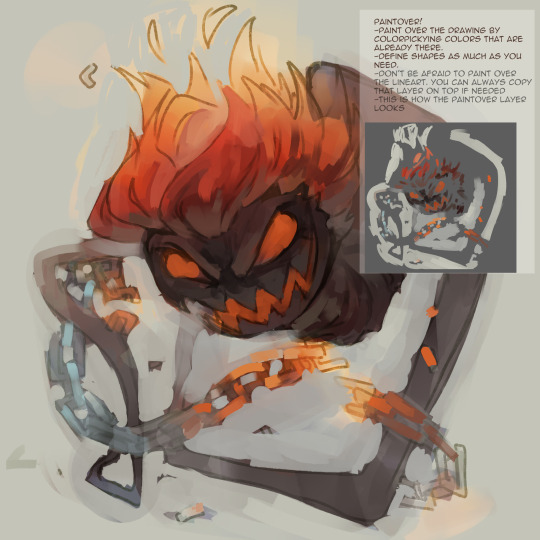
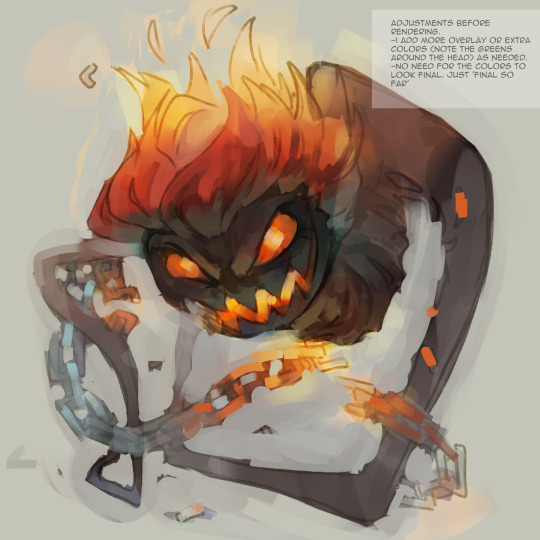
I guess I had enough spoons on me that when I was asked to do a tutorial on this picture I did
It's not perfect but it might help someone:

111 notes
·
View notes
Text
#spop#sole survivor#kaia gerber#dark academia moodboard#hotel#lil uzi vert#warhammer#tutorial#study blog#kyle broflovski#ts4mm#hp fandom#shigatsu wa kimi no uso#mycroft holmes
121 notes
·
View notes
Note
Do you have any advice for drawing rodents? Any advice help as I'm having trouble drawing their faces.
Hey there! I hear you honestly, rodent faces took me forever to figure out. I will say my style is very cartoonish, and I take a lot of liberties with my characters so I can have them fit a persona, style, or look that I'm going for.
But if you'd like a quick little tutorial I'd be happy to give it!
Most important thing is to study. Look at real life rodents, look at rodent skulls. The skulls especially are the building blocks of the entire anatomy of the face.
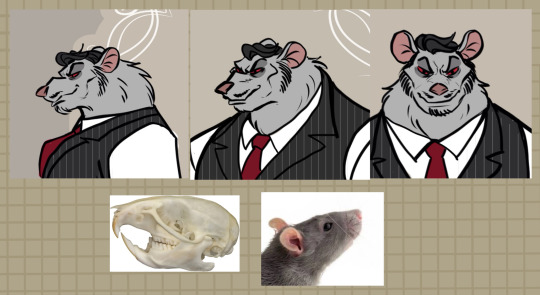
I'm mainly going to focus on side profile of a rat for now! Pads here is a good example of how you can take the basic form of the skull and add your own style to it.

When I look at the rat skull I break it down into the separate forms. I use circles here but you could easily use rectangles and squares to assist you with the volume/depth. I like to imagine the muzzle area as one slightly stretched egg shape. When switching to front view you're looking at the egg from top down, it's almost completely round.
You can use these forms when you are sketching out the outlines to help you draw the face. The most prominent feature on rats is their large upper jaw. A lot of mammals share this trait, but on rats its more pronounced and it's far more sloped.
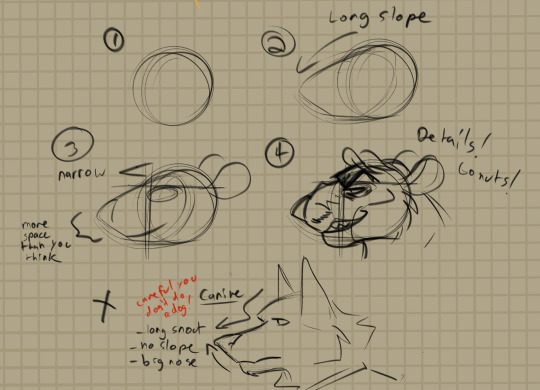
Here's a quick step by step. Rat/rodent heads are far more narrow and sloped downward than say a canine head, which often sports a longer more upward turned snout.
Once you have the basic of the form down you can pretty much go crazy from there! Pads here is a bit more angular and intense than say his sister Sorcha, who I've softened and made more sleek in comparison. Here's a pic of her and a few other rats!


But creating stylized characters is all about breaking rules. Once you have a basic understanding of the form, you can learn all the angles from there!
Hope this helped!
#how to draw#my art#tutorial#rodent tutorial#how to draw tutorial#rat#rat furry#rodent#rodent furry#original characters#ocs#ratterrock#how to draw rat#how to draw rodent
43 notes
·
View notes
Text
SiliNOT! Testing and Review
Since I run a lot of casting workshops, I've had several people in the costuming/maker community ask me my opinion on SiliNOT!, a relatively new product advertised as a budget- and eco-friendly moldmaking alternative to silicone, urethane, and other single-use materials.
I finally bought a couple of bottles to play with, so I did a test project. My experience and findings are below! (It's not a recipe blog, but if you want to skip the play-by-play and get to the TL;DR, it's under the big "In Summary" header near the bottom.)

First, if you aren't familiar with this material, SiliNOT! is a remeltable, reusable medium for making molds. Though its exact ingredients are not disclosed, it purports to nontoxic, food-safe, and compostable. It melts in a household microwave or double boiler and solidifies at room temperature (or in a refrigerator/freezer for faster results). The website is https://silinot.com/.
(I am not an affiliate, and have no connection to this company apart from having made one retail purchase from them. I just have a lot of casting experience and like trying out new products.)
The Positive Original
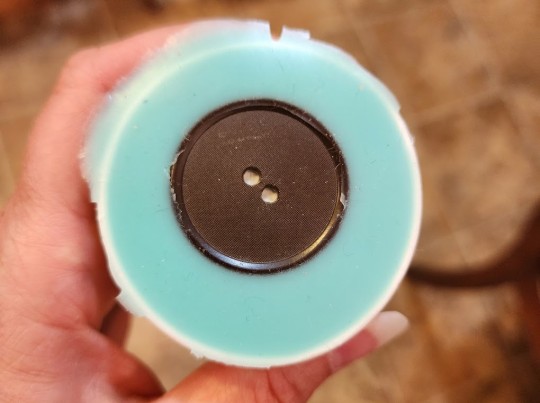
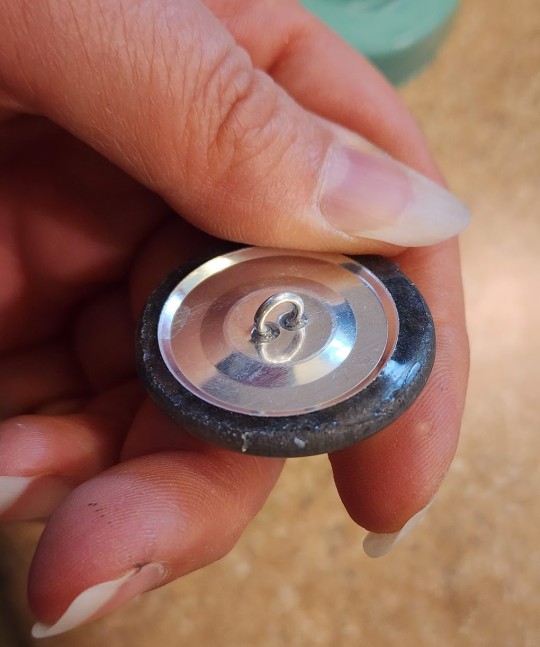
I’m still in the middle of a Vincent Valentine build, so I decided to test the SiliNOT! on his custom buttons. My original is a stack of various nonporous materials: an antique (probably Bakelite) coat button, an epoxy resin dome I cast using a mold I already had in my library, and some engraved Worbla’s Pearly Art for the raised detail. The button shanks won’t be added until the final casting, so the original can be mounted flat for the moldmaking process.
Sample Worbla on the left; completed button stack on the right:

The Mold
I built the mold container the same way I do for silicone pours, with the flat back of the button fixed to a styrene plate and a cylinder (actually a small paper cup with the bottom cut off) surrounding it for the walls. The lip of the cup is sealed all the way around with Monster Clay to prevent leaks.
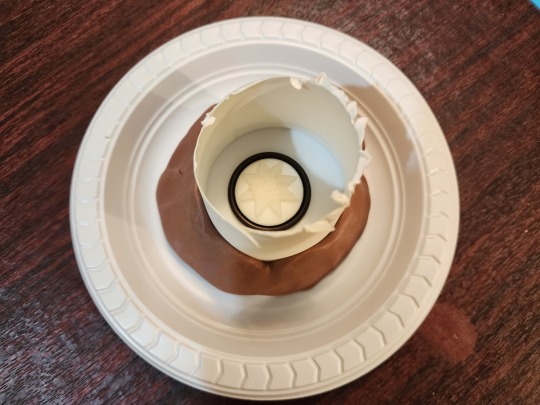
Heating and Pouring
The SiliNOT! didn’t take long at all to heat up; I did maybe four or five 20-second bursts before it was completely fluid. The bottle does get rather warm, so hand protection isn’t a bad idea. If you have heat-resistant gloves, you can use those; I was working in my kitchen (yay for nontoxic stuff!), so I just grabbed an oven mitt with a silicone grip.
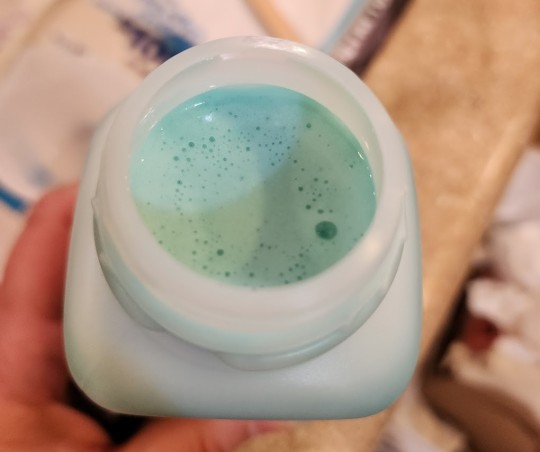
The melted SiliNOT! looks a bit like Luke Skywalker’s blue milk. It’s about the consistency of a yogurt smoothie and likes to pour in a thicker stream compared to silicone. While silicone can be stretched into a thin ribbon for delicate pours or chemically thinned with solvent for really tricky jobs, SiliNOT!'s viscosity is dependent on temperature and never seems to get quite as thin as silicone.
I’d automatically made my mold compact to conserve material (not really a concern with a reusable moldmaking material like SiliNOT!, but after using silicone for more than a decade, I’ve trained myself to be as efficient as possible), so the walls of my mold container were only about half or three quarters of an inch from my object. Because the target was so narrow, I found it difficult to accurately fill from the lowest area of the mold with the SiliNOT! The heavier pour also means more air can get trapped in or under the material.
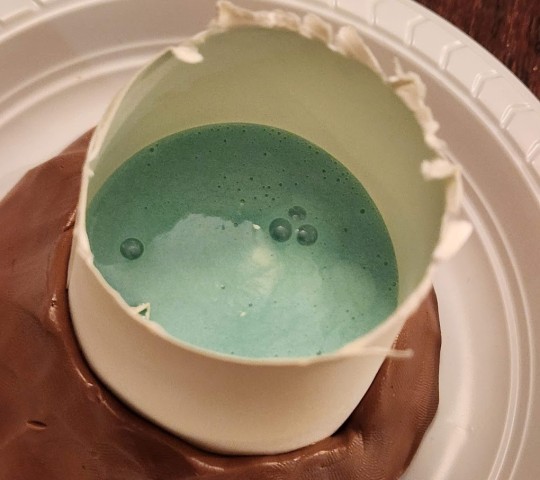
Bubbles are one of the areas in which SiliNOT! is decidedly inferior to silicone. SiliNOT! has higher viscosity, so bubbles don’t want to rise to the surface without vigorous tapping, which can distort the mold edges or affect leveling depending on your mold container. The bubbles that do make their way to the surface are difficult to pop, even when poked with a sharp implement. Heat gun degassing doesn’t have much effect.
Since the bubble surface cools and skins over quickly, I actually had to use a tool and scoop some large bubbles completely out of the mold to allow the surface to level. Critically, the SiliNOT! is opaque, so you can’t spot bubbles clinging to the surface of your original. (This is why my first mold was a reject, and I had to repour. More on that below.)
Hardening
Once the surface had set, I carefully moved the mold into the refrigerator to cool faster. Here’s another area where some types of silicone can have an advantage: I typically use fast-curing Smooth-On products (because I always have random quantities left to use up after our casting workshops), so I rarely have to wait more than half an hour for a silicone mold to cure, regardless of its size or mass.
The SiliNOT! has to chill completely before handling, though, and discharging that amount of heat requires a fair amount of time even in a cool environment. My mold was pretty small, maybe 2 1/2” wide by 1” deep, and it still took around 40 minutes to cool completely. A larger, deeper mold could hold considerably more energy in the center, and might have to be left in the freezer for a couple of hours before use.
Demolding the Original
When the mold was completely chilled, I removed it from the refrigerator and popped it off the plastic plate I’d used for the base of the mold. The texture was very different from what I’d expected: Unlike other meltable materials (Monster Clay, et al.) that have a firm surface when cool, the SiliNOT! remains tacky, which means it promptly collects any debris that crosses its path. In my case, this meant I had to pick dog hair off the surface throughout the casting process (and I don’t want to think about what would happen if glitter had contaminated the work space).
I’d used a paper cup for my mold walls, which usually works fine with fast-curing silicone. But the SiliNOT! must have a high oil content, because the cup absorbed some of it:
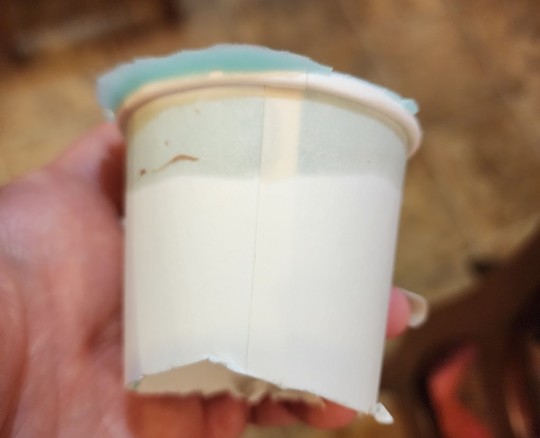
Lesson learned; use only nonporous containers with this stuff.
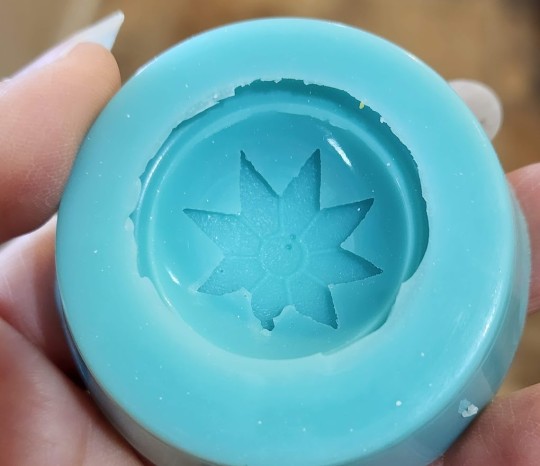
The SiliNOT!! really wanted to cling to the edges of my original, so I had to go slow at first to avoid tearing the thin flanges of the mold off. However, it did demold nicely from the smooth surfaces, and preserved texture very well. You can see the Worbla pebbling and the engraving channels clearly in the mold (as well as some dust and dog hair, because I made the mistake of setting it down briefly):
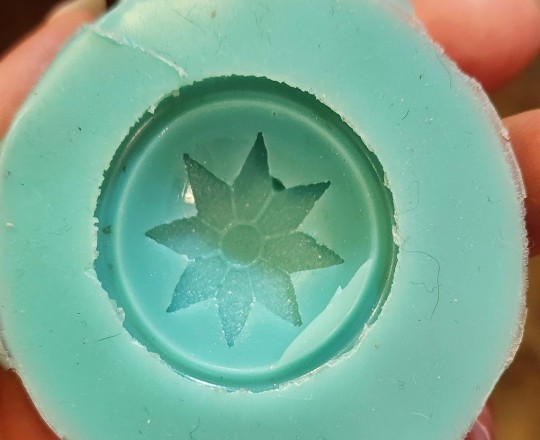
Unfortunately, as you can see, a large bubble had stuck to my original and created a pit in the mold, so I decided to do a second mold pour. I figured I’d tear up the failed mold and put the pieces back in the bottle to remelt… and discovered I couldn’t. The mold would stretch and twist, but not tear. It also seemed to return to its original shape relatively faithfully. Here’s a video of me manhandling the mold:
As you can see, the SiliNOT! has much better stretch and recovery than many silicone products (there are silicones that stretch well -- some of the Dragon Skin products come to mind -- but they’re not typically marketed for moldmaking). This means it’s likely well suited to casting objects with moderate undercuts or oddly-shaped bits that need the mold to stretch during demolding.
You can cut the SiliNOT! easily with scissors, which is the recommended method for getting it back in the bottle when you’re ready to remelt.
Take Two
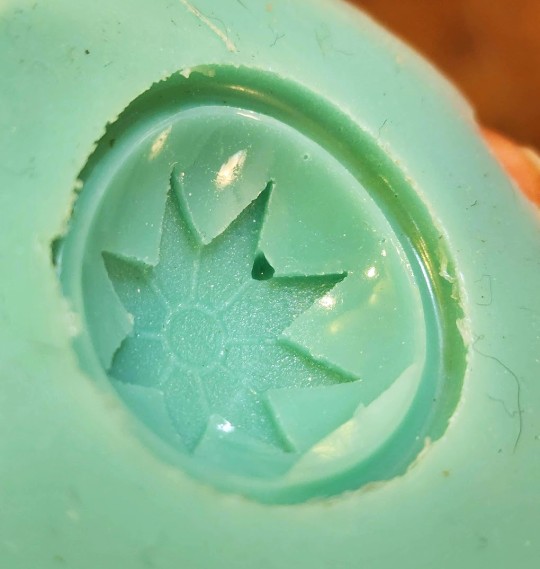
Using what I’d learned from the first pour, I did the second one inside a hard plastic ramekin. This gave me a bit more room to pour into the floor of the mold, reducing the bubble risk, and also eliminated the porous paper cup that had absorbed oil. I still had the issue with bubbles that didn’t want to pop, but there were fewer of them this time.

The ramekin made for a much cleaner mold, buuuuut there was ANOTHER BUBBLE right in the middle of the design. >.<
Take Three
Lather, rinse, repeat. Or in this case, melt, pour, chill.
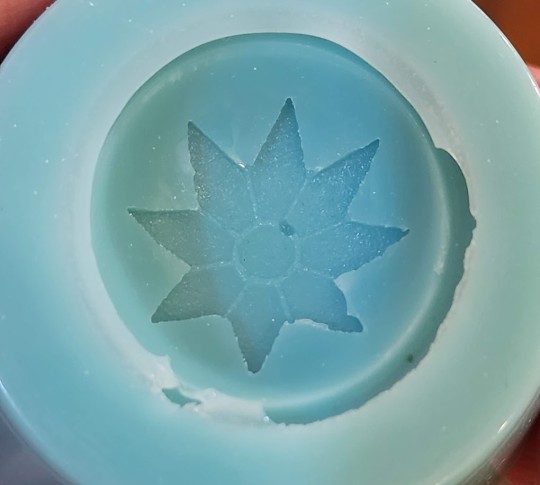
This time I heated the SiliNOT! as much as I dared and did the absolute slowest, narrowest pour I could manage, giving the air extra time to escape as the mold was filled from the bottom. The risk with stringing out the pour like this is that in a thinner stream, the heat escapes faster, leading to uneven viscosity as the liquid fills the mold. I don’t think that’s a major problem for this particular piece, but it’s something to pay attention to as regards leveling and degassing, especially for larger molds that will take longer to fill.
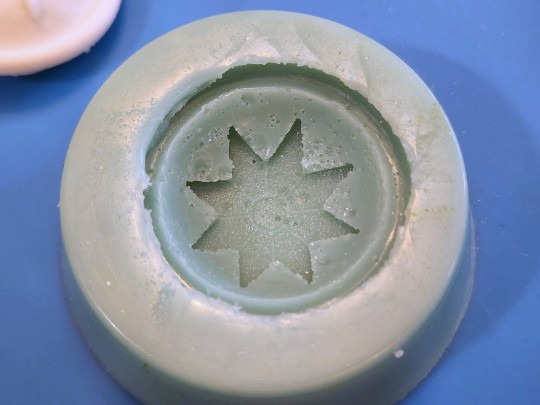
The result of pour three:
/siiiiigh/ Well, at least the bubbles are smaller, this time. They may not show up enough to matter in the final cast. I’ll give it a try.
Casting
I had leftover workshop resin that was getting on toward the end of its shelf life, so I used Smooth-On Smooth-Cast 300 for my initial resin trial. It’s an opaque white resin with about a 10-minute cure time (the fast turnaround is why we use it for workshops).
Before pouring, I had to do a little mold cleanup where the SiliNOT! had managed to sneak under the edge of the Worbla (I think I’d loosened the corner of the star from prying it out of so many molds), but since the SiliNOT! stretches so well, it was pretty easy to invert it to get little scissors down into the bottom of the depression.
For the first cast, I didn’t use anything but the resin in order to get a baseline. Ideally I’d like to cold cast or dye the resin so I don’t have to worry about paint chipping, but since I’m doing a trial here (and need multiple buttons anyway) I figured some plain white extras wouldn’t hurt.
So, my first cast…
…smacked into a big problem, which I probably should have seen coming: The resin I’m using is a fast cure formula, which means it discharges a fair amount of heat as it's going through that rapid chemical reaction -- enough heat to melt the SiliNOT!, as it turned out. When I tried to demold it (after giving it a few extra minutes beyond label time to be sure it was done), the surface of the mold had melted to the resin and even embedded itself in a few places. It’s difficult to see the resin detail in the photos (my camera went into white balance panic mode with all the shades of white and blue), but you can see how pitted the formerly-smooth mold surface is.
In fairness to the SiliNOT!, the bottle does say that you should put the mold in the freezer for half an hour before casting high-temperature materials. But I assumed high-temperature material was something like candle wax or melted chocolate, rather than ordinary resin. (And the mold had just come out of the refrigerator.)
So, on to pour FOUR of the SiliNOT! mold…
Take Four
NGL, this is getting a little old. >.<
Fourth mold definitely needed some cleanup around the edges, and there are still a couple of tiny bubbles I can’t seem to get rid of, but it’s good enough for a test. (I’m starting to despair of using these for actual production, given how many times I’ve had to redo the molds because of bubbles...)

Deep in the recesses of my basement, I found some transparent epoxy resin with a 24-hour cure time -- much slower and lower-temperature than the Smooth-Cast. Since it cures clear, I went ahead and mixed in some metallic powder pigment on the off chance that I get a usable button out of this one. I had excess resin after mixing, so I poured that into my first mold, which has a bubble in the design but is otherwise fine. Two test pieces are better than one, right?
Results
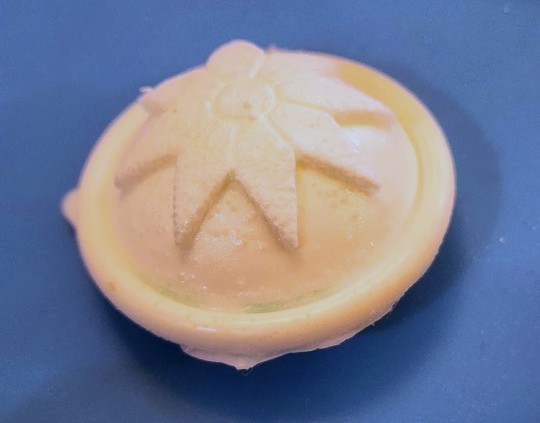
Here are the results of the slow-curing resin out of mold #4:

Finally, a (mostly) clean cast!
As you can see, the detail reproduction is excellent -- certainly on par with the pulls from the silicone mold I ended up making while waiting on this set to cure (purely for time reasons; I couldn’t afford five days to cast the buttons using slow-curing resin, and with a silicone mold and fast-curing resin I could get them all done within a couple of hours).
However, you can also see a few spots where bits of the SiliNOT! embedded themselves in the final cast. Part of that may be due to design flaw in the original; I didn’t want to glue anything permanently to the antique button, and that resulted in a tiny gap between the button and the resin hemisphere. Silicone has enough strength to resist tearing out in that kind of area, but apparently the SiliNOT! doesn’t. The bits of mold around the outer edge seem to have stuck just to be difficult, as there was no structural reason for those to have become embedded in the resin. This means the mold could be damaged by successive casts, reducing its usable life and accuracy.
Still, the mold definitely produced decent results for a first cast, and a different shape might not have had as much of a problem with tearing off mold parts. The slow-curing resin is a bit of a limitation, but not a unique one (I use this same epoxy resin for any glass-clear casts I do, and only use the Smooth-Cast 300 for opaque items or things I need very quickly). I don’t personally use UV resin, but I’d be curious to learn how it performs with the SiliNOT!
IN SUMMARY:
Here’s the TL;DR on SiliNOT!
Pros
Cost effectiveness. This is the most obvious advantage of SiliNOT! over silicone; it’s (theoretically) infinitely reusable, and even with natural attrition/inevitable contamination from use, you can likely get over a hundred pours out of a bottle. That's a lot cheaper per use than silicone.
Non-toxicity. SiliNOT! is touted as food contact-safe, so you don’t have to panic if you get it on your skin or kitchen counters. While platinum-cure silicone is also relatively harmless (some varieties are labeled for food or life casting), other common moldmaking materials such as tin-cure silicone or urethane are not. (NOTE: Since the company is very hush-hush about what actually makes up the SiliNOT! secret formula, I do not know if it might release any vapors or fumes that would be irritating or harmful to pet birds. In general, I advise not doing any kind of casting around birds.)
Eco-friendliness. This is the biggest draw for me personally: Given the number of casting workshops I run and all the things I sell commercially, I have constant guilt about the amount of waste I generate for creative projects. In most areas of life I’m an aggressive reduce/reuse/recycler and try to use organic materials instead of synthetics whenever possible, so a mold that’s reusable and compostable is very appealing.
Ease of use. It’s honestly pretty hard to mess this up -- just microwave according to the directions and pour. No measuring, no A/B mixture, no concerns about chemical contamination from latex or sulfur, etc.
Shelf life. Unlike silicones, which have a shelf life of anywhere from six months to three years depending on storage conditions, the SiliNOT! purports to be shelf-stable. It's compostable, so don’t bury it in your yard, but otherwise it appears that it could be kept on hand for years.
Cons
Bubbles. Honestly the most irritating thing about this stuff for me. I’m used to being able to see bubbles forming as I pour, tap them to the surface, and remove them. The fact that I poured four molds of the same object and never once got one without bubbles is super irritating.
Stickiness. I’m not a big fan of the tacky surface texture, and while I haven’t done any cold casting yet, I can imagine that it would be very difficult to clean out any pigment or mica powder that got where you didn’t want it. I probably wouldn’t use this for any kind of cold casting that required isolated colored areas or changing colors between casts.
Set time. The SiliNOT! may take longer to cool than a fast silicone would to cure when dealing with larger molds, so it’s not ideal for projects with a really tight turnaround. (But cosplayers would never be casting something the night before a con, right? We always plan ahead and never, ever procrastinate!)
Library life. The SiliNOT! may or may not structurally degrade over time the way urethane, latex, and tin cure silicones do, but I noticed even in my very limited casts that it was prone to having tiny bits of the mold (particularly at edges) stick and pull off. While I keep most of my platinum silicone molds for years and reuse them, I don’t feel that the SiliNOT! molds would hold up to repeated casting, and they’re far more sensitive to ambient temperature, so they’re probably best used for short term only. (I also wonder about the possibility of oil leaching out in long-term storage.)
Comparative Ranking
Ranking it against other mold-making materials, I’d place SiliNOT! below platinum-cure silicone in terms of performance, but maybe somewhere in the neighborhood of urethane and tin-cure silicone. It's definitely superior to latex. (Though to be honest, I'd rank Play-Doh above latex. I hate working with that stuff.)
Factoring in cost and environmental impact, it beats out urethane and tin-cure silicone. I'm still not sure if I'd rank it above platinum-cure silicone, though... Silicone costs much more and isn't eco-friendly, but the performance and lifespan is significantly better, so it still makes more sense for some projects.
Alginate is another type of material entirely, but in some ways SiliNOT! is comparable to it -- both are more cost-effective than silicone, both are biodegradable, both are skin safe, and both have long shelf lives. But SiliNOT! is easier to use for beginners than alginate, which has to be mixed to the right consistency and has an extremely short lifespan once poured.
Overall, I would recommend SiliNOT! for:
People who want accurate, non-shrinking molds but don’t have the budget for platinum-cure silicone
People who are committed to eliminating waste from single-use materials, and are willing to trade off a little performance for a more eco-friendly material
Projects with smooth surfaces and no indentations/sharp edges/undercuts where bubbles might stick (e.g. cabochons; simple geometric forms)
Projects where you need only one or two casts of something, rather than many casts from the same mold
Casting oddly-shaped pieces around which the mold needs to stretch in order to demold
Use with slow-curing resins that do not generate much heat
I would NOT recommend SiliNOT! for:
Extremely complex or detailed pieces, or pieces with a lot of surface texture that bubbles might stick to
Two-part molds
Projects requiring many identical casts out of the same mold
Molds that you intend to add to your library for future or repeat casting
Use with fast-curing resins, melted wax, melted Monster Clay, or any other material that emits heat
Cold casting with precise color application
My Overall Opinion
It's... okay? I will almost certainly keep SiliNOT! in my toolkit for certain specific applications. It's MUCH cheaper over the long term, I love the idea of recycling mold material, and there are some projects for which it will likely perform very well (those listed in the above bullet points). I will also admit that three days of working with it does not constitute a comprehensive familiarity with the product, and it might be the sort of thing that you get better at working with after more practice. (Just learning how to eliminate bubbles would go a long way toward making me adopt this for more projects!)
However, I don't quite buy the "better than silicone" tagline. It's definitely more difficult to get a perfect result, and there are some projects for which platinum-cure silicone is always going to be more reliable (e.g. high-temperature casting, mass production, large-scale life casting).
For those looking for a recommendation of whether or not to buy, I'd say look at your project budget and the applications for which you're going to be making molds, and let those factors guide which mold material you go with. People doing some kinds of projects are likely going to find this a godsend, while those doing different projects would probably hate working with it.
28 notes
·
View notes
Note
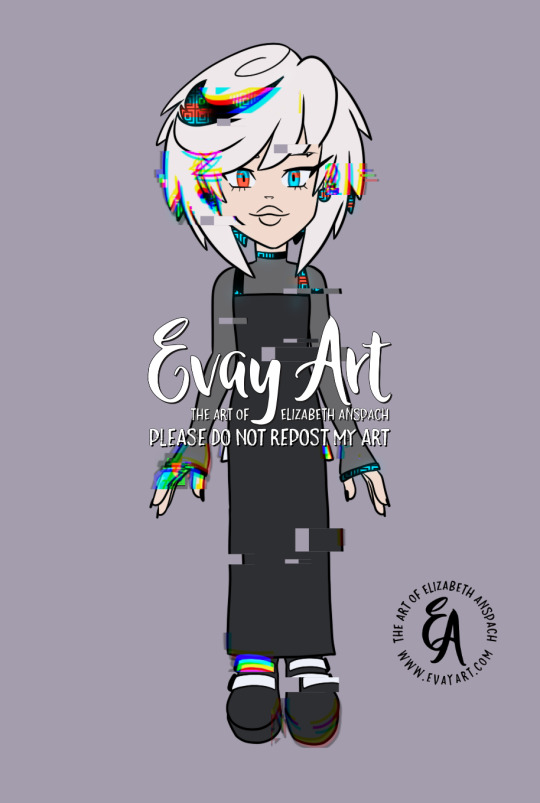
Looking back at your aurora and sage besties comic (its one of my favorites, only being beaten by were amy and sonic being a Simp) and I've got to ask, HOW DID YOU DO SAGES GLITCHING SO FRANKEN WELL??? IT LOOKS AMAZING AND I PERSONALLY LOVE HOW THOSE GLITCHS TURN RED WHENEVER SHES ON NEFARIOUS TIMING ARVDGDBABA
YOU ARE MY FAVORITE SONIC ARTIST.
...just wanted to say and ask.
You are so kind, thank you! I'm so happy you like them!
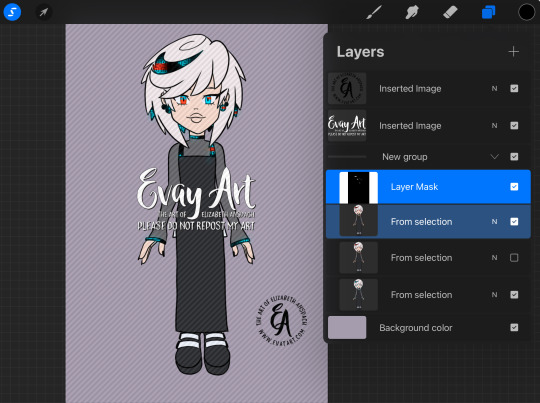
I do a lot of experimenting in Procreate until I find a technique I like. To achieve Sage's glitch, especially if she's doing something a little more wicked so her "red" side is showing, I'll start by drawing her in her blue version and her red version:

I'll select random rectangles from the red version and mask them/cut them out, so she's mostly blue but some red is showing:
I'll duplicate this layer and keep a copy of the "clean version" and apply effects to the duplicate. In Procreate, I'll use the "Glitch" effect and use the “Artifact” setting and mess with it until it achieves a result I like:
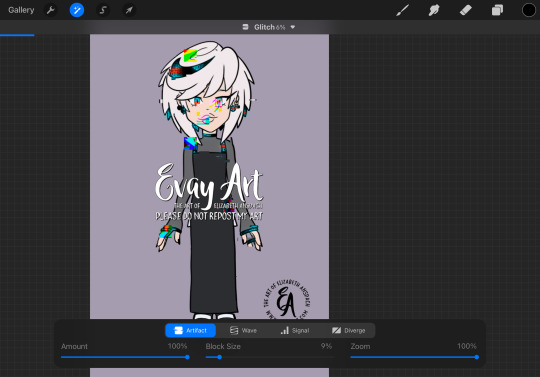
This may take several passes.
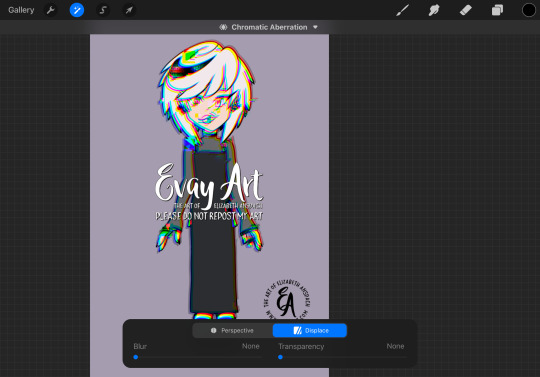
I duplicate the layers again, because again I always want to be able to go back if I don't like it. Then I'll play around with "chromatic aberration" under the “displacement” setting. She only needs a little for a subtle glitch effect, but if she's meant to look more menacing then I can go hardcore with it:
Then, I'll turn that original "clean" layer back on and I mask out the effect layer so only parts of it are coming through. When computers glitch, normally most of the image stays in tact and only some parts are scattered/messy so that's why I only have the effect in some areas.
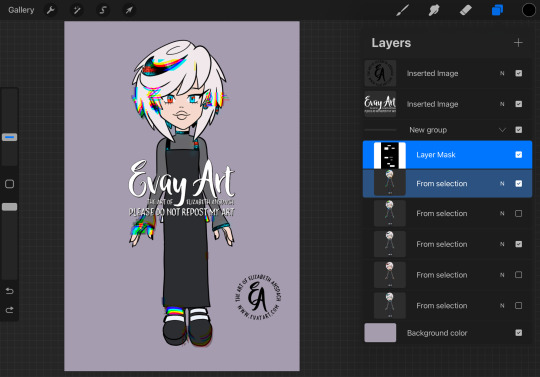
I might even slide bits of those rectangles to the left or right. It's just a matter of playing with it until I like how it looks.
I hope that explanation was easy enough to follow along!
Again, thank you so much! I'm really really happy you enjoy my art and stories 🥰 (and I'm delighted to hear you're a fan of Were!AmyXSimp!Sonic hehehe)
#ask me#evayQA#tutorial#procreate#procreate tips#sage the ai#sage robotnik#sonic trash#art tips#glitch effect
23 notes
·
View notes
Text
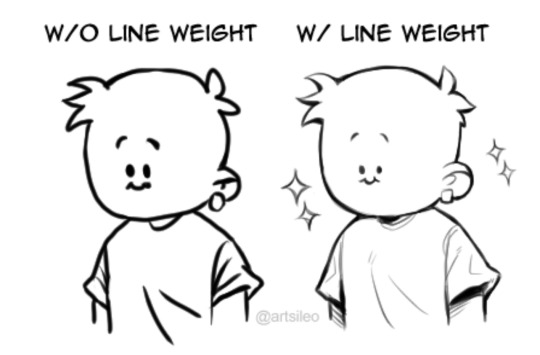


You don’t suck at Lineart, you’re just not familiar with line weight👍🏼!
#tips#artwork#digital art#digital artist#drawing#art tips#artists on tumblr#tutorial#art tutorial#tips and tricks#art tips and tricks
65K notes
·
View notes
Text
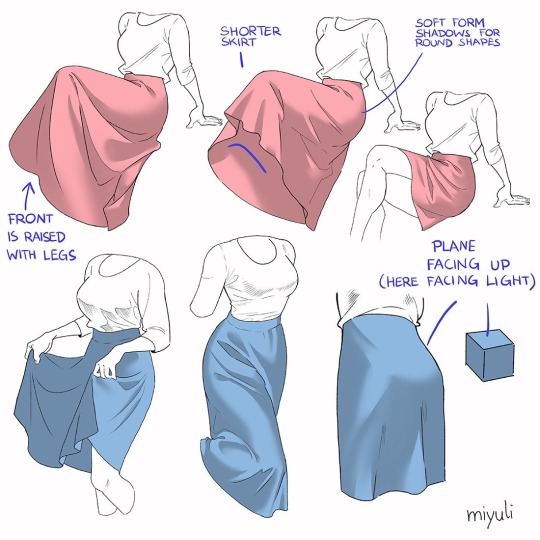
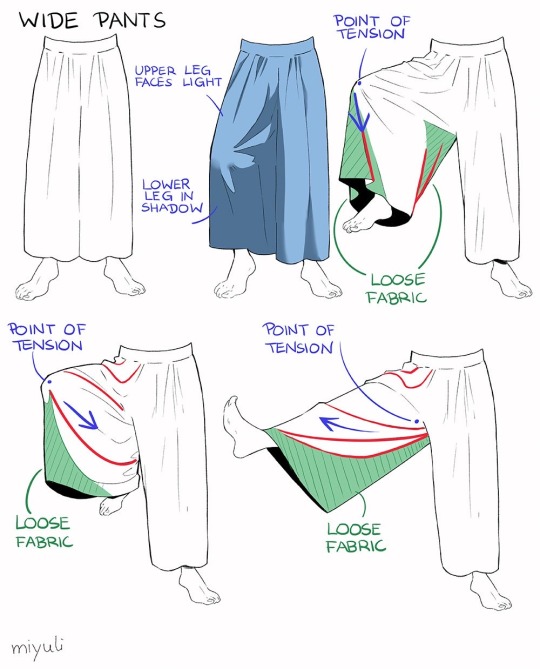
“Notes on skirts and pants”
Source: miyuli on twitter
#art tutorial#digital art#art reference#tutorial#art tips#drawing tips#drawing clothes#drawing pants#drawing skirts#drawing cloth#clothes#pants#skirts#clothing folds#clothing tutorial
48K notes
·
View notes
Text

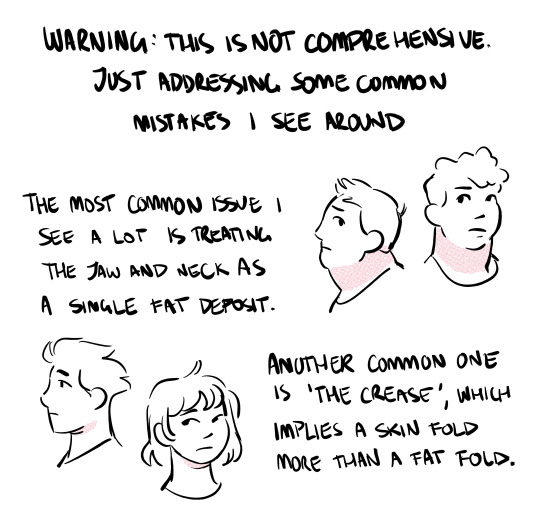


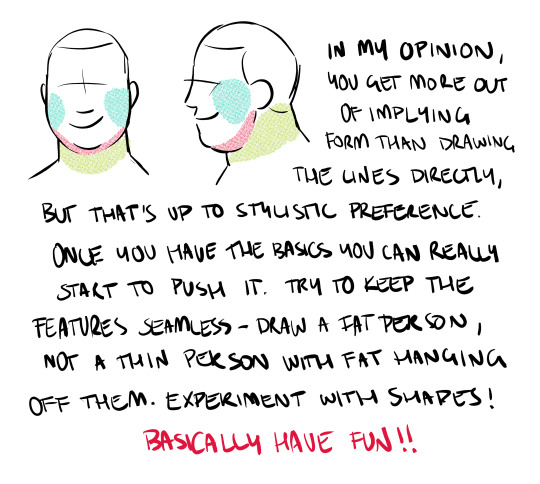

draw more fat characters ok. i love you
33K notes
·
View notes
Text
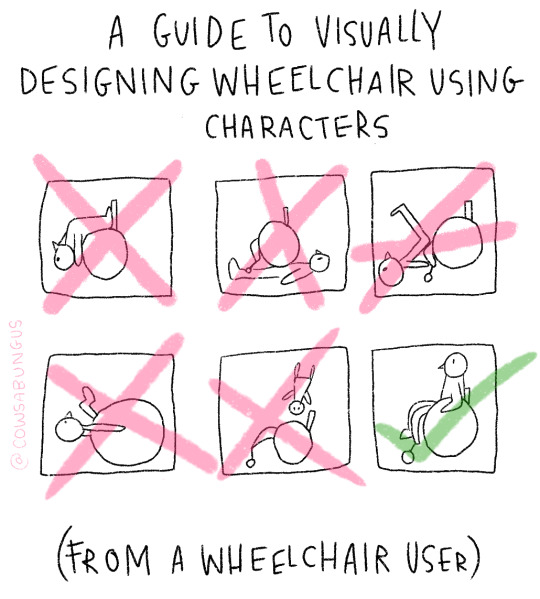
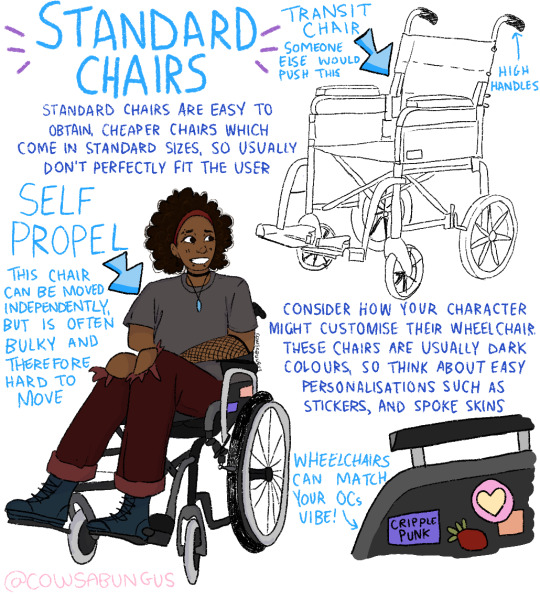
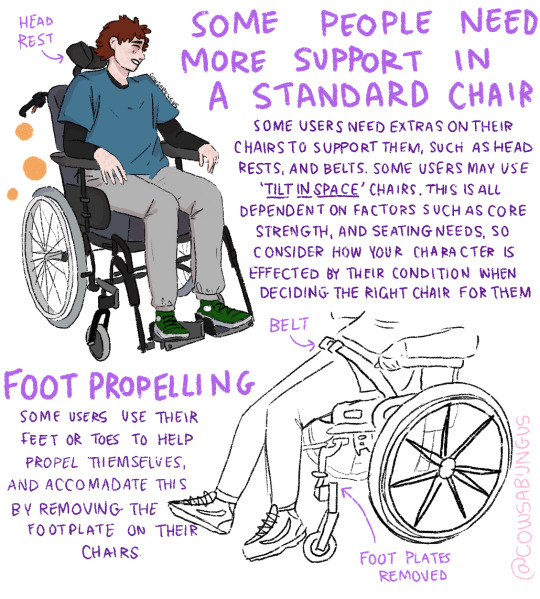

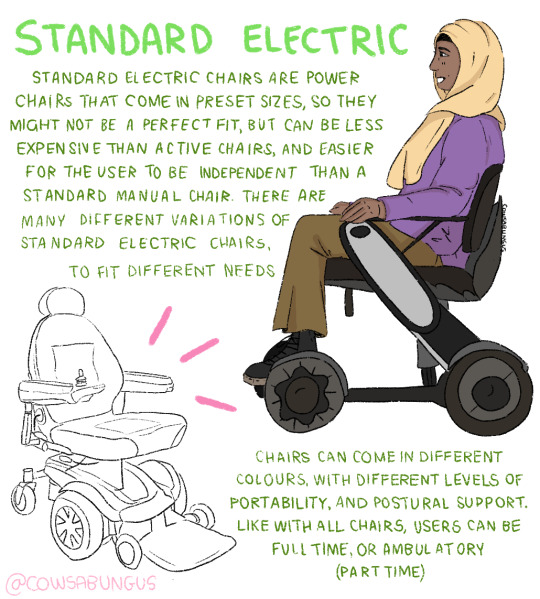

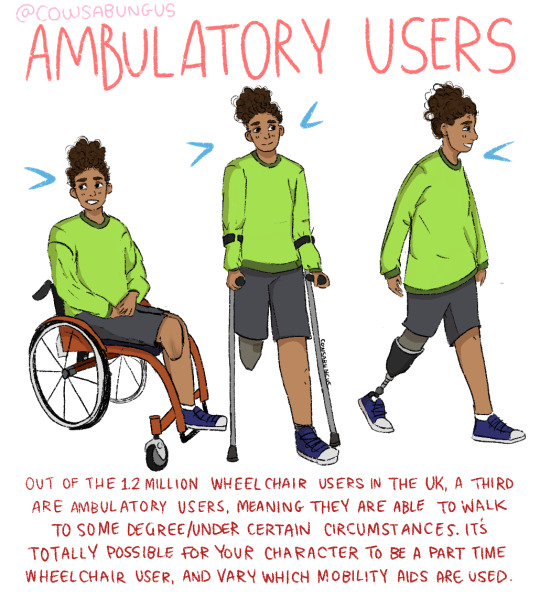
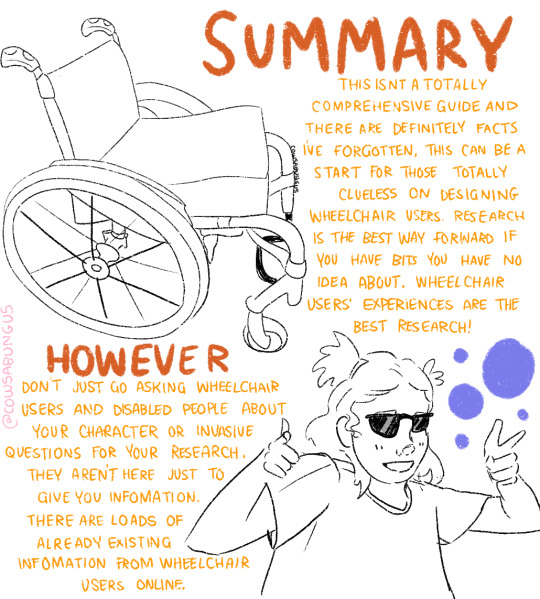
A guide to designing wheelchair using characters!
I hope this helps anyone who's trying to design their oc using a wheelchair, it's not a complete guide but I tried my best! deffo do more research if you're writing them as a character
#art#original art#artist#oc art#original character#queer#disabled#disabled rights#disability#disability pride month#tutorial#art tutorial#disabled character#design tutorial#drawing tutorial#Tumblr tutorial#character design#character illustration#concept art
90K notes
·
View notes
Text

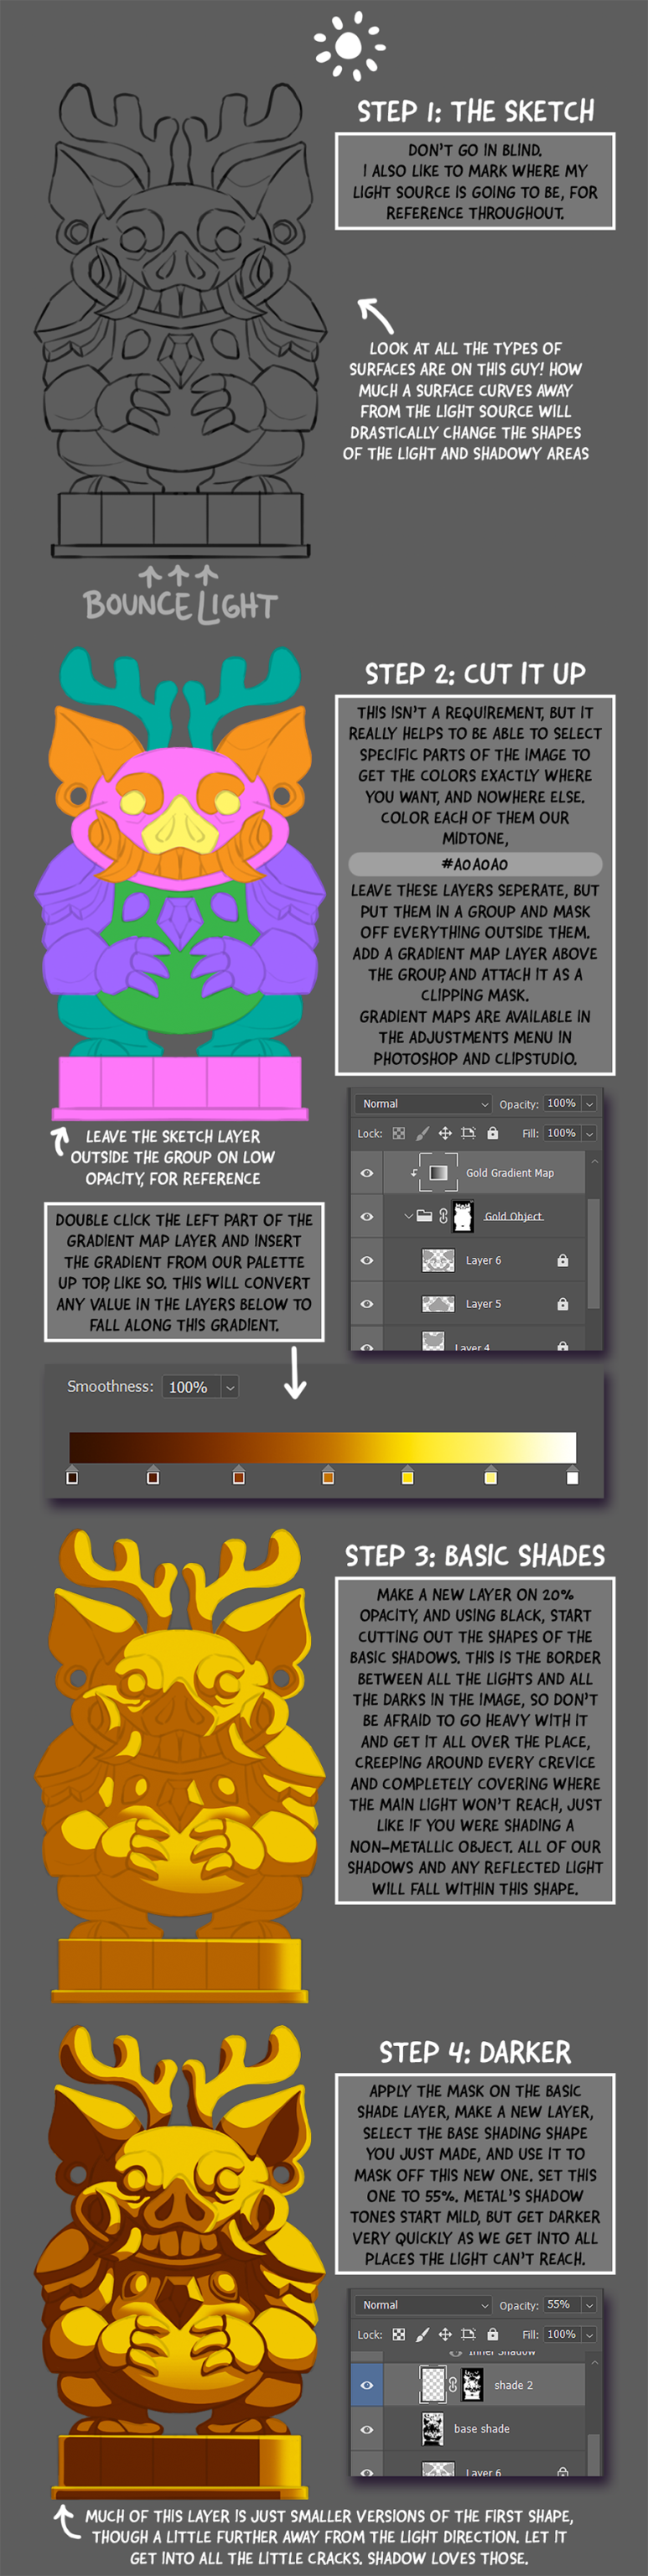
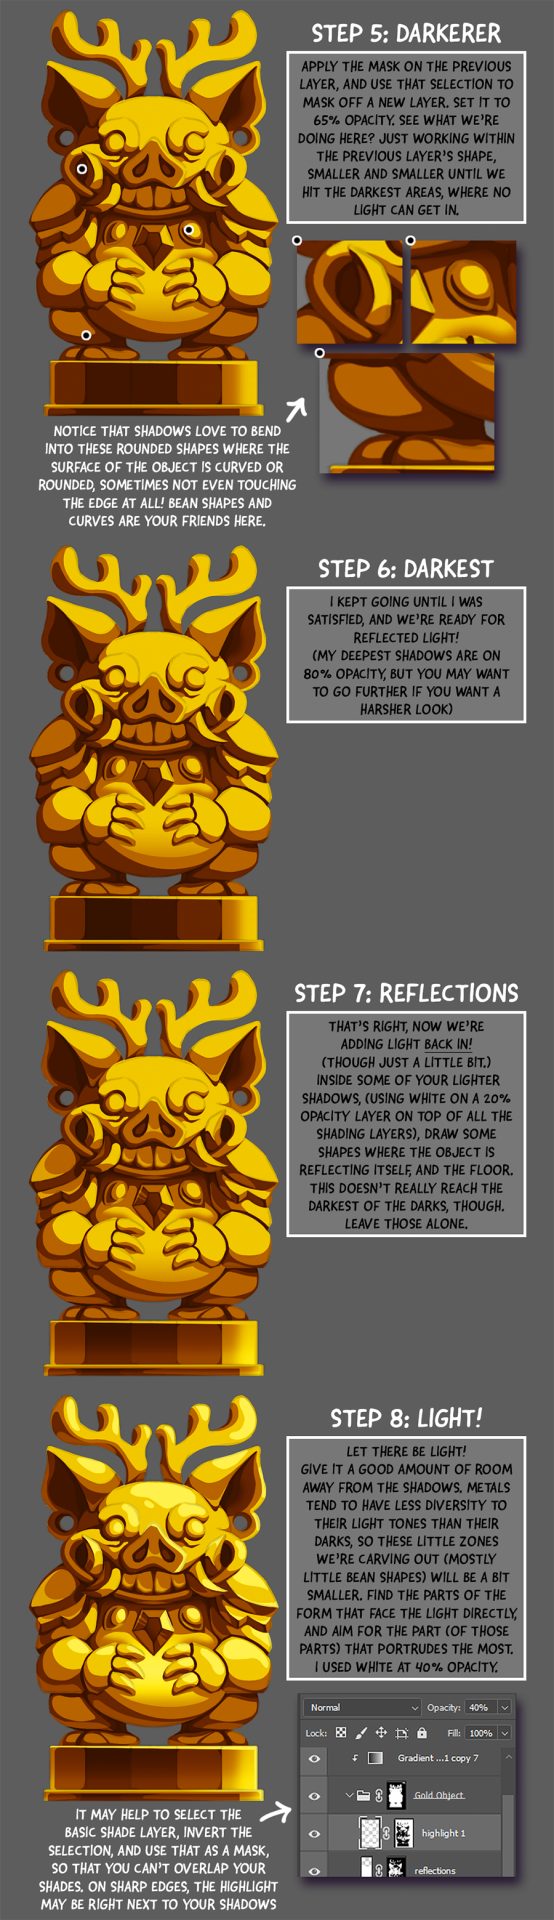
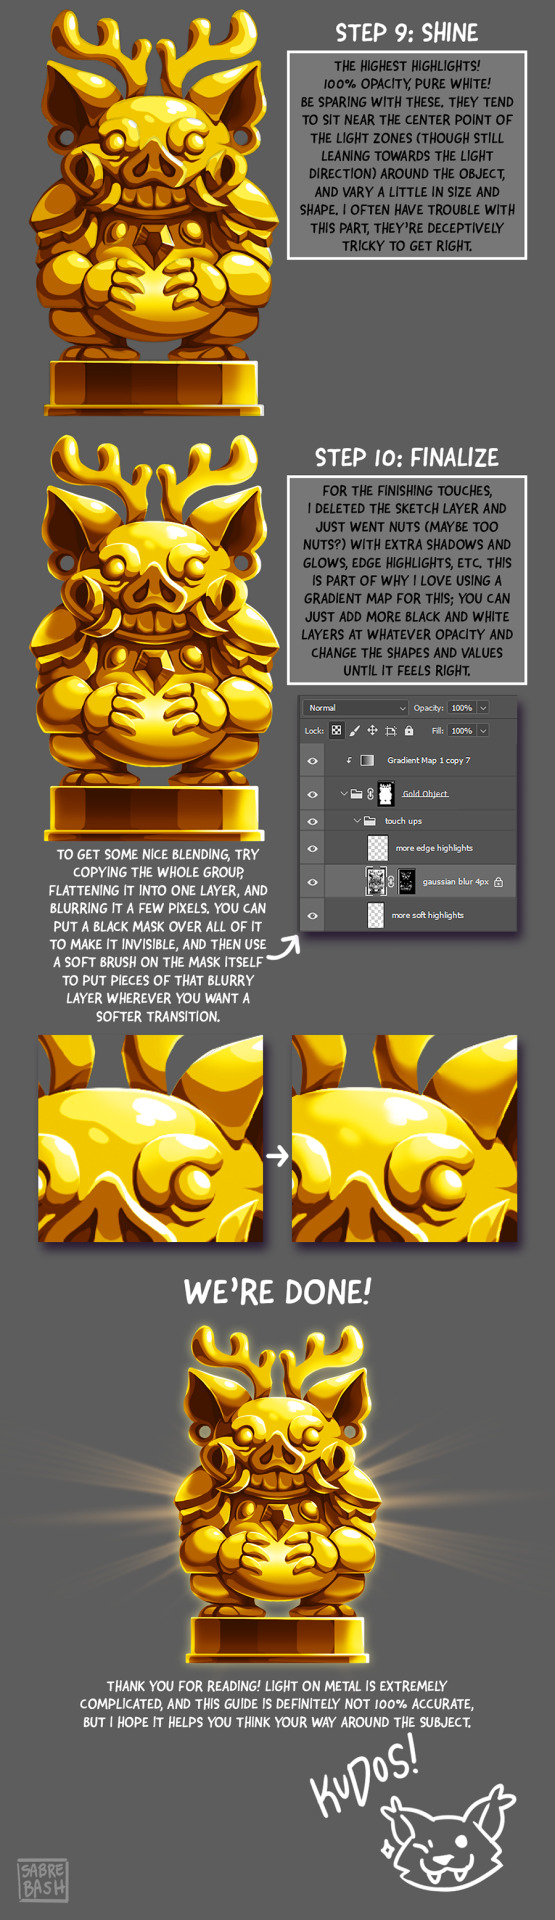
I have to draw a lot of gold and metal for my work, but wasn't happy with any of the metal tutorials i could find around. I prefer really specific instruction, so after some research i put together what i think works as a generalist's guide/tutorial. Not perfectly accurate, but i hope it's helpful!
#tutorial#tutorials#art#painting#artists on tumblr#reference#art reference#useful#art tutorial#art resources#tips#longpost
26K notes
·
View notes
Text
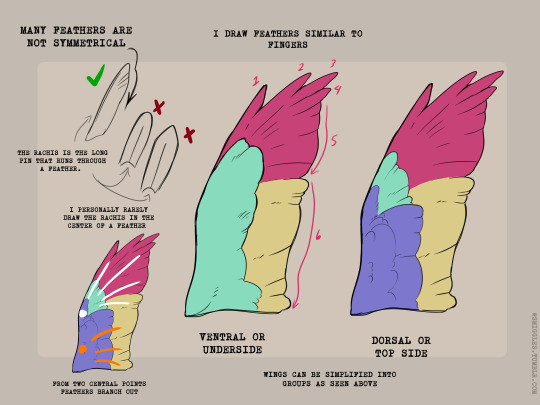

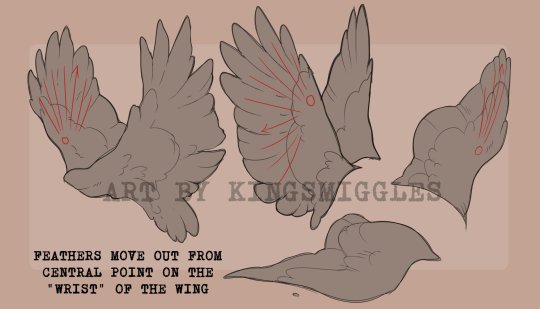
Wings anyone?
24K notes
·
View notes
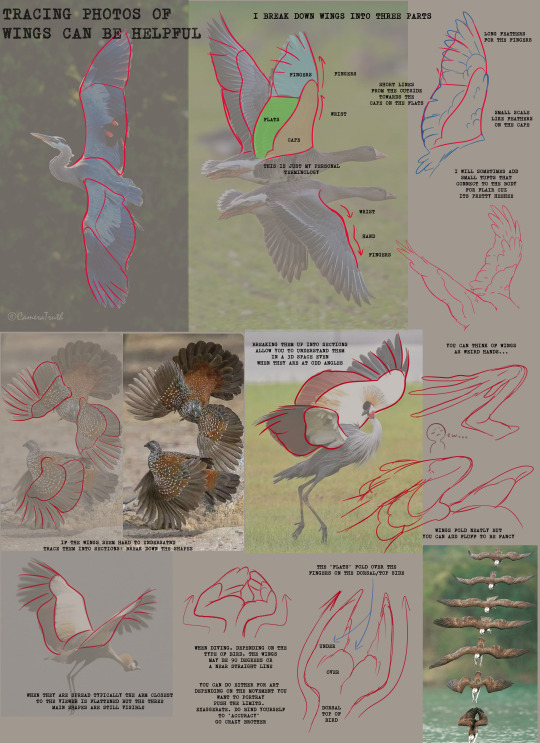
Text
I made an art/anatomy tutorial about birds! I hope people will find it helpful!


26K notes
·
View notes
Text
#asmr relax#asmr#oddly satisfying#diy#tutorial#do it yourself#tutorials#crafts#diy ideas#diy projects#easy diy#origami#video tutorial#craft#diy videos
106K notes
·
View notes
Text

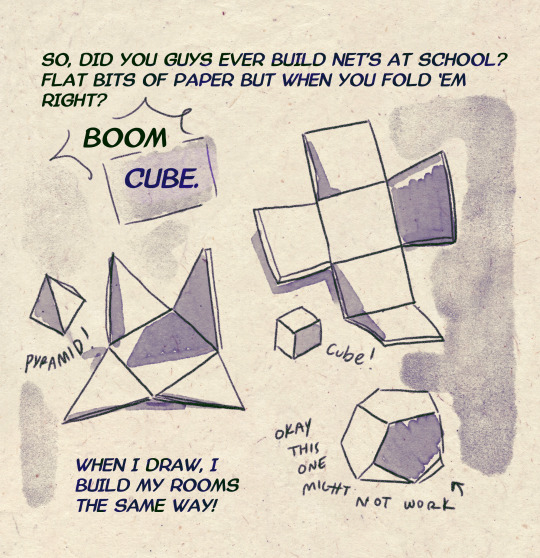
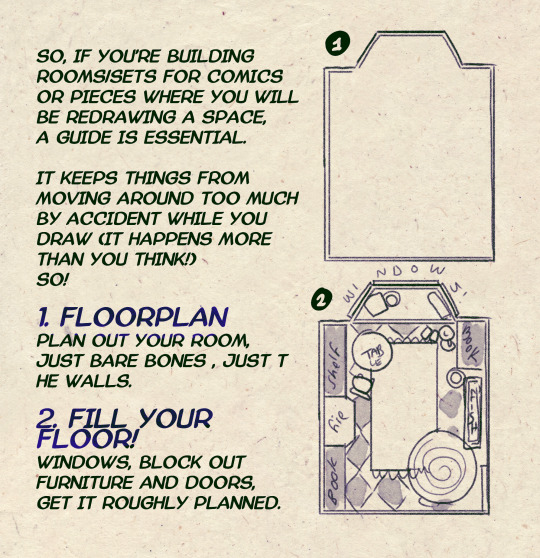
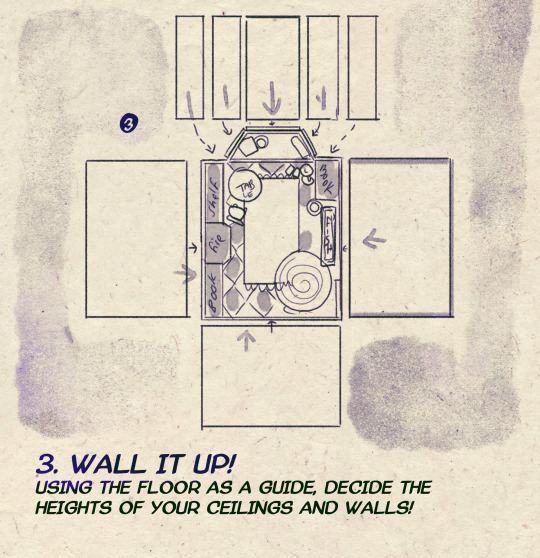


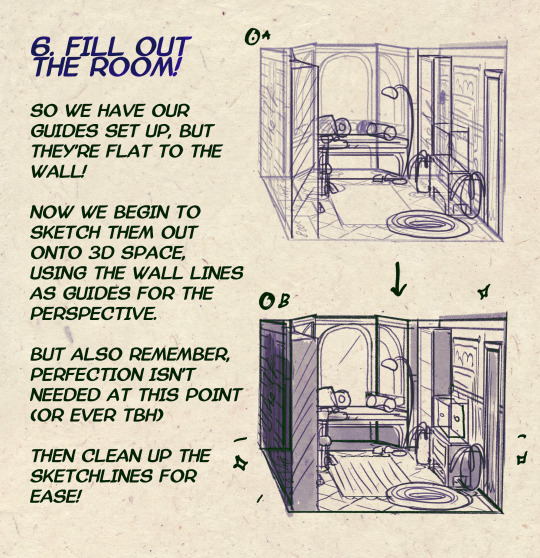

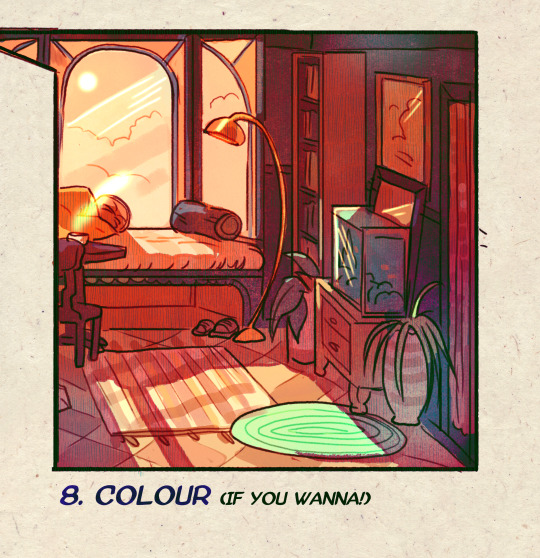
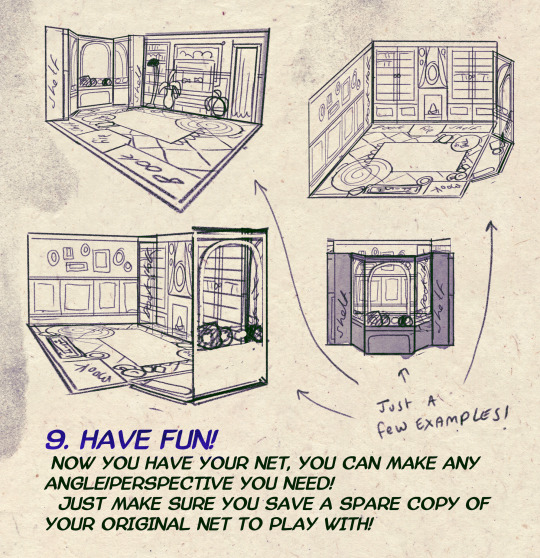
I made a Room Building tutorial! Lemme know if it helps! 🧡
Tip me here| Commission info here!
#anonbeadraws#digital#art tutorial#tutorial#room building#room design#illustration#gif#digital art#digital tutorial#art help#art resource#let me know if it helps!#tried to make it as simple as I could
35K notes
·
View notes
Last Seen Blogs

trallalleru
I don't even care anymore

itheo987-blog
Untitled

selwayne
Arulselvan

sweet-suzume
Decisive Victory
lady-of-the-yarn
Yarn Craftiness