
labinnak
L & M Cosplays
Professional Digital Artist, Designer, and Cosplayer. :)
538 posts
Don't wanna be here? Send us removal request.
Last Seen Blogs

vadervols
Untitled

bowtiesnblowjobs
Be Nice To Nice

milvfvchs
𝐩𝐫𝐞𝐭𝐭𝐲 𝐡𝐮𝐫𝐭𝐬
bronzetomatoes
it burns you as if you were wicked

bemesonline1
bemesonline
Photo
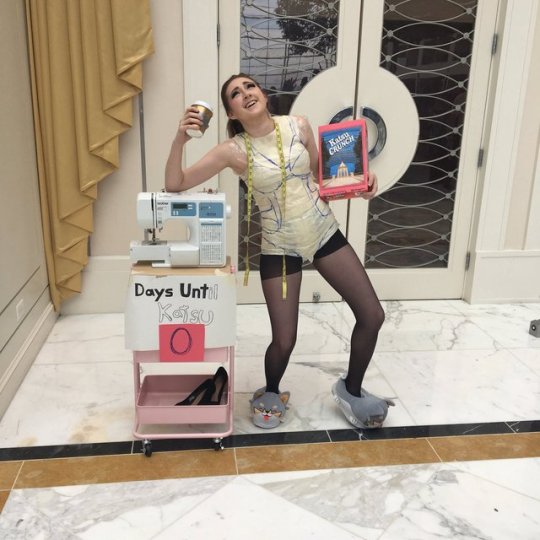
I came up with the idea in November when I first started patterning out in masking tape the swimsuit-like base to my Princess Mononoke Nightwalker cosplay. During this time I noticed that people were already posting their Katsucon lineups, so I thought it would be a silly idea for me to post my own lineup with three different photos of me in my masking tape pattern saying that I was going to be cosplaying Con Crunch all weekend. It was originally a joke although I thought to myself, “What if I did actually wear Con Crunch to Katsucon?”.
To be honest I did con crunch the Con Crunch cosplay! It was one of those cosplays that I just had to do at the convention because of how it was built. Plus if you are cosplaying con crunch - I think its appropriate to actually live through the experience of the crunch. Late the night before my debut my friends and I made the Katsu Crunch cereal box (which was essentially a Capt Crunch box that I taped a photoshopped Katsu Crunch image onto then hand wrote the slogan “Good Enough”) and the sign ‘Days Until Katsu’ sign. The next morning I was wrapped in cling wrap and masking tape (patterned out the same way as my Nightwalker cosplay). I actually used my sewing machine and a coffee cup that said 'cosplay tears’ on the side of it to roll around the convention center as my props.
I knew people would get a kick out of the cosplay but I wasn’t expecting how viral it became despite me only being in the cosplay for a few hours.Honestly I am happy that it did get the attention that it did because I did the cosplay to make a statement about Con Crunch as a whole and how ridiculous the crunch is. No cosplay is worth compromising your physical or mental health. It is perfectly fine to wear unfinished cosplays to events or even postpone them to wear at a later date. In the past I used to con crunch super hard for Katsucon (lots of late nights working on cosplay, working on cosplay in hotel rooms, a lot of mental breakdowns). This year I kept my health in mind as I was crafting and realistically looked at what I had time to make to wear at the convention. After all…. Cosplay is about having fun. This is what I focused on this year and I think its what allowed me to have an overall positive experience.
—- Labinnak & Mangoloo Cosplays - L&MC
Support Cosplay in America by shopping on Amazon : https://amzn.to/2Ek5y3M
387 notes
·
View notes
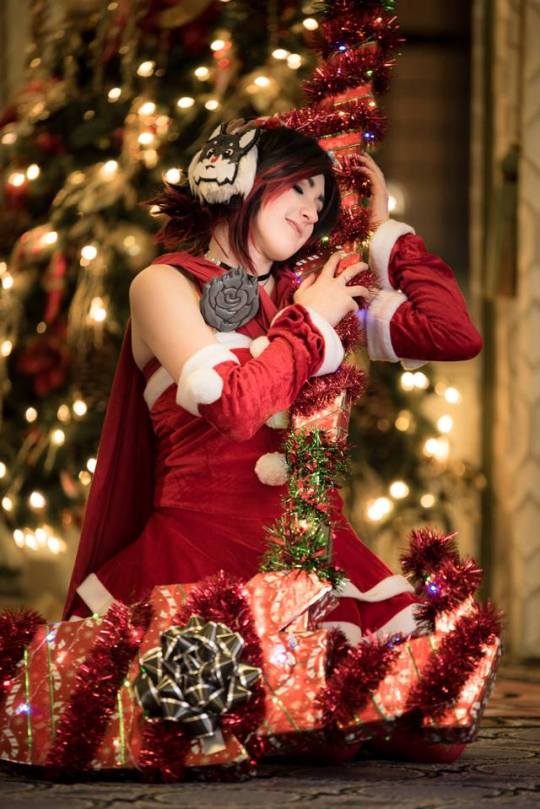
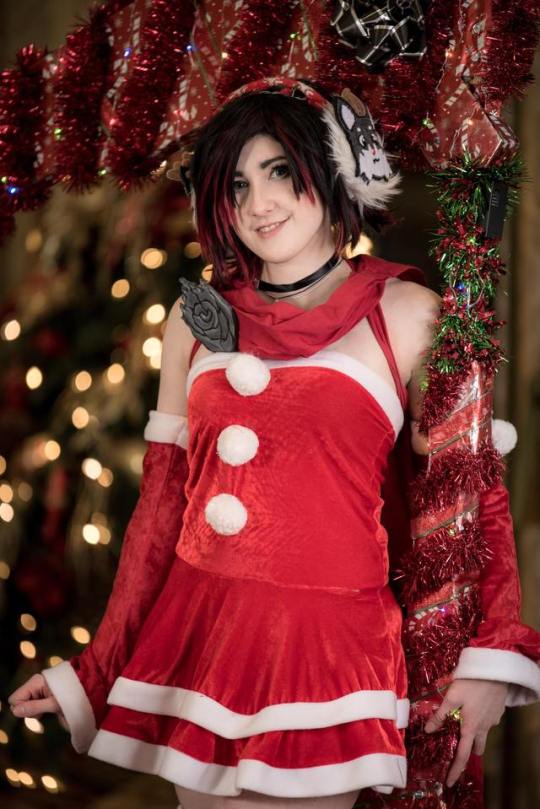
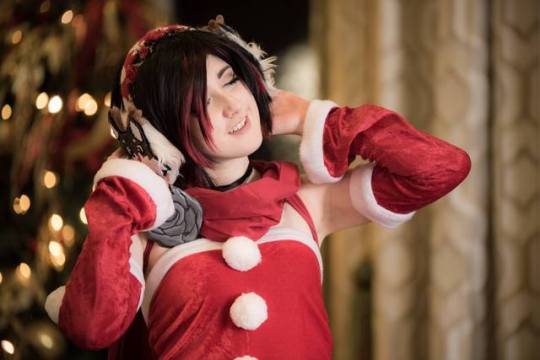
Photo
Christmas RWBY Ruby Rose <3
Photographer: Headphone Studios
Also we don’t post very often to Tumblr *sorry*
Consider follow us on our other more active social media:
Facebook
Instagram
Patreon
Twitter
146 notes
·
View notes
Video
Hi - I’m a noodle. Took my Xenomorph Queen cosplay into the pool... my tail is essentially a pool noodle.
822 notes
·
View notes
Photo

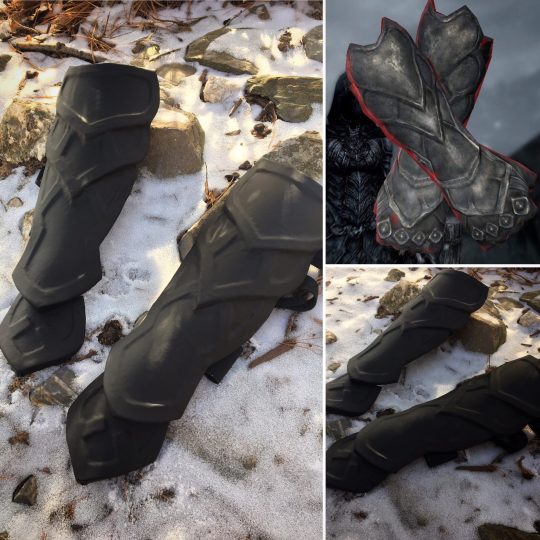
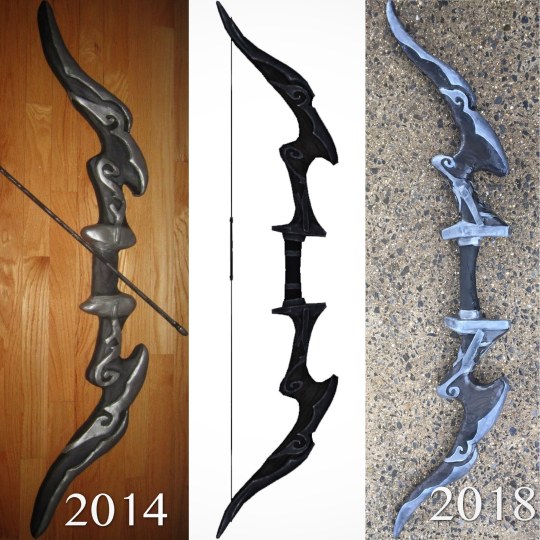
The very first cosplay I made entirely from scratch vs my most recent remake of the same character cosplay.
The Nightingale from Bethesda’s Elder Scrolls Skyrim was definitely an ambitious build... I felt like the both times I made it there was always something new that I learned and was challenged creatively. Yeah my first cosplay had a lot of flaws now that I look back at it, although at the time of the build I was extremely proud of it because I made it. Honestly this cosplay made me more brave to try complicated builds no matter how much skill I had or didn’t have. And because I love the character so much - I just had to remake it with all my new cosplay skills!
Got any cool cosplay glow ups? Share them with me!
Photographer: @headphonestudios
More of my work at www.Facebook.com/LMcosplays


417 notes
·
View notes
Photo
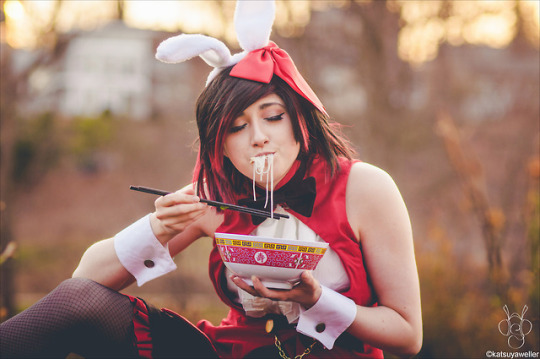
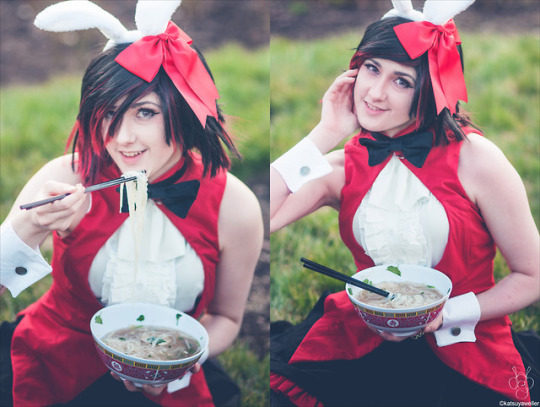
SEND NOODS!
What better way to celebrate Easter and spring with tasty noods ❤️. Happy Easter Fools Day ❤️. More noods to come throughout the day!
Photographer: @headphonestudios
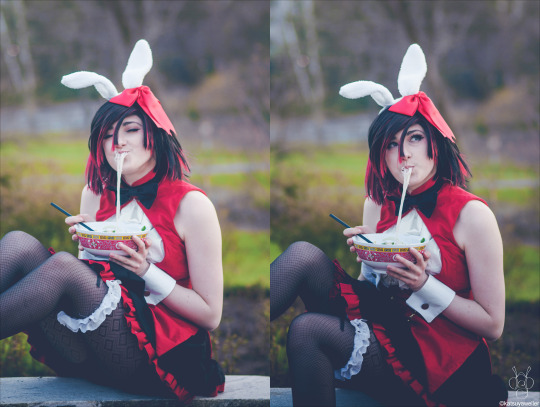
My face when I get those tasty noods.

Bunny Ruby eating the noods! I’m loving all the noods you guys are sending me! Now I want to actually send you noods! ❤️🍜
Everyone who donates to my ko-Fi between April 1st and 2nd will be getting a free nood(le) bunny Ruby Polaroid! Go to the link [ HERE: https://ko-fi.com/LMcosplays ] then click the add support button (will go towards Xenomorph cosplay). In a private message let me know the address that I can send the cute little Polaroid 🍜
All proceeds go towards new Cosplays - feel free to donate whatever you like fam ❤️
Also get hyped because yes NEW PRINTS are coming from the nood shoot! I’ll be posting the full set from the shoot with @headphonestudios!
Let me know which two photos are your favorite <3
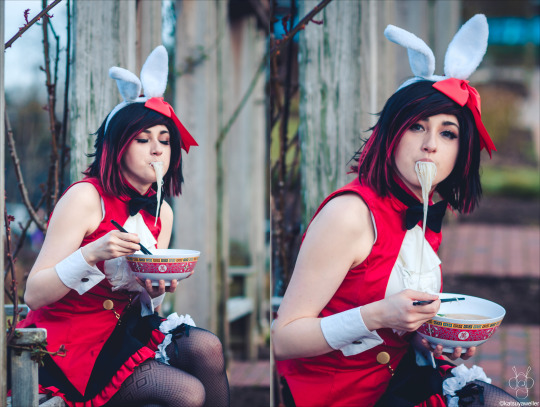
Hope you guys enjoyed the "noods" Whether you asked for them or not xD
Anyways I thought this prank was a cute play on words that also addressed those who ask to "send nudes". The cosplay community has been such a positive experience for me - but every once in a while I do run into people who do request that I do more nude content. There is nothing wrong with those people who do lewds - if its your thing... do it! Although it is wrong for someone to feel like they are entitled to lewds from another person.
Personally I cosplay what I feel comfortable with and if its being a derp and eating noodles than that’s where I am going to be. xD
91 notes
·
View notes
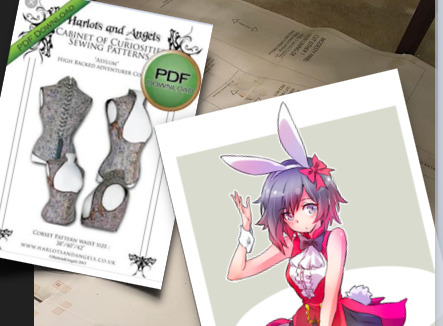
Photo
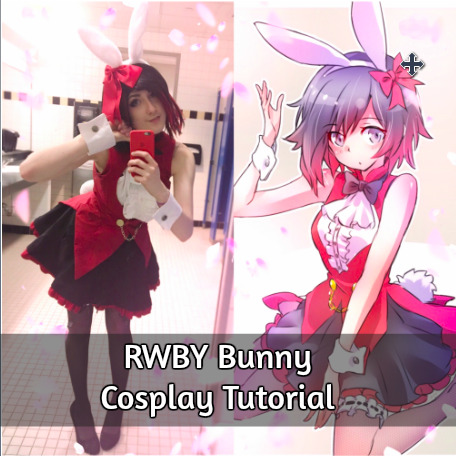
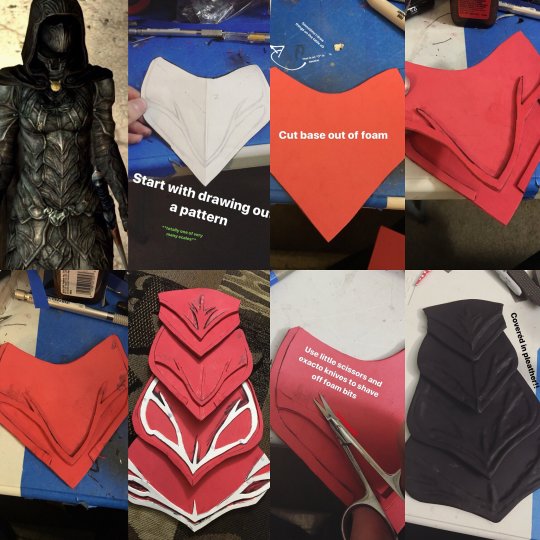
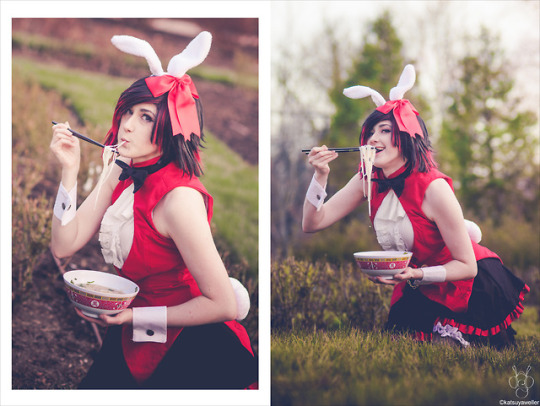
How I made my RWBY Bunny Ruby based on Art by Mojojoj27827860
Its been awhile since I have done a tutorial post. But because I am hosting a Bunny RWBY gathering at RTX Austin TX 2018 - figured I throw this guide together for you guys <3
VEST
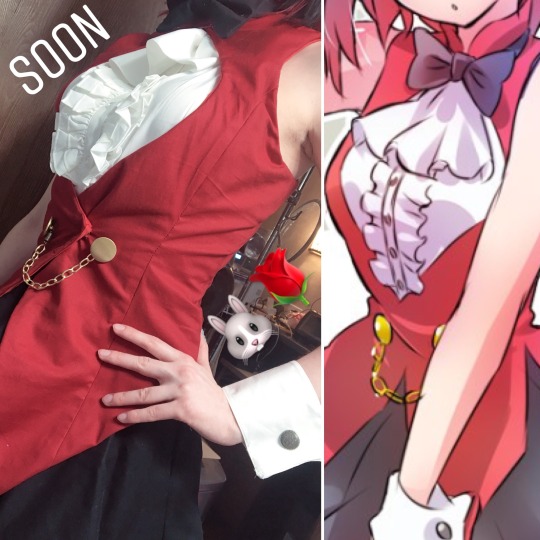
I started out with the Harlots and Angels “Asylum” sewing pattern
If you are using this pattern please take note of the different sizes and choose appropriately. I got super excited and ending up buying one that was entirely too big on me! But I made it work!
And made the following alterations to it:
Took out all corset elements. (don’t worry about boning unless if you really want to).
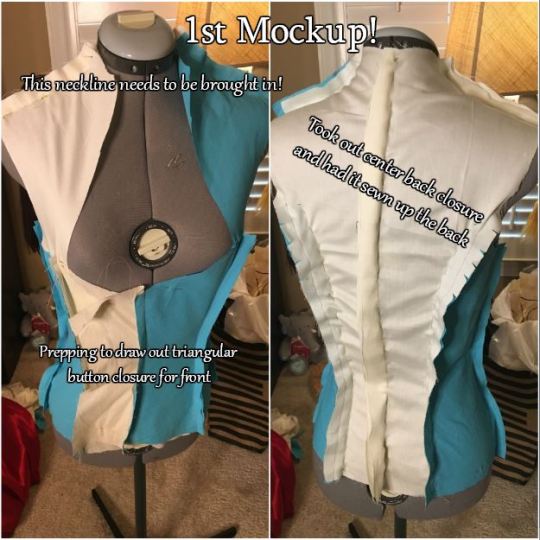
Closed up the back (no need to have it lace in the back
Altered the closure in the front (made it so that it was more triangular and closes with snaps rather than the clasps that the pattern directs you to buy.

Extended the length of the top center of the vest where bodice meets collar (just made it so that the center front came together.
Added tailcoat fins to front and back.
Shortened the shoulder length
Altered the pattern so that the weird shoulder piece is directly part of the front pattern instead of sewing it on separately (see blue line for new seam)
Added/removed fabric for the chest opening piece to make it more rounded diamond shaped
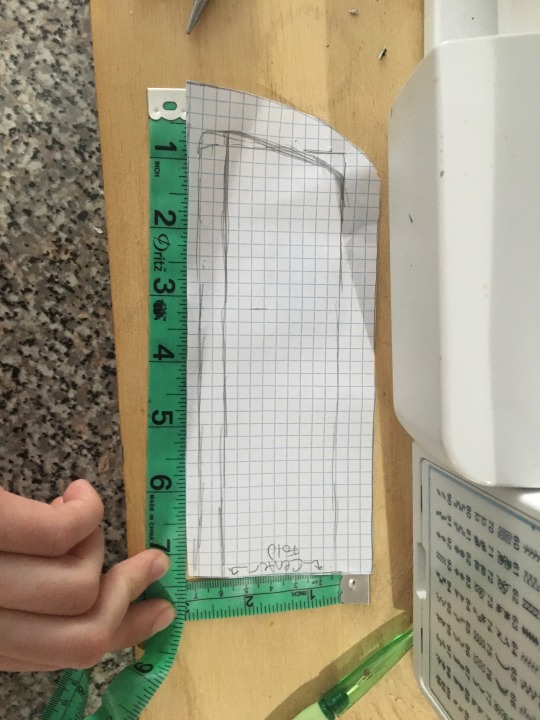
Extended the length of the collar (Above is a photo of my pattern with 5/8 seam allowance). Cut on fold! 2 of your actual fabric and 1 for interfacing!
I also lined my vest! Essentially I sewed together the top fabric together. Then sewed the lining separately. I matched up seams then I used bias tape around the entire edge of the fabric. It overall made the costume much nicer!

But what about the buttons and the chain?!?
For the buttons I used 2 La Mode Satin Gold buttons in 1 1/8 inch from JoAnn’s Fabrics! Or you can go online and get them [ HERE ]
The chain I found in the jewelry section. I simply matched the color to the buttons!
Lastly how it all comes together is... collar piece I just used a safety pin to bring it together.
And the spot where the buttons are (PLOT TWIST: they aren’t actually functional).... I just have it snap together then the chain has a magnet attached to it so I can take the vest on an off without difficulty.
SHIRT
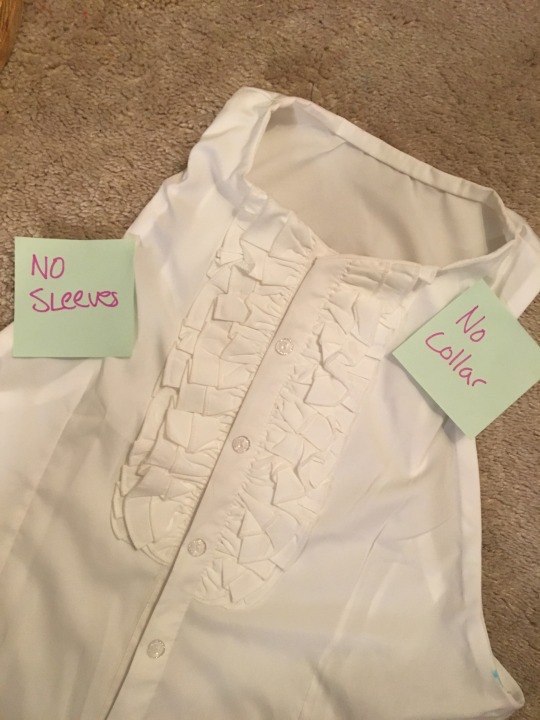
I bought and modified a shirt that I got off Amazon.
I removed the sleeves
Cut away some of the armscye so that the vest covered it.
Removed the collar
That frilly thing on the front was weird to do because attaching it to the shirt just made the shirt sag down a bit because mine had a big of weight.
Instead the frilly piece was entirely separate from the shirt.
Using the sleeve fabric that I cut off - made a long rectangle and gathered. Then I attached it to some ribbon that I would tie onto myself after I put on the shirt.
BUNNY EARS and TAIL
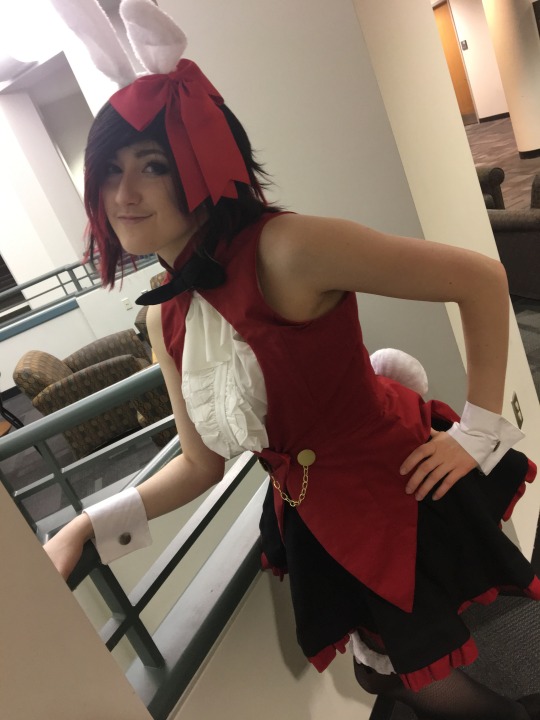
Probably the easier part of the entire cosplay. I just bought the bunny ears and tail on Amazon! Psst - the bunny ears come in a variety pack so you get 6 of them in different colors!
The bow I also bought but at Michaels. Here is a LINK to the product.
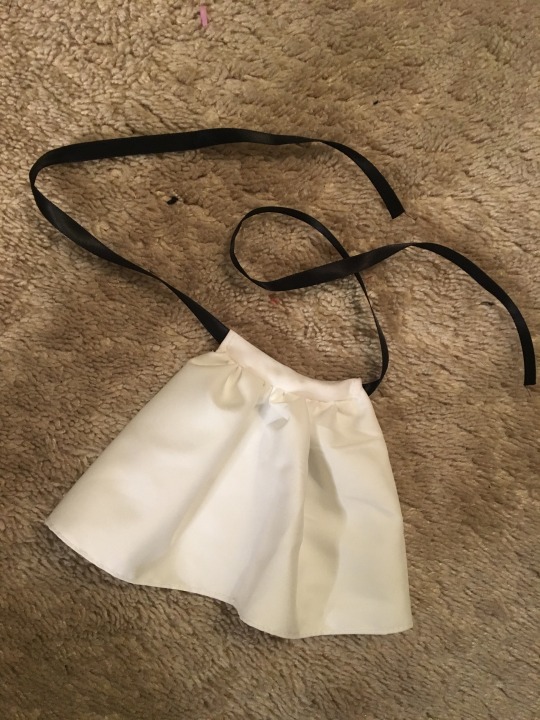
SKIRT and GARTER BELT
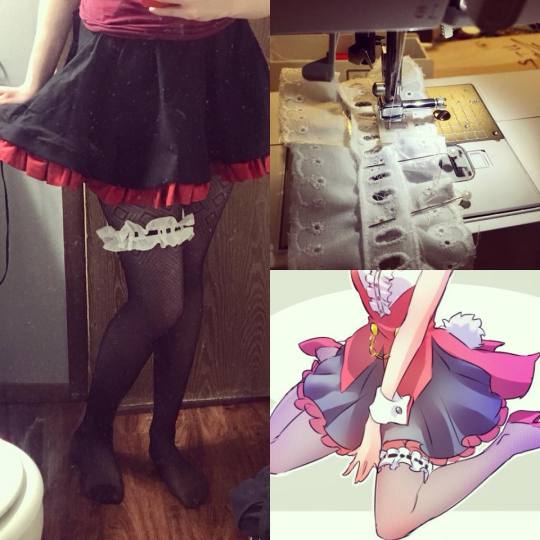
Shirt is actually a high waist circle skirt.
Circle skirts are pretty easy to make. If you are struggling with a pattern then check out this link [ HERE ].
ALSO PRO TIP - HORSEHAIR BRAID MAKES THE SKIRT DRAPE AMAZINGLY! Consider putting it into your skirt to give it more adorable floof!
Then of course the red fabric I just gathered and sewn along the edge of the skirt.
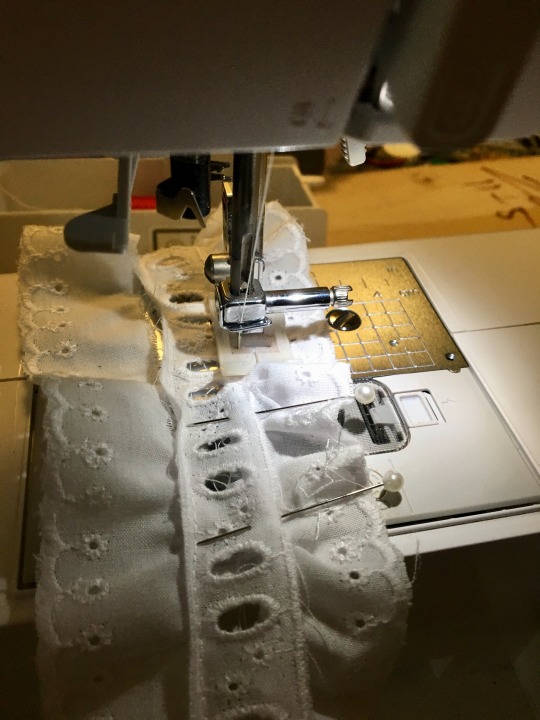
The garter belt - I found the perfect trim at JoAnn’s! Only problem was it wasn’t gathered enough. So I took off the stitching and did a gather then re-sewed to the trim.
Then I used black ribbon to thread through it and tie around my leg.
CUFFS

Another fairly easy part of the cosplay.
This was essentially a long rectangle of white fabric folded over and snapped together. You can use cuff links or buttons on either side to make it look like a cuff!
BOW
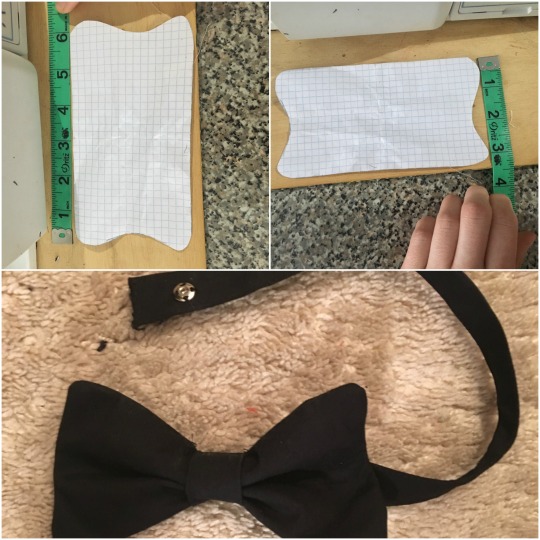
Another PLOT TWIST - its not tied like a real bow!
Instead its a rectangle with weird curves on the ends and wrapped with a small piece of fabric. Easy.
Essentially you would want to copy my pattern above (includes 5/8 Seam Allowance). Cut 2 on fabric and 2 on interfacing! Sew right sides together and flip inside out!
Wrap a small piece of fabric around the center.
And sew a long strand to wrap then snap around your neck.
SHOES & TIGHTS
Alright so the tights I just picked up a pair that had an interesting diamond pattern to them. And I ended up using these shoes [ HERE ].
And you are done!
If you have any questions then please message me! Also feel free to share your progress with me <3
If you enjoyed this tutorial - consider following my work here or on my social media! ------> Facebook / Instagram
I do plan on writing up more tutorials - especially when I open up my Patreon (Keep an eye out!).
Because I don’t have a Patreon at the moment and writing these tutorials take time to write - feel free to donate $3 to my Ko-Fi which helps me be able to continue doing cosplay ... link [ HERE ].
Stay Awesome - and can’t wait to see those cute bunnies <3
138 notes
·
View notes
Photo
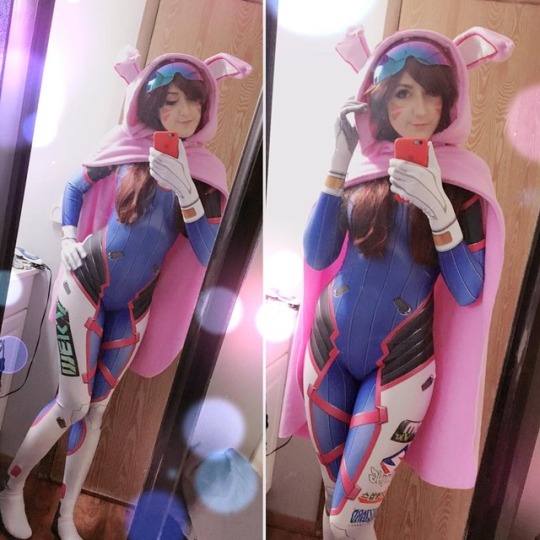


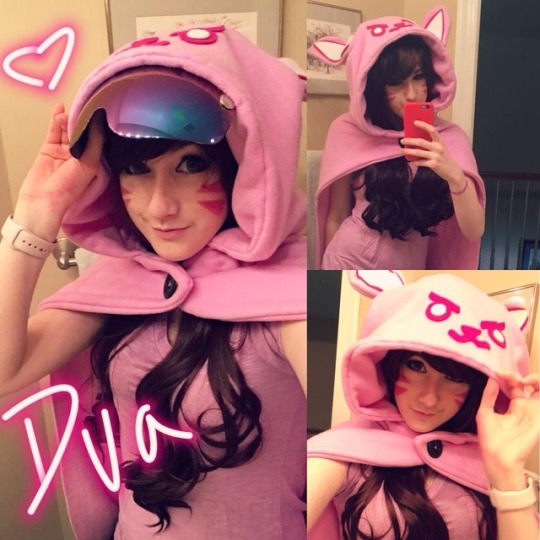
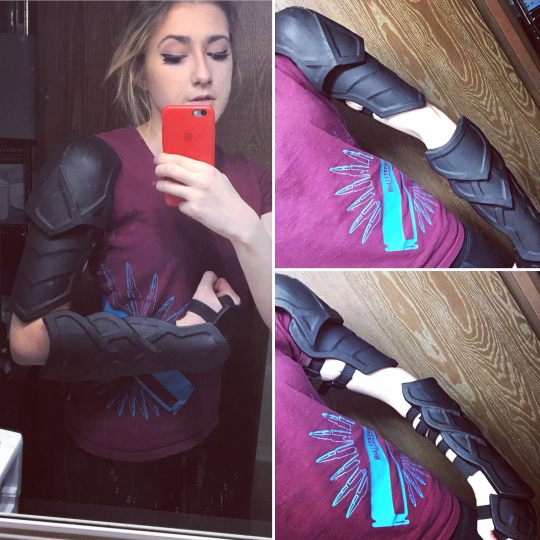
Overwatch Gremlin DVa ❤️
Extremely happy with how the cosplay looks!
Just got the bodysuit in the mail yesterday!
Pattern is by @brandonogilberto
Suit made at ZentaizoneI’ll be wearing this cosplay Friday of PAX East and hosting a gremlin Overwatch Dorito Mountain Dew party! RSVP on FB.
77 notes
·
View notes
Photo

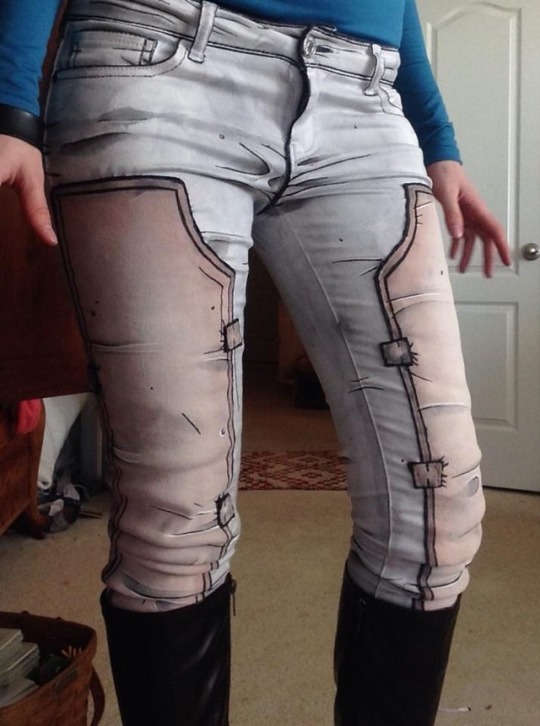
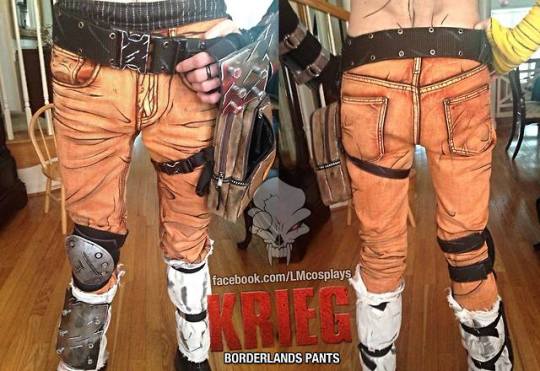
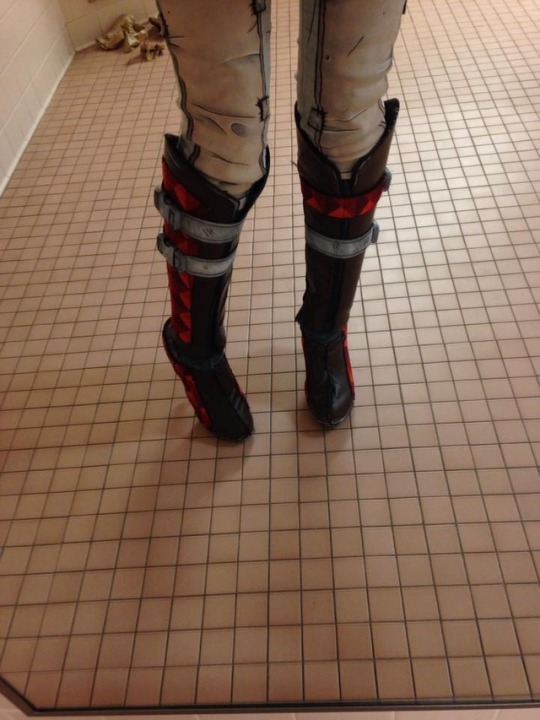
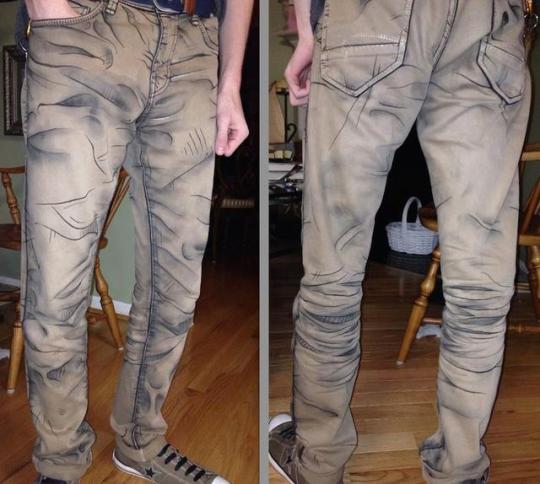
Cel shaded or Toon shaded pants!
Would you wear them?
Made by Labinnak & Mangoloo Cosplays
Based on the Borderlands art style.
754 notes
·
View notes
Photo
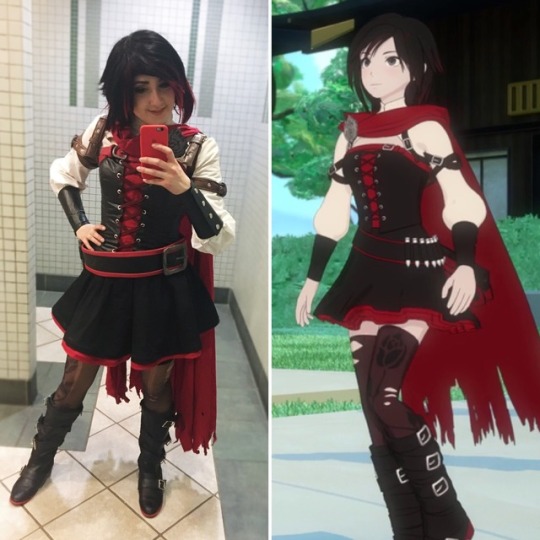
Been awhile since I’ve done a character vs cosplay. My RWBY Ruby cosplay has to be one that I am super proud of for accuracy to the original character model. Is there a cosplay that you feel are most proud of?
336 notes
·
View notes
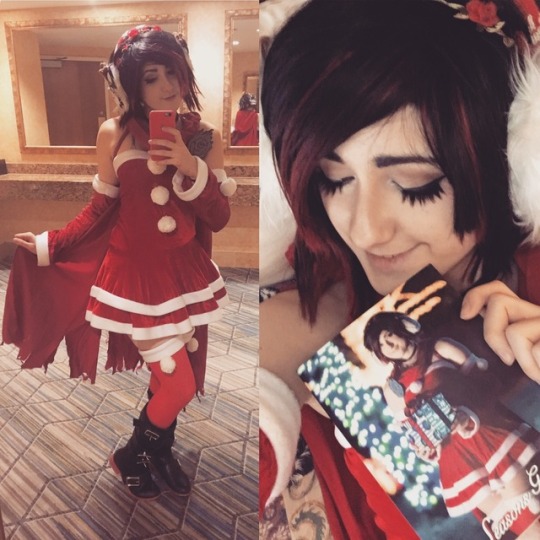
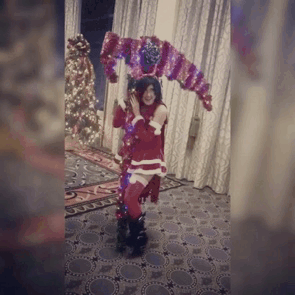
Video
Really enjoy this Werble app xD Here is some Christmas Ruby ❤️ . Anyone else have any cool Werbles to share? Photographer: @headphonestudios
60 notes
·
View notes
Photo

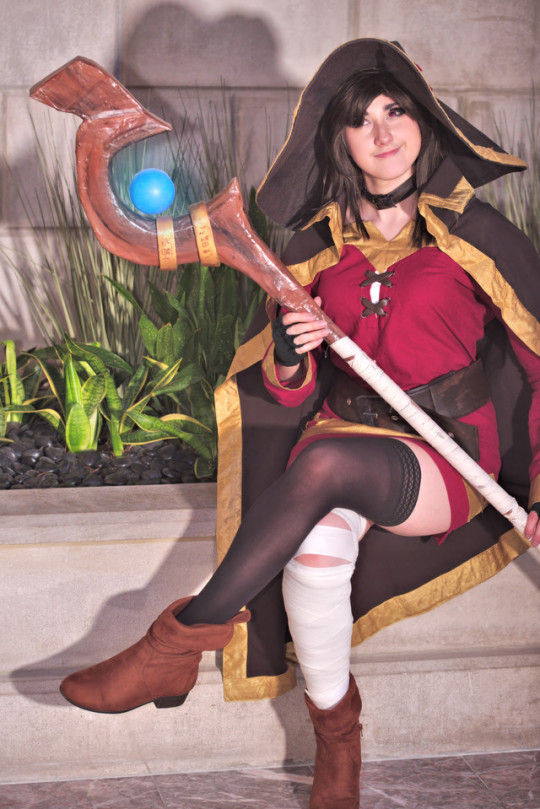

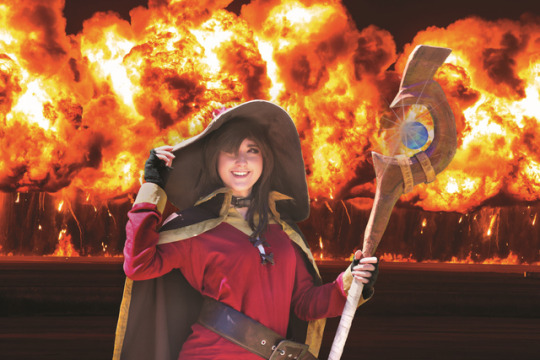
Been awhile since I posted any Konosuba cosplay - here is my Megumin cosplay.
“EXPLOSSSIIOOONNN!”
Photographer: Nick Ferris: Photographer, Ostensibly
131 notes
·
View notes
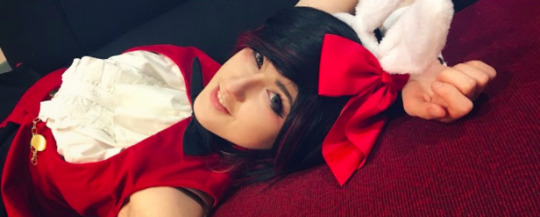
Photo

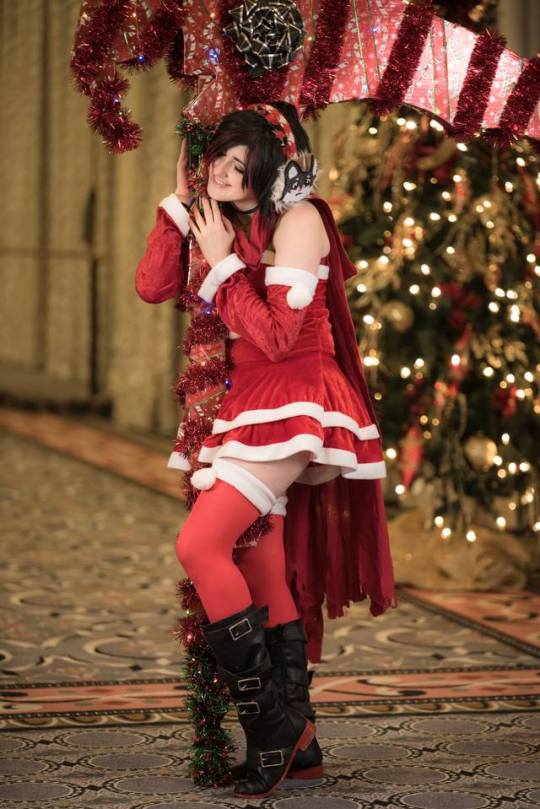
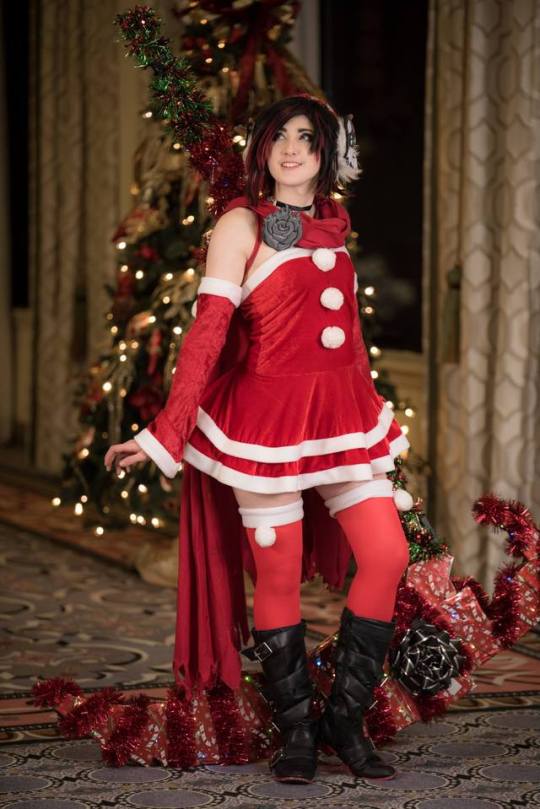
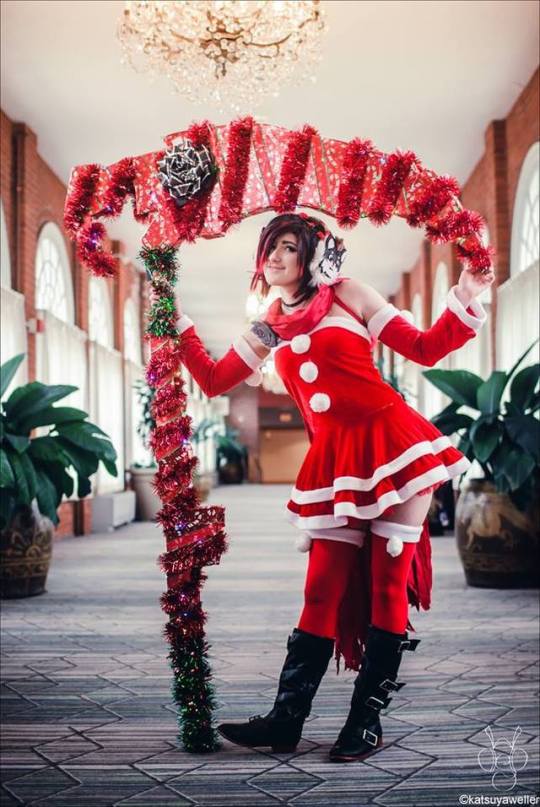
Merry Zwei-mas and a Happy new year!
RWBY Christmas Ruby Rose cosplay based on art by Mojojojoj
Photographer: Dan Seiter Photography
374 notes
·
View notes
Photo
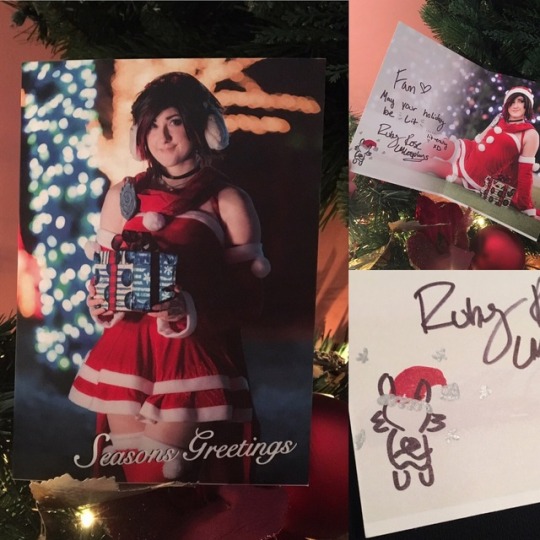
Did you order your holiday RWBY card yet? I'll be shipping them out late next week so be sure to get yours. I'm going to be writing personalized notes and holiday Zwei butts in them. Also offering unique polaroids with them. Link to get card http://lmcosplays.storenvy.com/ If you are struggling with the order: https://squareup.com/store/labinnak-and-mangoloo-cosplay/
73 notes
·
View notes
Photo
When you get yourself the best Present for Christmas
383 notes
·
View notes
Video
Hey guys Labinnak here! I've been so damn busy at Full Sail learning how to work in film production I haven't had time to post much, so I do apologize for that and hope y'all haven't forgotten about me just yet haha.
Anyway, check out my buddy Jay Hattori's channel, he interviewed me with his nerd question of the day videos! I had a blast working with you man and hope to do more stuff with you in the future!
#Lord beerus vs Satiama#Lord beerus#Satiama#Labinnak#Question of the day#Nerd question of the day#Jay#Jay Hattori
14 notes
·
View notes
Note
I love all your Ruby cosplays!!!!! Have you thought about making one of Ruby's dress from the Beacon ball?
That is actually the next cosplay that I am making! And thank you :)
7 notes
·
View notes
Photo

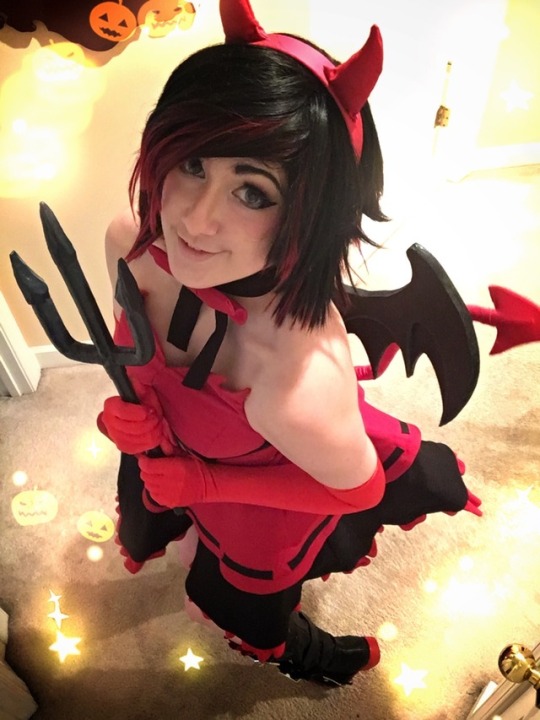
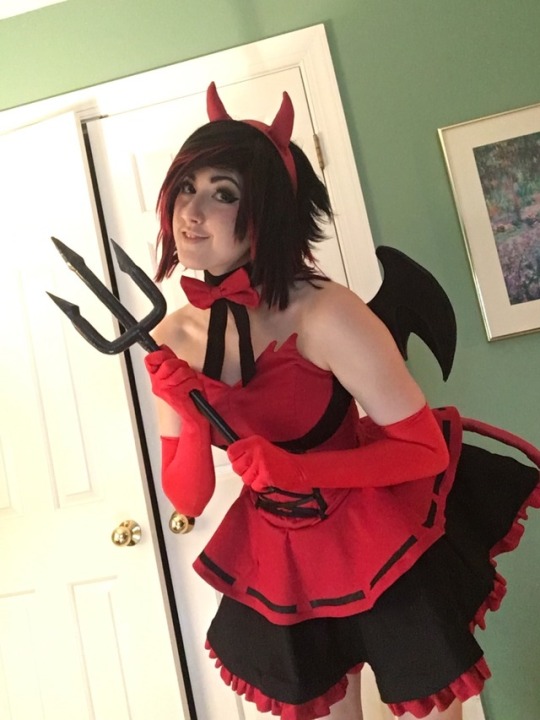
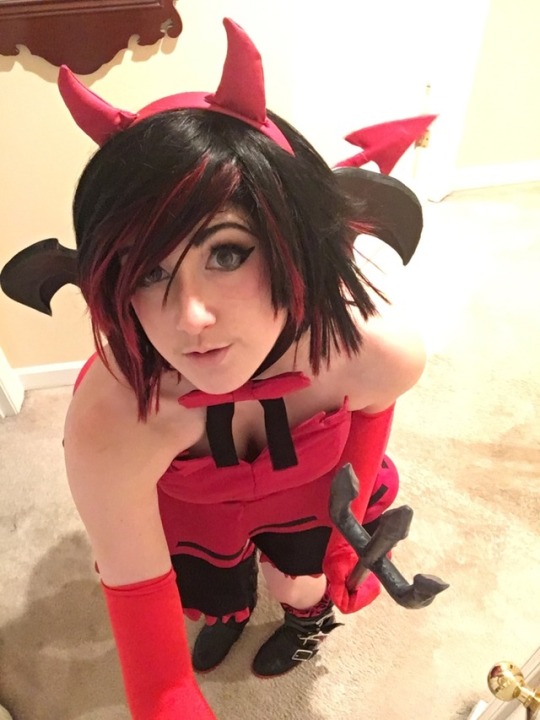
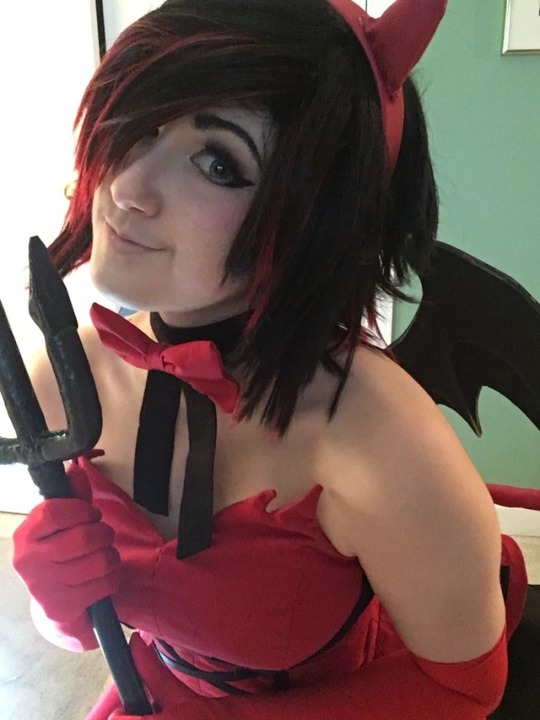
Happy Halloween Have some Devil Ruby inspired by Mojojoj's art
665 notes
·
View notes