
ts3creatorscave
TS3 Creators Cave
Everthing about TS3CC creation discord.gg/4duP5QE
86 posts
Don't wanna be here? Send us removal request.
Last Seen Blogs

biographhy
Untitled

itslateitslate
but not too late

thesecretstuff23
Mmmm

ibcyndi
Random

the-countdown-seconds-tick-by
Sir, should I press this button or NOT?!
Text
Tutorial Time: For beginners
@dhalsims commented on my post [Hi, lovely :D] and I thought I’d show you through a post instead of a private message [no hoarding knowledge you beasts!] This is a super simple method that Luna used to use when she was still in the community. If you ever pop open one of her models, you’ll see the textures are just simple images, and I was always baffled how she did it. When I first started modeling, I tried [and failed, and failed again] to create models from images and they either looked like a hot mess or they were wayyyy up there in polycount from trying to get every nook and cranny.
I wrote this as if you’re just starting out in blender before, so if you’re more advanced please forgive my rambling.
So, here I introduce, the knife tool in blender [I don’t use milkshape, so please don’t ask lol]
Why on earth would I want to cut something to make something? Shh, let me know you.
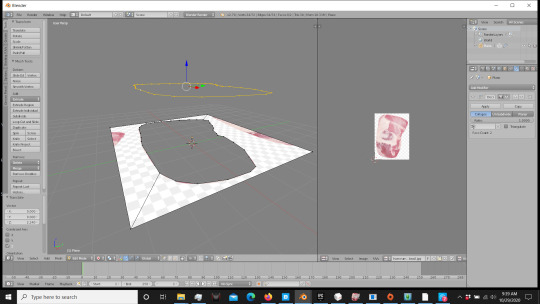
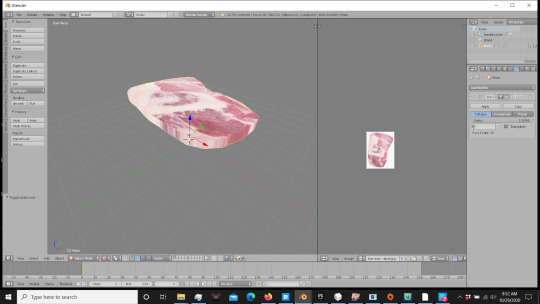
You’re gonna start with this:
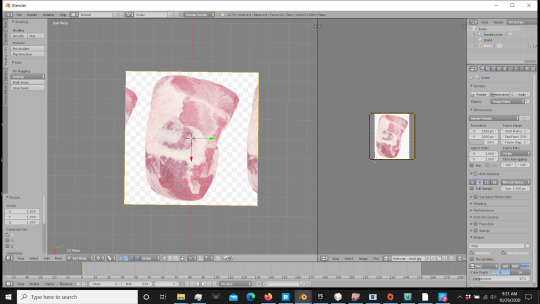
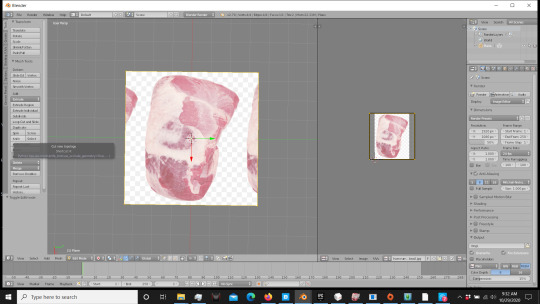
Yep, that’s it. Add a plane, UV map it so you can put the texture on it. I scaled mine so it wasn’t stretched, so just figure out the general size you’d like and hit edit mode for that plane. On the left side of the screen you’re going to want the tools section. Look down the list until you find the knife button.
Click it, and it’s going to give you a little knife with a green dot. Go around your image and trace the shape with the knife tool using small clicks. [Note, every click will be a vertice]
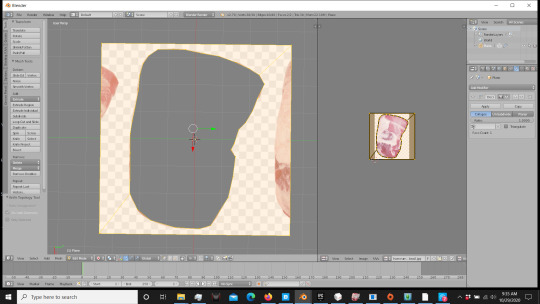
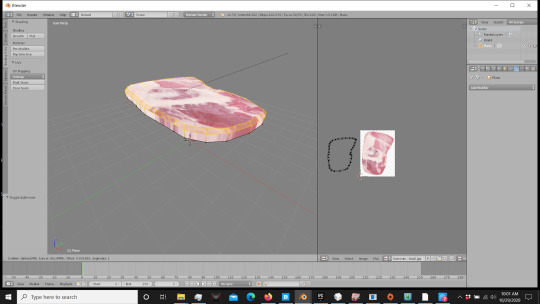
Trace your shape all the way around the edge, and when you connect the last one, you’re gonna have a string like thing. Don’t panic, just hit enter once those are connected and you have the random line attached to your mouse. It’s going to give you a cut-out like this.
Well crap, you say at the giant hole in your picture… No, just wait. Patience.
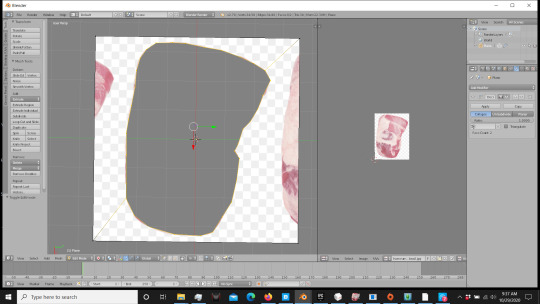
Select the vertices around your basic shape. [Shift/Alt Right click people, don’t be like me when I started and select every vertice by itself. Save yourself time.]
Now, you can do this 2 ways. Either duplicate those vertices, or [in edit mode] press P/Selection to remove those vertices from the plane. Either method will do.
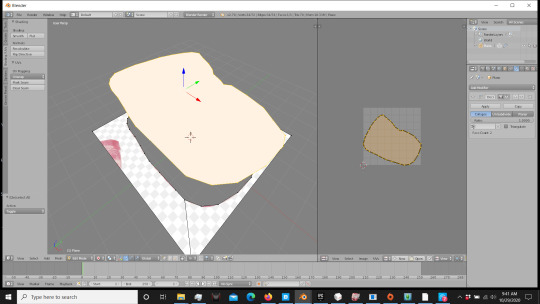
Now press F to fill in that space, and unwrap it. No need to go marking seams, just press unwrap, it’ll match the shape.

Press E to extrude that down. If it’s gone wonky, right click to release it and use your blue arrow to move it straight down so it’s not at an angle.
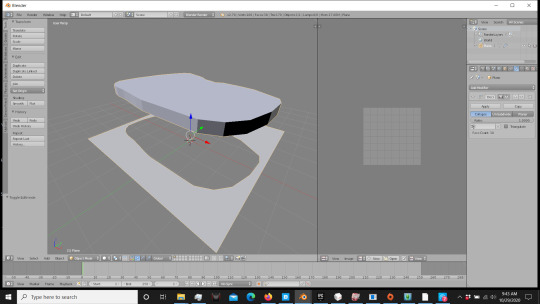
You now have a basic shape. Hold on, there’s a few more bits. Go ahead and delete that plane, you won’t need it anymore. [Remember if it’s attached to the mesh, select the vertices of the plane and then delete]
If your mesh looks like this [ignore the UV mapping, I fiddled with mine] just go to MESH in Edit mode, and go up to NORMALS. Hit Flip Normals to get it to flip directions.
Like so:
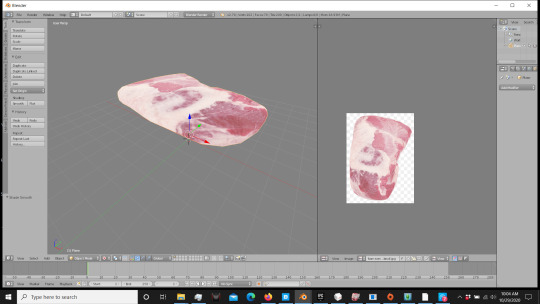
Now the rest is UV mapping and getting it to where you like it for your textures. I’m not going to go over that here, but I highly recommend watching videos and studying UV mapping. On a platform like the sims, you can do amazing things with textures without having astronomical polycounts. Now one more thing, to give your mesh a little oomph, you can bevel. One pieces like this, I use it regularly as meat isn’t supposed to be flat. Select the top of your mesh, and hit ctrl/B. Be gentle, it’ll take off with you. Drag that out until you have a slight bevel to your edge.

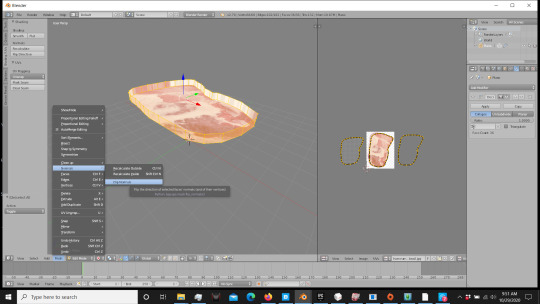
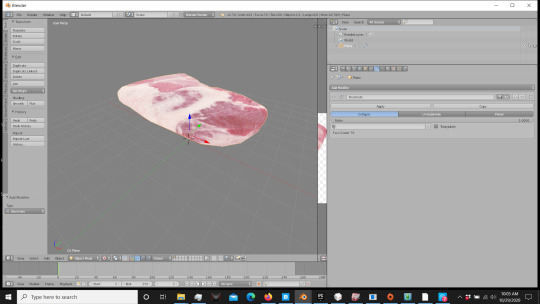
As you can see, since you UV mapped it beforehand, it already added that in for you.
And there you have it. A simple mesh, with textures straight from google image search. AND: Look at that number! :D [70]
Now go do great things! (: And tag me so I can see your CC! :D
NOTE: I am not an expert. There are other methods that you can use to do similar projects, there are methods that will get you more detailed results, but for a low poly, game-ready item, this is how I do it. If this helps you, let me know I did something for the world today :D [Kidding, but kind of…? lol] I hope it helps, and happy modding!
Cheers. -SimAddix
568 notes
·
View notes
Text
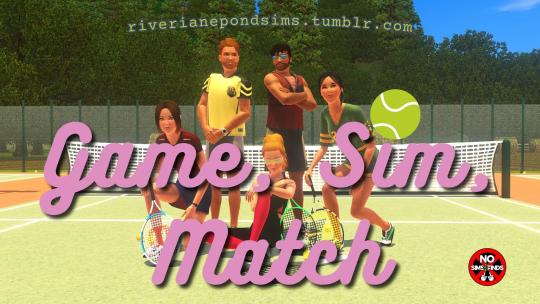

Game, Sim, Match | Tennis Collection for The Sims 3
Hey, I'm back again! This time, I bring you functional tennis.
Set machinima/music video: Game, Sim, Match | The Sims 3
Important info and download 💾 under the cut:
This project has been three years in the making. I started this back in 2020 after getting permission from Basimcly (aka lemmylou) to use their meshes. For various reasons, it got shelved until earlier this year. I've been on a CC creation kick this year, and in the midst of some not-so-great times that occurred from late March to early May, I decided to take on this project again as a distraction, and I put all my effort into it.
I used to play tennis myself, and modeled the tennis court in the previews after the one I spent far too many summer days on (it's missing the cracks it has today)...likewise, the soundtrack to the little film I linked above was one of the top 10 songs that year, so it's the most nostalgic song looking back on that summer I started playing.
This set is a combination of different elements.
- This set requires the University Life 📚 expansion pack. Since this is a cosmetic change to the ping pong table, which comes with UL, you will need that pack for the actual tennis court object's functionality, and for the tuning mod. The deco objects (besides the tennis court objects) will work fine with base game. You can also still use the collection file for the objects even if you do not have UL.
📌 Default Replacements
- First, the tennis is really ping pong in disguise. The tennis racket and tennis ball are default replacements. While I have provided several colors for each, you can only have one of each in your game at one time, because whichever color racket and tennis ball you choose, it will replace all ping pong paddles and all ping pong balls with the chosen color, so all sims will use the same color. Keep in mind that sims playing ping pong at the tables that came with the University Life expansion pack will also use these replacements, so you have to decide if it's worth the tradeoff.
Default Replacement Mesh Credits:
- The tennis racket mesh (offered as a default replacement and an edited fully recolorable deco object version) was created by LillieBou on TSR (2010). Tennis Set - LillieBou
-The tennis ball mesh (offered as a default replacement and a deco object version) was created by Basimcly aka lemmylou (2020).
Game. Set. Match. - Basimcly's Tumblr
📌 Tuning Mod
- By EA design, sims will learn the hidden table tennis skill as they play, and will gradually get better. The higher their table tennis skill, the more "real" this set looks, as sims play more skillfully.
- With the tuning mod, sims at least level 1 in Athletic will also improve their Athletic skill by playing tennis. I added the Fatigued moodlet if sims play for too long, and enabled playing for pregnant sims. The tuning mod will only conflict with any mod that also modifies the PlayPingPong_PingPongTable ITUN resource.
📌 Tennis Court Objects
- As for the tennis court objects, these are ping pong tables that look like tennis courts. The mesh was created by Basimcly aka lemmylou who was kind enough to let me use their meshes for this project!
- You may notice that there are four versions of the tennis court object. You can have all four versions in your game. They are all the same object with slight differences - the Volleying tennis court has the ping pong table's original routing spots, so sims stand very close to the net and all animations line up. The Match tennis courts have the routing spots moved gradually farther away. Some animations with the ball get a bit strange the further away, but I included these for variety. So if you place a few different courts down next to each other, sims playing will be standing in different spots, adding to realism for photos/videos.
- The animations are designed with a table in mind, so the ball does not touch the ground. When sims lose the match, they will throw their racket down, but it will also not touch the ground. Slightly annoying, but close enough.
📌 Decorative & Functional Objects
I have also included several decorative and functional items. Most of these are meshes that were created by Basimcly/lemmylou and the one by LillieBou, with modifications.
- All of the items were recategorized to show up on both community and residential lots and to not show up in Sporting Goods if deco,
-some items I removed or modified the dropshadows (for more of a maxis match game),
- I replaced any English text with Simlish versions,
- I included matching recolors for the tennis balls in the various states they come in (single, package, package opened, catchable),
- modified footprints and intersection for various items,
- changed the transparency of the tennis ball packs,
- and modified the recolor-ability of LillieBou's deco racket.
- Added an original tennis court rules sign, a recolor of EA's pool rules.
🔍 Search: To make it easier to find the objects in build/buy mode, a collection file is provided. You can also search for riverianepondsims, lemmylou, lilliebou, or tennis to locate the items conveniently using a catalog search mod.
Credits/Thank You:
This set would not have been possible without Basimcly/lemmylou @basimcly and LillieBou. Thank you for allowing me to use your meshes for this set!💖
I can't tell you how many times I started my game up for this, but it's a lot...
✨Download Catalog✨
Here is a download sheet/catalog with all of the preview images, price, location, type, name, original creator, and download links! There is also an installation guide provided at the end.
This is the easiest way for me to provide the download links, given that there are so many colors and individual downloads. I hope you all like this format. I will likely use this in the future when uploading item sets! I have some more things that will be coming, eventually.
Posting is what takes me the longest because if I were a sim, I'd have the Perfectionist trait.
- I ask that you do not re-upload, re-upload behind any paywall (early access, timer, ads, subscription, etc), or include my items in shared mod/CC folders.
- You can find all of my previous uploads conveniently by clicking “Navigation” on my blog and going to “Downloads” or visiting riverianepondsims downloads
My downloads will always be free, but if you would like to say thank you: Ko-fi ☕
💾 Download Catalog: Game, Sim, Match - riverianepondsims
🎾🏓👟🏅☀️
408 notes
·
View notes
Text

Merry Christmas Everyone!!
I've been pretty quiet on here, but that doesn't mean I've stopped simming! First up I'd like to say thanks (and sorry!) to all the lovely people who've sent me messages :) I'm gonna try my best to reply to everyone asap!
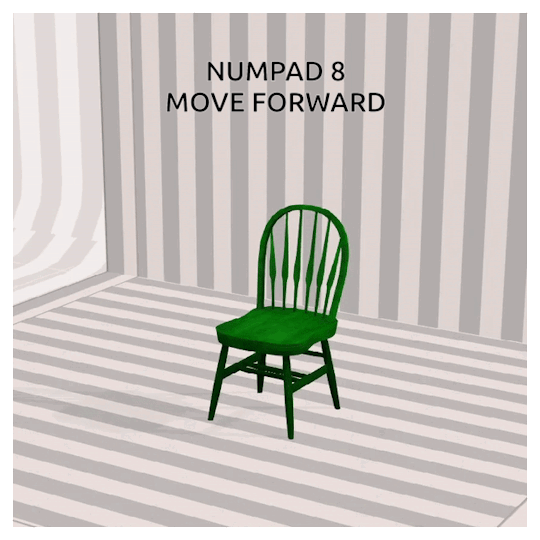
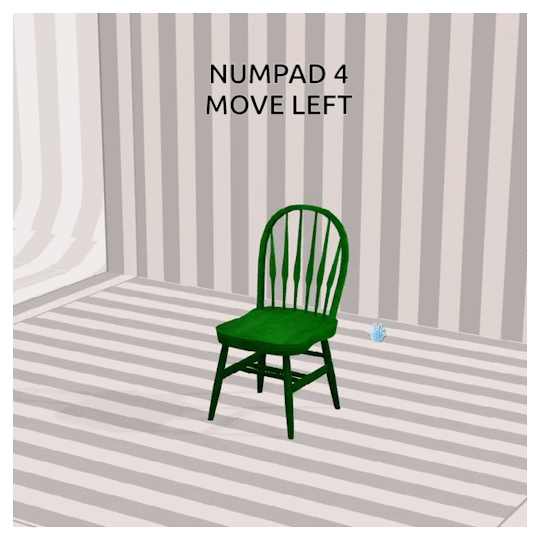
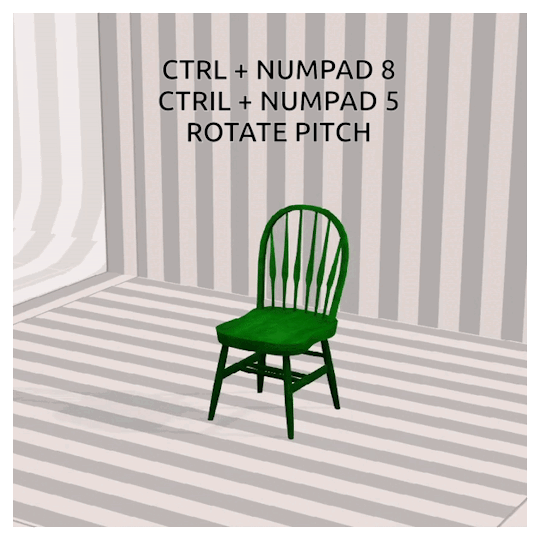
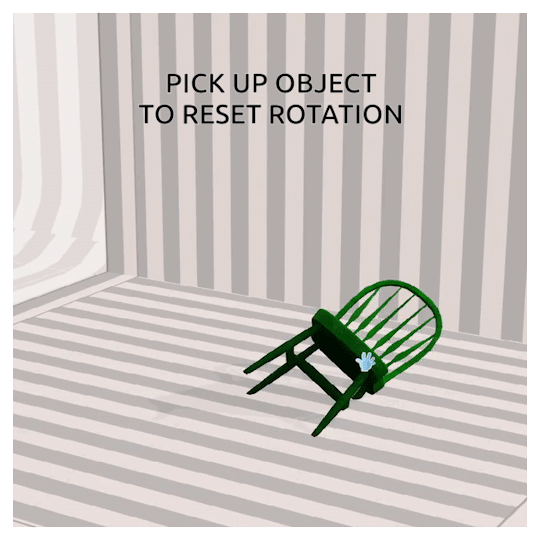
For christmas I wanted to share something special - so here is the public release of the first version of my Decorating Tools mod (or S3DT)
Quick Description -
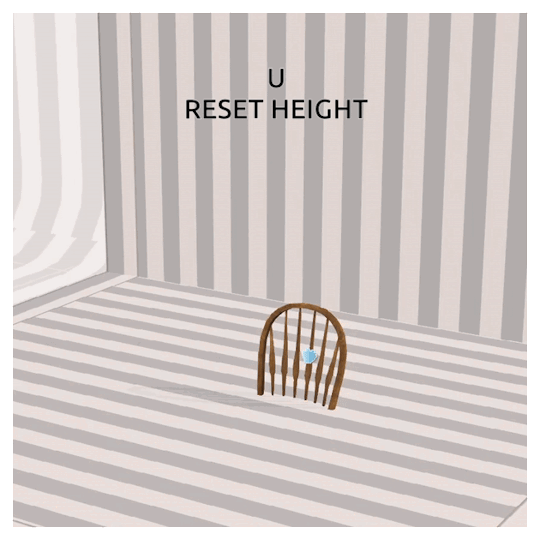
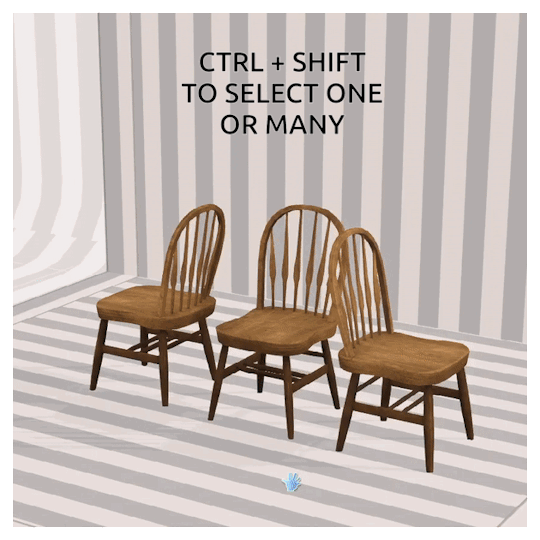
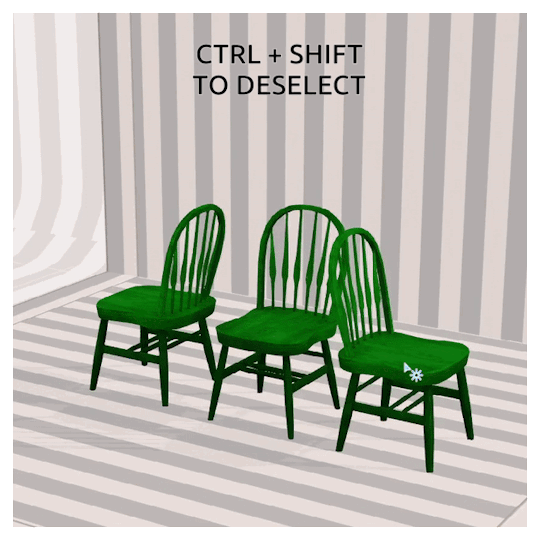
This mod adds hotkeys to the game to allow you to move objects up/down, left/right and rotate in all directions, similar to T.O.O.L for TS4
PDF Guide included below!
To my wonderful patrons - thank you for your support <3 I feel bad that real life has gotten in the way of me delivering more content to you all, so I'll likely be closing it soon! If it's possible, I'll also refund the last couple of months due to my inactivity. Anyone who wants to can still donate to my Ko-Fi
MOD INSTRUCTIONS AND DOWNLOAD BELOW THE CUT


This version is compatible with icarusallsorts' Transmogrifier Mod, and until I can figure out how to script it better, my mod actually REQUIRES it in order for them to be compatible together.
*** EDIT - For some, you might need to use CTRL + SHIFT + Click to bring up object menus! ***
If you would like a version that does not require the Transmogrifier (but is therefore incompatible) send me a message!
FUTURE PLANS:
- Adapting movement depending on camera direction
- Adding a UI interface for interactions and manual rotations etc.
- Scaling interactions with hotkeys
Don't be afraid to reply to this post, send me an ask or a private message if you have any questions or problems. I'm also in the Creator's Cave discord, so feel free to @ me there too :) And please tag me or use the tag #S3DT if you come up with any cool ways to use this mod!
DOWNLOAD S3DecoratorTools.V1
VIEW PDF GUIDE
Thank you to @greenplumbboblover for her help with pesky matrix44's, granthes and Misukisu for laying the groundwork for this mod, and @puddingface1902 for his super helpful videos!
@pis3update
2K notes
·
View notes
Text


[TS3] Blender References: Buy/Build Mode
Just a quick and tiny mod that I think people would appreciate as well!
I got tired of making furniture and having to copy EA objects to figure out their height, length, and width. And so I made myself a reference blend file!
I've made sure that everything is the right size, especially the walls and flooring, but it's possible that the table and seat have a milometer difference between a reference mesh and the cube reference.
Download it Here
198 notes
·
View notes
Text
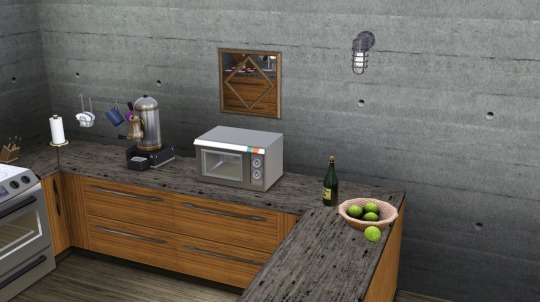
Get Pumped!
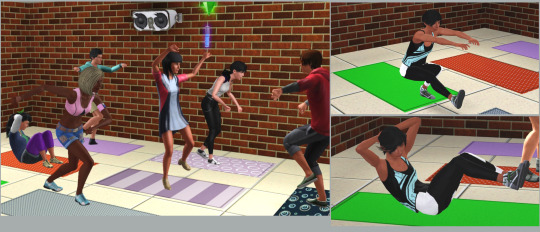
This started as just a simple solution to allow my Sims to work out without a TV, radio or gym equipment present but I’m a fitness nut so I knew I couldn’t stop there. I love working out and am always trying out new workouts or gyms like people try out food or clothes. It’s one of my favorite hobbies IRL so I was happy to try and make more exercise/fitness things for my athletic Sims.
This is the Exercise Mat I previewed a few weeks (months?) ago and I added a few more features like the ability to teach classes and also free weights (dumbbells and kettlebell).
Credit/Thanks: @aroundthesims for the free weights and kettlebell which are hers. I only recategorized them to Sports/Hobbies. Mats and board are EA. Animations by me, Mixamo and EA!
All the info and download link are after the jump, read through it all before downloading!
Exercise Mat:
Sims can do different floor and body weight exercises on the mat, which are skill gated:
Sit ups, squats: Level 2
Push ups, single-leg squats, bicycle crunches: Level 3
Burpees: Level 4
Sims can also stretch which has benefits if you do it before and/or after exercising.
Stretching before: the Feeling Limber moodlet will prevent your Sim from getting fatigued so long as it is active
Stretching after: the Feeling Limber moodlet will remove soreness if you have it
If there is an instructor mat on the lot, you can assign the mat to the instructor mat so Sims will use it for classes

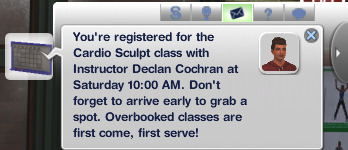
Instructor Mat: This mat lets Sims who have Athletic skill 5 or higher teach exercise classes.
Assign Instructor - sets who the instructor will be for the mat
Schedule Class - self-explanatory; select a time a date to host a class
Start Class - if you don’t want to wait, you can start a class now. Instructors will wait 20 sim minutes (tunable) before starting the class to allow interested Sims to join.
Toggle Stereo - requires IP to work, adds a stereo to the instructor mat so you can play music during class
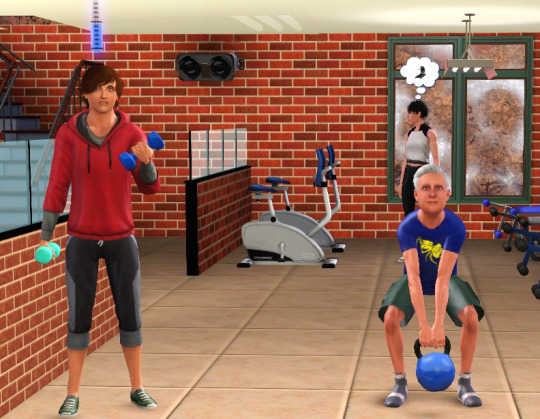
Free Weights:
You can lift dumbbells or kettlebells. That's pretty much it. These guys look super happy about it.
You only need one dumbbell. The other one is a prop which will be created once your Sim starts lifting.
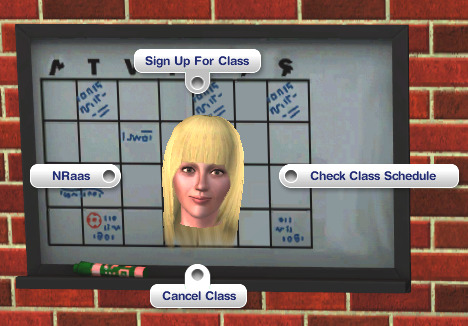
Gym Board:
Check Scheduled Classes
Sign Up for Class (Note: you can't sign up for classes that have no spots available but you can still show up and try to get a spot if there's a no show)
Cancel Sign Up
Cancel Class

Gym Classes:
Instructors can hold Beginner, Intermediate or Advanced gym classes, the difference in difficulty affects the fat/muscle delta, fatigue level and athletic skill gain. The ability to hold different class levels is skill gated at Levels 5, 6 and 7 respectively.
If you schedule a class, the instructor and any Sims that sign up for the class will be pushed to the lot an hour before the class starts. Sims cannot join a class after it starts but if they leave before the class ends, they still get charged.
The cost per person is based on the class level and the instructor’s athletic skill. If you have NRaas Career and the Instructor is in the Trainer skill-based career, they will also earn extra money and the funds will go towards their career advancement.
If there are no spots available, you can still check what time the class is and get information on the class if you want to show up and see if a spot opens up.
If classes are hosted on a non-park community lot, like a gym, 25% of the class fees will go to the venue (the venue owner will receive this if it’s owned).
You can check and sign up for scheduled classes on the gym board object. Instructors can also cancel classes there.
There are two "rewards" available: Top Trainer and Gym Rat. Top Trainers are Sims that have taught at least 20 classes. After achieving that, their classes are worth more and they also keep a larger percentage of the cost per student. Gym Rats are Sims that have taken at least 10 classes after which they get a discount on any other classes afterwards.

Notes:
My suggestion is to organize the class room like how I have in my photos with the mats horizontal facing the instructor. I'd also space them out more than I did as some of the exercises involve a lot of jumping/moving around but I have small lots so I have to squeeze in as much as I can! With this plus Twin's spin class and yoga mods, I'm going to need a bigger gym!!
The instructor will face whichever mat is first in the list of assigned mats so I would suggest assigning the front center mat first.
You can have multiple instructors/instructor mats on the same lot but an instructor can only be assigned to one mat.
Sims cannot take a class if they don't have more than $400 in their family funds. You can change this if you like but I don't want my broke inactives spending money on gym classes (we have gym at home!)
If Sims are not autonomously joining classes or using the mat, it’s probably because you have too many advertising objects on your lot that are competing with it. You can up the advertising for the mat but it’s already quite high so you just have to figure out how to balance it. The Join Class interaction does advertise fun and social in addition to the standard Athletic Game Object advertising so I would suggest upping that in order to get more attention from Sims.
The animation of Sims picking up/dropping the free weight is kind of wonky. I may try to fix it later.
There’s a collection file for all the objects but you will find all of them under Entertainment/Sporting Goods. Nothing is more expensive than 150 simoleons.
This is set for YA+ because a) some of the animations will sink for teens and b) they are always trying to do their fucking homework around each other while I'm holding classes and it drove me crazy. You can change the ITUN if you want teens to use it but you've been warned.
Future updates: I'm already thinking about using a similar system to create dance classes. Making an active Dancer career is something I’ve wanted for a while and I have a Sim that would be perfect to test it.
As always, if you run into any issues, let me know!
Download here | Alt: Simblr

What I originally wanted to name this mod 😭😭
519 notes
·
View notes
Text
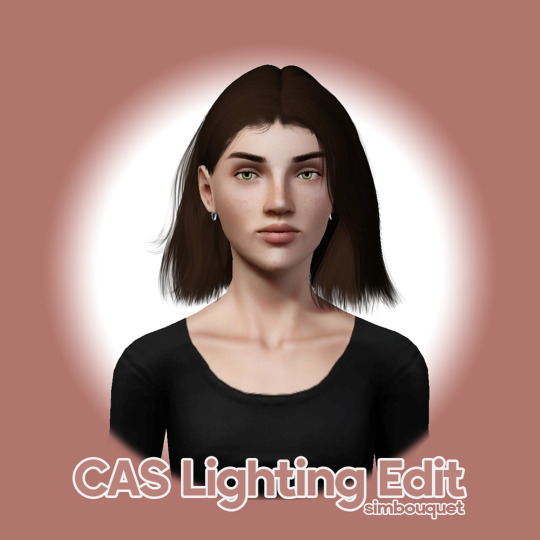
TS3: CAS Lighting Edit
Last year, I was experimenting a little bit with the CAS lighting and managed to come up with this neat little mod that I’ve had sitting around up until now. I figured it was about time I shared, so here it is!💡
More info and download under the cut!
Previews: White Background / Default CAS Background
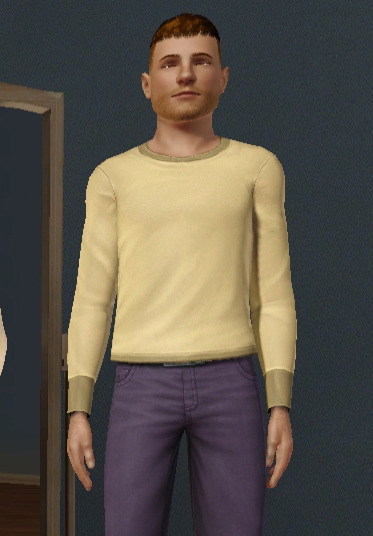
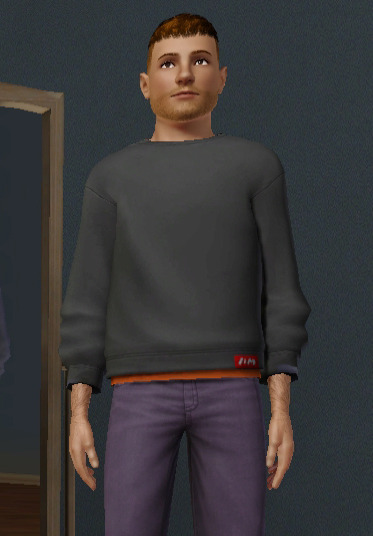
This CAS lighting is much less flat than EA’s default, with defined shadows that draw attention to the Sim’s face and add depth to their features, overall making them more faithful to what they’ll look like during gameplay. It also happens to make the mirror reflection just a little more bearable to look at! :P
I’ve included comparison images in the links above, one with the Sim on a flat white background where you can see the differences in lighting without distractions, and another in the good ol’ CAS screen to give you an idea of how it looks inside that environment.
Compatibility
This mod is compatible with all your usual world lighting mods, since they edit completely different resources.
This mod is incompatible with any mods that edit the CustomLightRigging _INI resource. AFAIK, the only other mod like this that’s out there at the moment is @criisolatex's lovely Pure CAS Lighting Mod, which I recommend if you prefer a more stylized, silky-smooth look.
Download: SFS / MTS
Place the .package file in your Packages or Overrides folder.
Credits & Thanks
s3pe: Exporting/Importing resources, creating the .package file.
Notepad++: Editing the .ini file.
Adobe Photoshop 2024: Creating the preview images.
Thanks to @misspats3, @antoninko, @simplyslow and @probablyzora for testing and giving feedback!
Thanks to the lovely community at TS3 Creators Cave!
310 notes
·
View notes
Text
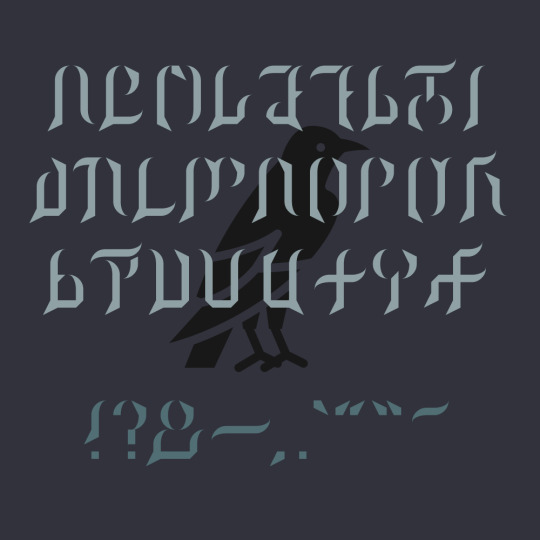
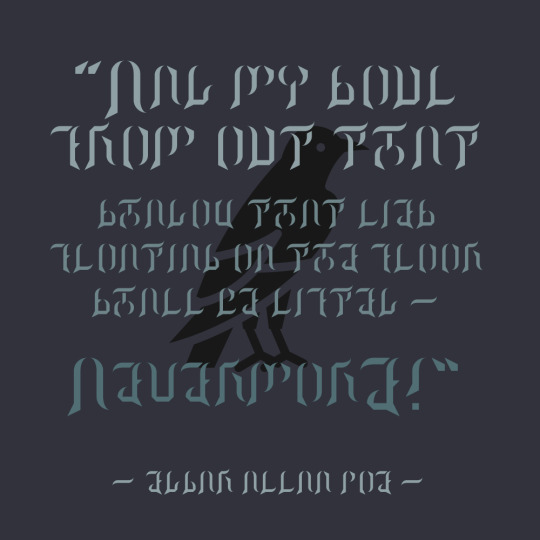
Nevermore - A Simlish Font

I meant to have this ready for Simblreen, but obviously that didn't happen. Mea culpa, and Happy Belated. Previews and download under the cut.
I really wanted to try my hand at a gothic Simlish font, and man, did this project cure that desire. 😫 Nevermore (named, of course, for EAP's The Raven) is definitely a display font; there are no lowercase letters or numbers. I might add numbers in the future if I can gin up the motivation to work on this one again.
The kerning on this one is pretty uniform, but I do suggest the usual manual edits if possible.
Attribution is appreciated, and I’d love to see your projects if you use it! Please do not use for commercial purposes or redistribute the font itself.
DOWNLOAD (SFS) OpenType format + preview images.
Lots of love,
Spacey
346 notes
·
View notes
Photo
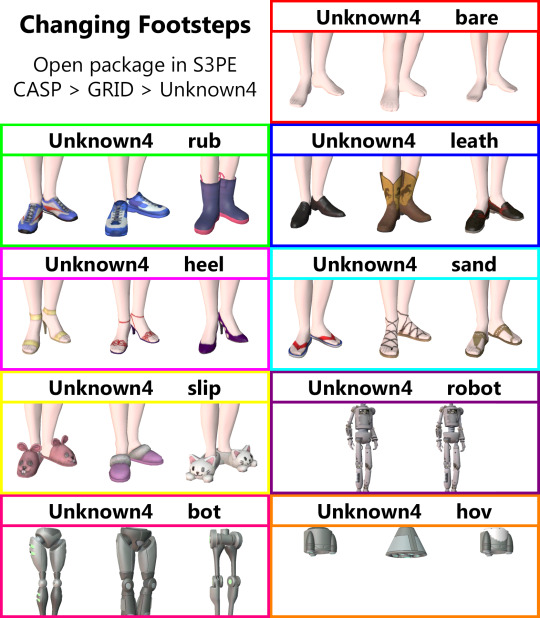

Have you ever noticed your Sim’s footsteps making the incorrect noise? Here’s how you can fix that.
Open the package in S3PE > Click CASP > Click GRID > Change the word after Unknown4 to the corresponding sound.
‘robot’ may require Ambitions. 'bot’ and 'hov’ may require Into the Future.
149 notes
·
View notes
Text
Please credit your Conversions
I've noticed a bit of a trend lately on converted/conversions objects not getting credited?
For example, a download would say "[insert objects'name here] - conversions", but the description never mentioning where it's from?
I get that often it could be from various of places, but there are a few reasons you may want to mention it anyway:
If it's a game, it will promote the game you converted it from. People often would google for said game and it may get them to play it. This is especially nice for indie-games as those developers often already struggle to make profits and keep their dream jobs.
Some people are pretty strong in the “copyrighting” game. So, typically, they'd want to know where it comes from, to then figure out if they want it in their games or not.
If it's a sims creator you converted it from, it would mostly come across as a nice "thank you" nod!
Without them, you wouldn't have been able to convert it. PLUS! Anyone who plays multiple sims games can then also download that version. 😉
The same counts for places like turbosquid.com, Sketchfab.com or any free assets websites (even Deviantart has it!). That way, someone can even use it for their own hobbies (think: 3D printing, making 3D scenes, etc), but let's be honest, the creator itself would love to see it being used too.
We sometimes forget that knowing the source of a conversion, can actually indirectly help many people! If not that, it can make their day. ♥
51 notes
·
View notes
Text
Here's why you should try out Simblr.cc
It is a place to share all things Sims (for the Sims 1 through 4 and Medieval, but also for upcoming life simulations like Life by You):
mods/CC – from simple recolors to elaborate game mods
WIPs – your ongoing or upcoming projects
tutorials – (be it gameplay-related, CC-related, or image editing...)
stories – a place for all your Sims stories! (import from tumblr)
lookbooks – show off that gorgeous outfit you styled!
showcase – show off builds, sims, gameplay...
user posts – for anything that you want to say or show!
dead sites repository – a place to share lost content
Other notable features:
feed option for endless scrolling through content (with filters)
import posts from tumblr or modthesims
events to participate in, badges to earn
adult/nsfw content is allowed (guidelines here)
The site is PG-13 friendly (NSFW is opt-in)
If you think there is a feature or function missing, suggest it on the➡️ simblr.cc discord!⬅️
(You can also just come to hang out 🦥)
The site is growing along its community.
Simblr.cc is a passion project, not a money grab, and it shows! It is currently running without ads and relying solely on 🪙donations🪙. Our own @greenplumbboblover aka Lyralei, who created simblr.cc, is working hard on implementing requests and squashing bugs.
The goal of the site is to cater to all life simmers and their needs and unite the community.
✨Simblr.cc ✨– made by a simmer, for simmers!
👉 What is your favorite feature of simblr.cc? Comment or reblog with our answer!
Thank you for reblogging, your support helps so much 🙏
132 notes
·
View notes
Text
Stuck at making mirrors? A tiptorial..
I discovered something while pulling my hair out of frustration in creating a custom mirror in TS3.
So the usual flow in creating mirrors is to clone a mirror (preferably a base game one), replace the mesh with your self-made or converted mesh while keeping the mirror group, resize the mirror group accordingly, assign bones if needed, import your mesh, edit textures and catalog info, then export and test in game.
Usually having the w values (more info here) untouched results in mirrors reflecting the backside and is usually resolved by setting the w value with negative values or just zero. The reflection will show up just fine.

However...
Once you rotate to a certain angle, some reflected objects disappear from view (example in left, right one is the vanilla base game mirror showing reflected objects normally).
It seems that the 1x1 base game mirrors are the culprit! Cloning any of them will produce the same result.

Avoid cloning them at all costs, and clone the 2x1 ones instead:

I cloned the 'mirror wall contemporary' and followed the same procedure. If you want your mirror as a single tile object you can just adjust the footprint to 1x1 (tutorial here, go instead for the predefined width x depth section and select 1x1). This will result in a mirror showing the correct reflections without even touching the w values!
I hope this helps!
ADDENDUM 28 OCT: Some EA mirror meshes have visible faces on both the front and back sides, that will most likely cause the "backside reflection" error ingame. Below is an example of how the mirror mesh is shown in Milkshape:

It will be resolved by removing the faces on the back side of the mesh (illustrated above, the back side is selected in red), so that only the front face will be rendered. So in other words, make sure the mirror mesh faces only the front side so that it will render properly ingame.
56 notes
·
View notes
Text
Using SNAP files to catalogue your Sims
Got an absolute ton of Sims in your SavedSims folder? Not sure which is which? Here’s a quick tip that comes in handy if you have S3PE installed: use the .sim file’s SNAP option to catalogue your Sims.
I’m chucking this behind a cut, but here’s a quick composite of two SNAP files from my latest Sims, to show you:

Keep reading
162 notes
·
View notes
Text
Creator Community Good Faith Practices
Here at the Creator’s Cave, our mission is to create a ‘safe space’ for people to learn how to create new content and mods for The Sims 3, and share their knowledge of how to create new content and mods for the Sims 3.
Frequently, new custom content (CC) is generated by making edits to existing CC. As part of the above mission, we feel it is required of us to encourage ‘Good Faith’ practices, and to discourage ‘Bad Faith’ practices when utilizing content from other creators in your CC or mods.
We've made a list of ‘Good Faith’ and ‘Bad Faith’, and ‘Grey Area’ practices to serve as guidelines for both existing and aspiring creators.
We asked those in the discord to help distill and tweak it, and will continue to make alterations based on feedback from the creator community. These guidelines are primarily enforced by the community itself, and other creators may decline to provide assistance to someone who is using ‘Bad Faith’ practices.
Here’s a link to the doc for any interested: TS3 Creator Good Faith Practices
#ts3 creators cave#creator community best practices#how to get along with your fellow modders#feedback is always welcome#if anyone wants to translate this into another language please feel free#I also don't mind if people copy/paste portions of it for use in other communities
87 notes
·
View notes
Text
The Sims 3 default clothing replacement tutorial
Hi everybody!
A couple of weeks ago an anon asked me if I could make a tutorial about default replacing clothes.
Well here it is.
This is my first time making a tutorial, so if something is not clear leave a comment.
You can find the whole tutorial under the cut.
Programs you need:
Sims 3 Object cloner (S3OC)
Sims 3 Package editor (S3PE)
Milkshape + plugins
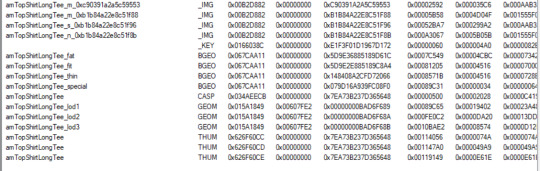
In this tutorial I'm going to replace this base game top (amTopShirtLongTee) With this conversion from Sim-songs
Step one: Clone the clothing that you want
open s3oc
There's actually 2 ways you can clone a clothing with s3oc, and I'm going to show both of them.
1.5.1 The First way of cloning a clothing is to click on Cloning -> CAS Part.
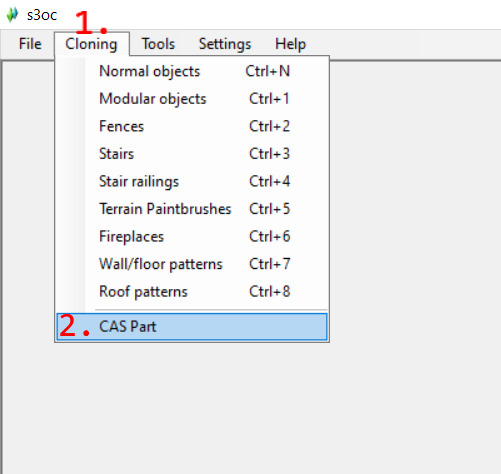
It will give you a big list of every Create a sim stuff, which is fine, but I personally don't like it.
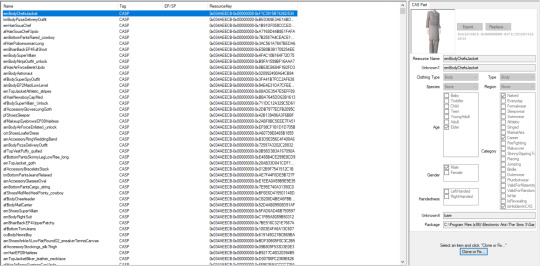
1.5.2 The second way of cloning is to go to Tools -> Search
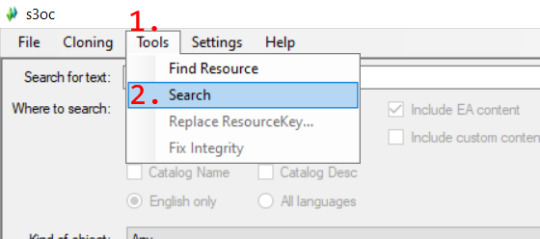
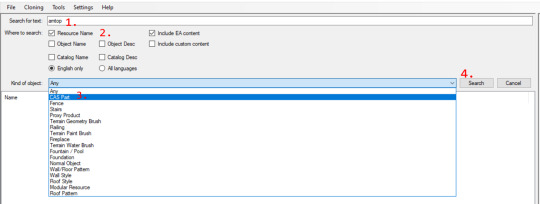
This one allows you to search for a specific thing.

For example if you want to clone a top then write top in the search bar, if you want bottom, then write bottom, but if you want to clone an outfit, then write body and not outfit.
You can even specify the age and the gender.
f=Female
m=Male
u=Unisex
p=Toddler
c=Child
t=Teen
y=Young Adult
a=Adult
e=Elder
You always have to write the age first, then the gender and then the type of clothing, so for example "amtop".
You can also specify that you want to clone CAS Part.
2. Now, if you've found the clothing you're looking for you can clone it by selecting it and then clicking on Clone or fix.

In the next window, on the right side you can recategorize the clothing if you'd like, on the left there are options that we have to tick and untick.

3. Tick Deep Clone, Include thumbnails and untick Renumber/rename internally and then hit Start and save it somewhere.
Step two: Replace everything that needed
Now that we've cloned the clothing it's time to replace the stuff.
open the cloned package with S3PE
1.5 A completely optional step but you can delete everything that we're not gonna replace in the cloned package.
Things that you have to keep:

Basically this is how it has to look:
2. Now moving on to actually replacing the stuff.
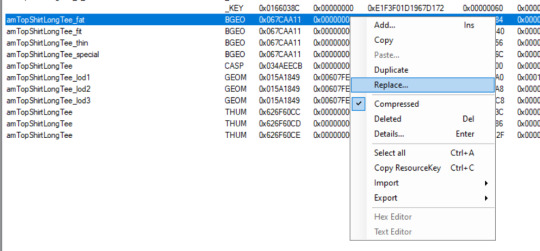
Open the custom content package in S3PE and export the texture files. Just right click on the file -> Export -> To file...

Give it a unique name or don't, it doesn't really matter just make sure that you know what is what.
Now go to the cloned package. Right click on the texture -> Replace.

And then select the corresponding texture.
Do the same thing with all the textures, but make sure that you replace mask with mask, multiplier with multiplier, specular map with specular map and normal map with normal map.
3. Go to the custom content package and export the BGEO files. Right click on them -> Export -> To file...

Again give them a unique name, but for real this time, because this can be confusing. It's hard to know which is which, but usually the first one is the fat morph, the second one is the fit, the third is thin and the last one is special.
Go to the cloned package. Right click on one of the Bgeo files -> Replace.
Do this with all of the Bgeo files. Replace the fat with fat, fit with fit, thin with thin and special with special.
4. Now export all the Lods (Geom files) from both the cloned and the cc packages. (right click -> Export -> To file...)

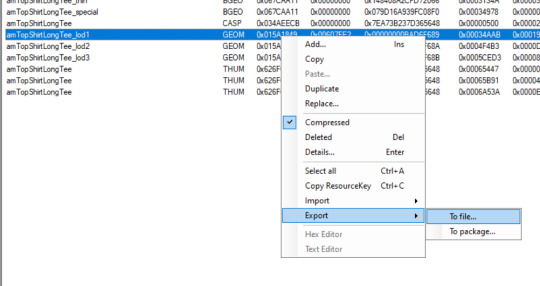
Make sure that you save them as " .simgeom " file.
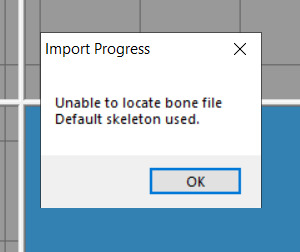
Open Milkshape and import Lod1 of the EA mesh.

If you get a pop-up like this just hit ok.
Go to Groups tab and then click on Comment
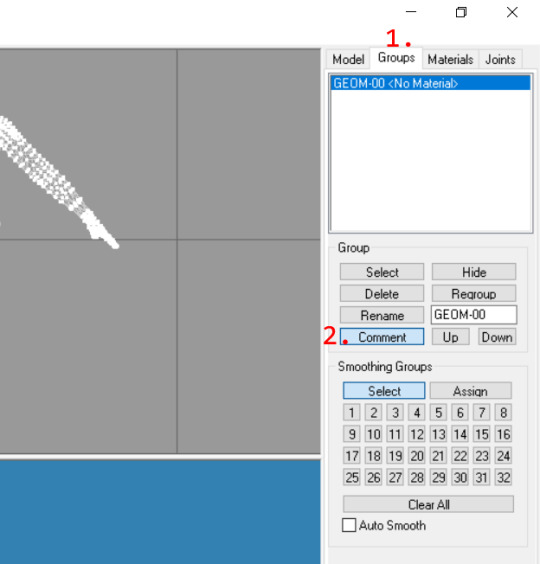
This window will pop-up. Select everything and then copy it.
I would recommend opening notepad and pasting it in there to make sure that it copied.
Now in milkshape click on File -> New (you don't need to save anything) and then Import the Lod1 mesh of the custom content.
Then go to Groups -> Comment and the same window as before will pop-up, but instead of copying everything delete everything.
So it should look like this.

Then paste in the one that you copied from the other mesh (the EA mesh).
Then hit ok and export it.

Do this for all the Lods.
Now go to the cloned package, right click on one of the Geom files -> Replace, and then select the corresponding Geom file.
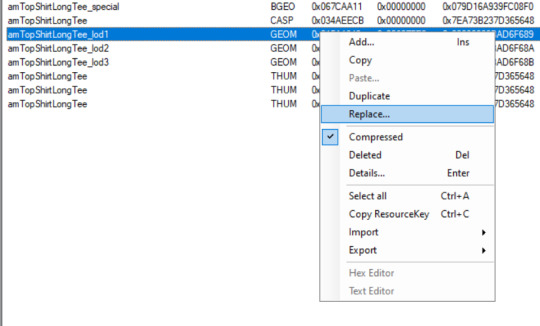
Now do this for all the Geom files and then it's pretty much done.
Save the package file and then it's time to test it in game.
Two things you should check:
if all the morphs work
if you can recolor it properly and it has the right amount of channels
For me the morphs work fine, but the channels are not right. It's recolorable, but it's not the right amount of channels.


So let's fix it!
Optional step: Copy the cc presets to the default replacement
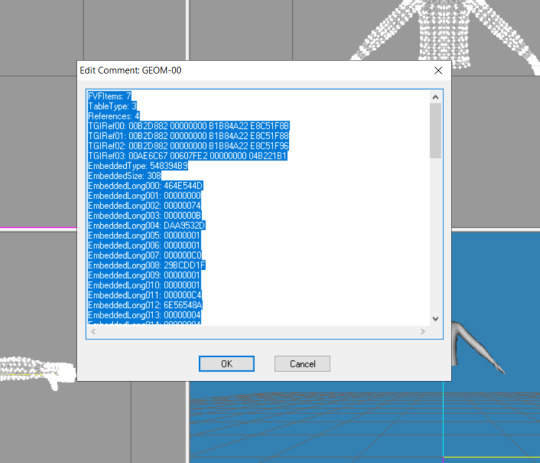
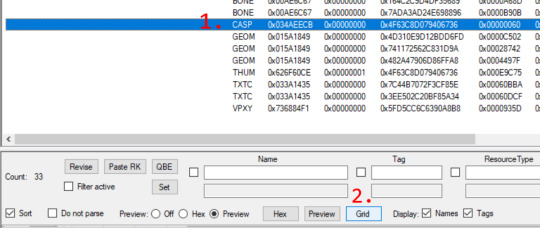
Open the cc package, click on Casp file and then click on grid.
A small window will pop-up. Click on Presets then click on that small rectangle.

A similar window will pop-up. Click on [0] Preset, then click on Xmlfile, a drop down arrow will appear, click on it, then click on Export, and save the presets.
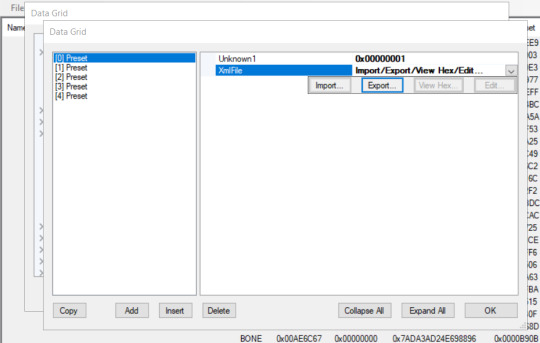
Now open the default replacement package, do basically the same thing as before (Casp -> Grid -> Presets -> XmlFile) but instead of clicking on Export click on Import and import all the presets.
Then hit ok and commit and you're done. You've copied the presets from the cc to the default replacement.
I hope that everything was understandable. If something was not clear leave a comment.
74 notes
·
View notes
Text
Guess I learned how to morph necklaces in blender without stuff exploding ^^
What I was doing before:
Every piece (the choker itself, the cross, the wings, etc) was separated in groups for every morph, and I tweaked it individually.
This was causing some morphs having more vertices than the others, and this is what makes the explosion.
Also it was quite high-poly (the raw choker itself was around 3k) and for morphs, for what I could understand, you must have 10k poly max, counting every one of the 5 morphs. So this was what was causing the explosion
What I did now:
I tweaked what I though was necessary, then I joined everything together in group_base, duplicated the meshs and went adjusting with scale tool and the grab tool in sculpt mode from blender, but I kept everything in the same group and didn't separate anything after.
I tried this method with some chokers from ts4 I was converting (will release them this week 👀) and now tried the same with the one above that was making me pull my hair.
After that, I didn't even need milkshape. I just assigned the bones from another CC choker that has just the b_spine2 one with Cmar's Mesh Toolkit, and for the other lods I'll decimate just the group_base and export as obj, and will do the morphing and bone assignment using my lod0 as reference :)
9 notes
·
View notes
Text
*Pay Attention - Part 2 - Tutorial*
I was about to go back to my business and quietly leave y'all with a word of wisdom but the very next package I opened raised my hackles. So here we go, hold on to your seat.
Disclaimer for younger/sweeter - followers - this has language in it because I'm pissed... I apologize in advance.
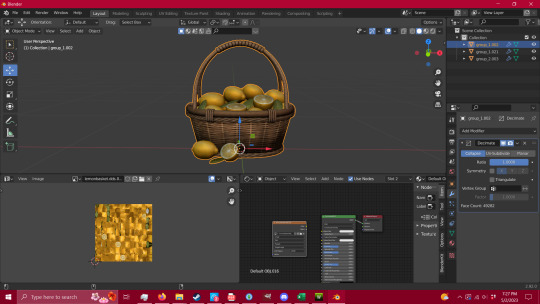
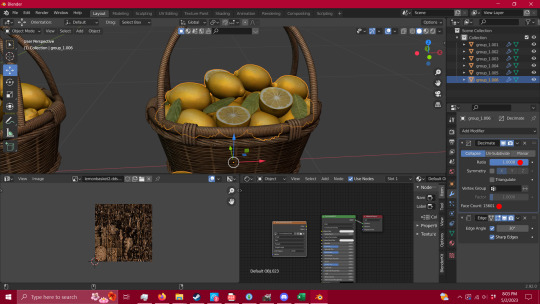
49,282 Polycounts. That's 50K for a fucking basket!!!
It's pretty, it's beautiful, and I downloaded it because it's everything you could want out of a basket of lemons... whoever created it did an outstanding job... for a movie production.
NOT PC GAMES.
So let's fix it - and let's hold our creators and converters to a higher standard or send them along to a different platform where they can create without our bitching.
First off, there's 3 or 4 ways you can check polycounts.
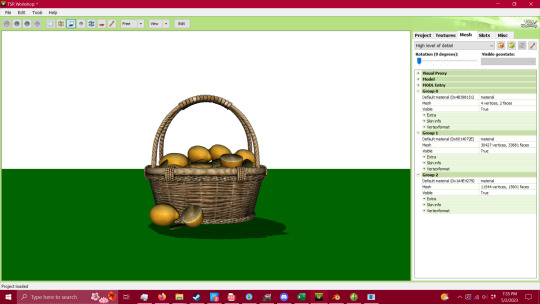
1 - TSRW under Mesh tab
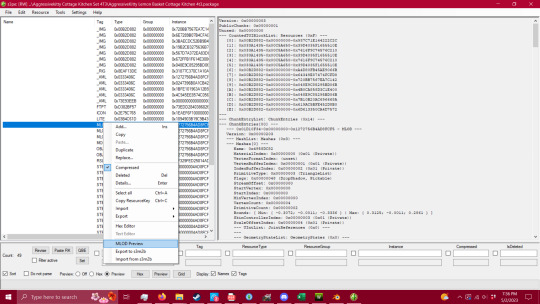
2 - S3PE (Pretty sure you have to have an addon to do this - I'll try to find it when I'm done and add the link) Under MLOD, right click and go down to Preview. It'll open up a window and you can view the model and the polycount.

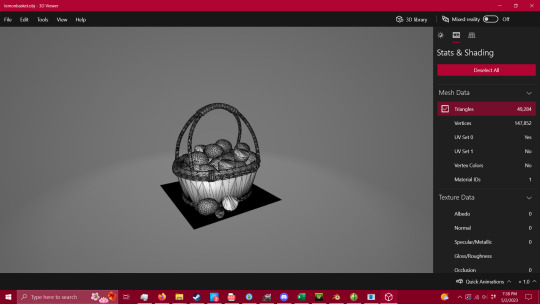
3 - 3D Viewer on your computer
4 - Blender or Milkshape

Now that we have the ability to check our polycount - we're gonna fix this mesh. I'm not going to show you how to package it, there are other tutorials for that part, but this is VITAL to having a healthy game, and honestly, being a creator or converter for this game. I do understand that you have to have the knowledge before you can fix a problem, so here it is - literally handed to you in a basket. I also understand that there are creators/converters who don't post polycounts because they're afraid people won't download it - that is inexcusable. If that's the case then you will eventually be boycotted by the players who know better.
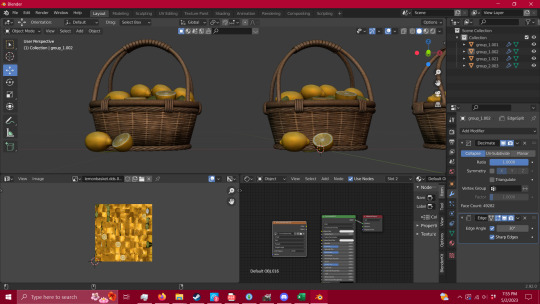
Alright, so step one - you're going to want to get into blender after exporting your mesh. You're going open the modifier properties and add a decimate modifier (the wrench circled in red, and the add modifier drop down menu).
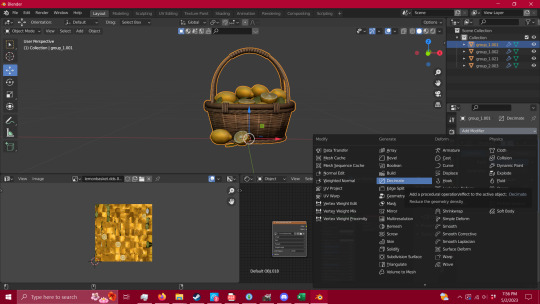
Keep it in Collapse, not un-subdivide. It's gentler on the mesh itself and you'll get a lot farther with it. You're also going to want your UV map to match what you're doing with your mesh, in case you need it for selection (I'll explain that in a minute) and have faces tagged so the selection is easier.
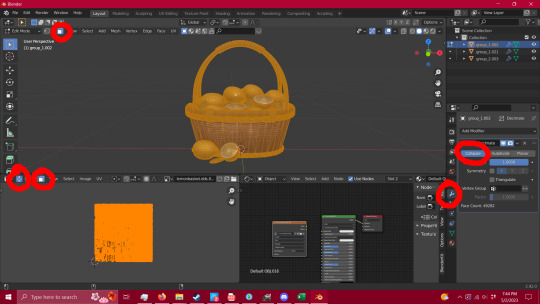
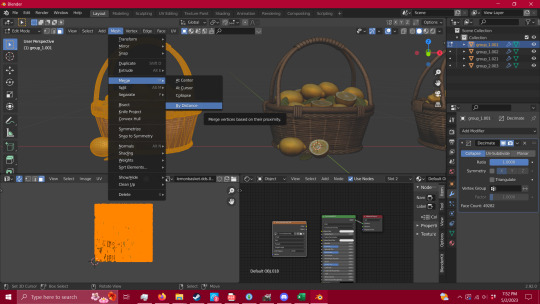
Now that you have that set up, you're gonna want to remove unnecessary vertices. See the shadows on the bottom of the basket? Here's how to fix that - hit tab, press A to select everything, and then go to MESH/MERGE/BY DISTANCE. This removed 16,900 loose vertices that didn't need to be there.
Go back to your modifiers and add an edge split modifier and hit apply.
Boom - no shadows.
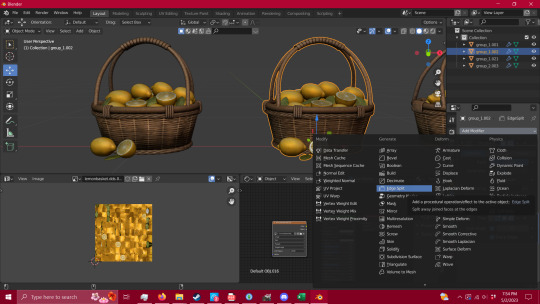
Now that that is all done you're going to go in to edit mode (tab) and press L while hovering over what you're wanting to select. This is going to select all of the islands in your UV, and it's the fastest way (that I've found) to quickly select pieces of your mesh.
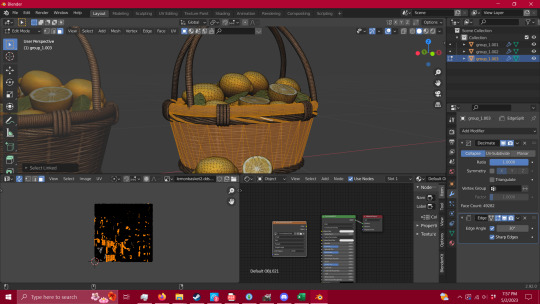
When you have your whole group selected (you can also figure out at this point what pieces need alternate textures or groups for TSRW later in your packaging process) you're going to hit P-Selection. That's gonna split whatever you have selected into a separate group.

Now, you can do that to however many pieces you see fit, but for this I'm just gonna stick with two - the lemons and the basket itself. You're going to click the blue Ratio box - and type in .5 and hit enter. That will collapse your polycount in half - (you can move that ratio box lower if you wish, but this way is the gentlest way possible and I've gotten better results. So play with it and see for yourself if you wish to. ) - Now repeat the process until your mesh starts to lose quality, I tend to stop there unless I can push it a bit further without making it look bad.
Now repeat that process with all groups.
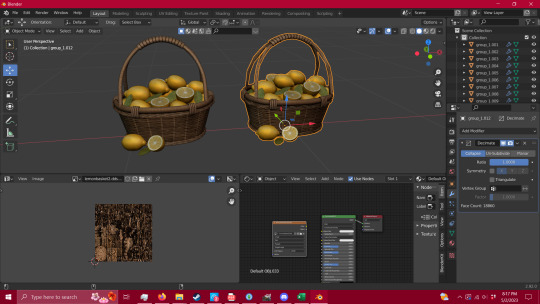
Given that this particular mesh was such high polycount and an intricate mesh, I could only manage to get it from 49,282 faces (polys) down to 18,860. This is absolutely not okay for TS3 - and I'm using as a lesson rather than using something that I can get down to an okay level - because this is what you're going to run into when getting meshes that start in the tens of thousands of polys. THIS IS NOT MEANT FOR TS3, it's beautiful, yes, but you are putting people's equipment at risk by advertising a mesh for a 13 year old game without disclaiming that it's dangerous for it.
This tutorial will absolutely work for most objects, and I've used this process for a couple of years now with success, but you have to be able to decide what you're willing to put into TS3. We have all of these tutorials for reducing lag in this old as dirt game, but NONE of that matters if you're carrying objects like this - no matter how pretty they are.
If you need it that bad, figure out how to make a version of it that CAN look as good as this with a little less detail (think the spirals in the wicker that is actually meshed rather than just textured), or ask a creator to make something for you.
If you have any questions, please feel free to ask. If I have the time, I try to help whoever comes into my inbox. If I can't help, there is a hoard of creators out there that probably can.
So have fun, CHECK YOUR CONTENT, and keep your computer safe.
And creators/converters - do better.
#ts3 tutorial#ts3 how to#ts3 creator tutorial#ts3 blender tutorial#ts3 poly count#ts3 poly count tutorial#ts3 how to reduce poly counts
307 notes
·
View notes
Text
Tutorial: Reducing polycount
@murfeelee Has saved my bacon more times than I can count with her tutorials. If you need a tutorial for ts3, seriously, go to her page, she probably has it with her infinite wisdom. <3 [She got me started when I was a baby modder, just fyi, so I count her as my mentor. Sorry, you’re stuck with me now murf :D lol]
https://www.tumblr.com/blog/view/murfeelee/633317103349497856 Make sure to check this out while you’re here! (:
Now, when I first started I actually sent her this file because I was a noob and needed help. This mesh was way too high for sims, as most 3d models from the web are, and I wound up scrapping it because I didn’t know better. Now, I give over a tiny tool that will help you big time with polycount.
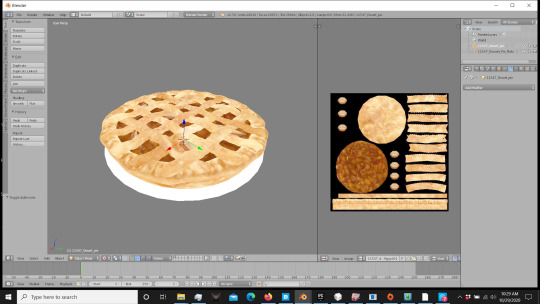
First off you’re gonna want to use this button over here. [I know it’s hard to see, I apologize]. What it does is links/unlinks the UV map to the mesh, so if you need to select something fast, you can use this tool to get it done quickly.

Using CTRL and your left mouse button, circle the part of the UV map/mesh you want to select. And bam, done. Easy. Now, for this mesh I’m going to click P/Selection to separate that part, because that’s the high poly sucker that we’re wanting to reduce. Not the overall pie just yet.


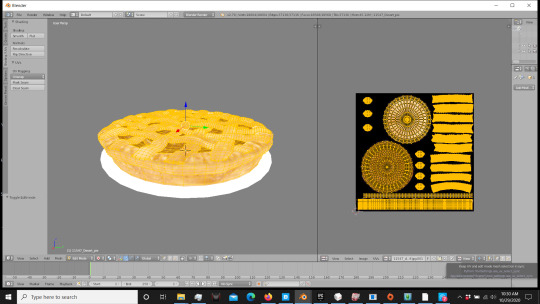
Now go to your decimate modifier. The crust piece is almost 14k. Do not use this kind of count for Sims, it’ll fry your damn computer. No. Noooo. You hear me? No.
What we’re going to do is keep it on that FIRST TAB. Do not go to Unsubdivide. This is what you’ll get if you use that one.

Yuck.
Instead, use the Collapse tab. In the Ratio tab, put in .5 and apply. Repeat this step until your satisfied. It’s much gentler than subdivide and will half the polycount every time you apply it, without changing the overall mesh shape.

As you can tell, there’s minor change to the crust, except that it’s now 1.5K instead of 14K. Much nicer for your game and computer.
That’s my mini-tutorial. I hope it helps, and happy simming people! :D
383 notes
·
View notes