#velvetcloak
Text
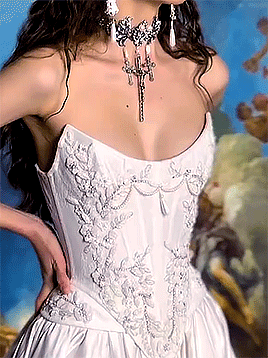
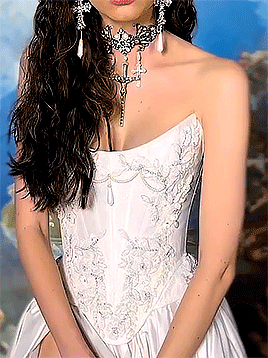
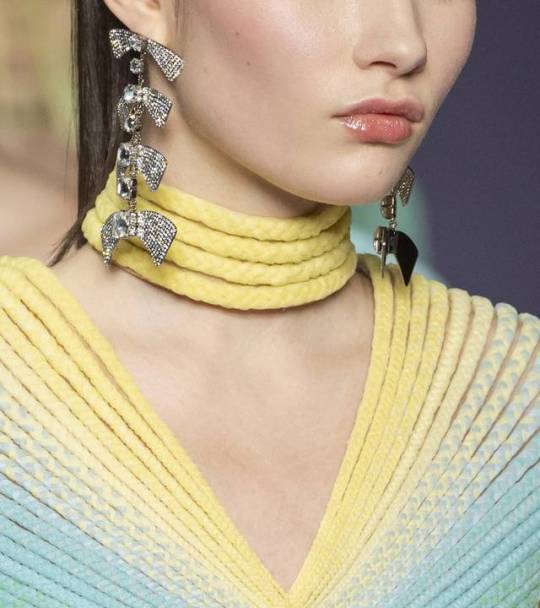
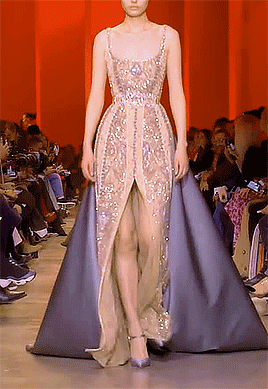
KIM KASSAS COUTURE
↳ Crown Jewels Bridal Collection — "Isabelle" gown
#fashion#fashionedit#haute couture#hautecoutureedit#kim kassas#coutureedit#fashion details#mine/post#mine/edit#usermin#velvetcloak#usersi
683 notes
·
View notes
Photo

The Druid Huntress Photos from my trip to Williamsburg, VA a couple months ago! Model: me @jessaraymuse Photos: @timhenness Bow & location courtesy of Fred Schollp Cloak by @costureroreal . . . #cosplay #bowwoman #archery #fantasyart #fantasycosplay #fantasycostume #druid #druidwarrior #priestess #priestessofavalon #celticwoman #rennaissancecostume #cloak #redcloak #velvetcloak #curlyhair #wildwoman #huntress #warriorwoman #jessaraymuse #periodcostume #periodmodel #dressup #timhenness #virginia #eastcoasttour #modeling #freelancemodel #travelingmodel #patreoncreator (at Williamsburg, Virginia) https://www.instagram.com/p/CeAM5NMO5y6/?igshid=NGJjMDIxMWI=
#cosplay#bowwoman#archery#fantasyart#fantasycosplay#fantasycostume#druid#druidwarrior#priestess#priestessofavalon#celticwoman#rennaissancecostume#cloak#redcloak#velvetcloak#curlyhair#wildwoman#huntress#warriorwoman#jessaraymuse#periodcostume#periodmodel#dressup#timhenness#virginia#eastcoasttour#modeling#freelancemodel#travelingmodel#patreoncreator
4 notes
·
View notes
Note
Hello there!! I love your fanarts, so much!!, but also your headcanons, they are so good, specially the house & house decor, chefs kiss!! One of my fav. (fanart) is the one that Rae wear that beautiful dress!! And i saw this post, velvetcloak(.)tumblr(.)com(/)post(/)726593079204806656/sororit%C3%A9 and, I was wondering if you think that Raven would wear them!


Thank you so much anon!! I appreciate your kind words so much ;; Just so you know I’ve been thinking of this literally all day fr fr. Keep the fashion coming! Lemme see some of your Damian fashion ideas too bc men’s creative suits are highly underrated.
I can’t get over Damian ogling over her in pretty clothes. Need more of that always.
Anyways here’s the link to what anon was referring to! I liked the first one best :)
325 notes
·
View notes
Text
Hi! @velvetcloak asked me to do some kind of lineart tutorial/step-by-step, I'm by no means an expert so don't hesitate to ask if you need some things clarified! Always glad to help.
I use three different methods that are pretty much trial and error, depending on what works best for the artwork but I'll do my best to explain with screenshots - these were taken on photoshop, I draw with procreate, but I'm guessing the layer modes are similar on other softwares. (Also mine are set in french, sorry in advance for the confusion.)
If you're already familiar with digital lineart and softwares, this probably won't be of much use, it's very basic stuff.
Otherwise, more below the cut! (It got a bit long.)
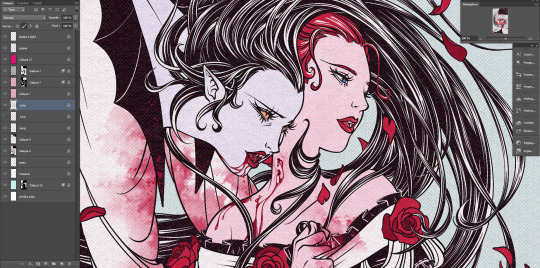
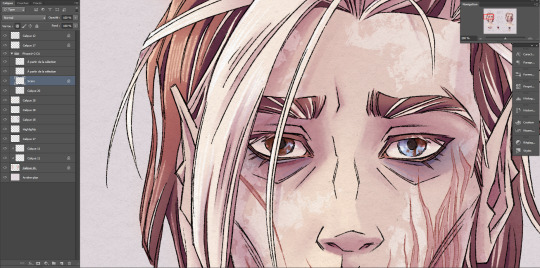
I. Solid black lineart, with this illustration used as reference.
I used the basic gesinski ink brush in procreate, 100% opacity in normal mode to get pure black. Very basic, it's set on top of the colour layers, everything above that is just additional effects and filters + textures. Note that I always draw separate elements on different layers and fuse them later, it's easier to deal with details this way.
The isolated layer looks like this (I changed the colour of a disappearing hair lock, more on this later):
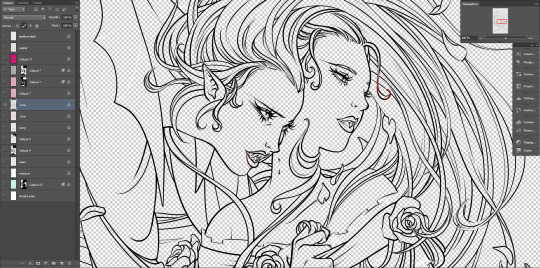
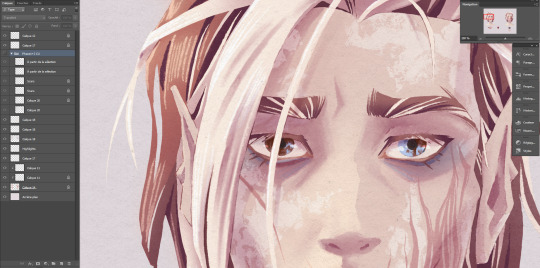
And the colours without it, like this (my style relies heavily on lineart, lol):
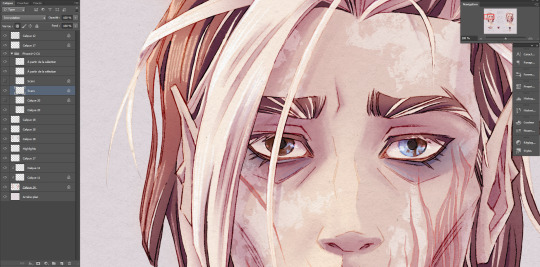
Both:
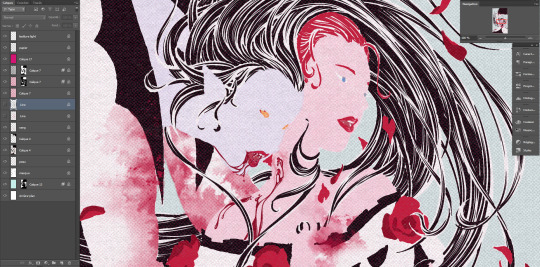
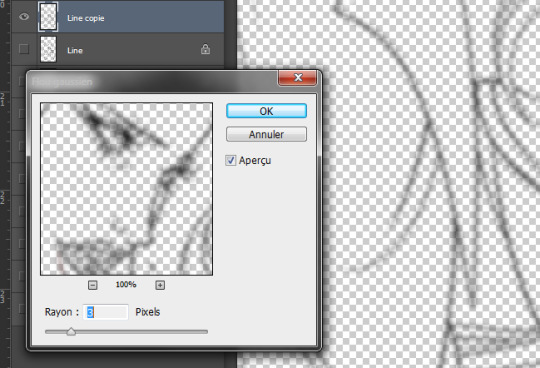
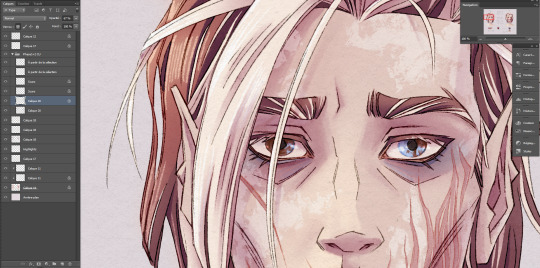
Good! It's a bit harsh though, I like to add a second layer to soften things up, set in 45% opacity multiply mode right under that. I duplicate the main lineart, and add a gaussian blur to the copied layer (between 3 and 5px, values vary from one artwork to another, same with the layer modes.)
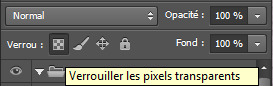
Not done yet! I use the blured lineart as a colour filter by locking it to pixels only and filling it with the tone I want. In this case, red. Isolated layer:
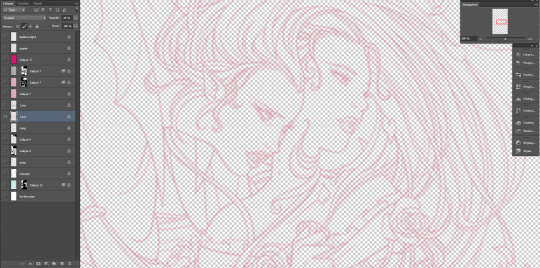
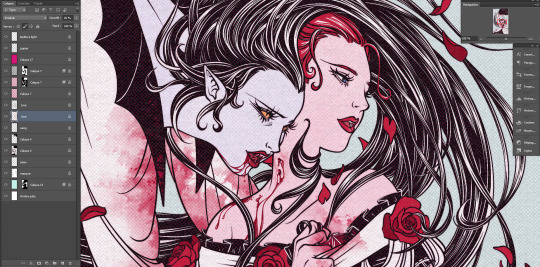
And the end result:
The second method, I tend to use more on sketches and loose drawings to get a better blend of lineart and colours:
II. Semi-transparent lineart, with one of these sketches.
Basic 6B brush in procreate (my fav), quite thin here but you can get great results with a larger brush. It's not really obvious looking at this scale, so here's a comparison between a black solid lineart (1 layer, normal 100% - the scars are on a separate layer because of the colour, otherwise it's the same setting) and a semi-transparent one (2 layers), especially visible in lighter areas, note how the second one lets hues show through. I find this to look a bit less stiff.
Now for the method! Since this relies on the layers underneath, you want your colours to a bit more precise than the previous example. Without lineart:
TBH it's also a two layers solution, super easy. Once you're statisfied with your basic lineart, set the layer to overlay 100%. You'll get something like this:
Then duplicate this layer, put the copied layer above the overlay one and set it to normal 70% (or whatever looks best, this is 67%) and you'll get the final result as previously shown! In this particuliar case, I erased the black circle around the iris in the normal mode layer to keep the blue of the overlay one. You could also skip step two depending on the desired rendering.
The third method is a blend of the other two result-wise:
III. Coloured lineart, with this illustration. (tw: a bit of gore and blood in the full artwork, I'll crop it out of the screenshots. Poor guy can't get a break. It's the only file in this style with a semblant of organization, don't be like me, rename your layers and use folders.)
Fountain pen toothy brush, from the MaxPack watercolor set. It has a bit of a texture to it, and isn't entirely opaque so it blends nicely with the layers below. The lineart is set to normal 100%, for this method it's preferable to have separate layers for each elements, since you'll be recolouring them individually. Here, the hands, skull and additional details are all on individual layers.

Just like the blurred layer in the first method, you need to lock your pixels (the little grid to the left on photoshop):
And either fill you layer with colour, or paint on it with an opaque round brush/a soft one depending on the desired outcome. (Some zones might need a gradient, or various colours.) You can also use another normal layer on top of a black lineart and set it as a clipping mask, same result, different method. But I prefer to keep the layers count to a minimum when possible.
With the layers below, it will look like this:
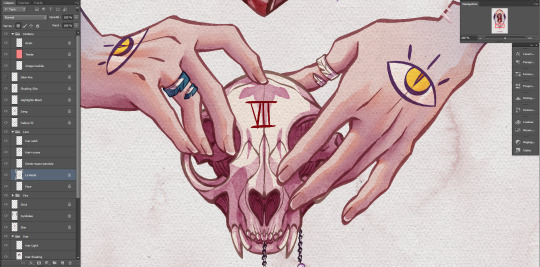
You can notice a bit of lineart transparency over the skull colour layer, cool stuff. (The shading of the skin is set on top for some reason, I don't remember why but surely there was a reason.)
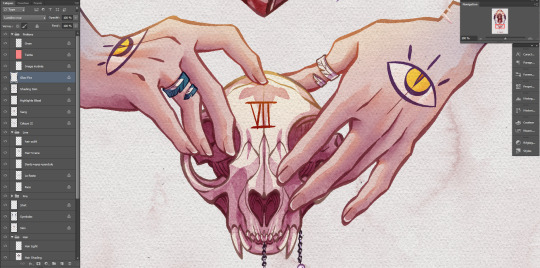
However! In this illustration, I need a yellow glow for the fire so let's create yet another layer, shall we? This affects the whole rendering. I painted a diffuse light source using a soft gradient brush, and set the layer to hard light. Isolated layer:
End result:
All done!
Now go create!
8 notes
·
View notes
Text

DISCLAIMER: this blog claims no credit for any images posted on this site unless otherwise noted. Images on this blog are copyright to its respectful owners. If there is any image appearing on this blog that belongs to you and do not wish for it appear on this site, please send me a message.
This blog post contains affiliate links. When you click on these links, use my coupon code, and make a purchase, I earn a small commission at no extra cost to you.
fashion tag
my post
ko-fi
tracking #fashionedit #velvetcloak
q-ed posts
18 notes
·
View notes
Text
@elysian-art-and-life here are the blogs
@lacetulle
@themakeupbrush
@guopei
@fashion-runways
@evermore-fashion
@velvetcloak
amd this is mine i mostly just reblog things @thetopshelf
1 note
·
View note
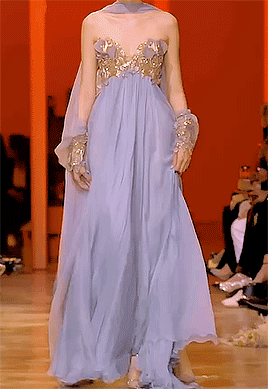
Photo
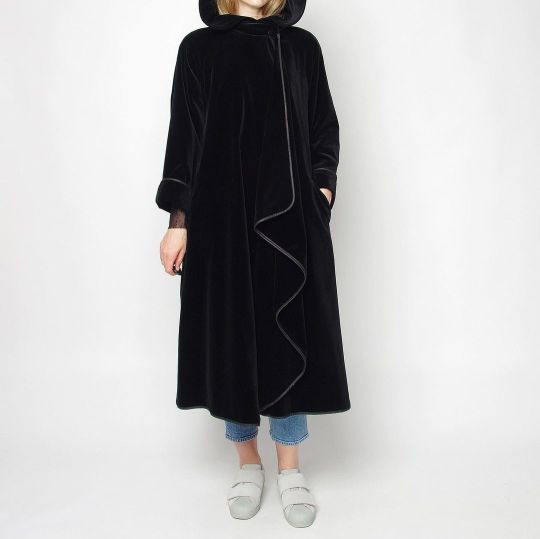
georges hobeika spring 2020 couture
#fashion#fashionedit#haute couture#georges hobeika#spring 2020 couture#runway#details#couture edit#chandelyer#velvetcloak
18 notes
·
View notes
Photo
1970s black cotton velvet cape 🧚♀️ tap on photo for more . . . #vintagecape #vintagecloak #velvetcloak #velvetcape #blackvelvet #blackclothes #velvetcoat #vintagevelvet #vintagecoat #70scoat #fairyclothing #fairycore #fairylife #seventiesfashion #1970sstyle #1970svintage #hippiechic #chicvintage #coolvintage #realvintage #vintageboutique #vintagevibe #only1copy #slowclothing #mindfulcloset #truestyle (w: Poland) https://www.instagram.com/p/CTK4yGmDSIs/?utm_medium=tumblr
#vintagecape#vintagecloak#velvetcloak#velvetcape#blackvelvet#blackclothes#velvetcoat#vintagevelvet#vintagecoat#70scoat#fairyclothing#fairycore#fairylife#seventiesfashion#1970sstyle#1970svintage#hippiechic#chicvintage#coolvintage#realvintage#vintageboutique#vintagevibe#only1copy#slowclothing#mindfulcloset#truestyle
0 notes
Photo

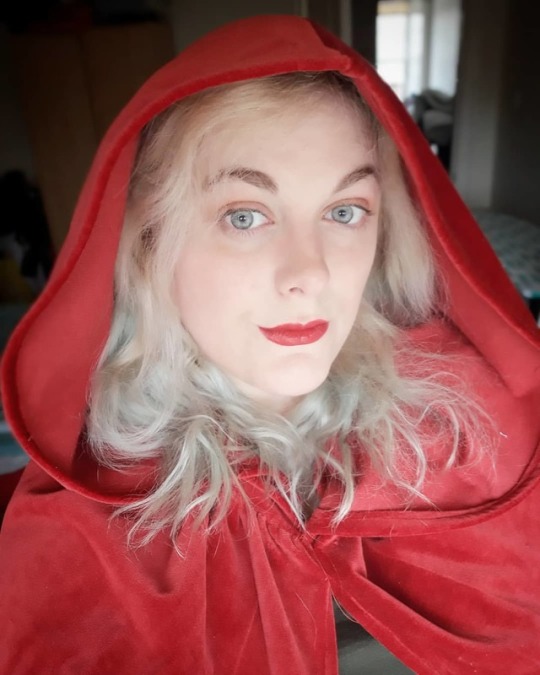
Got me this fancy new red velvet cloak for HALLOWEEN photos!!! Turns out my #rbf is pretty good for just straight up ‘looking creepy’... #whoknew 🤷🏻♀️ #littleredridinghood #velvetcloak #halloweentime #notsoscary #empathchick (at Halloweentown) https://www.instagram.com/p/CGBnzlNA_uc/?igshid=1ij7z5gpzk3gq
0 notes
Photo
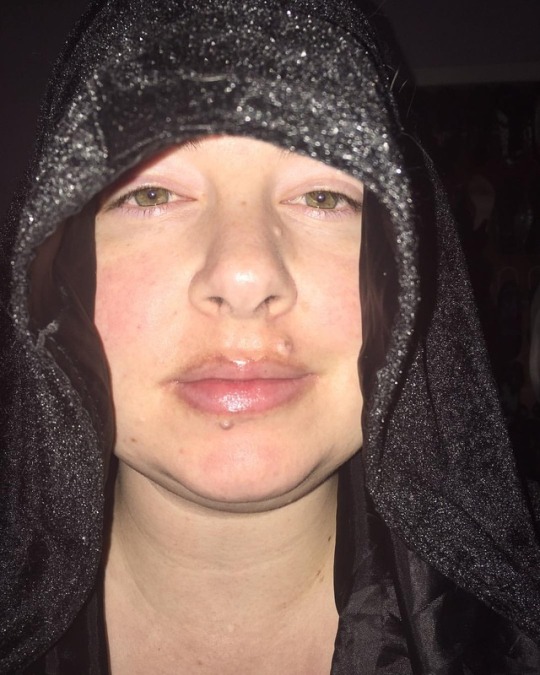
I'm FREEZING cold today. Was also freezing last night. I couldn't get warm even with fluffy pants and a winter hat, so I decided that maybe the only remedy is my floor-length black velvet cloak. It worked! I'm warm! And now sitting here doing my QA like pasty-ass Emperor Palpatine in an office chair that allows me to creepily spin around to face the door whenever someone bothers me. Eheheheh. #selfie #silly #greeneyes #nofilter #nomakeup #velvetcloak #cloak #hood #accidentalcosplay #softwareqa #qualityassurance #cold
#nofilter#cold#hood#softwareqa#accidentalcosplay#qualityassurance#greeneyes#selfie#cloak#velvetcloak#silly#nomakeup
3 notes
·
View notes
Photo
Lupercalia cloak done! So happy with it and just in time for winter too ^_^ . Assorted red velvet from my fave shop @thedoocotleith Inspired by @sabrinanetflix . . #cloak #finishedproject #redvelvetcloak #redvelvet #thriftedfabric #sewing #velvetcloak #costume #cosplay #craftybitch #gettingcrafty #sewingfun #sewingday #sewinglover #sewistsofinstagram #sabrinacosplay #sabrinacostume #chillingadventuresofsabrina #lupricaliacloak #red #lupricalia https://www.instagram.com/p/B0ifvClDLac/?igshid=18svmktv2ttre
#cloak#finishedproject#redvelvetcloak#redvelvet#thriftedfabric#sewing#velvetcloak#costume#cosplay#craftybitch#gettingcrafty#sewingfun#sewingday#sewinglover#sewistsofinstagram#sabrinacosplay#sabrinacostume#chillingadventuresofsabrina#lupricaliacloak#red#lupricalia
0 notes
Text


from Elie Saab Spring/Summer 2024
#fashion#fashionedit#haute couture#hautecoutureedit#elie saab#eliesaabedit#velvetcloak#couture#coutureedit#mine/post#mine/edit
57 notes
·
View notes
Photo


Day - 60
6 notes
·
View notes
Note
https://www.tumblr.com/velvetcloak/738595124264697856/fan-bingbing-miss-sohee
completely random, would u happen to know what this type of neckline, or if there is one for it? where what look like chest pads peek out from the bodice? not well versed in any fashion/tailoring terms, sorry 😭
disclaimer: I'm not well versed in fashion terms too but it looks like bustier to me
maybe oomf can help anon here?
this is the dress
0 notes
Note
hi leah! do you have any fashion blog recommendations? i’m getting into fashion and want to fill my dash with some good ones. thanks!!
sure!! here are some of my faves
@modelsof-color @lacetulle @cyberglittter @fashionalistick @velvetcloak @archivings @burntpink @thinfatfit @natsuluna @runway--report @yohjimargiela
10 notes
·
View notes
Text

Well, no cross stitching or pattern work lately. Been in a weird headspace lately (psych might have to adjust my Rx again).
Well, my ADHD taking the wheel, I decided to finally work on a sewing project for my child. A cloak. exactaly the same as the one mommy made almost 7 years ago. The same one that is almost a foot longer than I am and drags on the floor, is wide enough for a girthy football player, but makes for a GREAT blanket!
so, I went to go throw a swath of fabric over my shoulder while I moved things around, well. You can see. It clearly didn't make it on to my shoulder.
#Sewing #sewingproject #sewingisconfusing #satincloth #ADHD #MentalHealth #silly #Funny #Cloak #VelvetCloak #Hyperfocus #Cantstop ##ADHDGoneWild #ADHDProblems #IHaventSewnIn2Years ##TooManyIssues #TooManyMistakes #MeasureTwiceCutOnce #IDidntDoThat #Whoops #WhyIsThisSoHard #Frustration
#sewing#sewing project#adhd#mental health#funny#adhd gone wild#why is sewing so hard#it's not#just confusing#so many mistakes#measure twice cut once#i totally did not do that#whoops
5 notes
·
View notes
Last Seen Blogs

tomi4i
Fatima

blogtristanmichaelworld
Tristan Michael's World
kawaiionnna
Klavier Gavin’s Wife

bizarrelittlemew
onesie enthusiast

muffinmoonn
(mario voice) yahoo