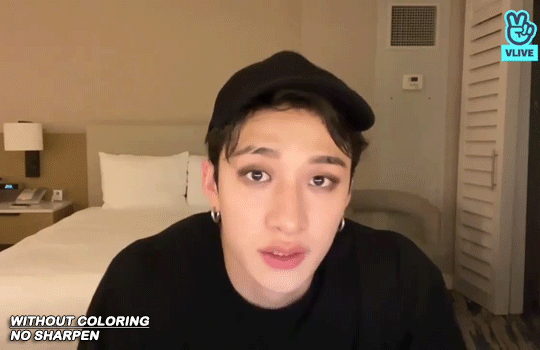
#quality is bad so sharpening is bad too <3
Text
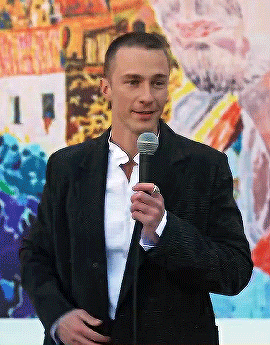


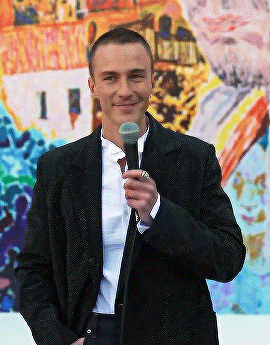
DREW STARKEY
LOEWE A/W 24 Show | Paris, France
20th January 2024
#dstarkeyedit#drew starkey edit#drew starkey#obx cast#obxcastedit#dailymenedit#mancandykings#flawlessgentlemen#menedit#outer banks cast#outer banks#mine.#**#ever see a man so beautiful u start crying? me#quality is bad so sharpening is bad too <3
500 notes
·
View notes
Text
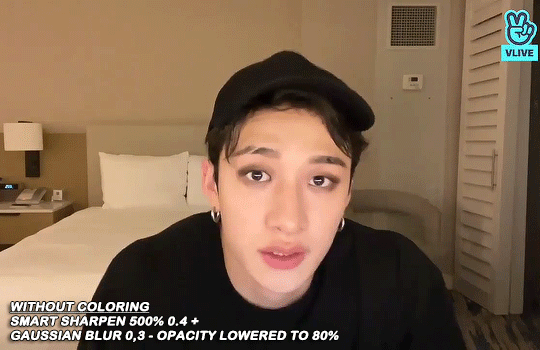
kinda slayed the coloring tbh <3
#on my display at least idk how this looks on others'/on mobile#still figuring out the best sharpening and exporting settings on this laptop but i think this isnt too bad <3#+ the export quality is better on my old laptop for some reason but that-#-one's so slow i think im just gonna have to adjust to this new one dfjjdk#i think this display is also less saturated than my prev one so im 👁👄👁 anxious abt coloring lmfao#y.txt
15 notes
·
View notes
Note
How do you get your drawings to be high quality? Whenever I post art the quality is SO bad 💔
uhm... sorry this is got long. for some reason you activated my work mode. i don't have a constumer service voice but i have like an explenation mode for clients so... uhm. here is way more information that you asked for. my apologies...
Resolution is what determines the sharpness of the artwork. The low-resolution illustration will appear pixelated when scaled in large sizes. this is why it is recommended to work on a digital canvas with a resolution of at least 300 dpi when you work. (i prefer 400dpi)
dpi are Dots Per Inch. dots just being a different name for pixels. the more pixels are contained in an inch the smoother lines and gradients are. an indication of higher quality. but, the device you are working on has to use up most of its ram/power to calculate the preview on the screen. so higher quality demands more capacity from your device but also from websites that display your artwork. Soo...
I have two files.
One on 400 dpi is way larger for me for smooth comfortable drawing.
and the second drawing is sized down to 150dpi to accommodate the recommended resolution of the website I want to post the image.
luckily for us, most social media sites have a similar resolution.
Tumblr's Dashboard images have a minimum size of 500 x 750 pixels, a maximum expanded the size of 2048 x 3072 pixels, and a recommended size of 1280 x 1920 pixels for a 2:3 aspect ratio.
I use a with of 1280. the high depends on the drawing
It's way easier and recommended to size images down rather than up.
sizing artwork up would put them through an interlacing process, which means that the graphics program of your choice would calculate the average between two pixes and add it in between them. It adds pixels to make the image larger. easy answer it blurs your image.
it isn't the end of the world if you have to size up the image a tiny bit.
I kind of have to do a bit all the time for work. and most of the time it's fine! it depends on your art style and how forgiving it can be.
It's also a difference if you post images in a JEPG or PNG.
uhm... without going into much detail... take PNG just trust me.
now... a tiny little last trick out of my sleeve.
if you... use photoshop. and you want some extra sharpness.
you can sharpen your images with the high pass filter.
Duplicate your artwork
Filter > other >highpass

As soon you select High Pass, your image will turn grey

It works by filling the entire image with flat, neutral grey. It then looks for edges in the image and highlights them by making the light side of the edge lighter and the dark side darker.
Don't overdo it. keep the contrast low. a radius of 1,5px is enough most of the time!
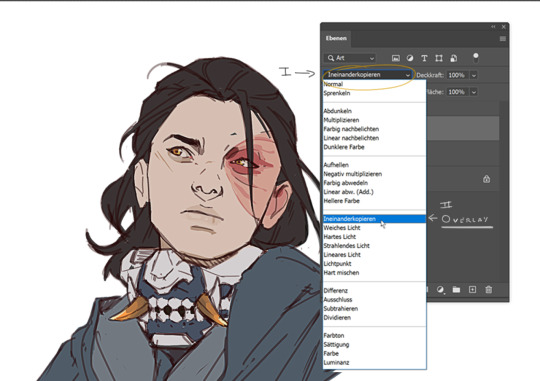
Click okay to exit the menu and set the layer on overlay.
ta-da! it is sharp and crisp!!!
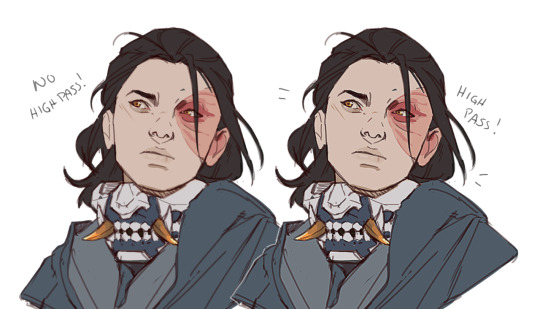
It's all a trick!!! vary subtle... i know but ehh i like it
I am sorry I don't know if other programs also have this option. I know CSP has a sharpening filter. but... you can keep images crisp by keeping resolution and dpi in mind too.
uhm... well so... -hides-
#chip!ask#chip!talks#i maybe overdid it here#but i ended wrtiting it and now i just... eh. i don't want to delate it... sorry!#zuko
984 notes
·
View notes
Text
ANGST Mother F***ers!
So, I got scolded by my friend for the amount of angst in the head cannon's blurb I wrote and got told to write a bunch of fluff to make up for it.
But mama didn't raise no bitch, SO HERE WE GO ROUND 2 MOTHERFUCKERS
pt.1 pt.3
His hair ties are actually his mother's, his fondest memories were of her doing his hair. So, when she passed, they were the first thing he took for his own.
Growing up his love languages were words of affirmation and physical touch. This stemmed from his mother showing love by doing his hair and seeking the approval of his father. He grew to resent these things though when he grew and lost his mom. Now, his love languages are quality time and physical touch. Granted he will NEVER admit it. so, unless you catch him resting his hand on you .5 seconds longer during training, you can't tell shit.
Once attempted to run away from home but got caught and dragged back to the Arktic (Lin Kuei's home).
Has chronic nightmares of the night his family died.
When he was inducted into the Lin Kuei, their father tasked Bi han and Kuai Liang to take care of him and treat him as their own. The day Tomas asked if he could call them brother was an... eventful one to say the least.
Kuai Liang, though not yet close enough to fully seem that was only nodded, while Bi han chose to walk away and ask their father to get rid of him. Tomas didn't sleep that night, too busy crying at the rejection. Kuai Liang did, however, come to comfort him. Even if it was because Tomas' sobs were keeping him awake.

Will sometimes wake up forgetting he's blind and scream thinking he's trapped in the dark.
Though he did forgive Mileena and deep down blames himself, he can't help but become on edge when he hears her voice.
Has extremely bad days that will leave him unable to do anything but stay in the corner of whatever room he's in because he needs to feel protected on all sides/boxed in.
Once Johnny decided to polish/sharpen Sento while he was asleep for his birthday as a surprise. But when Kenshi woke up before Johhny could put it back, he had a panic attack that nearly made him pass out.
#mk1 2023#mk1#sub zero x reader#smoke x reader#smoke and ice#i'm sorry#smoke#bi han x reader#bi han#kenshi takahashi
98 notes
·
View notes
Text
Tumblr users uploading gifs:
Step 1 - pay $15+ a month for photoshop
Step 2 - pay $80* a year on a decent vpn
Step 3 - download a file converter app that works on your computer
Step 4 - find a torrent link with seeders
Step 5 - download torrent with your terrible internet speed
Step 6 - convert file from MKV to MP4
Step 7 - scrub through episode to find the clips you want to use
Step 8 - open a clip on photoshop
Step 9 - cut down frame number to something that won’t compromise quality when you need to save it into the file size tumblr allows for upload
Step 10 - change speed
Step 11 - convert timeline
Step 12 - resize to tumblr specific dimensions
Step 13 - play around with sharpening settings suitable for your specific clip
Step 14 - convert frames
Step 15 - recolour and recolour again until it’s perfect
Step 16 - oh wait one character is POC and you need to check to make sure their skin isn’t too red!
Step 17 - you want to add text? Insert a text box and type in what your character has said. Oh there’s no autocorrect? Photoshop is unforgiving. Double check your text is correct
Step 18 - click on the text layer go to layer menu, add a shadow to text
Step 19 - repeat step 18 but choose outline text instead
Step 20 - play your gif through to see if everything is going well.
Step 21 - oh the text layers didn’t stick? Too bad photoshop hates you. Duplicate text layer while having all frames selected so that the outline and shadow actually work this time
Step 22 - they work congrats! Time to save
Step 23 - export your gifs find out that the file is too big. Go back and remove frames or adjust anything until the file is small enough to upload to tumblr!
Step 24 - it’s the right file size? Good. Now repeat steps for every other gif in the set. Make sure they all match and fit in the dimensions.
Step 25 - upload to tumblr and pray it actually wants to cooperate because if it doesn’t you might have to try it a dozen times. How fun!
Step 26 - code the captions on html mode
Step 27 - it’s uploaded yay! Now let’s hope it shows in the tags.
Twitter users uploading gifs:
Step 1 - hold finger down or right click to save
Step 2 - open on twitter and press post
96 notes
·
View notes
Note
your gifs are so nice! would you be willing to share your sharpening? and if it's not too much trouble do a quick rundown of your coloring process?
hi anon! it's no trouble at all, if it helps i'm happy to share <3
first i'd like to say that the size and speed of your gifs is key for the sharpen to look good! an incorrectly sized gif will look wonky on desktop (mobile is not very noticeable but desktop is where your gifs can potentially look bad if you size incorrectly) and same for slow-ish gifs, the slower your gif is the more the imperfections show so a correct speed hides the ugly parts lol
these are the standard tumblr photoset sizes

now with that out of the way i'm going to put everything under the cut bc it's probs going to be very long lol if you have any questions after reading all of this, do not hesitate to come back and i'll try to explain better!
okay! first i’d like to point out that i use an older photoshop, simply bc i like how they work lol i work on photoshop cs6 so to enable the same options i’m going to show you here you’ll have to have enabled the legacy option in the smart sharpen filters.
my sharpen varies depending on my source material tbh here are some examples:
source material: music videos
i actually use mvs downloaded from vimeo but these take longer to be up bc the directors don't usually upload at the same time the video is coming out unlike youtube mv, so if i'm working with something from youtube i like to get the biggest format available, so 4k and if it's not available then 1080p will do
i like to do big gifs for mvs so thats 540px width, these are my crop settings (putting it like that i don’t have to manually resize to 540px after cropping bc it’s going to be already the correct size)

and my sharpen for these is this

and then i lower the opacity of it to 75/80%, double clicking here

this is the result:


and my gif speed for mvs in particular is this

looks very crispy and ready to color away!
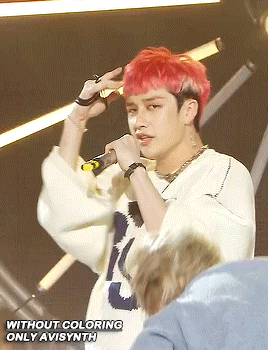
source material: stage videos in .ts format
for stages i like to work with .ts files since they are very high quality recordings of the stages and generally the gifs come out nicer. for stages that are from youtube the next part of this will probs help but this part will be focused on .ts files.
i get my files from kpop24hrs which is invite only right now and invites are a bitch to get a hold of but if you have access it’ll make your life so easy when giffing stages, there’s also twitter to look up files! for stray kids the fastest .ts uploader on twitter is @/STEii_e but if you look up the date + stray kids + .ts the tweets will show! anyway, back to the important thing
for .ts files i work with AviSynth! my computer hates vapoursynth so i use it’s older sibling lol it does the work just fine for what i use it imo bc i usually end up sharpening on photoshop. if you’d like an avisynth tutorial, this is what i used to learn about it and if you’d like to try vapoursynth there’s tons of tutorials from tumblr if you google, the most complete one is from user realstraykids
i modified my avisynth processor for it to have a denoiser (which is a feature from vapoursynth) to have my gifs look a little more smooth but that effect can also be achieved using topaz tbh

these are the output settings i get on the resizer

like i said i modified some things to have a denoiser so it won’t look like this on a regular avisynth
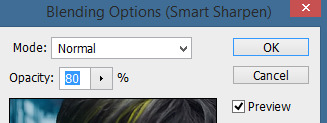
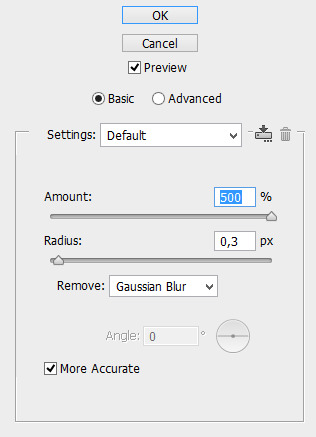
using debilinear usually makes my gif already look a bit sharp, so if i see it’s good i don’t use a sharpen, if i see it need a little push i’ll use a smart sharpen of 500% radius and 0.3px amount, and i’ll use a gaussian blur filter set to 0,3 and i lower it’s opacity to 75/80%


results:

and my gif speed for .ts stages

now it’s all ready to color!
final source material: your regular youtube/twitter/vlive video
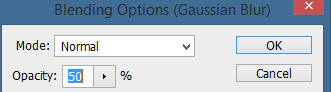
anyone that ever worked with a lq-ish video know how they just look ugly no matter how your try to sharpen, specially vlives and now channie’s rooms on youtube (*shaking fist in the air* damn you 720p videos!!) so i found a way to make them look decent, in this case i oversharpen using a 500% 0.4px smart shapen and then i slap a gaussian blur of 0,3 (lowered to 50% opacity) on top of it to smooth things out, more often than not it works very well but some videos are just plain bad (looking at you twitter) so this will work if you tweak the gaussian blur to your liking. i also recommend to work with small gifs if your video is not 1080p bc they’ll look better, but if you like pain like me and love big gifs this is what i do:


my results:


and my gif speed for these kind of videos

that’s about it for my sharpen tricks!
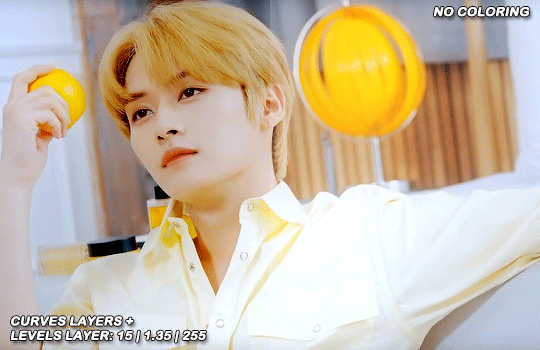
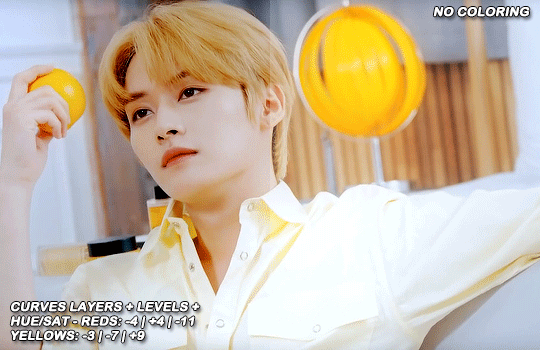
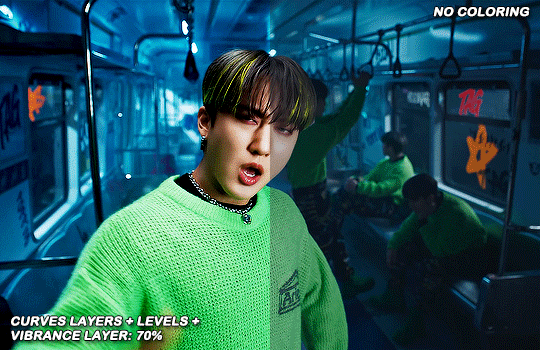
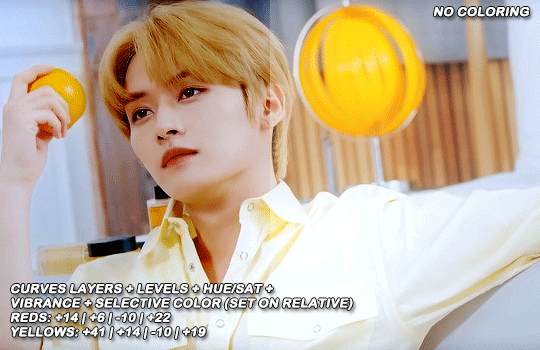
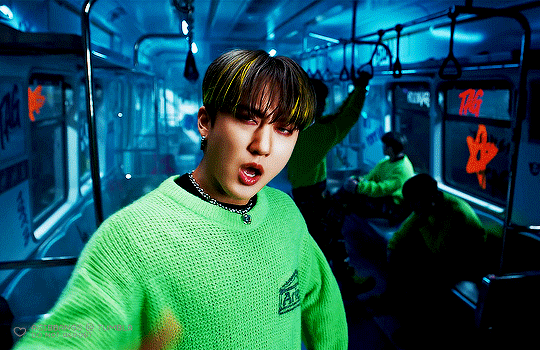
for coloring i like to do vibrant gifs, i adapted my latest method from this and this, and another tutorial that i can’t find rn, but for my base what i do is two curves layers, a levels layer to bring up darks, then i do a hue/sat to fix up colors, then i do vibrance and finally i selective color to fix things up. i’m going to show you on this binnie and minho gifs
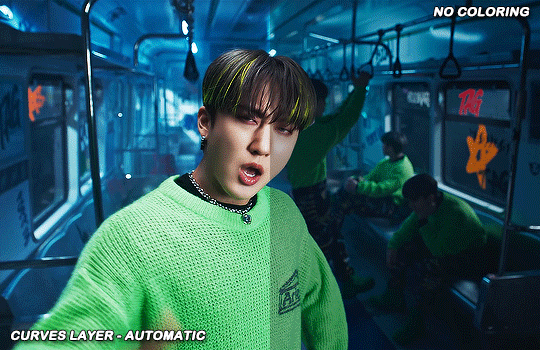
first we use a curves layer and we set it on automatic (no worries if it gets too bright, we’ll be fixing as we go)

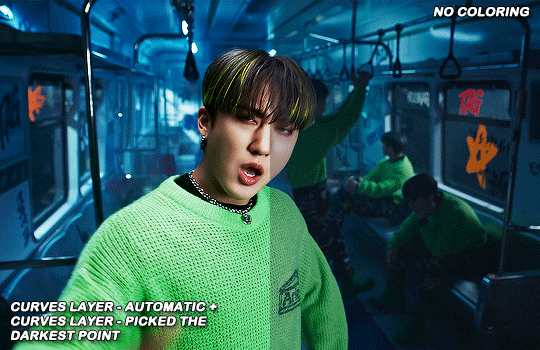
now we do a second curves layer, for this one we’ll use the black color picker from the curves layer and pick the darkest point on our gif

now we fix the darks and we bring some brightness with a levels layer
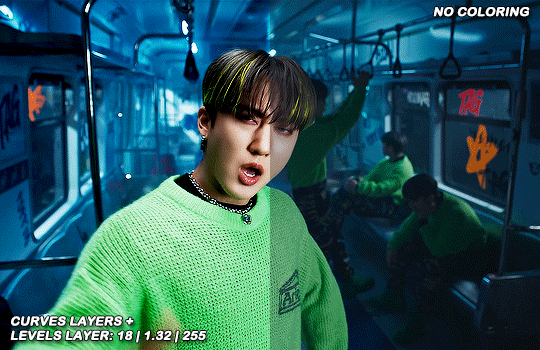
now we do a hue/saturation layer, here i fix up the reds and yellows, sometimes i skip it if the gif already looks good after the first 3 layers if that’s the case i go directly to the next step which is vibrance, in this case i only did minho in this step bc i felt like binnie’s was okay after the first 3 layers
now it’s the vibrance layer, for making the colors pop out more

and now the final layer: selective color! here we fix again red and yellows

that was my base coloring! sometimes i put in a gradient map in between the curves layers and the levels but only sometimes. after this if i want to mess around with colors i mostly go with another hue/sat layer or just use selective color, hue/sat is great for color manipulation. anyway, this is the finished result and my saving settings!


that was really long lmao, i hope it helps somehow? like i said if anything isn’t clear pls come back and we’ll go around it again <3
109 notes
·
View notes
Text
Audio Drama Sunday IV
Alright! Back again! Skipped last week as I went on a binge of Non-fiction history podcasts as is my occasional habit. This week however I resumed my audio fiction engagements with a fervor.
Edge of my seat week to week listens wise this was another win for @innbetween where I have to be a bit sneaky about spoilers since most y'all won't have access yet. This one gave me some chills as Max's character brought to mind some bosses I worked for in the past whom I am glad I am not working for now. Whereas previous adventuring parties were faster to making solid friendships of fate and circumstance this bunch remains first and foremost co-worker relationships which has opened the door wonderfully to working with themes of different types of ableism. I come from a decently cut throat industry myself and that whole "What good are you if you can't..." is a huge thing we need to talk more about as a society. Having party members we feel a little more gray about is a neat shift of dynamic too which I wholeheartedly approve of which has left me hoping either the arc carries everyone to a better wiser place ... or delivers some much needed kicks to the gems for bad behavior by way of catharsis.
My binge listen continues to be Spirit Box Radio where I have hit season 3 at last! The Host/ Creator/ Voice Actor of the show seems to be going through a testosterone based transition which I got to admit I am enjoying vicariously more than I probably should. My circumstances have taken a T transition off the table for me personally so when I encounter someone going through one I get fairly excited myself noting the changes. How deep Sam's voice will be by the end of the series is like an added bit of delightful mystery. On it's more narrative based merits however Spirit Box Radio continues to delight. There's an evolving ruminative quality to the story with leaps and bounds of development just when the slow drip of progress in the mystery starts to stretch the tension to the breaking point. Big changes in the status quo that then must be weighed and understood and considered starting the cycle anew. Pacing wise it's the cautious and moderate person's approach to danger which feels fairly true to life. It's something that works best in podcast format which makes it feel more fresh than the more common arc of act/react. Things must be digested in their own time and lately particularly I have been finding that slower pace is a welcome change from instant gratification.
Editing log of the week is fairy empty as I have finished the second draft of the season Finale and am taking a breather before doing the finalizing process. After this I get a nice two month vacay from all things audio to sharpen up my resolve for the next season and start making our backlog for the airing of season 2. I'm so close to relaxing I can feel it!
#ttrpg#podcasts#actual play#audio fiction#audio drama#audio drama sunday#audiodramasunday#audiodrama#inn between#spirit box radio
5 notes
·
View notes
Note
i have to shoot my shot and ask - HOW on earth do you make your gifs so crisp. they're so clean its literally out of this world!!!!!! when your gifs are on my dash i almost always know its you just by the QUALITY of the gif. help a girl out!!!
Hii! Thank you!! <3 I'm happy with the way my giffing process now goes but it's taken years and a few different fandoms and stumbling upon good tutorials which is why i decided to make one of my own too.
I still love figuring out new things to try and hopefully you can get some new tips to your process from me too. Under the cut is a long af post about gif making, focusing on some basic stuff and sharpening/coloring tips.
________________________
WAY TOO LONG INTRO
Before i get to the photoshop part, the base stuff is super important: You can't turn a very bad video into great gifs since there's only so much photoshop can do BUT you can turn a good video into great gifs. So, obviously the original video quality matters a lot.
I religiously stand by the correct tumblr size dimensions (see example, the numbers mean the width. Height doesn't really matter). However in 3 column sets i’ll sacrifice that one pixel and would make them all 177px. The empty space between gifs in 2 column sets is 4px, in 3 column sets it's 4px + 4px.
Since tumblr can only properly handle 540 gif pixels in the same row, sets with two wide gifs side by side can be laggy to scroll by. So for example, 268px gif will not be as sharp as 540px gif (if you click on it to see it bigger), since it legit has only half of the pixels, but if you plan to post 2 gifs in the same row, the 268px will look better on the dash in the gif set since it’s correctly sized for the best dash result.
I download videos when i can (dl is always better than screen recording), so that's youtube, instagram/twitter etc. Streaming sites/broadcasts i have to screen record and i use OBS to do it. It's the best i've tried for hq recording. I record with 60fps and use display capture. OBS is a heavy program, as is photoshop, so a good enough computer is also super important imo. I used to make gifs with a laptop of 4gb ram/128gb emmc and lost my mind after all the crashing and spent 1k€ on a new one. Basically, have as much performance as you can afford, and editing experience will be much much more pleasant. Of course gifs can be done with an average computer too, it'll just likely be slower and clumsier and you need more patience 😫
Also, i've gotten rid of the urge to be the first to post a gif set when new content drops. I'm not the fastest, i always do every coloring from the scratch. I save to drafts to see how it looks like on mobile, i go back to ps to correct the things that don't look right (too dark/bright, too green/yellow/red, too slow/fast), i make the changes, then save to drafts again and then post. I'd rather post a set i'm happy with than to post quickly knowing i could've made it look better with just a bit more time. (It'd bother me and i'd go back and re-color for my own peace of mind 😅) And i just wanna say it's totally fine when people make gifs of the same stuff!! The more the merrier, no need to think only the first to gif something somehow now has the rights to that moment. I just never get the best result if i try to hurry, so i’ve stopped trying to get my sets out asap. I’ll post when i’ll post.
________________________
SHARPENING
All these words and i haven't even gotten to the point yet 🫣 But fine tuning the details won't work if they don't have a proper base at first. Which!!! Finally brings us to your question:
I'm not sure if the order really matters but the main steps i do in this order: once the layers have been converted to video timeline and video timeline is converted into a smart object -> smart sharpen -> crop -> resize -> coloring
I like to sharpen things first, to me it makes sense to do it before resizing because after resizing you've already lost some pixels, so feels better to sharpen when you still have all the original pixels.
All the above steps (sharpening, cropping, resizing) will affect how the gif looks, so i do the coloring as the very last thing so i can better see how the end result will look.
To me sharpening and coloring go hand in hand, and you use both of them to get the best result. Sharpening obviously does what it says but good coloring will help to make the gif look cleaner and smoother too.
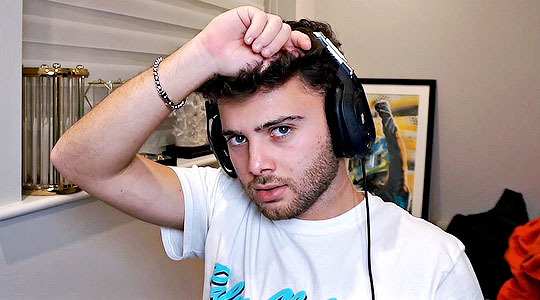
Finally, examples!! The key to a sharp result in my process is 2 sharpening layers. The main layer and the second layer.
Enjoy looking at judgy max f i giffed last year and chose to use as an example here. The source video quality was 1080px and i screen recorded with OBS.
I use photoshop CC2019 so cannot guarantee that these will work the same way in other ps versions. As always, it's about fuckin around and findin out 🙏🏻
__________________
1. Example with resizing done, but no sharpening or coloring (blurry and ungood)
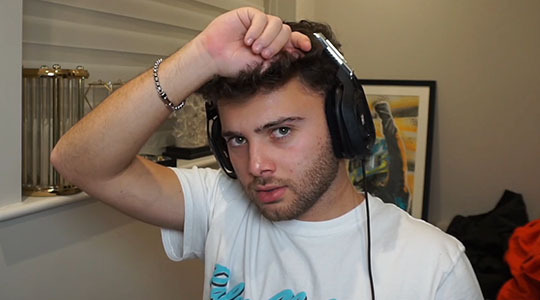
2. Example with resizing and main sharpening layer (already much better)

3. Example with second sharpening layer included (more depth, dark spots are darker, almost too strong of an effect but coloring will fix that)

4. Example with all of the above + coloring (the final result)
5. The final result as a gif

And how did we get that result?
Main sharpening layer settings (yes, it’s in finnish but i think the options are in the same place in every language):

Because the sharpening is quite heavy, I double click on this thingy (red circle) in the layers panel to lower the opacity to 50-70%
The middle layer is gaussian blur, which i’ve set to 0,2.
So basically i intentionally oversharpen the gif and use the opacity function and blur to soften the effect. Dumb or smart, who knows not me, but it’s working for me so i’m rolling with it.
The top layer is the second sharpening layer. A godsend trick i’ve learned along the way: (the difference between the example photos 2 and 3 above)

(I've created an action, so i just gotta push one button and it'll run thru these sharpening settings, ie. i don't have to manually click thru these every time, saves crazy amount of time)
Wasn't sure at which point i'll mention this so i'm just putting it here: when saving the gif for web, i almost always use adaptive and diffusion.
________________________
COLORING
I’m not gonna go thru every coloring thing in my process since this is already so long hsdkfjdkjgkd but i’ll give some info on what i usually do and some tips i've found helpful.
My style is quite natural and i prefer colder tones. I hateeeee overly green/yellow/red skintones that are caused by bad lighting so I always try to correct that. The below stuff is more or less what i did to color that example gif too. (Everything is down to preference, these are just the way i like to color)
My most commonly used coloring layers:
Curves. Utilize the eye dropper tools, pick white eye dropper and click on a white spot on the gif (not pure white tho since it won’t do anything) and it will turn that spot to 100% white and correct the other colors at the same time. Black eye dropper will turn a dark spot you picked to 100% black. It can be super effective, just try a spot, undo, try another spot, undo, until you find what looks good. If you like the result but it’s too strong, lower the layer opacity. And of course you can just simply drag the curve up and get brightness that way. There are times when the eye droppers won't work nicely but it's always worth a try.
Levels. Works similarly to curves, they are basically the more efficient brightness/contrast combo.
Color balance. No gif of mine has been made in the last 3 years without dragging the blue in the midtones to the right. I also often drag the green to magnetas side.
B&W gradient map. I set the blending mode to soft light and lower the layer opacity. Gives the gif a bit more depth and pop to the dark/light parts.
If the dark parts in your gif are too dark, for example details around eyes look messy but you don't want to lower the contrast, then try adding light colored gradient map (light yellow-white or light blue-white etc) and set it to soft light and play with opacity. It will give light and brightness to the gif without making things blinding and not losing much contrast.
Photo filter. I’m almost always going for cold blue and 10-20 setting. (Orange filters can give a nice effect too, if you want to bring some warmness to the gif.)
Vibrance. Always adding at least a little bit, helps colors to pop and makes skintones look nicer.
Selective coloring. Just drag them sliders to left and right to see what works, that’s really the best advice i can give. If you want reds to pop, go to red and play around. If you think the white spots are a bit blinding, go to white and then slide the bottom one (black) to the right. If you want some more contrast, go to neutral and slide the bottom one (black) to the right. Same with black (black).
Also, i don't like to do too much with one layer. I tend to do different colors with different selective coloring layers, so if needed i can lower the opacity and it will only affect that one color. Also it's handy to duplicate layers if you really want a certain color to pop, one layer often isn't enough in that case so duplicate it and if it's too strong then play around with opacity.
(Left image below). If you want to correct overly yellow/green skintones, go to yellow and you can try these settings. Then lower the layer opacity to see what looks good.
(Right image). If you struggle getting rid of very red tones, you can use hue/saturation layer, go to red and just drag the middle slider to the left. (This is also a good tip with POC, when you think their skintone is overly orange/red but you are afraid of white washing. This setting will usually correct the orange and red tone without taking the dark/black color away.)


______________________
THE END
Wheew this is what happens when you give me an opprtunity to talk about giffing 😅 I hope it was easy to follow, feel free to ask if i was unclear about something!! And hopefully you got to learn something new.
Also these are obviously just my way of doing things, not the Only Correct way, do whatever you like and enjoy and don’t worry too much if other people do things differently. Most important thing is to have fun creating 🫡
#slowestlap's lowkey gif tutorial of sorts#answered#one thing about me is that if i start talking about photoshop#i simply do not know how to stop hdjdjdjdk#ok to reblog btw if you found this helpful#(thank ya again for the nice words anon <3)
26 notes
·
View notes
Note
hi so i’ve been wondering how you make ur gifs? i’ve been meaning to for a while and i figured there’s no better person to ask than the one that inspired me 🥹 if you’re open to giving tips or starter suggestions, my messages are open 💞
hi!!!!! and plssss tysm ur too kind!!!!!
i keep it pretty basic bc i dont have a lot of time (this is why everyone should rb the people who make really beautiful sets bc think of the time theyre giving us <33) but main tips for basic editing:
use photoshop and 1080p. (i also use 2160p but its depends on ur computer. it could wash out, which requires a lot of color correcting. when starting out, 1080p is going to be better). for 1080p, if the size is under 1.5gb, its probably lost quality during compression so keep the file size in mind.
mpv is the go to for screencapping and im sure there are tutorials that explain exactly how bc its a little technical ur first time. if u have a mac that becomes even more complicated. ive known other gifmakers who just screen record instead bc of that and honestly i cant really tell the difference most of the time 💀 so choose whichever works for u!
cropping - everyone has their own preference. the closer to 16:9 the easier it'll be to keep the quality intact. so if u have media thats older and mb only 720p, u might consider using that ratio. default width for tumblr is 540px
ALWAYS SHARPEN!!!!!! this is the most important step. for a while i couldn't upload sharpened gifs and it was the worst moments of my editing life. after u crop the gif and set the frame time (usually 0.05), convert to a video timeline and convert all your frames into a smart object. thats when u can use the smart sharpen filter. my settings are usually 500%, 0.4, 0%, remove gaussian blur. then i do another smart sharpen at 20%, 20.0, 0%. you'll want to experiment with this bc it depends
coloring is hard to give advice on bc it really depends on what the source media is. if u dont have ps experience i would go here and there are so many amazing creators who have posted help for people learning to color!! and then u can figure out what method u like best from there :)
those are the main things i use when making gifs. but i also want to tell anyone who asks for tips that sometimes the quality of a tv ep or movie is just bad!!! or the coloring isnt completely fixable because they used some weird filter and thats okay!!!!! just have fun with it!!!!! i dont think 90% of tumblr really notices the small things that we do when making gifs and thats a relief <3
lmk if u have other questions and wishing u a great saturday!!!!
2 notes
·
View notes
Note
Hiya! Your gifs look so high quality. Can you pls do a gif tutorial? I tried to make gifsets as well but idk if Im using a bad source for the show or if it’s the program I use to make the gif.
Hii! thank you so much nonnie! <3
My gif-making process is not all that special, but sure here's my tutorial:

I'll once again start by saying that using good quality video is integral to making good quality gifs, I use 2160p videos or 1080p Bluray videos. I usually get my movies and shows from torrents, they take up space, each movie is about 30-40gb, and each episode is about 10GB, but it's worth it.
I use MPV video player, which is a free source app, and here's a tutorial on how to install/use it. with big 2160p videos, i use the frame-by-frame method, bc photoshop doesn't comprehend videos that quality, for me at least.
to make gifs your photoshop should be in Motion layout
Take frame-by-frame photos of the part you wanna use (alt+s) on mpv player.
Then in photoshop click File > Script > Load files into stacks
then Browse and select the frames you screenshotted and click okay.
Once the frames have loaded click on Create Frame Animation

When you load frames into layers they load backward, so you want to reverse that, to do that you want to click on Select > All layers then Layers > Arrange > Reverse.
Now that layers in order you are going to make frames from layers:

Now, you have a layout that can be saved into a basic gif, but we still have far to go.
Cropping: the basic gif you see on tumblr is 540px*500px, that's what i use for a single gif layout, but it can be longer or shorter, but keep the width 540px if it's gonna be a single gif on the line.

once you've cropped the gif, set the frame delay time, i set mine to 0,06 sec. but i know people use 0,05 too.. To do that, select all frames, at the bottom of the frame where is says 0 sec. Click on the little arrow, click on other and change it to your desired time.

Sharpening and coloring:
To sharpen a gif you must turn it into a smart object, for that Convert To Video Timeline

Then Select all layers, click on Filter > Convert For Smart Filter

now you are ready to sharpen. Click on Filters > Sharpen > Smart Sharpen I double-sharpen my gifs, here are my settings.

All there's left now is to color your gifs, coloring is very individual and you should do it as you like, here are my basic coloring settings:

I am making this gif of Sam, and when you are coloring gifs with black characters and making it brighter you might end up with them looking red, to avoid then i turn down the saturation in Hue/Saturation

and you are done! hope this helps <3
29 notes
·
View notes
Note
Yo, what do you use to make your Gifs? Seems like everyone else has gifs that look amazing. Even on my highest "quality" setting. They still post looking like a bunch pixels that wants to know if it looks like it knows what a Jpeg is.
Hey! I'm not sure about the exact result just from the description lol but gifs can turn blurry or lower quality because of various reasons. On Tumblr, it might be caused by the dimensions of the gif. For one gif on a row, the max size used to be 500 pixels, now it's 540. (This post has a quick overview.) If it exceeds that width, the gif will appear more blurry. Tumblr also compresses gifs if the file sizes are between 5-10 MB, though I have no idea how/if that effects the quality tbh.
The size of the video/screenshots you work with is also important. Since I have a copy of HoA, I record my own gameplay of it with 2304 x 1440 dimensions. An 8 min video with those dimensions has a file size of like 1 GB, and 1 screenshot has a file size of 1-2 MB, but it helps being able to gif only a small part of a scene and with image quality in general. Tbh I'd love to freely share either video or screenshots with other folks for editing purposes, in a way where people can just nab them if they wanna, but the file sizes make it difficult.
Probably unnecessary to add, but anyway: within the game, you can also set various image quality options to a higher or lower quality, so if your computer can handle it I recommend putting those settings as HQ as they can go.
Another important factor is not to oversharpen or undersharpen the images. If I crop out a lot of the canvas I usually sharpen it once, and if I keep almost the full image in the gif I sometimes sharpen it twice (in steps, eg first reduce the image size from 1400 x 1400 to 950 x 950, sharpen, then reduce the image to 540 x 540 and sharpen again). But that really depends on how the final result looks. More advanced folks use more detailed ways of sharpening (such as Smart Sharpen... or Unsharp Mask... in Photoshop) but personally, I stick to regular sharpening since it looks nice enough too and it's 1 click, as opposed to sliding the bars around to find the exact result I want.
I don't think doing 1 of these points wrong will lead to a horrible quality, but combining all of the bad points may lead to very blurry or pixelated gifs.
For recording I use what Windows has (by hitting Windows + Alt + R), for screenshots I use VLC media player, and for editing PS.
And for anyone looking to get into editing or giffing without PS: Photopea is an online website that emulates a lot of PS functions. The gif and text functions are sadly still a bit limited compared to PS, but it's free, doesn't even require an account, and it does incredible work imo <3
Lemme know if anything's unclear or if you have any other questions. (Same goes for other folks, I love seeing people's HoA edits, and if I can help anyone looking to start with that process I'm happy to)
4 notes
·
View notes
Note
How do you make your gifs have high quality? Do you use any presets or have any tips? Your edits are amazing, it would be AMAZING if you could share. <3
Ah thank you anon!! 🥰🥰
My tips are basically the same any other creator will give you tbh for good and crispy gifs your source material should be 1080p MINIMUM , I cannot stress that enough. For film search for files between 5-10gb for good results, but if you have space in your drives for even bigger files then go with these, sometimes files under 3-4gb are compressed as fuck and will only give you a headache when you try to color and The Pixels™ will inevitably show themselves. For tv anything under 1gb will be questionable, good streaming services rips are over 1gb for sure.
There is however good files not compressed for film under 3gb sometimes and they are encoded as x265 so if you don't have much space but still want to gif in quality get these downloads, in their name usually they say if they are 264 or 265 so look up for that. So in short:
Under 3gb encoded in 264: shit
Under 3gb encoded in 265: good!
If you need a place for downloads come of anon and I'll link you a trusted place for gifmakers only.
Okay enough on the files 😂 for doing the actual gifs I either screencap or use an external tool to trim an specific scene I want to gif. For screencaps I recommend mpv or mpv.net, both are open source programs and work really well and gifs will look the best imo. For trimming videos I use ffmpeg on my computer's CMD but it's not very user friendly if you don't know how to use ffmpeg well, I know people recommend handbrake though so there's that option and then use video frames to layers.
For sharpening I use 3 different settings depending on my source material:
Animation: I use a smart sharpen with 500 0.3, if it's ghibli or anime I'll lower the opacity of the sharpen around 80-85%
Tv/Film: a good source (files over 3gb) will only need a 500 0.3 sharpen sometimes. If I want it to look a bit more crispy I add another sharpen of 100 1. For not so good sources I apply a 500 0.4 sharpen and I lower its opacity to 80-85%
Youtube videos/music videos: first, YouTube is a bitch on quality so there's that, but if you can't find the thing you want to gif elsewhere (like our lord and savior Vimeo or the ShareMania forum) for YouTube I get my videos using Jdownloader, it will download the biggest file possible and more often than not it's the best quality possible. If the video even being 1080p looks kinda shit I use Topaz to denoise and clean my gif and then I apply a 500 0.4 lowered to 85% smart sharpen (gif making for kpop taught me many things lately 😂) and it looks like it was a video from a good source! There's also avisynth and vapoursynth but I don't use them, if you wanna check that out you can Google and lots of tutorials will show up, mostly from kpop creators.
After that, it's all coloring tbh. Know that shit files won't be able to handle vibrant coloring very well so be careful with that. If it's too bad I try to bring up the darks more to no make it too visible but you will always get pixelated stuff with bad quality source.
My saving settings vary between adaptive/diffusion and adaptive/pattern, if I'm working on animation or too heavily colored sets (like with gradients) I'll go with pattern, if not it's diffusion.
Okie I think that covers everything 🙈 if you ever need more help with gif making you can message me again and I'll gladly help!
You can also join the @pscentral server on discord where there's ton of gif makers (from beginners to well established ones) that will always be there to help and always give good feedback ☺️
33 notes
·
View notes
Note
hey! i hope this isnt too much to ask but could you share some things you use or tips and tricks for your videos? like what you use for the vhs effect, and how you get them so high quality/just pretty in general??? thank you if you do <3

hiiii! it's not too much at all! i will say i have been editing for over ten years now, i started on vine at 13 lol that's so wild, so my biggest tip is let yourself grow and don't expect yourself or your video to look amazing the first time around!
i now use a different method and program for my VHS effect. i used to use final cut pro, a mac only software, and a cracked version of the universe plugin (never pay for plugins unless you really wanna that's my logic knskjdnfs) but it broke a few months ago after an update </3 so if you want a look like THIS then use the universe plugin and tweak it to how you like!
my current method for VHS is some light work ina after effects and i honestly like that look more because it looks more realistic imo? but both are cute! but if you want something like THIS or THIS. here's a link to the really simple tutorial i use! i tweak some things coloring wise or blending modes but that's all up to you!
for quality tips, it's really a shot in the dark with tumblr because sometimes it'll make the video HD and sometimes it looks like it's shot on a potato akjnkjnfs as of recent i'm finding that using the dimensions 640x480 makes the video look better but i will say idk how it looks without a VHS filter on it ksjnfkjs. make sure the video is in .MP4 format and try to make the file as small as possible for the highest quality when uploading here. if it still looks bad, i upload to youtube and post via that way lmaooo
to make them look pretty i highly recommend sharpening and coloring the videos kinda like you do when making gifs! the goal for me is to always make the flat video match the mood of the edit i want make whether that be bright and happy for dramatic and sad. i like to make my clips look like they're from the same project if that makes sense kjfnkjsds i find that sharpening and coloring just ties everything together. there's a lot of cc for after effects on youtube that are great and it's really fun (for me anyways lol) to mess around with coloring until you make something you like :D
this is a bit long but if you have any more questions pls let me know! i'd love to answer them 😁🩷
4 notes
·
View notes
Note
Hello! How are you? I'm sorry to disturb you, but I discovered your Tumblr profile not so long ago and I love your gifs, they're so beautiful!
I wanted to ask you how you make them, what programs do you use and how to do them in order to upload them on Tumblr and make them work. I used to upload myself lots of gifs back in the day, but they were so bad and I always had problems with them not moving on the post.
I hope I'm not bothering you with this question. Thank you in advance for your response and I hope you have a great day!
oh, hello! 🥰 i'm doing alright! thank you sooooooo much for appreciating my gifs, it really means a lot to me 🥺 of course i will help you, as much as i can and don't worry you could never bother me!
first things first, i will provide you with some links to tutorials, my own gif making process was built on a bumpy road and by a method of trial and error LOL but don't worry if it happens to you too yeah? we're here to learn. here is my tag where i post or reblog photoshop/gif related stuff (there is not a lot but i will have to reblog all the tutorials i have in my likes, but that for later LOL) personally i use photoshop cc which i downloaded here, but in the tutorials i will leave for you you'll have a lot more of the versions and links to choose from. i use avisynth to resize my gifs without losing quality (download and tutorial) and a software called topaz denoise and clean which is a plug-in for photoshop, for quality control of my gifs, to get rid of ugly noise (download). and here is a tutorial how to use both in order to sharpen gifs properly. here is the first tutorial i would like you to check out, it's most similar to my own process because it includes both things i just mentoned, next two tutorials i recommend are this and this, they are amazing and everything here is basically covered, with exception there is a different process to it than mine because i rarely use screencaps to upload clips into photoshop, but it's a great way as well so definetely give it a try because you might like it more. as to why your gifs did not move after uploading, there might be a lot of reasons, starting from too large file (the limit is now 10mb) or lack of loop on the gif etc., but hopefully these tutorials will help you figure out what went wrong, i'm sure they will answer all your questions! 💞
here is also some additional tutorials for coloring: 1, 2, 3, 4
and something that might help with the issue you mentioned: 1
if you had any more questions in the future i will be always happy to help 🥰 have fun! thank you again and have a wonderful day as well please! ❤❤❤
#earlier today i had a small breakdown over my gifs and here you are complimenting me AND asking for advice!#how could i be sad ever again when people like you exist 🤧🤧#LOL sending you muuuch love!#anonymous#answered
8 notes
·
View notes
Note
your gifs are so hd!! omg how do you do it?
hiii, tysm i do try !!
i don't know how to be concise so bare with me if i ramble too much please !
i'm going to assume you know how to gif already bc i'm mostly going to explain how i use adjustment layers. but i listed the softwares i'm using here + links to gifmaking masterposts !
the process™️details under the cut :
the obvious answer would be to use high quality videos for hd gifs but i work with lq or faux hq videos all the time, so it's all about faking it ngl... my goal is to have a good contrast and full blacks.
tl;dr : play with sharpening settings, boost your black with curves/levels/selective colour, flatten&brighten then fix the contrast, exposure and voila !
also, make sure your monitor / laptop screen is probably calibrated bc i've had bad surprises lol
FOR SHARPENING :
unsharp mask -> my go-to settings are 30/30, 40/20 or 60/10. i adjust the amount/radius depending on gifsize and subject size. holy grail, it WILL add depth and dimension to your gifs just trust.
smart sharpen -> usual amount/radius : 10/10, 30/20 or 40/10. highlights are very sensitive to this one so i adjust accordingly.
smart sharpen -> for finer details, i do 500/0.3 in general, but for some fancams i put through vapoursynth 300/0.3 is less harsh
noise (optional) -> uniform > 1,5-3%. sometimes you just need texture to fake good quality lol, adding noise to flat lq gifs does magic. would also recommend if you use gradients but don't like the "smooth look". the only downside is that it makes your file larger. and i never add noise to fancams.
high pass (optional) : radius 2-5 > 30% opacity > soft light ; if you want a glowy finish, this is your filter. if i use unsharp mask i dont do high pass tho, it's just too much...
FOR COLOURING
how i use adjusment layers for contrast and depth, no particular order, i freestyle it 90% of the time :
curves/levels : use black and white points mostly, pretty intuitive to use. recently my default values in levels are (0 ; 1,27 ; 230) in rgb. both to brighten and fix contrast. i can use up to 3 of each on a single gif ngl bc do this in increments to avoid something too harsh.
channel mixers : not particularly relevant to the depth/hd thingie but it does perform witchcraft to remove tinted filters. HOWEVER, sometimes you look at your gif and you wonder why it's flat and it's because the dominant colour of your gif is tinting the rest, channel mixers is here to bring back balance and dimension !
colour balance : same reasoning as channel mixers, i try not to touch midtones and focus on highlights/shadows, but i like cold toned gifs so i'll always add some blues/cyan in there
selective colour - the star of my show, i use it 1) for colour manipulation, 2) tame harsh lights, 3) undo whitewashing -> for 2&3 i set sc to multiply > set black values to black in all tabs except white and neutral > adjust white and neutrals until i get a neutral skin colour or natural lighting, and/or good contrast. , 4) boost the blacks (2nd to last layer), +10 black values in black tab, sometimes i also add +5 black to neutrals
exposure (last layer) : the final pop, up to +0,60 ; sometimes i go with a layer mask to only target the subject/faces. sometimes i also adjust the gamma value but not often
black and white gradient map : also good for contrast, it will also reduce the number of colours on your base gif. if you have a super saturated original gif with heavy contrast this is v nice to play with to fix that
a tip specific to colourful gifs : if you're transition from vastly opposite colours, do it in increments, and have a solid colour layer of your dominant colour somewhere set to soft light or overlay (or both) on a 20-40% opacity to uniformize all that good stuff and make the blending look natural, it will prevent your gif from looking flat or hazy trust me. sometimes i also do this with a either colour balance shadows or a selective layer set to hue/color.
FOR EXPORTING
if you're working with timeline, say goodbye to exporting directecly from tl and reopening to fix the frame delay bc it causes quality loss. instead, flatten back to frames and reset the frame delay before exporting, that will save you headaches and time. -> here's a link to an action for this !
my preferred combo is adaptive/pattern
i don't know which gifset made you send the ask but here's a before/after comparaison from a gif i made from an IGTV/Reel, so not the best quality or hd finish but yeah.

4 notes
·
View notes
Note
Hiii I just saw your recent gifset and I was wondering if you could share some colouring/quality tips for gifs?? I've been having some issues lately and I'm trying to collect knowledge from people with great skills, thanks in advance!
hiii!! <3 first of all, thanks omg :(( i feel absolutely underqualified to be giving advice but i'll try to tell u some stuff that i think makes gifs look nicer (i'll do it after a read more so that i don't clog up the dash)
idk how much experience you have in making gifs so i'm gonna be all over the place probably lmao sorry!!
first all, in connection to quality, using anything other than photoshop to gif (like websites or stuff like that) is gonna make your gifs look much less hq no matter how nice the actual footage is. sadly no website can beat ps :( also, using 4k/1080p clips is going to make your job much easier. I use 4kdownloader to get videos from youtube and it works great most of the times.
in terms of processing, once i get my video i use vapoursynth but i don't sharpen/denoise there. i think the vs sharpening is a bit too harsh sometimes and the denoising can be too extreme. (i know ppl get great results w sharpening/denoising there tho!! i've never got it to work like that lol) after the clip is opened in ps, i sharpen there. my settings are very basic (amount 500% and radius 0.4px and then i do that again but with amount 10% and radius 10px) if the original clip is too lq and i'm not satisfied with how the gif looks i might use topaz clean / denoise a little bit. but i try to keep that light. in my personal opinion, i think gifs that are too smooth (so much so that their hair gets blurry and stuff) just don't look as nice. i'd rather have a slightly grainy gif over a very very smooth gif where ppl don't look like ppl.
a lil trick i do when i'm not as pleased with the quality and the gifs are from mvs is to add a little bit of grain using the smart filter. so then the grain looks like it's there on purpose and not bc the og clip is bad (other times i just add noise for aesthetics like with my keppie gifset)
another tool some ccs use is high pass. i feel like high pass needs to be used lightly because sometimes it just makes people look like dolls :(( it's like it takes away all texture and it just looks... slightly odd? i tried to use it a few times but in the end i went back to my own sharpening. i just think it's a tool that needs to be used v carefully.
ok, coloring time!! coloring can literally fix a gif sometimes hahah. like a gif that looks kinda grainy suddenly u color it and it becomes ten times better. when i color, i start by messing with the curves and i tend to do this (this pic is just me messing with a random gif hahah)
i obviously play around with that but i love doing this because it makes my blacks darker. i also play around with exposure and i tend to bring the exposure up a little, bring the offset down a little and the gamma correction up (again, me messing around randomly just so u can see how my settings might end up looking visually. the numbers change all the time because it's not that i do it exactly like this all the time)
i've been told (and i can attest to it myself) that having gifs with a lot of contrast is good for quality so i feel like doing these prev things (and also messing with the blacks in selective color) allows me to bring out that contrast and also make gifs that i enjoy (i'm a high contrast gif lover) but you also have to be mindful not to make your subjects too white by upping the exposure or messing with curves too much. whitewashing is a no no, even if whitewashed gifs always end up looking less grainy >:( for skintone i play around with color balance and selective color mostly. if the whitewashing in the original video is too much, i might go to color lookup, use the preset 3strip, set the layer as 'darken' and mess with the opacity and then if it ends up looking too red i might do the same with a 'fall color' layer and lower the opacity even more for that one (or else the gifs looks too yellow). i also play around with the reds and the yellows in hue/saturation
finally, when i export the gifs, i make sure that i pick the saving mode (i'm sure this is not the proper way to call this but anyways sdfasd) that makes the gif looks better. like sometimes i find that with green gifs some settings make the gif look atrocious so i have to use adaptable for those but anyways i usually mess around w that hahah

idk if this was useful in any sort of way??? if u have a question about something that i mentioned here or i want to ask me more u can totally dm me or come back and ask me 'hey girl wtf?' because i'm so so bad at explaining things by text!! also i wrote this under the idea that u are sort of knowledgable on how to gif but idk !!
#ask#anon#gif help#hope this made sense and was kinda useful???#my last piece of advice would be to make the gifs u love and pls don't feel like u have to gif using a certain style or way#if u don't like it#u know?? coloring is a matter of taste (as long as we avoid whitewashing(
5 notes
·
View notes
Last Seen Blogs
koffeecakesartz
Koffee

acidademataasestrelas
A cidade mata as estrelas
redhead7799
Satisfy me..

mollyscarfmbkp792
Colorful Home Decor
mollyscarfmbkp792
Colorful Home Decor