#project 0 is to load some example code
Text
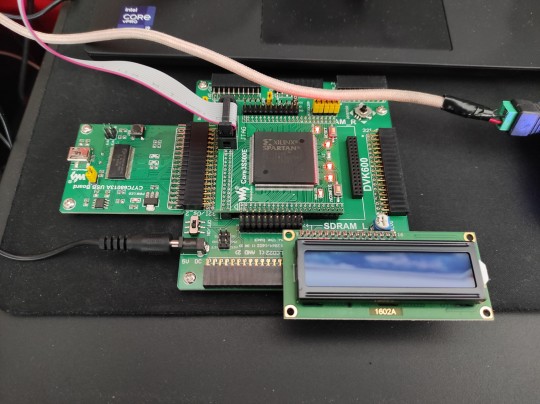
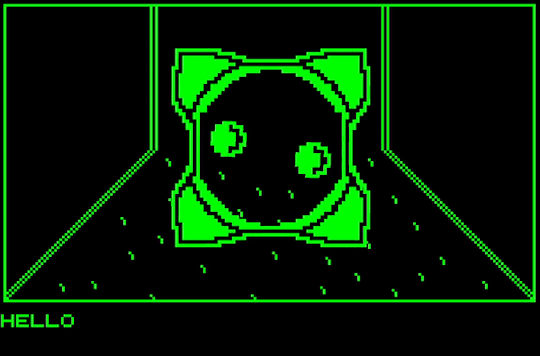
Bought an FPGA for practice and then I won (what I thought was) a long-shot auction on another FPGA so long story short I got two FPGA's for the price of one and a half FPGA's. AMD/Xilinx Spartan 3E and Intel/Altera Cyclone V.
You can tell one is more for hardware engineers and one is more for software developers because the software developer one doesn't let you touch the core to tell how hard it's running. That and I guess it's got an integrated ARM dual core processor in there somewhere but definitely leaning on the first fact more for guidance here.

34 notes
·
View notes
Text
Glucosify's Quick Start Guide to Twine's Sugarcube for Interactive Fiction
Or GQSGTSIF for short.
Very simplified guide to making interactive fiction on Twine, using Sugarcube. This won't cover how to change the UI or anything like that, it's really the bare bones on how to make passages, variables, choices etc. There are multiple ways and syntaxes to do these things, I'm covering the ones I use but it's really not the only way to write code and to do these things ^^
This is not a replacement to the documentation, I'll link relevant parts of the documentations throughout the guide but it's really going to be your best source of information
Let me know if there's anything else you think I should add in there ~
1. Passages & StoryInit
2. Variables
3. If statements
4. StoryMenu (bonus)
First of all, assuming you've already downloaded Twine and opened a new project, make sure that your default story format is Sugarcube (in the top left of the window, go to Twine -> Story Formats and click on Sugarcube then at the top left 'use as default format')

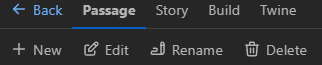
Now, go back to your project. In the top left, click on Passage -> New : this is how you'll create new passages.
Passages are what makes the game essentially, it's where you write your story. Whenever you play an if and you click on a choice and it progresses to a new passage of text, that's how it's done. Make sure to name your passages in a way that makes sense to you, two passages can't have the same name. It's probably best the names aren't super long either considering the names are what you'll type in your code to make the player go to this or that passage.
Special passages :
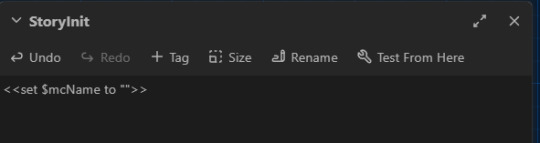
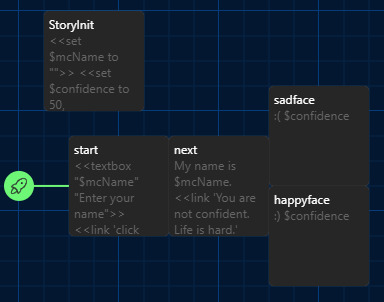
there are some passages that have special functions. Create a passage and name it StoryInit : this passage is used to store variables. Whenever a new game is started, it will load up the variables states as they are in the StoryInit passage. This is essentially a default state where no progress has been made in the story so for example : all stats would be at 0, all relationships points would be at 0, the MC wouldn't have a name yet etc.
We'll store our variables there. Variables are attached to values, these values change as the player goes through the story. A variable's value can be many things, it could be a string which is anything that you'd write inside double quotes "" and would be printed as is in the string.
For example :
<<set $mcName to "">>
$mcName is a variable. Its value changes to whatever the player chooses for the MC name. As you write your code, you just have to type $mcName and it will be changed to whatever name the player has set it to.
A variable's value can also be a number, in this case, you wouldn't write it in double quotes.
<<set $confidence to 50, $maxConfidence to 100>>
It can also be a true or false statement.
<<set $IrisRomance to false>>
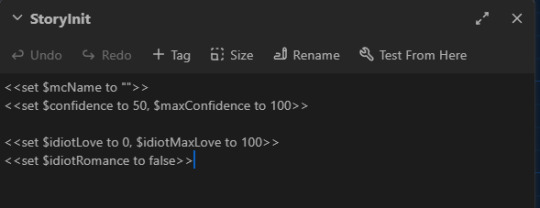
Figure out what needs to be a variable in your story and add them accordingly in your StoryInit passage, you'll add more variables as you go. Remember to give them a value, even if the value is 0 or "". Common variables would be for the MC's name and different physical traits, personality stats, pronouns, character's relationships stats etc. For this tutorial, write in your StoryInit :
<<set $mcName to "">>
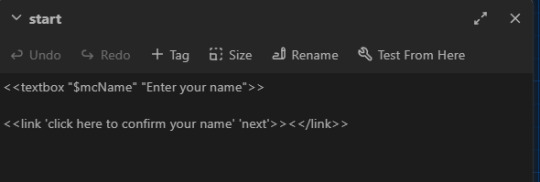
Now, let's test our variable. Create another passage, call it start. In the top left bar, select Start Story Here : you should now see a little green rocket attached to your start passage. This is the passage the players will first see when they launch your game.

Inside the "start" passage, let's make a way to enter your own name with a simple text box.
<<textbox "$mcName" "Enter your name">>
Under it but still inside the "start" passage, let's write a simple link that will let us go to the next passage when we click on it.
<<link 'click here to confirm your name' 'next'>><</link>>
((the first string in the single quote is what will be displayed on the screen as the link, the second word in quotes, in this case 'next' is the name of the passage this link should direct you to))
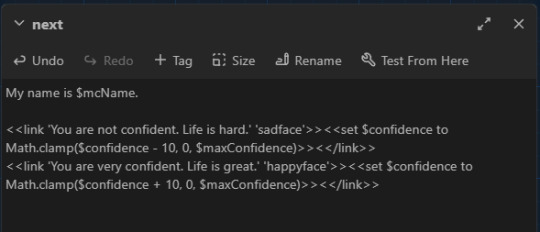
Now make a second passage and call it next.
Inside that passage, write this :
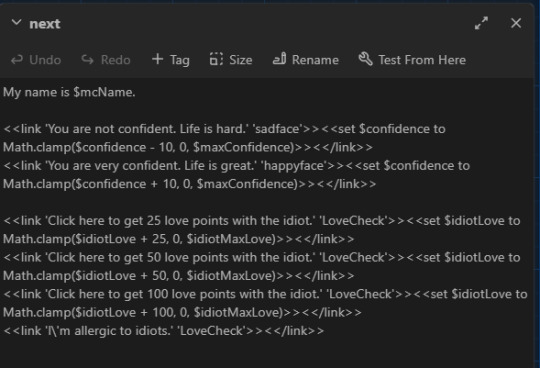
My name is $mcName.
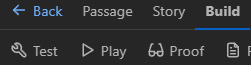
Let's see if it works : in the top left, go to build -> play.
It will open an html file in your default browser. Considering we haven't touched the UI, it will have the default Sugarcube UI. You should have a textbox on the screen and a link under it in blue. If your link is red or if you have an error, go back to your code and check for misspellings or make sure you have the right amount of quotes etc.

Type whatever name you want inside that text box then click on the 'click here to confirm your name' link. It should now have changed the $mcName we wrote in the next passage into the name you input in the box.
Congrats, you've learned how to set, change and display a variable :^)
Now, let's say you want personality (or relationship) stats that change when you select a choice. Back in your StoryInit :
<<set $confidence to 50, $maxConfidence to 100>>
If you want to have a visual elements like actual bars and meters, I would suggest making it easy on you and just getting Chapel's meter macro. You just copy the minified code inside your Javascript file (top left -> story -> Javascript) and then write in your StoryInit and in your relationships / stats / profile page as explained on his demo.
Go back to your "next" passage. Under the first sentence, let's write two choices link, one that will lead to an increase in confidence and one that lowers it.
<<link 'You are not confident. Life is hard.' 'sadface'>><<set $confidence to Math.clamp($confidence - 10, 0, $maxConfidence)>><</link>>
<<link 'You are very confident. Life is great.' 'happyface'>><<set $confidence to Math.clamp($confidence + 10, 0, $maxConfidence)>><</link>>
((Math.clamp might look intimidating but don't worry too much, it's just to make sure your variable's value doesn't go over the min and max allowed so you can't go below 0 or above 100 in this case. You write the variable you want to change then a + or a - followed by how many points you want to remove / add - in this case, 10. Then the 0 is the minimum and the $maxConfidence is the maximum value.))
Now create two new passages, one called sadface and one called happyface. To make sure your variable changed, type $confidence in both of the new passages and play your game.
On one of the statement, it should now say 40 instead of 50 and 60 in the other one. Congrats you've learned how to change a stat. :^)
But what if you want two choices to lead to the same passage but to display different informations depending on how high / low a stat is? Welcome to the world of if statements.
Back in StoryInit, you know the drill :
<<set $idiotLove to 0, $idiotMaxLove to 100>>
<<set $idiotRomance to false>>
New passage, call it LoveCheck. Go back to your "next" passage :
<<link 'Click here to get 25 love points with the idiot.' 'LoveCheck'>><<set $idiotLove to Math.clamp($idiotLove + 25, 0, $idiotMaxLove)>><</link>>
<<link 'Click here to get 50 love points with the idiot.' 'LoveCheck'>><<set $idiotLove to Math.clamp($idiotLove + 50, 0, $idiotMaxLove)>><</link>>
<<link 'Click here to get 100 love points with the idiot.' 'LoveCheck'>><<set $idiotLove to Math.clamp($idiotLove + 100, 0, $idiotMaxLove)>><</link>>
<<link 'I\'m allergic to idiots.' 'LoveCheck'>><</link>>
((you need to add a \ before your apostrophe when it's supposed to be part of the string, otherwise, the program will just think that's a closing single quote and not an apostrophe))
Alright, so now go to your newly created LoveCheck passage and let's write your first if statement. An if statement is basically a condition that you set, if the statement is 'valid' so like if it's a match then the program will ignore every other 'if' possibility. This is important because it means the order of your if statements matters. An if statement can be as simple as :
You are a person. <<if $idiotRomance is false>>You are not in love with an idiot.<</if>>
((this means that if the variable is false, then the second sentence will be displayed but if the variable is true, then the second sentence wouldn't be displayed to the player.))
An if statement can have an else :
You are a person. <<if $idiotRomance is false>>You are not in love with an idiot. <<else>> You love an idiot, I'm sorry. <</if>>
Note that this is the same as this, using elseif :
You are a person. <<if $idiotRomance is false>>You are not in love with an idiot. <<elseif $idiotRomance is true>> You love an idiot, I'm sorry. <</if>>
What this does is, if the variable is true, it will show the third sentence and not the second one and vice versa if the variable is false - because an if statement will only display the first statement that matches, if the variable is true then it will ignore any statement that require the variable to be false. As I said earlier, the order of your statement matter especially with variables tied to numerical values.
You'll understand better once you try it - let's do it in the wrong order first (still in your LoveCheck passage), we'll print the $idiotLove variable to see its value :
$idiotLove
<<if $idiotLove gte 25>> You like the idiot a little.
<<elseif $idiotLove gte 50>>You like the idiot quite a bit.
<<elseif $idiotLove gte 100>>You've fallen for the idiot, it's too late to save you.
<<else>> You don't even know who the idiot is, good for you.<</if>>
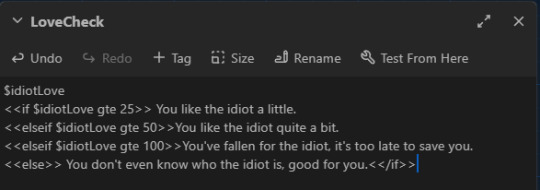
Click play and let's look at the problem. If you click on all the links, the number will be different but the sentence will still say that you like the idiot a little, even if you have 100 points. That's because gte stands for greater than or equal to, 100 is greater than 25 so the first statement is always valid so long as you have at least 25 points. The program sees the first statement matches and is valid so it has no need to read the rest of the if statements. To remedy this, we just change the order :
$idiotLove
<<if $idiotLove gte 100>>You've fallen for the idiot, it's too late to save you.
<<elseif $idiotLove gte 50>>You like the idiot quite a bit.
<<elseif $idiotLove gte 25>>You like the idiot a little.
<<else>> You don't even know who the idiot is, good for you.<</if>>
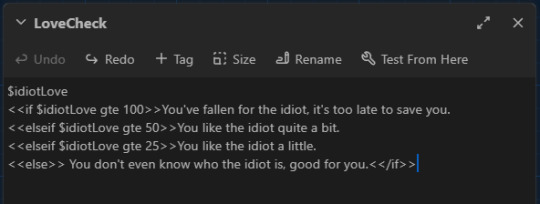
Now it works. If statements will be your most used tool I imagine, especially if there's a lot of variations in your story. You can use if statements for pronouns, for stat checks, romance checks etc.
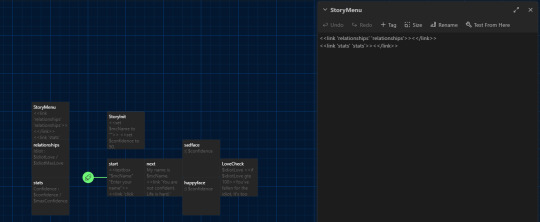
I can always make another guide for the UI but for now, I'll just show you how to add another link in the sidebar of the default UI, using StoryMenu.
Make a new passage, call it StoryMenu :
<<link 'relationships' 'relationships'>><</link>>
<<link 'stats' 'stats'>><</link>>
Make two new passages called relationships and stats. Write whatever you want in them, if you're using Chapel's meters, you could use the <<showmeter>> macro here to display your stat bars.
#did this in a couple of hours so it's nothing fancy#twine#coding in twine#twine sugarcube#interactive fiction#hope it helps the person who messaged me about needing help with sugarcube
80 notes
·
View notes
Text
i was recommended a really cool pokemon emerald romhack called "pokemon heliodor" and was really excited to flash it on my shitty repro cart i use for testing. unfortunately, the cart lacks a battery or a flashRAM chip, meaning the game injected into it needs to be patched with a couple assembly payloads to rework some of the functionality to get these games working on them. examples include having the game load and flush it's save data from or into the ROM itself (self modifying code?? wild), or having any real-time clock stuff be relative to the game-time rather than 24/7 like a real rtc.
now, this presents an issue if you want to apply such patches to a romhack, especially a romhack based on a decomp that has shifted data. A patch made for a regular rom and patched to a romhack will either fail to patch or corrupt it. The patch I was concerned about was the battery-less rtc, as the Romhack would fail to patch onto a rom already rtc-fixed. As this rtc fix exists online only as a random assembly payload I'd have to receive from the ROM itself and reverse engineer, and any searching for a similar project in mind came up short, I decided if I wanted to play this romhack on my shitty repro, I'd have to learn how to fix the rtc myself and then apply it to the romhack's source and pray that the rest of the process works.
.
.
.
it works! it took a bit of trial and error snubbing out the battery communications and adjusting how the data was interpreted, especially in a codebase I had 0 prior knowledge of. thankfully the flashRAM payload works fine as that's not really a patch and more of an automated function hook replacement.
the whole reason I wanted to do this was because this romhack has a functional day/night cycle based on the rtc and i didn't want it to be constantly day or night forever I'd just play vanilla pokemon emerald in that case lmao
anyway the final result is that I can play this romhack on my actual GBA with a repro cart that costs like $2 with most the features you'd expect from a proper flashcart or authentic copy, or at least as close as you can get. I want to figure out soft-reset RNG seeding as the lack of a 24/7 battery results in deterministic RNG which sucks for soft reset shiny hunting, but I'm sleepy. goodnight !
18 notes
·
View notes
Text
EMALGIA (old project)
Howdy Tumblr! Got another old project for you called...
-= EMALGIA =-
This is probably one of my favorite projects to design, to this day I would love nothing more than to finish a full game of it! I had a ton of fun making the short demo and this was probably the most complex thing I had made at the time (despite it's bugs.)
------------------------------------------------------------------------------
-- HEADS UP VIEWERS --
I created a text-based version for this idea for a university project, since It has more in it I will include screenshots and information about both the original demo (itch.io) and the text-based version (c++)
------------------------------------------------------------------------------
-- About The Game --
After discovering a broken oscilloscope in a garage sale, a lover of old tech like yourself surely had to buy it right there and then. You fixed it up and made it like new! Booting it up though, revealed something strange. It outputted a strange sound... and was that a loading screen displaying on the screen? How is that possible?
EMALGIA follows the player exploring their way through a forgotten game, with your new friend M4X! In this world, the keyboard is your deadliest weapon. Type and spell words to deal damage to attacking enemies and finish the game to help M4X with their mysterious quest.
-= SHOWCASE =-
-- Text-Based Version--
youtube
This is a video recording of the text-based adventure version of the idea, made for my university project (Year 1). It's my first time making anything in c++ so there are a lot of bugs and ways to improve. It's not available to play unfortunately but this video goes through everything in the project :)
-- itch.io Version --
This is the itch.io version of the idea, I much prefer this style and I 100% know that someday when I'm better at coding I will return to this! You can open it up and play for yourself, although there is a bug at the end sometimes that will prevent you from playing the final fight :/
-- Tests & Experiments --
There where of course moments where I wanted to try and remake the project and some where I got addicted to drawing/animating in this style! Here are some of those examples:


-= Music =-
The music below is from the text-based adventure version of the game, since the original demo only had two tracks both of which I have lost the files for... I hope these are just as enjoyable though!
Slightly different from my other post, I am going to list a few of my best tracks from the project instead of picking a few from certain categories. Let me know if you prefer this :0
-= My Thoughts =-
I feel like this project has the potential to be something cool, although I've intentionally been putting off touching it until I know how to program better. Perhaps someday this will make a return in full but for now I'll stick to randomly coming up with ideas for it out of the blue lol.
What do you think? Would you like to see this return someday? I would love to hear what you think about it and answer any questions or queries you may have!
#game design#game development#indie dev#indie developer#ost#video game music#video games#old work#old project#EMALGIA#indie game dev#indie games#video game ost#youtube
3 notes
·
View notes
Text
Embarking on Your Data Science Journey: A Beginner's Guide
Are you intrigued by the world of data, eager to uncover insights hidden within vast datasets? If so, welcome to the exciting realm of data science! At the heart of this field lies Python programming, a versatile and powerful tool that enables you to manipulate, analyze, and visualize data. Whether you're a complete beginner or someone looking to expand their skill set, this guide will walk you through the basics of Python programming for data science in simple, easy-to-understand terms.
1. Understanding Data Science and Python
Before we delve into the specifics, let's clarify what data science is all about. Data science involves extracting meaningful information and knowledge from large, complex datasets. This information can then be used to make informed decisions, predict trends, and gain valuable insights.
Python, a popular programming language, has become the go-to choice for data scientists due to its simplicity, readability, and extensive libraries tailored for data manipulation and analysis.
2. Installing Python
The first step in your data science journey is to install Python on your computer. Fortunately, Python is free and can be easily downloaded from the official website, python.org. Choose the version compatible with your operating system (Windows, macOS, or Linux) and follow the installation instructions.
3. Introduction to Jupyter Notebooks
While Python can be run from the command line, using Jupyter Notebooks is highly recommended for data science projects. Jupyter Notebooks provide an interactive environment where you can write and execute Python code in a more user-friendly manner. To install Jupyter Notebooks, use the command pip install jupyterlab in your terminal or command prompt.
4. Your First Python Program
Let's create your very first Python program! Open a new Jupyter Notebook and type the following code:
python
Copy code
print("Hello, Data Science!")
To execute the code, press Shift + Enter. You should see the phrase "Hello, Data Science!" printed below the code cell. Congratulations! You've just run your first Python program.
5. Variables and Data Types
In Python, variables are used to store data. Here are some basic data types you'll encounter:
Integers: Whole numbers, such as 1, 10, or -5.
Floats: Numbers with decimals, like 3.14 or -0.001.
Strings: Text enclosed in single or double quotes, such as "Hello" or 'Python'.
Booleans: True or False values.
To create a variable, simply assign a value to a name. For example:
python
Copy code
age = 25
name = "Alice"
is_student = True
6. Working with Lists and Dictionaries
Lists and dictionaries are essential data structures in Python. A list is an ordered collection of items, while a dictionary is a collection of key-value pairs.
Lists:
python
Copy code
fruits = ["apple", "banana", "cherry"]
print(fruits[0]) # Accessing the first item
fruits.append("orange") # Adding a new item
Dictionaries:
python
Copy code
person = {"name": "John", "age": 30, "is_student": False}
print(person["name"]) # Accessing value by key
person["city"] = "New York" # Adding a new key-value pair
7. Basic Data Analysis with Pandas
Pandas is a powerful library for data manipulation and analysis in Python. Let's say you have a dataset in a CSV file called data.csv. You can load and explore this data using Pandas:
python
Copy code
import pandas as pd
# Load the data into a DataFrame
df = pd.read_csv("data.csv")
# Display the first few rows of the DataFrame
print(df.head())
8. Visualizing Data with Matplotlib
Matplotlib is a versatile library for creating various types of plots and visualizations. Here's an example of creating a simple line plot:
python
Copy code
import matplotlib.pyplot as plt
# Data for plotting
x = [1, 2, 3, 4, 5]
y = [2, 4, 6, 8, 10]
# Create a line plot
plt.plot(x, y)
plt.xlabel('X-axis')
plt.ylabel('Y-axis')
plt.title('Simple Line Plot')
plt.show()
9. Further Learning and Resources
As you continue your data science journey, there are countless resources available to deepen your understanding of Python and its applications in data analysis. Here are a few recommendations:
Online Courses: Platforms like Coursera, Udemy, and DataCamp offer beginner-friendly courses on Python for data science.
Books: "Python for Data Analysis" by Wes McKinney and "Automate the Boring Stuff with Python" by Al Sweigart are highly recommended.
Practice: The best way to solidify your skills is to practice regularly. Try working on small projects or participating in Kaggle competitions.
Conclusion
Embarking on a journey into data science with Python is an exciting and rewarding endeavor. By mastering the basics covered in this guide, you've laid a strong foundation for exploring the vast landscape of data analysis, visualization, and machine learning. Remember, patience and persistence are key as you navigate through datasets and algorithms. Happy coding, and may your data science adventures be fruitful!
0 notes
Text
Deytah loading
I was halfway through writing the post about the battle system when I realized I didn't actually have the moves data loaded yet, lol.
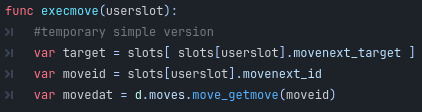
Like I mentioned before, I'm working on a Pokemon X/Y remake to fill in the gaps not yet created for my original game (maps, plot etc). At the moment it's kind of a hybrid situation, where the species and mechanics are for the original game while the maps and scenario are from X/Y. But at some point I'll need to decouple them, making a full original game map and scenario for the one, and a Pokemon game system for the other (not really necessary, but if I want to show it off as a portfolio piece it actually being Pokemon would be less confusing. Also I just want to). And you know, I'd really like to just keep them both in the same Godot project for as long as possible. And I'd like to be able to just cut the folders for those projects out and release the base code with a default/sample project.
So what I'm trying to say is, my method for loading species/move/etc data is going to be a little bit stupid.
Since I have two game projects that need to be easily swapped between, I don't want to have species etc data loaded directly as a singleton, which would probably be the most sane and normal option. So I'll do it like this:
A data-handler.gd file, loaded globally as just 'd' for easy access, contains the project folder string. On loading, this file uses the folder name to load the required data files- species, moves, map list, a few other things like the default starting map (which might be a title sequence or new/load game menu, but during dev it's whichever map I'm working on at the moment). For example, species.gd is loaded into the "species" variable. You can access the species data dictionary directly with like "d.species.species["species-ID-goes-here"]["name or whatever data you're getting"]" but ideally you'd want to call d.species.get_whatever(speciesID).

If the folder isn't found, the game loads "default-project" instead, then loads species, moves etc from there. So, if I just dump the project files minus the original and Pokemon project folders onto Github, people can just download it, fire it up and it'll Just Work(tm), loading a little demo project they can play around with, without changing anything. Thus, none of my original content do not steal will end up in the open source files and the only evidence of me volating Nintendo's copyright will maybe be the string "pokemon-project" somewhere in the data file.
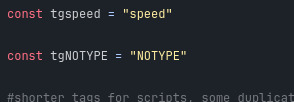
While doing this I realised that the scripttags file already had project-specific tags in it, namely types, but fixing that is as easy as adding another layer of extension and using that instead:

You guys can have this default NOTYPE tag though, that's free
Anyway, while I was at it I wrote a basic move-file-re-writer for moves like I did for species. This one is a bit more complicated as not all tags are needed; for example, if a move doesn't have a secondary effect it doesn't really need the effect tag, nor does it need the "effacc" (effect accuracy, ie chance of the effect happening) tag. I also decided that moves with a guaranteed effect (like moves that do the effect and nothing more) don't need the effacc tag either.
For the moment status-only moves aren't properly marked as such, just having damage set to 0 or -1 to indicate it. (Not that status moves are implemented yet anyway.) For Monstars there's no special-physical split, so it might not need anything but that, but for a real Pokemon-like engine you'd need a tag for physical versus special so you'd just put the status tag there too. Could a damage value of 0 versus a damage value of -1 or lower be used to indicate something? I dunno, probably not.
Also included as "moves" are player actions like switching, using an item and trying to run, which have special coding to not fill them out with any data aside from a high priority. (Of all things move priority is one of the first thing fully implemented in the battle system lol)
With that I'm probably ready to move on to implementing the battle system in this version of the project.
1 note
·
View note
Text
Shadow Play: Mastering Box Shadow in CSS

Introduction
Welcome to the world of shadows in web design! In this blog post, we'll delve into the fascinating realm of box shadows in CSS and how mastering them can elevate your design game. Box shadows add depth, dimension, and a touch of magic to your web elements, making them visually appealing and modern.
Whether you're a beginner looking to grasp the basics or an experienced developer seeking advanced techniques, this guide will walk you through the ins and outs of box shadows. Get ready to unlock the full potential of this powerful CSS feature and add a captivating layer to your web projects.
Understanding Box Shadow
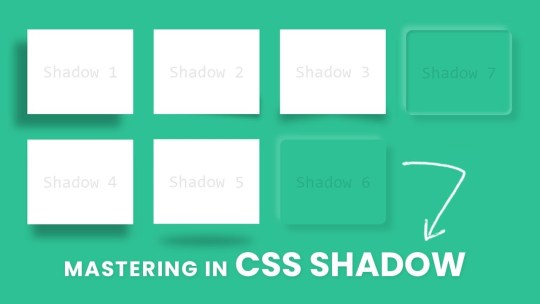
Box shadow is a versatile CSS property that allows you to add visual depth and dimension to elements on your webpage. It creates the illusion of elements lifting off or casting shadows, contributing to a more immersive and engaging user experience.
Let's break down the key components of the box shadow property:
- Color: The color of the shadow, specified in a variety of ways, such as named colors, hex codes, or RGB values.
- Blur: The blur radius determines how blurry or sharp the shadow appears. A higher value results in a softer, more diffused shadow.
- Spread: This property controls the size of the shadow. A positive value increases the size, while a negative value decreases it.
- Inset: An optional keyword that creates an inner shadow, giving the appearance that the element is pressed into the page.
Here's an example of a basic box shadow declaration:
CSS.box {
box-shadow: 10px 10px 20px #888888;
}
Creating Basic Shadows
Now that we've laid the groundwork for understanding box shadows, let's dive into creating some basic shadows to enhance the visual appeal of your web elements. Creating a basic shadow involves specifying the color, blur, and spread properties to achieve the desired effect.
Here's a step-by-step guide to creating a basic box shadow:
- Choose the Element: Select the HTML element to which you want to apply the box shadow. This could be anything from buttons to cards or images.
- Define the Shadow: Use the box-shadow property in your CSS to define the shadow. For example:
-
CSS.basic-shadow {
box-shadow: 5px 5px 10px #333333;
}
CSS.radial-shadow {
box-shadow: radial-gradient(circle, #4CAF50 0%, transparent 100%) 10px 10px 20px;
}
Optimizing for Performance
See the Pen
CSS Box Shadow Examples by vavik (@vavik96)
on CodePen.
While box shadows can enhance the visual appeal of your website, it's crucial to consider performance optimization to ensure a smooth and efficient user experience. Implementing box shadows irresponsibly can lead to increased page load times and negatively impact overall performance. Here's a guide on how to optimize box shadows for better performance:
- Limit the Use of Shadows: Avoid applying box shadows to a large number of elements on a page. Excessive shadows can contribute to increased rendering times and slower performance. Reserve shadows for key elements that genuinely benefit from the visual enhancement.
- Use Conservative Shadow Values: Opt for smaller blur radii and spread values, especially for shadows that don't require a pronounced effect. Smaller values contribute to faster rendering times while still providing a subtle visual lift.
- Avoid Animating Shadows: Animating box shadows can be resource-intensive. If possible, limit or avoid shadow animations, particularly on elements that are frequently interacted with or visible on the screen.
- Consider CSS Hardware Acceleration: Leverage hardware acceleration for smoother rendering. This can be achieved by applying shadows to elements that have their own GPU layers, such as elements with the CSS property transform: translateZ(0);.
Additionally, here's a quick reference table summarizing key optimization tips:
Optimization TipDescriptionLimit the Use of ShadowsAvoid excessive application of box shadows to maintain optimal performance.Use Conservative Shadow ValuesOpt for smaller blur radii and spread values for faster rendering.Avoid Animating ShadowsMinimize or avoid animations on box shadows for improved performance.CSS Hardware AccelerationApply shadows to elements with GPU layers for smoother rendering.
By following these optimization techniques, you can strike a balance between visual enhancement and website performance. Remember, thoughtful and judicious use of box shadows contributes to a polished design without compromising speed and responsiveness.
Practical Applications
Now that you've honed your skills in mastering box shadows, it's time to explore practical applications where these subtle yet powerful design elements can make a significant impact on your website. Let's delve into real-world examples of how box shadows can enhance various elements and contribute to a visually appealing user interface.
- Card Components: Implement box shadows on card components to create a sense of elevation and separation from the background. A subtle shadow can make cards appear as if they are floating, adding a modern touch to your layout.
- Buttons: Apply box shadows to buttons to make them visually stand out and convey a sense of interactivity. Experiment with shadow intensity to find the right balance between a subtle lift and a more pronounced 3D effect.
- Images and Thumbnails: Enhance the presentation of images and thumbnails by adding shadows. This technique provides a subtle border and makes the images pop on the page, especially when placed on a light background.
- Navigation Menus: Use box shadows to distinguish navigation menus from the rest of the content. Shadows can help create a layered effect, making it clear that the navigation is a separate and interactive element.
Here's a quick reference table summarizing practical applications of box shadows:
ElementPractical ApplicationCard ComponentsCreate elevation and separation with subtle box shadows.ButtonsEnhance interactivity by applying shadows to buttons.Images and ThumbnailsAdd a subtle border and make images stand out with shadows.Navigation MenusDistinguish menus with layered effects using box shadows.
As you integrate box shadows into these elements, remember to maintain a consistent design language throughout your website. Striking the right balance between visual enhancement and coherence contributes to a seamless and aesthetically pleasing user experience.
Common Mistakes to Avoid
While mastering box shadows can significantly enhance your web design, it's essential to be aware of common pitfalls that can lead to unintended and undesirable outcomes. Steering clear of these mistakes ensures that your use of box shadows contributes positively to the overall aesthetics and user experience of your website. Let's explore some common mistakes and how to avoid them:
- Excessive Use: Avoid the temptation to apply box shadows excessively throughout your site. Overusing shadows can clutter the visual hierarchy and negatively impact performance. Instead, selectively apply shadows to key elements that benefit from the enhancement.
- Contrast and Readability: Be mindful of the contrast between the shadow color and the background. If the contrast is too high, it can affect text readability or create a distracting visual effect. Opt for subtle shadows that complement the overall design without overpowering the content.
- Uniform Shadow Values: Using the same shadow values for every element may result in a monotonous design. Vary the shadow properties based on the context and size of the element to achieve a more dynamic and visually interesting layout.
- Ignoring Performance: Failing to optimize box shadows for performance can lead to slow page load times. Limit the number of elements with box shadows, use conservative shadow values, and avoid unnecessary shadow animations to ensure a smooth user experience.
Here's a quick reference table summarizing common mistakes and their solutions:
MistakeSolutionExcessive UseApply shadows selectively to key elements for a clutter-free design.Contrast and ReadabilityEnsure a balanced contrast between shadow color and background for optimal readability.Uniform Shadow ValuesVary shadow properties based on element size and context for a dynamic layout.Ignoring PerformanceOptimize shadows for performance by limiting elements, using conservative values, and avoiding unnecessary animations.
By steering clear of these common mistakes, you can leverage box shadows effectively, enhancing the visual appeal of your website while maintaining a seamless and performant user experience.
FAQ
Explore answers to frequently asked questions about mastering box shadows in CSS. Whether you're troubleshooting common issues or seeking clarification on specific aspects, this FAQ section is designed to provide helpful insights and solutions.
Q: Can I apply box shadows to any HTML element?
A: Yes, box shadows can be applied to most HTML elements, including divs, buttons, images, and more. However, consider the purpose and visual impact before adding shadows to ensure a cohesive design.
Q: How do I create a box shadow with a transparent color?
A: To achieve a box shadow with a transparent color, use RGBA or HSLA values for the color property, adjusting the alpha channel to control transparency. For example: box-shadow: 5px 5px 10px rgba(0, 0, 0, 0.5);
Q: What is the impact of box shadows on website performance?
A: Excessive or unoptimized use of box shadows can impact performance by increasing page load times. It's recommended to limit the number of elements with shadows, use conservative shadow values, and avoid unnecessary animations for optimal performance.
Q: Can I animate box shadows for dynamic effects?
A: While it's possible to animate box shadows, it's important to consider the potential impact on performance. Avoid excessive shadow animations, especially on frequently interacted elements, to maintain a smooth user experience.
Q: Are there alternative techniques for creating depth without box shadows?
A: Yes, alternative techniques include using borders, gradients, and pseudo-elements to create depth and visual interest. Experiment with different approaches to find the method that best suits your design goals.
Feel free to refer to this FAQ section as you navigate the nuances of working with box shadows, addressing common queries and optimizing your approach for a seamless and visually pleasing web design.
Conclusion
Congratulations on completing this journey into the art of mastering box shadows in CSS! Throughout this guide, you've learned the fundamentals of box shadows, explored advanced techniques, and discovered practical applications that can elevate your web design skills.
As you continue to integrate box shadows into your projects, keep in mind the importance of balance. Strive for a harmonious design where shadows enhance the user experience without overwhelming the visual landscape. Experiment with different values, apply shadows selectively, and consider the unique context of each element to achieve optimal results.
Remember to prioritize performance by avoiding common mistakes, such as excessive use of shadows and neglecting optimization. By following best practices, you can ensure that your web pages load quickly and provide a seamless experience for your visitors.
Whether you're creating subtle shadows for a clean and modern look or experimenting with advanced techniques for a bold and dynamic design, box shadows offer a versatile tool to express your creativity in web development.
Thank you for exploring the world of box shadows with us. May your future designs be visually captivating, user-friendly, and optimized for top-notch performance. Happy coding!
Read the full article
0 notes
Text
15 Best BPM Low-Code Platforms for Developers
Here is the list of best 15 low-code platforms which can help citizen developers or technology person to build custom applications. Low-code is helping organization to build simple to complex applications with less number of line of codes. Readymade features, prebuilt templates and app store are helping to build the application very rapidly and deployment without much dependency on IT.
Listing Top Platforms
More details +
Added to wishlistRemoved from wishlist 3
Add to compare
REI3
1
Open Source, Monthly payment
Pricing Model
Not Available
Analyst Recognition
App Builder, CRM, Custom App Development, Process & Workflow Automation, Project & Task Management
Platform Offering
What is REI3
REI3 is an open, low code platform for business applications with a wide variety of ready-to-use applications, available free of charge. You can also create your own applications to address your requirements with the graphical application builder.
Another low code platform?
Low code solutions serve to quickly create applications to address software requirements with individual apps. Existing low code software often requires a lot of time as applications need to be created from scratch, with simple templates only giving a vague idea of how to start – expensive user licenses come on top of that.
REI3’s goal is to make low code available to any size business and any budget. Professionally designed REI3 applications can directly be installed and used to address software needs. New applications can easily be created to extent these solutions or to address specific software requirements. Your software can directly solve your problems.
REI3 is open source and can be used 100% free of charge with most REI3 applications also freely available. Some examples: Project management, time tracking and password safes.
Complex workflows, email processing, notifications, mobile access, calendars, charts, gantts – REI3 has loads of features for you to address your individual requirements.
Why you should rely on REI3
Stay flexible with REI3 – everything you create or add to REI3 is yours. You can continue to use your applications indefinitely, hosted within your own infrastructure or inside the cloud. REI3 has only moderate hardware requirements, can be installed on Windows and Linux servers in minutes and requires no client installation.
Go pro
If you want to rely on REI3, you can get professional support. With ‘REI3 Professional’, advanced features (like LDAP integration and cluster management) are available starting at 2.50€ per user/month – Services fast and reliable support included.
Want to try it out?
Test REI3 directly with our public live demo system or download the portable version for Windows PCs . No registration, no sales calls, no charges.
More details +
Added to wishlistRemoved from wishlist 0
Add to compare
Linx
2
Free Trial, Monthly payment
Pricing Model
Not Available
Analyst Recognition
App Builder, Custom App Development, Enterprise Integrations, Process & Workflow Automation
Platform Offering
What is Linx
Linx is a general-purpose low-code platform for building backends like APIs, automations and integrations. It is an abstraction of programming itself and not domain, process or tooling specific. This means it can be used for any backend application in any domain with no limitations on connections to other tools and service.
Developers design and debug solutions in a familiar procedural style using a drag and drop interface with access to 1000s of ready-made functions. Solutions are deployed with one click to servers running in the cloud or on-premise.
What makes Linx different
The use of a programming abstraction makes Linx extremely powerful. It is not constrained by a domain or use-case driven paradigm and is often used in conjunction with other low-code tools to provide the API or integration services that those tools are not designed for.
Linx Unique features
Programming Paradigm – Linx is not constrained by a domain or use-case driven paradigm and is often used in conjunction with other low-code tools to provide the API or integration services that those tools are not designed for. It also allows for the easy implementation of complex functionality.
Developer Experience – Typical use is similar to working in any other traditional IDEs. Users can build, debug and test functionality using common operations for functions, types and services.
Technology agnostic – Linx works with any tool or service (SaaS, systems, apps and legacy), database (SQL, Oracle, OLE DB, ODBC, Postgres Mongo) and files (XML, Json, text, csv, PDF)
Hosting – 1-click deployment to on-premise or cloud. Security, configuration, logging & metrics are standard.
How does Linx work?
Linx allows users to set up interactions with databases, files, web services, email and other APIs to efficiently perform repetitive tasks and automate backend workflows
Users create solutions in the Linx Designer, a drag-and-drop desktop IDE. Solutions are designed to include server-side business logic, such as data validation, workflow rules, calculations, and more, with unlimited flexibility.
Completed solutions (applications) are deployed to the Linx Server where automated events are executed based on your predetermined triggers.
The typical Linx use-cases
Application Integration: Access APIs, databases & files from one application & convert them for use in other applications
Web Services: Create REST or SOAP web services, connect to databases, send emails, write files, call APIs, etc
Microservice or API layer creation: Use linx to expose your current systems’s functions as a fully-fledged API layer
Automate Data Transfers: Schedule or trigger the transfer of files over networks with message queues, FTP or email
Business Process Management: Automate business processes to improve efficiency & reduce errors
Extract, Transform, Load: Aggregate, synchronize and migrate data across systems and databases
Rapid Application Development: Deliver innovation fast without disrupting normal business operations
More details +
Added to wishlistRemove
d from wishlist 0
Add to compare
Automy
3
-
Pricing Model
-
Analyst Recognition
-
Platform Offering
6.3
What is Automy
Automy is a leading cloud-based, no-code platform that enables organizations to set up workflows and automate activities such as accounting, CRM, and purchasing. Professionals can use dynamic forms to set validation rules, keep track of to-do lists, and manage projects in compliance with service level agreements (SLAs). Automy delivers business intelligence (BI) technologies to help firms develop analytical reports and make better decisions.
Automy is a leading cloud-based No-Code digital solution for automating and tracking business activities. Created with a human-centric approach to process automation in mind. Designed for effective user cooperation, with the ability to scale and modify with minimal downtime. Forms with a variety of content and data kinds.
Automy is a no-code digital process automation tool that helps companies track and automate workflows throughout their whole organization. Automy is the world’s most adaptable automation platform, allowing individuals to be more productive by automating corporate operations.
What Automy Offers
Business intelligence software analyzes data and presents it as useful information for making decisions. Database and API REST integration allows for more efficient automation. Eliminating paper-based operations is one of the most significant steps in transforming your company. By utilizing process automation, businesses can speed up their operations while eliminating miscommunications and delays.
Why Automy
The features provide us with a wide range of possibilities, and the no-code allows us to quickly set up procedures. The tools make it possible to connect to APIs from the company’s various systems. It aids in the definition of various business rules as well as the identification of opportunities to automate business activities. It has a lot of flexibility when it comes to connecting with other systems in my organization and turning it into worldwide automation.
More details +
Added to wishlistRemoved from wishlist 0
Add to compare
Rindle
4
-
Pricing Model
-
Analyst Recognition
-
Platform Offering
7
What is Rindle
Rindle software is a platform for creating pro
cesses that help teams work more efficiently. The software has features for creating tasks and assigning them to various persons. To match the workflows and add structure to any project, organize tasks in lists and columns. Collaborate with teams to directly comment on a task and export the boards as CSV or ZIP files.
It works with Zapier, Google Calendar, and other services. Rindle allows users to create and automate unique business processes. Trello, Monday, and Asana are not our names. Traditional project management platforms are insufficiently flexible to automate the custom workflows or assist the team in adopting practices. Using no-code process automation and the BPM platform, users can increase efficiency, boost team adoption, and scale the team.
Rindle’s basic concept was straightforward: automation is the future of task and project management. It’s been exposed to the same basic project management capabilities in the same basic types of solutions. And it’s always a solution that makes people want to keep looking for the next best thing.
What Rindle Offers
Rindle automates the completion of steps in the process, allowing the team to be more efficient and productive while spending less time on administrative responsibilities.
Keep track of crucial deadlines and milestones within the project by visualizing the tasks in calendar view.
Create Gantt charts in minutes and provide your team with the project transparency they require. View any project’s high-level overview across time.
Each department should have its workflow. Delegate work by mirroring it from core workflows and projects to the department in charge of finishing it.
Everyone understands what to do, where things stand, and how to get what they need when they need it because everything is organized, centralized, and transparent.
Rindle’s real-time reports summarize critical activity across all teams and projects whenever users need it.
Why Rindle
Rindle is a cloud-based process and workflow management solution that promises to help business team members collaborate with a level of flexibility that conforms to the way any organizational team works.
With Rindle’s Automations, users can speed up and automate the entire processes of the business. Automations use triggers and actions to speed up process phases, saving your staff many hours monitoring their boards and repeating the same activities.
Built-in reporting and filtering features provide users a holistic perspective of your performance, with real-time feedback and visualizations of task accomplishment.
More details +
Added to wishlistRemoved from wishlist 0
Add to compare
Joget
5
-
Pricing Model
-
Analyst Recognition
-
Platform Offering
7.1
What is Joget
Joget is leading web-based workflow software that can be used to create workflow and business process management systems. It’s also a quick application development platform that goes beyond back-end EAI/orchestration/integration and the task-based interface to provide full agile development features. It allows both developers and non-developers to create apps visually using drag-and-drop tools. JW enables the d
evelopment of full-featured apps like CRM, healthcare, and human resources, among others, with suitable data management support. At the same time, it improves efficiency and production by completing manual procedures more quickly and consistently.
Joget DX: Joget DX is a next-generation open source low-code platform for digital transformation that is faster and easier (DX). Joget DX is a simple, versatile, and open platform that combines the best of process automation, workflow management, and low-code application development.
Joget Cloud: Joget Cloud is a modern platform for enterprise application development and workflow automation using low-code/no-code techniques. Customers who want to outsource their Joget DX infrastructure for an end-to-end solution can use the Joget Cloud Managed Services, which is a BYOL service. Users may rely on Joget Cloud for an integrated cloud platform that meets their application development, management, and maintenance needs.
Joget Marketplace: Build enterprise web apps and automate business processes for eKYC using Joget’s modern open source low-code/no-code application development platform. With real-time workflow and back-office management, users can remain ahead of the cost and compliance curve, allowing their business to streamline operations.
Designed for Education, Finance & Accounting, Health, Human Resources, Management & Admin, Office Tools, Sales & Marketing, Non-coders, and coders, to manage workflow cooperation and automate the design process. Bridging the business-technical divide, accelerating application development, and digitizing workflows using citizen development efforts are all examples of citizen development projects.
Joget, Inc. is the creator and maintainer of the commercial open source project Joget DX, a no-code/low-code web platform for cloud and mobile application development and workflow automation. Joget DX is the successor of Joget Workflow in the next generation. It allows anyone to build and develop online apps as well as automate procedures.
What Joget Offers
The App Center is a customizable landing page that allows visitors to access apps quickly and securely.
The Joget Marketplace’s seamless integration enables quick and easy downloads of new apps and plugins.
Visually construct and configure process workflows by dragging and dropping.
Supports simple and complicated procedures, including synchronous and asynchronous reminder and escalation deadlines.
Grids, spreadsheets, signatures, and other powerful form elements are available for a variety of uses.
Filtering, sorting, paging, and exporting to numerous document formats are all built-in.
Many advanced UI elements, including dashboards, calendar views, charts, and more, are available and responsive to accommodate desktop and mobile devices.
Developers can enhance the platform’s capabilities thanks to the platform’s dynamic plugin design.
More details +
Added to wishlistRemoved from wishlist 0
Add to compare
SavahApp
6
-
Pricing Model
-
Analyst Recognition
-
Platform Offering
What is SavahApp
Savah is a collaborative tool that allows designers to develop high-fidelity prototypes for web and mobile apps without
writing a single line of code. Designers, design agencies, and businesses can use Savah to turn their concepts into appealing interactive prototypes and mock-ups. Users can send these prototypes to their team/clients with a single click, bringing their visual feedback directly to their design screen. Instead of emailing design files back and forth, users can easily invite the design team/clients to projects where they may examine and contribute. Users can invite as many people as they want to each project in Savah. Users can manually drag and drop files or upload files straight from their DropBox account using Savah. New versions can be uploaded and compared visually side by side. Users can pinpoint exactly whatever part in each screen they want to comment on using its straightforward and interactive comment system. Better design collaboration will be aided by this interactive communication between users, the design team, and the users’ clients.
Platform Design Collaboration: Users can invite their whole design, development, and product management teams, as well as clients and stakeholders, to the event. They can interact and exchange ideas, as well as make comments, to improve the projects’ user experience. They will get access to their projects based on their role.
Project Workflow: Users can customize a design project workflow that works best for them and their team. They can edit the titles, reorganize the columns, and add/remove columns to fit your company’s unique workflow.
App Prototyping: Transform static screens into code-free interactive app prototypes in minutes with Savah, regardless of whether users are creating web, mobile, or smart-watch experiences.
Integrations: With the help of project integration management solutions, users can generate a WOW impact for design projects by showcasing prototypes in any browser without installing any plugins. Clients and stakeholders will get a firsthand look at how the product is made and how it feels to use it.
Sketch Plugin: The Sketch plugin can be downloaded and installed on a Mac. They can then submit all or just a few of the images from the Sketch artboard to SavahApp.
Mobile Apps: Users can now prototype offline using the iOS app.
The new SavahApp for iOS app allows users to browse project design screens, upload design ideas, and play or share prototypes with only one click. Users Designed to manage stakeholder collaboration and automate the design process for freelancers, graphic and UX designers, app prototype developers, and enterprises and agencies.
SAVAH is creating a new and improved approach for teams to collaborate and design things. Providing a forum for freelancers, designers, developers, and account executives to share design and receive feedback. Its goal is to assist every design team in realizing its full potential. Encourage teams to accept diversity and build an open work culture.
What SavahApp Offers
SavahApp enables teams to create amazing things by allowing them to exhibit digital concepts in real-time, collect comments, and accelerate the design approval process.
SavahApp allows anyone to quickly turn their designs into interactive prototypes.
Without writing a single line of code, quickly create interactive high-fidelity prototypes for any device.
It creates tools for modern teams to build prototypes, engage with stakeholders, and automate the design and approval process.
Users can create the workflow and automate the entire design process, from concept to completion.
Keep track of version history and upload new design revisions.
SavahApp may be integrated with a variety of different applications, including Dropbox, Google Drive, Sketch Apps, and many others.
Why SavahApp
SavahApp provides a platform that is both strong and simple to use.
Any team’s success depends on its ability to collaborate and communicate.
The SavahApp provides a clear image of the projects, priorities, and pending chores, among other things.
Users can change the workflows as needed so that they can work with what works best for their team.
More details +
Added to wishlistRemoved from wishlist 0
Add to compare
Userflow
7
-
Pricing Model
-
Analyst Recognition
-
Platform Offering
7.6
What is Userflow
Userflow is a no-code platform that SaaS companies may utilize to speed up user onboarding. Userflow allows users to create customized in-app surveys, tours, and checklists without having to know how to code. It is possible to convert more customers and boost customer retention. Flows can be viewed just inside the app, with no need to install anything. Any web app can be seamlessly linked with it. The ability to create highly personalized and dynamic flows will be available to users. With Userflow’s easy Flow Builder, anyone can create a flow in minutes. Users do not need any technical expertise because they can simply point and click or drag and drop. With a patented element selection algorithm, elements in the app can be identified based on simple language. Before publishing the flows to the users, users can simply see and edit them in draft mode. The installation code must be copied and pasted into the app or Userflow must be installed. Flows can be used in single-page and multi-page applications.
The main industries of the Userflow are SaaS, IT, Education, Business, etc. The companies who are intend to apply no-code patform can use Userflow to get the best workfow in their business.
Userflow is a self-contained company situated in Santa Barbara, California. It provides a solid foundation for SaaS businesses to maximize their growth. They simply aim to create the greatest and most useful product possible while also providing exceptional customer service. It aids in maintaining a lean, lucrative, and long-term business that is not reliant on outside investors.
What Userflow Offers
• Before releasing the flows to the users, users may easily preview and live-edit them in draft mode. • Flows are compatible with both single-page and multi-page applications.
• User characteristics can be used to segment and target users by tracking events and storing user information.
• Place beacons on any element on the page that user want to pay attention to.
• Buttons can be hidden or disabled based on user criteria, such as until a text field is filled in.
• Tasks can be used to initiate a flow, navigate to a page, or do anything else the app requires.
• When a user completes actions that users specify, the task is automatically marked as completed.
• While the customers are getting to know the software, checklists remain active in the background.
• Connect the existing knowledge base to the app and allow users to search for articles right in the app.
• Users can access their live-chat provider and see e-mail/phone contact information in the Contact box.
• Allow blocks to appear only on specific pages or for specific user profiles.
• We support a variety of question kinds, giving you a complete survey experience.
Why Userflow
The flow builder is fantastic, and there are so many different ways to include logic into the flows.
Setting up complex user flows is quite simple.
Users can upgrade or downgrade at any time as long as the new plan’s limits are not exceeded.
More details +
Added to wishlistRemoved from wishlist 0
Add to compare
ElectroNeek
8
-
Pricing Model
-
Analyst Recognition
-
Platform Offering
7.4
What is ElectroNeek
ElectroNeek is a leading integrated development environment (IDE) that aids in the development of robotic process automation (RPA) bots for enterprises. Using a single platform, administrators may design workflows, manage documents, and produce custom reports. It enables IT, workers, to automate the full software development lifecycle, from code authoring through application testing and debugging. Access control, an activity dashboard, collaboration, data import/export, a drag-and-drop interface, forms management, and analytics are all included in ElectroNeek Pro. ElectroNeek Studio Pro includes an application programming interface (API) that allows it to be integrated with a variety of third-party services, including Asana, DocuSign, Dropbox, Gmail, Google Calendar, HubSpot, Intercom, Jira, Mailchimp, and others. Pricing may be obtained upon request, and assistance is provided by phone, email, documentation, and other internet methods.
Bots created using ElectroNeek Studio don’t require any commercial software to run, so customers may deploy them across the firm without breaking the bank. Using the award-winning ElectroNeek Studio, accelerate RPA adoption inside your organization by creating unlimited automation. Robotic process automation (RPA) bots are software robots that are frequently referred to as a digital workforce.
At ElectroNeek, they think that automation, in which people and robots collaborate to create an effect, is the future of employment in every firm. IT professionals and Citizen Automators in enterprises of all sizes may use the ElectroNeek platform to harness the potential of Robotic Process Automation and improve the productivity of everyday procedures in their teams and organizations.
What ElectroNeek Offers
Bots may be deployed on any local or cloud architecture without the need for server authentication.
Users can assign any number of attended, unattended, or hybrid bots to their team.
With Windows Credential Manager, the credentials granted are saved locally.
The drag-and-drop editor with no-code/low-code blocks makes it simple to build their bot in minutes.
Studio Pro gives users the ability to create complex automation using Python and JavaScript.
To expedite the test-to-production cycle and RPA adoption timetable, create bots 10x quicker than with any other program.
Why ElectroNeek
Electroneek is an excellent RPA tool for SMBs to employ since it delivers many of the capabilities of the more expensive RPA solutions at a fraction of the cost.
Electroneek customer service is excellent, and they have been quick to respond to any issues I’ve had.
Electroneek less expensive to use, and it has most of the same features as the alternatives.
Electroneek program is simple to use for corporate users, and the command library is broad.
More details +
Added to wishlistRemoved from wishlist 0
Add to compare
Revolutio
9
-
Pricing Model
-
Analyst Recognition
-
Platform Offering
What is Revolutio
Revolutio is a unified no-code platform for developing corporate apps and complicated computational processes. Application architecting, data management, process automation, modeling, reporting, visualization, and project management are all included in the platform. Revolutio is the second generation of no-code platforms, offering complete stack plug and play as well as a large number of pre-built connectors. The platform can be deployed on both cloud and on-premise instances, making it easier to use in regulated sectors and areas where cloud providers aren’t available.
Revolutio includes pre-built libraries for computing operations, UI design and administration templates, and the most up-to-date data management technologies. Platform No-code is a leading ground-breaking framework that allows anyone, especially non-technical people, to use visual development to develop software applications without having to write code. Financial organizations can use Kepler CPM to manage credit quality, performance, and provisioning. Asset categorization, collateral allocation, NPA provisioning, portfolio monitoring, and financial reporting are all covered by Kepler’s post-disbursement monitoring and accounting.
RevolutioBI is a pre-built data analytics platform that includes data administration, computation, and visualization. Data Management Studio, Computation Studio, and Visualization are the three main components of the RevolutioBI platform. Credit origination and pricing, portfolio and collateral management, stressed asset management, investment strategy, and operations are just a few of the areas where Kepler MRM may assist with model life cycle management.
Revolutio aspires to deliver real and measurable results via the deployment of new generation technology and applications. Its business verticals are focused on helping businesses achieve growth and sustainability via innovation, rapid implementation, skilling, and scaling.
What Revolutio Offers
Easy front-end configuration and pre-built content libraries empower the end-user.
Using the pre-built industry-aligned repositories, achieve go-live in a short amount of time.
Using a drag-and-drop interface, users can easily build data linkages and sophisticated data models.
Create intelligent, high-speed, compute-intensive applications by building complicated data, statistical, machine learning, and image processing models from the front end.
Create visual workflows for any business process and connect them to any module in the app.
Users may also choose the output format for your visual reports so that they can be seen, downloaded, scheduled, and distributed.
Why Revolutio
For a bank or financial institution, ushers in the next phase of digital transformation at scale and speed.
Reduces development time for app deployment by allowing front-end users to customize their app to meet their own needs.
Reduces the cost of supplying technology by allowing any app to be built on a single platform rather than having to buy different pieces of software.
Stateless computation capabilities enable large-scale, near-real-time execution of tasks and sophisticated calculations.
Pre-loaded with cognitive and sophisticated analytical skills to improve decision
-making in high-profit/low-cost regions
More details +
Added to wishlistRemoved from wishlist 0
Add to compare
Quickwork
10
-
Pricing Model
-
Analyst Recognition
-
Platform Offering
What is Quickwork
Quickwork is a full-featured workflow management system for startups, small businesses, SMEs, and agencies. This Web-Based Workflow Management Software features a basic UI and is straightforward to use. Quickwork is compatible with Desktop and delivers end-to-end solutions for Windows operating systems. Drag & Drop, Multi-Channel, Integration, and Formula Mode are all features. It also aids with auditing, versioning, API management, and team management. Organizations may use the software to harvest leads from one platform, enhance them with data from other platforms, promote its products and services from a third, and manage converted customers from a fourth. The program enables users to deliver fully tailored proposals to each lead over any chat channel. Furthermore, any external source may be used to verify the customer’s identity, and the information can be kept in any CRM application. To construct trips, users do not need to know how to code. The application’s user-friendly drag-and-drop capability makes it simple to design personalized itineraries. In addition, Quickwork’s automation specialists have produced a variety of pre-configured trips.
Quickwork is an all-in-one platform that includes all of the tools and services needed to create strong and scalable integrations, serverless APIs, conversational experiences, and more. To deliver a fantastic user experience, businesses utilize Quickwork to construct simple and complicated processes, establish and publish secure APIs and manage conversational interactions with customers, workers, and partners. When an event happens in the source application system, the business workflow may be initiated in real-time. This event type is appropriate for conversational, IoT, financial, and other use cases that demand a quick reaction.
What Quickwork Offers
Building processes is as simple as dragging and dropping using a user interface built for citizen developers and non-technical people.
Users can create connectors using the connector SDK and publish them with public or private access.
With our built-in formula engine and programming connections, users may do any operation.
With a single-click deployment, workflow execution and data storage may be hosted in your selected area or on-premise anywhere in the globe.
Quickwork has a collection of pre-built data transformation routines. Users can change data according to the needs or as required by the use case by using Node.js or developing their functions.
Users can create and manage real-time conversational processes across a variety of platforms, including WhatsApp, Line, Facebook Messenger, Telegram, Slack, Microsoft Teams, Google Chat, web widgets, and more.
Why Quickwork
It facilitates the difficult decision-making process and ensures adaptability at every stage.
It allows users to access data from numerous devices and assists them in creating and seamlessly establishing APIs.
Building workflow journeys using the Quickwork Automation platform
does not require any coding experience.
It uses a variety of techniques to provide the smoothest inter-process interfaces with third-party apps.
More details +
Added to wishlistRemoved from wishlist 0
Add to compare
Phiona
11
-
Pricing Model
-
Analyst Recognition
-
Platform Offering
5.7
What is Phiona
Phiona is a no-code platform that allows anybody to manipulate data without having to know SQL or Python. Users may use Phiona to extract data from XLS, JSON, CSV files, APIs, databases, S3, and Google Sheets into one virtual data center. Numerous datasets can be combined without the need of multiple VLOOKUPs. Cleaning functions using machine learning to automatically indicate unclean data – no more hunting for white spaces or alternative date formats. Schedule procedures to run on a regular basis, email altered datasets to others, and expose data using a unique REST API for each dataset.
The Phiona Data Platform requires no scripting or configuration to integrate data from databases, Excel files, or online apps, construct transformations and automation from inside a spreadsheet interface, and share your data with the whole company. Platform Users may link data from databases, Excel files, and web apps to Phiona and develop transformations and automation right in the spreadsheet. Users can then offer a REST API to connect to the front-end application directly.
Phiona gives consumers access to a platform that lets them develop databases, SaaS apps, and cloud storage solutions. With its collection of cleans, transformations, and enrichments, it encourages individuals to turn raw data into clean, usable information. It enabled businesses of various sizes to construct enterprise-level systems at competitive prices.
Phiona is the outcome of a wild notion to create a new sort of product that makes data function quickly, simply, and humanly, without requiring users to know how to code. The scrappy team is remote and enthusiastic about producing exceptional products, intending to change the way people interact with data.
What Phiona Offers
It allows the user to manage all of the data in one location, users to quickly establish a virtual database without having to change the underlying details.
Reduce the time it takes to manage and automate business data by up to 90%.
By interactively manipulating, evaluating, and applying changes inside a spreadsheet view, users may create complicated data pipelines.
In a familiar spreadsheet interface, integrate online and offline data sources, automate typical data operations, and exchange data on a schedule. There is no need to code.
Connect the data by uploading a file or integrating it. Create a virtual data warehouse that allows users to see the data directly without affecting the underlying detail.
By interactively manipulating, evaluating, and applying changes inside a spreadsheet view, users may create complicated data pipelines.
Why Phiona
Optimized cloud data lakehouses, such as Phiona, function similarly to analogous data warehouses but are on average 80% less expensive.
We handle all of the configuration and tweaking for you, so you don’t have to worry about being on call
every time your database goes down.
Users only pay for performance when they need it with lakehouses, rather than wasting money on computing while the warehouse is idle.
REST APIs that have been created
Create individual API keys and endpoints for each of the internal and external users without giving them access to the raw data.
Any format may be used to transform or enrich the datasets.
Data visualization is used to make data easier to interpret.
More details +
Added to wishlistRemoved from wishlist 1
Add to compare
Origami
12
Free Trial, Free Package, Monthly payment
Pricing Model
Not Available
Analyst Recognition
App Builder, CRM, Custom App Development, Industry Specific Solution, IOT/IIOT, Project & Task Management, Smart Apps
Platform Offering
7
What is Origami
Share much Software’s Origami is an intranet solution for several industries. The solution enables businesses to transform their SharePoint sites into intranets. Document management, staff engagement, employee news, and collaboration are all important elements. The system can be installed on-premises or in the cloud. By offering a forum for dialogues and broadcasting company news, events, and other alerts, Origami encourages employee participation. Likes, comments, and sharing of events are all social components of the system. Furthermore, the system allows administrators to customize websites using pre-designed layouts for various departments. Origami has features such as a policy and procedure finder, classifieds, forms and templates finder, and survey and polling functionality. Employees can utilize the solution’s different directory capabilities to find project sites, colleagues, expertise, and talents.
ORIGAMI is a leading platform that allows the user to create information systems on the fly using a drag-and-drop user interface. It includes all of the components needed to quickly create a system that meets their every need. Without any setup, all of the data can be displayed in multiple views on demand. Each view includes sorting and filtering options, as well as presents. Fully responsive layouts that are easy to use on any device. Users can construct and customize entities to fit their specific data structures. Users’ data is valuable; keep it safe and accessible.
Origami is meant to let businesses of all sizes construct enterprise-level systems in less than a week and for less than a tenth of the market price.
Origami began as a software development firm, assisting businesses in increasing their efficiency and effectiveness via the use of technology. Origami’s mission is to assist business stakeholders in improving their processes through simple software configuration, regardless of the problem or company size.
What Origami can Offer
To automate data flow between the external systems that need full integration capabilities.
The core of ORIGAMI has been evaluated and verified, so users may create their system with confidence.
The streamlined user interface of ORIGAMI reduces onboarding time and exposes the staff to only the information that is relevant to them.
Stay informed as to the system tracks and communicates what is most
important to the business.
Wherever possible, ensure unmistakable accountability.
In ORIGAMI, every activity is forever recorded.
ORIGAMI-based systems are encrypted by default, and MFA, SSO, and other features are available.
For smooth failover, redundant servers on three continents are used, with full backups taken every eight hours.
Why Origami
Using integrated procedures that avoid repetitive administrative work, users can save a lot of time and money in the organization’s operations.
Streamline collaboration with linked data and processes that eliminate time-consuming administration tasks and distracting permissions.
An all-in-one system can automate assignment allocation and communicate directives to all parties within the company.
More details +
Added to wishlistRemoved from wishlist 0
Add to compare
Waylay
13
Not Available
Pricing Model
Not Available
Analyst Recognition
App Builder, Artificial Intelligence, IOT/IIOT, Machine Learning
Platform Offering
7.2
What is Waylay
Waylay was formed in 2014 to enable businesses to get a greater return on their IoT investments. Companies may utilize Waylay to go beyond connect-and-collect and put IoT information to practical use across the organization.
Waylay Enterprise: Enterprises may use the Waylay Platform to connect their IoT and OT investments with their IT platforms like CRM and ERP. Any issue in the digital transformation path is solved by ultra-scalable automation technology. The Waylay platform was designed from the bottom up to handle the diverse data patterns that IoT, OT, and IT generate.
Waylay Digital Twin: Waylay Digital Twin is a Salesforce composite app that blends IoT data with business context to enable connected assets to generate, monitor and report on business results. Salesforce AppExchange is where users can find it.
Waylay IO: Waylay IO simplifies serverless development and keeps developers from getting mired down in details that have little to do with the problems they’re supposed to address. Create a code snippets library. Any API-enabled service can be integrated. These code snippets are orchestrated by Waylay IO’s strong and unique automation technology.
Waylay Edge Solution: Waylay TinyAutomator is made up of a few docker images that feature the Waylay Console, Waylay Inference Engine, Resource service, and a nodejs-based embedded sandbox. Waylay TinyAutomator allows users to gain expertise with improved automation and construct automation scenarios on their Raspberry PI or locally on their laptops.
Manufacturing, industrial engineering, HVAC, utilities, consumer products, retail, smart buildings, processing industries, telecommunications, cybersecurity, and smart equipment are all examples of sectors that use technology.
By making AI, IT, and OT data accessible to everyone, waylay believes low-code automation liberates natural human intellect and offers new opportunities in value creation.
What Waylay can Offer
The Waylay platform offers powerful automation tools for creating, executing, and managing IoT automation logic.
The Waylay platform was designed from the bottom up to handle the diverse data patterns that IoT, OT, and
IT generate.
Use the same collaborative intelligence platform to combine streaming and time-series analytics.
Easily offer self-service and KPI-centric apps to non-developer teams to accelerate the time to market IoT, IT, and OT solutions.
Determine which automation tools are ideal for the IoT use case, then put them to the test against the benchmark.
Why Waylay
Waylay is at ease in any data-enabling environment.
With the low-code/no-code solution, users can turn their ideas into new business concepts.
Its knowledgeable staff assists users in determining their needs and providing suggestions.
For any business scenario, it’s ready to use.
More details +
Added to wishlistRemoved from wishlist 0
Add to compare
Arengu
14
-
Pricing Model
-
Analyst Recognition
-
Platform Offering
6.4
What is Arengu
Arengu is a popular online form builder that enables users to quickly create and publish several forms. Users may create three types of forms with Arengu: online forms for event registration and data collection; smart forms based on prior user behavior and habits; and multi-step forms that utilize conditional logic to skip questions based on responses provided. To create a form, all users have to drag and drop questions and content into Arengu’s form builder. This form may then be embedded into a user’s website. Users may obtain the answers and results in real-time through email or push notification after setting up or submitting the form using the Arengu interface. Arengu interfaces with several third-party products, including email marketing platform MailChimp, email service provider Mailjet, and messaging app Telegram.
Forms: Without coding, users may create customizable forms and unique server-side logic. At every level of the form, users may automate activities and integrate any API. In any stage of the form, run custom server-side logic flows.
Flows: The flow builder makes it simple to create unique server-side logic and automate actions at various stages of your form. It allows the user to quickly construct server-side logic for use in existing forms or as a stand-alone product. Without the requirement for coding, users may create custom validations, interact with other APIs, and automate operations. Users can visually build logic and automation their forms.
Pages: With a simple CMS based on HTML templates, users may quickly and easily develop specialized sign-up sites at scale. They can use mustache tags to automatically create input fields in the template, allowing users to change the content in a personalized dashboard.
Retail, Survey, Education, Office, Online platforms, and other industries that aim to simplify, digitize, and automate expert operations and services are the ideal Arengu users.
Arengu’s team aims to improve and make registration processes seamless, and they’re searching for talented people to join them in their quest to allow developers and marketers to create and iterate all of these flows in minutes.
What Arengu can Offer
Arengu provides great personalization options. Users can do all of this in the Forms editor and personalize the form’s interface as they like it.
Aren
gu allows users easily to integrate with other platforms to obtain the data that they need or enrich the answers of the forms with other platforms.
Arengu will allow users to make email verification flow and data enrichment forms integrating the form information with clear bit and adding conditional logic.
Turn the form submissions into interactive workflows with custom approval states.
Quickly add secure payments to the forms and collect one-off or recurring subscriptions for the business.
Users may create custom validations or API integrations by linking flows to different phases of the form between form steps, before submission, or after submission.
Why Arengu
User registration forms that are simple and customized
One-time passwords and SMS/email verification.
Forms with magic links that don’t require a password
Create a workflow for the forms’ approval.
Campaigns for landing pages should be automated and scaled.
More details +
Added to wishlistRemoved from wishlist 0
Add to compare
OMNIA
15
-
Pricing Model
-
Analyst Recognition
-
Platform Offering
7.5
What is Omnia
Omnia as a Platform for Applications Omnia’s intrinsic capabilities of low-code platform and integration enables IT to play a beneficial role in enabling the Business to achieve the anticipated new business model. Omnia can facilitate a quick iterative process of testing, failing, learning, adjusting, and iterating. because of its low-code platform and integration features Omnia is the only application platform that allows businesses to create true web apps without the usual technical headaches: not only process-driven but data-driven applications as well. It differs significantly from other BPMs or platforms now available on the market in this regard.
Omnia is the only system that uses a Low Code Application Platform with a powerful BPM (Business Process Management) tool, allowing users to build corporate data and process-driven apps. It has a very user-friendly interface that allows users to easily and easily create web and mobile apps, as well as responsive applications for any device. The data models and procedures necessary for the firm to simplify and automate staff activities, reducing manual and time-consuming work that is usually done using Excel or antiquated software, have no bounds.
Smart Applications: Smart Applications from Omnia are ready-to-use applications that are available on-premises or in the cloud. Omnia Platform adapts to individual business processes, which is a unique approach compared to other software on the market, which was built with tighter designs and needs code changes to modify.
Business Applications: Omnia is a comprehensive platform that provides everything users need to build, innovate, and extend enterprise applications fast and safely. All of Omnia’s new capabilities are available right now on the desktop and on the most popular mobile devices, with a user-friendly interface for all sorts of users.
Only Omnia manages the life cycle of business processes and combines the process repository with the Enterprise Architecture, the service model, and the CMDB, allowing for a unique view of the organiza
tion that is not limited to the firm’s many software silos. Its technique, which supports both organized and unstructured operations, is adaptable to change and helps the organization to respond swiftly to market demands. The Omnia platform helps corporate applications function for the people who work in them, not the other way around.
What Omnia can Offer
Because software plays a vital part in knitting together or enabling these new models, Omnia allows inventive organizations to experiment with new methods to mix goods, services, and data to develop new enterprises.
The Omnia Platform and the Omnia Document Management Smart Application may help businesses with their dematerialization and digitization efforts.
Users may create apps that take advantage of all of Omnia’s features.
Data management, processes, dashboards, data analysis, maps and geolocation, integrations, and social media are just a few of the capabilities that business apps may take advantage of.
Omnia BPM focuses on enterprise process improvements based only on business goals, and as a consequence, speed is a priority. As a result, the company unavoidably focuses on decreasing wastes and delays in current processes, resulting in cost savings.
Omnia Platform’s low-code approach helps businesses to adapt fast and effectively to business demands. Omnia Platform enables enterprises to deliver features across many channels in real-time.
Why Omnia
Omnia mobile applications are simple to use, feature a current, effective User Interface, and deliver a recognizable and successful User Experience.
People are at the heart of every application created on the Omnia platform.
Users can continue to operate the firm and develop while reducing risk.
Its customer support services are ready to assist users in using Omnia BPM daily.
0 notes
Text
Minecraft Console Commands And Cheats
Minecraft console commands and cheats
Minecraft console commands server commands, cheat codes and Minecraft commands to improve your blocky adventures, without the need to grind for materials

Jordan Forward
Published: Oct . 4, 2022 07:18 ET
Hard work: If you're not interested there are always cheats and console commands. What better method to conquer the vast sandbox of the Minecraft world than by pulling up the command bar, entering certain words and symbols, and then transforming yourself into a prissy clippy-cloppy pony with diamond armor?
A console command is more than simply a string of numbers. They can change the world in a matter of seconds and go from killing every enemy around you to instantly melting all the metal in your inventory. Some may consider this cheating however we see it as simply a way to save time and allowing you to get on with your amazing Minecraft project.
How do you enter Minecraft commands? The Minecraft console commands are easy to use. They are just like entering Minecraft seeds. When you're creating a brand new Minecraft world, you'll be asked to choose whether or not you want to allow cheats. After choosing yes and loading the world, you'll have to press the "C" button to bring up the command bar, which is where you'll input all cheats and commands.
Any command that you enter in single player must be preceded by a forward slash (/); multiplayer commands will not work with this prefix.
It's as easy as typing the desired command into the text box, then pressing the "Enter key.
Commands for Minecraft consoles and cheats
Shortcuts for identifying the targets to be targeted
@p - nearest player @r- Random player – All players @e- All entities @s - The entity that executes the command Target selector variable sets an individual target without needing to enter their full name. Below are five different shorthand commands. You'll soon be used to these commands when playing on the top Minecraft servers.
Help [CommandName] Provides additional information regarding the given command.
Give [Amount] To gift an item from your inventory to another player, use this command. Example: Give PCGamesN Minecraft:planks 13. This will give PCGamesN 13 Spruce Wood Planks. This command is more suitable to use for objects that are only one, but it is useful for stackable objects.
Teleport /tp [TargetPlayer] x y z Use this to instantly transport yourself or another player to a specific place in the world. The use of another player's name in place of coordinates will transport the target directly to said player's location. You can also teleport to a new world with these Minecraft maps.
Igralni
Kill Kill kills your character, adding another player's name will apply the command to them.
Weather WeatherType /weather allows you to choose the weather or the world. You have the option to choose from rain, thunder or snow.
Creative mode /gamemode creative Changes the game mode to Creative mode that allows players to fly unlimited resources and also stops mobs attacking you.
Survival mode/gamemode survival Changes gamemode to Survival mode. This means that mobs will attack you, and you'll need to gather all resources the traditional method.
Set time /time set 1000 Sets the time to day. Replace "1000" with "0" for dawn, "6000" for midday, "12000" for dusk and "18000" for night.
Change difficulty to Peaceful /difficulty peaceful Changes difficulty to peaceful mode. For more challenges, replace "peaceful" with "easy", "normal" or "hard".
How do I locate my world's seed code/seed This will create an HTML code for my world. Keep it in your notebook so you can load another one later.
Keep inventory in place after you die Gamerule keepInventory true This will ensure that you don't lose any of your items when you die. To reverse this you must enter "false" in place of "true"
Stop time /gamerule doDaylightCycle true This will stop the game's day/light cycle in it's place which allows you to live in perpetual sunlight or moonlight. To restart the day/light cycle, type "/gamerule/DaylightCycle true".
Summon /summon instantly releases a desired creature or object into your world, particularly handy for when you're short a couple of tame ocelots.
Atlantis mode Atlantis dramatically raises the level of the oceans, submerging all except the highest mountains.
Ride /ride Turns the creature you're facing into an animal.
Instant mine Instantmine One-click mining using any tool.
Freeze/freeze stops mobs from moving away.
Fall damage/falldamage It turns on and off fall damage
Damage from fire /firedamage Turns the fire damage on and off.
Water damage/waterdamage Water damage is turned on and off
Smelt item /superheat Turns all items into smelted forms.
Instant Plant Instantplant. Don't have to be patient waiting for seeds to develop.
Store items Dropstore stores all inventory items in the chest, which is then created close to.
Item Damage Items are no longer subject to damage or degradation.
Duplicate/duplicate Copy and drop the item stack you have installed.
These are the steps you must take to improve your Minecraft game and eliminate the guesswork from crafting. But where to next? These Minecraft mods can make your game more exciting. These mods can make your game more exciting than Mojang could have imagined. They may even put Pokemon into your world!
1 note
·
View note
Text
First let me post the update's notes.
Added an oxygen system where both characters have a visible bar that decreases the longer they are on water and resets if they leave water; They die instantly if the oxygen reaches 0 (This feature right now is lazily implemented because i just added “oxygen -= 1” in the code without using a Timer node or even a Yield statement so i should improve this some day).
Life system: Both characters share a life and if one dies, the life goes down.
Picking up coins adds a new life (Actual number of coins needed and max lives might change).
Fixed an issue where the game crashes if the Companion touches the Lifeguard floater.
The Companion can use the floater too and when it’s picked up, both characters are affected (There may be some weird bugs because i tried to fix an issue where if the floater is picked while the Player is getting hurt, their hurtbox would still receive damage).
Fixed volume sliders being at 0 but not silencing the sounds: Now they’re at 50% which also affects the sounds (Meaning you can see it to 100 just to see how loud it can get); These sliders are still a bit buggy but maybe next time.
Changed how things disappear (Keys, doors etc) to avoid yield related statements in code.
Now, about the "slideshow" cutscenes
Think of how older games in general had passing images and text boxes that changed, sometimes over time or others with a press of a button.
This part interests me because these story segments will always be different in each "instance", not just the images or text but specially the number of images/texts used and even how long a certain image/frame/slide etc stays (Because there will always be more text than images and some images are meant to stay for a few extra "frames" while the next changes).
Another part is the actual controls like moving forward/backward as if the Player was flipping a book or the ability to outright skip a cutscene.
Because a lot of YT tutorials will be more about cutscenes using animated characters and i'm not sure if copying GDQuest's Godot Slides projects is a good model to follow.
Random example but look at Faselei https://www.youtube.com/watch?v=b-9rELc2eHo&t=62s and just the basic idea of images changing but not as much as the characters' texts.
Obviously i'll also need good art for this but a good enough template is a start.
What else:
I hope the next update is about level design revision because of how mechanics are introduced.
I might try to "increase" the levels by splitting parts and seperating them with new areas, so the Player is introduced to mechanics in a better way.
This also means redoing the yellow books by creating more of them with dedicated messages about said mechanics instead of the 3 books i got right now.
With how levels change, i may try some new features like "moving vertical walls/doors" affected by green switches for some gimmicky area or some new type of platforms like disappearing/appearing ones or something that spins.
I also thought of a projectile enemy for the sake of it but a more interesting idea is an enemy that targets the Companion,
Also still haven't done a save/load system but again: Worried if there's specific differences between exe and HTML versions to consider.
0 notes
Text
Minecraft Console Commands And Cheats
It's hard work, but If you're not interested there are always cheats and console commands. What better method to conquer the vast sandbox that is a Minecraft world than opening the command bar, entering some words and symbols and magic-ing yourself up an adorable clippy-cloppy pony sporting diamond armor?
A console command is more than an arbitrary string. They can transform the world from eliminating all enemies in your vicinity to melting all the metal in your inventories. Some might call this cheating but we see it as simply a way to save time and allowing you to get on with your amazing Minecraft project.
How do you enter Minecraft commands? Thankfully, Minecraft console commands are extremely easy to use; they're as easy as entering Minecraft seeds. When creating a new Minecraft world you'll be prompted to select whether or not to allow cheats. Once you've chosen yes and loaded the world you will need to press "C" to open the command bar. This is where you will enter all your commands and cheats.
Forward slash (/); multiplayer commands are required to be prefixed with any command.
It's as simple as entering the desired command in the text box and hitting the "Enter” key.
Minecraft cheats and console commands
Target selector shortcuts @p: the closest player @r: random player @a all players @e = all entities @s. The entity which executes the command. Target selector variables allow you to define a particular target without having to type their full name. Below are five shorthand commands. You'll get used to seeing these when playing on the most reliable Minecraft servers.
Help/help [CommandName] Gives more details on the command.
Give/give [Amount] to give an item from your inventory to another player. Example for a given example: /give PCGamesN minecraft:planks 13. This will give PCGamesN 13 Spruce Wood Planks. This command is more suitable to use for objects that are only one, but it is useful for stackable objects.
Teleport /tp [TargetPlayer] Z Used to instantly transport yourself or another user to a specific place in the world. By using the name of another player in place of the coordinates will bring the target directly to the player's location. You can also teleport to a different world by using these Minecraft maps.
Kill/kill kills your character. However, adding another player's name will apply the command to them.
Weather /weather WeatherType enables you to select the weather or your world. The options include snow, thunder, rain and snow.
Creative mode /gamemode creative Changes the game mode to Creative mode which allows player flight, unlimited resources and stop mobs from attacking you.
Survival mode/gamemode survival Changes game mode to Survival mode. This means that mobs will attack you, and you'll have to gather all resources the traditional method.
gslist
Time/time set to 1000 Sets the day's time. Replace "1000" with "0" for dawn, "6000" for midday, "12000" for dusk and "18000" for night.
Change difficulty to Peaceful/difficulty peaceful Changes difficulty to Peaceful/difficulty peaceful. Replace "peaceful" with "easy", " normal" or "hard" to increase the difficulty an obstacle.
How do you find your world's Seed Code /seed. This will generate a code for the world. Keep it handy so that you can load another one in the future.
Keep your inventory up to date when you die. / game rule keepInventory true. This ensures that you don't lose your items upon dying. To change this simply type "false" in place of "true"
Stop time /gamerule doDaylightCycle true This will stop the game's day/light cycles in it's place, allowing you to live in perpetual sunshine or moonlight. To restart the day/light cycle, enter "/gamerule doDaylightCycle true".
Summon /summon Instantly brings a desired creature or object into your world, especially useful when you're running out of some ocelots you can tame.
Atlantis mode/atlantis Dramatically increases the levels of the world's water and submerges all other areas, excluding the highest mountains.
Ride/ride Changes the creature you're facing into an animal.
Instant mine/instantmine Mining using any tool
Freeze/freeze stops mobs in their tracks.
Fall damage/falldamage turns fall damage on and off.
Fire damage /firedamage Turns fire damage off and on.
Water damage/waterdamage The water damage switch turns on and off.
Superheat / Smelt item Turns all objects into smelted form.
Instant plant/instantplant There is no need to wait for a seed to develop.
Dropstore /Store Items All inventory items are kept in a chest that spawns near.
Damage to items or items is no longer susceptible to degradation or damage.
Duplicate /duplicate Copies and drops the stack of items that you have set up.
That's all the Minecraft console commands you'll need to help enhance your game and take the hassle out of the crafting. What's next? Perhaps you can make your game even more impressive with these Minecraft mods. They'll make your game more exciting than Mojang ever imagined. Plus , they can bring things like Pokemon into your world!
1 note
·
View note
Text
Minecraft Console Commands And Cheats
Minecraft console commands and cheats
Minecraft console commands, server commands, and Minecraft cheat codes to help you get the most out of your Minecraft adventures without the need to grind for materials

Jordan Forward
Published: October 4 2022, 2022 07:18 ET
It takes hard work. If it isn't for you, there are always cheats and console commands. There is no better way to conquer the vast Minecraft world than to use the command bar and type in certain words and symbols and then magically creating with a cute pony that is adorned with diamond armor.
A console command is more than just the string. They can instantly change the world, from eliminating all enemies in your vicinity to melting every metals in your inventory. Some may consider this cheating however we see it as a way of saving time and allowing you to concentrate on your awesome Minecraft project.
But how do you enter Minecraft commands? The Minecraft console commands are simple to use. They can be used just like entering Minecraft seeds. When you create a new Minecraft world you'll be prompted to choose whether or not you want to allow cheats. After selecting yes and loading the world, you'll have to press the "C" key to pull up the command bar, which is where you'll input all your cheats and commands.
Any command you enter in single player must be prefixed with forward slash (/); multiplayer commands will not work with this prefix.
It's as easy as entering the desired command into the text box, then pressing the "Enter” key.
Commands for Minecraft consoles and cheats
Shortcuts to the Target Selector
@p - nearest player @r - random player @a - all players @e all entities @s the entity executing the command Target selector variables assign an exact target without writing out their full name. Above are the five different shorthand commands. You'll get used to these when playing on the best Minecraft servers.
Help Help [CommandName] Gives more information on the given command.
Give [Amount] To give an item from your inventory to a different player use this command. Example: /give PCGamesN minecraft:planks 13. This will give PCGamesN 13 Spruce Wood Planks. This command is much simpler when it comes to giving objects as single objects however, it is useful for stackable objects.
Teleport /tp [TargetPlayer] [x,y,z] It is used to instantly transfer yourself or another person to a specific location within the world. By using the name of another player in place of the coordinates will transport the target directly to said player's position. These Minecraft maps can also be used to teleport to another place.
Kill/kill Kills your character. If you add another player's name the command will be applied to them.
Weather WeatherType allows you to choose the weather or your entire world. You have the option to choose from rain, thunder or snow.
Creative mode/gamemode creative This alters the game mode to Creative, which allows for player flight with unlimited resources and stops mobs attacking players.
Survival mode Gamemode Survival Changes the game mode to Survival mode, which means mobs will attack you and you'll need to collect all the resources the traditional method.
Set time /time set 1000 . Sets the time to day. Replace "1000" with "0" for dawn, "6000" for midday, "12000" for dusk and "18000" for night.
Change difficulty from a tranquil quiet to a difficult to a calm mode. For more challenges substitute "peaceful" with "easy", "normal" or "hard".
How do you find the seed code for your world /seed This will produce an HTML code for your world, write it down to be able to load a similar one in the future.
Keep inventory until you die keepInventory rule is a way to ensure that you don't lose your possessions upon dying. This can be reversed by typing "false" instead of "true".
Stop time /gamerule doDaylightCycle true This will stop the game's day/light cycles in it's place, allowing you to live your life under perpetual sunlight or moonlight. To start the day/light cycle again, type in "/gamerule doDaylightCycle true".
Summon Instantly drops an object or creature you want to see in your world. This is especially useful for those who are low on Ocelots that are tame.
Atlantis mode /atlantis Dramatically raises the world's water levels completely submerging all except the highest mountains.
name mc
Ride Changes the creature you are facing into a mount.
Instant mine /instantmine One-click mining with any tool.
Freeze/freeze stops mobs from moving away.
Fall damage/falldamage It turns on and off fall damage
Fire damage /firedamage Switches fire damage off and on.
Water damage/waterdamage Turns water damages on and off
Melt item superheat Converts all objects to a melted state.
Instant plant /instantplant No more waiting around for a seed to grow.
Store items /dropstore Stores all inventory items into a chest, which spawns close to.
Item damage /itemdamage Weapons no longer receive damage or degrade.
Duplicate/duplicate Copy and drop the stack of items you have installed.
These are the commands you need to improve your Minecraft game and eliminate the guesswork from crafting. What's next? Maybe you can make your game even more impressive by using these Minecraft mods. They'll make your game even more exciting than Mojang ever imagined. They may even put Pokemon into your world!
1 note
·
View note
Text
Capturing the ambience of The Witness
The Witness offers subtle sound design to complement its minimalist visuals.

Capturing footage
The Witness offers Ansel support, which allows limited free camera control along with some other visual enhancements. However, activating Ansel pauses the game, so we can't use it to capture world animations like trees or waterfalls.
To get true noclip control, we can use Witness Trainer. This program will also come in handy later, in identifying sounds. Note that to use it, I had to download an older depot of The Witness from Steam (specifically v6699512367181293800). There's another Trainer project that also offers noclip if you're having trouble.
To inspect individual .mesh models from the game, you can use Witnesser.

Extracting sounds
Use the LZ4D Python script to compress .sound assets. Most of these assets also be opened by importing raw data into Audacity.
You'll notice that, unfortunately, The Witness shipped with very quiet ambient sound assets. I contacted Andrew Lackey but he was hesitant to provide or license the raw sounds. He kindly encouraged me to go explore, and record my own instead!

Identifying sounds
If you have some coding ability, you can clone Witness Trainer and place a breakpoint in a place that allows you to inspect the currently loaded entities. Each sound will have a playback speed - use this to inform your understanding of the present soundscape. For example, the desert temple entrance sounds like this:
power_cable_spec_ruin_crt_lp1 1.4013e-45 0 1
amb_int_spec_ruins_lvl_01 1.4013e-45 0 1
amb_desert_dunes_ridge 1.4013e-45 0 1
amb_desert_dunes_open 1.4013e-45 0 1
amb_ext_generic2 1.4013e-45 0 1
Putting it all together
Stitch your extracted sounds together with your captured footage.
youtube
1 note
·
View note
Text
Minecraft Console Commands And Cheats
It takes hard work. If it isn't for you There are always console commands and cheats. What better way to conquer the sprawling sandbox that is the Minecraft world than by launching the command bar, entering certain words and symbols, and then creating a prissy clippy-cloppy pony with diamond armour?
A console command is more than an arbitrary string. They can alter the world in a matter of seconds, from killing every enemy within your reach to instantly melting all the metals in your inventory. Some might call this cheating, but we think of it as simply a way to save time and letting you get on with your amazing Minecraft project.
But how do you enter Minecraft commands? Fortunately, Minecraft console commands are wonderfully simple to use; they're as simple as inputting Minecraft seeds. When you create a new Minecraft world you'll be prompted to select whether or not you want to allow cheats. After choosing yes and loading up the world, you'll have to press the "C" button to pull up the command bar, where you'll input all cheats and commands.
Any command you enter in single player will need to be prefixed with a forward by a slash (/); multiplayer commands will not work with this prefix.
Bonfire
It's now a simple case of entering the desired command and then hitting the "Enter" key.
Minecraft cheats and console commands
Target selector shortcuts @p: closest player @r: random player All players @e = all entities @s. The entity that executes the command. Target selector variables permit you to set a specific target without typing their full name. Below are five shorthand commands. You'll get used to these commands when playing on the most reliable Minecraft servers.
Help/help [CommandName] Gives you more information about the command.
Give/give [Amount] To give an item from your inventory to a different player. Example for a given example: /give PCGamesN minecraft:planks 13. This will give PCGamesN 13 Spruce Wood Planks. This command is simpler when giving single objects, but it can be useful for stackable objects.
Teleport /tp [TargetPlayer] y z Used to immediately transport yourself or another player to a specific place in the world. The use of another player's name instead of the coordinates will bring the target directly to the player's location. You can also teleport to a new world by using these Minecraft maps.
Kill /kill Kills your characters, and adds the name of another player to apply the command.
Weather/weather WeatherType allows you to choose the weather conditions for your area. The options include rain, thunder and snow.
Creative mode/gamemode creative Changes the game mode to Creative mode that allows players to fly with unlimited resources, and prevents mobs from attacking you.
Survival mode/gamemode survival Changes gamemode to Survival mode. This means that mobs are going to attack you, and you'll have to gather all resources in the traditional way.
Set the time/time setting 1000. Sets the time of day. For dawn, noon, and night replace "1000" by "0", "6000" or "12000" and "18000" for each.
Change difficulty to Peaceful/difficulty peaceful Changes difficulty to Peaceful/difficulty peaceful. For more challenge Replace "peaceful" by "easy", "normal" or "hard".
How to find the Seed Code for your world's seed. This will generate a code for you world. Keep it in your wallet so that you can load another one in the future.
Keep your inventory in case you die. Game rule: Keep Inventory true. This ensures that you don't lose your belongings after dying. To revert this, type "false" instead of "true"
Stop time /gamerule doDaylightCycle true This will stop the game's day/light cycle from taking it's place, allowing you to live under permanent sunshine or moonlight. To restart the day/light cycle, type "/gamerule/DaylightCycle true"
Summon /summon Instantly drops the desired creature or object into you world. This is especially helpful for those who are short on tame Ocelots.
Atlantis mode/atlantis Dramatically raises the world's water level and submerges all except the highest mountains.
Ride /ride Turns the creature you're facing into an animal.
Instant mining / instantmine One-click mining with any tool.
Freeze/freeze Blocks mobs from getting away.
Fall damage/falldamage is based on fall damage.
Damage from fire or fire turns the damage on and off.
Water damage/waterdamage Turns water damages on and off
Superheat or Smelt item transforms everything into smelted.
Instant plant/instantplant Don't have to wait around for a planted seed to develop.
Dropstore Stores all inventory items into chests, which then spawn nearby.
Damage to items or items is no longer susceptible to degrading or being damaged.
Duplicate or duplicate copies and drop the stack of items you have set up.
That's all the Minecraft console commands that you'll need to help enhance your game and take the hard work out of all that crafting. But what next? Well perhaps you could make your game even more impressive by using these Minecraft mods. These mods will make your game more thrilling than Mojang could have ever imagined. Plus they can put things like Pokemon into your world!
1 note
·
View note
Text
Minecraft Console Commands And Cheats
Hard work: If you're not interested, there's always cheats and console commands. What better method to conquer the vast sandbox of a Minecraft world than opening the command bar, typing in certain words and symbols, and then transforming yourself into in a dazzling clippy-cloppy pony outfitted with diamond armor?
A console command is more than just an arbitrary string. They can change the world by killing all enemies around you to melting every metal in your inventories. Some may consider this cheating, but we think of it as a way of saving time and letting you get on with your amazing Minecraft project.
But how do you enter Minecraft commands? Thankfully, Minecraft console commands are wonderfully simple to use; they're as easy as entering Minecraft seeds. When creating a new Minecraft world you'll be prompted to choose whether or not you want to allow cheating. After selecting yes and loading the world, you'll have to press the "C" key to pull up the command bar, which is where you'll be inputting all your cheats and commands.
Forward slash (/); multiplayer commands are required to be prefixed to any command.
It's now simple to type in the desired command and hitting the "Enter" key.
Minecraft cheats and console commands
@p - Target selector shortcuts @r – nearest player @a – random player. All players @e - all entities @s. The entity that executes the command. Target selector variables allow you to set a specific target without having to type their full name. Below are five shorthand commands. You'll get used to these commands when playing on the top Minecraft servers.
Help/help [CommandName] provides more details on the command.
Give/give [Amount] Used to give another player an item from your inventory. Example is: /give PCGamesN minecraft:planks 13. This will give PCGamesN 13 Spruce Wood Planks. This command is more suitable to use for single objects, however it can be useful for stackable objects.
Teleport /tp [TargetPlayer] y z Used to immediately transfer yourself or another player to a specific place in the world. The use of another player's name in place of the coordinates will bring the target directly to the player's position. You can also teleport to a different world using these Minecraft maps.
Kill/kill kills your characters, and then adds the name of another player to apply the command.
Weather/weather WeatherType allows you to choose the weather or your world. The options include snow, thunder, and rain.
Creative mode/gamemode creative changes to Creative mode. This allows players flight as well as unlimited resources. It also keeps mobs away from attacking you.
Survival mode/gamemode survival Changes gamemode to Survival mode. This means that mobs will be attacking you, and you'll have to gather all resources the traditional method.
Set the time/time setting 1000. Sets the day's time. For dawn, noon, and night, replace "1000" by "0", "6000" or "12000" and "18000" and "18000" respectively.
Change difficulty to Peaceful/difficulty peaceful. Changes difficulty to Peaceful/difficulty peaceful. Replace "peaceful" with "easy", " normal" or "hard" for more of the challenge.
How do you find the Seed Code of your world's Seed. This will generate a code for you world. Keep it in your wallet to load another one in the future.
Keep inventory when you die/gamerule keepInventory true This ensures that you don't lose any of your objects upon your death. This can be changed by typing "false" instead of "true".
Stop time/gamerule donDaylightCycle true This will cause the game's day/light cycles stop and allow you to be in constant sunlight or moonlight. To start the day/light cycle again, enter "/gamerule doDaylightCycle true".
Summon /summon Instantly releases the desired creature or object into your world. This is especially useful for those who are short on Ocelots that can be tamed.
Atlantis mode/atlantis dramatically increases the world's water levels submerging all but the highest mountains.
Ride /ride Turns the creature you're facing into a mount.
Instant mine or instantmine mining with any tool
Freeze/freeze Stops mobs from getting away.
Fall damage/falldamage is based on fall damage.
Fire damage/firedamage Turns the fire damage off and on.
Water damage /waterdamage The water damage switch turns on and off.
Superheat/Smelt item turns all items into smelted form.
Instant plant / instantplant Don't have to wait around for a planted seed to develop.
Dropstore /Store Items All inventory items are stored in a chest which spawns near.
Item damage/itemdamage Weapons are no longer a threat to degrading or being damaged.
Duplicate/duplicate copies, then drop the stack of items you have prepared.
These are the Minecraft console commands you'll need to help enhance your game and take the stress out of crafting. What's next? Maybe you can make your game even more impressive with these Minecraft mods. Minecraft online These mods will make your game more exciting than Mojang could have imagined. Plus they can put things like Pokemon in your world!
0 notes
Text
Minecraft Console Commands And Cheats
It takes hard work. If it's not for you there are always cheats and console commands. What better method to conquer the vast sandbox of the Minecraft world than opening the command bar, entering some words and symbols and then transforming yourself into an adorable clippy-cloppy pony sporting diamond armor?
A console command is more than an arbitrary string. They can change the world in a flash, from killing every enemy within your reach to instantly melting all the metal in your inventory. Some people may call this cheating however we see it as a way of saving time and allowing you to concentrate on your awesome Minecraft project.
But how do you enter Minecraft commands? Thankfully, Minecraft console commands are extremely easy to use. They're as simple as inputting Minecraft seeds. When you're creating a brand new Minecraft world you'll be prompted to select whether or not you want to allow cheats. After choosing yes and loading the world, you'll have to press the "C" key to pull up the command bar, where you'll enter all cheats and commands.
Forward slash (/); multiplayer commands are required to be prefixed with any command.
It's as simple as entering the desired command into the text box and then hitting the "Enter” key.
Minecraft cheats and console commands
@p - Target selector shortcuts @r – nearest player @a – random player. All players @e – all entities @s. The entity that executes the command. Target selector variables permit you to set a specific target without having to type their full name. Below are five shorthand commands. You'll be accustomed to seeing these when playing on the most reliable Minecraft servers.
Help /help [CommandName] Provides you more information about the command you're given.
Give /give [Amount] To give an item from your inventory to another player. Example for a given example: /give PCGamesN minecraft:planks 13. This will give PCGamesN 13 Spruce Wood Planks. This command is much simpler to give single objects, but it can be useful for stackable objects.
Teleport /tp [TargetPlayer] Z Used to instantly transport yourself or another player to a specific location within the world. The coordinates can be substituted with the name of another player to transport the target directly. You can also teleport to a new world by using these Minecraft maps.
Kill /kill Kills your character. However, adding another player's name will apply the command to them.
Weather/weather WeatherType lets you select the weather for your location. You can choose between thunder, rain, or snow.
Creative mode/gamemode creative switches to Creative mode. This allows players flight with unlimited resources and prevents mobs from attacking you.
Survival mode/gamemode survival Changes gamemode to Survival mode. This means that mobs are going to attack you, and you'll need to gather all resources in the traditional way.
Set the time/time setting 1000. Sets the day's time. Minecraft Replace "1000" with "0" for dawn, "6000" for midday, "12000" for dusk and "18000" for night.
Change difficulty to Peaceful/difficulty peaceful. Changes difficulty to Peaceful/difficulty peaceful. For more difficulty Replace "peaceful" by "easy", "normal" or "hard".
How to find your world's Seed Code /seed. This will create a code for your world. Keep it handy to load another one in the near future.
Keep inventory when you die/gamerule keepInventory true This ensures that you do not lose any of your items upon death. This can be reversed by typing "false" instead of "true".
Stop time/gamerule donDaylightCycle true This will cause the game's day/light cycles stop and let you be in constant sunlight or moonlight. To start the day/light cycle again, enter "/gamerule doDaylightCycle true".
Summon /summon Instantly drops the desired creature or object into your world, particularly useful when you're in need of a couple of tame ocelots.
Atlantis mode /atlantis The world's water levels are dramatically raised level, bringing it to submerge all except the highest mountains.
Ride /ride Turns the creature you're facing into an animal.
Instant mine /instantmine One-click mining using any tool.
Freeze/freeze stops mobs from moving away.
Fall damage/falldamage Turns the fall damage off and on.
Fire damage /firedamage Turns fire damage off and on.
Water damage /waterdamage Turns water damage on and off.
Superheat/Smelt item transforms everything into smelted.
Instant plant/instantplant No need to wait for a seed to grow.
Dropstore stores all inventory items into the chest, which is then created near.
Damaged items/itemdamage weapons do not sustain damage or become degraded.
Duplicate /duplicate Copies and drops the stack of items that you have outfitted.
And those are all the Minecraft console commands you'll need to enhance your game and take the hassle out of the crafting. What's the next step? Perhaps you can make your game even more impressive with these Minecraft mods. These mods can make your game more thrilling than Mojang could have ever imagined. Plus , they can bring things like Pokemon into your world!
1 note
·
View note
Last Seen Blogs

f4nd0m4dd1ct
GRRRBARKBARKWOOFARFGRRRRR

ask-mephone
ask mephone

mellori
Just Another Online Idiot

captain-shay-cormac
Assassin's Creed

heyastardust2
IN THIS MOMENT