#not much one can do about the art you already uploaded but with this looming I don't seem Tumblr being viable for any kind of art anymore
Text
hot milk tea, thoughts and feelings
I’ve only mentioned it briefly, but I’ve said that I’ll be taking a break from my SetsuAyu series - mainly because of my uni workload though.
But for now, I have a lot of thoughts about the entire thing as a project as well as myself as an artist. So I figured that I’d write a reflection of sorts (warning: it gets kind of personal).
Can you believe it’s been 3-4 months since the series started? I can’t, and I’ve been the one drawing all of these!! If you’ve been reading my work, I’ll say it over and over but I really appreciate it!!! Like I’m dead serious!!! Completely!! Utterly!! Without a doubt!!! I love all of you!!!
When I posted that first comic, I didn’t think it’d get the positive reception that it did get. Like, I’ve been producing basically entirely Muse content for years and suddenly decided to tap into Nijigaku? You could argue that it didn’t get that much attention, but either way, the attention it did get surprised me. I was so happy that people were engaged (and it still makes me stupidly happy, like on a level where I’m almost embarrassed to admit HAHA)

Recently I’ve just uploaded the bonus for the 3rd update which wraps up that part, and it really just clicked - that I really have invested soooo much time into this series. 36 pages now! And we’re only 3/10 main updates in!! I have so much passion for this - like a fire that can’t be put out. Every single update has something that I want to communicate/show so I always feel fired up. Heck, if you’ve spoken to me during the process you’d catch me always saying “I’m excited for the next one!!!” while working on it LMAO. It’s been my longest string of non-stop work. Usually I feel burned out more quickly but I was always so excited that I couldn’t stop! You’d find that I’m usually in a state of conflict bc I alwaaaays want to talk about it but at the same time I don’t want to spoil anything. (THE NEXT UPDATE JUICY)
I think it’s a clear reminder of why I draw actually. The answer between each artist always differs, but I think it’s something important to be aware of. And well, for me? I’ve realised I’m a passion-monster. Passion keeps my blood pumping 100%. As a result... you could say I might be a more selfish kind of artist. Maybe it’s burn-out from running all those ask-blogs/RP when I was like 13-16, but I’ve realised that I’m having the most fun drawing what I genuinely love. It’s kind of why you’d rarely see me do requests and why I no longer do commissions. That isn’t to say that I hate drawing for other people. It can be fulfilling! But it’s more like - I barely have the time to draw for myself, so drawing for others is kind of a lower priority in general. It’s also why I’ve decided against studying graphic design when I graduated highschool. It’s just not happening as a career.
When I ask myself, “what kind of artist do I want to be?” I always think “Somebody who marches to her own beat and works hard to make content that she loves.” It’s also why I never delete anything - even my oldest art that makes me cringe. Because the me from 5 years ago put her love into that too. It’s really cheesy sounding but that’s how I see it LMFAO. I couldn’t do that to her. And also, just because I don’t like something anymore, it doesn’t mean that no one else does. So I’ll continue to never delete my old work. As a bonus, we get to see how far I’ve come too~.
I feel a little vulnerable admitting something like this and I’m pretty sure I’ve only told like 4 humans, but I think my #1 goal as an artist is that I want people to be able to look at my work (that I actually put my heart into) and think “this person loves this” or “this person works hard”. If you can do that, and sincerely feel the feelings I put into my comic, then I’ve already reached my goal. Can people tell how much I love these characters? The series? The concept? Can people tell how much work I’ve been putting into these updates? Can people tell when I’m having fun? It’s something I think about a lot. The idea of that people might think so makes me tear up HAHA - I get really sappy thinking about these kinds of things. And well, if people can’t tell then I’m not working hard enough!
That isn’t to say that I’m always putting my life-blood into everything I make. I’m mainly referring to the stuff where I do. I think it’s pretty clear when I’m pumping a lot of love into something. In general though, there’s always an intention for me to like communicate some idea or feeling and doing something like that requires maybe a bit of love~.
I feel like that as a character, Setsuna really resonates with me a lot. In personality? Not at all LMFAOOOO (she’s such a nice girl!!). More because of her ideals and principles. After typing like everything that I did up until this point, I bet you can guess why. I’ll keep it short and simple though, since this post is getting stupidly long.
Basically, I really resonate with her drive and passion as both an artist, and just in general actually? I’m a believer in that if you’re passionate about something, you can spread that passion. That’s the mentality I have with my art. If my love shows, then maybe other people will understand why I’ve come to love something. And maybe they’ll come to love it too. If I’m having fun, maybe they will have fun too! Very cheesy, I know, but that’s just how I roll!!!
Like rare pair? New fandom? Still applies. It might take awhile, but eventually either the people who love that thing will find me, or I’ll help people come to love something new (or at least see where it’s coming from lolol)!
And as Setsu says:
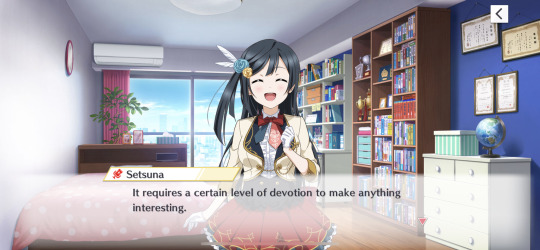
You tell ‘em girl !!! That devotion is my driving force!!
Of course I know this is idealistic, but I think that’s fine. It’s no bother to me if someone feels indifferent/ negative towards my work because that’s just natural.
I think it’s a form of communication and that’s what drives my art. I’ve been intending on writing a guide/ or talking about my art process for comics for some time now and I think that’d be the first thing I’d mention? I’m always trying to communicate some sort of feeling/tone/idea and that comes from a place of love y’know.
I feel like I’m saying “love” and “passion” a lot - you can really tell I’m vibing with Setsuna huh LMAO. There are other reasons I vibe with her too, but I won’t touch on that.
Coming back to my SetsuAyu series. You can tell why I’m so happy about it right? The story, the pairing dynamic, I feel like that people are understanding what I’m trying to communicate - that people are receiving my feelings of love for it and that makes me smile so widely. I really put a lot into it!!
This series is the first large project I’ve ever taken you see and I’m so so happy that I’ve been able to get this far! It really means a lot to me. But it wasn’t actually the first comic series I’ve tried to do. I actually had a Muse long-running comic planned years ago - a Dancing Stars on Me! AU but it never came to life. I think it was my lack of confidence that held me back. It might be weird of me to pat myself on the back, but I’m proud that I managed to get going this time!! I’ve actually written the SetsuAyu series in a way that for the first half, I could drop the series if I really wanted to at any point (each part is pretty independent, and that description I always copy-and-paste is all the explanation you really need), but now I know for sure that I don’t want to drop it! I wanna keep going!! Even if it gets tough. Although it might be a little early for me to make such bold declarations, I’m only 3/10 through LOOOL. But that’s just the way I feel right now!
I know it’s irrational and it’s something I’d rather not admit, but an anxiety that’s always looming over me is the idea that I’m not working hard enough - or that people think I’m not? Each comic update...takes like a month right? And a month is a long time. There’s this part of me that is convinced that people think I’m lazy for working so slowly. And I know it’s not true!! It doesn’t make sense for it to be!!! But like I said it’s irrational.
I’m really proud of this comic y’know. It’s a really big commitment and I’m proud of myself for being able to commit. I work full time 9-5, and I also am in my final year at university. I’m... kind of busy lol. So the huge factor in that month-long update turnaround is just that I don’t have the time to always be drawing. But I try to draw as much as I can! If you have me on discord you might notice me work on it for like 2-5 hours, almost daily before I go to bed (1am). Of course I’m not only drawing, but after I get everything plotted out sometimes that’s all I do. This comic is super time-consuming LMAO - and I try my best to work on it a little at a time.
So yeah, the entire month of comic-production is me drawing every almost every night.
Yeah it, - it’s kind of exhausting. Even though I’m itching to work on my next update, I’ve decided to take a break for uni crunch which is why I say the next one might be two months. It’s really odd though. The other night I was in bed feeling restless. It was so weird not drawing till 1am that I felt like I needed to be doing something. This comic series might have weird effects on my habits...
It makes me anxious thinking that it’d be so long till next update. But I’ll do my best to push that aside ! Hopefully I can get uni done and dusted ASAP! I want them to date dammit...
I've decided that I want to see this series through to the end. It’ll probably be May next year when that happens though LMAO! Please bear with my slow turnaround time. It’s only been 3 updates, but I can already see that I’m improving with each one. With each update I feel like I really learn from the previous and I always feel this sense of excitement with trying out new techniques and trying to create different feelings. I really want to see how the last updates will look compared to the first! Technically we’re 3/10 (10 is an epilogue), but after 6 I actually stop doing bonuses? So teeechnically I’m like 40% of the way through~.
It might be a little over-ambitious, but I kind of want to print it out and make a hard-copy when I’m done. I’m not sure about what the demand would be if I were to sell it, but I definitely want to print it for myself first and foremost (after touching up the earlier updates of course LOL). It’d be like a physical representation of my achievement. I hope I can make it there.
Anyways, I’ve rambled for far too long. I’m not sure why I suddenly felt like talking about uh, everything but yeaaaah. If you’ve read this far, kudos to you! You now have a window into my soul that I’m still not sure if I’m comfortable with revealing (but I’m comfortable enough because I’m posting this so...)!
After reading all of this, can you tell why I always get so so happy after each update? It’s the fruition of what’s usually 2-3 weeks of non-stop hard work! Seeing people connect with it always sends me to another realm of bliss and I always feel soft like putty LOL.
#myon speaks#HOLY MOLY#ITS 2K WORDS#no pressure for anyone to read all of this#its just me rambling into the air~#if you've been keeping up with my series: i just want to say thank you#this series is really important to me (i explain why in the post im not aboutta start rambling again)
21 notes
·
View notes
Note
hi! i'm not sure if you've answered this already but i saw on instagram that you are majoring in mechanical engineering at cornell. i'm going to be in an accelerated medical program in uni, and i'm worried that i won't be have time to draw, study art, practice, etcetera. seeing you consistently producing art amazes and inspires me. how do you balance art and all its things with such an intense major?
Hey! I get this question often, so I figured it’d be a good idea to assemble a decent response to it. Long post incoming. TL;DR: I gotta force myself to draw sometimes, because my mental health probably depends on it.
The honest answer is that I’m actually not that great at uploading art while I’m at school. During freshman year especially I’d just shut off the art side of my brain during exam season—a period which could last anywhere between two to five weeks and began again within a week or two due to Cornell’s batty exam schedule—in an attempt to study more effectively. I figured that less time on art equated linearly to more time on academics, which directly led to more academic success.
Turns out, uh, it’s not that simple. I finished up my sophomore year this spring and I realized that I do way better academically and mentally when I spend some time drawing throughout the day. I don’t know what it’s like for others, but I guess that my brain is just wired such that after a lifetime of drawing, quitting cold turkey for an extended period of time is really not ok for me.
Drawing in class (see the pics in this post), doodling stuff for friends, taking commissions, or studying a figure even just for twenty minutes a day is enough to work. Pushing myself to draw is often quite difficult, especially when I’ve got an exam/problem set/project looming over my head. To anyone in this position—in school or otherwise under enough stress that the thing you love causes you anxiety, fear, or boredom—I’ve got two tips.
The first is that drawing for ten minutes or less a day will make you feel orders of magnitude better than not drawing at all for another day in a row. Even thirty seconds will likely get the job done for you, mentally. I’m not going to BS you and say that you’ll improve much if you draw for ten minutes a day, every day, and no more, but it will give you peace of mind. Even as someone who’s trying to improve their art I find this fact really valuable, simply because I know from experience that getting yourself comfortable with drawing a little bit every day is a really reliable method of getting yourself to draw a lot every day. When you finally have the free time to draw (weekends, breaks, etc.), you’ll thank yourself for setting up that stepping stone.
The second is particularly meant for students with a very specific problem: avoiding making art because you should be studying instead. My roundabout solution works well for me, but may not work for a student who genuinely does not have any free time in their day, so keep that in mind. For me, it works to remind myself that I can easily spend one to three hours a day mindlessly browsing the internet or watching videos, but for some reason my mind takes no issue with this even during exam season. When I’m hesitant about picking up the tablet pen because I’m thinking about the exam in four days, I just tell myself that I’m replacing the time I’d be wasting anyways with something that I consider fulfilling.
I wish you the best of luck with everything (’you’ referring generally to anyone balancing art and school/work; this ask is old enough that the original asker may well be a doctor by now, who knows), and I hope you and art have a good relationship in the years to come. Cue random sketch.

1K notes
·
View notes
Text
Greetings From Galar Chapter One
Author’s Note: This is my first time writing a fan fic as well as my first time posting my writing anywhere. I'm super scared to put my baby out into the wild but i know it's something i need to do. This story was written as part of a group of in universe stories with people from my art department. It's how I think they would be or what they would do in the given universe. Pokemon has always had a special place in my heart, so, i hope with all my heart you enjoy reading it as much as I did writing it. Thank you for reading - Quill
Luke woke from his peaceful slumber to a soft buzzing & as soon as some semblance of consciousness inserted itself into his brain, he was up & getting dressed. Today was the day, the day that every kid dreams of & even at 16, he couldn’t be more excited. His hoodie & jeans, thrown on with almost professional speed but about as much grace as a primape putting on lipstick. Grabbing his backpack, Luke started stuffing it with everything he thought he’d need for his journey ahead. Cloths, throw those in there. Food, it is a long journey after all. “Entertainment”, what’s he gonna do talk to people? And finally his medication, eyepatch & bracket, stuff that he literally can’t live with out. Then, one last look at the clock, 11:55, before bolting out the door.
“Took ya long enough!” Yelled someone, a foot below Luke. “Says the one still in their PJ’s!”. The small child that stood before Luke in her personally made Pikachu onesie, was in face his close friend Hannah. Although being small in stature & having the appearance of a very lost child, she was in fact older than Luke. “Hey, don’t mock the onesie! They’re practical yet comfortable” “Ya know the professors gonna be bored waiting, right?” Inquired another figure. Wearing pastel pinks & blues head to toe but with a face stern with uninterest, was Luke’s neighbour & childhood friend Evie. Despite that cute outerwear of her’s, she has enough edge she needs no HM’s. Looking to their hips (stop it now you perverts) Luke noticed spheres attached to both their waist. “No way! You guys got your partners!? Who’d you pick!?” Luke excitedly asked. “Oh yea! Come out here bud” Hannah replied, before grabbing the ball & throwing it into the air “Right, I think you’ll like my pick” Evie smiled & mirrored Hannah’s action. With a flash of warm light, two small forms appeared & fell into the pair’s arms. “This cutie right here is blue” Hannah gleefully exclaimed as the form began to come into focus. It was a small, blue, amphibian with orange spots covering bits of its adorable body. “He’s a mudkip & my new best friend...besides ya know, you guys.” “& this is Astrid, a buneary & she’ll kick your ass harder than my dad beat mine!”. After a short silence Hannah replied “...Well someone’s got daddy issues” “AT LEAST I CAN REACH THE TOP SHELF, YOU MUNCHKIN B****!” "HEY IM COMPACT SIZE! It’s not my fault you people are freakish tall!” “If you wanna, go let’s go!” “Guys...” Luke interrupted “If you’re gonna battle at least wait till I can too, like damn”. Almost in unison the pair whipped their heads toward him. Luke realising his mistake slowly edged away from the two & towards the lab. The place where he’d finally take his first steps to what he’d always imagined. His own adventure.
As Luke reached the lab, distant screeching of insults could still be heard, like an extremely spiteful echo. Grabbing the handle, he flung the doors open & stood excitedly in the doorway. Only to be greeted with a near empty lab. He stepped in, a sense of confusion still stuck to him. He was late, sure, but for there to be no one there? It just felt off, then it hit him. A large cranium to the face to be precise. The impact knocked him to the ground, knocking the wind out of him. But, before he could comprehend what just happened the researchers jumped out, capturing whatever attack him. “Sorry ‘bout that kiddo. We weren’t expecting you to barge in so soon!” A hefty old man loomed over Luke chuckling heartily before offering him a hand. “Well, I was excited, so I woke up early. The early bird gets the worm isn’t that right, Alder?” Luke snickered back & grabbed the man’s hand. After being helped up & brushing himself off, Luke turned to look at the thing that attacked him. Although his vision was still fuzzy & slightly obscured, his face instantly lit up at the blurred sight of the Pokemon. It was a small, reptile-like Pokemon & it was currently trying to escape the corner the researchers had put it in. Luke shakily ran over, pushing past the researchers & knelt down to eye level. “I DONT THINK YOU SHO-“ But before Alder could finish his sentence, it was already running at Luke. It sprinted towards him, leaping up, right into Luke’s arms & butting it’s head right into his forehead. “See, this guy must really like me if he’s giving such affectionate head boops” Luke said though his wide grin. “Y-you sure you’re ok, we were just asked to coral that little guy. We’ve got a few starters left if yo-“ Luke stopped Alder “He’s perfect! I think I’ll call you...Hex!” Alder sighed but quickly changed to a smirk. “Then I guess you’ve got the partner you’ve always dreamt about”. Picking up Hex, with surprising difficulty, Luke walked with the Alder over to his desk. Clearing his throat, Alder spoke “Today, you have chosen your partner! The one who will walk with you no matter where you may find yourself. But the path ahead of you is still unknown, unmarked & only you may find it for yourself. But with your Pokemon by your side, you’ll never be lost!” He paused, as if flipping the page over in his head. “Your pokeball maybe be nothing than a metal ball to you, but it’s your Pokemon’s home. So, keep them safe. & here is your Pokédex. Your encyclopaedia of anything & everything you need to know about the creatures & world around you. Make sure to check & update it cause, between you & me, us professors get a commission for every entry uploaded. Though you didn’t hear that from me”. The professor winked, then patted Luke on the back “Now, scan your new buddy & get out there. Show them what you’re made of!” Picking up his new handy, dandy Pokédex. Luke pointing the device towards Hex, it whired into action. “Axew, the tusk Pokemon” blasted the now awoken Pokédex “They use their tusks to crush the berries they eat. Its large tusks have a tendency to break, but each time they grow back, they grow in harder and sturdier.“ Luke grinned & fist bumped Alder “This is unreal, my very own Pokemon. Thank you, for everything professor. Don’t you go dying before you see me at the top! Got it?” & with that, Luke ran out of the lab, to rejoin his bickering friends & embark on their first steps towards the journey they had always dreamed of.
2 notes
·
View notes
Text
crush culture - crs
- requested by @animejaem -
Word count,, 2k
Genre,, fluff, not that angsty but still kinda emo i guess
You absolutely hated crush culture. Every single one of your friends had spent the majority of their teenage years hung up on a guy or a girl that they thought was ‘the one’. Ultimately none of those relationships ever lasted. You didn’t understand why people would waste their time trying to make someone else fall for them when they would have to deal with heartbreak sooner or later. Having to be in a romantic relationship with someone just felt too suffocating anyways. In short, you didn’t understand everyone’s obsession with romantic love, forcing chemistry when they knew the equation wouldn’t add up in the end. You were content with your love for your friends, family, role models and hobbies. You didn’t mind feeling lonely once in a while.
You throw on a yellow hoodie, blue jeans and converse on, grabbing your bag as you get ready for another grueling day of college classes. You were majoring in visual communication. As soon as you got to class, you looked for your friends chaeyeon and eunbin who usually saved you a seat. You spotted them in the middle of the lecture hall, sliding between seats to reach them. On your way, you accidentally bumped into someone.
‘Oh i’m so sorry’ he immediately apologized, reaching down to pick up your fallen belongings.
‘No worries.’ you smiled at him, walking off to go join chaeyeon and eunbin. You greet them, taking out your notebook. Throughout the entire lecture, you noticed someone kept giving you looks. As you turned to your right you saw the same boy you had bumped into immediately put his head down, blushing furiously. You giggled, amused at his shyness. Chaeyeon immediately poked your leg with her foot.
‘Hey, what are you laughing at?’ she smiled at you, taking a sip of her iced coffee.
‘Oh nothing, it’s just that i bumped into this guy earlier and i saw him staring at me. What a cutie.’ you laughed, looking back at him to see him eagerly taking notes. You had never seen someone look so interested in a marketing lecture before.
‘I’m pretty sure everyone would agree that raesung is cute you’re not special sis’ she retorted following your eyes as she shamelessly winked at raesung who just smiled back.
‘Wait, you know him?’ you tilted your head, confused.
‘Oh my god y/n you must live under a rock. Raesung is well known on campus. He has a youtube channel and he posts covers. He’s an amazing singer, rapper and dancer. In conclusion, you just met an icon and it seems like he likes you.’
‘We just met, i highly doubt it. Besides i’m not interested in dating anyone. I will check out his channel though’ you retorted, turning away from chaeyeon’s nosy ass to pay attention to the lecture again.
-
You were in your bed about to go to sleep when you decided to search up raesung’s channel name ‘gongjuboi’. You had no idea what that meant but as soon as you listened to his music, you realized the name didn’t matter because damnn this boy was talented. You stared out of your dorm room window, wondering if you would ever be this talented. You had decided to study visual communication against your parents’ will but you didn’t seem to be improving much since classes had started.
-
The second time you met raesung was at the campus bookstore. You were looking through the racks of books on visual communication for your next assignment when you both grabbed a book at the same time. He immediately took his hand off, apologizing.
‘I’m so sorry you can take it’ he muttered.
You recognized him immediately, ‘you know, for a youtuber you’re really shy in real life huh? It’s really fine you can have it raesung. I’ll probably illegally download a pdf or something’ you commenting. You waved at him before walking away, your platform doc martens clunking away.
Raesung’s heart was beating so fast he could probably use it as a beat for his next song. You had watched his videos.
Raesung was the complete opposite. He was a hoe for romantic love. All of his songs had been inspired by someone that he either had feelings for or at least a crush on. He was the type of person who went to sleep and dreamt of falling in love. It was now happening all over again, because of you.
-
Raesung was at the studio, dark lighting looming over him as he finished up a song. It was about you. He had been producing the track for 2 hours and writing lyrics for 1 hour. He recorded the track, immediately uploading it onto his youtube channel.
Meanwhile, you were in your room getting ready for bed. Fridays were usually the start of the time of your life. For you, that meant eating pizza in your bed as you caught up on the latest episode of grown-ish before falling asleep. You mindlessly scrolled through your subscription feed as you got a glass of water. Your finger came to a stop as you saw the raesung’s username appear on your phone. You immediately clicked on the video, curious to see what magic he had made.
The song was slow and sensual, his voice giving you chills as he sang the words. The lyrics dripped off his tongue like honey.
‘Let’s take our time tonight girl, above us all the stars are watching.’
You heart was beating fast as the song came to an end. You were completely unaware of how you had gotten into this mess. You thought you were loveproof. Maybe you had thought wrong. It wasn’t just physical attraction. You had always known raesung was attractive. He was tall, he had a charming smile and an athletic body. But now… now it almost felt like there was a gravitational pull between the two of you. You had never felt this way before. A fire was brewing inside of you and there was nothing you could do about it.
‘There's no reason to hide, what we're feelin' inside’
Those words resonated in your mind the entire night. That night, you fell asleep with someone on your mind for the first time.
-
The next morning you decided to act like last night had not happened. You got dressed, getting your camera and strolling out of your dorm, steps bouncy as you looked for a target. You had an important assignment for your advertising class and you were determined to make it amazing. You were thinking of going for a vintage style ad. You went around the city, taking photographs and videos of various things. As you walked in the art building, you came across an old television with a broken screen. It looked nothing like the perfect and ideal image that a vintage ad would want and yet you decided to take a picture of it. It reminded you of yourself.
After a few more hours of the same ritual, you decided to head home and start editing your project. You settled on a completely different vibe, using the television as a background as you edited the words ‘crush culture’ in a retro font on top of it. You were really liking how it looked but it was definitely not enough to impress your professor. You needed audio. You thought of what would fit the concept, your mind immediately wandering to raesung’s voice. You placed your head in your hands, ruffling your hair. You were frustrated that you would have to see him but it was the obvious choice. You decided to call him before you could change your mind.
He picked up after three rings.
‘Hey, who’s this?’ he asked brightly.
‘Um hi, this is y/n. I just wanted to ask you a favor if that’s ok with you…’ you trailed off.
‘Oh y/n? um yeah sure whatever you want.’ he coughed out.
‘So i have a project to do for my advertising class and i would love it if you could narrate my ad. I listened to your music and i think you have a beautiful voice’
Raesung paused for a second, shocked. He wished you could feel how fast his heart was beating right now.
‘Thank you.. And um i’d love to narrate your project. Do you have like a script or something?’ he questioned.
‘Well i have an idea but i wanna know how you feel about it. How about we meet up at 5pm at the campus café?’
‘Sure, see you there y/n.’
-
When you got to the café, raesung was already sitting down, scribbling intensely in a notebook as he sipped what you assumed was a matcha latte. When raesung wrote, he had a special kind of hunger in his eyes. His fingers moved fast, almost like he was typing. You sat down across from him, waiting for him to notice your presence. You peeked over at his notebook.
‘The girl with the heavy steps’ you cocked your head, reading aloud.
‘OH MY GOD YOU SCARED ME’ he yelled out, rushing to close his notebook.
‘I’m so sorry you just looked so focused.’ you laughed heartily.
He smiled, scratching his neck nervously.
‘So… my concept is about crush culture. I’ve never really understood the concept of dating. I feel like i’ve been surrounded by couples that had their relationships and were happy for a while but they all eventually ended. I feel like love is so temporary that i’m not sure there even is a point in dating at all. All this love just seems so suffocating. I want to express that idea in my ad.’ you explained, taking a sip of your black coffee.
Raesung listened attentively as you spilled your guts out to him.
‘Well, i had no idea you were so skeptical of love. I don’t personally agree with everything that you said but i think i know how i can make the audio for the ad. Is it okay if i take you to my studio?’
‘Of course.’ you jumped up from excitement, sliding your bag over your shoulders.
-
Raesung got straight to work as you arrived at his studio. He sat in one of those rolling chairs, scribbling a few notes in the same notebook while you got your laptop out working on the editing. A short 30 minutes later, he was finished.
‘Ok, i’m gonna sing the song i wrote for the ad, just let me know what you think’ he explained.
You nodded, sitting patiently as he got in the booth, ready to record. You fell into a trance as you watched him sing. You literally couldn’t take your eyes off of him.
‘I’m not falling for you, cause this baby is loveproof.’
You slightly shivered as he glanced at you while singing this particular line. As the song came to an end you smiled, clapping loudly.
‘That was… everything i wanted and more. Thank you so much.’ you complimented, excitedly grabbing raesung’s hands.
‘Thank you. So i’ll send you the recording and we can look at the final product.’ he replied, blushing as he realized you were still holding his hands. He looked down at your hands on top of his. You followed his gaze, promptly putting his hands down.
You watched the final product together, the both of you amazed at how good you were at your different art forms. Your vision had finally come together.
‘Thank you again raesung. I’m positive this is one of my best works and i couldn’t have done it without you. Especially since the message behind it was kind of personal…’ you mumbled nervously.
‘No problem. I love working with you. But i just wanted to say, love isn’t always temporary. I hope you find someone who can make you feel like you deserve to be loved everyday.’ he gently stated.
‘Like you?’ you whispered.
‘HUH? ME?’ he yelled out, confused at your sudden question.
‘I mean, you’re the only person who’s ever made me feel like romantic love was worth it. I’m sorry if you don’t feel the same, that would just be confirming my original hypothesis anyways.’ you sighed out.
‘No no i do feel the same. That’s why i was so surprised. I’ve liked you since i met you. Since you walked away from me with your loud ass boots. Since you laughed at me in marketing class.’ he chuckled.
You smiled up at him, squishing his cheeks before you leaned in and kissed him. Raesung was your first kiss and it was a lot better than you had expected. He held you like a prized possession, lips sweet like cherries. Kissing him felt like summer. You weren’t used to feeling like this. You’d never felt so alive.
-
heyo hope you guys like it 🎀🌹love you all 💖✨
••
masterlist - requests are open !!
- ya girl tiyi 💖
31 notes
·
View notes
Link
OffQuest podcast episode 6.5:
Here are some interesting points and answers to fan questions on Emara by the creator, Fatma Elmheiri
(Note 1: any points that have been already mentioned in the 2 other podcast episodes I’d written about are not mentioned again here)
(Note 2: the interviewer states that some elements cannot be spoken about at the moment, based on Eating Star’s request for privacy. On topics like budgeting, etc)
(Note 3: questions that are too close to spoilers had to be left unanswered for the time being)
Unless she’s joking, Fatma confirms that the masked guy is indeed Soleiman
“Were you expecting Emara to be that well-liked?” “No, I didn’t, but my team had a lot more faith in the final product than I did.”
She’s surprised the English dub of Emara got much more views
According to YouTube’s stats, the biggest number of viewers is from the United States (around 25%), followed closely by Saudi Arabia (around 23%), then followed by Emirates, then South America, but Fatma cannot clearly remember which country had the most viewers there
Good news: a couple companies did get in contact with Eating Stars to talk about sponsoring the show or even co-producing, but nothing has been decided yet
She assures people that she and the studio follow the Emara hashtag on twitter, and that educated, constructive criticism is welcome. Criticizing for the sake of being rude is not cool and not welcome
“Is this particular story of Emara’s technically over, with episode 5?” “No, of course it isn’t! We didn’t answer anything, how can it be over?”“True, we only have more questions now.” Interviewer then goes on to list ALL the questions the fandom hasXD
“Is the end/conclusion of Emara already written down?” “Yep, has been for a while, actually.”
Kudos to the fans who noticed the Evangelion references
Fatma seems to be in burnout mode atm. She wants to get back into Emara but not right away. She also has other ideas she wants to work on in the future She’s in no hurry to throw herself back into the hectic life of producing (She wore several hats and did several jobs during the making of Emara so it was VERY draining)
Fatma is actually considering something of a spin-off mini story for Dhabian, to the interviewer’s delight
A potential future comic would be to further explore the world of Emara and for fun side stories, NOT to move the main story forward. Main story will exclusively be in the cartoon only
She didn’t think Dhabian would be so popular, so as episode 5 loomed she grew more anxious of people’s reactions. She didn’t expect him to be popular especially since she had a lot of difficulty writing him and defining his character. Interviewer thinks that’s weird, because Dhabian is easily the character that raises the most questions and thus is the most interesting story-wise
Fatma prefers Zeina and Jassim to Dhabian
Now onto some answers to spoiler-free questions from Twitter:
“Will there be something similar to a crossover with other superhero cartoons?” “Not sure, but there are definitely other superheroes in Emara’s specific world; Saudian, Palestinian, Yemeni and Kuwaiti superheroes.” “Really? What are their genders?” “The Saudian and Palestinian are girls, the Yemeni and Kuwaiti are boys. And the Saudian character is Jeddan, specifically. They have the coolest accent.”
“Is the absence of a romantic subplot intentional in Emara?”“Yes, it is. I hate romantic subplots. Furthermore, Emara as a character doesn’t look for it.”
“Will there be a comic book for Emara?”“Possibly, and we do have an Art of Emara book in the works.”
“Is Moza a STEM or technical student?”“No, she didn’t go to college.”“Oh, then just high school?”“No, she dropped out of high school.”
“What’s one of the most challenging things you faced while in production?”“Nothing goes according to your first plan.”
One question goes, “So uh, can I marry Sultan?” “Why not, but you gotta get his mother’s blessing first.”
“Which character is the most fun to write?”“Emara is, because she’s gullible and that allows you to get away with a lot of things. Jassim’s also fun, so is Ali! It’s good to write a person who’s angry, allows me to release my own anger. Pretty much every character was more entertaining to write than Dhabian!” “That is too weird. Maybe it’s because he was hard to write that you didn’t have fun doing it?”“Yes, that’s probably it.”
Fatma intentionally made it so that Sultan never uses his legs except when he’s actively doing superhero stuff, because she wanted to show that he could still be a competent and effective person even without them in civilian life. There’s more to it, but that’s spoiler territory
“Emara’s videogame preferences: combat games like Streetfighter. Sultan’s preferences: RPGs like Pokemon and Harvest Moon. He loves Pokemon, but he’s the trainer who’ll always sneak around other trainers to avoid a fight. He prefers just raising the Pokemon.”
“Emara’s a pickier eater than Sultan. Sultan eats anything.”
“Please support us by telling your friends about Emara, and seeing and sharing the eps on our YouTube channel! The exposure will help us in the future. Please don’t support re-uploads of Emara’s eps.”
216 notes
·
View notes
Text
Lucky day
Good evening again!
Jetlag is still there, but slightly improving. Dinner is proving to be a bit of an obstacle, but apparently nausea is very common with jetlags, so I’ll just grin and bear it then.
Anyway, today was quite a bit busier than I’d planned, even though I got a late start. As it turns out, shops open a lot later in Tokyo than I’m used to. This combined with the fact I’m staying in Tokyo and don’t have to leave super early to be somewhere at a reasonable time means that I can probably get up a bit later tomorrow, hmm.
My initial plan was visiting Nakano Broadway, but most of the shops there open around 12 o’clock, while I was ready to go out by 10. Oops. I just went to Ikebukuro station and decided to pay the Parco building a visit, only to find that the queue in front of the Pokémon Let’s Go pop up café was non-existent today. For reference, yesterday the queue ran down the stairs for two floors and I spotted an estimated waiting time of an hour and a half. What a difference a day makes! (Or, well, it being a week day instead of weekend helped I suppose.)
Since I had some time to kill anyway, I killed some time looking around in the merchandise shop before entering the queue of 2 whole other people.
They put a lot of effort in this café considering it’s only up for like, 3 months? At most? I got an ice latte with Eevee and a glass parfait with Snorlax. The latter was served with a spoon with a picture of a flute attached, and the waitress actually played the appropriate song in order to wake Snorlax up, haha. Like said, they sure put in effort.
I had kind of overestimated how much I could eat again and couldn’t completely finish it, but I felt bad enough anyway about eating such an adorable treat, yikes. I got two super cute stickers as commemoration of my visit here and then went my merry way to the JR part of the station.
Going to Nakano meant a transfer at Shinjuku station, my absolutely favouritest station in the whole of Tokyo! Nay, the whole of Japan! (Yeah, typo intended, I’m being sarcastic. I do not like Shinjuku station. Not at all.) Sigh. Anyway, on my way there I noticed the weather was actually very bright – the forecast had said rain for most of today, but that was clearly not true. And so I decided to stay in Shinjuku for a bit and walk to the Metropolitan Government Building (Tocho).
You see, there’s an observatory on top free of charge, and I kinda wanted to go up this week anyway to see if the view had improved over summer. And indeed it had! Once at the top, I was almost immediately treated to a view of the ever elusive Mount Fuji looming over Tokyo. Combined with the haze over the city and the clouds just below the summit, it made for a surreal scenery. I immediately whipped out my fancy lens and I called my own photos ‘obviously fake’ as I took them, haha. It really kind of looks like I just pasted two photos on top of each other.
Anyway, I was so mesmerized by the Fuji I almost forgot to take my obligatory pictures of the Skytree and Tokyo Tower, so I quickly fixed that and wandered around the shops here for a bit. After a break, a stroll past the windows at a little past 2 revealed that Fuji had gone back into hiding again, meaning I got super lucky having seen it at all. After all, it was indeed rainy for most of the morning, so Fuji can’t have been in sight for more than a couple of hours.
Happy with my photos, I strolled back to the station and hopped over to Nakano station, a couple of minutes removed. Right outside the station is the Nakano Sunmall shopping street, all decked out in illuminations, leading right into Nakano Broadway. Nakano Broadway is basically a 5 story shopping complex for nerds, haha. They sell a ton of comics and related merchandise, including quite some stores specializing in retro series. So if you ever considered going to Akihabara for the merchandise, definitely consider Nakano Broadway as well. There’s also a ton of gachapon – those machines that you can throw a couple of coins in to get a random 1 out of 5 or 6 different figurine or whatever. They sure have interesting stuff – Christmas hat for your cat, anyone? I ended up with a pug in a cup, haha. It’s actually a solid statue, I thought it’d be plastic but no, feels like rock. (I’d aimed for a French bulldog in that set, but meh, a pug is cute too.)
Anyway, I had a lot of fun browsing and tried to contain myself, ending up with just 2 art books. One came out so long ago I’d forgotten I ever wanted it, and the other one I’d given up years ago because it was already impossible to find then. So safe to say, I’m very pleased!
I went to a café for some matcha latte and a piece of cake before going back to Shinjuku station and hop on the Yamanote line there. Next stop, Shimbashi!
You see, most of Tokyo is decked out in Christmas/winter illuminations, but some places put in more effort than others. Near Shimbashi station is Caretta Shiodome, which has quite a spectacular layout, made even more spectacular by the shows they start putting on every 15 minutes after 5 PM. They have two, both themed after Disney movies: this week is Frozen, and within a couple of days, they switch back to Tangled. Basically, music from the movie is played (in the case of Frozen it’s obviously Let It Go, followed by For the First Time in Forever), and the lights start flickering and changing colour in time with the music. I recorded the full thing twice and made some animated gifs out of it, but I’m afraid you have to see the video to really appreciate it. Fingers crossed I can manage to upload that on tumblr, or else I’ll owe you one!
Anyway, that was pretty amazing and I’ll definitely be back later this week for the Tangled version.
It was getting pretty late now, but I still had one more thing to do. I got off at Nippori station on my way back to Ikebukuro and went to the Keisei section of the station. I almost forgot I have a plane back to the Netherlands next week, and I kind of wanted to be sure I had a seat in the Skyliner train to make it to the airport… Anyway, ticket secured, I finally boarded the train again, this time all the way to Ikebukuro. I made the full Yamanote line circle today, haha. (It’s a loop line.)
I got started on my convenience store dinner way too late, oops. My stomach doesn’t really like this salad, but at least I also had some chicken nuggets and eggs, so I’m not completely without food. Shame, though. I’d hoped my stomach was doing better today, but although I can feel improvement, I don’t feel confident enough to go out for lunch or dinner yet.
Oh well. Fingers crossed for tomorrow. At any rate, the weather should definitely be nice tomorrow, so I’ll go for some outdoors sightseeing.
Good night!
1 note
·
View note
Text
Sam and Max Hit the Road
Day of the Tentacle wasn’t the only splendid adventure game which LucasArts released in 1993. Some five months after that classic, just in time for Christmas, they unveiled Sam & Max Hit the Road.
At first glance, the two games may seem disarmingly, even dismayingly similar; Sam and Max is yet another cartoon comedy in an oeuvre fairly bursting with the things. Look a little harder, though, and some pronounced differences in the two games’ personalities quickly start to emerge. Day of the Tentacle is clever and funny in a mildly subversive but family-friendly way, very much of a piece with the old Warner Bros. cartoons its aesthetic presentation so consciously emulates. Sam & Max, however, is something else entirely, more in tune with an early 1990s wave of boundary-pushing prime-time cartoons for an older audience — think The Simpsons and Beavis & Butt-Head — than the Saturday morning reels of yore. Certainly there are no life lessons to be derived herein; steeped in postmodern cynicism, this game has a moral foundation that is, as its principal creator once put, “built on quicksand.” Yet it has a saving grace: it’s really, really funny. If anything, it’s even funnier than Day of the Tentacle, which is quite a high bar to clear. This is a game with some real bite to it — and I’m not just talking about the prominent incisors on Max, the violently unhinged rabbit who so often steals the show.
Max’s partner Sam is a modestly more stable Irish wolfhound in a rumpled three-piece suit who walks and talks like a cross between Joe Friday and Maxwell Smart. Together, the two of them solve crimes in the tradition of hard-bitten detectives like Sam Spade. Or, as Sam the dog prefers to put it, they’re “freelance police,” working “to protect the rights of all those whose rights seem to require protecting at whatever particular time seems appropriate or convenient to all involved parties.” As for Max, he just likes to beat, blow, shoot, and generally eff stuff up.
Sam and Max first made their names as the stars of an underground comic book, and carried a certain underground sensibility with them when they strolled onto our monitor screens. The safe suburban world of gaming had never seen anything quite like this duo — boldly but also smartly written, aggressively confrontational, and absolutely hilarious as they wandered a landscape built out of junk media and decrepit Americana.
This not-so-cuddly duo of anthropomorphized animals was the brainchild of one Steve Purcell, a San Francisco artist who invented them with a little help from his brother while both were still children. When he enrolled at the California College of Arts and Crafts circa 1980, he started drawing them for the student newspaper there. They fell by the wayside, however, when Purcell graduated and started taking work as an independent illustrator wherever he could find it, drawing everything from computer-game boxes to Marvel comics.
While Purcell was making ends meet thusly, a friend of his named Steve Moncuse was enjoying considerable buzz within the San Francisco hipster scene for his self-published series of Fish Police comics, which bore some obvious conceptual similarities to Sam and Max. Eager to add some mammals to his stable of marine investigators, Moncuse convinced Purcell to make a full-fledged Sam & Max comic book for his own Fishwrap Productions. “I had never written, penciled, and inked my own comic book before that,” remembers Purcell — but he was up for the challenge. In 1987, the first issue of Sam & Max: Freelance Police was published, containing two stories in its 32 pages. Over the next six years or so, more showcases for the animal detectives appeared intermittently under a variety of formats and imprints, whenever Purcell could spare enough time from his paying gigs — there was very little money at all in underground comics — to draw them. By 1993, their scattered canon was enough to fill perhaps half a dozen traditional comic books.
Said canon was marked not only by conventional comics storytelling — if anything involving the pair could ever be described as conventional — but also by a number of more interactive “activities” for the reader: Sam and Max paper dolls, puppets, etc., all sketchily described and sketchily implemented in cheap black-and-white newsprint. (The sketchiness of it all was, of course, part of the joke.) There was even a Sam & Max On the Road Official Board Game, a roll-and-move exercise in random happenstance: “Go back 2 spaces for dried-up donuts and soda”; “Kids unconscious from poisoned hamburgers. Zoom 3 spaces past Santa’s village without a tantrum”; “Get gas — lose a turn and don’t touch anything in the rest room.”
In the meanwhile, Steve Purcell the respectable above-ground commercial artist found himself working for none other than LucasArts. Shortly after the publication of the first Sam & Max comic, he was hired by them to illustrate what he intriguingly describes as “a role-playing game with cat-head babes.” When that project rather unsurprisingly got cancelled, he was laid off, but was soon brought back on again to draw the box art for the second SCUMM adventure game, Zak McKracken and the Alien Mindbenders. That worked won him a full-time job, upon which there followed much more in-game and box art for more adventures: Indiana Jones and the Last Crusade, Loom, the first two Monkey Island games.
Steve Purcell circa 1988.
Purcell didn’t come to LucasArts alone: a certain dog and rabbit accompanied him to his new job. The place was filled with bright young men, with young men’s taste for humor that might not always pass muster with the censors in the executive suites. (For proof, one need only look to the acronyms associated with key components of the SCUMM engine, which were tortured into conformance with various forms of bodily fluid: SPIT, FLEM, BYLE, MMUCUS.) Sam and Max fit right into this milieu. Indeed, the pair began to infiltrate LucasArts’s computers almost immediately, as, bowing to his colleagues’ demands, Purcell conjured up some graphics of them for everyone to play around with. Already by the time a couple of new hires named Dave Grossman and Tim Schafer were enrolled in the so-called “SCUMM University” in late 1989, Purcell’s creations had become fixtures of office life. Schafer:
Every afternoon Ron [Gilbert] would come up and tell us how to do one thing, like, “Here’s how you add a room to the game” or “Here’s how you add a character.” We had this Sam & Max art that Steve Purcell had made just for SCUMM U, which was Sam and Max’s office, which I don’t think ever saw the light of day. It had a few animation states — a staticy television set, rabbit ears made out of a coat hanger that could be in two different positions, and we’d go, “I’m gonna make the static on the TV animate,” and then we’d spend all day doing that, and by the end of it we were pooling in art assets from Indiana Jones, and all the Scummlets started making their own crazy, weird, improvisational SCUMM games set partially in the Sam & Max universe. I had a remote-control car in mine that would drive through a mouse hole in their office and then would come out of a filing cabinet in Nazi Germany…
Except for Nazi Germany, most of these things — including the office, the television with a coat-hanger antenna, and even the mouse hole — would later appear in the official Sam & Max game, albeit with dramatically upgraded graphics.
But even well before that came to be, Sam and Max were already getting a form of official recognition from LucasArts, one that the people in the executive suites probably weren’t really aware of. The first two Monkey Island games, the first two Indiana Jones games, and Day of the Tentacle all found somewhere to shoehorn in a mention of the LucasArts staff’s favorite comics characters. When in 1990 LucasArts instituted a newsletter for their fans in the tradition of Infocom’s old New Zork Times, they asked Purcell to provide a Sam & Max comic strip for each issue.
Still, there’s a considerable distance between such sly insertions as these and a full-fledged Sam & Max computer game. The latter may well owe its existence to expediency as much as anything else. In 1992, LucasArts’s management wanted a second adventure to join Day of the Tentacle on their release docket for 1993, but had yet to approve a project plan for same. As time ran short, Sam and Max had virtually the entire creative staff pulling for them, along with a wealth of rough art and design ideas that had been kicked around through the likes of SCUMM University for years by that point. So, Sam and Max got to make an unlikely transition from underground comics characters to the stars of a very mainstream, very mass-market computer game from The House That Star Wars Built.
https://www.filfre.net/wp-content/uploads/2019/06/SM.mp4
Ironically, the Sam & Max game got the green light just as Purcell himself was pulling back a bit from LucasArts. After some three years of full-time employment there, he’d just elected to return to freelancing, sometimes for LucasArts but sometimes for others. Thus the official designers for the game became a heretofore unheralded pair named Sean Clark and Mike Stemmle, who had worked as programmers on earlier SCUMM games. One can all too easily imagine such an arrangement going horribly wrong, missing the unique tone of the comics entirely. But thankfully, Clark and Stemmle proved to have a gift of their own for that trademark Sam & Max form of comedic mayhem, while Purcell himself and his soon-to-be wife Collette Michaud — another LucasArts artist, whom he had met on the job — made time to write or at least to edit most of the dialog.
Another obvious risk to the project was that of bowdlerization by nervous managers and marketers. Here again, though, it got lucky. Purcell:
I think the game is really close to the spirit of the comics. There’s violence, mild cursing, and a commendable lack of respect for authority, not to mention circus freaks and yetis. There’s less gunplay in the game simply because a gun is a terrible object to give someone to use in an adventure game unless you carefully guide the player to use it in a more interesting way. I don’t remember anything getting cut by management. Much to their credit, I think they trusted our judgment.
The theme of the game whose full title became Sam & Max Hit the Road was drawn from that old joke of a board game, as well as from kitschy roadside America more generally. By 1993, the cozy tradition of the cross-country family road trip — Route 66 and all that jazz — was starting to feel a little shabby in a post-oil embargo, post-interstate highway, postmodern America. Sam & Max steers into that shabbiness with a gonzo sensibility that’s more Hunter S. Thompson than Jack Kerouac; none of that romance-of-the-open-road nonsense for this duo! Instead they take us to pathetic would-be tourist traps like “The World’s Largest Ball of Twine!”, “Gator Golf,” “The Mystery Vortex,” “The Celebrity Vegetable Museum,” and “Frog Rock” (which doesn’t look much like a frog at all). The game tempers any sepia-toned nostalgia it might be tempted to evoke with an awareness that, really, all of this stuff was pretty tacky and stupid even in its heyday. And I haven’t even mentioned the spot-on parody of Graceland — presented here as Bumpusville, home of Conroy Bumpus, singer of the country classic “Let’s Get Drunk and Shoot Things.”
Smuckey’s convenience store, a monument to a homogeneous junk-food culture that stretches from sea to shining sea; there are several Smuckey’s in the game, and they all look exactly the same. “Max, crack open the Tang and those little cereal boxes with the perforated backs. I love that crap!”
And the reason for all this cross-country travel? Well, Sam and Max themselves never seem all that interested in the central mystery of the game, so why should we be? For the record, though, it’s something about a Sasquatch or yeti or something who’s escaped — or been kidnapped — from a carnival show. Jump through enough hoops and you’ll be rewarded with a bizarre denouement involving, as Sam puts it, “the wholesale destruction of the modern symbols of civilization in the western United States. You bet we’re proud!”
Suffice to say that you don’t play this game for the plot; you play it for the humor. A quarter century on from its creation, the latter has lost none of its sharpness. Sam & Max Hits the Road remains a veritable master class in comedy writing, with a sense of effortlessness about it that many another adventure game, huffing and puffing all too visibly in its own desperate efforts to be funny, could stand to learn from. Writing this game wasn’t truly effortless, of course, but rather involved countless hours of careful honing; as any of the great comedians working in any medium will tell you, being funny is first and foremost hard work. Yet the end result ought to feel spontaneous and easy, as it does here. The verbal jokes and visual gags are never belabored, never beat into the ground. On the contrary: they come so thick and fast that they can sometimes be a bit difficult to catch and appreciate. This is one of the few games I can think of that benefit from replaying just in order to savor all of the layers of its writing and presentation.
A Brief, Unsatisfying Interview with Sam and Max
Could you introduce yourselves?
Sam: I’m Sam. He’s Max. He’s a bunny. I’m a dog. We’re dangerous, but we work cheap.
How did you two form the Freelance Police?
Max: It was easy once we filed the monolithic heap o’ documents with the local government. They didn’t even notice that in the paperwork I claimed to be a nine-foot hamster and referred to myself as The Scatman.
Sam: Did you know that anybody can walk into a store and buy a real police badge? It really comes in handy when you want to enter the homes of people you don’t know.
What’s the toughest case you’ve ever cracked?
Sam: I guess the toughest case we cracked was when I lost the car keys and went as far as to have Max’s stomach pumped before I realized they fell down behind the radiator.
What special skills do each of you bring to the job?
Sam: Well, I have the ability to drive a car, enjoy a home-cooked meal, and get lost in a good book simultaneously.
Max: I can open a can of tuna fish with my own face.
In the best spirit of postmodern comedy, Sam and Max unleash a constant stream of blatant or subtle meta-textual commentary. When other games try to do this sort of thing, they tend to overplay their hand, with the result coming off as nervous tics on the part of creators who lack confidence in the integrity of their own fictions. Sam & Max Hit the Road, however, knows its fiction has no integrity, and revels in it. Likewise, it knows that we know how the highly artificial guide rails of genre-based storytelling run, and acknowledges that shared understanding. The selection of media tropes the game riffs off of is deep and broad, placing high and low culture on an equal footing, as any good postmodernist should. (“Every time I catch enough fish to fill a net, the helicopter swoops down and carries the fish to the Ball of Twine diner,” says one poor Sisyphus of a fisherman. “It’s like being stuck in a Norman Mailer novel.”)
But the greatest comedy goldmine here is always Max, who’s fun to watch even when he’s not really doing anything. He prowls restlessly about every area you visit, a perpetual live wire who looks likely to do something highly inappropriate and profoundly dangerous at every moment. LucasArts took an interesting approach to controlling the two protagonists. Rather than being able to switch direct control between Sam and Max, as in their previous multi-protagonist games Maniac Mansion and Day of the Tentacle, you ostensibly control Sam alone, but can “use” Max upon things in the world like you might an inventory object. It’s a brilliant choice. Max’s greatest comedic virtue is his sheer unpredictability, and this approach preserves that; even when you’re consciously “using” Max on something, you never know quite what he’s going to do.
Dialog works the same way; instead of presenting you with a cut-and-dried menu of questions or statements to make in conversations, the game lets you choose between the abstract options of a question, an exclamation, or the always worthwhile choice of the complete non sequitur. For “nothing would kill a joke worse than reading it before you hear it,” as Steve Purcell puts it.
In other ways as well, Sam and Max became a field for considerable experimentation with what had been the standard LucasArts adventure interface ever since Maniac Mansion: an interactive picture of your surroundings filling the top three-quarters or so of the screen, a menu of verbs filling the bottom of the screen. Sam and Max‘s design team eliminated the latter entirely for the first (and only) time since Loom; instead of clicking a verb on a menu here, you right-click to cycle the mouse cursor through them (with one of your options being that aforementioned Max “verb”). Although welcome in the sense that it gave LucasArts’s talented artists more room to paint their scenes, the new approach can be just a little awkward to work with, requiring an awful lot of repetitive clicking even once you’ve managed to cement in your mind what each of the cursor icons actually means.
One can make vaguely similar complaint about other aspects of Sam & Max. Certainly in comparison to Day of the Tentacle, a game which LucasArts polished to a well-nigh unprecedented sheen, Sam & Max can come across as ever so slightly ramshackle. Its scenes are often designed to scroll as the protagonists move across them. This is fair enough in itself, but it’s sometimes difficult to identify what is and isn’t a hard edge, especially in certain scenes where you must click in just the right vertical spot on one edge or the other to progress further to the left or right. This was such a problem for me when I played the game recently that I wound up consulting a walkthrough on a few occasions when I thought I was completely stumped, only to find that I simply hadn’t fully explored a location due to this interface confusion. These sorts of issues — sometimes referred to as “fake difficulty” in that they’re fundamentally external to the world being explored — were admittedly par for the course in the games from LucasArts’s contemporaries. But LucasArts themselves had made their name by rising above them to a perhaps greater extent than they manage here.
A particularly hard-nosed critic might also find reason to complain about some of the individual puzzles. Although the game does stay scrupulously true to the letter of the LucasArts design philosophy of no deaths and no dead ends, quite a few of the puzzles here are so warped that they can really only be solved via the tried-and-true “use everything on everything else” approach. While this feels thoroughly true to the anarchic spirit of the game’s source material, it’s much more debatable in the context of good adventure design in the abstract.
But then again, the whole game is so lively, and so full of funny responses and hilarious Easter eggs, that it’s usually more entertaining than tedious to lawn-mower through its scenes in this way. And there is a smattering of really good set-piece puzzles to enjoy as well. The “Gator Golf” scene, in which Sam gets to play golf on an alligator-infested swamp of a course, is an example of a puzzle that’s both intellectually stimulating and absolutely hilarious, the sort of thing that could only have appeared in Sam & Max Hit the Road. To alleviate the tension when you aren’t sure how to proceed, there’s also a few superfluous action games, like the rather grisly take on Battleship that’s known here as Car Bomb and a concoction known as Highway Surfin’ which combines a speeding automobile, Max on the roof of said automobile, and a bunch of low-hanging road signs. If not exactly good in the way we conventionally define such things, the mini-games are, like just about everything else about Sam & Max Hit the Road, really, really funny.
But the game’s rougher edges perhaps aren’t all down to the gleefully low-rent nature of its source material. Once again, a comparison with Sam & Max‘s immediate predecessor on the LucasArts release docket can be instructive in this context. Superlative though Day of the Tentacle‘s execution was, that game was also at the end of the day a thoroughly safe choice for LucasArts — the sequel to a beloved game, built around a style of cartoon humor with which Middle America was long-acquainted. Sam & Max, on the other hand, was a more dangerous proposition in more than one sense of the word. Even as we laud LucasArts’s management for the real bravery it took to let their creative staff make and release it at all, we can also see signs that they weren’t willing to pour quite the same amount of time and money into such a relatively risky concept. Tellingly, they didn’t pull out all the stops to release a CD-ROM-based “talkie” version of Sam & Max at the same time as the floppy-disk-based version, as they had for Day of the Tentacle. Instead they decided to wait a bit, to make sure there was in fact a market out there worthy of the additional investment.
Some of the first reviews would actually seem to confirm any suspicions LucasArts’s management might have had that Sam & Max could be more of a niche taste than a crowd pleaser. Charles Ardai, writing for Computer Gaming World, found all of the “self-referential jokes, sneering remarks, deadpan derision, sarcasm, and ridicule” — even the “unnerving” jazz-influenced soundtrack — to be decidedly off-putting. “Sarcastic New York intellectuals like [some of] my friends will find its tone wholly agreeable,” he concluded, “but whether it plays in Peoria remains to be seen” — thereby echoing a question that was doubtless much on the mind of some at LucasArts.
But, happily for everyone concerned, Sam & Max didn’t prove the commercial disaster which some of the Nervous Nellies at LucasArts might have feared. Right from the beginning, significant numbers of gamers responded strongly to the same edgy humor that seemed to leave some reviewers a little nonplussed. Interestingly, the early British reviews were much more uniformly positive than the American ones, perhaps reflecting the longstanding British taste for a drier, less literal stripe of humor — or perhaps just reflecting the longstanding British fascination with the weirder aspects of Americana. Rick Barba, writing for the British Electronic Entertainment, loved it unreservedly: “It’s hip, funny, adult, and well-written. It’s what literate adventure gamers have been craving for years.”
With the games’ sales and extremely positive reception in at least some quarters having sufficiently allayed any doubts at LucasArts, the CD-ROM version appeared about six months after the floppy-based version. It was well worth the wait. The same production team that had made Day of the Tentacle such a lesson to the rest of the industry in how to do a talkie right took charge of Sam & Max as well, with similarly stellar results. Sam and Max themselves were voiced by a pair of cartoon veterans named Bill Farmer and Nick Jameson respectively, both of whom were perfect for their roles. After hearing its stars for the first time, it becomes almost impossible to imagine playing Sam & Max without their voices. And this, of course, is just the reaction a talkie ought to provoke.
Since Sam & Max Hit the Road, the titular pair have continued their exploits in the pages of more comic books, in a brief-lived and sadly bowdlerized television series, and eventually in a string of episodic adventure games from Telltale Games, who have positioned themselves as the post-millennial heirs apparent to the LucasArts adventure tradition. Yet I’m not sure whether they’ve ever again been quite as sharp and funny as they were here, in their very first computer game. I can certainly write that, despite the competition from all of these other iterations of what’s developed into a minor media franchise in its own right, the stature of the original Sam & Max computer game has only grown over the years. Today it continues to stand out from the field of its contemporaries as a harbinger of a gaming future that would admit more diverse voices to the dialog, drawing from a more sophisticated palette of non-ludic cultural influences. Most of all, however, it remains what it has always been: one of the funniest games ever made. What better reason could you need to play it?
(Sources: the omnibus comic Sam & Max Surfin’ the Highway by Steve Purcell; Computer Gaming World of April 1991, January 1992, August 1993, and February 1994; Retro Gamer 22, 28, 70, 110, and 116; CD-ROM Today of August/September 1994; Edge of February 1994; Electronic Entertainment of March 1994; Game Developer of March 2006; LucasArts’s newsletter The Adventurer of Fall 1990, Spring 1991, Fall 1991, Spring 1992, Fall 1992, Spring 1993, and Winter 1994. Also “The History of Sam & Max,” as presented on the old Telltale Games home page.
A remastered version of Sam & Max Hit the Road is available for purchase from GOG.com and other digital storefronts.)
source http://reposts.ciathyza.com/sam-and-max-hit-the-road/
0 notes
Text
The Rise of and Looming Death of Flash
The Miraculous Trajectory of Adobe Flash
Two years from now, Adobe will finally stop updating and distributing the Flash Player plugin, a.k.a. Shockwave Flash. Flash will actually, finally, supposedly die. But before the nail goes into the coffin—in fact, before the nail even touches the coffin—let’s give credit where credit is due. Flash was miraculous. It enabled new possibilities on the web, helped bring video and video sharing to the internet, and most importantly, it got some people interested in designing for the web. I should know, Flash made me want to be a web designer.
Flashback
As a college student in the 1990s, being a graphic designer mostly meant creating graphics, logos, magazines, books, posters, album art, T-shirts… printed things, you get the picture. But when the internet came along, and everyone and anyone seemed to need a website, many designers were stumped since this web thing required code.
Most designers never had to code and didn’t need to since Photoshop, Illustrator, PageMaker, Freehand, and QuarkXPress did the work for us. Import elements, place objects, move them around, scale them, change their color or size, it happened easily thanks to “what you see is what you get” (WYSIWYG) software.
Print Alone…No Longer
Why learn to code? Designers, including yours truly, left the web to computer scientists, computer engineers, and software developers. They understood the matrix of letters, numbers, and symbols that made up Hypertext Markup Language (HTML). They were also much faster typists—at least compared to me. A lot of graphic designers didn’t give a shit about HTML. “Let the coders deal with coding,” we thought, “and we’ll stick to print.”
Many of us did, until we saw new opportunities for our clients who had to be on the web and it became a matter of evolve or die. Fortunately, web layout software had arrived that promised to make getting a website designed quickly and easily. GoLive CyberStudio (later acquired by Adobe), Adobe PageMill, and HoTMetaL helped you design for the web since the software’s backend rendered the necessary HTML; imagine Microsoft Word, but instead of a page with images and text that you can print, it makes a page you can put on the web. (Fun fact, older versions of Word let you convert documents to HTML for the web, and today’s versions still let you do this.)
But even with those early web design tools, designers had mixed feelings. The typography! Oh, the horrors. One of my university professors was disgusted by the fact that you couldn’t layout a site with Univers or any other specialty font that a company might have as part of their corporate identity program.
And on top of the expensive software we already needed, if we did not want to learn coding we would have to pay for another tool? Art supplies, computer peripherals, digital camera equipment, etc., etc., it was already expensive and especially for those on a budget.
On the other hand, design educator Ken Hiebert, author of Graphic Design Sources and Graphic Design Processes, found software such as GoLive to be a real blessing. The story from Hiebert’s perspective: we had been using PostScript fonts on a daily basis as well as PostScript laser printers, but that didn’t require us to read and write PostScript. GoLive handled HTML in a similar way: design what you needed, let it spit out the code, and upload it when you’re ready, without really needing to know HTML. If you wanted to get on the web without knowing code, GoLive or PageMill were a small price to pay. And if you were a visual thinker, those programs were right up your alley.
One Plugin, One Solution (Almost)
By the late 90s, and despite the advances in web design, things were limited. Sure, software could take care of most of the work, but you still needed to have some basic knowledge of HTML to make sure everything was properly composed. On top of that, Cascading Style Sheets (CSS) were on the horizon, and that was a whole new thing you would have to learn to make your site operable, as well as nicely designed.
To complicate matters, Browser Wars as well as download/upload speeds caused other challenges. But again, designers didn’t care. We wanted a better web, an experience that was designed rather than coded. Better typography!! Sound! Animation too! Why not? Well, for starters, it wasn’t easy to achieve. Even Macromedia’s Dreamweaver a program that promised a better web—Sites with Life was the catchphrase—had failed in our eyes.
But everything changed with Flash, first released as FutureSplash Animator, later acquired by Macromedia. Text, vector graphics, and images could be composed in a layout and uploaded to the web, with many if not all of the nuances designers had become accustomed to. For instance, if you wanted to use a particular font on the web, especially as a headline or button, you needed to make that text into a bitmap image that often looked quite awful. Today text as image is frowned upon, but back then it was the bee’s knees—even Apple did it.
Flash to Make Them Dance
When Macromedia acquired FutureSplash and released it as Macromedia Flash, a world of possibilities arrived. Yes, you had to pay for the Flash software to make a Flash site, but it was worth it. For starters, with tools like Director or Flash you could—as Ze Frank famously did—teach people how to dance properly. Visually, new possibilities emerged. Artists such as Joshua Davis (praystation), GMUNK, and James Paterson (presstube) pushed the web into new and unforeseen directions. Paterson himself began using Flash in 1997, and was in high school at the time. He got involved with Marty Spellerberg in the 1990s contributing to a website called Halfempty.com, which is still running.
For designer, developer, and curator Marty Spellerberg, Flash appealed to a certain audience, a creative one. “Flash was the internet that we thought we were going to get. Make things look more like Tron and less like documents. HTML and CSS websites were simpler then, but Flash was for visual artists, it was something you could relate to. With Flash, code was secondary, and the elements were visual.”
Lynda Weinman’s early website in 1998, captured here with the Wayback Machine, included all kinds of educational assets for the eager digital designer.
If you wanted to make your own digital art or online experiment or website, you could quickly and easily learn Flash by dabbling with it on weekends, reading a how-to book, taking a class or two or three, or you could learn with Lynda Weinman tutorials. I got my hands on every asset I could find, including sites like The Remedi Project that showcased stellar Flash work. I started making my own “amazing” Flash work, focusing on websites and corporate identity. When pitching to one prospective client decades ago, I showed them how I could animate their logo (using Flash, of course), and I was hired on the spot.
Flash Giveth, Flash Taketh Away
In the early 2000s, design was undergoing an identity crisis (isn’t it always?). Maybe long-ish animated logos weren’t needed? Maybe Flash is not the best way to go for the whole site? You could design your layout and slice it up using Macromedia Fireworks, with or without Flash content. Add all the gizmos and animation and sound and Flash headers you want after the fact. Or maybe not? The sky was the limit and many designers and clients wanted no limits.
“I want my website and I want it my way!” Creating unique, thought-provoking artistic experiments with Flash was one thing, but using Flash to make an eccentric website for users who wanted and/or needed something simple, well, that seemed unfair for users. But it happened. Approaching web design like a five-year-old, some would put every and any tasty ingredient into a bowl, mix it around, and offer it up as a super, special, flashy meal. Look what I made! So many flavors, so many textures! So much to look at and discover!! On the flip side, some designers thought it was their duty to challenge conventions, going so far as to “hide buttons” so the user had to work to find them. You might be thinking, “Seriously?!” Yes. True story.
In 2001 Apple didn’t require the Flash plugin to use their site, but they did use bitmap images to render type. Captured via the Wayback Machine.
As designers and non-designers packed more and more effects into their web content using Flash—or chose to hide web content in a wicked game of catch me if you can—sites became complicated and/or unusable. Some clients wanted the complex, but larger sites with more content meant longer load times, meaning longer wait times, especially if you had an animated logo that required 2-200 seconds of your patience before you even got to the actual website.
These website prologues, a.k.a. Flash Intros, became the norm. In order to let a site fully load in the background, a shortish introduction, animation, video, or game would keep users busy and/or entertained—actually, it really just pissed people off. But in time a solution would come in the form of a button. Users who didn’t want to wait and watch an intro could jump ahead by clicking Skip Intro. Saved by a button! Yes, there was a time.
Two captures from Macromedia’s old 2001 website, via the Wayback Machine, note the Flash requirement posted.
On the plus side, Flash brought people from all walks of life to web design, but we had been led astray by glamour, wanting to create one shiny thing after another. Too much of too much, and it had to stop. We saw what the web could be, and what it shouldn’t be. Coming to our senses, many designers and non-designers realized that the medium didn’t matter as much as the content and the people, a.k.a. the users. Fancy sites shouldn’t corrupt the experience, being bombastic just for the sake of effect. Don’t design for you. Don’t design for technology or because of technology. It’s all about people and as Bert Bos wrote, usability matters—a lot. It’s a principle and belief that Jakob Nielsen had been preaching long before Flash had caught on.
Usability was (and for the most part still is) less about flashy sites, and more about function. Tone things down. Keep It Simple Stupid (KISS). Books like Skip Intro: Flash Usability and Interface Design by Duncan McAlester & Michelangelo Capraro taught readers to design for users. And if that meant learning code in order to be a better designer, better artist, and a better web developer, then so be it. Some Flash users, including James Paterson, did just that. As each new version of Flash gained abilities and ultimately ActionScript, Paterson learned more and more, easing himself into coding. “It was a great way to baby-step my way into what was a scary thing for me (code in general). I feel very grateful for Flash.”
Work by James Paterson, “DAVEY JONES’ LOCKER” (2005). Designed using two Flash animations, then layered into a single After Effects composition. Paterson had become known for his Flash art and experimentation, pushing the medium in new directions.
Flash Blows Up, for Better and Worse
In 2005, Adobe acquired Macromedia and all of their products, including Flash. By that time, it seemed like everyone and anyone used Flash, even an upstart named YouTube. Trips to the zoo, cats gone wild, entertainment could reach the masses, video had evolved, and so did the internet. But design and development for the web advanced, specifically sans Flash, meaning you could do more than ever before with HTML, CSS, and JavaScript—they were lightweight, not requiring a fancy Flash plugin that might crash your browser.
Better yet, HTML, CSS, and JavaScript did not require you to purchase a piece of pricey software to get the job done, provided you were somewhat fluent with those web development platforms and had a text editor such as TextWrangler or BBEdit. In terms of web content, well, content itself became king and blogs had blown up. Content Management Systems (CMS) became the way to get on the web quickly and easily. Flash be damned!
Flash was beginning to look especially outdated and outmoded—and threatened—when Steve Jobs lambasted it, keeping it off the iPhone. To make matters worse, Flash had become a pathway for evil doers who would use it to attack your computer, as routinely reported by security experts such as Brian Krebs. As far back as 2015, Krebs removed Flash from his systems and claimed that he really didn’t miss it.
Turns out, most of us don’t miss Adobe Flash, especially if you own an iPhone, iPod, or iPad. But personally, I’ll miss Flash when it disappears completely because it changed the way we look at web design and think about the web. At the very least, Flash was the original engine that helped make YouTube work. And who does not like funny cat videos? So before we finally kick Flash to the curb, doesn’t it deserve some respect? Some credit? Who really knows? Like the opening animations and videos that Flash spawned during its glory days, we’ll have to give it some time.
The post The Rise of and Looming Death of Flash appeared first on HOW Design.
The Rise of and Looming Death of Flash syndicated post
0 notes
Text
Beach House: End Of The Year Tour!
Beach house progress, both big and small, feels like it’s happening so quickly that we hardly have time to keep up with documenting it, but I did walk through the whole house yesterday and make a big ol’ video tour… which basically catches you right up to date! So excuse this post for only having around a dozen photos (we have thousands on our phones, but they’d take us all day to upload and explain, and nobody got time for that with Christmas being less than a week away).
First let’s start at the front door. We hung a wreath (from Tar-jay) and put some battery powered LED candles with timers in the windows (so they’re auto-pilot even when we’re not there). Hallelujah, the house finally looks lived in! I mean, except for the whole it-has-no-landscaping-and-I-desperately-need-to-sand-and-stain-the-front-door thing. Also I still want to paint those white blocks behind the lanterns to match the house. Someday…
lanterns / wreath / house numbers / doormat / siding: SW Mellow Coral / ceiling: SW Breaktime / trim: SW Pure White
While things are far from finished, things are even farther from where they were this time last year. This photo is from almost exactly a year ago, and looking back is a nice reminder that wrinkly curtains and an unfinished pantry are far smaller problems to work through than THE ENTIRE SIDE OF THE HOUSE BEING TORN OFF. Here’s that whole story if you missed it (yup, we literally had to have 500 square feet removed and rebuild from scratch).
SO YEAH. It’s looking a lot better at the end of 2017 than it did at the end of 2016. And weirdly enough that picture makes me excited to get started on the duplex, because as much as I love having finished walls to decorate and finished floors to arrange furniture on, the process of planning (and dreaming about) all of the potential that’s fills the air during a big demo/rebuilding project is oddly addicting. Can’t wait to share our duplex progress as soon as we have our plans approved and all of our permits pulled! But back to the pink house, where I’m walking you guys through every room in a little video tour of sorts: If you can’t see this in a reader, click through to view it on our blog or you can view it here on YouTube.
If you can’t watch the video right now, I’d definitely recommend dropping back in and catching it when you can (a video is basically worth a million photos and I pretty much cover every crevice and explain a lot of extra stuff I couldn’t squeeze into this post).
One recent update, after months and months of debate, is that we finally pulled the trigger and painted the railing. The vertical balusters had all already been painted (SW Stone Isle), so it was just that top rail and the post at the end that were “wood.” I’ll explain why that’s in quotes in a second. It’s hard to see in this picture since that front post is getting hit with a ton of light through the open door, but we went with a deeper gray tone (SW Perpetual Gray) that’s about 3 shades darker than the trim, so it accents the post and the top rail without being too crazy and compete-y with the standout stars of the entire house (those stained glass windows).
I know what some of you are thinking. NOOOO! How could you disgrace such old beautiful wood with paint?!?! Well, this railing had been covered in a thick paint-like brown stain that showed zero grain and was sticky, roughed up, and ruined in a bunch of places (covered in paint splatters, spackle globs, and decades of other issues). After attempting to sand it down, we learned it was a darker redder wood – meaning we’d never be able to stain it to match the lovely heart pine floors. So, we reasoned that a fresh coat of paint applied nice and evenly was a heckuva lot better than its current state. And it really does look glossy and lovely in person, which makes us incredibly relieved.
The good news is that we don’t have any shortage of wood tones in this house. We have original heart pine everywhere (we stripped and clear-sealed all of the original doors that we could, brought the original floors both upstairs and downstairs back to their glory, etc). This house’s middle name could be wood. Pinkie “Wood” House. Wait that sounds bad. Forget the middle name thing.
Down in the living room, we added this cool wall-mounted bookcase, which instantly made us both say “Ahhh! It looks like an actual room people live in!” We also got to hang some cozy white curtains which need DESPERATELY to be steamed and hemmed. They’re Lenda curtains from Ikea– I just cut off the top tabs and make sure to wash them to pre-shrink them before hanging. We also have them in our home office and love how washable and easy they are. Also, my secondhand brass grasshopper (aka: Brasshopper) is a total badass and I love him more each day.
bookcase / blue pillow / curtains / rods / similar brass grasshopper
Also bought a rug from New England Loom (if you don’t follow them on Instagram you’re missing out because they have so many lovely secondhand rugs to be discovered) and the colors and patterns and antique feeling of the rug is PERFECT for a room that will be assaulted with food and sand and everything else that a rental living room has to deal with, so I have high hopes for it holding up like a champ (seeing as it is decades old already, that really does inspire confidence). That pretty blue pillow is from this Etsy shop (I love all of her pillows) and the pink one is from Target a while back. And you guys know the sofa is the Ikea Karlstad that they no longer make, which is a straight up travesty.
We also updated the light in here to this gleaming beauty from West Elm. The old light was a one-bulb fixture that we hung and immediately said “this room needs way more light.” We love the juxtaposition of this leggier modern light and the old-looking medallion (which is actually from Home Depot – shhh). And the old brick chimney that we discovered behind the wall and exposed is probably my favorite feature in the room, along with the giant windows (this room is 9′ tall, so the windows are easily over 6.5′ feet tall – that’s taller than John!). Don’t mind that TV on the floor. We found something we think will work for in there, just gotta get it out there in our next car load. #AlwaysRoadTrippingWithFurniture
rug source / chandelier / ceiling medallion /curtains / rods
The kitchen came a long way too, with the quartz island going in (it’s Pearl Jasmine by Silestone and we LOVE it so much) and a working sink. Cue the choir of angels! You can hear two ways we saved money on our quartz counters in Podcast Episode #74, which also covers why our original plan to do butcher block there didn’t work out. There are still some things missing though. Mainly, the backsplash that we’ll add after we hang the other missing element: shelves on either side of the stove under the sconces (probably two per side, not sure yet but we’ll keep you posted).
stools / quartz / butcher block / cabinets / range: secondhand refurbished / trim: SW Stone Isle / walls: SW White Heron
The back door was blue for a hot second, which some of you might have seen on Instagram, but as the room came together more John and I both realized that the same gray as the trim (SW Stone Isle) would let the pink stove do her thing and be the accent in the room that she has always been destined to become. Plus, we have a blue chippy door leading to the mudroom nearby, and one blue door + one pink stove is… enough. You know I didn’t love painting that door twice, so if I did it, it had to be done. Ha!
green vase / wood cutting board / wood stand / hanging rod / hood / kettle / sconces / pink salt & pepper
Upstairs the bedrooms are coming along with some art up on the walls, layered cozy bedding, and even headboards. HUZZAH! Still need to hang all the curtains up there (once we do that the headboard will look exactly as wide as the window because we are tricky tricksters). Stay tuned…
rug / large art / lamp / side table / striped blanket / headboard / fan
This is another view of that front bedroom, which is the largest of the four (the bunk room is teeny tiny and the middle bedroom and back bedroom are just fine but not giant). It also has that exposed brick chimney that we discovered hiding behind the wall, and next to it you’ll see my favorite craigslist find of all time that you might have already “met” on Facebook or Instagram when I shared a quick shot of it this weekend. Yes, I really did find an inlay piece of furniture on Craiglist, and yes, it’s currently selling for $2,000 on Restoration Hardware (I got it for $400!). Insert that screaming cat emoji face here. Seriously, it’s the score of a lifetime, and I’m going to share the whole story, including how I fix up a few missing inlay spots soon. So… stay tuned. Again.
And before we move on, that sconce looks crazy small above the dresser (we just hung it as a placeholder and it’s looking like a placeholder, so we’ll probably get a wider double-sconce for that spot soon). Anyway, on with the tour! Or should I say “roll the next flashback!” This is that wall a year ago. Same house. Just nekkid a year ago versus clothed now. With walls. You get what I mean.
And now, the back bedroom. Aka: our room whenever we stay there! Although the front room is the largest and has that lovely exposed brick, the back bedroom has its own master bathroom (complete with my big beautiful clawfoot tub) and it has its own stairs that lead up to it, which are surprisingly useful. We originally thought those back stairs would be more of a fun thing for kids and a cool historic detail to preserve, but we weren’t sure we’d actually use them very much but we go up and down them all the time!
rug / fan / leather stools / striped duvet cover / pocked doors: SW Riverway
One of our bigger projects this past weekend was this built-in dresser that we added to the nook behind the pocket doors that you see above. We love gaining some storage and function in that formerly blank area at the top of the back steps, and there’s more than enough room to pull out the drawers and take like five steps back before you’d fall down the steps (you know I’d be the one to bite it all the way down these steps, so we have to make sure these things we’re adding won’t curse me later).
dresser / mirror / wood top / door color: SW Riverway
John would be quick to point out it’s not complete. We ran out of nails for our nail gun, so the trim still needs to be attached, caulked, etc. But basically, a Malm from Ikea fit pretty perfectly in the space, so we made it look even more built-in by removing and reinstalling the molding around it (see below) and adding a few skinny filler pieces to each side (scraps from our kitchen install). We also popped some leftover butcher block counter from downstairs on top to tie into the pine floors and we’re also planning to add some leather pulls to it to tie in the stools at the foot of the bed (you can see them in the shot two photos up). Can’t wait to finish it up and share the final pics!
Next let’s move onto the master bathroom, which is easily my favorite room because I get to soak in that big ol’ tub after hours of DIY and it feels so freaking good every time. Except for the first time. I had sort of a false start in there (more on that in this podcast) but now the tub and I are bros and only happy things happen when I’m in there. And the kids love it too.
marble table / floor tile / accent floor tile / wall hooks / blinds / tub color: SW Riverway
I’m basically salivating while looking at this because we’re back home and our house has two bathrooms that we still have to redo and two tubs that are about 10″ deep (half of my body sticks out like an iceberg) so I’m itching to add a deeper bathtub into my life here at home.
The hall bath is still my boo too, thanks to my favorite vanity ever. The top is tiled with marble and the rounded wood drawers make it look like a furniture piece we converted to be a vanity but it came that way and WE SALUTE IT because goodness knows we have other stuff to keep us busy. Still on the list: making built-in bunk beds, building out the pantry and the mudroom, tiling the backsplash, landscaping, etc, etc. That big round silver mirror is an awesome (and recent!) HomeGoods find (the same one in brass hangs above our mantel at home) so if you’re looking for one in either color, try HomeGoods. Target also has a really similar one that’s slightly smaller and thinner in gold.
vanity / faucet / drum stool / light fixture / floor tile
And although we haven’t built the wall to wall bunkbeds in our small-but-mighty kids room yet, we did hang art. And that’s half the battle, right? (Nope, half the battle is being halfway done with the bunkbeds, but let me lie to myself for a second, ok?). That cute colorful painting is from our dear friend Lesli Devito (remember when we house crashed her wayyyy back here) and if you don’t have one of her paintings or prints I highly recommend getting one. The door also got a sign that says Mermaids Welcome and it made my whole life to hang it up (also we took a poll among a bunch of kids and basically everyone is cool with mermaid and pirates, but don’t get me started on how split the group was on dolphins).
marble table / mermaids welcome plaque / art by Lesli DeVito
So there you have it: a tour as of yesterday of the beach house (remember: watch the video! it has approximately 98% more info than some pics and captions can convey). Also, we hope you have a very happy holiday surrounded by the ones you love and delicious food and all the mermaid-related memorabilia that your heart desires. And if you have a tub where your entire body can be submerged, know that I, for one, now know what I’m missing and am deeply deeply jealous.
P.S. To see the entire process of fixing up this beach house (from floor planning and demo to tiling and tiling and tiling and getting the floors redone) here’s a full category of beach house updates for you to flip through.
*This post contains affiliate links*
The post Beach House: End Of The Year Tour! appeared first on Young House Love.
Beach House: End Of The Year Tour! published first on http://ift.tt/2qxZz2j
0 notes
Text
Beach House: End Of The Year Tour!
Beach house progress, both big and small, feels like it’s happening so quickly that we hardly have time to keep up with documenting it, but I did walk through the whole house yesterday and make a big ol’ video tour… which basically catches you right up to date! So excuse this post for only having around a dozen photos (we have thousands on our phones, but they’d take us all day to upload and explain, and nobody got time for that with Christmas being less than a week away).
First let’s start at the front door. We hung a wreath (from Tar-jay) and put some battery powered LED candles with timers in the windows (so they’re auto-pilot even when we’re not there). Hallelujah, the house finally looks lived in! I mean, except for the whole it-has-no-landscaping-and-I-desperately-need-to-sand-and-stain-the-front-door thing. Also I still want to paint those white blocks behind the lanterns to match the house. Someday…
lanterns / wreath / house numbers / doormat / siding: SW Mellow Coral / ceiling: SW Breaktime / trim: SW Pure White
While things are far from finished, things are even farther from where they were this time last year. This photo is from almost exactly a year ago, and looking back is a nice reminder that wrinkly curtains and an unfinished pantry are far smaller problems to work through than THE ENTIRE SIDE OF THE HOUSE BEING TORN OFF. Here’s that whole story if you missed it (yup, we literally had to have 500 square feet removed and rebuild from scratch).
SO YEAH. It’s looking a lot better at the end of 2017 than it did at the end of 2016. And weirdly enough that picture makes me excited to get started on the duplex, because as much as I love having finished walls to decorate and finished floors to arrange furniture on, the process of planning (and dreaming about) all of the potential that’s fills the air during a big demo/rebuilding project is oddly addicting. Can’t wait to share our duplex progress as soon as we have our plans approved and all of our permits pulled! But back to the pink house, where I’m walking you guys through every room in a little video tour of sorts: If you can’t see this in a reader, click through to view it on our blog or you can view it here on YouTube.
If you can’t watch the video right now, I’d definitely recommend dropping back in and catching it when you can (a video is basically worth a million photos and I pretty much cover every crevice and explain a lot of extra stuff I couldn’t squeeze into this post).
One recent update, after months and months of debate, is that we finally pulled the trigger and painted the railing. The vertical balusters had all already been painted (SW Stone Isle), so it was just that top rail and the post at the end that were “wood.” I’ll explain why that’s in quotes in a second. It’s hard to see in this picture since that front post is getting hit with a ton of light through the open door, but we went with a deeper gray tone (SW Perpetual Gray) that’s about 3 shades darker than the trim, so it accents the post and the top rail without being too crazy and compete-y with the standout stars of the entire house (those stained glass windows).
I know what some of you are thinking. NOOOO! How could you disgrace such old beautiful wood with paint?!?! Well, this railing had been covered in a thick paint-like brown stain that showed zero grain and was sticky, roughed up, and ruined in a bunch of places (covered in paint splatters, spackle globs, and decades of other issues). After attempting to sand it down, we learned it was a darker redder wood – meaning we’d never be able to stain it to match the lovely heart pine floors. So, we reasoned that a fresh coat of paint applied nice and evenly was a heckuva lot better than its current state. And it really does look glossy and lovely in person, which makes us incredibly relieved.
The good news is that we don’t have any shortage of wood tones in this house. We have original heart pine everywhere (we stripped and clear-sealed all of the original doors that we could, brought the original floors both upstairs and downstairs back to their glory, etc). This house’s middle name could be wood. Pinkie “Wood” House. Wait that sounds bad. Forget the middle name thing.
Down in the living room, we added this cool wall-mounted bookcase, which instantly made us both say “Ahhh! It looks like an actual room people live in!” We also got to hang some cozy white curtains which need DESPERATELY to be steamed and hemmed. They’re Lenda curtains from Ikea– I just cut off the top tabs and make sure to wash them to pre-shrink them before hanging. We also have them in our home office and love how washable and easy they are. Also, my secondhand brass grasshopper (aka: Brasshopper) is a total badass and I love him more each day.
bookcase / blue pillow / curtains / rods / similar brass grasshopper
Also bought a rug from New England Loom (if you don’t follow them on Instagram you’re missing out because they have so many lovely secondhand rugs to be discovered) and the colors and patterns and antique feeling of the rug is PERFECT for a room that will be assaulted with food and sand and everything else that a rental living room has to deal with, so I have high hopes for it holding up like a champ (seeing as it is decades old already, that really does inspire confidence). That pretty blue pillow is from this Etsy shop (I love all of her pillows) and the pink one is from Target a while back. And you guys know the sofa is the Ikea Karlstad that they no longer make, which is a straight up travesty.
We also updated the light in here to this gleaming beauty from West Elm. The old light was a one-bulb fixture that we hung and immediately said “this room needs way more light.” We love the juxtaposition of this leggier modern light and the old-looking medallion (which is actually from Home Depot – shhh). And the old brick chimney that we discovered behind the wall and exposed is probably my favorite feature in the room, along with the giant windows (this room is 9′ tall, so the windows are easily over 6.5′ feet tall – that’s taller than John!). Don’t mind that TV on the floor. We found something we think will work for in there, just gotta get it out there in our next car load. #AlwaysRoadTrippingWithFurniture
rug source / chandelier / ceiling medallion /curtains / rods
The kitchen came a long way too, with the quartz island going in (it’s Pearl Jasmine by Silestone and we LOVE it so much) and a working sink. Cue the choir of angels! You can hear two ways we saved money on our quartz counters in Podcast Episode #74, which also covers why our original plan to do butcher block there didn’t work out. There are still some things missing though. Mainly, the backsplash that we’ll add after we hang the other missing element: shelves on either side of the stove under the sconces (probably two per side, not sure yet but we’ll keep you posted).
stools / quartz / butcher block / cabinets / range: secondhand refurbished / trim: SW Stone Isle / walls: SW White Heron
The back door was blue for a hot second, which some of you might have seen on Instagram, but as the room came together more John and I both realized that the same gray as the trim (SW Stone Isle) would let the pink stove do her thing and be the accent in the room that she has always been destined to become. Plus, we have a blue chippy door leading to the mudroom nearby, and one blue door + one pink stove is… enough. You know I didn’t love painting that door twice, so if I did it, it had to be done. Ha!
green vase / wood cutting board / wood stand / hanging rod / hood / kettle / sconces / pink salt & pepper
Upstairs the bedrooms are coming along with some art up on the walls, layered cozy bedding, and even headboards. HUZZAH! Still need to hang all the curtains up there (once we do that the headboard will look exactly as wide as the window because we are tricky tricksters). Stay tuned…
rug / large art / lamp / side table / striped blanket / headboard / fan
This is another view of that front bedroom, which is the largest of the four (the bunk room is teeny tiny and the middle bedroom and back bedroom are just fine but not giant). It also has that exposed brick chimney that we discovered hiding behind the wall, and next to it you’ll see my favorite craigslist find of all time that you might have already “met” on Facebook or Instagram when I shared a quick shot of it this weekend. Yes, I really did find an inlay piece of furniture on Craiglist, and yes, it’s currently selling for $2,000 on Restoration Hardware (I got it for $400!). Insert that screaming cat emoji face here. Seriously, it’s the score of a lifetime, and I’m going to share the whole story, including how I fix up a few missing inlay spots soon. So… stay tuned. Again.
And before we move on, that sconce looks crazy small above the dresser (we just hung it as a placeholder and it’s looking like a placeholder, so we’ll probably get a wider double-sconce for that spot soon). Anyway, on with the tour! Or should I say “roll the next flashback!” This is that wall a year ago. Same house. Just nekkid a year ago versus clothed now. With walls. You get what I mean.
And now, the back bedroom. Aka: our room whenever we stay there! Although the front room is the largest and has that lovely exposed brick, the back bedroom has its own master bathroom (complete with my big beautiful clawfoot tub) and it has its own stairs that lead up to it, which are surprisingly useful. We originally thought those back stairs would be more of a fun thing for kids and a cool historic detail to preserve, but we weren’t sure we’d actually use them very much but we go up and down them all the time!
rug / fan / leather stools / striped duvet cover / pocked doors: SW Riverway
One of our bigger projects this past weekend was this built-in dresser that we added to the nook behind the pocket doors that you see above. We love gaining some storage and function in that formerly blank area at the top of the back steps, and there’s more than enough room to pull out the drawers and take like five steps back before you’d fall down the steps (you know I’d be the one to bite it all the way down these steps, so we have to make sure these things we’re adding won’t curse me later).
dresser / mirror / wood top / door color: SW Riverway
John would be quick to point out it’s not complete. We ran out of nails for our nail gun, so the trim still needs to be attached, caulked, etc. But basically, a Malm from Ikea fit pretty perfectly in the space, so we made it look even more built-in by removing and reinstalling the molding around it (see below) and adding a few skinny filler pieces to each side (scraps from our kitchen install). We also popped some leftover butcher block counter from downstairs on top to tie into the pine floors and we’re also planning to add some leather pulls to it to tie in the stools at the foot of the bed (you can see them in the shot two photos up). Can’t wait to finish it up and share the final pics!
Next let’s move onto the master bathroom, which is easily my favorite room because I get to soak in that big ol’ tub after hours of DIY and it feels so freaking good every time. Except for the first time. I had sort of a false start in there (more on that in this podcast) but now the tub and I are bros and only happy things happen when I’m in there. And the kids love it too.
marble table / floor tile / accent floor tile / wall hooks / blinds / tub color: SW Riverway
I’m basically salivating while looking at this because we’re back home and our house has two bathrooms that we still have to redo and two tubs that are about 10″ deep (half of my body sticks out like an iceberg) so I’m itching to add a deeper bathtub into my life here at home.
The hall bath is still my boo too, thanks to my favorite vanity ever. The top is tiled with marble and the rounded wood drawers make it look like a furniture piece we converted to be a vanity but it came that way and WE SALUTE IT because goodness knows we have other stuff to keep us busy. Still on the list: making built-in bunk beds, building out the pantry and the mudroom, tiling the backsplash, landscaping, etc, etc. That big round silver mirror is an awesome (and recent!) HomeGoods find (the same one in brass hangs above our mantel at home) so if you’re looking for one in either color, try HomeGoods. Target also has a really similar one that’s slightly smaller and thinner in gold.
vanity / faucet / drum stool / light fixture / floor tile
And although we haven’t built the wall to wall bunkbeds in our small-but-mighty kids room yet, we did hang art. And that’s half the battle, right? (Nope, half the battle is being halfway done with the bunkbeds, but let me lie to myself for a second, ok?). That cute colorful painting is from our dear friend Lesli Devito (remember when we house crashed her wayyyy back here) and if you don’t have one of her paintings or prints I highly recommend getting one. The door also got a sign that says Mermaids Welcome and it made my whole life to hang it up (also we took a poll among a bunch of kids and basically everyone is cool with mermaid and pirates, but don’t get me started on how split the group was on dolphins).
marble table / mermaids welcome plaque / art by Lesli DeVito
So there you have it: a tour as of yesterday of the beach house (remember: watch the video! it has approximately 98% more info than some pics and captions can convey). Also, we hope you have a very happy holiday surrounded by the ones you love and delicious food and all the mermaid-related memorabilia that your heart desires. And if you have a tub where your entire body can be submerged, know that I, for one, now know what I’m missing and am deeply deeply jealous.
P.S. To see the entire process of fixing up this beach house (from floor planning and demo to tiling and tiling and tiling and getting the floors redone) here’s a full category of beach house updates for you to flip through.
*This post contains affiliate links*
The post Beach House: End Of The Year Tour! appeared first on Young House Love.
Beach House: End Of The Year Tour! published first on http://ift.tt/2qCHnUt
0 notes
Text
Beach House: End Of The Year Tour!
Beach house progress, both big and small, feels like it’s happening so quickly that we hardly have time to keep up with documenting it, but I did walk through the whole house yesterday and make a big ol’ video tour… which basically catches you right up to date! So excuse this post for only having around a dozen photos (we have thousands on our phones, but they’d take us all day to upload and explain, and nobody got time for that with Christmas being less than a week away).
First let’s start at the front door. We hung a wreath (from Tar-jay) and put some battery powered LED candles with timers in the windows (so they’re auto-pilot even when we’re not there). Hallelujah, the house finally looks lived in! I mean, except for the whole it-has-no-landscaping-and-I-desperately-need-to-sand-and-stain-the-front-door thing. Also I still want to paint those white blocks behind the lanterns to match the house. Someday…
lanterns / wreath / house numbers / doormat / siding: SW Mellow Coral / ceiling: SW Breaktime / trim: SW Pure White
While things are far from finished, things are even farther from where they were this time last year. This photo is from almost exactly a year ago, and looking back is a nice reminder that wrinkly curtains and an unfinished pantry are far smaller problems to work through than THE ENTIRE SIDE OF THE HOUSE BEING TORN OFF. Here’s that whole story if you missed it (yup, we literally had to have 500 square feet removed and rebuild from scratch).
SO YEAH. It’s looking a lot better at the end of 2017 than it did at the end of 2016. And weirdly enough that picture makes me excited to get started on the duplex, because as much as I love having finished walls to decorate and finished floors to arrange furniture on, the process of planning (and dreaming about) all of the potential that’s fills the air during a big demo/rebuilding project is oddly addicting. Can’t wait to share our duplex progress as soon as we have our plans approved and all of our permits pulled! But back to the pink house, where I’m walking you guys through every room in a little video tour of sorts: If you can’t see this in a reader, click through to view it on our blog or you can view it here on YouTube.
If you can’t watch the video right now, I’d definitely recommend dropping back in and catching it when you can (a video is basically worth a million photos and I pretty much cover every crevice and explain a lot of extra stuff I couldn’t squeeze into this post).
One recent update, after months and months of debate, is that we finally pulled the trigger and painted the railing. The vertical balusters had all already been painted (SW Stone Isle), so it was just that top rail and the post at the end that were “wood.” I’ll explain why that’s in quotes in a second. It’s hard to see in this picture since that front post is getting hit with a ton of light through the open door, but we went with a deeper gray tone (SW Perpetual Gray) that’s about 3 shades darker than the trim, so it accents the post and the top rail without being too crazy and compete-y with the standout stars of the entire house (those stained glass windows).
I know what some of you are thinking. NOOOO! How could you disgrace such old beautiful wood with paint?!?! Well, this railing had been covered in a thick paint-like brown stain that showed zero grain and was sticky, roughed up, and ruined in a bunch of places (covered in paint splatters, spackle globs, and decades of other issues). After attempting to sand it down, we learned it was a darker redder wood – meaning we’d never be able to stain it to match the lovely heart pine floors. So, we reasoned that a fresh coat of paint applied nice and evenly was a heckuva lot better than its current state. And it really does look glossy and lovely in person, which makes us incredibly relieved.
The good news is that we don’t have any shortage of wood tones in this house. We have original heart pine everywhere (we stripped and clear-sealed all of the original doors that we could, brought the original floors both upstairs and downstairs back to their glory, etc). This house’s middle name could be wood. Pinkie “Wood” House. Wait that sounds bad. Forget the middle name thing.
Down in the living room, we added this cool wall-mounted bookcase, which instantly made us both say “Ahhh! It looks like an actual room people live in!” We also got to hang some cozy white curtains which need DESPERATELY to be steamed and hemmed. They’re Lenda curtains from Ikea– I just cut off the top tabs and make sure to wash them to pre-shrink them before hanging. We also have them in our home office and love how washable and easy they are. Also, my secondhand brass grasshopper (aka: Brasshopper) is a total badass and I love him more each day.
bookcase / blue pillow / curtains / rods / similar brass grasshopper
Also bought a rug from New England Loom (if you don’t follow them on Instagram you’re missing out because they have so many lovely secondhand rugs to be discovered) and the colors and patterns and antique feeling of the rug is PERFECT for a room that will be assaulted with food and sand and everything else that a rental living room has to deal with, so I have high hopes for it holding up like a champ (seeing as it is decades old already, that really does inspire confidence). That pretty blue pillow is from this Etsy shop (I love all of her pillows) and the pink one is from Target a while back. And you guys know the sofa is the Ikea Karlstad that they no longer make, which is a straight up travesty.
We also updated the light in here to this gleaming beauty from West Elm. The old light was a one-bulb fixture that we hung and immediately said “this room needs way more light.” We love the juxtaposition of this leggier modern light and the old-looking medallion (which is actually from Home Depot – shhh). And the old brick chimney that we discovered behind the wall and exposed is probably my favorite feature in the room, along with the giant windows (this room is 9′ tall, so the windows are easily over 6.5′ feet tall – that’s taller than John!). Don’t mind that TV on the floor. We found something we think will work for in there, just gotta get it out there in our next car load. #AlwaysRoadTrippingWithFurniture
rug source / chandelier / ceiling medallion /curtains / rods
The kitchen came a long way too, with the quartz island going in (it’s Pearl Jasmine by Silestone and we LOVE it so much) and a working sink. Cue the choir of angels! You can hear two ways we saved money on our quartz counters in Podcast Episode #74, which also covers why our original plan to do butcher block there didn’t work out. There are still some things missing though. Mainly, the backsplash that we’ll add after we hang the other missing element: shelves on either side of the stove under the sconces (probably two per side, not sure yet but we’ll keep you posted).
stools / quartz / butcher block / cabinets / range: secondhand refurbished / trim: SW Stone Isle / walls: SW White Heron
The back door was blue for a hot second, which some of you might have seen on Instagram, but as the room came together more John and I both realized that the same gray as the trim (SW Stone Isle) would let the pink stove do her thing and be the accent in the room that she has always been destined to become. Plus, we have a blue chippy door leading to the mudroom nearby, and one blue door + one pink stove is… enough. You know I didn’t love painting that door twice, so if I did it, it had to be done. Ha!
green vase / wood cutting board / wood stand / hanging rod / hood / kettle / sconces / pink salt & pepper
Upstairs the bedrooms are coming along with some art up on the walls, layered cozy bedding, and even headboards. HUZZAH! Still need to hang all the curtains up there (once we do that the headboard will look exactly as wide as the window because we are tricky tricksters). Stay tuned…
rug / large art / lamp / side table / striped blanket / headboard / fan
This is another view of that front bedroom, which is the largest of the four (the bunk room is teeny tiny and the middle bedroom and back bedroom are just fine but not giant). It also has that exposed brick chimney that we discovered hiding behind the wall, and next to it you’ll see my favorite craigslist find of all time that you might have already “met” on Facebook or Instagram when I shared a quick shot of it this weekend. Yes, I really did find an inlay piece of furniture on Craiglist, and yes, it’s currently selling for $2,000 on Restoration Hardware (I got it for $400!). Insert that screaming cat emoji face here. Seriously, it’s the score of a lifetime, and I’m going to share the whole story, including how I fix up a few missing inlay spots soon. So… stay tuned. Again.
And before we move on, that sconce looks crazy small above the dresser (we just hung it as a placeholder and it’s looking like a placeholder, so we’ll probably get a wider double-sconce for that spot soon). Anyway, on with the tour! Or should I say “roll the next flashback!” This is that wall a year ago. Same house. Just nekkid a year ago versus clothed now. With walls. You get what I mean.
And now, the back bedroom. Aka: our room whenever we stay there! Although the front room is the largest and has that lovely exposed brick, the back bedroom has its own master bathroom (complete with my big beautiful clawfoot tub) and it has its own stairs that lead up to it, which are surprisingly useful. We originally thought those back stairs would be more of a fun thing for kids and a cool historic detail to preserve, but we weren’t sure we’d actually use them very much but we go up and down them all the time!
rug / fan / leather stools / striped duvet cover / pocked doors: SW Riverway
One of our bigger projects this past weekend was this built-in dresser that we added to the nook behind the pocket doors that you see above. We love gaining some storage and function in that formerly blank area at the top of the back steps, and there’s more than enough room to pull out the drawers and take like five steps back before you’d fall down the steps (you know I’d be the one to bite it all the way down these steps, so we have to make sure these things we’re adding won’t curse me later).
dresser / mirror / wood top / door color: SW Riverway
John would be quick to point out it’s not complete. We ran out of nails for our nail gun, so the trim still needs to be attached, caulked, etc. But basically, a Malm from Ikea fit pretty perfectly in the space, so we made it look even more built-in by removing and reinstalling the molding around it (see below) and adding a few skinny filler pieces to each side (scraps from our kitchen install). We also popped some leftover butcher block counter from downstairs on top to tie into the pine floors and we’re also planning to add some leather pulls to it to tie in the stools at the foot of the bed (you can see them in the shot two photos up). Can’t wait to finish it up and share the final pics!
Next let’s move onto the master bathroom, which is easily my favorite room because I get to soak in that big ol’ tub after hours of DIY and it feels so freaking good every time. Except for the first time. I had sort of a false start in there (more on that in this podcast) but now the tub and I are bros and only happy things happen when I’m in there. And the kids love it too.
marble table / floor tile / accent floor tile / wall hooks / blinds / tub color: SW Riverway
I’m basically salivating while looking at this because we’re back home and our house has two bathrooms that we still have to redo and two tubs that are about 10″ deep (half of my body sticks out like an iceberg) so I’m itching to add a deeper bathtub into my life here at home.
The hall bath is still my boo too, thanks to my favorite vanity ever. The top is tiled with marble and the rounded wood drawers make it look like a furniture piece we converted to be a vanity but it came that way and WE SALUTE IT because goodness knows we have other stuff to keep us busy. Still on the list: making built-in bunk beds, building out the pantry and the mudroom, tiling the backsplash, landscaping, etc, etc. That big round silver mirror is an awesome (and recent!) HomeGoods find (the same one in brass hangs above our mantel at home) so if you’re looking for one in either color, try HomeGoods. Target also has a really similar one that’s slightly smaller and thinner in gold.
vanity / faucet / drum stool / light fixture / floor tile
And although we haven’t built the wall to wall bunkbeds in our small-but-mighty kids room yet, we did hang art. And that’s half the battle, right? (Nope, half the battle is being halfway done with the bunkbeds, but let me lie to myself for a second, ok?). That cute colorful painting is from our dear friend Lesli Devito (remember when we house crashed her wayyyy back here) and if you don’t have one of her paintings or prints I highly recommend getting one. The door also got a sign that says Mermaids Welcome and it made my whole life to hang it up (also we took a poll among a bunch of kids and basically everyone is cool with mermaid and pirates, but don’t get me started on how split the group was on dolphins).
marble table / mermaids welcome plaque / art by Lesli DeVito
So there you have it: a tour as of yesterday of the beach house (remember: watch the video! it has approximately 98% more info than some pics and captions can convey). Also, we hope you have a very happy holiday surrounded by the ones you love and delicious food and all the mermaid-related memorabilia that your heart desires. And if you have a tub where your entire body can be submerged, know that I, for one, now know what I’m missing and am deeply deeply jealous.
P.S. To see the entire process of fixing up this beach house (from floor planning and demo to tiling and tiling and tiling and getting the floors redone) here’s a full category of beach house updates for you to flip through.
*This post contains affiliate links*
The post Beach House: End Of The Year Tour! appeared first on Young House Love.
Beach House: End Of The Year Tour! published first on http://ift.tt/2r6hzQy
0 notes
Text
Beach House: End Of The Year Tour!
Beach house progress, both big and small, feels like it’s happening so quickly that we hardly have time to keep up with documenting it, but I did walk through the whole house yesterday and make a big ol’ video tour… which basically catches you right up to date! So excuse this post for only having around around a dozen photos (we have thousands on our phones, but they’d take us all day to upload and explain, and nobody got time for that with Christmas being less than a week away).
First let’s start at the front door. We hung a wreath (from Tar-jay) and put some battery powered LED candles with timers in the windows (so they’re auto-pilot even when we’re not there). Hallelujah, the house finally looks lived in! I mean, except for the whole it-has-no-landscaping-and-I-desperately-need-to-sand-and-stain-the-front-door thing. Also I still want to paint those white blocks behind the lanterns to match the house. Someday…
lanterns / wreath / house numbers / doormat / siding: SW Mellow Coral / ceiling: SW Breaktime / trim: SW Pure White
While things are far from finished, things are even farther from where they were this time last year. This photo is from almost exactly a year ago, and looking back is a nice reminder that wrinkly curtains and an unfinished pantry are far smaller problems to work through than THE ENTIRE SIDE OF THE HOUSE BEING TORN OFF. Here’s that whole story if you missed it (yup, we literally had to have 500 square feet removed and rebuild from scratch).
SO YEAH. It’s looking a lot better at the end of 2017 than it did at the end of 2016. And weirdly enough that picture makes me excited to get started on the duplex, because as much as I love having finished walls to decorate and finished floors to arrange furniture on, the process of planning (and dreaming about) all of the potential that’s fills the air during a big demo/rebuilding project is oddly addicting. Can’t wait to share our duplex progress as soon as we have our plans approved and all of our permits pulled! But back to the pink house, where I’m walking you guys through every room in a little video tour of sorts: If you can’t see this in a reader, click through to view it on our blog or you can view it here on YouTube.
If you can’t watch the video right now, I’d definitely recommend dropping back in and catching it when you can (a video is basically worth a million photos and I pretty much cover every crevice and explain a lot of extra stuff I couldn’t squeeze into this post).
One recent update, after months and months of debate, is that we finally pulled the trigger and painted the railing. The vertical balusters had all already been painted (SW Stone Isle), so it was just that top rail and the post at the end that were “wood.” I’ll explain why that’s in quotes in a second. It’s hard to see in this picture since that front post is getting hit with a ton of light through the open door, but we went with a deeper gray tone (SW Perpetual Gray) that’s about 3 shades darker than the trim, so it accents the post and the top rail without being too crazy and compete-y with the standout stars of the entire house (those stained glass windows).
I know what some of you are thinking. NOOOO! How could you disgrace such old beautiful wood with paint?!?! Well, this railing had been covered in a thick paint-like brown stain that showed zero grain and was sticky, roughed up, and ruined in a bunch of places (covered in paint splatters, spackle globs, and decades of other issues). After attempting to sand it down, we learned it was a darker redder wood – meaning we’d never be able to stain it to match the lovely heart pine floors. So, we reasoned that a fresh coat of paint applied nice and evenly was a heckuva lot better than its current state. And it really does look glossy and lovely in person, which makes us incredibly relieved.
The good news is that we don’t have any shortage of wood tones in this house. We have original heart pine everywhere (we stripped and clear-sealed all of the original doors that we could, brought the original floors both upstairs and downstairs back to their glory, etc). This house’s middle name could be wood. Pinkie “Wood” House. Wait that sounds bad. Forget the middle name thing.
Down in the living room, we added this cool wall-mounted bookcase, which instantly made us both say “Ahhh! It looks like an actual room people live in!” We also got to hang some cozy white curtains which need DESPERATELY to be steamed and hemmed. They’re Lenda curtains from Ikea– I just cut off the top tabs and make sure to wash them to pre-shrink them before hanging. We also have them in our home office and love how washable and easy they are. Also, my secondhand brass grasshopper (aka: Brasshopper) is a total badass and I love him more each day.
bookcase / blue pillow / curtains / rods / similar brass grasshopper
Also bought a rug from New England Loom (if you don’t follow them on Instagram you’re missing out because they have so many lovely secondhand rugs to be discovered) and the colors and patterns and antique feeling of the rug is PERFECT for a room that will be assaulted with food and sand and everything else that a rental living room has to deal with, so I have high hopes for it holding up like a champ (seeing as it is decades old already, that really does inspire confidence). That pretty blue pillow is from this Etsy shop (I love all of her pillows) and the pink one is from Target a while back. And you guys know the sofa is the Ikea Karlstad that they no longer make, which is a straight up travesty.
We also updated the light in here to this gleaming beauty from West Elm. The old light was a one-bulb fixture that we hung and immediately said “this room needs way more light.” We love the juxtaposition of this leggier modern light and the old-looking medallion (which is actually from Home Depot – shhh). And the old brick chimney that we discovered behind the wall and exposed is probably my favorite feature in the room, along with the giant windows (this room is 9′ tall, so the windows are easily over 6.5′ feet tall – that’s taller than John!). Don’t mind that TV on the floor. We found something we think will work for in there, just gotta get it out there in our next car load. #AlwaysRoadTrippingWithFurniture
rug source / chandelier / ceiling medallion /curtains / rods
The kitchen came a long way too, with the quartz island going in (it’s Pearl Jasmine by Silestone and we LOVE it so much) and a working sink. Cue the choir of angels! You can hear two ways we saved money on our quartz counters in Podcast Episode #74, which also covers why our original plan to do butcher block there didn’t work out. There are still some things missing though. Mainly, the backsplash that we’ll add after we hang the other missing element: shelves on either side of the stove under the sconces (probably two per side, not sure yet but we’ll keep you posted).
stools / quartz / butcher block / cabinets / range: secondhand refurbished / trim: SW Stone Isle / walls: SW White Heron
The back door was blue for a hot second, which some of you might have seen on Instagram, but as the room came together more John and I both realized that the same gray as the trim (SW Stone Isle) would let the pink stove do her thing and be the accent in the room that she has always been destined to become. Plus, we have a blue chippy door leading to the mudroom nearby, and one blue door + one pink stove is… enough. You know I didn’t love painting that door twice, so if I did it, it had to be done. Ha!
green vase / wood cutting board / wood stand / hanging rod / hood / kettle / sconces / pink salt & pepper
Upstairs the bedrooms are coming along with some art up on the walls, layered cozy bedding, and even headboards. HUZZAH! Still need to hang all the curtains up there (once we do that the headboard will look exactly as wide as the window because we are tricky tricksters). Stay tuned…
rug / large art / lamp / side table / striped blanket / headboard / fan
This is another view of that front bedroom, which is the largest of the four (the bunk room is teeny tiny and the middle bedroom and back bedroom are just fine but not giant). It also has that exposed brick chimney that we discovered hiding behind the wall, and next to it you’ll see my favorite craigslist find of all time that you might have already “met” on Facebook or Instagram when I shared a quick shot of it this weekend. Yes, I really did find an inlay piece of furniture on Craiglist, and yes, it’s currently selling for $2,000 on Restoration Hardware (I got it for $400!). Insert that screaming cat emoji face here. Seriously, it’s the score of a lifetime, and I’m going to share the whole story, including how I fix up a few missing inlay spots soon. So… stay tuned. Again.
And before we move on, that sconce looks crazy small above the dresser (we just hung it as a placeholder and it’s looking like a placeholder, so we’ll probably get a wider double-sconce for that spot soon). Anyway, on with the tour! Or should I say “roll the next flashback!” This is that wall a year ago. Same house. Just nekkid a year ago versus clothed now. With walls. You get what I mean.
And now, the back bedroom. Aka: our room whenever we stay there! Although the front room is the largest and has that lovely exposed brick, the back bedroom has its own master bathroom (complete with my big beautiful clawfoot tub) and it has its own stairs that lead up to it, which are surprisingly useful. We originally thought those back stairs would be more of a fun thing for kids and a cool historic detail to preserve, but we weren’t sure we’d actually use them very much but we go up and down them all the time!
rug / fan / leather stools / striped duvet cover / pocked doors: SW Riverway
One of our bigger projects this past weekend was this built-in dresser that we added to the nook behind the pocket doors that you see above. We love gaining some storage and function in that formerly blank area at the top of the back steps, and there’s more than enough room to pull out the drawers and take like five steps back before you’d fall down the steps (you know I’d be the one to bite it all the way down these steps, so we have to make sure these things we’re adding won’t curse me later).
dresser / mirror / wood top / door color: SW Riverway
John would be quick to point out it’s not complete. We ran out of nails for our nail gun, so the trim still needs to be attached, caulked, etc. But basically, a Malm from Ikea fit pretty perfectly in the space, so we made it look even more built-in by removing and reinstalling the molding around it (see below) and adding a few skinny filler pieces to each side (scraps from our kitchen install). We also popped some leftover butcher block counter from downstairs on top to tie into the pine floors and we’re also planning to add some leather pulls to it to tie in the stools at the foot of the bed (you can see them in the shot two photos up). Can’t wait to finish it up and share the final pics!
Next let’s move onto the master bathroom, which is easily my favorite room because I get to soak in that big ol’ tub after hours of DIY and it feels so freaking good every time. Except for the first time. I had sort of a false start in there (more on that in this podcast) but now the tub and I are bros and only happy things happen when I’m in there. And the kids love it too.
marble table / floor tile / accent floor tile / wall hooks / blinds / tub color: SW Riverway
I’m basically salivating while looking at this because we’re back home and our house has two bathrooms that we still have to redo and two tubs that are about 10″ deep (half of my body sticks out like an iceberg) so I’m itching to add a deeper bathtub into my life here at home.
The hall bath is still my boo too, thanks to my favorite vanity ever. The top is tiled with marble and the rounded wood drawers make it look like a furniture piece we converted to be a vanity but it came that way and WE SALUTE IT because goodness knows we have other stuff to keep us busy. Still on the list: making built-in bunk beds, building out the pantry and the mudroom, tiling the backsplash, landscaping, etc, etc. That big round silver mirror is an awesome (and recent!) HomeGoods find (the same one in brass hangs above our mantel at home) so if you’re looking for one in either color, try HomeGoods. Target also has a really similar one that’s slightly smaller and thinner in gold.
vanity / faucet / drum stool / light fixture / floor tile
And although we haven’t built the wall to wall bunkbeds in our small-but-mighty kids room yet, we did hang art. And that’s half the battle, right? (Nope, half the battle is being halfway done with the bunkbeds, but let me lie to myself for a second, ok?). That cute colorful painting is from our dear friend Lesli Devito (remember when we house crashed her wayyyy back here) and if you don’t have one of her paintings or prints I highly recommend getting one. The door also got a sign that says Mermaids Welcome and it made my whole life to hang it up (also we took a poll among a bunch of kids and basically everyone is cool with mermaid and pirates, but don’t get me started on how split the group was on dolphins).
marble table / mermaids welcome plaque / art by Lesli DeVito
So there you have it: a tour as of yesterday of the beach house (remember: watch the video! it has approximately 98% more info than some pics and captions can convey). Also, we hope you have a very happy holiday surrounded by the ones you love and delicious food and all the mermaid-related memorabilia that your heart desires. And if you have a tub where your entire body can be submerged, know that I, for one, now know what I’m missing and am deeply deeply jealous.
P.S. To see the entire process of fixing up this beach house (from floor planning and demo to tiling and tiling and tiling and getting the floors redone) here’s a full category of beach house updates for you to flip through.
*This post contains affiliate links*
The post Beach House: End Of The Year Tour! appeared first on Young House Love.
Beach House: End Of The Year Tour! published first on http://ift.tt/2uiWrIt
0 notes
Text
Beach House: End Of The Year Tour!
Beach house progress, both big and small, feels like it’s happening so quickly that we hardly have time to keep up with documenting it, but I did walk through the whole house yesterday and make a big ol’ video tour… which basically catches you right up to date! So excuse this post for only having around around a dozen photos (we have thousands on our phones, but they’d take us all day to upload and explain, and nobody got time for that with Christmas being less than a week away).
First let’s start at the front door. We hung a wreath (from Tar-jay) and put some battery powered LED candles with timers in the windows (so they’re auto-pilot even when we’re not there). Hallelujah, the house finally looks lived in! I mean, except for the whole it-has-no-landscaping-and-I-desperately-need-to-sand-and-stain-the-front-door thing. Also I still want to paint those white blocks behind the lanterns to match the house. Someday…
lanterns / wreath / house numbers / doormat / siding: SW Mellow Coral / ceiling: SW Breaktime / trim: SW Pure White
While things are far from finished, things are even farther from where they were this time last year. This photo is from almost exactly a year ago, and looking back is a nice reminder that wrinkly curtains and an unfinished pantry are far smaller problems to work through than THE ENTIRE SIDE OF THE HOUSE BEING TORN OFF. Here’s that whole story if you missed it (yup, we literally had to have 500 square feet removed and rebuild from scratch).
SO YEAH. It’s looking a lot better at the end of 2017 than it did at the end of 2016. And weirdly enough that picture makes me excited to get started on the duplex, because as much as I love having finished walls to decorate and finished floors to arrange furniture on, the process of planning (and dreaming about) all of the potential that’s fills the air during a big demo/rebuilding project is oddly addicting. Can’t wait to share our duplex progress as soon as we have our plans approved and all of our permits pulled! But back to the pink house, where I’m walking you guys through every room in a little video tour of sorts: If you can’t see this in a reader, click through to view it on our blog or you can view it here on YouTube.
If you can’t watch the video right now, I’d definitely recommend dropping back in and catching it when you can (a video is basically worth a million photos and I pretty much cover every crevice and explain a lot of extra stuff I couldn’t squeeze into this post).
One recent update, after months and months of debate, is that we finally pulled the trigger and painted the railing. The vertical balusters had all already been painted (SW Stone Isle), so it was just that top rail and the post at the end that were “wood.” I’ll explain why that’s in quotes in a second. It’s hard to see in this picture since that front post is getting hit with a ton of light through the open door, but we went with a deeper gray tone (SW Perpetual Gray) that’s about 3 shades darker than the trim, so it accents the post and the top rail without being too crazy and compete-y with the standout stars of the entire house (those stained glass windows).
I know what some of you are thinking. NOOOO! How could you disgrace such old beautiful wood with paint?!?! Well, this railing had been covered in a thick paint-like brown stain that showed zero grain and was sticky, roughed up, and ruined in a bunch of places (covered in paint splatters, spackle globs, and decades of other issues). After attempting to sand it down, we learned it was a darker redder wood – meaning we’d never be able to stain it to match the lovely heart pine floors. So, we reasoned that a fresh coat of paint applied nice and evenly was a heckuva lot better than its current state. And it really does look glossy and lovely in person, which makes us incredibly relieved.
The good news is that we don’t have any shortage of wood tones in this house. We have original heart pine everywhere (we stripped and clear-sealed all of the original doors that we could, brought the original floors both upstairs and downstairs back to their glory, etc). This house’s middle name could be wood. Pinkie “Wood” House. Wait that sounds bad. Forget the middle name thing.
Down in the living room, we added this cool wall-mounted bookcase, which instantly made us both say “Ahhh! It looks like an actual room people live in!” We also got to hang some cozy white curtains which need DESPERATELY to be steamed and hemmed. They’re Lenda curtains from Ikea– I just cut off the top tabs and make sure to wash them to pre-shrink them before hanging. We also have them in our home office and love how washable and easy they are. Also, my secondhand brass grasshopper (aka: Brasshopper) is a total badass and I love him more each day.
bookcase / blue pillow / curtains / rods / similar brass grasshopper
Also bought a rug from New England Loom (if you don’t follow them on Instagram you’re missing out because they have so many lovely secondhand rugs to be discovered) and the colors and patterns and antique feeling of the rug is PERFECT for a room that will be assaulted with food and sand and everything else that a rental living room has to deal with, so I have high hopes for it holding up like a champ (seeing as it is decades old already, that really does inspire confidence). That pretty blue pillow is from this Etsy shop (I love all of her pillows) and the pink one is from Target a while back. And you guys know the sofa is the Ikea Karlstad that they no longer make, which is a straight up travesty.
We also updated the light in here to this gleaming beauty from West Elm. The old light was a one-bulb fixture that we hung and immediately said “this room needs way more light.” We love the juxtaposition of this leggier modern light and the old-looking medallion (which is actually from Home Depot – shhh). And the old brick chimney that we discovered behind the wall and exposed is probably my favorite feature in the room, along with the giant windows (this room is 9′ tall, so the windows are easily over 6.5′ feet tall – that’s taller than John!). Don’t mind that TV on the floor. We found something we think will work for in there, just gotta get it out there in our next car load. #AlwaysRoadTrippingWithFurniture
rug source / chandelier / ceiling medallion /curtains / rods
The kitchen came a long way too, with the quartz island going in (it’s Pearl Jasmine by Silestone and we LOVE it so much) and a working sink. Cue the choir of angels! You can hear two ways we saved money on our quartz counters in Podcast Episode #74, which also covers why our original plan to do butcher block there didn’t work out. There are still some things missing though. Mainly, the backsplash that we’ll add after we hang the other missing element: shelves on either side of the stove under the sconces (probably two per side, not sure yet but we’ll keep you posted).
stools / quartz / butcher block / cabinets / range: secondhand refurbished / trim: SW Stone Isle / walls: SW White Heron
The back door was blue for a hot second, which some of you might have seen on Instagram, but as the room came together more John and I both realized that the same gray as the trim (SW Stone Isle) would let the pink stove do her thing and be the accent in the room that she has always been destined to become. Plus, we have a blue chippy door leading to the mudroom nearby, and one blue door + one pink stove is… enough. You know I didn’t love painting that door twice, so if I did it, it had to be done. Ha!
green vase / wood cutting board / wood stand / hanging rod / hood / kettle / sconces / pink salt & pepper
Upstairs the bedrooms are coming along with some art up on the walls, layered cozy bedding, and even headboards. HUZZAH! Still need to hang all the curtains up there (once we do that the headboard will look exactly as wide as the window because we are tricky tricksters). Stay tuned…
rug / large art / lamp / side table / striped blanket / headboard / fan
This is another view of that front bedroom, which is the largest of the four (the bunk room is teeny tiny and the middle bedroom and back bedroom are just fine but not giant). It also has that exposed brick chimney that we discovered hiding behind the wall, and next to it you’ll see my favorite craigslist find of all time that you might have already “met” on Facebook or Instagram when I shared a quick shot of it this weekend. Yes, I really did find an inlay piece of furniture on Craiglist, and yes, it’s currently selling for $2,000 on Restoration Hardware (I got it for $400!). Insert that screaming cat emoji face here. Seriously, it’s the score of a lifetime, and I’m going to share the whole story, including how I fix up a few missing inlay spots soon. So… stay tuned. Again.
And before we move on, that sconce looks crazy small above the dresser (we just hung it as a placeholder and it’s looking like a placeholder, so we’ll probably get a wider double-sconce for that spot soon). Anyway, on with the tour! Or should I say “roll the next flashback!” This is that wall a year ago. Same house. Just nekkid a year ago versus clothed now. With walls. You get what I mean.
And now, the back bedroom. Aka: our room whenever we stay there! Although the front room is the largest and has that lovely exposed brick, the back bedroom has its own master bathroom (complete with my big beautiful clawfoot tub) and it has its own stairs that lead up to it, which are surprisingly useful. We originally thought those back stairs would be more of a fun thing for kids and a cool historic detail to preserve, but we weren’t sure we’d actually use them very much but we go up and down them all the time!
rug / fan / leather stools / striped duvet cover / pocked doors: SW Riverway
One of our bigger projects this past weekend was this built-in dresser that we added to the nook behind the pocket doors that you see above. We love gaining some storage and function in that formerly blank area at the top of the back steps, and there’s more than enough room to pull out the drawers and take like five steps back before you’d fall down the steps (you know I’d be the one to bite it all the way down these steps, so we have to make sure these things we’re adding won’t curse me later).
dresser / mirror / wood top / door color: SW Riverway
John would be quick to point out it’s not complete. We ran out of nails for our nail gun, so the trim still needs to be attached, caulked, etc. But basically, a Malm from Ikea fit pretty perfectly in the space, so we made it look even more built-in by removing and reinstalling the molding around it (see below) and adding a few skinny filler pieces to each side (scraps from our kitchen install). We also popped some leftover butcher block counter from downstairs on top to tie into the pine floors and we’re also planning to add some leather pulls to it to tie in the stools at the foot of the bed (you can see them in the shot two photos up). Can’t wait to finish it up and share the final pics!
Next let’s move onto the master bathroom, which is easily my favorite room because I get to soak in that big ol’ tub after hours of DIY and it feels so freaking good every time. Except for the first time. I had sort of a false start in there (more on that in this podcast) but now the tub and I are bros and only happy things happen when I’m in there. And the kids love it too.
marble table / floor tile / accent floor tile / wall hooks / blinds / tub color: SW Riverway
I’m basically salivating while looking at this because we’re back home and our house has two bathrooms that we still have to redo and two tubs that are about 10″ deep (half of my body sticks out like an iceberg) so I’m itching to add a deeper bathtub into my life here at home.
The hall bath is still my boo too, thanks to my favorite vanity ever. The top is tiled with marble and the rounded wood drawers make it look like a furniture piece we converted to be a vanity but it came that way and WE SALUTE IT because goodness knows we have other stuff to keep us busy. Still on the list: making built-in bunk beds, building out the pantry and the mudroom, tiling the backsplash, landscaping, etc, etc. That big round silver mirror is an awesome (and recent!) HomeGoods find (the same one in brass hangs above our mantel at home) so if you’re looking for one in either color, try HomeGoods. Target also has a really similar one that’s slightly smaller and thinner in gold.
vanity / faucet / drum stool / light fixture / floor tile
And although we haven’t built the wall to wall bunkbeds in our small-but-mighty kids room yet, we did hang art. And that’s half the battle, right? (Nope, half the battle is being halfway done with the bunkbeds, but let me lie to myself for a second, ok?). That cute colorful painting is from our dear friend Lesli Devito (remember when we house crashed her wayyyy back here) and if you don’t have one of her paintings or prints I highly recommend getting one. The door also got a sign that says Mermaids Welcome and it made my whole life to hang it up (also we took a poll among a bunch of kids and basically everyone is cool with mermaid and pirates, but don’t get me started on how split the group was on dolphins).
marble table / mermaids welcome plaque / art by Lesli DeVito
So there you have it: a tour as of yesterday of the beach house (remember: watch the video! it has approximately 98% more info than some pics and captions can convey). Also, we hope you have a very happy holiday surrounded by the ones you love and delicious food and all the mermaid-related memorabilia that your heart desires. And if you have a tub where your entire body can be submerged, know that I, for one, now know what I’m missing and am deeply deeply jealous.
P.S. To see the entire process of fixing up this beach house (from floor planning and demo to tiling and tiling and tiling and getting the floors redone) here’s a full category of beach house updates for you to flip through.
*This post contains affiliate links*
The post Beach House: End Of The Year Tour! appeared first on Young House Love.
Beach House: End Of The Year Tour! published first on http://ift.tt/2BedaSe
0 notes
Photo
Beach House: End Of The Year Tour! http://ift.tt/2D8c9Mf
Beach house progress, both big and small, feels like it’s happening so quickly that we hardly have time to keep up with documenting it, but I did walk through the whole house yesterday and make a big ol’ video tour… which basically catches you right up to date! So excuse this post for only having around around a dozen photos (we have thousands on our phones, but they’d take us all day to upload and explain, and nobody got time for that with Christmas being less than a week away).
First let’s start at the front door. We hung a wreath (from Tar-jay) and put some battery powered LED candles with timers in the windows (so they’re auto-pilot even when we’re not there). Hallelujah, the house finally looks lived in! I mean, except for the whole it-has-no-landscaping-and-I-desperately-need-to-sand-and-stain-the-front-door thing. Also I still want to paint those white blocks behind the lanterns to match the house. Someday…
lanterns / wreath / house numbers / doormat / siding: SW Mellow Coral / ceiling: SW Breaktime / trim: SW Pure White
While things are far from finished, things are even farther from where they were this time last year. This photo is from almost exactly a year ago, and looking back is a nice reminder that wrinkly curtains and an unfinished pantry are far smaller problems to work through than THE ENTIRE SIDE OF THE HOUSE BEING TORN OFF. Here’s that whole story if you missed it (yup, we literally had to have 500 square feet removed and rebuild from scratch).
SO YEAH. It’s looking a lot better at the end of 2017 than it did at the end of 2016. And weirdly enough that picture makes me excited to get started on the duplex, because as much as I love having finished walls to decorate and finished floors to arrange furniture on, the process of planning (and dreaming about) all of the potential that’s fills the air during a big demo/rebuilding project is oddly addicting. Can’t wait to share our duplex progress as soon as we have our plans approved and all of our permits pulled! But back to the pink house, where I’m walking you guys through every room in a little video tour of sorts: If you can’t see this in a reader, click through to view it on our blog or you can view it here on YouTube.
If you can’t watch the video right now, I’d definitely recommend dropping back in and catching it when you can (a video is basically worth a million photos and I pretty much cover every crevice and explain a lot of extra stuff I couldn’t squeeze into this post).
One recent update, after months and months of debate, is that we finally pulled the trigger and painted the railing. The vertical balusters had all already been painted (SW Stone Isle), so it was just that top rail and the post at the end that were “wood.” I’ll explain why that’s in quotes in a second. It’s hard to see in this picture since that front post is getting hit with a ton of light through the open door, but we went with a deeper gray tone (SW Perpetual Gray) that’s about 3 shades darker than the trim, so it accents the post and the top rail without being too crazy and compete-y with the standout stars of the entire house (those stained glass windows).
I know what some of you are thinking. NOOOO! How could you disgrace such old beautiful wood with paint?!?! Well, this railing had been covered in a thick paint-like brown stain that showed zero grain and was sticky, roughed up, and ruined in a bunch of places (covered in paint splatters, spackle globs, and decades of other issues). After attempting to sand it down, we learned it was a darker redder wood – meaning we’d never be able to stain it to match the lovely heart pine floors. So, we reasoned that a fresh coat of paint applied nice and evenly was a heckuva lot better than its current state. And it really does look glossy and lovely in person, which makes us incredibly relieved.
The good news is that we don’t have any shortage of wood tones in this house. We have original heart pine everywhere (we stripped and clear-sealed all of the original doors that we could, brought the original floors both upstairs and downstairs back to their glory, etc). This house’s middle name could be wood. Pinkie “Wood” House. Wait that sounds bad. Forget the middle name thing.
Down in the living room, we added this cool wall-mounted bookcase, which instantly made us both say “Ahhh! It looks like an actual room people live in!” We also got to hang some cozy white curtains which need DESPERATELY to be steamed and hemmed. They’re Lenda curtains from Ikea– I just cut off the top tabs and make sure to wash them to pre-shrink them before hanging. We also have them in our home office and love how washable and easy they are. Also, my secondhand brass grasshopper (aka: Brasshopper) is a total badass and I love him more each day.
bookcase / blue pillow / curtains / rods / similar brass grasshopper
Also bought a rug from New England Loom (if you don’t follow them on Instagram you’re missing out because they have so many lovely secondhand rugs to be discovered) and the colors and patterns and antique feeling of the rug is PERFECT for a room that will be assaulted with food and sand and everything else that a rental living room has to deal with, so I have high hopes for it holding up like a champ (seeing as it is decades old already, that really does inspire confidence). That pretty blue pillow is from this Etsy shop (I love all of her pillows) and the pink one is from Target a while back. And you guys know the sofa is the Ikea Karlstad that they no longer make, which is a straight up travesty.
We also updated the light in here to this gleaming beauty from West Elm. The old light was a one-bulb fixture that we hung and immediately said “this room needs way more light.” We love the juxtaposition of this leggier modern light and the old-looking medallion (which is actually from Home Depot – shhh). And the old brick chimney that we discovered behind the wall and exposed is probably my favorite feature in the room, along with the giant windows (this room is 9′ tall, so the windows are easily over 6.5′ feet tall – that’s taller than John!). Don’t mind that TV on the floor. We found something we think will work for in there, just gotta get it out there in our next car load. #AlwaysRoadTrippingWithFurniture
rug source / chandelier / ceiling medallion /curtains / rods
The kitchen came a long way too, with the quartz island going in (it’s Pearl Jasmine by Silestone and we LOVE it so much) and a working sink. Cue the choir of angels! You can hear two ways we saved money on our quartz counters in Podcast Episode #74, which also covers why our original plan to do butcher block there didn’t work out. There are still some things missing though. Mainly, the backsplash that we’ll add after we hang the other missing element: shelves on either side of the stove under the sconces (probably two per side, not sure yet but we’ll keep you posted).
stools / quartz / butcher block / cabinets / range: secondhand refurbished / trim: SW Stone Isle / walls: SW White Heron
The back door was blue for a hot second, which some of you might have seen on Instagram, but as the room came together more John and I both realized that the same gray as the trim (SW Stone Isle) would let the pink stove do her thing and be the accent in the room that she has always been destined to become. Plus, we have a blue chippy door leading to the mudroom nearby, and one blue door + one pink stove is… enough. You know I didn’t love painting that door twice, so if I did it, it had to be done. Ha!
green vase / wood cutting board / wood stand / hanging rod / hood / kettle / sconces / pink salt & pepper
Upstairs the bedrooms are coming along with some art up on the walls, layered cozy bedding, and even headboards. HUZZAH! Still need to hang all the curtains up there (once we do that the headboard will look exactly as wide as the window because we are tricky tricksters). Stay tuned…
rug / large art / lamp / side table / striped blanket / headboard / fan
This is another view of that front bedroom, which is the largest of the four (the bunk room is teeny tiny and the middle bedroom and back bedroom are just fine but not giant). It also has that exposed brick chimney that we discovered hiding behind the wall, and next to it you’ll see my favorite craigslist find of all time that you might have already “met” on Facebook or Instagram when I shared a quick shot of it this weekend. Yes, I really did find an inlay piece of furniture on Craiglist, and yes, it’s currently selling for $2,000 on Restoration Hardware (I got it for $400!). Insert that screaming cat emoji face here. Seriously, it’s the score of a lifetime, and I’m going to share the whole story, including how I fix up a few missing inlay spots soon. So… stay tuned. Again.
And before we move on, that sconce looks crazy small above the dresser (we just hung it as a placeholder and it’s looking like a placeholder, so we’ll probably get a wider double-sconce for that spot soon). Anyway, on with the tour! Or should I say “roll the next flashback!” This is that wall a year ago. Same house. Just nekkid a year ago versus clothed now. With walls. You get what I mean.
And now, the back bedroom. Aka: our room whenever we stay there! Although the front room is the largest and has that lovely exposed brick, the back bedroom has its own master bathroom (complete with my big beautiful clawfoot tub) and it has its own stairs that lead up to it, which are surprisingly useful. We originally thought those back stairs would be more of a fun thing for kids and a cool historic detail to preserve, but we weren’t sure we’d actually use them very much but we go up and down them all the time!
rug / fan / leather stools / striped duvet cover / pocked doors: SW Riverway
One of our bigger projects this past weekend was this built-in dresser that we added to the nook behind the pocket doors that you see above. We love gaining some storage and function in that formerly blank area at the top of the back steps, and there’s more than enough room to pull out the drawers and take like five steps back before you’d fall down the steps (you know I’d be the one to bite it all the way down these steps, so we have to make sure these things we’re adding won’t curse me later).
dresser / mirror / wood top / door color: SW Riverway
John would be quick to point out it’s not complete. We ran out of nails for our nail gun, so the trim still needs to be attached, caulked, etc. But basically, a Malm from Ikea fit pretty perfectly in the space, so we made it look even more built-in by removing and reinstalling the molding around it (see below) and adding a few skinny filler pieces to each side (scraps from our kitchen install). We also popped some leftover butcher block counter from downstairs on top to tie into the pine floors and we’re also planning to add some leather pulls to it to tie in the stools at the foot of the bed (you can see them in the shot two photos up). Can’t wait to finish it up and share the final pics!
Next let’s move onto the master bathroom, which is easily my favorite room because I get to soak in that big ol’ tub after hours of DIY and it feels so freaking good every time. Except for the first time. I had sort of a false start in there (more on that in this podcast) but now the tub and I are bros and only happy things happen when I’m in there. And the kids love it too.
marble table / floor tile / accent floor tile / wall hooks / blinds / tub color: SW Riverway
I’m basically salivating while looking at this because we’re back home and our house has two bathrooms that we still have to redo and two tubs that are about 10″ deep (half of my body sticks out like an iceberg) so I’m itching to add a deeper bathtub into my life here at home.
The hall bath is still my boo too, thanks to my favorite vanity ever. The top is tiled with marble and the rounded wood drawers make it look like a furniture piece we converted to be a vanity but it came that way and WE SALUTE IT because goodness knows we have other stuff to keep us busy. Still on the list: making built-in bunk beds, building out the pantry and the mudroom, tiling the backsplash, landscaping, etc, etc. That big round silver mirror is an awesome (and recent!) HomeGoods find (the same one in brass hangs above our mantel at home) so if you’re looking for one in either color, try HomeGoods. Target also has a really similar one that’s slightly smaller and thinner in gold.
vanity / faucet / drum stool / light fixture / floor tile
And although we haven’t built the wall to wall bunkbeds in our small-but-mighty kids room yet, we did hang art. And that’s half the battle, right? (Nope, half the battle is being halfway done with the bunkbeds, but let me lie to myself for a second, ok?). That cute colorful painting is from our dear friend Lesli Devito (remember when we house crashed her wayyyy back here) and if you don’t have one of her paintings or prints I highly recommend getting one. The door also got a sign that says Mermaids Welcome and it made my whole life to hang it up (also we took a poll among a bunch of kids and basically everyone is cool with mermaid and pirates, but don’t get me started on how split the group was on dolphins).
marble table / mermaids welcome plaque / art by Lesli DeVito
So there you have it: a tour as of yesterday of the beach house (remember: watch the video! it has approximately 98% more info than some pics and captions can convey). Also, we hope you have a very happy holiday surrounded by the ones you love and delicious food and all the mermaid-related memorabilia that your heart desires. And if you have a tub where your entire body can be submerged, know that I, for one, now know what I’m missing and am deeply deeply jealous.
P.S. To see the entire process of fixing up this beach house (from floor planning and demo to tiling and tiling and tiling and getting the floors redone) here’s a full category of beach house updates for you to flip through.
*This post contains affiliate links*
The post Beach House: End Of The Year Tour! appeared first on Young House Love.
0 notes
Text
Beach House: End Of The Year Tour!
Beach house progress, both big and small, feels like it’s happening so quickly that we hardly have time to keep up with documenting it, but I did walk through the whole house yesterday and make a big ol’ video tour… which basically catches you right up to date! So excuse this post for only having around around a dozen photos (we have thousands on our phones, but they’d take us all day to upload and explain, and nobody got time for that with Christmas being less than a week away).
First let’s start at the front door. We hung a wreath (from Tar-jay) and put some battery powered LED candles with timers in the windows (so they’re auto-pilot even when we’re not there). Hallelujah, the house finally looks lived in! I mean, except for the whole it-has-no-landscaping-and-I-desperately-need-to-sand-and-stain-the-front-door thing. Also I still want to paint those white blocks behind the lanterns to match the house. Someday…
lanterns / wreath / house numbers / doormat / siding: SW Mellow Coral / ceiling: SW Breaktime / trim: SW Pure White
While things are far from finished, things are even farther from where they were this time last year. This photo is from almost exactly a year ago, and looking back is a nice reminder that wrinkly curtains and an unfinished pantry are far smaller problems to work through than THE ENTIRE SIDE OF THE HOUSE BEING TORN OFF. Here’s that whole story if you missed it (yup, we literally had to have 500 square feet removed and rebuild from scratch).
SO YEAH. It’s looking a lot better at the end of 2017 than it did at the end of 2016. And weirdly enough that picture makes me excited to get started on the duplex, because as much as I love having finished walls to decorate and finished floors to arrange furniture on, the process of planning (and dreaming about) all of the potential that’s fills the air during a big demo/rebuilding project is oddly addicting. Can’t wait to share our duplex progress as soon as we have our plans approved and all of our permits pulled! But back to the pink house, where I’m walking you guys through every room in a little video tour of sorts: If you can’t see this in a reader, click through to view it on our blog or you can view it here on YouTube.
If you can’t watch the video right now, I’d definitely recommend dropping back in and catching it when you can (a video is basically worth a million photos and I pretty much cover every crevice and explain a lot of extra stuff I couldn’t squeeze into this post).
One recent update, after months and months of debate, is that we finally pulled the trigger and painted the railing. The vertical balusters had all already been painted (SW Stone Isle), so it was just that top rail and the post at the end that were “wood.” I’ll explain why that’s in quotes in a second. It’s hard to see in this picture since that front post is getting hit with a ton of light through the open door, but we went with a deeper gray tone (SW Perpetual Gray) that’s about 3 shades darker than the trim, so it accents the post and the top rail without being too crazy and compete-y with the standout stars of the entire house (those stained glass windows).
I know what some of you are thinking. NOOOO! How could you disgrace such old beautiful wood with paint?!?! Well, this railing had been covered in a thick paint-like brown stain that showed zero grain and was sticky, roughed up, and ruined in a bunch of places (covered in paint splatters, spackle globs, and decades of other issues). After attempting to sand it down, we learned it was a darker redder wood – meaning we’d never be able to stain it to match the lovely heart pine floors. So, we reasoned that a fresh coat of paint applied nice and evenly was a heckuva lot better than its current state. And it really does look glossy and lovely in person, which makes us incredibly relieved.
The good news is that we don’t have any shortage of wood tones in this house. We have original heart pine everywhere (we stripped and clear-sealed all of the original doors that we could, brought the original floors both upstairs and downstairs back to their glory, etc). This house’s middle name could be wood. Pinkie “Wood” House. Wait that sounds bad. Forget the middle name thing.
Down in the living room, we added this cool wall-mounted bookcase, which instantly made us both say “Ahhh! It looks like an actual room people live in!” We also got to hang some cozy white curtains which need DESPERATELY to be steamed and hemmed. They’re Lenda curtains from Ikea– I just cut off the top tabs and make sure to wash them to pre-shrink them before hanging. We also have them in our home office and love how washable and easy they are. Also, my secondhand brass grasshopper (aka: Brasshopper) is a total badass and I love him more each day.
bookcase / blue pillow / curtains / rods / similar brass grasshopper
Also bought a rug from New England Loom (if you don’t follow them on Instagram you’re missing out because they have so many lovely secondhand rugs to be discovered) and the colors and patterns and antique feeling of the rug is PERFECT for a room that will be assaulted with food and sand and everything else that a rental living room has to deal with, so I have high hopes for it holding up like a champ (seeing as it is decades old already, that really does inspire confidence). That pretty blue pillow is from this Etsy shop (I love all of her pillows) and the pink one is from Target a while back. And you guys know the sofa is the Ikea Karlstad that they no longer make, which is a straight up travesty.
We also updated the light in here to this gleaming beauty from West Elm. The old light was a one-bulb fixture that we hung and immediately said “this room needs way more light.” We love the juxtaposition of this leggier modern light and the old-looking medallion (which is actually from Home Depot – shhh). And the old brick chimney that we discovered behind the wall and exposed is probably my favorite feature in the room, along with the giant windows (this room is 9′ tall, so the windows are easily over 6.5′ feet tall – that’s taller than John!). Don’t mind that TV on the floor. We found something we think will work for in there, just gotta get it out there in our next car load. #AlwaysRoadTrippingWithFurniture
rug source / chandelier / ceiling medallion /curtains / rods
The kitchen came a long way too, with the quartz island going in (it’s Pearl Jasmine by Silestone and we LOVE it so much) and a working sink. Cue the choir of angels! You can hear two ways we saved money on our quartz counters in Podcast Episode #74, which also covers why our original plan to do butcher block there didn’t work out. There are still some things missing though. Mainly, the backsplash that we’ll add after we hang the other missing element: shelves on either side of the stove under the sconces (probably two per side, not sure yet but we’ll keep you posted).
stools / quartz / butcher block / cabinets / range: secondhand refurbished / trim: SW Stone Isle / walls: SW White Heron
The back door was blue for a hot second, which some of you might have seen on Instagram, but as the room came together more John and I both realized that the same gray as the trim (SW Stone Isle) would let the pink stove do her thing and be the accent in the room that she has always been destined to become. Plus, we have a blue chippy door leading to the mudroom nearby, and one blue door + one pink stove is… enough. You know I didn’t love painting that door twice, so if I did it, it had to be done. Ha!
green vase / wood cutting board / wood stand / hanging rod / hood / kettle / sconces / pink salt & pepper
Upstairs the bedrooms are coming along with some art up on the walls, layered cozy bedding, and even headboards. HUZZAH! Still need to hang all the curtains up there (once we do that the headboard will look exactly as wide as the window because we are tricky tricksters). Stay tuned…
rug / large art / lamp / side table / striped blanket / headboard / fan
This is another view of that front bedroom, which is the largest of the four (the bunk room is teeny tiny and the middle bedroom and back bedroom are just fine but not giant). It also has that exposed brick chimney that we discovered hiding behind the wall, and next to it you’ll see my favorite craigslist find of all time that you might have already “met” on Facebook or Instagram when I shared a quick shot of it this weekend. Yes, I really did find an inlay piece of furniture on Craiglist, and yes, it’s currently selling for $2,000 on Restoration Hardware (I got it for $400!). Insert that screaming cat emoji face here. Seriously, it’s the score of a lifetime, and I’m going to share the whole story, including how I fix up a few missing inlay spots soon. So… stay tuned. Again.
And before we move on, that sconce looks crazy small above the dresser (we just hung it as a placeholder and it’s looking like a placeholder, so we’ll probably get a wider double-sconce for that spot soon). Anyway, on with the tour! Or should I say “roll the next flashback!” This is that wall a year ago. Same house. Just nekkid a year ago versus clothed now. With walls. You get what I mean.
And now, the back bedroom. Aka: our room whenever we stay there! Although the front room is the largest and has that lovely exposed brick, the back bedroom has its own master bathroom (complete with my big beautiful clawfoot tub) and it has its own stairs that lead up to it, which are surprisingly useful. We originally thought those back stairs would be more of a fun thing for kids and a cool historic detail to preserve, but we weren’t sure we’d actually use them very much but we go up and down them all the time!
rug / fan / leather stools / striped duvet cover / pocked doors: SW Riverway
One of our bigger projects this past weekend was this built-in dresser that we added to the nook behind the pocket doors that you see above. We love gaining some storage and function in that formerly blank area at the top of the back steps, and there’s more than enough room to pull out the drawers and take like five steps back before you’d fall down the steps (you know I’d be the one to bite it all the way down these steps, so we have to make sure these things we’re adding won’t curse me later).
dresser / mirror / wood top / door color: SW Riverway
John would be quick to point out it’s not complete. We ran out of nails for our nail gun, so the trim still needs to be attached, caulked, etc. But basically, a Malm from Ikea fit pretty perfectly in the space, so we made it look even more built-in by removing and reinstalling the molding around it (see below) and adding a few skinny filler pieces to each side (scraps from our kitchen install). We also popped some leftover butcher block counter from downstairs on top to tie into the pine floors and we’re also planning to add some leather pulls to it to tie in the stools at the foot of the bed (you can see them in the shot two photos up). Can’t wait to finish it up and share the final pics!
Next let’s move onto the master bathroom, which is easily my favorite room because I get to soak in that big ol’ tub after hours of DIY and it feels so freaking good every time. Except for the first time. I had sort of a false start in there (more on that in this podcast) but now the tub and I are bros and only happy things happen when I’m in there. And the kids love it too.
marble table / floor tile / accent floor tile / wall hooks / blinds / tub color: SW Riverway
I’m basically salivating while looking at this because we’re back home and our house has two bathrooms that we still have to redo and two tubs that are about 10″ deep (half of my body sticks out like an iceberg) so I’m itching to add a deeper bathtub into my life here at home.
The hall bath is still my boo too, thanks to my favorite vanity ever. The top is tiled with marble and the rounded wood drawers make it look like a furniture piece we converted to be a vanity but it came that way and WE SALUTE IT because goodness knows we have other stuff to keep us busy. Still on the list: making built-in bunk beds, building out the pantry and the mudroom, tiling the backsplash, landscaping, etc, etc. That big round silver mirror is an awesome (and recent!) HomeGoods find (the same one in brass hangs above our mantel at home) so if you’re looking for one in either color, try HomeGoods. Target also has a really similar one that’s slightly smaller and thinner in gold.
vanity / faucet / drum stool / light fixture / floor tile
And although we haven’t built the wall to wall bunkbeds in our small-but-mighty kids room yet, we did hang art. And that’s half the battle, right? (Nope, half the battle is being halfway done with the bunkbeds, but let me lie to myself for a second, ok?). That cute colorful painting is from our dear friend Lesli Devito (remember when we house crashed her wayyyy back here) and if you don’t have one of her paintings or prints I highly recommend getting one. The door also got a sign that says Mermaids Welcome and it made my whole life to hang it up (also we took a poll among a bunch of kids and basically everyone is cool with mermaid and pirates, but don’t get me started on how split the group was on dolphins).
marble table / mermaids welcome plaque / art by Lesli DeVito
So there you have it: a tour as of yesterday of the beach house (remember: watch the video! it has approximately 98% more info than some pics and captions can convey). Also, we hope you have a very happy holiday surrounded by the ones you love and delicious food and all the mermaid-related memorabilia that your heart desires. And if you have a tub where your entire body can be submerged, know that I, for one, now know what I’m missing and am deeply deeply jealous.
P.S. To see the entire process of fixing up this beach house (from floor planning and demo to tiling and tiling and tiling and getting the floors redone) here’s a full category of beach house updates for you to flip through.
*This post contains affiliate links*
The post Beach House: End Of The Year Tour! appeared first on Young House Love.
Beach House: End Of The Year Tour! published first on http://ift.tt/2hUI8pL
0 notes
Text
Beach House: End Of The Year Tour!
Beach house progress, both big and small, feels like it’s happening so quickly that we hardly have time to keep up with documenting it, but I did walk through the whole house yesterday and make a big ol’ video tour… which basically catches you right up to date! So excuse this post for only having around around a dozen photos (we have thousands on our phones, but they’d take us all day to upload and explain, and nobody got time for that with Christmas being less than a week away).
First let’s start at the front door. We hung a wreath (from Tar-jay) and put some battery powered LED candles with timers in the windows (so they’re auto-pilot even when we’re not there). Hallelujah, the house finally looks lived in! I mean, except for the whole it-has-no-landscaping-and-I-desperately-need-to-sand-and-stain-the-front-door thing. Also I still want to paint those white blocks behind the lanterns to match the house. Someday…
lanterns / wreath / house numbers / doormat / siding: SW Mellow Coral / ceiling: SW Breaktime / trim: SW Pure White
While things are far from finished, things are even farther from where they were this time last year. This photo is from almost exactly a year ago, and looking back is a nice reminder that wrinkly curtains and an unfinished pantry are far smaller problems to work through than THE ENTIRE SIDE OF THE HOUSE BEING TORN OFF. Here’s that whole story if you missed it (yup, we literally had to have 500 square feet removed and rebuild from scratch).
SO YEAH. It’s looking a lot better at the end of 2017 than it did at the end of 2016. And weirdly enough that picture makes me excited to get started on the duplex, because as much as I love having finished walls to decorate and finished floors to arrange furniture on, the process of planning (and dreaming about) all of the potential that’s fills the air during a big demo/rebuilding project is oddly addicting. Can’t wait to share our duplex progress as soon as we have our plans approved and all of our permits pulled!
But back to the pink house, where I’m walking you guys through every room in a little video tour of sorts: If you can’t see this in a reader, click through to view it on our blog or you can view it here on YouTube.
If you can’t watch the video right now, I’d definitely recommend dropping back in and catching it when you can (a video is basically worth a million photos and I pretty much cover every crevice and explain a lot of extra stuff I couldn’t squeeze into this post).
One recent update, after months and months of debate, is that we finally pulled the trigger and painted the railing. The vertical balusters had all already been painted (SW Stone Isle), so it was just that top rail and the post at the end that were “wood.” I’ll explain why that’s in quotes in a second. It’s hard to see in this picture since that front post is getting hit with a ton of light through the open door, but we went with a deeper gray tone (SW Perpetual Gray) that’s about 3 shades darker than the trim, so it accents the post and the top rail without being too crazy and compete-y with the standout stars of the entire house (those stained glass windows).
I know what some of you are thinking. NOOOO! How could you disgrace such old beautiful wood with paint?!?! Well, we love the old wood here. In fact, we stripped doors and floors to restore it! But this railing had been covered in a thick paint-like brown stain that showed zero grain and was sticky, roughed up, and ruined in a bunch of places (covered in paint splatters, spackle globs, and decades of other issues that had built up). After attempting to sand it down, we learned it was a darker redder wood – meaning we’d never be able to stain it to match the lovely heart pine floors. So, we reasoned that a fresh coat of paint applied nice and evenly was a heckuva lot better than its current state. And it really does look glossy and lovely in person, which makes us incredibly relieved.
The good news is that we don’t have any shortage of wood tones in this house. We have original heart pine everywhere (we stripped and clear-sealed all of the original doors that we could, brought the original floors both upstairs and downstairs back to their glory, etc). This house’s middle name could be wood. Pinkie “Wood” House. Wait that sounds bad. Forget the middle name thing.
Down in the living room, we added this cool wall-mounted bookcase, which instantly made us both say “Ahhh! It looks like an actual room people live in!” We also got to hang some cozy white curtains which need DESPERATELY to be steamed and hemmed. They’re Lenda curtains from Ikea– I just cut off the top tabs and make sure to wash them to pre-shrink them before hanging. We also have them in our home office and love how washable and easy they are. Also, my secondhand brass grasshopper (aka: Brasshopper) is a total badass and I love him more each day.
bookcase / blue pillow / curtains / rods / similar brass grasshopper
Also bought a rug from New England Loom (if you don’t follow them on Instagram you’re missing out because they have so many lovely secondhand rugs to be discovered) and the colors and patterns and antique feeling of the rug is PERFECT for a room that will be assaulted with food and sand and everything else that a rental living room has to deal with, so I have high hopes for it holding up like a champ (seeing as it is decades old already, that really does inspire confidence). That pretty blue pillow is from this Etsy shop (I love all of her pillows) and the pink one is from Target a while back. And you guys know the sofa is the Ikea Karlstad that they no longer make, which is a straight up travesty.
We also updated the light in here to this gleaming beauty from West Elm. The old light was a one-bulb fixture that we hung and immediately said “this room needs way more light.” We love the juxtaposition of this leggier modern light and the old-looking medallion (which is actually from Home Depot – shhh). And the old brick chimney that we discovered behind the wall and exposed is probably my favorite feature in the room, along with the giant windows (this room is 9′ tall, so the windows are easily over 6.5′ feet tall – that’s taller than John!). Don’t mind that TV on the floor. We found something we think will work for in there, just gotta get it out there in our next car load. #AlwaysRoadTrippingWithFurniture
rug source / chandelier / ceiling medallion /curtains / rods
The kitchen came a long way too, with the quartz island going in (it’s Pearl Jasmine by Silestone and we LOVE it so much) and a working sink. Cue the choir of angels! You can hear two ways we saved money on our quartz counters in Podcast Episode #74, which also covers why our original plan to do butcher block there didn’t work out. There are still some things missing though. Mainly, the backsplash that we’ll add after we hang the other missing element: shelves on either side of the stove under the sconces (probably two per side, not sure yet but we’ll keep you posted).
stools / quartz / butcher block / cabinets / range: secondhand refurbished / trim: SW Stone Isle / walls: SW White Heron
The back door was blue for a hot second, which some of you might have seen on Instagram, but as the room came together more John and I both realized that the same gray as the trim (SW Stone Isle) would let the pink stove do her thing and be the accent in the room that she has always been destined to become. Plus, we have a blue chippy door leading to the mudroom nearby, and one blue door + one pink stove is… enough. You know I didn’t love painting that door twice, so if I did it, it had to be done. Ha!
green vase / wood cutting board / wood stand / hanging rod / hood / kettle / sconces / pink salt & pepper
Upstairs the bedrooms are coming along with some art up on the walls, layered cozy bedding, and even headboards. HUZZAH! Still need to hang all the curtains up there (once we do that the headboard will look exactly as wide as the window because we are tricky tricksters). Stay tuned…
rug / large art / lamp / side table / striped blanket / headboard / fan
This is another view of that front bedroom, which is the largest of the four (the bunk room is teeny tiny and the middle bedroom and back bedroom are just fine but not giant). It also has that exposed brick chimney that we discovered hiding behind the wall, and next to it you’ll see my favorite craigslist find of all time that you might have already “met” on Facebook or Instagram when I shared a quick shot of it this weekend. Yes, I really did find an inlay piece of furniture on Craiglist, and yes, it’s currently selling for $2,000 on Restoration Hardware (I got it for $400!). Insert that screaming cat emoji face here. Seriously, it’s the score of a lifetime, and I’m going to share the whole story, including how I fix up a few missing inlay spots soon. So… stay tuned. Again.
And before we move on, that sconce looks crazy small above the dresser (we just hung it as a placeholder and it’s looking like a placeholder, so we’ll probably get a wider double-sconce for that spot soon). Anyway, on with the tour! Or should I say “roll the next flashback!”
This is that wall a year ago. Same house. Just nekkid a year ago versus clothed now. With walls. You get what I mean.
And now, the back bedroom. Aka: our room whenever we stay there! Although the front room is the largest and has that lovely exposed brick, the back bedroom has its own master bathroom (complete with my big beautiful clawfoot tub) and it has its own stairs that lead up to it, which are surprisingly useful. We originally thought those back stairs would be more of a fun thing for kids and a cool historic detail to preserve, but we weren’t sure we’d actually use them very much but we go up and down them all the time!
rug / fan / leather stools / striped duvet cover / pocked doors: SW Riverway
One of our bigger projects this past weekend was this built-in dresser that we added to the nook behind the pocket doors that you see above. We love gaining some storage and function in that formerly blank area at the top of the back steps, and there’s more than enough room to pull out the drawers and take like five steps back before you’d fall down the steps (you know I’d be the one to bite it all the way down these steps, so we have to make sure these things we’re adding won’t curse me later).
dresser / mirror / wood top / door color: SW Riverway
John would be quick to point out it’s not complete. We ran out of nails for our nail gun, so the trim still needs to be attached, caulked, etc. But basically, a Malm from Ikea fit pretty perfectly in the space, so we made it look even more built-in by removing and reinstalling the molding around it (see below) and adding a few skinny filler pieces to each side (scraps from our kitchen install). We also popped some leftover butcher block counter from downstairs on top to tie into the pine floors and we’re also planning to add some leather pulls to it to tie in the stools at the foot of the bed (you can see them in the shot two photos up). Can’t wait to finish it up and share the final pics!
Next let’s move onto the master bathroom, which is easily my favorite room because I get to soak in that big ol’ tub after hours of DIY and it feels so freaking good every time. Except for the first time. I had sort of a false start in there (more on that in this podcast) but now the tub and I are bros and only happy things happen when I’m in there. And the kids love it too.
marble table / floor tile / accent floor tile / wall hooks / blinds / tub color: SW Riverway
I’m basically salivating while looking at this because we’re back home and our house has two bathrooms that we still have to redo and two tubs that are about 10″ deep (half of my body sticks out like an iceberg) so I’m itching to add a deeper bathtub into my life here at home.
The hall bath is still my boo too, thanks to my favorite vanity ever. The top is tiled with marble and the rounded wood drawers make it look like a furniture piece we converted to be a vanity but it came that way and WE SALUTE IT because goodness knows we have other stuff to keep us busy. Still on the list: making built-in bunk beds, building out the pantry and the mudroom, tiling the backsplash, landscaping, etc, etc. That big round silver mirror is an awesome (and recent!) HomeGoods find (the same one in brass hangs above our mantel at home) so if you’re looking for one in either color, try HomeGoods. Target also has a really similar one that’s slightly smaller and thinner in gold.
vanity / faucet / drum stool / light fixture / floor tile
And although we haven’t built the wall to wall bunkbeds in our small-but-mighty kids room yet, we did hang art. And that’s half the battle, right? (Nope, half the battle is being halfway done with the bunkbeds, but let me lie to myself for a second, ok?). That cute colorful painting is from our dear friend Lesli Devito (remember when we house crashed her wayyyy back here) and if you don’t have one of her paintings or prints I highly recommend getting one. The door also got a sign that says Mermaids Welcome and it made my whole life to hang it up (also we took a poll among a bunch of kids and basically everyone is cool with mermaid and pirates, but don’t get me started on how split the group was on dolphins).
marble table / mermaids welcome plaque / art by Lesli DeVito
So there you have it: a tour as of yesterday of the beach house (remember: watch the video! it has approximately 98% more info than some pics and captions can convey). Also, we hope you have a very happy holiday surrounded by the ones you love and delicious food and all the mermaid-related memorabilia that your heart desires. And if you have a tub where your entire body can be submerged, know that I, for one, now know what I’m missing and am deeply deeply jealous.
P.S. To see the entire process of fixing up this beach house (from floor planning and demo to tiling and tiling and tiling and getting the floors redone) here’s a full category of beach house updates for you to flip through.
*This post contains affiliate links*
The post Beach House: End Of The Year Tour! appeared first on Young House Love.
0 notes
Last Seen Blogs

youtuber-tushin
YouTuber通信

richardarmitagefanpage
Richard Armitage Fan Page

sephvroth
❝ a touching reunion ❞

kinkhsarsm
self love

devirnis
Manuscripts Don't Burn