#its pretty average but its still his best stat surprisingly
Text

COOKIES OF DARKNESS NATION WE ARE OFFICIALLY BACK 💪💪💪💪💪💪💪💪💪💪💪💪💪💪💪💥💥💥💥💥💥💥💥💥💥💥💥💥💥💥💥💥💥💥💥💥‼️‼️‼️‼️‼️‼️‼️‼️‼️‼️‼️‼️‼️‼️‼️‼️‼️‼️‼️‼️‼️‼️
(long rambling in tags if u care)
#cookie run#licorice cookie#red velvet cookie#affogato cookie#I KNOW im late to this but i was at school ok 🙄 anyways i have a lot of thoughts#first off LICORICE UGH I MISSED HIM SO BAD IM SO HAPPY FOR HIM#his stats are so fascinating to me. i don't think anyone was expecting his strength to be that high#its pretty average but its still his best stat surprisingly#im shocked his strategy and puzzle solving are only 3. i think that's a strange decision to make them so low but I'm open to accepting it#maybe his avoidance/lack of ability to see the big picture contributes to the low scores?#his stats are so unexpected but I could get used to it. still i want an elaboration from devsis on these#i want them to show his strength in the show because i was expecting his strength to be like. 3 or 4#but anywho. i think its very funny how affo is 0 strength. i love how its canon licorice could easily kick his ass in a fist fight#i really do love affo and im SO happy to see him with the cod fucking finally all we got with him as a cod until now was ODYSSEY 😭#im so excited to see him work with the cod as an actual member. he's a very fun character for me#i cant wait for them to actually make him feel like one of the cookies of darkness its been over a year since he joined by now c'mon#im just so ecstatic that the cod are back. hopefully this is a good omen and will pave the way for more cod appearances soon#bcs u all know how i feel about the lack of cod for the better part of the past year. this better be their comeback i believe in them#😁😁😁😁😁😁 IM JUST SO HAPPY THIS IS THE BEST POSSIBLE OUTCOME IM SO HAPPY U HSVE NO IDEA I LITERALLY SCREAMED#btw ik crepe is there. but they're in a weird grey area of being a cod so i didn't post them BUT IM VERY HAPPY THEY'RE THERE TOO ‼️‼️‼️‼️‼️#♦️charlie's miscellaneous
43 notes
·
View notes
Text
Mata Hari Analysis: Because I LOVE HER
By god if there’s any of my analyses that get numbers please let it be this one, I’m very passionate about my appeals that Mata Hari is actually a very usable Servant, especially comparatively to other 1-stars.
Mata Hari
Assassin
Max HP: 6,565
Max ATK: 5,377 (Effective ATK: 4,839)
Attribute: Man
Star Absorption: 98
Star Generation: 24.6%
NP Charge ATK: 2.1%
NP Charge DEF: 4%
Death Rate: 55%
Traits: Female, Humanoid, Servant, Weak to Enuma Elish
QQQAB
Quick = 2 hits, Arts = 1 hit, Buster = 1 hit, Extra = 3 hits
Quick: 4.2%, Arts: 2.1%, Extra: 6.3%
Espionage A++: Increases own critical star generation rate for 3 turns. (10 -> 30%)
Cooldown: 7 -> 5 turns
Pheromone B: Chance to Charm all Male enemies for 1 turn. (30 -> 60%)
Reduces all enemies' defense for 3 turns. (10 -> 20%)
Cooldown: 8 -> 6 turns
Double Cross B: Seals one enemy's skills for 1 turn.
Reduces their defense for 3 turns. (10 -> 20%)
Cooldown: 8 -> 6 turns
Mata Hari
Arts
Chance to Charm All enemies (40 -> 60%, NP Level)
Reduces their attack for 1 turn. (20 -> 40%, OC)
Reduces their defense for 1 turn. (20 -> 40%, OC)
Primary Role: DPS Support, Debuffer
Secondary Role: Disabler
Mata Hari is one of my favorite Servants in the entire game, and not just because she's beautiful and I love her, but because she's a pretty competent Servant when used correctly. The key word there is correctly, and a lot of new players will end up overlooking Mata Hari because she doesn't play as simply as other Assassins do. She's not going to be as effortless to use as your Sasaki Kojirou and your Cursed Arm Hassans, but to a certain extent, it is understandable because DW has given her very little love. But that's okay, that's what we're here for.
Starting with her fundamentals, the first thing that will probably standout is her stats, which are pretty atrocious. Her HP is OK for a 1-star Servant, but she's not going to function as a tank any time soon, and her ATK is so low, especially with the Assassin ATK modifier, that she will struggle to deal any damage. Fortunately, Mata Hari is not really suited to tanking or attacking, and so largely her stats are mostly irrelevant. Her NP generation is actually quite standout, however, because of her very high base NP gain per hit. Her AQQ chain will generate on average about 44% of her NP gauge, which is quite standout, especially for a launch Servant. Even her QQQ chain has rather decent NP gain at 25%, especially since there are no Arts cards involved. However, when it comes to star generation, Mata Hari has a ton of problems. Her Quicks only have 2 hits which drastically limits her star generation potential. Her QQQ chain will generate 15 stars on average, and 25 with the Quick bonus, and with her 1st skill, she'll generate...18 stars on average. Without any star bombs like Sasaki Kojirou or Cursed Arm Hassan, she has no way to patch up her star generation. Even with maximum star generation though, she only has a potential maximum of 27 crit stars (6 + 6 + 6 + 9), or 37 with the Quick bonus. Low hit counts really suck kids.
Moving onto her skills, we first have Espionage, which is a borderline garbage skill. Star Generation buffs are nice, but 30% hardly moves the needle. All it does is give an extra 30% chance for a crit star. This is why the actually good star generation bonuses are much more often 50% or 100%. For Mata Hari's best chain this results in just a measly 3 extra crit stars, so this skill is only worth leveling if having a Servant at 1/10/10 gives you anxiety. Pheromones however is actually a pretty decent skill, having a moderate chance to Charm any Male enemies as well as reducing the defense of all enemies by 20%. The Charm chance is more of an added bonus, but the Defense down is what you're looking for the most here. This can be combined with Double Cross, which inflicts Skill Seal for 1 turn and reduces their defense by an additional 20%, and the gameplay strategy of Mata Hari might start to become clear. She's a Defense debuff stacker, and really more of a support Servant over anything else.
Mata Hari's NP is largely an optional bonus. It presents another moderate chance to charm, but this time its not gender locked, and she'll inflict an Attack and Defense down debuff to all enemies. This can be as strong as 40% with maximum OC, but it is extremely rare to get to that point or make it worthwhile, since the debuffs only last for 1 turn. Mata Hari doesn't need to use her NP to make an impact, but incorporating it into your strategies can be pretty helpful.
Mata Hari's role is to boost the damage of the team, and do largely little else. Due to this, her low stats don't really impact her, and in some cases, can be even beneficial. Since she's not going to do any DPS or real damage and she's not really meant to stick around for a long time, low HP and ATK will end up being okay. Of course, this also means that Mata Hari is a fairly inflexible Servant since she only does one thing really well.
Grails: Grails for a 1 star can be really important to cementing them amongnst competition. For Mata Hari however, this is largely just for love. It'll put her Max HP to 10,120 if you grail her all the way to Level 100, and her Max ATK to 8,355, or 7,520 effective ATK. Essentially, it allows her to stick along longer and have passable ATK.
Support Options: Supporting Mata Hari is...a choice, to be certain, but I salute you brave person for wishing to make a Mata Hari team actually work. You might want to grail Mata Hari just to make her a bit safer to use though. Since her NP generation is already pretty good, and her Defense debuffs will help sustain her damage enough, all she would really need is extra stars and added consistency to her Charms. Caster Gilgamesh can provide both of those, along with additional defense down and a source of DPS. Phantom of the Opera can also be used here, providing a massive, long lasting Debuff resistance down, Crit star regen for more crit consistency, and his own Charm with buff removal.
In reality, just use Mata Hari to boost the damage of your DPS.
Command Code: Since Mata Hari is mostly meant to be used asd a support, you can use some of the more supportive Command Codes like Bridge of White Rose or Jeweled Birds Coat of Arms. Command Codes that can generate critical stars ca be used to help out her star gen, and Command Codes that increase star absorption can be used to give her some extra help with NP. Command Codes that remove buffs from the opponent can also be useful, especially since they can be difficult to field on DPS with the large number of good DPS Command Codes.
Craft Essences: The biggest one out of the gate is GUDAGUDA Poster Girl, which will give Mata Hari 3 turns of taunt. This allows her to use her skills, tank a couple of hits and then make room for another Servant to continue the job. If you don't want her to just be a sacrifical pawn, you can use CEs such as Kaleidoscope or Demonic Bodhisvatta to abuse her NP. Even her Bond CE is pretty okay, since it'll boost the NP generation of allies as well. Fragments of 2030 can be used to provide an extra 8-10 crit stars, helping to even out her crit star generation for the team.
Competition: While Mata Hari is definitely not a DPS support on the likes of Waver, Merlin, Tamamo, or Skadi, the Servant she most faces competition with is Shuten Douji. Not only is Shuten of the same class, but her kit is extremely similar, just largely better. Howver, Mata Hari has a couple of things going for her. She fits much better into the support role than Shuten does, since Shuten not only has much better stats but also a hard defensive option, which means that playing Shuten as dedicated support means you're missing out. Shuten has the highest ATK of any Assassin currently in the game, and that shouldn't be neglected. But the biggest benefit of Mata Hari is cost, since she only costs 3 in comparison to Shuten's 16. Support Servants are overwhelmingly benefited by being in lower rarities if they aren't meant to also be defensive some way, and Mata Hari fits that bill extremely. Her low Cost means you can run more expensive Servants around her comapred to Shuten.
Pros:
-While having a somewhat flawed kit, it is surprisingly synergistic and will allow her to pull her weight
-NP generation is quite good, meaning that her NP is never too hard to access if desired
-Low HP makes her a fantastic Poster Girl option
-Low cost on a support Servant is amazing
Cons:
-Very inflexible. She's only really useful as a support Servant without extensive help
-Low stats mean she will struggle doing anything else, even if it makes her very good in her support role
-Crit star generation is really bad for a triple Q deck
-Charm chances are pretty bad, maxing out at only 60%
-DW didn't give her an animation update for either Salem or Ooku or Ooku re-run so she still has magic orbs
I'm biased a bit towards low-rarity support Servants since they are the least hampered by their stats. Using Kojirou as DPS, Bartholomew to farm, or Spartacus to tank will always run into problems with their low stats: low ATK reduces their ceiling on their damage and low HP means they simply cannot take many hits. But for a Servant who can be considered "fire and forget" neither stat matters and its much more about kit and cost, which Mata Hari delivers.
This all being said, Mata Hari getting a buff would really not be a bad thing in the long run. Espionage is a terrible skill, Pheromones is not only outclassed by Shuten's 1st skill, it's also outclassed by Europa's version which also outclasses Shuten. Her NP could also use an upgrade, at the very minimum to extend the duration of her debuffs although it could also boost her Charm chance, similar to D'Eon.
You will love Mata Hari though, this is non-negotiable.
#fate grand order#fgo#fate series#mata hari#servant analysis#literally the most overlooked servant in the game imo
30 notes
·
View notes
Text
Kyoko Sakura

Kyoko Sakura is one of the main protagonists of Puella Magi Madoka Magica, introduced a few episodes into the series to show someone taking the magical girl job far more cynically than the non-mystery shrouded leads had until that point. Not interested in killing witches just to keep them from hurting people, she's more invested in just keeping herself in top form by leaving them around until the optimal point to kill them to keep herself and her soul gem in top shape. This clashes rather fiercely with Sayaka's somewhat less practical but more moral "kill every witch on sight" stance, and the two clash over it early on. While she initially looks down on Sayaka, as time goes on she comes to want to help the less experienced girl as she realizes there is way more wrong with the system than either of them thought, with the handicaps and downsides of their bargain with Kyubey becoming ever more clear. That, and Sayaka begins to undergo a period of strongly regretting the wish she had made, something Kyoko finds she can relate too.
As the daughter of a preacher living in poverty, she desperately wanted her father's word to get out and have what they would need for her family to eat. Wishing to Kyubey for help, she got what she wanted, only for it to backfire horribly when she admitted how she did it. Kyoko was decried as going against the faith and using magic to bring people to him, and once his church collapsed ended up killing himself and Kyoko's little sister, leaving her to come back to the horrid sight. Seeing Sayaka regretting her own wish, Kyoko just tried to help her rebound, only to fail and have Sayaka succumb to her mental state and transform into a witch. Kyoko ended up having to put her down at the cost of her own life, but unlike Mami and Sayaka she at least managed to go out on her own terms.
StatsKyoko is not an especially large character, being about the same height as Pit with a slightly less wide hurtbox. Unfortunately, she's rather frail even for her size, having only 80 weight units, the same as Meta Knight and Zero Suit Samus, so she gets KO'd fairly early. Her jumps are quite good and her gravity is about average, giving her a fairly strong basis for her recovery, and both her air and ground speed are also on the high end. She's in the 12th-16th tie for fastest air speed with Mario, Sonic, and a couple others, while her run speed of 2.35 actually puts her in sixth place overall. She has a wall cling and wall jump, a reasonably low crouch, and a crawl, so on the whole her mobility is very good. While her traction is among the worst in the game, everyone in Ultimate has good enough traction that this isn't really going to have her sliding around.
Specials
Neutral Special - Surging Spear
Pointing her spear at the ground at first, Kyoko's spear breaks into segments and begins to wrap in circles around her a short distance away from her body, as she clasps her hands together and focuses. The tip of the spear, now pointed upward forward over her and enlarged to about double its normal size, then smashes into the ground in front of her, dealing 13% and diagonally upwards knockback that KOs at 150%. Kyoko's spear reverts to normal in her hand afterwards with surprisingly low end lag, its parts all just snapping back into place. This has a bit less start lag than the animation might sound like it has, the chain breaking into segments being an almost instantaneous visual, but its still not a fast move and a bit too slow to be worth its startup lag at first. The move covers a pretty big area in front of her due to the enlarged size of the spear point.
You can charge this move, as energy flares off the tip, like a flame but a darker red color rather than orange. This also slightly increases the size of the end of the spear over time, eventually about doubling it at full charge, which takes 1.4 seconds. The chain link coils also rise higher into the air, giving the move more vertical range in addition to more horizontal range. The power increases at a consistent rate of 1% every 0.1 seconds, capping out at 27% and being able to kill at about 55%. Given the size of the hitbox and the impressive maximum power this move reaches, its a pretty stellar kill move, but charging 1.4 seconds for it is not something most opponents will allow you to do outside of a shield break situation.
The good news is the charge can be cancelled like Giant Punch or Samus' charge shot, but at a bit of a price, you only get to keep half the charge. The half charged version of this move still deals 20%, has nice range, and KOs at about 100%, so its not a bad consolation prize, but it does make the move a bit worse than Giant Punch at the same niche. It does have a few advantages, which we'll go over.
The first is that you can actually change the impact point of the spear by pressing forward at any point during the start lag or charge. This will cause the spear to instead lurch forward and slam down about 1.5 battlefield platforms in front of Kyoko, dealing only 0.7x its usual damage and 0.8x the knockback as it launches forward before slamming down. The hitbox where it slams down has the same power as the original move. This version has noticeably more end lag as it takes longer for the spear to retract back to its default state, but the start lag remains the same, giving Kyoko a pseudo-projectile to harass people at a range.
There's another layer of pressure to this move if it has half charge or more, as a red shockwave is emitted from the impact point. At half charge, it goes a battlefield platform in each direction from the impact point, traveling at a speed that means the wave will still have the last quarter of its path to cover when Kyoko comes out of lag. Unfortunately the wave only deals 4% and a flinch at half charge, but it adds another layer of pressure to the half-charged version of this attack, as at close range it covers Kyoko's longer range spear attacks, and at long range it will help cover her shorter ranged ones. The red wave goes further at a slightly higher speed with higher charges, though the speed only increases to about 1.2x its base amount at full charge so its not much. The distance, however, is doubled to 2 battlefield platforms in both directions, and the damage and knockback spikes up quite a bit, capping out at 14% and upward knockback that KOs at 140%. This is a pretty scary projectile to have as additional pressure to Kyoko's game at all ranges, and it comes out on top of an already threatening hitbox, but you only get it if you use half charge or better.
In the air this move switches to a slightly less flashy version, with the spearhead simply stabbing forward at the end of the charge, either right in front of Kyoko or launching further away depending on if you tilted the control stick forward or not. It deals 2% less than it does on the ground, but due to the slam being less dramatic, the start lag is actually cut noticeably. The half charged version is, even with the slight damage reduction, pretty alarming in this context given you can use it relatively close to the blast zone if you set it up, and that 100% KO percent of the base version is from center stage. Having a decent amount of charge in this move makes Kyoko very scary in the air, given this move comes out considerably faster than Giant Punch in the air rather than slightly slower on the ground. That said, you lose the shockwave and a bit of punch, so there is a tradeoff, and the end lag is actually a bit worse in the aerial version, which adds up to be extremely punishable if you whiff the long range version of this move.
In the end, this move serves a couple functions. In the air, its a potentially powerful kill tool that comes out pretty fast, but needs stored charge for you to get much mileage out of. On the ground, it has more power but is less practical to actually hit with, in exchange for creating a projectile if you whiff. The projectile helps a pretty important part of Kyoko's play pattern, however, it allows her to transition from fighting at long range to fighting at short range and vice versa. Given Kyoko is at her best when knocking the opponent back and forth long and short ranges, this is a powerful tool to have wrapped up in just one input.
Up Special - Impale
Pulling her spear back with red energy forming at the tip, Kyoko's spear breaks into segments once again and launches forward with the tip faintly blazing with the energy. You can angle this move in all eight cardinal directions during the start lag similar to Fire Fox, but the move will default to 45 degrees upward in the air and directly forward on the ground. The spear goes out a similar distance to Fox's recovery, actually, and has quite a bit of start lag. For most of its flight, it deals 9% and pretty underwhelming knockback that doesn't KO until basically irrelevant percents, unless it hits pretty close to a blast zone. At the end of its range, however, the tip of the spear ignites with red energy, and if you hit the opponent with this hitbox, they take 15% and are trapped in a state similar to Corrin's pin. If it hits a ledge, Kyoko will tether to it, so this functions as her primary(and admittedly somewhat underwhelming) recovery move.
There are a couple differences, with the big one being that Kyoko doesn't need to pin the opponent against a surface, so it functions a bit closer to a grab hitbox. The amount of time the opponent is impaled for is much less than Corrin's on account of being able to do this in the air, but you'll still have time to use the inputs you have available out of this move. Kyoko has three options out of this move, pressing forward, pressing up, or pressing backwards. As an aside if you do manage to pin an opponent against a surface, this deals an extra 7% to that opponent, which pushes the damage once you factor in the follow up to a pretty astonomical value. Given you need to sweetspot this move that's not especially fast to pull it off, however, its a reasonable payment for the risk involved.
The forward option simply has Kyoko pull herself to the opponent, yanking the spear out and dropkicking the opponent once she gets into close range. This deals another 9% and weak horizontal knockback that scales poorly as well, so it serves as a pretty solid combo setup. If Kyoko fired the spear straight upward, she'll kick off to be a bit below the foe and the weak knockback will be vertical, and straight downward she will kick off above the foe and deal weak downward knockback, but the damage will remain the same. The upward version has her flick the chain upwards, sending the foe flying up off the tip of the spear with low vertical knockback that scales poorly, and only deals 6%. What's nice about this, however, is that you can use it to set up Kyoko's other long range attacks to follow up on her pressure at an extremely safe distance. These moves both remain the same on the ground and in the air.
The backward option is different depending on if you're on the ground or in the air. If you're on the ground, Kyoko will swing the chain spear overhead and smash the opponent into the ground on the other side of her, dealing 13% and initially weak knockback that scales quite well, killing at about 135%. An important thing to note about this is it will send the opponent flying at a point of impact far behind Kyoko, This actually makes the KO power even better than you'd expect... provided the opponent lands on solid ground. If they just reach the end point of the slam and are in the air, they instead get a pretty weak spike that won't kill until 150% and take 7%, but that still sets up a pretty solid edgeguarding scenario. While this option is definitely the most powerful of the three chain spear tools, keep in mind its also not very easy to follow up on unless you've set up a few specific situations, such as an edgeguard or using the Down Special which we're about to get to.
Both Kyoko holding the spear and the opponent will continue to fall at their normal fall speeds in the air. If one falls faster than the other they can't go past the end of the chain spear, which functions as a bit of a tether, and as such will become horizontally closer to Kyoko as the spear bends downward to keep them impaled. If Kyoko or the opponent end up the full spear length below the other, they'll just dangle there. Kyoko will straighten out the spear in front of her before performing a throw, so it'll always be performed from her height, so this stuff is only really relevant in some pretty big corner cases. Given the impale will not hold for very long, pulling off suicide kills with this is pretty difficult. The back throw does allow for some potential gimps, however, and the forward variation can also lead into a gimping attempt off stage, although considering this move is not a particularly great recovery that could easily backfire. Your Side B can compensate for that a little, but not enough that going off stage is great for Kyoko.
As a final note, this move has pretty bad end lag if you whiff, but Kyoko resets the spear back to its normal state pretty quickly if you do hit.
Down Special - Barrier
With a pulse of red energy from her soul gem and a wave of her hand, Kyoko manifests a wall made of red chains, each link a red diamond-shaped object. This wall is about 1.4x Ganondorf's height, and appears a single stage builder unit in front of Kyoko. If you're looking for a durable construct to protect you from projectiles, prepare to be a bit disappointed. The wall will only take two hits to destroy from attacks that deal less than 8%, and one hit from an attack that deals more than that. The rare non-flinching move that also happens to deal less than 5% will take three hits to destroy it, so Fox won't have quite as much luck breaking through, and its not terribly hard to set up given the lag is average. If the first two below 5% and no flinching hits are dealt to the wall, that will allow it to be destroyed by a subsequent hit of less than 8%. That said, you're not really using this as a defensive tool, but it has its niche uses as one to help Kyoko play her longer ranged game if you want to go down that road.
Kyoko's spear goes through the wall without damaging it, so it can serve as a sort of "armor" move to defend her while abusing the sheer amount of range her spear has, making life a bit difficult for opponents destroying the wall. The thing is most characters have an aerial or tilt that can smash through it in one hit, and if they do the attack will still go through and hit Kyoko potentially. There is a bit of impact stall upon destroying the wall, however, and the attack's damage is reduced by 8% with a corresponding knockback reduction from the damage lost. This loss of power can sometimes result in an attack being punishable on hit when it otherwise wouldn't be due to just flinching Kyoko rather than doing something more effectual, and combined with the impact stall it allows you to sometimes punish a foe in mid attack or on hit.
The real meat of this move is what happens if you hit the opponent and they get knocked flying into a wall. They will be caught on the barrier, causing some of the bindings holding it together to snap but enough will stay around to hold the opponent in place. They will be trapped in hitstun on the barrier for as long as they would take knockback, effectively turning high knockback moves that hit foes into the wall into ridiculous combo setups. If you hit them with something that might KO them but it got intercepted by the wall, don't worry, this is the perfect time to charge a Neutral Special or Smash Attack to get the kill anyway. With less knockback than that it can still prove incredibly useful for combo setups, allowing you to link what would normally be combo finishers into a longer string or turn a KO move into a stellar combo starter. Flinching and weak knockback will not catch the opponent against the wall, rather they will bounce off it and deal the equivalent of 1 of the 2 hits of less than 8% required to destroy it. The wall will crumple completely after the opponent's hitstun ends or Kyoko lands another hit on them, using it up.
If Kyoko is hit into this wall, rather than the opponent, it will crumple to catch her fall, reducing the knockback to almost none no matter how much it was initially an immensely reducing the hitstun. This can save Kyoko from death situationally, or interrupt an opponent's combo as Kyoko catches herself out of her hitstun just well enough to reverse it on the opponent. Kyoko can also tether to this wall with her Up Special, as unlike the rest of your spear attacks it will actually hook onto the wall. This does hurt your ability to latch onto foes behind it unfortunately, but it can allow you to get yourself to a nice aerial vantage point with your back to a wall that will cushion you against combos and KO moves. You can also wall cling on this wall, which is a niche but useful ability for amplifying Kyoko's air game.
The wall will fade after 12 seconds, giving you a decent amount of time to work with it in all its varied uses. It serves as a powerful reward for Kyoko winning control of the stage, as its a great thing to be backed against in disadvantage state, and a great thing to pressure the opponent into at an advantage state, and is best set up when you've gotten a large amount of space from the opponent. Your Neutral and Up Special give Kyoko powerful repositioning and zoning options to make setting this wall up at an ideal point for you at whatever stage of the game you're in a reality.
Side Special - Chain Dance
Kyoko swings her spear up in a small arc in front of her, a look of concentration on her face. This deals only 2%, and comes out on Frame 10, one frame slower than Marth's dancing blade, but the sweetspot at the pointy part of the spear deals 3.5% and increased hitstun. This has better range than Dancing Blade's first hit, albeit by a small margin, and I keep comparing them because this move works a lot like dancing blade, with three subsequent follow ups that can each be angled in three directions. Note that the down option comes out a bit slower than the other two after this first hit, and as such it will not true combo out of hitting with the spear's shaft. If you hit with the tip, however, all three hits will true combo, which is a very useful property to have.
The forward hit has Kyoko rapidly stab forward twice, once at a slightly downward angle and the second time at a slightly upward angle, dealing 2 hits of 1% and then 3%. This launches the foe forward with moderately strong base knockback that scales extremely slowly, only killing around 300%. This poor scaling is actually pretty important, because subsequent hits of Chain Dance actually transition into much longer range options that can be landed at foes on a wider range of percentages because of this. It also sets the opponent up nicely for the long range version of Neutral Special, not true comboing into it but because Kyoko has a couple options to follow up at that range including other hits of Chain Dance, a charged Neutral Special becomes a very scary alternative option for Kyoko to use out of this. Used in relatively close proximity to a wall the fact that the base knockback is this good also makes it an excellent combo tool, given the foe will be stuck in hitstun for a fair bit longer than most moves would leave them at a low percent.
The upward version has Kyoko sweep the spear over her head in an arc from front to back, dealing 3% at the shaft and 4% at the tip of the spear. This move hits in enough of an arc in front of her it will catch people hit by the first strike. If you hit with the shaft of the first hit, you'll hit with it on the second hit, and the same will be true for the tipper. The shaft only deals weak upward knockback that pops the opponent up into the air a bit too high for melee ranged combos, but not far enough for Kyoko's long ranged options. It gets the foe out of your face for a moment at least, but you're not aiming to hit with it. The tipper hit will send the opponent a fair bit further upward, dealing similar knockback to the forward second hit but with slightly decreased base knockback, and at a slight forward angle away from directly above you. Aside from being a good range to put the opponent at for Kyoko's longer ranged upwards options, it also is a good range to play off by jumping up near the top of your wall with your wall cling, as that provides you a fallback point if you want to go into an aerial pursuit of an opponent.
The downward hit has Kyoko swing the spear down and stab it into the ground in front of her at an angle, dealing 6% and noticeably increased hitstun. This is a stellar move for setting up melee combos, probably Kyoko's actual best combo starter, but you won't be able to confirm it out of Side Special unless you specifically hit with the tipper. That, being able to start a close range combo is a useful thing to have out of this move, as the long range combo options have a lot greater possibility of failure due to the percentages of the opponents being off from what you need. This is a good place to stop your chain dance if you're not in the right situation for some of the stronger payoffs, and for what its worth you can land this out of a sourspot first hit if the opponent reads you wrong.
Once the third hit starts, Kyoko's expression will change from a concentrated one to a visible grin, pleased to have gotten to such an advantage. Her expression will sour greatly if she misses any of these hits however, and she'll audibly grunt in frustration.
The third forward hit is where this move gets a little crazier, as Kyoko's spear extends outward, aimed directly at an opponent struck by the previous hit. If the opponent is "pinned" at close range by the downward version, it will just extend to the floor through the opponent for this hitbox. If an opponent was not struck by the previous hit it will just extend forward, as you'd probably expect. It can extend out up to 1.3 battlefield platforms, with the tip of the spear flaring up with red energy around it after its traveled a platform. This deals 5%-12% and knockback that KOs at 250%-160%, growing more powerful the further away from you the opponent was knocked. This is a good combo starter out of the downward variation if you want a foe a bit further forward rather than right at the tipper range of Side Special for subsequent hits, as the end lag of this hit is low if canceled out of at close range. At longer range, the ending lag gets worse and worse, and while its usually a true combo out of the up or forward hits due to its homing properties and fairly fast start lag, the gravity or percentage of the opponent will sometimes mess up the ability to true combo this, and if you whiff its pretty bad. Primarily at high percentages you'll want to be careful of using this as that's when the combos are more liable to not work. That said, given the foe will already be spaced away even before this hit this can get you a massive amount of distance from them to allow you to reset stage positioning. Sometimes in the air, this can also work as a pretty good gimp, as the way the knockback of the 2nd and 3rd hits will stack up in the air becomes a lot scarier closer to a blast zone, and you have to worry a bit less about needing the opponent at a percent where the true combo is less likely. Its a solid default third hit that always combos adequately out of the any of the first 3 hits due to its homing properties, and is situationally very powerful.
The third upward hit is actually a similar to the second upward hit, with Kyoko swinging her spear in an upward arc from front to back a second time most of the time. As a small caveat, she'll swing from back to front if she uses this out of the second upward hit instead for the purpose of making the animation a little neater due to where her spear ends after the second hit. The thing that makes this a bit more interesting is Kyoko will hop backwards a bit during this move, and also extend the spear out so that at the apex of the swing the spear reaches up 1.25 Ganondorf heights above her head. This spaces Kyoko back a bit for the rest of the dancing blade combo or any follow ups she commits too after this move. The spear deals 5% and knockback that pops opponents up lightly on the handle, or 8% at the tip with knockback that scales pretty hard, killing at 130% but being not knocking the foe much further at low percents. The tipper hit will combo out of the tipper hit of the second upwards hit, while the second forward hit will just whiff and the second downward hit will hit with the sourspot. This is the least conditional way to kill foes out of your Side Special, only requiring you hit with the spear tip on the first hit, but it doesn't kill especially early and it still requires you to sweetspot it. That said, if you go down second up third, it sets up pretty nicely if you just want to try and string into your aerials out of this. Lastly, if there's a wall in front of you, the forward second hit actually will set up for this, sounds pretty situational and like not the best use of a wall, but its worth keeping in mind for the fourth upward hit.
The third downward hit has Kyoko stab forward with her spear three times rapidly along the ground, each time increasing the length of the spear. This deals 2 hits of 1.5% at the handle and 2% at the tip, followed by a third of 3% at the handle and 6% at the tip. The first two hits don't have their knockback depend that much on the tip vs handle hitboxes, each having enough knockback to push the opponent forward about 0.45 Battlefield platforms, which is a tiny bit more than the spear extends each time (0.4 battlefield platforms). The tip of the spear's size is exaggerated a bit more with each successive stab, so you won't accidentally knock the foe out of your range with this with the tipper hitbox, but it gives you a small portion of the handle hitbox that will actually chain successfully into the next tipper hitboxes of the second/third hits. The handle third hit deals low mostly horizontal knockback that doesn't amount to much other than spacing the foe a bit further away from Kyoko, but the tipper hit actually deals greatly heightened hitstun. This unfortunately does not set up into your fourth hits especially well due to their weird hitboxes, but what it can let you do is set up your Up Special or Neutral Special. Its not a true combo, but the window the foe has to get out of the way is extremely small, giving Kyoko the chance to mix it up with a few of her other options to basically always get an advantage out of this, and Up Special combined with this move allows you to switch around positions on the stage exceptionally well provided you got the tipper on the first strike to go into the down hit and then this. Neutral Special, instead, provides pressure even if the foe is missed by the spear itself and kills pretty early provided its charged, and you can fake out the foe's dodges by further charging it. The forward hit can sometimes chain into it via a wall too, at a slightly closer range than the Up Tilt's sweetspot, so it gives a different option for if you used the forward second hit into a wall. As a final note this shield pokes foes really easily, always doing so by the third hit and easily doing so on the first or second hit if the foe has taken even chip shield damage, so this is a very useful move to go into against a blocking foe.
For the fourth and final hit, Kyoko's spear starts breaks into chain link segments out of the third hit as she lashes it forward in a slight arc in front of her, the ground shaking slightly from the impact if it hits the ground as this final hit covers a huge range of 1.65 battlefield platforms. This is unfortunately too laggy to true combo out of anything, barring the third down hit's sweetspot, which will always hit with the sourspot of this hitbox. That said, this is the one sourspot in this move with actual power behind it, dealing 6% and diagonal knockback that KOs at 175% which isn't terribly impressive but if you consider the move's range and ability to be used in the air its an acceptable result. If you hit with the sweetspot spearhead at the end of the move, you'll instead get 11% and a hitbox that kills at 95%, but that's not happening unless you have a very well positioned wall. That said, the spearhead is at least big enough to at least give you a bit of wiggle room on the exact positioning, exaggerated slightly on this version of the move. At specific percentages and ranges, you can actually land this move out of the third forward hit, which due to its variable power you won't get entirely consistent results for but chaining from second forward to third forward to fourth forward will specifically give the foe a very small window to dodge the fourth hit at 85%-110%, which makes this something the foe very much has to fear in those ranges. While they can dodge it, predicting their attempt too can allow Kyoko to go for something else. As an aside, while shielding this move is a good option to avoid it if you still end up on the ground after the first 3 hits, but if they're hit by the sweetspot that actually deals an absurd amount of shield damage and quite a bit of shield stun, almost enough to break it in one hit, so be careful reacting like that.
The fourth hit's upward variant instead has the spear break into segments and then Kyoko has it lash upwards at a 20 degree diagonal forward away from directly above her, dealing 5% on the body of the spear and weakly bumping the foe upward again. This is a fair bit faster than the forward fourth hit, actually true comboing out of the upward third hit, except for the part that due to only covering a specific angle that will stop working after about 50%. The good news is the sweetspot here is the strongest KO move Kyoko has here, dealing 14% and knockkback that KOs at 60%. This is insanely good, but you're only going to pull it off if you specifically second hit a foe into a wall with the forward version, third hit the foe upward at maximum range, and then they have to be between 60% and 85%. This is a really specific hit to ever land, but on the other hand you're killing the opponent in the 45%-70% range where you're factoring in the damage before this move out of a frame 10 move, and Kyoko's gameplan is all about positioning yourself well in relation to the opponent and your wall. So while situational, this is your big reward, and the nice thing is as mentioned there are a lot of other semi-specific ranges where certain combinations of Side Special hits will leave a pretty solid end result with a wall, so if you don't get the exact range for this right you still have plenty of other potential success cases.
The final version of the fourth hit has Kyoko's chain spear get tossed forward in a similar animation to the forward hit at first, before the tip curls backwards and then the chain segments further extend out into a vortex of whirling chain links, turning into a red blur at the end of the spear that covers an area 0.5 battlefield platforms wide, starting a distance 1.3 battlefield platforms from Kyoko. This has much better coverage than the forward version but suffers from similar, albeit not identical lag, slightly faster to allow it to do wall combos slightly easier. The chain slamming down before the tornado of spear parts deals 4% and considerably weaker diagonal knockback than the forward variant, but the whirlwind deals rapid hits of 1% that add up to 12% and a final hit that deals knockback TOWARD Kyoko that KOs at 170%. Like the forward variant, its not a true combo out of anything Side Special does, but what it does do is catch out non-perfectly timed dodges with its somewhat longer duration and as such encourage the foe to shield, while also having slightly different timing than the forward variation to further make avoiding one move or the other a pain. This gives Kyoko a pretty powerful 50/50 tool, one she can potentially mix up her other long range options to remind foes how terrifying she is at this range. The most exciting thing about this move is the result. Knocking the foe back toward you opens all kinds of possibilities, like getting a foe stuck in a wall behind you to pull off a flashy and exotic finisher. Or you bring them back in and because they failed to avoid this move, you get to go for yet another Side Special chain, or just a combo of standards and aerials. Even your smashes and Neutral Special, or slightly charged Neutral Special, can be landed out of this sometimes. This is an exceptional reward if you aren't at the KO range you're looking for, but you do to have to time it right and not just get shielded, as this move does pretty poorly on shields. At least you're far away when it ends. Also if you whiff this one, the extra duration means the potential punishment you could eat will be a lot worse.
Standards
Jab - Red Combo
Kyoko starts off her jab combo with a low kick with her left leg, hitting foes surprisingly close to the ground and dealing 2%. It comes out quite fast, on Frame 3, but has the downside of having shorter range than her spear moves. It is nice that it hits low though, partially because it can shield poke if the foe's shield has taken a decent amount of chip damage and partially because Kyoko's actually a bit lacking for close range low hitting options, so this at least helps. While this has enough end lag if you cancel out of it you'll just be in frame neutral, obviously what you'll want to do is instead go into the second hit.
Kyoko's second hit has her rapidly stab up and down, in a manner visually similar to Captain Falcon's Jab albeit carrying a spear. She only does it for a short burst though, dealing 8 hits of 0.5% that add up to 4%, pushing the foe back slightly while she does so. Like the first hit, if you cancel out of this here you won't be at enough of a frame advantage to true combo into anything, but you will be at a slight one, and the foe will be at tipper range of your spear in front of you, so you'll definently be at an advantage.
The final hit has Kyoko slide slightly forward and stab as she goes, the spear pointed slightly upward as she does so. This does 5% on the body and 6% at the tip of the spear, and sends the foe diagonally mostly forward with knockback that kills at 170%. You won't really get combos off this most of the time, like the other Jab hits, but it will space the foe decently far away and given how fast the first hit of Jab comes out, this is not a bad end result, and if landing actual kill moves has been going poorly enough this one can kill at the ledge in an emergency. One thing that's pretty nice here is this is one of the best ways to use a wall, because the knockback is high enough the foe will get stuck in it for quite a bit, actually allowing you to combo extend into quite a few things out of a move that comes out incredibly fast, at higher percents even allowing for you to get a kill confirm. So this is one of the best ways to capitalize on a wall's existence in your set, even if it doesn't link into your other moves terribly well otherwise.
Forward Tilt - Stab/Reel
Kyoko stabs forward in front of her with her spear in a very basic melee move, having good reach for a melee move and also coming out quite fast. She leans forward just a bit in this move to give it a bit more reach, but this is at the cost of ending lag that makes it worse for combos than you'd hope. The hilt of the spear deals 5% and weak horizontal knockback that will never kill, but starts at a slightly more respectable base value than you'd expect to make it not horrible for putting the foe at spear point range. The spear point deals 9% and better knockback, which will space the opponent to about a battlefield platform-1.5 battlefield platforms in the 10%-70% range before scaling to the point its not as good at putting the foe in Kyoko's long range pressure zone. It overall serves the purpose of being a great spacer, but unfortunately doesn't really set up a lot of combos. It at least sets up nicely for Nair/Jab with the sourspot.
While this is good as your basic spacer, there's a trick to it that gives it just a bit more versatility than just that. This move has a follow up where Kyoko actually has the spear break into segments and launch forward from where the move ends, but the spear point seems to just go around foes as it travels through the background instead. No, we're not about to pull some MYM11-12 level garbage here though, this is actually just so the spear can instead go around opponents and, if they're in range of the hitbox, wrap around their body and reel them toward Kyoko. This deals another 5% and pulls the opponent about 0.35 battlefield platforms of width toward Kyoko, and leaves her at a slight frame advantage. This looks like a grab but it won't go through shields, even if the way the foe is pulled toward Kyoko doesn't quite look like normal knockback with the chain wrapped around their body. It comes out fairly quickly after the base attack, and actually leaves Kyoko with a bit less end lag than the other version as the spear is already retracting back to its default state at the end of the move and Kyoko has reset her footing.
This allows this move to serve double duty as a spacer. The second hit comes out fast enough that while its a little on the predictable side, you can hit foes with it even if you didn't hit the first hit, and the first hit will combo into it until around 40% at the tip and at any range on the hilt. Of course, comboing into this on the hilt will frequently end up with the foe right back in your face, which you don't really want, but Kyoko is at least at a slight frame advantage. More importantly, this move allows you to just mess with the foe's spacing in a bit smaller increments, which if you're aiming for specific positioning in regards to a wall is incredibly useful. Its also not a bad way to transfer long range pressure into some closer range brawling, being faster and more convenient for this purpose than the fourth down hit of the Side Special. Its a lot less powerful, though, and because you do have to go through the first hit to get to this move the lag will add up to the point foes can definently get out of the way of this if you're trying to reel them in from afar. While the end result is nothing to write home about, this does catch out dodges sometimes at close range, which is a handy thing to have access to.
Up Tilt - Overhead Strike
Kyoko swings the spear up over her head, stopping a bit behind her. She then pulls her spear back to her side for the ending lag in a very quick motion, actually making this move quite fast on both ends. The tip of the spear deals 9% and weak upward knockback that eventually scales to kill at 235%, while the handle deals 6% and diagonal upward knockback that actually starts a bit higher than the upward hit but scales worse to not kill at any remotely relevant percent. This move comes out fast and ends fast, and serves as one of Kyoko's best grounded close range options for the most part. However, one thing worth looking out for is that its backwards coverage is pretty lackluster, so while it can hit a foe from behind Kyoko they can weave around it pretty easily. This means Kyoko needs to be careful of cross-ups, though you can still certainly land this move if the foe is behind you if you space yourself at the right angle from them, and for what its worth your Nair is a very good coverage tool.
The combo applications of this move depend on where you hit with it. The sourspot basically only combos into Nair with any consistency, but it will do so up until around 85% on middleweights, so if nothing else it has a pretty safe follow up. The upwards hitbox is much better, comboing into itself or Side Special at very low percents, and can also link into Up Smash at slightly higher percents and Uair/Nair for a bit longer than that. The problem is this move will lose its combo utility around 50% with the sweetspot, rather just spacing the foe upward, but it still serves its purpose as a juggler. Either hit will at least do decent work as a combo starter though, and it serves as a good tool to throw out in neutral or even when you're on the back foot if the foe mistimes something due to its general speed and safety.
Down Tilt - Low Lash
Kyoko's spear quickly separates into segments as she sweeps it low along the ground in front of her. This is an animation a bit similar to Ike's Down Tilt, but given much greater reach by the segmented spear. This is pretty quick to come out and has pretty enormous range for its speed, reaching nearly a full battlefield platform forward. The trade off for this is that the end lag isn't great, and the power is generally pretty weak. If you hit with the chain segments, all you're doing is popping the foe up for 5% and weak upward knockback that is barely above a flinch until about 40%. This makes this move actually pretty garbage at most ranges at low percentages, where the foe will actually be at a minor frame advantage on hit. Once the knockback has scaled a bit this stops being as much of a problem, as it will put Kyoko into a frame neutral or advantageous position that sort of sets up aerial combos at lower percents than you'd expect, though the true combos you get out of this move are basically non-existent barring some corner cases. Its not exciting to hit with this sourspot, but at percentages in the 70%+ range it leads into your aerial game pretty well if the opponent doesn't pull off some good predictions.
Up very close to Kyoko, there's actually a slightly better hitbox that deals 8% and diagonal knockback that while not comboing into anything or KOing at any relevant time, is safe on hit at all percentages. The fact that it will never combo means the short range in front of Kyoko where this hitbox hits is actually a bit worse than the one slightly further out. That said, you'll appreciate having the safety when the foe is at low percents that you otherwise would not have, even if the safe range has about the same reach as Mario's FTilt.
The spear tip itself is actually a pretty decent hitbox, however, dealing 11% and knocking opponents toward Kyoko with low to the ground knockback that KOs at 255%. This is not nearly as powerful of a "knock the foe to you" option as the Side Special's fourth downward hit, partially because of the weaker knockback and partially because of the somewhat annoying ending lag that makes going into laggier options less practical. Still, it can convert into Forward Tilt/Up Tilt easily, as well as your Nair/Side Special/Neutral Special sometimes and at very specific percentages your Up Smash. The slightly shorter range of the tip compared to Kyoko's other long ranged pressure tools is kind of unfortunate, but what this can do is catch out foes rolling closer from Kyoko's long ranged pressure, and provides a fast option to overload the foe's dodges alongside a Neutral Special shockwave for the longer ranged NSpecial. It also gives another place in Kyoko's range that the foe will need to be careful about.
This is a pretty good move to poke a foe with from behind a wall, one of Kyoko's best options in that regard. The tips hitbox can knock a foe into a wall, and while the knockback is not good enough for it to lead to a great use of the wall at lower percents it does slightly expand your combo options, and can lead into a kill confirm pretty easily at around 80%-100% depending on the foe's position relative to the wall. Also if you hit with the sourspot, its a bit better in this situation, as the foe's offensive options are messed up by the wall taking one or two of their hits and as such leaves their tools to punish Kyoko or retake control in the air a fair bit more limited. This isn't as powerful as some things you can do with the wall, but it shores up a lot of this move's weaknesses.
As a final note, this moves usefulness against shields varies pretty wildly. If the foe has a full health shield, you're going into a worryingly large frame disadvantage if you use this on one, but if they've taken even chip damage they will get shield poked. This means this move's viability to just throw out depends on if the foe has already taken shield damage, something to keep in mind as Kyoko's fast options go.
Dash Attack - Serpentine Spear
Kyoko lunges up into the air, holding her spear out below her as she travels in an arc that goes approximately 1.25 battlefield platforms. For the first half of the arc, the spear breaks into its segmented form as the spearhead increases in size, as Kyoko grounds herself on the head of it. The spear then smashes back down in the back half of the arc with Kyoko standing on it, a flare of red energy surrounding her as it impacts the ground. Kyoko goes up about a Ganondorf height into the air at the move's peak, and the spearhead is a bit bigger than Wario when it smashes into the ground. This is one the whole a pretty laggy dash attack, taking a bit for Kyoko to complete her arc through the air and having terrible end lag as she has to step off the spear and revert it to its normal size and shape.
While Kyoko's going upwards with the spear underneath her, Kyoko's body will lightly knock the opponent forward for 4% and knockback that scales very poorly. The spear is a bit better, dealing 7% and dealing upwards diagonal knockback that kills at 250%. These are not hitboxes you want to hit with, because Kyoko will not be canceled out of her dash attack when she hits with them, which means Kyoko will have to go through all the awful ending lag while the foe recovers from their knockback. If you hit with the spear, at least, you're likely to get punished a lot less badly than if you whiffed entirely, and at high percents you might just be completely fine as it'll start sending the foe a good distance away. That said, if Kyoko's body collides with the foe or this move gets outright dodged, you're definently going to take a big hit.
Once Kyoko is actually riding atop the spear, this move gets a lot better, as the power is buffed to dealing 13% and mostly horizontal knockback that KOs at 145%. This knockback has a slightly downward angle to it, which makes it a lot more impressive near a ledge. This is the start of the portion of the move you want to hit with, and its a perfectly acceptable consolation prize if you don't hit with the impact point. Of note, if you have a foe's back to a wall, this gets a lot scarier, as if you have the ranges right you can have both this hit and the final, more powerful hit collide to pile on an additional 13% and get the most powerful hitbox of this move out of the flight path, which as we're going to get to is a pretty impressive reward. You still have to be very careful about throwing this move out, and it'll be a bit predictable that you want too if the wall is there at a foe's back, but the threat being there is absolutely noteworthy.
When Kyoko finally lands on the ground, the sides of the spearhead deal 16% and mostly vertical knockback that KOs at 120%. This is pretty good, but what you really want to hit with is the middle of the spearhead, which will deal a terrifying 23% with purely vertical knockback that kills at 60%, obscenely powerful for a dash attack. That said, this only works at near the exact limits of this move's range, so compared to other slow power dash attacks this one is even harder to pull off. With all that said, Kyoko has a number of ways to pressure foes at long range, with the best one to lead into this move being Neutral Special. Putting the foe off balance with shockwaves on the ground makes avoiding this attack a fair bit harder, and the foe really has to be smart to avoid it, because this move has some notable anti-defense properties. It absolutely obliterates shields on the sweetspot, breaking them outright if they've taken more than a sliver of damage, and the flame around the hitbox indicates it lingering for a few frames to make dodging it surprisingly difficult, especially if the foe's dodges are decayed from other long ranged pressure.
If Kyoko goes off stage with this move, the result is risky yet powerful. Kyoko will basically activate the final hitbox at the same height she'd collide with the ground, except the sweetspot instead becomes a spiking hitbox comparable to Ganondorf's Dair, only actually a little bit stronger. This is obviously absurd, but landing this hitbox is vastly much predictable than said Dair, and it sends Kyoko falling down 2 Ganondorf heights before she exits her fall, reverting her spear back to normal as she gets off it. This can frequently lead into a gimp in the foe's favor if they get out of the way of this attack, but it is worth mentioning the area covered by it is very big and gives Kyoko's already strong ability to ledge guard an even scarier tool than usual.
One nice thing about this move is that in the second half of it with Kyoko riding on her spear, the spearhead is capable of just blocking and powering through incoming attacks. This gives Kyoko the ability to power through projectiles and not eat a fast move while trying to land this attack, meaning once she's reached the halfway point of her travel path, the best way to punish her is just to not get hit, as knocking her out of this move requires you to specifically attack around the spearhead. While the ability to pseudo counter with this by powering through a hitbox will not come up that often, sometimes you will cut through an opponent's aerial attack and send them flying backwards, often putting them at a good offstage angle or sometimes even smacking them into the wall for the ideal hitbox. This adds a secondary purpose to this move beyond just going in off long range pressure in the hopes of pulling off a kill on a good read. All in all this is a very powerful move, but it is a bit miserable at being a dash attack against close ranged opponents, so be aware of that.
Smashes
Forward Smash - Red Vortex Spear

Breaking her spear into segments, Kyoko spins it around herself in a sizeable vortex, covering both sides of her about a Wario width away from Kyoko on each side. It takes a bit for the spear to form into a large enough amount of segments to form the vortex, with this hitbox coming out on Frame 14 and lasting until Frame 28, at which point Kyoko flings the spearhead forward out of the vortex as the actual "forward smash" part of this attack. There is some pretty high end lag as Kyoko needs to return her spear to its default state, and between that and the duration/start lag this move is on the whole quite punishable. It makes up for this by the huge range on the forward hit, going forth 1.3 battlefield platforms, which is the kind of reach that would make the Belmonts envious. Given the move has an FAF of 85 frames though, it better be making up for it in some other departments, and I assure you this move definitely does.
The first thing worth mentioning is the knockback dealt by the vortex, which universally sends opponents forward a set distance forward while dealing 9%-12%. This even includes if you catch foes with the back of this hitbox, offering some rare utility for a Forward Smash in that it actually catches out rolling foes really nicely. The set distance forward is a little over a battlefield platform width, which is the range at which Kyoko's long range moves come into play nicely, and it also means the first hit will line up with the second one rather nicely!
The second hit deals 17%-24% while the spear is flying out and 20%-28% at the tip of the range, killing at 100%-65% for most of the hitbox while the tip of the range kills at 80%-45%. The first hit will usually not combo into the sweetspot unless the foe is right at the tip of the range, on top of another factor. You see, the foe will be out of hitstun if this move hits when it first comes out on Frame 14 by the time the spear comes rocketing after them, giving the foe a chance to shield or dodge. The move obviously takes a pretty hefty chunk out of the opponent's shield, and despite the move's bad ending lag a dodge will put the opponent in a position where Kyoko is actually at a bit of an advantage due to the combination of her range and the foe being in their dodge while she's going through the end lag. This leaves the foe with a window to react and only take the weaker hit if they get hit by it, but its not a bad place for Kyoko to be considering she does quite like being able to keep up long range pressure like this. You basically are transitioning from short range combat to long range combat in a single move here.
There's a bit of a trick here too, if you want to link the first hit into the second one a bit more easily. Kyoko can actually start charging the FSmash again by holding the input before she would throw the spear out forward, pausing her spin as she does so. The power of the second hit is actually affected by the charge of the first hit, so if its fully charged this is only useful for delaying the attack, but you can actually use this to add a bit more charge to the move mid attack in some situations, which lets it serve as an even scarier KO move. More importantly, given the foe is in a very tight situation in terms of dodging this attack, charging the second hit can screw with the opponent's timing, making linking the first and second hits a bit easier.
This move is at its best, however, when its used to punish rolls or approaches. You see, you aren't always going to hit the foe on Frame 14, if they only come into contact with the hitbox at say, Frame 19 or so, they will straight up get comboed into the second hit without question. If the foe is rolling toward Kyoko to get through her ranged pressure or to get behind her, you can turn their invulnerability frames against them by hitting them with this powerful two part combo that they suddenly have no ability to avoid, which is just an exceptionally powerful punish. Its also a nice way to switch from close range to ranged pressure, not as versatile as Side Special in that regard but serving as a decently powerful alternative that discourages rolls nicely, and sometimes works better as a KO move. As a final note, Kyoko is usually at her best trying to hit a foe at melee range or at a specific, a bit over a battlefield platform distance in front of her. While its too slow to be great at it, this is at least capable of covering the space that is normally a pseudo "blind spot" for Kyoko by hitting effectively at basically all ranges in one move.
Up Smash - Spear Vault
In a rather swift motion, Kyoko stabs up directly above her head with her spear, in a move that animates a bit similarly to Marth's Up Smash, but Kyoko spends a bit less time pulling her spear back to stab it upwards, giving the move a bit less force behind it but also a faster startup time. Coming out at frame 9, this stab deals 9%-13% on the hilt of the spear and upwards knockback that only KOs at around 220%-160%, and 15%-21% at the tip with upward knockback that KOs at 130%-85%. Given how fast it comes out, this can be a nice way to end a stock out of nowhere at higher percents with the tip hit, but unfortunately the handle sourspot only has the kind of power you'd expect of a tilt.
This move still has reasonably long ending lag and poor coverage, only hitting straight above Kyoko and only having an especially good hitbox at a fairly specific range above her, so its fast KO move properties are hindered by a those downsides. With that said, its a better move than you might at first think, because it has a fairly useful follow up. If you press the input a second time, Kyoko will jump up and bring her spear from above her into the ground, in a hitbox that deals 8%-12% and weak diagonal knockback that only kills at 275%-200% on the hilt and 11%-15% and diagonal knockback that kills at 200%-130% at the tip. This leaves Kyoko with her spear planted in the ground with her standing atop it, after which she will vault off it in one of three directions, depending on how this move was angled. This follow up combos out of the hilt hitbox at very low percentages and comes out reasonably fast, mitigating the move's ending lag problem to a degree, but because of the inherent mobility associated with the follow up that we're about to get to, its a slightly awkward option to just throw out every time you use Up Smash.
If you angle up, Kyoko will just leap off a Ganondorf height into the air from her point with her spear planted below her on the ground, effectively ending a Ganondorf height above the tip of where the first Up Smash hitbox would end. This can allow you to pursue foes high up from the sweetspot hit to make it a bit more useful at lower percents, and given Kyoko keeps her other jumps after doing this you can actually get a metric ton of vertical height with this move, allowing for a few decent setups involing Nair and Up Special that can lead into a kill with Uair at surprisingly early percentages. While its not the most used direction in this regard, Kyoko can also situationally take advantage of having a lot of distance above the opponent, walling them against the ground with Nair or taking advantage of using Dair/Up Special from above.
The other situational options out of this are if you tilt forward and backward as well as upward, which will cause Kyoko to vault forward at an accelerated speed well beyond her normal max air speed in those directions(about 1.35x faster but rapidly decreasing to her usual maximum). Vaulting backwards sets up Fair out of this and vaulting forward sets up Bair, and it can improve the viability of Nair as a combo move(we'll get to Nair soon I promise, its pretty important) just by virtue of Kyoko continuing to move in that direction at a high speed. In general this lets you weave around platforms and your wall immediately after throwing out two fast hitboxes, and combined with the fact that Kyoko wants a pretty specific kind of spacing the burst mobility this provides can really help with optimizing your positioning in regards to the opponent. With all that said, the fact that Kyoko will get launched off in one of these directions is a bit awkward if you don't want to respace yourself, in which case its better to just take the end lag, but that may not be a very safe option if the first hit whiffed.
Down Smash - Blade and Chain
Breaking her spear into segments, Kyoko begins spinning it around herself like a ball and chain, extending out a massive 1.1 battlefield platforms on each side of her. She will spin the chain around her three times before finally slamming it down in front of her, the spearhead enlarging a bit as she does so. The spearhead is slammed down 0.8 battlefield platforms ahead of Kyoko. This move has notable but not huge starting lag, moderate duration, and massive ending lag, so if you're throwing this move out it is very, very important to know what you're getting yourself into. Considering this is a larger area of coverage than a Belmont FSmash on both sides of you, the commitment is absolutely warranted.
The three spins of the spear deal 4%-6% at the tip and 2%-3% at the chain, with the tip of the spear dealing knockback that sends the foe slightly inward, to exactly the point on the ground the spear would impact with set knockback. The chain will deal a flinching hit that will just lock the opponent in place for subsequent chain hits. This means if you hit the foe with either the edge of the forward range or at exactly the point the spear would slam down, you will definently land the final spear slam hitbox. The spear slam deal 16%-22% and diagonal mostly upward knockback that KOs at 90%-55%, serving as an excellent finisher. Because this move does not come out especially slowly with the worst part of the lag being the ending of the move, this makes it a reasonable long range finisher if you hit with the tip.
What makes this move a bit more than just a long range finisher, something the FSmash generally does better, is two things. One, it comes out a lot faster than the more powerful hit of Forward Smash, so if you're not landing the initial sourspot of that move this is a fair bit easier to land, especially since the lag is now a lot closer to moves like Up Special or Neutral Special, Kyoko's other long range pressure tools. Its easier to land off a read, especially because this move's duration is such that spot dodging it is incredibly hard, and it also covers two separate, so it can actually be kind of annoying to roll around properly as well. Shielding it is probably the best option, but shielding is poor if Kyoko attempts to rush in with the dash attack, and this will deal quite a bit of shield damage thanks to all of the hits linking into each other on shield, at least making it easier to poke through with Down Tilt thanks to the heavy shield damage they took.
This move also serves a purpose of covering two points at once, the edge of the swing which knocks them in wards and the slightly closer point where the spear actually slams down. If you don't hit with either of those hitboxes but still land it far enough away, the massive ending lag becomes way harder for the foe to capitalize on other than say, throwing out a projectile which is usually not nearly as scary as their melee options. If you land it close... you should've probably used a different move. A lot of Kyoko's hitboxes are pretty lackluster outside their optimum range, so covering two optimum points at once while making spot dodging and rolling difficult is a pretty valuable threat to have in your spacing game.
Though, considering this swings behind you, this move actually has four points of coverage rather than two. Now, normally the back spear tip hit would not combo the foe into the spear slam, as the slam will take place in front of you and it will just send the foe in as much as the forward hit would, but behind you instead of in front. That said, if you press any input during the swinging process, you can have the spear slam occur behind Kyoko instead of in front of her at the same distance of 0.8 battlefield platforms behind her. This gives Kyoko a good way to deal with foes a large distance behind her, serving a secondary role to Bair in that regard working a fair bit better against dodges than said move.
Charging this attack actually has a secondary effect, as it boosts the set knockback of the inward hit with the spear tip, and simultaneously causes the slam down to occur closer to Kyoko. Fully charged, she will slam down the spear within 0.2 battlefield platforms of herself, and this means charging the move allows you to tweak where the inner hit would land to further this move's excellent coverage. Obviously charging this already somewhat laggy to start move is a bit predictable, and you don't want to be predictable with a move that you are quite liable to straight up die if you whiff, but it makes the move just that little bit more versatile in terms of covering space and punishing the foe's mistakes.
Aerials
Neutral Aerial - Spear Spin
Kyoko just spins her spear around herself with one hand, covering a complete 360 degree circle around her. This is one of Kyoko's fastest options, and has coverage over her entire body, even having pretty low ending lag, in exchange for not reaching out as far as even some of her more melee ranged weapon attacks usually do. The tip of the spear deals 9% and radial knockback that does slightly vary on where the spear hits the foe, dealing pretty weak knockback while the knockback is a majority upwards or downwards but improving to solid spacing knockback if it hits the foe mostly backward or forward. The hilt deals 6% and the knockback is always forward regardless of what part of the spin you hit with rather than radial, and a bit weaker than the tipped version. This sourspot is actually not terribly easy to hit with, given the spear spin is centered at a point inside Kyoko's hurtbox and the spear is not at all extended out.
The spacing oriented knockback if you hit with the front or back of this hitbox makes it less than exceptional at comboing if you hit from those directions, which is kind of unfortunate. It'd be a great combo starter and probably even chain into itself with lower knockback, but as it stands this is more useful for getting the foe to Kyoko's optimal range. Mind you, that's still a useful property, and because of its fast speed and coverage its actually pretty good at reversing a disadvantage state to suddenly forcing the foe into playing the spacing game with Kyoko again, or converting on any combo opportunity to end with the foe at long range. Also while it won't work at all percentages, there is a percentage range between 30%-60% on midweights where this combos into Fair's sweetspot, which as far as your long range game goes is pretty important.
The upwards and downwards part of the hitbox are way better for combos, as their knockback keeps the foe close enough that you can potentially chain this together multiple times for juggles, or easily go into Uair if the foe's above you. The downward version will link quite well above the stage into your ground game, and depending on Kyoko's prediction of the foes movement can sometimes link into itself a couple times to push foes back toward the ground or the bottom blast zone. The upward hitbox actually links into Side Special pretty nicely if the foe is hit at between a 30-60 degree diagonal, which given Side Special's versatility is potentially quite powerful. One thing worth mentioning is that the better comboing options you have to lead into this, Up Tilt, will not lead into the upward version of the hitbox, so you'll need to sweetspot it at a lower percentage if you actually want to go for the longer combo strings the upward version provides.
The sourspot is generally not great to hit with, if you hit the foe with the sourspot in front of, above, or below Kyoko, the foe will just not be put close enough to combo except at super low percents and not into your long ranged combat zone until fairly high percents. That said, below 20% you can do some more forward oriented combos with this, and that percent is extended quite a bit if you hit with the back hitbox, which due to its position relative to Kyoko makes the forward angled knockback better for combos. This gives an alternate part of the hitbox to link into Side Special with, giving the move additional chances to lead into one of Kyoko's more powerful tools.
As a final note, becuase of the wide variety of angles and knockback distances this move provides, this is one of your best tools for setting up exact positioning for an opponent if you're aiming to do something fancy with a wall requiring exact spacing. The position dependant amount of knockback means Kyoko can get the foe to pretty exact positioning if she predicts the foe's position with this attack, and given its speed that's easier to do when it sounds. Basically if you want to go for something flashy that requires optimized spacing, this move makes that process a fair bit easier, and combined with all of its other utility this is one of Kyoko's absolute most core moves.
Fair- Red Lash
Breaking her spear into chain segments and lashing it forward as she does so, Kyoko performs what is easily her fastest long range attack in the set. Going forward a full 1.2 battlefield platforms, this move comes out on Frame 6, and gives Kyoko an actual true combo out of some of her spacers that doesn't require the wall. The chain link segment of the spear only deals 3% and a flinch, while the tip deals 8% and slight forward knockback, which can actually at low percents link into itself. Yes, this is a combo move that's good enough to serve as an extender too, which is an immensely valuable option for Kyoko to have against a foe at long range. The problem is as most of her other long range moves are a bit on the laggy end, there isn't a lot to combo this move into, and it does lose its ability to string into itself as percentages get higher, at that point more just serving as a way to maintain advantage at a range.
There's a bit of a catch to this move, and its one you should be aware of while using it. The low ending lag it has that lets it combo into itself is not guarunteed, as it will only have that low ending lag if the speartip actually hits the foe. If it does it will catch on their body and allow Kyoko to quickly reset it to its normal state with a bit of hitlag. If you whiff and hit with the sourspot or don't hit at all, Kyoko will instead swing the spear all the way past her before resetting it back to its normal shape, which has actually fairly punishable ending lag. This means sourspotting this attack will outright put you at a frame disadvantage to the foe, which may not be that bad if the foe is further out from you but means you really, really should use Nair instead at closer range. It also makes this move pretty punishable on a whiff, so while its quite good at catching out opponents with its high speed, you actually do need to be a bit careful about when you throw this move out.
One thing that will alievate this problem slightly is that like Down Tilt, there's a close range hitbox that sends the foe with moderate but extremely poor scaling diagonally upward knockback very close to Kyoko, dealing 6%. It doesn't really link into anything of value and doesn't cover anything outside a range much shorter than even her unextended spear has, but it means at the very least if you input Fair on a foe in melee range in front of you, you're not just screwing yourself over.
There is a specific percentage range a bit after when this move combos into itself, specifically around 55%-75% on middleweights, where it can actually combo into Neutral Special's long ranged version. This is your one true combo into that move, and while that's below its center stage KO range, that's not when you want to go for this combo. No, if you use that near the edge or off stage, you can either confirm a kill or send the opponent very close to the blast zone, which is pretty important given Kyoko is actually really good at edgeguarding so if she gets the foe far off stage this can just serve as the finisher. While a bit position dependant and only working at specific percentages, this makes being at Kyoko's long range with her Neutral Special charged up that much scarier than it'd already be. While the window is extremely narrow, on some characters there's a gap of about 5% where the Nair will combo into this string, so if you get to that specific percentage a charged NSpecial can cause the foe to start playing incredibly scared, and if you condition them to be terrified of you that can make it easier to get exact spacing for something else. While harder to land than Nair, an Up Special's upward flick can also chain right into this combo with vastly more consistency than Nair, adding some fear factor to that move as well.
Back Aerial - Reversal Chain
Kyoko's spear separates into chain segments as she swings it behind herself, covering a downright massive arc behind herself starting at about her head's height and going down a considerable distance below her. This comes out with above average lag for an aerial on both ends, but the massive range that exceeds Shulk's Bair makes up for this. The spear tip starts pretty near Kyoko, goes all the way out to max length in a flash before being swung down, basically covering a straight line back from Kyoko and then the edge of the arc. It deals 13% and horizontal knockback that KOs at 135% while initially coming out and then 11% and diagonal slightly upward knockback that kills at 180% while traveling along the arc. The chain deals only 8% and mostly upward knockback that kills at 230%, not really great for combos or kills.
The power is decent provided you hit with the spear head in one form or another, but the power behind this move is its downright ridiculous area denial. Having such immense range where all the hitboxes are at least acceptable to hit with makes this really good at zone denial, and it edgeguards really well as long as you hit with the spearhead in some form. Just try not to hit with the chain if you're going for edgeguards, as that will let the foe just recover over you. Its bad punishability on whiff is at least helped out by the huge coverage, as at long range the foe will have trouble actually capitalizing on the big ending lag. Kyoko's recovery is kind of mediocre, but for what its worth having this kind of range does make gimps actually somewhat feasible, albeit predictable due to this move's lag.
The other primary use of this move is that it really lets you establish some level of stage control just by the sheer coverage it has coming out, and the power of the stronger spearhead hit. Kyoko can control ledges very well with her massive range, this move included in that package, and a wall gives a secondary thing to zone the opponents to if you want an option other than just zoning them to the edge. Of course, its not exactly a perfect tool for this given its lag, but if you're at a decent range from the foe it allows you to make large scale repositioning decisions in the same way Nair and Forward Tilt can force small ones.
This is really the best option you have out of the back hit of Nair, at low percents actually true comboing out of it and past that you can instead use it to zone out the foe or edgeguard them after Nair's back hit. As this is unsurprisingly your only long ranged backwards option, it makes hitting with the sweetspot on backward Nair still solid, even if comboing Nair to this at low percentages is actually not that great a combo since it ends there.
Up Aerial - Extended Stab
Kyoko stabs upwards with her spear, with the spear extending upwards a bit before she retracts it back. This move deals 7% and weak diagonal knockback at the hilt of the spear, but thankfully, because the spear tip extending upwards makes up a good portion of the hitbox as it extends out to double its base length, a large portion of the hitbox is not this lackluster one. The spear tip deals 10% and upward knockback that kills at 175% for most of the hitbox, and 12% and knockback that kills at 160% at the end of its extension. The spear takes about 8 frames to extend out all the way, meaning the hitbox is active for quite a bit longer than average. The downside is the ending lag, which is pretty bad and means while you can certainly combo into this move because of its pretty good start lag, the duration and ending lag make it quite punishable if you whiff it, and it is definitely going to be the end of whatever combo you went for.
This is obviously a pretty good thing to combo Nair's upwards hitbox into, which is one of the easier ways to land this move. If you want a kill confirm off Nair late off a high platform, this works fine, especially considering because of the way the hitbox works it true combos out of Nair a fair bit longer than you might at first thing it would. If "a high platform" is not an option, or you want to go for a somewhat earlier kill off one of the lower platforms, launching the foe with Up Smash and then pursuing them into the air with the follow up is a good way to get the Nair/Uair kill confirm a bit earlier. Its hardly a true combo out of the upward launch Up Smash, but the timing window the foe has to avoid it is pretty small so you'll at least pull this off reasonably often, and you can mix up by just going straight into Uair.
At high percents, this still works pretty well as a follow up out of the Up Smash lunge, as the foe taking greater knockback means they'll be in hitstun just a bit longer and the massive range of this move makes it continue to be close to a combo. If you predict the foe is going to properly dodge it, you can instead go for an Up Special, which also links well into subsequent Uairs by pulling Kyoko to the foe and then booting them even higher into the air, or possibly just flicking them up off the end of the spear to go for a second attempt at a successful Uair read. This is helped by the fact that the move is a bit hard to air dodge due to its longer duration, though the foe can potentially weave around it with a directional air dodge and if the foe is hit by the spear shaft after its extended upward, they only take the weaker hitbox so you probably won't get KOs off this. At least it means you won't be punished, and directional air dodges leave the foe with worse lag than a regular one, so forcing one of those out isn't exactly bad.
Down Aerial - Crash Landing
Pointing her spear downwards and slightly forward, Kyoko stabs it downwards as she plunges toward the ground at a slight forward angle. This forward angle is actually a bit dependant on the momentum Kyoko has going into this move, if she's currently moving forward in the air at maximum speed it will actually have her fall forward at a 45 degree angle forward, though she will cancel backwards momentum at the start of this move. Kyoko falls a little bit faster than her fast fall speed during this move, and deals 11% and upwards knockback that KOs at 190% for the first Ganondorf height worth of the fall. After that she actually accelerates for another 2 Ganondorf heights worth of falling, dealing an increased 15% and now downward knockback that spikes very early and KOs off a ground bounce at 125%, You also, obviously, travel considerably faster than Kyoko's fast fall speed during this time. There's a minor forward angle to this downward or upward knockback if Kyoko is moving forward near or at her top air speed before this move starts. Kyoko catches herself after falling the full 3 Ganondorf heights, still with a bit of downward momentum so this can be pretty dangerous to use off stage.
Kyoko cancels out of her fall with relatively low lag if she hits an opponent in the early part of the fall, and while the knockback is too high for combos at most percents she can pull it off at pretty low percentages, going into Nair as you might expect, Uair with little to no forward momentum and Side Special if you have some. If you're past the initial weaker part of the fall however, Kyoko will just plow through opponents and not stop, making it a lot less safe in exchange for more power. The slight forward angle of this downward knockback makes it a bit scarier than most spikes, since the foe does not have to be entirely off stage for this to spike them to their death. This is yet another potential reward for good positioning or another threat to foes near or on edges for Kyoko, serving as powerful stock ender in that position. Just keep in mind the landing lag is kinda bad even if Kyoko hasn't started accelerating, this isn't super quick to come out, and the landing lag and ending lag get a lot worse if Kyoko has reached the accelerated part of the fall.
While this is a small thing, it is worth keeping in mind this move has super armor against attacks that deal 11% or less while Kyoko is in the accelerated part of the fall. This at least provides a little safety to that part of the move, potentially plowing through weaker aerials or recoveries to land this hitbox.
The Up Smash lets Kyoko have additional forward momentum if she uses this move out of the forward variant, which actually triggers some of the accelerated bonuses without requiring Kyoko to descend at all. Instead her forward momentum will increase a bit and she'll gain some downward momentum as she throws out the spear's hitbox. The damage gets buffed up and the knockback becomes angled downwards immediately when used out of the higher speed you can achieve by vaulting off the spear in Up Smash, and you also acquire the super armor. This is obviously a little predictable, given you have to catapult forward off an attack not designed to entirely be used for momentum, but since the knockback is now angled even further than before it can allow for some shockingly early kills, or lead into them via subsequent edgeguarding. Keep in mind that Kyoko suffers the increased ending/landing lag if your using this, so its a rather risky thing to attempt, but it serves as something to mix up whatever other moves you'd use out of your approach as you're flinging towards the foe, like Nair/Side Special, or if the foe is particularly far away, Up Special/Neutral Special/Fair.
You can get an even stronger hitbox if you fall a full Ganondorf height out of Dair used out of Up Smash's added aerial momentum, upgrading to dealing 19%, knockback that kills about 30% earlier than the Dair's accelerated variant usually would, and total super armor, as Kyoko accelerates even further forward and faster downward for those 2 Ganondorf heights of falling. There's a couple problems with this, however. One, you don't get enough height out of the forward lunge of Up Smash to actually pull this off above the ground by default. Instead, you need to jump during the Up Smash's momentum and then use this immediately, which is very predictable, or go off the ledge while you're using this, which is pretty suicidal given how far forward and down you'll be off the edge once that happens. Still, this can be a useful last ditch kill attempt off stage, acting as a pseudo suicide KO, or occasionally cheese out a kill shockingly early onstage off a hard read. The nice thing about this version is its significantly less punishable as Kyoko creates a small explosion of debris around her when she lands on the ground, dealing 8% and diagonal knockback that KOs at 170% that lingers for a moment, making it hard to dodge and covering a sizeable portion of her landing lag. The explosion doesn't cover too far away from Kyoko, but it at least means shorter ranged foes might struggle to punish her.
Grab Game
Grab - Frustrated Grip
Kyoko reaches forward in a surprisingly decent, non-tether grab, having slightly above average range and normal lag for a grab. If she manages to get the foe, she'll hold them in a slightly different position depending on the foe's size. If they're her height or smaller, she'll lift them by their collar or neck, depending on if there's a collar available for her to grab. If the foe is bigger than her, she'll just grab onto their arms and restrain them as her chain spear wraps around their upper body. This is just a visual thing that has no impact on gameplay or her throws.
Pummel - Aggressive Kicks
Kyoko slams her foot into the opponents gut, in a slightly slow pummel that deals 3%, The animation looks slightly different on smaller opponents as she has to bring her leg up pretty high, but it comes out at the same speed regardless. While not an amazing damage racker pummel, it at least does the job.
Forward Throw - Coil Slam
Kyoko's spear suddenly bursts into chain form and wraps around the foe if they're smaller than her, before she tosses the spear back behind her with the foe trapped in its coils for a moment. Larger foes who are already ensnared in the chain spear's coils will have the coils tighten around them, and it takes Kyoko a bit longer to heft them behind her, so the animation length remains the same. This throw is actually chargeable if you continue to hold down the forward input, which we'll get to the exact applications of in a second. You will want to be a bit careful while charging this move, as if the foe mashes out during the charging they will be left behind you, which while not terrible at frame neutral is not really the place you want to leave the foe. This input can be charged up to 1 second.
When the charge is released, Kyoko slams the coiled spear down in front of her, at a distance depending on how long this move was charged. At minimum it will just leave the foe right in front of her while dealing the foe 7%, and at maximum charge it will leave them 1.2 battlefield platforms away and deal 14%. Regardless of charge, the foe will be left in prone at the end of the throw, unless the spear goes off stage. In that case, the part of the chain that is off stage will swing down a maximum distance of about half how far forward the foe was slammed down before releasing the foe with a weak spike and 5% less damage than this would otherwise deal. The chain operates with somewhat realistic physics, so obviously it can't go down further than the length of it that is offstage. The ending lag on this throw is increased a bit if the foe is slammed down off stage, so its not quite as easy to edgeguard the foe as it otherwise would be given your laggy options are a lot less viable. Still, especially given Kyoko's range alots her so much safety and the fact that the foe will be stuck below the ledge, its a pretty advantageous spot for her to be in, especially at higher levels of charge.
There's a wide variety of powerful ways to abuse the fact that Kyoko can leave foes in various ranges with this. If you leave the foe up close, it becomes extremely dangerous for the foe to try and roll behind Kyoko, because you can easily catch them out with a Forward Smash and brutally punish them for their decision. Given the slightly unorthodox amount of coverage Kyoko's UTilt has in front of her and Down Tilt being pretty bad up close, its the better option if the foe stays close, while if the foe rolls away Kyoko can start going for her long range options, albeit at close range the foe rolling away is not something she has amazing response tools for. If the foe is relatively close to Kyoko, Forward Smash can still catch them out rolling toward you and Down Tilt or a Short Hop Fair can catch them rolling away. At more middling ranges, you can catch out the foe rolling either direction with either long ranged moves like Down Smash/Neutral Special that are good at catching rolls or at least hitting with a complimentary projectile hitbox, or if they roll into your face you can go into Forward Tilt/Nair/UTilt. At maximum range, you can instead rush into a foe rolling away from you with Dash Attack or an Up Smash momentum boosted aerial, which are the stronger but riskier options, or just go for a long range Neutral Special and hit the opponent with the further shockwave before trying to get them back to your closer range options, while Down Smash and Down Tilt can be useful to catch out the foe if they try to get closer to you. Get up attacks and just standing up out of prone are pretty immensely risky as they offer less intangibility and are easy for Kyoko to punish no matter where she's left the foe, so all in all this gives you a lot of potentially scary advantage states you can pick and choose from based on charge.
If Kyoko slams a foe into a wall with this move, they'll become embedded in it for a set 15-30 frames based on charge. This is more likely to true combo into something nasty than the prone state ever was, but its harder to use with lagger options because of the ending lag of the throw being enough to prevent you from going into most of your power moves that aren't an already prepped Neutral Special.
Up Throw - Rising Impact
Tossing the opponent from their position lightly above her head, Kyoko rapidly stabs upward and slightly forward for 3 hits that add up to 8%, with the final one dealing upward diagonal knockback that is actually decent at base, but only has the absolute tiniest scaling component so it will not kill until about 800%. This is a pretty basic juggle setup, sending the foe a bit too far to combo into closer options and not true comboing into Uair because of the slight forward angle. That said, its close enough to a true combo with short hop Uair links well enough into Up Smash that as long as you handle your subsequent movements and timings well you're probably going to at least get something out of this, but as a pure combo throw, its not nearly the best Kyoko can be doing.
There is actually a follow up to this move if you press up or A during or at the end of the throw animation, which will have Kyoko actually lunge up about 1.7 Ganondorf heights into the air, with her spear shapeshifting into a coil form with an enlarged spearhead in a similar manner to Dash Attack as she does so. She then crashes down on top of the foe, dealing 12% and upward knockback that kills at 110%(102% when you factor in the previous hits), which is a fantastic kill confirm to have out of a grab especially considering it happens even earlier on higher platforms. There's just the one problem, its not guarunteed, there is enough room for the opponent to potentially get out of the way of this move. If you do whiff, Kyoko takes some surprisingly terrible ending lag, enough for the foe to easily punish her, which is definently not the end result you want out of this throw especially considering Kyoko's low weight and underwhelming recovery.
One thing worth mentioning is that the timing of this follow up actually depends a little bit on at what point the player inputs the follow up input, giving the foe the smallest window to avoid the move if you input it earlier. If you input it later, however, you can catch out a foe's attempt to dodge it, giving you a bit of a mixup. You can also move a bit back and forth while you're falling to make sure you catch the foe's DI. If you want this to kill confirm properly however, using it next to a wall with the minimum delay will trap the opponent just long enough once you reach a little below kill percentages that this will actually just kill confirm, making it quite scary for the foe if Kyoko lands a grab with a wall in front of her, and it will make the hit harder to dodge before kill percents if you want to go for it for the raw damage before then.
At a high enough percent, the foe will be sent too far for a follow up, but honestly if you get the foe to that kind of percentage they should really just be dead already, it only happens around 300% or so.
Down Throw - Double Stab
Slamming the foe against the ground from their current position, be it out of her spear's coils on larger foes or just with her own two hands on smaller ones, Kyoko plants her foot on them to hold them still and stabs twice. Planting her foot on the foe deals 1%, the first stab deals 3%, and the second stab deals 5% and light diagonal forward knockback, with Kyoko having very little end lag out of this throw. The knockback scales pretty slowly, so this move is exceptional for combos. It can go into most of your close range tools, at specific percents even setting up Dair if you want to try for that, and generally serves as an effective way to start a combo out of a grab, while also dealing a solid 9% to start with. Not a very complex throw, but its not a bad thing to fall back on, especially because it can link into things even at mid-high percents even if the combos will not be nearly as effective from the subsequent hits and you won't be able to pull off Dair or Side Special out of this like you would at low percents.
Back Throw - Coil Closer
Tangling the foe in the spear's coils identically to Forward Throw, Kyoko instead swings the foe behind her and lets the spear coils fly forward about 1.4 battlefield platforms, before she grips onto the spear to stop the foe's flight before pulling herself right to them. She then plants her feet into the foe's face, bouncing them off the ground slightly but needing a moment to catch herself afterwards, leaving both parties in frame neutral at the end of this move, with the foe spaced near the edge of Kyoko's close range melee options. This deals 4% with the initital throw, 2% when the chains constrict the foe's flight in place, and 7% when Kyoko kicks them in the face, adding up to 13%, a pretty respectable amount for a throw.
Leaving the foe in frame neutral with Kyoko facing them is not too bad a place to be, as at the very least you're in range to land the tippers of moves like Forward Tilt and Up Tilt now. The real reason you're using this move, however, is that it deals good damage and serves the unique role of simultaneously spacing the foe and Kyoko at the same time. This might not sound like a big deal, but you can get a foe with their back to your wall to lead into some incredibly dangerous combos you can't access without it. This can also put both of you quite close to the edge of the stage, though it will not technically send you off. This is because Kyoko will catch the spear and pull herself to the foe if they reach the edge, though the kick will send the opponent a short distance forward and slightly down a set amount instead of bouncing the foe off the ground if they reach the edge with this. While this isn't quite as good for setting up edgeguards as FThrow because Kyoko will be closer to the foe, but if the ledge is closer behind you than in front of you or you don't have enough percentage to charge, it will do. In general, this is another tool that lets Kyoko "control the stage", this time by giving you the rather unique option to reposition yourself and the foe at the same time.
Final Smash
Kyoko's soul gem flares up with the immense power of the Smash Ball, and she summons forth four giant spears in front of her, each twice as tall as Ganondorf and as wide as Wario. If they hit the foe, the opponent will take the initial hit of 10% and be sent into a cinematic, where Kyoko has surrounded everyone hit by this move with a wall of giant spears. She then forms an absolutely massive serpentine spear below herself, standing on the head as it towers over the characters you've trapped in this final smash. The camera zooms in on Kyoko as her spear is now absolutely flaring with energy, red flares pouring off of it.
The giant spear then dives forward, Kyoko standing on the head as a massive explosion of red and white energy occurs that obscures everything impacted, dealing 35% and obscene upwards knockback that kills at 50%, or more accurately 40% because of the initial 10% dealt by this move. While summoning these massive spears and performing this huge attack actually cost Kyoko her life in canon, it comes at no cost to her in Smash, as the Smash Ball's energy is used up instead of her own.
Up Taunt
Kyoko leans back against her spear as she plants it in the ground, taking a moment to recline with a somewhat smug expression on her face.
Side Taunt
Kyoko just turns forward with an annoyed expression and just says "Could you, like, stop?" This is very useful after you've beaten the same Little Mac 7 times in a row but he just does not know when to quit.
Down Taunt

Kyoko takes out a Taiyaki and bites into it, taking a moment to chew it before returning to battle. This actually heals her, but only by 0.4% over a long duration taunt you can't cancel, so don't expect to get much mileage out of it in battle. The food you get is actually randomly selected from one of three options, an apple, a stick of pocky, or the taiyaki shown above, but the healing is the same regardless.
Victory Pose #1
Twirling her spear behind herself, Kyoko smirks and says "You losers are all at the bottom of the food chain!" if there are multiple opponents, or just "You're at the bottom of the food chain!" to a singluar opponent.
Victory Pose #2
Kyoko is seen walking into view with a bag of apples in her arms, munching on the last bits of a piece of bread in her mouth. She probably did not pay for that, but hunting witches is not a viable source of income, cut the poor girl a break.
Victory Pose #3
Seen dancing on what appears to be some kind of Dance Dance Revolution knockoff arcade game, Kyoko briefly dances along for a moment before the song, a slightly more techno version of the usual victory theme, stops with a grade of "Spectacular" displaying on the screen. As it does so, Kyoko turns to the audience and gives a thumbs up.
Loss Pose
Kyoko just claps as you might expect, though she looks a bit taken off guard to have lost based on her facial expression. If she specifically lost against Sayaka, however, her expression will be a lot happier, as it seems she's proud of Sayaka for actually stepping up and defeating her.
"If you are just living for your own sake, it's all up to you. No hard feelings. No regrets."
1 note
·
View note
Text
Building Nico Minoru in D&D
I was actually thinking of building a different Marvel character using D&D 5e rules but then I realized this would, in theory, be a very simple build and also still very challenging because, well, we’re doing magic and magic in D&D is a lot of stuff. So why won’t we start with someone who can help us keep it relatively simple?
So first we need to decide what we want from this build. We need a wide variety of magic spells but also something that can reflect what happens if she breaks the “one word per spell” rule. We also need a magic staff that we can use in combat and finally a way for her to be the dean mother for all the other Runaways
As before, builds I do are inspired by an awesome job Tulok the Barbarian does building characters on his youtube channel and I tend to stick to some of his principles. For one, we will be using standard points array for Ability Scores - 15, 14, 13, 12, 10 and 8. If your DM would have you roll or point buy adjust the results to the below guidelines.
Our main stat is Charisma, not only will it be responsible for our casting but also because Nico is well-liked by her peers even at her angstier and grumpier. Constitution will follow, Nico has to cut herself for her spells to work, after all. Dexterity next, since she has shown some acrobatic skills in combat here and there. Then Intelligence, she is smarter than your average bear, as they say. Our lowest stats are Strength, since we don’t need it, and Wisdom, as Nico is has a reputation of being too trusting and making decisions driven more by emotions than cold reason.
Our points array should look like this: STR: 8 DEX: 13 CON: 14 INT: 12 WIS: 10 CHA: 15
For Race (which is D&D’s outdated way to say species) Nico is a human, so we’ll go with Variant Human. Variant Human get +1 to two Ability Scores of your choice, I recommend Charisma and Dexterity with the above array but it may be different for you - just remember even numbers are good numbers. We also get a free skill proficiency, take Acrobatics, and a feat. War Caster gives you a number of utilities - when you take damage and need a Constitution saving throw to maintain concentration on a spell, you have an advantage on that roll (meaning you roll twice and pick better result), you can perform somatic components of a spell even if your both hand are occupied with a weapon or a shield and when an enemy provokes an attack of opportunity from you, you can instead cast a spell as long as it only has one action casting time and targets one creature.
For Background, I’d pick the closest to a runaway - Urchin. It gives you proficiency with Stealth and Sleight of Hand, but I would customize it and change the latter for Deception, disguise kit and thieves’ tools and a City Secrets feature, that allows you to travel twice as fast between any two locations in a city, at least when not in combat.
Now to the Class Levels. For our first level, we will start off with Sorcerer. We get proficiency with Daggers, darts, slings, quarterstaffs, light crossbows, Charisma and Constitution saving throws and two skills, I would choose Persuasion and Intimidation.
Before we get into spellcasting, we will focus on Sorcerous Bloodline. And there is one that seems almost tailor-made for Nico - Wild Magic. It gives us a very climactic ability - whenever Nico casts a spell of level 1 or higher, you roll a d20. At natural 1 you get to roll a Wild Magic Surge table ad have a random effect happen. While it is admittingly not very optimized for combat-oriented games it is the best way to reflect Nico breaking “one spell, one word” rule. Just have it that you first tell you DM what you cast, then roll and on nat 1 roleplay a failure. Plus it is a ton of fun and you can make it even more unpredictable if you add some sort of custom table for wild magic effects, like this one here I just found today.
You also get Tides of Chaos. You can choose to gain an advantage on an attack roll, ability check or saving throw. You can use this ability once and get it back after a long rest or whenever you roll on Wild Magic Surge table.

Now for the spells. How it works is that you have a number of spell known and every level you learn a new spell and can replace one you know with another. You get a number of spell slots each day and when you cast a spell you burn out one spell slot of an appropriate level and you cannot know spells of level higher than your higher spell slots. It is sadly more limited than Wizard who just learns the spells but it is much more reflective of Nico as a character. Dark magic is not something she learned, like Doctor Strange, it is her legacy but also an inherently chaotic force she struggles to control. She represents the unskilled but strong type of magic user, as opposed to Strange who has next to no raw power but incredible skill and knowledge.
You may feel a limited number of spells known clashes with Nico not being able to cast the same spell twice but there are ways around it in roleplay itself. Agree with your DM to describe a slightly different way the same spell works each time, maybe a spell that once held an enemy in place did it by paralysis, next time by a tentacle and another time arms of the dead rose from the ground to grab them? You can also operate on rules closer to A-Force, where Nico gets to cast the same spells using different words.
Also, mechanically if a spell allows a target a saving throw, difficulty for it is 8+ Your Charisma Modifier + Your Proficiency Bonus. If it requires you to make an attack, the attack modifier is said Proficiency Bonus + Charisma Modifier.
As for spell themselves, you get two level 1 spells and 4 Cantrips - minor spells that do not burn your spell slots when used. Nico’s problem is that she is versitile - she can do near anything she wants, meaning there is little point in declaring you to take specific spells. There are many great options in spells and I do not plan of going through each and every single one of them, because this post would be a novel. I will, however, list for every level some good options in the offensive, defensive, control and utility spells and let you make choices which are most the kind your take on Nico would use. I’m not your mom and casters in D&D are versatile, go wild, experiment, pick spells YOUR Nico would use.
Anyway, I will list all most fitting spells of that level and whenever I mention you get a new spell, go back and refer to this. Also, if I will be referring to a spell “scaling” with you it means there are ways to boost it up as you advance in levels, usually by casting it from a higher spell slot. Each such spell has that mentioned in the description.
Cantrips:
Offensive: Booming Blade (which can also make it harder for your enemy to move), Shocking Grasp or Green Flame Blade all let you make an attack with an additional effect; Create Bonefire can double as “never have to worry about making a campfire for the night” spell; Infestation has a minor control effect and it is pretty terrifying.
Defensive: Blade Ward is great because it can give you damage resistance, which will be useful even at higher levels.
Control: None
Utility: Gust, Control Fire, Shape Water and Mold Earth all have a number of uses and each lets you control one of four elements to a degree that can be easily exploited; Prestidigitation has a great number of uses; Mending lets you repair minor things, Message allows you to contact others, Mage Hand is another surprisingly helpful one, Minor Illusion can double as a defensive spell and Light means you will never worry when exploring dungeons
Level 1 Spells:
Offensive: Ray of Sickness, which also doubles as a minor control effect as it can make the target poisoned; Witch Bolt, which stacks with your levels better than Magic Missle; Chromatic Orb which has a bonus of being able to be attuned to your situation and allows you to choose the type of damage the target does not have resistance or immunities;
Defensive: Shield allows you to temporarily grant yourself +5 AC as your reaction; Mage Armor gets you some extra AC and can be cast on your allies. False Life grants you temporary health points, which you’ll need since Nico is not exactly known for her durability; Fog Cloud is good to escape group of enemies
Control: Color Spray and Sleep can get your enemies temporarily blinded or unconscious and they stack with you.
Utility: Feather Fall can save you in a moment of need; Charm Person may let you survive some botched social encounter or convince a principal you’re Molly’s mother; Expeditious Retreat allows you to get in and out of close combat.
Now, for your Arcane Focus, which you can use to cast spells, pick a staff. This is far from the mighty Staff of One, but don’t worry, we will fix that in a moment. But first, we have some more Sorcerer goodies.

2nd Level Sorcerer gets an additional spell known and one more Spell Slot. We also Get Font of Magic. Which translates into Sorcery Points, their number always equal to your Sorcerer level. So far they can do one simple thing - you can spend them to regain spell slots - 2 for 1st, 3 for 2nd, 5 for 3rd, 6 for 4th or 5 for 7th level spell slots. You can also burn out a spell slot and gain number of Sorcery points equal to its level. You cannot have more Sorcery points than your Sorcerer level and you get them back to maximum after a long rest.
The real fun with that starts on 3rd Level of Sorcerer. That’s where you get Metamagic. How it works is that you get to pick two options that allow you to spend Sorcery Points while casting spells for extra effects. Out of the choices I recommend the fan-favorites Quicken Spell (for one sorcery point you can cast a spell with 1 action casting time as a bonus action instead) and Empowered Spell (for 1 sorcery point you can reroll a number of the damage dice for a spell equal to your Charisma modifier).
3rd Level is also where we get, aside a new Cantrip known, increase of our Spells known to 4 and a 4th 1st level Spell Slot, 2 2nd Level Spell Slots. Meaning we can now know 2nd Level Spells and here are some good suggestions:
Offense: Scorching Ray can damage several targets and Shatter is especially nasty against all kinds of constructs.
Defense: Blurr and Mirror Image make you much harder to hit and each is a solid choice but Invisibility is the real treasure here, with added huge utility bonus.
Control: Blindness/Deafness may replace Color Spray as you go on; Web is easy to trap a group of opponents; Crown of Madness and Suggestion lets you have limited control over the enemy; Darkness is a good save in trouble; Hold Person just gets an opponent off your back for a moment.
Utility: Alter Self has several uses beyond just making you look like someone else; Knock lets you open door and containers; Enhance Ability can help on a necessary saving throw or skill check; Enlarge/Reduce does exactly what you expect and if you doubt there is a ton of uses for that, ask Hank Pym; Detect Thoughts lets you play in Jean Grey’s playground for a moment; Levitate and Misty Step greatly help you move
Okay, now that we have covered basics of the Sorcerer, time to get ourselves a magic staff.
We will now be taking Warlock levels. Some metagame note: It is debatable when is a good moment to multiclass from Sorcerer into Warlock. Popular opinion is that if you take Warlock levels before hitting 5th level of Sorcerer, it will be a pain in the ass until you catch up. However, it all depends on the DM and the type of game you play. It might be perfectly fine with more forgiving DM to pick those levels after 2,3 or even 1 level of Sorcerer (in fact, I only didn’t do that because I wanted to explain Sorcery Points and Metamagic first), it might be a worst idea ever in more hardcore game. I recommend getting the feel of your game if you start at early levels.
The first level of Warlock means Pact Magic - Nico did made the deal with the One to not have to shed her own blood anymore after all. Good news is that it works exactly like Sorcerer’s magic and there is a lot of overlap - you can expend Warlock spell slots to cast Sorcerer Spells and vice versa and you can get Warlock Spells slots back using Sorcery Points or burn them for more Sorcery points. Bad news is your Warlock levels do not stack with Sorcerer for the purpose of determining the total number of spell slots and their level the way Sorcerer does with Wizard, Cleric or Bard. Good news is there is one crucial difference between how the spellcasting of both classes works. Sorcerer regains spell slots and Sorcery Points after finishing a long rest (usually 8 hours of in-game time). Warlock regains spell slots after a short rest. Meaning you can use your Sorcery Points to get higher level spell slots back or for metamagic and then burn warlock spell slots to get them back and get Warlock spell slots back after a short rest. This is a great way to ensure you won’t run out of spells early.
Warlock gets two Cantrips, but most of them overlap with the Sorcerer, aside of Eldritch Blast and Tool the Dead, each a pretty good offensive cantrip. Same goes for or the 1st Level. You only get one spell slot, but you have more options:
Offensive: Hellish Rebuke lets you do the most goth thing ever - snark at someone who hurt you in infernal and deliver such a burn you actually set them on fire.
Defensive: Protection from Good and Evil is the only one but it is pretty darn good (no pun intended), gives a number of helpful advantages against several types of enemies.
Control: Cause Fear lets you have Nico tap into her inner wicked witch and remind everyone how terrifying she can be; Hex allows you to curse your enemies with some good control and offensive effects
Utility: Unseen Servant has some nice uses and in a pinch, you can summon him behind an enemy’s back to give your Rogue flanking for Sneak Attack. There is also Healing Elixir, which would be a great healing spell but is FUCKING BROKEN. Not in a “doesn't work” way but in an “I replace the party cleric as a designated healer and also break the economy” way. So a savvy DM may ban it.
Warlock also gets an Otherworldly Patron, which will symbolize Nico’s deal with the One. We will pick Hexblade - a deal with powerful entity from Shadowfell granted you a special weapon (I mean, the One didn’t say where he is from, so...). As a Hex Warrior you gain proficiency with medium armor, shields and martian weapons, but we won’t need it - we’re here for its second ability. Whenever you finish a long rest you can choose one weapon that you are proficient with and lacks a two-handed property and from now on you can use your Charisma for attack and damage rolls with that weapon. I can hear some of you saying “but wait, Staff of One is clearly two-handed” and while you are correct, there is a little trick for you. The Rules as Written state that the weapon cannot have a “two-handed property” meaning it is not described as two-handed by the handbook. And quarterstaff is not - it is versatile instead, meaning you can choose to use it as either one or two-handed weapon as you please. But even if the DM would not agree with that, do not worry, we will get past that little problem in just a moment.
Hexblade also learns a curse - it allows you to curse a target as a bonus action, giving you a bonus to damage against it, a better chance of critical hit and lets you heal some if you kill them. Which overlaps nicely with both abovementioned Hex spell AND with two extra spells added to your list (since other two you already had from Sorcerer) - 1st level Wrathful Smite and 2nd Level Branding Smite, each dealing extra damage to a hit and some additional effects that impose extra penalties on your enemies.

All pretty useful when you need to protect an adorable cosmic being, btw.
2nd Level Warlock gets an additional spell known and an additional spell slot. You also get Eldritch Invocations - you can select two bonuses from a list and every time you take a level of Warlock you can replace one of the Invocations with another. Whichever you choose depends on how you want to play Nico, but here are some suggestions - if you want to focus on long-distance combat Agonizing Blast, Eldritch Spear, Grasp of Hadar, Lance of Lethargy and Repelling Blast each let you customize your Eldritch Blast. If you want to actually have Nico in the first line, aiding her allies then Armor of Shadows and Fiendish Vigor let you cast on yourself a helpful minor defensive spell (Mage Armor and False Life, respectively) at will without using spell slots and if you go for control then Thief of Five Fates allows you to once between every long rest to spend a Warlock spell slot to cast Bane, a spell normally available to Bards and Clerics, that can weaken your enemies. I advise picking wisely since on next level we will actually make use of the switching option.
3rd level Warlock gets to learn 4th spell and gets to choose 2nd level spells. Most of these overlaps with Sorcerer and the two special ones - Flock of Familiars and Ray of Efleebement - have mostly control use.
Warlock also gets a Pact Boon and we will choose Pact of the Blade. It allows you to summon a magical weapon that you are always proficient with that can be of any type except for bows and crossbows. You can also transform any weapon into your pact weapon, meaning if you ever come across magic quarterstaff you really like (or even make/get one made), you can turn it into your Pact Weapon and use to roleplay one of Nico’s staff powerups like Witchbreaker. And here is where I would recommend switching one of your Warlock invocations for Improved Pact Weapon (which we couldn’t take before hitting this level), which removes that “no bows or crossbows” limitation, grants your pact weapon +1 bonus to attack and damage unless it already has one and from now on you can use said weapon as your arcane focus for casting spells. And it specifically states it overrules Hex Warrior limitations - you can always apply Hex Warrior bonuses to the Pact Weapon no matter what it is.
This venture into Warlock let us create Nico’s own Staff of One - summon a magic quarterstaff to cast spells and if someone is stupid enough to try to get their hands on you or your family, you can nerf them with Hex and Hexblade Curse and then beat up or even smite with the same staff, to remind them this witch is far from helpless.
As Daken here helpfully demonstrates.
We go back to the Sorcerer for the rest of this build. 4th level Sorcerer means a new Cantrip known, a new Spell known and a new 2nd level Spell Slot. We also get an Ability Score Improvement and our priority is to maximalize Charisma so we will take +2 to it.
5th Level means a new Spell known and 2 new spell slots of 3rd level. So let us go through the options
Offensive: Erupting Earth, Fireball, Sleet Storm and Lightning Bolt are all an area of effect spells that let you hit hard a whole group of enemies with fury of the elements; Melf’s Minute Meteors is something more focused.
Defensive: Blink and Gaseous Form can save your life in a pinch; Counterspell and Dispel Magic let you do something against other masters; Protection from Energy meanwhile can help you or someone else survive, say, things like your own area spell; Wall of Water is good against melee attacks.
Control: Fear and Hypnotic Pattern may temporarily stop some opponents, while Enemies Abound can turn one of them against the other; Slow slows down your enemy while Haste is gonna make one of your more combat-oriented allies love you; Stinking Cloud makes everyone in the area of effect sick.
Utility: clairvoyance lets you keep an eye on your home or check out for nearby dangers; Fly does exactly that; Daylight gets rid of darkness; Water Breathing and Water Walk are likely self-explanatory; Major Image is an illusion with a lot of use.
6th Level Sorcerer learns a new spell and gets a third 3rd level spell slot. You also gain Wild Magic feature - Bend Luck, which allows you to choose an enemy or an ally and as a reaction spend two Sorcery points to apply a 1d4 penalty or bonus to their attack roll, saving throw or ability check.
7th Level Sorcerer gets to learn 4th level spells
Offense: Blight deals necrotic damage to target; Ice Storm is another, now ice-based area of effect ofensive spell; Storm Sphere and Vitroic Sphere are each a concentration-based area of effect offensive spell and so is Wall of Fire, which also has defensive uses.
Defense: Stoneskin gives you resistance to nonmagical attacks, Greater Invisibility is better version of an already good spell
Control: Banishment lets you put an enemy in a time-out or banish them completely if they’re from another dimension; Confusion can cause chaos among the enemies; Dominate beast lets you take over control over a beast; Watery Sphere traps enemies inside itself, Polymorph is a great spell for turning one tricky enemy into something less frustrating to take down or weak ally into a combat monster or Old Lace into a puppy.
Utility: Dimension Door lets you teleport with limited range.
8th Level Sorcerer - more spells known and spell slots and also an Ability Score Improvement, you should be able to cap your Charisma by now.
On 9th level, you get access to 5th Level Spells
Offense: Cloudkill, Cone of Cold and Insect Plague - evn more spells dealing damage in large areas; Immolation just SETS SOMEONE ON FIRE; Animate Objects turns a bunch of items or furniture into your servants who may fight for you.
Defense: Wall of Stone sounds, well, self-explanatory really
Control: Control Winds has several uses for defense, offense or just to make your enemy’s life harder; Dominate Person and hold Monster are better versions of spells we discussed already;
Utility: Telekinesis lets you move objects, teleportation circle can offer some help on your travels;
10th Level means more spells and you get another Metamagic. What to pick depends on what spells you selected. If you picked a lot of offensive and control spells affecting a whole area, most of them allow a saving throw and Careful Spell lets you for 1 Sorcery point to pick a number of creatures within the area up to your Charisma modifier, and make them automatically succeed said saving throw, meaning you no longer hit your allies. If you picked a lot of single-target spells, Twinned Spell lets you spend Sorcery points equal their level to make copy their effects on a second target. Distant Spell for 1 Sorcery point increases the distance of a spell so that if your teammate turns into a giant crab, you can deal with it at safe distance.
11th Level of Sorcerer lets you learn 6th Level Spells
Offense: Chain Lighting lets you hit up to 3 targets with lightning; Disintegrate hits one target and can deal even 100 force damage; Circle of Death is your area of effect murder spell of the level; Sunbeam hits all targets within a line for Radiant damage
Defense: Globe of invulnerability cuts off the target from rest of the battlefield, it can be both a life-saver and a control spell;
Control: Eyebite makes it that as long as you maintain the spell each turn you can grant some nasty things on your enemies by simply looking them in the eye; Mass Suggestion is like good old Suggestion for multiple targets.
Utility: Move Earth lets you manipulate the terrain around you; True Seeing has a number of uses, surprisingly
Investitures - there are 4 spells called that way, of Flame, Ice, Stone and Wind. Each one has a combination of defensive, offensive and control effects in one package.
12th Level Sorcerer gets more Spells and an Ability Score Improvement but we will pick a feat. Inspiring Leader lets you spend 10 minutes on boosting the morale of your allies. Choose up to six creatures within 30 feet, including you, who will get temporary hit points equal your level + your Charisma Modifier and you cannot give them the same bonus again until they finish long rest. Most of the players roleplay this as giving a speech for 10 minutes but it’s not said you must do it that way and a 10-minutes long speech in a game is gonna be a pain in the ass. You can easily use this to roleplay Nico being caring dean mother to her teammates.
13th Level Sorcerer learns 7th level Spells
Offense: Delayed Blast Fireball lets you cast Fireball with time for your allies to run away from the area; Fire Storm is, well, a storm of fire that you may be able to place in a way that avoids said allies; Finger of Death deals necrotic damage and slain target raises as a zombie; Prismatic Spray may hit an enemy with wide array of damage or effects
Defense: none
Control: Reverse Gravity is another one in a long line of “make your enemies’ life hell” area of effect spells, bonus points if Nico starts singing that one spell from Wicked.
Utility: Teleport, especially climactic with its possibility of mishap; Etherealness allows you to reach places you shouldn’t with an extra defensive effect; Plane Shift lets you take the entire team to another dimension or send an enemy on a such trip.
14th Level gives you a Wild Magic Feature, Controlled Chaos. From now on when you roll on Wild Magic Surge Table, you can roll twice and choose one result.
15th Level Sorcerer lets you earn 8th Level Spells
Offense: Abi-Dalzim's Horrid Wilting, Sunburst and Incidentiary Cloud are even more powerful area of effect spells to hurt your enemies. Warning, if you pick the first, you WILL mispronounce it at some point as “Horrid Writing” and lead to the Hitchhiker’s Guide to the Galaxy jokes at the table.
Defense: none
Control: Power Word: Stun lets you stun any target with less than 150 hp; Earthquake is the most overkill way to terrorize your enemies with some possible damage effect; Dominate Monster lets you take control over someone but remember - it has nothing to do with BDSM so don’t try it on Karolina during your kinky nights.
Utility: none
16th Level Sorcerer gains an ability score improvement, boost Constitution and remember it gives you bonus hit points for each level, including retroactively, adding 16 to your hp. Tough feat might have given you twice as much but we also need to boost up your Concentration and Constitution Save.
We will cap on 17th Level Sorcerer, grab another Metamagic of your choice and one 9th Level Spell. By which I mean grab Wish, Wish is fucking awesome and it fits perfectly with Nico’s “price to power” thing. If you exchange one of your other spells you can pick another 9th Level Spell (but remember, you only have one Spell Slot per long rest for 9th level spells) so choose one: Power Word: Kill lets you flat out murder someone with 100 hp or lower. Meteor Swarm is an area of effect offensive spell that bombards the area with meteors because I guess an Earthquake wasn’t over the top enough. Time Stop is sadly nerfed, but you can use it in a pinch to run away, no pun intended, buff or heal yourself
So we did it. Nico is a Warlock 3/Sorcerer 17 so now let us take a look at our pros and cons
For the pros, you have the way with spells that you think fits Nico’s character best and, if you choose right you can be a devastating force capable of taking down many enemies, control the battlefield or have a hefty dose of utility spells at your disposal. You have some additional versatility with Sorcery Points and Warlock spell slots, keeping you in battle a bit longer. You are a skilled party face, able to act as the leader to your group. You can also add your friends in direct combat with Hexblade abilities and your HP should on average get beyond the dreaded Power Word: Kill range.
For the negatives, your melee effectiveness is not THAT great, merely a last resort thing and you do not have that many spells that can improve it. Your strongest offensive spells are almost all likely to be the area of effect, meaning you need to be careful and your Wild Magic can as easily help as mess things up. Finally, we didn’t cap Constitution, meaning your concentration, Constitution save and health points are not as good as they could be. Finally, as a sorcerer, you cannot wear armor and your dexterity is not the best so your AC is meek and you need these defensive spells. However, you still are gonna be a great supporting caster capable of acting in second or even first line. Have a friend who is a good front-line combatant to shield you and add some punch to your magic and you should be a force to be reckoned with.

Get it?
As always, feel free to drop any constructive criticism or say if you tried this build in a game or have some suggestions. Also, check out my previous Cassandra Cain build.
- Admin
22 notes
·
View notes
Text
Theros Beyond Death Limited: Bomb Rares
Last but definitely not least, here are the Rares & Mythics for Theros Beyond Death. Hope you have some of these in your Sealed pool for prerelease, because these are the cards that can push your deck over the top. Let’s knock this out!
White

I have this pegged as the best White Rare in the set, for Limited. On its own, its a massive threat that will be just about impossible to race, and it runs away with the game really quickly. Your opponent will need immediate removal for this, or it’s going to be very hard to lose. 4.5/5

We play 5 mana removal all the time in Limited, and while it’s never exciting, it gets the job done. But this one comes with extra value attached, as reanimating your best dead threat (with an extra counter, no less), is something we also pay 5 mana for. Chapter 2 will mostly not do anything, but this is still a pretty clear 2-for-1, and you’ll basically always play it. 4.0/5
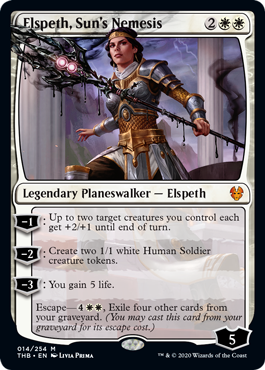
Elspeth, like most Planeswalkers, is powerful, and you should definitely play her. That said, this Elspeth seems more bonkers in Constructed. In Limited, the most likely line of play will be creating two tokens, then using her -1 the next few turns in a row to push damage through. That’s good, but it makes her more akin to History of Benalia than anything else, a card that’s great, but not unbeatable. In Constructed, she’ll be an important source of inevitability. 4.0/5
The Gods are all pretty much bombs. Even if he never becomes a creature himself, he’s still going to make racing incredibly difficult for your opponent, as you keep gaining life and building up your creatures. Which, weirdly, makes him splashable, though he’s obviously way stronger in a heavy White deck. 4.5/5

It’s been a long time since we’ve had an easy to cast board wipe at 4 mana. Your opponent is slightly more likely to get a card draw off of it, but that’s pretty negligible because it shouldn’t be hard to set yourself up for a situation where you can easily turn this into a 3-for-1 or greater. It gets less valuable post-board once your opponent knows it’s there, so be aware of that. But you can bet lots of Game 1s will be decided by this 4.0/5
White, as per usual, has some great bombs at Rare. No surprises when it comes to the threats, but the presence of a 4 mana sweeper is a very welcome change and will definitely impact the Limited format.
Blue

Yes, it costs a lot, but this card will make people scoop when it comes down. It just... does everything Blue wants to do to end the game. You get a giant Monster that pretty much can’t be removed, then you get two turns of unfettered attacks with it. If they’re still alive after that, you get to take their best thing permanently. 7 mana is a lot, but you can get there in most games, just make sure you have ways to stall, and once you get here, this card will singlehandedly take care of the rest. 5.0/5
This is pretty bonkers. You might as well just keep one land permanently tapped for this, since it’s pretty much always correct to pay, even at the expense of slowing yourself down a bit. There will be some games where this comes down on turn three and runs away with the game all by itself. Otherwise, it will at least eat a removal spell. It demands action from your opponent, and that’s exactly what I like in my Rares. 4.5/5

Thassa is less busted than Heliod, but still does a lot. She can retrigger ETBs (including Constellation), and provide pseudo-Vigilance for one creature a turn. She also completely invalidates most Enchantment-based removal (Banishing Light excepted), and turns into a really potent mana sink in the late game. If you get your devotion up, she’s a massive threat in and of herself. She’s less good if you’re not deep on devotion, but still worth including in most decks. 4.0/5

Thryx is likely going to be the largest threat in the air, and he comes down at the end of an opponent’s turn, so you’re usually going to get a turn to swing with him before he’s removed. He also helps ramp your bigger spells, and incidentally hates on Blue control, which is cute. But mainly, he’s a big flier. 4.0/5

The ceiling on Wavebreak Hippocamp is really, really high. If you have lots of Instants & Flash, it’s an engine that will bury your opponent in card advantage really fast. The rating I’m giving assumes you get to draw one card off of it. In a deck built to use it, it goes up a half or full point. In a deck with only one or two cards that can trigger it, it goes down. 3.5/5
Well, Blue got some bombs, didn’t it? I like how many of these cards are generically pretty solid, but become incredible in the right build. Except Kiora Bests the Sea God, which is just ridiculous in any deck.
Black
The cleanest removal for just about any threat in the game, and with Surveil 1 tacked on for enabling Escape. You should always run this. 4.0/5

I honestly don’t know how you’re losing if you play Erebos. The life loss isn’t insignificant, but it ensures you’ll bury your opponent in card advantage with every trade. He’s not great if you’re already super behind, but assuming you cast him when you’re at parity, he should help you win very quickly. 4.5/5

Flexible Instant-removal that doubles as Escape hate? I’ll take it. 4.0/5

This is a nonbo with Escape, but it’s so good on its own it doesn’t matter. First of all, it’s a 4/4 flier for 4 mana, which is great. That alone would be one of the best cards in your deck. But getting copies of every creature that dies, even if they’re 1/1s, is just insane. You get to retrigger any ETB, and they have all abilities they originally had. I expect this to be very good. 4.5/5

Woe Strider is a recursive threat that gets bigger when it comes back, and it basically always gets a Scry 1 tacked on to it. Also, the sacrifice ability doesn’t cost mana, which is phenomenal, so you can turn any other creature death into a free Scry. 4.0/5
Black’s Rares seem absolutely nuts. Even some of the others I didn’t pick are still great, so starting your pool with one or more of these is a great place to be.
Red
I suspect a lot of people won’t realize how good this will be. After a few turns, your opponent will have little to no board, while you will have been able to continue building up. It’s a massive tempo win, and can even help you come back from behind, which is a rare thing for Red. 4.0/5
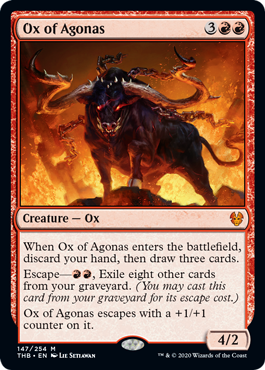
I can’t overstate how much card advantage this card represents. Yes, a 4/2 is small for a 5 drop, but it shouldn’t be hard to mostly empty your hand before you cast this, and net 2-3 cards right away. It will pretty easily trade with something, and then represents more threat in the graveyard, even if the cost is steep. It’s even a great topdeck. I suspect this will be great, even if it’s even better for Constructed. 4.0/5

The base stats alone are pretty awesome, but the fact that this has a very reasonable Escape cost and comes back bigger makes it even better. This will be a persistent and annoying threat for your opponents. 4.0/5
I actually don’t think Purphoros is all that bonkers in Limited. His ability is much more a plant for Constructed magic, so in Limited he’s mainly to be evaluated assuming you get devotion going. In that case, he’s still good, but not insane value on his own the way some of the other gods are. 3.5/5

I mean, that’ll do. This can take down nearly anything, and if you’re ahead in the game, you can just throw out a beater to threaten their life total. 4.0/5

Tectonic Giant seems great. While the stats are a bit anemic on their own, it’ll chuck a Lava Spike or draw you a card if your opponent tries to remove it, and if you can safely swing, the value is going to be nuts. Combat tricks go way up with this, since your opponent will always try to trade for it. 4.0/5
Red doesn’t have any completely unbeatable bombs, but the average Rare is really great, so I don’t think it’s much of a problem. Seems very strong.
Green
I love getting Legendaries of somewhat atypical tribes like this. A 3/5 with Reach would be playable for 4 mana anyway, but Arasta spawns babies every time your opponent casts an Instant or Sorcery. Sometimes it won’t come up much, and the plethora of Enchantment removal in this set makes it worse than it would be in other formats. Still, it’s a pretty strong hoser against certain decks that’s maindeckable, and that’s a good place to be. 3.5/5
If all the modes occurred at once, this would be a 4/4 creature that draws two cards on ETB, which is INSANE. Spreading it out over 3 turns (the fourth chapter is mostly flavor) gives your opponent more opportunity to deal with it, but there are going to be games where it just goes off as planned, and those games are going to be really, really good. 4.0/5

Auras normally have the issue of being easy 2-for-1s, but this cleverly gets around that by compensating you with two bodies when the creature dies. This will give you a massive swing when it comes down. It’s not a bomb, but I mention it because there will be people who ignore it simply because it’s an Aura, and this one is definitely worth playing. 3.5/5

Nylea is probably second to Heliod when it comes to Limited potential. Green loves permanents and has lots with double & triple mana costs, so getting her active will be easier than in some other colors. But her mana sink is going to be absolutely incredible in the late game, and should make wins easy if you don’t get overwhelmed too early. I’d basically always run her. 4.0/5

It only takes one Enchantment to make Setessan Champion great, and in a deck built around the theme, she’ll be an unstoppable engine. Pick highly. 4.0/5
Green surprisingly doesn’t have any crazy bomb Rares, at least from what I can tell. But it makes up for it with above average Commons & Uncommons, so Green decks are likely to be very consistent and powerful.
Multicolor & Colorless

This should come as no surprise. Ashiok starts with a pile of loyalty, and churns out surprisingly big creatures to protect themself, and yes I know that’s not a word (”technically”). Having Recoil on the -3 is phenomenal as well, and deals with basically any permanent (or Enchantment-based removal) very effectively. The Ultimate doesn’t take long to get to, and once you do, I like that it counts not only cards exiled by Ashiok, but also any they’ve exiled with Escape as well. Very flavorful and a clear bomb. 4.5/5

The casting cost is a challenge, to be sure, but this Sphinx is a near-perfect Control finisher. It’s big, keeps your life total high, blocks all but the biggest of threats, and is nigh-impossible to kill with targeted removal. Once you untap with it, the card draw keeps you ahead. I’m starting very high on this, assuming you’re in the color pair, since this is not very splashable. 4.5/5

Speaking of not splashable, Haktos here is completely unplayable outside of Red/White. That said, if you’re in the colors, he’s a massive threat that’s incredibly hard to deal with. Sometimes, he’ll trade down and that will be a feel bad. But other times, he’ll be unblockable and unkillable, and those times will be incredibly frustrating for your opponent. I’d give him a try. 3.5/5

Klothys may actually be the best god for Limited, no joke. Yes, the Devotion threshold is higher, but she comes down early and the ability is fuego. She's a clock in and of herself while keeping your life total nicely buffered, and will occasionally help you ramp out a threat ahead of schedule. She’s also incidental Escape hate, and that is absolutely relevant. I highly recommend playing Klothys if you open her. 4.5/5
I absolutely love that the designs for the Titans, though I very much wish there were three of them. Kroxa doesn’t do a ton at 2 mana, but that’s just setup. Once it Escapes, it’s absolutely brutal, and even just the threat of this sistting in your graveyard could cause your opponents to try to play around it, which is a great place to be. 4.5/5
Polukranos was a bomb the first time around on Theros, and it’s a bomb again this time. A 4 mana 6/6 is an absolute monster, but it’s ridiculous coming back as a 12/12. Yes, the counters go away when damaged, but this will just eat up whatever you want of the opponent’s board, then come back to do it all over again. The value here is insane, and will dominate Limited games. 5.0/5

Uro is even better than Kroxa. For 3 mana, you get a ramp spell, and then it sits in wait for the moment of Escape. It’s not hard to imagine this being a 3-for-1 or even better. It’s not unbeatable, but it’s pretty insane value. 4.5/5
Shadowspear asks very little, and gives so much. The activated ability won’t come up all that often, but when it does, it will feel so good (destroying gods is always fun). But mainly, it’s just a super-efficient way to power up your creatures and make racing a nightmare for your opponent. 4.0/5
The Rest of the Rares
Eidolon of Obstruction - This is a 2/1 with First Strike for 2. That’s solid in any deck, even if the Planeswalker text is ornamental. 2.5
Heliod’s Intervention - I wouldn’t generally run it for the lifegain alone, but it can gain a pile of life, which in some situations is almost a Time Walk. But being able to snipe lots of Enchantments is completely worth it in a format full of them, and makes this easily maindeckable. I’d be prepared to bump this rating up once the format shakes out. 3.5
Idyllic Tutor - You want at least 2 other Rares worth tutoring for to bother with this. Mostly save it for Constructed. 1.0
Taranika, Akroan Veteran - This is pretty solid. It upgrades your weakest dork to a 4/4 on attack, and is on-curve for 3 mana anyway. 3.5
Ashiok’s Erasure - Cute, but I’d rather just have Cancel most of the time. This is more for Constructed. 1.5
Protean Thaumaturge - Cute, but I’m always wary of cards that do literally nothing on their own. If you have lots of good Enchantment creatures, this gets better, but I’m not sold on its own. 1.5
Thassa’s Intervention - This strikes me as much better in Constructed, but the flexibility to hold it up as an answer then draw cards if there’s nothing worth countering makes it playable. 2.5
Thassa’s Oracle - A 2 drop that smooths your draws is fine by me, but you do want to be in heavy Blue before you play this. The win conditoin will happen every now and then, and there probably is a busted self-mill deck around this if you first pick it. 2.5
Aphemia, the Cacaphony - This is definitely playable on its own as a 2/1 flier for 2, but as soon as you can get some Enchantments in your Graveyard, the value goes way up. It dies to basically every piece of removal in the set, so I’m not super high on it, but the ceiling is high. 3.5
Gravebreaker Lamia - I actually like this quite a bit. I probably wouldn’t run Entomb in any Limited deck (except maybe Ultimate Masters draft), but Entomb stapled to a 4/4 Lifelink Creature is pretty sweet, and this really helps fuel the Escape deck. 3.5
Treacherous Blessing - Three cards for 3 mana is great, but the drawback is real. I’d mostly pass on this unless you have lots of lifegain or good ways to sacrifice Enchantments (There are a few in Red). 2.0
Tymaret Calls the Dead - There is some value here for not much mana, so I’d usually run this. But it’s not as good as the other Rare Sagas. 3.0
Storm Herald - This is a 3/2 with Haste for 3, so evaluate it as that. Sometimes you’ll have an Aura to get back, but not always, and even so it’s just for the one turn. 2.5
Storm’s Wrath - This kills most creatures, but leaves up the big baddies, which makes it a little harder to ensure you’re going to come out on top. Still good, but not quite as good as the White board wipe. Also, White needs sweepers more than Red does. 3.5
Underworld Breach - While clearly a Constructed powerhouse, this isn’t awful in Limited. You’ll buy back your best threat or removal for a 2 mana tax, which is playable, but I’d rather pick a good threat or removal over this first, then add this on the wheel if I’m short on playables. 2.0
Dryad of the Ilysian Grove - If you need need a 2/4 for 3 that fixes your colors, this does the trick very well, and is pleasant to look at while he does so. But he’s not going to be bonkers like he is in EDH. 2.5
Nessian Boar - On the one hand, a 10/6 is fucking massive. On the other hand, I have no idea how to evaluate that downside. Often, it’ll trade with several of your opponent’s creatures at once, but then they’ll draw a bunch of cards to replace them. It does make sure all your other attackers get through, so I’m going to start assuming this is very good and be open to adjusting up or down as the format shakes out. 3.5
Nylea’s Intervention - If there’s a skies deck in the format, this will be the ultimate sideboard card. If not, it’s purely for constructed. 1.5
Nyxbloom Ancient - Someone somewhere is going to win by playing this followed by a massive Purphoros’s Intervention, but most of the time, it’s going to be an expensive 5/5. Good with Nylea, but then you’ve really hit the jackpot. 2.0
Allure of the Unknown - This is so tough to evaluate, but I’m not optimistic. Let’s say you get 4 spells and 2 lands. Your opponent is going to take the best spell and gets to cast it immediately, then untap, while you have to wait until your next turn to cast your second-best cards. That doesn’t strike me as a great option, and this becomes a huge liability if you have a bomb or two in your deck. Let’s save this for Commander. 1.0
Atris, Oracle of Half-Truths - A 3/2 with Meance that does a mini Fact or Fiction is a good deal for 4 mana, even if this will never be bonkers. 3.5
Bronzehide Lion - Watchwolf with the ability to become Indestructible is sweet, and the added value when it dies is excellent. It won’t run away with games, but it’s going to be super annoying to play against. 3.5
Calix, Destiny’s Hand - Calix, aside from being super fine, is a niche card more than an auto-include. You want somewhere in the ballpark of 10+ Enchantments in your deck before I’d say he’s really great. Once you’re there, he’s incredible. 3.5
Dalakos, Crafter of Wonders - 2/4 Merfolk is fine, but unexciting for 3 mana. The rest of the text barely matters. 2.0
Enigmatic Incarnation - The hoops on this seem ridiculous to jump through in Limited. I wouldn’t bother, and I know someone is going to kill me with this now that I’ve said that. 0.0
Gallia of the Endless Dance - Fun Commander, and fun in Limited, particularly if you pick up a few other Satyrs. A nice mix of flavor and playability. 3.5
Kunoros, Hound of Athreos - 3/3 Vigilance, Lifelink, Menace for 3 mana is a great deal, and is definitely playable if you’re in these colors. That said, White/Black are two of the colors that most want to play cards from Graveyards, so this nonbos with many of the best cards in the colors, limiting its usefulness. 3.0
Nyx Lotus - This will be great for Brawl & Commander, and seems basically unplayable in Limited. 0.0
Labyrinth of Skophos - This Maze of Ith variant is useful, but comes at the expense of color fixing in a set where that matters. But I’d still usually run this, since it’s late game utility is so high. 3.0
Temple Lands - These are great, these fix your mana, and they smooth your draw. Play them. 3.0
That’s it! All the cards from Theros Beyond Death! Whew.
What are you excited to play this prerelease?
3 notes
·
View notes
Text
Domingo German
A Brief Editorial
I do not want German on the team. I do not like what he did, it appears that his teammates do not like what he’s done, and nothing he’s done off the field has made me think that he’s grown as a person. That said, he is a member of the team so Evan and I agreed to do a breakdown of him, and so I will be breaking down only his on the field work in here as fair as I possibly can. That said, hopefully it doesn’t matter because hopefully Deivi or Schmidt beat him out and take his job and the Yankees can send him off to KC or something.
A Second Brief Editorial
Evan here. Sam said everything I would, but with a greater sense of decorum. I have been actively booing his starts in ST with the same gusto that I cheer for Judge.
Okay, on to the stuff.
Basic Info
German is entering his age 29 season from San Pedro de Macoris, DR. He originally signed as an international free agent with the Marlins, but was traded to the Yankees along with Nathan Eovaldi and Garrett Jones for Martin Prado and David Phelps in 2014. After needing Tommy John surgery, the Yankees non-tendered him, but lack of interest elsewhere led to him re-signing with the team, eventually making his MLB debut in 2017. He will be arbitration eligible after this season, and is under team control through the 2024 season. Domingo also has one minor league option remaining.
2019 Breakdown

Outside of five bad starts in the Dominican Winter League this past offseason, Domingo hadn’t pitched since his suspension in late 2019. However, in 2019 he was a fairly effective pitcher- obviously people don’t take pitcher wins super seriously anymore, but he went 18-4 with the best win percentage in baseball in 2019 with a .818 ERA, and that was with him missing time due to suspension and a hip strain. His overall ERA wasn’t great (just over 4) and his xERA was worse (4.51), but he got the job done in a season where the Yankees had a billion injuries and had to use the opener more than you’d like to see.
As a reminder for what Domingo does as a pitcher, he throws a four seam fastball that sits around 93 with a ton of spin, a tight curveball with lower than normal break, a sinker that has a ton of movement, and a really nasty change up that he throws around 87 mph.


German’s biggest problem as a starter has been his home run tendencies- he gives up a LOT of hard contact and gave up a LOT of home runs in 2019- 30 homers allowed, with 18.8% of all fly balls he allowed ending up in the seats. He has changeup/sinker pitch mix to give up more ground balls, but his four seam and curveball are the pitches that get absolutely hammered. His curve is his go-to out pitch and his main option for getting swings and misses against lefties and righties, and it had a 45% whiff rate in 2019 which is really good. The issue is that 41.4% of the curveballs that were actually hit ended up being hard hit, and of the 99 curveballs that ended up put in play, 19% of them went for extra bases. Of the 145 four seams put in play, nearly 10% ended up as home runs! Hopefully, for both his and the Yankees sake, the ball not being juiced anymore will lower those home run numbers to a more manageable spot.
Split wise, German struck out a lot more lefties, but lefties had an OPS over .130 better than righties against him, and 20 of the 30 homers he gave up were to lefties. Surprisingly though, he was significantly better at home than on the road:


He was also a lot better earlier on in the season, which could be for a couple reasons:

The May numbers are highly inflated by one start in Kansas City, which is where Domingo’s hip issues began—after that start and two poor starts in June, he went on the IL for a month. The July numbers were also heavily inflated because Domingo started the classic game against Minnesota with the Hicks catch. He also pitched way more innings than he had in the past, so by the end of the season he was going from 6 or 7 innings a game to 3 or 4.
One of the positive things German has going for him (and also a reason why he gives up a lot of homers) is that he’s pretty accurate with his pitches:

That’s a lot of red inside the strike zone, and not a lot of wasted pitches either. German only walked 6.6% of batters in 2019 and averaged about 15 pitches an inning, so if he can stay healthy and built up he can be the kind of guy you can rely on to get you into the sixth or seventh inning and not have to use your bullpen after four innings. If he had pitched last year, I’d have a lot more faith in him being the other workhorse of the Yankees team, but having barely pitch for 18 months means that I’d expect them to take it slower with him, or for him to move to the pen towards August again.

I think for Domingo to ever be more than a fourth or fifth option on a team, he needs to improve his batted ball types. German is someone that when you hit him, you hit him hard, but giving up 52% of your balls as either fly balls or line drives (remember, 18.8% of those fly balls ended up as homers) is an issue. His curve is his most thrown pitch, and it’s his main strikeout pitch, but part of me wonders if a sinker/change approach may be better suited, especially against lefties, just to try and force more grounders.
Lastly, while his xERA was a half run higher than his actual ERA in 2019, it was nearly two runs lower in 2018 and below a 3.00 xERA in 2017, so even if he regresses a bit, he can still be a valuable pitcher for the team.
Optimistic 2021 Projection
Domingo stays healthy and despite not pitching for a year and a half, is still able to give the team length out of the rotation for most of the season. He averages almost six innings a start, and puts up a 4.00 ERA as the fifth starter, giving the bullpen a rest and letting the Yankees high powered offense pick up the slack against the other team’s worst pitchers. He’s on the postseason roster as a reliever who can give a little length, and makes an appearance in October in a blowout. He ends up being an important part of the team thanks to his consistency and the amount of innings he ends up eating.
Pessimistic 2021 Projection
It turns out that missing a year and a half is really bad for pitching, and despite the good spring training stats, Domingo is terrible in the regular season. He has an ERA over 6 after April, and is sent down for Deivi Garcia. After an injury to a starter, Domingo gets the call back up, but continues to be bad, as he gives up homer after homer, including a five bomb game against Toronto as the Jays finish off the sweep. Domingo gets the boot and is designated for assignment the next day, and ends up pitching in Mexico in 2022.
Sam’s Official 2021 Gift Basket Projection
I think German will be mostly fine for the first half of the season- I’d expect an ERA around 4.50, averaging around six innings a start, with a couple starts looking really ugly with teams teeing off on him and a couple starts where he looks like an ace. However, I do think he ends up running out of steam around the All Star break, which is when he’ll most likely be replaced in the rotation by Schmidt, Severino, or Garcia, and that he’ll end up being a long man out of the pen down the stretch.
Join us tomorrow as Evan tries to remember whether its Zack or Zach, as we take you Inside the Gift Basket on RP, Zac(h/k) Britton.
0 notes
Text
“Figures a Cowboy’s last stand might happen in Texas” The UFC Fight Night From Austin Preview
Joey
February 12th
The downside of the UFC's hectic, frenetic fight a week schedule is that sometimes really good free cards blend in with the schedule. Even with name value, the volume tends to smoosh everything into a fine paste and this card in Austin, Texas carries that sort of feeling to it. The UFC always tries to make these Texas cards special and this one is no exception as a very intriguing main card with plenty of stories to digest is headlined by two important fights. The headliner is Donald Cerrone in the midst of his first career losing streak vs Hawaii's Yancy Medeiros in the midst of a career changing three fight winning streak all by finish. The crazy durable Hawaiian has been a different guy since his move up to 170 lbs, showcasing his trademark toughness with increased cardio and fight stopping power. This is the perfect sort of fight where a fighter on a skid gets a step back in competition while we also get to test how "real" another fighter is. The main event pits two HWs who had their winning streaks snapped in the face of a step up in competition; Marcin Tybura (who lost to Werdum) and Derrick Lewis (who lost to Mark Hunt) duking it out. Throw in a really compelling 155 lb fight between James Vick and Francisco Trinaldo plus the return of favorites like Super Sage (!) and Thiago Alves and there's something for everybody here. IF this card still had Livia Souza vs Jessica Aguilar on it, I'd say I couldn't imagine a free fight night topping it for depth and action fight potential. The prelims are headlined by a 155 lb fight pitting Carlos Diego Fierrera vs Jared Gordon in a genuine test of what Gordon may truly have to offer but the preliminary slate is mostly here to have action fights with Stephen Peterson vs Brandon Davis figuring to be an early candidate for FOTN plus an intriguing battle between the law office of (Joby) Sanchez and (Roberto) Sanchez at flyweight.
Fights: 13 (12?)
Debuts: 5 (Curtis Millender, Stephen Peterson, Geoffrey NEal, Joby Sanchez, Tim Williams)
Fight Changes/Injury Cancellations: 4 (Humberto Bandenay OUT, Brandon Davis IN vs Stephen Peterson/Ray Borg vs Brandon Moreno CANCELLED due to injury to Moreno/Marion Reneau vs Tanya Evinger CANCELLED due to injury to Evinger/Livia Souza OUT vs Jessica Aguilar)
Headliners (fighters who have either main evented or co-main evented shows in the UFC): 5 (Marcin Tybura, Derrick Lewis, Donald Cerrone, Thiago Alves, Sage Northcutt)
Fighters On Losing Streaks in the UFC: 4 (Donald Cerrone, Jessica Aguilar, Brian Cammozzi and Josh Burkman)
Fighters On Winning Streaks in the UFC: 3 (Yancy Medeiros, James Vick, Jared Gordon)
Main Card Record Since Jan 1st 2016 (in the UFC): 28-16
Donald Cerrone- 4-3
Yancy Medeiros- 3-1
Derrick Lewis- 6-1
Marcin Tybura- 3-2
James Vick- 4-1
Francisco Trinaldo- 4-1
Thiago Alves- 1-1
Curtis Millender- 0-0
Jessica Aguilar- 0-1
Sage Northcutt- 2-2
Thibault Gouti- 1-3
Too High Up- Brian Camozzi vs Geoffrey Neal
Everything that should be on the main card is on the main card so this isn't about that. Camozzi vs Neal is not a bad fight by any stretch of the imagination but it's essentially a showcase fight. Chris Camozzi's lil bro is 0-2 in the UFC and he's been finished both times. Geoffrey Neal is a Dana White Tuesday Night Contender Series dude (who I admittedly forgot about which shows the imprint he left on me I guess) who got his contract because he had fought twice in two weeks and showed up on three days notice to KO Chase Waldon. He has the ability to fight between 170 and 185 lbs and he's a Texas native. I'm fine with this being on the FS1 prelims but in a perfect world, this is on Fight Pass.
Too Low- Sarah Moras vs Lucie Pudilova
In a division where Rocky Pennington can earn a title shot, everybody who has NOT already fought Amanda Nunes is fair game. That means that Lucie Pudilova and Sarah Moras deserve a little more attention. They're opening up the preliminary slate on FS1 which is fine but if they don't find somebody for Jessica Aguilar then this fight more than any other fight deserves to get the step up to the main card. Moras is a pretty popular fighter while Pudilova IMO should be 2-0 in the UFC.
Stat Monitor for 2018:
Debuting Fighters (Current number: 1-4): Curtis Millender, Stephen Peterson, Geoffrey NEal, Joby Sanchez, Tim Williams
Short Notice Fighters (Current number: 2-2): Brandon Davis, ?
Second Fight (Current number: 3-9): Brandon Davis, Roberto Sanchez, Oskar Piechota
Cage Corrosion (Current number: 4-5): Carlos Diego Ferreira
Undefeated Fighters (Current number: 4-8): Oskar Piechota
Twelve Precarious Ponderings
1- A lot of people laughed with the total of lack of American flag on Yancy Medeiros but let's.....well let's gingerly try to walk through this. For starters, the UFC has had a tendency to try and market Hawaiians almost as if they're not Americans. It's not anywhere near as bad as the "Samoans have thick skulls and eat raw meat" levels you saw in old school territory wrestling but one really only has to look at how BJ Penn has been marketed to understand that Hawaii is unique to any other United States fight market. Outside of the way they talk about New York fighters, Hawaiians really are their own denomination. You never hear them market dudes as "a proud Missourian" or a dude embodying the fighting spirit of Oregon or whatever. Hawaiian fighters like BJ Penn and Max Holloway are always depicted with Hawaiian flags in UFC promotional materials. Hawaii might as well be its own continent in UFC parlance. It MAY as well be American Brasilia at this point. LASTLY there is NO doubt that if the average UFC fan was presented with Yancy Medeiros and Donald Cerrone, they'd say Cerrone is an American and Medeiros is Hawaiian as if it's not a state. I guess what I'm getting at is that be it cause and effort or a self fulfilling prophecy, the poster just reinforces the UFC (and fight fans) belief that Hawaii is the 8th unofficial continent.
2- There are a lot of things Yancy Medeiros does really well that will parlay him toward success in this fight with Cerrone. His kicks when he commits to them tend to be powerful, he mixes up his techniques well, he's unorthodox and willing to try different things and obviously he hits hard and has heavy ground and pound. Like Cerrone, he tends to not let guys off the hook when he has them hurting either (I believe only Francisco Trinaldo has really ever made it through the rough patches with Medeiros). The problem is Yancy's biggest strength also plays into Cerrone's biggest strengths. Medeiros is fantastic at taking the best someone has to offer, recovering from it, regrouping and getting them back. Against Oliveira and Erick Silva especially, Yancy Medeiros was able to take serious punishment and buckle down en route to the rally stoppage. Against Francisco Trinaldo, he was basically dead in the first round before springing to life and beating the fuck out of Trinaldo in a wild second round to give himself a chance. The problem with being a blood, guts and balls type comeback artist is that it's dependent almost entirely on who is trying to finish you. Donald Cerrone NEVER lets guys off the hook. When he hurts them, he finishes them. When Medeiros has tried that blood and guts style vs more talented guys like Dustin Poirier, he's eaten the short end of the stick. If he gets hurt and tries to play desperation mode, Cerrone probably snatches up his neck.
3- Given his history and given the amount of fights he's had, it is worth wondering whether or not Donald Cerrone is simply cooked as a top level fighter. Even if you believe he beat Robbie Lawler, Cerrone has been hurt in four of his last five fights. He's still an offensive marvel (it wasn't too long ago he uncorked one of the greatest combinations of all time vs Rick Story) but his propensity to freeze up vs body shots and his struggles with straight shots haven't gotten any better. He'll be 35 this year, he's fought top level competition for the better part of the last eight years and he's fighting guys who hit way harder than he's used to when he was active at 155 lbs.
4- I wonder if Medeiros has the style to go five rounds? It's worth pointing out again that Cerrone has been doing five round fights for the better part of eight years.
5- Derrick Lewis vs Marcin Tybura feels like a fight that should be getting more attention than it is. Both are young by HW standards (Lewis just turned 33, Tybura is 30) and both have similar set ups into how they operate. Both are patient, at times overly so, strikers who do their best work with heavy top control and tend to use their size in an attempt to wear down and wear out their opponents. Both are surprisingly athletic guys who are really good kickers especially Marcin Tybura. Both are prisoners of pacing as neither man handles an uptick in tempo well and in the case of Derrick Lewis, it almost feels like a lack of confidence at times. Both are coming off fights where they essentially got checked by the elites of the division and fights where both left questions unanswered about their ceilings in the division.
6- Francis Ngannou vs Derrick Lewis has to happen, doesn't it?
7- The middleweight division takes a lot of knocks for being old and rightfully so but let's shine some light on a nice reverse trend for the 185ers in 2017:
In October; 29 year old Brad Tavares picked up his third straight win in dominating Thales Leites, 27 year old Antonio Carlos Jr picked up his 2nd straight sub win and Thiago Santos while not young at 33, took another step up the ranks by pretty much ruining the life of Jack Marshmann.
In November; 26 year old Paulo Costa ended Johny Hendricks' UFC career with a 1st round TKO, 27 year old kickboxer Karl Roberson made his debut and choked out Darren Stewart, the eternally frustrating but under 30 years old Elias Theodorou decisioned Judo Dad Dan Kelly and 26 year old Kelvin Gastelum presumably ended the career of Michael Bisping to end a December to December stretch with a 3-1 record at middleweight.
In December; 29 year old Gerald Meerschaert continued his Jake Ellenberger-esque career renaissance with a TKO win over Eric Spicely to run his UFC career mark to 3-1, under 30 year old Markus Perez made his UFC debut while 30 year old Eryk Anders took another step forward with his undefeated record in tact, two under 30 Italians (Alessio Dichirico and Marvin Vettori) picked up big wins.
The pattern hasn't quite kept up into 2018. Thus far we've only been greeted to a select few MW fights but the one pattern that's come up is age is conquering all. Jacare, Romero, Thiago Marreta and Machida were older middleweights who picked up wins while guys like Eryk Anders and Anthony Smith (29) suffered set backs. The reason we went through that entire walk on the mild side is that MW Oskar Piechota is back and he draws Tim Williams in a fight that has me both intrigued and concerned. Piechota showcased some really impressive grappling skills and power in his hands in his UFC debut. He's a former Cage Warriors champion and at a time where "the local draw" is a big deal, a young Polish fighter under 30 could be worth his weight in gold as the UFC aims for expansion. At the same time, it's his first fight outside of Europe and while Tim Williams is not a guy who I would believe to be UFC quality (this is like his third attempt at trying to break through to the other side), this has all the makings of a spoiler fight for an undefeated fighter. LEST we forgot undefeated dudes are really struggling as we head to 2018.
8- If James Vick was a middleweight, would he have fought for the title by now?
9- I wonder if Joby Sanchez has a chance to still compete for the title. Sanchez was probably bought into the UFC a smidge too early and struggled across three fights before ultimately getting released. He lost to Wilson Reis in his debut on short notice, barely got by Tateki Matsuda in a controversial decision win and was beating Geane Herrera before he got dropped and stopped. Since then the Jackson-Wink product has done nothing but win including back to back wins on Dana White's Tuesday Night Contenders. He's back in the house and draws local guy Roberto Sanchez in what should be at the very least an exciting fight. Sanchez is an LFA product who lost his debut.
10- Is this Sage Northcutt vs Thibault Gouti fight an unfair one? I've seen some "soft matchup!" calls on social media but let's be fair and realistic; Sage Northcutt really is on THIS kind of a level. That's not to say Gouti can't win (he's a good striker who can throw some shit together at you) but Sage is bigger, stronger, more athletic and there's no doubt that Gouti is here to be "the opponent" in the fight. Having said all of that, why is this a bad thing? Sage Northcutt isn't ready for the elites of the MMA or even guys above the bottom rung. View Super Sage as a long play and realize that these fights are more about checking off boxes than they are about getting him ready to fight for the title. This fight will test how he reacts to an aggressive guy who throws a lot of kicks in combination. We've seen Sage habitually freeze up in the face of pressure so let's see how he handles it this time.
11- So it IS worth pointing out that Dana White's Tuesday Night Contender Series has hit a bit of a skid in 2018. 2017 saw them get off to a very hot start when the fighters started to filet in (Allen Crowder was the only original night winner who didn't win his debut fight) but since then it's been a pretty rough patch. Matt Frevola and Brandon Davis both ate losses in their UFC debuts while Dan Ige got plasted (by fellow DWTCS candidate Julio Arce). That doesn't even count Austin Arnett who lost on the Contender Series and then lost again in the UFC. As such I've got my eyes on Geoffrey Neal and Brandon Davis, two guys who won their original night Contender Series fights and got contracts that night. Davis is a big of a weirder situation since he's facing a guy who got signed on short notice in Stephen Petersen out of DWTCS. That said the winners are the guys they wanted and so Davis takes precedent in this instance.
12- Should Josh Burkman still be fighting at this point?
Must Wins
1- Donald Cerrone
I LOVE what Donald Cerrone has brought to the UFC. He's been the model of consistency, the sort of guy who would fight AND win 3-4 times a year. Cerrone has been a UFC road warrior but at this point, you wonder what's left. Pushing 35 off three straight losses at a bigger weight class would lead you to believe that Cerrone's time could potentially be up. Yancy Medeiros is a guy who he is equal to stylistically.
2- Derrick Lewis
This isn't about Lewis having to fight for his job. He signed a new deal, he's very popular, he's normally good for a big finish and he will always keep himself involved. Consider that Nannou is probably the #2 most popular HW currently and the two have been going back and forth. Lewis needs to win to set that fight up in my eyes even if you can still do L vs L. I dont think the UFC wants Ngannou vs Lewis with both guys coming off losses and so Lewis HAS to win.
3- Joby Sanchez
If you've never fought Mighty Mouse, you've got to really REALLY go out there and impress because you could be only two wins away from snatching up a big title fight. What's more, Joby Sanchez has a bit of a ready made story. He got to the UFC too early, got cut and had to work his way back the hard way. He needs to win and win impressively.
Five Can't Miss Fights
1- Donald Cerrone vs Yancy Medeiros
2- Derrick Lewis vs Marcin Tybura
3- Roberto Sanchez vs Joby Sanchez
4- Carlos Diego Ferreira vs Jared Gordon
5- Thiago Alves vs Curtis Millender
6 notes
·
View notes
Text
NFL draft takes szn
youtube
I’ve finally made it all the way back around to where I started last summer.
Lamar Jackson is going to be the best player in this year’s draft, not even just the best QB. Right now, with 10 days to go until names start being called my QB preference is:
1. Lamar Jackson
The upside is outrageous but put him with a great coach (like Sean Payton or Bill Belichick) and the floor is pretty high, too. Lamar has much better accuracy than raw stats would indicate though he isn’t consistent with his placement. There are some mechanical flaws that have to do with falling back on his athleticism when the pocket breaks down or, more specifically, when he anticipates too eagerly that the pocket will break down. It’s not so much a matter bad vision in those situations but he gets a little bit too reliant on his arm without setting his feet (”base”) properly. That tends to lead to throws sailing. You can try this out for yourself - try throwing off your lead rather than your plant foot.
A lot of internet commenters and pundits have Louisville’s offensive scheme completely backwards. Remember why Bobby Petrino failed in the NFL? It was because he’s an untrustworthy snake who is always looking for his next meal, not because his offense was too simple. Louisville runs a route tree that is pretty similar to what most NFL teams run but with a bunch of receivers and running backs that will never even get tryouts in the league.
Jackson has shown great command of that offense and his otherworldly running ability (best of any player in this draft) is a positive to his overall game. Wherever he lands the staff needs to put in some designed QB runs for him to take full advantage but that’s not exactly crazy. He was nowhere close to a “run-first” QB in either of the last two seasons but you have to make use of your players abilities.

2. Josh Rosen
There is some truth to the fact that you can’t predict injury susceptibility. Look at Frank Gore, a guy who was injured constantly in college and missed time regularly through his early NFL career but who hasn’t missed a game in 5 years now as he lurches towards the sunset. Still, Rosen has had concussion problems which actually do tend to get worse with each one and he’s a QB with basically no running ability so he’s either going to have to go the full Peyton Manning/Dan Marino route where he gets rid of the ball so quickly that his line starts to look impenetrable or he’s going to be out of the league within four years. That is a pretty low floor by my reckoning.
Take away the concussion concerns (I don’t think the shoulder is probably worth worrying about) and Rosen is a perfect pocket passer. His placement is perfect every time he throws because he has absolutely text book mechanics. There is a bit of a gunslinger mentality that worries me just the slightest bit because his arm isn’t maybe as strong as he thinks his arm is but he’s got plenty of ability to hit strikes down the field. So the ceiling is pretty high if you can keep him on the field in a high volume passing offense. The Matt Ryan comparisons are pretty nice. So I guess just get him paired up with a generational talent at WR and let nature take its course.

3. Baker Mayfield
On the field I think Mayfield is pretty much without a legitimate weakness. He’s a little bit short and (surprisingly to me, at least) not particularly athletic for the position but his accuracy has been at the top of the charts in every metric available throughout his college career. Now the question is how much of that is god-given talent and how much of that is playing four years against barely perceptible defenses? He carried those same numbers over against higher level competition when he was given the chance so I think it’s a translatable skill.
Baker’s attitude and his competitive nature are either his biggest assets or his biggest detriments depending on who you ask. The physical component (i.e., size) is a non-starter in that it’s been shown to be an overrated trait a thousand times over in the last decade-plus. But is there a real threat of him getting crushed mentally the second he has a couple of bad games in a row? I’m not going to judge that from where I sit because I don’t have anything to base it on. You reading this probably don’t either. My guess is that his borderline obnoxiousness is going to be what makes him great.
Now, having said that, I do wonder if he has enough athletically to get over in the NFL. Drew Brees and Russell Wilson are both smaller than Mayfield but they also both have (had?) much more arm strength than Baker. His arm talent (!!!) is functional/good, theirs is good/great. But the accuracy thing with Baker and the Michael Jordan complex make me think he’ll do just fine in pretty much any team situation.

4. Sam Darnold
Here’s what gets me with Darnold: I think his arm-strength is overrated and I think his turnover machine tendencies are downplayed. His throwing motion is weird but he gets the ball out quickly so that shouldn’t be a cause for concern. Kerry Collins got away with that type of thing for over a decade and was a pretty good pro. But the downside here is that I think that’s what Darnold can best aspire to be: another Kerry Collins (without the off-field issues, one would hope.) That’s a fine thing to be but it’s not anything I would take over more singular talents that are also available. If you have a choice between Mike Vick playing for Andy Reid, Matt Ryan playing for Kyle Shanahan, Drew Brees playing for Sean Payton, or Kerry Collins playing for Jim Fassel, who would you take?
On the field Darnold reminds me of Jameis Winston for his carelessness but without the MLB-ready arm. Darnold is a better runner than Jameis (Peyton Manning is, too, that’s not high praise) but the way he deals with pressure or even a stalemate calls to mind all of Winston’s worst instincts for me. I think Darnold is going to be a fine starter but I’ll be shocked if he’s ever an All-Pro. Especially in Cleveland.

5. Josh Allen
Tools! Allen has everything you want physically if you’re designing a QB for a video game but his accuracy and his placement are horrible. If it’s all due to a mechanical flaw that can by fixed by a genius QB coach that’s great but then what? His mental game still didn’t look good at any point in his time at Wyoming. It’s not like he was making great reads and having his teammates let him down. He made poor throws at bad times and looked completely overwhelmed by anybody getting in his face.
At his absolute best I think you might get an average Jeff George season. That’s 100% on the rocket arm. Is Allen’s arm actually that good? I think the more likely comparison for Allen is Kyle Boller, who was also huge and athletic and rocket-armed with none of the mental aptitude for the NFL that you need to actually be a good QB. Hell, Allen wasn’t a good college QB so what makes anybody outside of the insular world of pro football think he can get better at the highest level? Within the NFL the answer is most obviously hubris but it might just be that there’s something (crossing the sports reference points here) like Jose Bautista’s jacked up swing that can be fixed and let that potential run wild. That seems like a ton of risk.
Worst outcome he’s Dan McGwire. Most likely outcome he’s Kyle Boller. Best possible outcome he’s Jeff George. Good for you, NFL team, if you think that’s a worthwhile risk but Allen seems so obviously the low man of the major QB prospects to me that I can only question my own judgment when he goes #1 overall. Until we see him play in an actual game I just do not get it at all.

93. Mason Rudolph
Rudolph made a great living against some horrible defenses just by having a great supporting cast. If you go looking for Garrett Grayson in the first round then here’s your guy. Otherwise just let it be the second draft with 5 first round QBs and be done with it. 1983 doesn’t need to be re-lived.
SPECIFIC COMMENT RESPONSE FROM LAST WEEK: Accuracy is about putting the ball in the proper “window” for your receiver to be able to make a play on it, placement is about how you get it there. In draft guy parlance that means “putting it where only your receiver can catch it” but it’s tied back to repeating your fundamental motion as close to identically as possible on every throw (repeatability.)
#nfl draft#quarterbacks#accuracy#placement#lamar jackson#josh rosen#baker mayfield#sam darnold#josh allen#mason rudolph
1 note
·
View note
Text
Nostrum
In my day job I act as a Director of Operations and Analytics for a large company. I say large because we did $1.4bn in revenue in FY16. How far we have come!
Our company generally and my team specifically, by and large, builds its own models. Occasionally -- due to sheer scope, resource constraints, complexity, whatever -- we will go out and entertain third-party solutions. That means direct interaction with sales guys -- sales guys who rarely have your best interest in heart and whose primary objective is to just get you to sign on the bottom line.
There is a pretty quick way to differentiate between pure pitchmen and guys who genuinely believe in their product. The biggest indicator is usually their response to any question concerning what their solution cannot do. Pitchmen will find a way to skirt the question (oversell and underdeliver; simply dodge the interrogatory; etc.). Those who are candid about weaknesses, open to you prodding around their product, and receptive to feedback tend to have the better solutions. And not surprisingly, those are the companies we tend to do business with.
One of the gray areas for companies here is toeing the line of transparency vs proprietary product. If an entity truly has the secret sauce, they’re not going to be open to sharing much of that until they have some sort of financial commitment. I’m sympathetic to this position from every angle.
You are starting to see a lot of this stuff - in both directions -- around the sports world, especially as leagues get knee-deep in big data. The world of data is much larger and much more transparent in some venues (/cough NBA). Not so much for the NHL, where we are still relying on play-by-play scrapes to formulate any sense of statistical understanding.
The modern era of hockey stats isn’t just about Corsi%. Corsi% might have started the discussion, but it’s branched off in a million different directions. From simply measuring teammate/opponent quality to calculating expected goal numbers on any and every shot attempt, the vast majority of this stuff has been carried out in the public sphere. There have been analyses of all quality, and opinions on certain things have changed over time. One of the true guiding lights though has been that all can run their own analyses and come to their own determination on what matters and what doesn’t. (As an aside, this is a great way to know which teams/media people/fans have actually studied certain things on their own vs. parroting whatever lazy claim was last posted on Twitter.)
Private companies have jumped into the mix, and with mixed degrees of success. Some have made their way by, well, pitching teams on magic bullets. Some have made their way by simply providing data the public cannot get their hands on. And, again, it’s up to the few individuals who see this data to suss out what’s real and what’s not.
This brings me to an interesting exchange I had with Mike Kelly, who works for one of the big tracking companies. I don’t really know Kelly well but he seems like a good enough guy.
Occasionally Kelly will dangle some proprietary information in the public sphere to support one of his claims. Today, he made the argument that shot quality > shot quantity. (As a brief aside, there is zero evidence this is true from the publicly-available data. Shot volume is the single-best predictor, and it improves when you *also* account for shot quality. I haven’t seen a single analysis to suggest that shot quality, in and of itself, predicts performance better than any other competing measure.)
When I asked for more information, I was redirected to what looks like a simple Excel sheet with colors streaking across rows and his comments in free text in a far right column. From my understanding the claim from the table is that a finishing rank in slot shot differential (how he is defining “shot quality”) was a better predictor than shot differential of team performance.
The table is included below and linked here :
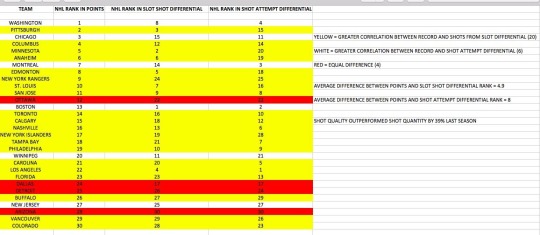
So just to recap: the argument, at least as I can understand it in the public sphere, is that shot quality is better than shot quality because of the above ranking system. He did this by coloring in rows for teams where rank variances were lower. He then took an average variance of the ranks, compared the two, and concluded shot quality was better. He lastly claimed that “shot quality was 39% better than shot volume”, which I think he calculated by simply netting the average rank variances and dividing out. (More on this later.)
You can sort of start to see the problems here.
For starters, it’s not clear to me why he would provide ranks rather than numbers, especially for a correlative analysis. Among other things, we want to understand sensitivity and variances. The above table would treat all team talent differences as equivalent. WSH is x amount better than Pittsburgh, Pittsburgh is x amount better than Chicago -- all the way down to Colorado. All we have are pure ranks and nothing else. There’s no good reason to run any analysis, ever, off of a ranking system like this.
But in fairness, it is plausible or even likely that he can’t release the percentages because his company owns it. Let’s assume this is a legitimate and fair constraint, and he -- in good faith, of course -- is trying to educate people on why this other measure matters.
Putting that aside, another slew of question should come up. What game state are we talking about here for slot and shot differential? I would suspect it’s not all situations because he would know that you shouldn’t be lumping unique game states (e.g 5-on-5 vs. 5-on-3 power-plays) as the same. But it can’t be purely 5-on-5 either. I know this because, well, 5-on-5 shot differential data is available.
I would also hope that he didn’t use raw 5-on-5 numbers, since we know the impact of score effects. Not only do trailing teams rack up shot differentials relative to their leading counterparts, they hurt their own individual shot quality in the process. This, again, is a known quantity -- it’s precisely the reason why we 'adjust’ Corsi% based on event, score, and venue.
Those numbers though -- they weren’t used in this ranking system. I quickly ran the table variances and, well, there are many. Amusingly enough, when you bring in *actual* shot differential numbers, there is no clear indication that either metric is better. One was more predictive for 14 teams. The other for another 14 teams. 2 remained the same.

The three right columns are what you’d want to look at. The 'Shot Rank Error H/(L)’ column is how variant Kelly’s numbers are to, well, their actual rank. Notice how Carolina is 13 ranks off -- that’s because there was no adjustment for score effects. Why the spread? Easy. The Hurricanes chased a ton of games last year, which, as everyone at this point knows, means that Corsi% goes up and Sh% goes down. This phenomenon was acknowledged and accepted back when the only hockey analytics studies were being done in the comments section of the Oilogosphere.
But I can’t just say 14 teams vs. 14 teams and call it a draw. That’d be lazy! And in fact, that’s not what he did. He took the average of each individual variance, ran quick division, and concluded that shot quality was 39% better.
So I’ll do the same. The average shot quality variance was 4.9. The average shot quantity variance was 4.5. Therefore, shot quantity is 8% better.
Same exact study. With the right numbers. And the completely opposite conclusion.
------------------------------------------------------------------------------------------
For the (quick) purpose of showing you why the above was wrong, I simply cleaned up Kelly’s work and re-calculated. But any credible analyst can see what’s wrong with this. And while Kelly may not be able to create this work himself due to employer constraints, it shouldn’t stop anyone else from asking these questions.
Let’s just walk through a quick list. I’ll give myself only two minutes to come up with pertinent questions ... starting now.
1. What game states are we measuring?
2. Why are we using a ranking system vs. the actual performance numbers?
3. How is ‘slot quality’ defined?
4. Why are we measuring to points, which is inclusive of performance across all game states, the overtime format, and the shootout format?
5. Why wouldn’t we consider a blended measure as a competing metric, like Expected Goal%?
6. Why wouldn’t we look over multiple season to increase our pool of data?
7. Why aren’t we adjusting for score effects?
8. Why are we taking the averages of rank variances to determine measurement superiority?
9. What’s our error margin?
10. How are we controlling for arena bias?
11. Why does ‘slot shot differential’ bin shot data? Does a shot one millimeter to the right or left of the slot have an expected goal value of 0.0? (No.)
12. Why are we correlating ranks?
And time. That’s 12. I’m sure you can think of more.
------------------------------------------------------------------------------------------
Just to recap: I think shot quantity matters. I also think shot quality matters. I think shot quantity matters more because it’s proven to be extremely indicative of a team’s true talent. I think when the data is aggregated together on an expected goal basis, the measures become even more robust.
But stuff like this bothers me. Tremendously so. If it’s not disingenuous, it’s bad faith. And if it’s neither, then it’s unacceptable negligence.
Keep in mind that NHL teams today are facing the same exact issue. Who do you believe? Who do you trust? Some teams have went with private data exclusively. Most teams, in fact. But some of those teams are just ingesting the data -- they have hired publicly-vetted, credible analysts to utilize that data to run complex analyses and make difficult decisions.
I don’t think you need to be vetted in the public sphere to ‘check out’ as a stat-based hockey analyst. Far from it! But it sure is interesting that some teams -- when faced with the question of ‘do you want our data or do you want our ‘services’? -- have chosen the former.
Those teams are worried about getting pushed down the wrong path. And they can’t risk being wrong, because their jobs are on the line.
My recommendation: treat everything like a skeptic until proven otherwise. (Second recommendation: feel free to change your opinion on things! It’s OK to be wrong.) This space was started, funny enough, because I was sure that SAP was taking the NHL for a ride. I have never been able to figure out if the NHL.com stats rollout was pure monorail sales work by SAP, sheer vetting incompetence by the NHL, or a combination of the two.
At the end of the day, SAP and the NHL took a terribly inaccurate product out of stage and into production. And although they have cleaned up some of the data discrepancies, the public is pretty uniform of it’s hatred of the current stats site. So much so that, well, not a single soul that I know or have worked with in the stats sphere for close to a decade utilizes it with any frequency.
If a company the size of the NHL can get taken for a ride, anyone can.
3 notes
·
View notes
Text
Kiara Sesshoin (Moon Cancer)
tl;dr There are no offensive Moon Cancers, only Kiara
Sesshoin Kiara (Moon Cancer)
Max HP: 15,336
Max ATK: 11,128
Attribute: Earth
Star Absorption: 50
Star Generation: 14.8%
NP Charge ATK: 0.6%
NP Charge DEF: 3%
QAABB
Quick: 3 hits, Arts: 3 hits, Buster: 4 hits, Extra: 5 hits
Quick: 1.8%, Arts: 1.8%, Extra: 3.0%
Mermaid's Flesh EX
Grants self Guts status for 1 time, 5 turns. (2000 -> 4000 HP)
Removes own debuffs.
Recovers own HP every turn for 3 turns. (1000 -> 2000)
Increases own NP damage by 20% for 3 turns.
Grants self Mermaid's Nourishment Regeneration buff for 4 turns.
-Grants self Skill Rank up buff (4 turns) every turn for 4 turns.
-2 Skill Rank up buffs can be used on her second and third skills. Will be consumed when used.
Cooldown: 8 -> 6 turns
Supernatural Power (Ink) B, B+, A
Charges own NP gauge. (20 -> 30%, 30 -> 40%, 30 -> 50%)
Gains critical stars. (10 -> 20, 15 -> 25, 20 -> 30)
Cooldown: 7 -> 5
Clam Palace A, A+, A++
Grants party Evasion for 1 attack, 3 turns.
Removes all enemies' Ignore Evasion buff.
Inflict stacks of Bewitchment debuff to them for 3 turns. (1, 2, 3)
-Reduces critical attack chance by 10%.
Reduces their defense for 3 turns. (10 -> 20%, 15 -> 25%, 20 -> 30%)
Reduces their Arts resistance for 3 turns. (20, 25, 30%)
Cooldown: 8 -> 6 turns
Territory Creation EX: Increases own Arts performance by 12%.
Spiritual World Creation EX: Increases own NP damage by 12%.
Indepedent Manifestation E: Increases own critical damage by 2%.
Increases own mental debuff resistance by 2%.
Increases own Instant-Kill resistance by 2%.
Logos Eater D: Increases own defense against Humanoid enemies by 14%.
Nirmannarati - Heaven's Foam
Arts
3 hits
Deals damage to all enemies. (450% -> 750%)
Deals (100% + 20*N%) extra damage to enemies with mental debuffs. (N: mental debuffs on enemy, max 10)
Chance to Instant-Kill them. (100% -> 150%, OC)
Primary Role: Farmer, Looper, Debuffer
Secondary Role: DPS, Solo
Situational Role: DPS Support
You know, I don't remember Summer Musashi or Summer Nero or Summer Tamamo or Summer Artoria or Summer Atler being this gimmicky...honestly not even sure if Bunnytoria counts. Kiara swoops into being the latest 5-star Summer Servant, and comes in with one of the most absolutely bloated kits in the entire game. I have her and can barely be arsed to remember everything she does. To start however, and to make things simpler, let's look at her fundamentals.
Her base stats aren't amazing. Like most Moon Cancers, she has very high HP and more middling ATK. Her ATK isn't that bad, but I'll never say no to having more ATK on a Servant who has an AoE NP. Her NP generation is...very average. She'll generate on average 34% of her NP gauge with her AQA chain, which isn't spectacular really for her card set. Her star generation isn't great either, with her best chains generating 15 crit stars on average. Blame her single 3 hit Quick for that.
Moving onto her skills...first we have Mermaid's Flesh EX. It gives her a powerful 5 turns Guts on a 6 turn cooldown, which is already enough to give praise, but it also removes her debuffs, gives her a decent HP regen, boosts her NP damage, and gives her a unique buff. I know I talked up Cu Chulainn's Guts buff when it was revealed, but this makes it look laughable in comparison. Her unique buff gives her another unique buff that lasts for 4 turns, ever turn for 4 turns. What this means is at Level 10, and honestly probaby at least Level 6, you will always have some number of this unique buff active all the time, since the last one will last a couple turns in. This buff is used to power up her second and third skills, which is the primary gimmick of Kiara and her unique one. This skill is fantastic, its a great survival option, and does basically everything else you want.
Her second skill is Supernatural Power (Ink), of which I am pretty strongly annoyed that Kiara gets a stronger version of this, at base, than Hokusai does. Why did that happen? Anyways, this is an NP charge with a star bomb baked into it, granting 30% of her NP gauge and 20 crit stars at max. On a 5 turn cooldown, this is a rather fantastic skill that helps to remedy both her average NP generation and poor star generation. Of course...that's before rank-up. With one Skill Rank Up buff used, the charge is boosted to 40% and the star bomb boosted to 25, and with two, it becomes 50% and 30 stars. At max skill rank, Kiara has access to one of the most powerful NP charges in the game, and it's only really slow for its first use, since you should always have some Skill Rank buffs active from that point on. It basically solves her NP and star generation problems every time its used.
Clam Palace gives Kiara not one, but two skills with a ton of different effects. It gives the party 1 hit of evasion for 3 turns, being a slightly weaker Harp of Healing in that regard, removes Ignore Evasion buffs from the enemy, inflicts a unique mental debuff that reduces crit chance, reduces defense, and Arts resistance. This skill is her damage steroid, and its very good for what it does. It turns on the special damage clause on her NP, boosts her Arts damage by 44%, 56.25%, or 69% depending on the rank, and is even a solid support option, although one that's not immediately available. The cooldown is even reasonable for this skill. It's very good.
Even her passives are good. Extra Arts performance, NP damage, and Defense all are appreciated, especially since they're at very high levels for passive skills. It's truly something.
Onto Kiara's NP, it does okay damage if the enemy isn't inflicted with a mental debuff. Thanks to her class and low ATK, it actually doesn't do as much as one would hope, even with her steroids factored in. It's enough to kill hands, at least. But when mental debuffs are involved...the damage goes up pretty significantly. I've heard from sources I trust that this is an effective damage buff, so not only do I have to edit the Quirinus analysis, but it makes Kiara's damage very strong, more than doubling it. Her NP will do about 68k damage on average to neutral targets with just the 3 Bewitchment buffs her 3rd skill gives, which is quite notable. It's not as powerful as say, Arjuna Alter, but it's comparable. With proper supports, Kiara can also function as a decent boss killer, since her steroids are a little on the low side and she can hit some pretty high damage in the right team comp, but her efficacy compared to ST NPs is questionable.
Onto looping discussion for a moment, it's possible. Due to the way Kiara works though, it's a bit complicated to determine how to optimally farm enemies. Since all of her steroids except for the NP damage on Mermaid's Flesh are debuffs, you need to hold them for the final wave, especially since with two stacks of Rank Up buffs she'll have a maximum power NP to use. At NP 1, this will restrict her to farming Rider and Caster mobs since she can't get the necessary amount of overkill hits from even neutral NP mobs like Sabers, and even then, this has a limit of about 40,000 HP since she'll need 6 hits of overkill in total, and requires the use of Fragment of 2004's NP gen buff. With Sign of Smiling Face or Royal Icing, she can farm Saber enemies with less than 30,000 HP optimally, and again with Fragment of 2004. With Assassin and Berserker enemies, with Royal Icing / Sign of Smiling Face, she'll need to use her 3rd skill turn 1 along with Fragment of 2004 to farm, which will dramatically lower her NP damage turn 3. If you have Kiara at a higher NP level, she's far more efficient at looping, and actually becomes a pretty great looper due to being able to largely ignore strong wave 3 enemies. At NP5, she'll do more than enough damage to be able to easily beat any mob with her Skill 3 up.
Support Options: Kiara really should be used with pretty much every single Arts support you can throw at her. They'll boost his damage, her consistency, and in many cases her survivability. It really doesn't get more straight forward than that. You can do gimmicky teams with Fuuma, Summer Abby, and another Kiara focused on mental debuffs, but it really isn't that worth it to give her a bit of a stronger NP.
Command Code: You'll want to focus on Command Codes that increase the star absorption of her Arts cards, in order to give her better access to crits, and NP generating codes. The majority of Kiara's damage is focused in her NP, so she doesn't benefit from card damage boosting command codes as much as other Servants.
Craft Essences: Really depends on the team you're using her in. For the majority of situations, The Black Grail, Royal Icing, and Sign of Smiling Face are her strongest options available, dramatically boosting her damage. Dive to Blue, Sumo CE, and Painting Summer are also good options thanks to her delayed 50% NP charge, and she can even use Kaleidoscope for instant NPs if that's what you need. Favor the first batch of CEs on dedicated Arts teams, and the second batch for general use teams.
Competition: Space Ishtar is, surprisingly enough, Kiara's main competition. Kiara's advantage over Space Ishtar is her ridiculous NP damage potential, but Spishtar is a much easier Servant to use for farming. Kiara's NP damage is so good that she comes out as the best Moon Cancer DPS, outshadowing everything else. Both BBs and Jinako still have their benefits, but they can't really claim to provide stiff competition in the damage department comparatively.
Pros:
-Three incredible skills with powerful and varied effects
-Guts, HP regen, and Evasion give Kiara surprisingly survivability
-Large NP charge and star bomb
-NP damage is very high for an AoE Servant and she can easily trigger her effective damage buff
-Solid looping potential
-Can solo well thanks to her Guts and HP regen, especially versus Avengers
Cons:
-Getting the most out of her skills is difficult thanks to the delayed nature of her Rank up buffs
-Looping potential is reliant on NP level, low NP levels will farm less effectively than usual
-Moon Cancer class is bad offensively, only hitting Avengers SE
-Skill 3 is nothing but debuffs, meaning she generally will only hit hard for one wave
-NP damage is much more mediocre without Skill 3
Kiara is probably the best offensive Moon Cancer we have right now. Her damage is pretty great, she can farm well in Arts teams, and she has good survival options. Despite her flaws natural to her kit, she's a very strong 5-star thanks to her great kit and good NP. Learning to use her might take some time, but you'll be better for it.
7 notes
·
View notes
Text
Theros Beyond Death Limited: Bomb Rares
Last but definitely not least, here are the Rares & Mythics for Theros Beyond Death. Hope you have some of these in your Sealed pool for prerelease, because these are the cards that can push your deck over the top. Let’s knock this out!
White

I have this pegged as the best White Rare in the set, for Limited. On its own, its a massive threat that will be just about impossible to race, and it runs away with the game really quickly. Your opponent will need immediate removal for this, or it’s going to be very hard to lose. 4.5/5
We play 5 mana removal all the time in Limited, and while it’s never exciting, it gets the job done. But this one comes with extra value attached, as reanimating your best dead threat (with an extra counter, no less), is something we also pay 5 mana for. Chapter 2 will mostly not do anything, but this is still a pretty clear 2-for-1, and you’ll basically always play it. 4.0/5

Elspeth, like most Planeswalkers, is powerful, and you should definitely play her. That said, this Elspeth seems more bonkers in Constructed. In Limited, the most likely line of play will be creating two tokens, then using her -1 the next few turns in a row to push damage through. That’s good, but it makes her more akin to History of Benalia than anything else, a card that’s great, but not unbeatable. In Constructed, she’ll be an important source of inevitability. 4.0/5

The Gods are all pretty much bombs. Even if he never becomes a creature himself, he’s still going to make racing incredibly difficult for your opponent, as you keep gaining life and building up your creatures. Which, weirdly, makes him splashable, though he’s obviously way stronger in a heavy White deck. 4.5/5

It’s been a long time since we’ve had an easy to cast board wipe at 4 mana. Your opponent is slightly more likely to get a card draw off of it, but that’s pretty negligible because it shouldn’t be hard to set yourself up for a situation where you can easily turn this into a 3-for-1 or greater. It gets less valuable post-board once your opponent knows it’s there, so be aware of that. But you can bet lots of Game 1s will be decided by this 4.0/5
White, as per usual, has some great bombs at Rare. No surprises when it comes to the threats, but the presence of a 4 mana sweeper is a very welcome change and will definitely impact the Limited format.
Blue
Yes, it costs a lot, but this card will make people scoop when it comes down. It just... does everything Blue wants to do to end the game. You get a giant Monster that pretty much can’t be removed, then you get two turns of unfettered attacks with it. If they’re still alive after that, you get to take their best thing permanently. 7 mana is a lot, but you can get there in most games, just make sure you have ways to stall, and once you get here, this card will singlehandedly take care of the rest. 5.0/5

This is pretty bonkers. You might as well just keep one land permanently tapped for this, since it’s pretty much always correct to pay, even at the expense of slowing yourself down a bit. There will be some games where this comes down on turn three and runs away with the game all by itself. Otherwise, it will at least eat a removal spell. It demands action from your opponent, and that’s exactly what I like in my Rares. 4.5/5
Thassa is less busted than Heliod, but still does a lot. She can retrigger ETBs (including Constellation), and provide pseudo-Vigilance for one creature a turn. She also completely invalidates most Enchantment-based removal (Banishing Light excepted), and turns into a really potent mana sink in the late game. If you get your devotion up, she’s a massive threat in and of herself. She’s less good if you’re not deep on devotion, but still worth including in most decks. 4.0/5
Thryx is likely going to be the largest threat in the air, and he comes down at the end of an opponent’s turn, so you’re usually going to get a turn to swing with him before he’s removed. He also helps ramp your bigger spells, and incidentally hates on Blue control, which is cute. But mainly, he’s a big flier. 4.0/5
The ceiling on Wavebreak Hippocamp is really, really high. If you have lots of Instants & Flash, it’s an engine that will bury your opponent in card advantage really fast. The rating I’m giving assumes you get to draw one card off of it. In a deck built to use it, it goes up a half or full point. In a deck with only one or two cards that can trigger it, it goes down. 3.5/5
Well, Blue got some bombs, didn’t it? I like how many of these cards are generically pretty solid, but become incredible in the right build. Except Kiora Bests the Sea God, which is just ridiculous in any deck.
Black

The cleanest removal for just about any threat in the game, and with Surveil 1 tacked on for enabling Escape. You should always run this. 4.0/5
I honestly don’t know how you’re losing if you play Erebos. The life loss isn’t insignificant, but it ensures you’ll bury your opponent in card advantage with every trade. He’s not great if you’re already super behind, but assuming you cast him when you’re at parity, he should help you win very quickly. 4.5/5
Flexible Instant-removal that doubles as Escape hate? I’ll take it. 4.0/5
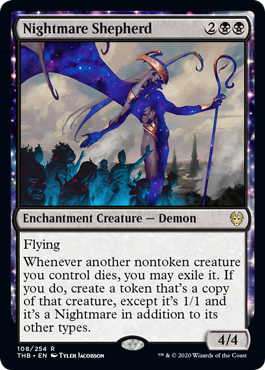
This is a nonbo with Escape, but it’s so good on its own it doesn’t matter. First of all, it’s a 4/4 flier for 4 mana, which is great. That alone would be one of the best cards in your deck. But getting copies of every creature that dies, even if they’re 1/1s, is just insane. You get to retrigger any ETB, and they have all abilities they originally had. I expect this to be very good. 4.5/5
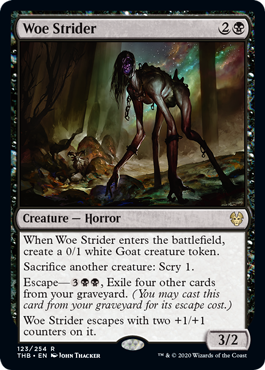
Woe Strider is a recursive threat that gets bigger when it comes back, and it basically always gets a Scry 1 tacked on to it. Also, the sacrifice ability doesn’t cost mana, which is phenomenal, so you can turn any other creature death into a free Scry. 4.0/5
Black’s Rares seem absolutely nuts. Even some of the others I didn’t pick are still great, so starting your pool with one or more of these is a great place to be.
Red

I suspect a lot of people won’t realize how good this will be. After a few turns, your opponent will have little to no board, while you will have been able to continue building up. It’s a massive tempo win, and can even help you come back from behind, which is a rare thing for Red. 4.0/5

I can’t overstate how much card advantage this card represents. Yes, a 4/2 is small for a 5 drop, but it shouldn’t be hard to mostly empty your hand before you cast this, and net 2-3 cards right away. It will pretty easily trade with something, and then represents more threat in the graveyard, even if the cost is steep. It’s even a great topdeck. I suspect this will be great, even if it’s even better for Constructed. 4.0/5
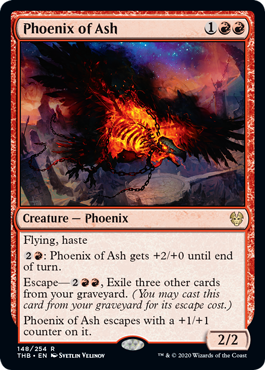
The base stats alone are pretty awesome, but the fact that this has a very reasonable Escape cost and comes back bigger makes it even better. This will be a persistent and annoying threat for your opponents. 4.0/5

I actually don’t think Purphoros is all that bonkers in Limited. His ability is much more a plant for Constructed magic, so in Limited he’s mainly to be evaluated assuming you get devotion going. In that case, he’s still good, but not insane value on his own the way some of the other gods are. 3.5/5

I mean, that’ll do. This can take down nearly anything, and if you’re ahead in the game, you can just throw out a beater to threaten their life total. 4.0/5
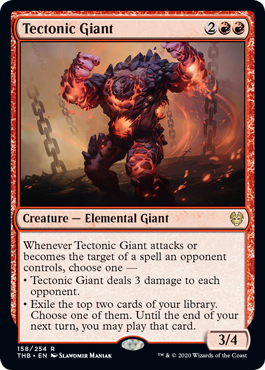
Tectonic Giant seems great. While the stats are a bit anemic on their own, it’ll chuck a Lava Spike or draw you a card if your opponent tries to remove it, and if you can safely swing, the value is going to be nuts. Combat tricks go way up with this, since your opponent will always try to trade for it. 4.0/5
Red doesn’t have any completely unbeatable bombs, but the average Rare is really great, so I don’t think it’s much of a problem. Seems very strong.
Green

I love getting Legendaries of somewhat atypical tribes like this. A 3/5 with Reach would be playable for 4 mana anyway, but Arasta spawns babies every time your opponent casts an Instant or Sorcery. Sometimes it won’t come up much, and the plethora of Enchantment removal in this set makes it worse than it would be in other formats. Still, it’s a pretty strong hoser against certain decks that’s maindeckable, and that’s a good place to be. 3.5/5

If all the modes occurred at once, this would be a 4/4 creature that draws two cards on ETB, which is INSANE. Spreading it out over 3 turns (the fourth chapter is mostly flavor) gives your opponent more opportunity to deal with it, but there are going to be games where it just goes off as planned, and those games are going to be really, really good. 4.0/5
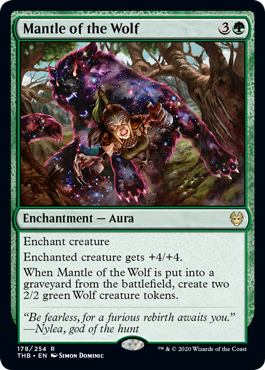
Auras normally have the issue of being easy 2-for-1s, but this cleverly gets around that by compensating you with two bodies when the creature dies. This will give you a massive swing when it comes down. It’s not a bomb, but I mention it because there will be people who ignore it simply because it’s an Aura, and this one is definitely worth playing. 3.5/5
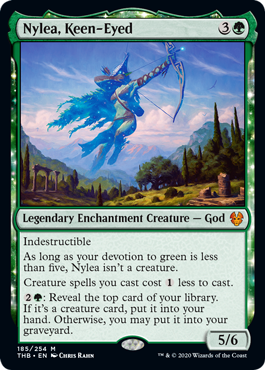
Nylea is probably second to Heliod when it comes to Limited potential. Green loves permanents and has lots with double & triple mana costs, so getting her active will be easier than in some other colors. But her mana sink is going to be absolutely incredible in the late game, and should make wins easy if you don’t get overwhelmed too early. I’d basically always run her. 4.0/5

It only takes one Enchantment to make Setessan Champion great, and in a deck built around the theme, she’ll be an unstoppable engine. Pick highly. 4.0/5
Green surprisingly doesn’t have any crazy bomb Rares, at least from what I can tell. But it makes up for it with above average Commons & Uncommons, so Green decks are likely to be very consistent and powerful.
Multicolor & Colorless

This should come as no surprise. Ashiok starts with a pile of loyalty, and churns out surprisingly big creatures to protect themself, and yes I know that’s not a word (”technically”). Having Recoil on the -3 is phenomenal as well, and deals with basically any permanent (or Enchantment-based removal) very effectively. The Ultimate doesn’t take long to get to, and once you do, I like that it counts not only cards exiled by Ashiok, but also any they’ve exiled with Escape as well. Very flavorful and a clear bomb. 4.5/5
The casting cost is a challenge, to be sure, but this Sphinx is a near-perfect Control finisher. It’s big, keeps your life total high, blocks all but the biggest of threats, and is nigh-impossible to kill with targeted removal. Once you untap with it, the card draw keeps you ahead. I’m starting very high on this, assuming you’re in the color pair, since this is not very splashable. 4.5/5
Speaking of not splashable, Haktos here is completely unplayable outside of Red/White. That said, if you’re in the colors, he’s a massive threat that’s incredibly hard to deal with. Sometimes, he’ll trade down and that will be a feel bad. But other times, he’ll be unblockable and unkillable, and those times will be incredibly frustrating for your opponent. I’d give him a try. 3.5/5
Klothys may actually be the best god for Limited, no joke. Yes, the Devotion threshold is higher, but she comes down early and the ability is fuego. She's a clock in and of herself while keeping your life total nicely buffered, and will occasionally help you ramp out a threat ahead of schedule. She’s also incidental Escape hate, and that is absolutely relevant. I highly recommend playing Klothys if you open her. 4.5/5

I absolutely love that the designs for the Titans, though I very much wish there were three of them. Kroxa doesn’t do a ton at 2 mana, but that’s just setup. Once it Escapes, it’s absolutely brutal, and even just the threat of this sistting in your graveyard could cause your opponents to try to play around it, which is a great place to be. 4.5/5

Polukranos was a bomb the first time around on Theros, and it’s a bomb again this time. A 4 mana 6/6 is an absolute monster, but it’s ridiculous coming back as a 12/12. Yes, the counters go away when damaged, but this will just eat up whatever you want of the opponent’s board, then come back to do it all over again. The value here is insane, and will dominate Limited games. 5.0/5
Uro is even better than Kroxa. For 3 mana, you get a ramp spell, and then it sits in wait for the moment of Escape. It’s not hard to imagine this being a 3-for-1 or even better. It’s not unbeatable, but it’s pretty insane value. 4.5/5

Shadowspear asks very little, and gives so much. The activated ability won’t come up all that often, but when it does, it will feel so good (destroying gods is always fun). But mainly, it’s just a super-efficient way to power up your creatures and make racing a nightmare for your opponent. 4.0/5
The Rest of the Rares
Eidolon of Obstruction - This is a 2/1 with First Strike for 2. That’s solid in any deck, even if the Planeswalker text is ornamental. 2.5
Heliod’s Intervention - I wouldn’t generally run it for the lifegain alone, but it can gain a pile of life, which in some situations is almost a Time Walk. But being able to snipe lots of Enchantments is completely worth it in a format full of them, and makes this easily maindeckable. I’d be prepared to bump this rating up once the format shakes out. 3.5
Idyllic Tutor - You want at least 2 other Rares worth tutoring for to bother with this. Mostly save it for Constructed. 1.0
Taranika, Akroan Veteran - This is pretty solid. It upgrades your weakest dork to a 4/4 on attack, and is on-curve for 3 mana anyway. 3.5
Ashiok’s Erasure - Cute, but I’d rather just have Cancel most of the time. This is more for Constructed. 1.5
Protean Thaumaturge - Cute, but I’m always wary of cards that do literally nothing on their own. If you have lots of good Enchantment creatures, this gets better, but I’m not sold on its own. 1.5
Thassa’s Intervention - This strikes me as much better in Constructed, but the flexibility to hold it up as an answer then draw cards if there’s nothing worth countering makes it playable. 2.5
Thassa’s Oracle - A 2 drop that smooths your draws is fine by me, but you do want to be in heavy Blue before you play this. The win conditoin will happen every now and then, and there probably is a busted self-mill deck around this if you first pick it. 2.5
Aphemia, the Cacaphony - This is definitely playable on its own as a 2/1 flier for 2, but as soon as you can get some Enchantments in your Graveyard, the value goes way up. It dies to basically every piece of removal in the set, so I’m not super high on it, but the ceiling is high. 3.5
Gravebreaker Lamia - I actually like this quite a bit. I probably wouldn’t run Entomb in any Limited deck (except maybe Ultimate Masters draft), but Entomb stapled to a 4/4 Lifelink Creature is pretty sweet, and this really helps fuel the Escape deck. 3.5
Treacherous Blessing - Three cards for 3 mana is great, but the drawback is real. I’d mostly pass on this unless you have lots of lifegain or good ways to sacrifice Enchantments (There are a few in Red). 2.0
Tymaret Calls the Dead - There is some value here for not much mana, so I’d usually run this. But it’s not as good as the other Rare Sagas. 3.0
Storm Herald - This is a 3/2 with Haste for 3, so evaluate it as that. Sometimes you’ll have an Aura to get back, but not always, and even so it’s just for the one turn. 2.5
Storm’s Wrath - This kills most creatures, but leaves up the big baddies, which makes it a little harder to ensure you’re going to come out on top. Still good, but not quite as good as the White board wipe. Also, White needs sweepers more than Red does. 3.5
Underworld Breach - While clearly a Constructed powerhouse, this isn’t awful in Limited. You’ll buy back your best threat or removal for a 2 mana tax, which is playable, but I’d rather pick a good threat or removal over this first, then add this on the wheel if I’m short on playables. 2.0
Dryad of the Ilysian Grove - If you need need a 2/4 for 3 that fixes your colors, this does the trick very well, and is pleasant to look at while he does so. But he’s not going to be bonkers like he is in EDH. 2.5
Nessian Boar - On the one hand, a 10/6 is fucking massive. On the other hand, I have no idea how to evaluate that downside. Often, it’ll trade with several of your opponent’s creatures at once, but then they’ll draw a bunch of cards to replace them. It does make sure all your other attackers get through, so I’m going to start assuming this is very good and be open to adjusting up or down as the format shakes out. 3.5
Nylea’s Intervention - If there’s a skies deck in the format, this will be the ultimate sideboard card. If not, it’s purely for constructed. 1.5
Nyxbloom Ancient - Someone somewhere is going to win by playing this followed by a massive Purphoros’s Intervention, but most of the time, it’s going to be an expensive 5/5. Good with Nylea, but then you’ve really hit the jackpot. 2.0
Allure of the Unknown - This is so tough to evaluate, but I’m not optimistic. Let’s say you get 4 spells and 2 lands. Your opponent is going to take the best spell and gets to cast it immediately, then untap, while you have to wait until your next turn to cast your second-best cards. That doesn’t strike me as a great option, and this becomes a huge liability if you have a bomb or two in your deck. Let’s save this for Commander. 1.0
Atris, Oracle of Half-Truths - A 3/2 with Meance that does a mini Fact or Fiction is a good deal for 4 mana, even if this will never be bonkers. 3.5
Bronzehide Lion - Watchwolf with the ability to become Indestructible is sweet, and the added value when it dies is excellent. It won’t run away with games, but it’s going to be super annoying to play against. 3.5
Calix, Destiny’s Hand - Calix, aside from being super fine, is a niche card more than an auto-include. You want somewhere in the ballpark of 10+ Enchantments in your deck before I’d say he’s really great. Once you’re there, he’s incredible. 3.5
Dalakos, Crafter of Wonders - 2/4 Merfolk is fine, but unexciting for 3 mana. The rest of the text barely matters. 2.0
Enigmatic Incarnation - The hoops on this seem ridiculous to jump through in Limited. I wouldn’t bother, and I know someone is going to kill me with this now that I’ve said that. 0.0
Gallia of the Endless Dance - Fun Commander, and fun in Limited, particularly if you pick up a few other Satyrs. A nice mix of flavor and playability. 3.5
Kunoros, Hound of Athreos - 3/3 Vigilance, Lifelink, Menace for 3 mana is a great deal, and is definitely playable if you’re in these colors. That said, White/Black are two of the colors that most want to play cards from Graveyards, so this nonbos with many of the best cards in the colors, limiting its usefulness. 3.0
Nyx Lotus - This will be great for Brawl & Commander, and seems basically unplayable in Limited. 0.0
Labyrinth of Skophos - This Maze of Ith variant is useful, but comes at the expense of color fixing in a set where that matters. But I’d still usually run this, since it’s late game utility is so high. 3.0
Temple Lands - These are great, these fix your mana, and they smooth your draw. Play them. 3.0
That’s it! All the cards from Theros Beyond Death! Whew.
What are you excited to play this prerelease?
0 notes
Text
Your Complete Betting Guide and Preview of “The Match: Tiger vs. Phil”
After a full day of football to be thankful for on Thursday, golf will take center stage on Friday with the highly anticipated head-to-head match between Tiger Woods and Phil Mickelson at Shadow Creek Golf Course in Las Vegas. Naturally, there’s quite a bit of buzz surrounding the match given the immense popularity over the past two-plus decades of these two highly accomplished golfers. Adding to the intrigue of the event are the high stakes wagers the two plan to make throughout the course of the match, and the betting odds available to the general public. Two of the sport’s legends in a one-on-one setting, talking trash and recklessly throwing around thousands of dollars?
Phil Mickelson bet $100k that he’ll birdie the first hole during The Match. Tiger doubled it.
Friday's going to be fun

#CapitalOnesTheMatch pic.twitter.com/61WqqRzaCj
— Bleacher Report (@BleacherReport) November 20, 2018
Sign. Me. Up.
THE BETS
Note: All information is as of 3:00 p.m. Tuesday.
The Winner
Woods enters as a strong favorite. He is currently -230 to win outright at DraftKings, 888sport and Play SugarHouse. If you’re looking on the best value on Woods, it’s at BetStars NJ and FanDuel where Woods is only -200 to win.
Those looking to back Mickelson should know that there’s more variance on his value. DraftKings, SugarHouse, and 888sport each are offering Mickelson at +175. Given BetStars’ favorable odds on Woods, their conservative +163 offering on Mickelson is understandable. FanDuel checks in with Mickelson at +165.
First Hole
Those looking for some quick action can wager on the result of the first hole at DraftKings, SugarHouse, and 888sport where Woods is +225, Mickelson +275, and a tie is -110.
Front 9
DraftKings, SugarHouse, and 888sport are offering up odds on the first nine holes. Both books list Woods at -121, Mickelson +188, and a tie at +400.
Specials
I was underwhelmed on Monday by the lack of prop and special bets offered, but some fun alternative options have been released since then. Let’s see what’s out there.
DraftKings
DraftKings is going heavy on specific hole props that allow bettors to wager on the winner of the first hole, along with greens and fairway bets on one. There’s a longest tee shot on the third hole, as well as closest to the pin wagers on the fifth and eighth holes. Here’s a look at some other of their other offerings:
SugarHouse and 888sport
The lines and odds at DraftKings, SugarHouse, and 888sport are each set by the gaming operator Kambi. Why does this matter? Because all three books offer the same odds on available props, but each company has the ability to decide which ones they want to run. In this case, SugarHouse and 888sport are taking bets on Woods’ t-shirt color. As of Tuesday morning, you can only bet “red” at -305. DraftKings, meanwhile, is not offering this option.
Because SugarHouse and 888sport are offering the same selections at the same prices, if you don’t have one of the apps it would be wise to download it and take advantage of the sign-up bonus (we prefer SugarHouse). If you already have an account at both books, then it just comes down to a matter of personal preference.
BetStars
The props at BetStars go a bit deeper into the sport’s finer details, including wagering options on driving accuracy and one putts. Hardcore golfers will be intrigued by these.
FanDuel
Surprisingly, FanDuel isn’t offering and special plays on the match.
THEIR LIVE ACTION
One of the elements of this spectacle that makes it an interesting watch is the fact that both men have already said they will be betting against each other within the match. Here is Phil Mickelson talking about what the live in-game action between them might look like:
The Match:
Where Phil Mickelson will be betting Tiger Woods 50k on putts
pic.twitter.com/czz4TmQpje
— The Action Network (@ActionNetworkHQ) October 26, 2018
“When we’re mic’d on the course, we’re going to have little challenges, let’s say, that can maybe get in each other’s head,” Mickelson said during a drop-in on an NBA on TNT telecast. “You have a downhill putt. I’ll bet you 50…50Gs that you miss this.”
For his part, Tiger doesn’t seem especially worried about any tests of his courage that Mickelson might throw at him — and he certainly doesn’t think he’s going to lose the psychological war against Mickelson. Now hear this from Eldrick:
.@TigerWoods is ready…
#CapitalOnesTheMatch – November 23 on @BRLive pic.twitter.com/aUK2zqWQ6j
— NBA on TNT (@NBAonTNT) November 16, 2018
“Well, I’ve been in Phil’s head for 20-some-odd years. Just look at the W total,” Tiger told Ernie Johnson and Kenny Smith on Thursday night.
What makes these side bets interesting is that, unlike the $9 million purse which will go to the winner, these “challenges” as Mickelson described them are coming out of the players’ own pockets. Woods, and especially Mickelson, are known to love action — they are also both known to hate to lose. So while neither of these men will take any fiscal losses they can’t afford (especially since lost wagers will be donated to charity), they will both want to claim the bragging rights of having lightened the other’s wallet in the side games no matter who wins the match.
THE MATCH
Phil Mickelson has been compelled to talk up his chances in the run-up to this match because his game hasn’t done much to make the betting public want any piece of him unless they’re getting good odds. Mickelson’s best finish on the PGA Tour last season was his World Golf Championships event win in Mexico in March. After that, things went bad quickly and pretty much stayed that way.
The lowest of the lowlights of last season for Lefty included his bizarre, intentional rules violation at the U.S. Open at Shinnecock Hills (he probably should have been disqualified), his missed cut at the PGA Championship (where Woods finished second) and his awful, terrible, no-good performance at the Ryder Cup. Mickelson’s Official World Golf Ranking is currently 27th, behind such household names as Alex Noren and Patrick Cantlay.
Watching #TheMatch preview on @HBO and Phil’s starting to look like he’s playing because he NEEDS the money. pic.twitter.com/S9tvH6OQn9
— Club Pro Guy (@ClubProGuy) November 14, 2018
Woods is 13th, which is impressive enough in its own right but which is frankly shocking when you see that his World Golf Ranking at the end of 2017 was 656th. On these facts alone, it is understandable that Woods is in that range of a -225 favorite, with Mickelson offering the much better price in the neighborhood of +175. Mickelson claims to be thrilled. “I like it, the payoff on my side is very good, I like it,” Mickelson said recently. Then again…what’s he supposed to say? “I suck right now, and I might get embarrassed.” Probably not.
Mickelson’s chances to prevail are tied to the format. The vast majority of professional golf is played under stroke play rules, i.e., you make a seven or an eight on a hole, that’s pretty much it for your score for that day and possibly for that tournament. In match play, each hole is worth one point, and your score only matters in relation to the score your opponent made on that same hole. This is more likely to help Mickelson who is, as noted above, prone to odd stretches of wildness and poor decision-making. Mickelson could shoot even par in this match and still win if he makes enough birdies.
Woods was first on Tour in 2018 in shots gained approaching the green and seventh in scoring average (69.350.) The lone weakness in Tiger’s game right now continues to be his propensity to spray it off the tee — he was 129th in driving accuracy. It’s hard to make birdie from the trees or the water hazards. Shadow Creek appears to be reasonably forgiving off the tees, which will help both players but will probably help Tiger a little bit more.
Have a question for @PhilMickelson or @TigerWoods to answer before The Match?
Send it here and they'll answer their favorites on Tuesday. pic.twitter.com/249rNMevEa
— PGA TOUR (@PGATOUR) November 19, 2018
If Mickelson is going to win this match, he will need to stay with Tiger to the best of his ability through the green and take advantage of his edge in putting. Even in an off-year in 2018, Mickelson was second on Tour in putts per round (27.88) and second in birdie or better conversions on the greens (36.6%.) That’s a match play stat if ever there was one, because eagles and birdies generally win holes. Woods had a decent year in 2018 with the putter (22nd in putts per round). But he also changed putters on multiple occasions and never seemed as comfortable on the greens as he did in his prime.
As the famous golf instructor Harvey Penick was fond of saying, “a good putter is a match for anyone.” Mickelson needs to come out hot with the putter and let Tiger know early that you only drive for show.
THE PICKS
Phil: The most clever, and also the meanest, quip I’ve seen about this match was that it will cost $19.99 to watch, which is also the last year it would have been worth that much money to watch them play golf against each other on television. There is a touch of a Mayweather/Pacquiao feel to this. Mickelson’s last major title came in 2013 at The Masters, the only major he has won more than once. Tiger’s last major win was all the way back in 2008 at the U.S. Open. That’s right: Tiger hasn’t won a major in a decade, though he certainly came close at The Open Championship and at the PGA in 2018. Less so for Tiger but true of both is that we have probably already seen their best.
Still, it’s better to celebrate who they are rather than who they aren’t. In late November of 2018, in a sport where nobody is all that interested in watching anyone but Tiger, this match between Mickelson and Woods is the best of what’s around.
As indicated above, match play is an entirely different game than stroke play. At its core, though, at the highest level of competition, it usually comes down to who wants to win more. I have no doubt that Tiger Woods very much wants to beat Phil Mickelson. But as he said, he has been beating Phil’s brain in for the better part of 25 years now. Tiger wants to win…Phil needs to win, if only to have just one thing he can hold over Tiger in what has been less a rivalry than a lopsided comparison over the years.
And don’t forget, there probably won’t be a rematch if Phil doesn’t win or come really close to doing so. As Chris Rock so eloquently put it, the money is in the comeback. Take Phil at +175 or as high as you can get it. Use your deposit bonus at SugarHouse and let it rip.
Bob: Woods has been the superior golfer lately, so there’s a reason he’s such a heavy favorite in this matchup. I’d probably stay off the match winner due to the lack of value, but if I had to, I would back Woods in this spot. Take him at FanDuel.
I don’t think it’s unreasonable that each golfer takes a conservative approach to feel one another out early on, so I’ll probably take the two to be tied after the first hole at -110. And given Mickelson’s aforementioned statistical superior efficiency on the greens, I’ll go to BetStars and take him to have more one-putts.
If you or someone you know has a gambling problem and wants help, call 1-800 GAMBLER.
Full disclosure: We are an affiliate of legal New Jersey sports betting sites, so we may receive a commission if you use our links.
The post Your Complete Betting Guide and Preview of “The Match: Tiger vs. Phil” appeared first on Crossing Broad.
Your Complete Betting Guide and Preview of “The Match: Tiger vs. Phil” published first on https://footballhighlightseurope.tumblr.com/
0 notes
Text
Game 41: Eamon: The Beginner’s Cave (1979)
This is pretty dope for the time, to be honest.
I’m tackling Eamon today, which presents something slightly different from my usual fare. On the surface it looks like a text adventure, but when you dig into it a little bit it’s very obviously a CRPG. More than that, though, it’s a tool for users to create their own games, very possibly the first one that was ever made available to a wide audience. Certainly it’s the first one I’ve encountered on the blog (unless you count the Wander programming language used to create games like Castle and Aldebaran III, but that could hardly be described as widely available).
If the number of games available for Eamon are anything to go by, it certainly had some measure of popularity. The Eamon Adventurer’s Guild – which is still posting updates in 2020, surprisingly – has a list of over 250 games available, which beggars a real question for a project like mine. How many of these games am I going to play? My gut instinct is to defiantly shout ALL OF THEM whenever the question comes up, so that’s a possibility. But being more realistic, I’m going to play it by ear as I plan out each year. For 1979 I have two Eamon adventures lined up: Beginner’s Cave and Lair of the Minotaur. 1980 jumps up to ten, and by 1984 there are a whopping 41. I’ll stick with it for as long as it seems feasible, and for as long as I’m enjoying the games.
But let’s take a step back and look at how Eamon came about. The details are a little hazy, because the game’s creator Donald Brown has spent the last 30 years not wanting to talk about it. What we do know is that Brown was a university student around the time that his father purchased an Apple II circa 1978. He was fascinated by the machine, as well as two other interests that seem so common to the CRPG creators of the era: Dungeons & Dragons, and the Society for Creative Anachronism. With the encouragement of his friends, Brown combined these interests to create Eamon, and distribute it out of his local shop, the Computer Emporium. From the beginning Brown made Eamon public domain, and it’s pretty clear that he wasn’t making any money from it: he was selling the game and its scenarios for the price of the media they were stored on. Later, in the mid-80s, Brown had a stab at a commercial version of Eamon with the SwordThrust line, but that apparently failed and Brown has had little to do with Eamon ever since. Others have maintained the community in his stead, and the entire library of games is still available today.
There’s some debate about exactly when Eamon first debuted. Most sources will cite 1980, but Jimmy Maher over at the Digital Antiquarian has done some pretty convincing detective work that suggests a date of 1979 is more likely. It’s pretty hard to dispute, so I’m going with 1979.
At this point I should probably get to the point and talk about what Eamon is, and what it does that’s inspired a community spanning close to half a century. I can’t really get into the technical specifics, which are well beyond my expertise, but I can speak to what it offers that no CRPG before it has done: an ongoing “campaign”. One of D&D’s most compelling features is its persistence, the ability to take your character from one adventure to the next and to have him or her gain in power (hopefully) or suffer setbacks along the way. Certainly games had emulated the “gain in power” aspect, and persistent characters were a thing going back to the PLATO days, but you were always stuck inside the same game, the same dungeon. Eamon expanded that to include a potentially endless number of scenarios, and gave users the tools to create their own scenarios as well. Not a bad deal for the price of a few floppy disks.
Eamon’s original release was on the Apple II, but it was later ported to the PC, and an Eamon Deluxe was created in the late 90s for MS-DOS. It was even made playable in a browser in 2017. I’m going to be playing the Apple II version, of course, and I won’t be checking out any of the other ports right now.
Before getting into the game I took a look at the documentation that’s out there, at least for players. (I didn’t want to get into the manuals for creating scenarios, because as much as I’d like to try it I don’t have the time to get sucked into something like that.) It covers the game’s systems in some detail, as well as giving a little bit of backstory: “Far away, at the dead center of the Milky Way, is the planet of Eamon. It doesn’t orbit any suns – all of the suns orbit it. The shifting pulls of all these great bodies bring strange forces to bear upon this planet; twisting light, tides, even the laws of science itself!” So that’s the basic framework for adventures within Eamon, although I’ve no doubt that there’ll be scenarios out there that make no sense within that framework. The player is supposedly a citizen of the planet Eamon, a free person out to seek their fortune.
The core of Eamon is the “Main Hall” of the Guild of Free Adventurers, which is contained on the main game disk. Here you create your characters, equip them, and save them between adventures. My first experience with the game was a rather ignominious one. The game begins as you enter the hall. There are many men and women guzzling beer, and a desk with a sign that says “register here or else!” I opted to join the beer drinkers first, and got a sword in the back for my troubles.
I mean, do I really want to associate with these people?
I’m not sure what the point of that was, but I suppose Donald Brown wanted to send a message to Eamon players to follow the rules. Or maybe he just thought it was amusing, who knows.
If you go to the desk, a burly Irishman – which already puts a dent in the planet Eamon set-up if we’re being honest – asks for your name. Here you can retrieve a character you’ve created before, or put in a new name to create a new character. If the character’s new, you get to choose whether you’re Male or Female, and then you get given your statistics.
This is done by a “tall man of possible elvish descent”, who tells you what your scores are in Hardiness, Agility and Charisma. He also gives you a book of instructions, which you can opt to read or totally ignore.
The three stats range between 3 and 24, generally landing in the mid-teens. Or at least, they’re supposed to be between 3 and 24; on the first version of the game that I downloaded I was getting stats in the 30s and 40s. Almost every version of Eamon that I found had the same problem. I suspect that the game had been cracked somewhere along the way, and for whatever reason that was the version that’s become widespread on the net. The version from the Eamon Adventurer’s Guild works correctly though, so if you’re looking to play the game that’s the place to get it from. The browser version also works correctly.
Hardiness is the equivalent of hit points. It also determines how much weight you can carry, although I can’t say that I ever ran into any encumbrance problems during The Beginner’s Cave.
Agility measures how often a character lands a hit in combat. It can apparently be useful for avoiding traps and other hazards, but again this didn’t come into play in this adventure.
Charisma is used to determine how characters will react to you, whether certain NPCs will be hostile or friendly. It also has an effect on the prices in shops, which is a thing that fantasy CRPGs like to do a lot that is in no way applicable in real life. No matter how lovable and charming I might be, ain’t nothing changing the price of that jar of Vegemite.
After that, the elf-like man gives you a Vulcan-like hand gesture, and you can enter the Main Hall proper. From here you get six options: go on an adventure, buy weapons, buy spells, deposit your gold in a bank, look at your stats, or save and quit. Going on an adventure without weapons would be foolish, and the spells are too expensive for a beginning adventurer, so visiting the weapons shop is the best first option.
Temporarily leaving the universe sounds pretty good right about now.
Eamon splits weapons into five categories: axes, bows, clubs, spears and swords. The game is very up-front with its internal systems, and gives you your base chance to hit with each weapon: beginning adventurers are good with clubs (20%), okay with spears (10%) and axes (5%), average with swords (0%) and bad with bows (-10%). This seems like a fair approximation to me for what weapons would be easiest for a novice to pick up and use without training.
Armour has only three categories, leather, chain and plate. Wearing armour reduces the damage you take when hit, but it also reduces your own chances to hit when attacking. Shields work much the same way.
You begin with 200 gold pieces. This was generally enough to buy one weapon, a suit of armour (usually leather, although with a high enough Charisma I could sometimes afford chain) and a shield.
My character just before his ill-fated adventure.
All of the above is done through menus, and is pretty self-explanatory, but the game does try to liven things up a bit by giving the various shopkeepers some personality. The weapons shop is run by Marcos Cavielli, a pretty heavy italian stereotype. The wizard who sells magic is an old grump called Hokas Tokas. The banker is called Shylock, which I’ll assume is a Shakespeare reference and leave it at that. It’s a valiant attempt, and it’s somewhat charming the first time you go through the process, but after a while it becomes a little tiresome reading the same dialogue over again.
When it’s time to adventure, the game asks you for the scenario disk. For The Beginner’s Cave, you just leave the main disk in and continue.
I couldn’t bear not to add an apostrophe.
The Beginner’s Cave is the first Eamon scenario, and the manual helpfully explains that it was set up by “The Warlord” as a service to all Free Adventurers, as a way for them to test their skills in a mildly dangerous setting. How thoughtful! As we’ll see, it makes very little sense with the adventure as described below.
The adventure began when I apparently stole a horse and rode it to the cave, where I was inspected by the local knight marshal. If you have no weapons he will turn you away, and he also won’t let you in if your stats are higher than those of a beginning adventurer. Like the sign on the cave says, this one is strictly for beginner’s only.
Doesn’t the guy care that I nicked some poor bugger’s horse?
Movement and commands are done in the usual adventure game manner: NESW for North, East, South and West. The game has a parser that generally behaves like an adventure game, but the commands are limited. In fact, if you type a command that the game doesn’t recognise it gives you a list of every command in the game. Apparently these can change depending on your scenario, For The Beginner’s Cave, it’s mostly basic stuff like GET, DROP, LOOK, EXAMINE, READ, OPEN, etc.
The entrance to the cave led to a passage heading south that then opened into a huge chamber with torches lining the walls. The entire dungeon is filled with lit torches, so there’s no need to worry about light sources. A tunnel headed south, and there were chambers to the east and west.
I started by exploring the east chamber, where I met a smelly old hermit. Also in the room was a bottle, which I took. The hermit, perhaps incensed that I was nabbing his personal belongings, attacked me.
The hermit was hostile this time, but in other games he’s been friendlier and decided to follow me around and help me fight various monsters. As I mentioned above, this is dependent on my Charisma. It also depends on the NPC’s Friendliness rating. The manual says that the Hermit has a Friendliness of 50%, which means that without modifiers he will be friendly half the time. This is modified by the player’s Charisma score minus 10, then multiplied by 2. A character with a Charisma of 5 would subtract 10 for a result of -5, then multiplying by two come up with a modifier of -10, which would reduce the Hermit’s Friendliness to 40%. If the player had a Charisma of 15, the Hermit’s Friendliness would be raised to 60%. Some characters and monsters have a Friendliness of 0, and will be hostile regardless of the player’s Charisma.
Obviously this time the roll hadn’t gone my way, because the hermit was attacking me. We exchanged blows for a few rounds, until he fumbled and dropped his axe. I picked it up, and without a weapon he wasn’t able to defend himself, so I beat the hermit to death without fear of reprisal. After the fight I examined the bottle and learned that it was a healing potion. I’d only been struck once byt the hermit, so I decided to save it for later.
Beating an unarmed hermit to death. Hey, he started it!
The chamber to the west had some treasure in the form of a pile of diamonds, but it was guarded by a trio of giant rats (each a different colour so that the parser can differentiate them). I struck the black rat, killing it, and the other two fled out of the room.
The ability to land a blow in combat is a percentage based on your Agility score multiplied by two, modified by your skill with the weapon you’re using and the complexity of that specific weapon. My character had an Agility of 16, which is doubled for a base score of 32. He was using a mace, for which he had a skill of 20%, but its complexity was -10%, so his chance to hit each round was 42%. If he’d been wearing armour it would have been further reduced, but for this game I didn’t buy any.
Your weapon skills increase through use. Basically, for every blow you strike, the chance of missing is your chance of increasing the skill. My character above would have a 58% chance of increasing his score with clubs every time he hits. This raises your skill in that weapon by 2% each time, which increases the chance to hit but makes the chance to learn a little lower. It’s a pretty solid system, and I could even see someone building a decent tabletop RPG out of it. Unfortunately, in practice it boils down to typing ATTACK BLACK RAT over and over again until you win or die. The math works, but it’s still a system that doesn’t give the player a lot of options.
I should also note that once you’re on an adventure you can’t look at your stats, and you have no idea how much Hardiness you have left. The combat descriptions give you a general idea of how your character is feeling, but you never know exactly how close you are to dying. It does provide a certain level of uncertainty that I appreciate (and I’ve done similar things when running tabletop D&D), but it would be nice to be able to check how my weapon skills are advancing.
With the black rat dead I scooped up the diamonds, and fought the two remaining rats in the main chamber. Sometimes when a creature fumbles its weapon can break, and in the screen shot below you can see the absurd situation of a giant rat killing itself by breaking its own teeth.
Actually, I’ve smashed a tooth out on the concrete before and
it was bloody awful, so this tracks.
I headed south, into a long passage lined with cells, six in all. In the first one I explored was a human warrior armed with a sword and shield. His shield had a sticker on it that said “Hi! I’m Heinrich!” Sometimes Heinrich will help you out, but once again the random numbers were against me, because Heinrich was hostile. I won the following battle, but by the end I was “knocking on death’s door”, so I drank the healing potion to regain some Hardiness.
In the other cells I found a gorilla guarding some gold pieces, and a mimic disguised as a chest. The gorilla fumbled and broke its weapon, so I was able to kill it without it fighting back. The mimic was disguised, as I said, but there was no way to find that out without first opening the chest. This caused it to grab me with its tentacles, and I had no choice but to fight back. I killed it with my first blow, and found a gold ring hidden beneath its corpse.
Further south I came to an intersection. One path led to a library, where I found a glowing book. I took it with me and left. (You can read the book, but this results in you being transformed into a fish and dying of asphyxiation. A typically arbitrary adventure game death, with no way of figuring out beforehand that this might happen.)
The tunnel east led to a flight of stairs heading down. The tunnel continued east until emerging in a small bay surrounded by cliffs. There was a pirate here, guarding a pile of jewels, and at my approach he muttered a word that caused his ornate sword to blaze with green fire. I probably should have fled at this point, seeing as I was quite badly wounded, but I decided to fight anyway.
Yarr, it be Trollsfire it be.
After the first swing the pirate fled. I took his jewels and pursued him along the tunnel, killing him with my first stroke. Now that he was dead I could claim his magic sword, called Trollsfire. Unfortunately, I used the wrong command when trying to wield the sword. I should have typed READY TROLLSFIRE, but instead I typed WIELD TROLLSFIRE. The game interpreted this as me activating the sword while it was on my person but not in my hand, and burning myself to death. Whoops.
Dumb ways to die,
So many dumb ways to die.
Despite dying I’d covered everything that Beginner’s Cave had to offer, or so I thought. While I was doing some preliminary reading for this post I discovered that there’s a secret passage leading to another area. I promptly stopped reading and sent another character into the cave, and began searching. I found the secret passage in the tunnel just south of the cells, where the walls are described as “very broken and rough”. I suppose that’s a hint, but it doesn’t come across as one when you’re not actually thinking about secret tunnels.
You can go east here without finding the tunnel first. If I’d been using my usual
adventure game method I’d have stumbled across it for sure.
At the end of the passage I found a temple, being presided over by a mad priest of some sort. Also here, presumably as a captive, was Cynthia “Duke Luxom’s not-too bright daughter”. This was the first I was hearing of any of this, but I duly killed the priest and allowed Cynthia to follow me. I also took some rare spices before I left the temple.
“An insane look on his face” covers most of the priests I’ve met.
Whenever you return to town, you sell all of your treasures to Sam Slicker, the local buyer of such things. I also got an extra reward for rescuing Cynthia, which kid of irks me to be honest. If I’d been told about her beforehand I’d have been much more inclined to start searching around for secret tunnels. As it was I thought I was done after killing the pirate, because there was no indication that there was anything else to do. And that’s not even mentioning the apparent set-up of “the Warlord” creating the cave for adventurers to train, which seems an unlikely place for an evil priest to be holding the duke’s daughter captive.
The reward you get for Cynthia is based on your own Charisma, which certainly
says something about how much Duke Luxom value’s his daughter.
I can’t say that this is a great start for Eamon, if I’m being honest. I like the idea of a CRPG with an adventure game parser, and I love the idea of being able to take my characters from adventure to adventure. Beginner’s Cave is a little too simplistic, though. There’s really nothing to do inside it but fight. Sure, there are friendly characters, but you can’t actually interact with them. Either they attack you or they follow you; they don’t react to any of your other actions. I’m also aware that fighting is pretty much all you do in loads of other CRPGs, but that works when the combat has some tactical depth. Eamon doesn’t, at least in its first scenario, and it suffers from that.
I suspect this will change in further adventures, particularly because of Eamon’s spell system. The game has four spells: Blast, Heal, Speed and Power. Blast hits the target with a magic arrow. Heal restores your Hardiness. Speed doubles your Agility for a time. Power is an odd one, in that its effect changes from scenario to scenario. It’s justified in-game as a “call to the gods”. It’s the only spell that’s cheap enough for a starting character to afford, so I bought it and tried to use it in the Beginner’s Cave. When I cast it I heard a sonic boom in the distance, but when I explored I didn’t notice any changes to the dungeon. Casting it in battle didn’t seem to do anything either, although in the final room it caused the rare spices to disappear. I’ll write more about the spell system when I cover The Lair of the Minotaur, because I’ll actually be able to afford some of the spells before going in.
RADNESS INDEX:
Story & Setting: There is a story to Beginner’s Cave, but the game doesn’t clue you in until you stumble upon it. If it had mentioned the duke’s daughter and the evil priest at the beginning it might have scored a little higher here. As for the setting the caves don’t really make a lot of sense. The setup with a warlord maintaining them to train adventurers almost works in a fantasy D&D-logic sort of way, but it’s harder to see how an evil priest got in there, or why it opens into a pirate’s cove. Rating: 1 out of 7.
Characters & Monsters: I appreciate that the game goes to some extra effort to give its shopkeepers personality, even if they are more than a little stereotypical. The monsters don’t offer much in the way of tactical variation, but they make up for that a little bit with some descriptive prose. The characters that you can befriend and fight alongside are a nice touch as well, although genuine interaction with them is very limited. Rating: 2 out of 7.
Aesthetics: This is effectively a text adventure in terms of visuals, with no sound beyond the very occasional beep from the speakers. Still, the descriptions of the rooms and characters are better then those in the vast majority of adventure games on home computers from this era. Rating: 2 out of 7.
Combat: This is among the least complex combat systems I’ve encountered in a CRPG. Possibly the magic system would mitigate this, but it’s pretty much inaccessible in the Beginner’s Cave scenario. Rating: 1 out of 7.
Mechanics: Despite the lack of options in combat, the math behind it is solid, and I do like how your abilities improve through use. The parser works, although it is extremely basic. I never had problems finding the right command in a situation (aside from accidentally killing myself), but that’s because the numbers of commands available are very limited by the standards of parser-based games. Or maybe not. It could be that adventure games of the era are just as limited, but hide it by not giving you the full list of commands available. Either way, I feel like Eamon loses that illusion of flexibility by putting the commands right out in the open. It’s a simple game that does what it does pretty well, but at least in this scenario it’s not trying to do all that much. Rating: 3 out of 7.
Challenge: I only died twice in the half-dozen times I played through this adventure: once when I read the book, and once when I accidentally burned myself to death with Trollsfire. For all the battles I fought in the cave, I never lost one of them, and the game was really rather easy. Of course, that is its intention: it’s a beginner’s dungeon designed to give an Eamon novice some extra experience and a feel for the game. It succeeds at that, but as a game in its own right I’d still say that it rates as trivially easy. Rating: 1 out of 7.
Fun: I like a short game, but this one was too short, and not at all challenging. I didn’t hate it, it’s just inconsequential. Although the secret passage and the unmentioned kidnapping of Cynthia did irk me slightly. Rating: 2 out of 7.
Bonus Points: 2. I’m giving this game both bonus points for its historical significance and the potential it gives for better adventures in the future. I really like what it’s trying to do, it just doesn’t quite get there with its first scenario.
The above categories total 12, which doubled (and given the bonus points) gives a RADNESS Index of 26. That puts it equal 27th, and equal 11th out of 17 CRPGs. It’s equal on points with Moria, which has the opposite problem, in that it’s empty and far too long. Otherwise it’s sitting just below Akalabeth, which was impressive but fundamentally flawed, and above a whole bunch of CRPGs that I didn’t much care for. Right on the dividing line between games I liked and games I didn’t get much enjoyment out of seems about right. I suspect that future scenarios for Eamon will do better.
NEXT: Next on my list is Futurewar which is a PLATO game that seems to be part CRPG and part primitive 3D shooter. I’m tempted to kick it off my list because I just don’t want to get stuck on a months-long mainframe game again, but it does have stats and experience points and levels, so… I guess I have to at least check it out. If I do get into it for any great length of time, I’ll alternate posts between playing Futurewar and progressing through the other games on the list.
source http://reposts.ciathyza.com/game-41-eamon-the-beginners-cave-1979/
0 notes
Text
Make the most out of the latest, greatest apple—the Cosmic Crisp
Even an average Cosmic Crisp looks good enough to be on the cover of "Twilight." (A.A. Newton/)
The apple you see in the photograph above is the result of more than two decades of selective breeding with one goal in mind: sheer perfection. Crisp, juicy, sweet, and tart, with a yearlong shelf life and glorious good looks, the Cosmic Crisp apple aims to be everything to everyone.
And though it may seem to have come out of nowhere, the Cosmic Crisp didn’t magically appear in grocery stores overnight. Its long, winding path to market started more than 30 years ago, and is a fascinating look at how a specialty apple gets made.
Taking on big Red Delicious
For about 50 years, the majority of apples sold in U.S. supermarkets were Red Delicious—but not because they taste especially good. This variety is incredibly durable, able to withstand packing, shipping, and extended storage with nary a bruise or blemish. But their main (and, I would argue, only) selling point is their iconic appearance. That deep, even red color, the dimpled bottom, the lacquered skin—all of it adds up to a product that looks fantastic stacked in a pyramid under fluorescent lights. Nevermind the fruit underneath is mealy and bland—the exterior is cute, and cute sells.
Sacrificing taste for appearance may be on its way out, but the tension between them is still a huge challenge for apple growers eyeing wide distribution. Consumers are no longer content with a pretty apple that tastes like wet cardboard—they expect something delicious, and each stage of the production line threatens deliciousness in different ways.
How to invent a new apple in just 20 short years
If you manage to not eat them all as-is, Cosmic Crisps will beautifully compliment any recipe that includes apples. (A.A. Newton/)
Bruce Barritt, a now-retired horticulturist at the Washington State University Tree Fruit Research and Extension Center in Wenatchee, Washington, figured there had to be something better. He set out to create an apple bred for flavor and long storage, rather than appearance alone—one that could compete with the crispy, flavorful new varieties on the market, such as the Fuji from Japan and the Gala from New Zealand. In 1981, Barritt started lobbying WSU to invest in identifying and developing that apple.
Creating an entirely new hybrid apple variety is an awful lot like breeding dogs: You start with two parents with known traits, then selectively breed for the ones you want over the course of several generations. Since apple trees take four to five years to bear fruit, growing trees that reliably produce the desired apple is a decades-long project.
But before all that, you need to actually create the seed. The Cosmic Crisp as we know it today began its life as a bit of pollen from a Honeycrisp flower, applied by hand to the stigma of an Enterprise. In 1999, after two years of greenhouse germination, the very first Cosmic Crisp trees were planted, and a few years later after that, they bore fruit for the first time.
According to Barritt, this is when the real work began—he walked the orchard rows, randomly picking apples and evaluating them by taking a bite. “Most were terrible, but when I found one with good texture and flavor, I’d pick 10 or 20 of them. Then I put them in cold storage to see how they would hold up after a few months,” he told PopSci in 2018. Once the fruit had been thoroughly evaluated by the rest of his team—How crispy was it? How firm? Did its sugar or acidity levels change during storage?—the whole cycle started all over again. In 2017, a full 20 years after the first seeds went in the ground, prospective growers could finally order trees of their own.
It’s worth mentioning that Barritt and his team didn’t instinctively know that the crisp texture and sweet flavor of the Honeycrisp, combined with the Enterprise’s disease resistance and long storage, would turn out the way it did—they crossed several other crisp varieties before hitting the mark. Taking all that experimentation into account—not to mention Barritt’s retirement in 2008, when WSU horticulture professor Kate Evans took over the project—that 20-year turnaround suddenly sounds pretty reasonable.
For once, the hype is real
Leave a regular apple in open air for an hour and you'll see how the flesh starts to brown. It took the Cosmic Crisp two and a half hours in a high-temperature oven to get to that point. (A.A. Newton/)
Whenever this much time and money are spent selling something (WSU has allotted $10 million over four years for this project’s marketing budget alone), it’s reasonable to wonder if the product actually matches the expectations.
But when it comes to the Cosmic Crisp—yes, yes it does.
I know my apples, and this is one of the best all-rounder varieties I’ve ever tasted. (If I hadn’t needed to save some for recipe testing, I would have eaten them all by myself.) They’re almost impossibly crispy, with a sweet, strong, fruity flavor that’s tempered by lots of acidity. Cut slices take what feels like hours to turn brown, making them an excellent variety to take to the oven.
To be honest, I’m not huge on baked or cooked apples, but the strong flavor of the Cosmic Crisp and its incredible resistance to oxidation made me think they’d be a great addition to savory meat dishes. So I sliced one up and roasted it alongside a chicken for about 3 ½ hours at a very low temperature. And boy, it did not disappoint.
I fully expected them to turn to mush after such a long time in the oven, but they held their shape—and somehow got tarter and more complex. (They also took nearly 2 ½ hours to even start to brown, which is insane.) A tender yet surprisingly firm slice of tart apple, completely saturated with salty chicken fat, is downright habit-forming. Should you find yourself with extra Cosmic Crisps, but not enough for a pie, do not hesitate to slice them up and serve them for dinner. You’ll be thrilled with the results.
Slow-roasted chicken with onions and cosmic crisps
It doesn't matter what time of day you're seeing this—this is mouthwatering. (A.A. Newton/)
Stats
Time: 20 minutes for prep, 3 ½ hours for cooking
Cost: $20 to $30
Difficulty: easy
Ingredients
2 tablespoons of salt
3 teaspoons of garlic powder
1 teaspoon of cracked black pepper
3 tablespoons of olive oil
1 whole chicken (3 ½ to 4 pounds)
1 large or 2 small red onions, cut into wedges
1 large Cosmic Crisp apple, cut into wedges
Instructions
We're already thinking about dinner. (A.A. Newton/)
<b>Marinate the chicken and preheat the oven.</b> Mix the salt, garlic powder, and black pepper together and rub it all over the chicken, making sure to get plenty of spice mixture in the cavity and under the skin on the breasts. If you have the time, refrigerate the chicken overnight. If not, heat your oven to 300 degrees Fahrenheit.
<b>Coat a sheet pan with olive oil.</b> Make sure you rub some on the chicken. Place the breast side down in the pan.
<b>Scatter the apple and onion wedges around the chicken. </b>
<b>Roast for 1 ½ to 2 hours. </b>Afterward, carefully flip the bird over and stir the apples and onions to evenly coat them with rendered fat.
<b>Cook for another 1 ½ to 2 hours.</b> The breast skin must be crisp and brown, and the legs quite loose in their sockets.
<b>Rest the chicken for at least 20 minutes before carving.</b> Serve with mashed potatoes or crusty bread, plenty of apples and onions, and a drizzle of the juices from the pan.
0 notes
Last Seen Blogs

betweenthings2
Somewhere Betwen Things

thewindigos
The Windigo
alyxisdead
Ceaseless Watchers special little guy

thirstyvampyr
bury me here

beclynn
Untitled