#if you're confused about any steps in the tutorial though I can probably help with that
Text
GShade Installation Guide (Sims 4)
because I am unhinged and hate watching tutorials/reading instructions I wanted to make a quick guide on how I installed gshade! this guide is gonna assume you already removed reshade but if you haven’t yet please go and do that and backup your presets into a folder somewhere!! this is the video I watched for that
Install Gshade from their website >here< and run the .exe
Follow the wizard setup and select the game you want to install gshade on, in this case it’s the Sims 4 (usually in the Origin Games folder).
You will be prompted to input some settings:
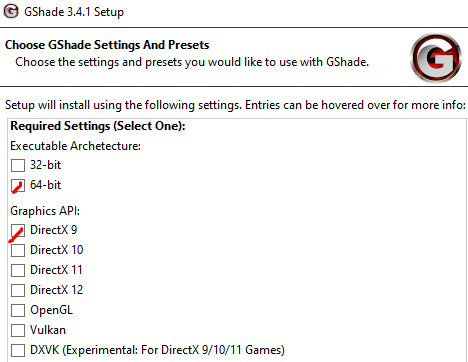
You will then be asked to select a hooking, I selected Normal Mode for this, and my gshade is working fine so I don’t know the benefits of the others ✌️
I left all the other options as is and decided to not use the Final Fantasy presets that come with gshade. But if you want to use them you can.
Open up Gshade Control Panel on your desktop and click ‘TOOLS’. This is how to convert your reshade presets to gshade presets. Launch the converter and select the folder where you stored your presets.
Don’t worry as gshade will create a backup for you, but now the presets in that folder will be gshade compatible.
Move these presets into your game by The Sims 4> Game> Bin> gshade-presets> Custom (If you’re familiar with reshade you will find this easily)
And there you have it you have Gshade! Open up your game and see if it works if not then I have no idea why as this is the exact steps I took sorry! One thing I urge you to do though is after removing reshade open sims to MAKE SURE that you actually did remove it sucessfully, as you don’t want to have both. Gshade so far has been quicker and easier for me to use, it only just lagged a bit the first time I loaded my preset and set it up, but since then it’s been fine. ✌️
- my Ko-Fi btw if anyone wanted to help me out I’d really appreciate it! 😘 mwah!
#tutorials#gshade tutorial#sims 4#the sims 4#btw I am completely computer iliteraite so if you're having troubles I probably can't help you#if you're confused about any steps in the tutorial though I can probably help with that
913 notes
·
View notes
Note
apparently you know redstone? do you have any suggestions for how one can learn redstone better? like should i just speedrun farms until i can do it without a guide or is there a better strategy here
Okay. First of all, I should probably admit that about 95% of my "knows redstone" comes knowing a little bit on a server full of builders and therefore getting the reputation of The Redstoner, and also just me being a giant nerd and being very interested in it in spite of knowing very little. That being said, there are some specific tips I have about how to learn things fast and in a way that sticks!
1. Use tutorials, don't just follow them. By that I mean: when you watch a tutorial for a farm, don't just copy it block for block. Pause after every step and make sure you know what each component does before you place it, and how they all work together to achieve a purpose in that section of the build. Focus on action and reaction, and try to divide the build into pieces to understand it! This will give you a functional farm/door/whatever at the end of the day, but at the same time, you'll be learning common combinations of components that you can put together in a different way later
(some YouTubers are better to watch for this than others. Try to find one who explains what each thing does instead of just placing it down. Once you get a good baseline knowledge, though, filling in the blanks for the ones who explain less is also helpful!)
2. Mess around. Literally just start placing stuff. Redstone is a very spatial thing and a very confusing one in terms of what powers what, so just putting down some components and answering questions about them with trial and error is a good way to get a sense for how that all works! My very first redstone experience was just shooting myself in the knees with dispenser arrows, it's a great time I promise :)
3. Prioritize learning over efficiency. Your first contraptions are (objectively) probably gonna suck. Thankfully, it's your world and your life, so "objective" can take a hike while you joyfully piece together as many spaghetti-like nightmare circuits as your little heart desires! I regularly choose to make my own farms instead of using a tutorial even when I know the output will be worse and it won't be as compact, because the important part to me is that I learn along the way and feel the satisfaction of invention for myself. It's a little bit like art, in a way. Somebody else might be able to do it "better" when you're new, but nobody can do it like you. Embrace that! You'll end up better for it in the end.
I'd apologize for being so wordy, but hey, it's me you asked. :) Now go forth, make cool stuff, and conquer!
#Minecraft#ask#shade rambles#okay in terms of who to watch i know I've found some good ones but i can't remember off the top of my head#but i do have one bit of advice that might be a little bit controversial? and that's uuuuuuh /don't/ watch Mumbo#not for the strategy I'm describing at least#don't get me wrong he's a great guy and his tutorials will get you the thing you need in the end#but i personally haven't found his explanations very helpful for Understanding the thingy#I very much vibe with Zed explanations but he tends toward kinda logic-heavy stuff (in the computing sense)#but then again I've heard the polar opposite from some people so Mumbo might be fine for you who knows#basically just: realize that the same method of teaching doesn't work for everyone and don't attach yourself to the most popular option#and then feel dumb for not understanding when they may just not be speaking your language#if that makes sense#good luck!!
49 notes
·
View notes
Text
Thumbnailing: Subject's Way
Thumbnails are an important workflow tool artists use to make creating their works more efficient. They are essentially tiny, low detail versions of the idea you may have in mind, and save time by helping you catch potential compositional errors, clashing colors in palettes(if you blob some colors on), and poses that simply might not.. work in character art as well as many other things not mentioned.
I am a very visual person and sometimes putting ideas to paper really helps me focus better on the task at hand. Organizing things into steps on the page really helps me not get overwhelmed. It might prove helpful to you as well.
In this tutorial, I'll take you through my workflow process when planning paintings and simple character illustrations.

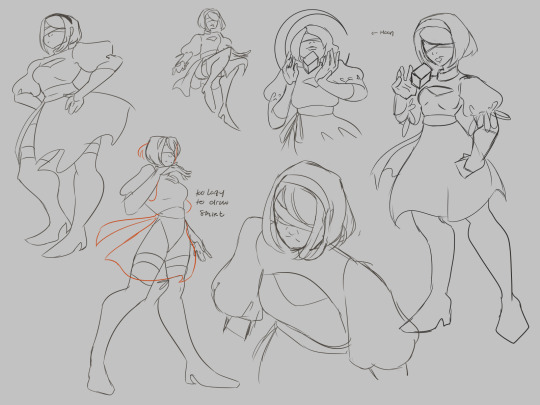
I start off the process by doing a ton of sketches of whatever thing from many angles, poses, etc. Usually if I have a certain image in mine I simply sketch that and adjust little things like angle, placement of limbs, etc. Work teeny tiny, you can enlarge it later. I,t really depends on what the goal is for that piece what the process looks like. Here the goal was to just draw a character, so I have many options.
environment sketches look a bit different for me, as I will sketch them in literal cubes. I am still working through the technique. I just haven't gotten good enough at them yet to consider a tutorial by me would be helpful to anyone though.
Like with piece D, it's good to plan compositional elements here too. I added the moon that would go in the eventual background, swords in the hands of B and E, etc. Had I had more time, F would have gotten rough roses, but I digress.

After I have base sketches, I do very rough lines so I know what I'm looking at, and it primes me for what I could possibly have issues with in doing the final. I keep it VERY loose and don't dwell too much on details. If I'm drawing a character, I'm not even going to look up references, unless their silhouette is very complex. There is not much need for accuracy here. Just to nail down your subject's silhouette.
At this point, you can start eliminating which poses you don't want. Here I was very indecisive so I went through with sketching all of them.
At this step ill also take the time to plan variants if I feel like I would be indecisive about them/need them for certain platforms (optional).

Here's where things start to actually take the form of thumbnails. I work large and draw most of the anatomy of the subject so that things are positioned correctly in the frame. Draw the whole of something, even if you know it's going to get cropped out. There is nothing worse than trying to draw in a way that is already cropped, it messes up your anatomy bad, and you'll spend more time trying to fix it, especially if you are just starting out as an artist.
Physically drawing a box around them to help with framing is really good to help plan the composition of the final piece. Again, you can eliminate stuff here as well if they don't make interesting compositions. Consider the rule of thirds and how much breathing room you want or need in your piece. The one not in a box was eliminated because I didn't like the pose nor would it make a very interesting piece.
I also use different colors on the boxes so I can overlap them and keep my eyes from getting confused where one "drawing" ends and one begins.

If I'm planning portraits/art in my painterly style, I'll take the time to block in some colors just to see what I should shoot for in the final. I will also do several pairings of colors in their own sets of thumbnails if the piece needs it/i want varients. I highly suggest blobbing so that you can see how potential colors will play with one another. Learning the teeniest bit of color theory will help, I promise, but for now, i'lI'lll refrain from the mini-lecture.

these three two (you'll see), I figured would make better cel-shaded/quicker pieces due to how zoomed out they are, any true details I would want to focus on don't exactly work for my current style faraway. Be sure to tailor compositions that suit your style. I will be keeping these sketch ideas for future reference.
It's important to remember that just because an idea doesn't get used in this piece, that doesn't mean it can't be used in a further piece down the road. I actually have a horrible habit of deleting my thumbnails after I'm done with them, but if I'm thumbnailing in a sketchbook? I find myself browsing back over them for future pieces to get some rough ideas of what could work later.
One last thing, you don't have to plan as many thumbnails as I did, but I do suggest at least 3 or 4 to really stretch your creativity.
Thumbnails also make for a good warm-up. If you're curious, I did the initial sketches in this order: A C E D B F. I think it helped me loosen up a bit, but you can be the judge of that.

I went back and tried another approach for a painting, but now I have the base for 3 paintings I could pursue, albeit rough, but it's good to learn how to paint like a sculptor, I digress.
That's all there is to it. the key is being clean enough to get the idea down, but rough enough to save time. work small, using basic shapes to create silhouettes. You can enlarge it later and use it as a base sketch.
Last two cents: I've also learned that sometimes if a piece is just not working, it's probably more than likely a compositional issue, anatomy, or perspective, Which is why thumbnailing can help you catch these issues early.
happy drawing :)
a/n: this is my first time really creating a tutorial. this might not be groundbreaking information for some of you and that's okay. this tutorial was initially created for someone in an art server I'm in on Discord, hence the slide-text-slide format. I have taken the images and text from that and compiled them here to make it easier to pick up the tips. I do not consider myself a pro on any of the things mentioned by any means, merely my take on it all. Get multiple sources, educate yourself, practice, and find what works for you. - Sub
#its not perfect#but i hope it helps#tutorial#composition#digital art#digital illustration#digital painting#reference#art tutorial#art#sketch#thumbnails#illustration#medibang paint#medibangpaint#digital drawing#drawing
21 notes
·
View notes
Last Seen Blogs

bokuroo-remade
remade

you-dont-fuck-with-a-reporter
I'm Carley.

agospei
Valar Morghulis.

karmajanme-blog
KARMA STYLE