#i messed up so bad exporting this and then i did some edits on my phone and messed up exporting it again evn worse
Text
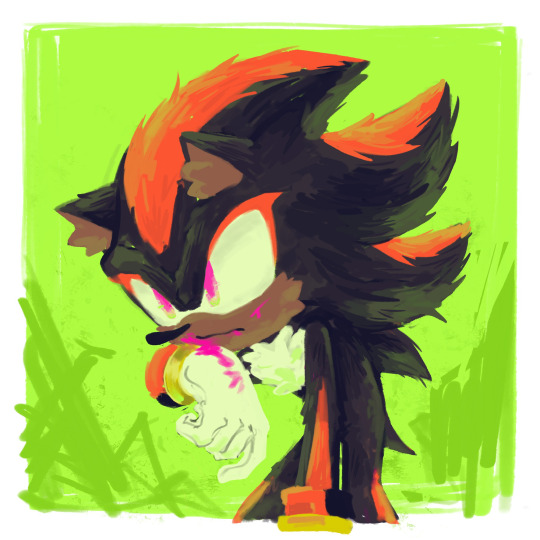
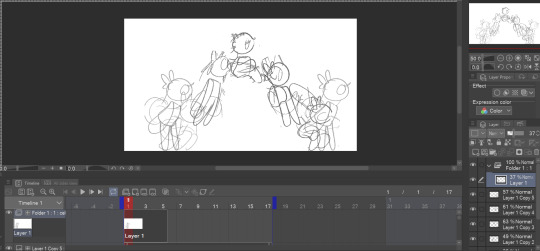
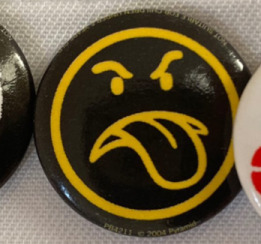
shadow doodle that got out of hand
#my art#shadow#shadow the hedgehog#sth#digital painting#shadow’s so fun to draw cause i can fuck around completely with the colours#it’s fun giving him strange coloured blood#i know the predominant headcanon is giving him greed blood like the black arms#but have you considered neon pink? maybe purple? orange even?#does shadow even bleed canonically who’s to say what colour his blood is#every time i draw him bleeding or the inside of his mouth i’m gonna give him a weird colour from now on#i messed up so bad exporting this and then i did some edits on my phone and messed up exporting it again evn worse#so it’s very blurry and artifact filled lmao#woops ☆〜(ゝ。∂)#know that i drew this and am writing these tags early in the morning and i have not slept in a while#i’m queuing this to post at a reasonable time though lol#blood#blood tw#bright colors#lmk if i should tag anything else
195 notes
·
View notes
Text
tbiny devlog #2
this is a repost of a blog article originally made at near-midnight august 21st, 2023 as i am migrating my blog to a new host. there was only two already written, everything here on out should be new :)
i should have been at work today, but i woke up with a horrible migraine, so instead, i called out and slept in. when i woke up, the migraine was still pretty bad, not in a state to go to work, but i wanted to finish setting up this blog and revamping my website, so i did that. don’t look at my commit history, it’s a mess. don’t migraine & code, kiddies.
today i want to get into a little bit about what the story of this game will be, its inspirations, etc. since it’s an idea i’ve had floating around for awhile, so that’s what we’ll jump into!
many eons ago, i got really interested in the concept of a ghost or spirit that lives in the body of or is otherwise attached to another person. this isn’t a unique idea, of course, it’s been done in a lot of media. the thing that originally drew me to the idea in this case was the Chronicles of Darkness book, Geist: The Sin-Eaters, but a lot of other media i’ve loved over the years has explored similar ideas in different ways, particularly The Blackwell series by Wadjet Eye Games.
i made characters based on this concept, but really wanted to incorporate this idea of the host being the main character, and transgender, and the spirit not knowing how to grapple with that, or something along those lines. in the end i don’t think it works well that way, or at least, is as interesting. i think there’s a lot more room for trans allegory in the spirit being the main character, and being trapped within the body, and having to cope with it being a different body than the one they came from. i want to explore things like gender and mental health through that super cool urban fantasy lens i’ve always grown up being attracted to, and what better way to do it through this story!
so that’s where our story starts. This Body is Not Yours is the working title, i don’t know if that will be the finished title, but that’s what i’m going with for now. you play as a ghost who, in the afterlife, made a deal with a dying person to bring them back to life on the condition that you’re bound to them now. and when you wake up, you don’t immediately remember that, because memories are a little weird when you don’t have a body for a long time. don’t think about it too hard, it’s better for the narrative if you learn these things slowly, i think.
i’ll make it make sense. maybe.
so on to day two of development.
first, i learned some more basics of conditional statements and how to edit sentences partway through using them for quality of reading, basically. i think that will come in handy later.
next, that CSS thing from yesterday was really starting to bug me, and with some caffeine for my migraine and the powers of google, i was able to thankfully find the solution. it turns out i just need to only be exporting the story.js once i have the CSS styling the way i want. oops!
with that in mind, i went ahead and did some more serious CSS styling, so now the game is nice and moody and has an appropriate light and dark theme :) i usually use light theme for everything, because my eyes suck, but i know most people prefer dark theme and it fits the setting, so here’s what it looks like now.

also, i commented out something i want to use later, but left it there so i can use it… later.

i also found out i can use ink’s class defining to define lines that i stitched together through scenes using glue (this all sounds ridiculous if you’re not familiar with ink, but knots, stitches, and glue are all real terms) so i can change the color of what appears to be a single line in the game, even if it’s split into a couple segments in the file. very useful!


this is pretty much it for technical stuff today, i think, the rest is just writing! so… this has been a devlog. tune in next time for god knows what!
1 note
·
View note
Note
OH QUESTION: in clip studio how do you make the tweening squash and stretch like that? I'm pretty new to the animation part of the program so forgive me if it's like, very obvious where it is but Ive never seen a way to squash/stretch a layer like how your animation does, I've only seen how to resize a layer
SURE I CAN DO MY BEST TO HELP!!!
Just know that I am very new to this as well and this something here PROBS has a better way of doing it, but IDK THAT WAY SO. Here's how I did it.
First off I have the big boy clip studio idk if the cheaper one works with this so just know that.
MY BADLY MADE TUTORIAL TIME!
(Will also link video tutorials at the bottom that I used to help me! So if you don't wanna read my ramble explanations just skip to that LOL-)
((Also things will be broken up into like- chapters? as I don't know how much you know and want to help cover some bases that I learned that you or others may not know! But Know I am still learning so feel free to try and do things your own way! :D))
STARTING BASICS
So to start off I use the Project:Animation option in clip for this, there are preset sizes for things, which i suggest using first trying things out. I didn't really mess with anything on the right side sense tbh starting off all you need is on the left, being canvas size and the amount of blank space you want.
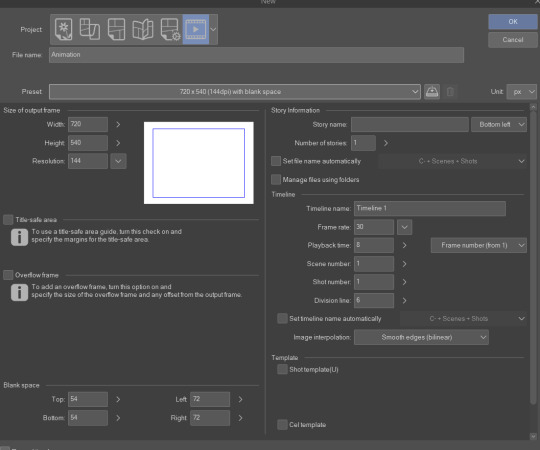
If you don't know what blank space it's like... A little secret place you can scribble down notes for animation to keep in mind, and won't show up in the animation when you're done exporting it.
This is also useful to overflow the things you want to tween as they don't get chopped off awkwardly. See how I drew her skirt and ear going past it? That's why.
So I can move them freely without fear of it ending suddenly! This is something I learned was a good tactic to do for when I did my vtuber models as it is also a type of tweening!
TLDR: Everything in the box will be seen, and everything outside of the box wont!
and if you want to change any of the blank space to add more or less go to Edit>Canvas Properties... It should be near the bottom of the list!
Correcting speed!
Clip studio does NOT actually show you the correct speed of your animation by default! To make it go closer to the actual speed of your animation go to Animation>Playback Settings>Prefer Speed! As by default clip has it set to prefer quality, which is just it trying to keep it looking nice while playing but may skip some frames! So that is something to check!
You can add music to clip studio animations!
Select the frame you'd like to add music onto, go to File>Import>Audio. BUT- make sure the audio file is a WAV file not a MP3. While MP3s work they are more likely to become off sync, while WAV's stay on sync.
Clip doesn't keep transparent backgrounds with gifs idk why but it's cringe.
---
PLACING YOUR TIMELINE
(I closed my brushes and some things to help be less distracting :D )
Personally I like to keep my timeline at the bottom of my screen as it allows the most space.
If for some reason your timeline isn't showing or you accidentally deleted it just go to Window>Timeline and it should appear! You can make it appear on non animation projects as well.
---
ANIMATION FOLDERS
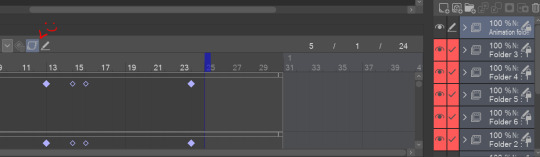
So if you used clip for animating there's a good chance, your timeline may have looked something like this.

Which, isn't bad. But it's not great. (I know because I did it like this until yesterday BUT GOOD NEWS, YOU NO LONGER NEED TO DO THIS STAIRWAY TO HEAVEN. (tbh it feels more like hell but w/e)
BECAUSE WE HAVE ANIMATION FOLDERS.
Now while this just sounds like a normal folder, it's very specific and will allow you do edit things with tweens! But it can also let you turn that stairway to heaven into a hallway!
Like say you want to do a simple jumping gif?
Put all of the separate layers into the animation folder! it'll show you only the first layer at first, don't worry that's normal.

Right Click next to the Layer 1, and select the layer name of the frame you'd like to add next! And continue until all your frames are down! And

*pretend this is a gif*
Congrats!!! You did it!!! You have a little animation!!!! You did it!!!
---
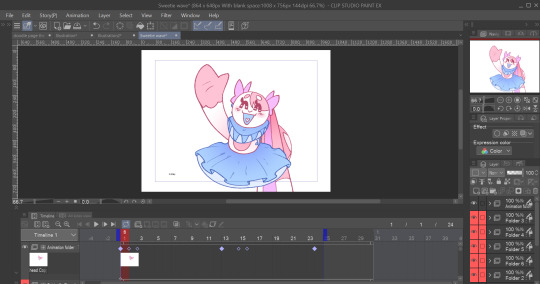
TWEENING/KEYFRAMES
(Im going to be using the Sweet Pea waving as my example here!. And to note after i drew her body parts separately, I copied it, and merged the the limbs with the lineart to their colors to make the process easier.)
So. You know how I just showed you how to put things together in animation folders? We're not doing that anymore, Unless you want 2 things to move the exact same way.
Instead your going to put each moving part into it's own animation folder.
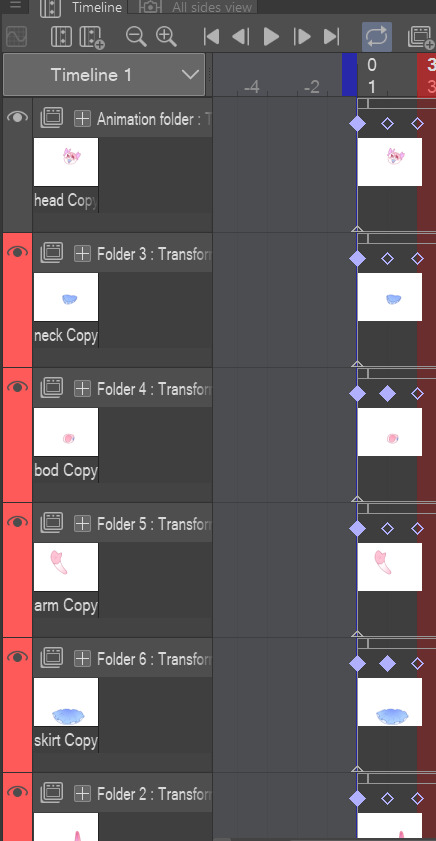
Have everything in? Good. Now what your gonna do is on the right where the layers are select them. Then you are going to press this button that looks like a zooming square.
This will allow you to add keyframes onto the layer. Note. You will not be able to draw on those layers with this on so if there is something you want to fix, you can turn it off the same way you turned it on.
There are 3 types of keyframes, yellow - hold, green - linear, and Blue - smooth. I only used blue here so that's all I'll be going over with. TLDR it does what it says, it keeps the animation from key 1 to 2 smooth.
And with keyframes this is where your going to be able to squish and move things freely and how you move things is you'll click this.

and from there I suggest moving your anchor point (the crosshair) to the base (say I'm trying to move her head so I would place the crosshair where her neck is as that's where it would be anchored to the body!)
And Im going to assume you know how to place keypoints. but if you don't click on the timeline and move the head to where you would want it to be at that time, and it will appear automatically!
And once you have those down NOW you can get to the squash and stretch!

These red and green lines will be pretty much how you handle everything! They're how you can edit your keypoints by changing position, scale ratio, ect!
if you want to focus on one thing you can click the XYV to remove that color of lines, or click the eyes to view only certain types of movements!
and youll really want to just play around with slightly tilting and moving the keyframes here to try and get the tween motion you want! It's a bit tricky So i suggest starting small!!!
---
ENDING
and yeah thats pretty much it! (also tumblr wont allow me to post more image references so- hard for me to get into too much detail but hoped this helped!!! If something I said doesn't make sense or you need more detail on please ask! I'm always open to helping people out when I can!)
There are alot of resources out there to help you out and I'm happy you let me be one of them! :] Good luck!!!
AND AS PROMISED HERE ARE 2 VIDEOS I USED THAT HELPED ME OUT ALOT (and pretty much said everything I said here) but I'm a step by step learner so- this is how I explain things LOL-)
(x) - this video has some swearing but is very funny and useful!
(x) - light but straight forward!
#tutorial#uncle helps#clip studio#animation#im sorry im autistic so i write alot when i really couldve just given you the videos LOL
45 notes
·
View notes
Photo
Finally got the horrid bone assignment/clipping mess cleaned up. It resulted from conflicting directions and/or assumptions. I’m doing this outfit nearly completely in Blender and I had to use the geom tool’s to renumber the vertices (it wouldn’t export w/out). When I imported it into TSRW, I thought when the popup comes up about renumbering the verts, I should NOT click ‘yes’ (there are some tutes that say absolutely DO NOT click yet and others say, well yeah do it...) (When I do it the .obj / milkshape method, I always click yes to renumber because of one of the aforementioned tutes that say to do it)
Because of my “bad assumption”, I did NOT do it and the mesh went BLUURRRRP. Then while struggling to fix the “clipping” (and driving myself to tears/distraction) I made “mistake” and clicked “yes”.... And poof. Fixed. :facepalm:
ANYWAY....
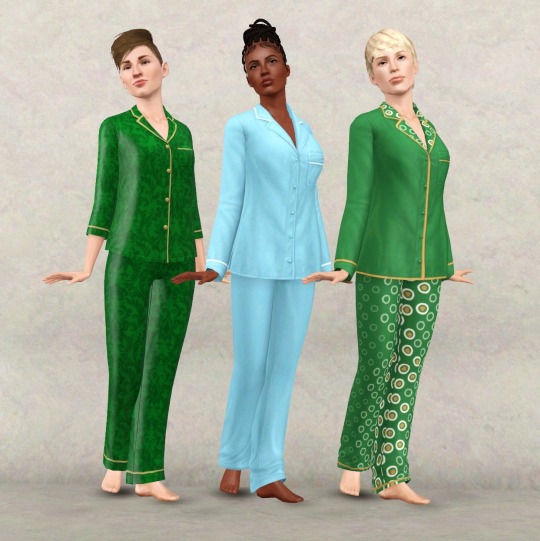
So this is for Malory’s sleepwear outfit. And YES, I KNOW. There is already a silk pajama store outfit - being modeled on the left by Valerie. (And no, I didn’t user that store item as the basis for this item.
Mine has longer sleves, longer top, bigger collar, more drape-y pants, and you can’t see in this pic, but in the previous pics you might have noted the side vents on the top. And also less “plastic-y” and more detailing.
SO - center, Isaro is modelling the “canon” preset. This matches the detailing of the pjs in the show. The piping is only on the shirt cuffs, pocket and top collar.
Somer, on the right, is modeling the “alternate” preset that has more piping. Both version have the top, collar and pants as different colorable areas.
Now to do the age conversions. And “maybe” separate top/bottom.. But tomorrow.
EDIT: Forgot to mention, this one is called “Secrets and Silk” (it’s the title Malory proposed for her memoires in the show).
19 notes
·
View notes
Text
owen harper’s badges
i was struggling looking for places to get owen’s badges (and just find out what the badges actually were tbh) so now that i have finished im gna share my knowledge with u all
if i missed any lmk and ill add them<33
lets start off easy dkjfh
red che guevara badge

this is a pretty common find
very easy to find ; ‘che guevara badge’ in ebay or etsy would do the trick
here is one: Che Guevara BUTTON PIN BADGE 25mm 1 INCH Political Student Cuba Face Revolution | eBay
uk subs badge


i love this band i will not lie 10/10 recommend
the photos we have of this are unclear - the badge looks mottled, like it could be khaki coloured in some photos, but there are no signs of badges like this online, so we could say its one of the more common black badges, but vintage, and has been weathered with time ? which honestly it looks more black in some shots than green
looking at different listings it does look like they fade to be greeny but i do not know
i dont have anything else to suggest so im going to blame it on weird lighting in the hub and move on
the plain black one is a common badge, one of the first things to come up when you type in ‘uk subs badge’ online (here is one for ur convenience UK Subs - Name Button Badge (rockbymail.com))
che guevara pop art badge (srry for lq image)

this one took me a while to find, but thats only because i made a spelling mistake and didnt realise for ages
id say its a pretty common badge, but it is out of stock everywhere- i put my email in on the site though so ill update the post if it comes back in stock (this site- Button, badge CHE GUEVARA - pop art | Tips for original gifts (ukposters.co.uk))
i managed to get one off of ebay, through a one-off auction, i dont imagine itd be too rare for that to happen again so just keep an eye out
manufactured by pyramid international, but is not on their site
8 ball badge
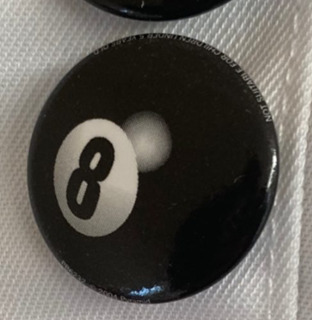
theres a lot of similar badges out there, and getting one slightly different probably wouldnt hurt that much
i managed to find an exact dupe on ebay (id drop the link but i got the last one)
this is a similar one: 8 Ball Pool 1 Inch / 25mm Pin Button Badge Black Snooker Billiards Hustler Fun | eBay
u can characterise it by the artificial reflection spot
crass anarchy and peace badge

to get an exact dupe of this badge would be pretty hard- i cant find a place that makes them with the red like owen’s instead of the black
because of this, im assuming that owen’s badge is a genuine one
if you want an exact one then keep ur eyes peeled on the likes of ebay, depop, etsy, etc one will turn up eventually
if ur lazy then a safe bet is probably just to get one made, or deal with it being a different colour (heres a link to one of those Crass - Anarchy & Peace - Button Badge - 25mm Punk Badges, Fridge Magnet Option | eBay)
john lennon badge
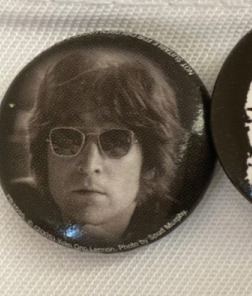
just a badge with john lennon on i found it pretty easily
John Lennon LP Cover badge Official Merchandise | eBay
siouxsie sioux badge

another punk icon i love siouxsie so much
this one took me FOREVER to find and it was so worth it i actually think its sick
this is the site i got mine from;
Siouxsie & the Banshees - Underwear Button Badge (rockbymail.com)
the clash badge
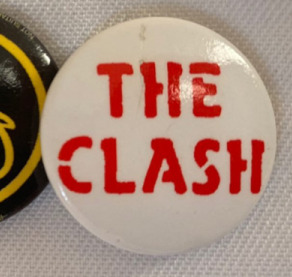
again... adore this band
i got the first one i saw on ebay, from this seller: THE CLASH Button Badge UK Punk Rock Band - London Calling, Combat Rock 25mm Pin | eBay, there is one left and i cant find another (red) for sale at the moment
there are a lot of similar looking badges out there, namely the same badge but with black text instead of red, which would work just fine (THE CLASH Button Badge - UK Punk Rock Band London Calling, Combat Rock 25mm Pin | eBay)
sex pistols im a mess badge


owen has good taste in bands
this one is pretty simple to find!! (was nice to have an easy one for a change)
owens looks to be light brown with blue text in some photos and then just look b+w in others; ur call
heres a link but if you look it up then youre almost guaranteed to find one
sex pistols im a mess | eBay
circle-a badge
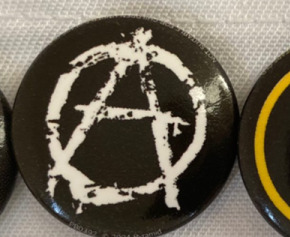
kind of just ur bog standard circle a
if u want the exact badge then heres the link but ngl noones going to tell the difference between it and any other
Punk Rock Anarchy Symbol 25mm Button Badge (thevinylfrontierbarry.com)
i got my eight ball and sex and drugs and rock n roll badge (below) from the same ebay seller and they included a free one, and i love them for it
sex n drugs n rock n roll badge

pretty standard tbh
theres a few on ebay but if u google it then theres loads!!!
you didnt need me to tell u this
here is one: SEx n Drugs N rock n Roll 1 inch 25mm Button Pin Badge Punk Skin | eBay
and here is a holographic one because who does not enjoy a holographic badge SEx n Drugs N rock n Roll 1 inch 25mm Prism Button Pin Badge Punk Skin | eBay
yellow and black tongue stick out badge
this was one that i really had trouble with for some reason like i just could not find an exact match
i found a glittery one which honestly was very exciting for me
if you know where to get this badge pls hmu !!
manic street preachers badge
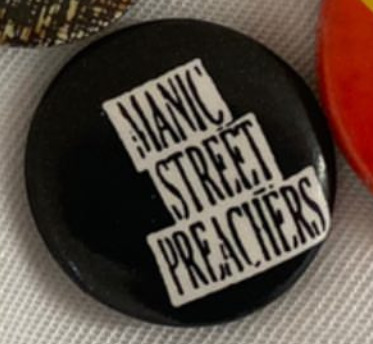
again, this is one i was unable to locate, unfortunately
this one was really bugging me so i made a post in forum to try and locate it, but i still came up empty handed. i think the best bet would be to get one custom made.
the text appears to be the logo on the front of their first studio album, generation terrorists (1992). i recommend btw.
like the last one, if u have any info on where to get one of these then hmu !! ill add it
sex pistols rock n roll swindle badge
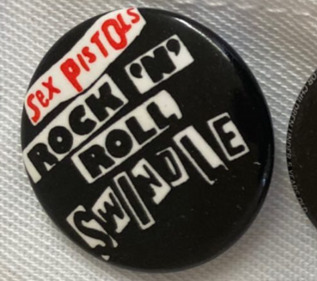
this badge had me confused for a while ngl
for a while i was sure that it was a different band and spent uh. quite a while looking for a badge that matched that description and then i checked my list again and i had a lightbulb moment where i realised that there were two sex pistols badges and id only done one (i may be stupid)
not that this realisation changed much as i still wasnt able to track one down anywhere
i played around in some editing software and made a (pretty bad but shhh) template thingy? which u can use to get ur own badge printed somewhere idk

onto the final badge (thats if i didnt forget one)
go deh badge


original badge manufactured by london based brand better badges (known for being one of the biggest exporters of punk badges in the 70s and 80s)
i cant find a place to recover one of these badges - i can only find two pictures of it online (that arent torchwood screenshots)
your best bet would to be get one made i reckon
i also made a template thingy for this one in case u wanted to get ur own printed. the font i used was futura condensed bold in case u wanted to do ur own (instead of using my ugly little attempt)

bonus: the frankenstein patch
Curse Of Frankenstein Sew On Patch Hammer Horror Film Movie | Etsy
dont think i missed any but in case i did then let me know!!! ill try my best to find them
thank u for reading hope i helped ! <333
when i was identifying some of his badges this post by scarecrowprops on ig really helped (https://www.instagram.com/p/CLuW01IjliB/) nd also this post (https://iant0jones.tumblr.com/post/141100170804/owens-badges-on-his-lab-coat/amp)
7 notes
·
View notes
Photo


RABBIT HOLE RECOLOURS AND RESCRIPTING TUTORIAL
Are you having difficulties getting the outrageously coloured rabbit holes to fit into your moody emo town? Or would you like to make your high street look like a Skittles factory had just exploded? Despair no more! Release your inner MacGyver and DIY!
Programs you need:
S3oc
S3pe
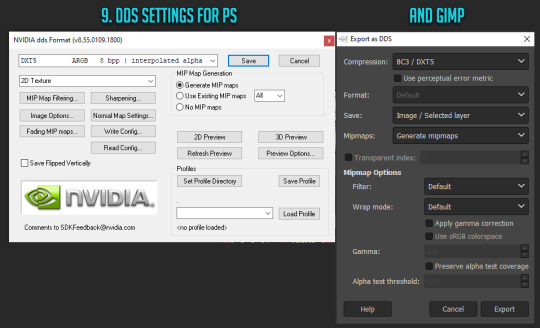
Photoshop or Gimp (DDS plugins for Photoshop -> this and this, Gimp has this feature built in already)
// Disclaimer: This tutorial is picture and text heavy. I hate having to have bazillion different tutorials open because everyone always assumes you know what you are doing and I keep on closing tabs by accident, so this tutorial will run you through each and every step with (far too much) detail because I’m a simpleton and I need both pictures and text when learning new stuff! I have divided this into digestable parts, so you can skip ahead down the tutorial if you are familiar with some of the steps such as cloning. Pictures above are numbered and each step is explained below.
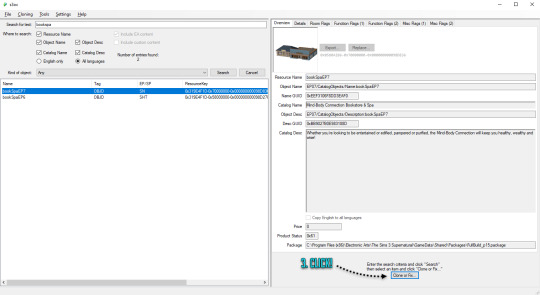
1. CLONING A RABBIT HOLE
1. Open S3oc, click Cloning and Normal objects.
2. Click Tools and Search, type in keywords such as bookspa or hospital. If you still can’t find what you are looking for, then the other option is to just scroll down the list of items and try locating the rabbit hole you need.
3. Once you have found your rabbit hole, click Clone or Fix.
4. Tick all the boxes I have ticked.
5. Edit the Catalog Name and Description, these are the things you see in game when you browse through the items and stuff. If you are not fussed, leave them as is.
6. Change the file name here (Some guides mention changing it, some skip it, but I have changed mine and nothing exploded so far!) and click Start. A window pops up asking where you want to save your package, I usually create separate folders for my projects on my desktop as I don’t want to accidentally mix my .DDS files with other rabbit hole files and stuff, but if chaos is your thing just save wherever.
2. RECOLOURING A RABBIT HOLE
7. Locate your newly created rabbit hole clone .package (You can create a backup copy of it somewhere if you think you will mess up somehow) and open it with S3pe. Look through the IMG tags and find a LOD image like this. Right click and Export to file. If you are organized like I am, you can save it in your project folder with your package file... Or place it wherever because of whatever method of madness you use when editing your files. I’m not your mother. Do whatevs.
8. Now depending on which program you use, open the .DDS file in Gimp or Photoshop, if you get a pop up window just go with default size and no mipmaps. This is the step where you let your creative juices flow and take over. Want to change everything? Or only one colour? Depending on the rabbit hole you have chosen to edit it could be a really simple one click thing fix, or if you picked a more complicated one like I did, you are going to spend some time on this step. I added my before and after picture edits I did in Photoshop as an example.
// Photoshop Tip! I’m not familiar with Gimp, so I’m not sure how well this works in there, but I abuse the hell out of Hue/Saturation and the colour picker in Photoshop to get rid of and edit the colours. Press the little hand icon in the Hue/Saturation pop up box and click the colour you want to change in the image and it picks it for you, then just use the three sliders to change your colours, easy! Be careful though! Sometimes it changes too many areas in one go, so you might have to use marquee tool to isolate the bits you want to edit so rest of the image doesn’t change (While using marquee tool you can press either Shift or Alt at the same time which allows you to add into or remove from your current selection!). Or use masks. Up to you. Then once you have selected the areas, create a new layer and hit the Hue/Saturation button and it will only impact the areas you have selected. Play with layer settings if you end up adding separate colours on top, for example my red paint layer looked best with linear light and 80% opacity.

9. Once you are satisfied with your colours and you have merged your layers, this next step is different with Photoshop and Gimp. With Photoshop you can use Save As option while with Gimp you have to use Export As. Either way, save or export over/replace the image you originally opened using the .DDS settings shown (Please correct me if I’m wrong with Gimp settings as I don’t really use it!). If you have been saving as psd or changing the file’s name, make sure the name is now EXACTLY the same as when you exported it earlier. However, I’d urge you to do backup copies before overwriting the file, in case you have coloured something wrong or if you think you might want to change something after doing a test. Just you know, to save you some hassle if shit hits the fan.
10. Back to S3pe, you will now replace the image you previously exported with the edited one. Click Resources (or right click the IMG file on list you are replacing, both ways work), Import from file and pick the newly edited file, click ok on the prompt. Your old IMG file should be crossed out on the list and new IMG added (Once you save the crossed out one simply disappears). Depending on what kind of edits you did to the LOD IMG, you have to repeat exporting, editing and importing each and every IMG file corresponding to the changes you did with the first one. Be extra careful with matching the colours between the IMG files, otherwise you get some funky rabbit holes when zooming in and out! For example for my rather edit heavy LOD image I had to edit another 5 IMG files all in all in the end (Different wall bits, bit of carpet, window trims, roof!).
3. MAKING IT BASE GAME COMPATIBLE
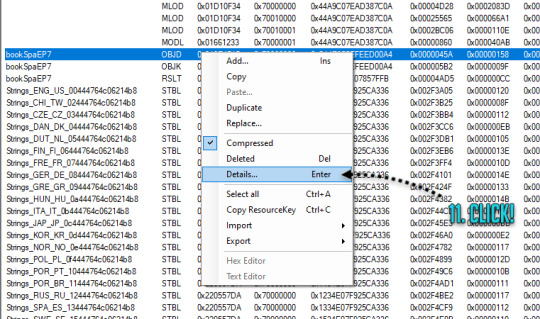
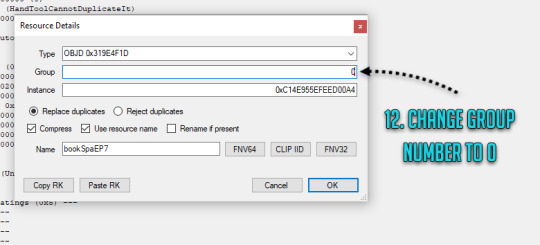
11. Done with your IMG files? Still in S3pe, locate OBJD file on the list, either hit enter or right click for Details.
12. Change the group number from whatever to 0. Save your package.
You are done and your rabbit hole is ready to go in game! Drop it with your other .packages in your Mod folder and test it, in edit and live mode in game. Are some parts of the building still showing old colours or are they changing drastically when you zoom in or out? It’s not the end of the world! You must have forgotten to edit one of the IMG files or the colours are not matching, double check that all the bits you edited in the first image match with rest of the IMG files. Even if you got the colours right there will be a slight chance due to how Sims 3 renders items, so don’t panic unless IT’S REALLY BAD! Just look at how other nonedited Sims 3 stuff renders and compare how yours behaves.
// But wait! Maybe you want to make it a default replacement rather than a new individual rabbit hole like my tutorial does? For default replacements, follow this guide.
4. CHANGING THE RABBIT HOLE SCRIPT (OPTIONAL)
Like the look of your rabbit hole building, but don’t think it looks like a spa or a bookshop? Is it giving you a hospital and science lab vibe instead? Again, no need for anxiety! You can fix it! Sort of. It should work but be wary! If you use lets say the Annex script, you got to have University EP installed to make it work. Without the right expansion, you can’t have special careers. Just keep in mind that some scripts may not work with some buildings due to the specific animations and stuff, so test it before you release your masterpiece in the wild.
13. Open your .package in S3pe, locate OBJK file and right click Edit OBJK.
14. Replace the String bit with one of these scripts from the following list. Commit to changes and save your package. You are done!
Bookstore
Sims3.Gameplay.Objects.RabbitHoles.Bookstore
Business and journalism
Sims3.Gameplay.Objects.RabbitHoles.BusinessAndJournalismRabbitHole
City hall
Sims3.Gameplay.Objects.RabbitHoles.CityHall
Criminal building
Sims3.Gameplay.Objects.RabbitHoles.Hideout
Diner
Sims3.Gameplay.Objects.RabbitHoles.Diner
Grocers
Sims3.Gameplay.Objects.RabbitHoles.Grocery
Hospital
Sims3.Gameplay.Objects.RabbitHoles.Hospital
Mausoleum
Sims3.Gameplay.Objects.RabbitHoles.Mausoleum
Military
Sims3.Gameplay.Objects.RabbitHoles.MilitaryBase
Movie studio
Sims3.Gameplay.Objects.RabbitHoles.MovieSet
Police station
Sims3.Gameplay.Objects.RabbitHoles.PoliceStation
School
Sims3.Gameplay.Objects.RabbitHoles.SchoolRabbitHole
Science
Sims3.Gameplay.Objects.RabbitHoles.ScienceLab
Spa
Sims3.Gameplay.Objects.RabbitHoles.DaySpa
Sports stadium
Sims3.Gameplay.Objects.RabbitHoles.Stadium
Theatre
Sims3.Gameplay.Objects.RabbitHoles.Theatre
Vault Of Antiquity
Sims3.Gameplay.Objects.RabbitHoles.VaultOfAntiquity
Subway
Sims3.Gameplay.Objects.RabbitHoles.Subway
Fortune teller caravan
Sims3.Gameplay.Objects.RabbitHoles.GypsyCaravan
Equestrian center
Sims3.Gameplay.Objects.RabbitHoles.EquestrianCenter
Annex
Sims3.Gameplay.Objects.RabbitHoles.Annex
Hospital & science combo
Sims3.Gameplay.Objects.RabbitHoles.ComboHospitalScienceLab
School & stadium combo
Sims3.Gameplay.Objects.RabbitHoles.ComboSchoolStadium
Book & spa combo
Sims3.Gameplay.Objects.RabbitHoles.ComboBookstoreDaySpa
City hall, police & military combo
Sims3.Gameplay.Objects.RabbitHoles.ComboCityhallPoliceMilitary
Business & bistro combo
Sims3.Gameplay.Objects.RabbitHoles.ComboBusinessRestaurant
And I think that’s it. Let me know if you know a better way or I have made an error in this tutorial! Or if you want to fight me, I will meet you behind the mall by the bins for some asskicking.
#the sims 3#ts3#simblr#ts3 tutorial#ts3 rabbit hole recolour tutorial#ts3 base game compatible tutorial#ts3 cloning tutorial
131 notes
·
View notes
Note
Hello! I was wondering how you made the videos with the faces layered on top and such? I’ve always wanted to make some.
Putting this under a read more because I ended up severely overexplaining (as I do) and i’m not about to remove all this typing I did. Anon I am so sorry if this is ridiculously long and no help at all.
As a disclaimer, this is meant for pc/laptop. Phones can probably do it, but they’re much less capable in general and most editing apps are paid, watermarked, just plain bad, or a mix of those. Also, it’s entirely possible this is a very unnecessarily tiring and inefficient way do do this. This is just how I personally go about it. If this method gives you the ol’ jangle bones (cause it sure does that to me!) and it doesn’t quite feel right of fulfilling then I strongly recommend asking other people on how they do it.
To get started you’ll need a few things beforehand:
✦ A video editor of some kind (I’m using Lightworks; it’s free, unwatermarked, and autosaves your projects if it ever crashes)
✦ A photo editor (I’m using Pixlr E, it’s, again, free, and you don’t need any installation
✦ The video you want to edit characters onto
✦ A render for the charcter with a transparent background
I’m not sure whether or not installing Lightworks has any oddities i need to mention here, but if you (or anyone else) ever gets stuck, don’t hesitate to dm me or shoot me another ask!
First of all, you’re gonna need a good video. Trust me, once you manage to get into The Zone, this is going to be your only obstacle. And it’s an annoying one. Having a source that reliably uploads these kind of “short but sweet” videos (preferably around 30secs long or less) really is half the battle!
Once you’ve got your video chilling somewhere on your pc, you’re going to need a character render (or two) of some kind. Fandom wikias are often good (or at least decent) sources for this. Of course, you’ll need one that has as little covering/touching the character’s face as possible. Once you’ve got your renders, go to Pixlr E, click the blue “open image” button over over on the left get the pic you need n’ open it. After that, it’ll look like this:

Next, you’ll need the crop tool. Go ahead and crop away everything till the face is the main focus.


Once you’ve done that, zoom in and select the cutout tool. Then, select the “draw mask” option and reduce it’s softness all the way down to 0.

Once you have that going, just draw over the character until everything from their chin down is all gone, like this;
And it’s all done! Click “file” in the upper left corner, then “save” to download it. Make sure you save it as a .png file, otherwise the background won’t be transparent. You can just close the tab from here. I recommend taking a break here, get a drink or maybe a snack!
Next, open Lightworks. If it asks you to log in, do so. Take a tutorial if you feel like it. (I strongly recommend watching the “quick start’” video tutorial they have over at the lightworks forums along with some more in-depth ones; for creating simple videos with characters pasted over it, my guide will be all you need, but it might be useful to know how to mess around with audio, crossfades, greenscreen/chromakey, etc.)
Once you’re all free to do what you want, create a new project, give it a name, and set the framerate. (if you don’t know about this one just set it to “auto”)
Now, it’ll look like this:

Go to the bottom left and select “local files”. From there, select the video and your characters’ faces and import them. (tip: holding ctrl or left shift while clicking allows you to select multiple, don’t remember which one it was www)
Once you have everything, go to the “edit” tab.
Make sure the long red stick-thing at the bottom is all the way at 0, then double click your video to open the source viewer and press “b” (or click the button labeled ‘replace.). Once it’s in the bars at the bottom, you can get rid of the source viewer. Then, if your clip is anywhere under 5 minutes, you’ll be stuck with this gaping hole next to it:
Right click the empty void and click “close gap” to solve the issue. This is somewhat necessary, because if you export the video afterwards without the gap closed there’ll just be a black screen for 4 minutes. Make sure you don’t have any tracks hidden, otherwise closing the gap won’t work (though you probably won’t have anything hidden if you didn’t click anyting else).
Alright, now for the most soul-murdering part of the process (after looking for the video, of course): Image Key, a.k.a where we actually put the characters’ faces on top of the video. Go ahead and click “VFX” at the top, and you’ll have a menu like this:
In the effect library to the left, select the “key” category and then double click “Image Key”. You’ll need one of these image key effect for each face you’re using. (Also, you can just minimize the color correction if it’s unfolded, we’re not gonna be messing with it.)
So now, we’ve got this! For the sake of simplicity, you can rename the effects to the characters’ names so you don’t mix them up. Under “choose a file,” select the character faces. If you imported them into your project when you started, they should be easily findable under the “Project” tab. Right now, the characters will be in the center, right under one another. You can move the characters by either using the “Position” sliders on the left or by clicking and dragging them with your mouse in the actual video. For the most part, we’ll be doing the latter, but because the faces are stuck under one another in the exact center, you move both of them at the same time. To fix this, move one face away from the other using the slider one time.
Okay, moving on! This part is important not to skip. Notice the little timer-like icons to the left of the sliders? If you hover over them, it says “Enable/disable keyframes for this parameter.” Click them for every slider under “scale” and “position”. Now, we can start keyframing it; keyframing basically tells the image where it needs to be, when it needs to be in that location, how big, etc. For us, this means that we can make faces move along very fluidly with the video.
By now, we’ve made quite a bit of progress! I recommend taking another break before this to avoid feeling tired. Green tea helps! Once you’ve done that, go ahead and click “Graphs”. Since you enabled the keyframes, your effect should show up with, lo and behold, some graphs to go with ‘em:
I personally work by keyframing one face at a time. To do this undisturbed, I disable the little green light that says “toggle bypass” when you hover over it for the face i’m not going to be keyframing. It hides that face temporarily until i put it back on again. To decide what face i’ll be keyframing first, I just look at whatever face appears in the video first. Once you have the face that appears first, make absolutely positively sure the red bar is at zero to be able to set where and how the image starts out. Then, drag the face onto the poor human soul whose face we’ll be replacing today. Go back to the “settings” tab and slide with the “Scale: Master” until the character’s face is big or small enough for your liking. Then, if the person we want the second character to portray is not on-screen, we click the green (now gray) lamp on the unused face and drag it off: depending on your video format, either to the black on the side (which we’ll crop off when we’re done) or just off-screen if your video is fullscreen. If the person is on-screen, just drag the face on top of that person and adjust size like we did with the first face. These will be the locations the characters start on. Switch the green light back off for your second character, and move back to Graphs.
This is where the “””””fun””””” begins. So, right now, you have your red bar at 0, and you have your character where you want it. We need to move the character’s face frame-by-frame. Luckily, there’s an easier way to move frames: with your arrow keys. Every press with your left or right arrow key moves the video one frame into that direction. Now remember what i said about using your mouse to drag the images where they need to be? It comes in really handy here. Press your right arrow key thrice to move 3 frames ahead, and then drag the image to wherever the face is on that frame. Lightworks will automatically fill in where the image needs to be on the frames in between those frames so you don’t need to precisely move the image on every frame (though this might be helpful on shorther videos or videos where there is very fast movement.) Do this repeatedly until the video ends or the character disappears off-screen. Every 3-4 or so frames. For the remainder of the video. Entertaining. Very, very entertaining. (In short, it’s just: press arrow keys thrice > reposition image > repeat.)
Adding to this, sometimes the characters go off screen and then come back, but the faces move gradually to the spot leading to them appearing too soon. (sounds incredibly vague, I know, but you’ll know what it means when it happens.) To fix this, you need to go into the graphs labeled “position”. It’ll look something like this:

What you need to do here is click somewhere above or below the diagonal line in the middle to move your red line there. Press the arrow with the vertical line to the left to move to the previous keyframe. Copy the numbers that are to the left of the graph, press the arrow with the vertical line to the right, nudge one frame back with your left arrow key, paste the value you just copied over the one that’s already there and then press enter or the plus. That should fix it.
Okay. You have now keyframed all of the faces. It’s all done. Take a break here. I don’t care how determined you are right now. you Gotta. You Just Gotta. get some water, you deserve it.
After getting your water, go back to the “edit” tab at the top, right click your video and select export. Select the format, give it a name, and huzzah! Finally. Unless you have a video format with black edges, then it’ll look somewhat like this. To crop those sides off, we’re going over to Kapwing to crop it off. (You need to register (free) to remove the watermark, and i’m pretty sure Lightworks can also do it, but I haven’t found that option yet and I’m too stubborn to) Once you’re done with that, download it, delete the old version and you’re really done. You deserve a pat on the shoulder now because god fuck if this isn’t one of the most tiring processes to do out of free will (and that times 10 if you’re a slow worker like I am) but honestly making hundreds of people laugh is SO MUCH of a payoff you can’t help but keep wanting to do it wwww
if there’s any more questiong about this or if i forgot something (which i probably did) please shoot me an ask or dm!! all i am physically incapable of doing is simplifying this into less of a wall of text
#not twst#not a meme#ohhhhh my god#ohhhhhhhhhhhhhh#my god#i am never typing again for a week#i need to recharge and i ABSOLUTELY need a nap#i only just finished chapter 2 bc. lazy#i still need to process it#gonna upload the vid i used here in a minute or 2#my brain is just coconut mall mario kart
27 notes
·
View notes
Photo

Fire Flower
Note: I originally made this painting and typed most of the description towards the end of March. I meant to upload this sooner, but things happened it obviously got pushed way back.
Oh gee, would you look at that. It has somehow been 8-9 months since I last made a full acrylic painting... But! I have a video for this one to make up for it! Link: youtu.be/8IgVvgTiZjM
I promise I've been trying (and failing) to come up with ideas to do more with this medium. Acrylic paint just isn't my thing. I swear I said this somewhere before, but I have no idea where; It's just hard for me to commit to an acrylic painting when I know I can get the look I want usually much faster and much more easily with other supplies. Acrylic painting just takes so much more time, set up, and patience. This very painting I know I probably could've had done in half the time using primarily watercolor instead, for example.
So why is this an acrylic painting instead of something quicker and easier? Because my dear Sparklers, I made this painting and filmed it as a bit of a blending demo for a friend. They tried their hand at an acrylic painting with a sky going from red to yellow...except they lost most of the yellow in the process, and even they weren't really sure how it happened. So since I'm in sort of an art teaching/mentoring position to them, I decided I'd pull out my paints and take a shot at a similar look.
Now, to be fair, my end result is very different from their's intentionally. They painted a boat on the water during sunset, I wanted something different and more me, so after some browsing around on Pinterest, I settled on this flower silhouette. I made my own job harder because the reference image had a blue and orange background with lots of black, almost like a vignette, so once I got past the stage of putting the base background colors down, I had a lot more work cut out for myself in trying to replicate that.
Speaking of which, you can see most of my process in the video, but a recap just in case:
I started by picking out my paint colors, and to be fair I could've gotten away with less or slightly different colors, but I got extravagant and picked a total of nine colors from my Liquitex Basics set (also known as currently the only decent acrylic paints I have):
• Mars Black
• Ivory Black
• Titanium White
• Cadmium Red Deep Hue
• Cadmium Red Light Hue
• Portrait Pink
• Naples Yellow Hue
• Cadmium Yellow Medium Hue
• Primary Yellow
Why the two blacks? Mars Black is a "denser" black so to speak, it's more opaque (less transparent/see-through). The Ivory Black is less opaque, and it's a bit warmer in color than the Mars black. I used the Mars black in areas where I wanted a total and complete black and the Ivory black where I wanted some of the colors from the background to leak through a bit. It's subtle, more of a "feeling" to the eye than something you can clearly see.
Also, I used the Portrait Pink, which like the name implies is a very pink flesh tone, and the Naples Yellow Hue (think a shade similar to Yellow Ochre...or fancy Mustard if "yellow ochre" doesn't help you visualize) primarily for blending and not so much for the colors themselves. And the Cadmium Red Light Hue is much more of a reddish-orange in person than it is red, which is why I picked it. It's also pretty transparent (yellows and oranges often are in acrylic paints, especially more student grade ones like the Liquitex Basics) so it also got lost in the mix fairly easily and I had to build it up a lot.
In the video, you can definitely see as I start that I do indeed do a lot of back and forth with the paints, blending and layering to my heart's content to try and get the right color balance while also getting a smooth transition. And this goes on for quite a while; the background was definitely the part that took the longest.
Initially, I did sketch in a couple of lines as markers for roughly where I needed certain parts of the gradient to begin and end, and with the paints, I went in and got down the base of red and yellows so I could then start working on marrying the two together. And I have to admit, even I let my yellows get a bit lost/pushed down more so than I would've liked. It's a difficult balance to strike; red is already a strong color that easily overpowers yellow. It's even easier when the yellow and your transition colors are more transparent while the red is more opaque. And even more so when your painting has a vignette feel to it.
But once I finally had something I was comfortable with and blocked in most of the black (which was a pain in the butt to blend out, by the way, as I'm sure is obvious by how much I go back and forth with it in the video, misusing a fluffy watercolor brush as a mop brush to blend), I then took my outline for the silhouette that I'd already prepared on another piece of paper and used a Faber Castell Gelato (first a gray, then later I'd use a black) on the back to be able to transfer it on the canvas by tracing it with a mechanical pencil with the point pushed in. Personally, I really do think the Gelatos are the best method I've tried for making faux-transfer paper. They're soft so they transfer the color without much fuss without making a powder smudge-y mess (like charcoal, chalk, or pastels might), and they're also water-soluble so they play nicely with the wetness of the acrylic paints, especially if you've thinned them with a bit of water.
Then I got the lovely challenge of trying to paint and blend out a nice bright setting sun on top of the blackish mess I'd made. (It actually wasn't that bad; the Titanium White is pretty opaque so once it mixed with the yellow and I got a couple of layers on it really didn't have any problem covering the darkness that it had to.)
After that, I transferred again some of my lines I'd covered up and then got to work on the black silhouette parts. I did have to alter the look slightly because I wasn't quite as careful with lining up the placement of my "transfer paper" that second time and also because the brush had different ideas about how much black should be in some places than I did, but it wasn't too much of a hassle.
And then, of course, the real challenge of blending the black up to meet the silhouettes without completely covering up my sun or messing up my other blending. Although, this also wasn't as tricky as I had thought it would be. Ironically, I think by the time I got this far I was finally starting to get a handle on the acrylics after having been away from them for so long.
Believe it or not, this tiny 4"x6" painting took well over two hours to complete. I had at least two hours of footage that I trimmed down and sped up like four times, and that doesn't include the dry time in between two background layers, the background and the sun, and then the sun and the silhouette. I'd say it was probably closer to 3 and 1/2 hours total, although technically longer because I kept getting interrupted by things and I had to figure out how to set up the camera and everything before I actually started painting.
Once I was done with the painting, I also had to actually edit the thing together, which took many more hours than I bothered to document or care to admit. (P.S. Whoever decided all free video editors that don't come pre-installed on a computer either must have stupidly low export limits and/or super obnoxious watermarks, I hate you.)
Yeah, there's a reason it's been almost a year since I last posted an actual video of me making art... It just takes so long to edit everything together and I also have to make an extra effort to get stuff set up before and after for filming...Like, maybe it would be different if I had the space and resources to have an area where I could just leave everything and have a camera set up that doesn't move, but right now when my space is limited and my phone is my camera it's just so much easier to...well, to not.
At any rate, here's one. One acrylic painting, and one video. A two-for-one special! Sort of! And I think both turned out pretty okay in the end, at least for someone that 1. Doesn't acrylic paint and 2. Doesn't make videos regularly. I call that a win, wouldn't you?
Although, I have a few canvases stockpiled. I really should work on trying to squeeze more acrylic paintings into my art regimen somewhere to use those up, if nothing else...
____
Artwork © me, MysticSparkleWings
____
Where to find me & my artwork:
My Website | Commission Info + Prices | Ko-Fi | dA Print Shop | RedBubble | Twitter | Tumblr | Instagram
2 notes
·
View notes
Text
Keeping Track of Articles
There are two key aspects to grad students accumulating a hoard of literature that helps to design their research project. The first is determining which articles are relevant, and the second is through managing their information. Which databases are best for acquiring sources depends heavily on what field of study you're in, but how to manage them once you've located them is an entirely different matter. So in this post I want to talk about references. Not about the field-dependent information on how to get them, but rather the much more useful and generally applied information on how to keep them, sort them, and track them. While I would suggest keeping a PDF file of every reference you read, it’s completely unnecessary to go through each one to pull citation information every time you need to reference them. You are of course able to do this manually, but why waste precious time and energy when you can use one of the many software options available? I'd like to break down the pros and cons of what I and many others consider the top four reference managers.
All of the top reference managers include a few key functions that are invaluable to the graduate student. Even if you choose not to use one of the ones that I’m suggesting here, definitely take some time to investigate your selection to ensure it has the capabilities you want and need.
◆ Storage space is the first thing you’ll want to check. If there’s a limit on anything, whether it’s the total number of references you can have or the number of folders you can sort references into, don’t pick that option! I assure you, there are few things as frustrating to a graduate student as having to move references between different managers at any point. It turns into a waste of time more than anything else, and really shouldn’t be necessary. While actually moving the references might not be so bad, the real time-suck is learning the intricacies of the other reference manager. Once you get used to one, switching can be a hassle.
◆ Cost is another important factor, and there really is no reason for there to be any cost to you as the graduate student. Of the four options I’m talking about in this post, two are completely free and the other two are free to the user as long as the university has a subscription. If you go with the one your university provides access to, do check first to make sure they aren’t considering or planning to switch to a different provider! Mine did this two years into my PhD studies and as I indicated before, switching was quite the debacle.
Consider how you’ll want to bring references into the manager. Do you want to have to find and type in all the information? Probably not. A lot of reference databases and journal websites include an option to export the citation information, which you can then import into the reference manager. Some reference managers have a preferred style, but sometimes the database or website messes that up. All of them, whether database, journal site, or reference database, allow RIS imports and exports so I just got used to selecting that option regardless. A few reference managers let you search for new references directly in their software, so they can add the citation information that way as well.
◆ Just as you’ll want to get your references into the manager easily, so too you’ll want to consider how to get them out and into any manuscripts you prepare. Ideally, having the manager take care of any formatting or stylistic concerns when it comes to the citations and bibliography would be best, because this lets your focus stay on writing! Fortunately, all of the reference managers I’m discussing have an option to integrate with the most common word processor, Microsoft Word, with some able to integrate with other word processors. Regardless, the basic idea of each is that you install an addon to the word processor that connects to your personal database of references. As you write, you can quickly and easily select which references you want to cite. When you’re done making any edits, simply choose the reference style of APA, MLA, Chicago, or any of the other options and within a minute, the document will have all the citations prepared according to that style. Additionally, a bibliography of all the cited references will be compiled in the chosen style at the end of the document! If you just want the reference list for your whole database, a specific folder, or just a selection, there’s no need to create a giant list of citations in a document using the addon feature, as the reference manager itself provides this as an option.
◆ Lastly, and this really applies to anything you may use to improve your efficiency, but the feel is a huge factor. So definitely, definitely, test them out before you commit! Even a half hour spent on figuring out which reference manager is easiest for you to navigate and use will pay off in the long run. Will you need to access your personal reference database from multiple computers? Go with one that has a browser version. Will you be working offline often? Choose one that has a downloadable software application. Are you working with a team who will need to share references? Make sure your option offers this feature!
There are few differences between the available options for reference managers, so for the most part they're interchangeable. With that having been said, let’s get into some specifics.
First up is the well-known EndNote. Put out by Clarivate Analytics, EndNote offers both a browser and application version to users. It is restricted to a university license, but since you'll be in an academic setting this shouldn't be problematic. As long as you maintain an active status at your school and they have a license agreement with Clarivate, you should be able to access EndNote for free. EndNote allows references to be imported using a few different file types including those in RIS format. For those collaborating with others, EndNote allows you to share all or part of your reference database. And, it also has an addon that integrates with a number of word processors to automate citations.
If your university doesn't have a license with EndNote, it likely has one with ProQuest’s version, the equally popular Refworks. Again, if your school has a license agreement with the company then you’ll be able to access Refworks for free for as long as you’re a student there. Unlike EndNote, Refworks is a browser-only reference manager, so you will definitely need internet access to interact with it. It allows references to be imported through several different file types including RIS format, and it has its own citation addon for integrating with any of several word processors as well. Need or want to share some of your references with collaborators? You can do that too!
But what if your university doesn’t offer one of these options, or you don’t mesh well with whichever one it does offer, never fret! Two equally useful, but completely free options are also out there. Elsevier’s Mendeley and George Mason University-designed Zotero have most of the same features of the other two. Much like EndNote, both Mendeley and Zotero offer users the option of accessing through a browser or downloaded software application. Even though the databases are saved to your own computer, these reference managers still allow shared libraries across different users so collaboration is an option. As expected, you can import and export references using either RIS format or a few other options. And again, both options also have their own respective citation addons to integrate with your word processor of choice.
In graduate school, and especially as a PhD student, you will read countless articles over the years that you may or may not choose to reference when it comes time to write up your dissertation. Rather than try to keep track of them all in your head, or have to reopen each file or dig through stacks of papers when it comes time to building a bibliography, I would strongly suggest using one of these reference managers. Which one you choose is up to you, but I promise, no matter which one you ultimately go with, you won’t regret it!
4 notes
·
View notes
Text
May’s Musical Director’s Commentary
Hey guys! I'm May. You might remember me as "the one who did those nifty chatlogs and the roster page" or "the one who did all the music" or "that one mod who never said anything." Los and Mints agreed to let me write up this "director's commentary" on the music I did for DECK. There's no secret lore tidbits in here or anything, but if you liked my music you might find this an interesting glimpse into the process.
A Note On Sampling
Sampling is the practice of using preexisting audio to make new music. When I talk about what I've sampled here, I'm only going to mention particularly interesting cases. Almost all of the music I've done for DECK features audio from Free Wave Samples, so I figure that's not really worth mentioning except here. It's the other stuff that's interesting. EarthBound was an influence on my decision to pull in a bunch of audio from outside sources. I've always admired that game's use of sampling.
The First Chatlog
The chatlogs have consistently been pretty fun to do. I knew from the start that I didn't want to edit this together by hand, so I wrote a Processing sketch to render the video. It's not the most elegant thing in the world, and adding new features is a massive pain, but it's a lot easier than putting these together any other way. All I have to do is swap out the script and background shader and write a new song and I can just let the program churn away rendering a new video. (Of course, fiddling with the shader until it looks presentable takes so long that it kind of eats into the time savings.)
There's not much to say about this one. The typing sounds were graciously provided by Mints. Those with careful ears might notice the instrument playing the chords in other chatlog songs.
The Second Chatlog
One of the only interesting things about this one: the melody is actually a musical cryptogram! What it spells out is an exercise for the reader. ;) The miscellaneous background sounds are all distorted versions of stuff I recorded myself one day when my film teacher let me wander the halls with a microphone. Film school has its perks.
Rio Hachimitsu's BDA
Doing the first body drop music was pretty intimidating. The body discovery music in Danganronpa has a particular instantly recognizable quality to it. If I wanted to go for that style, I'd have to get it down perfectly. (Otherwise I'd come off as a cheap imitation.) So I decided to be original. After school PSAs would be proud.
The melody here is probably pretty familiar to you all by now. Every BDA has used some variation of this melody because I'm a sucker for leitmotif. The melody itself is a slightly modified version of the Dies Irae. (Yes, I know I'm very pretentious, but being pretentious is fun.) This is also the first instance of what I call the "death rattle." I put that strange scraping sound into every BDA and execution for consistency's sake. You can see it as the moment the soul leaves the deceased's body or the moment the onlookers realize somebody's just died... or something. The really fun part is what it is - it's a bell tree! Yknow, those tinkly whimsical things. It's just been reversed and slowed down and drenched in reverb. It's fun how malleable audio is.
Minnie Minami's EXE
This was fun! Despite being a film student for a while, I've never had to write music to sync up with a video before. (I still haven't - I'm pretty sure the video was edited to match up with the music and not vice versa.) The overall tone of this one was pretty obvious. Of course a ringleader's execution would be accompanied by messed up circus music. Anything else just wouldn't be right. There's not really much else to say about it other than that it includes samples from my toy accordion and slide whistle.
Sampled:
An old recording of Auld Lang Syne
Yasu Kozakura's BDA
The body drop's usage of mirrors really hit me in the art gut, so I figured the BDA jingle should have something to do with mirrors. This is why the melody plays forwards and backwards simultaneously, because mirrors. (Some call that kind of thing a "crab canon.")
My incredibly good and quality cat piano is also in here. A stretched out meow recorded from it forms the basis of the background chord.
NANIKO's EXE
For this one, I gave the video editor three different tracks, one for each "segment" of the execution. I did this as a cop-out because I didn't want to have to try to sync my music up with the video - this way, the editor could mash it all together.
The segment with the mirrors was an exercise in what's called "phase music", where two lines drift out of sync with each other, creating different rhythmic textures over the course of the song. (Piano Phase and Clapping Music, both by Steve Reich, are two classic examples of the form.) For some reason, echoey piano lines phasing in and out of sync feel mirror-y to me. They also form a nice musical callback to the BDA.
Sampled:
Me switching frequencies on the radio
Sayuri Nishi's BDA
Shoutout to Free Wave Samples for having a heartbeat sound. I didn't want to try to make that sound myself with drums.
Kosuke Nakamura's EXE
This execution is significant because it's the first non-video one. Execution art wasn't my department, so I'm not going to speak on how that change affected the artists, but I found it liberating to be able to follow the more general emotional arc of the execution rather than being tethered to the pacing of a video.
When I asked Angela for guidance on where to go musically, we came to the conclusion that the proper genre would be "Tom and Jerry noir." That description alone is why I loved doing music for DECK - where else do you get the opportunity to write something with that as guidance? The most natural interpretation in my view was a song that starts out jazzy and segues into slapstick-esque classical to mirror the transition from the safety of noir to being mauled by a giant robot cat.
Also, the Slack notification sound is in there, since Los suggested a social media notification sound in the background somewhere. (Slack's basically social media for tech dorks, right?)
Sampled:
Slack
Tom and Jerry
The Missing BDAs
Unfortunately, I got preoccupied and neglected to do BDA music for the deaths in Chapter 4. Generally, there's not many interesting things to say about stuff that doesn't exist. The plan was to sample Pomp and Circumstance for Law N... but I didn't. Sorry, Froggy. I didn't have any other plans for this one.
Ukiyo-Maemi's EXE
This one relies so much on sampling it almost makes me feel bad. I got so much mileage out of the clanging percussion and the spooky background sounds that it's basically cheating.
Sampled:
My lovely girlfriend 💕
OFF
Akira Akatsuki's BDA
I was in a very percussion-heavy mood when I wrote this. (Can you tell?) Listening to the FLCL soundtrack had me jonesing for some dramatic cymbals.
Sampled:
Earthbound
Genko Junshu's BDA
Junshu's body was found in the Navigation Station. This called to mind sonar beeps and garbled radio messages and such. This is another one that wouldn't be nearly as interesting without the sampling. Hopefully this is transformative enough to not get me labeled a hack.
Sampled:
Earthbound
Law Kiyuu's EXE
This execution actually freaked me the hell out the first time I read it. Freaked me out for like a week - something about the combination of incredible writing and the subject matter. It honestly felt calculated to scare me specifically.
Anyway, I had a lot of fun with this one. I wanted to write something as unsettling as the execution it was accompanying. The intro is supposed to represent Law thinking he's already dead. Next comes his terror (evoked with the hilariously dissonant Altered scale), and then the final spooky arrhythmic section is supposed to be him being cut apart. (Note that part of the music drifts out of sync with itself to represent Law, uh, going to pieces.) The return of the piano is supposed to evoke the flashback section. That kind of piano sound always sounds spooky and/or sentimental to me.
Not much else to say now that I've dissected (heh) basically all of the decisions I've made for this one. I'm really proud of Law's execution song - it might be my favorite out of all the ones I've done for DECK.
Sampled:
Earthbound
Persona 2: Innocent Sin
The Doug Theme
Death Note
"It's a Long Way to Tipperary"
gamer butt song
Frogbot's EXE
The original plan for this one was start this one off with a hocket-y medley of all the previous body drops and executions. However, it would have been really tedious to export then import all the relevant instruments, so I didn't do that. Instead I remixed the typical BDA theme. It's supposed to convey the shift from FrogBot's reign of despair to the triumph of getting them executed. I realized part of the way through that this segment was far too triumphant given how many people died and the fact that the submarine is about to explode, so then I just ended it by lingering on a diminished chord. I'm not a very subtle person. Frogbot's execution lacks the death rattle 'cause there's no horrifying realization that one of your classmates is dead. (Exercise for the reader: find where I hid the Flintstones theme in this song. Good luck.)
Conclusion
DECK was a lot of fun to work on. I wrote some extremely messy code, made some sick as hell videos, and wrote some pretty baller music. I got to see some wonderful artists do their work, and I got to skim some pretty intense roleplaying. Thank you to everyone who said nice things about my music and to the mods for being really cool dudes. Special thanks to Mints and Los for letting me put this long-winded rant on their blog, and thank you for reading this whole thing.
See you on the flip side, y'all.
2 notes
·
View notes
Text
Clever Little Things — Part One — David Dobrik x Reader

A/N: hey guys so this one’s based off an awesome ask! I’m writing my asks a little slower at this time (and taking sometime away from Datalie until inspo comes back) to ensure better quality. I’m also turning this one into a series. Lemme know if you have any ideas of where you want this story to go. Anywho, thanks for taking the time to read, love ya!!
Masterlist
Summary: You don’t like David, and he plans on changing that.
Anon Asked: Hey !! Love you're writing, nobody ever does my requests so hopefully u can break that pattern :-), can u do a david x reader where it's an enemies to lovers sort of thing, where he's really charming and smug to her and like a huge flirt and she kinda just rolls her eyes and tells him to fuck off (maybe it could be a series??) Thanks !!
——
David fucking Dobrik.
Fuck that guy.
Yeah, you said it. Repeatedly and sometimes out loud. You couldn’t give a fuck about YouTube’s resident golden boy. You have lived in California far too long to be impressed with young, ridiculously wealthy men and their expensive cars. David seemed like a guy who fell face first into a vat of luck and wore humbleness like a cloak, hiding who he was underneath.
You were bound to run into him around Hollywood, your job as a freelance editor had you working with a ton of people in the industry he dominated. You had once preferred working in TV and film, but when a girl named Gabbie reached out to you, getting your info from a colleague, you were yanked into the YouTube world. Gabbie loved your work and had given your name out to all her influencer friends. The calls came rolling in.
Hey, it was a paycheck. These viral sensations actually made bank, and you were getting a more steady source of income from them than you did at any other job you’d worked in the city of angels. It even led to a pretty long contract job at a decent media group. Where you had to attend events and mingle and really learn about the world you were working in. It was mostly good.
But David, he fucking annoyed you. Whether it was hanging all over Instagram models for clout, or holding up the entrance line at a club to take paparazzi around his car, laughing and playing it up to an extreme, he fucking irked you. You had made the mistake of following him on Snapchat, one of his stories accidentally rolling over from a friends; he had two bleach blondes screaming about merch and then the camera flips around to his smug face telling you to swipe up. Yeah. Fucking. Right.
In your mind there were the Paul’s, Ricegum and David Dobrik: the premier fuckboys of YouTube.
So, there is no way you’re actually going to call Jason Nash about becoming his steady editor. You tell Gabbie as much over coffee.
“But, it’s a job, like long term and well paying... and he asked me about editors I knew the last time I saw him. Plus, if you last for a while, you can put that shit on your resume. And he’s great, like the coolest, chillest dude ever,” she’s explaining, trying to win you over. She had told you all about his kids and ex wife, how stressed he was. And that he could pay big money because he was racking in the revenue from his relationship with Trisha Paytas. Still, working for one of the vlog squad basically meant working for David, and you weren’t interested in that at all.
“Yeah, no. I’m sure he is, but the vlog squad? C’mon. Why would I do that to myself when you noped the fuck outta that mess years ago,” you tell her, sipping on your latte.
“Because I’m not an editor, (Y/N). It’s not like you have to hang out with them. You just hang around Jason and edit his shit. It’s not that complicated,” Gabbie says, looking at you like you’re dumb. You roll your eyes at her.
“Maybe I don’t want to be associated with David Dobrik and his loyal servants when their party comes crashing to the ground. You know it’s coming. He’s the next Shane Dawson expose for sure,” you ramble, “Like, Dobrik is the next Jake Paul. At least that’s what I get from his Snapchat’s, does he do anything but try to sell his shitty hoodies? And prank people until they cry?”
“Yeah. He gives people cars all the time.”
“PR move!” You yell, a little too loudly for nine in the morning at a coffee shop. Gabbie jumps a little and brings her hand to her mouth, shushing you. Ignoring her, you continue, “Yeah, it’s sooo genuine, Gabs. ‘Hey guys, I sent my friend to the hospital last week for a poorly thought out, unfunny stunt. This week I’m buying my assistant a car! No motive, no PR team screaming at me from the sidelines. Nope, I’m just a super awesome, humble guy who appreciates the people who obediently follow me around like a puppy so I can make content that’ll have 16 year olds everywhere buying my shitty merch!’ Gimme a break.”
“Holy fuck, I know you’re a cynic, but you have gone full pessimist lately,” Gabbie laughs at your impression, shaking her head. “They aren’t bad people, (Y/N). David isn’t either, he’s just young and rich and a little dumb. And Jason is probably the most down to earth one of them. Just think about it.”
“Ugh, fine. Fine, just no more talk about it. How’s your book coming?”
You change the subject, firm that the phone number she programmed into your phone will never get any use.
——
Then Defy Media goes under and Clevver, the main source of your rent lately, is done. You are out a decent paying job and next months check, you are royally fucked. Staring at the number in your phone, bent over on your couch, your thumb hovers.
You need the job. You want work, being at home with nothing to do all day makes you stir crazy. But all your points listed out about this still stand.
Fuck it.
You type out a quick message to Jason about Gabbie and his need for an editor with a link to your reel. You press send before you can talk yourself out of it. Then, it’s a waiting game. You’re scouring the internet for job postings when you get a message in return.
Hey! I’m so glad you hit me up. I desperately need help and would love to have you as my editor. Your reel is great! Can you meet for coffee in like 2 hours? I’m behind already and we can talk logistics.
You’re shocked. He must be desperate if he’s hiring you sight unseen and already getting you to work. But it’s a saving grace and more than you could of wished for. You’ll get a paycheck sooner and not have to worry about eviction. You let him know that’s fine and arrange a place.
The meeting goes well, Jason is a cool dude who doesn’t seem as wound up as your usual content creators were. You agreed on a wage (like 35% higher than your last gig, fuck yeah) and got to understand Jason’s edit style and post dates.
What didn’t shock you about the job, but you were hoping you could circumvent, was that you would be working closely with Trisha and David, as Jason often traded footage with both of them. And unlike Jason, they both edited their own vlogs because they had either, fewer responsibilities in their lives (Trisha), or were anal about their edit and wanted to do them personally (David). Great, great, great.
A jobs, a job though. You’ve survived working with some shitty people in your time and honestly didn’t think you’d have any problem on your hands.
——
There are problems though.
Yeah... there are a couple.
——
The first is Trisha. Well, she wasn’t a huge problem, but an obstacle. She was super insecure (you knew this going in) and the first time she came over to Jason’s and you were chilling on the couch, finishing up a vlog, things got tense. She knew you were hired, but she hadn’t met you before. You’d introduced yourself and shook the woman’s hands, wearing your usual editor getup of jeans and a giant hoodie, no makeup, hair not really done up but presentable enough for the public and giant headphones, to tune out the world around you.
You think that helped you because Trisha made a comment about how you were at least not trying to look good for Jason. You laughed at that, and looked her straight in the eyes with meaning behind them, and maybe a little intimidating,
“You couldn’t pay me into retirement to sleep with Jason.”
She’s taken a back for a second and you both look over to the man. You say no offense softly as the man shrugs, but don’t apologize or try to take it back. Trisha just snorts and says she likes you, claws retracting and a calmness returning to the room. Jason looks like a bomb’s been defused and ever grateful for you.
Bullet dodged... hopefully.
——
The next problem is David...
He’s actually the rest of the problems you have with your new job.
See, Trisha got over her bullshit pretty quickly and began texting you once a week for specific footage with Jason. She would describe them well and stay on the phone while you found and verified the clip, and then you’d send them to her. No muss, no fuss. She was an editor’s literal dream.
But, David fucking Dobrik was a nightmare.
Constantly texting you about clips from things that weren’t recorded, but he’s “sure they were because Jason was holding his camera like it was recording”, or waking you up in the middle of night to make sure you weren’t using a certain song for a montage or outro because he was going to use it in the next week.
And that was besides the ridiculous amount of times David was reminding you not to post certain things that were gonna premiere on his channel first. Like, yes, it’s fine to tell you. If it makes David feel better that you’re hearing it from him and not Jason, FINE. But to text you every post day, over a dozen times? It was a fucking joke and has been going on through week four of your new job. And you’d had enough. You’d mentioned it to Jason, but he’d just shrugged it off as David being David.
Well, fuck David.
You’d never even met the man in person at this point in time, but he was living up to every one of your terrible expectations. That’s when the 14th text comes in, as you’re exporting Jason’s latest vlog and just leaning back to relax on the older mans couch. That’s also when you snap, hitting the call button on the text and calling the douchebag.
“Hello? (Y/N)? Why are you callin-,” he starts after a few seconds of waiting for it to connect.
“Hey David! Nice talking to you finally and not just reading your utterly demeaning and demanding text messages!” You start in, just letting loose all the irritation he’s caused you over the last month. “Super appreciate the literally DOZENS of messages you leave me on post day, not to mention in the middle of the god damn night the rest of the week. I’m glad you understand what an invalid I am and how the constant texts actually do help me! It’s absolutely not a slight to my four year education and years of experience in my profession. Or the fact that I do heed your words the FIRST time I hear them, because it’s my literal job. A job I have that actually doesn’t revolve around you. Crazy, I know!” Your voice is just dripping with sarcasm at this point. In your brief pause you can hear a soft, amused breath from his end of the call. It doesn’t stop you at all.
“Anyway, I just wanted to call and let you know how productive you’re making me, and thank you! I really don’t know how I would function in my chosen career without your undying, unrelenting, un-asked for guidance. Hope the vlog that just posted meets your standards! Leave a comment if it doesn’t. Just please, please don’t text me about it.”
And you’re slamming the end button before he can respond. You look up and Jason is standing in the entrance way to his living room, jaw dropped. And all he can say after lifting it off the ground is,
“I didn’t know he was texting you in the middle of the night! Yeah... fuck him.”
You’re glad this ends with you both laughing and not you being fired.
——
“Your editor’s got some mega fucking attitude, dude,” is the first thing David says to Jason, picking him up in the Tesla the next day. Jason just starts cackling at that.
“Yeah, whatever. Don’t text her in the middle of the night. Most people’s work schedule doesn’t extend to 3am, Dave. And I thought she had quite a few points. Like, she works for me. And she does in fact know how to skillfully edit my shitty vlogs,” Jason’s laughing this out and is glad to find David just as amused.
“I wasn’t expecting to get ripped a new asshole is all. I was in an Uber to some event and Natalie heard the whole thing,” David replied, kinda sheepishly.
“You’re just butt hurt that there’s someone in this world that doesn’t give a fuck who you are and is willing to talk shit to your face. And that now Natalie and I know someone put you in your place,” the older man retorts, pointing at him accusingly before going on, “I’m not reprimanding her for having enough of you. She’s doing great AND Trisha likes her. Fuck off dude. Just text her less.”
“What do you mean she doesn’t give a fuck who I am?” Of course this is the part of what Jason was saying that David focuses on.
Shaking his head, he explains, “Well, she knows who you are and is absolutely comfortable enough to basically call you a dick within the first month of being my editor. Also, Gabbie told me the first time we talked about her that (Y/N) hates working for the bigger creators on the platform, and that she thinks they’re all materialistic and out of touch assholes. So, you know, I thought she would be a perfect fit for me. I’m basically nobody. But you? There’s no love lost there from the beginning, but she’s obviously professional enough to keep from snapping on your ass for like a month. I don’t know, Dave. What? You want me to force her to care who you are?”
“No! That’s not what I meant. I guess I just figured-“
“Sorry, dude. Not everyone loves our golden boy. But she’s not a mean person. She’s never even mentioned it. This is what Gabs told me forever ago. Either way, she doesn’t have to be blown over by you to be my editor. Right?”
“No, yeah, right. I guess I didn’t think I was bothering her. I’d always hit you up the same amount.”
“Yeah, but we’re friends. She works for me. It’s different,” Jason’s explaining as David nods along, eyes on the road, thinking.
(Y/N) doesn’t like him? Everyone likes him! YouTube world or not, David was charming as shit. It perplexed him, stirring uneasiness in his chest. This was just going to be a challenge in his eyes now.
She doesn’t like him? That’s fine. She will though.
David guar-an-fucking-tees it.
——
David Dobrik sends you an apology Edible Arrangement. The good kind, all chocolate covered fruit.
There’s a card attached that says,
Jason’s last vlog def met my standards, so you obvy don’t need my help. I’ll stop being such a dick.
(See? I didn’t text you.)
-D
It makes you laugh fucking hard.
You find it a little endearing but also, yeah, you deserve an unhealthy Edible Arrangement. He probably has a contact at the fruit company for appeasing all the people he steps on to run his empire. You’re not special, but the thought is at least there. Whatever. He had stopped bombarding you with texts and had been much more polite in general, so you were more than fine with the whole situation now.
You had hoped this was the end of it.
——
It wasn’t.
——
#david dobrik imagine#david dobrik x y/n#david dobrik x reader#david dobrik fluff#david dobrik smut#david dobrik fanfic#david dobrik#vlog squad imagine
97 notes
·
View notes
Text
Smarties Sound 19th/12 Edit
I am so relieved to have completed my final pro tools session for Smarties and having it added to the AVID picture edit for our film.
Andrew, Aaron and Amy were all in today helping me with the sound. we added in slight tapping sounds and buried them low in the mix so we had a noise for when the cookies and cakes were placed in the styrofoam boxes. I moved around the cash register noises a little just to make sure they were synched properly and we found a completely new window shattering sound with the added noise of a swinging bat so you got the idea of the force being used by Dan to break in. I added little subtle noises of footsteps over the glass for dan coming in to help give the idea of the mess off screen and the amount of broken glass which before we only had at the end of the film.
We realized how bad the background buzz still was especially on a section of lines from Catherine so we first put them on a separate track and played around with various forms of equalization but none really felt right. Aaron pointed out that he felt that this section didn’t really blend in with the rest of the audio so to fix it I pulled up the other audio tracks and we went through them to find a better one for this section of dialogue. Luckily we did, we took her LAV mic and I synched it up with the audio.
I had gotten there before everyone else and spend most of that time fine-tuning the larger tracks. I put the atmos in and adjusted the volume over the sections without dialogue to avoid complete silence in the background and then made sure the volume and gain were appropriate for the songs, I keep worrying over whether they are too high or low. Eventually, I had a version completed. I and my colleagues watched through it, again and again, trying to adjust problems in some tracks being too loud or quite and whether or not our equalization effects on the background noises were still too high. we adjusted everything according to our ideas and upon completion, we tried to upload as an AFF file but this didn’t really work as we needed a WAV. I feared in making the AFF file I had deleted all my work over the past few months and became almost paralyzed with fear and disappointment. thankfully our class were incredibly helpful and showed me how to export to WAV properly. with it uploaded and added to AVID I went home for some much-needed rest to get ready for the crit tomorrow, where we would be evaluated on how well we did in our roles.
1 note
·
View note
Text
So You Want To Record a Podfic?
So Les Mis Podfic Week ( @lesmispodficweek ) is coming up in June and in order for us to maximize the amount of amazing podfic for this fandom, I thought I’d make a tutorial for anyone out there who thought about making podfic, but then looked and said “well this is rather terrifying” and ran in the other direction.
I’m here to make recording podfic easy peasy lemon squeezy. Mostly so you can make the amazing authors you’re reading for squee with delight.
This post is going to just be about setting up to record podfic, we’ll handle the mess of actually recording and editing later. (and if you’ve been around the block before, I’ve hidden some trade secrets in here for all interested parties)
So to start out you’re going to need 4 things:
A microphone
A free piece of software called Audacity
A super awesome amazing fanfiction to record
A bunch of big blankets and chairs.
Let’s tackle these one by one below the cut. (and we’ll do a summary at the end)
MICROPHONE
Please, for the love of all that is holy, get a microphone.
If you do one thing for me, it will be going outside (scary, I know) and retrieving a microphone. It can be a:
Beautiful, expensive Blue Snowball or Blue Yeti
A cheap, less than $25CAN microphone from Walmart
That USB Microphone that came with your Xbox or Playstation so you could play Rock Band when you were 9
Hell, at worst, use the microphone on your smartphone.
But please, PLEASE do not use your laptop microphone. It sucks. No matter what computer you have, IT IS THE WORST.
“But Amanda, I sound okay on Skype and Discord, do I really need…”

YES. YES YOU DO.
When you record sound using your laptop microphone… it also picks up all those lovely little sounds happening inside your computer that you can’t hear. And it’s nigh impossible to edit them out. I want to hear you reading, not your computer. So PLEASE get some kind of microphone.
Ideally, you want a microphone that has a USB on one end. That’s going to be the easiest way to do this.
“But Amanda! My microphone has a 3.5mm Headphone jack on the end!”
That’s alright. There should be a microphone port on your laptop next to where you plug in your headphones. If there isn’t, record into an app on your smartphone/tablet and then download it to your computer.
“But Amanda! There’s some port on the end that’s not a USB and it’s not a headphone jack…”
Props to you for finding a fancy professional microphone! But, you’re going to need an adapter. Most music stores sell them.
“But Amanda! Can’t I just use the microphone on my headphones?”
You know, I’ve never actually tried this. If anyone can get it to work, please let me know and I'll link how to do it here. (You might be able to record this way using an app on a smartphone/tablet.)
AUDACITY
So now that I made you go spend money on a microphone, I’m damn well NOT going to make you spend money on software. Enter a free, open-source, lovely program called Audacity. Think of Audacity like the cheap grocery stores of the world. Everything is the same (mostly) as the big, fancy, grocery stores, but you get everything for cheaper because the store doesn’t look pretty.
Audacity looks intimidating and terrifying, but we’re here to help. You can make Audacity your bitch.
But first you need to install it. Or… you need to install two parts of it.
The actual program
A piece of extra software that will let you import and export MP3s (called Lame)
There are a dozen tutorials on how to install this software so I’m just going to link them here:
DOWNLOAD AUDACITY HERE: https://www.audacityteam.org/
DOWNLOAD LAME (the software that lets you use MP3s) HERE: https://lame.buanzo.org/#lamewindl
INSTRUCTIONS TO INSTALL BOTH (for WINDOWS): https://manual.audacityteam.org/man/installing_and_updating_audacity_on_windows.html
INSTRUCTIONS TO INSTALL BOTH (for MAC): https://manual.audacityteam.org/man/installing_and_updating_audacity_on_mac_os_x.html
Note: If you also want to work with WMAs, then you may also need to download another piece of software called FFmpeg. The installation instructions above cover that as well.
Okay, now that you installed those, did you restart your computer? Audacity won’t link up the two pieces of software if you don’t. Go do that and come back.
PICKING A FIC
Look, I know that 60k slow burn, fake dating AU owns a small part of your soul. I get it. I’ve been there.

This is not the fic you want to pick for your first podfic. Trust me when I say pick something short.
One-shots in the 3k-5k range are a good first project. It’ll give you more than enough audio to practice your editing skills, and shouldn’t take you much longer than a couple hours to record.
More importantly, it should edit down to something about 30 min. long, which is an easily listenable length for most people.
“But Amanda! I reaaaaaaalllly like this one fic and…”
Live your dreams, kid. But don’t say I didn’t warn you.
Another thing you have to do is ask the author if you have permission to make a podfic of their work. Some authors don’t like it, and others will be absolutely thrilled. In the case of Les Mis Podfic Week, everyone on the list has granted permission, so you’re good on that front.
BLANKETS AND CHAIRS
Time to get comfy, yo. Put on some PJs. Drag out some pillows. And then box the whole thing in with the best damn blanket barricade fort you’ve ever built.
(has anyone else noticed that Courf just hands Gavroche a gun in this scene? OMG)
And then christen the barricade fort by reciting the recording cardinal rule:
THOU SHALT RECORD GOOD AUDIO.
No amount of editing or fancy software can fix audio that was bad in the first place, so nest yourself into an environment that’s as close to perfect as you can get.
Building a blanket fort is a cheap way to build a (mostly) soundproof space. The blankets are soft and will absorb harsh sounds, but also insulate the space from outside.
You could create a blanket fort one of two ways:
The classic tables, chairs and blankets method
Throwing a comforter over your head while you record
One of these ways looks more like a barricade. Just saying.
If you’re blankets don’t quite reach the ground it’s okay. Just make the side you’re speaking towards longer than the side towards your back (this will also help to ventilate the fort, which will probably get hella warm).
Then climb in your fort, set up your computer and plug in your microphone.
Now sit for a full minute in quiet meditation and just listen.

You’re listening for anything that would interrupt your revolution you would consider loud and annoying while you were making a very important phone call.
Are there windows open? Can you hear the outside world? Close them. We are going to a world of pure imagination, we don’t want the real world.
Is the fan on your computer being unbelievably loud at this, the one time you need it to be quiet? Close some of the things you have open and see if it calms down. If not, move the microphone to the opposite side of your computer from the fan, and pull it as far away from your computer as you can. I like to stick my computer outside the blanket fort and the microphone inside on one of the chairs.
Can you hear other people in the house? Ask them to be quiet while you record, or move to a part of the house where you can’t hear them.
Is the air/heart in your house very loud? Mine is SO LOUD. It’s like a vacuum cleaner, I swear. Turn it off.
Basically, you’re looking to eliminate any sound you have control over.
Now you’re ready to record. We’ll deal with how to do this in another how-to, but some things to consider:
Be very still. Your microphone will pick up you shuffling. Get comfy or pause to shift and then continue reading. You can always cut out the shuffling parts in editing.
Take breaks. Stretch. I like to do this every time there’s a page break.
Bring a drink. Your voice is gonna go wonky with all that chatter. Enjolras is gonna be a word that gets harder and harder to say. Feuilly’s just gonna be hard right from the start.
Watch your microphone cord. If your microphone is handheld, the shifting of the cord as you speak will also be picked up by the microphone.
Consider duct taping handheld microphones to lamps. No, I’m not kidding. Duct tape your microphone to a lamp. Got one of those articulated lamps like in the Pixar logo? Look at that, you’ve basically got a professional microphone stand. AND IT’S ALSO A LAMP.
Don’t read straight into your microphone. Hold it/set it up a couple of inches to the left or right of where you’re speaking towards. This will stop you from popping your P-s and spitting your S-es
NOW LOOK AT YOU!

You’re practically a professional already.
So let’s say the recording cardinal rule together.
Thou shalt record good audio by:
Using a real microphone. NOT YOUR LAPTOP MICROPHONE.
Downloading and installing Audacity. And the extra bit that lets you use MP3s.
Picking a fic to read that’s around 3k.
Building a badass blanket fort and eliminating ambient noise.
If you have any questions or are really stuck on something, you can reach out and message me. Also, if this tutorial was helpful to you, tag me in whatever you make! I want to hear how awesome you sound.
You got this, kid. Now go out there and tell the world’s stories.
(also <3 to @mysunfreckle for helping me format this in a way that was actually readable)
85 notes
·
View notes
Text
A deep dive into my NES toolchain
Status update
I haven’t posted much lately but I’ve been working steadily on the game. With most of the major engine systems in place I’ve been focusing on writing and building out levels.
Months ago I did a full pass on the game in a graph paper notebook and blocked out all of the major areas for the facility. I highlighted key item locations, characters, major plot points, and more or less designed the structure of the game.
Now I am spending most of my time actually building the rooms I designed months ago. Art, story, and gameplay are all starting to come together. To that end, I now have to be very specific with regards to what characters appear in each room, how the rooms connect, what the dialog is for characters and item descriptions, and so on.
A heavy stick
The toolchain I have in place for building levels is really complicated. It requires me to use a mix of Windows and Mac tools on different physical machines. I have one tool for creating the art, another for building level graphics, another (custom) editor for building level collision and entity placement. Then, all of that gets complied into the game code which has to be updated with dialog and any custom code required to make the level do stuff. It’s a bad environment for creative work as making small changes can require a whole round trip through the pipeline.
So, to help the situation, I’ve been using Twine as the main tool for writing the game:

I can treat each in-game room as a passage in a twine story. Passages have connections which match the room connections in the game. I arrange the passages in the Twine editor in a way that mirrors the physical layout of the in-game rooms.
This let’s me write some dialog then run through a sequence of rooms and see if the dialog flows properly. What happens if a player skips a room or visits characters in a different order? Does the dialog still make sense? Does the tone fit?
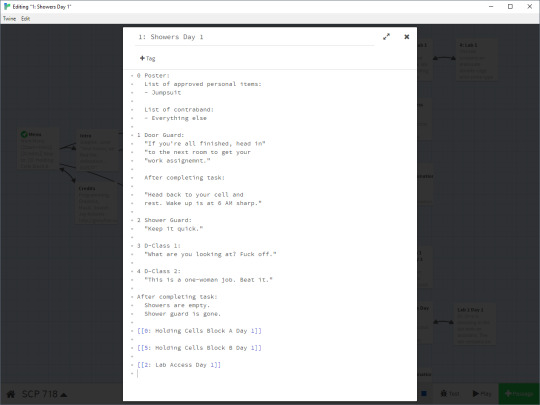
I can write and edit and delete quickly without fear of messing up a bunch of work. Then, when I’m happy with how things feel I can start doing the level layout knowing I shouldn’t need to make many big changes.
Designing level art
Level builds typically start in Aseprite and are really fluid. At this stage things are still really flexible.
This is the initial concept for the Shower level:
I need to make sure that for any given room the choices I make here need to:
Be renderable with a maximum of 13 colors
Use only tiles from one of my tilesets
Any new tiles added here have to fit within the available space of my chosen tileset
When I have something here that is starting to work I usually try to get it in game as soon as possible. Palette colors on the NES can be wonky and inconsistent depending on what is doing the rendering so a choice that looks great using Aseprite’s NES palette might look meh in Fceux and eye-scorching in Nintendulator or real hardware. It’s common to make a lot of round trips at this stage to find a good balance without just using the same palettes everywhere.
Laying out NES background data
The next step is to rebuild the level in NES Screen Tool using tiles from the tileset. This tool generates data which the NES uses to load background graphics which make up the level you walk around in.
Here’s what the Shower level above looks like when built out in NES Screen Tool with some palette adjustments:

You can see the tileset used to build this level on the right. That is the holding_cells tileset. It still has a lot of room for cool new art.
At this stage I will usually do a lot of tweaking to the position of various items in the level. I may add or remove props or inspiration might strike and I’ll create all new sprite art to include in the level.
I will also try lots of palette variations here as it’s very fast to do.
When the level layout is more or less complete, I export a bunch of things:
A .map file for the level which I use when making edits
The background data for the level as a C header file
The updated CHR data for the tileset
The palette for the level as a C header file
A bitmap file of the tileset in case I want to edit it in Aseprite
A bitmap file of the level layout to use as a reference in my custom map editor
(If I could make only one change to my current process it would be to make the above steps scriptable.)
Adding map data
Next I add the level to my SCP project in my custom map editor. I import the bitmap I generated previously and use that as a guide to mark up the level with collision information, NPCs, and triggers for dialog and game events:

That data gets exported into the game as C code which looks like:
The big block at the top defines the type of every tile in the level (e.g. walkable, non-walkable, trigger, exit, etc.).
Some tiles (up to 16) can also have 8 bits of extra metadata. This is used so exits can define where they link to and so triggers can indicate what procedure should run when they are activated.
The spawns define the type and location of entities and pickups in each level.
Finally the level state is 8 bits of persistent data which is kept in memory for every level in the game. The level editor uses this to mark which doors are closed and which are opened but game code can use those bits to keep track of pretty much anything. Those bits can be read even if the player is in a completely different level. Simply put, this allows a switch in one level to open a door in another level.
With just the above done I can load the level in game, walk around, and check the art.
Hooking it up
To get the dialog and triggers working I need to add two files. The first is the dialog definition for the level:

The dialog is all hand-written and is based on the dialog in the Twine passage for the level. Here is where I make sure that each line actually fits in the dialog box. I also add markers for quotes (\x26), line breaks (\x01), and page breaks (\x02).
This is where Twine is such a life-saver. Making changes to dialog in C code with all of the control characters is a giant pain in the ass.
The second file I add contains the scripting for the level:

The details of this are destined for another overly-long technical post. For now, the important thing is this is where we hook up the dialog lines from the previous file to the triggers we defined in the map editor.
This all has to be done by hand because dialog can change based on the game state and activating a dialog will, in some cases, trigger actions to happen in the world. This is the code that ties all of that together.
The result
When you put all of that together you get a finished game level:

It can take several days to go through all of the writing, design, and art for a small simple level like this. Then, the technical buildout and revisions typically take one or two evenings of head-down work.
It is a lot of effort but I’m pleased with the results so far.
If you read all this, wow, thanks for sticking it out. I’m happy to answer any questions you might have.
8 notes
·
View notes
Text
Double Moons - Default Replacement Mod
“One small step for simmers, one giant leap for Murf!“
I’ve always wanted something like this in my game, and my 2018 New Years Resolution is to learn to make new things, so here we are: double moons for y'all to use in whatever world you want! :D
Jupiter and Callisto
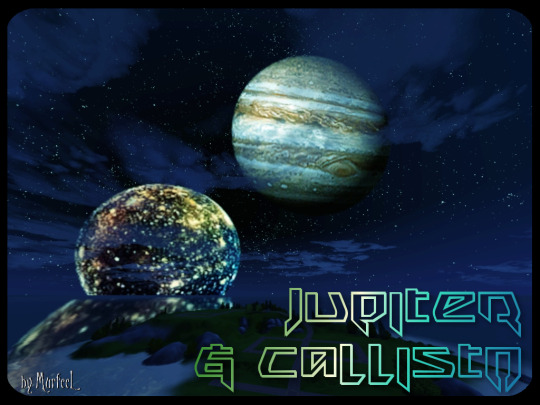
There’s phases included for those of y’all with Supernatural Lunar Phases turned on.
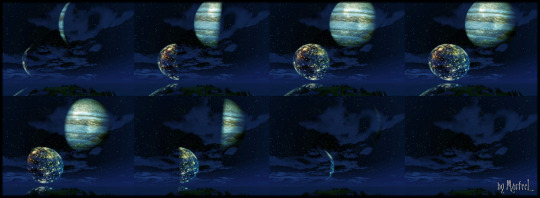
(HD view here)
Included is a 2000 and 4000 size file - the pics show only the 4000, which is effing huge in the sky -- you have zoom all the way out to see it all.
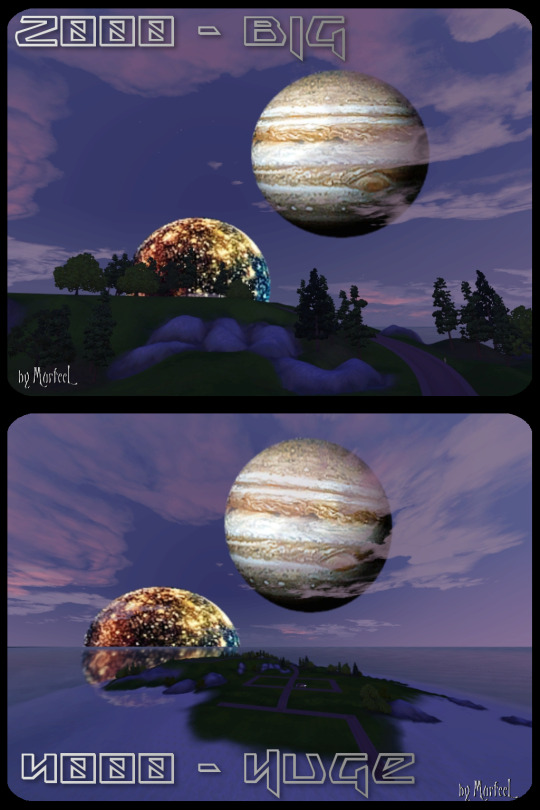
So, yeah, you get choices in case you want it to appear that your worlds closer (4000) or farther away (2000) from the crap in the sky.
Saturn and Iapetus
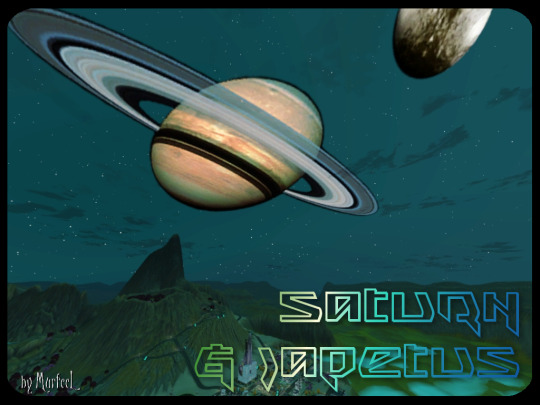
Included again is a 2000 and 4000 size file - the pics show only the 4000 flavor, which is effing huge in the sky -- you have zoom all the way out to see it all.
Here’s the only picture I took of 2000:
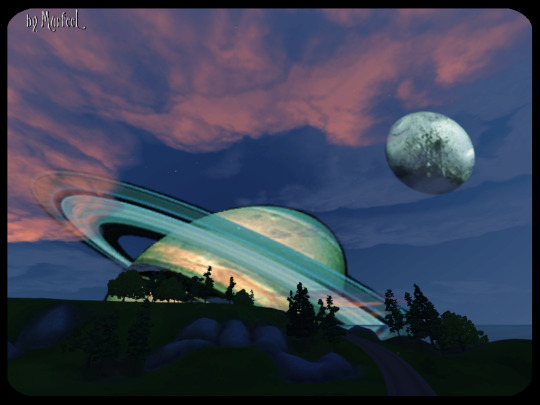
There’s phases included too for those of y’all with Supernatural Lunar Phases.
(HD view here)
For Saturn I converted a Skyrim moon replacement mod - I edited out the Earth from all the phases, and I changed the colors because I’m gaudy like that. Then I added Iapetus because reasons. :P
You only need the Basegame for this mod to work -- though you won’t be able to use any of the lunar phases without the Supernatural EP, just the Full Moon. Which is the best phase anyway, so who cares!
This will conflict with any mod that alters all these files:
YOU CAN ONLY USE ONE FILE AT A TIME.
Download 2000 & 4000-size moons (package files): SimFileShare
Download (beta version) 1000-size moons: https://murfeelee.tumblr.com/post/170633556094/so-murfeelee-asked-if-anyone-had-tried-out-her
And as a little something extra, I decided to make this post double (lol) as....
☽✶•.¸(✶•.¸★¸.•✶´)¸.•✶´☾ ☆«´¨`•°°•´¨`»☆ ☽.¸.•✶(¸.•✶´★`✶•.¸)`✶•.☾
Welcome to Murf’s School of Crap and Crap-Making!
School Motto: Prepare to be tortured! For Science!
Lesson #12: Jumping Over EA’s Moons to Make Your Own!
☽✶•.¸(✶•.¸★¸.•✶´)¸.•✶´☾ ☆«´¨`•°°•´¨`»☆ ☽.¸.•✶(¸.•✶´★`✶•.¸)`✶•.☾
I dunno about y’all, but I have never seen this done before; people making multiple moon replacement mods rather than just one. So I figured I’d walk those interested through the process -- though really it’s barely any different from making the zillion other moon replacement mods already out there.
All you need is S3PE and a .dds texture image program (GIMP/Paint.net/etc).
You can download EA’s moon textures in the MTS thread here.
Ready? Here we go!
So what you do is open up the EA textures in an image program -- on this new godawful Windows 10 Dell laptop I haven’t secured a pirated copy of Photoshop yet, so I’m settling on GIMP for the interim (which in my limited experience has been a piece of crap with DDS files. So I have to use Paint.net in order to make the dds properly, but yeah, I’m using GIMP right now).
So open EA’s textures -- start with the full moon one (especially for y’all without the SN EP).
Though this tutorial only covers making Twin/Double moons, it works for adding however many moons you freaking want.
And it doesn’t even need it to be round/moon-shaped!
Pi in the Sky. Cuz I’m a little snot, that’s why! :P
(If you’re somehow desperate for Pi in the Sky, you can DL the beta version here -- there are no phases included, and it’s pink. Cuz of course. :P)
Size In DDS Layers
The key is to have your image fit inside the limits of EA’s default full moon.

If your image is too big and goes over the moon’s edges, you’ll end up with the BS cropping I initially suffered through:
Again: It doesn’t matter what image you use, as long as it fits within EA’s moon.
My Steps
This is nothing new for y’all familiar with making regular moon replacements. I just wanted to show how I do it in GIMP, cuz alpha channels in GIMP confused THE EFF out of me with all their Floating Anchor BULLSH!TE and I could barely find any help online navigating this nonsense.
I did each of the moons separately, then pasted them together when I was done. So I’m only gonna walk through making one of the moons, not both - same steps y’all.
Start with opening one of EA’s moon phase images, then open your first moon you want to use. Make sure they’re the same size this time. It’ll look like this:

Now Hide the custom moon layer, and go into the Channels tab. Where it says Alpha Channel, right-click it and select Channel to Selection.

The little marching ants dotted lines will move around the image, so you’re good.

Go back to the Layers tab, and this time Hide EA’s moon and Show your custom moon, so you see the marching ants on yours.

Now right-click your custom moon’s Layer and select Add Layer Mask. It’ll give you a bunch of options -- choose Selection.
Wash Rinse Repeat for your second moon, arrange the two of them however you want on the canvas, then Merge the Layers together into one.
And remember -- when you’re done you have to rescale everything so they fit together within the frame of EA’s full moon.
The texture resolution quality is gonna BAIL on you, so you’ll need to use stuff like Sharpen and Contrast, in order to bring back some of the original quality.

It’s a bit tedious cuz you have to do this for every effing phase (7 phases -- the New Moon one stays clear cuz duh).
When you’ve got your phase finished, and you’re ready to save it as a DDS file, there’s an issue. In Photoshop and Paint.net, what you see is what you get when you save a file. DDS files need their dimensions to be multiples of 256 or whatever -- 256x256, 512x512, 1024x768, 2048x2048, etc. Try any other multiples, and things like TSRW will crash on you -- quickly.
So here comes GIMP when you try to save a dds image with a transparent background: rather than just saving the image as it is, GIMP will for whatever reason wrap around the actual image, not the whole canvas. So when you save it, if your image is only 325x418 on a 512x512 canvas, then 325x418's the dimensions GIMP’s gonna save your dds as -- WHICH IS BAD!!!
I have ZERO clue how to fix this issue, so what I’ve done is save the images as a PNG, since GIMP saves them with the transparency and dimensions just fine. Then I open the png in Paint.net, and export it out as a DTX5 dds.
THERE! Boom! The precious time lost scratching my frikkin head over GIMP’s strange way of dealing with Alphas!
Size In-Game
Now as you can see, your finished moons are gonna be however many multiple times smaller than EA’s moon, even if you use 512x512 dimensions rather than EA’s standard 256x256.
You fix this in the SkyCommon.ini file that alters the Moon Radius parameters.
(S3_1F886EAD_00000000_5E20253AF53E517F_Tunable Parameters Related to Sky%%+_INI.ini)
Find EA’s in something like C:\Program Files (x86)\Electronic Arts\The Sims 3\GameData\Shared\NonPackaged\Ini.
Import it right into S3PE, right-click it, and click Notepad, so you can edit it.
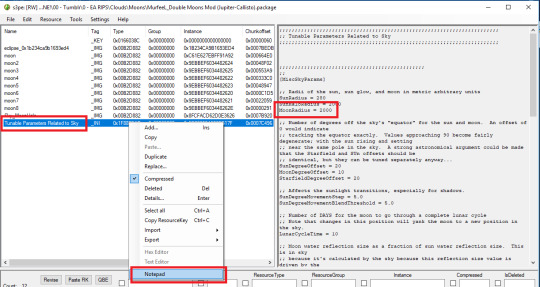
The only thing you need to touch is where it says Moon Radius = 200. Increase the number and the moon looks bigger in-game. Decrease the number and the moon size gets smaller.
If you’re squeezing all these moons into your dds, and you’ve got like 2 moons that are 10x smaller than EA’s moon, then you should increase 200 to 2000 -- that’s my mindset.
Whatever number you choose, when you’re happy click Save and exit out of Notepad, and it’ll ask you “Resource has been updated. Commit changes?“ so click Yes. Then Save your package again.
So that’s the whole size & texture thing. ^_^
The Glow Thing
You‘re gonna have to modify EA’s Moon Glow texture so that it’s perfectly transparent.
(EA’s default one is included in the MTS post here. I included the clear one I modified in the DLs.)

Otherwise you’ll end up with this hot mess:

I tried to do The Most and actually make a real edit of the glow -- but it was actually The Least. U_U
Just freaking get rid of it, whatever.
So yeah, when you’re done, just open up S3PE and Import in all of the .dds textures, plus the .ini. S3PE will then auto-generate a _KEY file for you, just leave it. Save your work as a package file, and that’s it!
Now go forth and do the moon walk! (^0^)/

103 notes
·
View notes
Text
Hjank- Making of
Link to Hjank script and notes
Initially comingnup with Hjank we started by riffing some ideas- Andy had given us a task as a starting point but Charlie and Kit didn't vibe with the task at all and wanted to start compltetly from scratch. After joking around for a while we decided to do a crime drama with a gritty detective and in all honesty I don't know how we came up with the idea of having a goose be the killer, I think Charlie honked at one point and we said we could dress him up as goose and then that evolved to the goose being a killer and ansock puppet because you know, getting a real goose wouldn't work and dressing someone up would be terrifying- this is also how we settled on a sock puppet, we thought that that would be the easiest way to make a goose and it would be the funniest thing to just have a really serious gritty Nordic noir inspired film and just play the goose completely deadpan, like not even acknowledge that he's a goose or a puppet at all and have it as serious as possible. This then posed the issues of what I would write about and how I would make a puppet.
Hjank
Making hjank was at first very difficult, I tried any number of paint and cardboard beak and a whole tube of gorilla glue and went through a fairly large amount of Primark White sports socks but the main success we had was after Jade suggested using food colouring (i hadn't used actual dye as its expensive and there was no guarantee it would've worked with the socks or been the right colour). This the had the issue of consistent colour but I solved that by doing test swatches and then making a bulk batch and I ended up staining most of my bathroom and all of my hands a faint orange for about a week BUT Hjank was born! Albeit he wasn't dry by the day we were shooting but you know my hand was already dyed so you know.
Writing
With writing I did a lot of watching of old noir interview scenes and more modern Nordic noirs and who-done it police shows and wrote out the basic storylines of each and tried to plan out the stereotypical scene between a detective and a criminal- it basically goes “set the scene, establish backstory and relationship, reveal evidence/guilt/admission, reveal of motive (and occasionally revels twist like that he's actually her dad or he's actually got a gun or was just stalling for time or something along those sort of lines)”. Using this template I set about writing out the scene, going step by step writing the bare basic plot and then going back over to add in emotion or edit the interaction or add in a bird related joke and then went back over to add in the different camera angles and editing techniques that I was picturing so that Charlie (cinematographer) could get an idea of what I was going for and Kit (creative producer) could get an idea of what she needed to find props wise and what vibe we were going for.
Needless to say both of them read through half of it and decided it was Good enough so that was fun explaining the plot and directions to them on the day but hey ho!
Shooting
It went really well!
Kit and Charlie turned up late and seeing as Kit had all the bookings me and Nathan set up as best we could and they brought the equipment from the ERC when they arrived and after sorting out some battery issues and generally hanging out and going through the script I decided to kind of get the ball rolling and actually start setting up so everyone would get the message. After we rushed through a bunch of the opening scenes for the montage and got as much of that done as possible (there was a miscommunication at this point about B roll so I did end up having to shoot a bunch at home and colour match it but eh)
After that we realised how late it was and after taking a short break to get more batteries we went into the bulk of the filming. For that it all went pretty smoothly, there was some discrepancies between what charlie thought would be best and what I actually wanted and envisioned for the shots but we compromised a lot so we both got what we wanted and actually for the most part, once he understood what I wanted and he’d set the shot up he really liked what I’d imagined. We’d recorded Hjanks voice as well as the Detectives monologue a couple times too we finsihed up pretty on time.
Editing
Editing was incredibly stressful but that’s on me- I decided to knock all of the editing out in one big sitting and and part way through realised that we hadn’t actually gotten any close ups of the actual pinboard by itself. This meant that I had to actually shoot some close ups of the board itself in my room (luckily I hadn’t taken anything off of it which was great) and then try and colour match in Premiere. I did manage to colour match as best I could, it was my first time actually editing colour in videos so I had to play around a lot but I think I got it as close as I reasonably could. I won’t lie, the beginning montage of the detective's monologue literally took me like 5 maybe 6 hours and the rest of the video took me maybe 2 at max? I don’t know why the first half took me so long, I guess it was probably the filming and colour matching? I also had the music to work with that Charlie made which was insanely good compared to what I was expecting which was great to be able to work with but when there’s music to a montage you want it to work rhythm and pace wise so I guess that added to the time? I also spent a long time trying to make the shadowy ‘4 years’ bit better but decided that there was no point and i was going insane but yeah- after that I had to match the audio files to the right clips which was annoying. I’d edited the whole video before matching the audio files which meant I really had no way of finding the right clips right at the start, I just had to see if it synced so I’ll learn from that next time. I also realised that so much of the audio was so loud, like i’d say 70%+ clipped so badly so I had to bring the volume all the way down and it was just a big mess, like trying to even out the levels between nathan speaking and him yelling was so difficult and because it peaked so badly a lot of the audio quality was lost- there was nothing I think I could’ve done to fix it anymore more than I did and it’s not that bad but I notice it and I know it could be better, so it’s just something I’ll have to keep in mind when Kit records sound next time (like I’ll make sure it very rarely peaks at 6 on the zoom rather than consistently peaks at 6 and I’ll be sure to tell that to whoever is recording the sound). After I synced the audio as best I could and fixed the quality and volume as best I could I made the credits and added the music in at the end which went well but then in putting in the background noises of the cars/siren/street outside (that I recorded from my window earlier) I accidentally wiped out the music so had to go back and do that later. With the background noise I used my old film camera’s buttons and mechanisms to make the recorders sounds and just stuck my arm out my window to get the general sounds for the streets and I think it matches well with the vibe and theme. After I added the music back in and just adjusted all the volume for both the detectives lines and also for Hjanks ADR and watched it through a couple times, added and adjusted little bits here and there and then exported to see what the group thought. They all adored it as it was so I didn’t go back and edit anything and just went to bed and slept off my late night editing session instead.
0 notes
Last Seen Blogs

merchantfinance
Financial Company

buckwild156
Untitled

spokenedition-blog
#SpokenEdition

carwrapsadelide
Untitled
xilienmultiverse-archived
The Infinite Xilien Multiverse!