#hope it's clear that i don't own the above series & these are just screenshots i took for my personal enjoyment. just to state the obvious
Note
yo i’m scavenging tumblr to see just how many blue and yellow gay pairings there are and in the tags of smth u mentioned u have a big list of them,, can i see it 👉👈
hello anon 🌸
first of all, thank you for this ask 💕
you are probably referring to the tags to this post
my first thought went to byler so this is how i found the post again
anyway, you have no idea on what kind of trip you sent me on (the amount of screenshots I had to go through... but that is not your fault but more my own🙈😅) but I'm really happy for going through all these fandom moments again 😄
I would not consider my list "big" but I'm going to list some canon queer couples in bl series (this is just from the ones that I watched so far since i started 4 months ago) that did not pass me by unnoticed when it came to blue and yellow (either in lighting, surroundings, clothes, objects, etc) and there are also going to be some short honorable mentions of other color couple who got yellow-blue moments.
Okay, I hope you're ready!
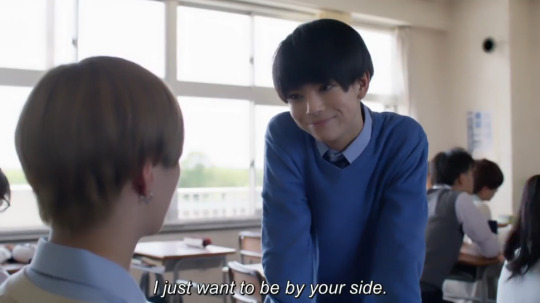
1) Cake & Seeiw - My Only 12%
aka the obsession that will not leave me and I will not let go of anytime soon
(and rightfully so. If you're like me a fan of slow(!)-burn, childhood best friends to lovers with good acting and a down-to earth story, then tada, this might be the series for you)


they are also shown wearing different colors* but Seeiw in the yellow hue variations** and Cake in the blue hue variations** has probably at least a 12% chance of happening during a scene😉
*(like school/college uniforms for ex., but even there -> look at their backpacks in the right picture below this)
**(tint, shade, tone) (if someone wants to know more about that you know where to find me. or google might help you too)

also look at this part from the title sequence:

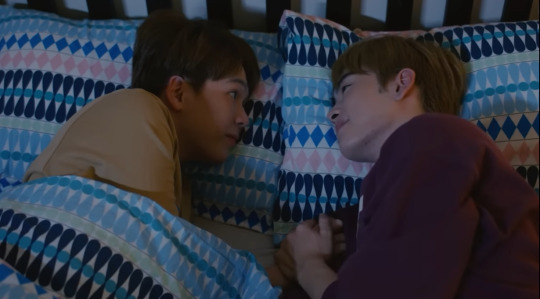
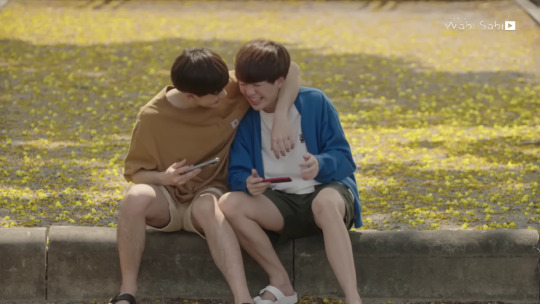
2) Takara & Amagi - Takara-kun to Amagi-kun
aka the cutest japanese bl series imo
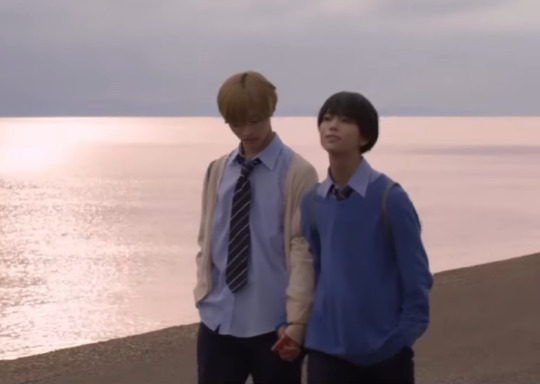
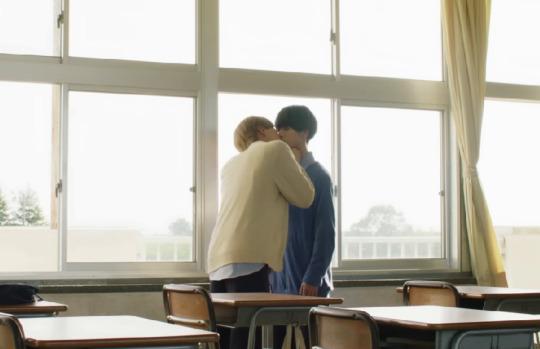
I got actually so used to them wearing their blue and yellow sweaters that it was actually more noticeable when they were not wearing them
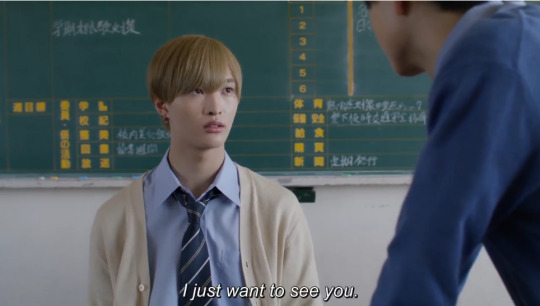
3) Aoki & Ida - Kieta Hatsukoi
aka my first bl love

Aoki is associated with the yellow heart while Ida is associated with the blue one


ah yellow and blue hues my beloveds
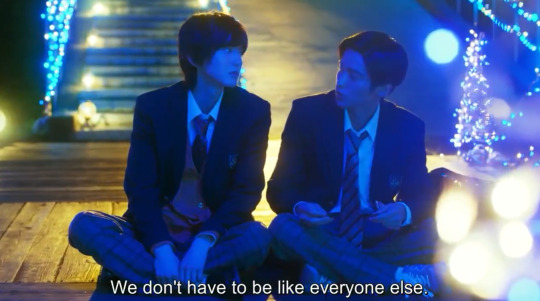
also the lighting in this pic !
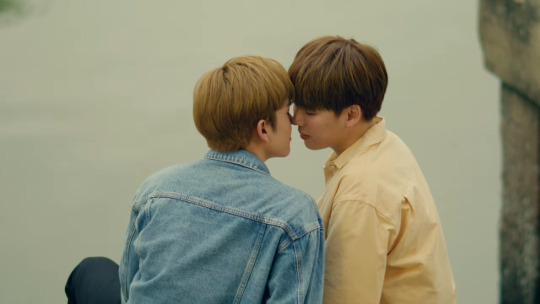
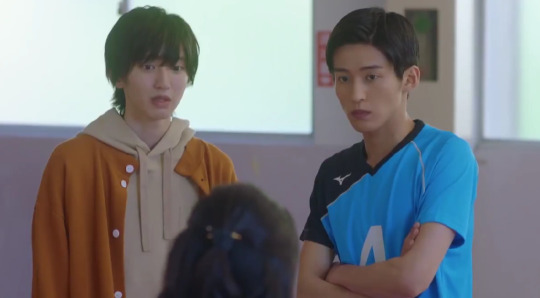
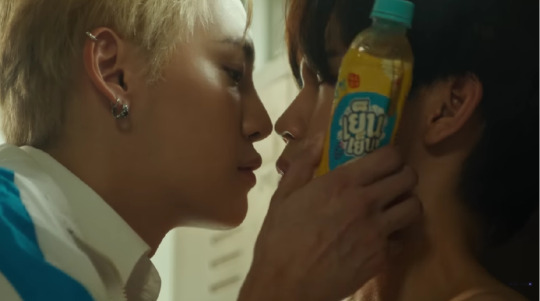
4) Sun & Ozone - 7 Project Ep.1: Would You Be My Love
aka where my current blog title is from

(1) if you are wondering: yes, these are the same actors as in 1)
(2) like you can read from the title the characters appear in just 1 episode together, so there really is just this to work with
(3) this quote takes me out, especially when I think about their names in colors with the color "sun" (or in this case I chose "radiant sun" but you probably get the drill) being a yellow hue variation and the color "ozone" a blue hue variation (as a blue-greyish tone):

just these cuties and the togetherness of blue and yellow ok
honorable mentions:
Team & Win - Between Us


they are a blue-red couple ... but i mean just look at the usage of the colors above. like a++
even marketing knows whats up with blue and yellow 😜
Kurosawa & Adachi - Cherry Magic

just this outfit combo 👌
Pat & Pran - Bad Buddy

long live ocher yellow. I'm also getting so emotional about them rn
Ink & Pa - Bad Buddy

some gl ❤
#ask#i know i know this got long#you probably just wanted one picture for each#but once i started with my only 12 percent there was no stopping me#tumblr also warned me like 4 times that i had to many pictures already in this and couldn't add more#hope it's clear that i don't own the above series & these are just screenshots i took for my personal enjoyment. just to state the obvious#my only 12 percent#takara kun & amagi kun#kiekoi
5 notes
·
View notes
Text
Scrivener 3 – Main Tutorial (Part 2)
I hope you find this guide useful! To enable me to make more of these, and make them available for everyone, please consider supporting me via KoFi! I love sharing my stuff freely and don't want to paywall anything, but I also have to eat – every contribution helps and is greatly appreciated!
This is tutorial 2 (part 2) of my neurodivergence-friendly tutorial series for Scrivener 3. It's intended for people who are new to Scrivener, as well as people who are already familiar with it, as it covers the major features in quite a bit of detail.
Important note: All my tutorials are based on Scrivener for MacOS! Though minor, there are some differences between Scrivener 3 for Windows vs for MacOS, so you may notice a few small discrepancies if you use Scrivener with Windows.
Further, all tutorials are based on my own personal workflow, and all screenshots are from my personal files, so please don't distribute those elsewhere. My workflow is not universal (duh), and if you use certain features differently that doesn't mean one of us is doing it wrong. You do you!
Lastly, this tutorial originated on Discord, which is probably noticeable in how it's written – I am not changing that, since many people have insisted that this was exactly what made it easier to follow than the official Scrivener tutorial.
A continuously updated Masterlist with all my Scrivener 3 tutorials can be found here.
(Part 2 begins below the cut.)
Main Tutorial (Part 2)
[Direct continuation from where Part 1 left off.]
Copyholder
Now I've already talked about layout and the Split modes further up, but that's not the end of our layout options in the Editor. Besides Split mode to show two files/scrivenings, you can also use the Copyholder to display notes, a snapshot (we’ll get to that), another scene – whatever. To do that, you right-click on the file you want and go to Open -> in Copyholder. You can change the position of the Copyholder with a right-click into its frame.


Similarly, if you choose Open -> as Quick Reference, the selected file will open in a small, floating window. Many options to have many things open at once – neat shit.
[There are a couple other options for the Editor (including Typewriter mode, Focus, and Composition mode); they are covered in the Extended Tutorial.]
The Inspector
So, finally, all to the right we have my favourite thing: the Inspector, with five tabs. [Reminder at this point that this is just my personal workflow. Ok? Ok.]
Notes
The first tab (outer left icon) is Notes. With Notes selected, up top you see Synopsis. I use this to roughly outline my scene. Sometimes there's no more than a sentence or two in there, in this case now it's a fairly detailed one.
Under that you see the Notes, and you see that not everything is in the same font. I put many things in the notes, the three main ones of which you see in the first image above:
something that'll potentially go into the author's notes when I eventually post the chapter with that scene in it; aka my thoughts while writing, how i felt, something funny, idk — really whatever, just author's notes
shit I wanna remember without having to think about it every time; here, who's in the scene and the age of the three most important characters
in the serif font you see deleted sentences! meaning sometimes while writing I'm like "nah, i wanna say this differently" but I also am not sure how, so instead of deleting the thing outright I cut-paste it into the side notes and keep it. Sometimes it gets used later, sometimes it won't.
Every now and then I'll clear out the side notes, for which (in some projects) I made a dedicated Deleted Passages root-folder to collect it all in. Whenever the side notes get too full, I cut-paste the whole blurb into the deleted passages file for that scene. Though, admittedly, it's quite rare that I keep multiple and organised files of my deleted passages. Usually it's just one huge thing where I never find anything.
Still, I've legit brought back whole long sections of text from this deleted passages log. Like, sometimes I'd bring back up to 700-1000 words that barely needed edit, it just had to go somewhere else and I wasn’t there yet. And I still do that, even though I by now discovered the Snapshot function. We’ll get to that in a bit.
Bookmarks
Moving on to the next Inspector tab, we're not with Notes anymore but with Bookmarks! So, wtf are Bookmarks, how do they work, why the fuck do we care?
In essence, a Bookmark allows you to open linked files in the Inspector. That’s neat because your Editor can stay where you were and you can continue writing, rather than clicking away from your scene there to check your notes — which then means you have to find your spot again once you return. Nobody likes that.
(Yes, you could right-click on your desired internal file to open it in the Copyholder. That’s effort though, plus now you can’t use the Copyholder for something else. Anyway, moving on.)
There are two "types" of bookmarks: Project Bookmarks (PB) and Document Bookmarks (DB) -- yes i'm abbreviating those because I'm lazy. You can easily switch between the two like this.

And because Scrivener is amazing, both of these do exactly what it says on the tin.
Project bookmarks are accessible from everywhere and anywhere in the project. No matter which folder, file, or scrivening you're in, PBs are always there for you, like the kind of reliable person that is too mentally stable to be friends with any of us and brings us tea when we’re cold.
"Okay, great, but why do we need that?"
Well, no matter what you’re writing (thesis, novel etc.) there are probably certain things you’re gonna look up more than once (if you’re anything like me and your memory is as sound as sieve at least). General notes, outlines etc. seem like the obvious choices to be linked as PBs — you’ll likely need them over and over, and a PB lets you access the thing(s) from anywhere quickly. Neat shit.
Document bookmarks on the other hand are specific to the file where you created the bookmark (shocking, right? I’d never have guessed that). So if you bookmark a thing for the third scene in chapter 14, the DB won’t show up anywhere else.
"But V, you just said that we can make things accessible from everywhere, why would we not just do that?"
Right, sure, fair point. Until there’s this side character which is kinda prominent in those two scenes but not really anywhere else and you keep forgetting whether you gave them armour or not, or whether they’re tall or tiny, and where did you say they came from again? Are you sure you want to clog up your project-wide bookmarks with the half-empty character sheet for Obscure-Sidekick #36? Exactly.
Now, though I’m sure it’s already quite obvious from above: What exactly do you actually save as a bookmark?
Internal Bookmarks (IB) are any files from within your Scrivener project that you select over the Binder-menu thingy you see in the image. Those are the notes, the outlines, the character and location sheets, the research you’ve imported — whatever, you could even link another scene that is really closely related to the one you’re working on with a DB.
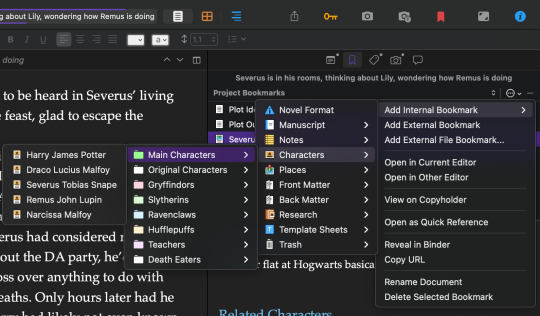
External Bookmarks (EB) are the logical counterpart of IBs, meaning anything that isn’t in your Scrivener project. Is there this one website you always inevitably open while writing? Bookmark it.

EBs also include External File Bookmarks which allows you to link a file from your computer to keep it on hand; like the PDF of that one Review article that covers the entire theory for your thesis and you’re tired of going back and forth while trying to paraphrase.
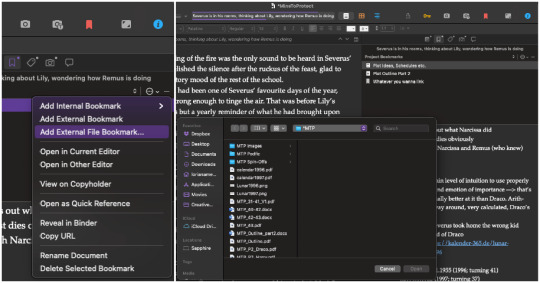
Now those of you who paid attention saw a thing named Matching Text. The way this works is that it’ll compare the text of the doc you’re currently in with the text in all the bookmarks and show you any matching text. I’ll admit I have not yet found a good use for this, except if you’re writing a research paper and wanna check that your paraphrasing holds up. I’m sure there’s a point to it and it’ll reveal itself eventually – until then we'll gloss over this here.
Metadata
Moving on from Bookmarks, we go one further to the right to the little tag icon: There we have General Metadata, Custom Metadata, and Keywords.
General Metadata is literally just that; ordinary metadata. Boring, moving on.
The only preset that I saw for Custom Metadata is “Event Start Date” – I added Event End Date myself by clicking on the three little dots which opens the settings. You can pick your date format (short, long, full, including time, custom etc.) and there are three other types of metadata (Text, Checkbox, List) that I haven’t explored yet.
I assume if you have something that can either be true or untrue for a scene a checkbox would make sense.
Keywords are really quite simple: To set it up, you either use the menu bar (Project) or click on the three little dots in the Keywords field and choose Show Project Keywords. Now in the beginning that’s obviously empty – so you fill it with ... well, with whatever you want!
I sorted mine by character and location, but you do what you need for your project. The left little plus is to add a keyword on the same level (sibling), the one to the right of it creates a sub-keyword (child), and the minus to the right of that deletes whatever is selected.
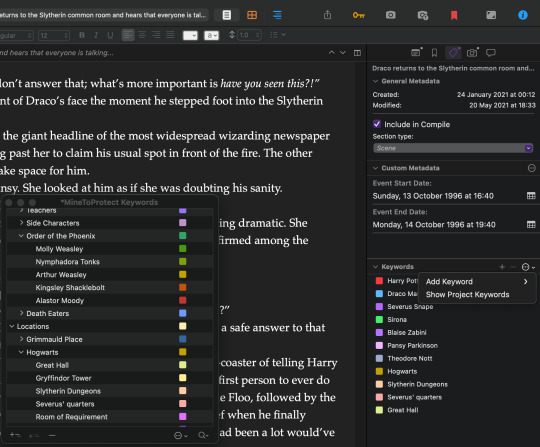
You can shift the keywords around as much as you like, can drag and drop them into each other to make them child-keywords etc. Though personally I’d create it as linearly as possible because then it makes a pretty rainbow by default! Whiii!! Of course you can also change the colours so… ANYWAYS
To add a keyword to a file (folder, scene, whatever), you either open the Project Keywords and drag-and-drop (works with multiple at once!) or you click on the three little dots again and choose your tag you wanna add.
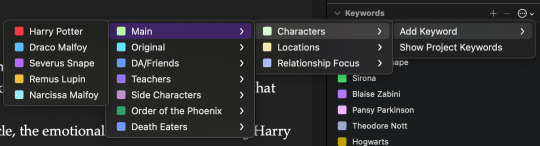
Now why is this cool? It’s cool because a) if you go into the Project Keywords, select one and then click the little magnifying glass (bottom right), it’ll show you all the files/folders that have that Keyword in the Binder (neat shit), and b) COLOURS!
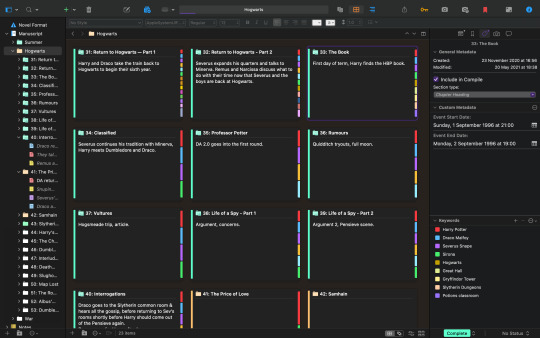
Corkboard view, for example, looks like this:
And Outline view looks like this:
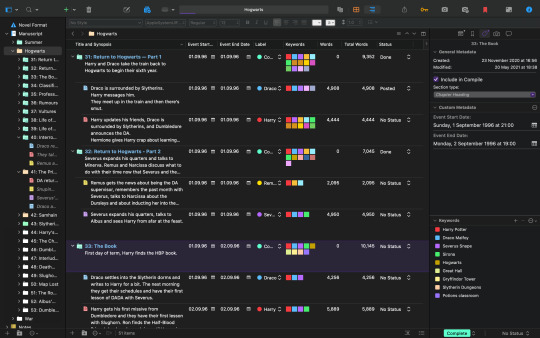
You can also display the actual text of the tags, I chose to have them as colour chips. You can pick and choose what is displayed in the outline; word count, progress, synopsis etc. Further, Outline view also gives you the option to display any Custom Metadata you made.
–––
Due to Tumblr having a maximum limit of 10 images per post, this is the end of Part 2 for the Main Tutorial. Click here for Part 3.
All tutorials, supplementary posts, and what they contain are listed in the Masterlist. Thank you for your attention, I hope it was helpful, and if you have questions send an ask or message me.
Part 1 | Part 3 | Tutorial Masterlist | KoFi
#scrivener#tutorial#writing#tool#resource#adhd#adhd friendly#neurodivergent#neurodivergence#neurodiversity#full tutorial#main tutorial#part 2
13 notes
·
View notes
Last Seen Blogs

cityoflostshoe
CityOfLostShoe

fredgalle
FredGalle

henryjones2504
Market Research Reports

burkymakar
too cute with the puck