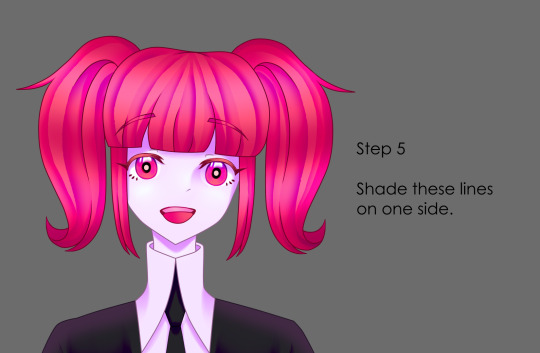
#gem tutorial
Text
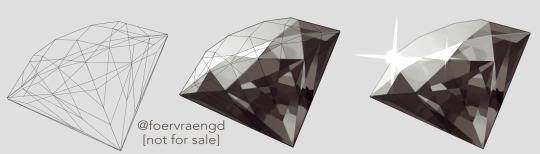
Mirre’s “How i render gemstones” tutorial!
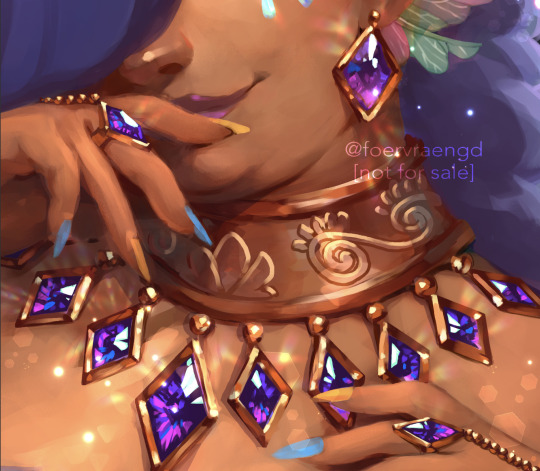
(note: image above is not what is shown in the walkthrough. It is an example piece)
Ingredients:
Art program that has layers and selection tools
Patience (hubris or stubbornness is fine too)
(recommended) photo references of gemstones and/or prisms
(Optional but very helpful) Knowledge on how to use Reference layers and anti-overflow in Clip studio Paint
For this tutorial i am going to use clip studio’s “anti-overflow” feature. This post is not going to explain how to use that specific setting but you should be able to find guides on how to use it on clip studio’s official website or on youtube.
Please Note: The result of this technique will not 100% represent real life gemstones. These are more simplified but should still make an impression of the brilliance and appeal of gems, crystals and diamonds.
If you don’t work in CSP: the best workaround is to use the polygonal lasso selection tool for the same purpose.
This ended up being a long post so I am putting it under the readmore:
First off; Basic idea on how the light refracts inside a solid transparent object:
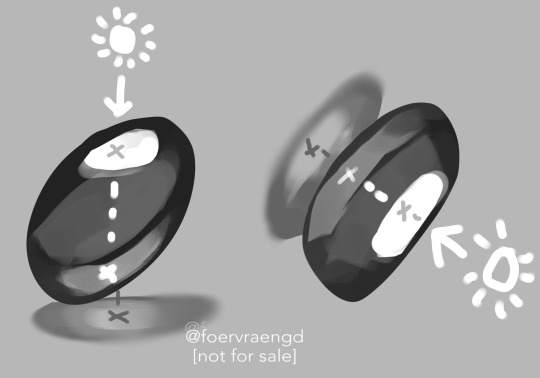
Wether it is acrylic, glass, water or crystal, the way light pass through more or less should behave the same as long as it is solid and not hollow inside. Pay attention to how the darkest parts of the stone goes along the inner edges, leaving a ”mid tone” sort of in the center. However, this might vary depending on the light setting. But it is a generally good rule-of-thumb to follow if you’re drawing something not based on a photo. Another thing to pay attention to here is how the placement of the highlight will lit up the inside of the gem in a parallel line. It also shows through on the cast shadow.
Light refraction on a cube:
I have already made two posts on this, so definitely go through them:
CUBE BREAKDOWN POST HERE
But a rough summary from those two links would be: Every side/facet of a gem or a cube etc refracts the light individually and not as one entity (that would make it look hollow and not solid). Think of it like how each piece in a broken mirror individually reflect your face back to you. Like a weird patchwork!
Putting this into practice:
For this tutorial I’m going to be nice to myself and not try to draw perfectly accurate gemstones. Instead I’m gonna draw them with a more ”natural” looking set of facets. Which actually isnt as common in real world as video games makes us think. Some crystals have geometric shapes naturally, but a lot of other stones are not as fancy. Anyway, im taking artistic liberty on these example stones because the technique I’m going to use will work for these just fine.
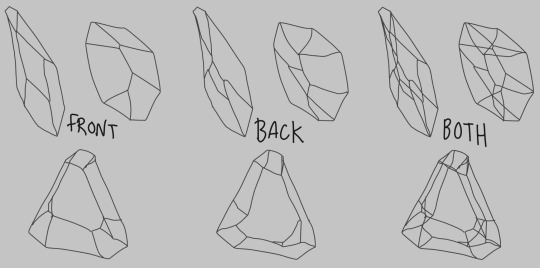
So, in clip studio paint, I first draw the stones on a vector layer. I give them facets for the front side. Then I duplicate the layer, remove the front facets and replace them with the facets on the back of the stone. The third image here shows both layers visible on top of each other. I now put these into a layer folder and mark the folder as ”reference”.
Now, on a layer below the lineart folder, fill with your base tone. Then make a layer on top (if you can clip it to the base tone, do that), this layer is where you decide where the highlight will be placed. In some cases the highlight is only lighting up one single facet - it really depends on the design of the stone. You can also blend and soften the highlight here if it looks good for you, just make sure not every facet is highlighted. The highlight layer should be on top of all the other layers clipped to the base tone layer.
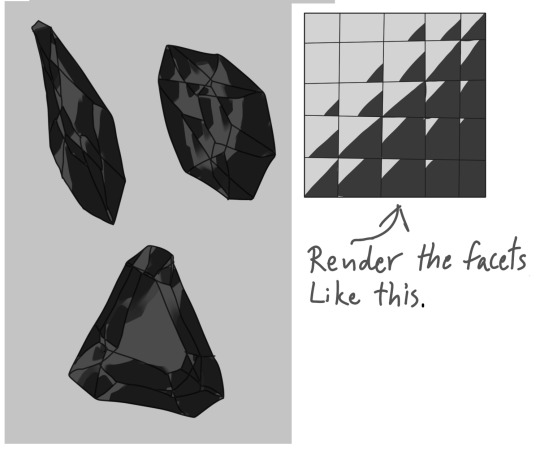
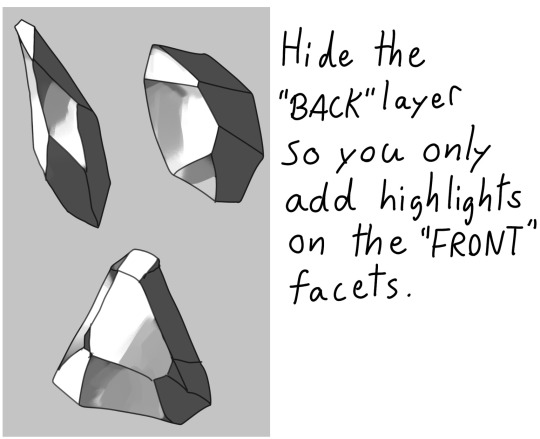
Now it is time for the juicy juicy stuff! Turn on both lineart layers so they’re both visible. I hid the hilight layer here because it was in the way, but might not be needed in your case. Make a layer clipped to the base tone and paint in the darkest tone. This is where anti-overflow helps me out, because when i run my brush over all these crossed lines it will make the stroke pop in and out for each facet. If you dont use CSP, this is where you can use the lasso tool and select every second facet. It will take a bit more time but it should work similarly.
After the darkest tones I then make a layer for the inside light that the highlight has lit up. Here i keep it inside the darkest tone but this might vary depending on the light setting. If it looks good to me, then that’s what i stick to.
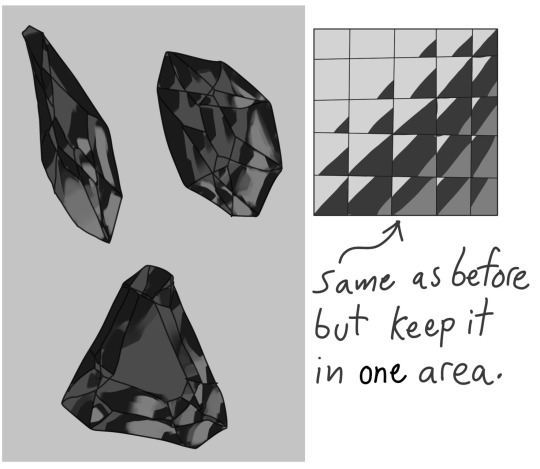
The way I approach rendering the facets here is like the grid in the example images above, every shade and tone appear more or less in each facet but the amount is relative to their position. So a gradient wouldnt have a smooth transition; it would be slightly scewed in each square on this example grid. Essentially like how some bathroom window glass panes look like.
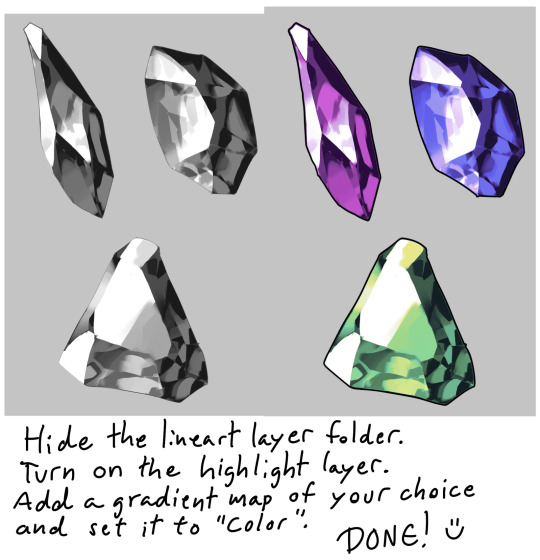
Now it’s time to hide the lineart layer folder and check if the gemstones look decent to you. If not, then you can look up some reference photos and analyze where the values group together the most; be careful not to focus too much on the photos 500 million sparkles. Squint your eyes or blur the reference and try to see how the overall values behae.
I, personally, am satisfied with these rocks so I slap on a gradient map (you can manually color in them too if that’s your thing) and call it a day. The lit up inside of a gemstone tend to have a brighter and more saturated color than the mid tone.
Other Examples with this technique:
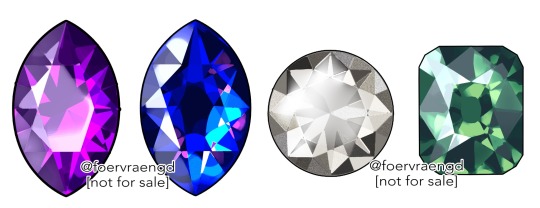
If you look up ”gemstone types” you can often find images displaying various facet types from more than just front view. These can serve as useful base templates for practicing this rendering technique. The backside of a gemstone is called the “pavillion” and is really useful to have at hand when it comes to painting the inner refractions. You can probably also use 3D models and convert the wireframe into lineart. But that is slightly out of my pool of knowledge.
Applying this knowledge without using a base lineart layer is of course possible. In this painting I followed a simplified summary of how the facets sparkle: Keep the highlight shape to match the front facet design, and all the inner refractions should be more scattered and split up but face a direction towards the center of the gem. Now don’t you think this sort of makes the gems look like eyes? That’s right! You can, and absolutely should, apply this on eyes to create the most sparkly anime eyes ever.
Now, refracted light that lands on the surface surrounding gemstones varies depending on the material - and if the gem is inside a metal frame it usually doesnt create this much refraction around it. But I want to have fun so i decided to break this rule in the name of pretty sparkles. :)
2K notes
·
View notes
Text
im so normal about these 2
#tutorial for my painting style coming.. sometime? idk sometime for sure#hermitcraft#hermitcraft season 10#geminitay#ethoslab#hc gem#hc etho#hermitcraft gem#hermitcraft etho#kiwi’s scribbles
2K notes
·
View notes
Text
Alright it seems I'mma post this now

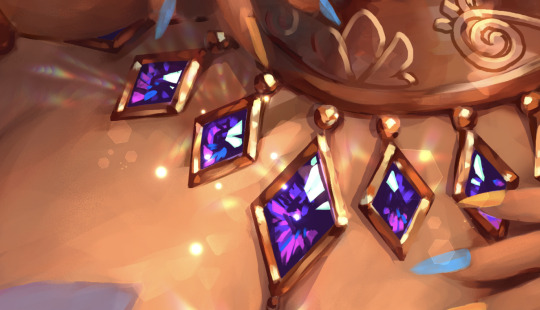
Meet my lego persona (//_^)
Well about the hair clip that she wear
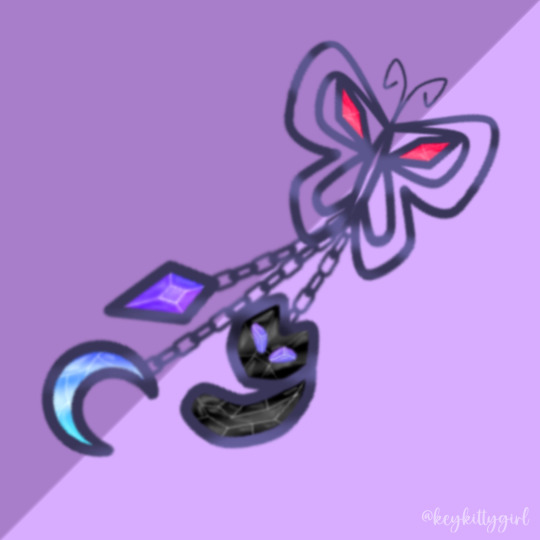
It's not always fully shown like this, it's usually shown depended on the situation, the one that often show is the butterfly one while the other gem usually remains hidden. Each gem have different purpose to the user, there will be time where only the black gem that showing, or only the blue gem, nor only the purple gem.
(//v^)
Well that's enough for now!
If you have any questions about her you can ask on the comments or my ask box, but no promises that I'll answer them :3
#monkie kid#lmk fanart#digital artist#art#digital art#ibispaintx#keyart#keysona#my sona#lmk sona#sona reference#sona art#should have post this yesterday but I'm to lazy lol#im having fun with drawing the gem#first time doing and its without any tutorial#yipppeeee
61 notes
·
View notes
Text

this is how i draw gems.
#art#digital art#clip studio art#clip studio paint#artists on tumblr#art tutorial#gem#drawing tutorial
91 notes
·
View notes
Text
okay so after sleeping on it i’ve come to the conclusion that sometimes . you really do just have to drag your favorite gacha png home by the ankles. which is exactly what i will do
#i gave him a chance to come home peacefully and he cruelly rejected me#tragic sad awful etc but .#it’s fine . :) i’m fine . :) totally :)#his banner stays up for like one month anyway so. i’ll keep gathering gems….#and if all else fails i WILL look up a tutorial on how to link my credit card to the jp appstore so i can drag him home By Force 🫡#this is a very tragic day for ariland but. i should have expected it#sugu isn’t the typw to open his heart up willingly…. you have to give him a final push yourself (<- slipping into deep insanity)#anyway all this to say i Will bring him home no matter what lenghts i have to go to 🫡#ari noises ✩
11 notes
·
View notes
Text
How to draw Gems, Gemstones & Crystals
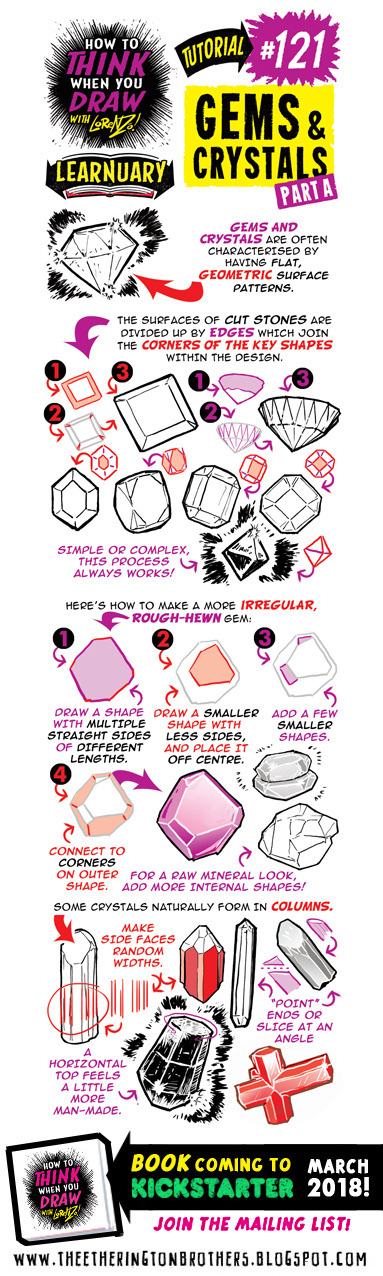

Credit: Etherington Brothers
#121#122#gem#gems#crystals#gemstone#jewel#jewelry#jewellery#rock#art tutorial#drawing tip#art tip#art tips#art tutorials#drawing#drawing tips#drawing tutorial#drawing tutorials#art#tip#diamond#ruby#sapphire#topaz#emerald
118 notes
·
View notes
Text
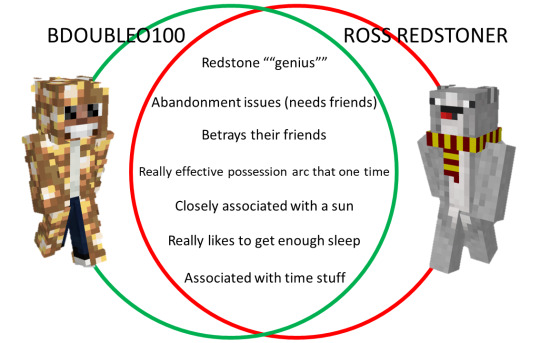
functionally continuing my habit of being the empires redstoner crossover guy, i have come to a couple realizations. no one understands my vision yet and i am going to explode.
Image Description under the cut!
[Image Description: A Venn diagram comparing BdoubleO100 and Ross Redstoner. A green circle is labelled with “BdoubleO100″ and his glowstone cloak skin, while a red circle is labelled with “Ross Redstoner” and his skin, a squirrel in a red and yellow scarf. All of the other text is in the centre of the Venn diagram, inside of both circles. The text reads:
Redstone ““genius”“
Abandonment issues (needs friends)
Betrays their friends
Really effective possession arc that one time
Closely associated with a sun
Really likes to get enough sleep
Associated with time stuff
/End ID]
#bdoubleo100#yourpalross#redstoner#oh crud what series do i even tag bdubs as#hermitcraft#empires smp#and most of his betrayals are in the life series but it seems unfair to tag those#for context redstoner is an OLD redstone tutorial parody/horror mcrp series#in which the red sun never sets (meaning our protagonist cannot sleep)#i will never be Over It and therefore gem's new sun + sleep religion makes me Lose It#they're so conceptually similar... yet so different... antithesis even...#and that made me realize just how much bdubs is redstoner-coded#i believe he could do both the calculadder and 'that's the part that doesn't happen'. he has the range.#but for now i just need others to see what i see#picking up these rodents by the scruff and shaking them.#ross minecraft#analysises#mcyt#a-post-lon
112 notes
·
View notes
Text
guys we're so back (crocheting some snails. of a certain variety.)
#depending on how cute they turn out ill post some pics#using a tutorial ofc but im modifying one of them so the neck is longer for gem#they call me the crochet master#moss chitchat
4 notes
·
View notes
Text

WIPs
weird design challenge, idk if i can even pull it off but at least the rocks look nice?
#wip#there's a hidden layer on the left bc it covers the rock almost entirely#there is. a lot going on in this design.#followed a gem tutorial for the right one and it looks way nicer#even if i had to fudge it bc it was for a single-color gem not an opal
16 notes
·
View notes
Text

I'M SO HAPPY WITH THE CLOTH SHADING, WIND CHIMES AND GEM SHADING PLZ NOTICE ITTT XP
But have mah bb girl in a spooky look X3
I wanted to show her choice of fashion more clearly but the pose doesn't allow it but it's an interesting type of poncho I saw online :P
BUT!! I WORKED VERY HARD ON THIS PIECE SO NO STEALING THIS OR ANY PIECE I DREW... PLZ?
Extra versions under the cut
A lineless version

One without the wind chimes XP
#Void doodles#Nova#Nova sans#Deathglitch shipkid#Deathglitch#Errordeath shipkid#Errordeath#Destructivedeath#destructivedeath shipkid#Error x Reaper shipkid#I looked up Pinterest tutorials for the cloth and gem shading#Honestly I'm happy with how they ended up#Wanted to add black frills but got lazy XP
64 notes
·
View notes
Photo


Though I usually come up with new strategies when shading gem hair (especially realistic hair like Lapis or Dia, not blobs like Peridot) and this is my newest one ft. Red Beryl. Hope at least one person finds this helpful lol.
#houseki no kuni#land of the lustrous#hnk#宝石の国#red beryl#those shades of pink and purpple#tutorial#how to shade gem hair
62 notes
·
View notes
Text
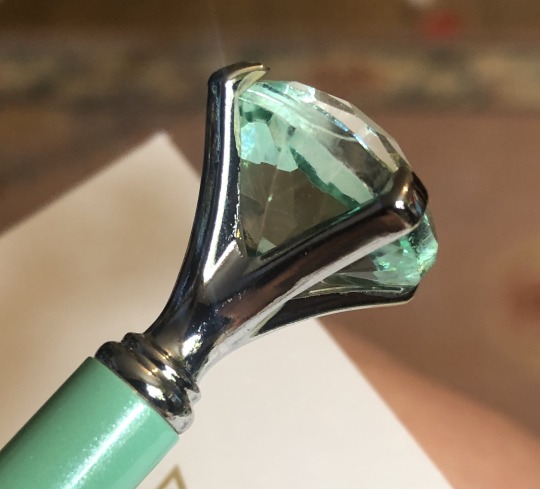
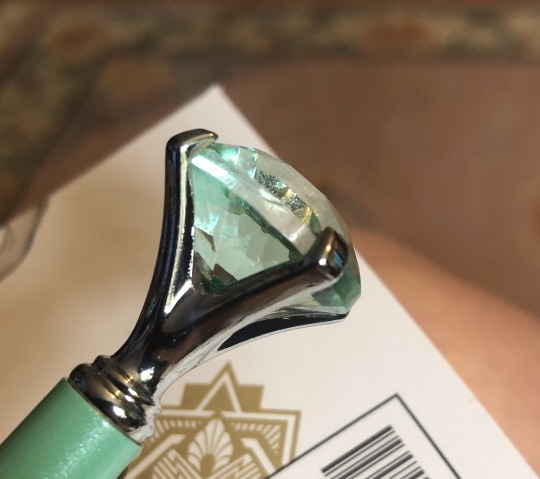
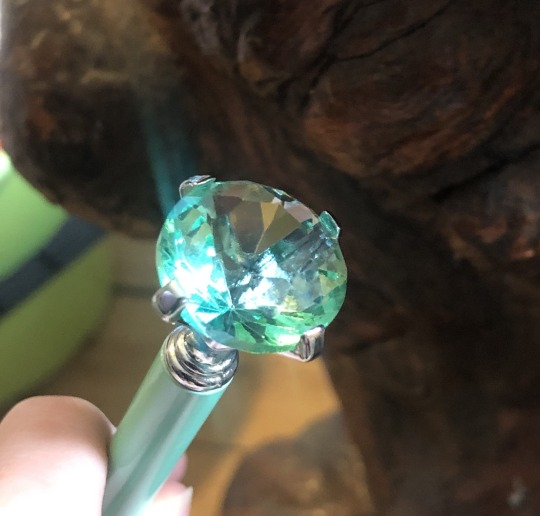
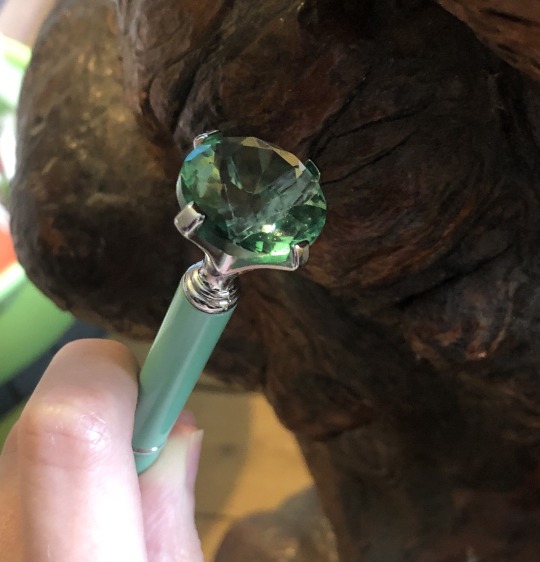
Using a cheap plastic “diamond” on a ballpoint pen as an art reference:
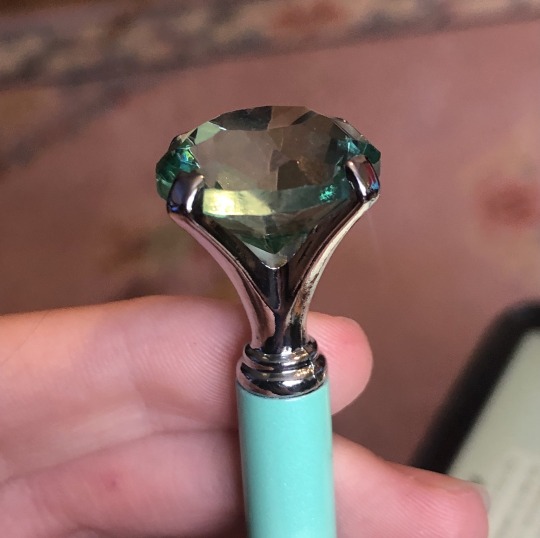
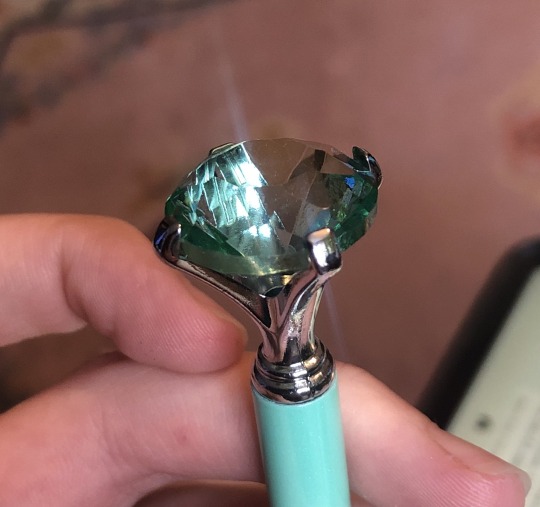
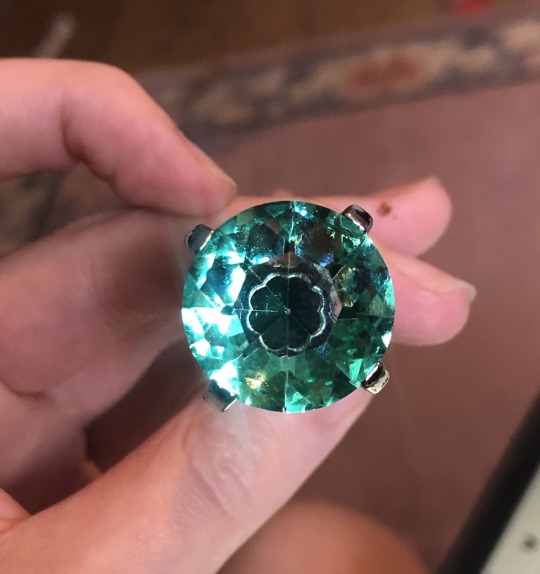
The first three photos show how the angle of the gem can make it switch between almost colorless to completely teal colored. Note how the color of the carpet in the background is clearly visible in most parts of the first image, but there are teal color along the edges close to the metal hooks(??? Idk what theyre called). The middle image has the gem with a strong highlight and color matching the placement of one of the supporting metal hooks that holds the gem in place. In the third photo the gem is angled with the top facing the camera which makes the gem almost completely teal colored.
These two photos show where the background color show through in the gem.
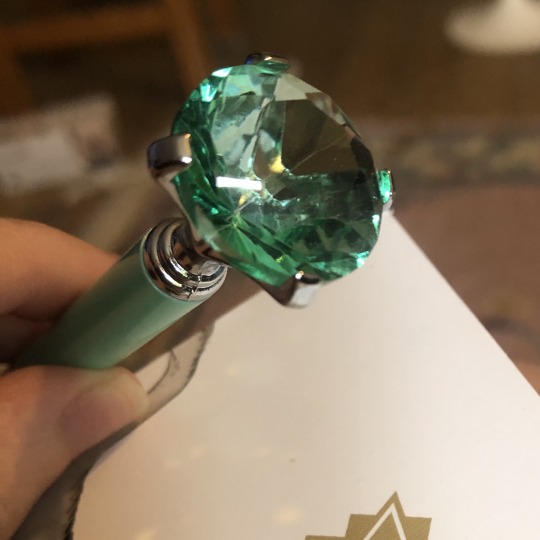
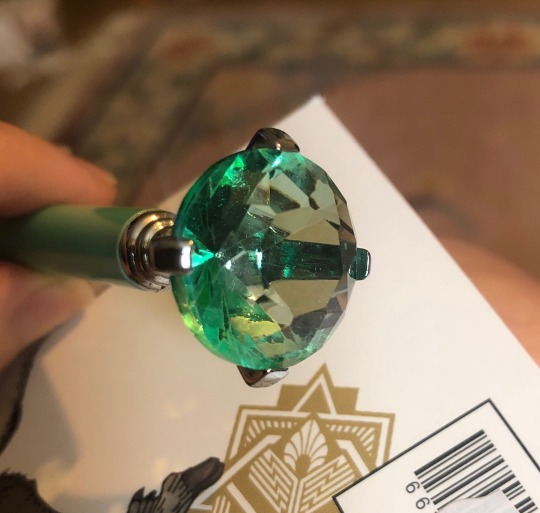
Similar demonstration as the previous two photos. But with the gem angled so the top face the main light source. Note how one of the metal hooks behind the gem is clearly visible here in the second image.
And finally here is the difference of the gem in direct light versus when it is under a cast shadow. The main difference here is that the bright highlight is gone and we are left with just the secondary light sources reflected inside the gem.
#protip#art tutorial#reference tutorial#note to self#im making this post because i never feel like i find a crystal or gem reference photo that works for me so#sort of undescribed? i am basically explaining what i observe in the photos but idk if thats enoufg#gem#crystal
185 notes
·
View notes
Text
one thing about me is if a mobile game has a tutorial on skipping wait times, i will simply find every way to wait out the time so i don't use Any of the currency they're trying to teach me how to use
#i will hoard those gems forever fuck you#one of my games would just Restart the tutorial if you left the app while waiting for the time to run out#meaning it would restart the timer every time i tried#so i have had it open next to me. for two hours. just waiting#i have 20 minutes left. i am not spending any of your gems you fool#only time i will give in and skip is if it is 100% Free#if they give me extra moneys to skip the time fuck you im keeping the moneys
1 note
·
View note
Text
The announcements for SIF2 mention you'll receive special rewards for your progress in SIF when you transfer your data. I think your player level is one of the things that will be rewarded, so if u want to raise your level quickly, play the live arena events!!! There's one going on right now, and there will be one more before the game shuts down! Each day you play, you'll be rewarded with items to instantly rank up to the next level, so you can gain level really quickly!
#i can make a tutorial if anyone needs it theres not a lot of info on live arena suprisingly!#also if u want to reach a certain lvl just for the sake of it b4 the game ends this is another good way to do it#im almost lvl 700 rn and im hoping to reach 900 before the end! which is totally possible with the level gems#llsif
15 notes
·
View notes
Text

Tsukasa still won’t come home and apparently not buying costumes for a. Very long time has left me with 42 outfits and I am genuinely on the verge of desperation
#since I’ve had the game i have bought 5 outfits#1 during the tutorial missions and 4 during toya wedding to get gems#and then never again lmao
2 notes
·
View notes
Text
I like the cartoon show “Steven Universe” a lot. The characters are so diverse and relatable.
Therefore years ago I made a whole tutorial series about them!
5 notes
·
View notes
Last Seen Blogs
defensive-tactics
Personal Defense Connection

juansdominguez
juan s. dominguez fotografía / video
d1rtdyk3
DIRT DYKE

micropigmentaciollisett-blog
Sin título

mdze03
Untitled