#firstly i chosen a difficult panel
Text

I give myself, body and soul, to the carnage that is to come!
#hidan#akatsuki#naruto#manga coloring#naruto manga coloring#naruto shippuden#manga edit#at last he's finished!#love the quote.#i also thought of “the judgment has been passed” but no girl can resist a carnage#can we appreciate that i edited out the speech bubble and rocks and redrawn his arm and hair#firstly i chosen a difficult panel#and struggled with it for 1.5 month before i gave up and decided to make this one work#phi colors
119 notes
·
View notes
Photo


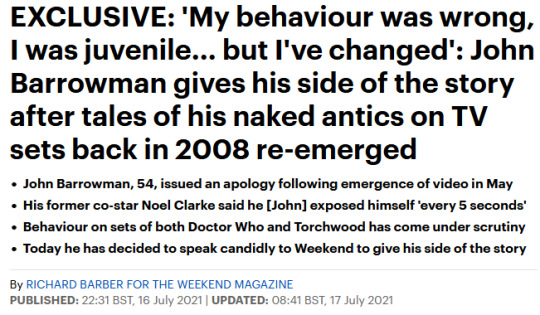
By his own admission, John Barrowman has always been notorious in showbusiness circles. 'I'm known for my jokes, my sense of fun, my high jinks,' he says.
But those 'high jinks' have come back to haunt him recently as a result of serious allegations against his former Doctor Who co-star Noel Clarke.
John's role as Captain Jack Harkness in Doctor Who began in 2005 and the character was given his own spin-off series, the far more adult Torchwood, a year later.
It launched a hugely successful career for John on both stage and screen, taking in leading roles in West End musicals, big-budget US TV shows such as superhero series Arrow, and homegrown light entertainment favourites like All Star Musicals and most recently Dancing On Ice, where he's one of the judges. He was by anyone's measure a family-friendly favourite.
Then a couple of months ago the sky fell in. Following accusations of sexual harassment against Noel Clarke, who played Mickey Smith – the boyfriend of Billie Piper's character Rose – in Doctor Who from 2005 until 2010, historic footage emerged on YouTube of a sci-fi convention, Chicago Tardis, in 2014, released by The Guardian newspaper which had investigated Clarke's behaviour on the Doctor Who set.
In an interview in front of a live audience, Clarke is seen regaling fellow cast members Annette Badland and Camille Coduri with tales of John's behaviour on the set of Doctor Who, exposing himself 'every five seconds'. Clarke then jokes with the audience not to do this at their workplace or they might go to prison.
The allegations levelled against Clarke are extremely serious. At least 20 women have come forward to accuse him of sexual harassment and bullying, 'inappropriate touching and groping' and secretly filming naked auditions before sharing the videos without consent.
He denies all the allegations, but BAFTA has since suspended the Outstanding Contribution award it bestowed on him just weeks earlier, and the BBC has shelved any future projects he was working on with them.
Now John's behaviour on the sets of both Doctor Who and Torchwood has come under scrutiny once again. The furore has led to a video of Captain Jack Harkness being expunged from the current immersive Doctor Who theatre show Time Fracture, a planned Torchwood audio production featuring John and former Doctor Who lead David Tennant being scrapped and doubt about whether he will be invited back to the Dancing On Ice panel.
ITV will announce the line-up for the next series in September. John immediately issued an apology following the emergence of the video back in May, but today he's decided to speak exclusively and candidly to Weekend to give his side of the story.
'The moment has come to set the record straight,' he says from the Palm Springs, California, home he shares with his husband Scott Gill. 'This is the first time – and the last – I will address this subject. And then I plan to draw a thick black line under it.'
Firstly he says it's important to set the scene. On the set of Torchwood, which followed a team of alien hunters and explored themes of sexuality and corruption, he had what might be called a 'relaxed' attitude to nudity, and would wander around in an open robe. But it's claimed that he was well known for flashing and mooning at cast and crew alike on both the Doctor Who and Torchwood sets.
As Captain Jack Harkness I was the star of Torchwood, so I felt it was down to me to lead the company and keep them entertained,' he explains. 'When I was doing a nude scene or a love scene it was clear in the script I'd be naked and everyone would have known about that at least 48 hours in advance. So I'd be waiting in my trailer wearing just a robe with a sock over my "parts". Then, if I were standing waiting to film a scene where I needed to be nude and someone came into view, I'd make a joke to put them and myself at ease. My actions were simply designed to defuse any potential awkwardness among the cast and crew.
'I've never been someone who's embarrassed about his body so it didn't bother me if anyone saw me naked,' he adds. 'The motivation for what I'd call my "tomfoolery" was to maintain a jokey atmosphere. There was absolutely nothing sexual about my actions and nor have I ever been accused of that.' Whether this sort of behaviour would defuse any awkwardness, or actually foster it, is debatable.
WHY I'VE GONE INTO THERAPY
This scandal has clearly not left John unscathed. 'It was upsetting my mental health,' he tells me. 'My husband Scott suggested I talk to somebody. I won't discuss what I've said in therapy sessions – that's a matter of doctor/patient confidentiality – but I don't mind admitting it's helped me a great deal.
'It's made me aware that despite how much cancel culture may talk about respecting people's mental health, too often they don't respect the mental health of the people they're trying to cancel. So I needed to understand what was happening, which is why I went to speak to somebody.'
Has he had more than one session? 'Yes. It's a conversation that's still going on,' he says with a wry laugh. 'Seriously, whatever the situation, if you feel you need to reach out to someone it's very important to keep talking.'
'If what happened had taken place in the changing rooms after a rugby match it would be regarded as no more than a prank,' he continues. 'On the other hand, it's never going to happen in an accountant's office or a supermarket. But my job is not a regular nine-to-five, we're a family working long hours and in close proximity to each other.' Again, one has to bear in mind that a rugby changing room would be an all-male environment. There were many women in the cast and crew of the TV shows.
'In the theatre quick costume changes happen in the wings all the time, with everyone stripping off to get into their new outfits in time for the next scene,' he says. 'Girls might be braless, boys only in jockstraps. That's just how it is and no one gives it a second thought. But I accept that my behaviour at the time could have caused offence.'
Although John's recollection is that no one complained at the time, and he says that no one has complained since, at one point he was called in for a private conversation with Julie Gardner, an executive producer on Doctor Who and Torchwood. She has confirmed to The Guardian that she did receive a complaint.
'My antics had come to her attention and she told me I should rein in my behaviour,' he recalls. 'In blunt terms, she had just two words of advice: "Grow up!" That struck a chord. I did as I was told and my behaviour changed overnight. I'd still be full of jokes and fun, but no more naked pranks. I can see now my actions were pretty juvenile but this was a different time and it's something I would not do today.'
When these rumours were swirling back in 2008, it's also said John exposed himself during a Radio 1 interview in which his behaviour was being discussed. He denies this today.
'I was being goaded by the presenters about my reported behaviour on the Doctor Who set. I went along with it but I didn't actually do anything inappropriate in the studio. What would have been the point, it was on the radio? Still, it created such a stir that the following day I decided to make a full public apology and get on with my life.'
And that might have been that, but for the accusations against Noel Clarke coming to light. 'It seems to me that I've become collateral damage to a much bigger story,' says John.
Given his and Clarke's high profiles and the severity of the allegations against Clarke, this is hardly surprising. Has he spoken to his former co-star since the balloon went up?
'I have not.' Does he plan to? 'I do not. But listen, I'm not trying to cast myself in the role of victim here.' That said, he clearly resents these stories re-emerging, although he has had messages of support.
'In fact many members of the cast and crew have been in touch since this latest storm blew up giving me their support,' he insists. 'I won't name them because I don't want anyone to find themselves in the firing line.'
However, Gareth David-Lloyd, who played bisexual Jack Harkness's lover Ianto Jones in Torchwood, has chosen to go public about working with John. 'In my experience John's behaviour on set was always meant to entertain, make people laugh and keep their spirits and energy high on what were sometimes very long working days,' he said.
'It may be because we were so close as a cast that professional lines were sometimes blurred in the excitement. I was too inexperienced to know any different but we were always laughing. The John I knew on set would never have behaved in a way he thought was affecting someone negatively. From what I know of him, that is not his nature. He was a whirlwind of positive energy, always very generous, kind and a wonderfully supportive lead actor.'
In the weeks following this new public scrutiny John has had time to reflect, and has come to the conclusion there are two issues. One is the aftermath of the #MeToo movement; the other is cancel culture.
'I'm a supporter of #MeToo because no person should ever feel that in order to succeed in their career they can be coerced into doing something sexual against their will.
'My problem with cancel culture, on the other hand, is that it can take the form of intolerance and prejudice. It's a culture with no shades of grey. There's no leeway for forgiveness or room for recognising any change in someone's behaviour. Cancel culture tends to talk at you or past you or through you, rather than listen to you. Dialogue is extremely rare.'
He sounds upset now. 'Look, I'm in a good place,' he insists. 'I've got a great husband, a great family, a great "fan family" around me. But I've found it difficult. And yes, some of the things that were being said have been hurtful.
'Scott and I would go to bed on a Saturday night dreading the stories in the Sunday papers. And then I'd wake up to lies. One newspaper printed as fact that I'd been dropped as a judge by Dancing On Ice. Well, apart from the fact that the new panel isn't decided until the autumn, no one from ITV had spoken to me or my agent about this latest upset.'
Ashley Banjo, leader of dance troupe Diversity and a fellow Dancing On Ice judge, has only worked with John for the past couple of years so did not know him during the time of the behaviour he's now being scrutinised for, but has publicly spoken out in support.
'I've told John I'd readily work with him again,' said Ashley. 'He's always fun on Dancing On Ice and he's been very respectful and considerate. I'd like to see him come back. The impression I get from this story is it's something small and historic, something blown out of proportion. What I'm not a supporter of in regard to cancel culture is when the speed of allegation is much faster than the speed of investigation. Before I make a judgment I want to see and understand the facts.'
There has been outrage on Twitter, with many users pointing out that John's 'tomfoolery' could be regarded as indecent exposure, and that the fact it happened among work colleagues is no excuse. 'You don't do that in work. You don't do it full stop. If you did it in the city centre you'd be arrested,' posted one user.
So does he regret the way he behaved? 'You can't wind the clock back,' he says.
'They were different times, which is why I wouldn't do now what I did then. I've acknowledged that by the way my behaviour has changed. The trouble is that certain cancel culture enthusiasts are not allowing me to acknowledge it. I've always believed that the reason I was put on this planet was to bring joy to people, make them laugh. How I do that has evolved over the years. I'm still using humour, just in a different way than might have been the case ten or 20 years ago.'
Now, he says, he wants to move on, both personally and professionally. Many years ago he bought a house for his parents down the street from where he lives with Scott.
'They're getting on now and I've been their primary carer throughout the pandemic, doing their shopping, getting their prescriptions from the pharmacy and so on. My mother broke her pelvis at one stage but she's on the mend now. I'm just thankful I can keep an eye on her and my father. I'm thankful too to the scientists for coming up with the means by which we can combat Covid via vaccinations, and the healthcare workers for administering them and looking after us so selflessly. We owe them a great debt of gratitude.'
What about professionally? 'Well, I'm at the early stages of putting together a show full of anecdotes and songs that will tour throughout the UK when restrictions are finally lifted. As far as I'm concerned, it's back to business as usual.'
But it remains to be seen later this year with the announcement of the line-up for Dancing On Ice whether John's career too might be put on ice.
***
I can see now my actions were pretty juvenile but this was a different time and it's something I would not do today.'
Well, to be blunt, he’s too old to be doing it anyway, people would just roll they eyes at a pathetic old lech instead of maybe giggling at a younger man’s adorable/innocent/whatever tomfoolery.
'In fact many members of the cast and crew have been in touch since this latest storm blew up giving me their support,' he insists. 'I won't name them because I don't want anyone to find themselves in the firing line.'
I think he should name them. Just for fun. Come on! Because I doubt there have been (m)any. If this story teaches anything, it’s that whatever you say/do can come back to haunt your celebrity status years later in most unexpected ways. Or maybe he was always the intended main course, Noel Clarke only the appetiser...
#John Barrowman#Doctor Who#Daily Mail#hmm#I wonder if Noel Clarke has been arrested already?#heh#funny how John's not actually talking about Doctor Who#it's all about Torchwood#and basically saying what everybody already knew#except adding some human touches#hubby and parents#and of course therapy#he should get in touch with Prince Harry#or Oprah#maybe both#lol
1 note
·
View note
Note
Bro your writing is AMAZING!! I’d like to request if that’s cool with you? Maybe something like you’re a praetorian guard thats friends with kylo, but he doesn’t know you’re a guard (bc of the whole red theme/masks). Then in the fight scene after snoke dies Rey is fighting you & somehow ur helmet comes off and Rey is about to kill u but kylo saves you & when Rey refuses his offer to rule w him, maybe you take it instead bc u guys have lil crushes on each other?? idk man just a thought.:)
A/N : Thank you for your comment! It really means a lot to hear feedback like this, it’s really inspiring me to keep writing 〔´∇`〕
I…really don’t know where this came from I was meant to work today but I’ve caught a cold or something; so I’ve been resting up today (By that I mean I’ve watched a SHIT ton of Adam Driver films lol). I have spent part of the day writing this. I hope you enjoy it anon! I am sorry if it’s not up to the usual standard as I said I am a bit ill! ty for your request
Warnings: TLJ Spoilers! Don’t read if you don’t want to be spoiled for The last Jedi.
W.C: 3,500

The honour of being a praetorian guard was reserved for the most dedicated and elite warriors; you considered it a privilege to be included in this elite group. Dedicating your entire being to the service of Supreme Leader Snoke. It was protocol to be trained in numerous martial art, perhaps the most influential being Akane, in which the imperial royal guard was trained in during the reign of The Emperor.
When you were not on duty, you were either resting or training. You took your training seriously, it was a great stress relief too. You were not sure when you would get the opportunity to train, so when you did you jumped at the chance.
This lead to a walk in with Kylo Ren himself. Ren caught you training in the room that is usually empty at that time of the day. The training room doors opened swiftly, you turned to face the open door. Your face red and your body sweaty, although you did not expect judgement as it is a training room; you are supposed to be sweaty.
“Commander Ren,” You acknowledged his presence, performing the standard First Officer Salute. You knew he was nothing like The Supreme Leader; he was better.
You knew Kylo could defeat The Supreme Leader in a combat of physical strength in mere seconds, but it was The Supreme Leaders mental ability, in particular, his strength in the force, which kept him alive. It was your responsibility to be his physical strength, your duty and your honour.
“At this hour, I normally train in this room,” He observed, his voice monotone through his helmet.
You did not know what to say, “Apologies commander, I can leave if needed”
“I can offer an alternative” He pondered “Spar with me”
You were not in a position to refuse; nor that you wanted to either.
“Yes, Commander Ren” You could not deny you were ecstatic to train with a man who wielded a lightsaber. You saw it as excellent practice, that was it, right? Nothing more.
There were numerous weapons available, you hesitated before you took the spear. Would he guess you were part of the praetorian guard? No, surely not from your choice of picking a spear.
“Let’s begin” He flicked on his erratic saber, the noise surrounding the room.
You were watching him in two ways; firstly, on the skill in which he swung his saber, as well so you could effectively block and parry his attacks. Secondly, which you would not admit to anyone, was you ogling his toned arms, well they were more than toned. Although you had not yet seen his face, you could not help finding yourself attracted to him physically
Likewise, Kylo watched you intently; he saw the strength in your physical form. You were not what he would consider a stereotypical officer to be; what stuck out for him was your individual mind. You were dedicated to The First Order but separated at the same time.
The sparring session ended when Ren knocked the blade out of your grip, it flew to the floor with an almighty thud. You were stunned, it had to be a long time since you were bested in battle.
You were breathing was short and fast, your body sweaty and warm. Ren noticed how the heat had risen to your cheeks; turning them a soft pink. He caught himself staring at you; he pulled away.
“Thank you, Commander Ren, for the opportunity” You saluted him.
“You did well; I’ll see to it that we spar again”.
That was the first time you spared with Kylo Ren and it seemed like so long. Since the discovery and pursuit of the BB8 unit you had been placed at Snoke’s side twenty-four seven, you considered yourself blessed if you got a moment to rest.
The efforts were unsuccessful, and Kylo Ren was at the front of the scrutiny of Emperor Snoke.
“Take off that ridiculous thing off” Snoke whispered, urgently and seriously.
You began to hate how he spoke to Ren; but more so why had you come to idealise a man you don’t really know or understand. But you wanted to, so much.
Praetorian guards were conditioned to react to any unspurred movement in the vicinity of The Supreme Leader. You watched the scene unfold; he had recently returned from his fight with the other force user. Being at the side of Snoke you heard the untold rage, anger and disappointment that he felt.
When Ren adamantly removed his helmet; the Ren you saw was not like the man you use to know. He looked so defeated, his dark hair fell in front of his pale face. You noticed how his right eye was a dark red, bruised and sore. Not to mention the new edition of the sharp scar falling across his eye; although the thin black bandaged covered the majority of it. You were observing Ren as Snoke continued his verbal abuse, your ears clocking back to the current moment when Snoke roared;
“… he split your spirit to the bone. You were unbalanced, bested by a girl who had never held a lightsaber, you failed!”
Kylo reacted, as any individual would. He began to hastily rose to his feet but Snoke was always one step ahead, he released a wave of force lightning which sent Ren smacking the cold ground.
You empathized with his pain immensely; the crimson armour you wore would send sharp electric currents throughout the panels. A necessity to deflect blasters and lightsaber.
The conditioned bodies of the guards reacted the moment Ren rose to his feet, yourself included. You all shifted to a battle stance; your decorated spear pointing towards Ren, the man you admired so much. The base of the spear was the same red as your armour but was decorated with a beautiful silver blade, no doubt made from the finest silver in the galaxy.
The moment Snoke returned to this throne you relaxed, spinning the spear to stand on the ground; the tip peering over your shoulder
The man you saw was not the Kylo you had come to know; although he was unaware that you knew him. He left the room and entered the elevator, you could only imagine what was whizzing through his mind.
Eventually, you were allowed to rest, you returned to your quarters. Shedding off the heavy armour. You stepped into the hot shower, letting the water wash away the intense situation that occurred today. Your mind could not help sympathising with Ren; you found yourself becoming nostalgic on the times you use to spar with him.
“Thank you for the opportunity once again, Commander” You hated being formal, but it was necessary. A few hours before Ren had left a message for you on your transceiver, a request to spar with him again.
You would not deny yourself the opportunity; you were excited about the experience. The moment you read the message your world brightened ever so sightly.
You and Ren were in the same training room as before, although this time you had not chosen your weapon. You glanced over the display of various tools and devices.
perhaps something different this time? You considered.
“No, the same weapon as last time” He spoke, ah, you had forgotten how to force users can sense the smallest detail of your mind.
“Yes, Commander” You affirmed, grasping the spear. While you were checking it over, you heard whirs and clicks that you did not recognise. Followed by a thud. You turned your head and for the first time saw the commander without his helmet.
You understood it was more of a statement rather than a need to hide anything he was ashamed of; you thought how you liked his physical features. Especially his hair, you then reminded your thoughts to be quiet.
He already had heard them of course, but he did not tell you that.
You both took the position, standing opposite each other.
“Let’s begin” He unsheathed his saber, and twirled it at the same time.
The training was far more intense than the one before, you had both gotten accustomed to your fighting style. Making it more challenging. As expected Kylo once again bested you in battle, throwing you to the floor, the spear dancing on the floor as it flew from your hand.
He held his gloved hand out to you, you took it gripping it tightly. It was so much…larger than your own.
“Thank you again, Commander” you wheezed out, trying to look respectable.
You left the shower, finally relaxed and able to sleep for the night. You hoped Kylo Ren also had ease sleeping that night, you imagined he found it difficult to sleep most nights, especially with the responsibility he carried. What followed the next day would continue to prove you wrong.
The reflection of a hissing blue blade bounced off your armour, your mind and body coming to attention the moment it ignited. You watched as it pierced through The Supreme Leader. You stopped breathing for a short second; you faced Snoke and watch the blade be pulled from him, cutting him in half.
Instantaneously you equipped your spear; yourself and the other guards began your assault on the girl and Ren. You could not show resilience, you could not show you did not want to kill the person you admired the most. But you had a duty above all.
Fate had landed you in the position to fight the girl, wielding the blade that killed Snoke. He was fast, although slightly inexperienced but the rage made up for this. The rage seethed through her eyes as her blade hit your spear. You focus was on her, but you observed from the corner of your vision how your fellow guards fell one by one.
This is it you gravely thought. The end of your life was near.
The girl scraped the saber against the floor, the hot sparks bouncing off your armour. The blade swung close to your feet, you instinctually stepped back. Unfortunately not far enough.
As she pulled the blue saber up it ripped through the front of your crimson helmet. Scraping away at the armour, somehow missing the right side of your face. It obliterated the front of the helmet; leaving a large gaping chunk. Rendering it useless. Nevertheless, you continued to fight back.
Kylo watched as Rey glided through the helmet like it was nothing; the more you moved the more the masked chipped away.
Eventually, the right side of your face was exposed
It’s her. The thoughts whizzed through Ren’s mind. The one I sparred with.
The right of the helmet continuously chipped off, you got frustrated. Ripping off the rest of your helmet. You could still feel the heat of the saber lingering on the broken armour.
This was when the girl used the moment to her advantage.
You were no stranger to being hit by the force, in the early days of your training you were frequently conditioned to withstand such an intense power. She held out her hand in front of you and your body came to a sudden halt. You knew what was coming.
She forcefully pushed you, sending you flying into the wall very high from the floor; your back violently crashed into it. You felt your armour crack, which spread throughout your chest area.
Miraculously the armour still proved useful as you fell to the floor with a depressing thud, your spear falling arm length away from you. if it was not for your Armor you would not have survived the fall; although the pain was indescribable.
Your eyes were begging to close, but you force them open. The impact had flown through your entire being, affecting you in multiple ways. You thought this would be it; she would come to finish you off. You imagined her shoving the lightsaber through your chest, this is how you would die.
By the grace of the gods, it seemed the girl had forgotten you once you were out of her immediate proximity and focused on your fellow guards. One was holding Ren in a choke, you could see him struggling
She threw her saber to Ren, who in one click of a switch put it through the head of the last guard.
That’s it, you was the last one.
The girl then turned to you. It appears she would not show you mercy after all, anyway why would she? You served the most powerful and most destructive being in the galaxy; there would be consequences.
Your arm weakly stretched out and gripped your broken spear; although it was not in its prime it was still sharp. A last-minute defence.
Her eyes bolted to you, she saw you reach out and grip your weapon. You could feel her march over to you, her footsteps heavy on the metal floor. Although your senses were blurry, you could tell at the velocity in which she was coming to finish the job.
“Rey” That deep voice, which you had come to admire called out. She ignored it and continued powering towards your defenceless body.
“There is no life left in that one” Your heart sank.
“leave her to die”. Your heart sank even more.
You were not sure if it was due to the intense physical pain that she caused or the intense emotional pain that he had just inflicted. But tears begin to sting your eyes, dripping down your bloody face.
Had Kylo Ren betrayed The First Order? Was he to return from where he came? Anger and confusion surged through your veins, Ren could sense this. Rey thought he was staring at her, but he was staring through her. At you.
Trust me, stay still, do not move. His voice reverberated through your mind.
Calmness washed throughout your body, although this was not the best decision in this moment in time as you felt your body beginning to slip in and out of consciousness. Resulting in you hearing parts of their conversation.
“It’s time to let old things die…We can rule together and bring a new order to the galaxy”
So, he had not betrayed The First Order; not entirely.
“Please, don’t go this way” She begged
‘Your nothing, but not to me” Oh, did he care for her? It seemed like she did
“Join Me” Ah, another stab in the chest.
“Please” He was pleading; you sort of hoped she took his decision. You could imagine the consequences if she did not.
You regained a clearer consciousness when you felt a strange force hitting your body. You forced your sore eyes open; observing Ren and the girl pushing themselves away from one another. The lightsaber hanging in the middle. Momentarily a bright light surrounded the room, both of them flying in opposite directions. The sheer force of the blast rolled you over, knocking you out once again.
By the time you awoke the throne room was somehow worse than before, more specs of fire falling from the ceiling. You looked around the room.
The girl was gone. Perhaps she had offered you mercy or had more important matters to see to. Either way, you were relieved, and very lucky.
Wait, Kylo. His name shot through your mind like a speeder, your eyes desperately searching for him. You could not mistake his broad frame, collapsed on the metal floor, his back facing you. You could not tell if he was breathing, you still had a duty, you had to get closer to him.
You slowly rose to your feet by leaned up onto your knees, continuing onto standing on your right foot and then you left. Your body ached like no pain you had ever known.
You limped over to Kylo; your weight bearing down on your injured left leg. You held onto your side in which the girl cut you, while it was not a deep cut it hurt badly. You could feel your muscles begging for rest. Eventually, after what seemed like far too long you reach Kylo’s body. Your training kicked in; begrudgingly you knelt down next to him. Letting out a groan of pain as you moved next to him,
“Commander Ren,” you called to him as loud as you could, which was actually the sound of whispering.
You hastily removed the armour from your right hand, Flexing your fingers. The soothing air hitting the bloody skin. You placed two fingers on Ren’s neck, feeling for a pulse.
It was there, faint, but there. You sighed. Thank the heavens.
Commander Hux entered the room, his face paler and pastier than usual. The destruction was beyond what he had imagined. He wearily walked over to The Supreme Leader’s split body; he watched The Supreme Leader’s lower half fall to the floor. The thud reverberating throughout the shattered room.
You had not glanced at his corpse once. You did not desire that image burned into your mind for the rest of your days. You were unaware of Hux gazing at you and Ren, you were too focused on making sure The Commander was alive; as a consequence, you were oblivious to Hux maliciously pulling out his pistol.
Kylo awoke with a gasp, his head facing the floor. You instinctively placed your hand on his shoulder, he gazed at your bloody face.
“Your alive” He gently spoke. Kylo stared at you; he noticed how your bottom lip had a large cut in which the blood around it had dried up. Your eyes bloodshot, your face once perfectly clean was covered with small nicks, bruises and blood. He only imagined how bruised your body would have looked. Ren could tell you were in agony, but admiring you for persevering
Hux placed the pistol back into its holster, sneakily pulling his back coat over it.
“What” Hux was pissed, you had only known General Hux around The Supreme Leader, like a doting child. You had never heard such anger in this voice although you imagined him to expressing it frequently. “Happened”.
“The girl murdered Snoke” He was lying through his teeth, it was necessary for his survival.
“General” You stood hastily, the pain shooting through your body. Hux could tell you were in great pain, he did not care.
“I can corroborate with Commander Ren, what he speaks is the truth”. You saw Hux’s pale eyes gaze you up and down; no doubt judging you for how defeated you had looked. You would have no motive to lie, you were a guard and nothing more. You saw Hux’s eye observe you with concern. Kylo hastily stood up,
“What happened?” He sturdily asked Hux.
“She took Snoke’s escape craft” Hux spoke, grinding his teeth in anger.
“I know where she is going…get all of our forces down to that Resistance base, let’s finish this” He asserted his authority, without a shadow of a doubt.
“Finish this?” You instantly recognised the threatening tone of Hux’s voice. “who do you think you’re talking to?”
Your aching body reacted instinctively, taking a defensive stance to the side of Ren. Albeit you would be useless without a weapon and not to mention how beaten up your body was. It hurt to lift your limbs so it would be impossible to perform hand-to-hand combat. He did not need you to defend him, but it was more of a symbolic signifier to general Hux. One which Kylo did take notice of.
—-
After Ren had force strangled Hux and assumed his position as The Supreme Leader you hastily retreated to your chambers, you knew the fight was not over. But you were no use to anyone in this physical condition. You tore off the remains of your crimson Armor, countless panels laying on your once clean floor.
There was no time to take a shower regrettably as you would begin the assault on the rebel base, in which Ren asserted that you would accompany him.
The sound of the door sliding open brought you to attention, you walked out of your private bedroom freshly changed into your First Order uniform; he was standing there, with troopers behind him.
“Leave us,” He commanded the pair, who took watch outside of your chambers.
There was a pause for a short second “I never suspected you were a praetorian guard” he inquired.
“You never asked” You smirked at him, “Besides, I felt best if I kept my identity as a praetorian guard a secret so it would not impact my duties” You muttered, actively lying through your teeth. Since you had met Kylo your entire stance on being a guard had changed, watching Snoke torture him made your blood boil.
“I am still bound by my duty. If you would have me, I want to serve you. Although I feel that was obvious by my actions earlier, I feel it had…value if I say it to you directly” You warmly smiled at him.
He took a step closer to you, your heart leapt for a second.
Ren’s eyes never left yours, moments ago he was betrayed by the one person he believed would join him. Yet here you were, someone who had always been there, diligent, loyal and strong. It made his heart slightly flutter.
“So, you will join me?” He repeated himself, he was so close to you that the personal space was almost none existent.
“You never had to ask, I am always at your side Supreme Leader Ren.”
#Kylo Ren x Reader#Anonymous#Kylo Ren Imagine#Kylo Ren#Star Wars Imagine#TLJ#The Last Jedi Spoilers#TLJ Spoilers#Star Wars#Star Wars Fanficiton#Kylo Ren Fanficiton#This one is so long LOL#TheLeastWriting#MKWrites
239 notes
·
View notes
Text
Is Glass Conservatory Roof Or Lightweight Tiled Roof Covering The Best Choice?
Get New Construction Houses Available
Content
Exactly How The Home Remodelling And Refurbishment Solutions In London Job.
Rj Refurbishment Services.
Begin Your Job.
Small Orangery Conservatories And Glass Conservatories.
Let The Sunlight In! Every Little Thing You Would Like To Know Concerning Sunrooms
Freshly Built Residences.
To look for registration as a building contractor, firstly make certain you have examined the registration details and application guidelines. A Residential Contractors Licence details a certain areawhere you are certified to achieve jobs. Various categories are used for developing experts (Engineer, Building Inspector, Amount Property surveyor, etc.). When it comes to experience, you are needed to have functioned as an employee, a subcontractor or a chosen supervisor.
How The Home Renovation And Also Refurbishment Providers In London Job.
Is the NCC part of the law?
However, while the NCC provides a legal framework, it is ultimately the responsibility of the individual states and territories to administer. The NCC is the national technical code – the actual laws that reflect the application and administration of the NCC are matters for the states and territories to enforce.
To be registered, you will certainly need to present your certifications and experience. You will certainly require to document your qualifications as well as experience. Look into the page "Recording your experience as well as qualifications" for more information.
The 'extremely helpful' as well as high-quality solution impressed our viewers with 85% saying that making use of MyBuilder made their life less complicated and 92% score their experience good or superb. Despite which specify you stay in as well as what sort of permit you need to obtain, you will certainly have to successfully complete a training program with a Registered Training Organisationthat concerns official certifications.
TrustATrader additionally has a far better score on TrustPilot when compared to Checkatrade, although Checkatrade do have even more evaluations. It truly resembles TrustATrader are taking a look at what has not helped Checkatrade as well as have seen to it that they do a better work at ensuring both consumers as well as tradespeople obtain the greatest out of the system. TrustATrader was set up in 2005 by Gary McEwen that like Kevin, had a disappointment with a trader and also wanted to find a solution for it.
Which suggests that specific areas will be filled with investors, limiting the chance for you to be seen and to obtain jobs. Checkatrade also have a a great deal of collaborations, several of which supply special deals to tradespeople at particular suppliers such as Wickes. They likewise have partnerships with particular councils, that refer individuals on to the web site when work is needed. With both firms being very comparable, among the largest benefits that Checkatrade has a great deal of marketing plans. Checkatrade advertise on TV, usually on prime ports such as Good Morning Britain climate, the Jonathan Ross show and also others.
With this, you will certainly see to it your licence is not delayed or denied. Mandatory certifications are explained in the Construction Professions Mandatory Qualifications Arrange. You should also check the experience needs prior to applying. Keep in mind that specialist building work is notincluded in those courses.
Do I need Building Regs approval?
You will require Building Regulations approval if you intend to carry out any new structural work or alterations to your home. Additionally, work involving these areas also requires approval, although in some of these cases, competent persons can self-certify their works for compliance: drainage.
Whether a profession is regional and also what they're already devoted to will tell you a whole lot regarding whether it's practical for them to provide what they assure. It may simply be that the various other quotes are excessively high and the one firm is simply good value. A high cost is not always an indicator of top quality in a building firm yet, more than that, it is important to stand up to the evident lures of an affordable price. If one building contractor returns with a quote for your work which is significantly less than the other tender rates, you need to be suspicious.
Rj Repair Solutions.
Start Your Job.
TrustATrader's vision is to produce the most relied on trade directory site as well as to aid consumers make useful choices on which tradesperson to utilize. TrustATrader is very comparable to how Checkatrade functions but do have a few one-of-a-kind marketing points that help to make it truly stand out. While doing some research study, I have additionally seen that a great deal of traders are miserable with the search formula the site employs, with un-related tradespeople being shown above them on the website. This also reflects that Checkatrade do not limit the quantity of tradespeople that can register in certain areas.
A certified manager certificateis released for 3 years and does not enable you to get for job. You are enabled to do only the types of work explained on your licence. You can unsubscribe at any moment as well as we'll never ever share your information without your permission. A good relationship will certainly ensure the job runs efficiently, that conferences progress well, job is kept up at an excellent pace and any kind of unforeseens are handled in one of the most expert way. Paying for job not yet carried out is a recipe for calamity and also any kind of demand by a building contractor for labour repayments ahead of time could be an indication he's in monetary difficulty.
What is a glass room?
A glass room is an extension of the garden rather than an extension of your house, meaning it's designed to allow you to use your garden and outdoor living space for a much longer period of the year. This can be extended further by installing infrared heaters.
Place information of the job down in composing-- The more thorough the better. As one of the UK's lengthiest standing and also trusted profession bodies, the National Federation of Builders is continuing to spearhead the fight versus rogue investors. local architects enables you to contact our trustworthy builder and also agreement participants, every one of whom have been strictly vetted as well as have undergone a range of referral checks. TrustATrader market on TV as well as on over 60 radio stations throughout the UK. This aids to construct recognition of the service and to generate possible leads to the tradespeople.

Nonetheless, you need to be willing to fund huge product products yourself upfront-- yet make certain they are purchased in your name. After taking into consideration all this, you could locate that your head is rotating. Ultimately though, there is something to be claimed for your suspicion. It's difficult to evaluate each and every single little point up, so if you have a fellow feeling about one specific building contractor or professional, and also the cost is right, then choose it. First of all, where are they based, as well as what jobs do they currently have on the go?
What is the minimum area of window with respect to floor area?
As a general guide, the total window area should be less than 25 per cent of the total floor area of the house. Most of the windows should be located to the north where good solar access is easiest to manage, with minimal amounts on the east and west facades.
Small Orangery Conservatories And Glass Conservatories.
The home builder declines to authorize a contract agreement or produce any kind of documentation. Another negative sign, which provides you no hard copies to draw on, while leaving you in a weak placement legitimately if things go wrong. See MyBuilder for a convenient way to choose the ideal tradesperson for your work. The quick as well as trustworthy platform was complimented by our visitors with 90% of our panel concurring they would certainly suggest the service to a close friend.
youtube
You can not take advantage of zero score forVAT on a new construct, or most of the BARREL concessions on restoration work if the builder you hire is not BARREL signed up. Checkatradeand theGuild of Master Craftsmenare also great areas to locate a building contractor local to where you live. They supply rigid checks, which should provide you much more peace of mind. They have a search tool where you can discover certain sell your area and look at their recommendations. All FMB members are vetted and independently evaluated, as well as are examined to make certain that they have the correct insurance policies in place.
It also sponsors the English Football League Trophy, renaming it to the Checkatrade prophy. All of this advertising aids to bring customers to the web site, helping to supply potential work to the tradespeople listed to them. Checkatrade and also TrustATrader are various and also work with a registration charge, so investors will certainly not pay per lead and also will certainly receive leads automatically from people looking for traders.
Newly Built Residences.
. Dublin, Ireland that can handle the full range of works, either by themselves or through sub-contracting.
Request recommendations and tales about how the builder has fulfilled various difficulties along the way.
Assemble a shortlist of at the very least three home builders in Dublin, Co
It is usually a good idea to play evil one's advocate and ask what the home builder will certainly not be accountable for, such as structural designer consultations.
If you can, you can try to see contractors' previous projects face to face and also speak to previous clients, or otherwise, read testimonials, suggestions as well as ratings, as well as consider detailed pictures of jobs.
However, for identify with the luxury of having the ability to choose when to purchase their first house, they ought to keep in mind that it doesn't pay to wait too long.
As the record notes, 50% of the homeowner in the research were able to buy when they were in this age variety, contrasted to only 37% of homeowner today.
Before you hire a builder in Dublin, browse through our network of 217 contractors.
We follow green building techniques as well as use environmentally friendly products in kitchen cabinetry, carpeting, exterior siding, paints as well as landscaping.
Read through consumer evaluations, check their previous projects and then request a quote from the most effective builders near you.
Specialist structure job entails demolition of a buildingand setup of a pool. You will certainly also require to supply two referrals, evidence of insurance policy, economic info, and experience a meeting. glass extensions of professionals "ensure that all building work carried out satisfies the needed building requirements". The first one allows you "to work in building and construction, profession, demolition, website prep work as well as restoration as well as fixings".

With both Checkatrade as well as TrustATrader, before a trader signs up to the site, they are fully vetted as well as checked to make sure that they are of a top quality and also will be able to perform a high level of job. The leading 4 trades directory sites in the UK are TrustATrader, Checkatrade, MyBuilder and Rated People that all use the very same sort of services. MyBuilder as well as Ranked People are a pay per lead version, where the investor pays for warm leads that come via the site. With these web sites, nearly any type of investor can join, making it a really affordable landscape, suggesting that paying for leads will frequently lead to paying for a work that will certainly never occur. Must you think a cowboy contractor, ask around - and ask if anyone has had actually any job done by the builder, as well as was it finished to their fulfillment.
#home builder#best builders#quality build recommend#glass room extension#extension with glass#general builders local#local general builders#home refurbishments#refurbishments services#office refurbishment#home conversions#house conversions#attic conversions#home extensions#house extensions#extension builders#architect builders#new home developments#conservatory extension#local architects#new property developments#glass rooms#building contractors#residential architect#best new home builders#building contractor#kitchen refurbishment#garage conversions#convert garage to living space#garage extension
0 notes
Text
How To Start a Blog In 2020
How To Start a Blog In 2020
Are you finally ready to start a blog you have been thinking about for years? Well great! In this article, I will let you through how to start a blog and how to get up and running quickly. I will make it clear to you through the step by step process. So, if you are ready, let's get going if you want to learn more tips to improve your WordPress blog.

● Get Hosting
● Choose a domain name
● Install WordPress
● Choose a theme
● Add plugins
● write our first blog post
Step 1. Get Hosting
Whenever you are creating a blog, it's very similar to what's happening when you build a house. You have the area that you need to use to build the house on. That's the same as the hosting provider.
You want to start building your blog and the website is your home. That's what blog files, images used in the blog, the color structure, how it looks, the functionality of it via the plugins.
Now, we recommend using the Bluehost as your hosting provider. They have:
● Great customer support
● Most established Hosting Company
● Officially recommended by Blog Tool, Publishing Platform, and CMS - WordPress
● Users can get an attractive discount
● Free Domain
One of the great things about Bluehost is now they have made installing WordPress even easier. You can also select a theme that you might like to go with your blog. Once you set up your account, you can click start building up and we will be taken to the backend of our WordPress dashboard where you can easily start customizing it.
Each blog needs a web host to enter its site on a server so that people can access it online. Without a hosting account, your blog is not noticeable on the Internet.
The achievement of your blog depends a lot on your provider, so you should choose your best web hosting. An excellent hosting platform keeps your blog up and running without interruption, strengthens security, and integrates with WordPress.
You should select a host that is accurate and comes at a reasonable price. In this phase, your best option is a simple budgeted hosting plan. Next, you will need to register your domain and choose a web hosting company to start your blog.
Step 2. Choose A Domain Name
Designating the blog domain is not a relatively difficult task and you can easily assign a perfect domain name for your new blog. If you have chosen your domain name so you can skip this part.
This part is especially for you If you haven’t specified the domain name till now-
When I turned on my blogging career, I didn’t know how to select a premium or brandable domain for my blog, and that’s why I spent 10+ domains because I don’t like it, and also they didn't look brandable.
Here are some tips which will assist you to find your dream domain –
1. Keep it Short & Simple
You must always try to keep your domain as short as possible, never make it too long because it’s not easy to utter. And if you keep your domain name simple, then it’s simple to remember.
2.Aim Keyword
You can utilize your main keyword in your domain, which benefits you in SEO.
Recommended Blog- SEO FOR KEYWORD RESEARCH
3. Never ever Use Numbers
You can’t utilize numbers in your domain because it’s not clear to remember the numbers.
4. Always utilize TLD Extension
I suggest you use a domain extension like .com because it’s available for global use.
If you are still not able to conclude the domain for your blog, then you can reveal brandable domain name utilizing one tool: LeanDomainSearch
But the one thing we want to do is we need to change our permalinks. The permalinks are describing the URL of your blog. Some blogs prefer to have their whole date structure up where it's like by the year, by the month, by the day, and under permalinks where this is changed or updated.
You will want to see this in the beginning and you will want to stick with this throughout and that's simply because once you have set this up. You don't want to keep changing the permalink structure so you really want to get that from the get-go.
But here are some other examples of what you could use and if you are doing like a true blog where it's very important to you to showcase the time and date then you can keep that. It's simple, it is easy for readers to possibly remember because it is shorter and it is also better for search engines.
So, for me, I prefer that. But once you figure out which one you want, go ahead and set it now and then really try to ever change it again.
Here, I will steer you how you can obtain the domain and host.
Follow these steps to purchase hosting and domain for your first blog:
1. Click on the formal link of the Bluehost to start your first blog.

2. Choose Your Favorite Domain.

3. Fill Your Account Information.
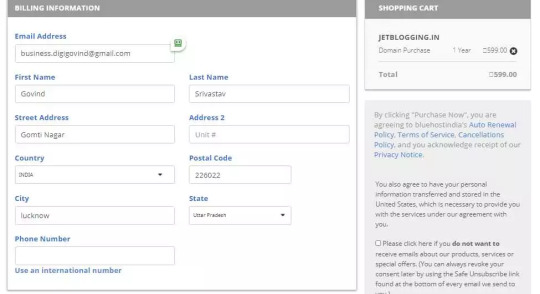
4. Enter Your Credit/Debit Card Information.

5. Confirm the conditions and let's get started.

And you’re done.
Congratulations! You have successfully completed the process of purchasing a hosting and domain for you. You have scratched the most prominent step on your way to starting your blog.
Step 3. Install WordPress
Let's move on and have a look at how to set up a WordPress blog.
As we all know that installing WordPress is not like a missile and it's not so easy as it seems.
The most important thing is that we must have a proper guide. Here in this portion, I will let you know how you can set up your WordPress blog in order to make it live on the web.
Firstly, you have to go to your web hosting account, If you have already purchased it, then you can see the similar interface after login to your account:
You have to determine the start of a website option to make a new brand website.
Then, you must click on the software which you want to install on your website,
Just click on the WordPress software so that you can install it on your website. After that you just have to fill some of the login details related to your blog:
This data is necessary, so I suggest you write your password on dairy so if you miss so you can check there,
After filling out all the basic login information,
Then you have to relate on the big complete button to continue with the process.
It will take a while to complete setting up your WordPress blog.
Now, hit on the proceed button to go on customer area:
Now, click on my account button on the menu and Click on the installation tab:
Now, hit on the Go to Admin Panel in order to visit your new blog admin dashboard:
Now, you will turn to your WordPress dashboard after that fill your login details which you prefer during the installation and Click on the login button:
That's all to set up your WordPress account.
After putting in WordPress, themes are more essential if you are just starting your new blog.
In blogging, the layout of the blog matters because if you don’t have a considerable design, then you are missing a lot of traffic and audience. Good layout assists to build more trust towards your readers.
Step 4. Choose A Theme
In your WordPress stock, there are a lot of free themes that are accessible for you, but I don’t suggest you go with those themes because these free themes are lenient to hack, and by this, you will mislay your all blog data.
If you are utilizing free or nulled themes is similar to Architecting your own Destruction.
If you want a successful blogging business, just invest in themes and plugins because of this, you can get the best involvement on your blogging journey. I notice many bloggers don’t invest in this type of thing and encounter many critical issues later.
So how will you choose a good theme for you?
I usually use GeneratePress, which is one of the lightest themes of the blog, and also I preferred the design of this theme, and many pro bloggers are utilizing it because it’s simple to design.
There are some more themes which I can suggest to you but before that here are some few things which you must keep in your mind while purchasing a theme -
You should choose the premium themes which you are buying must be lightweight and easy to use.
Check that the theme is consistent with your deadest WordPress version.
Always examine that the theme is responsive or not.
Support is the main thing, so strive to get a theme that has great contact support (like Generatepress and Themeshop).
Now let me know you some of my favorite paid themes that I am presently using on my other blogs.
Astra Pro

Astra Pro is convenient and easy to customize the theme. This theme is similar to generatepress, but they have a lot of characteristics that are not available in generate press. And, you can easily make your homepage impressive and responsive too.
FocusBlog By Thrive Themes

Focus theme is one of the most powerful themes which has all essential options like email opt-in, shortcodes, and many more.
Schema Theme

Schema theme is formulated by mythemeshop, and the useful part of this theme is this is search engine optimized. It’s also the quickest theme as well.
GeneratePress
GeneratePress is the theme that I am currently utilizing in this blog. It is one of the lightest theme (under 50KB) and loads your website soon.

After grabbing one theme, now it turns to install that theme on your blog.
In order to install any WordPress theme on your blog, just follow these below steps:
First of all, you should sign-in non your WordPress dashboard ➡ appearance ➡ themes.
1. In the themes section, you will get various free themes, then click on the add new button.
2. Hit on the upload theme and upload your theme zip and generate that theme on your blog.
Finally, you installed your theme on your blog.
Installing a theme is a very simple job, but the primary and essential job is to customize that theme.
So if you are willing to customize your theme, click on appearance ➡ customizes, and now you can easily customize your theme as per your choice.
Step 5. Add Plugins For WordPress
WordPress without plugins is like a disabled person because plugins are important to (Optimize your content, for SEO, Speed, and many more things). There are many more plugins available on WordPress, but there are few plugins which I am presently utilizing.
Recommended Blog- What is SEO
Like to notice the list of my favorite plugin?
So, here is the list of my favorite plugins which I am privately using almost in all my website –
Elementor or Thrive Architect

These are some of the page builders for formulating any page. These plugins enable you to build your dream landing page by just drag and drop. I employed both, and they are very portable to use and support me to create a stunning page.
Rank Mathe SEO

SEO is fundamental to rank and steer a lot of traffic. Rankmath is a fresh SEO plugin. Many bloggers imply you go with Yoast, but I don’t suggest that because they don’t have lots of attributes like others have.
WP Rocket

You already understand that speed is one of the most important factors which helps the blog to rank on google. So wp rocket is the plugin, which boosts you to optimize your full blog. I strongly advise you to purchase this plugin if you are seeking for an opportunity so you can move with autoptimize.
Convertpro

It is one of the best lead generating plugin that offers you a great opportunity to serve as a pro at improving modifications on your blog.
These are some of the top plugins which I tried to run my blog properly.
I don’t recommend you to go with nulled or clanged plugins because these types of plugins are simple to hack by the hacker, and by this, you can lose all your blog data.
If you are stuck into how to install the plugin? Let me assist you how to install the plugin,
● First, go to your WordPress dashboard.
● Then go to Plugins.
● Then Add New.
● Then upload your plugin zip file and hit on the “install now” button.
● After installing the plugin, hit on the “activate button” to install that particular plugin.
Step 6. Write Your First Blog Post
Are you tensed about writing your first blog post?
So let me assist you to write your first post on your blog.
First of all, I want to greet you that you have successfully created your WordPress blog, and now it’s turn to make some quality posts for your new blog.
For building a blog post, you have to go:
Dashboard → Post → Add New
After that, you will reach on your post, and here you can turn on writing your first stunning post.
Now, Let me provide you some tips that assist you to make your first epic post:
I suggest you go with long-tail keywords because it’s lenient to rank.
Always strive to create a catchy title of your blog post by using numbers and power words.
Add some attractive images for making your article more inclusive.
I strongly suggest you develop your article lengthy and more in feature, and by a more lengthy post, you can make your reader your true lover.
I recommend you go through with the on-page direction so you can optimize your content easily.
Now, just have a look at how well you write SEO friendly content. Before writing, you just have to research your target keywords.
Key writing tips for SEO-friendly blog
● Think before you write.
● Create a clear structure like an introduction, body, and conclusion.
● Use paragraphs less than 150 words.
● Use headings to increase readability.
● Optimize the length of your post.
● Use active voices.
● Use Grammarly keyboard to avoid grammatical errors.
● Use transition words like so, after that, that, in spite of, even though, in addition, moreover, furthermore, consequently, similarly, etc.
● Try to keep the readability score more than 60.
Some Of The Brainstorming Blogging Tips In 2020
Now, we are going to discuss some best brainstorming blogging tips that will boost your blog successfully.
Let's get started.
Browsers do not wait to visit your blog.
If you are assuming that after generating a blog, any guest waits to explore your blog, then you are thinking absolutely wrong.
Because guests are much smarter than you. And till they do not reveal your blog beneficial, they will not browse your blog every day.
If you want your visitors to stay for you to reach your blog, then you have to circulate content on your blog that will attain their soul and mind and compel them to reach your blog.
Blogging is not a one day game, it needs some time to rank.
You cannot get success in blogging in a day because it requires time and patience. Some of the basic things in indexing your posts on Google, driving traffic, increasing followers, earning from Google Adsense, and other things.
However, brisk work can damage you.
Google can easily identify unique and quality content.
If you are thinking that you can cheat Google, then you are a fool. Because Google is wiser to identify quality content.
So unless your content is factual and quality, your post will not index on the top pages of Google. Google bots identify quality and copied content easily.
You should always publish good quality content on the blog so that Google perceives your blog and gets it ranked as soon as possible.
If you are not making regular blog updates, then you might suffer from failing in blogging.
The primary reason for maximum people failing in blogging is not updating the blog on a regular basis.
If you think that if you will update 1-2 posts in a week, and your blog will rank on top 10 search engines, then your concept is wrong.
If you initiate a new blog, you should keep updating it day by day in order to make it a successful blog. If you update your blog regularly then you will achieve two objectives from it.
The first advantage will be that your content reader will become your regular clients and he/she will visit your blog daily to read new posts on your blog, due to which the traffic of your blog will boost.
And the other advantage will be that Google will largely appreciate the blog or website on which some posts are revised regularly. Thus your indexing in regular search engines will automatically improve and you will drive more traffic than search engines.
Correlate your Good Content as much as possible.
If you have composed a unique article, then you must try to link it as much as possible in your other content.
In addition, also amplify the popular post widget to the sidebar of your blog.
Discard Bad Links From Your Site
Just have a look at your blog's link profile. If the number of bad links or toxic links on your site will be extremely high, then it will greatly impact our Domain Authority, ranking, and traffic.
You can utilize SEMrush, Ahref or LinkPatrol a tool to keep an emphasis on the link profile.
Writing and Editing is not only essential for blogging.
If you are formulating a business blog then you need not just improve writing and editing skills.
Also, there are various things that you need to infer. You have to perform data analyzing and know what should be done and what should not be done consequently.
In addition, you should also renovate your blog. Call-to-action is also fundamental in your content and in addition, you should also, focus on email marketing and social media marketing.
Never stop learning
There are some updates and changes in blogging regularly. And in day-to-day blogging, new things will be discovered. So if you want to create your blog, then you should focus on new things of day-to-day blogging and use it.
Stop Keyword Stuffing
Keyword stuffing renders your content uninteresting and provides the reader with a bad experience.
You think that laying a lot of keywords in a blog post will make your content rank well. It is not a fact.
Always keep the amount of keyword density in your content at 1.5% - 2%.
Always target Long Tail Keywords
Long Tail keywords play a significant role in boosting organic traffic to your blog.
Advantages of using the Long Tail keyword:
● Less competition.
● Better conversion rates.
● They rank well in search results.
● Helps in fetching more traffic from the search engine.
Do not make Multi-Topic Blog
Most new bloggers do this type of mistake. If you choose a multi-topic blog, then surely you will not get success in blogging.
Before you commence blogging, decide which topic you appreciate the most and you can write well on that topic.
I would recommend you to build a single topic blog.
Reason, Single niche blogs index quickly in Google search results and they attain success soon.
Publish Quality Content
Content is King.
If you want to discern your post on the first page of Google search engine, then you must first focus to publish the quality content.
Always write distinct and quality content. Also, your content should be engaging and attractive.
And one thing that needs your focus, your articles should be at least 1000 words. Because lengthy content comes faster in search engines than short content.
Always write down the Catchy Title
The title is necessary to improve CTR and increase visitors on your blog.
If you compose a good article but do not write a catchy title, then no one will connect to your article. Because most of the people discern the title of the post and click on the article.
If you write an engaging title with good content, you will have many advantages such as:
● More Readers.
● Incoming Links.
● New Subscribers.
So, always focus on writing an attractive and unique title for your blog post.
How to compose a good and catchy title:
● Keep post title short (less than 60 characters)
● Add your primary keyword.
● Use numbers in your title.
● Use when, why, and how.
● Write the title of the post clearly.
Use of social media in your article
Social Media improves the quality of your content and creates your content attractive and useful.
If you want to stay the visitor on your blog for a long time, then just use the media in your content.
Read More Blogs -
WHAT IS BLOGGING
13 TOP WAYS TO MAKE MONEY BLOGGING ON WORDPRESS
Source- How To Start a Blog In 2020
0 notes
Text
Your Rep Book: What is it? What to include? Where to start? Plus my TOP TIPS 🎤 ~
So, you’ve heard about rep books? But don’t know where to start or what to include in yours? Never fear, I’m here to (hopefully) clear things up a bit and answer any questions you may have. A rep book or rep folder is essentially all of the songs that you’ve chosen to have as ‘go-to’ options for auditions. The songs that show off best what you can do and, most importantly, are VARIED and DIVERSE so that they cover most eventualities when you have an upcoming audition and need to choose a song.
What to Include - a ROUGH guide:
🎤 At least TWO contrasting contemporary ballads
🎤 At least TWO contrasting contemporary uptempo songs
🎤 At least TWO contrasting legit (pre-1965) ballads
🎤 At least TWO contrasting legit (pre-1965) uptempo songs
🎤 If you’re classically trained, it’s good to have a classical song or a song from an operetta, e.g. Gilbert & Sullivan
🎤 At least ONE Stephen Sondheim song
🎤 At least ONE ‘golden age‘ song by a composer like Gershwin
🎤 At least ONE Disney song
🎤 At least ONE pop song
🎤 At least ONE rock song
Some Questions You Might Have:
🎤 What exactly do I mean by ‘contrasting’? - The songs in your repertoire could be contrasting in a variety ways. For example: character, musical style, time period, etc. After all, the term ‘contemporary‘ is a really broad category that covers A LOT of material so it’s good to have a couple of DIFFERENT options.
🎤 Why have two options? - It’s always good to have a backup in case the audition panel asks to hear something else and you don’t want to be caught short with nothing else relevant to show them. However, you also don’t want to show them something that’s super similar to what you just sang - there’s a reason they asked to see something DIFFERENT, after all!
🎤 Why does Sondheim have his own category? - A couple of reasons. Firstly, in general, you shouldn’t sing Sondheim at an audition unless they specifically ask for it OR if you’re auditioning for a Sondheim show. Secondly, Sondheim songs are very specific and unique in style and often very difficult for both the vocalist and the pianist so it’s always good to have a Sondheim option ready in case you need it, but it shouldn’t take the place of one of your contemporary songs, if that makes sense!
My Top Tips!
🎤 Make sure you’re equally comfortable with all of the pieces in your rep folder/book
🎤 Make sure each piece is roughly within your casting type (this includes age, ethnicity, look and gender)
🎤 Do not lower or raise the key - always sing the song as written
🎤 Always be clear on your chosen tempo. Don’t be afraid to go over to the pianist and politely yet assertively mark out your tempo for them before you start. Remember, the pianist is on your side and you are in control of your own audition.
I might make some future posts that go into more detail about how to present your rep book and sheet music, as well as the individual song categories, but that’s all for now! x
#singing advice#singing#songs#sing#audition#advice#help#musical#theatre#theater#rep#repertoire#rep book#rep folder
98 notes
·
View notes
Text
SOUTH AFRICAN GOSPEL HOPEFULS TURN UP IN NUMBERS AT THE NEWTOWN MUSIC FACTORY FOR BET SUNDAY BEST AUDITIONS
FOUR AFRICAN VOCALISTS STAND A CHANCE TO SHARE THE STAGE WITH INTERNATIONAL TALENT WITH MENTORSHIP FROM THE BIGGEST GOSPEL STARS
BET Africa (DStv channel 129) opened up the industry with a gospel talent search in South Africa and Nigeria scouting the next best and biggest local gospel singers to join BET in the USA for the production of the ninth season of Sunday Best gospel competition show hosted by the legendary gospel crooner Kirk Franklin.
On Saturday, 6 April, BET Africa took to Newtown Music Factory in Johannesburg where hundreds of hopefuls lined up for an opportunity to audition for the upcoming BET Sunday Best production which could have them sing their way to Atlanta in the United States of America. The aspiring gospel hopefuls auditioned in front of professional and award-winning South African musicians; Bishop Benjamin Dube, Mahalia Buchanan and Amanda Black – who had the tough task to select the best of the best.
Said Monde Twala, Vice President of Youth, Music and BET at Viacom International Media Networks Africa (VIMN Africa): “BET Africa is ecstatic to have collaborated with such remarkable musical talent from South Africa and Nigeria. We are proud to be able to provide this elevating experience for African gospel talent to shine on a global stage as part of Sunday Best in the USA. This is a once-in-a-lifetime opportunity that has once again seen brand BET open up the industry and enrich young talent.”
This slideshow requires JavaScript.
Commented Bishop Benjamin Dube: “Firstly, one has to keep in mind the goal and what we are looking for in the judging process, especially for BET Sunday Best. We are looking for people that are very radical and that would represent us in a proper manner on an international scale. The talent we have seen gives me hope that there will be good representation for South Africa. We understand that the international stage demands that people go an extra mile and that is our reasoning for being a bit difficult during the judging process”
The international show, Sunday Best, is a BET original production that gives amateur gospel singers an opportunity to perform in front of a panel of celebrity judges, who have previously included the likes of Mary Mary, Bebe & Cece Winans and Donnie McClurkin.
Only the top four South African and Nigerian based singers stand a chance to win the once-in-a-lifetime and all-expenses-paid opportunity to participate in the show from 15 April to 15 May this year. Contestants will be part of the top 20 gospel stars from around the world competing for the top prize.
Said Mahalia Buchanan: “We definitely had a bunch of very interesting contestants today and we are hopeful of the pack we have chosen. Our trust is definitely within them knowing that they will do well on a global platform. I mean we already have favourites who not only sing from a place of talent but sing from a place of conviction which showcases that they have a relationship with God where people can have fellowship and get to know Christ through their craft”
Concluded Amanda Black: “We have a lot of promising talent in South Africa and I am confident that from the individuals who have made it through to the second round, we will find what we are looking for, for this competition. I had two to three favourites I believe stand a very good chance of representing the continent in America.”
For more information on about Sunday Best, visit www.betafrica.tv, like and chat to us on Facebook at www.facebook.com/BETinAfrica, or join the conversation about the channel on Twitter and Instagram @BET_Africa using the hashtag#SundayBestAfrica.
BET BRINGS GOSPEL TALENT TO LIFE SOUTH AFRICAN GOSPEL HOPEFULS TURN UP IN NUMBERS AT THE NEWTOWN MUSIC FACTORY FOR BET SUNDAY BEST AUDITIONS…
0 notes
Text
Diana grabbed the microphone when it was offered to her, stepping forward. “Thank you, and good evening,” she said, looking around the room. “I would firstly like to thank the Accountability Panel for organizing this event. Democracy is a conversation, not a contract, and decisions that would affect us all should always be a matter of the people, from the very beginning.” She paused, turning to face the crowd. “Secondly, for matters of transparency and even if unnecessary, please allow me to introduce myself. My name is Diana of Themyscira, or Diana Prince for those who prefer it. I am a member of the Security Council of the United Nations, and a founder of the Justice League. I am unregistered, acquiring diplomatic immunity due to my position in the UN, and because the country I represent and I do not agree with this Panel’s actions. I’ve been in this world for a hundred years, seen ordinary and extraordinary people working together, both for the good of the world and for it’s destruction. I’ve been both on the side of the law and outside of it, with the government and against it, but never against the people and their rights. I’ve never claimed to be perfect, I’ve never claimed not to make mistakes, and that’s why I’ve always been willing to accept the consequences of my actions.” She paused, her gaze traveling through the crowd. “It is my choice for you to know who I am, to not wear a mask, just like it’s your choice to let me know who you are.” She turned towards the podium, looking at the man behind it. “So my request, Mister Orse, is for you to practice what you preach, to be transparent with us like you want us to be with you, and to answer my questions honestly. What makes you specifically the most qualified to lead the Accountability Panel? How can we trust personal beliefs and experiences won’t affect the Panel’s decisions when only the handful of members are allowed a say in what is done?”
For the first time in the evening, Orse was apprehensive. Diana Prince had proven from the beginning that she was difficult. She had been one of the first they approached, urging her to sign, and she had hidden behind her diplomatic status and staunchly refused. His distaste for her knew no bounds -- though he showed none of it, smiling at her as she approached, nodding his head graciously at her thanks.
When she (finally) finished speaking, Orse leaned towards the microphone. “Thank you, Ms. Prince. For your transparency, and as ever, for your intelligence and wisdom. Though we disagree on several matters, we at the Panel have always admired the work you have done.” He straightened up, rolling his shoulders back, facing the crowd. “Ms. Prince is a unique situation. She herself has told you about her unwavering commitment to accountability, how she has always bravely accepted the consequences of her actions when mistakes were made. This, combined with her dedicated service to the United Nations, and the fact that she has never felt the need to hide behind a mask or false identity, has allowed this Panel to place its trust in her. She is technically unregistered, and yet, we regard her as an ally in the fight for truth and justice, ideals we do agree upon.” He flashed Diana a smile, then turned back to the crowd.
“Perhaps it is time to return that trust. Ms. Prince’s wisdom is sound, her questions fair. I would merely like to preface my answer with the fact that everything I am about to tell you is a part of the public record. I too, have never felt the need to hide my true identity.” He gazed across the crowd, as if he were attempting to make eye contact with every person in the room. “I was born into a military family. My father and mother both served this country during World War II, and as soon as I was able, I followed in their brave footsteps. I served terms in Korea, Vietnam, and the Dominican Republic, first as a soldier, though I eventually achieved the rank of Lieutenant Colonel. From there, I decided to continue serving my country by working in the public sector. I was elected a Congressman for this great state, and have spent the last five decades working tirelessly to ensure the safety and rights of our country, and our local communities.”
He turned to Diana now. “The public elected me to that position, and I did not waver in my responsibilities until a greater calling pulled me to this Panel. I was chosen by the state and federal government to serve on this Panel because of my experience, integrity, and a track record which shows I have always sought justice and peaceful cooperation. As were all the members of my team,” he said, gesturing to them now. “The decision to appoint me as the chairman of the Panel was an unanimous decision, one that was not taken lightly. I implore you, Ms. Prince, and all the people here...” He gestured to the crowd. “Go look for yourself. I have never acted with personal bias, the will of the people has always been my guiding light. It may seem as though the decisions that have been passed in the recent months have come from this group of dedicated men and women, but in truth, ladies and gentleman, it has come from you. We have heard your fears, we have listened to your worries, and we have taken action. Our authority, the very reason this Panel exists, is because of the will of the public. And we will continue to serve that will, transparently and without hesitation. We will do what is necessary to uphold your wishes, not those of a select few, no matter how powerful those few may be,” he said pointedly.
0 notes
Text
How to do Post-Processing of Focus Stacked Images
Let me take you on a short walk through Lightroom and Photoshop. There are relatively few steps required to process focus stacked images. In a previous article (How to Photograph the Images Needed For Focus Stacking), I went through what I think you will find is the best and easiest way to take the required photographs.
My Melbourne tea cup
This image is acceptably in focus from the front to the back. You can only achieve this sort of large depth of field by taking, and computationally combining, several photographs. You can work through the image, taking photographs which are focused on different points, then combine those photographs with software. Photoshop does the job well, but there are also other specialized programs for doing focus stacked images. Zerene Stacker and Helicon Focus are the ones which seem to be mentioned most often.
I hoped that the tea cup made a bright, attractive image, and gave a clear illustration. However, it is hardly a great photograph, is it? Being a little more aspirational, I have mostly used this technique to produce images of palm leaves. It would really be great if you could find your own project, your personal muse to apply this technique.
Palm leaf
I confess that I am not always the most patient person when it comes to processing. Every now and then, I have spent hours on one image, but I generally like to get things done quickly. However, with focus stacked images, working in Lightroom, then Photoshop, I actually rather enjoy the process. I think part of the reason for that is that I am happy with the final product, but it is also quite a pleasant, simple routine, which can be almost relaxing.
Stage One – Lightroom
One of the joys of photography, and computers too is that there is often more than one way of doing things. This is my approach, it is probably not the only approach, but it works well.
Firstly, I import the RAW files into Lightroom.
Import to Lightroom
The images to be focus stacked
The images below have not been processed, just converted to jpegs. I thought you should have some idea what I started with, and that it might be helpful for you to see where each individual shot was focused.
Image #1
The next shot was focused on the other side of the frame, on the left. In the actual situation of taking the photographs, it was easy to see which part of the leaf was furthest from the camera, and which was just a little closer.
Image #2
This is moving forward, with focus along the left edge of the leaf.
Image #3
If you are photographing a subject which has a distinct edge, like this leaf, something running from the back to the front of the object, it can be very useful. It makes focusing easier, and it gives you something which you can work along in equal increments.
Image #4
For the next shot, I moved to the other side of the leaf.
You may notice that I like to be extra careful to make sure that the front part of the photograph, where the viewer’s eye will go first, is extra sharp.
Image #5
Three shots cover the front section at slightly different depths.
Image #6
Lightroom adjustments
For these shots, I knew what my goal is for the final image. To that end, I did a modest amount of processing, using only the Basic panel in Lightroom. I certainly would not do anything like lens corrections, or transformations, or local adjustments – nothing beyond the basics, only global adjustments. The real work is going to be done by Photoshop, and we should give it the best possible chance to do its job.
It might be leaves, your favorite possessions, or even be a landscape (I would love to try and make a focus stacked portrait, a tight portrait with focus from front to back) the point is that your project will require your own individual processing. This is what I did for the highly-textured leaves.
Lightroom settings
This processing revealed a few details and gave the images a little more bite or edge. That seemed to work well, and move towards what I had in mind for the final image. I then synchronized all settings in Lightroom.
So far so good?
With all the images selected, in this case just six, press G and then CTRL/CMD + A. You can then move to the second stage, by going to Photo > Edit in > Open as layers in Photoshop.
Select Photo > Edit In > Open as Layers in Photoshop
Stage Two – Photoshop
You may well have Photoshop set up in your own individual way. This is what you should see in the Layers panel once your images are opened.
The first step in Photoshop is to select all the layers. My habit is to do this by clicking on the top layer, holding down shift and clicking on the bottom layer.
All layers, all six images, selected.
Another confession? There is a part of me which would like to make this sound much more difficult, at least a little bit cleverer. There would then be more chance of you being impressed. However, the next two steps are too easy.
Align the images
Because the point of focus has moved through the image, the size of the object in the frame will have shifted slightly. But, Photoshop can handle this for you.
Edit > Auto-Align Layers has always worked perfectly for me.
You could choose to go to great lengths to resize the images by hand, making the actual object the same size in each image, being careful to align parts of the subject in each of the photographs. I have never found it necessary, and any extra steps to achieve alignment, would probably be best covered by a video. For the moment, I am happy that Photoshop has never let me down using Auto-Align Layers.
The auto-align layers dialog box
Under the Projection area, I have found that Auto works perfectly well.
For the Lens Correction section, I have found it best to uncheck Vignette Removal and Geometric Distortion (as shown above). Those choices gave me a couple of strange results and did not provide any discernible benefit. I like to think that the secret for this smooth progress is having taken good images in the first place. Push OK, and Photoshop does its thing and does it very well.
Of course, you are welcome to try whatever settings you like. In fact, I would very much encourage you to experiment, have a play! However, the old KIS acronym, of Keeping It Simple, seems to work well enough.
Blend the layers
Next, go to Edit > Auto-Blend Layers. I do wish I could make this sound more difficult.
Auto-Blend Layers…
As I am sure you will realize, you should choose the Stack Images option in the Auto-Blend Layer dialog box that pops up. With the images I have been feeding to Photoshop, I have chosen to put a check mark next to Seamless Tones and Colors.
But, if that does not produce a result you are happy with, it costs you very little time to experiment. This is what has worked well for me. The images which you have loaded into Photoshop may have been created in different circumstances to mine, and your desired final image may be very different too. The important thing is that the main steps will be the same.
from DIYS http://ift.tt/2q7MUm8
0 notes
Last Seen Blogs

spones-in-my-bones
We Go Together or Not at All

motheatenscarf
I Would Prefer Not To
mrxss
Valyrianpet

naturalsynergy-blog1
Untitled

meedough
mm