#etn
Text

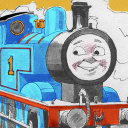
Drew him from that TF2 palette challenge (The original post was deleted on Twitter but 💔)
#etn#etn s3#etn the detective#escape the night s3#escape the night#my art#treesters#digital#fanart#youtube#matpat#etn matpat#lineless art#palette challenge
340 notes
·
View notes
Text
I need everyone to go watch the Escape The Night Minecraft episode 1, JOEL’S A FUCKING PRIEST AND ITS INCREDIBLE.
I think Joel and Fwhip are my favorites so far
#joel smallishbeans#smallishbeans#fwhip#joey graceffa#escape the night#escape the night Minecraft#escape the night mc#etn#etnmc#smajor1995#smajor95#smajor#scott smajor#lizzie ldshadowlady#ldshadowlady#shubble#shubbleyt#katherine elizabeth#strawburry17
170 notes
·
View notes
Text
your honor..........
#NERDDD#i love their dynamic#even if im not a big fan of jatthew#you have any etn ship > affing “j” at the beginning of shipname > now its ot3 with joey > congrats#jatny jatny jatnyy#escape the night#etn s3#escape the night season 3#etn#joey graceffa#matpat#manny mua#the detective#the record producer#the savant
160 notes
·
View notes
Text
get voted twice, win twice

#smallishbeans#smallishbeans fanart#joel smallishbeans#joel smallishbeans fanart#escape the night#etn#ETNCraft#escape the night fanart
139 notes
·
View notes
Text
Tyler Oakley has a tumblr account..???????
I think???
308 notes
·
View notes
Text

Absolutely true , just look at this man ↓
460 notes
·
View notes
Text

Finally,,,,, a full body drawing,,,,,
#YES its still the duo™#escape the night#escapethenight#etn#escape the night s3#etn season 3#etns3#doodle#digital art#Escape the night art#escape the night season 3#nikita dragun#matpat#the detective#the troublemaker#theyre stuck in my head help <3#theyre so duo#i just adore they dynamic#one day ill draw anyone else <3
306 notes
·
View notes
Text
i drew after hearing that one mashup
162 notes
·
View notes
Text
Poe's Giffing Tutorial (From One Beginner to Another)
Hey, everyone! So, I've been thinking about this for a while, and decided to finally make it happen. This post aims to be a giffing tutorial that isn't a bunch of technical jargon that nobody except experienced giffers understands. This is for the person that I was when I first started out: someone who wants to make gifs, for free, without having to learn the entirety of a new program. As such, if you're already familiar with the basics, this probably won't be super helpful to you.
In this, I'll cover the basics of actually capturing a gif, the how-to of color correction (though without getting into the nitty-gritty detail of it), some basic text effects, and some more decorative effects like overlays and ~fancy coloring. I'll also show you the program I use to resize gifs.
I don't have a fun quip to lead us into the next part, so, uh, let's just dive in.
Tools*:
A PC capable of handling heavy processor loads (I use a mid-range gaming laptop; it's a little slow sometimes, but it works)
Whatever you're giffing (obviously...)
ScreenToGif (a free, basic screencapture program)
Photopea (a free, in-browser Photoshop dupe)
RedKetchup (a free file resizer/converter)
*Note: These are not the end-all, be-all of gifmaking. They may not even be the best tools for the job! But they're free, they work well, and they're relatively intuitive.
Step 1: Capture your gif.
I'm going to use ScreenToGif for this. The first thing I do is open the program and click Recorder, which opens the recording interface.

I click and drag (or manually input dimensions in the boxes next to the recording button in the lower right corner) to set my dimensions, and then I press record. The red "Record" button will change to a blue square that says "Stop," and a timer will appear in the upper right corner, showing how many seconds your gif is.
Generally, I'll pause the video 5-10 seconds before my desired start time, to give myself a buffer (you'll be able to delete those frames later), start the recording, and then start the video. You'll probably find a system that works for you once you do it a few times.
Once the scene that I want to capture is done, I'll click the blue "Stop" button, and the overlay will close itself. A few seconds later, depending on how long/complex/large your gif is, the program will pop up with a new window where you can edit. Here's what it looks like:
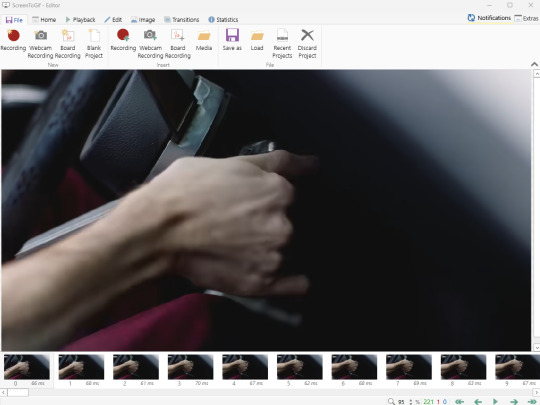
You can do a lot with ScreenToGif, but we'll be using the dead simple stuff today. Click the "Edit" tab, fourth from the left, and this will show up.

"Delete All Previous" and "Delete All Next" are our friends here. Go to the FIRST frame that you want in your gif, using either your arrow keys or just dragging the slider, and select it. Then hit "Delete All Previous." This will make that frame the first frame of your gif. Then, go to the LAST frame of your gif, and hit "Delete All Next." This makes the last frame of the scene that you want the last frame of the gif. You can also use the "Delete" option to delete frames by selecting them with your cursor if you want a more manual option.
Now you have your raw gif! Go to the "File" tab, the first one on the left, and select "Save As" from the menu. You want to make sure that it's saving as a .gif file, not an .mp4 or .apng --- you can check this up at the top. Don't worry, though, as .gif is the default, so unless you change it, you should be golden. Select whatever folder you want to put it in, name it, and save it.
You could absolutely stop here. It is by no means required to color your gifs or slow them down or any other number of things associated with giffing. But if you want to, here's how I do it.
Step 2: Edit your gif.
Head on over to Photopea. You'll see this:
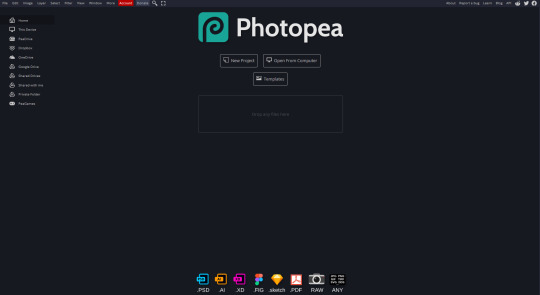
What we want is the "Open From Computer" option. Click it, and your File Explorer will show up. Navigate to whatever folder you saved your gif in and select it by double clicking or clicking once and hitting "Open."
It'll open in a new workspace that looks like this.
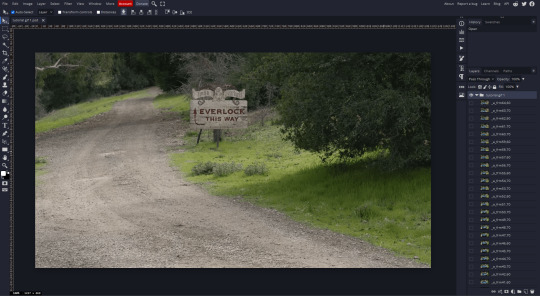
You may be saying, "Gee, Poe, that sure looks a lot like Photoshop!" Yes, it absolutely does. If you're familiar with Photoshop, you will most likely be able to find your way around Photopea just fine, and can probably go from here. But if you're not familiar with Photoshop, here's the basics.
First thing's first: gifs are frequently pretty fuzzy/blurry. Luckily, sharpening them is easy.
Select all your frames (the list on the right with all the numbered layers) by clicking one end, scrolling up/down, holding Shift, and clicking the other end. Then go up to the tabs and do Filter > Sharpen > Smart Sharpen. This will automatically sharpen each frame using a percentage; the default is, I believe, 150%, and this is usually what I use because I am fundamentally lazy.
If you don't select all your frames, only the one that you're currently on (the one highlighted in a lighter color) will get the effect applied to it. This goes for basically anything you do, so it's good to get in the habit of selecting all.
Now that it's sharpened, we can color it. Go up to the tabs again, and go to Layer > New Adjustment Layer > [whatever you want to adjust]. Most commonly in Escape the Night, you'll have to adjust brightness, because there's a lot of dark, moody scenes; Season 3 is also especially yellow/orange tinted, so you'll probably want to color correct it, too, using the Color Balance adjustment layer. This is a total guessing game based on the exact scene you're doing and my method is just selecting random things and adjusting sliders until it looks good (remember: fundamentally lazy). Honestly, I'm not an expert in coloring gifs, so I won't pretend to be — especially since people can and do write entire posts just dedicated to it. For this gif, I'm just lightening it a little.
And if this is all you want to do — no text, no effects — you're done! Go to File > Export As > GIF. It will take a few moments to load, so don't panic when your page freezes. A new window will pop up that allows you to do things like set looping, time, etc. but you can also just "Save" and you're done!
But let's say you want something fun. Maybe you'd like to overlay a quote or make it a cool color. If that's the case, continue on...
Step 3: Make your gif shine.
Three parts in this: text, fun colors, and overlays. You can combine these three to do some awesome things, and they're all very simple to do, once you know what you're doing. Think of them less like steps and more like a mix-and-match deal. You can use one, two, or all three!
So, here we go.
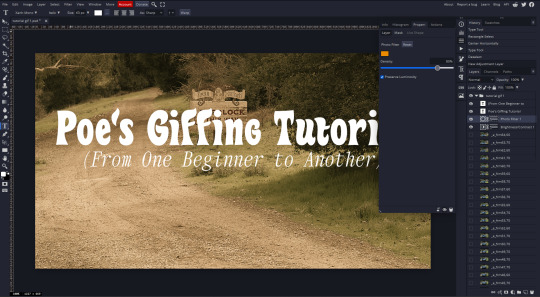
Option 3a: Add some text.
The easiest option of the three, this one works exactly like you think it does. The uppercase T symbol on the sidebar will create a new text layer where you can type something and set a font, size, and color.

I'll spare you the lecture on typography that I could give you — you can find better ones than I could make. Generally, though, you have a decorative/display font for headings and emphasis, and then a different, more generalized font for subheadings and other things. In this, the display font is Heavy Heap, which was used on the Season 3 tarot cards, and the general font is a relatively generic serif font.
(Sidenote: you can load fonts into Photopea! Just go to a font website like Dafont, download the font you want, and then open it as you would any other file by going to File > Open and selecting it from your files. You should get a message that says "Font [Your Font Name Here] Loaded," and then you'll be able to use it in your design. That's how I got Heavy Heap in there.)
You can change size and color with these, which will show up at the top when you select the text tool. Keep in mind that if you're making changes after you type something out, you will need to select (highlight) the text you want to change — it won't do it automatically.

I will admit that Photopea's text editor is not the cleanest, simplest, or nicest to use, especially at first. I came from Canva where it was much faster and easier. The downside, of course, is that Canva is highly limited with what you can do.
There are also ways to warp the text, change the blending, and do outlines, but I'll leave that for another time as to avoid making this any longer than it already is.
Option 3b: Make it a cool color.
You have a couple different ways to do this. Probably the most intuitive is to go to Layer > New Adjustment Layer > Photo Filter. Select the color box, pick the color you want using the picker or a hex code, select your desired density, and click OK. Boom, color over your gif.
It defaults to this vintage-y orange, but you can pick whatever color your heart desires.
However, I usually use a different method using Gradient Maps. This is also pretty easy; Layer > New Adjustment Layer > Gradient Map. If you leave it black and white, by the way, you get a B&W gif (you can also just select the Black and White option in the Adjustment Layer menu). Click on the gradient, select the white square on the right side of the gradient line, and then select the square down at the bottom of the window and change it to whatever color you want.

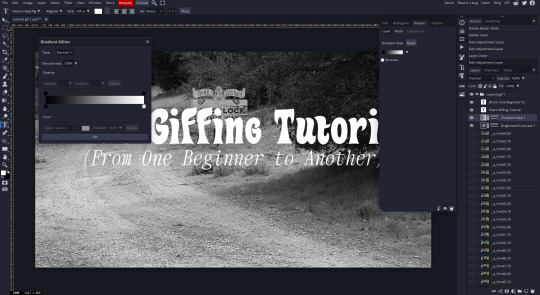
For this gif, I'm leaving it B&W.
(You can have a lot of fun with gradient maps. Play around with them!)
Option 3c: Overlay another gif on top.
Ooookay, so, this is the most advanced and tedious of effects to do (at least of the ones documented in this post), but it's worth it, I promise. For this, you'll need at least one other gif. I usually use a base gif that's relatively neutrally colored, oftentimes B&W but sometimes just faded or pastel, plus one (or more than one) colored, brighter gif. These are, of course, just guidelines — combine whatever gifs you want. The only real requirement, per se, is that they have the same amount of frames. If they don't, it'll look weird. (But if you do end up with two gifs that have different amounts of frames, you can delete the difference right in Photopea, so I don't stress about it too much.)
You also generally want to add text after this step, so if you're planning on doing this, save the text for last.
First things first: color your gifs the way you want and then save both of them. Then re-open them both in Photopea. Yes, this is annoying. I did say it was tedious.

So now I have both of them in my navbar, labeled as "tutorial base" and "tutorial overlay."
Go to your overlay gif and right-click on the gif folder. This is the top layer with a little arrow and folder icon next to the name of the gif.

Select "Duplicate Into" and then pick your base gif in the popup. In my case, it's named "tutorial base."

Now you'll click over to your base gif, and you'll see that your accent has been put on top of your base. Now you get to have fun with blending!
Right click on the overlay gif's folder again. Then, select Blending Options, which is the first menu item. It'll bring up a popup with all sorts of options for styling your layer.

The default setting is Pass Through, which is what we see here. If you want, you could just change the opacity to get your desired effect.
You could also play around with blending options such as Overlay, Color Burn, Lighten, and Screen. Every gif is different, and every gif will look different with different options, so experiment and see what looks best! You may have to go back and recolor it a few times, so I recommend just keeping the project open in your navbar for easy access.
For this gif, I think I'll go with Darker Color at 67%.
One last step, and then you're done with blending!
Go to Layer > Animation > Merge. This will merge each frame of your animation (the gifs) with each other, meaning that they'll play at the same time. If you forget this step, as I do frequently, you'll go to save your gif and find that it plays as a sequence.
Once you've merged your gifs, you can add texts, more effects, PNG overlays, whatever you want! Congrats! You did it!
Step 4: Resize your gif (if necessary).
Maybe you've made a gif, and it's beautiful, and it's amazing, and you wanna show everyone...but it's five million megabytes and you can't send or post it anywhere. Tumblr's max file size is 10 MB, while Discord's (standard) max file size is..7 MB, I think? Either way, if you try to upload something bigger than that, you'll get an error message and the familiar taste of disappointment.
Never fear, Redketchup is here!

This is Redketchup, and it's super simple.
Go to "GIF Resizer" under Animation Tools. Upload your gif, then scroll until you see the Resize GIF section. Input the percentage you'd like to reduce it by (presets are 25%, 50%, and 75% smaller, but you can set it manually, as well).
This is also the step where you can slow it down if you desire if you didn't do it in Photopea — it's in the next section down. Set the speed, if you'd like, and then go down to the bottom and hit Download.

It'll take you to a preview tab where you can check if your gif is small enough. If it is, hit Download again up in the top left, and that's that! Go share your gif with the world!
Conclusion:
Thank you for reading! I am by no means an expert gifmaker, but I want to spread the love and give other people the option to do it. I wouldn't know any of this stuff without the people who taught me, and I'll put a list of tutorials down at the bottom that I referenced when I was first learning to make gifs.
At any rate, if you use this post to make a gif, feel free tag me or send it to me so I can see! And for those of you who are on the fence about learning or starting to gif...
Do it. I double-dog dare you.
:)
References:
Blending Gifs by @the-mother-of-lions
Photopea Coloring Tutorial by @heroeddiemunson
Merging in Photopea by @bellamyblakru
And, though not a specific reference, I frequently browse @usergif for inspiration (they have tutorials there, as well, but I haven't checked them out yet).
#gifset#giffing#gif tutorial#how to gif#how to make a gif#photopea#escape the night#etn#I wrote this instead of socializing at my family's thanksgiving dinner#because that's just who I am
98 notes
·
View notes
Text
lol

153 notes
·
View notes
Text

Etna I drew for a friend
229 notes
·
View notes
Text

thats the plot of escape the night s3 isnt it
#mars draws#art#drawing#escape the night#etn#this is so bad but it’s a frame from a video i made bc i haven’t been drawing recently tbh
81 notes
·
View notes
Text
the pharmacy (unfinished)
you and detective mat get a little.. buddy buddy in the pharmacy and almost get caught.
you bring him unbearably close, his glasses press slightly against your flushed cheek. the pharmacy feels stuffed with the heavy breaths eliciting from your mouths. "hey-" mat mumbles out as you remove his brightly coloured glasses.
"what?" you ask, "i'm just making life a tiny bit easier, you need a break from those."
"me and those glasses are a package deal whether you like it or not," silence. then a hefty sigh. "you're lucky your hot," he says, whispering the last word.
"why thank you, you don't look so shabby yourself, mr. straight guy."
"shut up."
then you pull his face into yours, you're both hungry to kiss each other again. his lips were like poison, the taste lingered on your lips and you wanted more. he squeaks slightly as you chuckle against his slight chapped lips. your hands are propped up on the counter, his back facing it. you knocked over the candy jar sitting on the marble in the process but you couldn't care less.
KNOCK KNOCK
the sound of knocking boomed, but the two of you ignored it. the both of you were out of sight so it seemed safe, until the door came crashing open with a dramatic sound effect.
"HEY BITCHES!" nikita had just started to yell hands up in the air, too busy being a queen to notice the smothered hair, swollen lips and heavy panting. people were to slowly start trickling in so, out of fast reflexes, mat pushed you to the ground where there had conveniently been a first aid kit nearby.
a/n LOL i'm pretty sure this got finished but i did it on ao3 so the draft deleted itself after a while. however, i wanted to post this since i thought about this for weeks.
#etn season 3#etn#escape the night#matpat#male reader#matpat x reader#not many tags bc i can't be bothered#matpat x male reader#mathew patrick#mathew patrick x reader
112 notes
·
View notes
Text
hi! i like you! *throws my matny sketch to your face*
#im bored#someone save me from school#escape the night#etn s3#escape the night season 3#etn#matpat#the detective#the record producer#uhhhhhhh#im dying can someone save my pityful soul
157 notes
·
View notes
Text


Here’s how Rosanna Pansino can find a way to kill Mr. Beast.
90 notes
·
View notes
Text
I have no shame
Crossing the International Matpat Canon Line to offer up a Escape the Night Crack Fic idea. The server in Joey's diner is Ness from the FNAF movie.
Like imagine, Joey looks up all excited, expecting this:

Competent, traumatized love of his life SAE Agent Matpat
And instead its this guy:
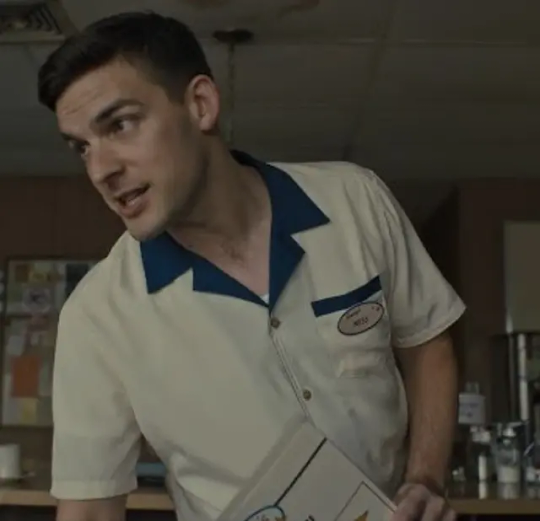
Gay, AuADHD, always a service worker!Ness. He's just a sweet, hyperactive guy, trying to take Joey's order.
Joey: OMG Matt, there's an eyeball in my milkshake!
Ness: Oh no! You're so right, eyeballs are totally out of season! I don't know what the kitchen was thinking! I'm so sorry, can I get you a side of Hand instead? A plate of fingies for the table?
The man doesn't even question a stranger calling him Matt, so long as he tips.
He takes human souls as a legal tender btw.
#sir this is a wendys#forget the minic#joey graceffa is the best fnaf villain#he's out here voting henry emily to die#because afton causes more drama for the group and its good for ratings#ness survives the ETN movie despite doing absolutely nothing#they dont vote for him because he makes them pancakes#joey's out here collecting remnant#im so sorry I'll see myself out#etn#escape the night#escape the night movie#joey graceffa#matpat#fnaf ness#fnaf movie#five nights at freddys#matpat egos
125 notes
·
View notes
Last Seen Blogs
shinygoku
Cut Cat

augusst
x
sarahhail
Hail of a lot of words

alunasky-blog
Alunasky

sidekit-kitkat
*sniff* so uh, that weather huh?