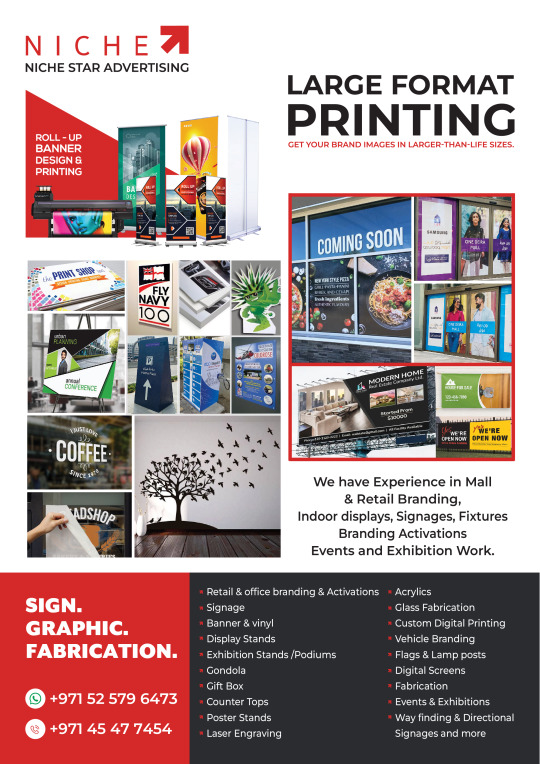
#custom acrylic fabrication
Text
Discover the Beauty of Custom Acrylic Fabrication
Elevate your space with our custom acrylic display cases and laser cut designs. Explore the beauty of custom acrylic fabrication in Ontario.
custom acrylic fabrication, custom acrylic display case, laser cut acrylic Ontario, custom laser cut acrylic, laser cut acrylic
#custom acrylic fabrication#custom acrylic display case#laser cut acrylic Ontario#custom laser cut acrylic#laser cut acrylic
0 notes
Text
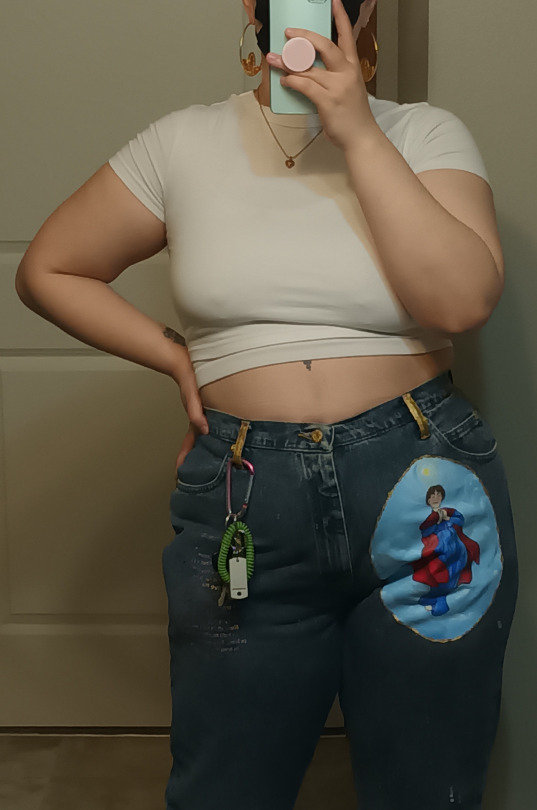

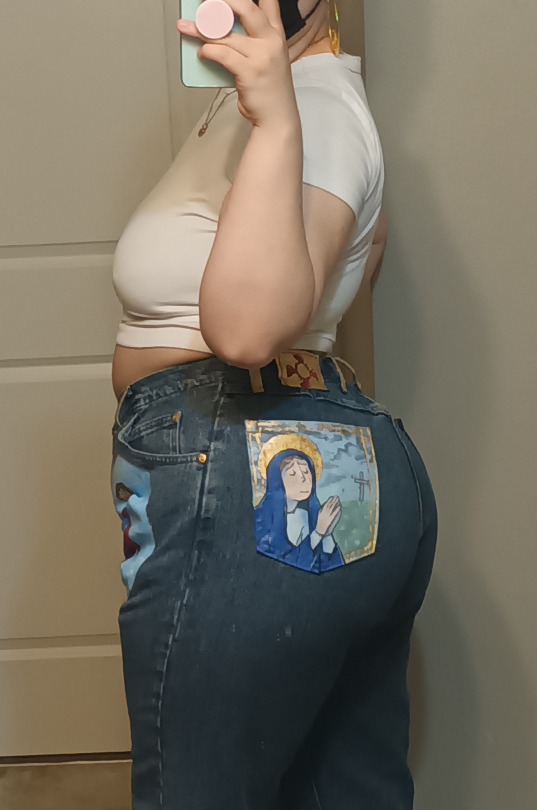
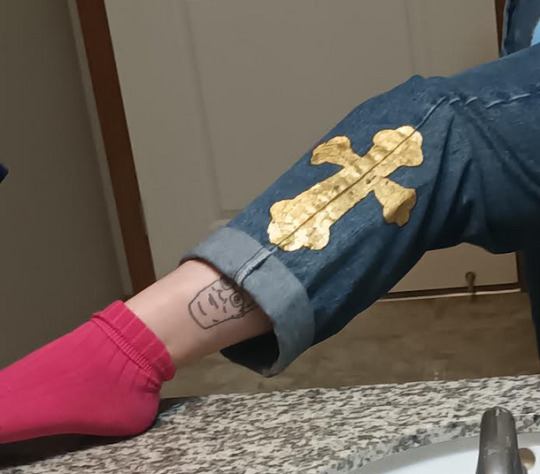
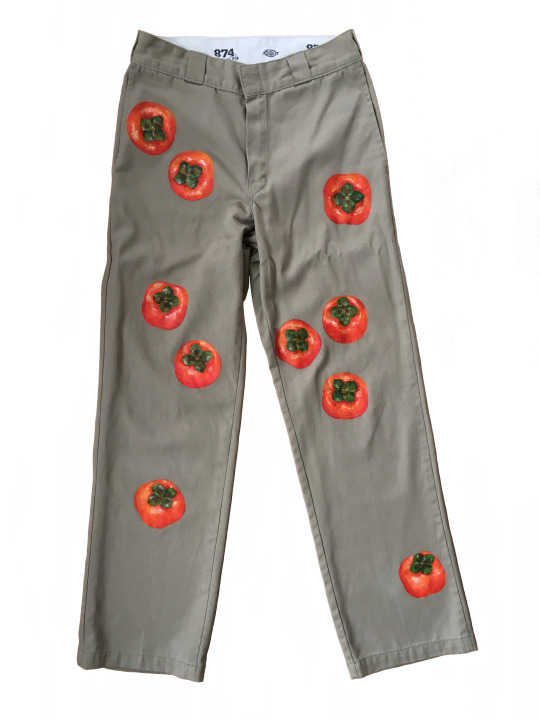
I've been custom tailoring my pants lately, decided to paint the virgin mary on one (along with gold leafing the lyrics to Ave Maria)
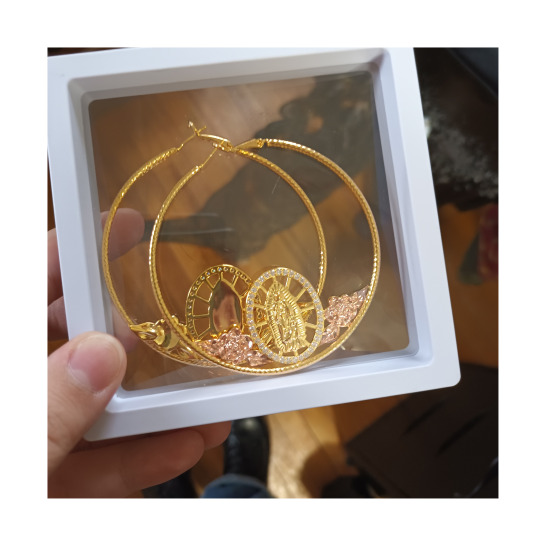
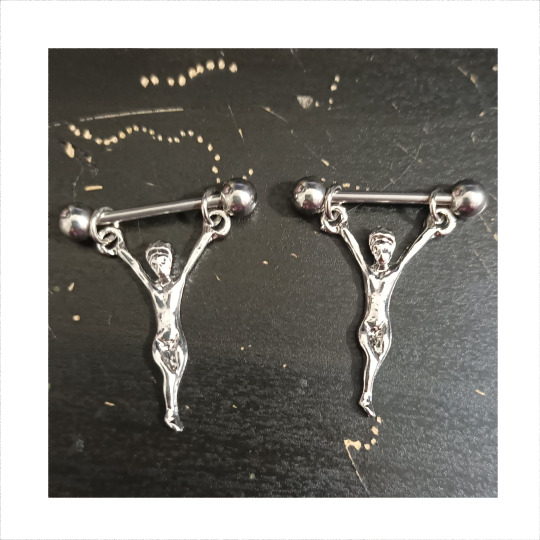
Also some super fun jewelry I paired with it hehe
#literally dont wanna touch gold leaf for like a decade#it took me so many hours to leaf those fucking lyrics#but these are the coolest pants i own sooo#my art#christian#chatholic#painting#paint#acrylic#jean#jeans#fabric paint#virgin mary#lesbian#dyke#picture#photo#fashion#outfit#custom#sewing
11 notes
·
View notes
Text
りんご
29 notes
·
View notes
Text

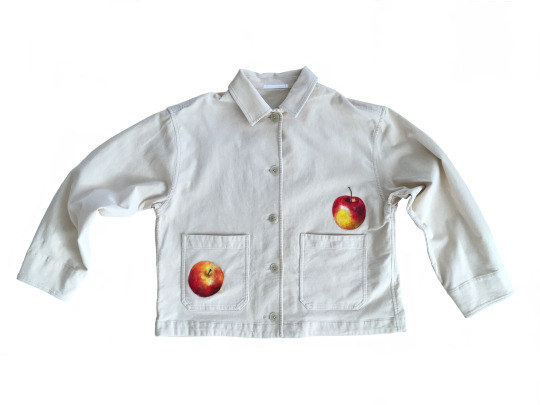
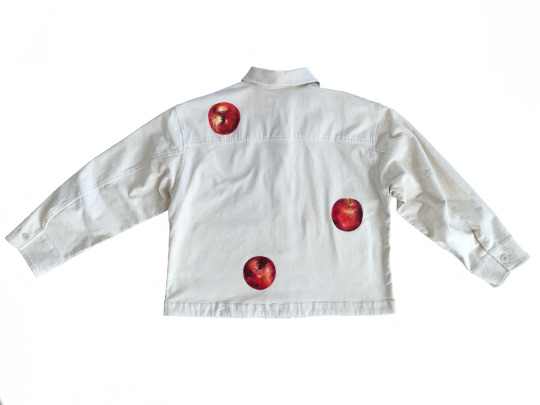
I’m not dead!!!
I’ve just been doing this in 100 degree heat for 3 weeks.
#y’all would not believe how much of a bitch acrylic paint is#in the heat#with fans on#impossible!#my art#battle jacket#painting#acrylic painting#fabric painting#custom jacket#battle vest#skull#traditional art
66 notes
·
View notes
Text
Ah if i didnt leave my beads at my dads house i coulda made something to add to my chains for aro week…..
#i had a little charm w ‘love sucks’ on one side and i coulda added the aro flag to the other side…#i have acrylic paints and spare fabric… i could make a ‘love loses’ patch to add to the old pair of jeans ive been meaning to customize??#ooh i think ive got soda tabs in the aro colors i could do something w that!#sev rambles#aromantic#PLEASE give me suggestions i need more ideas#like im gonna wear green all next week naturally but i also want to make something special#maybe i could do like. a one a day thing? if i can come up with enough ideas
2 notes
·
View notes
Text
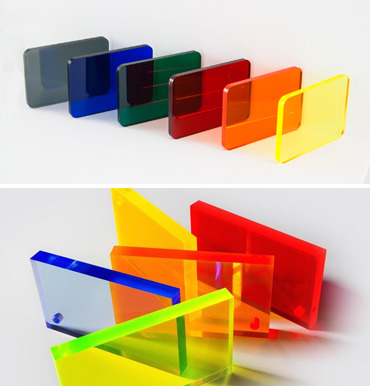
The Advantages of Custom Plastic Fabrication
Upgrade your projects with precision-crafted acrylic solutions from R&T Plastic Fabricators, your trusted acrylic products manufacturer. Experience superior quality and unmatched expertise in every piece.
#Australian Plastic Fabricators#Perspex Manufacturers Sydney#Acrylic Products Manufacturer#Custom Plastic Fabricator#Acrylic Fabrication Manufacturers#Perspex Supplier Sydney#Perspex Suppliers Near Me#Perspex Plastic Suppliers#Perspex Sheets Suppliers#Acrylic Products Supplier
0 notes
Text
we specialize in transforming your creative visions into tangible realities. As a leading provider of comprehensive visual communication solutions, we offer a range of services that elevate your brand presence, captivate your audience, and drive your business forward.
#sign boards#Large Format Printing#Acrylic Fabrication#Display Stands & Gondola Ends#Custom T-Shirt Printing:#Corporate Gifts
0 notes
Text
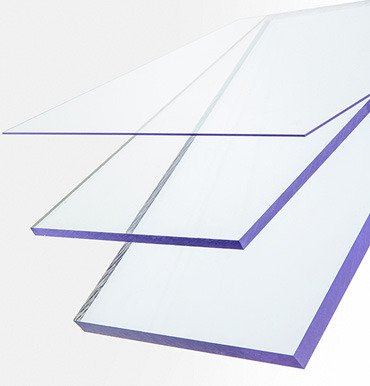
A Quick Guide to Cleaning a Clear Acrylic Sheet
Keeping your clear acrylic sheets pristine and spotless not only maintains their visual appeal but also ensures their longevity. Whether you have acrylic plastic sheets in your windows, displays, or DIY projects, knowing the proper cleaning techniques can make all the difference.
In this quick guide, we'll walk you through the steps to achieve a sparkling clean acrylic surface effortlessly.
1. Gather the Right Tools
Make sure you have all of the necessary cleaning supplies before you begin. Grab a soft, lint-free microfiber cloth or a sponge and mild soap. Avoid using harsh chemicals or abrasive materials, as they can scratch or damage the acrylic.
2. Dusting Off
Begin by gently dusting off the acrylic sheet with a clean microfiber cloth or a feather duster. Removing loose dirt and debris prevents scratching during the cleaning process.
3. Preparing the Cleaning Solution
Mix a small amount of mild soap with water in a container. Ensure it's a gentle soap without any harsh chemicals or additives. Stir the mixture until a soapy solution develops.
4. Wiping Down the Acrylic
Dip the soft cloth or sponge into the soapy solution, wring out excess water, and carefully wipe down the acrylic surface. Use gentle, circular motions to clean the entire sheet. For stubborn stains or grime, apply a bit more pressure, but avoid excessive force.
5. Rinse and Dry
Once you've cleaned the acrylic sheet thoroughly, rinse off any soap residue with clean water. Make sure there are no traces of soap left on the surface. Finally, use a dry microfiber cloth to gently pat the acrylic dry.
6. Avoid Common Pitfalls
To prevent scratches, never use abrasive materials like scouring pads or rough sponges. Additionally, steer clear of ammonia-based cleaners, alcohol, or glass cleaners, as they can damage the acrylic's clarity.
Acrylic Plastic Sheet Suppliers
By following these straightforward steps, you can maintain the pristine appearance of your acrylic plastic sheets, whether they are custom cut plastic sheets in your DIY projects or acrylic windows in your home or business. You can get custom cut acrylic plastic sheets from R&T Plastic Fabricators and continue to elevate the aesthetics of your surroundings for years to come.
#Buy Acrylic Plastic Sheets#Custom Cut Plastic Sheets#Acrylic Plastic Sheet Suppliers#Plastic Sheet Fabrication
1 note
·
View note
Note
can we talk about how konig would be someone who’s quiet when he gets jealous…then when y’all get home he js absolutely goes HAMMMM….
the way i got so excited to write this…it’s actually way longer than i intended but idgaf! part 2 soon 😏
NO BC YOU LITERALLY WOULDNT GET HOW HE’D BE SO QUIET LIKE ???
“papa, i don’t understand what i did wrong,” you’d frown at your man with an annoyed whine. könig, who was a whooping 6’10 would only give you a heavy grunt in response. you’d be on the way back to his car from the mall, dozens of your victoria’s secret and H&M bags held in his visibly large hand. the moment könig reached before you (with help of his tree-like long legs anyway), he opened the door for you, the balaclava on his face making his features ten times harder.
no matter how mad the big bear was at you—or more so, what you happened to get yourself involved in—he’d never disrespect you. anything other than sexually, at least. stepping on the custom made step for your smaller figure, you slide into the huge seat of his completely blacked out bmw suv, allowing him to shut the door behind you. you nearly jump at the visible shake of the car beneath your bottom.
you play with your curls as könig carefully sets your bags on the floor behind your seat. because his was set all the way back to accommodate for his long legs, your seat had the better amount of space for your things. when könig finally got back in the car, he immediately started it, causing the monsterous growl of his deleted muffler to come alive.
and he wouldn’t even break a sweat at you !!! you’re over here going over all your actions for the day, step by step, and all könig could think through his mind was what positions he was gonna force you in when you two got back home.
the sound of könig’s car matched the energy that was coursing through his veins. he know you didn’t do anything wrong; not intentionally at least. but the selfish ass part of him wanted nothing more than for your pretty little ass to sit in the passenger’s seat, overthinking on what the fuck you possibly could have done to rile him up this much.
the ride home is everlastingly silent as the small of your voice breaks the thick tension, “baby,” you don’t know how to further articulate your words. “i know you’re mad at me. i wanna fix it, but i can’t it you won’t talk to me. and you’ve been dead ass silent since we been in the mall.”
könig keeps his cool, though. he knew his silence was practically eating at you alive, shaming you with guilt for something you didn’t even intentionally mean to do. but with the way your pretty body sits in the black skims dress you’re in, accompanied by your black and white dunks—his eyes could practically frame your nipples right through the see through fabric, and he was sure that fucking doorman at victoria’s secret could have as well.
you keep talking. “was it the dude at VS? i swear, i made it very known that you were my man and—“ your words are endless blabber to him as the disgusting and pervasive thoughts cloud könig’s mind.
he looks so sexy in his balaclava, protecting his face from the harsh upcoming winter temperatures. he’s sported in an all black outfit, helplessly matching yours. anyone who saw you two together would automatically know that was your man. i mean duh, he walks around with his hand on your ass protectively 99% of the time.
when you get the sense that the brute isn’t listening to a fucking word you’re saying, you let out a frustrated sigh and turn your body away from him. but the sudden placement of a large hand on your knee takes you by surprise as you eye the man who’s ice blue eyes refuse to falter from the darkening road before you.
the moment könig pulls up in the driveway of your shared home, you can’t help but twiddle with the polish on your acrylics. anxiousness is bouncing off you, and könig could tell. you turn your head and open your mouth to speak, only to be cut off for the first time that night.
“go inside.” könig’s voice is very low, but you don’t miss the command in it. there’s no emotion behind the dark eyes of his balaclava. usually you could decipher exactly what and how he was feeling, but in the moment—
“kö—“ your boyfriend’s snow blue eyes harden at your talk back. with softer features, you whisper, “will you be inside?”
“soon. need to make a call first,” you watch him pull out a fresh cigar pack. “be ready for me when i get in.” you open your mouth to talk back again, but wire it shut when könig lovingly grabs your face. leaning in so the pink of his lips ghost over your full brown ones, he whispers, “now, mama. i won’t ask again. can you listen to that one thing for me?”
with a small gulp, you give him pretty doe eyes, feeling between your legs tingle at his masculinity radiating onto you. in the most confident voice you could muster up, you nod your pretty head at him. “yes daddy.”
könig gives you a nod of approval and runs his hand along the curve of your ass. “good girl. go on, liebling.”
you exit the huge car, already getting idea of what was to come when könig came back inside. with a heavy heart, you head upstairs to your room and slowly begin undressing, hoping that the slower you went, the more your punishment would be delayed.
your hopes were proven to be false the minute you were completely naked and turned around to see könig leaning against the threshold of the door, silently watching you.
you jump in fear at the sudden sight in front of you, but feel your heart beat calm down when könig strolled over to you. naturally, your head tilted backward as a way to get a full view of his face. his balaclava remained on, so you knew he was still upset about the events from earlier.
könig takes his large hand and rests it on your cheek, giving it a comforting rub. “you know i love you and respect you more than anything on this earth, right?” the brown of your skin instantly heat up at his words as you slowly nod your head at his sudden expression, unsure of where he was going with his words. könig’s lips can’t help but lightly turn upward into a small smile. you had no idea what was gonna come.
“good. because for today, libeling, i’m gonna fuck you like you mean absolutely nothing to me.”
#lora’s fics! ೄྀ࿐#oooh my coochie purring#könig x black reader#könig x reader#könig smut#könig cod#konig x black reader#konig x reader#konig smut#cod x black reader#cod smut#cod mw2#cod könig#könig x plus size reader#könig x chubby reader#cod x plus size reader#cod x chubby reader
4K notes
·
View notes
Text
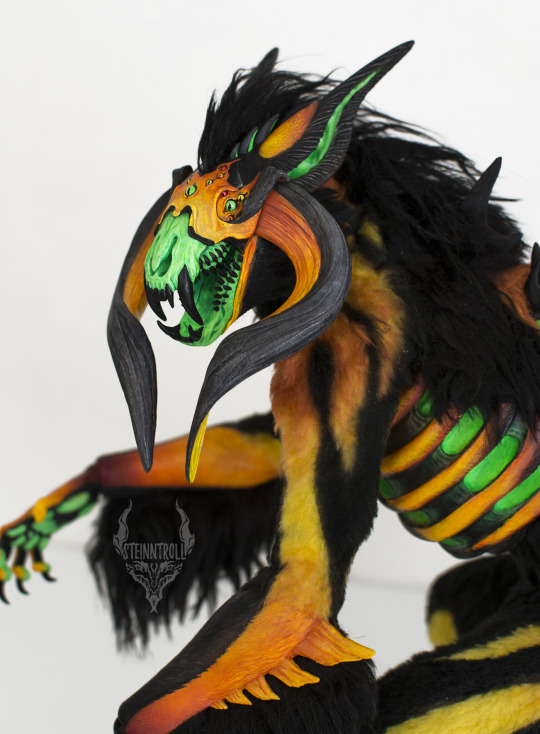
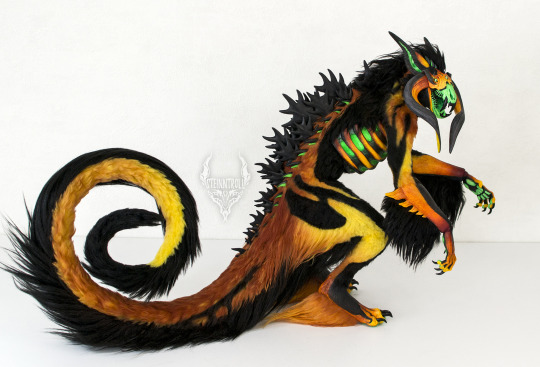
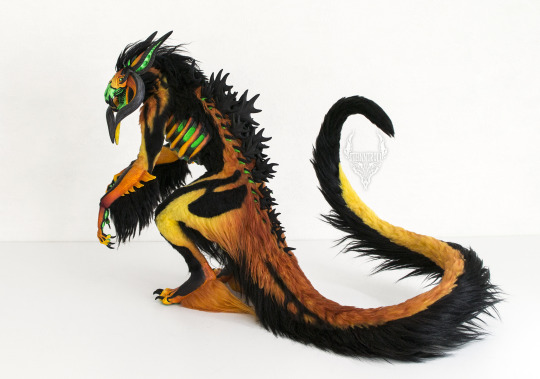


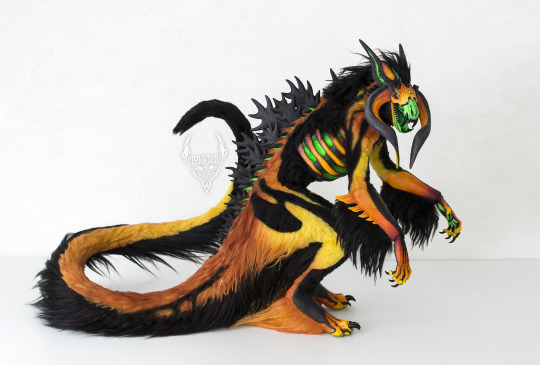
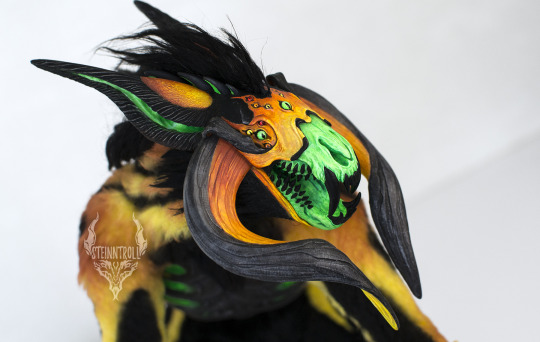
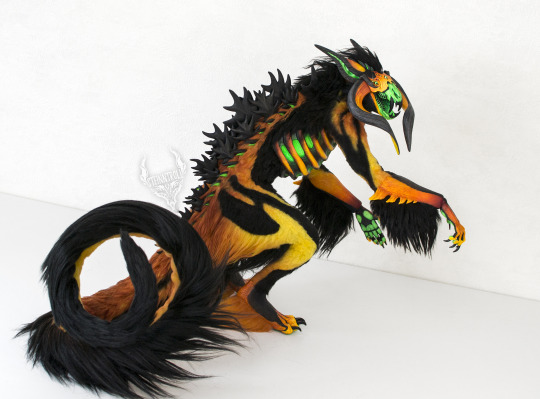
Kronos Jackelhound art doll- commission.
Character belongs to customer
UV resin, fabric fur, wire+plastic armature, primer, acrylic paint, varnish. Posable neck has plastic ball-and-socket armature inside and can be posed. Tail and arms are also posable and contain wire armature inside, wrists are bendable as well. Legs and lumbar also contain wire armature inside, so you can carefully and slightly move it to find perfect balance if you keep the doll on uneven surface.
Size: Doll is 38cm tall
#art#doll maker#creature art#beast#oc commission#commission doll#sculpt#mixed media art#art toy#posable art doll#artist on tumblr#art dolls#hand made art
2K notes
·
View notes
Text
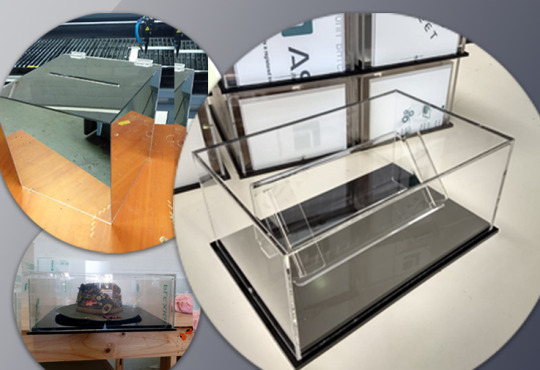
Plastic Fabrication |Plastic Depot | Gardena, Ca
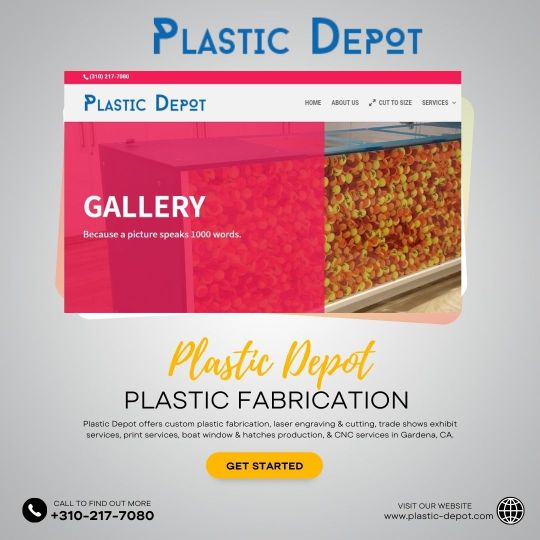
We are a full-service company that can assist you in services from the design and creation of prototypes, to full-production rollouts. We provide more than basic machine shop services that produce things like widgets For more information : www.plastic-depot.com
#plexiglass sheets#digital printing#glass display case#banner printing#custom printing#plexiglass at home depot#printing places#acrylic display case#sneezeguard#3d printing near me#plastic sheets clear#print on demand companies#plastic fabrication company#plastic fabrication
1 note
·
View note
Text

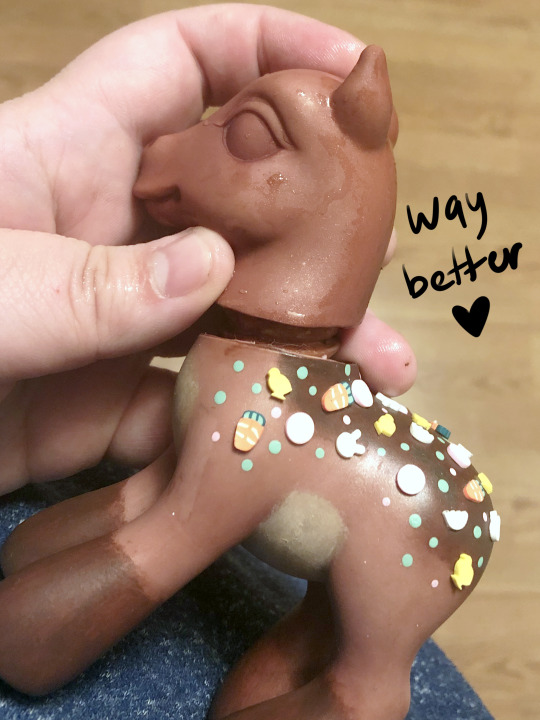
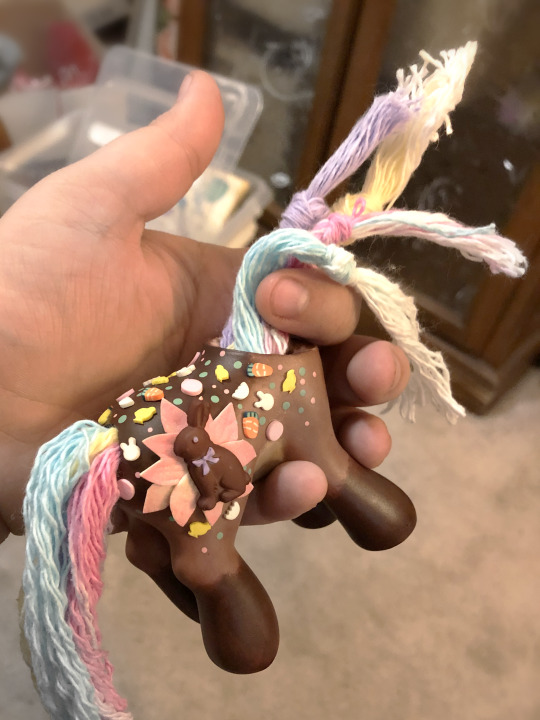
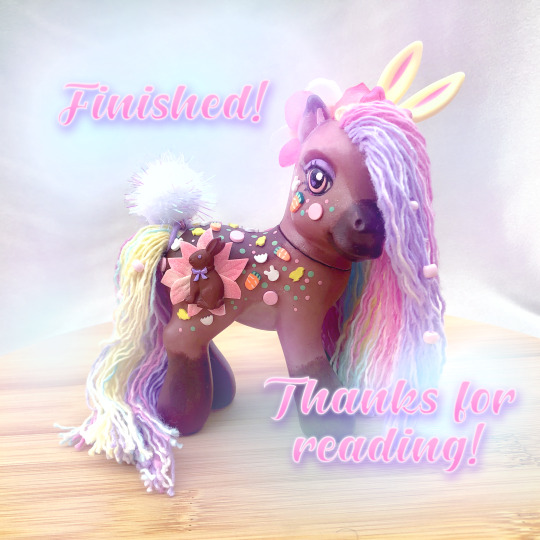
Hello! I wanted to share my process of how I made my Easter Pony! She is my second ever custom and she made all the trouble I had with the first one seem like a walk in the park in comparison ಥ_ಥ Let's begin!
DISCLAIMER: Custom ponies like this one are not to be played with by children nor made by children. This pony was made with the use of nail polish remover (acetone) which is toxic. You need to wash your hands throughly after use and use in a well ventilated area. This pony was also made with sharp tools such as an xacto knife, sewing pins, rehairing needles, and an awl.

First, the concept art! Trial and error caused her to look a little different than the concept art but I still love the end result!
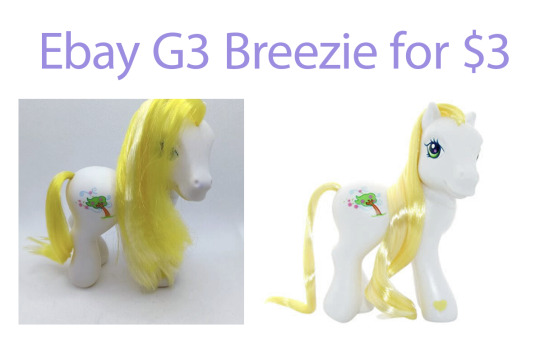
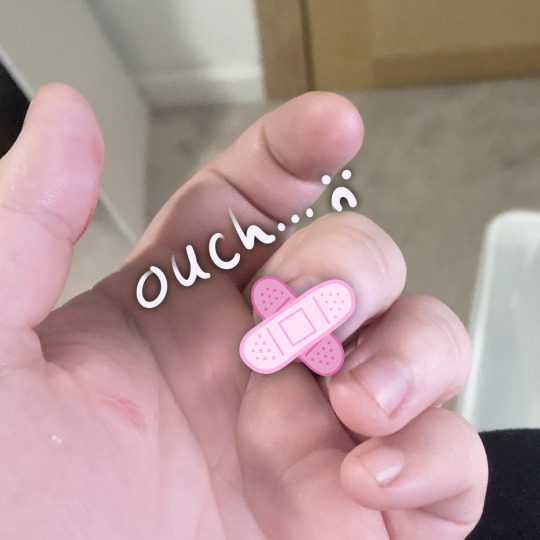
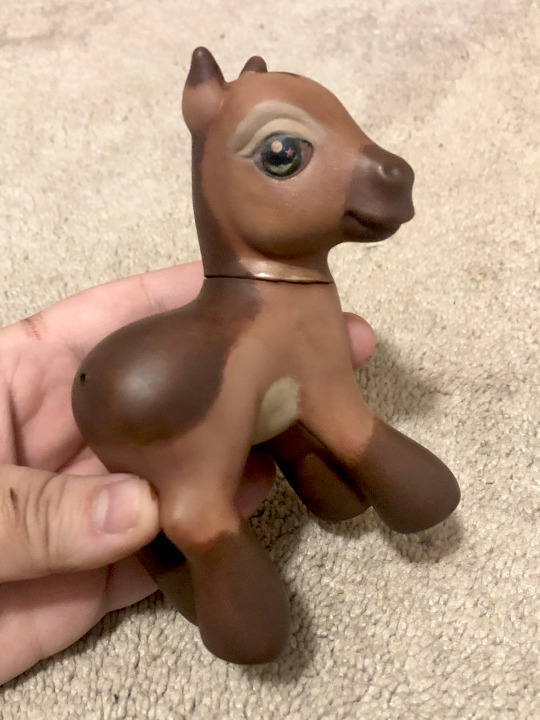
I wanted to start with a white base to give myself a clean canvas for dyeing so I got this G3 Breezie off Ebay for only $3. I decided to first remove her mane and tail which requires removing the head. If you know anything about G3 pony customzing, you know their heads are difficult to get back on once they come off. Even when you run them under warm/hot water. So to get it back on for dyeing, I tried trimming a little excess of vinyl off the neck ring with my xacto knife. It slipped and got me right under my nail! Bad omen for what's to come!
After getting her prepped (removing her mane and tail, cleaning her, using acetone (nail polish remover) to remove her cutie mark) she was ready for a dye bath! I used Rit DyeMore as regular Rit Dye won't dye the vinyl material that ponies are made of. This was my first ever time dyeing anything that wasn't fabric so I was thrilled when she came out this warm rich brown! So pretty!

I read online that dyed ponies will leach dye onto other ponies if they touch, so I wanted to try and prevent this as much as possible with some matte sealer. Lesson #1: Even though she was dry, the matte sealer reactivated the dye! The smallest touch left a print! :(

I pushed forward! And tripped immediately after! I thought, "Surely matte Modge Podge will seal her just that much more" and to my dismay, the Modge Podge kept every brush stroke I made when it dried!! She looked like a leather hand bag! ˚‧º·(˚ ˃̣̣̥᷄⌓˂̣̣̥᷅ )‧º·˚ I learned later you can buy matte Modge Podge spray online but all I had was the type you brush on to your surface.
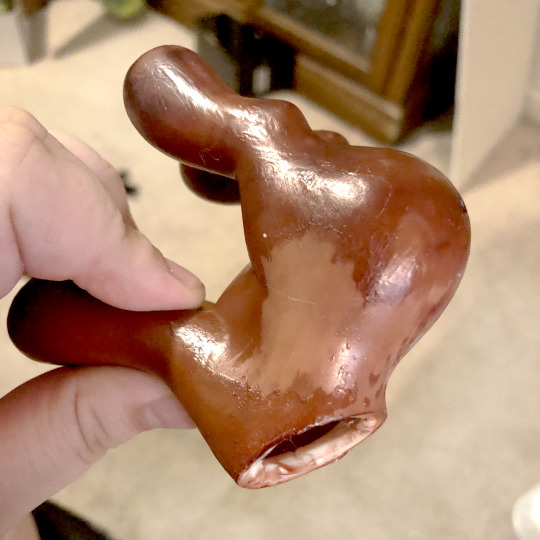
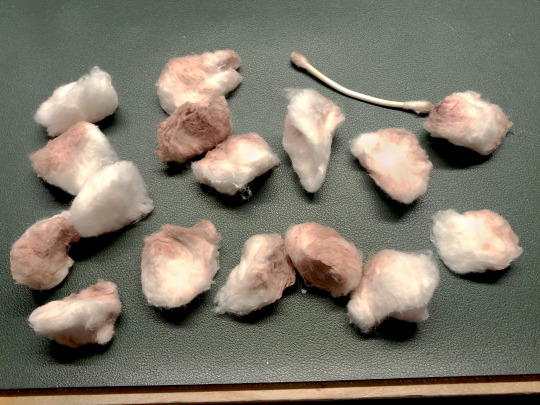
Thankfully, with the help of sixteen cotton balls and a q-tip with acetone, I managed to remove all the sealer but she was no longer that nice rich brown. Oh well I still loved her!
And whoever said the paint will protect the eyes from the dye has clearly never dyed a dark pony! Her eyes were so brown after this lol


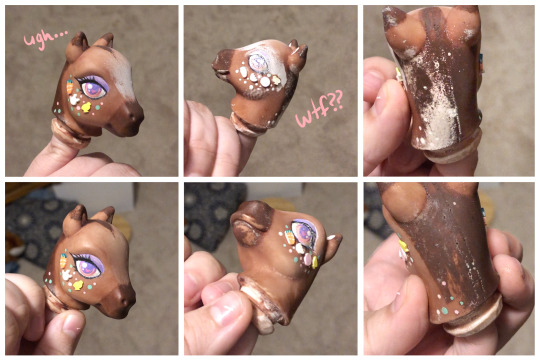
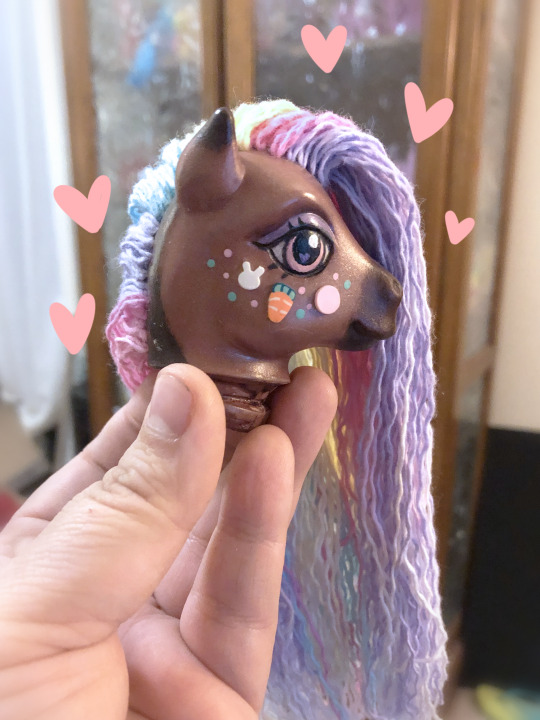
Painting, adding of polymer clay easter themed confetti, and adding her 3D chocolate bunny cutie mark went great! It was all going well until the eyes.
I had never fully painted pony eyes before so the first attempt was pretty bad. Not even my multiple attempts at glitter and using clear nail polish as a cheap gloss on the eyes could save them.
It was so bad that I almost didn't take any pictures but when I went to seal her head, this weird white powder covered half of her face?? I had never seen this before and it freaked me out thinking I just ruined her. I managed to get it off with a cotton ball and some acetone but her paint was fully damaged.
Turns out this was caused because I didn't shake the can of sealer well enough. I needed a break....
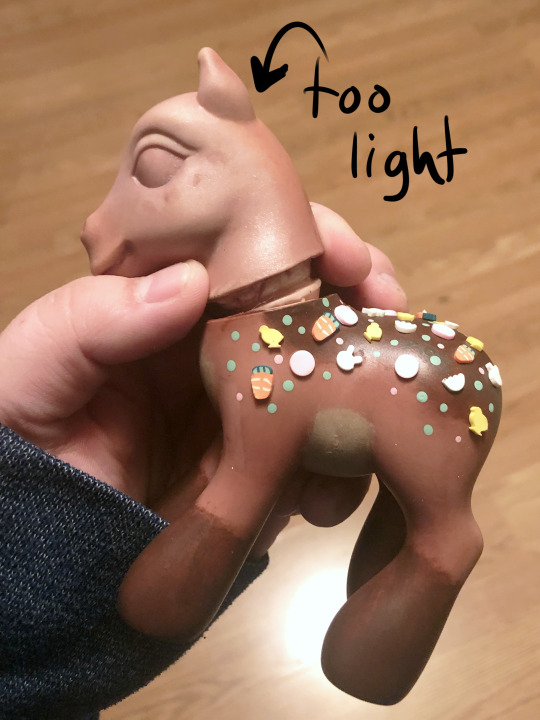
While I took a break for a few days, I decided to watch tutorials on how to paint doll eyes and learned that it's actually pretty common to use high quality watercolor pencils; either Faber Castell or Derwent (which is what I ended up buying).
When I came back, I made the hard decision of removing all the paint and decorations from the head and starting over. Hours of work gone but it was so worth it! 🩷 Removing the paint with acetone ended up making her head lighter than her body so I had to redye her head lol. This time I mixed Derwent pencils with acrylic paints for her eyes.


Time for the hair! I've never done curls before and my original plan was to buy curly hair online but it's so hard to find in the color and curl size I wanted.
So my second idea was to buy small curlers to use on regular nylon doll hair bought from ShimmerLocks on Etsy. But when I tested them out on poor Flower Bouquet it looked so bad ಥ_ಥ
I discovered a Youtube channel you may know called Dollightful where in one of her Stock Box videos she used yarn that she unraveled to make super cute tight wavy hair for a doll. It was a perfect solution! It looks so good but omg it was tedious haha! I used it for her tail too; sectioning off the colors hoping they'd stay separated (they didn't lol).
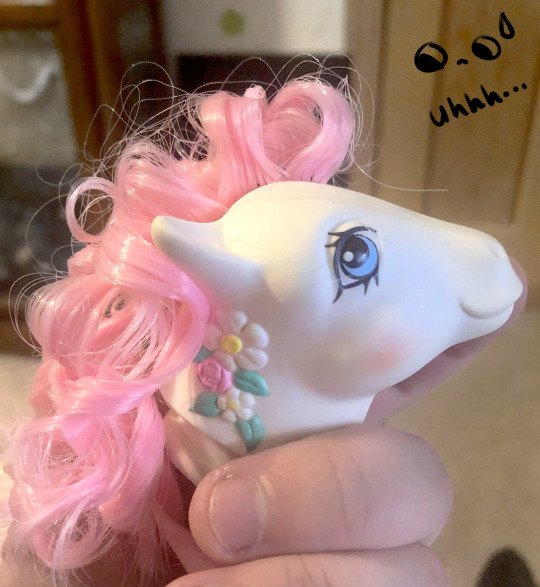
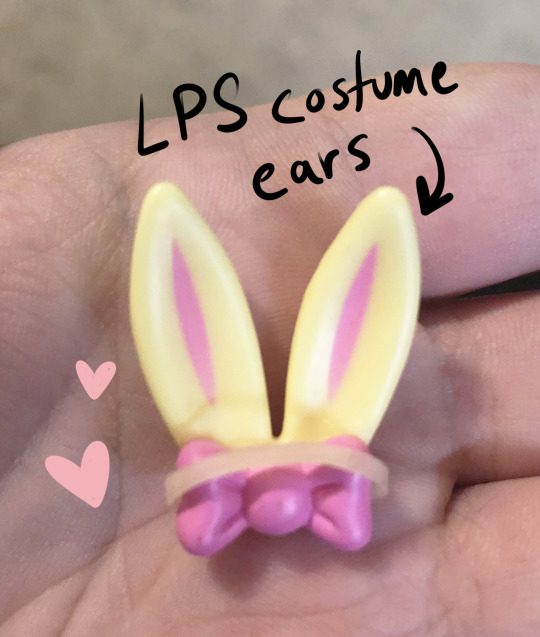
She's nearly complete! Time for small decorations! I tried so many different ears from air dry clay to stealing some from bunny decorations I bought at the store and nothing was working! But I had one last idea...
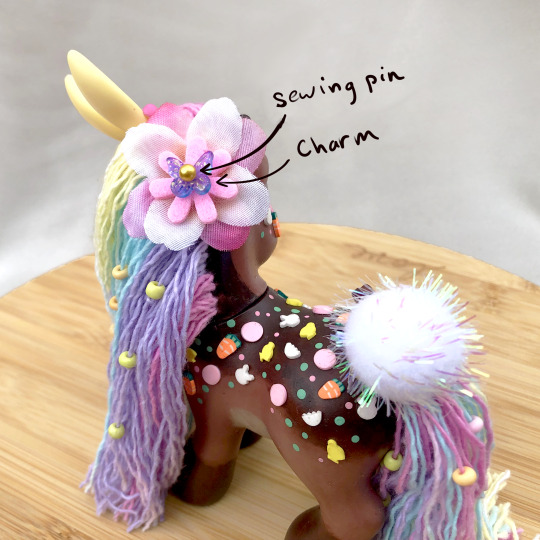
I gave these old Littlest Pet Shop costume bunny ears some use with a flat top sewing pin and some glue so now my pony has bunny ears! Yay!
I forgot it in the concept art, but I originally wanted to add flowers to her mane but I couldn't figure out how to do that without glue which I didn't want to do, too permanent, so I opted for some beads I had on hand. I didn't have any light blue so I made some with the use of acetone (nail polish remover in my case) and boom! Light blue beads! Then I washed them off so the acetone wouldn't damage anything :)
I used a gold topped sewing pin, a butterfly charm, a felt flower and two faux flowers to create a cute hair accessory!
Finally I sewed a hair tie to a puffball to give her a removable cottontail if I ever wanted to take it off.

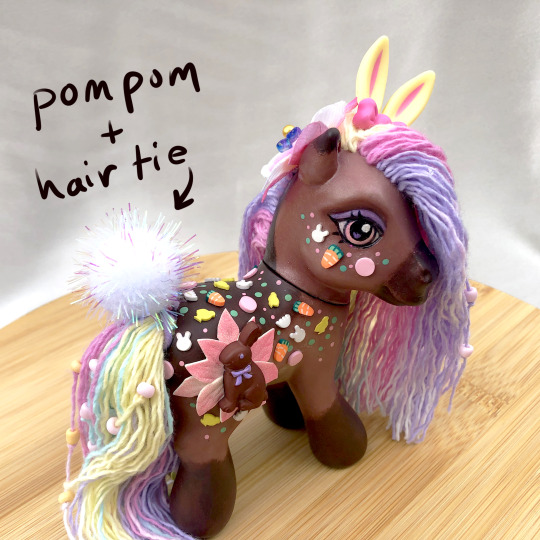
And DONE! She looks so good after so much time and effort! I worked on this girly for two weeks I think? She actually had a partner I designed but I've run out of time to make her :') Maybe next year? 👀 🩷🩷
#my art#art#horse#pony#equine#equine art#artist on tumblr#mlp#mlp art#mlp g3#my little pony g3#g3 mlp#custom pony#ooak#ooak doll#ooak mlp#ooak my little pony#custom mlp#my little pony#my custom ponies#easter#bunny#pastels#pastel rainbow#walkthrough#custom
105 notes
·
View notes
Text
柿
22 notes
·
View notes
Note
advice for someone getting into custom patch making ? like how to start and what to use
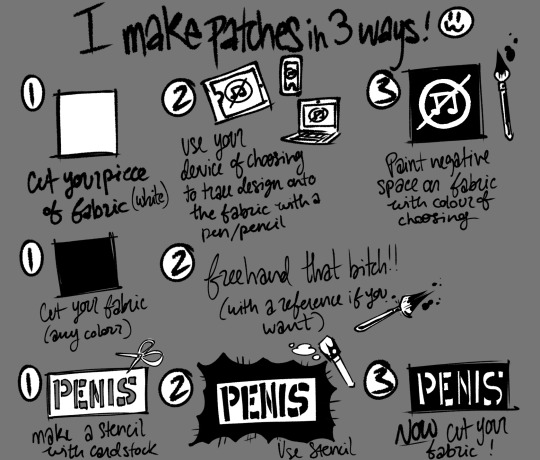
[text: I make patches in 3 ways! 1: cut your piece of fabric (white). 2: use your device of choosing to trace design onto the fabric with a pen or pencil. 3: paint the negative space on fabric with color of choosing. / 1: cut your piece of fabric (any color). 2: freehand that bitch! (With a reference if you want). / 1: Make a stencil with card stock. 2: Use stencil (on fabric with paint). 3: NOW cut your fabric!]
I mainly do the first method in order to get a very bold, bright, and solid white color for the text or drawing on the patch. But any of these have worked great in my experience :)
I mostly use cotton duck fabric for my patches, which is available for cheap at Joanne Fabrics or your local fabric store. But I also just use whatever clothing scraps I can get my hands on! Collect free fabric if you have the opportunity.
and I also use pen, sharpies, paint markers and textile acrylic paint. Cotton duck can kind of suck your ink, but if you don’t care about that any kind of pen works amazingly on it. Here is the paint I mainly use.

336 notes
·
View notes
Text

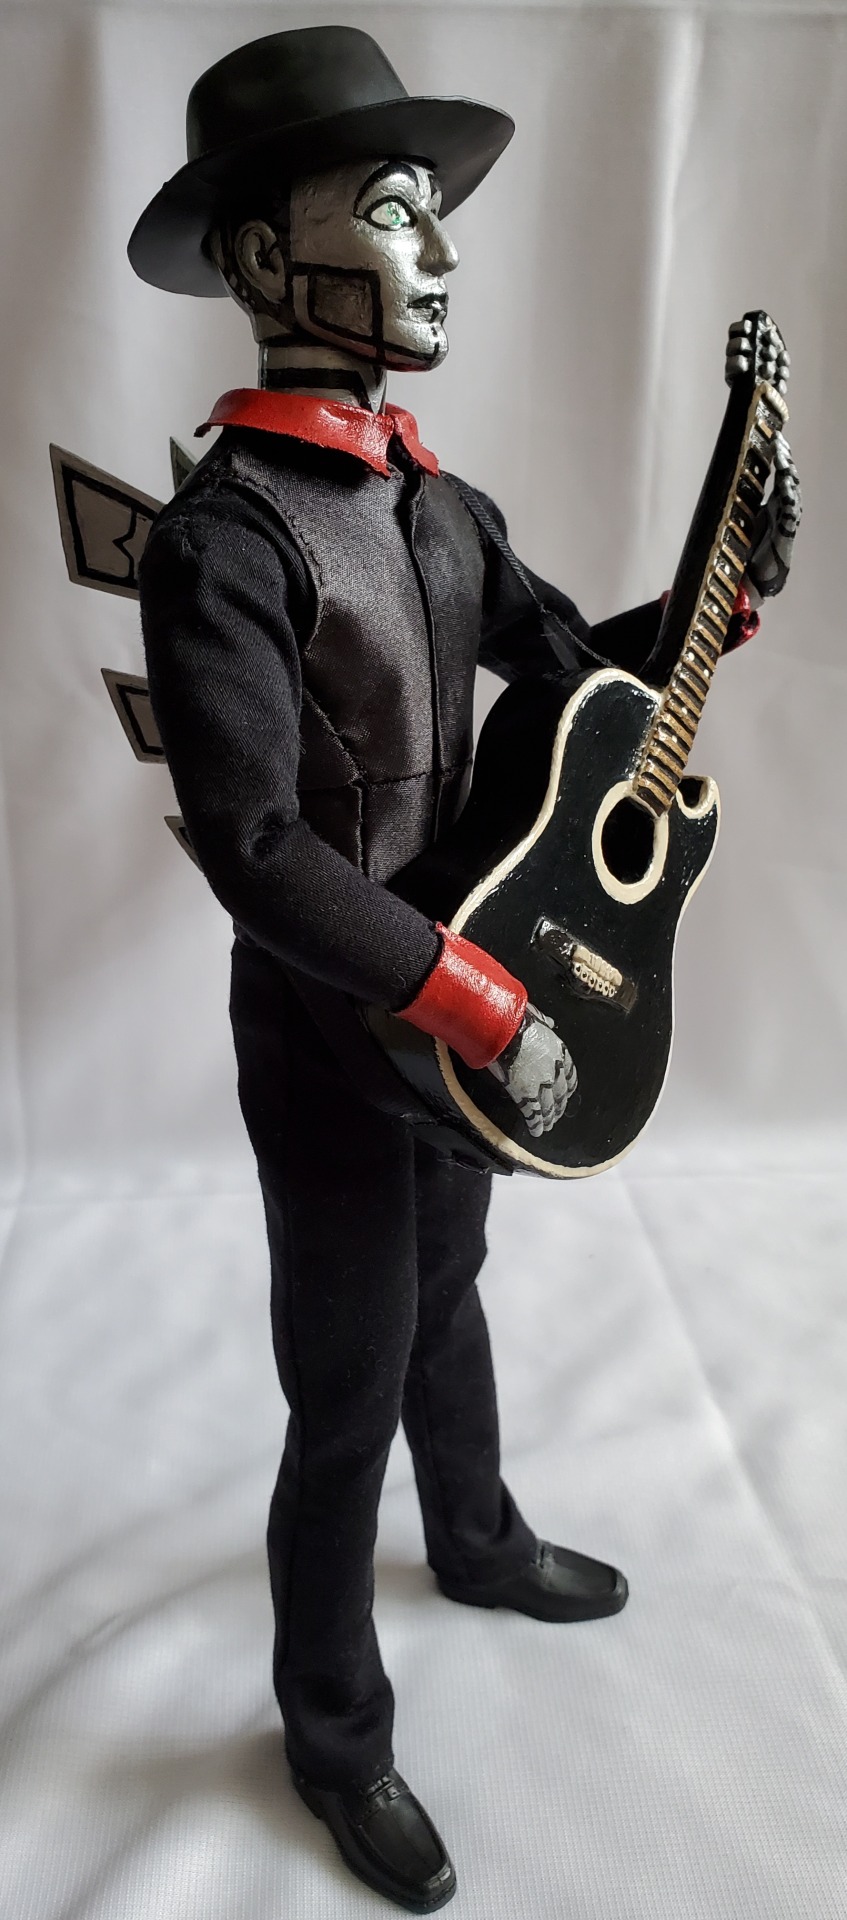
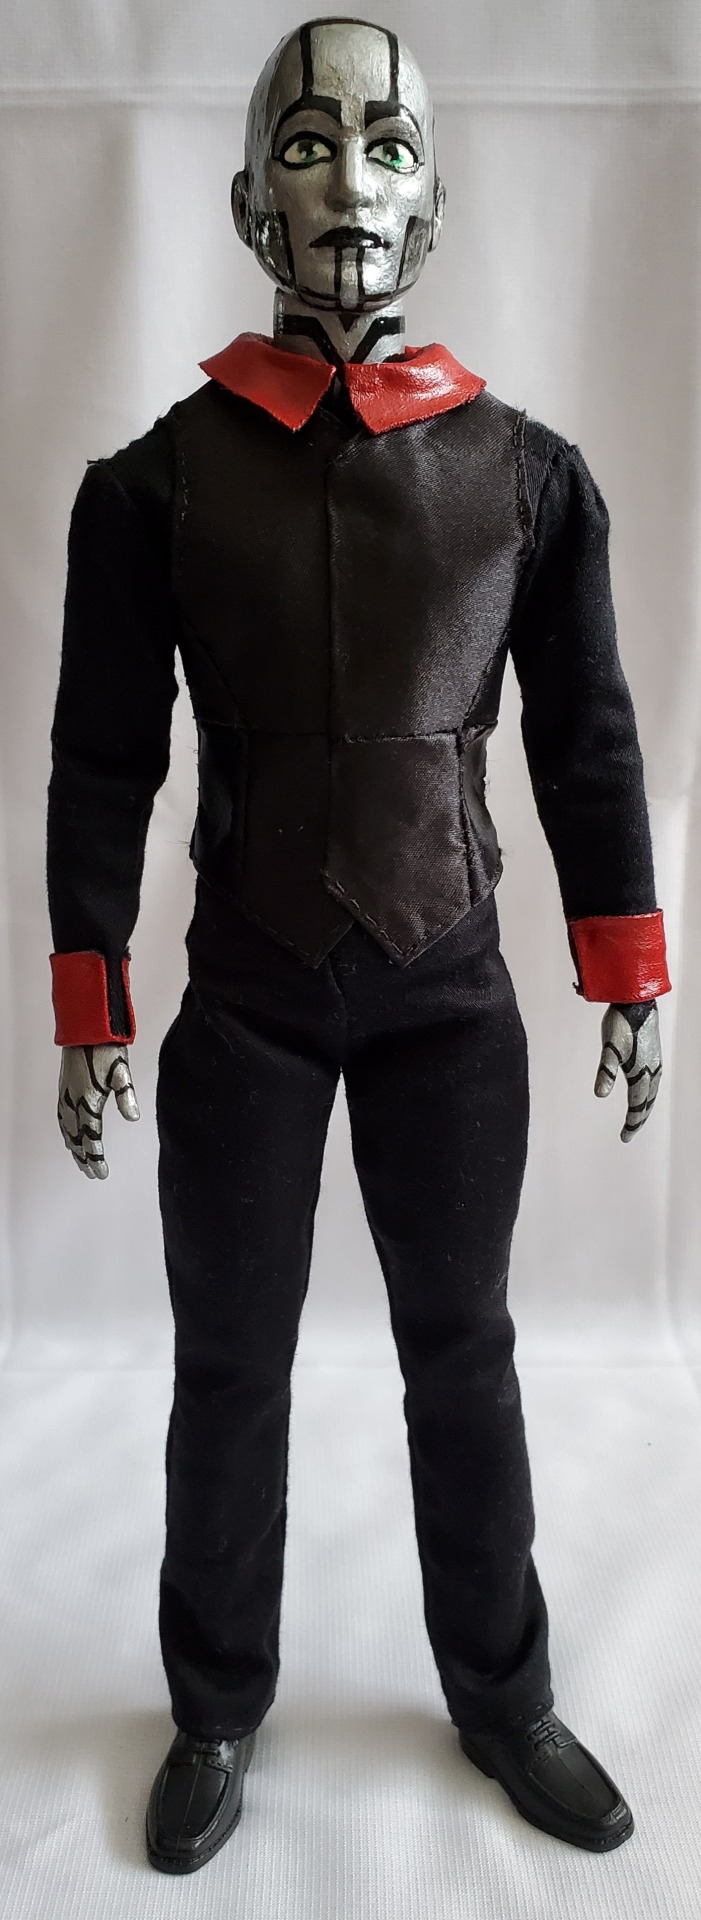
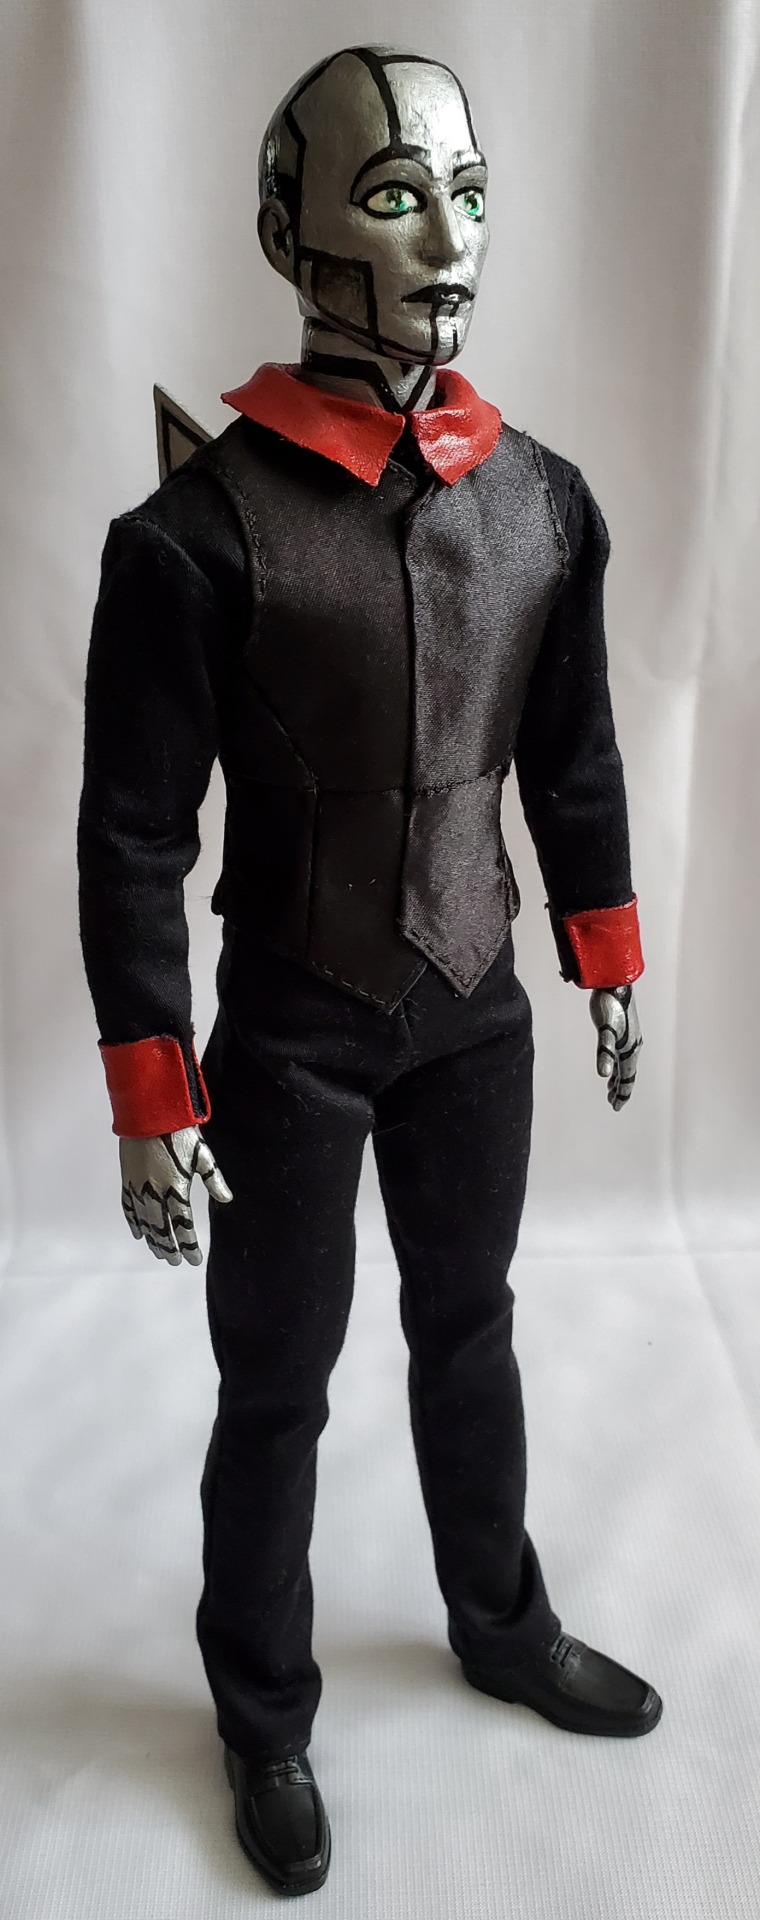
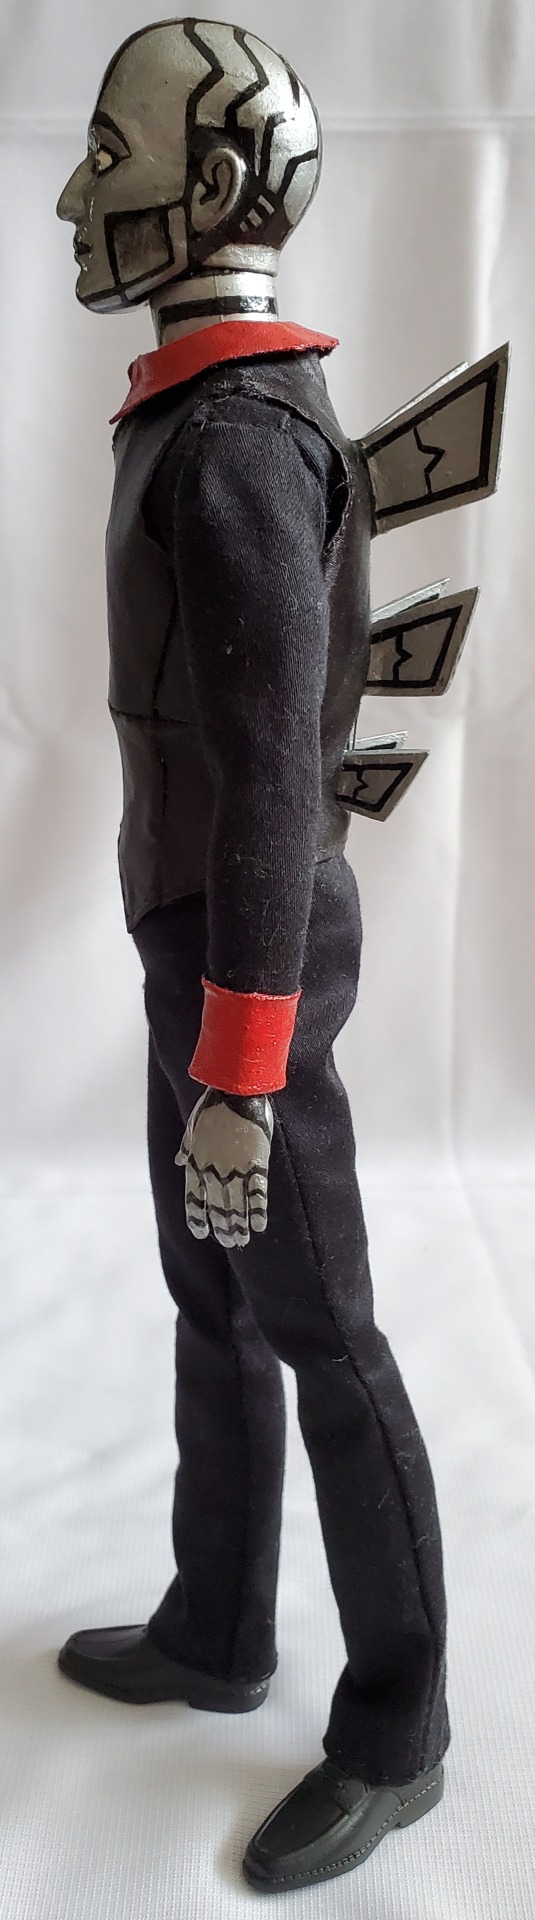
{{{ WIP: The Spine Custom Ken Doll }}}
So, this is actually a project that I started back in the summer of 2020. My sister (@arcticusluna) had been making custom doll clothes for a while and she wanted to start a full doll customization project. When she told me about it we thought it would be fun to do it together. She was going to make a Rabbit custom and I would make a Spine custom.
I still have quite a bit left to go before finishing this. I still plan to add stripes, buttons, and pocket to the vest and to make some edits to the hat I ended up finding and settling with. I also had plans to make his long trench coat. but that will probably be a project for the future. I honestly just wanted to post this since I worked really hard on it but just haven't had the time/motivation to finish it yet.
The Rabbit my sister made will probably not be posted as the paint and glaze we used have deteriorated quickly on her over the last few years and we are unsure as to why, considering that we used the same materials and mine only has a few minor issues. We think it may have been the doll she started with as the rubber seemed to be a lot more flimsy and soft. She might post the clothes or parts of the doll later.
Work in progress photos and process under the read more:
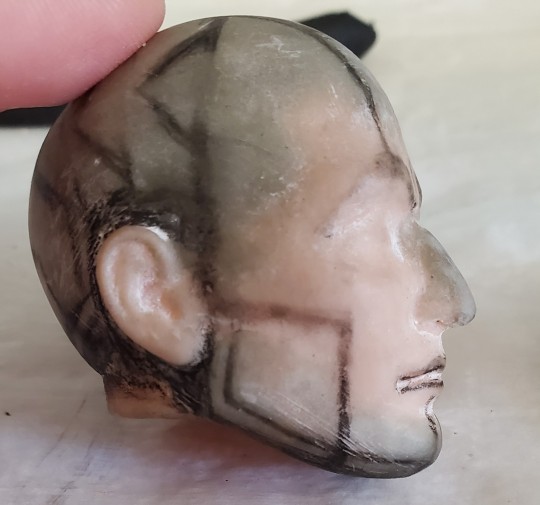
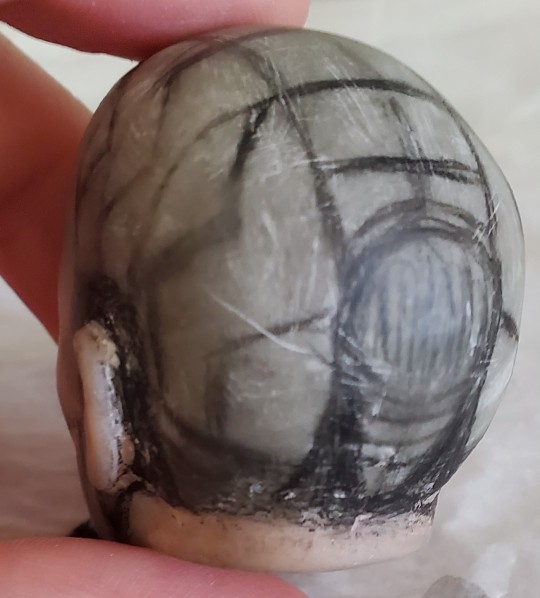

For the edits on the face I used 2-part Apoxie Sculpt. I would lightly score the rubber after removing the hair and then gently shape the apoxie to the face. After getting it as smooth as possible I lightly sanded it. The lines on his head and faced were referenced from the Hot on the Trail music video.
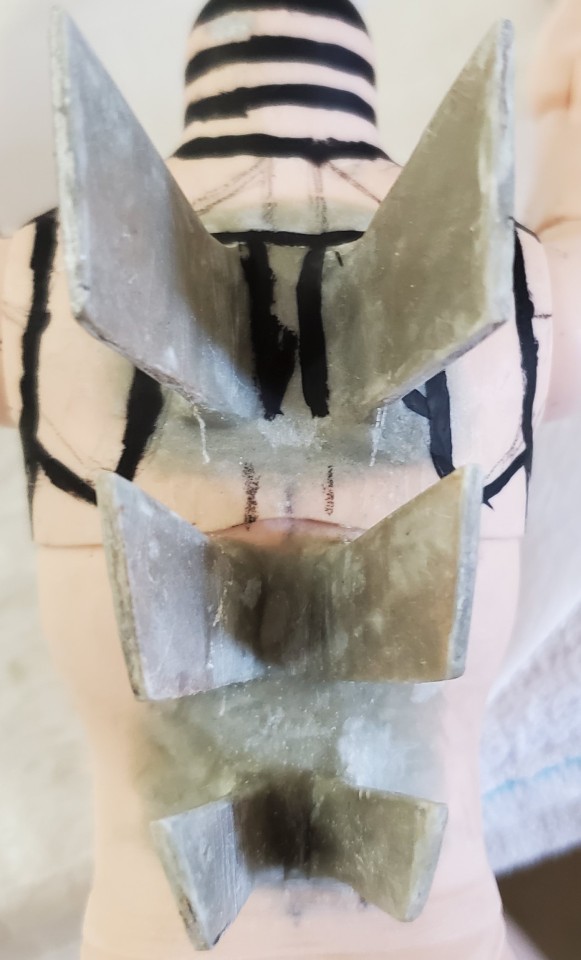
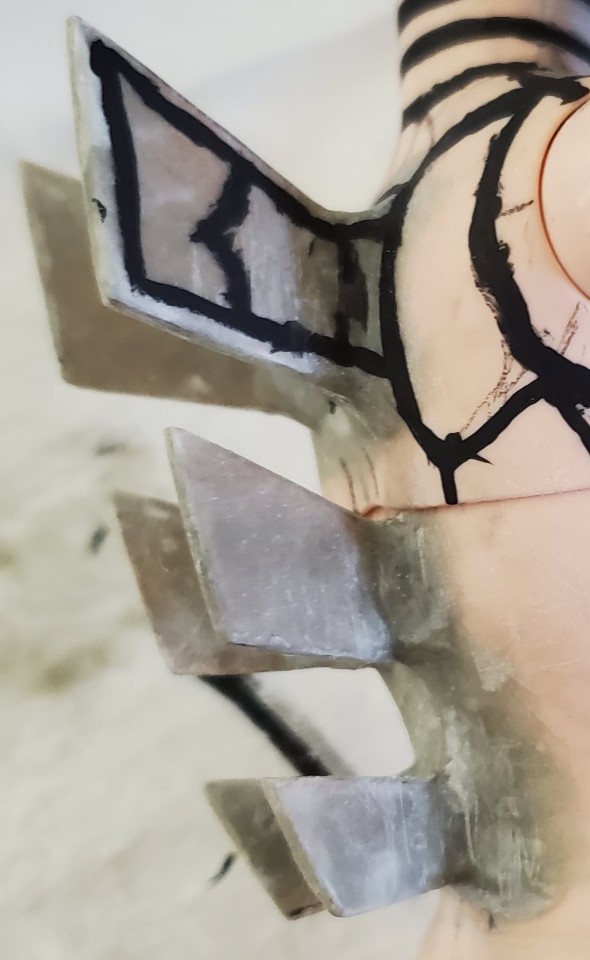
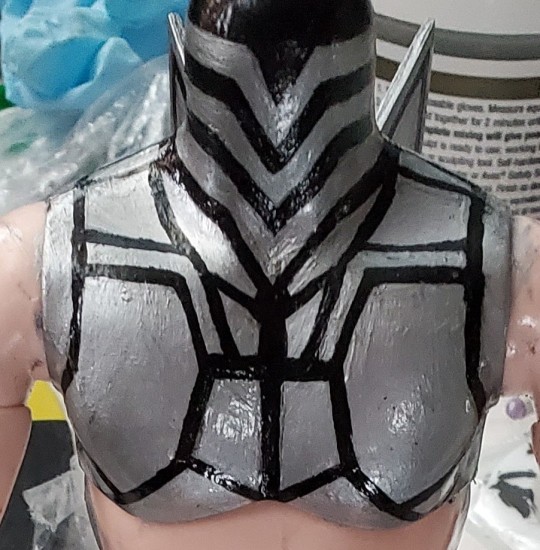
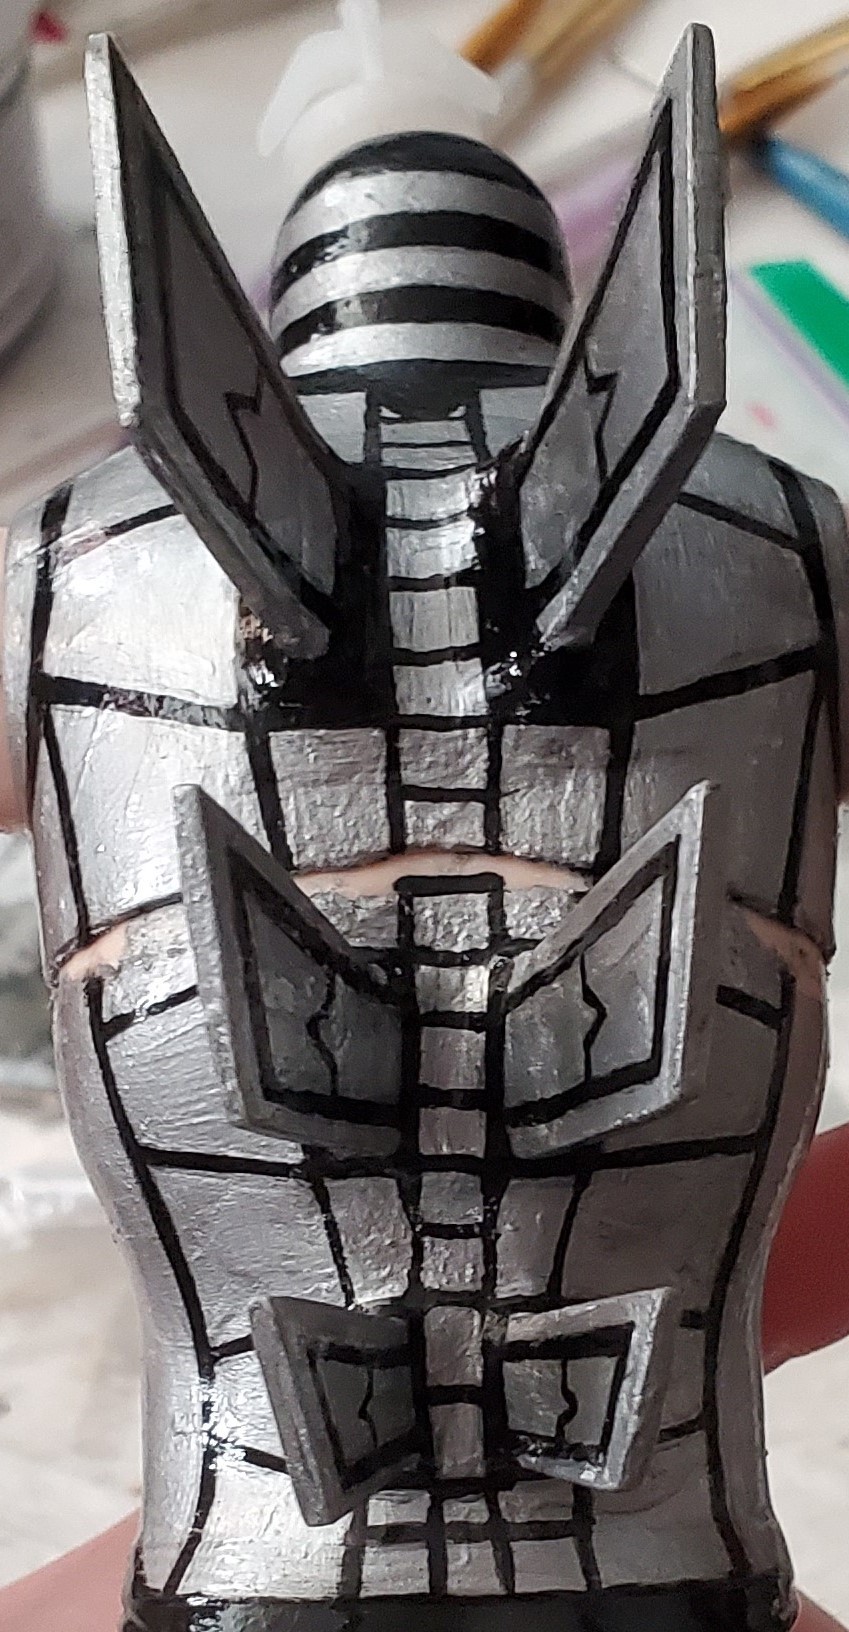
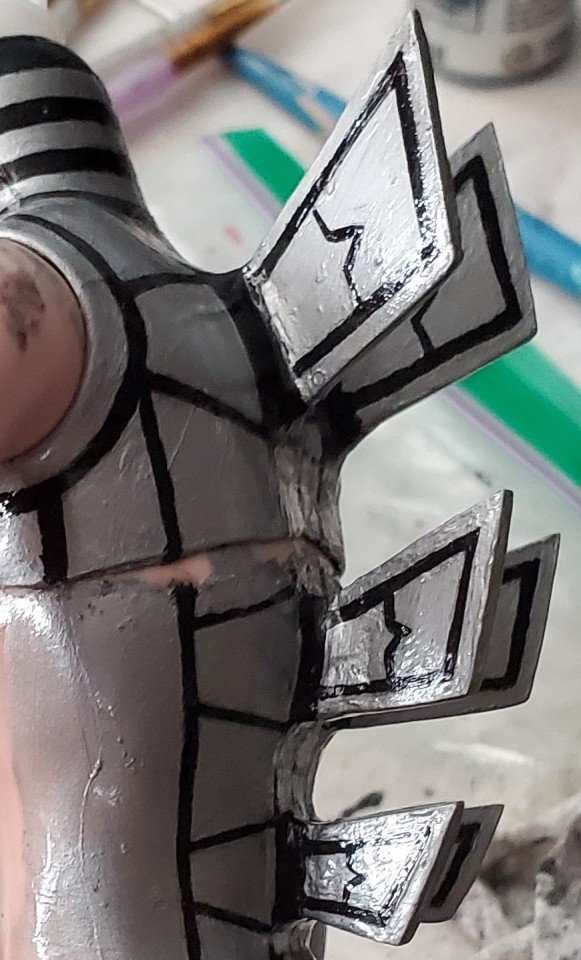
The fins were probably the most challenging part. I cut out paper to the sizes I wanted and made marks where I wanted the fins placed. Then I cut pieces of cardboard to size and covered them with a thin layer of apoxie to make them more sturdy and smooth. once the fins were cleaned up I scored the back of the doll and carefully molded the spines to the back. This was very tedious as they tended to not hold in place when the apoxie was still drying. It was also hard to get the spacing right so that the back was still movable/posable. They are not completely accurate to the Spine's but the bases had to be widened so that they would be more sturdy and attach to the back properly. Once everything was dry, I sanded it the best I could and began painting. I used FolkArt acrylic paints and then a glaze top coat. If I were to do this again I would probably have primed the doll first and use spray paints instead so that the layering was more even and smooth.
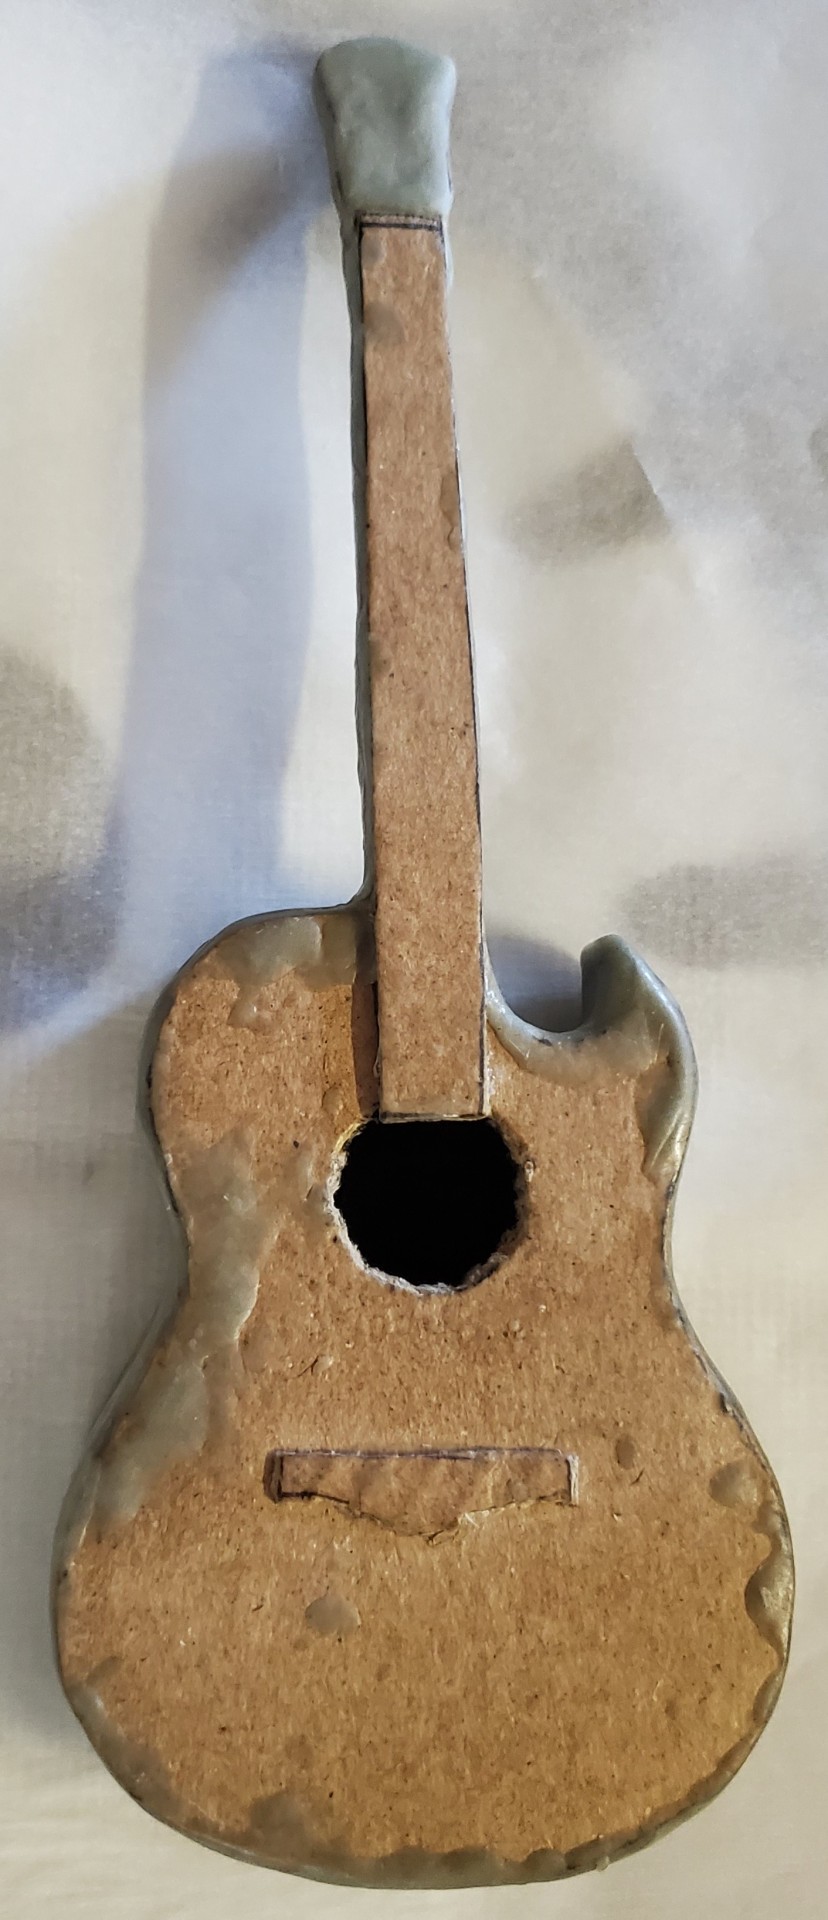
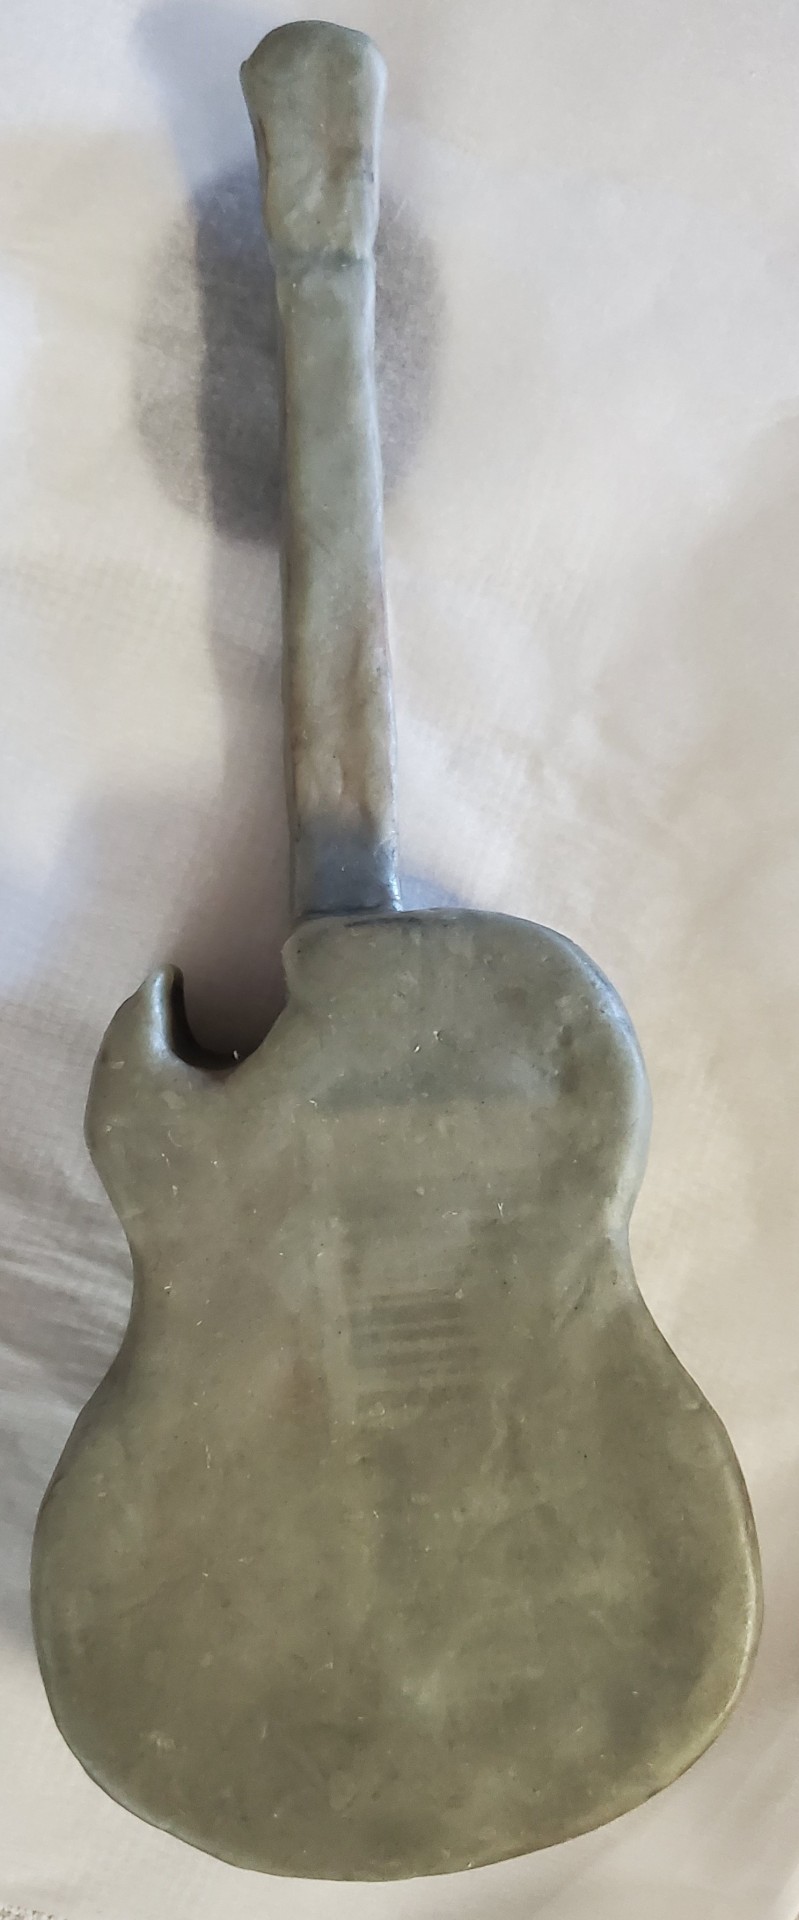
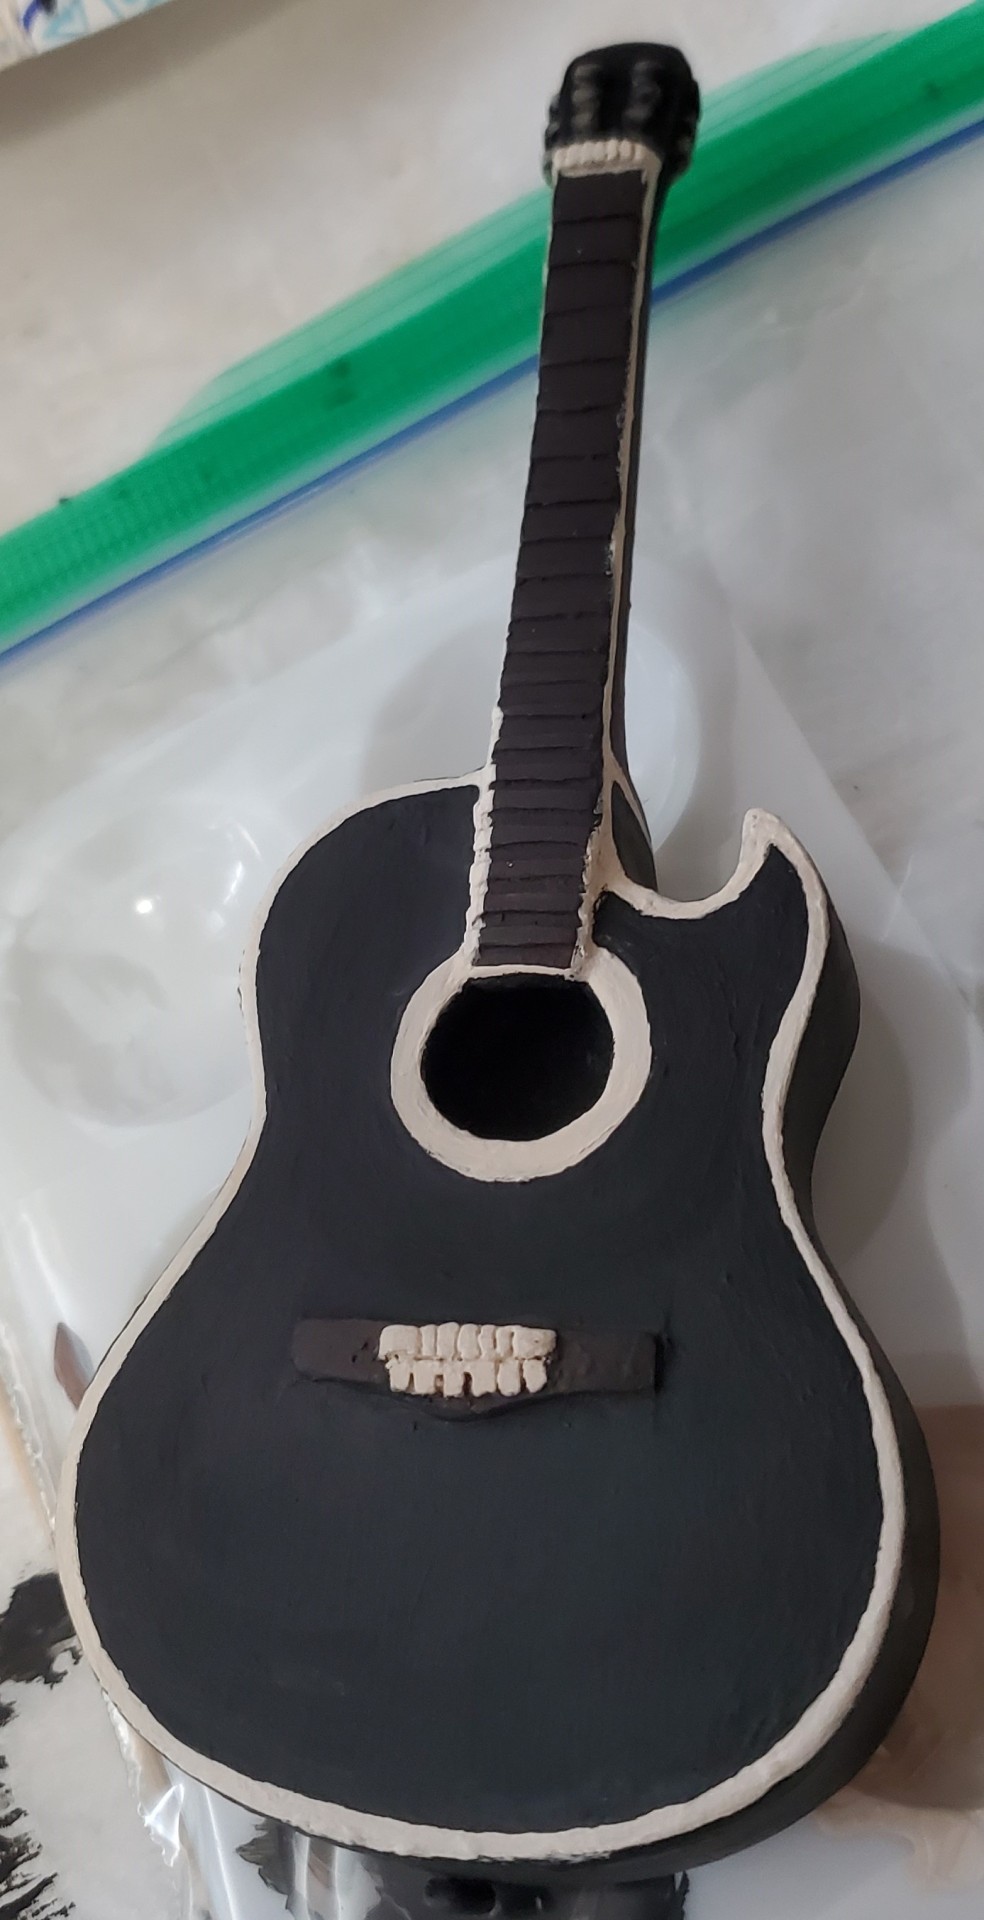
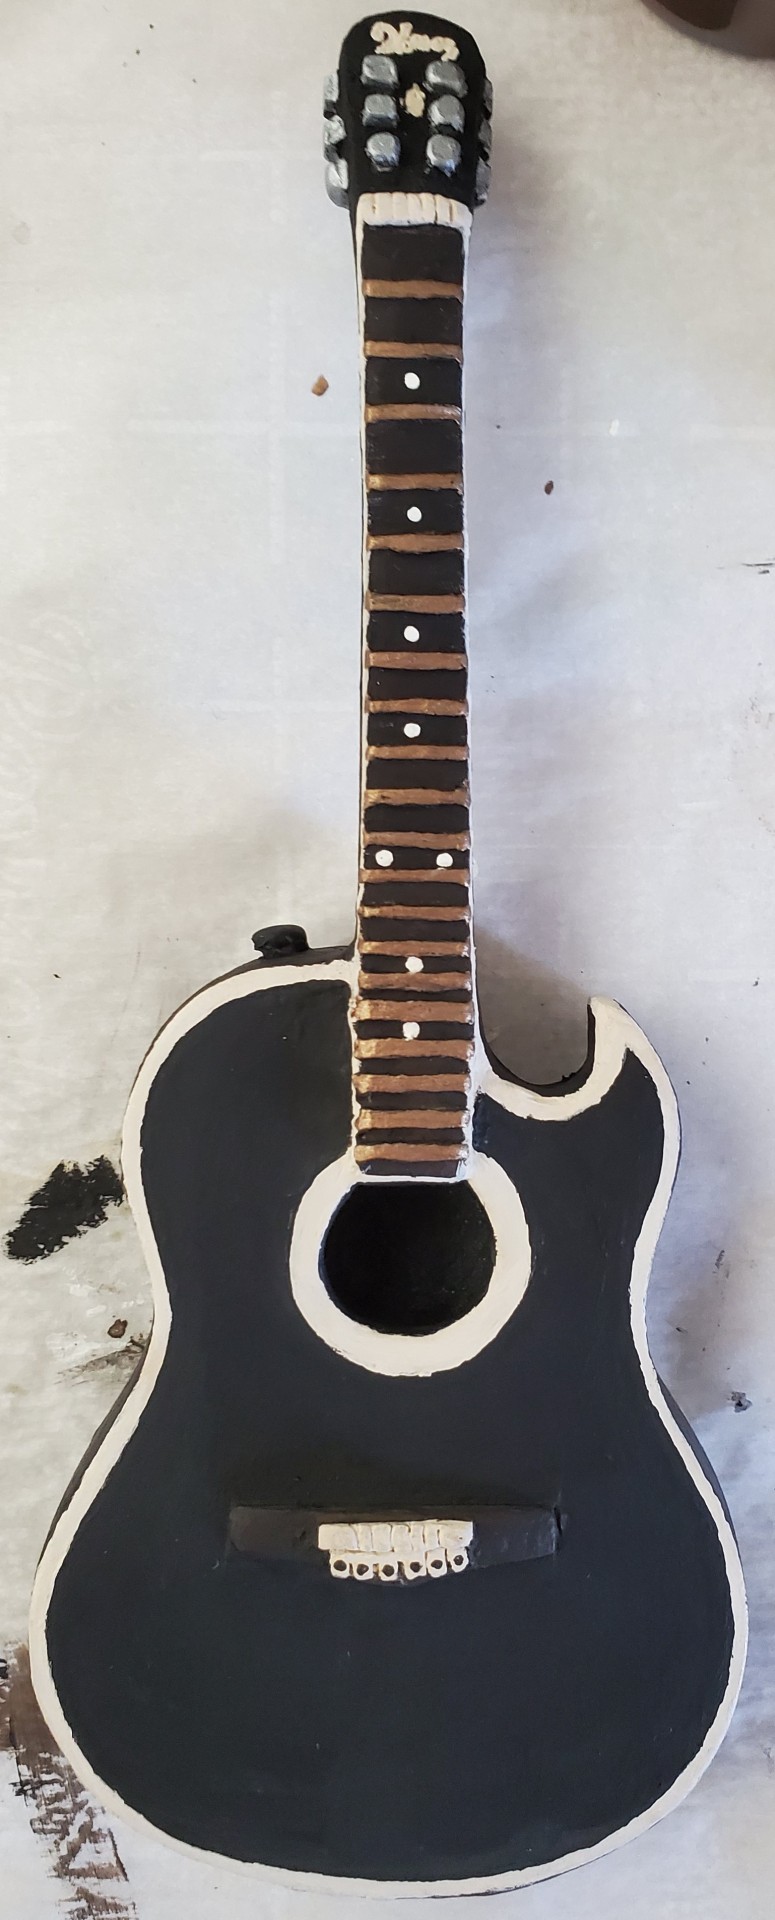
As I was working on the main doll, I was also working on the guitar. The guitar was made entirely from scratch since I really didn't like any of the doll/model guitars that I found. Most were extremely thin/cheap or not really to scale. I used my own acoustic guitar for scale and then drew out The Spine's guitar as close as I could with the proper dimensions. From there, I cut multiple layers of cardboard until I got the right thickness. The bottom two layers were full, the middle layers were hollowed out in the center, the top layer had the sound hole cut, and an extra layer for the neck was made and rested on top. I glued all these layers together, and like the fins, I covered it all with a thin layer of apoxie. I sanded it until smooth and sculpted in all the extra details such as the tuning pegs, the 20 frets, the bridge, and small pegs to hold the strap. Everything was then painted and glazed. The strap is made from a ribbon and pieces of faux leather glued together with the ribbon sandwiched between them.
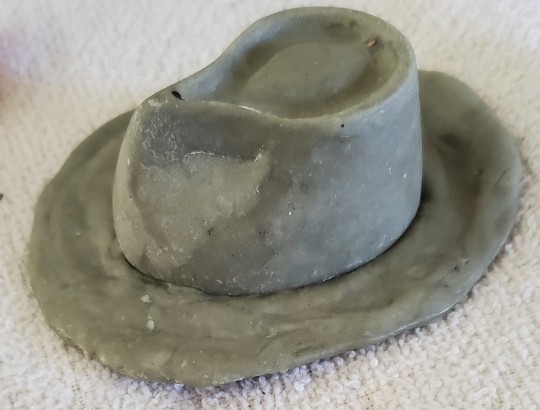
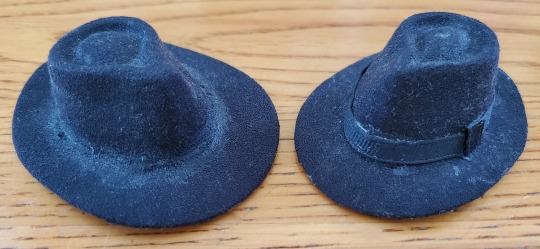
The hat was a struggle. I could not find a single hat that was close to the one Spine wears so I tried a few times to make one by hand. In the end they ended up way to heavy/bulky when I tried to make molded ones and I couldn't get them to sit on his head quite right. (I have absolutely no clue how to make a fabric one.) A few months ago I randomly found a hat while shopping that was actually pretty close to Spine's. So I will be using this for now until I can either edit it or make a different one.
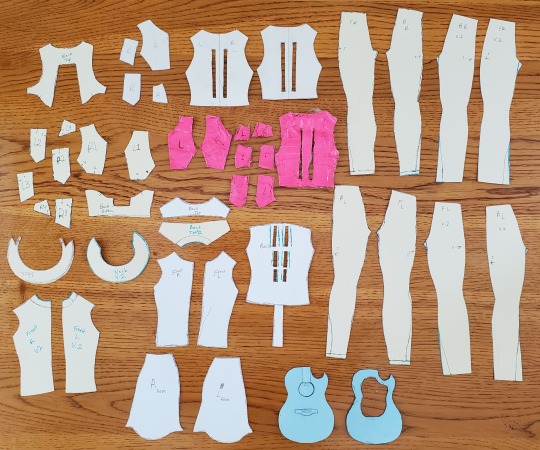
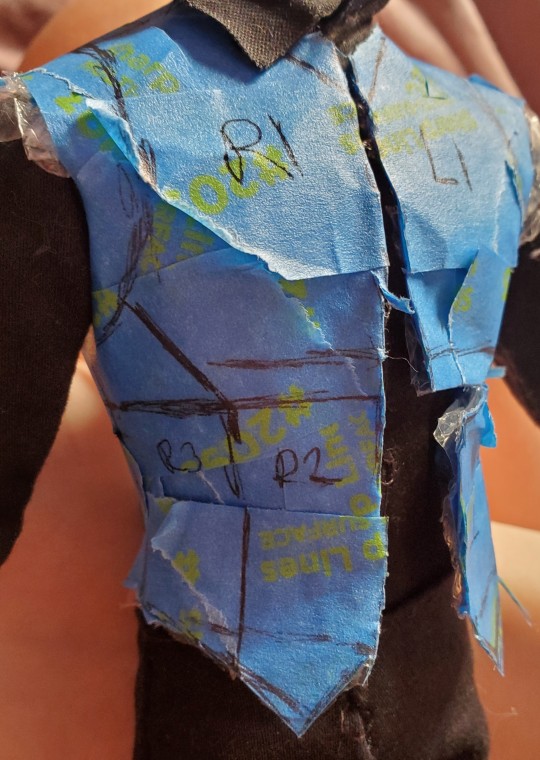
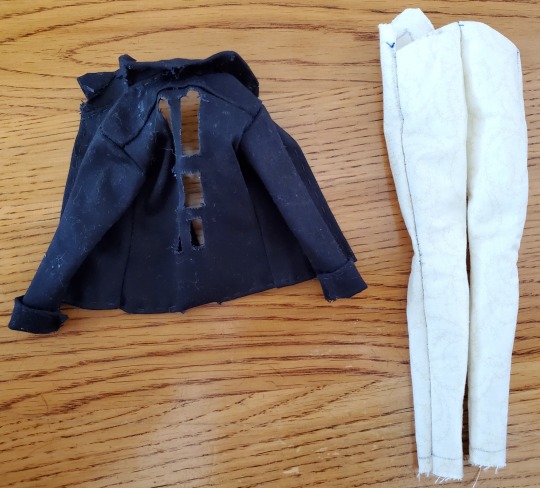
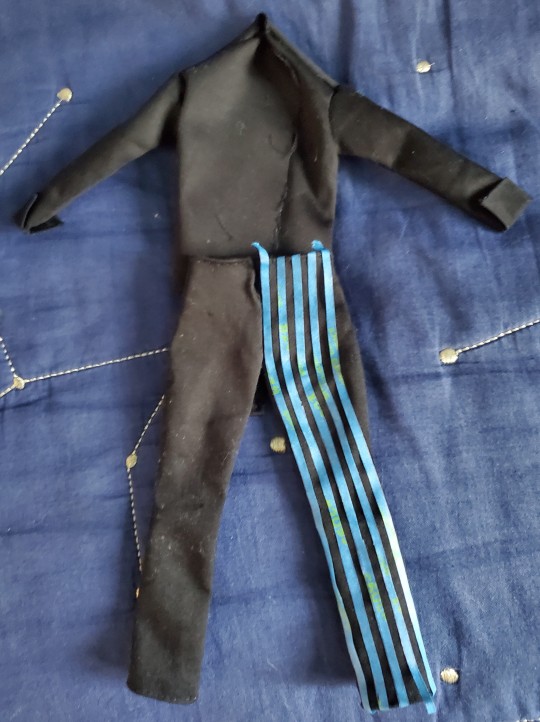
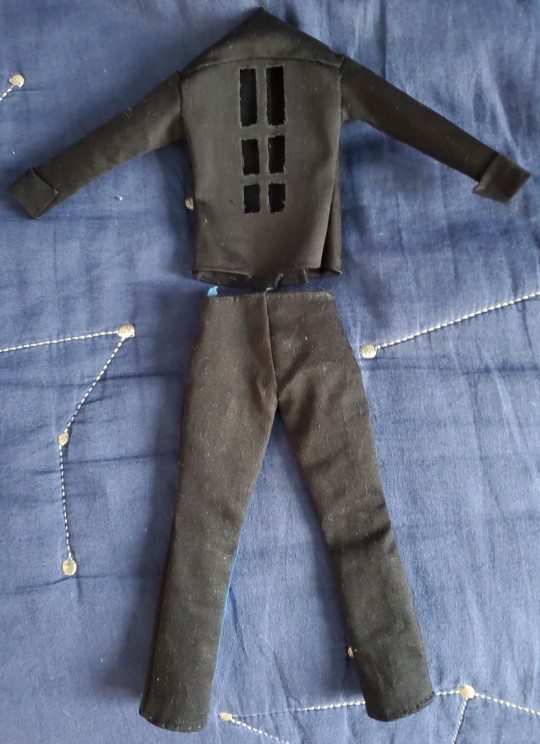
For this project the pants, shirt, and vest were all made from scratch. I have no prior experience with doll customizations at all and while I know how to sew, I have only ever sewn plush animals. I have never made clothes or my own patterns. To make my patterns I used the plastic wrap and tape method. This is when you wrap the body with plastic wrap, cover this with tape, and then mark out the pattern on the tape. You can then cut out the pattern and use it to measure out your fabric. This was very tedious since the dolls are so small. The small size made it very difficult to get clean seams and to have the pattern actually line up properly once fitted to the doll. In the images above you'll see that I had to make most of the patterns twice to get it the way I wanted. Another challenge was trying to get the clothes to lay properly around the fins without leaving giant holes in the fabric and without the fins tearing up the fabric around them. I ended up gluing an interface on the insides of the shirt and vest to help keep the fabric sturdy and then glued along the edges of the gaps to keep them from fraying. I ended up finding the shoes I needed on ebay.

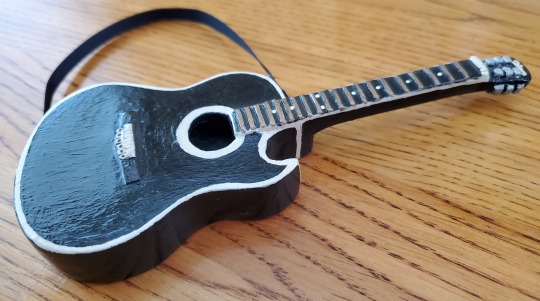
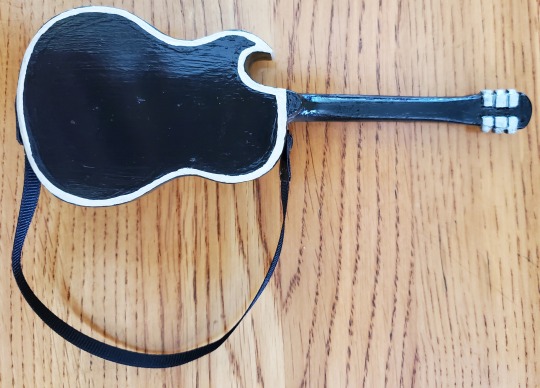
Here are more closeup photos of the finished guitar. I also put it next to the guitar I used for its design just to show the size difference.

Here are more pictures of the doll without the guitar and hat.
Also if anyone was curious this is the original doll used for this custom.
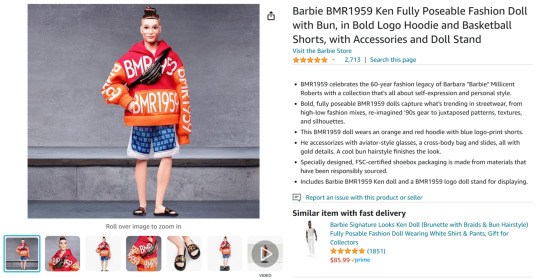
#steam powered giraffe#spg#the spine spg#the spine steam powered giraffe#barbie custom#ken custom#doll custom#my art
78 notes
·
View notes
Text
Custom Plastic Fabrication | R&T Plastic Fabricators
Create impact with custom plastic fabrication from R&T Plastic Fabricators. Quality that speaks for itself. Our custom plastic fabrication services are tailored to make a visual impact, combining quality craftsmanship with innovative design to create solutions that speak volumes about your brand.
#Acrylic Plastic Fabrication#Perspex Fabrication Near Me#Acrylic Fabrication Near Me#Custom Perspex Fabrication#Acrylic Fabrication Sydney#Custom Plastic Fabrication
0 notes
Last Seen Blogs
aspiringfrood-blog
AspiringFrood

m0the
no brothers left and there'll be no more after me

omoinohoka-blog
Omoinohoka

sufiopie
Untitled

limberry
It's limberry time