#calotype
Text
100 notes
·
View notes
Text
The Very First Pets Ever To Be Photographed
New Post has been published on https://petn.ws/YZmnK
The Very First Pets Ever To Be Photographed
For nearly as long as there have been cameras, there have been photos of pets, some of which date back to the early 1800s. Animals are the perfect companion, friend, and as the history of photography shows, photo subject. The advancement of camera and photographic technology is marked by many things, not the least of […]
See full article at https://petn.ws/YZmnK
#CatsNews #Animalportraits, #Calotype, #Cats, #Daguerreotype, #Dogs, #History, #Historyofphotography, #Petphotos, #Pets
#animalportraits#calotype#cats#daguerreotype#dogs#history#historyofphotography#petphotos#pets#Cats News
2 notes
·
View notes
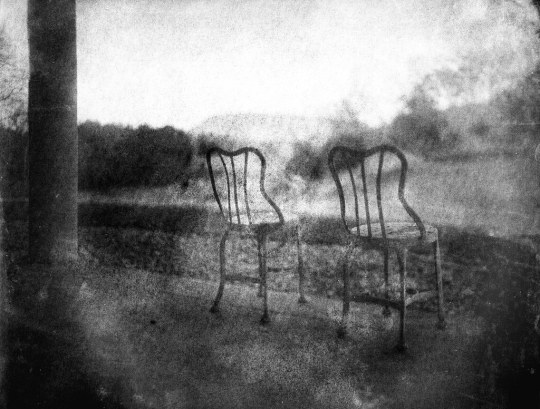
Photo

30.January 2023 - From my Collection: ca.1850
This is probably a salted paper or calotype photograph made using processes invented by William Henry Fox Talbot ca.1840. What attracted me to it are the streaks indicating the brushed-on sensitizer. The “handmade-ness” of this photograph is splendid.
14 notes
·
View notes
Text

#4x5#calotype#diy camera#large format photography#neopictorialism#paper negative#papernegative#pictorial#pictorialism#soft focus#diy lens
12 notes
·
View notes
Text
How to Make a Calotype - Regis' Calotype Recipe
How to Make a Calotype - Regis' Calotype Recipe
Recipe by Regis Casillas
Public domain
Version 1.0
Yes I am aware there are grammatical and tense errors in this passage, I just wanted to get this info out ASAP. Proofreading will be done in a later version of this passage.
PREFACE:
For those who don't know, a calotype is an early photography process invented and patented by Mr. Fox Talbot in the early 1840s, recognized for being the first photography method to introduce the positive-negative relationship, allowing for multiple duplicate positive images to be made from one negative, compared to the daguerreotype. I had been looking online for a recipe on how to make my own calotype, but I couldn't find anything past "he used silver iodide (silver nitrate + potassium iodide), writing paper, acetic acid, and gallic acid". All I got were the ingredients, but not measurements or chemical strengths. I couldn't even find the original calotype patent papers online. Despite being an important piece in photography's history, I couldn't find much info on how to make one (other than that there supposedly exists a calotype recipe in a photography college textbook). But after relentless searching and experimentation, I finally cracked the secret on how to make a calotype, and I'm making my recipe public! It might not be the original 1841 recipe, but it's pretty close. Acetic acid was substituted with strong vinegar, and gallic acid was substituted with green/black tea in this recipe.
Ingredients:
Distilled Water
Silver Nitrate (at least 5g will do)
75% Vinegar (40% could also work, but adjust measurements if you're getting undesired results)
Potassium Iodide
Potassium Bromide (Optional)
Green and/or Black Tea
Sodium Thiosulfate (or a weak solution of ammonium thiosulfate)
Beeswax (Optional)
Equipment:
Gloves, Eye protection
3 liquid containers with a cap/lid, with no metal parts in contact with whatever gets put in there
A bowl or dish for holding liquids, big enough to hold the paper you will be using, ideally 3 to 5
Tweezers or Tongs
Measuring cup
Measuring spoons
Coffee filters
Funnel
A red light source (such as a darkroom light, or a flashlight with a red filter, the light CANNOT be any regular colored bulb)
Something to heat up water (hot plate, jar warmer, kettle, etc.)
Foam brushes
Paper that can handle getting soaked (ideally paper that's 60lbs or above)
An analog camera (preferably a plate or large format camera) capable of long exposures (as indicated by "T" [time] and/or "B" [bulb])
SAFETY NOTICE:
Please wear gloves and eye protection when mixing and handling chemistry. Silver nitrate can cause burns and skin discoloration, and even blindness if it gets in your eyes. You are also advised to make this in a well ventilated room or space, as the 75% vinegar will release strong fumes. Vinegar of this strength is considered a poison (for reference, 10% is used as weed killer), and can cause burning sensations if inhaled or comes into skin contact for instance. Please consult a Material Safety Data Sheet (MSDS) for more info. I AM NOT RESPONSIBLE FOR ANY DAMAGES OR INJURY, FOLLOW AT YOUR OWN RISK!
PREPARING THE SOLUTIONS:
Note: For both solutions, especially the silver nitrate solution, you will need some sort of liquid container (glass bottle, glass jar, plastic bottle, etc.) that does not have ANY metal parts in contact with the liquid inside. It's due to the fact that silver nitrate is an oxidizer, and will rust out a metal mason jar lid for example. The iodizing solution can also corrode metal over time due to the strong vinegar solution. So whatever you're storing your fluids in, please make sure the container is made out of plastic or glass, and the same applies to the cap or lid.
And before anyone asks, the purpose of the vinegar (acetic acid) is to act as a retainer. Without the acetic acid, the calotype paper would turn completely black (if not mostly darkened up) as soon as the developer (gallic acid) was applied, regardless if it was exposed or not. The vinegar prevents that, and allows a proper negative to form upon development.
To get started, let's make an iodizing solution. We'll start with 300ml of distilled water, and then add 50ml of the 75% vinegar. One issue with this type of vinegar, at least the one I'm using, is that there tends to be an oily residue on the surface, that if left, could cause spots on the paper that will result in unexposed white spots on the final developed image. If your vinegar has this oily surface, get another liquid container like a jar, and place a funnel on top. In the funnel, add two layers of coffee filters and pour the liquid to filter the oily residue off the surface. Repeat for the best results. Once that's done, add 1/8 teaspoon of potassium iodide, and stir the mixture. Optionally to increase the light sensitivity of the calotype, you could add a pinch or another 1/8 teaspoon of potassium bromide. This will drastically reduce the exposure times from 4 minutes to 45 seconds (in my experience) for example.
To prepare our silver nitrate solution, measure 25-50ml of vinegar solution, and tap that at 200ml with distilled water. As previously mentioned, filter the liquid with new filters. Then take 1/2 teaspoon of silver nitrate, and mix it into the liquid. Once done, you should now have a silver nitrate solution ready to use. The best part is that the silver nitrate solution is also compatible in the production of salt/albumen prints.
To make our fixer, place 1/2 teaspoon of sodium thiosulfate in 350ml of distilled water. Using a weakened version of an ammonium thiosulfate based fixer (such as Ilford's Rapid Fixer) will also work, but make sure the solution has been weakened prior to use, as ammonium thiosulfate will erase the image if the solution is too strong.
PREPARING THE PAPER AND DEVELOPER:
Cut the paper to the size that your camera will accept (i.e. if you use a 4x5 camera, trim the paper to 3.8 x 4.8). Then fill your dish or container with the iodizing solution. Now place your sheet of paper into the solution, you may place up to 4 papers in one dish at a time. You may see bubbles coming out of the paper, this is normal. Use your tongs or tweezers to press the paper down if they start floating up to the surface. Soak the paper for 5 to 7 minutes, flipping halfway through for an even soak (if you're soaking multiple sheets, be sure to separate the sheets after flipping them). Once the paper has been soaked thoroughly, remove the paper (one by one if you soaked multiple sheets) from the bath, and place them somewhere to dry, such as on a paper towel on a piece of cardboard. If you're impatient, you can also blow dry the paper with a hair dryer, though it's not advised. Once dried, the iodized paper will be able to last for ages in storage; it's only once that you add the silver nitrate, that the expiration timer starts.
Once you're ready to take a photograph, we'll need to prepare our developing solution for the calotype. This solution is also what helps amp up the light sensitivity of the calotype. In a jar or cup (can't be plastic), place 3 black or green tea bags (I personally use two green tea bags and one black tea bag), then either pour in approx. 25ml of hot water (from a kettle or a stove for example) or pour approx. 25ml of distilled water, and place the container on a hot plate or a jar warmer for a few minutes until the liquid is heated up. The end goal is to create a very strong and hot/warm tea solution. The reason why we need to use green/black tea specifically is because those two teas contain a chemical known as gallic acid, which was originally used as the developer for Talbot's calotype. There is enough gallic acid in the tea solution (given we placed 3 tea bags in a minimal amount of water) to act as a developer for our calotype, and by heating up our "tea developer", that will increase the strength of the developer compared to using a cold solution. Be advised that the tea developer is very weak, and is only good for use on one (or two if you're lucky) calotype(s), so I recommend you buy a big pack of tea (you can get a 100pk of green tea from a dollar store, which is what I use) if you plan on making several calotypes.
In a dark room, under red or very dim light, place your paper on a clean non-metal surface (such as another paper towel on a cardboard, or a clean plastic dish). Take your two foam brushes, run it under some water and squeeze it all out to soften up the brushes, as they could shred up the paper if too hard. Grab your silver nitrate solution, and using a foam brush, brush a liberal amount onto the surface of the paper, coating the entire surface (if brushing isn't giving you good image results, try blotting with the foam brush instead). If your tea developer is on a heat source, remove the container from the heat source (also power off your heat source as you'll be heading outside for the next step). Wait at least 30 seconds after applying the silver nitrate on the paper to allow the silver nitrate to react with the iodized paper to form silver iodide (and silver bromide if you opted to add potassium bromide to the iodizing solution) on the paper's surface. After some time has elapsed, take your second foam brush (do not mix the brushes) and brush the developer solution onto the paper. This is what really activates the paper to become light sensitive. If your paper darkens up upon application of the developer solution, that is a sign that you might have not added enough vinegar to either one of the two solutions. If your paper remains white, place your sensitized paper into your camera or your film/plate holder.
Once that is done, you can turn on the lights as your paper should be protected from the light.
TAKING THE PICTURE:
Now you are ready to take a picture! Please note that calotypes work best when wet. Set up your picture and set the focus. As for exposure times, that is dependent on various factors, such as type of camera, your aperture settings, if your paper uses silver bromide, and the like.
Let me try to guide you to how I expose my papers:
I set my camera to the "T" (time) mode, which means the shutter remains open until I press the shutter again. If your camera only has a "B" (bulb) setting, you may need to tape down the shutter to perform a long exposure.
My plate camera's lowest aperture setting is F8, so on a bright sunny day outdoors, I typically only have to expose the image for 45 seconds (silver iodide + silver bromide) or 5 minutes (silver iodide) to get a good exposure. If I set my aperture to F16, I double the exposure time to 90 seconds (silver iodide + silver bromide). That should give you a good baseline for exposure times, the rest is experimentation. Just remember it's better to overexposure than it is to underexpose. I have not been able to successfully photograph a calotype indoors, regardless of exposure times or aperture width.
After you've taken your photograph, it is now time to develop it. Return to your dark room, and under a dim or red light, take the paper out of the camera or plate/film holder. You might see a faint negative of your image on the surface of your paper. Take your paper and place it in a clean plastic tray, and pour your tea developer onto the paper. Squeeze out any tea from your foam brush into the tray if there's some developer still absorbed. Rock the tray for the first minute and let it rest for 30 seconds. You can add a few drops of the silver nitrate solution into the developer if you want a little more OOMPH in the developing process. Keep alternating between rocking the tray and letting it sit, occasionally checking the density of the negative by holding it up to the red light; you don't want the negative to be too faint when held to the light. Once you’ve determined the development process is complete, rinse the paper 3 or 4 times to clean off the developer. As for the developer, you can dump that down the drain, but if you added silver nitrate to your tea developer, it's best that you put the liquid in a separate collection container, again with no metal parts in contact with the fluid inside, for safe disposal later.
With the room still dark/under red light, pour your fixer into a separate tray, and place your paper in that tray. Rock the tray for the first minute, and let it sit afterwards. Let your paper sit in the fixer for 5 to 7 minutes (depending on the strength of the fixer), continuously alternating between rocking the tray and letting it sit every minute to ensure that all the unexposed silver is washed away. After that, you should be okay to turn on the light.
Now we'll want to give our paper a final rinse to remove any chemicals the paper had absorbed. Rinse the paper under a running faucet of warm water 3 to 4 times, and place your paper in a clean tray. Fill the try with cold water, and let the negative rest for 7 minutes in the water bath. After the paper is done soaking, give the paper one final rinse, and hang the calotype to dry.
Now that we've finished making our calotype, you can scan your calotype on a flatbed scanner to digitize it. I recommend you scan at 1200dpi as a .PNG format image for the best image quality. Please note that calotype images are mirrored due to how cameras work. You can also apply beeswax onto the calotype to increase its transparency (for making a salt print from the negative) and to add contrast to the negative.
TROUBLESHOOTING
"My paper keeps darkening up when I brush on the tea developer, even when it's not exposed!"
A: You might have not used enough acetic acid, or used a weaker strength than what is mentioned here. Please note that the vinegar you can get at a grocery store is only 5% vinegar; you'll need at least 40% or 75% to properly do this experiment. If you're using 40% vinegar, you may need to add more vinegar to the solution than what is listed here, making sure the solution still caps off to 350ml (iodizing solution) or 200ml (silver nitrate solution).
"Nothing appears on my paper upon development"
A: There could be various causes for this, such as possibly using too much vinegar, not exposing the paper long enough, shooting the image in low-light environments, or maybe your tea developer is too cold/old for use. Try troubleshooting those variables and see if that fixes your issue.
CONTACT:
Reddit - u/Regis_Casillas
Twitter - @RegisC_Animates
Tumblr - regiscasillas
Dates:
v1.0 - Oct. 14, 2022
#photography#analog photography#vintage#calotype#art tutorial#photo tutorial#images#early photography#film photography#darkroom#paper negative#old images
3 notes
·
View notes
Text

Salt paper print from calotype negative
3 notes
·
View notes
Text
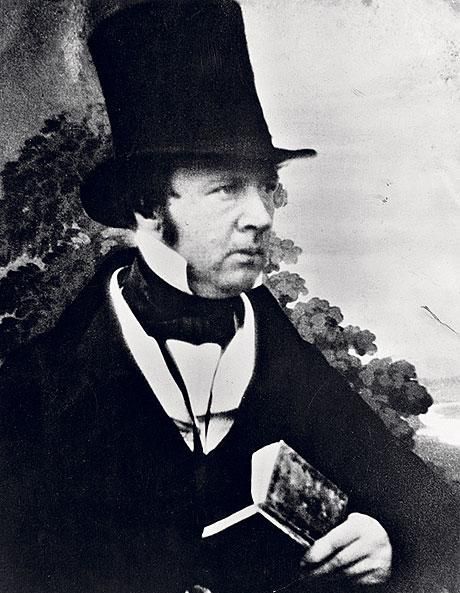
#William Henry Fox Talbot#photography#black and white#Victorian#inventor#science#history#historical#top hat#men's fashion#academia#book#reading#calotype
1 note
·
View note
Photo

Earliest Types of Camera
The history of photography dates back to the early days of human civilization, with various devices used to capture images of the world around us. This article explores some of the earliest types of camera and their impact on the development of photography.
Camera Obscura
The camera obscura, a device used to project images of the outside world onto a flat surface, was one of the earliest forms of camera. It was used by artists as a drawing aid and by scientists as a tool for observing solar eclipses and other phenomena.
The basic principle of the camera obscura was known to the ancient Greeks and Romans, but it wasn't until the Renaissance that it became a popular tool for artists. By the 18th century, portable camera obscuras had been developed, allowing travelers to capture images of the world around them.
Daguerreotype
In 1839, French artist Louis-Jacques-Mandé Daguerre announced the invention of the daguerreotype, a process for capturing photographic images on a silver-coated copper plate. The daguerreotype was the first practical method for producing photographic images and revolutionized the field of photography.
The process involved exposing a sensitized plate to light, developing it with mercury vapor, and fixing the image with a solution of common salt. The resulting images were sharp and detailed, but the process was complex and time-consuming.
Calotype
In 1841, Englishman William Henry Fox Talbot introduced the calotype, a process for producing photographic images on paper coated with a silver salt solution. The calotype was the first photographic process to use a negative, allowing multiple prints to be made from a single image.
The calotype process involved exposing a sensitized paper negative to light, developing it with a solution of gallic acid, and fixing the image with a solution of sodium thiosulfate. The resulting images had a softer, more naturalistic look than daguerreotypes and were easier to produce.
Wet Plate Collodion
In 1851, British photographer Frederick Scott Archer invented the wet plate collodion process, which used a glass plate coated with a solution of collodion and light-sensitive silver salts. The wet plate collodion process was faster and more versatile than the daguerreotype and calotype processes, and became the dominant photographic method of the mid-19th century.
The wet plate collodion process involved coating a glass plate with collodion, sensitizing it with a silver nitrate solution, exposing it to light, and developing it with a solution of iron sulfate and acetic acid. The resulting images were sharp and detailed, and could be reproduced in large quantities.
Conclusion
The earliest types of camera were rudimentary devices that relied on simple principles of optics and chemistry to capture images of the world around us. From the camera obscura to the daguerreotype, calotype, and wet plate collodion processes, each new development brought new possibilities and expanded the boundaries of what was possible with photography.
Today, we take for granted the ease with which we can capture and share images with our smartphones and digital cameras. But the legacy of these early photographic pioneers lives on, inspiring and informing the work of photographers around the world.
Source: History of Camera – From Camera Obscura to SLR
1 note
·
View note
Text
William Henry Fox Talbot
Doune Castle, Scotland
1844
Calotype negative
National Science and Media Museum
1937-4030, Schaaf 2040
#Henry Fox Talbot#Doune Castle#Scotland#1844#Calotype negative#National Science and Media Museum#photography#William Henry Fox Talbot
303 notes
·
View notes
Text

41 notes
·
View notes
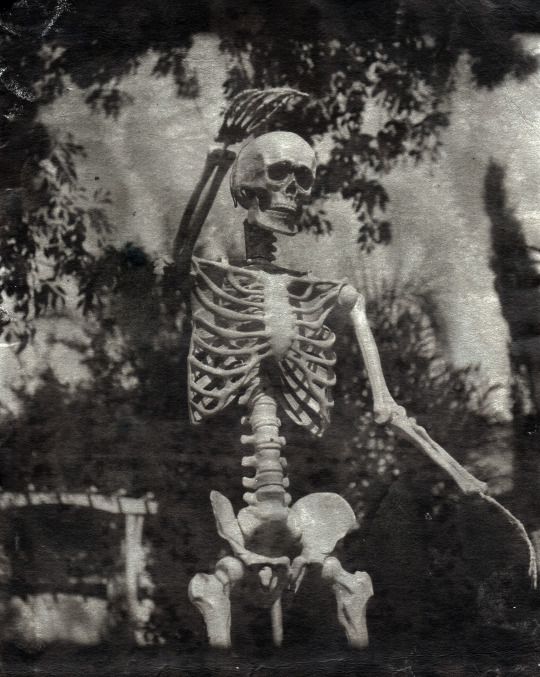
Text
apparently when photography was first invented there was a whole huge debate in victorian england over whether photographs (the material items) were too smooth or not smooth enough. Team Smooth won in the end with the invention of an Even Smoother Photograph but by god Team Texture did not go down without a fight
#referring to calotypes specifically when i say photographs#but yeah apparently there were op-eds like have you felt a photograph?? it’s weird. it’s unnatural even. so smooth.#ryddles
38 notes
·
View notes
Text


Toll in Grange Loan, Edinburgh.
The Grange is an area in the south of Edinburgh. It lies to the south of Grange Road and to the west of Ratcliffe Terrace. The area served, from the mid 12th century, as agricultural land associated with St Giles Kirk. It was bought in 1631 by William Dick. The area was substantially developed in the mid to late 19th century. Many of the streets built at this time carry names associated with the Dick Lauder family.
The photo is by James Good Tunny first appears as a professional photographer in Edinburgh in the early 1850s, but he was one of the many who were swept by enthusiasm in 1839, on seeing the publication of Fox Talbot's photographic process, the calotype. He admired the work of Hill and Adamson and knew Hill personally in the 1850s.
24 notes
·
View notes
Text
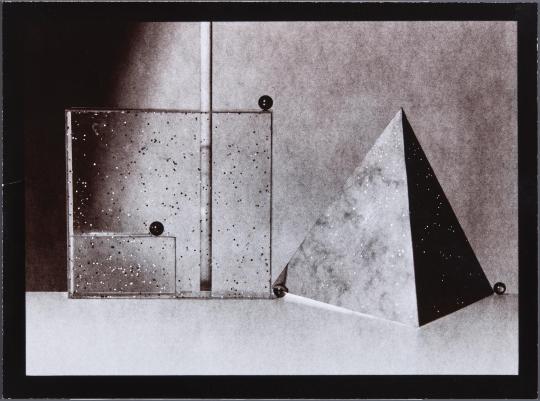
Toni Catany, S/T (Bodegón), (selenium-toned calotype on paper), 1982 / Vintage print, 1987 [Museo Nacional Centro de Arte Reina Sofía, Madrid. © Toni Catany]
#art#photography#sculpture#structure#geometry#toni catany#museo nacional centro de arte reina sofía#1980s
33 notes
·
View notes
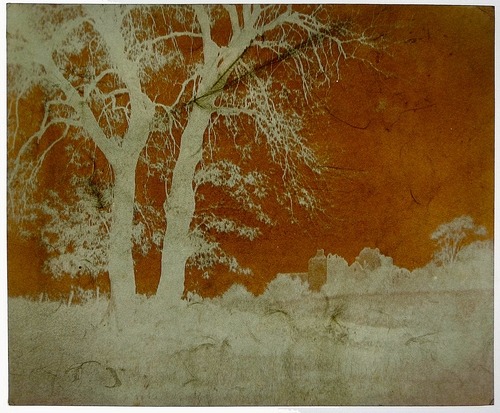
Photo


Hedgerow Trees at Clerkenleap, Worcestershire, photograph by Benjamin Brecknell Turner, albumen print from calotype negative, about 1850, England. Museum no. PH.15-1982. © Victoria and Albert Museum, London
“ Benjamin Brecknell Turner (1815 -1894) was one of Britain's first photographers and a founding-member of the Photographic Society of London which was formed in 1853. His images were based on the traditionally 'picturesque' styles and subjects of the generation of watercolour painters before him. “ (http://ndmagazine.net/photographer/benjamin-brecknell-turner/)
3. https://artblart.com/tag/still-life-with-fruit-and-decanter/
48 notes
·
View notes
Text

"A MOUNTAIN RIVULET WHICH FLOWS
AT THE FOOT OF DOUNE CASTLE"
WILLIAM HENRY FOX TALBOT // 1844
[salt print from a calotype negative | 3 1/2 x 4 5/16"]
#henry fox talbot#film photography#analog#landscape#nature#monochrome#scotland#19th century#british#photography#u
24 notes
·
View notes
Photo

Sara Imloul, de la série Le Cirque Noir (2008-2011), calotype
67 notes
·
View notes
Last Seen Blogs
ra-overload
Richard Armitage Overload

lenowom
Blog that Doesn't Exist

onewingedangel3
best bitch machine

mandesaida
Sans titre

bugaboowritings
.plagg doing short king shit .