#beadalon
Text


The Bead corner cafe blog, is posting a series of holiday closeout sale items that has been reduced to, $16, so order today at, [email protected], and make your check to me, and write cash at the bottom right hand corner of the check. Valentine's day is coming soon, so be sure you have a list of the friends and family you have in mind this year.
Happy Thursday,
The Bead corner cafe
0 notes
Text
im working on a flower patterned cuff that is sooo cute but its using a peyote stitch and i think i dont have the right kind of string (it is elastic but barely stretches unlike the fabric-based cord ppl use but i COULDNT FIND ANYWHERE) soo i have to keep it in place by holding the beads down with my foot. Otherwise it twists everywhere and then its impossible to tell if im doing the pattern right or not when every other bead flips around as they please. it is actually not very fun =_= i just want the PROPER STRING THAT STRETCHES !!!
what i got: cord that barely stretches so my kandi is at 100% tension and ready to explode fucking everywhere if i put it on wrong

WHAT PEOPLE ACTUALLY USE:

#but everyone was like 'nah that looks right i use beadalon all the time- what do you mean you cant get it to stay tied. just tie it'#I DID. I DID TIED IT. AND THEN HOT GLUED IT. AND YET. BEAD EXPLOSION.
4 notes
·
View notes
Note
!! ducky necklace !!! I love it so much!!! how did you make it/where did you get it? I've been wanting to make or find some replica jewelry...
aah thank you it was so fun to make! I got the gold and lapis filler beads just from Michael's, and the ducks and axes were from two different Etsy shops. Duckies were from NobleBeadsShop. I got the carnelian and black jade duckies because they were pretty, and I didn't feel like taking an extra hour to research what stones would be used in Minoan jewelry (besides lapis i did need that somewhere). The axe heads were from BeadWorldSeattle. I chose them because they reminded me of the double-headed axe/labrys so important in Minoan culture, but in jewelry beads this shape would more likely be intended to emulate papyrus plants instead. As long as it looks good!
I used a toggle clasp to fasten the necklace--no idea if that's historically accurate or not but it's MY favorite necklace fastener. Call it...historically plausible.

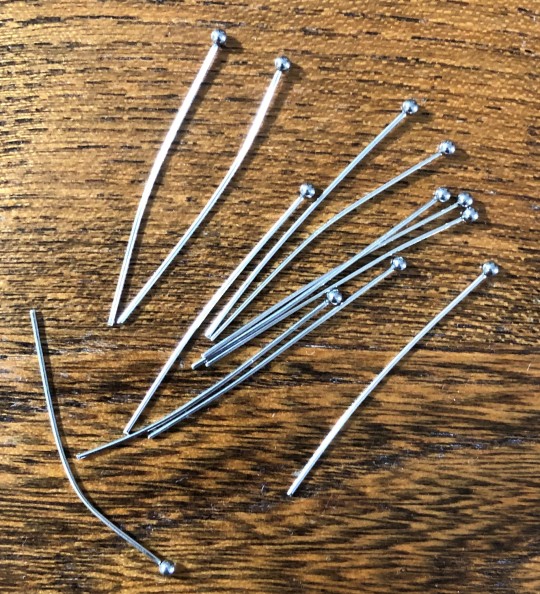
The hardest part was turning the duck beads into pendants--the Saffron Goddess duckies are strung through front-to-tail, but my beads were drilled through top-to-bottom.

My solution was to thread head pins through the ducks, anchored with a small gold bead at the bottom, and then use tweezers to roll the top of the pin into an eye that I could thread onto a string. When all assembled, they looked like this:
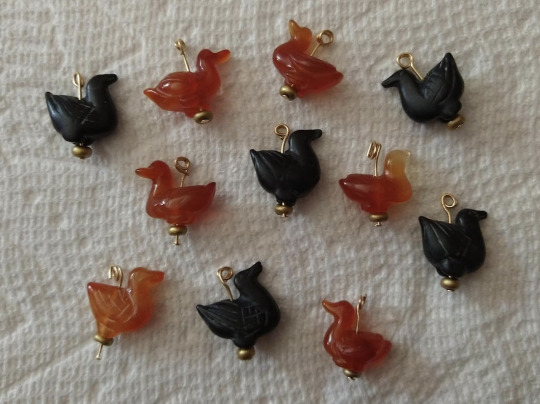
With that done, all that was left was to decide my pattern and string them all together! Oh--and I then went back later and strengthened the knots at the end with a small dab of Beadalon cement to make sure they didn't come loose and fling duckies everywhere :(. I find making jewelry very soothing and only wish I had the opportunity to do more of it, so thank you for giving me the opportunity to talk about my perfect adorable ducky necklace <3
80 notes
·
View notes
Text
I offer to you this knowledge in troubling times:
If you dip your pliers in school glue and let them dry, it'll form a barrier that reduces the appearance of tooling marks.
The best possible thing you can make with crochet is a roll to slot your hooks into.
Life's too short to make things you don't want to make.
Buy a jump ring opener ring and thank me later.
If you're beading and your workspace is on carpet, put a dropcloth down.
And I cannot stress this enough: Beadalon WildFire can be fused using heat at the end of a project. Berkley FireLine absolutely cannot.
Make the weird thing that excites you. Unless you don't have the energy to be exciting, in which case, make the safe thing that you know you like.
You are allowed to take things apart- your own work, things you bought, who cares. Take it apart and use the pieces. That's called bricolage, baby.
If your hands are feeling shaky and you're in that loop where you just can't get a handle on it, drop it. Physically drop what you're holding (or set it down if it's fragile), reset, then pick it back up again.
That thing you made? It looks cool as hell. It's rad, and nobody else would have made it quite like you. Unless you're using a kit and you wanted it to look exactly like the picture, in which case, good job, I knew we could count on you.
12 notes
·
View notes
Text
Tutorial: Hanging Wire Necklace
In this post, I'm going to explain how to make a hanging wire necklace. I don't know if there's an actual term for this style of necklace, but the idea is that you have beads on wires that can hang freely from the necklace. Very good for fidgeting with.
This is a really simple project that can look extremely effective.

What you need:
Headpins jewellery findings. Ball head or flat head are both fine. These are essentially straight lengths of wire with something wide at one end, which is what will hold your beads in place. They don't end in a point the way that, say, sewing pins would. You can usually buy them in packs of several hundred - and inevitably find that a large number of them are bent from rattling around in the packaging when it comes time to use them.
Decorative beads of your choice. I'm using rainbow acrylic beads, but really your only requirement is that the hole is big enough to go over the pin, but not so big that the bead can pass over the head.

Spacer beads. These ideally should be unobtrusive, and close in size to your decorative beads. You can get away with them being slightly smaller, but you want them wide enough that the hanging wires lie next to each other instead of over the top of each other. In this case, I'm going with clear, glass beads, which will face into the background against the neck when the necklace is worn, but another good choice is to use metal beads that match the pins.
A fastening mechanism of your choice. Personally, I really like toggle fasteners. I find them much easier to take on and off than other fastening mechanisms so it tends to by my default, but you use whatever works for you.

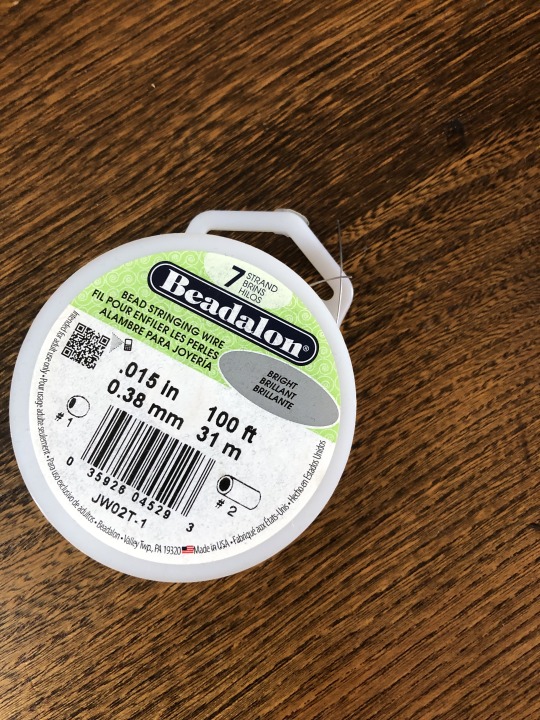
Beading wire. I like Beadalon 7 strand because it's quite forgiving. It doesn't get bent out of shape too easily. They also have a few different colours. Any wire will work though.

Half open crimps, sometimes called crimp covers. You want a couple of these to attach the fastening mechanism, and then a couple spare because they're really easy to drop.
Wire cutter and pliers. You want pliers with a fine, round end for this project. I prefer ones with a flat end for doing the crimps, so if you have both styles, that's a bonus, but you can get away with just the round ended ones if that's all you have.

Step 1:
Put a bead on a pin. It's as easy as that.

Step 2:
Grip the very end of the pin with the point of the pliers and twist so that you create a small loop of wire around the end of one half of the pliers. You want a tight loop, with no gap, otherwise you run the risk of the pin falling off the necklace wire later. If on the first attempt, there's a little bit of a gap, you can put the end of the pliers back in and hold that still, then use your other hand to press the pin against the pliers to close the gap.

Step 3:
Repeat step 2 for your other beads and pins.

Step 4:
Cut your beading wire to the length you want for your necklace, plus an inch or two for attaching the fasteners. If in doubt, cut a little bit longer than you think you need - you can always trim it later.
Step 5:
Feed the first pin onto the necklace wire.
Step 6:
Feed the first spacer bead onto the necklace wire.
Repeat steps 5 & 6. You want the pins to be the same way round. I think it looks better if the pin comes up over the wire in the front, and then loops back behind the wire, but what really matters is that they're all the same.

Step 7:
Now it's time to attach the fasteners. First you need to work out the length you want. Find a mirror and hold the necklace around your neck to find the length that looks right to you. If you hold an end of the wire in each hand and hold them behind your neck, you can find the right point for you. Once you done this, bend the necklace wire at the point where you want to attach the fasteners.

Step 8:
This is the fiddly bit. Put one side of the fastener onto the end of the wire, where you've put the bend in it. You then need to fold the end of the wire over and position one of the half open crimps over both sides of the fold.

Step 9:
Use the (flat-ended if you have them) pliers to squeeze the crimp tightly over the wire to hold the fold in place with the end of the fastening mechanism in place.
Step 10:
Repeat steps 8 & 9 with the other half of your fastening mechanism and the other end of the wire.
Congratulations, your necklace is now complete.
If you want to experiment, you can try this out with different lengths of pins (you can trim them with wire cutters) or with more than one bead on each pin.
#jewellery making tutorial#beading tutorial#necklace#hanging wire necklace#jewellery making#tutorial
6 notes
·
View notes
Text
Beadalon Jewel Loom Kit: Beading Loom, Needle, Threader, Pouch
Price: (as of – Details)
https://amzn.to/3PRUe37
This Beadalon Jewel Loom kit is great for making beaded bracelets and learning new weaving techniques. You can create your own pattern for infinite creativity. This will make a perfect gift! Make your own beaded bracelets and learn new weaving techniques. You can create your own pattern for infinite creativitThis jewely loom kit is simple and…

View On WordPress
0 notes
Text
Beadalon® Elasticity thick stretch elastic
Length: 5 m
Diameter: 1.0 mm (.039")
Colour: transparent, clear
Cores: 1 core
Amount per package: 1 spool
Extremely strong, tear proof elastic cord for elastic bracelets.
This size is deal for heavy beads and beads with larger holes.
Includes knotting instructions.
0 notes
Link
Check out this listing I just added to my Poshmark closet: Beadalon Bangle bracelet weaver tool..
0 notes
Link
Check out this listing I just added to my Poshmark closet: Crystal drop earrings, beads are by Ababele crystal, bling bling.
0 notes
Link
Check out this listing I just added to my Poshmark closet: 😀 NECKLACE 24” NWOT Hand Crafted Myself June 2022 Apple Green Beauty.
0 notes
Photo

March Meet The Maker 2023 24. Colour What colour would you like?! 😂🤣😂 #LakelandLoom #lakeland #loom #beadloom #beadlooming #loombeading #beadweaving #beadwork #lakedistrict #thelakedistrict #MarchMeetTheMaker #MarchMeetTheMaker2023 #MeetTheMaker #madeincumbria #lovethelakes #thedesigntrust #justacard #beadloombracelets #beadloompendants #beadloomtapestries #beadloomwork #beadalon #colour #tohobeads #delicabeads #ukbeadloomartist #lakedistrictjewellery #beadloomexpert #beadloombusiness #beadloomartist @joannehawker https://www.instagram.com/p/CqLysQnrHIL/?igshid=NGJjMDIxMWI=
#lakelandloom#lakeland#loom#beadloom#beadlooming#loombeading#beadweaving#beadwork#lakedistrict#thelakedistrict#marchmeetthemaker#marchmeetthemaker2023#meetthemaker#madeincumbria#lovethelakes#thedesigntrust#justacard#beadloombracelets#beadloompendants#beadloomtapestries#beadloomwork#beadalon#colour#tohobeads#delicabeads#ukbeadloomartist#lakedistrictjewellery#beadloomexpert#beadloombusiness#beadloomartist
0 notes
Text

I just Posted my classic seashell glass teardrop necklace which is perfect for at your next Claim bake party and it's easy to make, for that hostess gift this weekend. I have this necklace listed at, $20, so order now before it's gone. Place your order at, Jamilbauer19645@the-bead-corner-cafe, or if you're looking for a easy project, this perfect project to do.
The-Bead-Corner-Cafe
1 note
·
View note
Link
Check out this listing I just added to my Poshmark closet: Craft Lot 4.5 lbs.
0 notes
Link
Check out this listing I just added to my Poshmark closet: NATURAL QUARTZ /925/ CHOOSE COLOR OF WIRE!! SEE BELOW !!CHOOSE COLOR OF WIRE!!!!.
0 notes
Text
Floating wire necklace tutorial
A floating wire necklace, sometimes called a floating wire illusion necklace, is a style of necklace that has beads spaced out on a fine wire so that you don't notice the wire and it's not obvious what's keeping the beads in place from a distance. It's also a style that's really easy to make look good if you're just getting started with making beaded jewellery, but that has a lot of options to increase the complexity later.

What you need
Wire
You want to have a wire that's fine but that won't kink easily. If you go for a fine silver or gold wire that's just a single strand of the metal then it's very easy to get a bend into the wire accidentally that won't easily come out again. I like Beadalon 7 strand beading wire for this because it holds its shape well. They have a few different colours as options. I'm sure there are other brands out there that are similar, but this is a style that was sold at the shop I got my beads at when I first started and I've not seen any reason to change because it does what I want it to for these sort of projects. If you've tried other brands of wire you find work really well for this, please share the names.
Beads
You don't need loads of beads to make a floating wire necklace work because you'll space things out. You can use all the same type of bead, or make a pattern out of different sizes, shapes, and colours. It's entirely up to you. The main thing to check is the size of the holes. You want nice, small holes. We'll be using crimps to hold the beads in place and we want the crimps to be small and unobtrusive, which means that the length of the crimp, when flattened needs to be larger than the diameter of the bead's hole. A hole of about a millimetre is good. More than that and it would be hard to achieve the effect. There are options if you do want to use beads with larger holes, but I'll leave those for another post.

Crimps
Crimps come in different varieties, but the simplest and the ones you'll find often referred to as simply "crimps" without any other descriptions or modifiers are tiny, metal cylinders. When you put them on a wire and squeeze them with a pair of pliers, the cylinder flattens around the wire into a little rectangle that will hold its place. This is what we use to create the illusion effect. In theory, you need twice as many crimps as the number of beads you're planning on using, but have a few spare because they are very easy to drop.
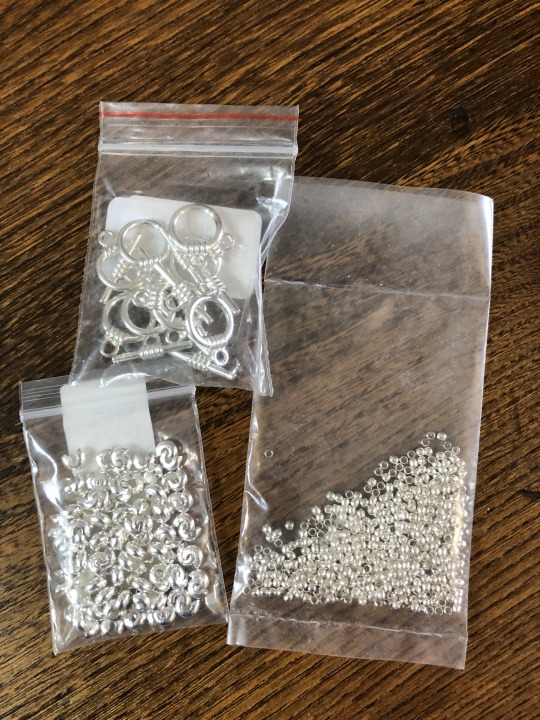
Half-open crimps/crimp covers
These are shaped like small spheres that someone's taken a slice out of. These can be slid onto the wire from the side instead of needing to be fed in from the end. They're not the only options, but I find they work well (especially if you start making necklaces with multiple wires which is one of the options for building on this idea).
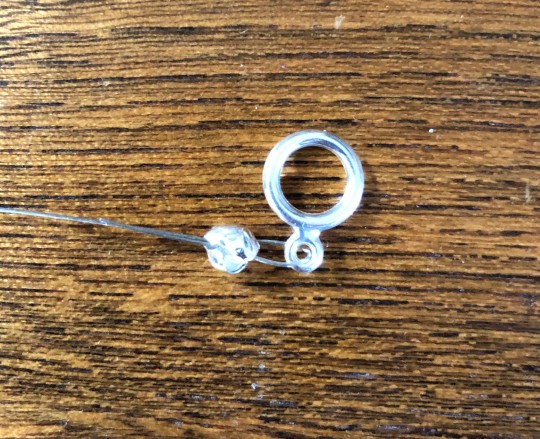
Fastening mechanism/clasp
You need something to open and close the necklace. Personally, I like a toggle. I find these much less fiddly than standard spring clasps or lobster claw fasteners so basically every necklace I make these days uses a toggle, but it's entirely up to you what sort of fastener you want.
Ideally, you will have a match of colours/metals between the crimps, half-open crimps and the fastening mechanism. Here, I’ve used silver for all of them. It’s not the end of the world if you have a clasp of a different colour as it will be hidden around the back, but it’s better to match if you can.
Pliers and wire cutters
The only tools you'll need for this are pliers and wire cutters. There are many types of pliers out there and most of them will work here, but you'll have a much easier time with a pair of flat nose pliers than round nose pliers for this project. I couldn't find my good flat nose pliers when I went to start on this project, so I used a pair of bent-nosed pliers and they were perfectly fine. Basically, a flat squeezing surface will be easier than a rounded one, but at the end of the day, all you need is something that will squeeze.

The Process
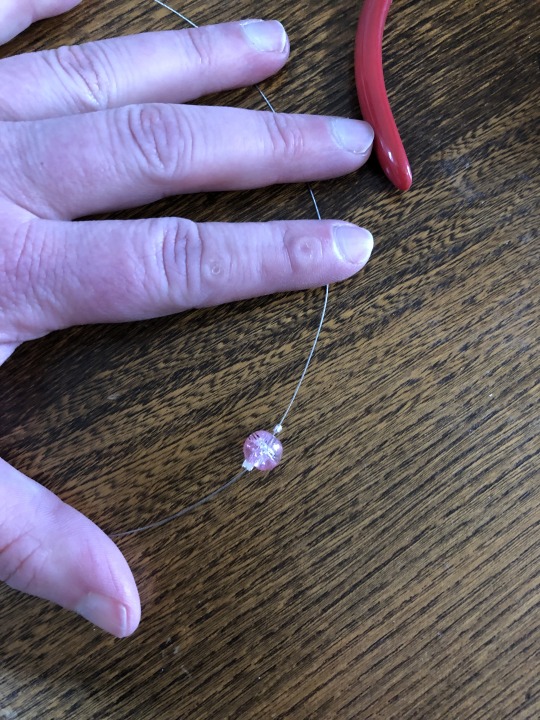
Step 1: Cut your wire
Figure out how long you want your necklace to be and then add on a couple of inches as a safety margin and to give yourself enough extra wire to attach the fastener. If you're unsure how much you need, always over-estimate. You can easily trim excess wire off later, but you can't add more on. If this is your first time doing something like this, give yourself maybe an extra five inches to give yourself plenty of room. This also means that if you accidentally position the beads off-centre, you can trim one end of the wire to fix that issue. Once you've worked out how long a piece of wire you're going to want, cut that length with the wire cutters.

Step 2: Place a crimp by the mid-point
Slide one of the crimps onto the wire (the cylindrical crimps, not the half-open ones) and hold the wire by the two ends. Holding both of the ends together between the finger and thumb of one hand, you can slide your other hand down the two sides of the wire together until you're holding it about an inch from the mid-point. The crimp should be on the wire between your fingers, close to the mid-point of the wire.

You want that crimp to be just to one side of the mid-point. If you do this perfectly, it will be half the width of one of your beads away from being in the exact mid-point - but one of the reasons for giving yourself a bit of excess wire was so that you don't have to be exactly perfect. Holding the wire near the mid-point, take the pliers with your other hand and close the end gently around the crimp. You can use the pliers to position the crimp where you think it is half a bead's width from the middle and then squeeze hard.
Squeezing the crimp with the pliers will flatten it onto the wire and hold it in place.

Step 3: Add your first bead
You now have a wire with a single crimp on it, near the middle. The wire on one side of the crimp will be slightly longer than the other, so place the bead that you want in the middle of your necklace on that side. As long as the hole isn't too big, the bead will slide down as far as the crimp and then get stuck.
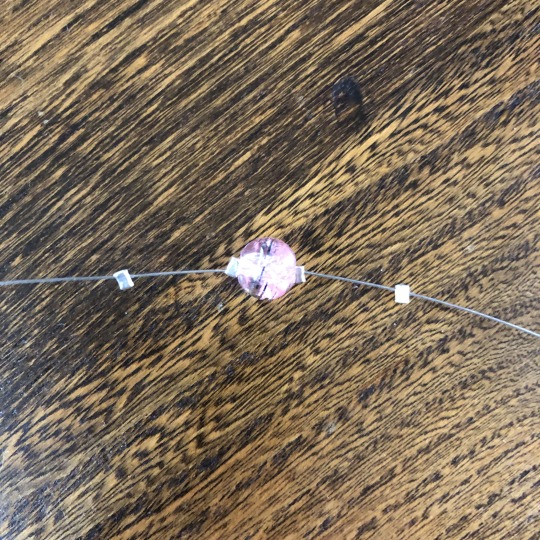
Step 4: Add your second crimp
Place a second crimp onto the wire so that it is on the other side of the bead to the first. Use the pliers to position it right next to the bead and squeeze hard, flattening the crimp onto the wire. You should now have a single bead in the middle of your necklace held in place by a crimp on either side.
Step 5: Place more crimps to either side of the bead
You want to add more crimps to your wire, but you want to have a gap between them and the crimps you added in steps 2 and 4. To keep the spacing even, it can be useful to use something as a spacer. This can be basically anything. A bit of card, a watchstrap, whatever you have lying around that will serve to keep the gaps the same. The Beadalon wire that I like to use comes with a plastic cover that holds the wire in place between projects and I like to use this to mark my spaces.
This is where I really struggled to have enough hands to show my process and take the photos.
Slide another crimp onto the wire - it doesn't matter on which side. Hold your spacer item against the wire so that it is pressed up against one of the already flattened crimps on one side. Use the pliers to position the new crimp so that it is against the other side of your spacer item and squeeze hard to hold it in place.

Then do the same on the wire on the other side of the bead. Once done, you should have a single bead in the middle of your necklace and then a pair of crimps on either side of it, the same distance from the bead.
Step 6: Add more beads
Repeat the process of adding a bead and fixing it in place with a crimp that was done in steps 3 and 4. Then repeat the process of adding more crimps as per step 5 and more beads until you have as many on your necklace as you want.


Step 7: Find the point to add the fasteners
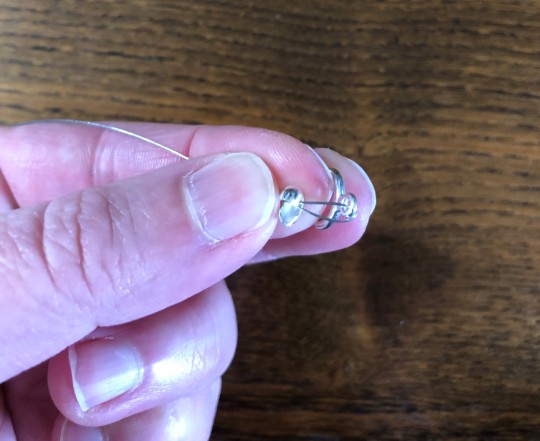
Holding the necklace by both sides of the wire up to your neck in front of a mirror, bring your hands behind your neck as though fastening it. Adjust the position of your hands on either wire so that both sides of the wire are touching where you hold them and so that the necklace hangs at the right length and with the first bead centrally positioned. Once you're satisfied that you've got the length and position right, the points you're holding the necklace will be the points where you want to attach the fasteners. Fold the wire firmly at those points to leave a deliberate kink in the wire.

Step 8: Attach the first fastener
Slide one half of your chosen fastening mechanism onto one end of the wire and position it at the point you folded the wire. Now comes the really fiddly bit.
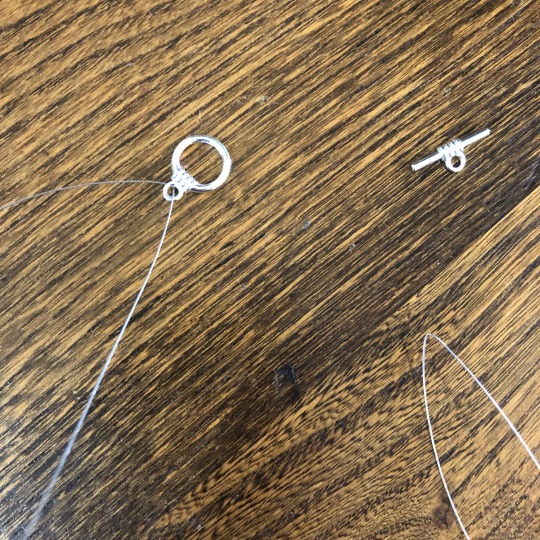
Take one of the half-open crimps and position it over the wire near to the fold. Make sure that the wire is bent double so that it goes through the half-open crimp twice, making a small loop that holds the fastener in place. You don't need to get the crimp right next to the fastener, but it should be fairly close. About a centimetre is fine. When you have the doubled-over wire in the half-open crimp, squeeze hard with the pliers.
I often find that because I'm struggling to hold everything in place, my first squeeze with the pliers isn't quite enough. It starts closing the crimp, but the wire still has some ability to slide. That's fine. Once you've started to close the crimp, it will be easier to keep it in the right place while you squeeze with the pliers again.
Step 9: Attach the second fastener
Slide the other half of your chosen fastening mechansim onto the wire on the other side of the necklace and repeat the process from step 8.

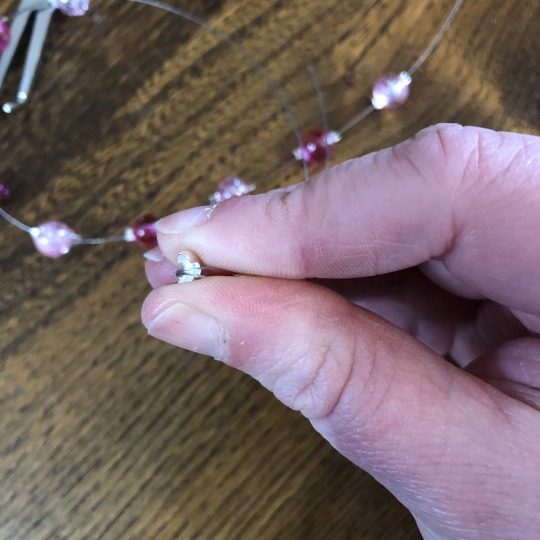
Step 10: Trim any excess wire
You should have a bit of excess wire on each side of the necklace. Cut off the excess with your wire cutters close to the half-open crimps that are holding the fastening mechanism in place.
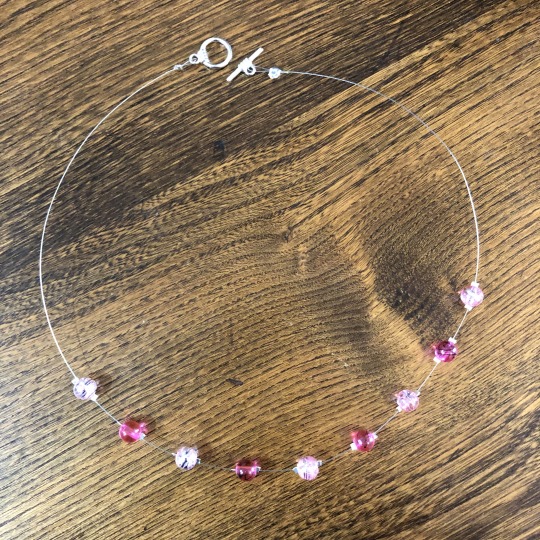
Finally: enjoy your necklace
This is quite a straight-forward technique once you get the hang of holding crimps, wires, pliers, beads and everything with only one pair of hands. It took me about twenty minutes to make the necklace I'm using as an example - and that includes the time it took to stop and take photographs of my progress.
You can use this as a starting point to build up to more complex and creative necklace designs. Depending on the interest in this post, I will probably do some further tutorial posts that build on this concept and show you what you can do once you've mastered the basics.

Good luck, and please share any pictures of anything you make following these instructions because I'd love to see them. Also, if my instructions are confusing at any point, let me know and I'll try and improve them.
#crafting#tutorial#floating wire necklace#beading tutorial#beading#jewellery making#jewellery making tutorial
11 notes
·
View notes
Text
Beadalon Collapsible Eye Needles 2.5-Inch Medium
Price: (as of – Details)
https://amzn.to/3PRUe37
Collapsible Eye Needles are flexible and are particularly nice for stringing beads that have very small holes. Extra-spring wire is kink-resistant and has a specially designed eye that automatically collapses and instantly reshapes when it is pulled through the bead. The large eye is easy to thread and accommodates many sizes of cord. 2 1/2”…

View On WordPress
0 notes
Last Seen Blogs

heatherwitch
be at peace

katriadoodles
now katriaraden

nic-mharta
They feed him hungry behind their fires...

knkgkhn
Gökhan

dstroyerradio
D-Rock Radio