#apiverse
Text
Pinky, Brain, and Daniel in Body Rockers ( Mighty B Spoof )
( it was Friday and the Animaniacs cast were on a field trip )
Cast: Peanut butter in a Cup!
We sing this chant
To wake us up!
Bang! Bang! Choo Choo Train!
Come on Pinky
Do your thang!
Pinky: I can’t!
Cast: Why not!?
Pinky: I just can’t!
Cast: Why not!?
Pinky: My back is aching
The sun's too bright
My hips are shaking from left to right
Cast: To the left To the right
To the left To the right
Left right! Left right!
Left right left right
Left right left right!
Nora: ( whistles to silence them ) Quiet Animaniacs! When we arrive at the Discovertorium, I want everyone to stay together, so buddy up.
Daniel: Oh! I call Brain and Pinky! I know you all want them but, you know, you snooze, you loose.
Pinky: And what did I win? Poit.
Brain: ( sighs )
( soon, they arrived at the Discovertorium )
Daniel: Water: Check! Cheese bites: Check! Headlamp: Check! Medical records: Check! Long copy of Atlas Shrugged: Check! Buddies: Check! That’s everything! Come on boys, science awaits!
( they enter in as Pinky drinks his water bottle. Inside, they were greeted by the tour guide )
Mr. Starlight: Good morning Cell Clusters! As we’ll discover today, that’s exactly what we are. I’m you’re tour guide, Mr. Starlight, but you can call me Starry, everyone does.
Nora: I’m Nora Rita Norrita, the CEO of WB. And certified Patty Pay Cosmetics Representatives. Call me when you’re done with this... whole look.
Mr. Starlight: Oh... Well, I hope everyone's ready to get their hands dirty, because today, we are going to explore the stinky messy wiener that’s the Human Body! Let’s dig in!
( the cast follows Mr. Starlight )
Cora: Did you hear that Bucktooth, she called you stinky.
Pinky: She also said wonder.
( they enter a exhibit where a film starts )
Announcer: In the future, doctors will be able to shrink down to the size of a vitamin, and repair your body from the inside.
Pinky: Poit... uh... Dan?
Daniel: Not now, Pinky. We’re looking at the future.
Announcer: If you think that’s wild, just imagine what a year like 2030 will bring.
( Pinky pulls on Daniel's jacket to get his attention )
Daniel: Pinky, please! I’m deep in my learning zone!
Pinky: But I gotta... tinkle!
( Daniel looked surprised before turning to Nora )
Daniel: Uh, Nora? Can I have a second? I think Pinky needs the—
Nora: ( whistles a bit ) Quiet! We are in a museum!
Pinky: Daniel, Brain I have to go right now! RIGHT NOW!
Brain: Pinky, calm down. Let’s just find a bathroom ourselves.
Daniel: I hear ya. When a mouse has to pee, a mouse has to pee!
( Daniel then imagines himself as a superhero )
Daniel: Pinky! Brain! Facilities! Starboard!
( the mouse fights his way through the rest of the cast before busting a door, but then next one knocks them back and reality comes back. They tumbled into a storage room screaming and crash into a box of moths. Daniel removed the sign off his face and they tumble on an electric ball and poom off before riding down a dinosaur fossil and into a elevator. They went up and when they reached the top, they slipped and slide across the wet floor. They slip into the aircon system and were immediately blown away into the vent. After some turns and twists, the three mice bounce on something soft and then onto the ground. After groaning in pain and getting up, they looked around )
Pinky: Uh oh. Someone forgot to flush.
Daniel: This isn’t a bathroom, this is... a human brain!
Pinky: ( gasps ) But I can’t pee in someone’s brain!
Brain: Okay, calm down boys. Thinking, thinking, Brain, processing, piecing together, okay! I know what happened! As foretold by the exhibit, we’ve been zapped to the size of raisins, and— and now we’re trapped inside someone’s head!
Pinky: Trapped!? Oh, no, no-no-no, no-no-no, no-no-no!
Daniel: Wait a minute, Brain, think you meant was we’re stuck.
Pinky: EGAD! Stuck! Forever, and ever, and ever, and ever, and ever and—!?
Daniel and Brain: PINKY, GO TO YOUR QUIET PLACE!
( Pinky calms down but nervously )
Brain: Okay, don’t worry. I know there is a number of exits in the human body. The right eye, the left eye, the left nostril, the left nostril, both ears, and the mouth.
Pinky: What about the b—?
Brain: ( silences Pinky ) Uh, dah-dah-dah-dah, no-no-no, we’re not going there! ( grabs Pinky and Daniel's hands and heads some way ) Let’s find the nose, and get out of here!
( back with the group, they were looking at a huge robotic man )
Mr. Starlight: And who is this hunky fellow? Let’s look at the name tag. Why it’s Jumbo Jim! A perfect plaster replica of the human body. Now we all know what the outside of the human body looks like, but Jumbo Jim allows us to take a plunge into the inside! Did you know, the average human swallows 29 gallons of mucus a year?
Nora: ( gagging ) Ugh! I don’t know a single person who does that! Disgusting!
Mr. Starlight: ( chuckles ) Let’s talk about breathing. ( breaths in and then out in Nora's face ) The involuntary actions that powers all of our other actions. Observe. ( presses a button )
( back with the mice, they found the nostrils )
Daniel: Look! There’s a way out!
( they jump out but were pulled back in screaming )
Dot: Eh... Rhino Nasty. I wonder where my boyfriend is. ( Puts on cotton candy lipbalm )
( the mice struggled to hold on to nose hairs )
Brain: Daniel! Pinky! Don’t let go of those nose hairs! Hold on!
Daniel: I can’t! It’s smelling me too hard!
( The nose hairs snap and they were sent flying into the lungs )
Brain: BOYS, ARE YOU OKAY!?
Pinky: I STILL HAVE TO PEE!
Mr. Starlight: And that’s where coughing comes in. It is the plan B of the Respiratory System. ( presses another button )
( the robot coughs and the winds inside loose control )
Daniel: Hold on! ( lassos Pinky and Brain before they were sucked into something )
Mr. Starlight: And now it’s time for our fantastic journey to begin. ( the mouth opens and sticks out the tongue ) We'll enter the body like most things through the mouth.
( everyone crosses the tongue, with Yakko gagging with every step. Cut to the group in red blood cell carts, cheering )
Mr. Starlight: Before we can take a while ride on a Red Blood Cell Rollercoster, we have to alert the engine of the body, the heart. Ready?
( the ride powers down for a bit. Mr. Starlight bangs on it and it takes off, but slowly, much to everyone's disappointment. They didn’t notice the mice floating through the veins past them )
Mr. Starlight: Woah, hold on to your hats everyone!
Katie KaBoom: Who wears hats anymore? Ugh...
( the mice scream as they enter the heart and bounce all around uncontrollably )
Brain: HEAD FOR THAT HOLE! ( grabs Pinky and Daniel and jumps through the next vein )
( cut back to the group )
Mr. Starlight: Isn’t this exciting? We are speeding along down this vein just like red blood cells collecting and distributing oxygen to the body!
Slappy: Whatever, I’m gonna catch up on my reading. ( takes a book out of her purse and reads ) Chapter 5: The Big Day.
( meanwhile with the mice, they scream as they tumbled into the hand. After getting up all dizzy, rain is the first to notice
Brain: ( gasps ) Let’s see. Radius, ulna, metacarpals, phalanges...
Pinky: TOILET!
Brain: We’re in the hand! There’s no way out! ( throws a lighting rope down to them ) Grab on boys, we’re gonna have to climb all they way back to the head! ( climbs up )
( later, the mice were walking down a pipe )
Pinky: I can’t hold it all the way to the head! Poit!
Daniel: Think positive Pinkadoodle. You are an Animaniac. Picture yourself as a butterfly with beautiful wings, flying over a river of obstacles, letting all your fear flow out of you.
Pinky: ( cringes ) Don’t say 'flow'. Troz.
( back with the troop )
Mr. Starlight: When we get sick, it means a foreign bacteria or virus has invaded our bodies, just like bill collectors or guys in suits telling you to pay your taxes for Salazar. We attack them and we throw them out!
( everyone stares at him )
Slappy: Hm. Surprise, surprise. Wakko's Wish made the hippie not like paying taxes.
Mr. Starlight: ( pulls a lever and white balloons blow forward ) Here we see the body’s bodyguards white blood cells fighting off foreign bacteria. Go get ‘me white blood cells!
( back with the mice, Brain was getting tired )
Brain: Whew... must... rest... ( sits down ) Just for a minute... ( takes a few breaths ) Go on boys... go on without me... save your bladder Pinky...
Pinky: Poit! Come on Brain, don’t give up now! I’m starving and we ate all the cheese!
Daniel: Wha...!? Pinky, don’t you need the bathroom!?
Pinky: I do! It’s making me hungry!
Daniel: Pinky, that doesn’t make any sense.
Pinky: But it’s making me hungry, we didn’t pack lunch, and it took longer than I thought!
Daniel: Quit yelling at me like I did something wrong! It’s not my fault we’re in a body!
( Brain sighs in annoyance as the two mice bickered at each. Suddenly, the balloons hit and trip them. Daniel karate kicks though his way )
Mr. Starlight: Look at these white blood cells, united together to fight of the government... I mean disease! The immune system shows no mercy!
Nora: Couldn’t we focus in n something a little less violent? Like... blinking.
( meanwhile with the mice, they were walking down when they scream and fall into the chest and onto the ribs )
Pinky: ( wiggles ) I’m gonna burst!
Daniel: Pinky, no! These ribs weren’t made for dancing!
( the rib they were on collapses and the mice scream and fall into the pit of the belly )
Brain: ( muffles )
Daniel: You’re telling me. This belly could use a spit shine.
( the mice sink in and land inside of the belly. The troupe is out of the body and back outside )
Mr. Starlight: Food is the fuel of the body and the stomach is where it gets digested. What kind of food should we feed this body today, anyone?
Wakko: Food!
Yakko: He said what kind of food, dummy.
Cora: Sushi.
Mr. Starlight: I heard chili! Chili it is!
( He presses a button and the robot swallows down chili. The stomach gets full and it corners the screaming mice )
Brain: Boys, this could be it! And I just want to say that I’m sorry I lied that time about riding a baby elephant!
Daniel: I forgive you, Brain! I don’t really have drawings and stories of Dot belly dancing stashed away in my playroom in the basement!
Pinky: ( as they get washed away ) NO, YOU DO! I'VE SEEN THEM!
Mr. Starlight: But sometimes when the body is thrown out of whack, we get indigestion. So what do we do? We add a base to a acid to neutralize it. We take an antacid! Get it? An antacid! ( laughs and presses a button )
( meanwhile inside, Pinky was eating all the chili when suddenly, a antacid drops and lands in the ocean of chili, causing it to foam )
Daniel: PINKY! DON'T PANIC! REMAIN CALM! REMAIN CALM! PINKY, DON'T PANIC! WHATEVER YOU DO, REMAIN CALM!
Mr. Starlight: Then, this lovely mixture can be drained into the intestines. ( presses another button )
Brain: OH NO!
( they were suddenly drained and began to rush down the intestines, screaming )
Mr. Starlight: The intestines span miles and miles ultimately connecting to—
Nora: A dead end! Nothing more! Just like a cul-de-sac!
Mr. Starlight: Oh, on the contrary, waste has to leave our bodies somehow, which brings me to another hot topic: Gas!
( Nora moans and faints. Inside, the mice burst out a plug and land on the ground. They then hear rumbling )
Pinky: NARF! Oh no! This is the big one!
( the chili bursts out and the mice scream and run for their lives. Brain lighting lassos to a hook and they all hold on for dear life )
Brain: I really didn’t want to go out like this! Hold on boys!
( cut to outside )
Mr. Starlight: And that is the beauty of the human body!
( a door to the rear opens and the mice and chili shot out )
Dot: CHILI!!!
( the chili sprays all over everyone )
Mr. Starlight: Oh, wasn’t that moving?
Minerva: Oh, my hair, my dress, my shoes... ( groans )
Nora: ( angrily ) The Discovertorium is going to receive a dry cleaning bill! And a very strong letter!
( the mice on the other hand recovered )
Brain: We made it!
Daniel: Wow, I didn’t even feel the unshrinking! The— The deshrinking, the biggening! How about you Pinks?
Pinky: ( spits out chili ) I got bigger but the pee stayed small! I don't have to pee anymore. Narf!
Cora: ( groans ) Gross me out! You three make me ill!
Daniel: ( gasps ) You’re sick? I can fix you! Watch this!
( Daniel shoves himself into Cora's mouth, getting stuck in the process, ending our story )
THE END
3 notes
·
View notes
Text
Mantén tu Kubernetes actualizado: Detecta APIs obsoletas con Pluto
¿Te preocupa que tu clúster de Kubernetes esté utilizando APIs obsoletas que podrían causar problemas de seguridad o compatibilidad en el futuro? Aquí es donde Pluto entra en escena.
Pluto: Tu guía para APIs saludables en Kubernetes
Pluto es una herramienta desarrollada por Fairwinds que te ayuda a identificar y actualizar las versiones de API de Kubernetes (apiVersions) obsoletas en tu código y…

View On WordPress
0 notes
Text
SFDX commands (continued..)
Creating a salesforce project
sfdx force:project:create --projectname "projectName" --manifest
Setting the api version
sfdx config:set apiVersion=55.0
Authenticating the sandbox/developer org.
#For Sandbox orgs:
sfdx force:auth:web:login -a "sandboxName" -r https://test.salesforce.com
#For dev/Production/scratch orgs:
sfdx force:auth:web:login -a "sandboxName" -r…
View On WordPress
#deploy to org#retrieve from org#retrieve objects from org#Salesforce#salesforce apex#salesforce authentication#vscode
0 notes
Text
0 notes
Text
A Minimal Guide to Deploying MLflow 2.6 on Kubernetes
Introduction
Deploying MLflow on Kubernetes can be a straightforward process if you know what you're doing. This blog post aims to provide a minimal guide to get you up and running with MLflow 2.6 on a Kubernetes cluster. We'll use the namespace my-space for this example.
Prerequisites
A running Kubernetes cluster
kubectl installed and configured to interact with your cluster
Step 1: Create the Deployment YAML
Create a file named mlflow-minimal-deployment.yaml and paste the following content:
apiVersion: v1
kind: Namespace
metadata:
name: my-space
---
apiVersion: apps/v1
kind: Deployment
metadata:
name: mlflow-server
namespace: my-space
spec:
replicas: 1
selector:
matchLabels:
app: mlflow-server
template:
metadata:
labels:
app: mlflow-server
name: mlflow-server-pod
spec:
containers:
- name: mlflow-server
image: ghcr.io/mlflow/mlflow:v2.6.0
command: ["mlflow", "server"]
args: ["--host", "0.0.0.0", "--port", "5000"]
ports:
- containerPort: 5000
---
apiVersion: v1
kind: Service
metadata:
name: mlflow-service
namespace: my-space
spec:
selector:
app: mlflow-server
ports:
- protocol: TCP
port: 5000
targetPort: 5000
Step 2: Apply the Deployment
Apply the YAML file to create the deployment and service:
kubectl apply -f mlflow-minimal-deployment.yaml
Step 3: Verify the Deployment
Check if the pod is running:
kubectl get pods -n my-space
Step 4: Port Forwarding
To access the MLflow server from your local machine, you can use Kubernetes port forwarding:
kubectl port-forward -n my-space mlflow-server-pod 5000:5000
After running this command, you should be able to access the MLflow server at http://localhost:5000 from your web browser.
Step 5: Access MLflow within the Cluster
The cluster-internal URL for the MLflow service would be:
http://mlflow-service.my-space.svc.cluster.local:5000
You can use this tracking URL in other services within the same Kubernetes cluster, such as Kubeflow, to log your runs.
Troubleshooting Tips
Pod not starting: Check the logs using kubectl logs -n my-space mlflow-server-pod.
Service not accessible: Make sure the service is running using kubectl get svc -n my-space.
Port issues: Ensure that the port 5000 is not being used by another service in the same namespace.
Conclusion
Deploying MLflow 2.6 on Kubernetes doesn't have to be complicated. This guide provides a minimal setup to get you started. Feel free to expand upon this for your specific use-cases.
0 notes
Text
如何disable default namespace?
{{/* templates/deployment.yaml */}} {{- if eq .Release.Namespace "default" }} {{- fail "cannot deploy into 'default' namespace }} {{- end }} apiVersion: apps/v1 kind: Deployment ...
0 notes
Text
Securing Turing Pi Kubernetes Cluster With HTTPS
Of course I'm not done yet. I'm a responsible citizen :)
Last time, I told you to encrypt everything or else I was going to eat you. Do you want me to eat you? Do you now? I am going to eat you if you come to me with a silly "this certificate is not valid" warning on your website.
Encryption costs literally 0 thanks to http://letsencrypt.org. You don't have to pay a CA to get an SSL certificate for your site. Of course, in some cases in the enterprise you will, but as an indie, you literally don't have to fork a single cent with letsencrypt, or with a self signed certificate. I cannot stress this enough, I need you to learn how to wrangle certificates. It's not that bad and it pays massive dividends.
If you setup your Turing Pi Raspberry Pi cluster with k3s-ansible you will notice that the traefik ingress you get by default already created a dummy certificate for "ExampleCorp" if you visit your site with https://. Of course, this certificate is malformed, and you will see a google chrome warning if you try to open your site under https. This is referenced in the issue here: https://github.com/k3s-io/k3s-ansible/issues/109
Let's setup traefik on Kubernetes now with cert-manager so it can generate letsencrypt certificates and use them for SSL when people visit your site under HTTPS. For more details about SSL certificates and how SSL works with the CA system, refer to the video I linked above.
Install the traefik CRDs with kubectl apply -f https://raw.githubusercontent.com/traefik/traefik/v2.10/docs/content/reference/dynamic-configuration/kubernetes-crd-definition-v1.yml. This includes the Middleware CRD, which we'll use to handle HTTP traffic incoming to our cluster.
CRDs are additional domain models added to the Kubernetes domain models which allow for new features and definitions. Third parties will offer them as a way to extend what Kubernetes does or to implement their own systems and features with them.
Now, install a version of cert-manager compatible for your Kubernetes 1.17 cluster (I picked 1.6.2): kubectl apply -f https://github.com/jetstack/cert-manager/releases/download/v1.6.2/cert-manager.yaml This will create some pods, let it finish.
Cert-manager is an extension that talks to ACME certificate services, integrates their resources into Kubernetes and handles their lifecycle so you don't have to. For example, for us, when this is setup correctly, cert-manager will drop our letsencrypt certificate into a Secret of our choice.
Next, create a certmanager ClusterIssuer. Save the following into issuer.yaml, ensure that you have exported the EMAIL and DOMAIN environment variables first, and run cat issuer.yaml | envsubst | kubectl apply -f -:
apiVersion: cert-manager.io/v1 kind: ClusterIssuer metadata: name: letsencrypt-prod spec: acme: email: ${EMAIL} server: https://acme-v02.api.letsencrypt.org/directory privateKeySecretRef: name: letsencrypt-prod solvers: - http01: ingress: class: traefik
Next, create the traefik Middleware. Save this as middleware.yaml and run kubectl apply -f middleware.yaml:
apiVersion: traefik.containo.us/v1alpha1 kind: Middleware metadata: name: redirect-https spec: redirectScheme: scheme: https permanent: true
Finally, **reconfigure the smbdxfortunes-ingress traefik ingress you set up last time to allow for HTTPS traffic, adding annotations for certmanager and traefik. You probably want to modify your deploy.yaml from the other time...
Pay close attention to the secretName field under tls in the spec: it seems a bit counterintuitive, but the name here will be used to create the secret which will host your letsencrypt certificate over time.
apiVersion: networking.k8s.io/v1beta1 kind: Ingress metadata: name: smbdxfortunes-ingress annotations: kubernetes.io/ingress.class: traefik cert-manager.io/cluster-issuer: letsencrypt-prod traefik.ingress.kubernetes.io/router.middlewares: default-redirect-https@kubernetescrd spec: rules: - http: paths: - path: / backend: serviceName: smbdxfortunes servicePort: 80 tls: - secretName: smbdxfortunes-tls hosts: - ${DOMAIN}
And presto, if done correctly (takes a couple minutes to kick in fully), open https://smbdxfortunes.zapto.org and you should get a nice, beautiful lock symbol next to https on the address bar. Thanks :3
0 notes
Text
Many people around the world look for ways to build container images in Kubernetes without the need to mount the docker socket or perform any other action that compromises security on your cluster. With the increased need, a famous software engineer, Jessie Frazelle saw the need to introduce Img image builder. This is an open-source, daemon-less, and unprivileged Dockerfile and OCI compatible container image builder. Img is a wrapper around the open-source BuildKit, a building technology embedded within Img.
There are many features associated with the img image builder. Some of them are:
Img CLI, a responsive CLI that provides a set of commands similar to Docker CLI commands when dealing with container image building, distribution, and image manipulation.
Rootless Builds: img can be run without requiring the –privileged Docker flag or the equivalent privileged: true security context in Kubernetes.
BuildKit: defined as one of the next generation build engines for container images.
Parallel Build Execution: BuildKit assembles an internal representation of the build steps as a Directed Acyclic Graph (DAG), which enables it to determine which build steps can be executed in parallel.
Cross-Platform/OS Builds: it’s possible to build images for different combinations of architecture and OS on a completely different platform
In this guide, we will take a deep dive into how to build container images on Kubernetes using img image builder.
Setup Pre-requisites
This guide will work best if you have a Kubernetes cluster set up. Below is a list of dedicated guides to help you achieve this:
Install Kubernetes Cluster on Rocky Linux 8 with Kubeadm & CRI-O
Install Kubernetes Cluster on Ubuntu using K3s
Deploy Kubernetes Cluster on Linux With k0s
Run Kubernetes on Debian with Minikube
This guide will demonstrate how to build container images from Dockerfile using img image builder in Kubernetes with Github. So, you will also need:
Access to Kubernetes cluster with permissions to create, list, update and delete pods, jobs, and services
Github repository with a Dockerfile: we will use the repo URL as the path of the Dockerfile
Dockerhub account: to be able to authenticate and push the Docker image.
#1. Configure Build Contexts
For this guide, we will use a private GitHub repository as our build context. We need to configure it with the required Dockerfile.
The URL to my private git repository used in this article is:
https://github.com/computingforgeeks/kubernetes-demo
In the repository, I will create a Dockerfile with the contents below:
FROM ubuntu
ENTRYPOINT ["/bin/bash", "-c", "echo hello"]
Now obtain a Personal Access Token to your git account.
#2. Create the Img Pod Manifest
We will have two containers:
Git-sync: an init container to clone the private git repository
img: that builds the docker image and pushes it to docker hub
These two containers share a volume git-repo mounted as emptyDir at /repo
Create a manifest for the pod.
vim pod.yml
Add the below lines to the manifest:
apiVersion: v1
kind: Pod
metadata:
labels:
run: img
name: img
annotations:
container.apparmor.security.beta.kubernetes.io/img: unconfined
spec:
securityContext:
runAsUser: 1000
initContainers:
- name: git-sync
image: k8s.gcr.io/git-sync:v3.1.5
volumeMounts:
- name: git-repo
mountPath: /repo
env:
- name: GIT_SYNC_REPO
value: "https://github.com/computingforgeeks/kubernetes-demo.git" ##Private repo-path-you-want-to-clone
- name: GIT_SYNC_USERNAME
value: "computingforgeeks" ##The username for the Git repository
- name: GIT_SYNC_PASSWORD
value: "ghp_JilxkjTT5EIgJCV........" ##The Personal Access Token for the Git repository
- name: GIT_SYNC_BRANCH
value: "master" ##repo-branch
- name: GIT_SYNC_ROOT
value: /repo
- name: GIT_SYNC_DEST
value: "hello" ##path-where-you-want-to-clone
- name: GIT_SYNC_ONE_TIME
value: "true"
securityContext:
runAsUser: 0
containers:
- image: r.j3ss.co/img
imagePullPolicy: Always
name: img
resources:
workingDir: /repo/hello
command: ["/bin/sh"]
args:
- -c
- >-
img build -t docker.io//helloworld . &&
img login -u -p &&
img push docker.io//helloworld
volumeMounts:
- name: cache-volume
mountPath: /tmp
- name: git-repo
mountPath: /repo
volumes:
- name: cache-volume
emptyDir:
- name: git-repo
emptyDir:
restartPolicy: Never
In the above file, replace the values appropriately. You can also notice that the destination folder for git-sync is the working directory for img. If you are using a public git repository, you may not be required to provide the Personal Access Token for the Git repository.
#3. Run img image builder in Kubernetes
Using the manifest, run the pod using the command:
kubectl apply -f pod.yml
Now follow the image build and push process with the command:
kubectl logs img --follow
Output:
From the above output, we are safe to conclude that the image has been successfully pushed to DockerHub
#4. Pull and Test the Image
You can now pull and test the image using:
1. Docker
Ensure that Docker is installed on your system. The below guide can help you achieve this:
How To Install Docker CE on Linux Systems
Now run a container with the image using the command:
docker run -it /
For example:
docker run -it klinsmann1/helloworld:latest
Sample output:
2. Kubernetes
The image pushed can still be used on Kubernetes. Pull and test the image as below;
$ vim deploy.yml
apiVersion: apps/v1
kind: Deployment
metadata:
name: hello-world
spec:
selector:
matchLabels:
app: hello
replicas: 1
template:
metadata:
labels:
app: hello
spec:
containers:
- name: hello-world
image: klinsmann1/helloworld:latest
Apply the manifest:
kubectl apply -f deploy.yml
Check the status of the deployment:
$ kubectl get pods
NAME READY STATUS RESTARTS AGE
hello-world-7f68776d79-h4h4z 0/1 Completed 1 (4s ago) 6s
img 0/1 Completed 0 13m
Verify if the execution was successful.
$ kubectl logs hello-world-7f68776d79-h4h4z --follow
hello
The end!
We have successfully walked through how to build container images on Kubernetes using img image builder. I hope this was significant to you.
0 notes
Text
網站系統通常會用到電子郵件傳送的功能。 在Linux系統中,傳送電子郵件通常都會使用sendmail套件。 最近我遇到一個奇怪的狀況。 每當操作到sendmail的時候,整個系統就會卡住,兩三分鐘後信才能順利寄出。 這是為什麼呢? https://linuxconfig.org/sendmail-unqualified-hostname-unknown-sleeping-for-retry-unqualified-hostname 在安裝rsyslog後發現到了真正的原因「My unqualified host name (debian) unknown; sleeping for retry」 原來是因為伺服器的host name並不是合格的主機名稱,所以sendmail會卡住。 https://kb.iu.edu/d/aiuv 合格的主機名稱,fully qualified domain name,又簡稱為FQDN。 合格的主機名稱必須至少要有「.」。單純只是把hostname設為debian,並不算是合格的主機名稱。 https://kubernetes.io/docs/concepts/services-networking/dns-pod-service/#pod-s-hostname-and-subdomain-fields 那在Kubernetes裡面要怎麼為pod設定合格的主題名稱呢? 答案是要用hostname跟subdomain,兩者都必須要設定。 ```yaml apiVersion: v1 kind: Pod metadata: name: busybox1 spec: hostname: busybox-1 subdomain: default-subdomain containers: - image: busybox:1.28 command: - sleep - "3600" name: busybox ```` 在這個例子中,pod的主機名稱會叫做「busybox-1.default-subdomain」。 這樣設定之後,sendmail就可以順利寄信了。 除了在Pod設定之外,也可以把這個設定套用到Deployment之類的controlle上喔。 ---- 你有遇過其他的伺服器問題嗎? 歡迎下面留言喔。 #sendmail #FQDN #Kubernetes
0 notes
Text
Using Daemonset with Kubernetes
Definition of Kubernetes Daemon set
Kubernetes makes sure that an application has ample resources, runs reliably, and maintains high availability throughout its lifecycle. The location of the app within the cluster is not a priority.
A DaemonSet is typically described using a YAML file. The fields in the YAML file give you added control of the Pod deployment process. A good example is utilizing labels to start specific Pods on a limited subset of nodes.
What is Kubernetes Daemon's set?
The Daemon set has normally defined with a YAML file and the additives within the YAML documents deliver the person additional management over the deployment method of the pod. Pods are the easy items deployed in Kubernetes which signifies the single instances of an executable manner in the cluster. Pod incorporates one or multiple packing containers which might be controlled as single resources.
A daemon set is a dynamic object in Kubernetes which is managed to utilize a controller. The user can set the favored country that represents the unique pods that want to exist on each node. The compromise in the manage loop can evaluate the cutting-edge sensible nation with the favored kingdom. If the sensible node, doesn’t fit the matching pod, then the controller of the daemon set creates a new one mechanically. This automatic technique has all lately created nodes and present nodes. The pods evolved utilizing the controller of the daemon set are not noted by the Kubernetes scheduler and gift because of the identical node itself.
Create a Daemon set
To create a Daemon set the following steps are involved.
The Daemon set is developed in a YAML file with a few parts.
It requires apiVersion
It requires the type or kind of the behavior for Daemon to set
It needs the metadata for the Daemon set
It needs spec_template for pod definition which the user needs to execute on all nodes.
It needs spec_selector to manage the pods for the Daemon set and this kind must be label specific in a template of pods. The selector name defined in the template is applied in the selector. But this name cannot be changed once the Daemon set is created without leaving the pods created before the Daemon set.
The spec_template-spec-node selector is used to execute only the nodes subset which suits the selector
Spec-template-spec-affinity is used to execute on nodes subset which has affinity match.
Once the configuration is completed, Daemon set is created in the cluster.
0 notes
Photo

Kyverno is a new CNCF incubating project that is designed to be a Kubernetes native version of OPA, something that can be more convenient but also less powerful and with a reduced number of integrations with other systems.
Policies are expressed with custom resources that are loaded by the Kyverno Admission Controller, like this example for disallowing the use of bind mounts:
apiVersion: kyverno.io/v1 kind: ClusterPolicy metadata: name: disallow-bind-mounts spec: validationFailureAction: audit rules: - name: validate-hostPath match: resources: kinds: - Pod validate: message: "Host path volumes are not allowed" pattern: spec: =(volumes): - X(hostPath): "null"
38 notes
·
View notes
Text
This song is just so perfect for Natsumi loving wishes because of Wakko's Wish! And this is perfect for Disney's Wish coming up in a few weeks too!
youtube
#animaniacs#pinky and the brain#sgtfrog#natsumi hinata#care bears#wakko's wish#wish#wish 2023#headcannons#apiverse#Youtube
4 notes
·
View notes
Text
[PowerBi] Obtener datos de una “carpeta” de Sharepoint o OneDrive para empresa
Hace un tiempo tuvimos la oportunidad en un post anterior de ver como podíamos conectarnos de forma alternativa contra un excel alojado en drive de Microsoft. Obteníamos una URL del archivo, hacíamos unos retoques a en power query y llegábamos a conectar directamente, sin necesidad de gateway, nuestros datos.
Recientemente me preguntaron si podíamos repetir el proceso pero contra una carpeta. La necesidad que me consultaron fue combinar muchos archivos .csv de una carpeta de OneDrive para la empresa tal como lo hace el conector de “carpeta” que trae por defecto Power Bi.
Lo primero que pensé fue: “existe uno para Sharepoint pero no para OneDrive, que pasaría si intentamos conectar el drive para la empresa, que de cierto modo usa la tecnología de sharepoint, en el mismo conector”. ¡Ese razonamiento fue correcto! Veamos como conectamos tradicionalmente un Sharepoint y luego como funcionaría en OneDrive para la empresa.
Sharepoint
Para conectarnos vamos a tomar de ejemplo el conector nativo de Power Bi.

El mismo nos pedirá una URL que debemos construir de la siguiente manera:
https://[domain].sharepoint.com/sites/[site]/
Domain será el con el que se registró la entiendad en el portal de office y site el nombre del sitio de sharepoint al cual pretendemos llegar.
La respuesta del conector serán todos los archivos que existen en el sistema de archivos. Esta respuesta es un poco ambigua y sucia, por ello vamos a “transformar datos” para dirigirnos al editor de consultas.
Como mencionaba antes, la respuesta por defecto de Power Query al editor es una función para devolver todos los archivos dentro del sitio de sharepoint ignorando las carpetas.
= SharePoint.Files("https://[domain].sharepoint.com/sites/[site]/", [ApiVersion = 15])
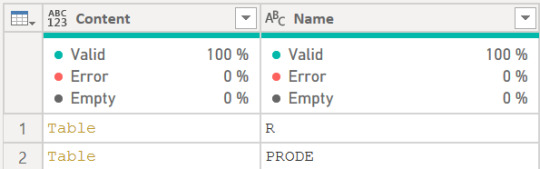
Si tenes pocos archivos o nuestros archivos contienen un patrón en el nombre podríamos filtrarlo con Text.Contains o algo semejante al nombre del archivo antes de combinarlo. Sin embargo, existe una forma más amigable para explorar nuestro contenido. Vamos a modificar un poco el método de origen de sharepoint de Files a Contents de la siguiente manera:
= SharePoint.Contents("https://[domain].sharepoint.com/sites/[site]/", [ApiVersion = 15])
De esta forma el motor reconocerá la metadata de cada nivel dentro del sitio para que podamos ir navegando las carpetas como si fueran tablas. Cuando veamos una carpeta a la cual queremos ingresar, le daremos click a la celda que dice “Table” con formato vínculo amarillo.
Continuamos hasta llegar a nuestra carpeta que tiene los archivos que deseamos leer y podemos tomar la decision si tomar un único archivo o combinarlos como ya bien sabemos.

Así logramos conectarnos a una carpeta de Sharepoint como si fuera el conector "carpeta”.
OneDrive para la empresa
El proceso es exactamente el mismo. La única diferencias es que tendremos que cambiar la URL. En el caso de OneDrive debemos construirla de la siguiente manera o podemos copiarla estando en la raíz de archivos de la página web de OneDrive dentro del portal de office 365:
https://[domain]-my.sharepoint.com/personal/ibarrau_ladataweb_com/
Las funciones de Power Query se aplican por igual, es decir que automáticamente el conector Sharepoint utilizará la función Files que podemos reemplazar por Contents.
Espero que el pequeño truquito les sirva para tomar archivos combinados como el conector carpeta.
#onedrive#powerbi#power bi#sharepoint#power bi sharepoint#power bi onedrive#power bi tutorial#power bi training#power bi tips#power bi argentina#power bi cordoba#power bi jujuy#power bi desktop#power query
1 note
·
View note
Text
نحوه توسعه برنامه ها در Kubernetes با Okteto
Okteto CLI یک پروژه منبع باز است که تجربه توسعه محلی را برای برنامه های در حال اجرا در Kubernetes فراهم می کند. با استفاده از آن می توانید کد خود را بر روی IDE محلی خود بنویسید و به محض ذخیره یک فایل ، تغییرات را می توان به خوشه Kubernetes خود وارد کرد و برنامه شما فوراً بروزرسانی خواهد شد. کل این فرآیند بدون نیاز به ساخت تصاویر Docker یا اعمال مانیفست های Kubernetes اتفاق می افتد ، که می تواند زمان قابل توجهی طول بکشد.
در این آموزش ، شما از Okteto برای بهبود بهره وری در هنگام تهیه یک برنامه بومی Kubernetes استفاده خواهید کرد. ابتدا ، یک خوشه Kubernetes ایجاد می کنید و از آن برای اجرای یک برنامه استاندارد “Hello World” استفاده می کنید. سپس از Okteto برای توسعه و به روز کردن خودکار برنامه خود بدون نیاز به نصب محلی استفاده خواهید کرد.
پیش نیازها
قبل از شروع این آموزش ، موارد زیر را نیاز خواهید داشت:
⦁ خوشه Kubernetes 1.12+ . در این آموزش ، از یک خوشه vpsgol Kubernetes با سه گره استفاده می شود ، اما شما می توانید با استفاده از یک روش دیگر ، خوشه ایجاد کنید.
⦁ kubectl و doctl برای برقراری ارتباط با خوشه شما نصب و تنظیم شده باشند.
⦁ یک حساب کاربری Docker Hub
⦁ Docker در حال اجرا بر روی دستگاه محلی شما.
مرحله 1 – ایجاد برنامه Hello World
برنامه “hello world” یک سنت قدیمی در توسعه وب است. در این حالت ، یک سرویس وب ساده است که به هر درخواست با ” hello world” پاسخ می دهد. اکنون که خوشه Kubernetes خود را ایجاد کرده اید ، اجازه دهید یک برنامه “Hello World” را در Golang و مانیفیستی که برای استقرار آن در Kubernetes استفاده خواهید کرد ، ایجاد کنیم.
اولین به دایرکتوری هوم خود سوییچ کنید:
⦁ $ cd ~
⦁
اکنون یک دایرکتوری جدید به نام hello_world تهیه کرده و به داخل آن بروید:
⦁ $ mkdir hello_world
⦁
⦁ $ cd hello_world
با IDE یا ویرایشگر متن مورد علاقه خود ، فایل جدیدی را با نام main.go ایجاد و باز کنید:
⦁ $ nano main.go
⦁
main.go یک وب سرور مجازی Golang خواهد بود که پیام hello world را به شما باز می گرداند !. بنابراین ، اجازه دهید از کد زیر استفاده کنیم:
main.go
package main
import (
“fmt”
“net/http”
)
func main() {
fmt.Println(“Starting hello-world server…”)
http.HandleFunc(“/”, helloServer)
if err := http.ListenAndServe(“:8080”, nil); err != nil {
panic(err)
}
}
func helloServer(w http.ResponseWriter, r *http.Request) {
fmt.Fprint(w, “Hello world!”)
}
کد main.go موارد زیر را انجام می دهد:
⦁ اولین عبارت در یک فایل منبع Go باید نام بسته باشد. دستورات اجرایی همیشه باید از package main استفاده کنند.
⦁ بخش ورودی نشان می دهد کد بسته به چه مواردی بستگی دارد. در این حالت از fmt برای دستکاری رشته و net / http برای سرور مجازی HTTP استفاده می کند.
⦁ تابع main نقطه ورود به باینری شماست. از روش http.HandleFunc برای پیکربندی سرور مجازی جهت فراخوانی helloServer در هنگام دریافت درخواست به مسیر / استفاده می شود. http.ListenAndServe یک سرور مجازی HTTP را شروع می کند که در تمام رابط های شبکه به پورت 8080 گوش می دهد.
⦁ عملکرد helloServer شامل منطق کنترل کننده درخواست شما است. در این حالت ، hello world! را به عنوان پاسخ به درخواست خ��اهد نوشت.
شما باید یک تصویر Docker ایجاد کرده و آن را به سمت رجیستری Docker خود هدایت کنید تا Kubernetes بتواند آن را دریافت و سپس برنامه را اجرا کند.
یک فایل جدید با نام Dockerfile را با IDE یا ویرایشگر متن مورد علاقه خود باز کنید:
⦁ $ nano Dockerfile
⦁
Dockerfile شامل دستورات لازم برای ساخت کانتینر Docker برنامه شما می باشد. اجازه دهید از کد زیر استفاده کنیم:
Dockerfile
FROM golang:alpine as builder
RUN apk –update –no-cache add bash
WORKDIR /app
ADD . .
RUN go build -o app
FROM alpine as prod
WORKDIR /app
COPY –from=builder /app/app /app/app
EXPOSE 8080
CMD [“./app”]
Copy
Dockerfile شامل دو مرحله است builder و prod:
• مرحله builder شامل ابزارهای ساخت Go است. که مسئول کپی کردن فایل ها و ساخت باینری Go است.
• مرحله prod تصویر نهایی است. فقط شامل یک سیستم تهی و باینری برنامه خواهد بود.
این یک تمرین خوب میباشد. کانتینر تولید شما را کوچکتر و ایمن تر می کند زیرا تنها شامل برنامه شما و دقیقاً آنچه برای اجرای آن لازم است می باشد.
تصویر کانتینر را بسازید (نام_DockerHub_usus را با نام کاربری داکر هاب خود جایگزین کنید):
⦁ $ docker build -t your_DockerHub_username/hello-world:latest
⦁
اکنون آن را به Docker Hub وارد کنید:
⦁ $ docker push your_DockerHub_username/hello-world:latest
⦁
سپس ، یک پوشه جدید برای مانیفست Kubernetes ایجاد کنید:
⦁ $ mkdir k8s
⦁
وقتی از مانیفست Kubernetes استفاده می کنید ، به Kubernetes می گویید که چگونه برنامه شما اجرا می شود. این بار ، یک شیء استقرار ایجاد می کنید. بنابراین ، یک فایل جدید deployment.yaml را با IDE یا ویرایشگر متن مورد علاقه خود ایجاد کنید:
⦁ $ nano k8s/deployment.yaml
⦁
مطالب زیر یک شیء استقرار Kubernetes را شرح می دهد که تصویر داکر okteto/hello-world:latest را اجرا میکند. این محتوا را به فایل جدید خود اضافه کنید ، اما در مورد شما okteto ذکر شده بعد از برچسب image را با your_DockerHub_username جایگزین کنید:
~/hello_world/k8s/deployment.yaml
apiVersion: apps/v1
kind: Deployment
metadata:
name: hello-world
spec:
selector:
matchLabels:
app: hello-world
replicas: 1
template:
metadata:
labels:
app: hello-world
spec:
containers:
– name: hello-world
image: your_DockerHub_username/hello-world:latest
ports:
– containerPort: 8080
مانیفست استقرار دارای سه بخش اصلی است:
⦁ metadata نام استقرار شما را مشخص می کند.
⦁ replicas مشخص می کند که چند نسخه از آن را می خواهید اجرا کنید.
⦁ template به Kubernetes می گوید که چه چیزی را مستقر کند و چه برچسب هایی را اضافه نماید. در این حالت ، یک کانتینر واحد ، با تصویر okteto/hello-world:latest ، که به پورت 8080 گوش میدهد، و با برچسب app: hello-world همراه است. توجه داشته باشید که این برچسب همان مورد استفاده در بخش selector است.
اکنون به راهی برای دسترسی به برنامه خود نیاز دارید. می توانید با ایجاد یک شیء سرویس ، برنامه ای را در Kubernetes قرار دهید. بیایید با استفاده از مانیفست این کار را انجام دهیم. با IDE یا ویرایشگر متن مورد علاقه خود فایل جدیدی ��ه نام service.yaml ایجاد کنید:
⦁ nano k8s/service.yaml
⦁
محتوای زیر سرویس هایی را نشان می دهد که شیء استقرار hello world را در معرض دید شما قرار می دهد:
k8s/service.yaml
apiVersion: v1
kind: Service
metadata:
name: hello-world
spec:
type: LoadBalancer
ports:
– protocol: TCP
port: 80
targetPort: 8080
name: http
selector:
app: hello-world
مانیفست سرویس چهار بخش اصلی دارد:
⦁ metadata به Kubernetes می گوید كه چگونه سرویس خود را نامگذاری كنند.
⦁ type به Kubernetes می گوید چگونه می خواهید سرویس خود را در معرض دید قرار دهید.
⦁ برچسب ports به Kubernetes می گوید كه كدام پورت را می خواهید در معرض دید قرار دهید ، و چگونه می توانید آنها را برای استقرار خود نگاشت كنید. در این حالت ، پورت 80 را به صورت خارجی در معرض دید قرار می دهید و آن را به پورت 8080 در محل استقرار خود هدایت می کنید.
⦁ selector به Kubernetes می گوید که چگونه ترافیک را هدایت کند. در این حالت ، هر پوسته با برچسب app: hello-world ترافیک دریافت می کند.
اکنون شما همه چیز را برای استقرار برنامه “hello world” خود در Kubernetes دارید. در ادامه کار استقرار را انجام خواهیم داد.
مرحله 2 – استفاده از برنامه Hello World شما
در این مرحله برنامه “Hello World” خود را در Kubernetes مستقر می کنید ، سپس تأیید می کنید که درست کار می کند.
با استقرار برنامه خود در Kubernetes کار را شروع کنید:
⦁ $ kubectl apply -f k8s
⦁
خروجی زیر را مشاهده خواهید کرد:
Output
deployment.apps “hello-world” created
service “hello-world” created
بعد از گذشت حدود یک دقیقه یا بیشتر ، می توانید IP برنامه خود را بازیابی کنید. برای بررسی سرویس خود از این دستور kubectl استفاده کنید:
⦁ $ kubectl get service hello-world
⦁
خروجی مانند این را مشاهده خواهید کرد که اشیاء سرویس Kubernetes را لیست میکند. به IP برنامه خود در ستون EXTERNAL-IP توجه کنید:
Output
NAME TYPE CLUSTER-IP EXTERNAL-IP PORT(S) AGE
hello-world ClusterIP your_cluster_ip your_external_ip 8080/TCP 37s
مرورگر خود را باز کنید و به برنامه your_external_ip که برای برنامه “Hello World” ذکر شده است بروید. قبل از ادامه مرحله بعدی تأیید کنید که برنامه شما در حال اجرا است.
تا این لحظه ، شما یک مسیر نسبتاً سنتی را برای توسعه برنامه ها با Kubernetes دنبال کرده اید. در ادامه ، هر زمان که می خواهید کد را در برنامه خود تغییر دهید ، باید یک تصویر جدید Docker بسازید و وارد کنید و سپس آن تصویر را از Kubernetes بیرون بکشید. این روند می تواند مدتی طول بکشد. Okteto برای ساده تر ساختن این حلقه درونی طراحی شده است. بیایید به Okteto CLI نگاهی بیندازیم و ببینیم چگونه می تواند کمک کند.
مرحله 3 – نصب Okteto CLI
اکنون با نصب Okteto CLI ، بهره وری توسعه Kubernetes را بهبود می بخشید. رابط خط فرمان Okteto یک پروژه منبع باز است که به شما امکان می دهد تغییرات کد برنامه را با برنامه های Kubernetes همزمان کنید. شما می توانید با استفاده از IDE ، اشکال زداگر یا کامپایلرهای مورد علاقه خود استفاده کنید بدون اینکه برای تست برنامه خود مجبور به تعهد ، ساخت ، ارائه یا استقرار مجدد کانتینرها باشید – همانطور که در مراحل قبلی انجام دادید.
برای نصب Okteto CLI در دستگاه macOS یا Linux ، دستور زیر را اجرا کنید:
⦁ $ curl https://get.okteto.com -sSfL | sh
⦁
بیایید نگاهی دقیق تر به این دستور بیاندازیم:
⦁ از دستور curl برای انتقال داده به سرور مجازی استفاده می شود.
⦁ پرچم -s هر خروجی را سرکوب می کند.
⦁ پرچم -S خطاها را نشان می دهد.
⦁ پرچم -f باعث عدم موفقیت درخواست در HTTP می شود.
⦁ پرچم -L باعث می شود درخواست از تغییر مسیر پیروی کند.
⦁ عملگر | این خروجی را به دستور sh پایپ می کند ، که آخرین باینری okteto را در دستگاه محلی شما دانلود و نصب می کند.
اگر ویندوز را اجرا می کنید ، می توانید فایل را بطور متناوب از طریق مرورگر وب خود دانلود کرده و به صورت دستی آن را به PATH $ خود اضافه کنید.
پس از نصب Okteto CLI ، آماده هستید تا برنامه “hello world” را در حالت توسعه قرار دهید.
مرحله 4 – قرار دادن برنامه Hello world در حالت توسعه
Okteto CLI به منظور جابجایی برنامه در حال اجرا بر روی خوشه Kubernetes با کد موجود در دستگاه شما طراحی شده است. برای این کار ، Okteto از اطلاعات ارائه شده از یک فایل مانیفست Okteto استفاده می کند. این فایل شیء استقرار Kubernetes را که با کد محلی شما تعویض می شود ، اعلام می کند.
با IDE یا ویرایشگر متن مورد علاقه خود فایل جدیدی به نام okteto.yaml ایجاد کنید:
⦁ $ nano okteto.yaml
⦁
بیایید یک مانیفست پایه بنویسیم که در آن می توانید نام شیء استقرار ، تصویر پایه Docker برای استفاده و یک پوسته را تعریف کنید. بعداً به این اطلاعات برمی گردیم. از فایل محتوای نمونه زیر استفاده کنید:
okteto.yaml
name: hello-world
image: okteto/golang:1
workdir: /app
command: [“bash”]
با اجرای دستور زیر آماده شوید تا برنامه خود را در حالت توسعه قرار دهید:
⦁ $ okteto up
⦁
Output
✓ Development environment activated
✓ Files synchronized
Namespace: default
Name: hello-world
Welcome to your development environment. Happy coding!
default:hello-world /app>
دستور okteto up برنامه “hello world” را در یک محیط توسعه عوض می کند ، این بدان معنی است که:
⦁ کانتینر برنامه Hello World با تصویرداکر okteto/golang:1 به روز می شود. این تصویر شامل ابزارهای لازم برای ساخت ، آزمایش ، اشکال زدایی و اجرای برنامه “Hello World” است.
⦁ یک سرویس همگام سازی فایل ایجاد شده است تا تغییرات شما بین سیستم فایل محلی و غلاف برنامه تان را به روز نگه دارد.
⦁ یک پوسته از راه دور در محیط توسعه شما شروع می شود. اکنون می توانید برنامه خود را بگونه ای که در دستگاه محلی خود هستید ، بسازید ، آزمایش و اجرا کنید.
⦁ هر پردازشی که در پوسته از راه دور اجرا می کنید ، همان ترافیک ورودی ، همان متغیرهای محیط ، والیوم یا رمزها را به عنوان غلافهای اصلی برنامه “Hello World” دریافت خواهد کرد. این به نوبه خود ، یک محیط توسعه کاملاً واقع بینانه و شبیه تولید را به شما می دهد.
در همان کنسول ، اکنون برنامه را طبق معمول اجرا کنید (بدون ساختن و ارائه تصویر Docker) ، مانند این:
⦁ Okteto> go run main.go
⦁
Output
Starting hello-world server…
اولین باری که برنامه را اجرا می کنید ، Go متعلقات شما را دانلود و برنامه را کامپایل می کند. صبر کنید تا این فرآیند کامل شود و با باز کردن مرورگر و ریفرش صفحه برنامه خود ، دقیقاً مانند گذشته ، برنامه خود را تست کنید.
اکنون آماده هستید تا توسعه را مستقیماً روی Kubernetes شروع کنید.
مرحله 5 – توسعه مستقیم روی Kubernetes
بیایید شروع به ایجاد تغییراتی در برنامه “hello world” کنیم و سپس ببینیم که چگونه در Kubernetes بازتاب می یابند.
فایل main.go را با IDE یا ویرایشگر متن مورد علاقه خود باز کنید. به عنوان مثال ، یک کنسول جداگانه باز کنید و دستور زیر را اجرا کنید:
⦁ $ nano main.go
⦁
سپس ، پیام پاسخ خود را به Hello world from vpsgol! تغییر دهید!:
main.go
package main
import (
“fmt”
“net/http”
)
func main() {
fmt.Println(“Starting hello-world server…”)
http.HandleFunc(“/”, helloServer)
if err := http.ListenAndServe(“:8080”, nil); err != nil {
panic(err)
}
}
func helloServer(w http.ResponseWriter, r *http.Request) {
fmt.Fprint(w, “Hello world from vpsgol!”)
}
اینجاست که گردش کار شما تغییر می کند. Okteto به جای ساختن تصاویر و استفاده مجدد از کانتینر برای به روزرسانی برنامه “hello world” ، تغییرات شما را در محیط توسعه خود در Kubernetes همگام سازی می کند.
از کنسولی که فرمان okteto up را اجرا کردید ، با فشار دادن CTRL + C، اجرای go run main.go را لغو کنید. اکنون برنامه را دوباره اجرا کنید:
⦁ Okteto> default:hello-world /app> go run main.go
⦁
Output
Starting hello-world server…
به مرورگر برگردید و صفحه برنامه “Hello World” خود را مجدد لود کنید.
تغییرات کد شما بلافاصله و همه بدون نیاز به تعهد ، ایجاد یا ارائه در Kubernetes اعمال شد .
نتیجه
Okteto با کلیک روی یک دکمه ، خوشه Kubernetes را به یک پلت فرم توسعه کاملاً برجسته تبدیل می کند. در این آموزش شما Okteto CLI را نصب و پیکربندی کرده اید تا کدهای خود را مستقیماً بر روی Kubernetes تغییر دهید تا بتوانید کد را سریعاً تایپ کنید. اکنون می توانید به مخزن نمونه Okteto بروید تا نحوه استفاده از Okteto با زبان های مختلف برنامه نویسی و اشکال زدایی را ببینید.
همچنین ، اگر یک خوشه Kubernetes را با تیم خود به اشتراک می گذارید ، میتوانید به هر یک از اعضا یک فضای نام Kubernetes ارائه دهید که به گونه ای پیکربندی شده که از سایر توسعه دهندگان که بر روی همان خوشه کار میکنند، جدا باشد. این قابلیت عالی توسط اپلیکیشن Okteto در بازار Kubernetes vpsgol نیز ارائه شده است.
از این لینک ها زیر می توانید آمورش های بیشتری برای لینوکس پیدا کنید :
چگونه به Ubuntu 20.04 Focal Fossa ارتقا دهید
نحوه ایجاد نماها (Views) برای توسعه وب Django
نصب Mount NFS در اوبونتو 20.04
نحوه توسعه برنامه ها در Kubernetes با Okteto
نصب و پیکربندی Laravel با Nginx در اوبونتو 20.04
نحوه تنظیم Jupyter Notebook با پایتون در Ubuntu 20.04
نصب Jitsi Meet در Debian 10
نصب و پیکربندی Nextcloud در اوبونتو 20.04
نصب و پیکربندی Ansible در اوبونتو 20.04
مقدمه ای بر مدیریت پیکربندی با Ansible
نحوه نصب R روی اوبونتو 20.04
ارائه برنامه های Flask با uWSGI و Nginx در اوبونتو 18.04
نصب و پیکربندی Postfix در اوبونتو 20.04
خرید vps – خرید سرور مجازی – خرید سرور – سرور هلند – فروش vps – سرور مجازی آمریکا – خریدvps – سرور مجازی هلند – فروش سرور مجازی – سرور آمریکا – vps – سرور مجازی انگلیس – سرور مجازی آلمان – سرور مجازی کانادا – خرید vps آمریکا – خرید وی پی اس – سرور – خرید سرور مجازی هلند – vps خرید – سرور مجازی فرانسه – سرور مجازی هلند – خرید vps آمریکا – خرید سرور مجازی ارزان هلند – vps – خرید vps هلند – خرید سرور مجازی آمریکا – خرید vps فرانسه – تست vps – سرور مجازی تست – سرور مجازی ویندوز – ارزانترین vps – خرید وی پی اس – vps ارزان –
برچسبها:Golang, Kubernetes, Okteto CLI
1 note
·
View note
Text
0 notes
Text
Deploying Text Generation Web UI on a Kubernetes Cluster
In this blog post, we'll walk through the process of deploying a text generation web UI using the Docker image atinoda/text-generation-webui on a Kubernetes cluster. We'll cover everything from creating a Persistent Volume Claim (PVC) to setting up a Kubernetes Service for port forwarding.
Prerequisites
A running Kubernetes cluster
kubectl installed and configured to interact with your cluster
Step 1: Create a Namespace
First, let's create a namespace called text-gen-demo to isolate our resources.
kubectl create namespace text-gen-demo
Step 2: Create a Persistent Volume Claim (PVC)
We'll need a PVC to store our data. Create a YAML file named text-gen-demo-pvc.yaml with the following content:
apiVersion: v1
kind: PersistentVolumeClaim
metadata:
name: text-gen-demo-pvc
namespace: text-gen-demo
spec:
accessModes:
- ReadWriteOnce
resources:
requests:
storage: 100Gi
storageClassName: standard
Apply the PVC:
kubectl apply -f text-gen-demo-pvc.yaml
Step 3: Deploy the Pod
Create a YAML file named text-gen-demo-pod.yaml with the following content:
apiVersion: v1
kind: Pod
metadata:
name: text-gen-demo-pod
namespace: text-gen-demo
labels:
app: text-gen-demo
spec:
containers:
- name: text-gen-demo-container
image: atinoda/text-generation-webui
ports:
- containerPort: 7860
- containerPort: 5000
- containerPort: 5005
env:
- name: TORCH_CUDA_ARCH_LIST
value: "7.5"
volumeMounts:
- name: text-gen-demo-pvc
mountPath: /app/loras
subPath: loras
- name: text-gen-demo-pvc
mountPath: /app/models
subPath: models
volumes:
- name: text-gen-demo-pvc
persistentVolumeClaim:
claimName: text-gen-demo-pvc
Apply the Pod:
kubectl apply -f text-gen-demo-pod.yaml
Step 4: Create a Service
Create a YAML file named text-gen-demo-service.yaml with the following content:
apiVersion: v1
kind: Service
metadata:
name: text-gen-demo-service
namespace: text-gen-demo
spec:
selector:
app: text-gen-demo
ports:
- name: "webui"
protocol: TCP
port: 7860
targetPort: 7860
- name: "api"
protocol: TCP
port: 5000
targetPort: 5000
- name: "api-stream"
protocol: TCP
port: 5005
targetPort: 5005
Apply the Service:
kubectl apply -f text-gen-demo-service.yaml
Step 5: Port Forwarding
Finally, let's set up port forwarding to access the web UI locally.
kubectl port-forward svc/text-gen-demo-service 7860:7860 -n text-gen-demo
You should now be able to access the web UI at http://localhost:7860.
Troubleshooting
If you encounter issues with port forwarding, make sure:
The pod is running and healthy (kubectl get pods -n text-gen-demo)
The service is correctly configured (kubectl describe svc text-gen-demo-service -n text-gen-demo)
The service has endpoints (kubectl get endpoints text-gen-demo-service -n text-gen-demo)
Conclusion
You've successfully deployed a text generation web UI on a Kubernetes cluster! You can now interact with the web UI locally and generate text as needed.
0 notes
Last Seen Blogs

sweet-15
sweetener

lebdiesekunde
Finn 丰

hajime01
のんびり きながに

grimmsnarkk
ESXPLOSION!!!!!!!! I EXSPLODE!!! WAHHGHGHHG!!!!

marriagecounselsblog
Marriage Counselling