#and i struggled on the 540 px one :(
Text
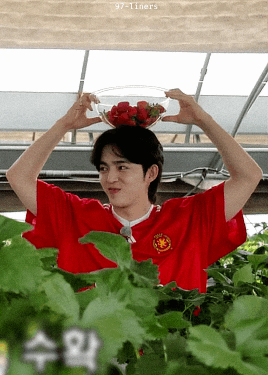


strawbebbies...
#scoups#choi seungcheol#seventeen#going seventeen#97.gifs#loml....... he's... so cute....#the sharpening is inconsistent i know but this is very zoomed in#and i struggled on the 540 px one :(
2K notes
·
View notes
Note
Hi Jodie! I'm not really tech-savvy and am struggling with uploading my first piece on Tumblr. I went with a really big canvas size and then once finalized I decreased the image size (540 x 810 px). However, the quality looks terrible. Additionally, when I attempt to upload it to Tumblr I get an 'error' prompt. Do you know what I can do to fix this?
Hello Nonny,
Sorry to hear you're having technical issues! Without knowing exactly what programme or format you're using I'll try and give you my best guess. I use Photoshop so that's all I can speak to.
W 540 x H 810 px is pretty small. To format a small copy of my artwork for the internet, I usually reduce my images to an absolute minimum of W 1000 x H (whatever the relative height is) and I always save them as a PNG. JPEG's are a very lossy image format and I believe they reduce in quality every time a file is opened, edited and saved. They crunch your images right down which is perfect for squeezing an email attachment but not so much for a finished artwork. A PNG doesn't suffer with the same loss compression issue so make sure that you're saving the file in the right format when you're preparing the copy. The only other problem I could maybe see you having is if the native file ( Your large master copy) has a really low resolution to begin with - before any canvas resizing occurred. I use 300 ppi whether an image is intended for print or not so they are pretty hefty before I do any scaling on them.
As to the tumblr error, unless your file is in a format that tumblr can't process, I can't help you on that one I am afraid.
Hope that helps Nonny, I am not the most technically minded painter either but using the above metrics, I haven't had any quality issues. <3
27 notes
·
View notes
Note
Hello, it’s me again the one who is very struggling with making gifs. Can you show me a tutorial of your gif making process, like from A to Z? So I can learn from it and try one last time cause I’m losing my shits.
You guys, the gif making people idk if this is a polite way to say but yeah, you guys really cool people with massive passion 🤍
hey there!
tbh I’m not the best at explaining but I hope my humble tutorial will help you. Also, I referenced from the tutorials @usergif a lot. It is my go to when i need tutorial or help :)
Shoutout to all the amazing gif/content creator out there! Also if any of my content creator moots have any helpful guides, please do leave it under the reply ❤️
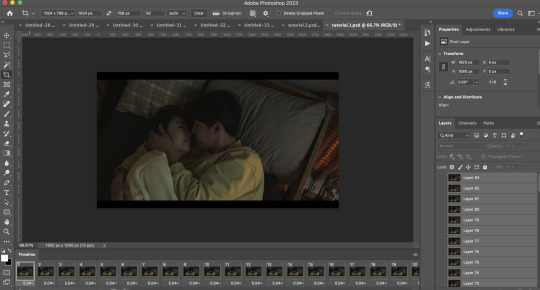
Firstly, i’ll have my scenes to gif ready. I either use VLC player or Quick Time player to screen record ( i’m very basic lol). Then I open Photoshop and here goes.
1. File > Import > Video frames to layers. And then I’m gonna choose the file that I’ve trimmed from screen recording and choose the part I want to gif first (circled in screenshot)

2. Then you can see the amt of layers, you can play and see which part you want (if it’s a LOT of layers) to delete because too many = exceeding 10mb limit for Tumblr
I have my own theory 🧐 that for certain size, only a certain amount of layers will fall within Tumblr 10mb limit size. I mainly use these 3 sizes to crop so: square (max 45-50), 1028px (max 60-65), 1280px (max 70-80). if you’re doing extensive colouring/gradients/blending etc this needs to be further limited so that it doesn’t exceed 10mb. Crop sizes I usually use:

3. Set frame delay. I click on the 3 lines > Select All Frames. Click on 1 of the layer dropdown > Other > 0.05s. Tip: you can set at 0.03s and then after you’re done with your gif, you can re-time it to 0.05s, it’ll be smoother but I’m lazy so I just do at 0.05s.

From this steps onwards, it will be very long. I made an action for myself where I click on the play button and it’ll automate for me but idk how to share this with you 😭 so bear with me for the steps.
4. Click on the 3 lines again > Convert to Video Timeline
5. Select > All Layers
6. Filter > Convert for Smart Filters. And then you have a single layer like below:

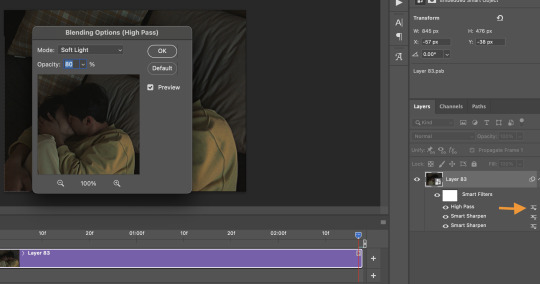
7. Now we go to Sharpening. I refer from usergif tutorial on sharpening (you can follow the tutorial!) I tweak it around to my preference and use high pass instead of vivid.
For high pass if you want to try. Filter > Other > High Pass > 4.0 radius. Then you want to double click on the line beside high pass, Mode: Soft Light, Opacity: 80%
8. Next! The fun part. Colouring!! (I’m not an expert at this because I play around a lot) All my sets are coloured from scratch but I use this settings for easier colouring. It can very long if it’s a difficult scene to colour. This tutorial from usergif tutorial is very helpful!

9. Then I will resize this. Image > Image size > Width: 540 px

HOPE THIS HELPS!!
5 notes
·
View notes
Note
Hi it’s me again (the one who asked about the gif thing) I’m both interested in the process and the colouring and sharpening and thank you so much for being willing to help it means a lot
hi again! no no it's really nothing and as i already said, im more than happy to help! idk if you want to know how i make my live performance gifs or mv gifs but i'll describe both processes!
it got a little bit long lol
- process: so for my mv sets, i first search for either a bugs, melon or master (master > rest) online. i then use mplayer for mac to screenshot the parts that i want to gif (found a tutorial online on how to screenshot with mplayer, idk what settings i had to change again but i can look for you if you want to know!) -> open ps and with "scripts" ("load as stack" i think?) import the screenshots -> convert to video time line -> convert to frames -> convert to frame animation -> reverse frames and delete the first frame. i then crop it using the ps crop tool and select the dimensions that i want (540 x 400-540 px depends on what looks the best). for live performances i use vapoursynth with denoise (6.1.1.1.2 ? something like that? idk) and sharpen in ps
- sharpening: for my mv sets, it really depends on the file im working with. i have three different kind of settings i can use, and if these don't fit i just do smth else lol, but i use lens blur, radius 0.3, 500, select "use legacy" "more accurate" + lens blur, radius 10, 10 OR gaussian blur, radius 0.3, 500 + lens blur, radius 10, 10 OR lens blur 0.2, 500 + gaussian blur 0.2, 500 + lens blur, radius 10,10. and if this doesnt look good i fool around a bit with the settings :D. for my live performances, i dont really know .. i think i fool around a bit with lens blur 0.2 or gaussian blur 0.3 ? idk i try something and select what fits
- colouring: okay so for my mv sets i stay true to the original colours. i like to add contrast and to make the colours really pop (im still struggling with this btw) but qua process i dont really have a standard psd i use i just colour from scratch everytime cuz every mv or scene is different . itd be kinda weird to make everything look the same imo. anyways i usually use the levels layer and select the brightest + darkest spot. most of the times this adds a lot of difference. so much sometimes that i only need to add one other layer but those moments are rare. i then add some contrast (still with levels) . i then move on to selective colour and make the neutrals/greys darker. i then go the colour balance and see what fits. then go to brightness contrast, add some brightness + contrast. go to vibrance and add some vibrance. then go back to selective colour and change the settings of some colours if needed. but this is not my standard process. sometimes i use 7 layers and sometimes 2. really depends. btw this is my own preference!! there are so many different kind of styles of colouring id advice you to just look around and try something for yourself and see what you like the most :D
so for my live performances i always struggle lmao. i do the same as above but with live performances its far more difficult. i make tiny adjustments and i have no idea honestly. i use levels/selective colour/colour balance/contrast+brightness/photo filter/vibrance/gradient map sometimes/colour lookup/channel mixer sometimes/hue+saturation to get rid of some colours. i just use everything basically sjfjsf
im sorry anon it got a little bit too long hshhs i hope this helped tho! if anything is still unclear or if you have additional questions, feel free to ask them!
#im gonna go to sleep in another 15 minutes i think so if you do and i dont respond just know that im probably asleep ^^#i hope this helped!#also if u have a specific set that you liked the colouring of i MIGHT have saved the psd not a big chance but i might#i havent deleted the taeyeon gifs on ps so those are def available hhh#asks#anon
1 note
·
View note
Note
hi soph! i was wondering how you found videos / clips to gif from when you're making tv + film sets? i'm relatively new to gifmaking, and i've been struggling with making gifsets (especially those that are 540 px wide) that look okay and finding diverse scenes to gif. thank you so much, i love your blog!!
hi love!! 🥰 sorry I didn’t see this before, tumblr mobile isn’t giving me notifs for asks? ridiculous!!!!!
anyway, in terms of where to actually get stuff, I will refer you to this post, as this is how I get content and make my gifs from that nowadays!!! this is a great place to start if you’re new to gifmaking and want to download 1080p content!
in terms of what to actually gif—I always crop my stuff to the bits I want, and then resize, if that makes sense? So get the part of the scene you want, then resize to 540px, and then decide if you’re happy with the height of your gif or if you want it to be smaller! that’s completely up to you!
finding scenes is a lot of *feeling* I think? It’s the same with making icons for me, the more you do it, the more you get to know what scenes will work and which ones won’t. sometimes, no matter what you do, some gifs just won’t look good, and that’s not your fault! It’s about choosing the right scenes, cropping in interesting ways, you know? also mixing up shots, like faceless ones, scenery, negative space, close ups.
I’ve only been giffing for just under a year now, and you can see the difference in just that short time, and I’m definitely still learning. so I think the best thing is to just go for it, find what works for you and your ‘style’ will come from that naturally!
I’d love to know how you get on, so let me know, if you want to! And thank you so much, it means the world! 🥰 don’t hesitate to ask if you have anymore questions!!! 💖
2 notes
·
View notes
Photo
How to make a gif without photoshop!
Photoshop is definitely the best to make gifs these days--it has a lot of great features and is generally unparalleled. That being said, it can definitely be difficult to download without purchasing, and most of us don’t have enough money to buy it legally. I know that I’ve struggled to find photoshop downloads for my Mac, and for a while, I thought I wouldn’t be able to make quality gifs. I played around with GIMP a little bit, but I found it quite difficult to use, there were no good gif plugins that worked on Mac, and I couldn't find any tutorials that produced high quality, photoshop-like gifs. So, I have come up with a way to make gifs involving little downloading and primarily two websites.
The first step is to find a high-quality video that you want to make into a gif. THIS IS CRUCIAL! We’re going to need as much quality as we can get, especially since we’re moving our gif around from website to website rather than keeping it in one place. I was able to use a torrented version of Thor: The Dark World that my friend found. I then used command-shift-5 on my Macbook to take a video screenshot of the segment in the film that I wanted. I believe in Windows 10, you would press Win+Alt+R, but I’m not sure. Depending on what device you’re using, even mobile devices, you should be able to easily record your screen. If not, there are plenty of free programs that let you do this, such as this one.
Once you’ve got your video, go to this website to convert it to a gif. .MOV and .MP4 files work best. I set it to 540 px, 10 FPS, 5 seconds that I liked, and clicked convert.
Now that you have your gif, download it and open it in the website photopea. This website has many photoshop like features and can open PSD files. It is definitely the best website I’ve found so far for opening PSDs.
I deleted every other frame to condense my video down to only 22 frames. This is optional, but will make your gif faster and smaller in size. Remember, you cannot upload a gif to Tumblr that exceeds 3.1 MB, or else Tumblr will compress it for you and make it look very low quality.
Select all the layers at once by holding down shift as you click from the top layer to the bottom and play around with them until the gif looks bright and sharp. I personally chose:
Filter: Noise: Add Noise... : 3%
Filter: Sharpen: Smart Sharpen: 15%, 1.5px
Image: Adjustment: Exposure: 1.4
If you want more edits, download a PSD from a photoshop resources page such as this one and open it in photopea. Drag the folder with the PSD over to the tab with your gif to place it on top of the gif.
To add text, just click the T button on your left and place a text layer on top of your gif. Make sure it ends up on top of your frames. Pick a simple font with the color white and rasterize the layer when you’re done by going to Layer: Rasterize. To add a black border around the text, go to Edit: Stroke, and select your preferences. For a gif of 540 px, I think 3px of a black border is more than enough.
Now you’re done! Export your file as a gif and upload to Tumblr :)
#completeresources#gif tutorial#photoshop tutorial#gif without photoshop#no photoshop#tutorial#peggrogers#how to make a gif#Mac gif tutorial
68 notes
·
View notes
Link
BAIYUSOURCE now has a wordpress counterpart!
Since Verizon sold tumblr there’s been a lot of discussion about tumblr’s future. Initially, I wasn’t worried. I’m still not too worried. I started using tumblr in 2008 and I think it’s going to stay. Or I’m 75% sure, anyway.
Still, I started thinking about longevity, and efficiency, and all sorts of things.
I’ve been struggling a lot with posting content from events, where photos from various fansites mean photos beyond the limit of one post. I also started thinking about tumblr’s set up, which can be a struggle. I have to make sure each image fits tumblr’s 540 px frame.
BAIYUSOURCE will not be leaving tumblr, but I thought wordpress would be a great archiving tool. It’s also great for posting content that doesn’t necessarily fit on tumblr. Like this post about My Agent and I posters posted by the show’s weibo page! Each event or photoshoot should only take up one post, now, and the rest will be on the wordpress post, which I’ll link to the bottom of the tumblr post.
Feel free to check out the wordpress blog! Thanks for loving Bai Yu!
6 notes
·
View notes
Note
Hello! I'm a bit new to making pixel art and I was curious if you have any suggestions on picture sizes that will maintain resolution on tumblr? I've found that it's very difficult to size pixel art in a way that doesn't make it look like garbage once it's uploaded.
oh, lovely anon, you’ve stumbled upon the greatest bane to any pixel artist’s existence: resolution when posting... especially on Tumblr.
see, Tumblr does this nightmare thing where it super-anti-aliases (ie, ‘blurs’ the boundaries between colors) pictures. this is unnoticeable in photography (usually), but most artists, even non-pixel artists, hit this struggle. it’s why so many of us will mention at least periodically ‘click for full resolution’ - it makes a huge difference in visible quality.
to answer your question, though, my best advice is just to make sure your final resolution is of HD quality! my process usually simplifies down to this:
1) make the art in ‘1x’ resolution (widest dimensions usually don’t go beyond 300px for ‘detailed’ pixel art, for me - 320 tends to be my max, but ‘smaller’ sprites may cap at 120 pixels, etc etc)
2) when exporting the art, i choose to multiply it’s size (i use Asesprite, a pixel art program with this option built in, but if you’re in photoshop/etc, you can choose to multiply the resolution by whole numbers, and choose no anti-aliasing as an option for this to keep it from blurring). in general, you’ll probably want to make the ‘final resolution’ at least greater that 1000px on one side, but you can play with what works for you.
that’s really about it! showing pixel art as ‘large’ as i or other pixel artists do is really about expanding the sprite size (not the canvas size). sometimes you’ll see pixel artists have multiple versions in the same picture, too, for comparison. i usually have the ‘big version’ in the photo post, and then the 1x version below in the text entry area, where it won’t get distorted.
Extra Tip: if you ONLY want to show the 1x resolution - or 2x, but still
Warning regarding this technique-
unless you’re sure to make your canvas ~500 px wide, Tumblr mobile, hell app that it is, will not show the 1x resolution properly. Tumblr has built-in coding that automatically tries to expand the image to fit the width of the post window, so... weight your choices, basically.
a Tumblr text post is 500 px wide (though sometimes 540, so... godspeed), so if you make the canvas 500 px wide and then export it - with your sprite still at it’s normal small dimensions within that - then it should combat this issue. it’s just frustrating extra hoops is all. =v=;;;
#night answers#on pixel art#pixel art tips#hopefully this helps!#basically it boils down to 'make your sprite at the resolution that looks good within the art program#then export it to be big to avoid the worst of the anti-aliasing in a photo post#Anonymous
45 notes
·
View notes
Last Seen Blogs
zagreuses-toast
Dr who gay
my-maehem
Mae
barrtac
Barracks Growth Emporium

z69z
You Can Call Me Chico.